#HTML Code Outline
Explore tagged Tumblr posts
Visit Tumblr Blog
Explore Tumblr blogs with no restrictions, modern design and the best experience.
Last Seen Tumblr Blogs


Fun Fact
The total number of visits Tumblr.com received during January 2021 is 327 million.
Text
PureCode AI review | HTML Code Outline
To truly grasp the essence of HTML and its role in web development, it is helpful to understand the basic outline of an HTML document. Here is a simplified overview of the typical structure
#HTML Code Outline#purecode ai reviews#purecode#purecode software reviews#purecode company#purecode ai company reviews#purecode reviews#web development
0 notes
Text
HTML & CSS Comment Tips
One valuable thing I have learned when starting any project is to include comments on your pages to provide a more structured layout.
For example, in HTML files, comments can be made with <!-- --->; anything within that space won’t appear on the page or be read by the browser.
A good way to use this in a page is to outline your areas, like in the image below.

Anywhere on your pages where you have a new section, you should use comments to outline what they are. This helps in a few ways. First, it increases readability for yourself and anyone else reading your code. Second, as your projects grow, doing this helps keep them organized.
It’s easier to add to and edit when you can find the area where you want to make changes or add classes based on the comment tags rather than trying to narrow it down through many <div> tags. Third, it helps with remembering what you were doing.
The same principles apply to CSS files, although comments are left in a CSS file type with /* */.

Using comments to outline the different style groups you intend to use in your projects can help you find the parts you want to edit. In general, using comments is something everyone should do. They are very helpful in JavaScript and other languages when making notes about what a function does or should be doing. You can also leave yourself notes about what you were working on.
#html#css#comments#code comments#tips#leave yourself notes#organization#structure#outline#coding tips
4 notes
·
View notes
Text

CSS Outline Glow Effect
#css outline glow effect#css tricks#css effects#css#html#divinector#learn to code#frontenddevelopment#css3#webdesign#html css#css text effects
1 note
·
View note
Text
literally where do Spotify now playing widgets for twitch get off being so fucking annoying to build. you're telling me i have to know html css AND js to build this the way i want it in my head????
#part of the problem is that i don't even know what i want it to look like it's just nebulous ''cyberpunk/futuristic'' in my head lmfao#but even still none of the default shit out there looks good. like ffs#i did find one site right before i had to go to bed that's much more customizable (html/css-wise) than others#so at least i can make something decently close. but ughhhh#*#ykw i'm just now realising that i can just. draw it. draw the outlines and use the coding aspect to match it to the rest of my overlay. UGH#that's so much more work than i wanted to do. whatever. the shit i do for a stream 3 people show up regularly to.
1 note
·
View note
Text

CSS Text Outline Effect
#CSS Text Outline Effect#css text effects#html css#frontend#learn to code#codingflicks#html#css#css3#frontenddevelopment#code#csseffects
0 notes
Text
you should make a website!
"my favorite social media site is shutting down!"
"the CEO of the site i use just committed another atrocity!"
"i want a webspace that's all my own!"
if any of these sound like you (and if you're on tumblr, i know at least one applies) you should make your own website!
why make a website?
incredibly customizable
you can put whatever you want on it
it's, well, your own! like a house you build with your own hands
things you'll need
a computer. you can maybe get away with doing this on a mobile device, but i have zero experience there
a code editor. i like VScodium, which is a de-microsoft-ed version of VScode.
a will to learn ;)
site hosting
neocities. everyone knows neocities. at this point i do feel like it's become a bit too centralized, but it's a good option nonetheless. do note that there are filetype restrictions for free users, but that shouldn't be a huge issue for most. what may be an issue, though, is that there's a content security policy that prevents sites made after jan 1st, 2024 to use outside scripts. also, you have to pay to use your own domain
nekoweb. similar to neocities, but there's no filetype restrictions or a content security policy. some differences are outlined in the FAQ (thinking about moving here... i am a traitor...) i'm not sure if domain support is free or paid.
github pages or codeberg pages. you'll need an understanding of git for this
pages.gay: run by besties.house, uses git
teacake: free hosting is currently closed, but paid hosting starts at 2 bucks a month.
leprd.space: i know next to nothing about this.
a web server. don't recommend this if you don't know computer stuff but it is an option (you'll likely have to provide your own domain though)
gripes & solutions (?)
i'm not comfortable maintaining pages in pure HTML / templating with JS sucks!
with a static site generator, you can write pages in markdown and they'll be converted into HTML and (if you'd like) be put into a template of your choosing. my personal choice is 11ty but there are tons of options!
static site generators can be a bit of a learning curve (and you will have to write some html for templating) but if you're making a lot of pages or blogging regularly it's something to consider
there are starters for 11ty online but i might make a more beginner-proofed starter and/or guide in the future? don't count on it
i don't want to write/maintain CSS
simpleCSS is a tiny CSS file you can use to make semantic HTML ("naked" HTML) look nice. it's got decent customization options too. it's not particularly fancy or opinionated, but it's a good starting point if you need something
i don't know what to put on my website!
small list of ideas:
weblog
art/writing/music gallery
movie/show/book tracker
place to store bookmarks/links
scary! i'm scared!
my askbox/messages/e-mail inbox/etc. are open to anyone who'd like to ask for help!
428 notes
·
View notes
Note
hi, may i ask how did you get the soft pink on your blogs? i really want to use it but dunno how
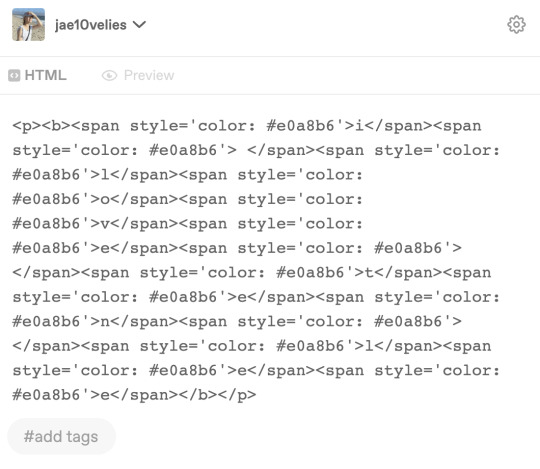
how to get custom text colors <3
hiii, sorry for the late reply, but here is how i do it. i'm not sure how to do it on mobile since i exclusively do it on my macbook.
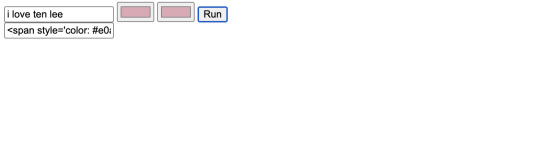
this is the website i use. ignore like everything on the page and focus on the white box in the bottom right corner.

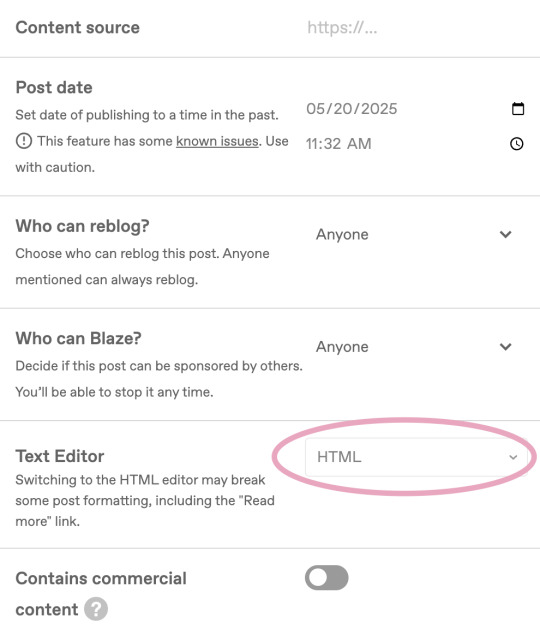
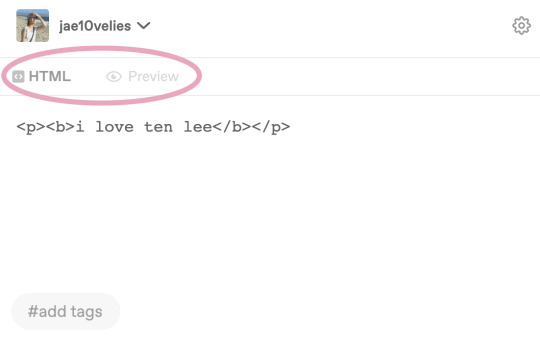
—what you'll do is put whatever text you want turned into the custom color in the first box (the one to the left of the red and green boxes) —if you click on the red or green box, you'll pull up the color selector and from there, you can select whatever color you want. if you want a gradient for your text then the two boxes will be two different colors. if you want them to be the same, then just copy the RGB code to the other. i usually keep it to a single color throughout, i rarely use the gradient option so therefore i have memorized the RGB for the pink i use. —once you have your text and your desired color(s), you can hit run and it'll fill the empty box that's by itself on the bottom with the code. —from there, you want to click inside the box. you'll see the cursor line that pops up when you usually write text and the box will have an outline. hit ctrl a to highlight the entire code and ctrl c to copy it. —come back to tumblr, and into whatever post or draft it is, you'll go to the top right where the settings gear is, opposite end of where your username is on a post. —once you open that little menu, stroll down until you see text editor. you should see that it is selected for rich text. you want to change this into 'HTML' —once you change it to 'HTML', it should look like this if you have any text (it'll be blank if there's no text, etc.)

—what i would do is go to the top at the very beginning, hit enter to make a new paragraph and then paste the code into it. —after that, you go back to the text editor with the settings gear again at the top right, switching it back to rich text. —and thats it! to move it to a different spot, i just select the words and ctrl x (which deletes and copies), and then paste it where i need it.
helpful tip
instead of going back and forth making new code for every phrase, or word, you need colored, there is an easy way that i tend to do. select your colored text, either ctrl x or ctrl c to copy it and then paste it where you want the new one to go. to edit the text to your new words, hit the left arrow key. you'll see a faint highlight around the words in that color. hit the left arrow key three more times, for a total of four, and you'll notice the highlighted area has shrunk. if you use the arrow key once more, then the cursor can move around the text. from there, you can edit the text to whatever you want. with this tip, you can also paste text into it as well and share the color!
so that's how you get custom colors, and from there, you can choose a color, or shade of pink, of your liking for your posts! <3
51 notes
·
View notes
Note
im filling out ur rabbit hole miku template and i wanna make dni byi and interests boxes like the ones you did in the examples section but UMM how do i add the different fonts for "dni" "byi" etc :sob: :sob: :sob: pls ur like a magician with bundlrs..

OMGG YAY UR FILLING IN MY TEMPLATE!! ok so in my example i added a font, you're going to have to put this like under where i put "hugh is life"

@font-face { src:url("https://files.catbox.moe/icleme.otf"); font-family: 'milkshake creps'; }
so there we have the font, but how did i do the outline hrm 🤭🤭 i got the code here
span.highlight { font-family: 'milkshake creps'; background: none !important; font-size: 15px; font-style: normal; font-weight: normal; text-decoration: none; color: #ffff; text-shadow: 1px 0px 0px #b09be3, -1px 0px 0px #b09be3, 0px 1px 0px #b09be3, 0px -1px 0px #b09be3; filter: drop-shadow(1px 0px 0px #b09be3) drop-shadow(-1px 0px 0px #b09be3) drop-shadow(0px 1px 0px #b09be3) drop-shadow(0px -1px 0px #b09be3); }
you can change the hex code in "text-shadow" and "filter: drop-shadow" to any color you'd like, but i like that one for the rabbit hole template
to use it just type == before and after your text so you'd end up having something that looks like this

"e#html br#" just tells the bundlrs to start a new line :3
and there you have it, fancy font in front of my textbox thing in my rabbit hole template


71 notes
·
View notes
Text
come to think of it, it's been a hot minute since i posted my fic writing setup, hasn't it?
(feat. sneak preview of make no plans chapter 9)

my vim setups tend to terrify everyone because i LOVE splits but this is because i feel a deep inner need to see like eight different things simultaneously. most other text editors i've tried make this difficult and annoying to set up, but like... i want to see the outline and my notes file while i write? hello?? also i have a vim plugin that autosaves my session layout so it just automagically pops back up whenever i run vim in the fic repo root directory.
at the very top: tabs. i have all the fic i'm semi-actively working on open simultaneously in the same vim session because why not. to a first approximation, each project gets its own tab (and also a more or less incomprehensible working title).
the split layout: there's only really room for two columns on a laptop screen so that's what i go with for this; for coding on the Big Screen i usually use three. (this frightens my coworkers and makes me look extremely l33t.) for fic, i keep my various notes files, my outline, and anything i'm referencing open in the right column, and the chapter(s) i'm working on (and the author's notes file) in the left column. (when i'm writing code i usually do tests and header files in the right column, source code in the middle column, and config files in the left column, but this isn't a hard and fast rule.) often i'll have more than one split pointed at the same notes file (or chapter file!) so i can look at multiple bits of it simultaneously.
i write all my fic in markdown (and use pandoc to convert it to html for poasting -- i should probably write a makefile or something but rn i just use bash scripts sprinkled about my various fic project folders). my main markdown extensions are preservim/vim-markdown (syntax preview, like italics and stuff) and masukomi/vim-markdown-folding (collapses and expands sections of markdown, which i use heavily in my outline and notes files). i also put the wordcount in the statusline for markdown files, mostly so i know if a chapter is fooming out of control on me.
and the font is victor mono, which has very pretty cursive italics <3
#the trashcan speaks#my fic#(tangentially)#wait. AM i l33t???#i'm like 'yeah i have this overly complicated vim setup that tricks everyone into thinking i'm l33t'#but. uh. well#WAIT I HAVE A TAG FOR THIS >#yes i write all my fic as markdown files in vim. we exist
15 notes
·
View notes
Text
for @yoshit-he-dinosaur and anyone else struggling w this:
here's how to use custom text colors in your posts!
this is the guide i've been using, i'll be showing the method outlined here
i highly recommend doing this on desktop, as it will be easier to switch between tabs and access the html editor this way (also there is probably an easier way to edit text colors via html, but this is the way i know best and i'm not a huge computer girlie!)
so let's say i have this text here and i wanna make it pink
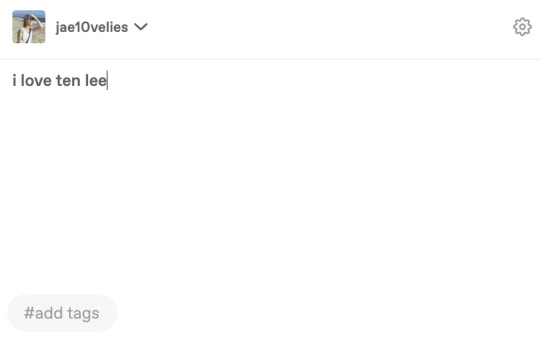
first make any font edits (bold, italic, size, etc) to your text
open this link in a separate tab
we are gonna work w this portion of the site here:
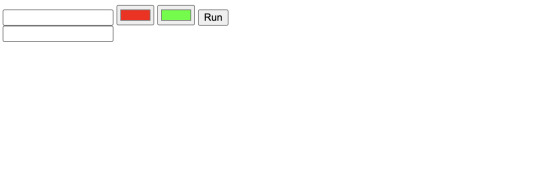
copy and paste your text into the top box and select your desired text color from the two colored text boxes next to it (hex code, rgb, whatever's easiest for you!)
for a solid color, make the two color selectors the same color. for a gradient, the first selector is the beginning color and the second selector is the end color
here is my selector after making my color choices:
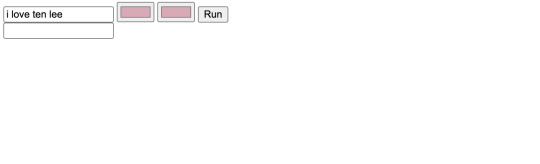
press run and you should get a string of html code in the bottom box like this:
copy this html code
now you're going to return to your tumblr text post and click the settings icon in the top right (circled)
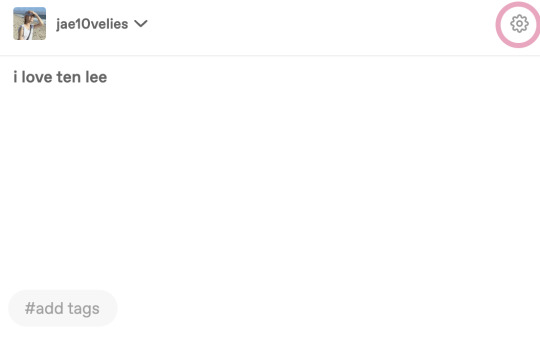
navigate to the text editor selector and choose html from the drop-down menu (circled)
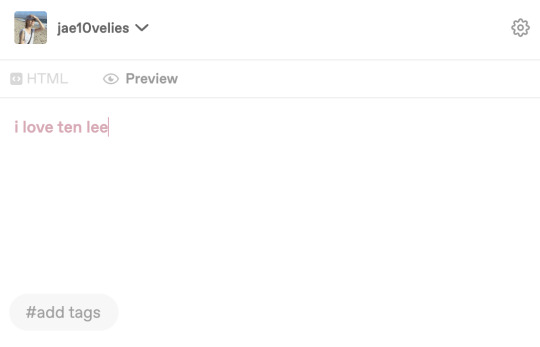
your text post should now be open in the html editor w the option to switch back and forth between html and text preview like this:
on the html editor locate your desired text and select it like so:

paste the html code from the color selector and it should replace the selected text like this:
if done properly, your text should be colored once you return to the text preview!
hope this was helpful! if you have any questions about the process don't hesitate to ask <3
#jae10velies#tumblr tutorial#custom text#text colors#this took me forever to figure out at first let me save u guys some pain and struggle 😭#moots#i <3 my moots#jae!
16 notes
·
View notes
Text
How to Build Software Projects for Beginners

Building software projects is one of the best ways to learn programming and gain practical experience. Whether you want to enhance your resume or simply enjoy coding, starting your own project can be incredibly rewarding. Here’s a step-by-step guide to help you get started.
1. Choose Your Project Idea
Select a project that interests you and is appropriate for your skill level. Here are some ideas:
To-do list application
Personal blog or portfolio website
Weather app using a public API
Simple game (like Tic-Tac-Toe)
2. Define the Scope
Outline what features you want in your project. Start small and focus on the minimum viable product (MVP) — the simplest version of your idea that is still functional. You can always add more features later!
3. Choose the Right Tools and Technologies
Based on your project, choose the appropriate programming languages, frameworks, and tools:
Web Development: HTML, CSS, JavaScript, React, or Django
Mobile Development: Flutter, React Native, or native languages (Java/Kotlin for Android, Swift for iOS)
Game Development: Unity (C#), Godot (GDScript), or Pygame (Python)
4. Set Up Your Development Environment
Install the necessary software and tools:
Code editor (e.g., Visual Studio Code, Atom, or Sublime Text)
Version control (e.g., Git and GitHub for collaboration and backup)
Frameworks and libraries (install via package managers like npm, pip, or gems)
5. Break Down the Project into Tasks
Divide your project into smaller, manageable tasks. Create a to-do list or use project management tools like Trello or Asana to keep track of your progress.
6. Start Coding!
Begin with the core functionality of your project. Don’t worry about perfection at this stage. Focus on getting your code to work, and remember to:
Write clean, readable code
Test your code frequently
Commit your changes regularly using Git
7. Test and Debug
Once you have a working version, thoroughly test it. Look for bugs and fix any issues you encounter. Testing ensures your software functions correctly and provides a better user experience.
8. Seek Feedback
Share your project with friends, family, or online communities. Feedback can provide valuable insights and suggestions for improvement. Consider platforms like GitHub to showcase your work and get input from other developers.
9. Iterate and Improve
Based on feedback, make improvements and add new features. Software development is an iterative process, so don’t hesitate to refine your project continuously.
10. Document Your Work
Write documentation for your project. Include instructions on how to set it up, use it, and contribute. Good documentation helps others understand your project and can attract potential collaborators.
Conclusion
Building software projects is a fantastic way to learn and grow as a developer. Follow these steps, stay persistent, and enjoy the process. Remember, every project is a learning experience that will enhance your skills and confidence!
3 notes
·
View notes
Note
Hiya! I found your blog through your neocities website! I was wondering if there’s any tips or things you read/watched that help you make your site. (Im heavily considering making one of my own neocities site it just seems fun)
hihi welcome !! i have quite a few pieces of advice, but the tldr is you should come up with an idea for what you want to make beforehand, and look up how to do each piece! your knowledge will start to fill in along the way :]
(this is probably gonna be long as hell so under the cut is all of the fun stuff /silly)
the way i personally started off was by sketching out what i wanted my site to look like! if you know what you want before you begin, you'll know where to look to figure out what you need to do. html+ css are extremely easy languages to read/write once you know what to look for!
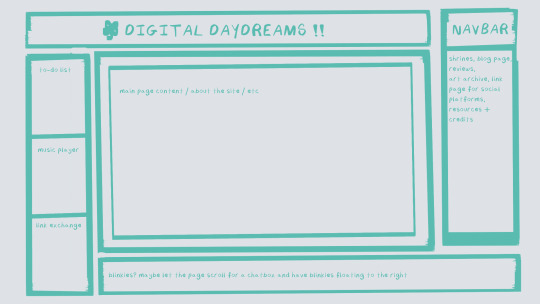
^ this was the original sketch for my site, where i planned out everything i wanted to include. it's a bit different from what actually ended up on the site, but that's alright! it's just about having an outline to work from. i think of it like outlining before you write, it feels like such a pain in the ass because u just wanna start working NOW but u will thank yourself later for taking the time to plan.
once you know what you want to make, start looking for tutorials and resources to make it easier! the grid for my homepage and some of my other subpages was made using a css grid generator, since its one of the more confusing bits of css. you can make grids without it, but its a very easy way to make a more asymmetrical design if ur using the generator!
thats linked here, it gives you some css to put in your head or css sheet, and then the html for the different boxes to slap in your main document. it can be easier to understand what itll look like if you give each one a border while you work, even if its just temporary!
when looking for information about css and html, w3schools is your best friend. its a pretty comprehensive database of every little piece of html + css you could ever need, with examples you can play with yourself to understand what each variable does! it's been a lifesaver for me, ive watched basically zero video tutorials because everything on there is explained so well and you can find basically Anything.
they even have code snippets for things that take more than one or two lines of code, which you can use and adapt yourself! (the tooltips on the official art + my art sections on the hinata shrine were adapted from a tutorial on there!)
in general, having a plan and working from there will make ur life so much easier. the pages that ive sketched out beforehand or ive had a very clear vision for have been WAYY easier to code than the ones i tried to come up with on the fly, and ive been much happier with how they've turned out as well. though i do also have some smaller, rapidfire tips as well that ill go thru now!!
— inline css (the style="" tag) seems so so useful but really should only be used when you're resizing images like buttons. when u keep all of your css in the head or in a seperate document, its way easier to debug and read later. i cleaned up my homepage recently by removing all of the inline css and looking at the code stresses me out WAY less because i can actually read it LOLOL ... plus cutting the css out and putting it in its own document made me realize that id accidentally wrote some really weird code in some places
— this is very much 'do as i say, not as i do,' but use an external editor (like visual studio code) instead of editing live on neocities! you can set up a live preview, and generally wont be pushing out 100 updates every single time you change or add something. i tend to code directly on neocities but its a bad habit and i want to break it eventually v_v
— if you really like an effect someone else has on their site, you can peek using inspect element i promise the coding police won't get you !! dont steal code line for line, but you can figure out what theyre doing and put your own spin on it. things like border images can be really cool, and i only figured out about them because i looked at what someone else was doing and figured out how to adapt it for my own site! check linkbooks and credit sections as well, a lot of people will include links to any effect they didnt make themself or got help with. (including me! the credits section of the linkbook has a ton of little things i got from other places, including a really neat little music player, the rss feed for my status cafe, and the wobbly text on the homepage!)
— most stuff in html and css basically just... says what it does in the tag. so looking stuff up for it is extremely easy! if you've used carrd before you honestly probably already know more abt html than u'd think just intuitively. when ur adjusting the margins or padding in carrd, you're adjusting the margin: and padding: properties in the css of the website it's outputting!
this is getting way too long but!! my best advice is to just get started. you'll never be able to learn without trying, and it genuinely is so fun to have something that's truly your own!
(if u have any specific questions im happy to answer anytime as well! i love talking abt neocities, its a super fun hobby and way easier to pick up than u would think!)
#originals.txt#inbox.txt#neocities.zip#god im so sorry abt how long this is i havent had time to work on the site for a while and its getting to my head /silly
6 notes
·
View notes
Note
Ink/Inky does have a downloadable IDE now that doesn't require an install (just download, unzip, + go); it's very nice with an outline feature similar to a word doc that you can use to jump around your files with (both scene files + labels within the files). It also allows you to see changes (and do play throughs) within the game as you go (though some of the more advanced coding does require it to be tested in an exported html file) and will highlight coding errors as you type. It's honestly just very accessible for people new to this.
That's so cool! I'm so glad Ink is becoming a real player on the IF field. 💙
20 notes
·
View notes
Text
The Roadmap to Full Stack Developer Proficiency: A Comprehensive Guide
Embarking on the journey to becoming a full stack developer is an exhilarating endeavor filled with growth and challenges. Whether you're taking your first steps or seeking to elevate your skills, understanding the path ahead is crucial. In this detailed roadmap, we'll outline the stages of mastering full stack development, exploring essential milestones, competencies, and strategies to guide you through this enriching career journey.

Beginning the Journey: Novice Phase (0-6 Months)
As a novice, you're entering the realm of programming with a fresh perspective and eagerness to learn. This initial phase sets the groundwork for your progression as a full stack developer.
Grasping Programming Fundamentals:
Your journey commences with grasping the foundational elements of programming languages like HTML, CSS, and JavaScript. These are the cornerstone of web development and are essential for crafting dynamic and interactive web applications.
Familiarizing with Basic Data Structures and Algorithms:
To develop proficiency in programming, understanding fundamental data structures such as arrays, objects, and linked lists, along with algorithms like sorting and searching, is imperative. These concepts form the backbone of problem-solving in software development.
Exploring Essential Web Development Concepts:
During this phase, you'll delve into crucial web development concepts like client-server architecture, HTTP protocol, and the Document Object Model (DOM). Acquiring insights into the underlying mechanisms of web applications lays a strong foundation for tackling more intricate projects.
Advancing Forward: Intermediate Stage (6 Months - 2 Years)
As you progress beyond the basics, you'll transition into the intermediate stage, where you'll deepen your understanding and skills across various facets of full stack development.

Venturing into Backend Development:
In the intermediate stage, you'll venture into backend development, honing your proficiency in server-side languages like Node.js, Python, or Java. Here, you'll learn to construct robust server-side applications, manage data storage and retrieval, and implement authentication and authorization mechanisms.
Mastering Database Management:
A pivotal aspect of backend development is comprehending databases. You'll delve into relational databases like MySQL and PostgreSQL, as well as NoSQL databases like MongoDB. Proficiency in database management systems and design principles enables the creation of scalable and efficient applications.
Exploring Frontend Frameworks and Libraries:
In addition to backend development, you'll deepen your expertise in frontend technologies. You'll explore prominent frameworks and libraries such as React, Angular, or Vue.js, streamlining the creation of interactive and responsive user interfaces.
Learning Version Control with Git:
Version control is indispensable for collaborative software development. During this phase, you'll familiarize yourself with Git, a distributed version control system, to manage your codebase, track changes, and collaborate effectively with fellow developers.
Achieving Mastery: Advanced Phase (2+ Years)
As you ascend in your journey, you'll enter the advanced phase of full stack development, where you'll refine your skills, tackle intricate challenges, and delve into specialized domains of interest.
Designing Scalable Systems:
In the advanced stage, focus shifts to designing scalable systems capable of managing substantial volumes of traffic and data. You'll explore design patterns, scalability methodologies, and cloud computing platforms like AWS, Azure, or Google Cloud.
Embracing DevOps Practices:
DevOps practices play a pivotal role in contemporary software development. You'll delve into continuous integration and continuous deployment (CI/CD) pipelines, infrastructure as code (IaC), and containerization technologies such as Docker and Kubernetes.
Specializing in Niche Areas:
With experience, you may opt to specialize in specific domains of full stack development, whether it's frontend or backend development, mobile app development, or DevOps. Specialization enables you to deepen your expertise and pursue career avenues aligned with your passions and strengths.
Conclusion:
Becoming a proficient full stack developer is a transformative journey that demands dedication, resilience, and perpetual learning. By following the roadmap outlined in this guide and maintaining a curious and adaptable mindset, you'll navigate the complexities and opportunities inherent in the realm of full stack development. Remember, mastery isn't merely about acquiring technical skills but also about fostering collaboration, embracing innovation, and contributing meaningfully to the ever-evolving landscape of technology.
#full stack developer#education#information#full stack web development#front end development#frameworks#web development#backend#full stack developer course#technology
10 notes
·
View notes
Text
#Playstation7 #framework #BasicArchitecture #RawCode #RawScript #Opensource #DigitalConsole
To build a new gaming console’s digital framework from the ground up, you would need to integrate several programming languages and technologies to manage different aspects of the system. Below is an outline of the code and language choices required for various parts of the framework, focusing on languages like C++, Python, JavaScript, CSS, MySQL, and Perl for different functionalities.
1. System Architecture Design (Low-level)
• Language: C/C++, Assembly
• Purpose: To program the low-level system components such as CPU, GPU, and memory management.
• Example Code (C++) – Low-Level Hardware Interaction:
#include <iostream>
int main() {
// Initialize hardware (simplified example)
std::cout << "Initializing CPU...\n";
// Set up memory management
std::cout << "Allocating memory for GPU...\n";
// Example: Allocating memory for gaming graphics
int* graphicsMemory = new int[1024]; // Allocate 1KB for demo purposes
std::cout << "Memory allocated for GPU graphics rendering.\n";
// Simulate starting the game engine
std::cout << "Starting game engine...\n";
delete[] graphicsMemory; // Clean up
return 0;
}
2. Operating System Development
• Languages: C, C++, Python (for utilities)
• Purpose: Developing the kernel and OS for hardware abstraction and user-space processes.
• Kernel Code Example (C) – Implementing a simple syscall:
#include <stdio.h>
#include <unistd.h>
int main() {
// Example of invoking a custom system call
syscall(0); // System call 0 - usually reserved for read in UNIX-like systems
printf("System call executed\n");
return 0;
}
3. Software Development Kit (SDK)
• Languages: C++, Python (for tooling), Vulkan or DirectX (for graphics APIs)
• Purpose: Provide libraries and tools for developers to create games.
• Example SDK Code (Vulkan API with C++):
#include <vulkan/vulkan.h>
VkInstance instance;
void initVulkan() {
VkApplicationInfo appInfo = {};
appInfo.sType = VK_STRUCTURE_TYPE_APPLICATION_INFO;
appInfo.pApplicationName = "GameApp";
appInfo.applicationVersion = VK_MAKE_VERSION(1, 0, 0);
appInfo.pEngineName = "GameEngine";
appInfo.engineVersion = VK_MAKE_VERSION(1, 0, 0);
appInfo.apiVersion = VK_API_VERSION_1_0;
VkInstanceCreateInfo createInfo = {};
createInfo.sType = VK_STRUCTURE_TYPE_INSTANCE_CREATE_INFO;
createInfo.pApplicationInfo = &appInfo;
vkCreateInstance(&createInfo, nullptr, &instance);
std::cout << "Vulkan SDK Initialized\n";
}
4. User Interface (UI) Development
• Languages: JavaScript, HTML, CSS (for UI), Python (backend)
• Purpose: Front-end interface design for the user experience and dashboard.
• Example UI Code (HTML/CSS/JavaScript):
<!DOCTYPE html>
<html>
<head>
<title>Console Dashboard</title>
<style>
body { font-family: Arial, sans-serif; background-color: #282c34; color: white; }
.menu { display: flex; justify-content: center; margin-top: 50px; }
.menu button { padding: 15px 30px; margin: 10px; background-color: #61dafb; border: none; cursor: pointer; }
</style>
</head>
<body>
<div class="menu">
<button onclick="startGame()">Start Game</button>
<button onclick="openStore()">Store</button>
</div>
<script>
function startGame() {
alert("Starting Game...");
}
function openStore() {
alert("Opening Store...");
}
</script>
</body>
</html>
5. Digital Store Integration
• Languages: Python (backend), MySQL (database), JavaScript (frontend)
• Purpose: A backend system for purchasing and managing digital game licenses.
• Example Backend Code (Python with MySQL):
import mysql.connector
def connect_db():
db = mysql.connector.connect(
host="localhost",
user="admin",
password="password",
database="game_store"
)
return db
def fetch_games():
db = connect_db()
cursor = db.cursor()
cursor.execute("SELECT * FROM games")
games = cursor.fetchall()
for game in games:
print(f"Game ID: {game[0]}, Name: {game[1]}, Price: {game[2]}")
db.close()
fetch_games()
6. Security Framework Implementation
• Languages: C++, Python, Perl (for system scripts)
• Purpose: Ensure data integrity, authentication, and encryption.
• Example Code (Python – Encrypting User Data):
from cryptography.fernet import Fernet
# Generate a key for encryption
key = Fernet.generate_key()
cipher_suite = Fernet(key)
# Encrypt sensitive user information (e.g., account password)
password = b"SuperSecretPassword"
encrypted_password = cipher_suite.encrypt(password)
print(f"Encrypted Password: {encrypted_password}")
# Decrypting the password
decrypted_password = cipher_suite.decrypt(encrypted_password)
print(f"Decrypted Password: {decrypted_password}")
7. Testing and Quality Assurance
• Languages: Python (for automated tests), Jest (for JavaScript testing)
• Purpose: Unit testing, integration testing, and debugging.
• Example Unit Test (Python using unittest):
import unittest
def add(a, b):
return a + b
class TestGameFramework(unittest.TestCase):
def test_add(self):
self.assertEqual(add(10, 20), 30)
if __name__ == '__main__':
unittest.main()
8. Order of Implementation
• Phase 1: Focus on core system architecture (low-level C/C++) and OS development.
• Phase 2: Develop SDK and start building the basic framework for UI and input management.
• Phase 3: Work on backend systems like the digital store and integrate with front-end UI.
• Phase 4: Begin rigorous testing and debugging using automated test suites.
This comprehensive approach gives you a detailed idea of how each component can be built using a combination of these languages and technologies. Each section is modular, allowing teams to work on different aspects of the console simultaneously.
[Pixel Art/Sprites/Buildinodels/VictoriaSecretPixelArtKit #Playstation7 #DearDearestBrands]

#victoriasecretrunway#runwaybattle#victoria secret fashion#victoria secert model#victoriasecret#victoria secret#VictoriaSecretRunwayBattle#capcom victoriasecret#capcom videogames#playstation7#ps7#deardearestbrands#capcom#digitalconsole#python#script#rawscript#raw code#framework#VictoriaSecretVideoGame#deardearestbrandswordpress
2 notes
·
View notes
Text
you used to be able to google a statistical test and the results would all be some prof’s .edu page coded in basic html clearly outlining every statistical method under the sun. now you google a statistical test and the results are all articles trying to get you to sign up for some data science course
4 notes
·
View notes