#Heard it in a blender tutorial originally
Explore tagged Tumblr posts
Visit Tumblr Blog
Explore Tumblr blogs with no restrictions, modern design and the best experience.
Last Seen Tumblr Blogs


Fun Fact
Tumblr’s reach among the 26-to-35-year-olds in the US is 11%.
Note
favorite word?
Greeble, I think it's a fun sounding word
From my understanding it's the use of a shape or a bunch of shapes to create a lot of detail or make a model seem more complex than it might actually be underneath all the greebling.
#It was either greeble or galumph#Chose greeble since I think it's something I can hopefully use more often#Heard it in a blender tutorial originally
7 notes
·
View notes
Text
"Tails's Joke Corner: Part 2 – 200% More Chaos, 100% More Punchlines. Btw yes ididnot take much care on this thanthe lasttime technical issues
Why did Sonic start a podcast? Because he wanted to go live at the speed of sound.
Shadow tried therapy once… …but the therapist couldn’t handle the existential edge.
Rouge stole a Chaos Emerald and said: “Oops, my kleptomania’s acting up again.”
Tails built a mech that could fold laundry. It folded itself into depression.
Amy tried Tinder, but everyone swiped left. Except Sonic. He ran from the app.
Omega updated his firmware… Now he’s emotionally unstable and slightly British.
Knuckles locked his keys in the Master Emerald. The echidna tech support said: “Have you tried punching it?”
Sonic Frontiers glitch: Sonic fell off a boss and landed in Skyrim.
Shadow in Shadow Gems be like: “I am the ultimate bug report.”
Big the Cat got lost in Cyberspace. Froggy sent him a GPS pin.
Dr. Eggman created a dating sim. It only matched him with himself.
Tails installed Windows 98 on the Tornado. Now it runs slower than Classic Sonic.
Sonic ordered a chili dog. Shadow asked, “Is that your purpose?”
Shadow’s keyboard only has edge keys. Ctrl + Alt + Existential Crisis.
Silver came from the future just to say: “Bro, 06 still sucks.”
Amy has a hammer. Sonic has trauma.
Eggman tried creating a streaming service. It’s called Eggflix and only plays his TED Talks.
Chaos tried swimming in Gatorade. He evolved into an energy drink mascot.
Rouge infiltrated Area 51. Found Shadow’s original edgy design sketches.
Tails got stuck in Blender. Not the software. The kitchen appliance.
Shadow used Chaos Control to skip the tutorial. Now he doesn’t know how to play life.
Sonic forgot his rings. Shadow said, “You dropped your bling, faker.”
Blaze lit her stove with her fingers. The kitchen is gone now.
Knuckles downloaded Duolingo. He still can’t read ancient text.
Omega’s internal clock runs on doom energy.
Sonic Heroes but every team talks at once. “Sonic! Espio! Charmy! Eggman?!?”
Shadow Generations: The camera is your enemy.
Tails accidentally created ChatGPT. Now the Tornado argues with him.
Eggman made a clone of himself. He lost an argument to it.
Sonic got stuck on a wall. Knuckles asked, “You climbing or glitching?”
Amy’s hammer is Bluetooth now. It plays Spotify mid-swing.
Big became a Twitch streamer. Category: Just Froggin’.
Shadow’s motorcycle runs on trauma.
Tails modded Minecraft. It now runs in the Tornado’s cockpit.
Sonic tried sleeping. His dreams were just speedruns.
Knuckles’ dating profile: “Guardian of your heart. Punch first, ask later.”
Eggman’s mech broke. He rage quit and blamed lag.
Metal Sonic tried making toast. Set the house on fire with precision.
Sonic did a kickflip. Amy said: “Husband material.”
Shadow Generations glitch: “Camera said: I do not perceive you.”
Sonic blinked… And ended up in the ARK again.
Shadow joined a meditation group. He yelled “CHAOS CONTROL” in the first 5 minutes.
Tails tried yoga. Now he’s a pretzel with an IQ of 300.
Rouge wore stealth shoes. Still heard by Knuckles from 3 zones away.
Silver made a TikTok.
ITSTHENEARFUTURE
Eggman uses Microsoft Paint for schematics.
Blaze sneezed. The entire zone caught fire.
Knuckles found a riddle. Punched it. Problem solved.
Sonic Generations glitch: Sonic yeeted himself into the title screen.
Shadow said "Maria" so hard the game crashed.
Tails made a backup of Shadow’s memory. Now it’s just labeled “DO NOT OPEN – TOO MUCH EDGE.”
Shadow blinked in Shadow Gems… Game crashed out of fear.
Knuckles got a library card. Then punched the librarian for "being too mysterious."
Eggman tried stand-up comedy. The punchline exploded.
Sonic ran so fast, he entered another Sonic game. It was Sonic Boom. He immediately ran back.
Tails made a smart fridge. Now it lectures him about nutrition.
Amy joined a rock band. Her instrument? The hammer, obviously.
Omega tried painting. The canvas caught fire from rage.
Shadow sat in a therapist's chair. The chair disintegrated.
Sonic got a sponsorship deal. It was for anti-glitch spray. He refused.
Rouge tried yoga. She stole everyone’s mats.
Knuckles made a smoothie. He punched the fruit directly.
Shadow hacked the game code. He replaced all NPCs with himself.
Sonic found a bug in Shadow Gems. Shadow just called it a “feature.”
Tails asked ChatGPT for advice. Now he’s building a sarcasm bot.
Eggman joined Twitter. He blocked Sonic in real life.
Big the Cat wandered into Final Fortress. No one knows how. Not even Big.
Silver said “IT’S NO USE” at a coffee shop. Now he's banned for life.
Shadow downloaded Spotify. Every playlist is titled “Angst.”
Sonic tried ASMR. Too fast. The mic exploded.
Tails built a drone. It follows Shadow and whispers “edgy…”
Knuckles tried sushi. Punched the wasabi.
Amy wrote a fanfic. Sonic moved to another timeline.
Omega tried gardening. Now he grows C4.
Shadow entered cyberspace. The internet got emotional.
Sonic got invited to Smash. Shadow broke the door down asking “WHERE’S MY INVITE?!”
Tails made a Sonic AI. It speedran its own shutdown.
Eggman bought a Fitbit. Declared war on his step count.
Rouge got a diamond sponsorship. She stole the diamonds right after.
Sonic accidentally boosted into a mirror. Said “Sorry faker” to himself.
Knuckles started a podcast. Only one episode. It’s just grunting.
Shadow turned off motion blur. The game lost 90% of its style.
Tails programmed a meme bot. It only posts "Shadow = edgy" memes.
Silver tried therapy. Time travel made every session awkward.
Omega entered a rap battle. He dropped bars and missiles.
Big became a motivational speaker. His only advice: “Froggy.”
Shadow walked into a Hot Topic. Got hired on sight.
Sonic got a glitch where he turned into a car. Shadow drove him off a cliff for “justice.”
Rouge disguised herself as a Chaos Emerald. Knuckles fell for it.
Tails made an AI Sonic. It spent 3 hours saying “Gotta go fast.”
Eggman’s mech had a voice assistant. It refused to listen unless bribed with EggTokens.
Shadow stared into the void. The void blinked.
Knuckles tried a Rubik’s cube. Solved it with one punch.
Sonic made a cooking show. Every dish was chili dogs.
Silver said “It’s no use” to a vending machine. It worked.
Omega tried to join Instagram. Got banned for explosive selfies.
Amy went to therapy. The hammer got its own seat.
Tails accidentally opened the multiverse. Now there are 12 Sonics and a plumber.
Shadow tried journaling. It was just the word “darkness” 400 times.
Sonic met his alternate self. They raced. Time imploded.
(Btw there might be errors bc of autocorrect in the text like reblog this took me a whilee btw what shoud i do next theory or etc?)
#tails the fox#sonic the hedgehog#shadow the hedgehog#rouge the bat#knuckles the echidna#dr eggman#amy rose#silver the hedgehog#blaze the cat#big the cat#omega#sonic jokes#shadow gens#shadow generations#sonic memes#tails jokes#sonic tumblr#sonic glitch#sonic fandom#gaming memes#funny sonic#sonic humor#chaos emeralds#chaos control#chaos blast#glitchcore#glitch memes#hedgehog with attitude#sega#sega memes
23 notes
·
View notes
Text
Adding on to this with some of my favorites!!
Winged Canvas (love love LOVE these guys! they have tons of tutorials and streams for just about anything regarding 2D art and animation)
chupuko (live2D animation tutorials! goes over the whole process from drawing the model to setting it up in vtube studio. her tutorials were what inspired and taught me to make my own vtube model)
Blender Guru (goes over the basics of 3D modeling program Blender, his donut tutorials are kinda considered the classic starting point for beginners)
And some programs:
ibisPaint X (free, lots of tools available including one for comic paneling. can get it on your phone)
Aseprite ($20, for pixel art, you can find it on Steam)
Live2D Cubism (free but also has a paid version with some extra features. used for animation and rigging, and usually the go-to for rigging vtube models but can be used for other animation too. i'd recommend just getting the free version, it has everything you need and the paid version is pretty pricey)
FlipaClip (free animation app, you can get it on your phone)
Procreate Dreams ($20. procreate's animation app, but i wouldn't recommend it as of now since it's still pretty shoddy and missing a lot of core features. i'll put it in here regardless since it's the one i have experience in)
ToonSquid ($10. for animation as well. haven't tried this one yet but i've heard it's pretty good! i've been considering getting it to replace Dreams actually just haven't decided yet)
Shotcut (free, video editing)
Audacity (free, audio editing)
OBS Studio (free live streaming/recording software)
OpenUtau (free vocaloid alternative. an updated version the original UTAU, you don't need to change your locale for this version and it's compatible with all UTAUloids. shareware so anyone can create a voicebank for the program, the main downside is that there's no one place to find a voicebank so you gotta hunt for em a little, but here's Kasane Teto and Adachi Rei - ignore the "download faster" thing to the left of the screen for Rei, it's not necessary to download the file and idk why it's there either. and you only need one of the voicebank downloads from each of em it depends on which language/voicebank type you wanna use so it's probably best to look into that a little bit first)
RPG Maker (pricey, but a solid game development engine. it has a ton of different iterations so i'd recommend doing lots of research before settling on anything, but it's a good tool if you're interested in game design. there are also a lot of plugins made by community members that can really enhance your game, my favorite plugin dev is Caethyril! They have a bunch of free plugins for both MV and MZ - and here's their tweaks for MZ as well!)
Ren'Py (free visual novel maker)
Twine (free choose-your-own-adventure maker that you can use on your browser, just be careful about clearing cookies cause it'll clear your Twine stuff as well. there is also a downloadable version though)
Unity (free 3D game development software)
Unreal (another free 3D game development software)
cheer, resources be upon ye!
Can't afford art school?
After seeing post like this 👇

And this gem 👇
As well as countless of others from the AI generator community. Just talking about how "inaccessible art" is, I decided why not show how wrong these guys are while also helping anyone who actually wants to learn.
Here is the first one ART TEACHERS! There are plenty online and in places like youtube.
📺Here is my list:
Proko (Free)
Marc Brunet (Free but he does have other classes for a cheap price. Use to work for Blizzard)
Aaron Rutten (free)
BoroCG (free)
Jesse J. Jones (free, talks about animating)
Jesus Conde (free)
Mohammed Agbadi (free, he gives some advice in some videos and talks about art)
Ross Draws (free, he does have other classes for a good price)
SamDoesArts (free, gives good advice and critiques)
Drawfee Show (free, they do give some good advice and great inspiration)
The Art of Aaron Blaise ( useful tips for digital art and animation. Was an animator for Disney)
Bobby Chiu ( useful tips and interviews with artist who are in the industry or making a living as artist)
Second part BOOKS, I have collected some books that have helped me and might help others.
📚Here is my list:
The "how to draw manga" series produced by Graphic-sha. These are for manga artist but they give great advice and information.
"Creating characters with personality" by Tom Bancroft. A great book that can help not just people who draw cartoons but also realistic ones. As it helps you with facial ques and how to make a character interesting.
"Albinus on anatomy" by Robert Beverly Hale and Terence Coyle. Great book to help someone learn basic anatomy.
"Artistic Anatomy" by Dr. Paul Richer and Robert Beverly Hale. A good book if you want to go further in-depth with anatomy.
"Directing the story" by Francis Glebas. A good book if you want to Story board or make comics.
"Animal Anatomy for Artists" by Eliot Goldfinger. A good book for if you want to draw animals or creatures.
"Constructive Anatomy: with almost 500 illustrations" by George B. Bridgman. A great book to help you block out shadows in your figures and see them in a more 3 diamantine way.
"Dynamic Anatomy: Revised and expand" by Burne Hogarth. A book that shows how to block out shapes and easily understand what you are looking out. When it comes to human subjects.
"An Atlas of animal anatomy for artist" by W. Ellenberger and H. Dittrich and H. Baum. This is another good one for people who want to draw animals or creatures.
Etherington Brothers, they make books and have a free blog with art tips.
As for Supplies, I recommend starting out cheap, buying Pencils and art paper at dollar tree or 5 below. For digital art, I recommend not starting with a screen art drawing tablet as they are more expensive.
For the Best art Tablet I recommend either Xp-pen, Bamboo or Huion. Some can range from about 40$ to the thousands.
💻As for art programs here is a list of Free to pay.
Clip Studio paint ( you can choose to pay once or sub and get updates)
Procreate ( pay once for $9.99)
Blender (for 3D modules/sculpting, ect Free)
PaintTool SAI (pay but has a 31 day free trail)
Krita (Free)
mypaint (free)
FireAlpaca (free)
Libresprite (free, for pixel art)
Those are the ones I can recall.
So do with this information as you will but as you can tell there are ways to learn how to become an artist, without breaking the bank. The only thing that might be stopping YOU from using any of these things, is YOU.
I have made time to learn to draw and many artist have too. Either in-between working two jobs or taking care of your family and a job or regular school and chores. YOU just have to take the time or use some time management, it really doesn't take long to practice for like an hour or less. YOU also don't have to do it every day, just once or three times a week is fine.
Hope this was helpful and have a great day.
104K notes
·
View notes
Note
How did you actually start making these models or how do you basically have the motivation to do so, i really wanna try modeling like yours but im so confused on where to start😵💫
My motivation originally came from wanting to animate, but to animate in 3d you also have to know how to model, texture, and shade... As of some resources to start, I've included what helped me the most under the cut!
Getting Started:
Im sure anybody new to learning blender has probably heard of blender guru, if not, ill be happy to introduce him!
youtube
He's honestly what helped me the most with getting familiar with all the in's and out's of creating a good render, as well as figuring out how to go about approaching certain things. He also has a few older videos (blender 2.79 my beloved and behated....) that walks you through the process of creating different renders. My only problem with them is that they're a bit long...
youtube
ok hear me out, this actually really helped me with learning how to model in general. This tutorial may be old but it honestly taught me things like using the mirror modifier (an actual lifesaver), and how to approach modeling more complex shapes. Yea i get that the entire tutorial is kinda hyper specific but sometimes you just gotta roll up your sleeves and say "today im going to learn how to model a lowpoly elephant"
Intermediate:
have you gotten bored of making lowpoly elephants? Time to expand onto more advanced things, like people! One of the absolute best tutorial makers i've ever seen with my own two peepers is daniel krueter
youtube
Again, a bit of an old tutorial, its what opened the door to creating characters for me. He expands upon more complex box modeling, as well as introduces you to edge modeling for more specific shapes like the face. I'm pretty sure he also goes a lil bit into topology, and edge flow, but in case he doesn't the general idea is: quads are amazing and beautiful, tris can stay but are on thin ice, and n-gons are the devils spawn. (you know its true because it rhymes)
youtube
youtube
Two other tutorials from him that utilize 2.8+ and a lil bit of sculpting/retopologizing. To be honest I haven't really gotten around to watching these, but I would recommend the second one if you want a more in-depth look on how he did certain things, whereas if you want a general view of his process you should take a look at the first one.
If you're looking for some ✨quick tips✨ a few recommendations I have are Gleb Alexandrov, Cgmatter/Default Cube, and Ian Hubert.
Gleb Alexandrov has a lot of tips on just how to make things look a lil bit better, rendering/material-wise
Cgmatter/Default Cube do more technical tutorials, like how you would go about making certain things, abstract or otherwise
Ian Hubert is kinda like Cgmatter but they do more tutorials on things you would find out in the wild such as buildings, fish, posters, and scary nightmare men! (They also do a lot of vfx/hard surface stuff which i think is super cool)
And finally, leaning on the more advanced side is Dikko
youtube
youtube
he does quite a few tutorial videos for things like Adobe Illustrator/Maya both of which i don't have because im broke but i mainly really like their rigging/hand modeling tutorials. I'm pretty sure he introduces drivers for the different controllers of rigs and ik constraints, but im not sure because i haven't really gotten around to watching the whole thing.
Advanced; Learning to Stylize:
From here it gets a lil bit more abstract because theres no "right" way to stylize, whereas with photorealistic rendering most of the time there is a very clear line between real-lookin and not real-lookin. A lot of it is just kinda what looks good.
My go-to person for stylized environments is Kristof Dedene, he makes some of the prettiest shaders ive ever seen. (im a huge fan of his water shader)
youtube
he has tutorials for clouds, waterfalls, buildings, rocks, and grass which all look so good i could cry
My absolute beloved, my blorbo, my favorite activity. Sam Bowman is like the godfather of all things procedural, words cannot describe how much this man has helped me make funny lil designs for my funny lil projects. Everyone should watch his videos (and subscribe while youre at it, my boy is criminally underrated)
A geometry nodes connoisseur (if theyre doing geo nodes you know they got the class that wont quit). Their renders are really cool to look at, but geo nodes scare me so i haven't really gotten around to doing their tutorials yet, still would definitely recommend them if youre interested!
ok so if im being completely honest i don't know what hes doing, but in my defense i don't think anyone else does either. His newest normal editing series is witchcraft to me but i think its funny how he casually dabbles in the dark arts so im including him in here. He's covered a lot from uvs, to masks, to drivers, to shaders, but again they are all kinda advanced so proceed with caution.
And because this post wasn't long enough heres some extra people to check out who do kinda tutorial stuff (but mostly i just like looking at their work)
Bobacupcakes - Who i reference the most whenever i wanna make something sparmkly (i know the link leads to twitter but theyre also on tumblr)
Rukikuri - prebbty models!! (some normal editing too!)
Niall Stenson - kinda a grab bag of stuff (i just think theyre neat)
Late as Usual - another wild geo node wizard!
Dillon Goo - suuuuper cool animator (i like their fight scenes)
Rui - neato burrito 3d character creator (their textures are godly)
Dyzi&liz - im pretty sure theyre actually making an entire show in blender and i am both scared and amazed
Yoolie - another 3d character creator <3
高部 - テクスチャが大好き~~~ ;0; いちばんすきなテクスチャアーティスト!!
Nugget - Yet another wizard that dabbles in the darkest of arts (im pretty sure ive mentioned them before but in case i haven't theyre the person who's node setup ive been using for raymarching textures)
かめ山 - モデルはとてもかわいい~~
Im sorry that most of these people are from the bird app, but trust me they are definitely worth checking out
Super Secret Bonus Channel For Those Like Me Who Are Constantly Frothing At The Mouth For More Bnpr Content. We Want It, Crave It. We Lurk In The Shadows Waiting With Slacked Jaws And Glazed Eyes, Waiting For The Next Model To Descend Down Upon In Droves:
86 notes
·
View notes
Note
Hi oydis ! I hope you're goodI'm sorry if i'm disturbing you but I do have some questions, if you don't want to answer it it's absolutly fine and understable, it's about to how become a cc creator, and some advices and i guess many ppl are asking you about those questions so... Here some questions : Which software we absolutly need to make good and original cc (clothes, shoes..) ? Do you know any creator who is giving tutorials and advices for beginners ? (that's kinda all lol have a lovely day)
Hello! :) let’s see, the software you’ll absolutely need to venture into cc creation can be summarized in 3 kinds:
A package editor, since packages are the file format of cc and mods. There are specific ones depending on the type of content you’re creating, if you’re making cas items you can use Sims4Studio and/or S4 Cas Tools (both are free). They have their own strengths and weaknesses, s4s is probably the best starting point for a beginner since it’s more intuitive.
3D editor - for the shape. Some examples are Blender, Milkshape, Maya. I heard people say Maya is the easiest to use, but you’ll have to buy it (there are discounts for students I believe) or find some other creative way. Most maxis match creators use Blender, it’s open source and free. Plus I think it’s the only one with Sims4Studio integration (but only for version 2.70 - see release list).
2D editor - to draw the texture, it’s what makes your 3D shape become whatever object you’re making. As free options you have Gimp (to download) or Photopea (you can use it in your browser, it’s similar to Photoshop). of course then you have Photoshop but it requires a subscription or, again, some creativity. Depending on your 2D editor of choice you might have to download a plug-in to allow saving in .dds (it’s a file format that saves the transparency of an image as a separate channel: the “alpha” channel, as opposed to the RGB channels which contain the color information). You can definitely live without but it can be very convenient AND it allows you to fix some problems you may have with pixelation/discoloration.
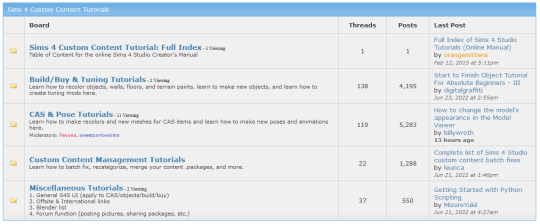
Getting to the tutorials: we are actually very lucky because the community has been very active writing any sort of documentation and you can find anything just with a quick web search. The Sims4Studio forum has a section dedicated to tutorials, as you can see in the screen capture below. Some threads also have a beginning-to-end full-process step-by-step description of how to make certain items.
But really, a simple browser search such as “sims 4 cc tutorial whateveryouwanttomake” goes a long way :) I hope I answered your questions, I wish you well on your adventure 🧡
71 notes
·
View notes
Note
How do you make your meshes and textures? Do you create them from scratch or idk, modify existing ones? Your creations are so original, detailed and honestly, look far better than what EA has to offer.
I'm asking because I was thinking about learning how to make cc food and I found the tutorials about tuning, hashes, etc., but I have no knowledge about meshing and textures of food. Could you share some knowledge or recommend other sources? Is it very different from clothes?
And the last point, have you received any info on the EA creator program (the one that used to be called game changers haha)? If still not, I'm keeping fingers crossed! 🤞🤞🤞 Hope they have some decency to at least notify you if it's not successful and not just leave you guessing forever... 😒
Hi!
I start with ea meshes but then modify them, sometimes to the point its basically a new mesh but it can be easier to use ea items to find out how you want the mesh to look.
I suppose it's different than clothes.. to me it seems a bit easier than clothes as there isn't so many moving parts to accommodate for but I guess it depends on how detailed the mesh will be. There is however, all the different serving sizes so a simple food can turn into a bigger task quite easily.
Beginner's Guide to Blender : 13 Steps - Instructables this is a really helpful guide as it goes over the basics!
And no 😔 I haven't heard anything yet.. still pending. I guess that's a good thing unless they have been overwhelmed and just stopped answering people.. which I feel is highly possible 😅
Good luck with making food! I hope you've found a new hobby 😊💛
27 notes
·
View notes
Text
Idk who actually reads these, but I figure it may be a good reference to somebody at some point 🤷♀️ My process reblog as promised:
Very early on in my costume design for the haunted house, I decided I wanted all of the characters to wear masks. Since I was working with a very limited budget, I figured it was an easy way to make all of the characters look unsettling, while also making them all somewhat cohesive as a group. In my head, these masks represented how "lost" each of the characters were in the woods. The more lost they were, the less human they became, and the mask would change to reflect that. I kind of imagined that each character was once a lost human or soul and slowly became corrupted by the forest, at which point they would be given a mask--made from they very trees they were trapped within--to live out the rest of their lives as the role they were given. Did any of this make it into the writing or story? Not really 😅. But it helped to give me some direction with the look of each character. Problem was, I've never made anything like this before 🤷♀️
As with most things I've never tried, I started on YouTube. I had heard of foam clay after seeing cosplayers use it for costume armor and helmets and such, and figured that seemed like a good material to start with. After searching for 'foam clay tutorial' on YouTube, I watched this video by Kamui Cosplay. I mostly followed the steps they laid out, with a few changes here and there for cost and skill level.
First, I gathered up my paper patterns--as previously mentioned, I got three off of etsy, and the last two were made by a friend with blender, and turned into a paper pattern using Pepakura.
I printed them out on cardstock (100 lb weight), then folded and glued them. I used these paper versions to check the fit on the actors. The bat and fish masks had to be made more than once at different scales for a better fit.
I took the final paper versions and divided them in a way that probably only makes sense to me, making sure to add registration marks that would help me to put them back together later. These were then transferred to foam and glued together with contact cement. The stuff has potent fumes, so be sure to do it near a window and wear a respirator!


I then waited 24 hours for the glue to set, and covered the fronts in foam clay to smooth the features and give them a more organic look. The foam clay expands as it dries, so some of the masks lost a lot of the definition I had sculpted originally. This was especially the case for the multi-faced mask:

You'll notice that the furrowed brow and nose in the final version is missing a lot of the details that were in the above pic, which I took while the foam clay was still wet.
Once the foam clay had dried after 24 hours, I used a heat gun to 'seal' the foam. Idk how necessary it was, but that's what the tutorial said to do, so that's what I did! The heat gun was also useful for re-shaping the things that warped as they dried. Instead of plastidip, like most websites suggest, I just primed the mask with three coats of mod-podge. This added some needed strength and a better surface to paint on top of.
After that was dry, I did three coats of the lighter base color. I then did one pass of the darker "grain" color, using a fan brush like this:
I found that dipping just the tip of the bristles in the paint caused some hairs to clump together, making stripes of different widths when I painted. The friend I mentioned who knew how to use blender also kindly made me references to follow 🙏 This made it much easier to see how the wood grain would fall on a 3D figure!
After one final coat of mod podge, they were all done!
It really helped getting to know other people in the theater world because they were very generous with their time and materials 😭 I was given the contact cement and eva foam that I used, and I would have never been able to get it all done within the budget without so much generosity!!! It blows my mind how kind and willing to help people can be. Makes me want to pay it forward 🥲

Foam masks I made and painted to look wood-carved!
Three of the original paper patterns are from etsy:
The Raven
The Fish
The Bat
The last two patterns were made by a very talented friend who knows how to use blender!
#my process#my post#mask#halloween#bat#raven#fish#masquerade mask#unsettling smile#crafters of tumblr#craftblr#costume design#leave only footprints#eva foam#foam clay#cosplay techniques
72 notes
·
View notes
Note
Hello, I'm a fool who knows nothing about computers with a couple questions. For reference, I'm on Windows, for no reason other than I prefer it. I want to make a video game, a very very large video game. I'd be making it out of the love of my heart and for people to play, and not for any other reason. It would be a third-person 3D game. Now, I've heard that RollerCoaster Tycoon 1 was built in Assembly, and is thusly able to run just about anywhere, though I don't know the truth of that. 1/2

Hey yeah tl;dr you should Not try and make your game in assembly, especially as a beginner. Your best bet is to learn a modern game engine and start with that. Especially nowadays if you can get your head around Unity or Godot or any other similar game engine making a 3D game is, while not ~easy~, much easier than it ever was in the past when you would have had to roll your own engine from scratch.
The guy who made Heat Signature and Gunpoint recently started a tutorial series for “Make a game in Unity with no experience.” which may interest you. From there you’ll want to learn how to design 3D objects in something like Blender or Wings3D so that you can build your world and texture it.
I’d recommend starting small, Big Game Projects are ambitious but you’ll want to put out a few small things first, something like a game where you walk around, say, A Single Building with a garden and talk to NPC’s in the building, maybe have a combat system, etc. to really get the hang of your tools before attempting a project where it won’t seem like anything works for potentially weeks of work.
I have tons of little dead-end projects that were dedicated to figuring out simple things like “How do I create randomly generated terrain” or “How do I make Gun.” There’s plenty of YouTube tutorials basically dedicated to stuff like this, Sebastian Lagues’ Coding Adventures are basically all videos dedicated to exploring how to create common interesting things in Unity that you might want to use in a game like random terrain, portals, weird gravity etc.
You’ll have to pick up A Language but it’s honestly not that hard. One thing you will want to do if you’re doing game design is brush up on your high school trigonometry because a truly ridiculous amount of the maths you will do in the process of making a game is just finding relationships between angles and coordinates in space.
Rolling your own engine is a good learning experience if you’re interested in how to write optimized code, designing a scripting language, and writing really wacky dynamic code, but if you just want to Make A Game for your friends to play then it’s a waste of time.
The long explanation for this is:
Assembly is a very powerful but extremely specific tool that’s only useful in the modern day in a very specific handful of situations.
The lowest level of programming that you can do (more or less there are some lower levels that don’t count) is Machine Code programming, which is where you write the binary instructions to a program out by hand. This can be done and is indeed how we used to do it in Ye Olden Times but even in Ye Olden Times programmers quickly got bored of this and invented Assembly.
Assembly is a very simple mapping from raw binary code to a somewhat human readable system. Talking about what that binary code looks like without a firm grounding in processor basics is hard but needless to say that binary generally represents something like Operation, Data1, Data2, Data3, for example you might have a set of codes that correspond to Add A, B, C where that adds A to B and stores it in the address at location C. That instruction in binary will be like 0110 0001 0010 1001, but that’s a pain in the dick to write so you write a simple program that can read in you writing “ADD A B C” and convert it to the right binary code.
In contrast to more high level languages, the mapping between assembly and machine code is pretty direct, usually 1 to 1 or almost 1 to 1. You can’t really do an “if X is true then do A” in assembly, instead you have to do “Compare X to True, check if the True flag was set, if so then jump to the location in memory containing A.”
This has some advantages, like, if you’re very familiar with the processor you’re using and where you’re storing everything in memory, you can skip certain steps you know you don’t need and dramatically speed up your software. Old games, especially for games consoles like the GameBoy and PlayStation, would be partially or wholly written in Assembly so that they ran fast on very limited hardware (the original PlayStation had a stunning 2MB of system RAM) . There’s lots of programming libraries for doing extremely fast maths written partially in Assembly for this very reason.
The DISADVANTAGE is that you have to be really good to write faster code than a quality optimizing compiler. Even fairly barebones languages like C have a lot of creature comforts that make programming nicer, faster and more readable, such as having language constructs to create loops, systems to help you create structures in memory, etc., and once you put that code through a modern compiler it will add in its own very smart optimizations that can make even fairly amateurish code run extremely quickly.
in Assembly you have to do all of that by hand, and doing so requires tracking a lot of things manually. It’s not something for the faint of heart and building a modern game entirely in assembly is something you wouldn’t really do if you could avoid it.
That’s not to say it can’t be done. Since ultimately all programs boil down to machine code, there’s nothing stopping you from making a full 3D game in assembly. Rollercoaster Tycoon is almost all assembly, as you said. Indeed plenty of old 3D games are written partially or mostly in assembly for performance reasons, and if you use a game engine like Unity, some chunks of the engine will be written in Assembly for speed. Especially when it comes to things like realtime physics or very fast AI and the like.
On modern computers for even fairly complex games, the performance of well-optimized compiled code in a normal language is plenty for most games. The benefit of using Unity is that you can leave the heavily optimized engine stuff to a team of skilled programmers who’ve been writing game engines for years and you can deal with the unique things that you need to make your game happen. If you were to start writing a game in Assembly you’d first have to design your own engine, probably write your own scripting system, etc. which would require a robust basis in programming language design, parser design, and a firm view of what you want to create. Tooling around in Unity experimenting with things as you go is much easier.
Learning Assembly and getting good at it is a valuable skill if you want to write crazy optimal code and get a robust understanding of how the internals of a computer work (although not actually but I’m not going to talk more about microcode beyond linking this video lecture) and fi all you want to do is make Video Game your best bet is to learn Unity because it’s what everyone is using.
Pitches for other engines I like but that might not be for everyone:
Godot: Basically a fully open source baby unity that is a little easier to use but a lot less powerful and with a much smaller community, I really like it for experimenting
LÖVE2D: Not a 3D engine, but a really minimal 2D game engine that uses Lua for scripting. It is extremely bare bones but gives you a lot of room to program all behaviours yourself if you feel like making extremely fast demos, I mostly use it to write graphical simulations.
LÖVR: A 3D game engine heavily inspired by LÖVE with a focus on VR game design, shares the same bare-bones, lua-scripted design that makes it very suitable for quickly throwing demos and experiments together but less suitable for large projects unless you pull in some libraries.
10 notes
·
View notes
Text
Boyfriends & Beauty Vlogs - Tom Holland/Reader
Summary: Reader is a professional Hollywood makeup artist who also has her own popular YouTube beauty vlogging channel. She has been dating Tom Holland for about 8 months in secret when they decide to make their relationship public by participating in the ‘I do my boyfriend’s makeup’ tag.
Warnings: None? I’m pretty sure this is G-rated, or at least PG. There might be like 1 swear word and an innuendo towards the end that you can take it as you like.
Word Count: 3,397 according to my Google Doc.
Author’s Note: This was partially inspired by an ask I saw on another Tumblr, but I can’t find the original ask so I’ll paraphrase: Basically Peter P. watches the reader put on makeup and tells her that she’s beautiful even without it (I think.) Combine that with my current obsession with makeup tutorials on YouTube (which is hilarious since I don’t wear much makeup AT ALL) and you’ve got this glorious piece of trash fic. This is likely going to wind up being a series as I discover more tags for the Reader to do (or even have Tom & Reader answering the YouTube comments on the video they’re filming in this fic).
(PS: I purposely didn’t use any brand names for any products that the Reader uses, although it’s very common for beauty vloggers to tell their audience what product they’re using.)
Cross-Posted on AO3.
Y/N Y/L/N adjusted one of the lights in her beauty room as she was getting ready to film the latest video for her YouTube channel. “We good?” she asked her friend/assistant Carmen, who was adjusting the camera. “Everything looks great,” Carmen replied.
“Are you ready?” Y/N said off-camera to her boyfriend of 8 months.
“Absolutely,” he replied.
“Ok then, I’ll go through my initial welcome then I’ll call you into frame,” she explained. “Are you sure you’re ready to do this?”
Her boyfriend nodded. “If you’re comfortable with it, so am I.”
“Ok, let’s go.”
Carmen hit the record button and the red light lit up on the front of Y/N’s camera.
Y/N beamed at the camera. “Hi, everyone, welcome back to my channel! Hope everyone is doing well and enjoyed my last video. As I said last time and as you can probably tell from this video’s title, I have a special surprise for you. I’ve mentioned my boyfriend several times on this channel but he’s never made an appearance nor have I ever even mentioned him by name. Well, there was a reason for that, but he & I have talked about it and since a lot of you have been asking about who my ‘mysterious boyfriend’ is he’ll be joining me today for the 'I do my boyfriend’s makeup’ tag.”
She looked off camera. “You want to join me, honey?”
Her boyfriend walked into frame, just his torso showing since the camera was angled down to where Y/N was sitting.
“Well, have a seat, you goof!” Y/N laughed as her boyfriend sat down. He leaned over towards Y/N and gave her a kiss on the cheek. “Hello, love.”
Y/N took a deep breath. “Everyone, this is my boyfriend, Tom Holland.”
Tom looked at the camera and gave an adorably awkward wave. “Hi, everyone.”
Y/N looked over at Tom. “So, thanks for joining me today, babe.”
“It’s no problem, love,” Tom replied.
“Normally this is where I’d ask if you’d ever worn makeup before, but I don’t need to since I’ve been your makeup artist before and therefore already know the answer to that one,” Y/N teased.
“Yes, but you never used a lot of stuff on me, right?” Tom replied. “I only recall some sort of powder.”
Y/N nodded. “Well today we’re going to do a full face - eyes, lips, everything. You ready?”
Tom nodded.
“Ok, so this is primer.” Y/N held up a small bottle. “I’m going to put a little bit on my fingers and I’m going to rub it all over your face and neck. It’ll moisturize you so the rest of the makeup doesn’t dry and crack.” She squirted a pump of the liquid onto her fingers and rubbed them together. “Here we go.”
She smoothed the primer onto Tom’s face, turning his head gently to get both sides of his neck.
“This feels really nice,” Tom remarked.
Y/N laughed. “I know you’ve used moisturizer in your skincare routine.”
Tom shrugged. “Yeah, but I’ve never had my beautiful girlfriend be the one applying it to my face before.” He shot a cheeky wink towards the camera.
Y/N shook her head. “You flirt.”
Tom grinned. “You love it.”
“Anyway,” Y/N said jokingly, “the next step is foundation. I think I managed to match some foundation that I already had on hand to your skin tone, although I didn’t actually swatch it on you so we’ll have to cross our fingers and see if it works. I did grab a few other shades just in case.”
She pumped a dollop onto the back of her hand. “Let’s see…” She dipped her finger into the foundation and swiped a tiny bit onto Tom’s face. “Huh, ok, wait, that might actually work.” She held up an oval-looking sponge, one end flattened and the other rounded into a tip. “You know what this is?”
“Some sort of makeup tool?” Tom guessed.
Y/N laughed. “Technically, you’re right. This is called a beauty blender. I’m going to take the beauty blender and dip this pointy end into the foundation and dot it all over your face, then I’m going to use the other side to buff it into your skin.”
“Ok.” Tom leaned in a bit.
Y/N pumped a bit more foundation onto the back of her hand and began to dot the foundation onto Tom’s face. “Ok, so I know everyone is going to have questions, so leave a comment down below and we’ll try to answer as many as we can in another video. I know the biggest question everyone’s going to want to know is how exactly we met and/or got together. Well, as some of you already know, I was hired as a makeup artist on Avengers: Endgame and Spider-Man: Far from Home, which meant I did Zendaya’s makeup for FFH. I did Tom’s too for both films, but since he wasn’t on set a whole lot for Endgame we didn’t interact much and since he’s so naturally pretty all he needed on FFH was setting powder so he wouldn’t be shiny in front of the cameras.”
“Aww, thanks love,” Tom interrupted. “You’re naturally pretty too.”
Y/N grinned. “Thanks, babe. So anyway, Z and I became friends during the FFH shoot so while we were in London she invited me to go out to dinner with her, Tom, and Jacob. Tom and I sat next to each other at dinner and afterwards he said he wanted to buy his mom some new moisturizer for her birthday so would I mind helping him pick something out while we were in London since I’m a professional makeup artist. So we exchanged numbers and a couple of days later he texted me asking if I could go shopping with him. Little did I know that it was just a ruse.”
“Hey, I had to get your number somehow!” Tom protested. “I didn’t really feel like I had a chance to get to know you enough during Endgame to ask you for it and Z wouldn’t just give it to me – she said I had to work for it!”
Y/N laughed. “And you did. You suffered through 2 hours in a bougie skincare store in order to find your mother some skin cream for her birthday.”
"Totally worth it,” Tom said with conviction.
Y/N couldn’t help the smile that spread across her face. “So then Tom offered to take me out to dinner at some fancy London restaurant as a 'thank-you’.” She stopped to include the air quotes.
Tom turned slightly toward the camera so he could chime in. “Yeah, I planned to take Y/N to one of the nicest restaurants in London, right, thinking I was going to impress her, but when we get there it turns out the place was closed because 3 people had gotten food poisoning the night before.”
Y/N finished blending in the foundation. “Ok, wait a sec, babe. Next step is concealer.” She held up the tube. “I’m going to swipe this under your eyes, on your chin, and on the bridge of your nose, then I’m going to use the same beauty blender to smooth it out.”
“Wait, so it’s foundation, then concealer?” Tom asked. “Wouldn’t you want to conceal first?”
“You would think, but this is how it goes,” Y/N replied. “You’re correcting what the foundation didn’t cover.”
“Oh, well that does make sense.”
“Ok, just stay still for a sec, but you can continue talking.”
“So anyway, the fancy restaurant is closed, so Y/N suggests this fish-and-chips spot we had passed on the way there. We get in there and place our orders, start talking, pause to get our food, and the next thing we know the place is closing.”
Y/N finished blending in Tom’s concealer. “We had literally sat there and talked for 4 hours,” she added. She set the beauty blender down and picked up a brush and another container. “Ok, next step is setting powder. This is what I used on you on set.”
She tapped out a bit of powder, dipped her brush in it, and tapped off the excess before brushing a light coat all over Tom’s face. “So yeah, we sat there and talked for like 4 hours, then Tom walked me back to my hotel.”
“I was so nervous because I wanted to ask you out for real, but I didn’t know how to tell you that my mum’s birthday had actually just passed.”
Y/N laughed. “You heard that right. Tom’s mom’s birthday had actually been the week before and Tom didn’t really need a gift.” She leaned back to take a look at Tom’s face. “Ok, next step is bronzer followed by contour, then highlighter. You don’t really need bronzer so we’re going to skip that, so we’re just going to take this brush here, tap into our contouring palette, and brush a little here on your cheeks, across the forehead, and then take this fan brush and go down either side of your nose.” She followed through as she explained. "You know what, we can skip the highlighter too. We’re just going to do a tiny bit of blush instead.“ She grabbed her blush palette. "Yeah, we’ll go with this one.” She dipped a blush brush against the palette, tapped off the excess, and swiped a bit on the apples of Tom’s cheeks. “Perfect.”
She set her brush and palette down. “Okay, we are going to lock this all in with some setting spray, but before we move on to the eyes we’re going to take a little break, so let’s go ahead and get this set.”
Y/N picked up her can of setting spray and said, “I’m just going to spritz this on your face. You might want to close your eyes real quick.”
Tom did as instructed and Y/N gave his face a quick spritz. “All done,” she declared. “So again, next is eyes but before that we’re going to take a quick break and will be back soon!”
“And we’re out,” Carmen said as she cut the camera off. “I’ll be right back.”
“So, how do you feel?” Y/N asked Tom.
“Surprisingly light,” Tom replied. “It doesn’t feel like there’s much on.”
“Good, that’s how a good makeup job is supposed to feel.” Y/N stood and stretched. “You want something to drink? I have bottled water in the fridge over there in the corner.”
“Yeah, that would be lovely. It’s a bit warm under those lights.”
Y/N grabbed Tom a bottle of water and sat back down next to him.
“Thanks again for doing this with me,” Y/N said, giving him a quick peck on the lips. “Maybe eventually we can try out some of the other tags.”
“Like what?” Tom replied.
“Well, they’re mostly variations of this one - like you’d do my makeup, or I’d do Harrison’s makeup, or one of your brothers.”
Tom nodded. “Yeah, alright. I probably could talk one of them into participating since they all adore you. Sam was right pissed that he couldn’t fly out here for this trip. He said he wanted to see me 'looking all pretty’.”
Y/N laughed. “We’ll get him out here eventually.” She checked the time on her phone as Carmen walked back into the room. “Ok, ready to get back to it?”
“Sure. What all is left?”
“Eyes, so eyeliner – well, we’ll attempt that, at least– shadow, mascara, and a lot of people do false lashes but I don’t because they make me look like fuzzy caterpillars are resting on my face, so we’ll skip that. Then lips and some more setting spray and we’ll be done.”
“Angles are still good,” Carmen stepped behind the camera and checked the viewfinder. “You guys ready?”
Y/N sat up a bit straighter and nodded.
“Ok then, 3, 2, 1.” Carmen hit the record button and the light lit up once again.
“Ok, we are back from a quick break, so now we’re going to move on to eyes.” Y/N picked up an eye pencil. “We’re going to try eyeliner, but if your eyes water too bad we’re going to have to skip it.”
She took a deep breath. “Ok, babe, close your eyes and stay still so I don’t accidentally poke you.”
Tom sat stock-still while Y/N lined his upper lids.
“Ok, now I’m going to attempt to do your waterline.”
Tom looked puzzled. “My what?”
“Your waterline,” Y/N repeated. “You know, where your tear ducts are.” She smirked. “You trust me?”
Tom began to look mildly terrified, but nodded.
“If you’re uncomfortable or your eyes start watering we’ll stop, I promise,” Y/N reassured Tom. “Now, get as close to me as possible.”
Tom scooted forwards on his stool.
“Here we go. Now, keep your eyes open and look up for me.”
Y/N managed to get the eyeliner on Tom without too much trouble. She checked his eyes out. “Well, damn. That’s not too bad.”
She sat back. “Ok, the rest of this is easy.”
She picked up another brush and her eyeshadow palette. “We’re just going to get a nice smoky eye going here, so we’re going to dip into this gray color here and get that all over the lower lid.” She pursed her lips as she worked. “Anyway, babe, we were talking about how you walked me back to the hotel after we had fish and chips in London.”
“Oh, right,” Tom replied. “Yeah, so I walked you up to your hotel room and was trying to figure out how to ask you out for real.”
Y/N grinned. “You’re so cute when you’re nervous.” She dipped her brush into a deep purple eyeshadow and continued working on Tom’s upper lid.
“So we’re standing there,” Tom continued, “and Y/N says that she’d see me Monday on set then she goes, 'tell your mom happy birthday for me… you know, when it comes around next September’ before winking at me and going into her room.”
Y/N laughed. “I had been interested in you for a while and Z knew that, so when I mentioned to her that you had asked me to go birthday gift shopping with you for your mom she called you an 'idiot child’ and told me that you were interested in me and had been asking her for my number, then said that Nikki’s birthday was actually the week prior. I just couldn’t figure out a way to tell you that I knew what you were up to without embarrassing you.”
“Well I did feel like an idiot for a second since I was basically busted, but then my phone chimed with a text.” Tom smiled at the memory.
“I just couldn’t leave him hanging,” Y/N explained as she started on Tom’s other eye. “So I texted him immediately telling him that I had a really great time and asking if he’d like to do something the next day.”
Tom chuckled. “I immediately said yes, of course, so we quickly planned to go for coffee and to an aquarium. Since it was early and a Sunday the aquarium wasn’t very busy, so we had a lot of time to ourselves. When we got to the dolphin tank, Y/N turned towards me and said something about the dolphins, but I was too busy looking at her to catch it. It seemed like the perfect opportunity to make a move, so I took her hand, leaned in, and kissed her, and the rest is history.”
Y/N’s eyes crinkled up at the corners. “Best first kiss of my life,” she said. “Now, mascara. Try not to blink, ok?”
She swiped mascara on both of Tom’s upper eyelashes and carefully applied it to his bottom lashes.
“Last step – well, second-to-last, really – lips. I’ve chosen this really pretty plum color for you, so we’re just going to kind of line your lips here with a deeper color…” She trailed off as she lined Tom’s lips, making sure to slightly over- line his top lip to make it seem fuller. “And we’re going to fill in with the plum.”
She scrutinized her work. “Let’s see…” She dabbed a little bit more lip gloss to the corner of Tom’s lips. “Ok, done. Just another spritz of setting spray and you’re done! Close your eyes.”
Tom held still while Y/N set his makeup. “You ready to see what you look like?” she asked.
Tom laughed. “I’m kind of nervous but then again I trust you, so… yes?”
Y/N picked up a hand-held mirror and gave it to him reflective side out. “Ok on the count of three, flip it around and check yourself out. 1, 2… 3!”
Tom flipped the mirror over and his jaw dropped. He lowered the mirror and showed his shocked expression to the camera. “Damn, love, I look good.” He raised the mirror once again and checked himself out. “It hardly looks like I’m wearing makeup at all except for the lipstick.”
Y/N laughed. “ Well, yeah, we were going for a full beauty look, not drag makeup.”
Tom looked over at her. “Can I kiss you with this stuff on my face?”
Y/N grinned. “Yeah, it’s set so it shouldn’t smudge.”
Tom leaned over and gave her a tender but chaste kiss. “This looks amazing. If I ever have to wear makeup for a role I’m bringing you as my personal stylist.”
Y/N laughed again and turned back to the camera. “Well there you have it. Thanks so much again to Tom for being such a good sport and for letting me use him as my canvas, thanks to you for watching, and again, I know you guys will have questions, so leave us a comment down below and we’ll do our best to answer them in a later video. And always remember: Bring your inner beauty out. Bye, guys.”
“Bye,” Tom echoed.
“Annnd, cut.” Carmen stopped recording and closed the viewfinder on the camera before checking the time. “Ooh. I’ve got to run – gotta pick Simon up from daycare since my husband’s working late.”
Y/N nodded. “Don’t worry, we got this. Thanks so much for helping out this afternoon. I’ll see you later!”
Tom checked himself out in the mirror again as Carmen left. “This really looks fantastic. Can we get a few pictures so I can post them on Insta after the video is released?”
“Absolutely, babe.”
Tom pulled out his phone and took a few selfies, then took some more shots of him & Y/N together. Tom texted Harrison one of the photos and laughed when he got a response.
“What?” Y/N asked.
“Haz said that the makeup is a vast improvement on me and that we make a very pretty couple,” Tom said.
Y/N smirked. “Tell Haz I’m willing to pretty him up for my audience too. Just say the word.” She bit her lip. “So the world is going to know we’re together in a few days’ time. I know I keep asking but you’re absolutely sure you’re ready to go public with our relationship? I know how much you value your privacy. Don’t feel like you have to do this for my benefit.”
“To be honest, I’ve been wanting to shout it from the rooftops,” Tom replied. “You have no idea how many times I’ve almost talked about you in an interview. You’re beautiful, talented, brilliant, and best of all, mine. Now I’ll be able to talk about my incredible professional Hollywood makeup artist girlfriend all the time.”
“Aww, honey, you’re too sweet.” Y/N gave Tom a long, slow kiss.
Tom stood. “Now, let’s get all this put away so we can go see just how 'long-lasting’ this makeup is.”
*************************3 days later***********************
Tom sat next to Y/N as she finished checking the settings on her latest video. Y/N added one more tag and sat back. “Ok, it’s done loading. Ready?”
Tom put his hand over hers on the mouse. “On the count of three. One, two…. three.”
And together, they clicked the 'publish’ button and revealed their relationship to the world.
#tom holland fanfiction#tom holland fanfic#tom holland x reader#avengers fanfic#avengers fanfiction#tcmf writes#my writing
70 notes
·
View notes
Link
0 notes
Text
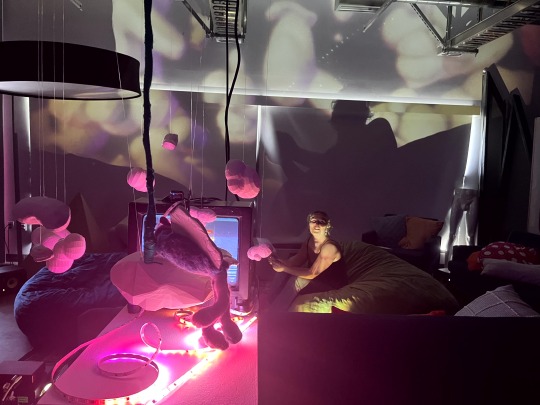
Open Studios interactive project
UCSC DANM grad school winter 2023 - week 9-10
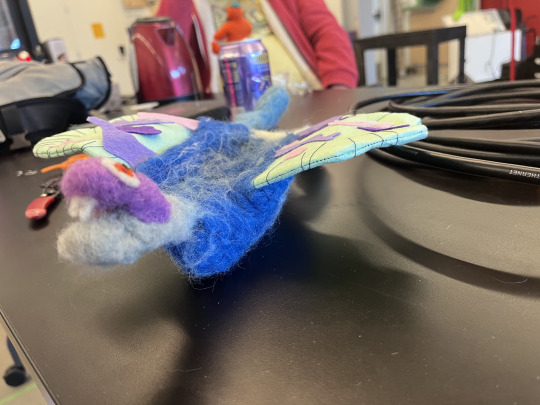
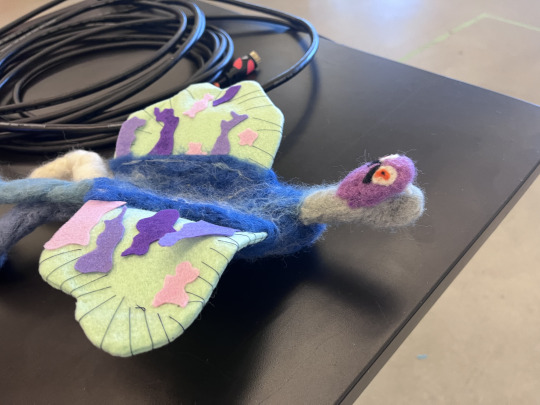
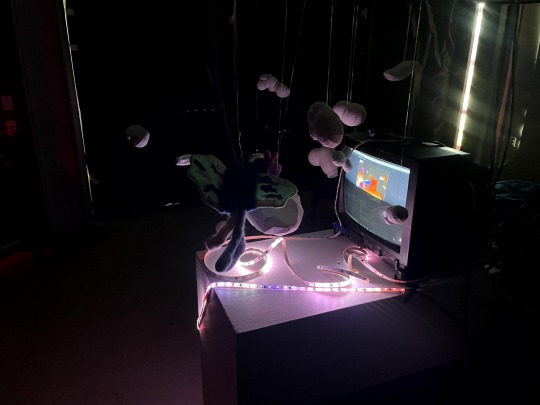
The final prompt for my interactive art class involved a skill share. From one other student I learned how to use a RFID reader with a raspberry pi. From the other I learned how to do needle felting. We each created small figures out of felt and decided to put them in a space together, with different zones that they could interact with. Here’s the felt figure I created.

youtube
This was also the first time I ever sewed anything! I sewed the wings.
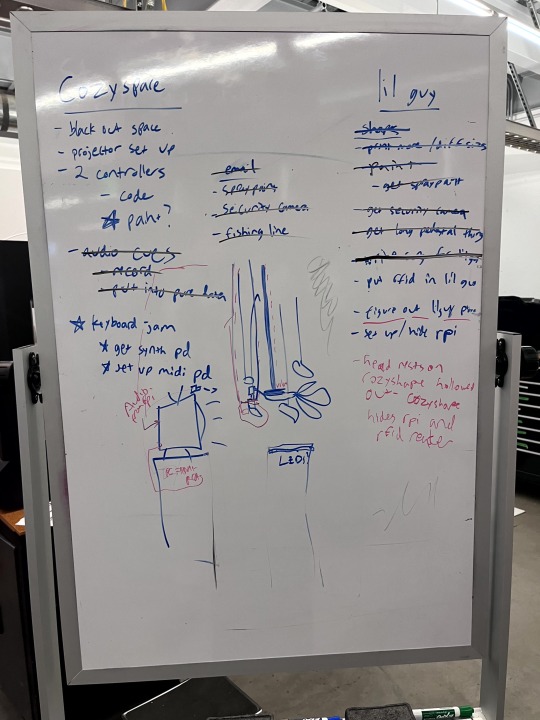
Here’s the brainstorming board the three of us put together to create a weird version of a petting zoo:
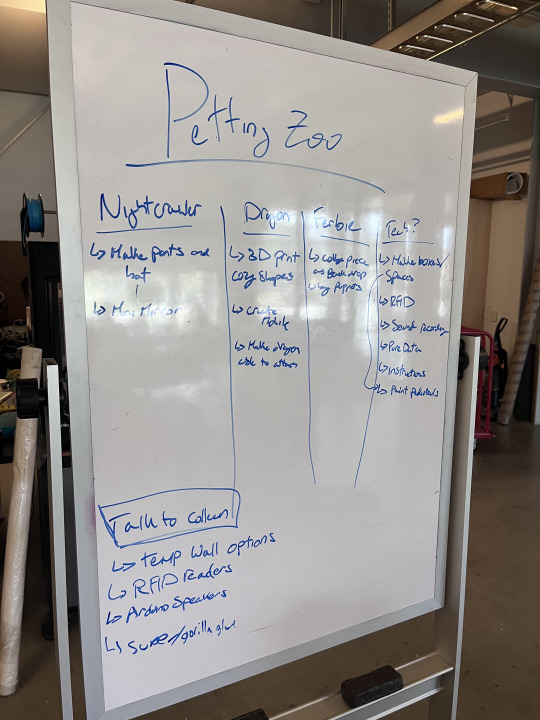
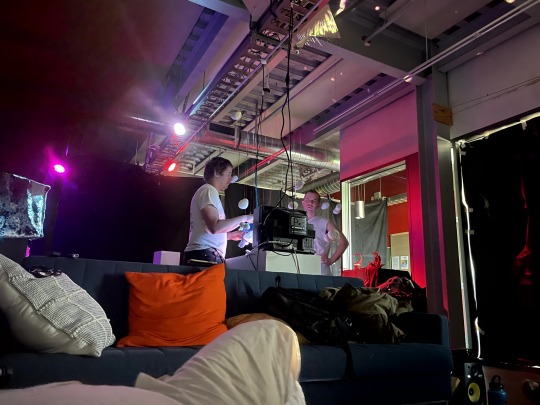
We planned on showing it off at the art department’s open studio (despite the fact that we’re not part of the art department). While we were able to show stuff at the open studios, other projects ended up taking priority and this didn’t come to fruition the way that we had originally planned.
I wanted to make a reference to Nam June Paik’s TV buddhas, but I wanted to make it softer and kind of silly. I crafted a cute TV out of felt and replaced the dragon’s head.
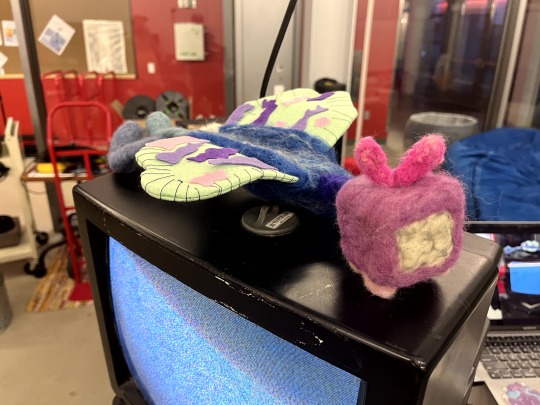
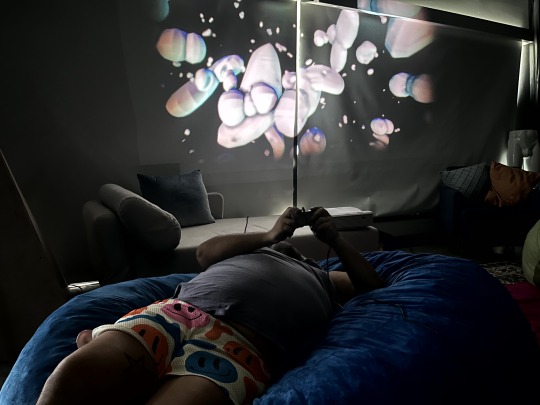
I intended on having the dragon (now a TV dragon) watch himself on a TV while it streamed to Twitch. I wanted to install COZYSPACE as well, near where this was. When you place the TV dragon in the right place, I wanted a little bit of music to play. This idea got a little out of hand, but I managed to set everything up that I planned, and it worked fine.
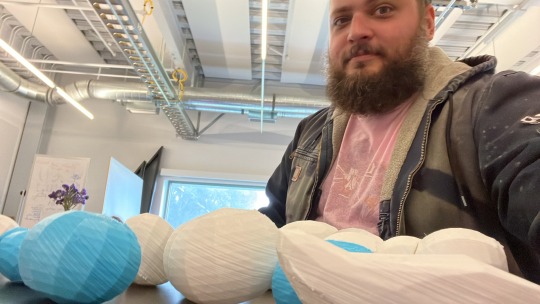
I began 3D printing the shapes in COZYSPACE at various sizes with the intention of hanging them near the TV and the dragon.
I also wanted to have the controllers for COZYSPACE be closer to my original vision of regular Super Nintendo controllers, but wireless. I got a pair and began painting them to make them cuter.
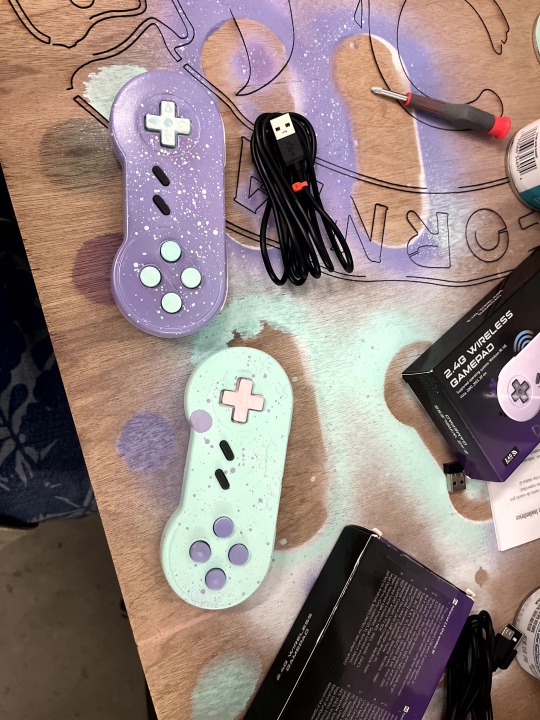
I used regular spraypaint from the hardware store, using the splatter technique I learned from making stuff for BEARPAD. I chose a purple and teal color scheme with pastel accents, as COZYSPACE was originally intended to chill me out personally, and I like that early 90s party cup/taco bell aesthetic. The spray paint took a long time to cure - the controllers were still a little sticky for up to a week after I painted them.
I rigged a raspberry pi and RFID reader to activate when placing a chip on it, combining a couple tutorials online to get it to also play music using the pygame library. I have only minimal python coding experience and it took a bit longer than I anticipated. I was amused that people recommended playing .ogg files for audio, as I haven’t really heard of those being used in over 15 years. I wrote a piece of music really quickly to play when the TV dragon rests on the cozy spot. I made a synth sound, threw a bunch of effects on it, and improvised in g flat major pentatonic using my computer keyboard in ableton.
https://on.soundcloud.com/7ALpC
Patrick designed a new shape that would look good alongside the shapes in COZYSPACE, but was large enough to hold a raspberry pi and an RFID reader. We grabbed a raspberry pi case design from thingaverse and dropped it into Blender to make sure we had the size right, built a chamber for it, then he built a shape out around the chamber. Here’s some pics of it hanging in action.
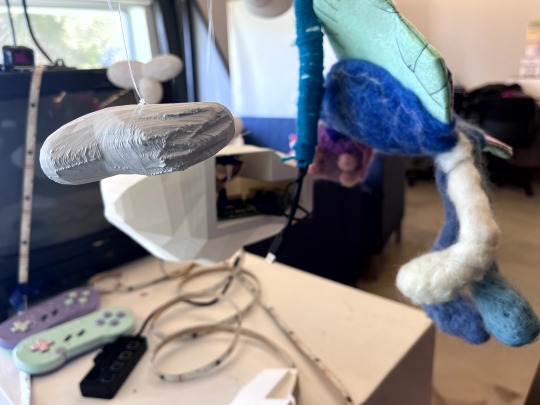
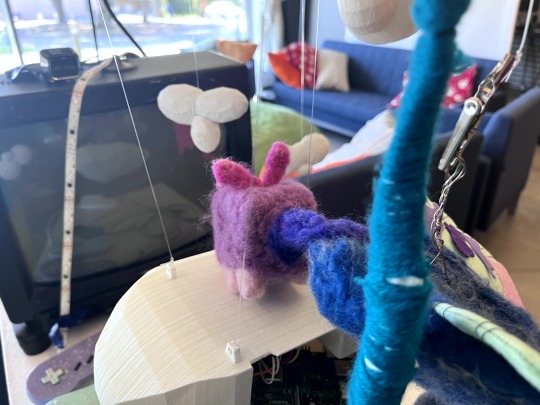
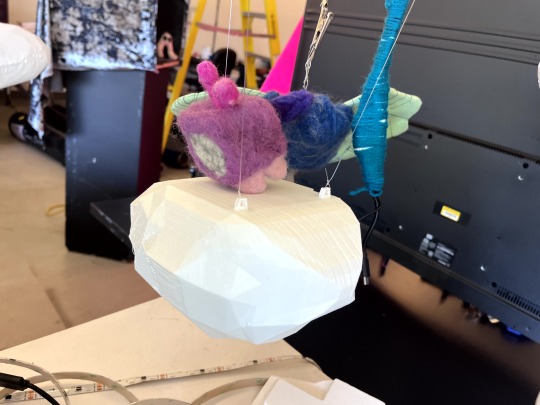
I tried it out streaming on twitch, but it immediately brought up concerns of privacy, so I ditched it and left it on the OBS screen, as though he was about to start streaming on twitch. I felted the RFID sensor inside of the bottom of his head so that his head would activate the sensor. I threaded a wire through him and attached an alligator clip to fishing line from above, so that people could attach it to that and have him rest on the cozy shape, watching himself on the TV. The sensor range was very small, however, making it a little finicky and not the experience I had hoped.
Here’s my todo/sketch board I used for a lot of the install:
I added the LED strips late in the install. There are kits you can buy for ambient lighting that sits behind a flatscreen TV. You plug in your HDMI cable and it takes the video signal and translates some of the colors to the LED strips. I know there are ways to make them with raspberry pis or with arduinos, but i was running out of time and wanted the effect of the colors in the COZYSPACE also changing the color of the 3D printed shapes, so I bought the kit from amazon. It plugged in and worked well enough right away for my purposes. I draped the LEDs a little haphazardly around the install in a way that I thought looked good for my purposes.


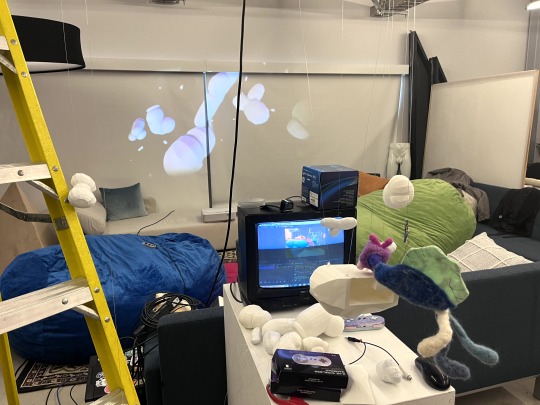

Setting up took MUCH longer than I had anticipated. I spent about 2 and a half days of work just blacking out the space, setting everything up, and hanging the cozy shapes.

I was a little worried I wouldn’t have enough time for everything to get done, but I ended up setting up everything I wanted. I left programming the controllers for last because I didn’t want to spend more time in Unity after not using it for so long. I found a way to address the joystick buttons directly in the code rather than using Unity’s input manager, which was a relief.
I also made some tweaks to the sound of cozyspace. Each of the 4 channels is playing a sub bass frequency that is slightly out of sync with the others, giving the sensation of something moving around in space around people in the center of the installation. I made the frequencies closer, which made the movement feel much much slower. I also made the looping track twice as long, adding some slight movement to the tracks, and reset everything to G flat major.
The actual open studios was a very educational experience, hah. I learned that people need to be told when you can touch the art. I assumed (incorrectly) that bean bags and video game controllers would be enough, but I had to invite people to interact with it. In the future I’ll have signage with my name and info about the work, even for an open studios.
https://youtube.com/shorts/PYVX6z-7OGc
https://youtu.be/XffYEqUQ8qc
https://youtu.be/y0zdaRWFfSc


0 notes
Text
Good Editing Programs For Mac

Adobe Photoshop Elements. Where you can use it: Mac and Windows Why we love it: While not truly a free photo editor, Photoshop Elements does have a free trial, and it’s far and away among the best photo editing software for Mac and Windows.The suite of automated editing tools — including for exposure, color balance, and reducing the effects of camera shake — make short work of the. Apple’s Photos app is included for free on all recently released Macs. It does a good job at organizing your photos, but its collection of photo enhancement tools leaves much to be desired. Hopefully, our selection of the best free programs for photo editing on Mac will help you choose the right app to suit all your creative needs.
iMovie is no longer free for Mac users to edit videos. So you need to look for other free video editing software for Mac (macOS 10.14 Mojave included) as alternative solution. No need to search around the internet, here you can get top 9 free video editors for Mac listed below that are sure to accomplish all your video editing needs. Edit a wide variety of video file formats to make them your own customized movie experience. Add effects, subtitles, music..you name it. When it comes to video editing, your creativity is the limit.
Top 9 Best Mac Video Editing Software You Should Know
#1. Filmora Video Editor (Mac and Windows)
Why settle for a simple and limited video editor when you can have it all? Filmora Video Editor brings all tools into one amazing program that enables video editing, and is also a video converter. Edit video and convert video at will, for virtually all formats available and a huge array of devices.

Whatever you need, Filmora Video Editor for Mac has it! Or, if you're absolutely just looking for a dedicated video editor, we also have the best solution. Try our Filmora Video Editor for Mac! The best video editor for Mac (macOS High Sierra included) in the market.
Supports almost all video, audio and image formats.
Makes amazing movies with 300+ new eye-catching effects.
Allows you to add music to video or crop/trim/merge videos.
Full compatible with macOS 10.6 or later including macOS 10.13 High Sierra, and Windows 10/8/7/XP/Vista.
Step-by-Step Guide on How to Edit Videos on Mac using Filmora Video Editor for Mac
Step 1. Import Video
Open Filmora Video Editor for Mac and click on “Import” button on the home screen. Choose “Import Media Files” and select the video file on your Mac that you want to upload. Alternatively, you can drag and drop the video from your local storage to the program window.
Step 2. Edit Video
To edit the video, you need to drag the video to the timeline on the screen.
To cut the video place the pointers on the position that you want to cut the video and click on Scissor button. Alternatively, you can right-click on the video and click on cut or split the video. You can also delete the part that you have cut.
When you click on “Edit” once you right click on the video, you will get basic editing options appear on a window such as brightness, contrast, saturation as well as audio editing options like volume, pitch and noise removal.
For effects click, on the desired effects like overlay. Choose an overlay and drag it to the video. It will appear on the video once you play it.
Step 3. Save the Edited Video
After editing the video, click on “Export” button and select “Output” format. You can also opt to burn video to DVD, export online or save to a device. For Output option, just choose the output format and then select the destination on your folder and export file.
Editing videos on Mac with Filmora Video Editor for Mac is quite simple and fast. Moreover, this video editor for Mac allows you save and share files in different ways.
#2. Avidemux
Avidemux is an open source video editor for Mac that will make encoding, filtering, and cutting a breeze. In comparison to other video editors for Mac, this video editor for Mac is compatible with different video formats such as DVD, MPEG, AVI, and many more. It also supports some audio formats including WAV, AAC, MP3,among others. If you are a beginner in video editing, there is no need to worry because it's very easy to use and will allow you to edit your video files without experiencing any inconvenience. Like all video editing programs, this tool is easy to install. It can also be downloaded easily. For first time users, there is a detailed tutorial provided. It also comes with advanced features that will provide total convenience for all users. However, for non-tech savvy people, you might find some of its functions confusing. But, with its user-friendly interface, you won't need to study numerous tutorials.
#3. Blender
Blender is a free video editing software for Mac and free 3D rendering program, which features the best list of animation essentials such as modeling, rigging, interface, animation, shading, UV unwrapping, real time 3D game creation, and so on. This also has a pack of high-end interface that is loaded with intrinsic and useful tools. But, like most video editors, this has also pros and cons. When compared to some video editors, this video editor for Mac is a video editor that provides professional 3D quality that is available for free. It has a lot of features and ideals for every 3D enthusiasts, graphic artists, and designers. It is also versatile and lightweight. Unfortunately, beginners might experience difficulties when using this software. But, luckily, there is a manual that can help you make the most of it. Blender is also compatible with various versions of Windows.
#4. Kdenlive
Kdenlive or KDE Non-Linear Video Editor is an open source Mac video editing application. Its package is based on MLT Framework that focuses on easy to use features and flexibility. When compared to other video editors, this supports all formats, which are supported by the FFmpeg including AVI, QuickTime, FlashVideo, WMV, and MPEG. This video editor for Mac also supports 16:9 and 4:3 aspect ratios for NTSC, PAL, and some HD standards including AVCHD and HDV. The videos created with this software can be exported to a Device. Users can also write it on a DVD using its simple menu. Kdenlive is also compatible with Linux. But, make sure to check the compatibility of your system to avoid any issues. Most users like this Mac video editing software. However, others have experienced difficulties in using it because of the complexity of its interface. Nevertheless, the manual is of certain help for any doubts.
#5. JahShaka
JahShaka is one of the Mac video editing tools that aim to become an open source, cross-platform, and free video editing tool. At present, it is in its alpha stage and supports real time effects rendering. It is best for every user who has not yet enough experience using video editors. But, professionals can also rely on this video editing tool. Unfortunately, JahShaka is still lacking some helpful implementations of numerous features including the non-linear editing system. This video editing tool was written with the use of Qt by Troll tech, but the user interface of this software is using the library of OpenGL to make the GUIs. This video editor for Mac is also compatible with Linux and Windows. Nevertheless, this video editing software has some issues. So, before you consider it, see to it that your system is compatible with the program's features to avoid any inconvenience and for you to use it properly.
#6. VideoLan Movie Creator
VideoLan Movie Creator is a video editor for Mac, which is different from VLC Media Player, but they are both developed by VideoLan Organization. The project was developed for playing videos and some media formats. This movie creator is perfect for everyone who wants a program that will provide convenience whenever they are creating movies and videos of high quality. The software is compatible with other operating systems as well. However, there are some issues that were experienced by many users. These issues include sudden crashes of the program. But, overall, VideoLan Movie Creator is a video editor mac that you must try, most particularly if you are just starting to explore movie creation or video editing. The interface of the movie creator is easy to use and simple. So, this just means that there is no need for you to learn more about it as it won't require special skills in order for you to use it.
#7. iMovie
Mac video editing tool that was developed by Apple for iOS devices (including iPod touch, iPad Mini, iPad, and iPhone) and Mac. Originally released in 1999 as an application for Mac OS 8. The third version of iMovie was only released for OS-X, but there are modified versions so users can use it properly. iMovie is best at importing video footage to Mac using the interface of FireWire or through USB. This video editor for Mac also imports photos and video files from hard drives. With this video editing tool, you can edit video clips, add effects or music. There is also included a basic color correction option as well as other video enhancement tools. Transitions like slides and fades are also possible. However, even if iMovie is rich in various features, the effects options are not really very comprehensive, when compared to other editors.
#8. Adobe Premiere Pro
Well, many people heard about Adobe Premiere Pro. This video editor for Mac is a professional Mac video editing software program, which also has Windows version. It is a part of the Adobe Creative Suite for designers and developers. It has both standard and professional features, but you will need some experience to learn working with it. People from all around the work use it because it allows them to perform a lot of actions.
#9. HyperEngine-AV
Our last proposition for you is HyperEngine-AV, another free video editing software for Mac. You can capture, edit, and export audio and video files, and even to create quality DVDs with your movies. It offers you twelve studio quality effects, and you can also add info and credits, titles, or karaoke lyrics. We like it a lot because it comes with editable fonts, colors, styles, and many more.
Related Articles & Tips
January 02, 2020
18 min to read
Most free photo editors available on the App Store are quite basic, offering just a limited number of filters and allowing you to easily and quickly liven up your photos before posting them on social media.
But if you’re an aspiring or professional photographer, you probably need a more powerful app with a broader set of tools to use your creativity to the fullest. Besides, you probably use your Mac for photo editing because working on a large screen makes it possible to adjust the slightest details.
1. Apple’s Photos (Built-in app)
Apple’s Photos app is included for free on all recently released Macs. It does a good job at organizing your photos, but its collection of photo enhancement tools leaves much to be desired. Hopefully, our selection of the best free programs for photo editing on Mac will help you choose the right app to suit all your creative needs.
2. Luminar (7 days trial)
Luminar is another full-featured photo editor that’s popular with both Mac and Windows users. It can work as a standalone app as well as a plugin for such popular programs as Apple Photos.
Luminar uses Artificial Intelligence to enable sophisticated yet quick photo enhancements. Among these AI features are Sky Enhancer, which adds more depth and detail to the sky in your photos while leaving other areas untouched; Accent AI, which analyzes a photo and automatically applies the best combination of different effects to enhance your image; and Sun Rays, which allows you to place an artificial sun and adjust the lighting to your liking or make the sun rays already in your photo look even more incredible.
Luminar has over 60 filters you can apply to your photos to enhance them in a moment. Luminar also provides a set of powerful tools for cropping, transforming, cloning, erasing, and stamping, along with layers, brushes, and many more incredible features. Luminar supports the Touch Bar on the latest MacBook Pro, making photo editing even more effortless and pleasing.
3. Photolemur 3 (Free Version with watermark)
Photolemur is a relative newcomer on the photo editing market but it has all the chances to win the favor of beginner photographers and hobbyists. Running on Artificial Intelligence, Photolemur is a completely automatic photo enhancer, meaning that it does all the editing for you in no time. It has the simplest interface, with only a few buttons and sliders to adjust the enhancement to your liking and view the before and after results.
All you need to do is choose a photo (or a few) that you want to improve, drag and drop or import them using the Import button, and let the program make enhancements. After it’s done, you can compare the edited version with the original image by using the before–after slider and, if you want, adjust the skin tone or even enlarge the eyes using additional sliders. Pretty easy, huh?
Photolemur also offers a number of impressive styles to touch up your photos and give them a sophisticated and professional look. With this app, you don’t need to stuff your head with photo editing nuances and terms. Just run Photolemur and watch the magic happen!
4. Aurora HDR (14 days trial)
As you probably can tell from the name, Aurora HDR is designed to help photographers enhance their HDR photos, making them even more detailed and beautiful. It’s an ideal tool for editing your photos, with an extensive collection of more than 20 tools including details, tone, mapping, color, glow, and vignette. Each tool has its unique selection of controls to adjust its effects.
Good Picture Editing Programs For Mac

Aurora HDR enables you to work with brushes, layers, and masks, and provides a number of automatic AI tools for recognizing and removing noise, enhancing colors, lighting, and details, improving clarity, and adding contrast to dull areas while leaving other areas untouched.
Aurora HDR does a great job dealing with difficult lighting situations and creating full-of-life images while being easy to use.
5. Pixelmator (Trial 30 Days)
Pixelmator is a photo enhancer beloved by many Mac users, as it offers a good combination of a modern and simple interface, the ability to work on multiple layers, and powerful features that take photo editing to a whole new level. With so many editing tools, brushes, and effects, you can enhance your photos to your liking. You can choose between two versions of Pixelmator – standard and pro – depending on your needs. The standard version is great for basic photo editing with its selection of essential tools and filters, while the pro version is packed with extra brushes, tools, and effects that let you push your creativity to new boundaries. You can decide which version is suitable for you according to what features you’re looking for in a photo editing app.
6. Adobe Photoshop Elements 2020 (Trial link)
Photoshop Elements isn’t as affordable as other photo enhancers for beginner photographers. But luckily there’s a trial version available, so you can check it out before deciding whether this app is worthy of your money. Photoshop Elements acquired many powerful features from Photoshop, only Elements is simplified for amateur photographers and enthusiasts. It includes a good number of effects and filters, plus automated editing options for improving lighting, color balance, and exposure, and even opening closed eyes and reducing the effects of camera shake.
In addition to all of these awesome features, Photoshop also offers editing modes for beginners, intermediate users, and experts. Beginners will probably prefer Quick mode, as it focuses on essential tools to quickly enhance your photos by improving color, lighting, and other basic settings. Guided mode provides intermediate users with step-by-step guidance with more professional features like artistic effects, skin tone correction, and background replacement. Expert mode gives you full access to the app’s really powerful editing features and is ideal for creating stunning images.
7. Affinity Photo (Free Trial)
Affinity Photo’s interface may seem overwhelming at first, especially for novices, but when you come to grips with it you’ll find that the app is just what you’ve been looking for. Its numerous professional tools, effects, and filters encourage you to get creative with your photos. Among the coolest features Affinity Photo has to offer is a before and after view to compare the original photo with its edited version.
Affinity Photo works with 15 file types, including common ones like PDF, PSD, JPG, and GIF as well as some less popular ones. The app amazes with its abundance of basic and top-notch editing tools, allowing you to tweak your photos using all possible kinds of instruments. Affinity Photo allows you to edit HDR photos, apply artistic filters and effects, play with masks and layers, and create breathtaking compositions by combining several images in one. If you find its interface a bit much and are afraid of getting lost in all those advanced tools, you should probably look for something more suitable for your level. But Affinity Photo is worth mastering.
8. Google Photos
Best Editing Software For Macbook Pro
Google Photos is a popular cloud storage service for photos and videos. It can’t boast countless masterly tools like other photo enhancers that we review in this article, but it includes some fundamental features like filters, color adjustment sliders, and transformation tools.
Although Google Photos may not be that helpful when it comes to editing photos, it does a pretty good job at storing high-resolution images and videos with 15GB of free online storage, compared to iCloud’s mere 5GB (which you can upgrade to 50GB for a monthly fee). If you’re planning to go on a trip and take plenty of photos, then it might be smart to sign up for Google Photos to use that extra storage space when you come back.
Sony vegas for mac download. 9. PhotoScape X (Free)
A relatively new photo editing app, PhotoScape X has been gaining popularity with many Mac and PC users since its release in 2008. Its interface is simple but unconventional, with a number of tabs running along the top of the window. Each is responsible for a specific stage of editing. The Viewer tab allows you to browse and organize your photos. After you pick a photo, you can switch to the Editor tab, which includes a broad set of instruments, filters, and effects and a useful feature that enables you to compare the adjusted photo with the original.
The next tabs, including the Batch tab, mainly concentrate on editing and renaming multiple photos at once. The GIF tab allows you to easily create an animated GIF from a group of selected photos.
Adding more RAM can breath new life into an old Mac.As always,. 16gb ram for mac. If you’ve got an old Mac that’s out of warranty, you can take more risks than if you’re thinking about tearing open a brand new MacBook Pro. While Macs certainly aren’t as easy to upgrade as a typical PC, it’s surprisingly simple to upgrade some components like RAM—especially if you’ve got a Mac desktop or an older laptop. Finding Your Mac’s ModelMacs are regularly refreshed and even if newer models don’t look all that different, big changes can happen on the inside.
The downside of PhotoScape X is a lack of selection tools, so all changes are applied to the whole image rather than to a selected part.
Good Editing Programs For Mac Free
10. Gimp (Free)

Gimp is a free open-source photo editing app that has been on the market for over 22 years and is available for Windows, Mac, and even Linux. Unlike many free apps, Gimp doesn’t have any ads or in-app purchases. Its grey interface might seem a little old-fashioned and it may be a bit sluggish when it comes to complex effects, though.
Gimp offers a vast collection of advanced tools that hardly any free photo editor can boast. It has numerous enhancement options such as clone and heal brushes, layers and channels, accurate selection tools, a number of transformation instruments, and, of course, color adjustment controls. Gimp is one of the most powerful tools for enhancing photos and is beloved by so many users for its price (free) and versatility. But if you can’t come to grips with Gimp’s interface, it may be worth paying some cash for a more user-friendly program.
0 notes
Link
I didn’t write any of this, just wanted to share it! THE BLOAT LIST (Here's the different types of bloat I tried over the years, and there result) STOMACH CAPACITY TRAINING: -Drink a large glass of water before, and after a big meal, it make each stuffing session much more intense -Eating a head of lettuce before a meal to expand the stomach: It's not very fun to eat, but it works very well! SPRITE AND BANANA Pretty good, resulting in a big solid belly. It creates a foam that doesn't go away instantly www.youtube.com/watch?v=kN9ife… Peoples doing Banana & Sprite are trying to drink a 2 liters bottle in one go, so of course, their little stomach reject it. Just try with a can and two bananas to begin, and work your way up each time. For this method, you can take it very slowly. COKE AND MENTOS: Use DIET COKE, it's more effective, youtu.be/iS2vG1o7Op4 , and don't put it in the fridge, it's easier to chug when it's not cold. Use ORIGINAL MENTOS (the fruit one doesn't work), or Excel/Eclipse Mints instead. They take MINUTES to disolve and keep releasing air! It's amazing! I use 710 ml, but if you have a large stomach capacity, you can try a 2 liters bottle -First, I put 2 mentos in my mouth. I quickly open the bottle and push the third of its content while I swallow as fast as I can. At this point, I'm inflated from the carbonation, and I can push my belly out and hear it sloshing around. The urge to burp is beginning -I wait a couple minutes, and do the same thing again. It produce a geyser in your mouth that you are trying to swallow immediately. (If the bottle was full, the pressure would make you spit everything out instantly) At this point, I'm full of air and the urge to burp is really strong. I lie down and wait for it to pass a minute, and let my stomach relax. -Finally, I put a last mentos in my mouth, and I chug the geyser until there's nothing left. At this point, I can't even push my belly out: the air is pushing to hard. Nothing is sloshing around: I'm maxed out. -Next: Now that my belly is stretched out, time for a big meal! If you could keep all the air in, your intestines will be full of gas, making a food inflation even more impressive. Note that I'm skinny and I see the effect immediately. If you have a layer of fat, the effect might be less visible. The key information here is to maximize the amount of air you swallow. I heard people says that they ingest several rolls of Mentos in a bloat, but you don't need that much. Just put one Mentos in your mouth and try to drink from a bottle of Coke which is not full (otherwise it will create a geyser). It will bubble up and you can swallow the foam quickly to ingest a massive amount of air. All that with just a single Mentos. Your stomach will get full rapidly. CAKE SHAKE: Blend a box of Betty Crocker Yellow Cake mix with a quart of milk, a little at a time so it doesn't cake up in the blender. (DON'T add eggs!) Drink that down. Then I drink two 8 oz. glasses of water as chaser, to stimulate the baking soda in the mix. (I'm a slim guy, so I used half a box and 750ml of milk) It's quite filling, leaving you big all day long: the reaction comes later (approx 10 hours). You will fart A LOT, as the chemical reaction happens. It kind of clog your system, while increasing your appetite and stomach capacity, so every meal will build up on top of that It wasn't painful at all, and quite delicious. As the day ended, I was fully bloated, 10 pounds heavier, with a belly stretch at my maximum (I couldn't even push my stomach out). It's really great, but it's not your typical 1 hour bloat. You have to be committed for an entire day, but it can be very, very effective (I can't even imagine doing the entire box). CHEMICAL REACTION: -Pop Rocks and Coke: One of my favorite. Tastes good and is not dangerous. It's great to hear the crackling noise in your stomach. I recommend. -Vanilla ice cream and root beer: like a root beer floater, it makes a lot of foam growing inside you. Really good and effective. -Swallowing whole Alka-Seltzer with water: It bloat you good, but it's an analgesic. Only do it when you have a headache. But it works. -Cook 4 packets of oatmeal, then chug 900mlof water: It expand in your stomach, but not very much -Baking Soda and Coke: It bloat you full of air quickly and strongly. It's a little disgusting and not very good for your system, but it works -Baking Soda and Vinegar: it create a violent foam expanding in your stomach, but it's disgusting (don't mix with Coke, trust me) FOOD/LIQUID: -Water Inflation (drinking): Heavy bloat, free, and you can reach your capacity quickly. Use it as a stomach stretcher before a big meal. -Seltzer water: the carbonation will inflate your stomach without the sugar and caffeine of Coke (HEALTHY!) -Diet Pepsi ans Chocolate Milk: A lot of calories, it really bloats you heavily for a long time. Drink the Pepsi, then chug the chocolate milk. -Ramen stuffing: it expand a little in the stomach, but not enough to be an inflation method. -Mashed potato powder: a guy on a forum said it works for him, it was disgusting and impossible to swallow -A tube of raw cookie dough: I never thought I would say this, but it's too sweet. Half a tube and I had more than enough. It doesn't expand that much -Drink half solid bowl of Jell-o: it works, and will have more chance to stay in your stomach, even in large volume -Uncooked Pancake mix: I've tried it, but I don't remember the results, I'll have to do it again -Half-cooked rice: Eating rice that is still a little crunchy will makes you extremely gassy for a whole day... Be careful! -Eat a big watermelon: A big hard bloat, cheap and good for you! BLOAT BY GAS: (that one differ from one person to another, but try it out first): -Fiber One Bars. Eat 4 bars or more, and you'll get a gigantic bloat and fart all day long! -Kombucha Tea (named "Rise" where I live). It's as fizzy as alcohol, can leave you seriously bloated if you drink a lot -Lentils, dry beans, chilli ENEMAS: -Water Inflation (enema): The best one to feel full to the max, but, a lot of trouble to setup up and you can't keep it in for long -Whipped Cream Enema: the compressed air from the air will inflate you up. You may need more than one can. Bloatedboy9 made a tutorial here youtu.be/wtOKP4XtuTs -Inflation with soda carbonation: great idea, you drill a hole in the cap of a coke bottle, use a tube that goes in your rear, and you just have to shake the bottle to produce carbonation that will inflate you. ChubbyInflator had the idea here: youtu.be/7KntaByRIgI AIR INFLATION -Painful afterward, and dangerous if you go too far. You can try it, but other bloats on this lists are much more pleasant. Each time I did it, it ruined my day with cramps and pain. I personally prefer more candid bloats that you can just burp and go back to your normal activities. BUT, if you like incredibly loud and long fart (which I don't really), it's the perfect way to inflate. The best is to use an aquarium pump (slow and steady flow) with the tube going in your butt, or pumps like a bicycle pump. Careful, you have to go slowly to prevent intestine rupture, and you absolutely have to stop if you begin to feel pain. Do at your own risk. SHOWER BLOAT: A thing I do often, while in the shower, I catch a small portion of the jet with my mouth, and I begin to swallow endlessly. The goal here is to swallow more air than water, to inflate your stomach to the maximum. At one point, I'm so full of air that my throat don't allow me to swallow anything more. (You could just drink water, but when you reach your maximum capacity with water only, you'll probably vomit. With this technique, you'll just have a gigantic belch, and then be OK. You could also just try to swallow air, but I find it hard to do without something in my mouth) I didn't try yet: -A gallon of milk -After a meal, take 1/4 cup of Metamucil, the fiber with bloat you -Yeast bloat, instructions on pyrotvfun profile page, or the instructions from pineapples123 I received on DeviantArt: "1.5 oz of yeast in a water bottle that i drank a little out of, plus some koolaid mix for flavor and some sugar to feed the yeast. leaving the warm laptop on my stomach makes it almost feels like its growing so quick. chugged about a liter of sweet tea afterwards to clean my throat, so I'm already feeling a bit full." (I wouldn't try it, it may be dangerous) -Water through nasogastric tube (that seems dangerous too) TIPS: -For a big liquid bloat, use those large straw for shake or slosh. You'll drink a large amount of liquid in no time! -To try once: buckle a belt tighty below your pec or in the middle of your stomach before a bloat, the inflation will be more intense, and your belly will push out even more! -How to suppress the need to burp after a bloat: Close your mouth and only breath through your nose. Wait a couple minutes, and your stomach will relax, expand and adapt to its fullness. It helps to make the best of coke and mentos bloats, where your stomach is full of air SUGGESTION? PLEASE LEAVE A COMMENT! :-) If you want to encourage me for doing more morphs, you can donate will PayPal at [email protected]
45 notes
·
View notes
Text
How to Make Cashew Sour Cream
May 3, 2018
How to Make Cashew Sour Cream
by Kare Comfort Food, Dips & Spreads, Fast (20 Minutes or Less), Healthy, Kid Friendly, Protein Powered, Recipes, Sauces, Jams, and Condiments, Tutorials 3 Comments / Leave a Comment »
I can confidently say you’ll be blown away when you try your first taste of this vegan cashew sour cream. At least, if you’re anything like me.
Because holy yum. If you’ve been avoiding dairy, you might think to yourself, “Holy crap – this is what I’ve been missing. This is life-changing. LIFE CHANGING!!!” You might also do a happy dance – a literal one that’s sort of a combination of that classic Flashdance scene and Snoopy kicking his feet like a bunny.
I mean, if you’re anything like me.
Cashew sour cream is super DUPER easy to make, and guys. It is SO good. Plopped on chili, served up with quesadillas, plopped on nachos. Basically, you’ll be doing a lot of cashew sour cream plopping when you make this recipe. It’s totally plop-worthy.
It’s also silky smooth and – with lemon and apple cider vinegar lending a good amount of tartness – really does taste a lot like sour cream.
You’ve probably at least heard of cashew sour cream by now, but if you haven’t, let me assure you that I am definitely not the brilliant mastermind that came up with the idea. I’ve been making it for years – well, over two, to be exact – since I had to cut dairy from my diet. I don’t remember where I originally saw the idea that has gradually morphed into my own cashew sour cream recipe, but the earliest instance I can find online is here, on a blog called Gluten Free Bay.
So what’s in cashew sour cream, you ask? Well, cashews, of course. Soaked in water to soften them up and ensure a nice, smooth consistency when pureed. Then, you add lemon juice and apple cider vinegar for that classic sour cream tang. Then some salt for savoriness. And a bit of water. Then puree the heck out of all of it and watch it come together into a glorious substitute for sour cream that’ll make your dairy-free days so much more pleasant.
Especially when a bowl of chili is involved.
Plop-worthy!
Okay! Here’s how to make cashew sour cream (hint: it’s so, so easy)
1. Choose the right cashews.
We’re talking raw, unsalted, whole cashews. That’s it.
2. Soak the cashews.
This is so they blend up all nice and smooth and perfect.
You can do the quick-soak method or the not-so-quick-soak method.
Quick soak: Pour about 3 cups of boiling water over 1 cup of cashews. Let soak at room temp for 15 minutes.
Not-so-quick soak: Pour 3 cups cold/tepid/lukewarm tap water over 1 cup of cashews. Let soak at least 2 hours, up to 18 hours (any longer than that and you should refrigerate).
3. Drain and rinse the cashews.
Yup, just pour them into a colander or wire mesh sieve to drain the soaking water. Rinse, then place the cashews in the blender. Because next up, it’s time to …
Cashews, soaked and rinsed
4. Transform those cashews into cashew sour cream!
Add 1/3 cup water, 2 tablespoons lemon juice, 2 teaspoons apple cider vinegar, and 1/2 teaspoon sea salt to a high-speed blender (like a Vitamix) along with the soaked cashews.
Then puree for about a minute until it’s silky smooth.
Mixing it all together. About halfway there!
By gosh, you’ve done it. Delicious, right?!
Here’s the full-blown, printable recipe. Happy plopping!
Print Recipe
Did you make this recipe? Leave a review »
Yield: About 1 cup
How to Make Cashew Sour Cream
Prep: 20 minutes (including time for quick-soak)
Total: 20 minutes
Silky-smooth, rich, and creamy sour cream – with not a lick of dairy! Only 5 ingredients – cashews, lemon juice, apple cider vinegar, salt, and water – will get you there. A batch of this vegan sour cream is in our fridge 24/7!
Ingredients:
1 cup whole raw cashews, soaked (at least 15 minutes in hot water; 2 hours in cold water)
2 tablespoons freshly squeezed lemon juice (from approximately 1 medium lemon)
2 teaspoons apple cider vinegar
1/2 teaspoon kosher salt or sea salt + more to taste
1/3 cup water
Directions:
Soak cashews in at least 3 cups of water. For a quick soak, pour 3 cups of boiling water cashews. Let soak at room temp for 15 minutes. For a not-so-quick soak, pour 3 cups cold/tepid/lukewarm tap water over 1 cup of cashews. Let soak at least 2 hours or up to 18 hours (any longer than that and you should refrigerate).
Drain soaked cashews in a colander or sieve and rinse with cold water.
Place soaked cashews in the pitcher of a high-speed blender along with the lemon juice, vinegar, 1/2 teaspoon salt, and water.
Puree on max speed until completely smooth, 1-2 minutes.
Taste and add additional salt if desired. Sometimes I like to add another teaspoon of apple cider vinegar if I’m looking for some extra tangy tang.
Keeps in refrigerated in an airtight container for 4-5 days. You can also freeze it – score!
All images and text ©Kare for Kitchen Treaty.
Like this? Here's More:
Vegan
Dairy-free
Recipes with cashews
How I live a life without cheese
Kare
Kare is a vegetarian home cook living among carnivores. She loves creating irresistible and flexible recipes that help multi-vore families like hers keep the peace - deliciously.
Don’t Peace out yet!
Subscribe and get my Top 10 Easy Weeknight Dinners eBook for FREE!
Send me...
New Recipes
Weekly Newsletter
« Previous PostOne-Pot Pasta Primavera
Next Post » White Strawberry-Lemon Sangria
Source: https://www.kitchentreaty.com/how-to-make-cashew-sour-cream/

0 notes
Text
Tips & Tricks for UV Mapping props for the modern blender game artist
No, this isn’t any different from my post in Blender Artists. I just decided to move it here because linking to my tumblr boosts my ego just a bit more than linking to a dead Blender Artists thread.
This is more for intermediate users, I expect that you already know how to uv map, but are curious to know about a few tools you might not have heard of or a few time saving workflows.
Useful plugins
“I used to think blender's uv toolset couldn't or didn't need to get any better. Then I saw this video“ - Warmaster Horus
UV Packmaster 2 Pro ($), I pack my UVs by hand but from the results seen, this script is as good if not better.
Tex Tools, absolutely essential for game artists.
UV Squares ($ but not really it's on github), not "essential" but it's a nice time saver.
Useful Tutorials
_“Scarred,afraid, the flatten mapping button is in a different shape in this non blender tutorial so abstain from it I shall“ _- blenderwarrior420
Chamferzone's "Unwrap special" & his Machette asset creation tutorial, which is a 100% free from start to finish by the way. He uses max but if you're comfortable with 3d you shouldn't have a problem figuring out what the blender equivalents are.
Polycount wiki this page in particular.
CGBoost's 20 UV Tips & Tricks
Unique Tips I've picked up along the way
I've run out of fake quotes to create so I'll stop now - fdfxd
Tip - 1, The pin tools exist for a reason.
shocking I know.
But say you've got to unwrap something like this pistol grip (the same pistol grip of the amazing oscar nominated krinkov aks 74u you can get it's autograph here!!!! ) So you place your seams, as you would. Then you unwrap only to find.... Distortion! Might not seem like much but it will(and has) show if you say... slap a diamond pattern texture on this grip, like i was planning to do.
So what to do now? Go on BA forums and complain? Convert to using the tools of the ruinous powers? Not quite yet I have a solution
Project from view while having the "view"(camera) be perpendicular to the surface. We're not done yet, this causes another problem This is where the pinning comes in, In your UV Mode, select all the coplaner faces, and hit p(or right click and click pin) Then unwrap, and your troubles are no more(for the most part, maybe unpinning some of the edges near the bottom will yield better results.)
This isn't where the usefulness stops
Say you've watched that Tim Bergholz tut that emphasised that the borders of your UV islands should ideally be straight for perfect baking at any resolution
But what happens when you get a piece like this? With the pin workflow you can fix this no problem
Tip 2 - Using Materials to keep track of how much texel density each bit needs
This trick I learned recently while modelling a handgun that I haven't uploaded at the time of writing this
But, this whole trick is based on the principle that not every bit needs as much space in the uv map equally, some bits are going to be on the player camera more often so they need more space.
Say this is our prop (I wouldn't put the seams this way in actual prop by the way, just an example)
I'll create 3 materials Assign them based on how close you'd expect them to be to the player camera.
After you're done with that, do the next two steps for each material.
Select the faces linked to the material. Make sure nothing else is selected
Using the textools addon, set the texel density to the appropriate numbers and apply. in this case I decided,
UV_High (the highest texel density) - 256 UV_Medium - 128 UV_Low - 64
Tad overkill, you're free to experiment with better values.
After you've done all that, select all the faces of the object and pack.
Now most of the detail should be concentrated in the areas where the player will spend the most time looking at.
That's all for now. It's worth noting that I'm not ex-ilm,bungie,mlg,etc god modeller, I'm just a random talkative(in public forums behind edgy avatars, god knows I can't speak irl or in dms) prop artist
So if I get anything wrong, feel free to correct.
0 notes
Text
How to Make Cashew Sour Cream
May 3, 2018
How to Make Cashew Sour Cream
by Kare Comfort Food, Dips & Spreads, Fast (20 Minutes or Less), Healthy, Kid Friendly, Protein Powered, Recipes, Sauces, Jams, and Condiments, Tutorials 3 Comments / Leave a Comment »
I can confidently say you’ll be blown away when you try your first taste of this vegan cashew sour cream. At least, if you’re anything like me.
Because holy yum. If you’ve been avoiding dairy, you might think to yourself, “Holy crap – this is what I’ve been missing. This is life-changing. LIFE CHANGING!!!” You might also do a happy dance – a literal one that’s sort of a combination of that classic Flashdance scene and Snoopy kicking his feet like a bunny.
I mean, if you’re anything like me.
Cashew sour cream is super DUPER easy to make, and guys. It is SO good. Plopped on chili, served up with quesadillas, plopped on nachos. Basically, you’ll be doing a lot of cashew sour cream plopping when you make this recipe. It’s totally plop-worthy.
It’s also silky smooth and – with lemon and apple cider vinegar lending a good amount of tartness – really does taste a lot like sour cream.
You’ve probably at least heard of cashew sour cream by now, but if you haven’t, let me assure you that I am definitely not the brilliant mastermind that came up with the idea. I’ve been making it for years – well, over two, to be exact – since I had to cut dairy from my diet. I don’t remember where I originally saw the idea that has gradually morphed into my own cashew sour cream recipe, but the earliest instance I can find online is here, on a blog called Gluten Free Bay.
So what’s in cashew sour cream, you ask? Well, cashews, of course. Soaked in water to soften them up and ensure a nice, smooth consistency when pureed. Then, you add lemon juice and apple cider vinegar for that classic sour cream tang. Then some salt for savoriness. And a bit of water. Then puree the heck out of all of it and watch it come together into a glorious substitute for sour cream that’ll make your dairy-free days so much more pleasant.
Especially when a bowl of chili is involved.
Plop-worthy!
Okay! Here’s how to make cashew sour cream (hint: it’s so, so easy)
1. Choose the right cashews.
We’re talking raw, unsalted, whole cashews. That’s it.
2. Soak the cashews.
This is so they blend up all nice and smooth and perfect.
You can do the quick-soak method or the not-so-quick-soak method.
Quick soak: Pour about 3 cups of boiling water over 1 cup of cashews. Let soak at room temp for 15 minutes.
Not-so-quick soak: Pour 3 cups cold/tepid/lukewarm tap water over 1 cup of cashews. Let soak at least 2 hours, up to 18 hours (any longer than that and you should refrigerate).
3. Drain and rinse the cashews.
Yup, just pour them into a colander or wire mesh sieve to drain the soaking water. Rinse, then place the cashews in the blender. Because next up, it’s time to …
Cashews, soaked and rinsed
4. Transform those cashews into cashew sour cream!
Add 1/3 cup water, 2 tablespoons lemon juice, 2 teaspoons apple cider vinegar, and 1/2 teaspoon sea salt to a high-speed blender (like a Vitamix) along with the soaked cashews.
Then puree for about a minute until it’s silky smooth.
Mixing it all together. About halfway there!
By gosh, you’ve done it. Delicious, right?!
Here’s the full-blown, printable recipe. Happy plopping!
Print Recipe
Did you make this recipe? Leave a review »
Yield: About 1 cup
How to Make Cashew Sour Cream
Prep: 20 minutes (including time for quick-soak)
Total: 20 minutes
Silky-smooth, rich, and creamy sour cream – with not a lick of dairy! Only 5 ingredients – cashews, lemon juice, apple cider vinegar, salt, and water – will get you there. A batch of this vegan sour cream is in our fridge 24/7!
Ingredients:
1 cup whole raw cashews, soaked (at least 15 minutes in hot water; 2 hours in cold water)
2 tablespoons freshly squeezed lemon juice (from approximately 1 medium lemon)
2 teaspoons apple cider vinegar
1/2 teaspoon kosher salt or sea salt + more to taste
1/3 cup water
Directions:
Soak cashews in at least 3 cups of water. For a quick soak, pour 3 cups of boiling water cashews. Let soak at room temp for 15 minutes. For a not-so-quick soak, pour 3 cups cold/tepid/lukewarm tap water over 1 cup of cashews. Let soak at least 2 hours or up to 18 hours (any longer than that and you should refrigerate).
Drain soaked cashews in a colander or sieve and rinse with cold water.
Place soaked cashews in the pitcher of a high-speed blender along with the lemon juice, vinegar, 1/2 teaspoon salt, and water.
Puree on max speed until completely smooth, 1-2 minutes.
Taste and add additional salt if desired. Sometimes I like to add another teaspoon of apple cider vinegar if I’m looking for some extra tangy tang.
Keeps in refrigerated in an airtight container for 4-5 days. You can also freeze it – score!
All images and text ©Kare for Kitchen Treaty.
Like this? Here's More:
Vegan
Dairy-free
Recipes with cashews
How I live a life without cheese
Kare
Kare is a vegetarian home cook living among carnivores. She loves creating irresistible and flexible recipes that help multi-vore families like hers keep the peace - deliciously.
Don’t Peace out yet!
Subscribe and get my Top 10 Easy Weeknight Dinners eBook for FREE!
Send me...
New Recipes
Weekly Newsletter
« Previous PostOne-Pot Pasta Primavera
Next Post » White Strawberry-Lemon Sangria
Source: https://www.kitchentreaty.com/how-to-make-cashew-sour-cream/
0 notes