#How To Setup Cricut Maker
Explore tagged Tumblr posts
Visit Tumblr Blog
Explore Tumblr blogs with no restrictions, modern design and the best experience.
Last Seen Tumblr Blogs


Fun Fact
In 2020, 44% of users from Denmark used Tumblr daily.
Text
How to Use a Cricut Maker to Create a DIY Project? (Easy Guide)
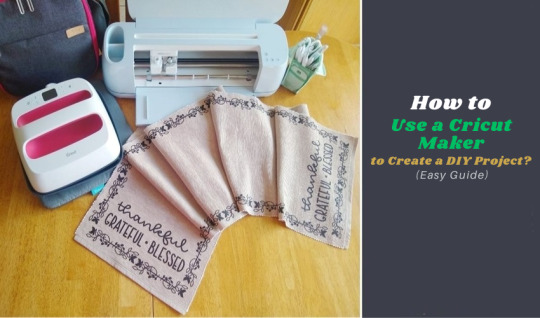
Are you thinking of buying a Cricut Maker? Or you have just got one and are not sure where to start? This guide will walk you through all the different ways to learn how to use a Cricut Maker without any previous experience.
This cutting machine is advanced and unique from other models, like Explore Air 2 and Joy machine. It delivers a wide range of features, tools, and accessories for crafting projects. With this machine, you can cut fabric, vinyl, cardstock, chipboard, and more precisely.
So, if you are a beginner and don’t know how to use this machine—don’t worry; we are here to help! Read this blog, and you will learn how to use it easily.
How to Use a Cricut Maker: Unboxing and Initial Setup
Once you have got your machine in your hands, it is time to check if you have all the necessary supplies and tools that come with the machine or not. So, in order to do that, you must follow these steps:
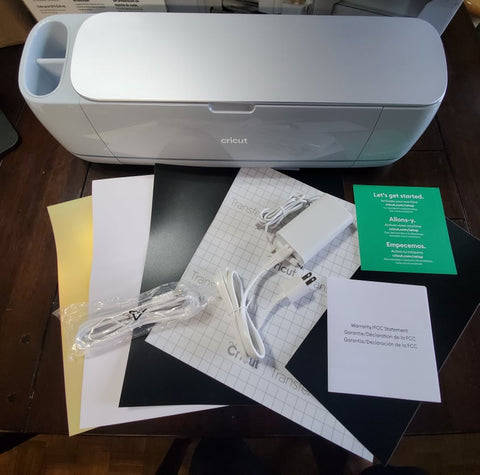
Step 1: Unbox Your Machine
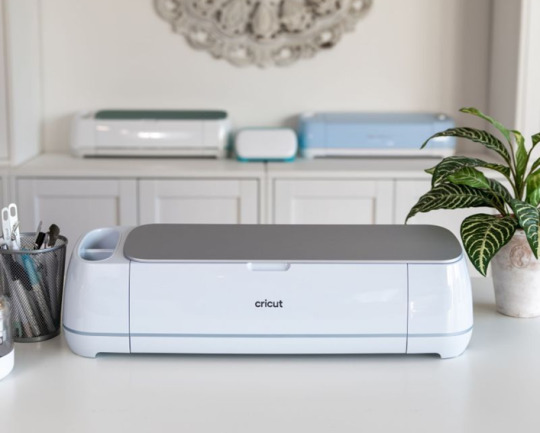
Carefully remove the machine from the box, ensuring that all packaging materials are removed. Inside the box, you will find the machine, a power cable, a USB cable, a cutting mat, a fine-point blade, and a welcome guide.
Step 2: Positioning Your Machine
Place the machine on a flat surface, ensuring at least 10 inches of space in front and behind the machine. This space allows the cutting machine to move freely during operation.
Step 3: Connecting to Power
Now that you have unboxed your machine, it’s time to take the most important step: giving it life support. To do that, you must insert the power cable into the back of the machine and plug it into an electrical outlet. Once you finish the connection part, let us look into how to activate your machine.
How to Activate a Cricut Maker: Quick and Easy Steps
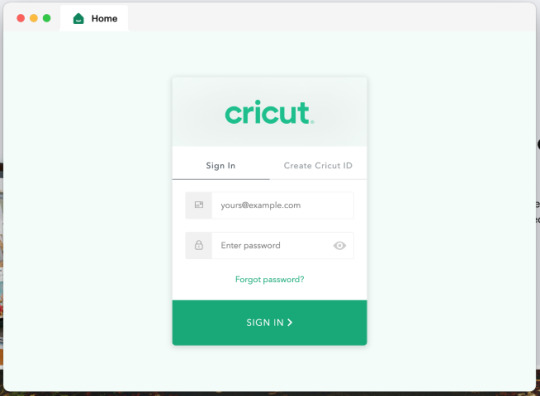
The first thing to do is activate the machine. To do so, from your Windows/Mac, you must head over to cricut.com/setup from any browser of your choice. Activating the machine is even easier if you have already used the Design Space app. To set up the machine from the app, go to the Menu icon and then select ‘Cricut New Product Setup.’ After that, follow the prompts that let you choose your machine.
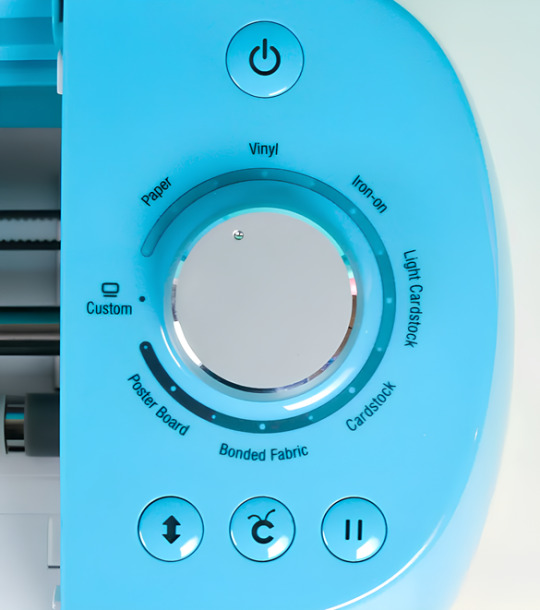
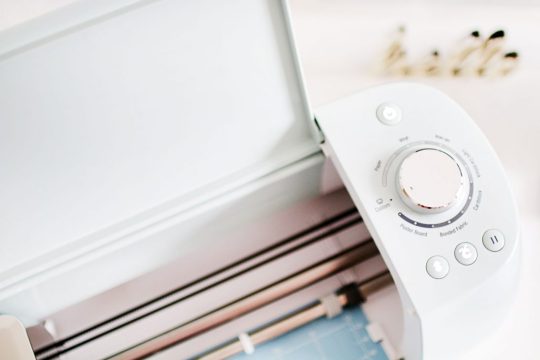
To open the machine, you must lift its lid. This will open the cover of the machine automatically.
Power button: With this button, you can turn the machine on and off.

Feeding switch: This button lets you feed your mat into the machine.

Cricut switch: This is the button with the initial C. Press it when you want to start cutting (it is also called the confirm button).

Pause button: This button gives you the flexibility to pause your machine in between. It’s extremely handy if you’re in the middle of a cut and want to change something or for any other reason.

That’s all in terms of design. In the next section, we’ll look at the steps to create a project.
How to Use a Cricut Maker: 5 Easy-To-Follow Steps
To use a machine, follow these detailed steps from setup to your first project. As the Cricut Maker Setup is a versatile cutting machine, it can handle various materials, making it ideal for crafting projects.
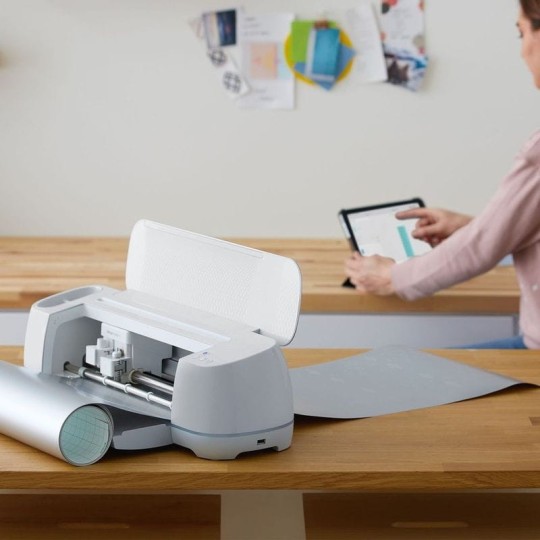
Step 1: Connecting to Your Device
In order to get a hold of the machine, you must connect it to your desktop or computer. This is crucial because, without the connection, the machine cannot communicate with your device. Even though the Design Space app can work offline, you still need a connection at least once to save it on the app.
You can connect your machine to your device via a USB cable or Bluetooth. Connect the square end to the machine and the USB end to your PC via USB. To pair your device with the machine using Bluetooth, turn on the machine and then go to the Bluetooth settings.
Visit the official website or surf design.cricut.com and download the Design Space application. It is essential for project creation and supports various platforms, like Mac, iPad, and iPhone.
Step 2: Setting Up Design Space
This is the most important step after connecting the machine and your device (Mac/Windows). Once you have downloaded the app, you must do these things for a smooth experience:
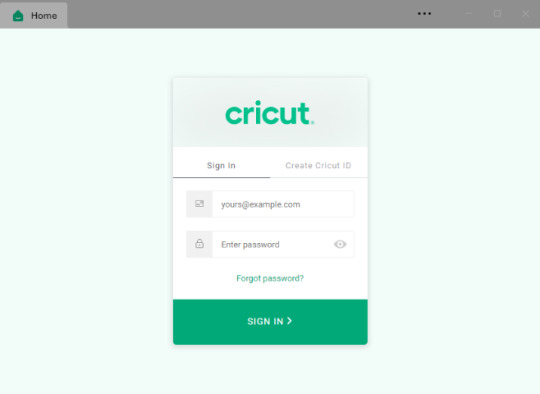
Open the software and fill out the required fields to create an account. The account allows one to save their projects and access various design features.
In the software, select “New Machine Setup” from your profile. Finish the on-screen steps to choose your machine model and perform the setup process. The app will guide you in connecting your device to the machine.
Step 3: Designing Your DIY Project
Now that you have done all this, let’s start creating your first project. To do so, let’s look at these steps:
Start a New Project: Once your machine is connected, you can start a new project using the software. Select the type of project you want to create, such as a card, decal, or label.
Choose Your Materials: Design Space allows you to select the material. If you use cardstock, set the material type accordingly.
Prepare Your Cutting Mat: Place your chosen material onto the mat. Ensure it is aligned correctly and adheres well to avoid shifting during cutting.
Step 4: Start the Cutting Process
Now that you are familiar with downloading the app and activating the machine, let us look at its main purpose: the cutting process. It happens as described below; follow the steps carefully for a seamless cutting.
Load the Mat: Insert the mat into your crafting machine until it clicks into place. This will automatically feed the mat in for cutting.
Start Cutting: Press the “C” button on the machine to begin cutting. Your device will display a percentage of the cut completion and allow you to monitor the progress.
Completion: Once the cutting is finished, the machine will signal it is done. Carefully remove the mat and peel off your cut material.
Step 5: Post-Cutting Steps
It is equally important to know what to do after you are done with your cutting process.
Removing Your Cut Material: Gently lift the material from the machine mat. If you use delicate materials, such as intricate designs, use a spatula tool to help lift them without curling.
Assemble Your Project: Depending on your project, you may also need to assemble various pieces. Follow any additional steps to add embellishments or complete your design.
Conclusion
Don’t be discouraged if your first project isn’t perfect. The more you use your cutting machine, the more comfortable you will become with the process. Take time to explore the features of Design Space, like templates, images, and fonts. This exploration can inspire new project ideas. Using a crafting machine opens up a world of creative possibilities. Following these steps, you can confidently set up your machine, design your projects, and bring your creative ideas to life. Happy crafting!
FAQs
How do you use a Cricut for beginners?
To use a crafting machine as a beginner, unbox your machine and follow the setup steps. Download the Design Space software on your computer or mobile device for project creation. Familiarize yourself with basic operations like uploading images, selecting materials, and changing settings. Start with modest projects, such as stickers or paper cards, to build confidence. Use online resources and community forums to get more support and inspiration.
What do you use a Cricut Maker for?
A Cricut Maker is a versatile creative gadget that can cut materials like vinyl, paper, and fabric. It’s excellent for making unique designs for home decor, apparel, and more. The machine is capable of cutting a variety of materials, making it appropriate for both simple and intricate crafts. Beginners begin with projects such as greeting cards or decals, gradually discovering their full potential as they gain skills.
Do I need a computer to use a Cricut?
While a computer is not required to use a Cricut, it is suggested for maximum performance. The Design Space software can be accessible from a computer, tablet, or smartphone, making design management easier. Using a computer allows for a wider screen and more accurate control when making complex designs. However, several users have operated their machines using mobile apps, allowing them to create while on the road.
Source: How to Use a Cricut Maker
#how to use a cricut maker#cricut design space download#cricut design space app#cricut design space software#Cricut Maker Setup#cricut new product setup#how to setup cricut maker#cricut new machine setup
1 note
·
View note
Text
How to Setup Cricut Maker 3: A Complete Guide for Beginners
Have you purchased a Cricut Maker 3 and want to learn how to setup Cricut Maker 3? In this case, you have reached the right place. Here, you will learn about the basic procedure for your machine setup. To start using the machine, you should follow the steps below and set your machine up accordingly.
This machine has advanced features since it is the latest tool in the Cricut family. It can cut more than 300+ materials, including smart materials that do not need a mat. In this blog, I will discuss how to connect your machine to a computer and then download the Design Space software. So, let’s get started.
Preparing Your Cricut Machine for Setup
To begin learning how to setup Cricut Maker 3, you should start by preparing the machine. Before you go on to the setup process, you need to do the following things.
First, unpack the machine and remove all the items inside the box.
Next, you should check them all and ensure that all the materials are there and nothing is missing.
Then, you have to place the machine in a safe place on a flat surface.
Now, the machine is ready to setup. You can start the process by following these steps.
The first thing you need to do is plug the machine into a socket using the power adapter.
After that, press the power button on the machine and hold it for a while. When the machine is on, it will be ready to connect.
Now, connect the machine to your computer using Bluetooth. Although you can connect them using USB as well.
Also, download the Design Space software on your computer and sign in.
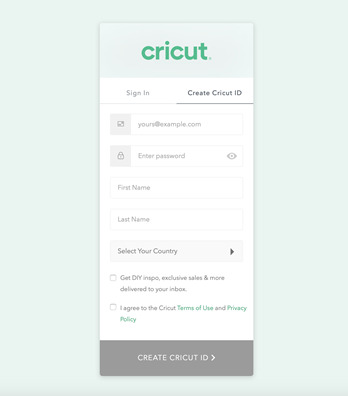
If you are a new user, you may have to create a new account.
How to Connect Cricut Maker 3 to Computer via Bluetooth?
When you want to learn how to setup Cricut Maker 3, one of the most important things you need to do is connect the machine to your computer, either a Windows or Mac. Here, you will see the connection process for a Mac computer.
To initiate the connection, plug the machine’s power adapter into the wall socket and press the power button of the machine.
Next, the distance between the machine and your system does not have to exceed 10-15 feet so that your computer can easily detect the machine.
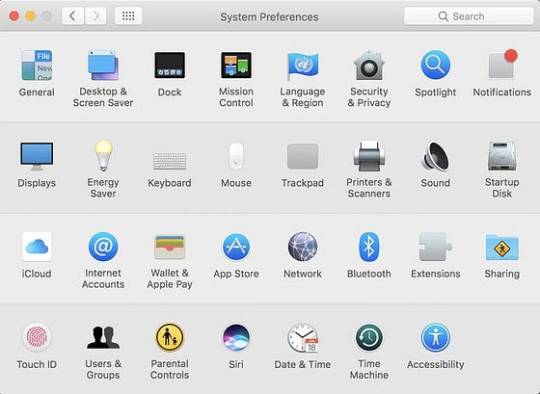
Then, go to the Apple menu, System Preferences, and Bluetooth.
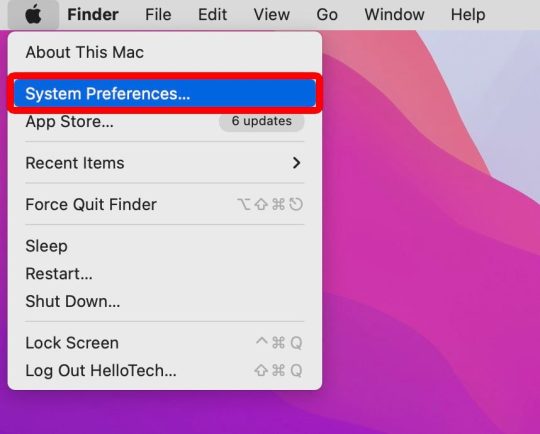
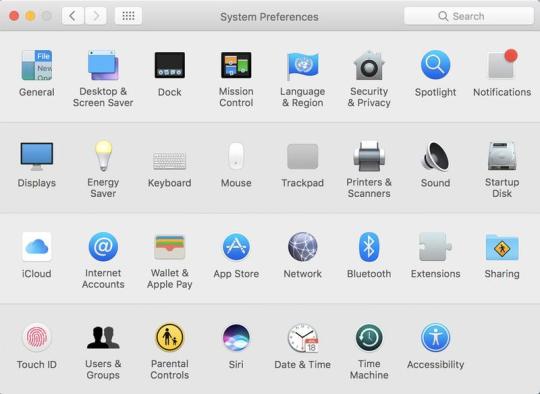
After that, turn on Bluetooth and start searching for your machine’s name.
Now, you will find the machine on your screen; you have to select it and wait.
The machine will be paired to your computer in no time.
In the end, you should go to the app and check New Product Setup. The machine will appear to be connected.
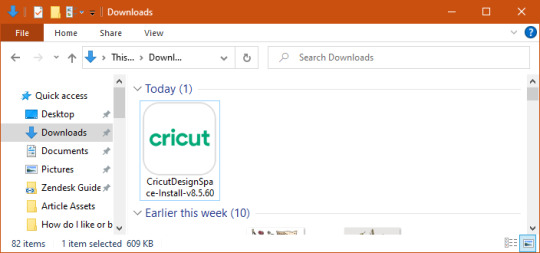
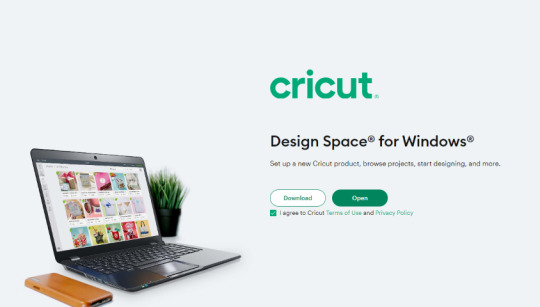
How to Download Cricut Design Space on Computer?
The final step in learning how to setup Cricut Maker 3 is downloading the app. The app is a must for your machine as it operates on your computer. It is also important to start creating projects. To download this software on your Mac, follow the steps below:
To begin, open your Mac computer and go to cricut.com/setup.
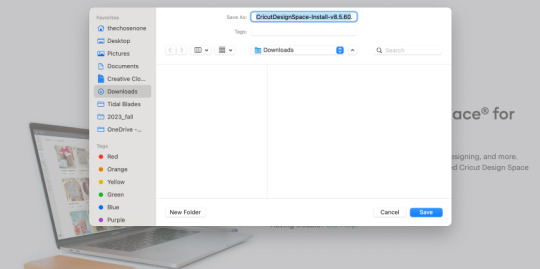
Then, you should look for the Design Space app and click Download. Before downloading the file, you will have to agree to Cricut’s Terms and Conditions.
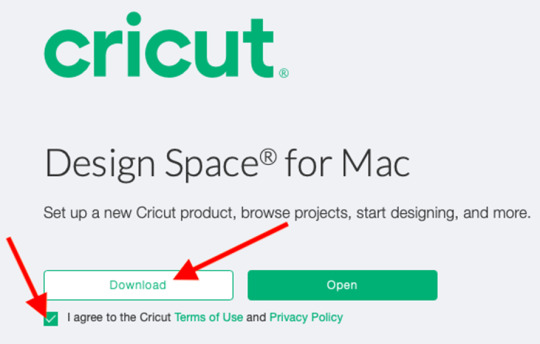
Next, the file will be saved in the Downloads folder, although you can choose a folder where you would like to download it.
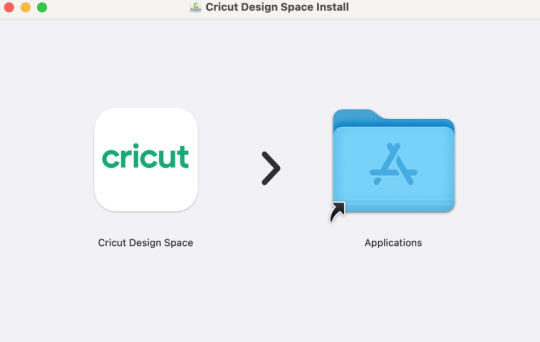
After that, you have to go to the folder and double-click on the file.
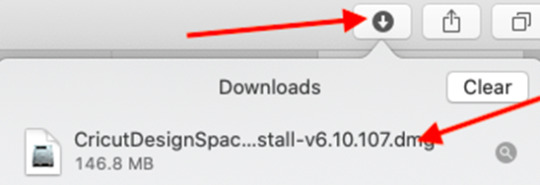
Now, a new window will pop up on the computer screen. The window has two icons: the Cricut icon and the Applications icon. You have to drag the app icon into the Applications icon.
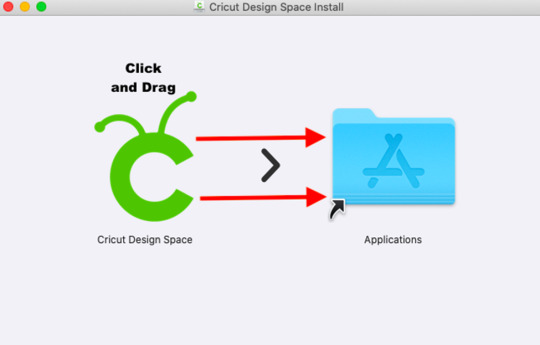
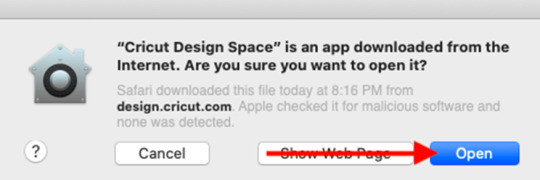
Also, you need to open the Applications folder and click on the software to launch it.
Click on Open,and the Design Space will be installed on your computer.
Log into your account, and the app will be ready to use.
Finally, you learn the full process of how-to setup Cricut Maker 3. Now, you can easily setup your machine and work on your projects.
0 notes
Text
Connecting Cricut Bluetooth: A Complete Guide
Connecting Cricut Bluetooth is an easy task! All you need is a Cricut machine and a compatible device. In this post, I will cover the most frequently asked questions, such as how to connect Cricut to computer.
Do you know what is the most interesting part of this blog? I’ll be talking about connecting Cricut cutting machines, such as Maker, Explore, and Joy. I will also show you how to connect Cricut to different types of computers and mobile devices.
While connecting, you will also need to maintain the proper distance of the Cricut machine by placing it in the right place. Let’s delve into this guide and start connecting it to the Bluetooth device.
Connecting Cricut Bluetooth to a Windows PC
Connecting a Cricut machine to a PC is not a big deal. Anyone with little guidance can do it in no time. All you need is a Cricut cutting machine, and you have to locate it in the right place, such as a flat surface like a table. Once you have placed the machine, make sure it is not too far from the PC.
Here are simple steps to connect Cricut to a Windows PC:
You need to turn on the Windows PC and your Cricut product.
Place your Cricut machine at a distance of 10 to 15 feet from the PC.
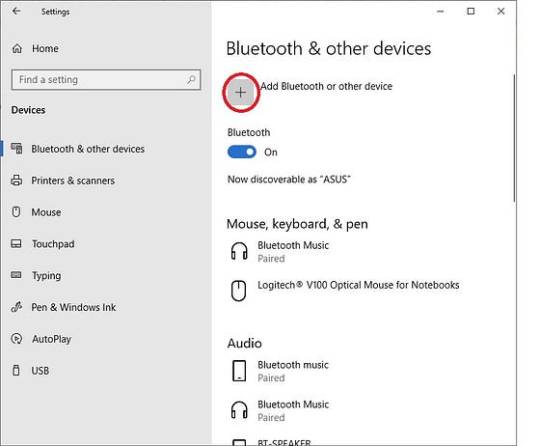
After that, you should navigate to Settings.
Next, you will need to choose the Devices option on the next screen.
Once done, you should turn on the Bluetooth.
Then, you will have to click on Add Bluetooth or another device.
Once done, you will receive pop-up windows telling you to add a device.
There, you need to select the Bluetooth option.
Also, hold on and see if it detects your nearby Cricut model.
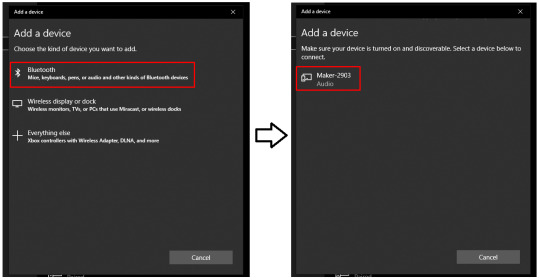
Now, you need to choose the machine and pair it with your PC.
Connecting Cricut Bluetooth to Your MacBook
If you are connecting your Cricut to your MacBook, it will be easier by following the steps below. Let’s go to the steps below:
Start by placing your Cricut on a flat surface. Ensure it is within 10 to 15 feet of your Mac.
Then, you will need to navigate to the Apple menu and select System Preferences.

After that, you should search for the Bluetooth option.

On the following screen, turn the Bluetooth on.
If it is already turned on, then you have to choose the Cricut model from the available list.
Finally, you have connected your Cricut machine to your macOS desktop.
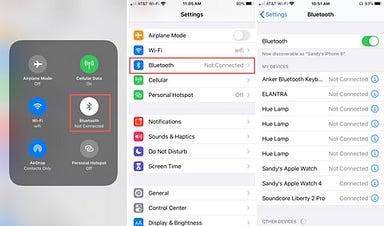
Connecting Cricut Bluetooth to an iOS Smartphone
Are you an iOS device user? Don’t worry; I am here to explain the stepwise instructions for connecting your Cricut to your Bluetooth on iOS in no time. Let’s start!
On the iPhone, you need to find the Settings app.
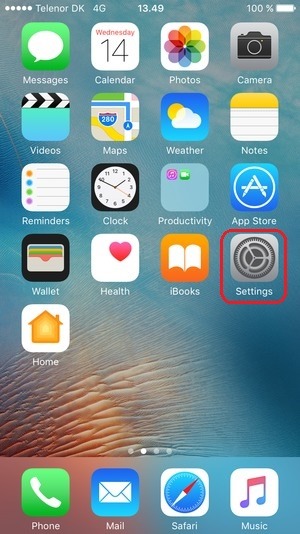
After that, navigate to find the Bluetooth option.
Now, you need to enable Bluetooth by clicking on the toggle button.
https://cdsassets.apple.com/live/7WUAS350/images/iOS/iOS-17-iphone-14-pro-settings-Bluetooth-pair-third-party-device.png
Wait for some time and let your iPhone find your Cricut model.
Once it is seen, select the Pair option to connect the device.
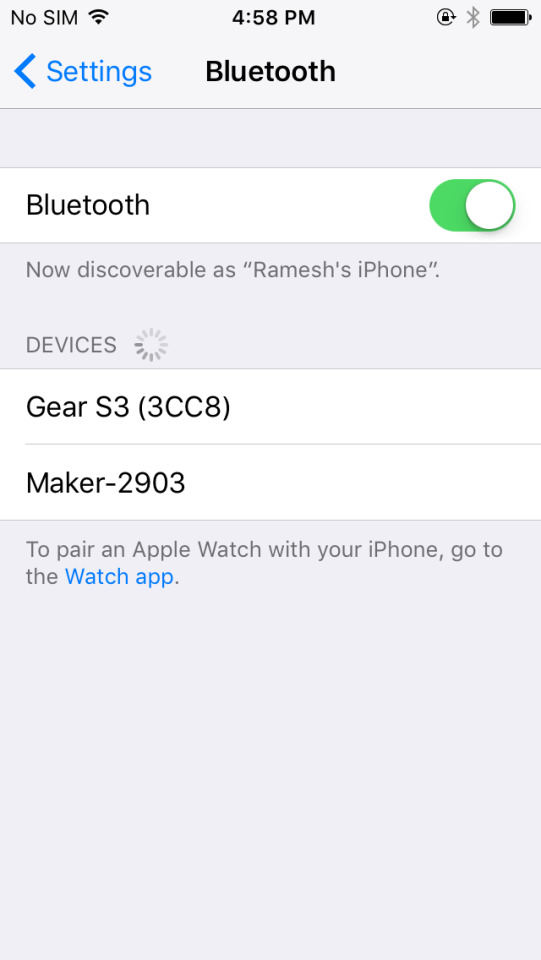
Now, you have made the connection between your iOS and Cricut machine.
Connecting Cricut Bluetooth to Your Android Device
Here are the steps to connect your Cricut to Bluetooth on an Android device. If you are an Android user, you must go through the steps below:
Go to your Android phone and find the Settings app.

Once you reach your phone settings, navigate to the Bluetooth option.
Then, you should enable your Bluetooth.
https://www.digitalcitizen.life/wp-content/uploads/2018/05/android_Bluetooth-10.png
After that, you should wait and visit until your device is located in your nearby Cricut machine.
Once you find the Cricut model, select it to pair it.
Finally, you have connected your Cricut to an Android device.
FAQs
Question 1: How do I get my Cricut in pairing mode?
Answer: Connecting Cricut Bluetooth or getting it into pairing mode is done by the following steps:
First of all, you will need to turn on the Cricut machine.
Locate the machine 15 feet away from your device.
Then, go to Settings and Bluetooth.
Turn on Bluetooth and pair the device.
Question 2: Why is my Cricut not connecting to Bluetooth?
Answer: Several reasons, such as Bluetooth, devices, pairing, and computers, can affect the process of connecting Cricut to Bluetooth. Therefore, you should ensure that your Bluetooth is working or turning on properly. Also, make sure the distances are properly maintained or do not exceed 15 feet between the device and Cricut.
Question 3: Is connecting Cricut Bluetooth the same for all devices?
Answer: Absolutely not! The process of connecting Cricut via Bluetooth is not the same for all devices. For example, if you are connecting it on your Mac, then the same steps cannot be used for Windows computers or other devices. Therefore, follow the right methods to connect your Cricut to Bluetooth.
#Connecting Cricut Bluetooth#www.cricut.com/setup#How to setup cricut maker#Install cricut design space app#Setup Cricut.com
0 notes
Text
Cricut offers numerous DIY smart cutting machines that work with a specialized application to personalize your projects. It’s one of the top-selling DIY machines in the market that guarantees that users will deliver desirable results with minimum effort. With an ability to cut over 300 materials, Cricut set itself apart from the competition. Moreover, its highly economical price makes it even more appealing to the users. If you want to use this cricit machine setup to create something of your own, visit cricut.com/setup and move ahead.
0 notes
Text
Cricut Maker Software Download: Easy Guide for Beginners
Hey, Cricut folks! Are you looking for a guide on Cricut Maker software download? If so, then you have come to the right page! Do you know when I have to download Cricut Maker software? I get very excited. I don’t know why, but I love easy steps that I can perform again and again. Downloading is quite satisfying for me. Sounds weird, right? I can understand, but it is what it is.
In this write-up, I will explain how to download Cricut Design Space on Windows, Mac, iOS, and Android. This post will be helpful for new crafters who want to get started with their Cricut Maker machine!
Cricut Maker Software Download on Windows
Cricut Design Space is the best software to create, modify, and personalize your projects. However, if you are a Windows user and want to download Cricut Maker software, then you need to follow the steps described below:
Open your browser on your PC and type the URL design.cricut.com on the search bar.
Then, click a checkbox saying, “I agree to Cricut Terms of Use and Privacy Policy.”

After that, the Download control will be clickable to download.
Once you finish the download, navigate to the Downloads folder.
Get the file you downloaded.
Then, double-click on it to install the Cricut Design app.
Once you complete the installation, you need to register to a Cricut account.
Cricut Maker Software Download on Mac
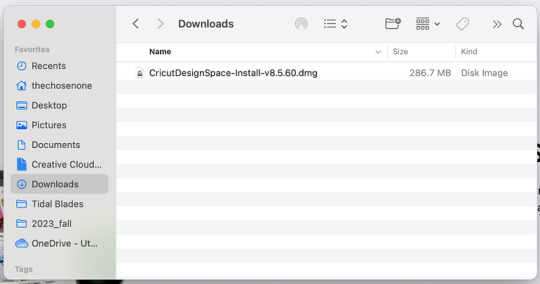
Okay, here comes the other computer, i.e., a Mac. Downloading from the browser is completely the same as downloading from the Windows computer, but the only difference you will notice is in installation. Let’s see how to download and install the software below:
Enter the URL — design.cricut.com on your browser and check the box to accept Cricut’s Terms & Conditions.

Second, you will be asked to go to a page where to select the location to save the file.
After saving, you will see that the download has started.

Then, head to the Downloads folder to discover the .dmg file.
Double-click on it to install.
When installing, drag the Cricut icon to the Applications folder.
Finally, your Cricut software will be added to your folder.
To open the app, you have to double-click on the app and then start creating what you love.
Cricut Maker Software Download on Your iOS Device
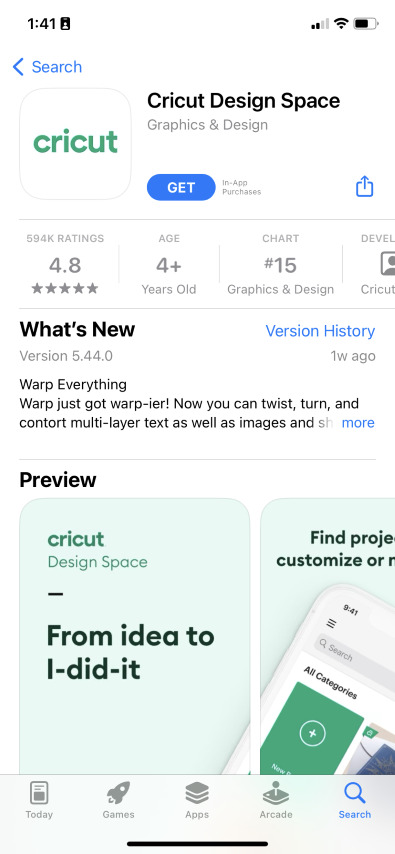
Now, let me show you the steps to download the Cricut app on your iOS devices. The app is fully compatible with your iOS device, and you don’t need to download it using your browser. All you need is a pre-installed App Store app. So, without giving it a second thought, let’s begin downloading:
Launch the App Store app.
On the App Store, enter Cricut Design Space on the search bar.
Now, hit the Get button to download the app and verify your download with your iTunes password (if prompted).

When you have the application on your device, you need to open it.
Afterward, you can start a Machine Setup or Sign In to proceed with crafting.

Cricut Maker Software Download on Android
Last but not least, we are going to download the Cricut app on an Android machine. To download the software, head to the Google Play Store. Now, follow the steps described below to install the software:
Go to your Android phone’s home screen.
And find the Google Play Store icon on your device.
On the Play Store, search for Cricut Design Space.
You will find a Cricut app in the suggested apps below.
Select the app from the suggested results.
Then, press the Install button given below to begin installing the app.
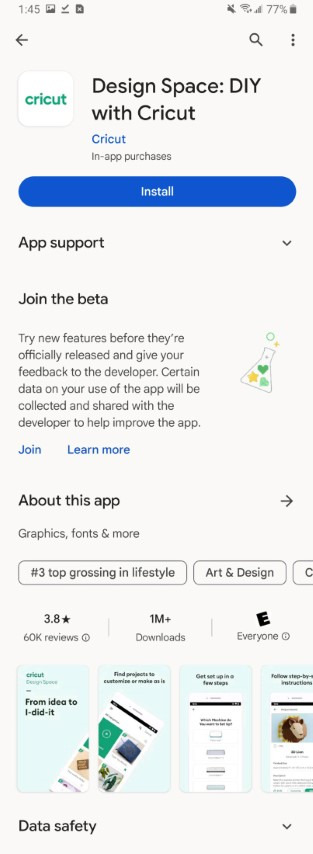
After installation, the Cricut software will be added to your phone’s home screen.
Open the application and set up your machine right away.
FAQs
Question 1: Which software does Cricut Maker use?
Answer: The Cricut Maker is a robust machine in the Cricut lineup that cuts more than 300 materials in no time. However, the software used with this machine is the same as that used with others. This is nothing but a Cricut Design Space, which is a companion app to all Cricut cutting machines.
Question 2: What are the Windows system requirements for Cricut?
Answer: In order to run the Cricut software on a Windows computer, you will need to meet the following needs:
● Windows 10 or later (64-bit) operating system
● Disk: 2 GB free
● A USB port/Bluetooth
● Minimum 4 GB RAM
● CPU with Intel Dual Core or equivalent to AMD processor
● The display should have a minimum 1024px x 768px screen resolution
Question 3: How to use the Cricut software to setup the machine?
Answer: To set up your Cricut machine on your computer, you have to follow the steps below:
Plug in the machine and power it on.
Then, you need to connect your Cricut to the computer via Bluetooth.
Now, download and install the Cricut Design app.
After that, open the Cricut app and sign in to your Cricut account.
Select the Menu and select Machine Setup.
Finally, choose the model and follow the instructions on your screen.
Read more: Cricut New Machine Setup
install cricut design space app
cricut.com/setup mac
Cricut Design Space
Source: cricut maker software download
#design space signin#cricut maker software download#install cricut design space app#install cricut explore air 2#cricut.com/setup#cricut explore 3#how to setup cricut maker#cricut design space
0 notes
Text
Cricut Bluetooth Setup: Full Guide for Computers and Mobiles
Before getting started, I want to tell you that you can connect your Cricut machine via a USB cable or Bluetooth connection. You just need to choose the method that suits you. So, I think I have told you enough, and it’s time to check out the process.
Cricut Bluetooth Setup on Your Desktop (Windows/Mac)
As you know, a Cricut machine is accessible through desktop and mobile devices; you should note that each device has a different process to setup on a Bluetooth connection.
Windows
If you’re a Windows user, you should follow these steps to the Cricut setup on Windows via Bluetooth.
To get started, enable your Cricut cutting machine.
Ensure that your machine is not more than 10-15 feet away from your computer.
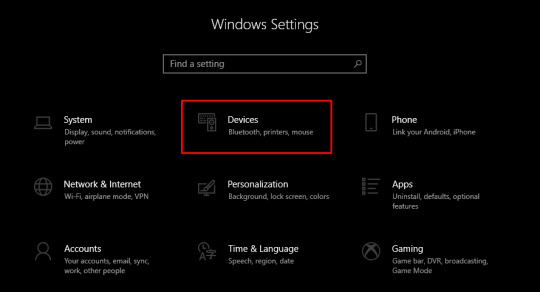
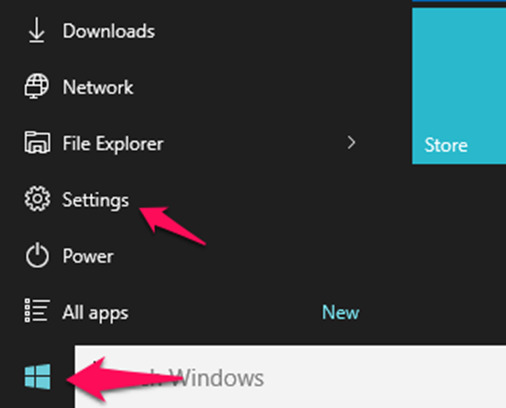
Now, head to the Start button on the screen.
After that, select the Settings option.
Moreover, move to the Devices option.
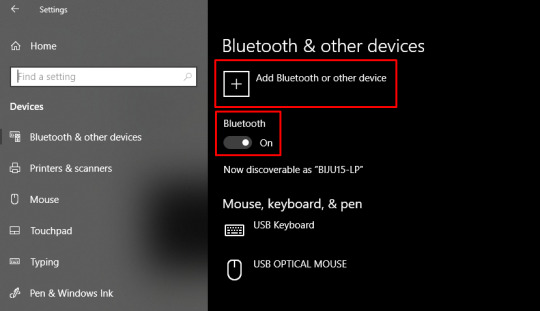
Then, turn on the Bluetooth option.
Next, select the “Add Bluetooth or other devices” option.
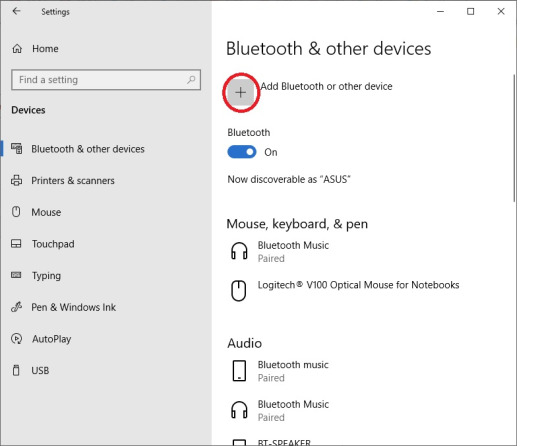
Also, select the Bluetooth option in the next window.
When you see your device in the list, select it to finish the pairing process.
When your pairing process is complete, your system will show you that the connection has been built.
Now, you’re good to go for the Cricut New Product Setup.
Finally, the Bluetooth connection is built, and you’re good to go when creating your first project.
On Mac
On a Mac, the procedure is different from a Windows PC; let’s see the steps below for Cricut Bluetooth setup on a Mac.
In the beginning, turn on your Cricut product.
Then, ensure that your distance is 10-15 feet apart from each other.
Now, move to the Apple menu and select the System Preferences option.
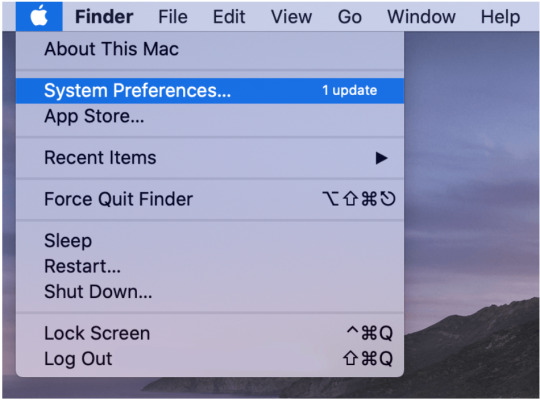
After that, search for the Bluetooth option.
Next, enable the Bluetooth option, and then a list of devices will appear.
Your machine will connect to your Mac computer via Bluetooth.
Launch the Cricut Design Space and select the New Product Setup option.
At last, you’ll see your Cricut machine connected to your Mac system.
That’s how you’ll finish the Cricut setup via Bluetooth on a Mac computer. Now, you can continue with your project making.
Cricut Bluetooth Setup on a Mobile Device (Android/iOS)
These are the steps to setup your Cricut product on a mobile device. Let’s have a look at them.
Android
All the Android users who want to setup their Cricut machine via Bluetooth. Let’s look at the steps below.
To get started, ensure that your machine is ON and within a range of 10-15 feet from the mobile device.
Then, go to the Settings option and search for the Bluetooth option.
Now, enable the Bluetooth option, and then a list of available devices will pair.
After that, select your Cricut machine from the list of devices.
Also, launch your Cricut app and sign in to it.
In the last step, select the New Product Setup.
Finally, the Cricut Bluetooth setup will finish on your Android device. You can use your Cricut product now.
iOS
If you are an iPhone or iPad user, complete these steps to setup a Bluetooth connection between your Cricut cutting machine and iOS device.
In the beginning, ensure that your machine is ON and only 10-15 feet away from each other.
Then, head to the Settings option and open the Bluetooth option.
After that, enable the Bluetooth option.
Now, a list of available devices will appear on the screen.
Then, you can select your device to connect with the machine.
Next, launch your Cricut app and sign in to your app.
Now, select the New Product Setup option.
Lastly, you’ll see your Cricut machine on the mobile screen as a connected device.
That’s it for the Cricut setup on an iOS device. Now, you can now start crafting with your Cricut cutting machine.
Why Is My Cricut Bluetooth Setup Not Working?
A Bluetooth connection is one of the best methods of connection. But, sometimes, it may not be successful due to many reasons. It may also be possible that the connection is built correctly at first, but later, it starts creating problems.
So, why does this happen? There are some main reasons that contribute to this problem. The main problem is when the Cricut machine is not turned on and not at an appropriate distance from your computer or mobile device.
In such cases, you’ll need to ensure whether your devices are connected to the power supply and the Bluetooth option is enabled. Now, you need to again select your Cricut model from the list and connect it to your device. Finally, you’ll see your Cricut product paired to your device via Bluetooth connection once again.
Conclusion
You have learned everything about the Cricut Bluetooth setup in this blog. Haven’t you? I tried my best to provide you with all the steps needed to setup a Bluetooth connection. Hopefully, you got an idea about the connection process on every device. Once you’re ready with the setup, you’re all set to use your one and only Cricut machine. However, if you want, you can setup your machine with a device using a USB connection, but a wireless connection is preferred over a wired connection. So, go forward with a Bluetooth connection.
Read more: install cricut design space app
how to setup cricut maker
cricut.com/setup mac
Source: Cricut Bluetooth Setup
#Cricut Bluetooth Setup#cricut.com/setup mac#cricut maker bundle#cricut explore 3#cricut design space#cricut accessories#cricut.com/setup#install cricut design space app#how to setup cricut maker
0 notes
Text
How to Make Custom Shirts with Cricut: A Step-by-Step Guide
I am obsessed with my Cricut machine and create projects on it every day. You can call it my hobby or my big passion for crafting. Recently, I have made dozens of custom shirts with my Cricut Maker machine, and you can create some on your own, too. Following this guide, your guesswork will be reduced to zero, as I will share some of the easiest steps on how to make custom shirts with Cricut.

If you are interested in my tutorial, I would recommend you continue it till the end so as not to miss anything important. I have been creating unique stuff with my Cricut for more than 6 years now; it has been a beautiful journey for me.
Whether you are a beginner or a well-trained Cricut user, this post will help you get some ideas for starting something new. I hope you found this blog helpful and that you will come back for more Cricut-related blogs like this one. Let’s start learning how to design shirts with Cricut for beginners.
Which Is the Best Cricut for Making Shirts?
When you are making a custom shirt, you will have this doubt about which machine to choose. My answer would be to choose anyone you have. Whether you have Cricut Maker, Joy, or Explore, you can choose anyone with your iron-on vinyl to make a perfect custom shirt.
However, you will need to insert the fine point blades to cut this type of vinyl. I hope you got an answer to it. Let’s move forward with this guide on making your custom shirt.
How to Make Custom Shirts with Cricut Machine?
When you are clear about which machine to use and what design you wanna make, let’s get started with my steps. Well, you will need a few things before you move your hands on the desktop. So, gather up all the listed things here.
Cricut Explore Air 2
EasyPress 2
EasyPress mat
Shirt apparel
Weeding tool
Brayer tool
Scissors
Standard mat
Premium vinyl
Are you ready with all these? So you’re good to go. When you are ready, head to your Cricut Design Space and show some of your creativity. And follow all the steps carefully.
Step 1: Go to the Cricut Design Space App
In the first step, you should go to your Design Space and pick a design to print on your shirt. As the Cricut app is full of ready-to-make designs, fonts, images, and templates, you won’t have to hustle to make a design. I am using my Explore Air 2 machine; you can use a machine you’re familiar with.
Step 2: Adjust Your Design
Once you are ready with your final design, you can take some time to make that fit for you. For example, you can change the design’s color. On the Design Space canvas, you will get a few options on the right-hand side, from where you can choose your favorite color for the shirt.
Step 3: Change Vinyl Color
Here, you need to change your vinyl color as your shirt’s color may not be a good match with the vinyl’s color. In order to keep the color vibrant and not blend them, you have an option to change the color of your iron-on vinyl. To do this, you should click on the Layers option on the canvas. After that, you can click on the white box with the Layer option and pick a color for your vinyl.
Step 4: Final Your Design
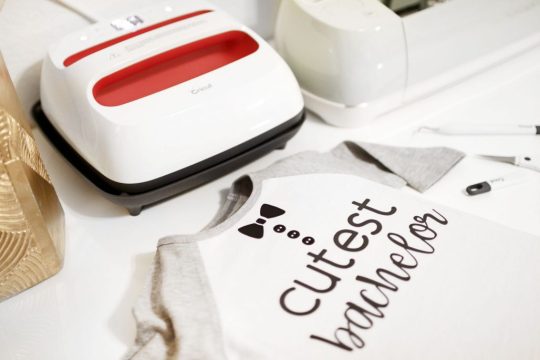
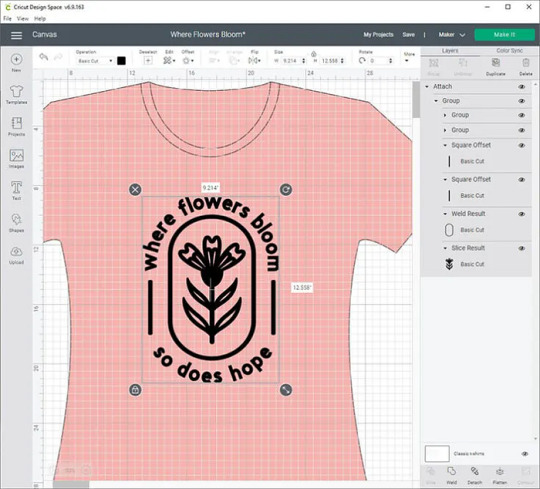
If you find the color combo not as expected, you can change it. Once you have done all the updates, you are ready to save your design. You need to hit the Save button along with the name of your project to remember what this design is about. I am making a design that says “Cutest Bachelor.” Let’s check more steps on how to make custom shirts with Cricut.
Step 5: Load Your Material (Iron-on Vinyl)
In this step, you are ready to cut your project with your special Cricut machine. Don’t forget to load your vinyl on a Cricut cutting mat and then into the Cricut machine. Once you are done, you can start the cutting. Also, select the correct size of your mat on your machine so that your design fits the cutting mat. And the most important thing is to align the iron-on vinyl correctly to get an expected cut.
Step 6: Cut Your Design
When your design is ready, and you have checked all the settings, you can allow your Cricut machine to perform a cut for you. Once you hit the Go button on your machine, it will show you a preview of your final design. If you are satisfied with it, click the Continue button to get a cut. Once the design is fully cut, unload your cutting mat.
Step 7: Weed Out the Excess Vinyl
When you have a cut in your hand, take a weeding tool and take out excess vinyl to make the design clear and ready to be ironed. You can use your hands too, but a weeding tool is more convenient. Now, you have finally come to the main part of how to make custom shirts with Cricut.
Step 8: Ready Your EasyPress
When your design is ready, you can set your Cricut EasyPress to cotton or linen to get the desired results. So, now you need to put your weeded design on the shirt apparel and use a Cricut EasyPress 2 to heat it. However, before that, you must use a brayer tool to remove lint and fibers from the shirt’s fabric. Once you do that, for the next steps.
Step 9: Preheat Your Shirt
When your apparel is ready, use your EasyPress to preheat it for 15 seconds with moderate pressure to remove the moisture and wrinkling. For the final heating, you should consider a Cricut Heat Guide that will help you find the best setting for your design. After that, use the temperature and pressure accordingly.
Step 10: Apply Heat to Your Shirt
And the last step is to just apply the heat as the Cricut guide suggests. Use a towel to place on your vinyl design, and apply heat for 30 seconds. Using a towel will prevent your iron-on from getting damaged. Viola, you have just designed a perfect custom shirt with your Cricut.
Conclusion
You were all wondering how to make custom shirts with Cricut. And with my blog, you might have found this process a bit easier than before, I guess. Don’t worry; if you follow the instructions carefully, I can bet you can make a fabulous shirt.
However, be mindful of the heating setting as it can ruin your project and waste everything. It’s always better to use a household iron while making your first project. When you get familiar with the process, you can take one step ahead with an EasyPress.
#how to setup cricut maker#How to design shirts with cricut for beginners#Best cricut for making shirts#How to Make Custom Shirts with Cricut
0 notes
Text
install Cricut Design Space app
"Cricut is a leading brand in the world of crafting and DIY projects. With a range of cutting machines and intuitive software, Cricut enables you to bring your creative ideas to life with precision. To get started, simply install the Cricut Design Space app on your mobile device. This app serves as the gateway to designing, editing, and cutting a variety of materials. Create custom projects and access a library of designs and fonts, all at your fingertips with the install Cricut Design Space app." https://criccricut.com/
#cricut design space#cricut design space app#cricut design space login#cricut design space software#cricut design space setup#cricut design space for mac#cricut#cricut.com setup mac#install cricut design space app#how to setup cricut explore#cricut.com/setup mac#cricut new machine setup#cricut explore air 2#how to setup cricut maker
1 note
·
View note
Text
how to setup cricut maker
Cricut offers amazing machines, including cutting machines and heat press machines, that invite you to explore your creative depths. Connect it to your PC or mobile using a USB cable or Bluetooth, and dive into your DIY projects. Download and install the Cricut app from the cricut.com/setup website, where you'll shape your artistic vision with precision cutting, writing, engraving, and scoring.
Cricut Design Space software
cricut.com/setup
Install cricut design space app
cricut.com setup mac
cricut device setup
install cricut printer
cricut setup maker
cricut maker software
Cricut.com/setup
cricut design space for mac
cricut design space for windows
cricut explore air 2 software
how to setup cricut maker
how to setup cricut explore
#how to setup cricut explore#how to setup cricut maker#cricut.com/setup#cricut design space#cricut explore air 2#cricut design space download#cricut new machine setup#cricut setup#cricut maker new machine setup#connecting cricut maker to laptop#cricut setup on computer#cricut setup website#cricut new product setup
1 note
·
View note
Text
How to Use Cricut Machine? [For Beginners]
Cricut machines are versatile and advanced crafting devices. Crafters can work on unique and intricate DIY crafts. Plus, the brand offers a wide variety of heat press and cutting machines that you can choose from. For cutting machines, Cricut Maker and Explore are excellent devices available for crafters. If you also want to start your crafting journey with any of these Cricut machines, then you must know the process to use the machine and the process to connect it with a device (computer or laptop). So, this blog post will impart all the essential knowledge on how to use Cricut machine to begin your crafting journey.
How to Use a Cricut Machine for the First Time?
If you are using the Cricut machine, then you are required to connect your device to a computer or smartphone device. Here is how you have to use the machine for the first time.
How to Connect Cricut Machine to a PC/Laptop?
If you want to know how to use Cricut machine for the first time, then it is necessary to have the knowledge to connect your machine to a PC or laptop. Hence, the following guide will help you connect the machine to a computer device.
Step 1: Connect the Machine to Your Device via Bluetooth
Note: You may have to use the Bluetooth adapter for some Cricut machines on Mac devices. Also, you can use the USB cable to establish the connection between both devices.
Step 2: Download Cricut Software on Your Device
How to Use a Cricut Maker?
The following guide will help you with how to use Cricut machine. Follow the guide to start using your Cricut maker machine.
Setup 1: Setup the Cricut Machine
Step 2: Create Your First Craft Project
How to Use a Cricut Explore?
If you have an Explore machine and want to know the process, then follow the below step-by-step guide on how to use a Cricut machine.
Conclusion
In the above post, you got to learn about the complete procedure of how to use Cricut machine. You also understood the process of using and creating a project on Cricut Maker or Explore machine. Using this guide, you can easily get started with either of the machines you are using. If you have any other further queries, then you can also go to Cricut's official website or connect to their customer service. We wish you to have acquired all the essential knowledge and start your new crafting journey to create your dream projects.
Visit: cricut.com/setup mac Install cricut design space app
Source: https://cricutdesignacut.wordpress.com/2023/10/19/how-to-use-cricut-machine-for-beginners/
#cricut.com/setup#cricut setup#cricut explore air 2#cricut.com/setup mac#cricut design space download#cricut design space#install cricut design space app#cricut machine maker#cricut design space login#cricut new machine setup#how to setup cricut maker#how to setup cricut explore
0 notes
Text
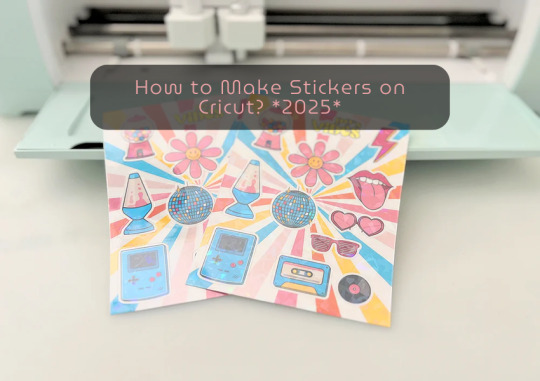
How to Make Stickers on Cricut? 2025
learn ‘how to make stickers on Cricut‘, then you have come to the right place. Stickers are loved by everyone, whether you’re a child or an adult. You do not need a printer to make custom stickers. You can create stickers at home using the crafting machine and some supplies and tools.
Stickers may look like ordinary sheets of paper, but they are a great way to personalize journals or gifts. Whether you are a Cricut user or a beginner, if you have a crafting machine and Cricut Design Space app downloaded to your device, you can make stickers in any shape, color, or size you can imagine.
There are three general types of stickers you can create with your Cricut cutting machine: written labels, vinyl decals, and Print Then Cut stickers. In this blog, you will learn about Print Then Cut stickers.
What Materials Do You Need for Your Project?
Before starting the process of how to make stickers on Cricut the first step is gathering all of the supplies and equipment needed for sticker making.
Cricut Explore, Explore Air 2, and Maker 3
Design Space
LightGrip cutting mat
Inkjet printer
StandardGrip mat
Sticker paper, printable vinyl sticker paper
Making Print Then Cut stickers is a great way to personalize gifts, decorate water bottles, or add stickers to scrapbooks and journals. Creating stickers is fun and easy, but to get started, you need to gather the materials mentioned above and then follow the steps below to proceed with the sticker-making.
How to Make Stickers on Cricut: 6 Simple Steps
Here are the steps you will need to follow for creating stickers on your crafting machine. So, let’s get started right away.
Step 1: Calibrate Your Machine for Print Then Cut
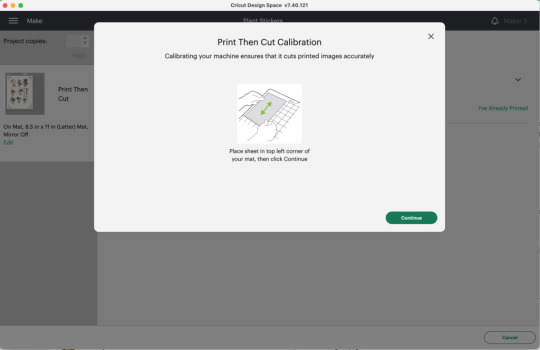
Calibrating your machine can sound optional, but this is the important part of making stickers with Cricut. In the Cricut Design Space app, choose Calibration from the menu, and then choose Print Then Cut. The software will prompt you to print a test sheet and load it into your machine. Tip: If possible, try to use a lightGrip machine mat.
Step 2: Add a Printable Image to Your Canvas
Now, within the Cricut Design Space Software, you can add multiple images to your canvas to make custom stickers. Or you can upload your SVG file. Once you have placed the images on your canvas, select Print Then Cut under the Operation menu and change the design from a Basic cut to a printable design.
Step 3: Format Images With Offset Feature
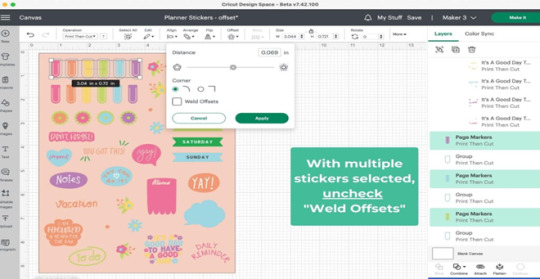
When you are done creating your stickers, you can add a finishing touch. To do this, you need to create a white border around your images. This creates a decorative outline called an offset, adding dimension to your sticker. Choose the design/ image that you want to offset, and then click the Offset option in the toolbar. When you are done selecting the offset feature by default, it can show you dark gray, which you may need to change to white.
Step 4: Attach the Images

Once you are done formatting your stickers, select each with its layers in the layers panel and click Flatten. When you flatten the images, make them into one layer, and to keep your project in order, select all photos and click on the Attach option.
After flattening the design, you cannot change the colors. But you can always Unflatten the images and make changes later.
Step 5: Print Sticker Sheet
Now, you’ve reached the best part of sticker making. Once you click the Make It button, you are ready to print your design. Click on Use System Dialog, and a preview box will appear where you can fix your print settings. Printer settings vary depending on your model, but select the highest-quality print setting if possible. Make sure the sticker paper is compatible with the printer and the paper you have chosen.
Step 6: Cut the Image Using Your Machine
This is the last step of ‘how to make stickers on Cricut‘. Firstly, when your stickers are printed, put them on the Cricut mat, then choose your material settings. After that, load your cutting mat and press start to cut using the standard fine-point blade. Remember to change your custom settings to Sticker paper. They have clear white options, so choose accordingly. When the stickers are done cutting, remove them from the mat, and it is ready to use.
Summary
Making stickers with Cricut is a very fun and creative process. Using your machine, you can make different kinds of stickers in different colors for your journals, scrapbooks, or for your gift hampers. It is a great way to get kids involved in a fun and creative activity. You can create stickers for your journal, notebook, or customized gifts. Not only is it a creative process, but it is also a great way to add a unique touch to your belongings.
In this blog, you explore ‘how to make stickers on Cricut’, and now you can decide which kind of stickers you want to make.
Source: How to Make Stickers on Cricut
#how to make stickers on Cricut#cricut stickers#cricut design space app#cricut design space software#cricut maker setup
1 note
·
View note
Text
5 Easy DIY Cricut Halloween Decorations Ideas For 2024

It is the fall season, and Halloween is approaching, so you get a chance to unleash your creativity, so you want to make these Cricut Halloween decorations. Whether you are throwing a party or decorating your own home, it does not matter. Use Cricut to create DIY decor, party projects, and costumes. With Cricut, you get to customize and personalize them with your style.
Here is a great collection of fun and DIY crafts you can make with your Cricut, so read and explore some amazing ideas.
1. Treat Bags
Sometimes, it is not possible to buy treat bags specifically for Halloween. It is important to have treat bags for your candies, but instead of buying them, make them at home with the help of your Cricut machine. Create a spooky and scary design in the Design Space app, cut the iron-on vinyl, and transfer it to the bag with a transfer sheet. Your treat bags will be ready for a Halloween party.
Materials Required
To make the customized treat bags, you will need these materials and tools:
Cricut Machine and Design Space app
Cardstock
Sticky Tape
Iron on vinyl
Transfer sheet
Scoring Tool
Debossing Tool
2. Halloween garland
Grab your Cricut machine and some black cardstock, and start making some freaky and cool spiderweb garland for your home. It’s easy to create. Design as many spiderwebs as you like on your app, cut them out with the help of a Cricut machine, and glue all the pieces together until you have a garland. This is a unique way to add a spooky vibe to your Halloween decorations and decorate your entire staircase railing. What can be a better Cricut Halloween decoration than this?
Materials Required
Halloween garland is one of the easiest projects that you can make with these supplies and with Cricut:
Cricut machine
Cricut Design Space software
Black Cardstock
Glue
3. Costumes
Halloween children like to gear up their looks on the eve of Halloween, and this year, you can use Cricut to make your costume, allowing you to be more creative with your work. Cricut Maker is best for making costumes because it can cut hundreds of materials, ranging from delicate to slightly thick fabrics. The possibilities are endless with Cricut Maker. You can choose a skeleton image using Cricut Design Space software, cut the materials, and place your design on the cloth with the help of EasyPress.
Supplies and Tools
For making costumes, you will need these art supplies and tools:
Cricut Maker
Cricut Iron-on
Cricut Design Space app
Weeding Tool
EasyPress
Blank Cloth
4. Tumblers or drinkware
What is the best way to design your tumbler or drinkware to be spooky? When your guests come over for a Halloween party, you can serve your beverages and scare them. It is a unique project design, an HTV project, and you can stick it to your tumblers. You’ll have to use a scary design from your Design Space and then apply it to your tumblers using heat transfer vinyl.
Supplies and Tools Needed
One of the unique crafts that you can make with your Cricut and with the help of these materials:
Black Cups
Cricut machine
Design Space software
Transfer tape
Cricut permanent vinyl
5. Lanterns
Turn a bunch of jars into amazing spooky lanterns and decorate your house for Halloween. This simple yet impressive craft is easy to do. Choose a ghost as your design in the Design Space app or upload your SVG file, then cut it out. Use the weeding tool to remove the excess part from the design. Then, place your design on the jar with the help of transfer paper. Then, peel off the transfer sheet and put an LED light inside your lantern, which is ready.
Supplies
To make spooky lanterns, get these supplies:
Cricut Maker or Cricut Explore
LightGrip mat
Transfer paper
Colored Cardstock
LED light
Wrap up
In this write-up, you explored all the Cricut Halloween decorations you can make with Cricut. It offers you a variety of features and tools with which you can customize anything and create unique crafts for your Halloween party. You can create all the above projects with your Cricut. It provides so much that you can never get bored of it, and the possibility of making projects is limitless.
So, make this Halloween memorable with Cricut. Unleash your creativity, and surprise your family and friends with these amazing, fun, and spooky projects.
For more information visit: Cricut.com setup mac cricut new machine setup how to setup cricut maker
#cricut halloween decorations#how to setup cricut maker#Cricut Maker Series#Cricut Maker Setup#Cricut Design Space app#Cricut Design Space download#Cricut Design Space Software#cricut new product setup#cricut new machine setup
1 note
·
View note
Text
How to Connect Cricut Maker Bluetooth: All Devices Covered!
If you are a beginner who has just bought a new Cricut cutting machine and wants to use it, then you must know how to connect Cricut Maker Bluetooth. Connecting your machine to your device is necessary to start making your crafting projects. To make the connection, you need a mobile phone or computer. You can connect it to your machine using Bluetooth or USB, but today, I will talk about wireless Bluetooth connection in particular. Keep reading the blog to learn how to connect your device to your machine.
Cricut machines can be paired with 4 various devices that are Android, iOS, Windows, and Mac. Here, I am going to discuss connecting all four devices to your machine. You will be able to connect whichever device you are using to your machine.
How to Connect Cricut Maker Bluetooth to Windows?
To connect your cutting machine via Bluetooth, you need a device. A Windows desktop or laptop is a great option. Just remember that your computer needs to be either Windows 10 or newer. Apart from that, the computer needs some other features. Once you make sure that the computer is compatible with your machine, you can continue connecting the machine to your PC.
First, you must turn on your machine. To do that, you have to press the power button and hold it for a few seconds.
Then, make sure that you have put the machine within 10–15 feet of the device.
Once you have turned on the machine, you should move to your computer and check whether it is Bluetooth-enabled or not. To do that, go to Device Manager on your computer.
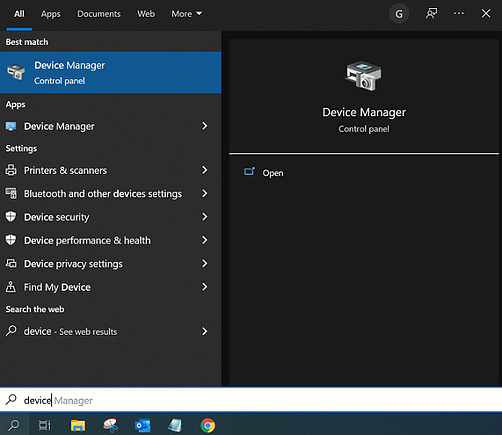
Now, check to see if Bluetooth is listed on the computer. If it is, your computer is enabled to use Bluetooth. If it isn’t, you will have to purchase an external Bluetooth dongle.
After checking Bluetooth inability, close the Device Manager and open Settings from the Start menu.
Next, open the Devices option, turn on Bluetooth, and click Add Bluetooth or other device.
After that, select the Bluetooth option.
You need to wait until the device searches for the machine model. When you see it among other devices, you have to select it.
If the computer prompts, type 0000 as the PIN and select Connect.
Your crafting machine is now connected to your Windows computer.
How to Connect Cricut Maker Bluetooth to Mac?
If you have a Mac instead of a Windows PC, you can also use this one with your machine. The computer is compatible with the Design Space app, and you can easily connect it to your cutting machine. Before connecting a computer, you just need to make sure that it is running macOS 11 or later and has other required features.
This is how you can connect the crafting machine to a Mac system:
Add your machine to an electric socket and then press the power button.
Next, keep the device and the machine in the range of 10–15 ft.
Then, open your desktop computer and go to the Apple menu.
Now, move to System Preferences and open the Bluetooth option.
Once you open Bluetooth, turn it on and look for your machine model.
Also, when the machine appears, tap on it.
If the computer asks you for a PIN, type 0000 and then select Pair.
Your pairing process for the machine and Mac is complete.
How to Connect Cricut Maker Bluetooth to Android?
You can also use a smartphone with your machine. Cricut is a versatile tool that works on both phones and desktops. You can connect an Android or iOS phone to your cutting machine and work with it. This is how you will have to connect your Android to the machine.
Start by turning on the machine and then keeping it within 10–15 feet of the phone.
Then, open Settings and go to Bluetooth.
Next, turn the Bluetooth on and search for your machine.
Now, click on the model when you see it.
Finally, your machine is paired with your Android phone.
How to Connect Cricut Maker Bluetooth to iOS?
To connect your machine to an iPhone, you have to follow these steps.
Initiate by enabling the machine to connect by pressing the power button and then putting it within 10–15 feet of your iPhone.
After that, go to the Bluetooth setting on your phone and turn the Bluetooth on.
Again, search for the machine’s name, and when you find it, tap on it.
If prompted, you will need to enter the password — 0000.
In the last step, the pairing procedure will be complete.
Conclusion
I hope you read the blog till the end, and I am sure you have learned how to connect Cricut Maker to Bluetooth. Connecting your machine to your device is essential to start making crafts. Only after you connect the machine to your operating system will you be able to create projects on the Design Space software and cut unique designs on your machine. You have two options for connecting Cricut to your machine either using Bluetooth or USB. In this blog, I only talked about Bluetooth connection.
FAQs
How Can I Fix My Cricut Connection via Bluetooth?
If you are having connection problems while connecting your machine to any device via Bluetooth, you should make sure of a few things. First, you must check whether you have turned on Bluetooth on your device. You should also check and ensure that your machine is connected to a wall socket properly and is available for the connection. Lastly, check that the machine does not exceed the permitted distance of 10–15 feet. In that case, you will have to bring them closer.
Does Cricut Maker Have Built-in Bluetooth for Connection?
Yes, it does have. Although this machine is a first-generation crafting model, it is enabled with built-in Bluetooth. Hence, you will not need an external Bluetooth adapter to connect the machine to a Bluetooth device. You can simply turn on the machine, and it will be available for the connection on your device. You have to go to Bluetooth settings on your device and select the machine’s name. And your wireless connection will be done.
Does Cricut Maker Need a Wi-Fi Connection?
The answer depends on what you want Wi-Fi for. For example, if you want to know whether you need Wi-Fi to connect your machine to your device, then the answer is no; it does not need Wi-Fi. But if you want to use Wi-Fi for the internet connection, you can use it to download the Design Space app and work on your craft projects. However, you don’t necessarily need Wi-Fi for your machine.
Source: how to connect Cricut Maker Bluetooth
Visit here to Know More: Cricut.com/setup
Twitter
Pinterest
0 notes
Text

Cricut makes a digital cutting machine that works with easy-to-use software, and crafters can get it for free at Cricut .com/setup. With the help of this software, you can make any cricut explore air 2 software and cut it with the help of the machine. Apart from this, you can upload your project and access it from anywhere and can also access pre-made projects and designs. It helps craft projects within a minute. cricut setup for pc
0 notes
Text
Cricut Machine Set up: Essential Guide for Beginners
Are you wondering about the Cricut machine set up on computers and smartphones? Don't worry, as I am going to help you with everything. If you remember, last time, I taught you what exactly a Cricut is and what its models are. But this blog will teach you how to set up your machine on computers and smartphones. As mentioned in the previous blog, Cricut is a cutting machine that can cut 100+ materials with ease and accuracy.
Before starting the crafting process, all users are supposed to set up their respective systems on the Cricut machine. After completing the setup process, you must connect both devices. Besides, you need a Cricut Design app that will help you make a variety of DIY projects. This post will provide all the details on downloading and installing the Cricut software and setting up the Cricut machine with different systems.
How to Download Cricut Design Space on Mac?
As shared in the introductory paragraph of the Cricut machine set up blog, Cricut Design Space is one of the most essential tools for all DIYers. You can easily make numerous customized projects through its various features and tools within a few minutes. To get the app on your Mac, you are instructed to have a look at the below steps:
Start the process by visiting Cricut Design Space's official portal, design.cricut.com.
After arriving at the portal, tick the Terms to Use and Privacy Policy box.

Next, choose the folder to save the Design Space downloaded file.
Then, click the Start button, and the file will download to your system.
When the download is finished, minimize the window and go to the Downloads folder.
Now, double-click the .dmg file, and a small pop-up window will appear on your system screen.
Following this, move the Cricut software to the Applications folder to start the installation process.
At this point, launch the app by double-clicking the Cricut app, which is available inside the Applications folder.
A small Mac window will appear, and you must click Open to continue the process.
In conclusion, sign in or create your Cricut account using your login details.
As a result of this process, you can now use the Cricut app to make uncountable DIY designs.
Cricut Machine Set up on iOS Smartphones
Answer: If you are an iPhone user and want to create your DIY ideas from a cutting machine, you must set it up with your mobile device. Have a look at the below steps to learn about the method:
First, plug your machine power cord into the nearby wall socket.
After that, pair your smartphone with the Cricut product via Bluetooth.
Next, install the Cricut Design Space app and create your account.
Now, launch the app, create your Cricut ID, or sign in by entering the details.
Following this, open the Menu tab and select the Machine Setup section.
Choose your model and complete the setup by following the on-screen instructions.
Cricut Machine Set up on Mac Computers
Simultaneously, you can set up your devices to get the appropriate craft out of the cutting machine by setting it up with your Mac computer. If you aren't aware of the stages that are part of the setup process, then follow these steps:
Initiate the process by plugging in the Cricut model and turning it on.
Afterward, unpack your device and connect it via USB cable or pair it up with Bluetooth.
Next, go tocricut.com/setup and download the Cricut Design Space app.
Now, follow the instructions to create your Cricut account and set up your machine.
Finally, you will learn that the setup was made when you were invited to cut a material.
At the end of the Cricut machine set up blog, it's pretty evident that to create your favorite DIY project, you need to set up & connect the craft plotter to desktop and mobile devices. Without performing the process, you won't be able to start the machine and work on the Cricut Design app.
Frequently Asked Questions
Question: How Can I Pair Cricut to My Windows?
Answer: With the help of the following details, you can easily pair up your cutting machine with Windows:
Begin by checking that your machine is on and comes under your computer's 10-15 ft. range.
After that, enable Bluetooth on your device and look for your model name inside the list.
Next, choose your model name from the list and enter the password.
Finish the process by clicking the Pair button in the middle of your screen.
Question: How to Install Cricut Design Space on Android?
Answer: To get the Cricut app on your phones, to get this designing app you need to follow the steps available below:
First, you need to open the Google Play Store and look for Cricut Design Space.
Next, press the Install button visible on the right side of the page.
After the installation is done, open the app and tick the Machine Set up or Sign In.
Finally, you can create various DIY projects on your canvas.
Question: What Do I Need to Use Cricut?
Answer: To use a Cricut machine, you need to have several supplies that will help you create the project as you wish. The names of certain supplies are:
Cricut machine
Cricut ID and password
Computer or mobile device
Materials
USB cable
#how to setup cricut maker#install cricut design space app#Cricut.com/setup#cricut.com/setup windows#cricut.com/setup pc#cricut.com/setup mac#cricut design space#install cricut explore air 2#cricut maker bundle#cricut new machine setup#cricut explore 3#cricut machine set up
0 notes
Text
How to Use Cricut Maker for DIY Crafting Magic?
Again, I am ready with my new tool, Cricut Maker. Using this machine, I am going to teach you how to use Cricut Maker to create your own shirt in a couple of minutes. At one time, I was also a beginner, and it was not easy for me to learn it. Somehow, I learned it from the internet. However, it took me a lot of time to gain practical expertise on this tool but believe me, it was worth learning.
Moreover, the machine is very easy to use, and it has a simple setup process, which I have already covered in this blog. My intention in writing this blog is for beginner crafters who have just bought the machine and want to learn how to use it from the beginning. So, are you ready to join me on this journey of learning about the Cricut Maker from the ground up? If yes, let’s get started!
The Process to Setup a Cricut Maker Machine
When I got my new Maker machine, I was too excited to unbox it. But after unboxing, I had to set it up. In the beginning, I was nervous as hell! I really didn’t want to make any mistake that would cause a technical problem. But the Cricut’s guide finally helped me. In addition, the setup is also easy for different platforms like Windows, iOS, Mac, and Android.
To learn how to setup Cricut Maker on computer and mobile device, follow the instructions given below:
First of all, plug the power cable into the back of the machine and connect it to the power source.
Next, you have to connect the machine to the computer. Here, you can either use a USB cord or Bluetooth feature.
Now, open a browser such as Chrome and search for cricut.com/setup.
On the next page, you will need to download the Design Space and then install it.
Here, you can simply follow the instructions available to you on the screen and set up your account.
Finally, you will be notified about the completion of the Cricut setup.
As soon as we complete our setup, we are always prompted to perform a test cut. This is easy, and you can do it by following the steps given to you on the screen.
What Supplies Will I Need to Make a Custom Shirt?
Before I teach you how to use Cricut Maker, let’s discover some of the essential Cricut supplies needed for making a shirt. Here is what you need to make your own shirt on Maker:
Iron-on Vinyl Material
Cotton Blank T-shirt
Cricut Maker (or any other cutting machine)
LightGrip cutting mat (or Standard Grip mat)
Weeding tools
EasyPress
EasyPress Mat
I have specifically chosen the cotton shirt, which has smooth textured and high-quality cotton. It really works well with Iron-on vinyl.
Important Note: I would recommend pre-washing your blank shirt before applying the vinyl on it. In this way, your vinyl won’t crack if the shirt shrinks. In addition, pre-washing will help you remove the dirt or any impurity that can hinder the ability to adhere to vinyl on the shirt.
How to Use Cricut Maker for the First Time?
So, are you ready to learn the process of making a shirt on the Maker machine? If yes, follow the steps one by one:
Step 1: Create a New Design or Upload

Step 2: Load the Vinyl and Cricut Mat
Now, you need to place the material on the mat for cutting. For this, you need to load the vinyl onto the mat. Make sure you are using the mat that has lost its stickiness a little bit. After that, you have to use the brayer tool to flatten and adhere the vinyl to the cutting mat.
Remember: The shiny side of the vinyl should be facing down. For patterned vinyl, the pattern side should be down.
Once done, you are ready to tap on the Load button to start the loading process of the cutting mat into the Maker machine. Next, you will need to send your design to the Cricut Maker.
Step 3: Send Your Design to the Cricut Machine
Navigate to the Cricut app and click on the Make It button in the top-right corner.
Next, select the toggle button to turn on the Mirror.
Afterward, you will be moved to the next screen, where you need to choose the base material. Choose the Everyday Iron-on from the list.
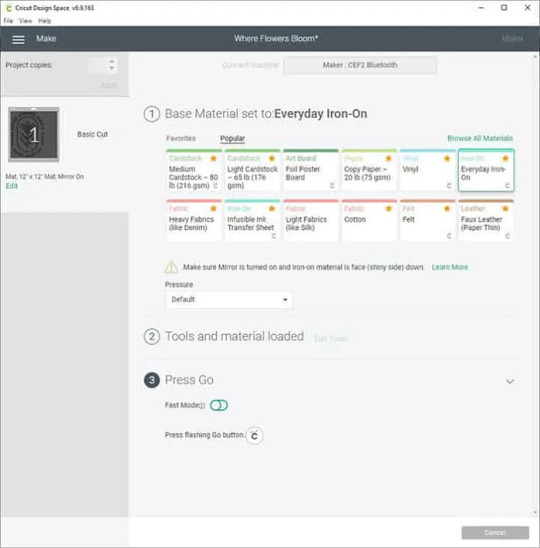
Step 4: Cut and Weed Out the Design
After choosing the material, you need to load the Fine-Point blade and the mat.
To start cutting, you need to press the Go button to cut the design.
Once cutting is done, unload the mat and weed the design using the weeding tools.
Step 5: Transfer Your Design
This is the step where your EasyPress comes into play. Preheat the blank shirt and then place your design on it. After that, set the recommended temperature and press gently on the design.
Wrapping Up
In this blog, I have explained to you how to use Cricut Maker along with the full setup process. This guide not only explores the setup process but also how to make a shirt using it. The process is easy for both setup and shirts. However, this guide can also help you if you want to add your design to a tote bag or any other fabric. The process will be almost the same for every project.
FAQs
Question 1: How to use smart vinyl with Cricut Maker?
Answer: Smart Materials doesn’t require you to use a cutting mat, making it easy to use. Below are the steps given that explain the usage of vinyl.
First, you need to load the material and ensure a 10-inch gap behind the machine.
Next, try to position the material. For example, keep the color side facing up.
Then, feed the material into the guides.
Now, you have to press the Load button and gently push the material forward.
Finally, it’s time to apply the vinyl on the clean, blank surface.
Question 2: How to use Cricut Maker for stickers?
Answer: Find the steps below to create amazing stickers using the Maker machine.
First, you need to create a sticker design on Design Space.
After that, print the image using a compatible printer.
Once you have printed the image, set the materials on the Cricut app.
Next, you should load the mat into the cutting machine.
After that, press the Go button to cut stickers.
Once the sticker is cut, unload the mat and remove the stickers.
Question 3: How to use pens with Cricut Maker?
Answer: In order to use the pens with Cricut Maker, you have to follow the instructions provided below:
First, you need to place the laser copy paper on a LightGrip mat and then load it.
On Design Space, create the design that fits your blank and assign a Cricut pen color.
Also, you must Mirror your design.
Then, browse all materials and then choose Copy Paper.
Insert your Infusible Ink Pen into Clamp A and hit the flashing Go button.
Once the design is done, you can unload the mat.
Read more: install cricut design space app
how to setup cricut maker
Cricut Design Space Login
Source: how to use Cricut Maker
#how to use Cricut Maker#Cricut Design Space Login#cricut design space#cricut.com/setup#cricut.com/create#how to setup cricut maker#install cricut design space app#cricut new machine setup#cricut.com sign in#www.cricut.com/setup login#cricut setup
0 notes