#How to Scan Google Drives for Viruses
Explore tagged Tumblr posts
Visit Tumblr Blog
Explore Tumblr blogs with no restrictions, modern design and the best experience.
Last Seen Tumblr Blogs


Fun Fact
The most popular pages on Tumblr are about Minecraft, GIFs, and David J. Peterson.
Text
Can You Track IMEI Number Through Google Earth? (Spoiler: No, But Here's What Works)
Can You Track IMEI Number Through Google Earth?
Okay, so your phone's gone. Maybe lost. Maybe stolen. And now you're googling like crazy trying to find it.
Someone told you about tracking IMEI numbers with Google Earth? Yeah, I've been there too. Spent hours trying to make it work.
Bad news first. It doesn't work. At all.
But don't worry. I'll show you what actually does work. And save you from the same mistakes I made.
First Thing: What's an IMEI Number Anyway?
IMEI is just a fancy name for your phone's ID number. Every phone has one. No two are the same.
It's like your phone's social security number. Except it's 15 digits long.
Here's what mine looks like: 352094087654321.
Want to find yours? Easy:
Type *#06# on your phone
Check your phone settings
Look at your phone's box
Check under your battery (if you can remove it)
When I first heard about IMEI, I thought it was some spy stuff. Nope. Just a boring number that identifies your phone.
Can Google Earth Track Your IMEI? Nope.
Let me save you some time. Google Earth cannot track IMEI numbers.
I know. Bummer, right?
It sounds like it should work. Google Earth has all those satelite photos. Your phone has a unique number. Put them together and... nothing.
Because that's not how it works.
Here's Why It's Impossible
Google Earth is just photos. That's it. Pictures taken from space.
Think about it. Can you see your phone from space? No way.
Even if you could, how would Google Earth know it's YOUR phone? It can't read IMEI numbers from orbit. That's science fiction stuff.
I wasted three hours trying every "trick" online. Nothing worked. Because physics doesn't work that way.
It's like trying to use binoculars to hear someone's conversation. Wrong tool, wrong job.
So How Does Real IMEI Tracking Work?
Actual IMEI tracking is totaly different. And regular people can't do it.
Only these folks can track IMEI:
Your phone company (Verizon, AT&T, etc.)
The police
Sometimes the phone maker
Here's the deal. Your phone talks to cell towers. When it does, it shares its IMEI. The phone company logs this.
But catch this. Your phone must be:
Turned on
Have a SIM card
Connected to a network
Phone turned off? Can't track it. SIM card removed? Forget about it.
Those "Track Any IMEI" Websites Are Scams
Trust me on this one. Every single website that promises IMEI tracking? Fake. All of them.
I tested dozens. Here's their playbook:
You type in your IMEI
They show a fancy "scanning" animation
They ask for money
You pay (don't do this!)
They give you nothing
Some are nastier. They might:
Put viruses on your computer
Steal your info
Use your IMEI for bad stuff
Almost fell for one myself. My bank saved me by blocking the payment. Thank god.
What to Actually Do When Your Phone Goes Missing
Forget Google Earth. Here's what works:
1. Use Your Phone's Built-In Tracking
Got an Android?
Go to android.com/find
Log in with your Google account
Pick your phone
See where it is (if it's on)
Got an iPhone?
Go to iCloud.com/find
Log in with your Apple ID
Click your phone
Check the map
I've used both. They work great. But only if your phone's on and online.
2. Call Your Phone Company NOW
Don't wait. Call them immediately. Tell them what happened. Give them your IMEI.
They can:
Block your phone
Stop anyone from using it
Sometimes show where it last connected
Once they blacklist your IMEI, that phone becomes a paperweight. Good.
3. Get a Police Report
I know, I know. Cops probably won't launch a manhunt for your phone. But you need that report.
Why? Insurance claims. Plus, sometimes cops find batches of stolen phones. They use IMEI numbers to return them.
Happens more than you'd think.
4. Change All Your Passwords
Super important. People always forget this part.
Change passwords for:
Email
Banking apps
Social media
Any app with your credit card
Do it now. Not later. Now.
Myths That Drive Me Crazy
Let's kill some myths:
"Anyone can track IMEI numbers" Nope. Only phone companies and cops. With the right tools.
"Secret apps can track any IMEI" These are scams. Or viruses. Usually both.
"Google Earth has hidden IMEI features" It doesn't. Google Earth shows maps. That's all.
"Hackers track IMEI easily" Actually pretty hard. They'd need to hack your phone company.
About Those YouTube Videos...
Oh man. Those videos make me mad.
"Track ANY Phone with Google Earth!" Millions of views. All fake.
They show:
Fancy computer screens
Random typing
Fake "hacking"
Magic phone finding
It's all video editing. Hollywood tricks. Total BS.
I tried copying one once. Wasted an hour. Felt real dumb after.
Is IMEI Tracking Even Legal?
Quick reality check. Even if you COULD track someone's IMEI (you can't), it's probably illegal.
Tracking people without permission is:
Creepy
Illegal
Called stalking
Only legal reasons to track:
Your own lost phone
Your kid's phone (if they're underage)
Company phones (that the company owns)
Cops with warrants
Don't track your ex. Or your neighbor. Or anyone. Just don't.
Stuff That Actually Works
Stop chasing IMEI fantasies. Try these instead:
GPS Apps That Work
Like:
Life360
Find My Friends
Google Maps sharing
These work. But everyone has to agree to share location.
Bluetooth Trackers
Those AirTag things? Or Tiles? They're great.
Not for phones exactly. But amazing for keys and wallets. I got one after losing my keys a million times. Best 25 bucks ever.
Security Cameras
Worried about theft? Cameras beat any tracking. They might not find your stolen phone. But they stop theft before it happens.
My Phone Got Stolen. Here's What Happened.
True story. Coffee shop. Put my phone down. Looked away for five seconds. Gone.
First thought? "I'll use the IMEI to track it!"
Yeah, right.
What actually worked:
Opened Find My iPhone on my laptop
Saw it moving away fast
Called cops with the location
Locked it remotely
Put my number on the screen
Thief dumped it once it locked. Good person found it. Called me. Got it back next day.
Never used the IMEI once.
Why Do People Fall for This?
Good question. Why do smart people think Google Earth tracks IMEI?
My theory:
Both sound high-tech and mysterious
Movies show impossible tracking
Desperate people try anything
Scammers keep lying about it
Like those Nigerian prince emails. Obviously fake. But desperation makes people stupid.
Will This Ever Be Possible?
Will satelites ever track IMEI numbers?
No.
Satelites take pictures. They don't read electronic signals from phones. Two different things entirely.
What might get better:
Phone tracking features
Faster police response
Better security systems
More phones recovered
But Google Earth reading IMEI? Never gonna happen.
Keep Your Phone Safe (So You Don't Need Tracking)
Better to not lose it in the first place, right?
Keep It Physically Safe
Never leave it alone
Front pockets, not back
Watch it in crowds
Get a case with a strap
Digital Safety Too
Use a real passcode (not 0000)
Set up fingerprint lock
Turn on find my phone
Back up everything
Just In Case
Write your IMEI somewhere
Photo your serial number
Save your carrier's number
Maybe get insurance
This boring stuff works better than satelite tracking dreams.
Simple Tips Everyone Ignores
The best advice is usually the most obvious.
Don't:
Wave your expensive phone around
Leave it on tables
Let strangers "borrow" it
Skip security updates
I learned all this the hard way. Several times. I'm not that bright aparently.
Here's the Deal
Lost phones suck. Stolen phones are worse.
But Google Earth won't help. Can't track IMEI. Never could. Never will.
What works:
Find My Phone features
Calling your carrier fast
Police reports
Being careful
What doesn't:
Fake tracking websites
Bogus YouTube videos
Scam apps
Google Earth dreams
Stick with what works. Skip the fantasy.
My Final Take
I've wasted so much time on this. Testing everything. Trying every method.
Know what I learned? Boring security beats exciting myths.
Strong passwords. Regular backups. Being careful. Not as cool as satelite tracking. But it works.
So when someone says they can track IMEI with Google Earth? Now you know better. Send them this article. Save them the headache.
Lost your phone? Skip Google Earth. Use Find My Device. Call your carrier. File that report.
Yeah, it's boring. But boring works.
Keep your phones safe, friends. The smart way. Not the Google Earth way.
Quick note: This is just for learning. Respect privacy. Only track your own stuff. And seriously, those YouTube videos are fake. All of them.
0 notes
Text
Clearing Malicious Software to Get Your Google Ads Approved
Google Ads can be a powerful tool for driving traffic and generating leads, but having your ads disapproved due to malicious software can be a frustrating setback. Understanding why your ads were disapproved and how to resolve the issue is crucial for getting your campaigns back on track.
This blog, provided by Reliqus Consulting , will guide you through the steps to fix Google Ads disapproved due to malicious software.
Understanding Google Ads Disapprovals Due to Malicious Software
When Google detects malicious software on your website, it takes immediate action to protect users. Malicious software, or malware, can include viruses, spyware, and other harmful programs that can compromise user data and security. Google’s stringent policies ensure a safe browsing experience, so any hint of malicious software on your site will result in ad disapproval.
There are several reasons why Google might flag your site for malicious software:
Infected Files: Your site might have files that are infected with malware.
Compromised Plugins or Themes: Using outdated or compromised plugins and themes can introduce vulnerabilities.
External Scripts: Third-party scripts or ads that you run on your site might be the source of malware.
Hacked Website: If your website has been hacked, attackers might have injected malicious code.
Steps to Identify and Remove Malicious Software
The first step in resolving the issue is to identify and remove the malicious software from your site. Here’s how you can do it:
Use Google Search Console: Google Search Console is a free tool that can help you identify security issues on your site. Check the "Security Issues" section for any alerts about malware.
Scan Your Website: Use a trusted malware scanning tool to scan your website for any malicious software. Some popular tools include Sucuri, Wordfence, and SiteLock.
Remove Infected Files: Once you’ve identified the infected files, remove them from your server. Be careful not to delete essential files that your website needs to function.
Update Plugins and Themes: Ensure that all your plugins and themes are up to date. Remove any that are no longer maintained or have known vulnerabilities.
Check External Scripts: Review any third-party scripts or ads running on your site. Remove or replace any that are flagged as malicious.
Secure Your Site: Implement security measures to prevent future infections. This includes using strong passwords, keeping your software up to date, and using security plugins.
Requesting a Review from Google
After you’ve cleaned your site, you’ll need to request a review from Google to get your ads approved again. Here’s how to do it:
Log in to Google Ads: Go to your Google Ads account and navigate to the "Ads & Extensions" section.
Find the Disapproved Ad: Locate the ad that was disapproved and click on the "Disapproved" status for more details.
Request a Review: Click on the "Resubmit" button to request a review. Provide any additional information or documentation that can help Google verify that your site is now clean.
Monitor Your Site: After submitting your request, continue to monitor your site for any signs of malware. It’s essential to ensure that your site remains secure to avoid future disapprovals.
Preventing Future Disapprovals
To safeguard your Google Ads from future disapprovals related to malicious or unwanted software, it’s essential to maintain rigorous website security and adhere to best practices. Regularly update your website’s software, scan for vulnerabilities, and use trusted security tools to detect and address any potential threats promptly. Additionally, ensure that all third-party scripts and plugins are from reputable sources and are kept up-to-date.
For more detailed strategies and tips on preventing ad disapprovals, read more here.
0 notes
Text
How to Fix Abnormally Functioning Operating System or Software?

PC LAP Mall is a leading computer and laptop sales and services center in Saravanampatti
Call : 9952274058 | Call / WhatsApp: 8870708883
PC LAP Mall Google Map Location
There are a number of things you can do to fix an abnormally functioning operating system or software. Here are some common troubleshooting steps:
Restart your computer. This may seem like a simple solution, but it can often fix minor software glitches.
Run a virus scan. Viruses and malware can cause a variety of problems, including system instability. Make sure you have a reliable antivirus program installed and that it's up-to-date.
Update your software. Software developers regularly release updates to fix bugs and improve performance. Make sure your operating system and all your software are up-to-date.
Check your hardware. If you've tried all of the above and your system is still malfunctioning, it's possible that there is a hardware problem. Try running a hardware diagnostic tool to check for any errors.
Boot into Safe Mode. Safe Mode is a special mode that starts Windows with a limited set of drivers and services. This can be helpful for troubleshooting problems that are preventing your system from booting normally.
Restore your system to a previous point in time. If you've created system restore points, you can use them to restore your system to a state when it was working properly.
Reinstall your operating system. If you've tried all of the above and your system is still malfunctioning, you may need to reinstall your operating system. This is a last resort, but it can sometimes fix problems that cannot be resolved in any other way.
Here are some additional tips for troubleshooting abnormally functioning operating system or software:
Try to identify the specific symptoms of the problem. This will help you narrow down the possible causes and solutions.
Search online for solutions to the specific problem you're experiencing. There are many websites and forums where you can find help from other computer users and experts.
If you're not comfortable troubleshooting the problem yourself, you can contact a computer technician for assistance.
It is also important to note that some abnormally functioning operating system or software may be caused by hardware problems. If you have tried all of the above troubleshooting steps and the problem persists, it is possible that you have a faulty hardware component, such as a hard drive or memory module. In this case, you will need to replace the faulty component.
BuyComputer.co.in: Your Computer Shopping Destination
We are One of the Best Computer and Laptop Service center in Saravanampatti, Coimbatore
We service all branded laptop and computers. Mainly, HP Laptop Service Center Dell Laptop Service Center Lenovo Laptop Service Center Samsung Laptop Service Center Acer Laptop Service Center India
If you don't find out near a computer service center, Contact
PC LAP Mall, @ Saravanampatti — Call Now: +91 88 70 70 88 83
0 notes
Text
How to Increase My Laptop Speed?
To increase your laptop speed, there are several steps you can take to optimize its performance. Here are some tips to help you speed up your laptop:
Upgrade Hardware (if possible): If your laptop allows for hardware upgrades, consider increasing the RAM or replacing the hard drive with a solid-state drive (SSD). Upgrading your RAM will enable your laptop to handle more tasks simultaneously, and an SSD will significantly improve the system's overall speed and responsiveness.
Keep Your Laptop Clean and Dust-Free: Over time, dust can accumulate inside your laptop, leading to overheating and decreased performance. Regularly clean the vents and fans to prevent thermal throttling and maintain optimum performance.
Uninstall Unnecessary Programs: Remove any applications or software that you no longer use or need. Unused software takes up valuable resources and may slow down your laptop.
Disable Startup Programs: Disable unnecessary programs from starting up with your laptop. Many applications tend to launch automatically during startup, which can cause your laptop to boot slowly and consume system resources.
Use an Antivirus Program: Malware and viruses can slow down your laptop significantly. Install a reputable antivirus program and perform regular scans to keep your laptop safe and running smoothly.
Update Your Operating System and Drivers: Keep your operating system and drivers up to date. Manufacturers release updates that may contain performance improvements and bug fixes.
Clear Cache and Temporary Files: Regularly clear your browser cache, as well as temporary files from your system. These files can accumulate and slow down your laptop over time.
Optimize Power Settings: Adjust your laptop's power settings to prioritize performance over energy saving. This can be done in the Control Panel or Settings menu, depending on your operating system.
Close Background Programs: Make sure to close any unnecessary programs running in the background, especially resource-intensive applications, to free up system resources.
Use a Lightweight Browser: If you notice slow performance while browsing, consider using a lightweight and faster browser like Google Chrome, Mozilla Firefox, or Microsoft Edge.
Manage Virtual Memory (Pagefile): Adjust your virtual memory settings to ensure your laptop can use the hard drive as an extension of RAM, if needed. This can improve multitasking performance.
Defragment Your Hard Drive (if not using SSD): If you're using a traditional hard drive, defragment it periodically to optimize file access and improve overall speed. Note that this step is not necessary for SSDs.
Check for Resource-Hungry Applications: Use your task manager to identify applications that are consuming a lot of resources and consider closing or replacing them with more efficient alternatives.
Implementing these tips should help you increase your laptop's speed and overall performance. However, it's important to note that the extent of improvement may vary depending on your laptop's hardware configuration and the specific tasks you're performing.
#Buy Laptop Spares Online#Buy Laptop Spare Parts Online at Lowest Price#Buy Laptop Spare Parts Online at the Best Price#Buy Online Laptop Hardware#Buy HP Laptop Parts Online#Laptop Accessories Wholesale in Delhi#Best Computer Accessories Shop in Nehru Place#Laptop Accessories Nehru Place#Computer Accessories Wholesale in Delhi#Computer Accessories Wholesale in Nehru Place#Laptop Parts Wholesaler & Distributor in Nehru Palace#HP Laptop Keyboard Price
1 note
·
View note
Text
Seedr: A Cloud-Based Service for Downloading and Streaming
Do you want to download and stream files from the web without using your own internet connection or device storage? Do you want to access your files from any device, anywhere, anytime? Do you want to enjoy maximum safety and privacy online? If you answered yes to any of these questions, then you might want to check out Seedr, a cloud-based service that enables you to import anything into your Seedr storage.
How does it work?
Seedr is very easy to use. All you need to do is paste a link from another website, wait a few seconds, and then download or stream your file on any device. You can watch, listen, read, or play anything that is accessible on the web. You can also use private trackers, mount Seedr as a network drive, or automate with their REST API if you go premium.
What are the benefits?
Seedr has many benefits for its users. Here are some of them:
Speed: Seedr gets your files faster than your own internet connection, and lets you stream them in HD quality.
Security: Seedr acts as a barrier between you and the wild web, encrypting your traffic with AES256 and scanning for viruses.
Compatibility: Seedr works on any device with a browser, including mobile devices and TVs. It even supports Chromecast out-of-the-box.
Storage: Seedr offers up to 1TB of cloud storage for your files, depending on your plan.
How much does it cost?
Seedr has three plans to choose from: Basic, Pro, and Master. The Basic plan gives you 30GB of storage and is suitable for light use and casual users. It costs $6.95 per month. The Pro plan gives you 100GB of storage and is the most popular choice. It costs $9.95 per month. The Master plan gives you 1TB of storage and is ideal for power users and developers. It costs $19.95 per month. Price list from July 2023.
How can I get started?
If you are interested in trying out Seedr, you can sign up with your email or with Google or Facebook. You can also get a free trial of the Pro plan for 14 days. To sign up or learn more, visit their website at https://www.seedr.cc/. I did and it was a very good move!
1 note
·
View note
Link
Scanning a file for viruses is as important as removing the viruses. Most devices offer a built-in scanner on the system. However, you can also scan a file for viruses using a third-party service. A virus scan can perform lot of activities on your system. Explore a scanning program below and learn how to scan a file for viruses.
Tip:
If you are unsure using for using antivirus software, we recommend you to download easy to use Waredot Antivirus software for perfectly scanning process on your system.
How to scan a file for viruses windows 10
Microsoft Defender called “Windows Defender” on Windows 10 always scans files before you open them unless you’ve installed a third-party antivirus. You can also perform a quick scan for any file or folder, too. Let’s see how.
1. First of all, locate the file or folder you want to scan. Go to File Explorer and find it in the file menu location where you stored it. Once you find the file, right-click on the file or folder.
2. Once you right-click on the file or folder, it will open the options menu. From the menu, select “Scan with Microsoft Defender.”
Note: On earlier versions of Windows 10 to the May 2020 update, this option will stay “Scan with Windows Defender.”
3. A Windows Security window will pop up now, and the results of the scan will be shown near the top-right below the “Scan Options” heading. Now, you may see “No current threats.”
4. On the other hand, if malware is detected, Microsoft Defender will alert you with a message that says, “Threats Found,” and doing so will list the file or files that are infected.
5. Now, click on the “Start Action” button to remove the threat. Once you click on it, Microsoft Defender will start removing all the threats automatically, and once it will be done, everything will back to normal.
Note: If you want details about the result that came out, you need to click on “Protection History” just below the scan results.
How to Scan a File for Viruses using Command Prompt
You can find multiple ways to use Microsoft Defender or to scan a file for viruses with Microsoft Defender using the command prompt.
To scan a specific file or folder manually using a command prompt, follow the below steps:
Go to the search bar option at right on the Start button and search for Command Prompt. Now, right on the top result, and select the Run as administrator option.
Now, type the following command to access the platform folder and press Enter.
cd c:\ProgramData\Microsoft\Windows Defender\Platform
Enter the following command to identify the latest version of the antivirus command tool and press Enter.
dir
Enter the following command to access the folder with the latest version and press Enter.
cd 4.18.2009.7-0
In the command prompt, replace “4.18.2009.7-0" with the latest version of the folder available on your device.
Now, you need to type the following command to scan a specific folder and press Enter
mpcmdrun -Scan -ScanType 3 -File "C:\PATH\TO\FOLDER"
Now, in the command, replace "C:\PATH\TO\FOLDER with the path to the folder you’d like to scan.
For instance: notice that this command scans all the contents in the “Files” folder.
mpcmdrun -Scan -ScanType 3 -File "C:\Users\username\Downloads\files"
Now, type the following command to scan a specific file and press Enter.
mpcmdrun -Scan -ScanType 3 -File "C:\PATH\TO\FILE.TXT"
Now, while staying in the command, replace "C:\PATH\TO\FILE.TXT" with the path to the folder you’d like to scan. For instance: this command scans the file names “image-1.jpg” inside the “files” folder:
mpcmdrun -Scan -ScanType 3 -File "C:\Users\username\Downloads\files\image-1.jpg"
Now, Microsoft Defender will scan the files. It may that once the file cleans, make sure you check the files for viruses because Windows may not notify once the file cleans.
How to Scan a File Virus Before Using Them
To avoid getting your computer infected by malware, make sure you scan files before executing them. Yes, you can do so. Here we will discuss a couple of options that will help you scan files easily from the computer.
Antivirus Software
You can see that antivirus software will out an option in the context menu so you can scan individual files. Once you download a file or email attachment, simply right-click on the file and choose the option to scan with your Antivirus software.
Now, if you want to scan more than one file at a time, then hold down the Ctrl key while you clicking each file you want to scan. Then right-click and select Scan with your Antivirus software.
If you’re already downloaded the antivirus software, that may also appear in the option. You can select them also, otherwise, we recommend you to choose the Microsoft Defender as the best option or Microsoft Security Essentials scanning a couple of files.
When or if the virus is found, the Antivirus software will neutralize the virus.
Virus Total Uploader
You might want to check out VirusTotal Uploader for the best virus scanning. This is one of the best handy software that will scan your files with 41 different antivirus software online. After installing VirusTotal Uploader, right-click on the file, and go to Send To, then VirusTotal.
Alternatively, you can launch the VirusTotal Uploader and click “Get and Upload File.
Now, it will send the file to VirusTotal.com and scan with 41 different Antivirus apps and show you the results.
If you don’t want to install the Uploader, you can go to the VirusTotal site and upload a file from there to scan.
Note that sometimes you will be shown the false-positive detected on files we know are clean. The definitions database of the Anti-malware app isn’t current, or an obscure Antivirus App will find something questionable. If that is the case, use your best judgment when viewing the results.
How to Scan Google Drives for Viruses
Users can use Google Drive cloud to scan suspect files. It protects you from harmful viruses and malware and allows you to protect your data. The use of a Virus Scanner with Google Drive is one solution for scanning Google Drive for viruses.
This will detect viruses or spyware on your documents without the installations of antivirus software. It protects you against damaging viruses, malware, and spyware to enable you to maintain secure private information.
Here’s how to
scan Google Drive for viruses
:
1.Open Google and type Virus Scanner with Google Drive in the search bar, and it will show you the various options; make sure you click on the first option. Take the image help, how the website will appear.
2. Note that a virus scanner with Google drive is opened. You need to click on Visit Website button. Once you click on the button, the following screen will appear:
3. Now, select the Button that says Select Files from Google Drive. As you will click on the button, the options menu will appear.
4. Click on the button that says Login & Authorize. It will prompt you to log in with Google Drive. Enter the login details now.
5. Notice that all the files of Google Drive will appear on the screen. Select any one file which you’d like to scan and click the Select button. Once you select the files, they will appear in the text area. Now, click on Start Virus Scan button to scan selected files as follows:
6. Now, once you click the Start Virus Scan button, the progress log will appear. Once it will be done, the scanning process ends here.
How to run a Virus Scan on Google Chrome
Google Chrome can also help you to scan for the viruses:
1. First of all, open Google Chrome and click on the three dots in the top-right corner and choose Settings.
2. Now, scroll to the bottom and click Advanced. Scroll down again and select Clean up computer.
3. Now, click Find. You should uncheck the Report Details filed below to avoid giving additional info to Google.
4. Wait for Google to Report whether any threats were found. If Chrome finds any malicious software, it will prompt you to remove it.
5. Now, click on Remove to remove the malicious items. You might need to restart your computer afterward.
6. Make sure that this tool for threats that do not comply with Google’s unwanted software policy. It’s for Windows only, too.
Summary
Hey guys! This was the guide about “how to scan a file for viruses.” Here, you can the various ways for virus scanning on Windows. You can notice that we did not include any third-party scanner in this article. Windows offers the best built-in scanner program to scan a file for viruses.
Please let us know in the comment section if you’ve any queries regarding this article. We would glad to answer you!
#How to Scan a File for Viruses#How to scan a file for viruses windows 10#How to Scan a File for Viruses using Command Prompt#Scan a File Virus#How to Scan Google Drives for Viruses#how to scan Google Drive for viruses#How to run a Virus Scan on Google Chrome
0 notes
Link
Scanning a file for viruses is as important as removing the viruses. Most devices offer a built-in scanner on the system. However, you can also scan a file for viruses using a third-party service.
#How to scan a file for viruses windows 10#How to Scan a File for Viruses using Command Prompt#How to Scan a File Virus Before Using Them#How to Scan Google Drives for Viruses#how to scan Google Drive for viruses
0 notes
Note
Hello.
I hope youre having a nice weekend!
Hope you don't mind if I ask for a link of the 3 slime tutorial of mp100. I'd thank you a Lot, if nothing just for offering it on the notes. Love, ~Frey
Heya! No problem, here they are!
MP100 (1st)
MP100 urataiura (2nd)
MP100 A Clash With Claw’s Seventh Division! (3rd)
How to download: Open Google Drive link. In top right hand corner, select downward facing arrow to download as .zip file. Google will give an alert that it is unable to scan for viruses due to size; select download anyway. Save wherever you wish, extract .zip folder, and there you go!!
Note: DO NOT click blue download button in center of Google Drive link. It will download an empty folder. Use the arrow in the top right hand corner, next to the meatball (three dots) menu!
Have fun!
#jupe’s inbox#been sending them as emails prev. to make sure the kinks are worked out#but now i'm fairly certain we've got it#have at it! reblog ahoy#mp100#mp100 stage play#arrrr and yohoho and all that
38 notes
·
View notes
Note
Hey, your computer buying post was really informative. You mentioned doing routine maintenance stuff to keep your laptop/computer running in the meantime while supplies suck ass. Can you tell us what we should be doing to help the longevity of our computers? Ie spybot/windows defender seem obvious to remove viruses, and i clean and defragment my hard drive on a semi-regular basis, delete temp files, etc. Any other things we should be doing?
So if you're using a modern OS you can go ahead and stop defragging your hard drive, and if you are using an SSD you REALLY NEED TO STOP defragging your hard drive, that can actually damage it.
I've got a big post about how to keep from killing your computer but it basically boils down to:
1 - Avoid heat stress. This means making sure that the fans are spinning, this means making sure the case isn't clogged with dust, this means making sure the poor thing isn't constantly churning away at max CPU and max RAM use. Make sure you aren't running a ton of background programs, uninstall things that you don't use, make sure the vents on your laptop aren't blocked (don't use it on soft surfaces like blankets). If your computer is hot, it is unhappy.
2 - Be nice to the fragile bits. Don't slam your screen shut on a pen, don't spill soda on your keyboard, don't jam your power cord into place or yank out your USB-C charger by the cable. All the stuff like power ports and USB ports and power buttons are generally soldered onto the motherboard and if you are too rough with them you will rip them loose and getting those fixed is MUCH MORE of a hassle than people think. They think it's going to be a twenty dollar fix and it's usually more like a $100-200 fix.
3 - Prepare for the worst. Make backups regularly. Keep a system restore disc handy. PLUG YOUR COMPUTER INTO A SURGE PROTECTOR OR POWER SUPPLY TO KEEP FROM GETTING YOUR POWER SYSTEM FRIED. We had a sudden thunderstorm here the other day and the only reason my computer and Large Bastard's computer didn't get fried by the power surge after a lightning strike on a transformer was that he has a UPS and I have a surge protector. It totally killed my MiL's laptop.
4 - Regularly install updates and do system optimization. Delete temp files, check for OS updates regularly, update your browser regularly. Uninstall unused programs, do a virus scan every once in a while. Honestly Windows Security or whatever the free windows antivirus is is totally good enough for Windows. Use the free version of Sophos if you have a mac (macs DO need antivirus)
5 - Shut down/restart your computer every once in a while. Some people shut down their computers every night, some people never do. Just, like, at least once a month turn the thing off and let it chill out for a second before you reopen a thousand tabs.
6 - Everyone should start using firefox; that isn't a thing to make the computer better, that is a thing to make the world better. Use firefox, set duck duck go as your main search engine, and use that setup as much as you can. You can still use chromium browsers like Opera or Brave if you need to access pages that don't work in Firefox, but please folks use firefox and try to get google out of your life a little bit.
620 notes
·
View notes
Text
Clip Studio Paint 1.9.4 Download
A tutorial written by @evilkaito / @iamnottechsupport
Hi everyone! I made this tutorial for absolute beginners who are new to pirating things, and using this program as an example. It’s a really simple crack, so it’s good for people getting started.
This is a WINDOWS ONLY tutorial. Please do not ask for a Mac tutorial, you will not get a response. I do not use Apple products and have little to no familiarity with them. Also I believe this is 32-bit compatible, but I’m not sure.
This tutorial will be written in as plain English as I can manage. I am a cyber defense major, and I know not all these terms are “technical”. This is for those starting out with pirating.
DO THIS AT YOUR OWN RISK! I take NO responsibility for you messing up your own computer. If you follow the instructions exactly how I say, you should be fine. Lastly, I am not tech support, I’m doing this for free. If you want me to do more than this, pay me. I will answer basic questions though, @iamnottechsupport, my sideblog that accepts messages and asks. Google first. Troubleshoot second. Ask me third. Please.
https://1drv.ms/u/s!AiS9D6TfY0bgayGm_c0bFbiFmbI?e=1o8j9E
^ Here is the download for the thing.
1. Disable your antivirus, and I mean all of them. This includes your installed antivirus, and the antivirus that came with your computer. This download might come up as a “virus”. It is not. I have ran this program in Sandbox and scanned it. No viruses. It might display as a virus to your system, simply because it goes into your drive’s deeper files and edits them. Your computer/browser might detect this as a trojan horse and try to keep you from running it. If you run into those issues, use google.
Here’s what to do if chrome gives you an error.
https://superuser.com/questions/678601/disable-chromes-built-in-automatic-virus-scanning-of-downloaded-files
2. Download the zip file provided called “Crack Files + Program”. Cracks, aka “medicines”, is what makes a program run at full capacity without you having to pay for it. It changes the Clip Studio files in your program files. It is not the same as the program itself, which is a separate download.
3. Download something to unzip the files. Think of the .zip file as a container, and the “unzipping” program as a pair of scissors to help you cut it open.
4. UNHOOK YOUR INTERNET. Do not skip this step. You must unhook your ethernet or turn off your wifi card or whatever you use. You don’t have to turn off your router, just make sure your computer cannot access the internet. If you don’t do this, there’s a big change of this failing.
5. Unzip the files to one folder on your desktop (google search how to unzip if you don’t know how to). Open the file. The very first thing you should see is a folder named “Crack” and a “Setup.exe”.
6. Run the Setup.exe to completion. Do NOT start the program when it asks you to, uncheck that box. The setup wizard will close.
7. Double click “Crack”. Here you will see “CLIP STUDIO PAINT” in all caps. You want to copy this entire folder. Ctrl+C or right click and hit “copy”. Then, you need to go into the drive you installed it in. This is usually “Local Disk (C:)”. When you get to your local drive, double click “Program Files”.
8. Then, double click “CELSYS”. Then, double click “CLIP STUDIO 1.5”. Then, you are going to paste the files into this drive. It will ask you if you are okay with overwriting the files. Click YES.
9. You have now placed the cracked files exactly where they need to be! Good job! We’re not done though. Make sure that internet is STILL off during this next step.
10. Launch “Clip Studio” from your desktop. There might be a loading screen. Let it load. If there’s an error from no internet, ignore it. On the left panel, there is “Clip Studio Paint”. Click it.
11. Now, it will lead you to a setup wizard to activate the program. It will initially fail, because it is trying to access the internet. Here’s the loophole, click offline activation.
12. Go back to the “Crack Files + Program” file I gave you, and run “offline activation – kg.exe” as administrator.
13. Generate a serial number by clicking “generate”. Copy and paste that into Clip Studio Paint’s license verification. It will give you a “License authentication key”.
14. It’s annoying, but you have to copy each box and paste them into the “License Auth Key” box in the “Clip Studio Paint EX v1.6.2 Keygen” one by one. Do not add spaces. Click generate when you are done, and the keygen will give you an “Authentication Key”.
15. Copy and paste this authentication key into Clip Studio Paint. Hit next.
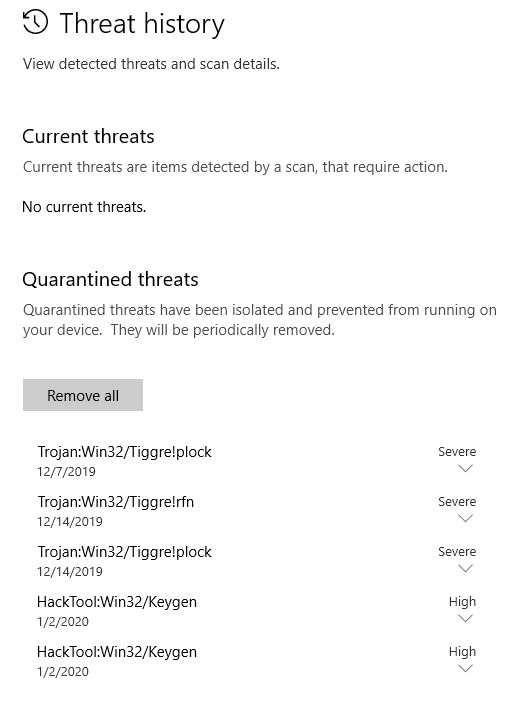
Bam you’re done. If you’re using Windows 10 like me, you might get an error when you first try to startup the keygen, because window’s defender considers it a threat (like a dumbass). Just go to your settings and type in “windows defender settings”. Click on that. Then click Virus and Threat protection. Then, click “threat history”. It will show you the “HackTool:Win32/Keygen” file its quarantined. Just click the arrow and click “Restore”. It will be returned to your folder.
Everything should be activated when you’re done. Here’s what it looks like for me.

Have fun. Steal shit.
#nyaos#collab between me and kaito! yahoo!#clip studio paint#clip studio paint ex#under a read more cause its long#spread this! please!#and if you want kaito to help you out specifically please pay him! its only fair!#here it is for people who've been waiting for so long! thank you for your patience
695 notes
·
View notes
Text
Digital Self-Sufficiency 101
I’ve noticed that the chaos of 2020 has caused many people to notice that commercially available technologies have grown increasingly intrusive, expensive, and restrictive. Therefore, I thought I would put together some easy ways to maintain privacy and self-sufficiency as much as possible in the digital age.
SOFTWARE IN GENERAL
Using incognito mode or private mode in your browser actually does nothing to prevent your internet service provider from watching your activity. The Tor browser is your easiest option for keeping your search history private.
To keep downloads, system updates, and activity from other applications private, consider using a VPN. Personally, I sometimes use ProtonVPN for this, but some people might find it uncomfortably slow. A proxy server will not provide the same layer of protection but suffices for day-to-day use.
Never reuse passwords, but it is usually okay to choose a common theme for them, and choosing long or uncommon phrases is actually safer than using random strings of characters.
Password managers are also relatively safe. KeePass is a good open-source choice that creates an encrypted password database on your device and so keeps your information entirely private.
Consider switching browsers. Chrome (including Chromium) and Edge both send data to Google and Microsoft respectively. Firefox is heavily customizable, open-source, and focused on privacy; Opera is closed-source but does provide useful features such as a built-in browser VPN.
TrackMeNot is an add-on that performs automated random Google searches, making it much harder for Google to determine your search activity. Also, use an adblocker wherever possible - AdBlock Plus is an effective free choice.
Archive.org is an excellent source of ebooks, journals, music, etc. that allows you to borrow materials and download them or read them online without requiring any personal information.
DRM, or digital rights management, is a form of software used to prevent people from copying files or accessing them outside of certain applications (such as iTunes for music, Adobe Reader for ebooks, etc). It is perfectly legal to remove DRM from works you have purchased, so that you actually own the file and not just a license to access it within a certain framework.
There are several plugins available for the Calibre ebook library that get rid of DRM on book files; this is the one I use. I don’t have iTunes or Spotify, but I’ve heard good things about NoteBurner, and I know that plenty of alternatives exist for DRM removal of music files.
Also, youtube-dl is a useful tool for downloading videos from YouTube. Be careful to use this only on open-source or public domain videos.
LINUX
Linux has advanced astronomically in the past decade -- it is definitely the best option for privacy and security, and is now fairly easy to use.
If you’re just beginning, Ubuntu is a great choice with graphics that will make your PC look and feel a bit like a Mac. You can completely opt out of giving any data to the developers, and it’s by far the most commonly used distro in the Linux community, meaning that most support and apps are developed for it.
Take a test drive! Here is an easy tutorial for how to put Ubuntu on a USB stick and run it on your computer without affecting your Windows system or changing any of your files.
On most hardware, an out of the box Ubuntu installation works fine for browsing the web, watching movies, studying, and day-to-day use -- do test it using a USB before installing it, though.
The best thing about Linux is that you are the absolute dictator of your own computer. The appearance, functionality, and resource management of your system is all up to you. Also, there are hundreds of different operating systems and configurations under the Linux umbrella.
The fact that most viruses and malware are designed to run on Windows offers a degree of protection to Linux users, and those running more obscure distributions are less vulnerable, but security consciousness is still very important. ClamAV is a good open-source antivirus specifically designed to scan for malware targeted at Linux systems, and chkrootkit can detect any rootkits that may be installed on your system.
If you use Linux exclusively, the WINE toolkit can allow you to run programs designed for Windows. It does require some setup but eliminates a lot of compatibility issues (*pointed glance at my online classes*).
WINDOWS
A computer with standard Windows installed will never be all that private or independent, given the limitations hard-coded into the system, but there are still plenty of things you can do.
Don’t use a Microsoft account on your personal computer -- this enables Microsoft to combine data sent from your computer with your personal information. To turn this off, go into Settings, select Accounts, find your own account, and click the “Delete” option.
If you are installing Windows on a computer, don’t connect to the Internet during the setup process. When it asks you to connect to WiFi, click the “I don’t have Internet” option in the bottom left corner -- this will allow you to set up Windows using a local account, bypassing the requirement to create a Microsoft account.
When it comes to protecting your PC from hackers, choose strong passwords and be careful what you click on, and after that Microsoft Defender should do the trick. For the most part, commercial antivirus software is not necessary; any malicious actor worth their salt will be able to circumvent common choices like McAfee or Norton.
The Windows updater includes many invasive features without a way to opt out, and can be disabled. Hit the Windows key + R to bring up the Run menu, type “services.msc” in the text box, and press Enter to open the Services Manager. Find Windows Updates and Windows Update Medic, right-click on both of those, and select “Disable.”
Use caution when electing not to update Windows; oftentimes patches for important security vulnerabilities are incorporated into the updates, and Microsoft doesn’t allow users to select which updates to install.
OS X / iOS
The entire Apple business model is based on hardware that’s far below the industry standard for the price range and software that’s obsolescent from the moment you purchase it. These products are pure fashion over function and are pretty much inseparable from their surveillance software and use restrictions.
HARDWARE
Don’t get a new laptop simply because yours is getting older or slower. Hardware available to the average consumer hasn’t changed significantly in the past decade. If your computer is getting older and feels slower, that’s probably because Windows has grown heavier and less efficient with every update.
Self-sufficiency and durability go together in technology as in all other facets of manufacturing.
SSDs may be slightly faster than conventional hard disk drives, but they don’t have as much storage capacity and will fail more quickly, so for most uses an HDD is probably more practical. Anything that has “flash memory” as its sole form of storage should be avoided.
Entry-level laptops in 2020 are usually worse in terms of design and specifications than they were in 2015. Second-hand options can be a good idea, especially workstations designed for business use (my PC was made in 2012 and is still humming along with no problems).
Swappable batteries are increasingly rare but go a long way to increase the usefulness of a PC while traveling or offline. Also, touchscreens always shorten battery life by at least an hour or two.
Intel Atom processors are common on lower-cost laptops but are very slow and prone to overheating unpredictably.
Also, anything without a fan (look for a visible vent on the underside) can overheat in the summer and is probably indicative of lower processing power.
The vast majority of two-in-one laptops and tablet hybrids are severely underpowered -- the extremely small size prevents the use of proper computer hardware.
Source: am a Linux user and hobbyist programmer who learned most of this using the time-honored Mess Around and Find Out methodology.
12 notes
·
View notes
Text
[UPDATED] Massive 480 Gb. #Occult Collection. #Magick, #Thelema, #OTO, #Golden #Dawn, #Qabalah, #Wicca, Astral Travel, #OBE, #Healing, etc.
[UPDATED]
The Library v1.5 (480GB Occult) (FiXED)
Massive 480 Gb. Occult Collection. Magick, Thelema, OTO, Golden Dawn, Qabalah, Wicca, Astral Travel, OBE, Healing, etc...
481.5 GB number files 68455
Just to make things a little easier here's a link for the Library v1.0 Torrent.
1.) Download the New UPDATED Torrent link to your Downloads folder.
https://bit.ly/Libraryv15Fixed
If you know how to use a Magnet here is the magnet link to full torrent.
Copy and Paste the magnet text below.
magnet:?xt=urn:btih:8F9657E240D07719FA73350485A8BDBBDF5368EC&dn=Library%20v1.5&tr=udp%3a%2f%2fopen.demonii.com%3a1337
2.) THIS IS A BIG FILE. Add the link manually to your Torrent App. WAIT. It's a MASSIVE torrent file. It took at least 3 minutes to load on uTorrent. If it STILL keeps crashing then you my not have enough RAM. Sorry. It does work on my computer. BE PATIENT
3.) THIS IS A BIG COLLECTION. It may take several days to download the whole collection. Most Torrent Apps allow you to pick and choose the folders and files you want to D/L beforehand to save you hard drive space. Most Torrent Apps also allow you to scan for Malware and Viruses.
4.) If you need help, simply! RTM! READ the uTorrent or BitTorrent Manual! Also There are literally 100s of “How To” Articles & Videos on listed on Google & YouTube!
https://bit.ly/HowTouTorrentYouTubes
https://bit.ly/HowToUTorrentGoogleArticles
Enjoy!
Here’s what’s inside:
African Traditional Religion
Alchemy
Chaos Magic
Egyptology
Enochian
Entheogens
Everything Else
Finbarr Books
Freemasonry
Golden Dawn
Greek - Roman Mythology
Grimoires
Lucid Dreams - Astral Projection
Meditation
Misc
New Age
Paranormal
Parapsychology
Qabalah
Ritual Magic
Rosicrucian
Satanism & Left-hand Path
Shamanism
Site Rips
Sufism
Taoism
Tarot
Thelema
Wicca
Enjoy!
#wicca#thelema#goldendawn#magick#rosicrucian#tarot#qaballah#paranormal#meditation#grimoire#alchemy#ritualmagic#occult
1 note
·
View note
Text
McAfee stinger for windows 10
Welcome to Antivirus Support
McAfee stinger for windows 10- Security Premium Our best protection, plus PC backup and family safety features, for you and the people you care about.
How to Activate McAfee Antivirus with Retail Card?
If you have Already Bought the McAfee antivirus than You can Activate in just a few simple and quick steps –
You must have a Retail Card with a 25 Digit Card Activation Card.
Let’s Go And activate McAfee anti-virus Protection –
Open Your Browser and Type
www.mcafee.com/activate
Or use This Link mcafee.com/activate.
Enter Your 25 Digit Activation Code And Submit. Please Create a McAfee Account In the next Step. Sign Up with Your emailMcAfee Account will Help You to Install And Manage Your McAfee Antivirus Services.
Now You Can Install Your McAfee antivirus protection for Best Installation make sure You Remove any other Antivirus Program From Computer. After Installing Your McAfee anti-virus Please Restart Your Computer. Please Run A full McAfee Antivirus Scan And Check For Viruses. For More Details, We Do Have One More Post with More comprehensive Information.
How to define McAfee activate 25 digit code?
The 25 digits activation code is necessary to install and activate any software be it McAfee or any other antivirus solution. The activation code is something for which you actually pay for. Without this code, you will not be able to show the authority and authenticity of the product. To start using the product it is necessary to download and activate it which you cannot without having an unused product key.
This code makes sure that a user will not face any difficulty while using the product and gives him the idea that the product he is using is not a pirated one. The software with the product key implied on it is officially registered with the company who owns it and this tells us that the product is authentic. With a registered product, you get an opportunity to get the latest updates for the software.
1. Steps to Redeem McAfee retail card:
This section contains the necessary steps to redeem your McAfee retail card:
Using your web browser navigate to mcafee.com/activate.When the sign-in page opens, enter your McAfee login details. If you do not have an account, click on “Create a new account”.Further, select an option for “Country” and “Language” from the list. When prompted, enter the McAfee activate code. Type the email address and click on the “Submit” button. Finally, click on “Verify” and wait for the activation to complete.This process should be followed by downloading the product.
2. A few steps to download McAfee security on your device:
To download McAfee total protection or any other McAfee product follow the steps given below: McAfee stinger for windows 10-
Go to the home page of McAfee by using the URL mcafee.com/activate. Log in to your McAfee account or click “create a new one” if you do not have one. Upon creating a new account, you should complete the sign-in process. When a new page opens, select “My Account”.From here, select your desired product. After this, choose the payment method to pay for the product. Read the McAfee’s license agreement and click on the “Agree” button. Wait for a few minutes and then begin with the installation process.
McAfee antivirus software is beneficial in many ways:
It protects your important documents and secures your files and folder on the device. The McAfee antivirus prevents malware. Secures the important information. Enable your search history to remain private. Prevents ads. It is the most famous antivirus for privacy and security purpose. To get McAfee antivirus security by downloading, installing and activating McAfee setup, visit mcafee.com/activate.
Minimum System Requirements :
Operating system:
Microsoft Windows 10, 8.1, 8, and 7 SP1 (32- and 64-bit)
Mac OS X 10.12 or later
Google Android smartphones and tablets 4.1 or higher
Apple iOS 10 or later
Internet Connection Required
High-speed connection recommended
Supported Browsers:
Internet Explorer 10.0 or later
Firefox
Google Chrome
Safari (Mac and iOS OS Only)
Microsoft Edge
Hardware:
2 GB RAM for Windows 7 and above
500 MB free drive space
1 GHz Processor
Some installation problems of McAfee antivirus software: McAfee stinger for windows 10-
Download it and activate McAfee antivirus from McAfee 25 digit activation code it will provide all kind of safety required and protect you in every manner. We are here to support the users of McAfee to get rid of all kinds of viruses and other harmful activities. Activate McAfee security and protect your device and other devices from Malware, spyware, rootkit, and viruses. McAfee Software is available for Mobile Phones, Tablets, PC, laptops or any other devices. Range of McAfee products is very wide and we provide support for all the McAfee Software.
We have experienced and skilled experts for McAfee Support and our McAfee technical support team helps the user to resolve all the technical issues within a very little amount of time. If you have security software and you are not satisfied with that then we will recommend you to try McAfee antivirus Software. To Redeem, install, Re-install, or Activate of McAfee you can visit McAfee activate with activation code. These processes are very simple so that You can do these all by yourself only but if you need any support you may contact us. We believe in 100% customer satisfaction. We will support you in all issues and provide the right solution required.
McAfee Antivirus Installation Problems: McAfee stinger for windows 10-
Upgrading McAfee Antivirus to the latest version.Resolve activation key problems from mcafee.com/activateOffering Help in McAfee Antivirus Setup and Configuration.Provide the solution to you if McAfee Antivirus is not working or a guide to solving other software issues.Un-installation of other conflicting Applications and repair of any software problems.Provide better System protection.Troubleshoot any McAfee Antivirus problem.Customize the setting of McAfee product as per your system requirements.Scan your device to prevent any type of risk that may occur through viruses Malware or any other threat.Resolve issues related to the firewall.
Overview of McAfee Security Features: McAfee stinger for windows 10-
There are certain features that make McAfee best from other antivirus solutions, and these are:
It safeguards your device from viruses, malware, spyware, and Trojans.Your identity is safe and secured with McAfee’s firewall. It restricts you from visiting suspicious, unsafe websites.You can transfer your subscription from one device to another.It allows you to safeguard several devices using single protection.Your kids can securely surf the Internet with McAfee Safe Family.The antivirus provides you the option to track the misplaced devices.The software has the best-in-class features to help in removing all the possible threats.McAfee automatically scans and removes malicious files.It displays the overall health record of your PC after scanning it thoroughly.
2 notes
·
View notes
Link
Scanning a file for viruses is as important as removing the viruses. Most devices offer a built-in scanner on the system. However, you can also scan a file for viruses using a third-party service. A virus scan can perform lot of activities on your system. Explore a scanning program below and learn how to scan a file for viruses.
Tip:
If you are unsure using for using antivirus software, we recommend you to download easy to use Waredot Antivirus software for perfectly scanning process on your system.
How to scan a file for viruses windows 10
Microsoft Defender called “Windows Defender” on Windows 10 always scans files before you open them unless you’ve installed a third-party antivirus. You can also perform a quick scan for any file or folder, too. Let’s see how.
1. First of all, locate the file or folder you want to scan. Go to File Explorer and find it in the file menu location where you stored it. Once you find the file, right-click on the file or folder.
2. Once you right-click on the file or folder, it will open the options menu. From the menu, select “Scan with Microsoft Defender.”
Note: On earlier versions of Windows 10 to the May 2020 update, this option will stay “Scan with Windows Defender.”
3. A Windows Security window will pop up now, and the results of the scan will be shown near the top-right below the “Scan Options” heading. Now, you may see “No current threats.”
4. On the other hand, if malware is detected, Microsoft Defender will alert you with a message that says, “Threats Found,” and doing so will list the file or files that are infected.
5. Now, click on the “Start Action” button to remove the threat. Once you click on it, Microsoft Defender will start removing all the threats automatically, and once it will be done, everything will back to normal.
Note: If you want details about the result that came out, you need to click on “Protection History” just below the scan results.
How to Scan a File for Viruses using Command Prompt
You can find multiple ways to use Microsoft Defender or to scan a file for viruses with Microsoft Defender using the command prompt.
To scan a specific file or folder manually using a command prompt, follow the below steps:
Go to the search bar option at right on the Start button and search for Command Prompt. Now, right on the top result, and select the Run as administrator option.
Now, type the following command to access the platform folder and press Enter.
cd c:\ProgramData\Microsoft\Windows Defender\Platform
Enter the following command to identify the latest version of the antivirus command tool and press Enter.
dir
Enter the following command to access the folder with the latest version and press Enter.
cd 4.18.2009.7-0
In the command prompt, replace “4.18.2009.7-0" with the latest version of the folder available on your device.
Now, you need to type the following command to scan a specific folder and press Enter
mpcmdrun -Scan -ScanType 3 -File "C:\PATH\TO\FOLDER"
Now, in the command, replace "C:\PATH\TO\FOLDER with the path to the folder you’d like to scan.
For instance: notice that this command scans all the contents in the “Files” folder.
mpcmdrun -Scan -ScanType 3 -File "C:\Users\username\Downloads\files"
Now, type the following command to scan a specific file and press Enter.
mpcmdrun -Scan -ScanType 3 -File "C:\PATH\TO\FILE.TXT"
Now, while staying in the command, replace "C:\PATH\TO\FILE.TXT" with the path to the folder you’d like to scan. For instance: this command scans the file names “image-1.jpg” inside the “files” folder:
mpcmdrun -Scan -ScanType 3 -File "C:\Users\username\Downloads\files\image-1.jpg"
Now, Microsoft Defender will scan the files. It may that once the file cleans, make sure you check the files for viruses because Windows may not notify once the file cleans.
How to Scan a File Virus Before Using Them
To avoid getting your computer infected by malware, make sure you scan files before executing them. Yes, you can do so. Here we will discuss a couple of options that will help you scan files easily from the computer.
Antivirus Software
You can see that antivirus software will out an option in the context menu so you can scan individual files. Once you download a file or email attachment, simply right-click on the file and choose the option to scan with your Antivirus software.
Now, if you want to scan more than one file at a time, then hold down the Ctrl key while you clicking each file you want to scan. Then right-click and select Scan with your Antivirus software.
If you’re already downloaded the antivirus software, that may also appear in the option. You can select them also, otherwise, we recommend you to choose the Microsoft Defender as the best option or Microsoft Security Essentials scanning a couple of files.
When or if the virus is found, the Antivirus software will neutralize the virus.
Virus Total Uploader
You might want to check out VirusTotal Uploader for the best virus scanning. This is one of the best handy software that will scan your files with 41 different antivirus software online. After installing VirusTotal Uploader, right-click on the file, and go to Send To, then VirusTotal.
Alternatively, you can launch the VirusTotal Uploader and click “Get and Upload File.
Now, it will send the file to VirusTotal.com and scan with 41 different Antivirus apps and show you the results.
If you don’t want to install the Uploader, you can go to the VirusTotal site and upload a file from there to scan.
Note that sometimes you will be shown the false-positive detected on files we know are clean. The definitions database of the Anti-malware app isn’t current, or an obscure Antivirus App will find something questionable. If that is the case, use your best judgment when viewing the results.
How to Scan Google Drives for Viruses
Users can use Google Drive cloud to scan suspect files. It protects you from harmful viruses and malware and allows you to protect your data. The use of a Virus Scanner with Google Drive is one solution for scanning Google Drive for viruses.
This will detect viruses or spyware on your documents without the installations of antivirus software. It protects you against damaging viruses, malware, and spyware to enable you to maintain secure private information.
Here’s
how to scan Google Drive for viruses
:
1.Open Google and type Virus Scanner with Google Drive in the search bar, and it will show you the various options; make sure you click on the first option. Take the image help, how the website will appear.
2. Note that a virus scanner with Google drive is opened. You need to click on Visit Website button. Once you click on the button, the following screen will appear:
3. Now, select the Button that says Select Files from Google Drive. As you will click on the button, the options menu will appear.
4. Click on the button that says Login & Authorize. It will prompt you to log in with Google Drive. Enter the login details now.
5. Notice that all the files of Google Drive will appear on the screen. Select any one file which you’d like to scan and click the Select button. Once you select the files, they will appear in the text area. Now, click on Start Virus Scan button to scan selected files as follows:
6. Now, once you click the Start Virus Scan button, the progress log will appear. Once it will be done, the scanning process ends here.
How to run a Virus Scan on Google Chrome
Google Chrome can also help you to scan for the viruses:
1. First of all, open Google Chrome and click on the three dots in the top-right corner and choose Settings.
2. Now, scroll to the bottom and click Advanced. Scroll down again and select Clean up computer.
3. Now, click Find. You should uncheck the Report Details filed below to avoid giving additional info to Google.
4. Wait for Google to Report whether any threats were found. If Chrome finds any malicious software, it will prompt you to remove it.
5. Now, click on Remove to remove the malicious items. You might need to restart your computer afterward.
6. Make sure that this tool for threats that do not comply with Google’s unwanted software policy. It’s for Windows only, too.
Summary
Hey guys! This was the guide about “how to scan a file for viruses.” Here, you can the various ways for virus scanning on Windows. You can notice that we did not include any third-party scanner in this article. Windows offers the best built-in scanner program to scan a file for viruses.
Please let us know in the comment section if you’ve any queries regarding this article. We would glad to answer you!
#How to run a Virus Scan on Google Chrome#How to scan a file for viruses windows 10#Scan a File for Viruses#How to Scan a File Virus How to Scan Google Drives for Viruses#how to scan Google Drive for viruses#how to scan a file for viruses
0 notes
Text
wondershare filmora 6.0.3 crack file
Does wondershare filmora 7.5 0 serial key take forever to stock up your software packages? Like Microsoft Word? Or Excel? Or any applications you may also use on every day basis? If you had your computer for sometime chances are that it's slowing down and does not perform may damage used to positively. And trying to find out why can leave you with on the headache. Perhaps even a new computer can act strange and just slow down for no reason at all at each and every. There are a few explanations why your computer is aiding. Let me summarize: every time we begin our devices, the machine registry records each every single track we do. Like setting up new application, working new or old program, altering the background picture, all of it! Check out the new Taskbar. It's no doubt one of the most instantly recognizable changes from Windows Vista and Vista. The new Windows 7 Taskbar looks cleaner, shinier, as well as it easier to manipulate than older versions. Likely to allow in which navigate between programs pretty effortlessly. Foods high in protein also right click when you strike it to change settings, and enable smaller icons you don't considerably huge quantity screen industry that the Taskbar wastes. You'll need to get familiar with the Taskbar to navigate easily around Windows basic steps. Auto Defrag: This is the default feature of iobit smart defrag. It will check your system and defrag when tend to be using personal computer. If you wish to change anything, click "Settings". Scan your computer system weekly for spyware and viruses. When it comes to a sluggish computer, viruses are at fault most of your time, prescription medicine most good anti-virus software can take them off automatically, having a good anti-virus program is a no-brainer. You will discover free anti-virus programs available on the market that will catch most viruses and keep your computer safe. Scheduled Defrag: Allow a person set up a groundwork. Mark the hard drive you desire to defrag, pick "Enable Schedule" and click "OK". wondershare filmora crack windows 7 will be at ten o' clock, on every Saturday. Google Accessible Is designed to search pages in order of how clean they are of trash. wondershare filmora universal crack will bring up pages that typically not only easy to read, but quick to load. 3)Clean your registry:this the best quality way to speed up your computer, by cleaning pc will set you back its maximum power! To do this you have to have a Registry Cleaner software, those software will seek and fix all involving registry struggles. The best ones will are using options to do everything mentioned in this article and whole lot!
1 note
·
View note
Text

These days to get the work done efficiently, almost all students need to use a laptop. From Googling for information, making PowerPoint presentations, and attending classes online to writing essays in a word processor, students need to learn how to use a laptop.
Tips, tricks, and hacks For Your Laptops
Here are some tips that can make your work fast and productive.
Always Backup your Work We understand how much time and effort students put into preparing their presentations, essays, thesis, and other materials. Whether it is an educational video that you plan to watch later or a sample test paper, always back up your work. Doing so will let you access them in case of uncertainty arises. You can create a backup in Google Drive or use an external device.
Protect your Laptop from Viruses A good antivirus works as a sanitizer for your study laptop. It runs, scans, and eliminates unwanted and harmful files and viruses. You can download free versions of virus-protection apps from their official websites. However, the best way to avoid computer viruses is by following certain internet etiquette, such as not clicking on links or downloading files that look suspicious.
Use Binder Clips Using binder clips to keep the cords of any peripheral devices attached to your laptop table is an effective and creative hack. Use medium-sized or jumbo-sized binder clips depending on how many cords or cables you want to fix. Fix the binders to the corner of your table and run the wires through the metal loop of the clips. Doing so keeps all the wires and cables organised in one place and does not let them fall or jumble up.
Save the Battery Hack If you want your laptop’s charge to run longer, turn on the battery-saver mode. You can find the battery-saver option in the settings of your laptop. You can also customise it according to your needs. You can dim your display to the optimum level to save battery.
Read More (Original Source) - articleswing.com
0 notes