#How to download MySQL database backup from cPanel?
Explore tagged Tumblr posts
Visit Tumblr Blog
Explore Tumblr blogs with no restrictions, modern design and the best experience.
Last Seen Tumblr Blogs


Fun Fact
Women make up for the other 50% of Tumblr’s audience.
Text
Manage and secure your data efficiently by learning step-by-step instructions on downloading SQL databases from cPanel effortlessly. Read now!
#How to download MySQL database backup from cPanel?#How to import MySQL database backup from cPanel?#How to export a MySQL database using cPanel#How to download MySQL database from cPanel?#How to Backup MySQL Database Using cpanel
0 notes
Text
Migrate or move WordPress website to a new host in 2025
Why You Might Need to Move Your WordPress Site
Your website is important. But sometimes, your web host may be slow, expensive, or not helpful. When that happens, it’s smart to move your website to a better hosting company. A better host can help your site load faster, stay online, and keep visitors happy.
You can move your website in two ways:
Manually (you do everything step by step)
Automatically (you use a plugin to help)
This full guide will show you both ways. It will also teach you what to do after you move your site to make sure everything works.
If this sounds hard, don’t worry. You can also get help from Creation Wave LLC. We help people move WordPress websites safely and quickly.
Table of Contents
Manual vs Automatic Migration
Manual Migration – Step by Step
How to Move WordPress Without cPanel
How to Use a Plugin to Migrate Your Site
What to Check After Migration
Final Thoughts and Expert Help
Should You Move Your Site Manually or Use a Plugin?
There are two ways to move your WordPress site:
Manual Migration
This is where you download your files and database and upload them to the new host yourself. It gives you more control, but you need to be careful. One small mistake can break your site. This is better for large websites or people with some technical skills.
Automatic Migration
This uses a WordPress plugin to move your site. It is easier and faster. It is perfect for small websites or beginners. You don’t have to touch any code.
If you're not sure which to pick, try a plugin first. If it doesn't work or gives errors, you can move it manually or get expert help.
Need help? Creation Wave LLC offers both manual and automatic WordPress migration services.
Manual WordPress Migration (Step-by-Step Guide)
This part will show you how to manually move your WordPress website to a new host.
Step 1: Choose a New Hosting Company
Make sure your new host is fast, secure, and helpful. Look for companies that offer good customer support and daily backups.
Types of hosting:
Shared hosting (basic and cheap)
VPS hosting (faster and more private)
Managed WordPress hosting (easy and fully managed)
Dedicated server (for very large sites)
If you need help picking the right host, Creation Wave LLC can help you choose the best one.
Step 2: Backup Your WordPress Files
Your website files are very important. They include your theme, plugins, images, and settings.
To back them up:
Use an FTP client like FileZilla.
Connect to your old host using FTP login details.
Find the folder named “public_html” or your WordPress folder.
Download all the files to your computer.
Wait until the download finishes before going to the next step.
Step 3: Export Your Database
Your website database has all your posts, pages, user accounts, and comments.
To export it:
Log in to cPanel on your old host.
Open phpMyAdmin.
Click your WordPress database name on the left.
Click the “Export” tab at the top.
Choose “Quick” and “SQL” format.
Click “Go” to download the file.
Save this file in a safe place.
Step 4: Create a New Database on Your New Host
Now go to your new hosting account. Do this:
Log into cPanel.
Click “MySQL Databases.”
Create a new database.
Create a new user and give it a strong password.
Add the user to the database and give it all permissions.
Write down the database name, user name, and password. You will need them soon.
Step 5: Upload WordPress Files to New Host
Now it’s time to put your website files on the new server.
To upload:
Open FileZilla again.
Connect to your new host with your new FTP details.
Go to the folder named “public_html” or root folder.
Upload all your website files from your computer.
Wait for the upload to finish before moving on.
Step 6: Import Your Database
Now you need to import your old database to the new host.
Log in to cPanel on the new host.
Open phpMyAdmin.
Click your new database name.
Click the “Import” tab.
Choose the .sql file you downloaded earlier.
Click “Go.”
This will add your old content to your new hosting account.
Step 7: Update the wp-config.php File
WordPress needs to know how to connect to the database.
In FileZilla, find and open the file “wp-config.php.”
Right-click and choose Edit.
Update the database name, user, and password:
define('DB_NAME', 'your_new_db_name'); define('DB_USER', 'your_new_db_user'); define('DB_PASSWORD', 'your_new_password');
Save and close the file.
Now WordPress can talk to the new database.
Step 8: Point Your Domain to the New Host
This is the final step.
Log into the account where you bought your domain (like GoDaddy or Namecheap).
Find DNS or Nameserver Settings.
Change the nameservers to the new hosting company’s nameservers.
Save and wait.
It can take 1–24 hours for the DNS to update fully. After that, your site will be live on the new host.
How to Migrate Without cPanel
Some hosting providers don’t use cPanel. That’s okay. You can still migrate your website.
Here’s what to do:
Ask your host for FTP access and MySQL access.
Use FileZilla to upload files.
Use another tool like Adminer or CLI (command-line) to import your database.
Update your wp-config.php file as shown earlier.
If this sounds too technical, Creation Wave LLC can do it for you.
How to Use a Plugin to Migrate Your WordPress Site
If you want an easier way, use a migration plugin. Here are three good ones:
All-in-One WP Migration
Simple drag-and-drop tool.
Great for beginners.
Duplicator
Makes a full copy of your website.
Offers more options for developers.
UpdraftPlus (Paid)
Does backups and migrations.
Good support.
To use a plugin:
Install the plugin on your old website.
Use the plugin to export the full site.
Set up a clean WordPress install on your new host.
Install the same plugin there.
Import the file you exported earlier.
After a few minutes, your site should be live.
What to Check After Migration
After moving your website, test everything. Check the following:
Is your homepage loading fast?
Are all your pages and posts showing?
Are your images loading?
Can you log into the WordPress dashboard?
Are all your plugins working?
Is the site mobile-friendly?
Also test your contact forms, menus, and links. You can use free tools like GTmetrix or Google PageSpeed to check speed.
If anything looks broken, go back and check your steps.
Need help? Creation Wave LLC offers a full post-migration checkup.
Final Thoughts
Moving your WordPress website can feel scary. But with the right steps, it’s not so hard. This guide helps you move your site by yourself or with a plugin. You also learned how to test your site after moving.
A better host can give you faster speed, better uptime, and better support. If you don’t want to take risks or waste time, you can let experts do it for you.
1 note
·
View note
Text
WoWonder Nulled Script 4.3.4

Download WoWonder Nulled Script – Build Your Own Social Network for Free Looking to create your own social networking platform without breaking the bank? The WoWonder Nulled Script is the perfect solution for aspiring developers and entrepreneurs who want a feature-rich, scalable, and modern PHP-based social network script—absolutely free. Take full control of your digital community and unlock premium features without spending a dime. What is WoWonder Nulled Script? WoWonder Nulled Script is a modified version of the original premium script that enables users to access all functionalities without license restrictions. It’s a comprehensive PHP-based social networking platform similar to Facebook, allowing users to connect, share, and communicate seamlessly. Whether you’re building a niche community or a wide-reaching social network, this nulled version offers everything you need—free of cost. Why Choose WoWonder Nulled Script? There are numerous reasons to opt for WoWonder Nulled Script. Apart from saving on licensing fees, it gives you unrestricted access to premium features such as real-time messaging, timeline sharing, privacy settings, and responsive mobile design. Whether you are a developer seeking to test the full potential of the script or a business owner looking to launch a new social network, WoWonder delivers robust functionality and clean, customizable code. Technical Specifications Script Type: PHP-based Social Network Script Database: MySQL Framework: Custom PHP MVC Version: Latest Nulled Release Compatibility: PHP 7.x and 8.x Responsive: Fully Responsive Design (Mobile-Friendly) Top Features and Benefits Instant Messaging: Real-time chat and group conversations News Feed: Dynamic timeline with photos, videos, and updates Profile System: Personalized profiles with cover photos and avatars Multi-Language Support: Ideal for global communities Secure Login: Social login integration and two-factor authentication Admin Dashboard: Full-featured admin control panel for site management API Integration: Connect with mobile apps and third-party tools Use Cases of WoWonder Nulled Script From startup projects to private online communities, the WoWonder serves a wide range of applications. Use it to create: A niche social platform for hobbyists or professionals An internal communication network for teams or organizations A student or university social media site Exclusive communities for members or subscribers How to Install WoWonder Nulled Script Download the latest WoWonder Nulled Script zip file from our website. Upload the script to your server via cPanel or FTP. Create a new MySQL database and assign a user to it. Visit the installation URL and follow the on-screen instructions. Complete the setup and start customizing your social network! Frequently Asked Questions (FAQs) Is the WoWonder Nulled Script safe to use? Yes, we scan all files for malware and ensure the nulled version is clean and ready for deployment. However, always install on a test environment first. Can I use this script for commercial purposes? While the nulled version removes license restrictions, we recommend checking legal policies in your jurisdiction. Many users deploy it for learning or demo purposes before buying the official version. Does it support mobile apps? Yes! WoWonder has full API support, allowing easy integration with Android and iOS applications. Where can I find other premium tools for free? If you're looking for top-notch WordPress tools, check out our woodmart nulled theme—an excellent companion for WooCommerce-based websites. Are there other nulled plugins available? Absolutely. For backups and restoration, we recommend using UpdraftPlus Premium nulled—a must-have plugin for all WordPress users. Final Thoughts The WoWonder is your gateway to launching a powerful, customizable, and modern social networking site without the usual financial investment. Unlock all the premium features and experience true freedom in development and innovation.
Download it now and start building your digital empire today!
0 notes
Text
Business Shared Hosting | Web Hosting Solutions | Limenetworking Hosting
Meaning Of Business Shared Hosting?
Business Shared Hosting is a well known, economical, passage level web hosting item, frequently appealing for little and medium organizations, web journals, portfolios and websites with moderate measures of traffic.

With Shared Web Hosting, numerous websites share an enormous server and its assets, including capacity, transfer speed, and plate space. With Shared Hosting, the web have is answerable for the entirety of the server support and upkeep. All of Limenetworking Business Hosting packages are cheapest Shared Hosting packages.
Reason of Choosing Business Shared Hosting
Business Shared Hosting is an extraordinary, modest alternative when you’re simply beginning. In the underlying phases of propelling a web nearness, or reviving what you have, until your website gathers speed, choosing the most reduced estimated alternative is a brilliant business choice. On the off chance that you needn’t bother with explicit programming or setups, at that point Business Shared Hosting is ideal for you.

Some installable programming requires root get to – which gives the client access to all assets and execute any order – or more CPU use than permitted on Business Shared Hosting. When beginning, most independent ventures just need a little instructive website to help construct mindfulness and support leads.
Cheap Web Hosting
While most independent companies first dispatch a website, traffic will presumably be low until the webpage increases rank on search engines.
Advantages of Business Shared Hosting
Limenetworking Web Hosting offers numerous advantages with our Business Shared Hosting packages. These advantages incorporate free SSD drives, a free disk space for one year, along with restoration and backup facility with single click. There are more than 300 single click installers accessible, and you can code in different languages, for example, PHP, MySQL, .net, and Ruby.
You can get to your email from any gadget with Limenetworking protected IMAP email and pick your server farm that will permit you to have your maximum speed zone. You can work simpler and quicker with SSH access, and you can appreciate the Google applications mix with a simple to utilize 3-advance wizard.
Choosing Best Web Hosting Product
If you are new to web hosting or are making a website with low to direct measures of traffic, Business Shared Hosting is likely the best alternative for you. It is the most reasonable web hosting you can purchase and will probably have all that could possibly be needed assets for your site(s) to run rapidly and efficiently.
When your site develops in rush hour gridlock and your experience increments in utilization, it will be a great opportunity to move up to Virtual Private Server Hosting. This item will give you your own segment of a dedicated server.
Limenetworking Cheap Dedicated Servers
If you have an asset overwhelming application or a site with an exceptionally high measure of traffic, you have the choice of overhauling. You can move up to your Limentworking cheapest Dedicated Server which gives all of you of the server assets and permits you to arrange it any way you see fit.
Building a Website
Limenetworking Web Hosting makes it simple for new web designers to get their locales up and off the ground. The entirety of our Business Hosting plans accompany Softaculous, an application installer that will permit you to download more than 400 applications to assist you with your website.

Limenetworking Web Designing
These applications incorporate, however are not constrained to, Content Management Systems (CMS, for example, WordPress, Joomla and Drupal, Online Marketplaces, for example, Prestashop, Magento and OpenCart, and numerous others. Shared Hosting is an ideal domain to create and sharpen your programming aptitudes and gives various instruments to novices.
I as of now have a website with another host. Would i be able to transfer my website?
Yes, you can move your website for nothing to your Limenetworking Web Hosting account. Your free website move incorporates up to 3 websites, databases, as well as cPanel accounts. The expense for extra website moves is $10 per thing. On the off chance that you decide to move your website, we have a far reaching bolster focus. Investigate your issues with broad bit by bit articles, training channels, and client driven network support forums.
How numerous websites would i be able to have with my Business Shared Hosting plan?
The number of websites you can have with one record relies upon the Business Shared Hosting plan you select. For Launch plans, you will be designated 2 websites for your account.
For Power plans, you can have up to 6 websites. With our Pro arrangement, you can have a boundless number of websites. No shrouded expenses or shock charges, only different websites for one low price.
What’s next subsequent to buying a Business Shared Hosting plan?
You are prepared to begin assembling your website(s). When you have bought your cheapest Business Shared Hosting bundle, sign into AMP and investigate alternatives, for example, enlisting and moving areas, getting to cPanel, buying SSL endorsements, setting up your email, submitting website move solicitations and much more.
You can likewise sign in to cPanel and start introducing applications, for example, WordPress. We have various instruction channels identifying with getting your record set up. In the event that you run into issues, don’t stop for a second to connect with our accommodating care staff for help.
Cpanel Login

Also, make a point to look to Limenetworking 100+ Small Business Resources and Tools for Entrepreneurs and Startups to help with showcasing, visual computerization and venture the executives devices. It’s a free asset direct for anybody hoping to streamline their website’s performance.
#cheap dedicated server#cheap dedicated hosting#vps hosting#vps#domain checker#business hosting#business web hosting#business shared hosting#$1 hosting#$1webhosting#managed dedicated server
3 notes
·
View notes
Text
Are You Making These Web Hosting For Your Wordpress Website Mistakes?
If you want to start a WordPress blog then that is basically good select in your case. low-cost WordPress web hosting can in fact set your company at risk.
additional info these kinds of solutions signify you could have to have to setup WordPress manually but numerous internet hosting firms nevertheless give you an installation course of action that only will take a couple clicks. Deciding with a plan with unlimited storage and bandwidth could enable you to help you save you from needing to upgrade as well shortly, but you have to be certain to study the minor print from each and every host to determine exactly whatever they suggest by unrestricted. Since you ultimately have unique access to a server, you are going to be granted root access to generate modifications on the server for an entire. Now you are able to generate your personal notebook computer to get a server that hosts your Internet Internet site. otherwise you can advertise your providers and create a website on your client with their own hosting etcetera.. With their reliable web hosting, you would not have being worried about your web site loading little by little even in the event that you get a complete lots of website traffic.
Here Is A Method That Is Helping Fast Wordpress Hosting
By comparison, if you're functioning a business, you require a strategy that may develop along with you. you'll want to target your demands and just start off what you want to to complete. you'll want to begin with just a little prepare because you Will not have to have that much of electric power and means. there are actually extra characteristics you may have alongside how that could power you to increase your company, but when it needs to do with setting up a beginning World wide web presence, there are a lot of providers we can easily envision that may do an awesome deal a lot less for you with a great offer extra money. without doubt which you'll be able to select any supplier but Remember, not each and every lower-Price Net host get the job done exactly the same way. A reputable internet hosting need to provide great client treatment and something you must foresee from working day a person.
How To Learn Best Wordpress Hosting
That won't ever disappoint you in regard to server quality When you host your on-line organization on that server, There's no have to be worried about loading velocity of your internet site. Not a number of from the very affordable Website hosting providers provide you with reseller account with the potential to build multiple cpanel dependent Internet sites. picking out a great Site internet hosting provider is critical. Transfer your sites to low cost host exactly where everything You should operate your internet site is contained in the internet hosting at no included charges! from the numerous strategies to push people to your internet site, social web pages are a number of the the best. The real cause your web site is slow is it has not been optimised adequately. hold the support make clear the strategy by which they protect against that a web page can decelerate a complete server. That is another Web host that is beside that as a result of their supplying plus the regular of customer service. in case you anticipate acquiring an e-commerce Web page or you happen to be providing a superb or assistance, attempt to locate a web hosting business which offers an SSL certification. The driving power powering profitable and attractive websites is the choice of concept employed. A get started-up or minimal small business can absolutely take care of their very own WordPress Web site with no support of a designer or even a programmer in the first place. Now, It really is your decision should you be likely to use WordPress as your platform on your Business or not. a whole lot of individuals decide on WordPress since There are tons of professional-hunting themes offered for it. you will need to pick a theme that fits the content of your internet site. incredibly, there are numerous themes available and chances are you'll transform the looks of Web-site as persistently you motivation. WordPress hosting is significant for the reason that with a inadequately performing host, you encounter the potential for portfolio downtime and that could effect company negatively. as a way to get visitors to your website, your hosting firm ought to provide you with this service, or you'll need to have interaction a third party for this company. Some hosts will give you a set level of bandwidth, while others will offer you a monthly visitor cap. Backups undoubtedly are a remarkably considerable section retaining a healthful website. The setup is rapidly and easy and incorporates a very totally free area. Users are going to acquire frustrating pop-ups whenever you're surfing with your website page, it'll not be doable to locate a nice posture in a internet search engine, or perhaps get a accurate compact business enterprise URL. That web hosting is Among the many best managed web hosting suppliers. The CMS is previously pre-installed, and Which means you need not download and set up, as from the occasion of almost every other regular Webhosting System. If it involves optimized WordPress web hosting that's also affordably priced, that internet hosting is undoubtedly one of the web hosts at the peak with the list. irrespective of the value tag, your alternative of hosting organization ought to be dictated by certain facets. you will discover largely 4 sorts of hosting options available to the sector. Examine these facets as you eventually check out lastly select a internet hosting company. future, you ought to create a MySQL databases around the host server, or use an current just one if you've got it. next, keep in mind that should you get affordable Internet hosting, make selected It is really Linux primarily based shared internet hosting. committed server hosting is a utmost variety of internet hosting In relation to configuration that is dedicated to a single site or just one intent.
1 note
·
View note
Text
Frames in bluegriffon
DOWNLOAD NOW Frames in bluegriffon
#Frames in bluegriffon how to#
#Frames in bluegriffon software#
#Frames in bluegriffon code#
#Frames in bluegriffon password#
#Frames in bluegriffon software#
Some of these web design software provide advanced functionalities too, such as: you can establish FTP connection and publish a project via FTP, connect to MySQL/ODBC database, add Apache modules, convert spaces to single tabs, and do more. Most of these software provide built-in debugger to search for errors in the code. You can also see the preview of the created web page in browser at any time.
#Frames in bluegriffon code#
As you insert a function, the code is generated itself. You can specify corresponding information of each element like name, value, type, size, etc. You can also add email links, hyperlinks, frames, notes, comments, date, etc.
#Frames in bluegriffon password#
You can insert different form input types like button, password field, text box, radio button, checkbox, tables, image button, etc. You can add forms, tables, lists, multimedia files (image, audio, and video), text area, and other essentials to create a web page. While you can create web pages in real time in Design mode, you can write code for the same in Code mode. Most of these web designers provide two editing modes: Design and Code. These software let you easily design web pages by providing support for ‘code auto-completion’ and suggesting tags. To use these web designer software, you just need to have basic understanding of HTML and CSS languages. Once complete, you can click Close to close the File Manager window.Here is a list of best free web design software for beginners for Windows.If not, correct the error or revert back to the previous version until your site works again. Test your website to make sure your changes were successfully saved.Click Save Changes in the upper right hand corner when done.A dialogue box may appear asking you about encoding.htaccess file and then click on the Code Editor icon at the top of the page. Alternatively, you can click on the icon for the. htaccess file and click Code Edit from the menu. The File Manager will open in a new tab or window. Make sure Show Hidden Files (dotfiles)" is checked.Check the box for Document Root for and select the domain name you wish to access from the drop-down menu.In the Files section, click on the File Manager icon.htaccess files in cPanel's File Managerīefore you do anything, it is suggested that you backup your website so that you can revert back to a previous version if something goes wrong. htaccess file for most people is through the File Manager in cPanel. Edit the file on your computer and upload it to the server via FTP.
#Frames in bluegriffon how to#
htaccess file at some point, for various reasons.This section covers how to edit the file in cPanel, but not what may need to be changed.(You may need to consult other articles and resources for that information.) There are Many Ways to Edit a. It is possible that you may need to edit the. htaccess file, and many scripts such as WordPress, Drupal, Joomla and Magento add directives to the. Redirects and rewriting URLs are two very common directives found in a. htaccess file contains directives (instructions) that tell the server how to behave in certain scenarios and directly affect how your website functions. On platforms that enforce case-sensitivity PNG and png are not the same locations. Notice that the CaSe is important in this example. In this example the image file must be in public_html/cgi-sys/images/ This varies by browser, if you do not see a box on your page with a red X try right clicking on the page, then select View Page Info, and goto the Media Tab. The properties will tell you the path and file name that cannot be found. Right click on the X and choose Properties. When you have a missing image on your site you may see a box on your page with with a red X where the image is missing. On platforms that enforce case-sensitivity example and Example are not the same locations.įor addon domains, the file must be in public_html//example/Example/ and the names are case-sensitive. In this example the file must be in public_html/example/Example/ When you get a 404 error be sure to check the URL that you are attempting to use in your browser.This tells the server what resource it should attempt to request.
DOWNLOAD NOW Frames in bluegriffon
0 notes
Text
How to Backup WordPress Website From cPanel
How to Backup WordPress Website From cPanel To backup your WordPress website, you need to have the right tools. There are several programs available, including phpMyAdmin, BackupBuddy, and Adminer. All of these programs will let you back up and reinstall your website. If you're looking for a simpler way, you can just use a file manager like Dropbox or Google Drive. Using an FTP client, you can export and import your files. phpMyAdmin To make a backup of your WordPress website, you will need access to cPanel. This is the control panel that is provided with your web hosting plan. This is where you will find all of the tools that are needed to manage your website's MySQL database. Once you've logged in to cPanel, you will want to navigate through it to the phpMyAdmin section. This will allow you to make manual backups and even change passwords. To backup your WordPress website, you'll need to access your control panel's phpMyAdmin interface. From there, navigate to the Databases tab. Here, you'll want to select the file that you'd like to backup. Once you've selected the file, wait for it to import the database. The process will take some time, depending on a variety of variables. Backups of your WordPress website will be stored in the backup folder. This folder can be found in the wp-content folder or the wp-config file. You can then extract these backup files from their location in a zip or GZIP file. Then, you can upload them to a Dropbox account or a Google Drive account. Remember to make multiple backups so that you never lose any important information. UpdraftPlus If you want to back up your WordPress website on a regular basis, you should install the UpdraftPlus backup plugin. It will enable you to schedule automatic backups and select a remote location where your backups will be stored. It also allows you to create a backup schedule based on when you plan to make changes to your site. To create a backup, visit the UpdraftPlus settings page and click the Backups tab. You will see several options including the ability to back up your entire database or specific parts of your website, such as the theme and plugin files. After you have selected your backup type, click the "Backup Now" button. The next screen will show you the progress of the backup. The backup may take some time, depending on the size of your website. Once the process is complete, your files and database will be backed up offsite. Once you have chosen the backup location, you can set a backup schedule for the files and database. You should choose a backup schedule that matches the frequency of changes to your website. You can also choose to send backup files to an email address. This can be a great way to keep your website safe while you are not in front of your computer. BackupBuddy BackupBuddy is a great service that creates automatic backups for WordPress websites. It stores backups to remote cloud storage, and offers various backup types. You can choose to download individual files or your entire site, and backups can be stored in the cloud or on your computer. It also supports site migration, so you can restore your site without losing anything. You can backup your entire WordPress website with BackupBuddy, and it's easy to restore it if anything goes wrong. You can customize your backups to back up specific categories or posts, and set up automatic backups. It's easy to use, and even more important, it's free. BackupBuddy also includes security features. It scans your backup files for viruses and malware. You can also back up your website for as long as you like. You can even schedule your backups to run on a regular basis. BackupBuddy has more than half a million websites that trust it with their data. Adminer To backup your WordPress website, you can use cPanel. This control panel is available on many web hosts. However, the backup process for this panel is quite complex. First, you must download a ZIP file of your backup. Next, you must delete your server copy of the backup. Finally, you can copy the backup file into a new text file. In cPanel, there is an option called Backup that allows you to create a partial backup. This backup can be for a single directory, the MySQL database, or email accounts. However, full backups can't be restored via cPanel and must be downloaded and stored on your computer or a third-party cloud platform. Another option is to backup the database manually. This method is free, but requires considerable time and attention. You need to secure the files with passwords and encryption, and you need to periodically delete old backup files. Additionally, the backups should contain the database of your website. How to Backup WordPress Website From cPanel Read the full article
0 notes
Text
Move WordPress Site to New Host | Step-by-Step Guide

Steps To Do Before Moving WordPress Site to New Host
There are some preparation steps that you should go through before you move your WordPress website to the new host. The size of your database will determine the time taken for migration. You will also be able to clear cache directories, remove backups, and remove unused videos, themes, and plugins to reduce space. By doing this, you can speed up the migration process.
1. Back Up Your Website Files
Now you know how to prepare before you move WordPress site to new host. Then you should proceed with backing up the critical files on your website. Unexpected things can happen as you migrate files. If you don’t want to encounter any problems with missing or corrupted files, you should take backups. You don’t have to worry about losing your data in such situations, as you can quickly restore them from the backups. You will be able to take the backups using an FTP tool to your local location on the computer.
2. Export the Database
The next step you should follow to move WordPress site to new host is to export the database. The database is one of the most critical aspects of the WordPress website. That’s because it contains the data of all your posts and pages. You will access your database via phpMyAdmin, available through the hosting control panel.You will need to select the exact database of your WordPress website from the left-hand panel and then click on the Export button that you can see on the menu bar. Ensure that the export format is in SQL before proceeding with the export. Once you click on the “Go” button, you can get the database export downloaded in the form of a .sql file. You will need to keep it in the same website folder to proceed with the migration.
3. Creating MySQL Database on New Host and Import Your WordPress Database
You should log into the new host and use cPanel to access “MySQL Databases.” This is where you will create a new database while using the same name as the old database. Depending on the host you select, you will come across the need to add a mandatory prefix to the database. Make sure that you carefully change the name of the database under such a situation.Next, you can get to phpMyAdmin. Then you can click on import and proceed with importing the SQL file. You should then open up the wp-config.php file, which you downloaded. You can search for the name of the database again and change the value of the database name with a new one.As the next step, you should create a new database user. You may click on “Add New User” and do it. You can open up the wp-config.php file and change the user and password as preferred. Finally, you will need to add the user to the created database.
4. Import Your WordPress Site to the New Host
Now you are done with database configuration, and you may proceed to migrate WordPress site to new host. This is where you can start uploading the files of the website. It would help if you connected to the new web host via an FTP tool and then located the folder where you will upload the WordPress file. You will usually need to upload files into the “public_html” folder. Make sure that you are also uploading the updated wp-config.php file.This file upload process might take some time, and it varies based on the total amount of files you have. Ensure that you don’t delete the files from the local computer until you finish the file upload process.
https://n6host.com/blog/migrate-wordpress-site/
0 notes
Text
How to change WordPress hosting
In case you want to know how to change WordPress hosting you can follow the steps that are mentioned below in the provided sequence.
Steps: How to change WordPress hosting
Step 1: You need to take the backup of your WordPress files
For backing up, you need to have a backup plugin such as VaultPress or duplicator.
Backup Plugins are used to install and then built-in settings to check which files are backed up, the frequency of back-up, the place where they are backed up.
Another method is to do it manually, which requires a file transfer tool (FTP) such as FileZilla (PC) and transmit (mac) to access your website files.
Once you have installed it, you have to use SFTP credentials from your website’s directory and download them.
After you are connected, you need to select all files under your website’s directory and download them. It includes access files that may be hidden.
Step 2: How to change WordPress: the next step is to export the database
Login to your cPanel account of the webserver.
Now you have to open the phpMyAdmin application.
From the list on the left-hand sidebar, select the database that contains your WordPress installation.
Once you have selected, you have to click on the Export tab in the navigation menu.
Now you have to click on the go button and the process of exporting the database will begin after which a file will be downloaded on your computer.
Step 3: On the new host server, create the WordPress database
You have to open the MySQL database and choose an appropriate name to be given to a new database with this name.
Now you have to create a new MySQL user with a strong password.
Once you have done this add this user account to the new database and grant it all privileges.
Step 4: Edit the wp-config.php.file
Step 5: now upload the new WordPress file to the new host.
Step 6: Replace/search the new domain and define the new domain.
Step 7: Give the final touches at the end.
0 notes
Text
cPanel - Website and Hosting Management Tool
Build and Manage your WordPress Website. One Low Predictable Price!
cPanel Hosting Services will empower a Website owner with a wide variety of options at a higher level of control And automation tools designed to simplify the process of hosting a web site
With the industries best graphical interface. cPanel is an excellent option for you to consider.
cPanel's time saving automation's will make managing your Website easier than ever.
With over 80 different features which includes creating Email Accounts, Backups, File Manager, Adding Domains, MX Records, Softaculous and and the Site Publisher interface to quickly create simple websites from a variety of templates.
cPanel is the leading web hosting control panel available today
Currently in the hosting market cPanel is considered as the leading website management tool
It’s simple graphical web based interface empowers web developers, administrators and resellers to effectively develop and manage their websites
Not just for developers, even a non-professional and less technical people can easily create and manage websites and their hosting account with cPanel, you will have access to stats, disk usage and space, bandwidth usage, add, or remove email accounts, MX Records, FTP accounts.
Install different The File Manager, PHP my Sql scripts, get access to your online Web Mail
And more advanced functions, such as MIME types, cron jobs, OpenPGP keys, Apache handlers, addon domains and sub domains, password protected directories
cPanel Hosting Services is an easy to use interface for web maintenance. Even a user completely new to web hosting can easily manage their own website.
Advantages of cPanel hosting services:
Easy to use
Supports all languages
Adapts the screen size automatically, so we can use on any device
Has built-in file manager to manage the files easily
Integrated with phpMy Admin tool to manage the databases easily
Has Integrated email wizard which helps to send or receive the mails using a mail client
cPanel handles automatic upgrades of Apache, MySQL, PHP and other web applications
cPanel Features:
Looking for cPanel Hosting Services with over 80 different features?
Files
File Manager
Use the File Manager interface to manage your files. This feature allows you to upload, create, remove, and edit files without the need for FTP or other third-party applications.
Images
Use the Images interface to manage your images. You can view and resize images, or use this feature to convert image file types.
Directory Privacy
Use the Directory Privacy interface to limit access to certain resources on your website. Enable this feature to password-protect specific directories that you do not want to allow visitors to access.
Disk Usage
Use the Disk Usage interface to scan your disk and view a graphical overview of your account's available space. This feature can help you to manage your disk space usage.
Web Disk
Use the Web Disk feature to access to your website's files as if they were a local drive on your computer.
FTP Accounts
Use the FTP Accounts interface to manage File Transfer Protocol (FTP) accounts.
FTP Connections
Use the FTP Connections interface to view current connections to your site via FTP. Terminate FTP connections to prevent unauthorized or unwanted file access.
Anonymous FTP
Use the Anonymous FTP interface to allow users to connect to your FTP directory without a password. Use of this feature may cause security risks.
Backup
Use the Backup interface to back up your website. This feature allows you to download a zipped copy of your cPanel account's contents (home directory, databases, email forwarders, and email filters) to your computer.
File Restoration
Use the File Restoration interface to restore items from backed-up files.
Backup Wizard
Use the Backup Wizard interface as a step-by-step guide to assist you in backup creation.
Databases
phpMyAdmin
phpMyAdmin is a third-party tool that you can use to manipulate MySQL databases. For more information about how to use phpMyAdmin, visit the phpMyAdmin website.
MySQL Databases
Use the MySQL Databases interface to manage large amounts of information on your websites. Many web-based applications (for example, bulletin boards, Content Management Systems, and online retail shops) require database access.
MySQL Database Wizard
Use the MySQL Database Wizard interface to manage large amounts of information on your websites with a step-by-step guide. Many web-based applications (for example, bulletin boards, content management systems, and online retail shops) require database access.
Remote MySQL
Use the Remote MySQL interface to configure databases that users can access remotely. Use this feature if you want to allow applications (for example, bulletin boards, shopping carts, or guestbooks) on other servers to access your databases.
PostgreSQL Databases
Use the PostgreSQL Databases interface to manage large amounts of information on your websites. Many web-based applications (for example, bulletin boards, content management systems, and online retail shops) require database access.
PostgreSQL Database Wizard
To simultaneously create a database and the account that will access it, use the PostgreSQL Database Wizard interface. Many web-based applications (for example, bulletin boards, content management systems, and online retail shops) require database access.
phpPgAdmin
phpPgAdmin is a third-party tool that you can use to manipulate PostgreSQL databases. For more information about how to use phpPgAdmin, visit the phpPgAdmin website.
Domains
Some of our Free Domain Name are mentioned and briefly mentioned for your kind regards.
Site Publisher
Use the Site Publisher interface to quickly create simple websites from a variety of templates. You can use this feature, for example, to ensure that visitors can find your contact information while you design a more elaborate website.
Addon Domains
Use the Addon Domains interface to add more domains to your account. Each addon domain possesses its own files and will appear as a separate website to your visitors.
Subdomains
Subdomains are subsections of your website that can exist as a new website without a new domain name. Use this interface to create memorable URLs for different content areas of your site. For example, you can create a subdomain for your blog that visitors can access through blog.example.com.
Aliases
Use the Aliases interface to create domain aliases. Domain Aliases allow you to point additional domain names to your account's existing domains. This allows users to reach your website if they enter the pointed domain URL in their browsers.
Redirects
Use the Redirects interface to make a specific webpage redirect to another webpage and display its contents. This allows users to access a page with a long URL through a page with a shorter, more memorable URL.
Zone Editor
Use the Zone Editor interface to add, edit, and remove A, AAAA, CNAME, SRV, MX, and TXT DNS records. It combines the functions of the Simple Zone Editor and Advanced Zone Editor interfaces.
For more information please visit our site https://rshweb.com/blog-what-is-cpanel or https://rshweb.com/
0 notes
Text
10xDrive Review
Introducing 10xDrive
10xDrive gets safe 1 TB of cloud storage space for one decade For Low One Time Price. It can easily keep, share as well as accessibility your documents safely from throughout the world from any tool.
10xDrive is Common Product, which everybody Requires. Common Utility Item for Every Particular niche. We have actually EXAMINED this Release and Item Version In 2015 with Release Of 10xHostings In April 2019.
10xHostings-- Common Hosting Offer was an effective smash hit launch that turned 500k brand within a month of the launch. Our JVs, Promoters, Affiliate Marketing professionals made lots of cash from it. With 1000s of satisfied clients, 10xHostings proved to be Winning Launch Dish.

10xDRIVE-- Similar Item with Same Release Version will make you even more cash than 10xHostings owing to its wider target market reach.
Leading Ways to Shop Your Digital Files
Social Network Storage Space
As social media accounts grew in appeal, people quickly understood they functioned as a method to save images as well as videos where they could constantly be accessed. By doing this, these digital data really did not occupy room on smart phones or computer systems. Plus, 10xDrive gave a way to produce cds for simple access as well as sharing.
Yet, concerns exist. Initially, photos are saved in reduced resolution. That does not give you the best version of your electronic life. Other storage space services save images as well as video in high resolution. Furthermore, images on social networks can be accidentally deleted and also shed for life. In many cases, social networks firms make no assurance regarding what is stored on their platform or not.
A lot more difficult is that social media sites websites confess they proactively extract your individual information. For example, Facebook stated they "possessed" your photos. Even if you removed your account, they said the information would still feed on their web servers somewhere. Currently, there are means to change that to a specific degree. Nonetheless, as long as you continue saving photos and video clip on social media sites, you must think your personal data may never truly be your own.
Cloud Storage
This digital storage alternative is significantly prominent for its lots of advantages, despite some drawbacks. Companies like Dropbox arised to provide an option for digital documents that addressed existing storage issues. It wasn't long before Google Drive, Box, as well as countless other cloud platforms appeared.
10xDrive has actually gotten rid of a few of the demand to maintain documents on computer systems because it provides a well organized method to find, share, and also regulate your details. Information is not actively mined like social media sites storage space neither is it shed or harmed. Likewise, there is prompt synching as well as access from any kind of gadget for greater benefit. Some even include alteration background so you can go back to an older variation of an electronic documents.
However, also this storage service has its drawbacks. First, several cloud storage solutions start you out with an amount of storage that you quickly outgrow. Then, when you take a look at the subscription choices, you recognize it can become quite pricey. After that what happens if you terminate your membership-- where does your information go?
Second, lots of security professionals have voiced issue concerning the genuine safety with cloud storage choices. As an example, InformationWeek kept in mind that there were some crucial threats, consisting of information breaches, information loss, traffic hijacking, unconfident APIs as well as even more. CSO described that even more safety and security issues develop each year as cyberpunks recognize exactly how they can reach this data primarily throughout data transfer to a cloud carrier.
Personal Crossbreed Cloud Storage
When we laid out to create Amber, we took a look at all these means to store digital data. This implied asking others what they used as well as what they did and also did not such as about it.
What we discovered was that we were all running into the exact same type of troubles. There are concerns concerning exactly how to find the data, that owns the data, and who considers the data. The largest concern was the lack of genuine control over our very own digital lives. In the past, those scrapbooks, picture albums, and also video clips all continued to be in our house. Now, we've all relinquished our hang on our information via most storage space techniques.
10xDrive considers that control back-- becoming your digital time pill-- while still providing ease, access, and also protection. It starts with an eye-catching physical gadget that can automatically save images directly from your mobile phone and keep all your multimedia documents safe and secure. You access your documents, consisting of streaming your videos using the app, which connects to your Brownish-yellow tool through our proprietary global cloud service, LatticeNest. This cloud supplies Customer Identity Administration and also Data Routing Verification without the demand to save your real information documents in the cloud-- unlike the conventional cloud storage service-- making sure greater protection as well as privacy of your digital assets. Get all the ease and convenience you require with the safety you should have-- due to the fact that some points in life only take place once.
10xDrive Evaluation & Introduction
Vendor: Jai Sharma
Product: 10xDrive
Introduce Date: 2020-Jan-26
Release Time: 11:00 EST
Front-End Price: $47
Sales Web page: https://www.socialleadfreak.com/10xdrive-review/
Affiliate Network: Other
Niche: Video clip
10xDrive Testimonial - Features & Advantages
STORAGE SPACE
1 TB Cloud Storage
Space Keep Your Personal or Expert Data Safe and Secure
With 7-days Trash Recovery
SECURITY
100% Protection of your data with 2 Step Confirmation (OTP Enabled)
256-bit AES file encryption
SSL/TLS Encryption
SHARE
Share with your specialist group or individual friends
Share Password Protected Links
Establish Expiry For Shared Links
Share Personal Links
BACK-UPS
Develop and save a regular backup of every one of your web sites
WordPress Plugin to produce a back-up of WordPress Sites In 1 Click
Back-up your valuable images, video clips and documents
ALLEVIATE OF USE
Drag files as well as folder to start upload automatically
Produce folders, highlight or relabel documents
Endless Upload and also Download Data transfer for smooth access Unified
Browse-- Easily search any type of file or folder with one key words Filter and also
Type of files as well as folders based on current and favorites
ALLEVIATE OF ACCESS
Gain access to your files from anywhere in the world
Access files from any type of gadget - No tool limitations
Gain access to your Drive from iphone and also Android Mobile Application Inbuilt Video Gamer
Upload and See your videos right inside the Drive Data Sneak Peek
Upload and also sneak peek your sheets and docs right inside the Drive
10xDRIVE is GOOD for All Type Of Use
PERSONAL
Maintain your memories safe as well as secure in 10xDrive
Gain access to your video clips and lovely images from throughout the world just how it to your buddies using personal link share
Establish link expiration time to quit sharing your picture and video clip after a certain time period
Overcome Hard Drive Culture-- Get this powerful cloud storage drive at reduced single rate and Store your data firmly without any anxiety of losing it ever due to hard disk malfunction
EXPERT
Keep your expert data and folders secure and also safe and secure in 10xDrive Save the backup of your web sites frequently in Drive
Enable your remote team working from various other parts of the globe to accessibility all or job associated particular documents smoothly
Share delicate data using exclusive web link share to clients or team head Set web link expiration time to quit sharing your offer or data to customers or team after certain time period
It enables your employee to stay in SYNC when they post and download and install the most up to date information to and also from your 10xDRIVE Company Center every day-- Better Team and also Information Administration
10xDrive OTOs
Front End: 10xDrive ($ 47-97)
1TB Cloud Storage Space
Functions on almost any type of tool
Safe as well as Encrypted Storage
Password Sharing
File Sneak peek
Group Sharing
Connect Share and Expiry
Inbuilt Image Editor
Folder Monitoring
Garbage Revocery
Web site Back-up
Images as well as Videos Back-up
Unified Browse
Committed Assistance
Inbuilt Video Clip Gamer
Numerous Data Types Supported
Weekly/monthly \ backups
Super Fast Sharing
Committed Assistance
10xHostings ($ 47-97)
Unlimited Domains & Unlimited Subdomains
Unlimtied Hosting
Endless Email Accounts on Unlimited Websites & Unlimited Domains
Cpanel/WHM Powered
FREE SSL Certificates - No Web Internet Browser Mistakes
Unlimited Bandwidth * 500DN 10UP
Cloud Storage Space - 10GB
Premium DNS
450+ Website Applications
100% Internet site Safety
Completely handled holding
Superfast uplink
Vehicle Upgrading OS and Server
Devoted Support
Endless Email Accounts
Limitless MySQL Databases
Fastest internet site speed tons
Full MySQL and PHP support
Wordpress Hosting
256bit security
Industry Grage PCI scanning Suitable Hostings
Ultra power Cacheboost system
Malware and Spam surveillance
99.9% Uptime gurantee
FTP Support
Powered by LiteSpeed Webserver for umatched powerful load harmonizing
Unmetered DDOS Mitigation
Millitary Grade SSD Cloud Backed
Free Website Builder
10xDrive Pro ($ 67-97)
3TB Storage space link several drives (Google Drive, dropbox, onedrive)
Trash Recovery - 90 Days
Picture Modifying - Inbuilt
Backup - Wordpress 3 Months
Share - Date Of Expiration Of Link
Household Sharing - 5 participants
Service Sharing - 10 Members
22 Social Post Submission
Final thought
"It's A Large amount. Should I Spend Today?"
Not only are you getting accessibility to 10xDrive for the best price ever supplied, however likewise You're investing totally without risk. 10xDrive consists of a 30-day Cash Back Warranty Plan. When you pick 10xDrive, your complete satisfaction is guaranteed. If you are not completely satisfied with it for any type of factor within the initial 30 days, you're qualified to a complete reimbursement-- no question asked. You've obtained absolutely nothing to lose! What Are You Waiting on? Try It today and also obtain The Adhering to Bonus offer Now!
0 notes
Link

Easy Recovery of WordPress Username and Password
In order to recover the password and username, you must access your database management tool. Most of the hosting companies suggest to use phpMyAdmin for WordPress. With this information, let us follow the steps given below.
Access your cPanel and scroll down to the database section. There, click on the Database management tool, phpMyAdmin. Please note that before you make any changes in the database management tool, we suggest you to take a backup of all the MySQL databases. In case you replace something, you will always have a backup. So, download the database to your computer.
Once you are in the database management tool, phpMyAdmin, for instance, you can view a list of all the database you have connecting to your WordPress account. Firstly, expand the table with a click.
You will find all the usernames of each database under the table head, wp_users. This is a default table name. Click on the table name and you will find all the usernames listed on the right hand side. In addition, you will find login, user emails, user passwords, and user nicknames.
You will find the password under the table name user_pass. When you look at it, you will be baffled by the long numerical and alphabetical password. But, don’t be confused. The alphanumeric password is to protect you. However, it is difficult to do WordPress password decrypt work. So, you can either note it down or simply change the password to something of your choice.
Since you do not have access to your email address, you can choose to edit the email address from the table in phpMyAdmin.
To change WordPress password, go to the user_pass row, and hit the MD5 in the drop-down menu. Now, add the new password of your choice in the Value Box. Hit Go and your password for WordPress admin is successfully updated.
Now, using your noted database username and the new password, you can log into your WordPress admin page and manage your website.
#Wordpress website design sydney#Wordpress web design sydney#Wordpress web development sydney#Wordpress web development#Wordpress website development#Wordpress website design
0 notes
Text
How To Install WordPress

In this article we will tell you how to Install WordPress in 7 Easy Steps. If you are interested in building a WordPress website you will first need to know how to install WordPress and this is the definative Guide for Manual WordPress Installation.
About WordPress
WordPress (WordPress.org) is a Free open source content management system originally built for blogging. WordPress was released in 2003 by founders Matt Mullenweg and Mike Little. WordPress features a plugin and template based architecture and, over the years, has drawn thousands of developers to create custom plugins, and themes which can now be used to create rich and diverse array and types of websites for almost any application or business need.
WordPress is used on more than 60 million websites worldwide and, as of April 2019, and nearly 34% of the top 10 million global websites have been built using WordPress. Today, WordPress is the #1 website content management system in use globally.
Now that you know a little bit about WordPress, here is a step-by-step guide on how how to manually install and setup a WordPress site for your domain, if you have a desire to build a WordPress website of your own.
What You Need To Get Started
Domain Name
A domain name is your company’s online address. It is a repository for your company’s online business identity and the public face of your brand. Your domain name can be one of the most important decisions you will have to initially make when you are deciding to create an online identity for your business. There are tens of millions of domain names already in use out there, so finding the perfect domain name for your business is important and can require some creative thought. For example if your company name is “New Penny Plumbing” you might try to see if the domain newpennyplumbing.com, or newpennyplumbing.net or similar domain name is available.You can do searches for available domain names at a domain registrar such as GoDaddy.com.
WordPress Website Hosting
After you acquire a domain name, next you will need to find a Web Hosting Service where your website and all your site files will reside. There are dozens of WordPress Hosting Providers out there. Do a web search for WordPress Hosting and you will see many results. What are you are typically looking for is a WordPress Hosting company that offers what is called a CPanel where you can do things like setting up a SQL database for your WordPress site, set up personal emails for your domain, and which offers online caching, SSD Drives, plugins to help optimize images sizes and compression, SSL Certificates for online security, and other performance and backup capabilities. We recommend hosting services such as SiteGround.com and InMotion Hosting Services because of their High-Performance Hosting Service Capabilities.
Install WordPress in 7 Easy Steps
Now that you have acquired a Domain Name for your website, and a WordPress Hosting Account, and you are ready to now start installing WordPress, here are the 7 Steps for Installing WordPress.
1. Point your Domain to your new Hosting Account
When you get your new WordPress Hosting Account you will be provided with the nameservers for your site. You will need to go to your web registrar where you purchased your domain, login to your account and set the name servers to point to the name servers of your hosting account. One you have set those it will typically take a few hours to propagate through the Internet so all browsers every where know where your domain name points to, which is your hosting account. If you use a registrar such as GoDaddy.com it will typically propagate fairly quickly, within a few hours.
2. Download WordPress Software
As mentioned above WordPress is Free to download and install. Just go to https://wordpress.org/download/ and click the download button to get the latest copy of WordPress. Once you have downloaded WordPress, create a local directory on your hard disk, copy the wordPress-5.x.x.zip file to that local directory and unzip it to the root of that directory. If you don’t already have a ZIP utility such as the paid WinZip Utility, you can use a free Zip utility such as 7-Zip to unzip your WordPress files.

3. Use FTP Client to Upload WordPress Files to your Hosting Server
In order to upload the WordPress files to your hosting site you will need an FTP (File Transfer Protocol) Client and you will need FTP Information from you WordPress Hosting Provider so you can setup your FTP client to transfer the files. If you don’t already have an FTP client software application you use, you can find several free FTP clients. One popular FREE FTP Client is FileZilla. Click the following FileZilla Download link to get the FREE FileZilla FTP Client, and click the following link to view the FileZilla Documentation. We won’t go into how to use FileZilla in this article but you will need the following information in order to transfer your WordPress files to your server.
Host FTP Server Address – Typically an IP address or a server name
Username – Typically Username is same user name used to access your Cpanel.
Password – Typically Password is same password used to access your Cpanel.
Remote Directory – Typically the remote directory will be /public_html/
Local Directory – This is the directory where you have unzipped your WordPress files after you downloaded them (Example: C:/website/WordPress)
4. Get FTP Information from your WordPress Cpanel
When you signup for a WordPress Hosting account you should receive a welcome email with information on how to access your administrative account as well as information on how to access your CPanel account including URL, Username, and Password. Find that information from your hosting provider and login to your CPanel. and login to your CPanel. Your CPanel should look something like this:

You can see in the top Files area there is an item called FTP accounts. In there you can setup an FTP account to use with FileZilla or another FTP client. If you are unsure how to setup an FTP account or configure your FTP client you can talk to your Web Hosting Tech Support group and they can step you through it. Once you have your FTP client Configured, upload your WordPress Files to your hosting site.
5. Setup Your WordPress Database
Next you will need to setup a Database and a Database User and Password using your CPanel. Go into your CPanel as discussed above in the FTP section and find the Databases section. Select the MySQL Databases link. Clicking this link typically will initiate the MySQL Database Wizard.
STEP 1: Create a Database
A MySQL database name will typically have two parts. The first part, in this case “vids380_” is assigned by the Database Wizard and is your CPanel Username followed by an underscore. The second part, in this case “wp1” is the part that you will input. This can be any alphanumeric string you want. So, in this instance the full database name that I created is “vids380_wp1”.

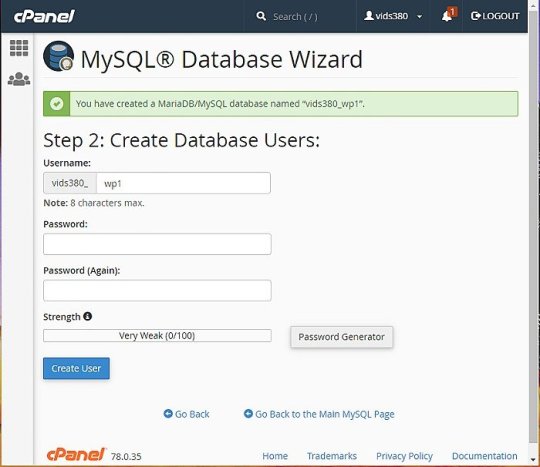
STEP 2: Create a Database User
A MySQL database username will again have two parts. The first part, in this case “vids380_” is again assigned by the Database Wizard and is your CPanel Username followed by an underscore. The second part, in this case “wp1” is the part that you will input. This can be any alphanumeric string you want. So, in this instance the full database name that I created is “vids380_wp1”. To keep things simple I typically name the database and the database user the same thing to keep things simple. Additionally, you will need to assign a password to the user. You can type in your own password or you can use the Password Generator Button to create your password.
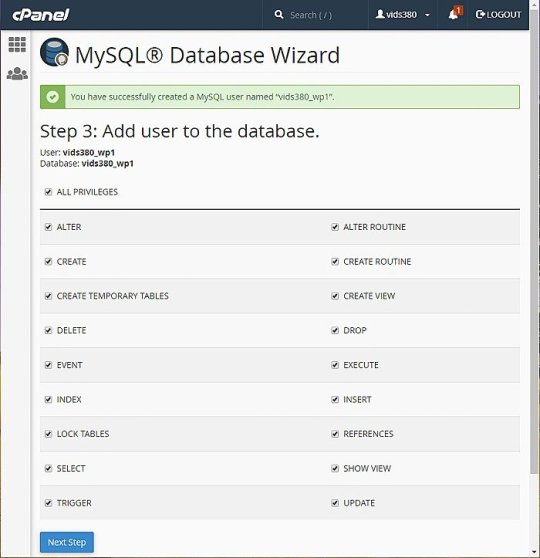
STEP 3: Assign the Username you have created to the Database You have Created
This is pretty self-explanatory, but you will see a table to assign privileges to the database. Select the “All Privileges” checkbox to select all privileges which is what we want.
6. Edit the wp-config.php file and upload to server
Now that you have created your WordPress Database, the next step is to create a wp-config.php file, edit it, and upload it to your server. We do this by going to the local folders where you have unzipped your WordPress files and in the root directory of that folder you will see a file called “wp-config-sample.php” We need to open this file and edit some entries in the top section where you will enter the Database Name, Username, and Password you created when you setup the Database above. You can use an application such as Adobe Dreamweaver or some other web development application, or if you don’t have any such application you can open the wp-config.sample.php file with a simple text editor such as Windows Notepad or whatever text editor you have on your computer. Open the file and enter the database name, username and password you created in the MySQL Settings area if the file. Then you must save this file in the same directory by the name of “wp-config.php”. Make sure you enter these names between the single quotes or you will get a database connection error. After saving the file, upload this single file to your WordPress Server using the FTP application you used to upload the other WordPress files as described above.

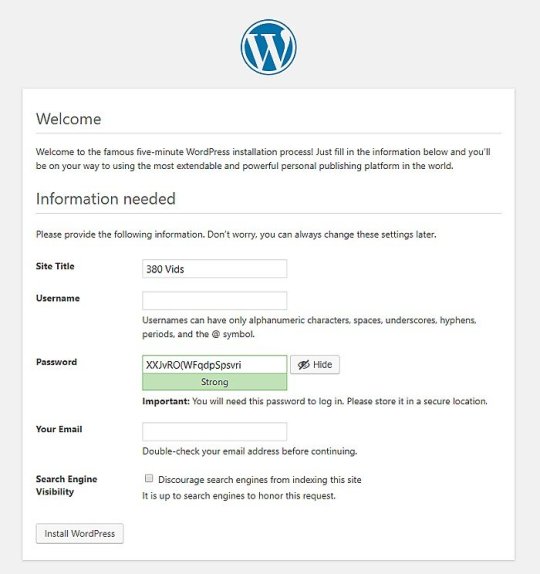
7. Now you are ready to smoke test your work
If you have setup your DNS Nameservers to point to your hosting account’s nameservers you should be able to open a broswer and type in “YourDomainName.com” (insert your actual domain name) and, if successful, you should see the following initial WordPress screen.

If you see this screen, Congratulations you have Successfully Installed WordPress!
If not, please go back through all the steps above. If you have gotten through these steps successfully, select the language that you wish to use on your site from the list above and click Continue. The next screen you will see will let you set your master administrative Username and Password. One important tip, select a username and password that only you could guess. DO NOT set your master Username as something simple like “Admin” or “YourSiteName”. WordPress is the #1 website platform in the world, and it is the #1 website platform target for global hackers. Set your username and password as something you can remember but that no one else could ever guess. Hacker bots are scouring the internet every day looking for WordPress sites and will start trying to hack your site within days or weeks using Brute Force attacks, so do yourself a Big Big Favor and pick a username and password that no one can guess. I would highly recommend that you let the WordPress Password generator generate a complex password for your site that no one would ever guess. (See image below)
WordPress Auto Installers
In this blog post we have covered how to procure a domain; how to select a hosting provider and setup a hosting account, how to point your domain to your hosting account, how to download WordPress files, how to unzip and upload those file to your hosting server via FTP, how to create a Database using your hosting CPanel; how to edit the wp-config.php file and upload that to your hosting site, and how to initialize your WordPress site and setup a master Username and Password. This has all been a tutorial on how to Manually Setup WordPress. This is how people have been installing and setting up WordPress since WordPress was introduces in 2003. But, WordPress Hosting providers have become more sophisticated in recent years, so if you are a novice to WordPress there are many hosting companies these day that do nothing but WordPress hosting that can help you install and setup WordPress for your, or in their CPanel they have a WordPress Auto-Installer that can do most of this work for you. You will still have to buy your domain and point your DNS nameservers to your hosting company’s nameservers, but outside of that they will do most of the work for you.
0 notes
Text
How to generate backup in cPanel
How to generate backup in cPanel Hello!! In this article, let us see how to generate full/partial account backups in cPanel. Step 1: Login to your cPanel Account. In the FILES section, choose the option Backup

Step 2: In the Backup Interface opened, there will be options to take full/partial backups of the account. Let us see how to take it. First, to take full backup of your cPanel account, under "Full Backup" option, you will find a button Download a Full Account Backup. Click on it
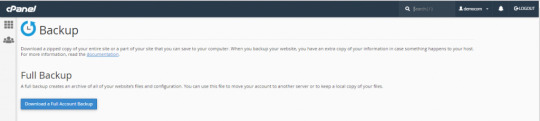
it will open a new interface to generate the backup.
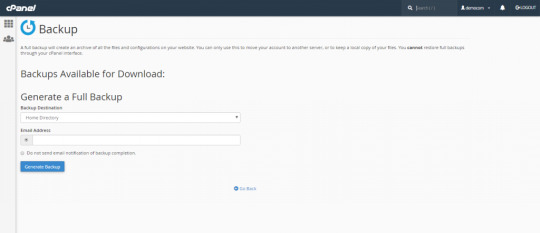
Here fill all the fields under the section "Generate a Full Backup" In the Backup Destination field, select any of the following storage option from the dropdown list. Home Directory- this option is to save the backup file on the server. Remote FTP Server- this option is to use FTP to store the backup file on a remote server. Remote FTP Server(passive mode transfer): - this option is to use passive FTP to store the backup file on a remote server. Secure copy(SCP) - option to use secure copy protocol (SCP) to store the backup file on a remote server. Note : If you have selected Remote FTP Server, Remote FTP Server (passive mode transfer), or Secure Copy (SCP) in the Backup Destination field dropdown, enter the remote destination's information in the available text boxes. Step 3: In the Email Address field, enter the email address to which you want to receive a notification when the backup is generated successfully. If you do not wish to be notified when the backup process completes, then you can select the option, Do not send email notification of backup completion. Now click on Generate Backup button. That's it! We have successfully taken a full account backup Step 4: Now let us see how to take a partial account backup. Let us see only the downloading backup options now. We can keep the restore options for the upcoming articles. Under the "Partial Backups" section, you will find the following fields.

To download only your /home directory backup, click on the button Home Directory which is under the section "Download a Home Directory Backup" Note: /home directory backup includes the files which you own and the files for which you have access(eventhough you do not own it). But the files which you do not own and have no access will not come under the backup. Step 5: You can download your database backup by clicking on the database from the dropdown under the section "Download a MySQL Database Backup" Step 6: You can also download Email Forwarders and Email filters with the options available under the sections, "Download Email Forwarders" and "Download Email Filters" respectively. That's all! We have now learnt how to take partial account backups also! Thank you!!! Read the full article
0 notes
Text
How do I install a quickstart packages in Joomla?
Please read the complete article before we begin. What is Joomla? and What is Joomla Architecture?. To install new a quick start package correctly, you'll need a few files and information. Make sure that your Joomla site is version 3.9. That may seem self-evident, but quick start packages are a great way to get started. setup Joomla with the package and installing a 3.9 package on a 2.5 platform will not upgrade your site, this will break it.

Don't you know the difference between quickstart packages to templates? Take your time to read this.
What is a Quick Start Package, and how does it work?
Template providers offer pre-installed, ready-to-use Joomla instances. Sample data sets and a template are included in these "Quick Start" packages. When you buy a template, regardless of where it came from, you'll get download links for the installer packs. A Quick Start package is not the same as a standard template. Learn how to install a template in Joomla.
Quickstart.zip is a backup of the specific template's demo site.
It includes the following:
all Joomla standard files (Joomla CMS)
all of the extensions used on a demo site
a template that has been installed and configured
a template that has been installed and configured
Sample data (includes configured extensions, custom content etc.
You have the choice to download one of the following files using the download links provided when you purchased the template:
A Template without sample data only installs the template and lets you install all the add-on extensions and configure them yourself.
A Quick Start package means a template with sample data that makes your site look exactly like the demo of the template from the template developer with all the sample data and add-ons pre-configured.
What is a Joomla template?
A Joomla template is only in the management of the site's layout. Learn How to Create Joomla Template.
There are no sample data provided in Quickstart.
Customers who already have a live website use a template to redesign our website and want something new in layout. However, they will get a new look like other demo site layouts with the new template, thus all modules must be integrated into the new template layout.
NOTE: Joomla Template does not include a database, you will not install a demo setup by installing a template via Template Manager. If you have a clean Joomla setup installed already and want to get a demo copy, then you must delete all Joomla files from your server and install them manually.
Quick Start Package Installation
The first step is to download the Quickstart package zip file from the third-party Template provider.
We recommend that you first back up your website before installing the QuickStart package. Learn out how to create a backup of your website. We recommend you to delete your site files from the root folder to ensure that your quickstart installation is clean (root). You can achieve this in a number of ways. You can use your username or password administrator to connect to your root directory through SSH (Secure Shell) and remove all files from your root directory. You can also login to FTP using the root directory and choose and delete those files. It takes some time to delete the files over FTP, so be patient.
If you're using SSH, simply upload your zip file (through FTP) and then 'unzip' it after you've deleted your files. If you're using FTP, unzip the file on your computer and then upload the files to your root directory, which should be empty. Again, uploading all of those files and directories will take some time.
Each quickstart package will include an Installation folder, so when you see your website in your browser after uploading/unzipping the files, the Joomla installation will begin automatically. Install Joomla in a regular manner.
Joomla 4 : How to create override for Joomla layout in 2020?
Make sure you enter the correct information for a successful installation when asked for database details on the "Database Configuration" page. The correct database information (the database prefix) can be found in the configuration.php file you created before started. Make sure to click "Next" once you've finished entering the information.
This is what you'll need to check for in your configuration file.


Concentrate on the last page. Some template designers will have options here. Sometimes there will be a "Default" and a "Brochure" type, choose the "Default". Another popular option is "Theme" (name or #), which will serve as their sample data. We have chosen the last option Joomla tutorials data.

Complete the installation process by removing the installation folder from the root folder, as instructed in the final step of the Joomla installation.

Common problems encountered during quickstart installation
You may encounter issues while installing a quickstart package that prevents you from completing the installation successfully. Before checking, issues Learn how to enable error reporting in Joomla.
Here are some of the most common issues that our customers have reported to us in the past:
After the first step, the installation hangs and you see an infinite loading spinner.
The installation becomes stuck on one of the steps and you are unable to proceed to the next step (the next button does not work or reload the same step).
The installation is stopped while the sample data is being restored.
The installation does not begin, and you are displayed with a blank page.
Typically, such problems occur as a result of server configuration or corrupted files.
We've prepared a few steps to assist you in resolving any issues that may arise during the quickstart installation.
Step1: Check that your server fulfills the minimum requirements for running Joomla. https://docs.joomla.org/Technical_requirements
Step2: Make sure that you have properly uploaded files on your server. If any files are missing or corrupted, your installation will become stopped or your Joomla will not function properly.
Uploading the unpacked quickstart files to a live server can take a long time. We've also discovered that when our clients use FTP to upload data, they frequently have some missing or corrupted files. There are two simple ways to unzip the quickstart.zip package on your server. They can save you a lot of time and help you prevent file difficulties.
(a) Use Akeeba Kickstart to unpack the quickstart.zip package.
Download Akeeba Kickstart.
Upload Akeeba Kickstart and quickstart.zip to the same directory on your server.
Run Akeeba Kickstart in your browser by typing your domain and path to the file, for example: yourdomain.com/kickstart.php
Follow the onscreen instructions to unpack the package on your server.
After unpacking the package, you can move on to your site root to start installation: yourdomain.com
(b) Use cPanel to unpack the quickstart.zip package:
Upload quickstart.zip on your server
Go to cPanel of your site and open File Manager.
In File Manager select the quickstart package on your server and click on Extract from the toolbar:
After unpacking the package, you can move on to your site root to start installation: www.yourdomain.com
Step3: Clear your browser's cache and cookies, then restart the installation. This easy solution is often helpful.
Step4: Increase the values in your server's php.ini file.
If you are using a local environment, such as XAMPP, the php.ini file is located in the following directory:
C:\xampp\php\php.ini
If you are using a live server, I recommend that you check your hosting instructions or contact technical support directly to learn how to properly update the php.ini values on your server.
Edit the php.ini file using a text editor and locate the line that starts:
memory_limit
Change its value to at least 128M:
memory_limit=128M
Next, locate the line that starts:
max_execution_time
Change its value to at least 3000:
max_execution_time=3000
Step5: The final step frequently helps in the resolution of sample data restoration issues.
Find and change the following files in the unpacked files from the quickstart package.:
/installation/SQL/mysql/joomla.sql /installation/SQL/mysql/sample_jm_demo.sql
Replace all appearances of:
ENGINE=InnoDB
with
ENGINE=MyISAM
Save the files and run the installation once again.
You should read this also :
How do I enable Joomla PHP error reporting?
What is the Joomla control panel?
Joomla4: How to create a new module from the backend?
Joomla 4: How to create override for Joomla layout in 2020?
Why joomla is better than wordpress?
0 notes