#How to import MySQL database backup from cPanel?
Explore tagged Tumblr posts
Visit Tumblr Blog
Explore Tumblr blogs with no restrictions, modern design and the best experience.
Last Seen Tumblr Blogs


Fun Fact
Tumblr was acquired by Yahoo for $1.1B in 2013.
Text
Manage and secure your data efficiently by learning step-by-step instructions on downloading SQL databases from cPanel effortlessly. Read now!
#How to download MySQL database backup from cPanel?#How to import MySQL database backup from cPanel?#How to export a MySQL database using cPanel#How to download MySQL database from cPanel?#How to Backup MySQL Database Using cpanel
0 notes
Text
Migrate or move WordPress website to a new host in 2025
Why You Might Need to Move Your WordPress Site
Your website is important. But sometimes, your web host may be slow, expensive, or not helpful. When that happens, it’s smart to move your website to a better hosting company. A better host can help your site load faster, stay online, and keep visitors happy.
You can move your website in two ways:
Manually (you do everything step by step)
Automatically (you use a plugin to help)
This full guide will show you both ways. It will also teach you what to do after you move your site to make sure everything works.
If this sounds hard, don’t worry. You can also get help from Creation Wave LLC. We help people move WordPress websites safely and quickly.
Table of Contents
Manual vs Automatic Migration
Manual Migration – Step by Step
How to Move WordPress Without cPanel
How to Use a Plugin to Migrate Your Site
What to Check After Migration
Final Thoughts and Expert Help
Should You Move Your Site Manually or Use a Plugin?
There are two ways to move your WordPress site:
Manual Migration
This is where you download your files and database and upload them to the new host yourself. It gives you more control, but you need to be careful. One small mistake can break your site. This is better for large websites or people with some technical skills.
Automatic Migration
This uses a WordPress plugin to move your site. It is easier and faster. It is perfect for small websites or beginners. You don’t have to touch any code.
If you're not sure which to pick, try a plugin first. If it doesn't work or gives errors, you can move it manually or get expert help.
Need help? Creation Wave LLC offers both manual and automatic WordPress migration services.
Manual WordPress Migration (Step-by-Step Guide)
This part will show you how to manually move your WordPress website to a new host.
Step 1: Choose a New Hosting Company
Make sure your new host is fast, secure, and helpful. Look for companies that offer good customer support and daily backups.
Types of hosting:
Shared hosting (basic and cheap)
VPS hosting (faster and more private)
Managed WordPress hosting (easy and fully managed)
Dedicated server (for very large sites)
If you need help picking the right host, Creation Wave LLC can help you choose the best one.
Step 2: Backup Your WordPress Files
Your website files are very important. They include your theme, plugins, images, and settings.
To back them up:
Use an FTP client like FileZilla.
Connect to your old host using FTP login details.
Find the folder named “public_html” or your WordPress folder.
Download all the files to your computer.
Wait until the download finishes before going to the next step.
Step 3: Export Your Database
Your website database has all your posts, pages, user accounts, and comments.
To export it:
Log in to cPanel on your old host.
Open phpMyAdmin.
Click your WordPress database name on the left.
Click the “Export” tab at the top.
Choose “Quick” and “SQL” format.
Click “Go” to download the file.
Save this file in a safe place.
Step 4: Create a New Database on Your New Host
Now go to your new hosting account. Do this:
Log into cPanel.
Click “MySQL Databases.”
Create a new database.
Create a new user and give it a strong password.
Add the user to the database and give it all permissions.
Write down the database name, user name, and password. You will need them soon.
Step 5: Upload WordPress Files to New Host
Now it’s time to put your website files on the new server.
To upload:
Open FileZilla again.
Connect to your new host with your new FTP details.
Go to the folder named “public_html” or root folder.
Upload all your website files from your computer.
Wait for the upload to finish before moving on.
Step 6: Import Your Database
Now you need to import your old database to the new host.
Log in to cPanel on the new host.
Open phpMyAdmin.
Click your new database name.
Click the “Import” tab.
Choose the .sql file you downloaded earlier.
Click “Go.”
This will add your old content to your new hosting account.
Step 7: Update the wp-config.php File
WordPress needs to know how to connect to the database.
In FileZilla, find and open the file “wp-config.php.”
Right-click and choose Edit.
Update the database name, user, and password:
define('DB_NAME', 'your_new_db_name'); define('DB_USER', 'your_new_db_user'); define('DB_PASSWORD', 'your_new_password');
Save and close the file.
Now WordPress can talk to the new database.
Step 8: Point Your Domain to the New Host
This is the final step.
Log into the account where you bought your domain (like GoDaddy or Namecheap).
Find DNS or Nameserver Settings.
Change the nameservers to the new hosting company’s nameservers.
Save and wait.
It can take 1–24 hours for the DNS to update fully. After that, your site will be live on the new host.
How to Migrate Without cPanel
Some hosting providers don’t use cPanel. That’s okay. You can still migrate your website.
Here’s what to do:
Ask your host for FTP access and MySQL access.
Use FileZilla to upload files.
Use another tool like Adminer or CLI (command-line) to import your database.
Update your wp-config.php file as shown earlier.
If this sounds too technical, Creation Wave LLC can do it for you.
How to Use a Plugin to Migrate Your WordPress Site
If you want an easier way, use a migration plugin. Here are three good ones:
All-in-One WP Migration
Simple drag-and-drop tool.
Great for beginners.
Duplicator
Makes a full copy of your website.
Offers more options for developers.
UpdraftPlus (Paid)
Does backups and migrations.
Good support.
To use a plugin:
Install the plugin on your old website.
Use the plugin to export the full site.
Set up a clean WordPress install on your new host.
Install the same plugin there.
Import the file you exported earlier.
After a few minutes, your site should be live.
What to Check After Migration
After moving your website, test everything. Check the following:
Is your homepage loading fast?
Are all your pages and posts showing?
Are your images loading?
Can you log into the WordPress dashboard?
Are all your plugins working?
Is the site mobile-friendly?
Also test your contact forms, menus, and links. You can use free tools like GTmetrix or Google PageSpeed to check speed.
If anything looks broken, go back and check your steps.
Need help? Creation Wave LLC offers a full post-migration checkup.
Final Thoughts
Moving your WordPress website can feel scary. But with the right steps, it’s not so hard. This guide helps you move your site by yourself or with a plugin. You also learned how to test your site after moving.
A better host can give you faster speed, better uptime, and better support. If you don’t want to take risks or waste time, you can let experts do it for you.
1 note
·
View note
Text
How to Move Your WordPress Site from Localhost to a Live Server
Developing a WordPress site on localhost is a great way to build and test your website in a controlled environment. However, the real challenge arises when it's time to move the site from your local server to a live hosting environment. If not done correctly, you could encounter broken links, missing images, or even database errors.
In this blog, we'll guide you through a step-by-step process to successfully move your WordPress site from localhost to a live server.

Step 1: Choose the Right Hosting Provider
Your first step is to select a reliable web hosting provider that meets your website’s needs. Look for:
Server Speed: Fast servers for better performance.
Uptime Guarantee: At least 99.9% uptime to ensure availability.
Ease of Use: User-friendly dashboards and tools.
WordPress Support: Hosting optimized for WordPress websites.
Popular options include Bluehost, SiteGround, and WP Engine.
Step 2: Export Your Local WordPress Database
The database is the backbone of your WordPress site. To export it:
Open phpMyAdmin on your local server (e.g., XAMPP or WAMP).
Select your WordPress database.
Click on the Export tab and choose the Quick Export method.
Save the .sql file to your computer.
Step 3: Upload Your WordPress Files to the Live Server
To move your files:
Compress Your WordPress Folder: Zip your local WordPress installation folder.
Access Your Hosting Account: Use a file manager or an FTP client like FileZilla.
Upload the Files: Transfer the zipped folder to your hosting server's root directory (usually public_html).
Unzip the Folder: Extract the files once uploaded.
Step 4: Create a Database on the Live Server
Now, set up a new database on your live hosting server:
Log in to your hosting control panel (e.g., cPanel).
Navigate to the MySQL Databases section.
Create a new database, database user, and password.
Assign the user to the database with full privileges.
Step 5: Import the Database to the Live Server
Open phpMyAdmin in your hosting control panel.
Select the new database you created.
Click the Import tab.
Choose the .sql file you exported from your localhost.
Click Go to import the database.
Step 6: Update the wp-config.php File
To connect your site to the live database:
Locate the wp-config.php file in your WordPress installation.
Open the file in a text editor.
Update the following lines: define('DB_NAME', 'your_live_database_name'); define('DB_USER', 'your_live_database_user'); define('DB_PASSWORD', 'your_live_database_password'); define('DB_HOST', 'localhost'); // Keep this unless your host specifies otherwise.
Save the file and upload it to your server via FTP.
Step 7: Update URLs in the Database
Your localhost URLs need to be replaced with your live site URLs.
Use a tool like Search Replace DB or run SQL queries in phpMyAdmin.
In phpMyAdmin, run the following query: UPDATE wp_options SET option_value = 'http://your-live-site.com' WHERE option_name = 'siteurl'; UPDATE wp_options SET option_value = 'http://your-live-site.com' WHERE option_name = 'home';
Step 8: Test Your Live Website
Once everything is uploaded and configured, check your website by entering its URL in a browser. Test for:
Broken Links: Fix them using plugins like Broken Link Checker.
Missing Images: Ensure media files were uploaded correctly.
Functionality: Verify forms, buttons, and features work as expected.
Step 9: Set Up Permalinks
To ensure proper URL structure:
Log in to your WordPress admin dashboard on the live site.
Go to Settings > Permalinks.
Choose your preferred permalink structure and click Save Changes.
Step 10: Secure Your Live Website
After migrating, secure your site to prevent vulnerabilities:
Install an SSL Certificate: Most hosting providers offer free SSL certificates.
Update Plugins and Themes: Ensure everything is up to date.
Set Up Backups: Use plugins like UpdraftPlus for regular backups.
Conclusion
Moving your WordPress site from localhost to a live server may seem daunting, but by following these steps, you can ensure a smooth and error-free migration. A successful move allows you to showcase your site to the world, engage your audience, and achieve your goals.
Start today and take your WordPress project live with confidence!
0 notes
Text
Grasp the basics of website hosting with cPanel guidance!
While talking about web hosting solutions, the effective and one stop solution for website owners is cPanel. It is an effective interface that holds various different functions to manoeuvre around easily whether to manage files, databases or emails. It may seem difficult to use but is easy as you get your hands on it. Whether you are expert in the digital realm or just starting off, gaining the knowledge of cPanel can drastically improve the performance of your website and the overall user experience. So let’s understand the basics of web hosting and how to navigate and utilise cPanel effectively.
Understanding Web hosting and cPanel
Web hosting
Suppose you have some spare furniture at your home and have no space left, so you go to the storage space and rent one of many storage rooms at the facility. All your goods are stored there safely and whenever you want to access them, you can go and unlock it with your own distinct key. Similar is the concept of web hosting. It is the process of storing the web pages over the internet over the shared space on a server where all the data of your website is stored safely. When a user types the name of the domain in their browser, the hosting server provides the data of your website which allows users to view your website. cPanel
cPanel means a control panel to website hosting services which simplifies the tasks of managing a website for users. It is a GUI (Graphical user interface) and automation tools to provide various different tools like managing files, email accounts, database security settings and much more. It is designed to facilitate various administrative obligations linked with website management. Under one roof it can handle all the components of your web hosting environment.
Key Features of cPanel
User friendly interface: Understanding the interface of cPanel is so easy that you don’t need any skill set to understand it. Navigating through different sections can easily explain each and every function and feature which makes it very handy for every customer.
Domain management: With cPanel, adding, removing or changing the domain or subdomains is really easy which allows you to evolve the structure of your website according to your needs.
File management: By going to the file manager you can easily upload, organise, and edit documents in your server with cPanel. You can create directories, add files, and even edit codes directly from your browser, doing away with the need for 0.33-celebration FTP clients.
Email management: cPanel gives control over managing your emails with a designated menu where you can easily see, manage, respond to emails and even automate the emails according to your needs and configure unsolicited mail filters, with that you can develop a professional communication channel.
Database administration: Database is a really important aspect for a website particularly if a website has dynamic content and a lot of important information. This is a really important and helpful tool provided by cPanel where you can easily manage MySQL databases.
Security features: While managing a website, security is an aspect which worries various users and if not done correctly can create trouble for the important data on your website. cPanel offers a security suite which safeguards your data and structure of the website. You can easily install SSL certificate, IP blocking, directories which can only be accessed through password; all under the cPanel by which you can protect your website from potential threats.
Backup and restore: Regular backups are really crucial to lower the risk of data loss. cPanel makes this process easy for you by allowing users to automate this process on regular intervals and can even restore your website to any previous version as well.
Benefits of cPanel Web Hosting
Efficiency:
By gathering all the controls under an interface which is easy to understand, cPanel streamlines website management, which eventually saves your time and effort which can be used in other important aspects of your online presence.
Scalability:
It doesn’t matter if you are writing blogs or managing an e-commerce store at your website, cPanel gives you all the necessary controls for you to scale up according to your needs. It has a flexible structure which allows you to upgrade and add functions as your site expands.
Accessibility:
cPanel’s interface is user-friendly unlike other server management tools which require technical knowledge and assistance. It offers users who do not have that much technical knowledge to take control in a web hosting environment without any outside assistance.
Reliability:
You need to rest assured about the reliability of cPanel as it is sponsored by way of robust infrastructure and dependable help, which ensures premiere performance. You can be confident in your website managing the environment by regularly updating and being up to date with the information.
Cost-Effectiveness:
If we consider hiring dedicated server directories or purchasing costly management software, cPanel offers a low-priced solution for managing hosting of your website and making it accessible for all user groups.
Best web hosting Practices for Maximizing cPanel’s Potential
Regular updates:
By updating your cPanel with modern-day patches, you can stay away from the vulnerabilities and safeguard your website towards threat.
Security measures:
Using a strong password and enabling two factor authentication, and auditing your website time to time, you can eliminate potential threats to your data.
Backup strategy:
Establish a complete backup strategy which contains ordinary backups of your website files, databases, and configuration settings to reduce the risk of information loss.
Resource Optimization:
By monitoring your server’s useful resource usage and optimizing website’s performance by using cache mechanism, optimizing snapshots, and minimizing the use of external scripts you can reduce potential risk for your website.
User Training:
By investing in tutorials, user know-how guides and learning resources, you can make yourself familiar with the key contributing factors along with functionalities of cPanel which will allow you to utilize its complete capabilities.
Conclusion: Mastering cPanel web hosting empowers website owners with the gear and talents they need to manipulate their on-line presence successfully and efficiently. By harnessing the energy of cPanel's intuitive interface, strong features, and security features, you may manage your hosting environment. Whether you are launching a new website online or optimizing a current one, cPanel stays a valuable asset for your jo
0 notes
Text
How to Select a Thailand Hosting Server
Website hosting is a service that makes your website available to be accessed over the internet. It is important to select a good thai web hosting server to ensure your site loads fast and has good performance.
This hosting provider operates in a state-of-the-art data center in Thailand. Its servers are located in a high-speed network and have a reliable power backup system and precision cooling systems.
SiteGround
SiteGround is a great host for WordPress sites. They offer fast speeds and a number of features to make your website better. They also provide a staging environment and backups to help you protect your data from hackers. Their support is fast and helpful. In addition, they offer a number of security features, including distributed denial-of-service attack protection and SSL certificates.
The service offers a variety of hosting plans for businesses and individuals. The prices vary based on the size of your site and your needs. You can choose from shared, cloud, and enterprise hosting options. You can also choose to host your site at one of their many data centers around the world.
SiteGround has a good customer support team and is available 24/7. They use a live chat system that connects you with an agent who can answer your questions and concerns. They also have an extensive knowledge base that covers a wide range of topics.
Hostinger
Hostinger is a popular web hosting service, offering a wide range of cheap and affordable packages that are perfect for beginner users. It also offers a searchable knowledge base and reliable servers. It can handle WordPress, cPanel, and FTP migrations, so you won’t have to worry about your site’s data being lost or damaged during the transfer process.
Hostinger’s servers use LiteSpeed, which boosts server response times. In addition, it provides free access to CloudFlare CDN, which can further speed up your website’s load times. Its plans include a standard 30-day money-back guarantee and 99.9% uptime.
Unlike some budget hosts, Hostinger has 24/7 support available via live chat and email. It also has a number of security features, including 2FA and an in-house malware scanner. Its plans also come with SSL certificates to keep your site’s data secure and prevent malicious attacks. They also support weekly backups and allow you to selectively restore your files.
Cloudways
Cloudways makes it easy for digital agencies, freelancers, bloggers, and ecommerce retailers to manage their servers. The platform provides high-quality infrastructure from top providers and adds its own hosting management features.
It also offers server monitoring, which gives you a detailed overview of your website’s performance. For example, you can see how much RAM is used and whether your site has exceeded its disk storage limit. In addition, the platform allows you to upload multiple SSH public keys and launch an SSH terminal in your browser.
The company’s security features include unlimited SSL certificates and one-click installation, two-factor authentication, new login alerts, and bot protection. The company also has a free staging environment, which allows you to make changes on your live site without interrupting your visitors. In addition, it has a powerful backup system that keeps your data safe. The backup files are stored offsite and can be restored in a few clicks.
Kinsta
Kinsta is a WordPress-specific hosting service that offers a variety of plans. Its plans are based on the number of websites hosted, the amount of storage, and the number of monthly visits. Plans also include a free CDN and unlimited MySQL databases. Its dashboard is easy to use and features an option for creating a staging site. It also includes automatic backups.
After a standard signup process, you can begin using your Kinsta account. Once your payment goes through -it took less than a minute for me -you will be able to view your website’s stats and other information in the main dashboard.
It also offers state-of-the-art firewalls, DDoS protection, and customizable security rules. Its cloud architecture also allows it to deliver fast response times. Kinsta has 29 data centers worldwide and plans to add more. Its servers are highly scalable, so they can handle traffic surges without slowing down.
BlueHost
BlueHost is one of the most popular web hosting services on the market. It offers affordable pricing and excellent customer support. In addition, it is easy to use for beginners. It also has a number of features that can improve your website’s performance, such as automatic backups and monitoring.
However, it is important to note that Bluehost does not offer a money-back guarantee. This is a disadvantage compared to other hosting services that offer this feature. This is because a website’s downtime can cost businesses money.
Founded in 2005, Bluehost has made an impression on the industry. In just 7 years, it grew big enough to attract the attention of web hosting giant Endurance International Group (EIG). They now have a team of over 750 people and are one of only 3 WordPress-recommended hosts. In addition, their customer support is available around the clock.
A2 Hosting
A2 Hosting offers a wide range of web hosting packages, including shared, VPS, and dedicated servers. Their hardware is optimized to provide fast load times and support high traffic surges. Their servers also feature a generous SSD storage space, so you can host large images and videos without worrying about storage space.
A2-Host is a Thailand-based web hosting service that provides affordable and reliable services. Its customer support is excellent and its technical knowledge is extensive. In addition, the company provides a number of extra features to enhance security and performance, such as free SSL certificates, 2FA, brute force protection, and malware scanning.
A2 Hosting also offers a variety of hosting plans that come with different amounts of storage and website limits. Its shared hosting plans are priced on a monthly basis, while its Turbo and Turbo Boost servers come with unlimited websites and databases.
0 notes
Text
WHAT IS WEB HOSTING?
Hi, I’m MALIK & in this blog I’m going to explain everything you need to know about web hosting. At the end of this blog you’ll have all the information you need to make an informed decision when you come to buy a hosting service. OK, so the basics. Web Hosting is the home of your website. If you want a website you’ll need somewhere to host it. That’s exactly what a hosting service is. There are different types of web hosting like shared hosting , Getrespomce, Virtual Private Servers & Dedicated Servers. But in this blog I’ll cover Getresponce which is the most popular & most affordable type of hosting. Check our web hosting plans at https://www.getresponse.com/?a=KgJGa93pWV So hosting is basically the computer & network infrastructure that keeps your website available across the internet. It also provides other key services like email for you. SO HOW DOES IT WORK? Well it all starts with a server. A server is basically a powerful computer that is kept in a highly secure, purpose built, multi-million pound facility called a datacentre. The datacentre provides the necessary power and network connectivity with temperature control, backup & fire suppression systems and high levels of physical security. Security is also important at the server level so the server is built with things like dual parts for critical components like hard disks so there is no single point of failure. This is so that your website will always be available. So when you order a hosting service what you’re ordering is the physical disk space on one of the servers as well as the bandwidth which is the network connection to the server. Most of the time you will see hosting advertised in terms of Disk space and Bandwidth and is measured in GigaBytes like 5GB of space and 100GB of bandwidth. The diskspace covers your website files including things like databases as well as your emails. The monthly bandwidth is the network traffic to and from your web hosting and most of this will be email traffic that you send and receive but it will also include traffic to your website. In order to manage your web hosting you’ll need a user friendly interface called a Control Panel. One of the most popular is called cPanel and this allows you to manage all aspects of your hosting such as setting up email addresses, managing domains, databases and loads of other stuff with an easy to use interface. If you want to build your own website then you can use a Website Builder tool which is included and this allows non technical people to build a website using pre-made templates. For more advanced users or if you have a web designer there is also a ton of pre-installed software for building more advanced websites as well as databases such as MySQL. These free tools include popular applications like WordPress as well as advanced ecommerce tools like Prestashop & Magento so you can sell online. Other security features are things like anti spam and data back up. These ensure that your emails always get through as well as keeping your data safe. If you’re with one hosting company & you want to switch this is a very straightforward process called migration. Your files just need to be copied over & some small changes need to be made to your domain name. So there you have it. That’s a quick overview of hosting. If you are looking for a web hosting provider please check https://www.getresponse.com/?a=KgJGa93pWV I hope you found this blog useful on what web hosting is. If you’ve got any questions or comments just leave - I always read them & I will get back to you.
2 notes
·
View notes
Text
Frames in bluegriffon
DOWNLOAD NOW Frames in bluegriffon
#Frames in bluegriffon how to#
#Frames in bluegriffon software#
#Frames in bluegriffon code#
#Frames in bluegriffon password#
#Frames in bluegriffon software#
Some of these web design software provide advanced functionalities too, such as: you can establish FTP connection and publish a project via FTP, connect to MySQL/ODBC database, add Apache modules, convert spaces to single tabs, and do more. Most of these software provide built-in debugger to search for errors in the code. You can also see the preview of the created web page in browser at any time.
#Frames in bluegriffon code#
As you insert a function, the code is generated itself. You can specify corresponding information of each element like name, value, type, size, etc. You can also add email links, hyperlinks, frames, notes, comments, date, etc.
#Frames in bluegriffon password#
You can insert different form input types like button, password field, text box, radio button, checkbox, tables, image button, etc. You can add forms, tables, lists, multimedia files (image, audio, and video), text area, and other essentials to create a web page. While you can create web pages in real time in Design mode, you can write code for the same in Code mode. Most of these web designers provide two editing modes: Design and Code. These software let you easily design web pages by providing support for ‘code auto-completion’ and suggesting tags. To use these web designer software, you just need to have basic understanding of HTML and CSS languages. Once complete, you can click Close to close the File Manager window.Here is a list of best free web design software for beginners for Windows.If not, correct the error or revert back to the previous version until your site works again. Test your website to make sure your changes were successfully saved.Click Save Changes in the upper right hand corner when done.A dialogue box may appear asking you about encoding.htaccess file and then click on the Code Editor icon at the top of the page. Alternatively, you can click on the icon for the. htaccess file and click Code Edit from the menu. The File Manager will open in a new tab or window. Make sure Show Hidden Files (dotfiles)" is checked.Check the box for Document Root for and select the domain name you wish to access from the drop-down menu.In the Files section, click on the File Manager icon.htaccess files in cPanel's File Managerīefore you do anything, it is suggested that you backup your website so that you can revert back to a previous version if something goes wrong. htaccess file for most people is through the File Manager in cPanel. Edit the file on your computer and upload it to the server via FTP.
#Frames in bluegriffon how to#
htaccess file at some point, for various reasons.This section covers how to edit the file in cPanel, but not what may need to be changed.(You may need to consult other articles and resources for that information.) There are Many Ways to Edit a. It is possible that you may need to edit the. htaccess file, and many scripts such as WordPress, Drupal, Joomla and Magento add directives to the. Redirects and rewriting URLs are two very common directives found in a. htaccess file contains directives (instructions) that tell the server how to behave in certain scenarios and directly affect how your website functions. On platforms that enforce case-sensitivity PNG and png are not the same locations. Notice that the CaSe is important in this example. In this example the image file must be in public_html/cgi-sys/images/ This varies by browser, if you do not see a box on your page with a red X try right clicking on the page, then select View Page Info, and goto the Media Tab. The properties will tell you the path and file name that cannot be found. Right click on the X and choose Properties. When you have a missing image on your site you may see a box on your page with with a red X where the image is missing. On platforms that enforce case-sensitivity example and Example are not the same locations.įor addon domains, the file must be in public_html//example/Example/ and the names are case-sensitive. In this example the file must be in public_html/example/Example/ When you get a 404 error be sure to check the URL that you are attempting to use in your browser.This tells the server what resource it should attempt to request.
DOWNLOAD NOW Frames in bluegriffon
0 notes
Text
How to Backup WordPress Website From cPanel
How to Backup WordPress Website From cPanel To backup your WordPress website, you need to have the right tools. There are several programs available, including phpMyAdmin, BackupBuddy, and Adminer. All of these programs will let you back up and reinstall your website. If you're looking for a simpler way, you can just use a file manager like Dropbox or Google Drive. Using an FTP client, you can export and import your files. phpMyAdmin To make a backup of your WordPress website, you will need access to cPanel. This is the control panel that is provided with your web hosting plan. This is where you will find all of the tools that are needed to manage your website's MySQL database. Once you've logged in to cPanel, you will want to navigate through it to the phpMyAdmin section. This will allow you to make manual backups and even change passwords. To backup your WordPress website, you'll need to access your control panel's phpMyAdmin interface. From there, navigate to the Databases tab. Here, you'll want to select the file that you'd like to backup. Once you've selected the file, wait for it to import the database. The process will take some time, depending on a variety of variables. Backups of your WordPress website will be stored in the backup folder. This folder can be found in the wp-content folder or the wp-config file. You can then extract these backup files from their location in a zip or GZIP file. Then, you can upload them to a Dropbox account or a Google Drive account. Remember to make multiple backups so that you never lose any important information. UpdraftPlus If you want to back up your WordPress website on a regular basis, you should install the UpdraftPlus backup plugin. It will enable you to schedule automatic backups and select a remote location where your backups will be stored. It also allows you to create a backup schedule based on when you plan to make changes to your site. To create a backup, visit the UpdraftPlus settings page and click the Backups tab. You will see several options including the ability to back up your entire database or specific parts of your website, such as the theme and plugin files. After you have selected your backup type, click the "Backup Now" button. The next screen will show you the progress of the backup. The backup may take some time, depending on the size of your website. Once the process is complete, your files and database will be backed up offsite. Once you have chosen the backup location, you can set a backup schedule for the files and database. You should choose a backup schedule that matches the frequency of changes to your website. You can also choose to send backup files to an email address. This can be a great way to keep your website safe while you are not in front of your computer. BackupBuddy BackupBuddy is a great service that creates automatic backups for WordPress websites. It stores backups to remote cloud storage, and offers various backup types. You can choose to download individual files or your entire site, and backups can be stored in the cloud or on your computer. It also supports site migration, so you can restore your site without losing anything. You can backup your entire WordPress website with BackupBuddy, and it's easy to restore it if anything goes wrong. You can customize your backups to back up specific categories or posts, and set up automatic backups. It's easy to use, and even more important, it's free. BackupBuddy also includes security features. It scans your backup files for viruses and malware. You can also back up your website for as long as you like. You can even schedule your backups to run on a regular basis. BackupBuddy has more than half a million websites that trust it with their data. Adminer To backup your WordPress website, you can use cPanel. This control panel is available on many web hosts. However, the backup process for this panel is quite complex. First, you must download a ZIP file of your backup. Next, you must delete your server copy of the backup. Finally, you can copy the backup file into a new text file. In cPanel, there is an option called Backup that allows you to create a partial backup. This backup can be for a single directory, the MySQL database, or email accounts. However, full backups can't be restored via cPanel and must be downloaded and stored on your computer or a third-party cloud platform. Another option is to backup the database manually. This method is free, but requires considerable time and attention. You need to secure the files with passwords and encryption, and you need to periodically delete old backup files. Additionally, the backups should contain the database of your website. How to Backup WordPress Website From cPanel Read the full article
0 notes
Text
Move WordPress Site to New Host | Step-by-Step Guide

Steps To Do Before Moving WordPress Site to New Host
There are some preparation steps that you should go through before you move your WordPress website to the new host. The size of your database will determine the time taken for migration. You will also be able to clear cache directories, remove backups, and remove unused videos, themes, and plugins to reduce space. By doing this, you can speed up the migration process.
1. Back Up Your Website Files
Now you know how to prepare before you move WordPress site to new host. Then you should proceed with backing up the critical files on your website. Unexpected things can happen as you migrate files. If you don’t want to encounter any problems with missing or corrupted files, you should take backups. You don’t have to worry about losing your data in such situations, as you can quickly restore them from the backups. You will be able to take the backups using an FTP tool to your local location on the computer.
2. Export the Database
The next step you should follow to move WordPress site to new host is to export the database. The database is one of the most critical aspects of the WordPress website. That’s because it contains the data of all your posts and pages. You will access your database via phpMyAdmin, available through the hosting control panel.You will need to select the exact database of your WordPress website from the left-hand panel and then click on the Export button that you can see on the menu bar. Ensure that the export format is in SQL before proceeding with the export. Once you click on the “Go” button, you can get the database export downloaded in the form of a .sql file. You will need to keep it in the same website folder to proceed with the migration.
3. Creating MySQL Database on New Host and Import Your WordPress Database
You should log into the new host and use cPanel to access “MySQL Databases.” This is where you will create a new database while using the same name as the old database. Depending on the host you select, you will come across the need to add a mandatory prefix to the database. Make sure that you carefully change the name of the database under such a situation.Next, you can get to phpMyAdmin. Then you can click on import and proceed with importing the SQL file. You should then open up the wp-config.php file, which you downloaded. You can search for the name of the database again and change the value of the database name with a new one.As the next step, you should create a new database user. You may click on “Add New User” and do it. You can open up the wp-config.php file and change the user and password as preferred. Finally, you will need to add the user to the created database.
4. Import Your WordPress Site to the New Host
Now you are done with database configuration, and you may proceed to migrate WordPress site to new host. This is where you can start uploading the files of the website. It would help if you connected to the new web host via an FTP tool and then located the folder where you will upload the WordPress file. You will usually need to upload files into the “public_html” folder. Make sure that you are also uploading the updated wp-config.php file.This file upload process might take some time, and it varies based on the total amount of files you have. Ensure that you don’t delete the files from the local computer until you finish the file upload process.
https://n6host.com/blog/migrate-wordpress-site/
0 notes
Text
HOSTMONSTER HOSTING REVIEW

HOSTMONSTER Hosting Review
HOSTMONSTOR Hosting was founded by Matt Heaton in the Western US in 1996. The company went ahead to acquire over 80 web hosting brands, making it one of the largest web hosting providers in the world. HostMonster offers top-notch hosting solutions for single individuals and business. Shared hosting, VPS hosting, and dedicated server hosting are the major hosting packages offered by HostMonster.
GENERAL INFORMATION
1.Speed : 900 ms (October 2019 – October 2020 average )
2. UpTime : 99.98% (October 2019 to October 2020 average)
3.Support : 24/7 live chat, email, and phone
4.Apps : WordPress, Joomla, and CMSs

5. Features : Unlimited storage space, Unlimited domain hosting, Add-on domains, Free domain name and subdomains, Free site builder, FTP access, Email auto- responder, 3 webmail, Site analytics, Databases, Website scripts, E-commerce tools, Multimedia features, 24/7 server monitoring.
6. Plans : Shared / VPS hosting/ Dedicated server hostings.
7. Site Transfer : Up to 5 websites
8. Price : The hosting plan starts at a costs $4.95 per month.
PROS AND CONS OF HOSTMONSTER HOSTING
1.Superb uptime
Uptime is what determines how long your site is accessible online. Frequent downtimes may cause huge losses to your business. HostMonster is an above-average uptime of 99.98%.
2. Free domain for one year
HostMonster like any other web hosts, this feature is a nice addition to feature-packed hosting plans.
3. Quick app installers
HostMonster features has fast and easy app installer. Any user can use the MOJO Marketplace to get plenty of apps, plugins, appealing themes, and scripts to use on your website. Installing your favorite CMSs and other apps will only require a click.
4. Advanced security features
Security is the most important factor for a reliable web hosting provider. HostMonster hosting comes with unmatched security options including SSH access, SSL certificates, Hotlink Protection, and anti-spam tools. Additionally, the web host conducts regular site backups.
5. Easy site-building
HostMonster hosting is that knowledge of coding features to build a site is built in with them. One can take advantage of their pre-built templates or use drag-and-drop feature to create own website from scratch.Their templates and themes are ideal that assures the site to look professional.
6. User-friendly dashboard and cPanel
HostMonster’s user interface was made keeping beginners in mind. It has easy-to-use navigation elements. Experience persons can also opt for the cPanel.
7. Free domain migrations
HostMonster can help to move five domains and 20 email accounts from a host to their platform.
8. Responsive customer support
Users can raise their concerns and questions with HostMonster through email, phonecall and 24/7 live chat. An appreciable customer support team professional and knowledgeable give high end support.
9. Few Cons of HostMonster Hosting
Some hidden costs after purchasing the low-cost sites on renewing a subscription it is shocked to see a huge, inflated figure and It does not offer Windows-based hosting. HostMonster is laser-focused on Linux hosting which does not a suite for those looking for Windows hosting.
Hosting Plans
1.Basic - $4.95 per month, one website, Unmetered Bandwidth, 50Gb Storage, 5 Mailboxes, Free SSL, Free Domain & Sub Domain, MySQL database.
2. Plus - $6.95 per month, unlimited website, Unmetered Bandwidth, Unlimited Storage, Unlimited Mailboxes, Free SSL, Free Domain & Sub Domain, MySQL database, Spam Experts,Site Backups.
3. Choice Plus - $6.95 per month, unlimited website, Unmetered Bandwidth, Unlimited Storage, Unlimited Mailboxes, Free SSL, Free Domain & Sub Domain, MySQL database, Spam Experts,Site Backups, Domain Privacy.
4. Go Pro - $14.95 per month, unlimited website, Unmetered Bandwidth, Unlimited Storage, Unlimited Mailboxes, Free SSL, Free Domain & Sub Domain, MySQL database, Spam Experts,Site Backups, Domain Privacy.
5. Add -On’s for Shared Website Hosting
1.Extra domain names are not free.
2.Premium SSL pricing starts at $80.04/ year
3.Dedicated IP address costs $5.99 a month
4. Spam Experts email filter $2.99 per month per domain
5.Reactivation of expired hosting accounts $30
Recommended
HostMaster Hosting is all about helping business in increasing their online presence through the affordable hosting. One-click app installations, excellent uptime guarantee, professional email accounts, free domain names, knowledgeable customer support, a 30-day money-back guarantee that allows users to seek a refund of their money after cancelling their subscription.
0 notes
Text
How to Delete a WordPress Website
How to Delete a WordPress Website If you're wondering how to delete a WordPress website, you're not alone. This process is not as easy as it looks. For starters, you must make sure that you keep a backup of your files before making the delete request. Then, you should use an FTP client to remove your website files. You can then delete the site's database. Creating a backup of a wordpress website Creating a backup of a WordPress website before deleting it is important for several reasons. First, it protects your site from any security vulnerabilities. Once hackers or other users get access to your website, they can damage it, so proactive security measures can help you prevent this from happening. Second, you must make sure that your backup contains all of your site's content and core functionality. Creating a backup should not leave any content gaps; otherwise, you may have to recreate everything from scratch or resort to the Google Cache method to retrieve the lost content. Third, creating a backup of your WordPress website can save you a lot of trouble. A backup is a copy of your website's files, including the database and plugins. This backup can be restored if something goes wrong. You can also use it to duplicate your website or move it to another host. Keeping a backup of your files before deleting a wordpress website Before deleting your WordPress website, you should back up your site files. The files in the WordPress directory include themes, plugins, cache, images, and WP Admin details. You can backup the files manually or use a free FTP client. WordPress recommends that you make three backup copies. These copies can be stored on your hosting server, an external hard drive, or even a cloud-based service. Keeping backups in different locations is a good idea to ensure redundancy should anything happen to your website. A backup of your files is essential in the event of a website accident. Even the smallest mistake can bring your site offline. For example, accidentally altering one line of code may cause your site to become unavailable. To avoid such disasters, make a backup before deleting your website. The process of backing up files is very simple. Just make sure that you set up the backup in a safe place, and check it periodically. It is not recommended to back up files to a single location, because it puts all your eggs in one basket. In addition, a single backup site can be vulnerable to disasters. Therefore, you should create a separate backup site for your WordPress site. One way to back up your files is by using a service like BackupBuddy. It offers free offsite storage with Stash and also lets you restore single files. Account reversals are only possible within 30 days If you've accidentally deleted your WordPress website, you can try to revert the decision, but only within the first 30 days. This is because data from deleted WordPress accounts will remain on WordPress servers for 30 days. During this time, you can contact WordPress support to revert the decision. Before you delete your WordPress website, you'll want to make sure all of the files on your website are deleted. This includes your user account. If you're unsure how to delete your WordPress account, you can go to MySQL Databases > Users > Delete Accounts. You'll need to enter your website's URL for final confirmation. Otherwise, you'll lose access to the website's content. Using an FTP client to delete a wordpress site If you need to delete a WordPress website, you have several options. Some hosts offer cPanel, which makes it easy to delete files. But if you don't want to spend time in cPanel, you can also use an FTP client to delete your website. One of the best FTP clients is FileZilla, which is free and reliable. To get started, log into your hosting account and open the File Manager. In the File Manager window, find the folder containing the theme that you wish to remove. You must also make sure that the theme you want to delete is no longer active. Before you delete a WordPress site, you must first review the content. If you do not like any part of the website, you may want to delete it. But make sure to save the backup first. Though this might seem redundant, you may find that you need to restore the site someday. It's much easier to restore a backup than to start building it from scratch. Read the full article
0 notes
Photo
Hostarmada Review - Best or Worst Hosting of 2020? Honest Opinion
In this blog I will cover everything about Hostarmada with Pros and Cons including my personal experience with proof. So Read this blog till end to get a better review of Hostarmada.
Hostarmada Detailed Introduction
Before starting Hostarmada Review let us just talk about them first.
Hostarmada is a newly launched independent Hosting Company founded in the last quarter of 2019. Please notice one thing that I mentioned them as Independent which means they do not resell hosting from anywhere. They have their own dedicated Team for everything, from server management to Client Support.
As a Starter Hosting Company and as a beginner they have approx 2000 client told by one of their support members and I think its good number. Even I have migrated this blog from siteground to hostrmada after trying their hosting in demo site and checking performence. The reason is mentioned below
Technology used by Hostarmada Hosting
So let's start Hostarmada review with the most important factor of any hosting company i.e. Server Technology and Infrastructure. They have Cloud SSD based server like siteground but they are using Linode Cloud infrastructure instead of Gooogle Cloud on Siteground.
They have one thing that makes their server more powerful than siteground and another provider is LiteSpeed Technology. Now many of you are familiar with LiteSpeed but who are not let me tell you that LiteSpeed is something that enhances your normal Apache server without much interference.
-> Siteground Honest Review of 2020
The above image shows after using LiteSpeed the server load reduces to very low. Which means you can handle more visitor and requests on the same server after using LiteSpeed technology. Actually, It balances the load and increases the performance of both Apache and PHP. For More about Litespeed Visit here.
The second most interesting thing about LiteSpeed is, it is sole friendly with WordPress and if you use QUIC free CDN by LiteSpeed your website is going to load faster than the rocket.
The third surprise for you is LiteSpeed Plugin for WordPress. It improves code and image optimization and your caching is going to be super smooth with it. So these are the PROS of Technology used by HostArmada to make their Hosting server more powerful than normal cloud infrastructure.
Server Location Provided by Hostarmada
As a starting company, I am very impressed with HostArmada Server locations. As per my research, and also told by one of their executives (Bogdan Toshev) that they are using Linode Cloud Infrastructure which has a benefit for Indian Users because they are going to get Indian Server.
They have servers in ->
USA West Fremont, CA,
South Canada Toronto, ON
Europe London, UK
USA Central Dallas, TX
USA East Newark, NJ
Europe Frankfurt, DE
Mumbai India, IN
Asia, Singapore, SG
Sydney Australia, AU
You can better recognize geolocation of all servers provided by HostArmada by checking the above image
Hostarmada Server Uptime
So let's talk about one more fact that you should know while choosing any hosting provider i.e. Uptime of Server.
As an experienced blogger and my research on Hostarmada before the review, I can say with confidence that the server configuration and technology used by them is highly flexible and hence you will never notice any effective downtime.
Here is last few month Uptime details provided by Hostarmada itself about their Uptime.
Hostarmada Uptime Review
From the above picture, you can see 100% uptime and Ping of Hostarmada Hosting and this monitoring is done by me personally using freeping.io a free website monitoring tool.
I have personally monitored and tested their hosting form last 8 month. Here is last 8-month Uptime report
December 2019 average uptime: 100%
January 2020 average uptime: 100%
February 2020 average uptime: 100%
March 2020 average uptime: 99.99%
April 2020 average uptime: 99.99%
May 2020 average uptime: 99.98%
June 2020 average uptime: 99.99%
July 2020 average uptime: 99.98%
From this statistic, you can calculate average Uptime of Hostarmada for last 8-months that comes to approx 99.99%.
Hostarmada Speed Test
I have tested Hostarmada hosting with default WordPress installation with twenty-twenty WordPress theme from 30+ different location with 3+ speed test tool including google page insight.
Please note that I have not used any CDN and Optimization or Cache plugin while taking the test, which means its a default WordPress site test.
Speed Test by Google Page Insight
This test is for mobile loading time but the desktop was also the same and you can see it is pretty fast. And you know that speed is one of the main factor for On-Page SEO as it reduces Bounce back and increase conversion.
-> Know more about on page SEO
2. Speed Test By GTMatrix
GTmatrix performance Report
As you can see on Gtmatrix Speed Performance Report that a 261 KB page takes just 2.8 seconds to load even without any compression and speed optimization. Also, no CDN used anyhow.
3. Speed Test by Dotcom-tools
I have tested their speed with 25 location using dotcom-tools for this particular Hostarmada Review So that you can get a better understanding and can decide which hosting to choose at this range of price. Please visit here to see the live speed test report.
Speed Test 1
Speed Test 2
Pros of Using Hostarmada Hosting
HostArmada have powerful Hosting Infrastructure which is main and most important Pros of it. But it is not only, here are few more pros of using hostarmada.
LiteSpeed Technolody to enhance server speed
Cloud SSD Based Servers to handle request frequently.
Highly Scaleable infrastructure
Good Quality 27x7 Support
Simple Hosting Dashboard
cPanel Included
Free Domain with All Plans
Daily Backup with one click Restore
Free Speed Optimization to Speedup your website
Huge Server Resources to handle sudden traffic growth
Very Affordable as Compared with others in same configuration
9 Server Location from all over the world
Cons of Hostarmada
I didn't see any major consequence of using HostArmada as Hosting provider but here are few that can be considered
Not having support of Other card rather than Visa
Indian Local Payment Method Not Available
LiteSpeed is available only for higher plans.
If you think there are other pros and cons of Hostarmada, you are most welcome to post it on comment section. I will add it to my Hostarmada Review as soon as possible.
Hostarmada Plan And Pricing Review
Now many of you are thinking that they are using Cloud + SSD + LiteSpeed which will cost you very high than normal hosting. The answer is, You are absolutely wrong. They provide the most reliable, most powerful and better optimized hosting platform.
-> HostArmada Shared Hosting Plan <-
Start Dock
-> $ 1.20/mo
Regular Price: $7.99/mo
1 Website
15 GB Cloud SSD Storage
2 Cores CPU
2 GB RAM
Unmetered Bandwidth
FREE Domain Name
~10 000 Unique Visitors
7 Daily Backups
*Default Hosting Perks
*Prepare for Launch Perks
Check Offer
Web Warp
-> $ 1.94/mo
Regular Price: $12.95/mo
Unlimited Websites
30 GB Cloud SSD Storage
4 Cores CPU
4 GB RAM
Unmetered Bandwidth
FREE Domain Name
~60 000 Unique Visitors
14 Daily Backups
*Default Hosting Perks
*Prepare for Launch Perks
*Warp Features Perks
Check Offer
Speed Reaper
-> $ 2.69/mo
Regular Price: $17.95/mo
Unlimited Websites
40 GB Cloud SSD Storage
6 Cores CPU
6 GB RAM
Unmetered Bandwidth
FREE Domain Name
~120 000 Unique Visitors
21 Daily Backups
*Default Hosting Perks
*Prepare for Launch Perks
*Warp Features Perks
*Speed Reaper Perks
*Dynamic Caching
Check Offer
Default Hosting Perks
Prepare for Launch Perks
Warp Features Perks
Speed Reaper Perks
-> HostAramda VPS Hosting Plan <-
Web Shuttle
ONLY $ 41.21/mo
Regular: $54.95/mo
50 GB SSD Storage
1 Cores CPU
2 GB RAM
2 TB Bandwidth
40 Gbps Speed In
2000 Mbps Speed Out
Daily Backups
cPanel
Nginx Web Service
Web Voyager
ONLY $ 48.71/mo
Regular: $64.95/mo
80 GB SSD Storage
2 Cores CPU
4 GB RAM
4 TB Bandwidth
40 Gbps Speed In
4000 Mbps Speed Out
Daily Backups
cPanel
Nginx Web Service
Web Raider
ONLY $ 63.71/mo
Regular: $84.95/mo
160 GB SSD Storage
4 Cores CPU
8 GB RAM
5 TB Bandwidth
40 Gbps Speed In
5000 Mbps Speed Out
Daily Backups
cPanel
Nginx Web Service
Site Carrier
ONLY $ 101.21/mo
Regular: $134.95/mo
320 GB SSD Storage
6 Cores CPU
16 GB RAM
8 TB Bandwidth
40 Gbps Speed In
6000 Mbps Speed Out
Daily Backups
cPanel
Nginx Web Service
Payment Methods
Payment methods is one of most Important things while choosing any product. It can be hosting or domain OR Any tools, Because when you decide to buy a hosting and you goto checkout and your payment method is missing there. How will you feel? Ofcourse Irritating.
So let me tell you here that how many and which payment methods are supported by Hostarmada Hosting.
payment method for hostarmada
For this time they accept Visa (USD Enabled) and PayPal (USD enabled). Like other hosting provider they do not offer different site for different country which means local payment methods are not going to work there.
Let's take an example of India, If you are a Indian Customer you should have a International Cross Border Enabled Card to pay on hostarmada Website. In most of case, Indian users do not have such type of cards. So If you are intrested and do not have card just contact me I will help you personally step by Step.
[fluentform id="11"]
Tools and Dashboard of Hostarmada
Hostarmada provides traditional cPanel to monitor and Manage hosting and website. I have attached the cPanel Dashboard picture that shows all tools provided by them. So let see them one by one.
Hostaramada cpanel
They provide all the tools and features that you need to manage your website like Free SSL Certificate for encrypting, Daily backup for making your site ready to restore any time and many more tools like that.
As usual Cpanel, you can monitor the usage of hosting and can access everything from FTP to MySQL database.
WordPress Management Software inside cPanel
They provide Softcalculous to manage any type of CMS like WordPress, Magneto, BBPress etc.without too much experience with one click. You can easily create and manage your blog using their one-click WordPress Installation.
-> Learn All About Blogging -> Complete WordPess Tutorial PDF
Free Professional Emails ([email protected])
I am a huge fan of hosting providers that give us Free Professional emails with Encrypted SSL because using professional emails you get more trust and conversion among your customer. Hostarmada Provides the same service in their Cpanel Dashboard.
From here you can create professional email and forward them to your gmail to keep a copy of every email received on your pro email.
Daily Backups
Backup for a website is most important thing even from hosting because website crashes are normal and If you have backup you can recover it. Hostarmada have daily backup plugin installed in cPanle, Please note it's not a WordPress plugin. It is integrated with cPanel to store and restore backups.
Free SSL
Every developer and blogger knows, how much is SSL important for your blog when it comes to user trust and security. For the same reason hostarmada provide secure SSL for free with their hosting.
Free Speed optimizaton
Hostarmada offer free website optimization by their team in less than 1 hr. This is really a cool service that everyone will enjoy since no more extra charges for website speed optimization. Generally they use LS cache plugin and optimize it according to your website.
LiteSpeed + LS Cache + Quic Cloud CDN
As I have already mentioned above that they are using LiteSpeed Technologay which is very fast and secure. In addition with lightspeed they integrate QUIC Cloud CDN on demand that will speed up your website an give your user a fast experience.
How to order Hostarmada Hosting in any Country by any Payment Method
Goto Hostarmada Home Page
Visit Hostarmada Home page and decide any plan according to your need and budget. You can go with their Starting plan as it also has plenty of resources and good speed with uptime.
Choose a Plan
Select the plan that you like the most and proceed to next. You will get a free domain on every plan and hence you need to put a fresh domain that you wish to buy. Then click on next.
Choose Domain For Free
When you select a plan it will ask for a domain, enter any domain you want and you will get it for free. After entering domain go to next step.
Select Duration and Server Location
In next window, you will see two option, the first one for duration and the second one is for server location. Choose according to your preference and proceed to checkout.
Choose Payment Method
On checkout page you can see your order summary and you can see few availbale payment methods there. Choose the one by which you can pay. If your local payment method is not indicated there just contact me through any medium I will purchase it on behalf of you.
Install WordPress and Ready to Go
Conclusion
Conclusion of this Hostarmada review, which I did very Honestly is described here. After personally using and monitoring Hostarmada that you can go with them without hesitation. It's not only my experience but also my research that shows at this price you can't expect more. This is the best and affordable hosting available in the market with Cloud SSD and LiteSpeed Technology to take your website to the next level in point of speed.
If you need any personal support regarding hosting you can Comment below or contact me anytime.
Thank You
Which one is better Siteground or Hostarmada?
Hostarmada is the winner when you take a closer look at performance and Quality of Hosting.
Do we get a Free Domain on Hostarmada?
Yes, you will get a free domain with every shared hosting plan by Hostarmada.
What payment methods does Hostarmada Accept?
They accept Visa Credit Card and PayPal for now but in future, they will accept all major cards.
Do they provide cPanel with their hosting?
Yes, They provide a cPanel with their Hosting Plan.
How hostarmada Hosting is performing?
Hostarmada hosting is performing pretty great in term of speed and uptime.
Is Hostarmada best according to its price?
Yes, They are damn reliable when you compare with others with the same spec hosting.
Is Hostarmada a Good Hosting for 2020?
Yes, It's the best hosting If you look at pricing and specs. You will almost everything at a reasonable price.
Read More https://bloggertutor.com/hostarmada-review/?feed_id=785&_unique_id=5f41488091ad2 #hosting#hostarmada #hostarmada_detailed_review #hostarmada_hosting #hostarmada_hosting_review #hostarmada_review
0 notes
Text
The Best 2019 Webhosting Services for Websites
In this day and age, developing an effective website does no longer require you to be an HTML expert. There are a variety of webhosting solutions available on the market from numerous providers that can help you in this aspect, from A to Z. Even so, there are five tips, in particular, that you should be aware of before selecting one (below).
The Top Tips to Consider When Choosing a Webhosting Provider
Be Aware of the Type of Help That You Require You might be comfortable in structuring several aspects of a website, while other aspects not so much. By identifying what you need, you will be able to choose the adequate plan. Consider Website Builders To get online, you do not necessarily need website hosting, as website builders are an alternative that you can take into account; nonetheless, due to their proprietary nature, you would be able to migrate content in an easy manner. Choosing Between a Cheap Deal and a Free Solution You should only opt for a cheap deal or a free solution if your website is not meant for business, or professional viewing. If it is business-related, you should consider a splurge, as you would acquire more benefits; thus, the website itself would be more professional. Find Out About Price Alterations You might be enticed with an introductory offer, but you should make sure to find out if that price will change. There are times when a plan’s price might augment significantly after a few months, which could definitely cause you to have a downfall in more than one aspect. Webhosting Provider’s Credibility Is Vital Unfortunately, there are more than a handful of untrustworthy providers. The only way to find out how credible is a provider is by conducting a search to discover ratings and thus find out which ones are worth the time of day.
Top Webhosting Providers on the Market
If you come to the conclusion that you do require a webhosting provider, consider any one of the following. They are the top webhosting providers on the market for 2019 due to being affordable, effective, innovative, and always there at your service for anything you require. 1&1 IONOS This provider, which is the top one in Europe, is ideal for businesses. Plans vary in their features. They can include baremetal servers, free SSL certificates, secure hacker protection, email marketing, free web design software, graphic archive, 24/7 support, 30-day money-back guarantee, transparent replication, 300Gbps network connectivity, among many other features. I&1 IONOS Pro is $8.99 USD/£6.99 per month I&1 IONOS Plus is $.4.99 USD/£3.99 per month I&1 IONOS Basic is $0.99 USD/£0.99 per month Click for More Details on I&1 IONOS Bluehost Based in Utah and owned by Endurance International Group (EIG), Bluehost has become well-known on the market for being ideal for WordPress users. It provides unmetered bandwidth, cPanel-based section, WooCommerce hosting, free domain, 45-day money-back guarantee and 24/7 U.S.-based support. You can choose from basic shared hosting, which would cost $2.99 every month when you opt for the three-year contact. There are introductory WordPress plans that start at just $20.00 per month, which are totally worth it due to you acquiring automated setup for WordPress and popular applications via a Mojo marketplace-powered system. Every TechRadar visitor can take advantage of the Bluehost Shared Plan and get 63% off; thus, instead of paying $7.99 USD every month, you would only pay $2.95 USD per month for the first term. There are other plans that you can get 25% off (below). Bluehost Basic is $2.95 USD per month Bluehost Choice Plus is $5.45 USD per month Click to Get Mosre Details on Bluehost GoDaddy This option is ideal for SMBs. It offers SEO services, free domain, database restore and backup, unmetered bandwidth, unlimited storage, uptime guarantee, free Microsoft Office 365 business email for one year, and customer support. GoDaddy Economy is $2.99 USD per month GoDaddy Deluxe is $4.99 USD per month GoDaddy Ultimate is $5.99 USD per month Click to Get More Details on GoDaddy HostGator

If you are on a tight budget, HostGator is a provider that you should take note on. Features in plans vary. HostGator provides a cPanel-based management section, 99.9% uptime guarantee, unlimited bandwidth, unlimited disk space, FTP, MySQL databases, emails accounts, subdomains, 24/7 customer support, $200.00 USD worth of Bing and Google Ads credits. It is important to note that no domain is provided, but for the price of the plans, HostGator is worth the try. HostGator Business Plan is $5.68 USD per month HostGator Baby Plan is $3.78 USD per month HostGator Hatchling Plan is $2.64 USD per month. Click to Get more Details on HostGator InMotion Webhosting With 15 years in business, InMotion webhosting is one of the most respected providers on the market. It is always striving to provide consumers with effective plans that meet every budget. Their plans come along with a 90-day money-back guarantee. InMotion provides WordPress solution, business hosting, spam-safe email, DDoS protection, backups, web design services, and 24/7 U.S.-based support. Right now, you can acquire 60% off the Power Plan from TechRadar’s #1 rated webhosting. There are several plans available to choose from. InMotion Launch is $3.99 USD/£2.99 a month InMotion Power is $3.99 USD/£2.99 a month InMotion Pro is $13.99 USD/£10.50 a month Click to Get More Details on InMotion TSOhost This provider provides a range of flexible plans. Its main focus is WordPress. It is ideal for UK shared hosting. Features in plans vary. TSOhost offers custom web console, free SSL, daily backups, technical support, 60-day money-back guarantee, unlimited bandwidth, 500MB storage, 10 mailboxes, among other things. It has an entry level of just £1.61 per month for two years. If you commit to just one year, it would be just £1.79. TSOHost Startup is £5.00 per month TSOHost Business is £12.00 per month TSOHost Ecommerce is £34.00 per month Click to Get More Details on TSOhost Weebly This is a free website builder with plans for those individuals who prefer to upgrade to take advantage of more benefits, such as the elimination of advertisements. It offers SSL security, drag and drop builder, $75.00 search credit, free SEO tools, among other helpful tools. Weebly Starter is $8.00 USD per month Weebly Pro is $12.00 USD per month Weebly Business is $25.00 USD per month Click to Get More Details on Weebly Wix Due to having numerous of interesting features for both beginners and experts, Wix has become one of the most popular webhosting providers on the market, and it does not appear like this is going to change anytime soon. It permits you to tailor your plan as you see fit. Wix offers image editors, templates, great storage options, $75.00 USD worth of Google Ads vouchers, among many other features. Wix Connect Domain is $5.00 USD per month Wix Combo is $11.00 per month Wix Unlimited is $14.00 per month Click for more Details on Wix Hosting
What Is Website Hosting?
It is just as it sounds: A hosting of a site for it to be present online in order for others to view. There are a variety of different options available on the market; thus, one should go the extra mile to choose the adequate option. Website Hosting Dedicated: With a dedicated server, the entire web server is available for use. You will be responsible for its maintenance. You would have to pay extra, but it would definitely be well-worth it. Shared: With a shared hosting service, a server can be utilized with other websites and webhosting accounts. They are on the cheap side and great for small sites, ones that do not require the use of a lot of bandwidth resources. VPS: With a virtual private serve (VPS), you would be able to scale resources as you require them. This type of server draws from a pool of processing power, storage, and memory depending on requirements. Paid or Free Website Hosting? The answer to this question will depend on the type of website that you want. If you want one in which you are not going to conduct any type of business on, you should consider free website hosting. Now, if it is business-related or you just want your website to look professional, the paid route is the solution. Choosing the Best Webhosting Provider Any of the aforementioned webhosting providers would be worth it; nonetheless, you should question the features that you want for your website in order to choose a plan that best meets your specific needs and wants. What might work for your friend, might not so much for you, and vice versa. Read the full article
0 notes
Text
How To Install WordPress

In this article we will tell you how to Install WordPress in 7 Easy Steps. If you are interested in building a WordPress website you will first need to know how to install WordPress and this is the definative Guide for Manual WordPress Installation.
About WordPress
WordPress (WordPress.org) is a Free open source content management system originally built for blogging. WordPress was released in 2003 by founders Matt Mullenweg and Mike Little. WordPress features a plugin and template based architecture and, over the years, has drawn thousands of developers to create custom plugins, and themes which can now be used to create rich and diverse array and types of websites for almost any application or business need.
WordPress is used on more than 60 million websites worldwide and, as of April 2019, and nearly 34% of the top 10 million global websites have been built using WordPress. Today, WordPress is the #1 website content management system in use globally.
Now that you know a little bit about WordPress, here is a step-by-step guide on how how to manually install and setup a WordPress site for your domain, if you have a desire to build a WordPress website of your own.
What You Need To Get Started
Domain Name
A domain name is your company’s online address. It is a repository for your company’s online business identity and the public face of your brand. Your domain name can be one of the most important decisions you will have to initially make when you are deciding to create an online identity for your business. There are tens of millions of domain names already in use out there, so finding the perfect domain name for your business is important and can require some creative thought. For example if your company name is “New Penny Plumbing” you might try to see if the domain newpennyplumbing.com, or newpennyplumbing.net or similar domain name is available.You can do searches for available domain names at a domain registrar such as GoDaddy.com.
WordPress Website Hosting
After you acquire a domain name, next you will need to find a Web Hosting Service where your website and all your site files will reside. There are dozens of WordPress Hosting Providers out there. Do a web search for WordPress Hosting and you will see many results. What are you are typically looking for is a WordPress Hosting company that offers what is called a CPanel where you can do things like setting up a SQL database for your WordPress site, set up personal emails for your domain, and which offers online caching, SSD Drives, plugins to help optimize images sizes and compression, SSL Certificates for online security, and other performance and backup capabilities. We recommend hosting services such as SiteGround.com and InMotion Hosting Services because of their High-Performance Hosting Service Capabilities.
Install WordPress in 7 Easy Steps
Now that you have acquired a Domain Name for your website, and a WordPress Hosting Account, and you are ready to now start installing WordPress, here are the 7 Steps for Installing WordPress.
1. Point your Domain to your new Hosting Account
When you get your new WordPress Hosting Account you will be provided with the nameservers for your site. You will need to go to your web registrar where you purchased your domain, login to your account and set the name servers to point to the name servers of your hosting account. One you have set those it will typically take a few hours to propagate through the Internet so all browsers every where know where your domain name points to, which is your hosting account. If you use a registrar such as GoDaddy.com it will typically propagate fairly quickly, within a few hours.
2. Download WordPress Software
As mentioned above WordPress is Free to download and install. Just go to https://wordpress.org/download/ and click the download button to get the latest copy of WordPress. Once you have downloaded WordPress, create a local directory on your hard disk, copy the wordPress-5.x.x.zip file to that local directory and unzip it to the root of that directory. If you don’t already have a ZIP utility such as the paid WinZip Utility, you can use a free Zip utility such as 7-Zip to unzip your WordPress files.

3. Use FTP Client to Upload WordPress Files to your Hosting Server
In order to upload the WordPress files to your hosting site you will need an FTP (File Transfer Protocol) Client and you will need FTP Information from you WordPress Hosting Provider so you can setup your FTP client to transfer the files. If you don’t already have an FTP client software application you use, you can find several free FTP clients. One popular FREE FTP Client is FileZilla. Click the following FileZilla Download link to get the FREE FileZilla FTP Client, and click the following link to view the FileZilla Documentation. We won’t go into how to use FileZilla in this article but you will need the following information in order to transfer your WordPress files to your server.
Host FTP Server Address – Typically an IP address or a server name
Username – Typically Username is same user name used to access your Cpanel.
Password – Typically Password is same password used to access your Cpanel.
Remote Directory – Typically the remote directory will be /public_html/
Local Directory – This is the directory where you have unzipped your WordPress files after you downloaded them (Example: C:/website/WordPress)
4. Get FTP Information from your WordPress Cpanel
When you signup for a WordPress Hosting account you should receive a welcome email with information on how to access your administrative account as well as information on how to access your CPanel account including URL, Username, and Password. Find that information from your hosting provider and login to your CPanel. and login to your CPanel. Your CPanel should look something like this:

You can see in the top Files area there is an item called FTP accounts. In there you can setup an FTP account to use with FileZilla or another FTP client. If you are unsure how to setup an FTP account or configure your FTP client you can talk to your Web Hosting Tech Support group and they can step you through it. Once you have your FTP client Configured, upload your WordPress Files to your hosting site.
5. Setup Your WordPress Database
Next you will need to setup a Database and a Database User and Password using your CPanel. Go into your CPanel as discussed above in the FTP section and find the Databases section. Select the MySQL Databases link. Clicking this link typically will initiate the MySQL Database Wizard.
STEP 1: Create a Database
A MySQL database name will typically have two parts. The first part, in this case “vids380_” is assigned by the Database Wizard and is your CPanel Username followed by an underscore. The second part, in this case “wp1” is the part that you will input. This can be any alphanumeric string you want. So, in this instance the full database name that I created is “vids380_wp1”.

STEP 2: Create a Database User
A MySQL database username will again have two parts. The first part, in this case “vids380_” is again assigned by the Database Wizard and is your CPanel Username followed by an underscore. The second part, in this case “wp1” is the part that you will input. This can be any alphanumeric string you want. So, in this instance the full database name that I created is “vids380_wp1”. To keep things simple I typically name the database and the database user the same thing to keep things simple. Additionally, you will need to assign a password to the user. You can type in your own password or you can use the Password Generator Button to create your password.
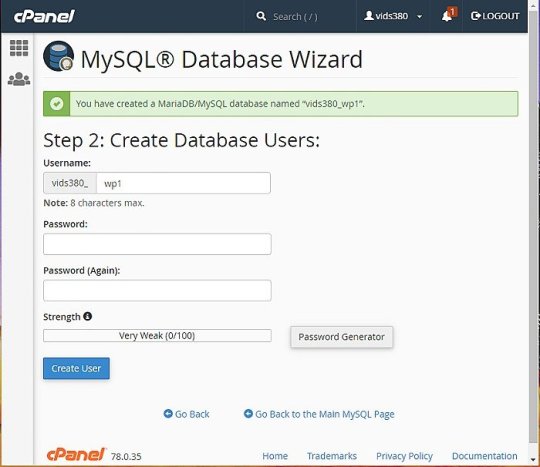
STEP 3: Assign the Username you have created to the Database You have Created
This is pretty self-explanatory, but you will see a table to assign privileges to the database. Select the “All Privileges” checkbox to select all privileges which is what we want.
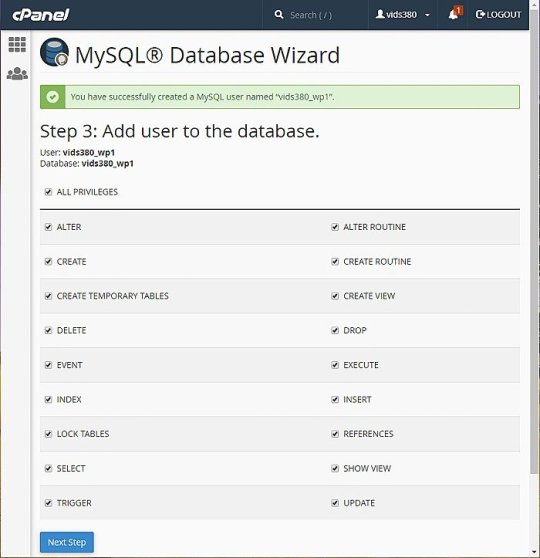
6. Edit the wp-config.php file and upload to server
Now that you have created your WordPress Database, the next step is to create a wp-config.php file, edit it, and upload it to your server. We do this by going to the local folders where you have unzipped your WordPress files and in the root directory of that folder you will see a file called “wp-config-sample.php” We need to open this file and edit some entries in the top section where you will enter the Database Name, Username, and Password you created when you setup the Database above. You can use an application such as Adobe Dreamweaver or some other web development application, or if you don’t have any such application you can open the wp-config.sample.php file with a simple text editor such as Windows Notepad or whatever text editor you have on your computer. Open the file and enter the database name, username and password you created in the MySQL Settings area if the file. Then you must save this file in the same directory by the name of “wp-config.php”. Make sure you enter these names between the single quotes or you will get a database connection error. After saving the file, upload this single file to your WordPress Server using the FTP application you used to upload the other WordPress files as described above.

7. Now you are ready to smoke test your work
If you have setup your DNS Nameservers to point to your hosting account’s nameservers you should be able to open a broswer and type in “YourDomainName.com” (insert your actual domain name) and, if successful, you should see the following initial WordPress screen.

If you see this screen, Congratulations you have Successfully Installed WordPress!
If not, please go back through all the steps above. If you have gotten through these steps successfully, select the language that you wish to use on your site from the list above and click Continue. The next screen you will see will let you set your master administrative Username and Password. One important tip, select a username and password that only you could guess. DO NOT set your master Username as something simple like “Admin” or “YourSiteName”. WordPress is the #1 website platform in the world, and it is the #1 website platform target for global hackers. Set your username and password as something you can remember but that no one else could ever guess. Hacker bots are scouring the internet every day looking for WordPress sites and will start trying to hack your site within days or weeks using Brute Force attacks, so do yourself a Big Big Favor and pick a username and password that no one can guess. I would highly recommend that you let the WordPress Password generator generate a complex password for your site that no one would ever guess. (See image below)
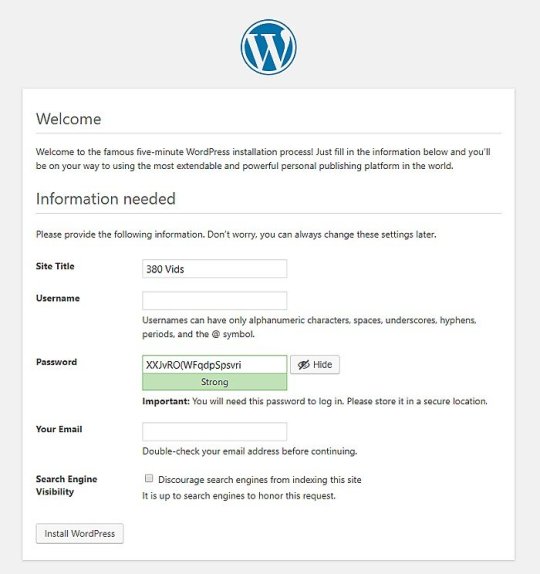
WordPress Auto Installers
In this blog post we have covered how to procure a domain; how to select a hosting provider and setup a hosting account, how to point your domain to your hosting account, how to download WordPress files, how to unzip and upload those file to your hosting server via FTP, how to create a Database using your hosting CPanel; how to edit the wp-config.php file and upload that to your hosting site, and how to initialize your WordPress site and setup a master Username and Password. This has all been a tutorial on how to Manually Setup WordPress. This is how people have been installing and setting up WordPress since WordPress was introduces in 2003. But, WordPress Hosting providers have become more sophisticated in recent years, so if you are a novice to WordPress there are many hosting companies these day that do nothing but WordPress hosting that can help you install and setup WordPress for your, or in their CPanel they have a WordPress Auto-Installer that can do most of this work for you. You will still have to buy your domain and point your DNS nameservers to your hosting company’s nameservers, but outside of that they will do most of the work for you.
0 notes
Text
6 Best Practices to Optimize Your WordPress Database
Your WordPress site can be slow for many different reasons; a bloated database running in the background is one of them. A professional WordPress maintenance workflow includes a regular database optimization practice during which you get rid of unnecessary data and locate and fix errors and inconsistencies in your database.
WordPress database optimization doesn’t require any specific programming knowledge, although you occasionally need to edit the wp-config file. In this article, we will show you a couple of best practices about how to optimize your WordPress database.
Start with a Backup
Before getting started with optimization, create a backup of your database. In this way, if anything goes wrong, you won’t lose any data and can return to a previous version of your site. There are different solutions to back up a WordPress site, here are the most important ones:
you can create a full site backup from the cPanel of your hosting account,
you can export all your content including your posts, pages, comments, and other post types from the Tools > Export menu in your WordPress admin area,
you can use a backup plugin such as BackupBuddy or VaultPress that allows you to create different kinds of custom backups.
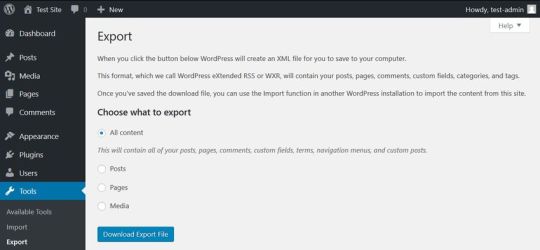
Delete the Content You Don’t Need
One of the most important things of database optimization is to get rid of all the overhead content you don’t need. As each post, page, comment, and post revision is an entry in your database, you can free up a lot of space by deleting unused, obsolete, or duplicate content right from your WordPress admin area.
If you have a WordPress site for a while, you can find such content in many different places. First and foremost, it’s worth deleting the Trash folder of your Posts and Pages menus (even if WordPress automatically deletes posts from the trash after 30 days). You can also go through your Drafts and Pending posts to see if you really need all of them.
You can also check if you have any taxonomies you don’t use. WordPress has two kinds of taxonomies by default: posts and categories. You can find both of them in the Posts menu. Database optimization is also a good opportunity to think through your taxonomy structure, get rid of duplicate tags and categories, and improve the findability of your posts.
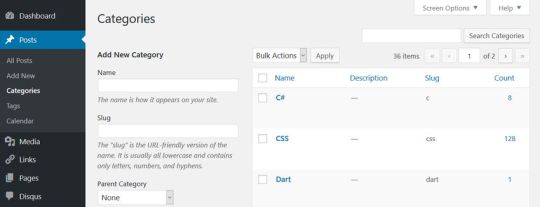
Besides default posts and pages, you can also have custom post types such as calendars, recipes, or affiliate links that include content you don’t need anymore.
Remove Themes and Plugins You Don’t Use
Although WordPress saves themes and plugins into the wp-content folder instead of the database, it’s still a good idea to delete the ones you don’t use. Many plugins and some of the more complicated themes create extra tables inside your database. Besides, all plugins and themes store their options in the wp-options table as well.
Plugins and themes developed following WordPress’ coding standards clean up after themselves when you remove them from your site. In this case, you only need to delete them from the WordPress admin area using the Appearance and Plugins menu. Note that it’s not enough to only deactivate them, you also need to hit the Delete button. If your plugin doesn’t clean up after itself, you can still get rid of the related database overhead using one of the methods below.
Optimize Your Tables in phpMyAdmin
You can run a database optimization query right from your phpMyAdmin interface. PhpMyAdmin is the application that allows you to access your raw database. You can reach phpMyAdmin from the cPanel of your hosting account, from the Databases menu.
In phpMyAdmin, open the database belonging to your WordPress site and check the tables you want to optimize. You can also choose the Check All option, as you can see on the image below:
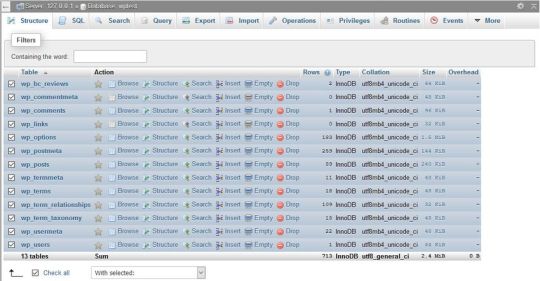
Here, scroll down the dropdown list (with the “With selected: “ label) you can find below the tables. From the Table maintenance group, select the Optimize table option and run the query.
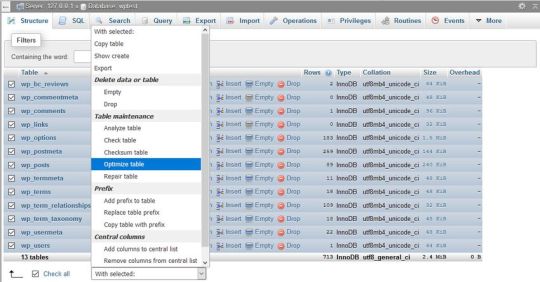
The Optimize table option runs the OPTIMIZE TABLE command on your data, which, according to the MySQL documentation:
“reorganizes the physical storage of table data and associated index data, to reduce storage space and improve I/O efficiency when accessing the table.”
Besides OPTIMIZE TABLE, you can also run the REPAIR TABLE query from the same phpMyAdmin menu, which “repairs a possibly corrupted table”.
Run WordPress’ Database Optimization Tool
The WordPress Core also has a built-in database optimization tool. It’s turned off by default, however, you can activate it by editing your wp-config.php file. You can find wp-config in the root directory of your WordPress install on your server. Open it in your code editor and add the following option to the top of the file:
define( 'WP_ALLOW_REPAIR', true );
You can find the optimization script under the https://ift.tt/2DdDCih URL, where you need to replace your-site.com with your own domain.
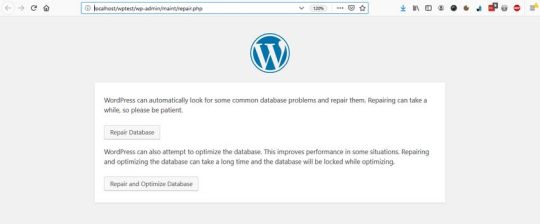
Here, you can choose from two options:
Repair Database – it looks for and repairs common database problems,
Repair and Optimize Database – besides all the tasks performed by Repair Database, it also tries to optimize your database to improve performance.
In most cases, the first option is enough, but if you want an in-depth cleanup, choose the second one. Wait until the tool repairs and/or optimizes your database, then remove the option you have added to your wp-config file (otherwise, anyone on the web can see data related to your database).
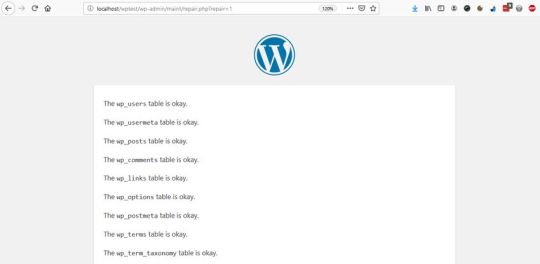
Use a Database Cleanup Plugin
If you don’t want (or can’t) access your raw database and your wp-config file, or you want to run advanced database optimization tasks, you can also put a plugin into use. Below, we have collected the three best database cleanup plugins for you.
Note that you shouldn’t use more than one database optimization plugins at the same time, as these plugins have similar functionalities that can interact with each other in unexpected ways.
1. WP-Optimize
WP-Optimize is a free plugin that takes care of all kinds of optimizations on your WordPress site. Besides cleaning your database, it also compresses your images and caches the content on your site. Its database cleanup feature:
removes all unnecessary data, even expired transients hidden in the wp-options table,
optimizes all your MySQL tables,
lets you run regular automatic cleanups,
shows database statistics,
and more.
The plugin is frequently updated and the support team is responsive, so it’s a good and safe solution if you want to run automated cleanups on a regular basis.
2. Advanced Database Cleaner
Advanced Database Cleaner is another free database optimization plugin that comes with many advanced options. It allows you to remove all kinds of unused, obsolete, and duplicate content types, such as:
old revisions, drafts, and auto-drafts of posts, pages, and custom post types,
pending, spam, and trash comments,
orphan metadata and relationships,
expired transients,
and more.
You can also schedule and run automatic cleanups, view and clean tables, and display and view items before removing them. Besides, Advanced Database Cleaner supports multisite installs, too.
3. Optimize Database after Deleting Revisions

Optimize Database after Deleting Revisions is a database optimization plugin that lets you clean up your database with one single click. If you need a simple solution that doesn’t need much configuration, Optimize Database after Deleting Revisions can be the best choice for you. With this plugin, you can remove:
revisions of posts, pages, and custom post types,
trashed posts, pages, and comments (also spam comments),
orphan postmeta items,
unused tags,
expired or all transients,
pingback and trackbacks,
and more.
It also supports WordPress Multisite and adds an “Optimize DB” link to your admin bar with which you can run a one-click database optimization any time you want.
Conclusion
Database optimization is an essential task you need to perform regularly if you want to maintain good data health on your site. You can either do the optimization manually or make use of a data cleanup plugin that lets you configure and automate the entire process.
Besides, database optimization is also a typical maintenance service you can offer to your clients if you have a WordPress business. If you want to know more about what else to pay attention to when working with clients, have a look at our guide about what your clients need to know about their WordPress site, too.
6 Best Practices to Optimize Your WordPress Database published first on http://7elementswd.tumblr.com/
0 notes