#How to export a MySQL database using cPanel
Explore tagged Tumblr posts
Visit Tumblr Blog
Explore Tumblr blogs with no restrictions, modern design and the best experience.
Last Seen Tumblr Blogs


Fun Fact
Tumblr was created by web developers David Karp and Marco Arment.
Text
Manage and secure your data efficiently by learning step-by-step instructions on downloading SQL databases from cPanel effortlessly. Read now!
#How to download MySQL database backup from cPanel?#How to import MySQL database backup from cPanel?#How to export a MySQL database using cPanel#How to download MySQL database from cPanel?#How to Backup MySQL Database Using cpanel
0 notes
Text
Migrate or move WordPress website to a new host in 2025
Why You Might Need to Move Your WordPress Site
Your website is important. But sometimes, your web host may be slow, expensive, or not helpful. When that happens, it’s smart to move your website to a better hosting company. A better host can help your site load faster, stay online, and keep visitors happy.
You can move your website in two ways:
Manually (you do everything step by step)
Automatically (you use a plugin to help)
This full guide will show you both ways. It will also teach you what to do after you move your site to make sure everything works.
If this sounds hard, don’t worry. You can also get help from Creation Wave LLC. We help people move WordPress websites safely and quickly.
Table of Contents
Manual vs Automatic Migration
Manual Migration – Step by Step
How to Move WordPress Without cPanel
How to Use a Plugin to Migrate Your Site
What to Check After Migration
Final Thoughts and Expert Help
Should You Move Your Site Manually or Use a Plugin?
There are two ways to move your WordPress site:
Manual Migration
This is where you download your files and database and upload them to the new host yourself. It gives you more control, but you need to be careful. One small mistake can break your site. This is better for large websites or people with some technical skills.
Automatic Migration
This uses a WordPress plugin to move your site. It is easier and faster. It is perfect for small websites or beginners. You don’t have to touch any code.
If you're not sure which to pick, try a plugin first. If it doesn't work or gives errors, you can move it manually or get expert help.
Need help? Creation Wave LLC offers both manual and automatic WordPress migration services.
Manual WordPress Migration (Step-by-Step Guide)
This part will show you how to manually move your WordPress website to a new host.
Step 1: Choose a New Hosting Company
Make sure your new host is fast, secure, and helpful. Look for companies that offer good customer support and daily backups.
Types of hosting:
Shared hosting (basic and cheap)
VPS hosting (faster and more private)
Managed WordPress hosting (easy and fully managed)
Dedicated server (for very large sites)
If you need help picking the right host, Creation Wave LLC can help you choose the best one.
Step 2: Backup Your WordPress Files
Your website files are very important. They include your theme, plugins, images, and settings.
To back them up:
Use an FTP client like FileZilla.
Connect to your old host using FTP login details.
Find the folder named “public_html” or your WordPress folder.
Download all the files to your computer.
Wait until the download finishes before going to the next step.
Step 3: Export Your Database
Your website database has all your posts, pages, user accounts, and comments.
To export it:
Log in to cPanel on your old host.
Open phpMyAdmin.
Click your WordPress database name on the left.
Click the “Export” tab at the top.
Choose “Quick” and “SQL” format.
Click “Go” to download the file.
Save this file in a safe place.
Step 4: Create a New Database on Your New Host
Now go to your new hosting account. Do this:
Log into cPanel.
Click “MySQL Databases.”
Create a new database.
Create a new user and give it a strong password.
Add the user to the database and give it all permissions.
Write down the database name, user name, and password. You will need them soon.
Step 5: Upload WordPress Files to New Host
Now it’s time to put your website files on the new server.
To upload:
Open FileZilla again.
Connect to your new host with your new FTP details.
Go to the folder named “public_html” or root folder.
Upload all your website files from your computer.
Wait for the upload to finish before moving on.
Step 6: Import Your Database
Now you need to import your old database to the new host.
Log in to cPanel on the new host.
Open phpMyAdmin.
Click your new database name.
Click the “Import” tab.
Choose the .sql file you downloaded earlier.
Click “Go.”
This will add your old content to your new hosting account.
Step 7: Update the wp-config.php File
WordPress needs to know how to connect to the database.
In FileZilla, find and open the file “wp-config.php.”
Right-click and choose Edit.
Update the database name, user, and password:
define('DB_NAME', 'your_new_db_name'); define('DB_USER', 'your_new_db_user'); define('DB_PASSWORD', 'your_new_password');
Save and close the file.
Now WordPress can talk to the new database.
Step 8: Point Your Domain to the New Host
This is the final step.
Log into the account where you bought your domain (like GoDaddy or Namecheap).
Find DNS or Nameserver Settings.
Change the nameservers to the new hosting company’s nameservers.
Save and wait.
It can take 1–24 hours for the DNS to update fully. After that, your site will be live on the new host.
How to Migrate Without cPanel
Some hosting providers don’t use cPanel. That’s okay. You can still migrate your website.
Here’s what to do:
Ask your host for FTP access and MySQL access.
Use FileZilla to upload files.
Use another tool like Adminer or CLI (command-line) to import your database.
Update your wp-config.php file as shown earlier.
If this sounds too technical, Creation Wave LLC can do it for you.
How to Use a Plugin to Migrate Your WordPress Site
If you want an easier way, use a migration plugin. Here are three good ones:
All-in-One WP Migration
Simple drag-and-drop tool.
Great for beginners.
Duplicator
Makes a full copy of your website.
Offers more options for developers.
UpdraftPlus (Paid)
Does backups and migrations.
Good support.
To use a plugin:
Install the plugin on your old website.
Use the plugin to export the full site.
Set up a clean WordPress install on your new host.
Install the same plugin there.
Import the file you exported earlier.
After a few minutes, your site should be live.
What to Check After Migration
After moving your website, test everything. Check the following:
Is your homepage loading fast?
Are all your pages and posts showing?
Are your images loading?
Can you log into the WordPress dashboard?
Are all your plugins working?
Is the site mobile-friendly?
Also test your contact forms, menus, and links. You can use free tools like GTmetrix or Google PageSpeed to check speed.
If anything looks broken, go back and check your steps.
Need help? Creation Wave LLC offers a full post-migration checkup.
Final Thoughts
Moving your WordPress website can feel scary. But with the right steps, it’s not so hard. This guide helps you move your site by yourself or with a plugin. You also learned how to test your site after moving.
A better host can give you faster speed, better uptime, and better support. If you don’t want to take risks or waste time, you can let experts do it for you.
1 note
·
View note
Text
How to Move Your WordPress Site from Localhost to a Live Server
Developing a WordPress site on localhost is a great way to build and test your website in a controlled environment. However, the real challenge arises when it's time to move the site from your local server to a live hosting environment. If not done correctly, you could encounter broken links, missing images, or even database errors.
In this blog, we'll guide you through a step-by-step process to successfully move your WordPress site from localhost to a live server.

Step 1: Choose the Right Hosting Provider
Your first step is to select a reliable web hosting provider that meets your website’s needs. Look for:
Server Speed: Fast servers for better performance.
Uptime Guarantee: At least 99.9% uptime to ensure availability.
Ease of Use: User-friendly dashboards and tools.
WordPress Support: Hosting optimized for WordPress websites.
Popular options include Bluehost, SiteGround, and WP Engine.
Step 2: Export Your Local WordPress Database
The database is the backbone of your WordPress site. To export it:
Open phpMyAdmin on your local server (e.g., XAMPP or WAMP).
Select your WordPress database.
Click on the Export tab and choose the Quick Export method.
Save the .sql file to your computer.
Step 3: Upload Your WordPress Files to the Live Server
To move your files:
Compress Your WordPress Folder: Zip your local WordPress installation folder.
Access Your Hosting Account: Use a file manager or an FTP client like FileZilla.
Upload the Files: Transfer the zipped folder to your hosting server's root directory (usually public_html).
Unzip the Folder: Extract the files once uploaded.
Step 4: Create a Database on the Live Server
Now, set up a new database on your live hosting server:
Log in to your hosting control panel (e.g., cPanel).
Navigate to the MySQL Databases section.
Create a new database, database user, and password.
Assign the user to the database with full privileges.
Step 5: Import the Database to the Live Server
Open phpMyAdmin in your hosting control panel.
Select the new database you created.
Click the Import tab.
Choose the .sql file you exported from your localhost.
Click Go to import the database.
Step 6: Update the wp-config.php File
To connect your site to the live database:
Locate the wp-config.php file in your WordPress installation.
Open the file in a text editor.
Update the following lines: define('DB_NAME', 'your_live_database_name'); define('DB_USER', 'your_live_database_user'); define('DB_PASSWORD', 'your_live_database_password'); define('DB_HOST', 'localhost'); // Keep this unless your host specifies otherwise.
Save the file and upload it to your server via FTP.
Step 7: Update URLs in the Database
Your localhost URLs need to be replaced with your live site URLs.
Use a tool like Search Replace DB or run SQL queries in phpMyAdmin.
In phpMyAdmin, run the following query: UPDATE wp_options SET option_value = 'http://your-live-site.com' WHERE option_name = 'siteurl'; UPDATE wp_options SET option_value = 'http://your-live-site.com' WHERE option_name = 'home';
Step 8: Test Your Live Website
Once everything is uploaded and configured, check your website by entering its URL in a browser. Test for:
Broken Links: Fix them using plugins like Broken Link Checker.
Missing Images: Ensure media files were uploaded correctly.
Functionality: Verify forms, buttons, and features work as expected.
Step 9: Set Up Permalinks
To ensure proper URL structure:
Log in to your WordPress admin dashboard on the live site.
Go to Settings > Permalinks.
Choose your preferred permalink structure and click Save Changes.
Step 10: Secure Your Live Website
After migrating, secure your site to prevent vulnerabilities:
Install an SSL Certificate: Most hosting providers offer free SSL certificates.
Update Plugins and Themes: Ensure everything is up to date.
Set Up Backups: Use plugins like UpdraftPlus for regular backups.
Conclusion
Moving your WordPress site from localhost to a live server may seem daunting, but by following these steps, you can ensure a smooth and error-free migration. A successful move allows you to showcase your site to the world, engage your audience, and achieve your goals.
Start today and take your WordPress project live with confidence!
0 notes
Text
How to deploying Laravel projects on a live server – Complete Step-by-Step Guide
Learn How to deploying Laravel projects on a live server with this comprehensive guide. Step-by-step instructions on setting up hosting, configuring files, and deploying your Laravel app smoothly.Read Laravel Docs
How to deploying Laravel projects on a live server, you’ll need to follow a structured process. Here’s a step-by-step guide to help you:

1. Purchase Domain and Hosting
Make sure you have a domain and a hosting plan. Most shared hosting plans (like cPanel-based ones) or a VPS will work for Laravel, but ensure your server supports PHP and MySQL and meets Laravel’s requirements (PHP version, required extensions, etc.).
2. Prepare Your Laravel Project
Make sure your Laravel project is working locally.
Run the following command to clear any cached configuration and to optimize the project:
php artisan cache:clear
php artisan config:clear
php artisan route:clear
php artisan view:clear
Set up your environment variables (.env file). Make sure they are correctly configured for the live server (e.g., database, mail, and app URL settings).
3. Zip and Upload Your Laravel Project
Compress your entire Laravel project folder (without the node_modules and vendor directories) into a .zip file.
Use FTP (with FileZilla or any other FTP client) or File Manager in cPanel to upload the .zip file to your server. Typically, upload the file to the public_html or a subdirectory within it if you want to run your Laravel app in a subdirectory.
4. Extract the Files
Once uploaded, use File Manager in your hosting control panel to extract the .zip file.
5. Set Up the Public Directory
By default, Laravel’s entry point is the public folder, which contains the index.php file. On a shared hosting server:
Move everything in the public folder (including the .htaccess and index.php files) to the root directory (usually public_html).
Edit the index.php file to update the paths:
Change:
require __DIR__.'/../vendor/autoload.php';
$app = require_once __DIR__.'/../bootstrap/app.php';
To:
require __DIR__.'/vendor/autoload.php';
$app = require_once __DIR__.'/bootstrap/app.php';
This ensures that Laravel can find the necessary files in the correct directory.
6. Set File Permissions
Ensure that the following directories are writable by the server:
/storage
/bootstrap/cache
Use the following command via SSH (if available) or through the hosting file manager:chmod -R 775 storage chmod -R 775 bootstrap/cache
7. Set Up a Database
Create a MySQL database and a user with privileges in cPanel (or via SSH if using VPS).
Update the .env file with your database credentials:
DB_HOST=localhost DB_DATABASE=your_database_name DB_USERNAME=your_database_username DB_PASSWORD=your_database_password
8. Install Composer Dependencies
If you have SSH access:
SSH into your server using a terminal or a tool like PuTTY.
Navigate to your project directory
cd /path/to/your/project
Run Composer to install the dependencies:
composer install --optimize-autoloader --no-dev
If you don’t have SSH access, you can run composer install locally, zip the vendor folder, and upload it to the server.
9. Run Migrations
If you have SSH access, run the following command to migrate the database:
php artisan migrate --force
If you don’t have SSH access, you can run the migrations locally and then export/import the database to the server via phpMyAdmin.
10. Set App Key
Generate a new application key if you haven’t already:php artisan key:generate
Ensure the key is set in the .env file:
Read Full Tutorials
0 notes
Text
How To Move Magento 2 From Localhost To Server [In 8 Steps]
Welcome to our comprehensive guide on how to seamlessly move your Magento 2 e-commerce store from localhost to a live server. Relocating your website is a crucial step in making your online business accessible to a wider audience. In this step-by-step tutorial, we’ll walk you through the entire process, ensuring a smooth transition with minimal downtime. Whether you’re a beginner or an experienced developer, follow along to master the art of transferring your Magento 2 store and unleash its full potential on the web. Let’s dive in and get your store up and running on the live server!
How To Move Magento 2 From Localhost To Server
Before embarking on the migration process of your Magento store from localhost to a live server, it’s crucial to ensure that you have everything you need to execute a successful transfer. Here’s a comprehensive checklist to guarantee a smooth and efficient migration:
Choose a Magento-specific hosting plan for optimized speed and performance.
Get a unique domain name to represent your store and improve SEO.
Install the latest versions of phpMyAdmin and MySQL for database management.
Use cPanel for easy website management, commonly provided by hosting providers.
With these essentials, you’re ready to migrate your Magento store successfully. Let’s proceed with the steps.
Steps to Move Magento 2 from Localhost to Server:
Step 1: Export Database from Localhost

Connect to your localhost software (e.g., XAMPP, WAMP) and log in to phpMyAdmin.
Select the database of your Magento store from the menu on the left.
Click on the “Export” option at the top of the page.
Click the “Go” button to initiate the database export process.
The database files will be available for download in .sql format, and you can also choose to save them as .zip files.
Following these steps will allow you to successfully export your Magento store’s database from the localhost environment.
Step 2: Create Magento Files in Zip Format
Select all the files and folders from localhost and create a zip file.
Go to htdocs folder (if you are using XAMPP) or www folder (if WAMPP)
Go to Magento folder and compress the files in zip format More Info: https://www.evrig.com/blog/move-magento-2-from-localhost-to-server/
#magento#magento 2#Localhost#server#ecommerce#ecommerce business#magento developer#magento development#EvrigSolutions
0 notes
Text
How to Host WordPress Website From Localhost to Server
How to Host WordPress Website From Localhost to Server Before you can move your WordPress website from localhost to server, you'll need to change the link structure of the content files. By default, WordPress URLs start with https://localhost/. This means that you'll need to change the link structure to match your live server installation. Duplicator plugin The Duplicator plugin for hosting a WordPress website from localhost to server will automate the process of setting up a WordPress site on a new server. After installing the plugin, the WordPress dashboard will show a Duplicator section. If there are no packages yet, click the Add Package button. A download archive and installer file will appear. Once you download it, you can follow the installation instructions. The Duplicator plugin backs up your entire site, including all files, plugins, themes, pages, posts, media, and media. The plugin can create an archive of your website as a zip file. If you choose the wrong archive, your site will not be restored. XAMPP The first step to host a WordPress website on a server is to install the WordPress application on the hosting server. To do this, you need to download the latest version of WordPress from WordPress.org and manually unzip it into the XAMPP folder. Once the program has finished installing, you can create a database and folder to store your website data. XAMPP is a free web application package that runs on all operating systems. It has different versions for Linux, Mac OS X, and Windows. Once you download and unzip the XAMPP file, follow the installation instructions. In some cases, XAMPP will prompt you to select which Windows version you want to run, although this is generally not necessary if you're using the program on a Windows computer. If you're using a Mac or Linux computer, you can also use XAMPP to host your WordPress website. phpMyAdmin First, you'll need to start the Apache Web Server and MySQL Database. Once you've done that, open up phpMyAdmin by going to localhost/phpmyadmin. You'll see a list of all the databases and URLs for your WordPress website. Now, you need to import your database from your localhost to your server using phpMyAdmin. To do so, you'll need to open phpMyAdmin and navigate to your hosting account's control panel. Once you've launched the program, you'll see a list of database names. Choose the one you want to import and click Export. Then, you'll need to create a new database in your new hosting account. Note that some hosts disable the ability to create databases using phpMyAdmin, so it's best to check with your hosting provider before you try this. cPanel To host a WordPress website on a server, you'll first need to create a MySQL database. If you already have one, you can skip this step. If not, you can create a new one by using the MySQL Database Wizard. You'll find this wizard in the Databases section of your cPanel dashboard. Click on the "Create a new database" icon, and enter a name for it. After that, the wizard will create a new database for your WordPress site. You'll also need to know how to install FTP on your computer. FTP is a file transfer protocol. You can use it to transfer files to and from your server. WordPress Installing WordPress on a localhost can help you get started with building your site without the need for a user server. It also allows you to test customizations and settings before transferring them to the live server. In addition, you can use it to test any third-party tools, plugins, or themes before committing them to a live server. The first step is to open phpMyAdmin and navigate to the root directory of your local WordPress website. This directory contains your wp-admin and wp-includes files. Once you have the files you need to move your site to the remote server, upload them there. These files will replace their counterparts on the remote server. permalink structure Moving your WordPress website from localhost to server is an excellent option for building many different sites without the need for an internet connection. It also allows you to test new settings and customizations, including the WordPress core installation, plugins, and themes, without affecting your live website. This way, you can identify any conflicts or issues before transferring your changes to your live site. The first step to move your WordPress website from localhost to a live server is to get an account with a web host. This will allow you to upload your website from localhost to the live server in a few steps. In order to do this, you will need a web hosting account, a domain name, and an FTP program. You should already know how to use an FTP program, such as FileZilla or WinSCP. DNS name If you are creating a WordPress website locally, you need to change the DNS name of the site to point to the server. You can do this on your computer. This will make your site available to everyone. After you've changed the DNS name, you can go live! Follow these instructions to move your WordPress website. You can also use cPanel to move your site. If you're using IPv4, you can use the localhost DNS name. If you're using IPv6, you'll want to use the server name. The localhost name resolves to 127.0.0.1, which is a reserved top-level DNS name. This allows developers to test their sites without causing any unauthorized changes. How to Host WordPress Website From Localhost to Server Read the full article
0 notes
Text
Move WordPress Site to New Host | Step-by-Step Guide

Steps To Do Before Moving WordPress Site to New Host
There are some preparation steps that you should go through before you move your WordPress website to the new host. The size of your database will determine the time taken for migration. You will also be able to clear cache directories, remove backups, and remove unused videos, themes, and plugins to reduce space. By doing this, you can speed up the migration process.
1. Back Up Your Website Files
Now you know how to prepare before you move WordPress site to new host. Then you should proceed with backing up the critical files on your website. Unexpected things can happen as you migrate files. If you don’t want to encounter any problems with missing or corrupted files, you should take backups. You don’t have to worry about losing your data in such situations, as you can quickly restore them from the backups. You will be able to take the backups using an FTP tool to your local location on the computer.
2. Export the Database
The next step you should follow to move WordPress site to new host is to export the database. The database is one of the most critical aspects of the WordPress website. That’s because it contains the data of all your posts and pages. You will access your database via phpMyAdmin, available through the hosting control panel.You will need to select the exact database of your WordPress website from the left-hand panel and then click on the Export button that you can see on the menu bar. Ensure that the export format is in SQL before proceeding with the export. Once you click on the “Go” button, you can get the database export downloaded in the form of a .sql file. You will need to keep it in the same website folder to proceed with the migration.
3. Creating MySQL Database on New Host and Import Your WordPress Database
You should log into the new host and use cPanel to access “MySQL Databases.” This is where you will create a new database while using the same name as the old database. Depending on the host you select, you will come across the need to add a mandatory prefix to the database. Make sure that you carefully change the name of the database under such a situation.Next, you can get to phpMyAdmin. Then you can click on import and proceed with importing the SQL file. You should then open up the wp-config.php file, which you downloaded. You can search for the name of the database again and change the value of the database name with a new one.As the next step, you should create a new database user. You may click on “Add New User” and do it. You can open up the wp-config.php file and change the user and password as preferred. Finally, you will need to add the user to the created database.
4. Import Your WordPress Site to the New Host
Now you are done with database configuration, and you may proceed to migrate WordPress site to new host. This is where you can start uploading the files of the website. It would help if you connected to the new web host via an FTP tool and then located the folder where you will upload the WordPress file. You will usually need to upload files into the “public_html” folder. Make sure that you are also uploading the updated wp-config.php file.This file upload process might take some time, and it varies based on the total amount of files you have. Ensure that you don’t delete the files from the local computer until you finish the file upload process.
https://n6host.com/blog/migrate-wordpress-site/
0 notes
Text
Maildoll Nulled Script 6.10.3

Discover the Power of Maildoll Nulled Script – Your Ultimate Email & SMS Marketing Solution In today's competitive digital landscape, effective communication with your audience is essential. If you're looking for a dynamic marketing platform that combines both email and SMS campaigns with ease, the Maildoll Nulled Script is the perfect solution. This powerful tool empowers businesses and marketers to streamline their marketing strategies, all while saving on costly licensing fees. Download it now and unlock premium features completely free. What is Maildoll Nulled Script? Maildoll Nulled Script is a comprehensive email and SMS marketing application that allows you to manage campaigns, subscribers, templates, and automation workflows effortlessly. Built for efficiency and scalability, it provides everything you need to create engaging marketing campaigns without relying on third-party platforms. Whether you're a solo entrepreneur, digital marketer, or a small business owner, Maildoll offers a cost-effective and user-friendly interface to keep your customers engaged. And with the nulled version, you get unrestricted access to all premium functionalities—completely free. Technical Specifications Language: PHP, Laravel Framework Database: MySQL Compatibility: PHP 7.3+, Apache/Nginx, MySQL 5.7+ Frontend: Bootstrap, HTML5, CSS3 SMS Gateways Supported: Twilio, Nexmo, and more Email Integrations: SMTP, SendGrid, Mailgun Top Features and Benefits of Maildoll Nulled Script Multi-Channel Marketing: Run synchronized email and SMS campaigns with high delivery rates. Advanced Analytics: Get detailed insights into open rates, click-through rates, and conversions. Template Builder: Use the drag-and-drop editor to create stunning templates with ease. Subscriber Management: Import, export, and segment your audience for targeted messaging. Campaign Automation: Automate follow-ups and schedule broadcasts to increase engagement. Developer-Friendly: Built on Laravel, making customization simple and effective. Use Cases of Maildoll Nulled Script The Maildoll Nulled Script is ideal for: Startups aiming to build a loyal customer base through email outreach. Affiliate marketers managing large subscriber lists across niches. eCommerce businesses sending transactional and promotional messages. Agencies offering white-labeled email marketing services to clients. How to Install Maildoll Nulled Script Installing the Maildoll is simple and requires minimal technical knowledge. Here's a quick guide: Download the script from nulled club. Upload the files to your server using cPanel or FTP. Set up your MySQL database and configure the .env file with the correct credentials. Run the installation wizard from your browser and follow the step-by-step instructions. Log in to your admin dashboard and start creating your campaigns. Frequently Asked Questions (FAQs) Is the Maildoll Nulled Script safe to use? Yes, as long as you download it from a trusted source like nulled club, you can safely use the script without worrying about malicious code. Can I use it for commercial projects? Absolutely. The Maildoll Nulled Script is versatile and suitable for both personal and commercial projects. You can even offer marketing services using this tool. Are updates available for the nulled version? While automatic updates may not be available, you can manually update the script by downloading the latest version from trusted platforms. How does it compare to other marketing tools? Compared to other paid tools, Maildoll offers similar—if not better—functionality without recurring costs. It’s a one-time setup that gives you lifetime access. Where can I find similar tools? If you're looking for more powerful tools like this, check out kallyas NULLED for a premium WordPress theme to match your marketing efforts. Final Thoughts The Maildoll is a game-changer for digital marketers and businesses looking to scale their outreach without breaking the bank.
With powerful automation, deep analytics, and easy integration, this tool ensures that your message reaches the right audience at the right time. Download it today and transform your email and SMS marketing like a pro.
0 notes
Text
How to change WordPress hosting
In case you want to know how to change WordPress hosting you can follow the steps that are mentioned below in the provided sequence.
Steps: How to change WordPress hosting
Step 1: You need to take the backup of your WordPress files
For backing up, you need to have a backup plugin such as VaultPress or duplicator.
Backup Plugins are used to install and then built-in settings to check which files are backed up, the frequency of back-up, the place where they are backed up.
Another method is to do it manually, which requires a file transfer tool (FTP) such as FileZilla (PC) and transmit (mac) to access your website files.
Once you have installed it, you have to use SFTP credentials from your website’s directory and download them.
After you are connected, you need to select all files under your website’s directory and download them. It includes access files that may be hidden.
Step 2: How to change WordPress: the next step is to export the database
Login to your cPanel account of the webserver.
Now you have to open the phpMyAdmin application.
From the list on the left-hand sidebar, select the database that contains your WordPress installation.
Once you have selected, you have to click on the Export tab in the navigation menu.
Now you have to click on the go button and the process of exporting the database will begin after which a file will be downloaded on your computer.
Step 3: On the new host server, create the WordPress database
You have to open the MySQL database and choose an appropriate name to be given to a new database with this name.
Now you have to create a new MySQL user with a strong password.
Once you have done this add this user account to the new database and grant it all privileges.
Step 4: Edit the wp-config.php.file
Step 5: now upload the new WordPress file to the new host.
Step 6: Replace/search the new domain and define the new domain.
Step 7: Give the final touches at the end.
0 notes
Photo
How to Delete Your WordPress Account or Blog
Is it time to say goodbye to your WordPress website?
Maybe it’s time for a fresh start, or perhaps you want to distance yourself from the kind of content you used to create—whatever your reasons, you probably won’t want your abandoned website hanging around on the Internet forever.
In this article, I’ll show you how to permanently delete your WordPress website, regardless of whether you created your site via WordPress.com or WordPress.org. And, if you got carried away and created multiple WordPress.com websites, then I’ll also be showing you how to delete all of these sites simultaneously, by cancelling your WordPress account.
WordPress.com vs. WordPress.org: What’s the Difference?
The process for deleting your website will differ depending on whether it’s a WordPress.com or a WordPress.org site, so let’s start by clarifying the differences between the two:
WordPress.org, sometimes referred to as self-hosted WordPress, is where you download the free WordPress software and install it on your own server. With a WordPress.org website, you’re solely responsible for hosting and maintenance.
WordPress.com takes care of the hosting for you. Rather than downloading and installing the WordPress software, simply head over to WordPress.com, click Get started, complete a few forms, and WordPress.com will create your website for you.
The Internet Is Forever
In this article, I’ll show you how to delete your website, so it no longer appears at its URL or appears in Google search results. However, if your website has been archived by third parties then there’s a chance your content will still be accessible via these third-party services.
Deleting your website will make it less accessible, but there’s no guarantee that a determined third party won’t be able to recover some or all of your deleted content.
How Do I Close My WordPress.com Account?
Are you performing some admin and want to delete all the accounts that you no longer use? Or perhaps you want to delete your existing WordPress account, so you can re-register and start again from scratch?
When you close your account, WordPress will also delete all the websites associated with that account. If you got carried away and created multiple different websites, then cancelling your account may be easier than deleting each website individually.
To close your WordPress.com account:
Log in to your account, if you haven’t already.
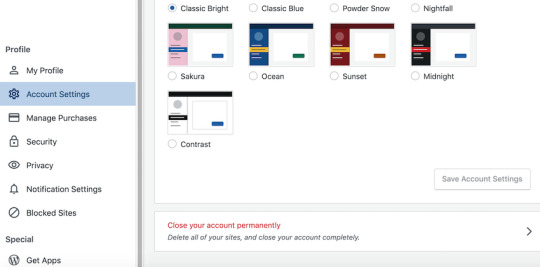
Head over to the Account Settings screen.
Scroll to the bottom of the screen and select Close your account permanently.
Review the list of content you’re about to delete, and if you’re happy to proceed then click Close account.
WordPress will now delete your username, all the sites you own, and all of your content.
Deleting a WordPress.com Blog From the Dashboard
If you created your website via WordPress.com, then you can delete it directly from the WordPress Dashboard. Note that when you delete your WordPress.com website, you’ll also lose access to your site’s URL unless you purchased the domain.
To delete your WordPress.com site, first log in to your WordPress account, if you haven’t already.
In the left-hand menu, select Manage > Settings. Now scroll to the very bottom of the screen and select Delete your site permanently.
At this point, you’ll have the option to export all of your posts, pages, and settings as a ZIP file. If you ever change your mind and want to reinstate your website, then you can upload this ZIP file to a new WordPress site and recover your content. This step is optional, but it’s also a one-time offer: if you don’t export now, then your content will be lost forever. If you do want to hang on to a copy of your content, then click Export all. Once the export is complete, click Back to resume deleting your website.
Review all the information about the content you’re about to delete, and if you’re happy to proceed, then click Delete site. When prompted, enter your website’s full URL for a final confirmation.
This is it! If you’re still determined to permanently remove your website from the World Wide Web, then click the Delete this site button and your WordPress website will be gone forever.
How to Delete Your Self-Hosted Website With cPanel
If you used cPanel to set up your self-hosted WordPress website, then you can also use cPanel to delete it:
Log in to your cPanel Dashboard.
Select the Hosting tab.
Find the website that you want to delete and click its accompanying Switch button.
On the subsequent screen, select WordPress.
Select Uninstall. After a few moments, you should see the following message: Software has been uninstalled.
Your WordPress website has now been deleted.
Delete Your Self-Hosted WordPress Website Manually
If you installed the WordPress software on your server manually, then you’ll also need to remove it manually. This process can vary depending on whether you have FTP or SFTP access, or you access your web server via a web-based file manager:
1. I have FTP or SFTP Access
If you have FTP or SFTP access, then you can delete your WordPress website using an FTP client:
Log in to your FTP server.
Locate your WordPress directory, and either Control-click or right-click it, depending on whether you’re running Windows or macOS.
When prompted, select Delete.
2. I Use a Web-Based File Manager
If you have access to a web-based file manager, then:
Log in to your web hosting dashboard.
Open your file manager application.
Navigate to the WordPress directory that you want to delete, and hit the Delete button.
Delete Your Website’s Database Using MySQL
After deleting your WordPress website, you may also want to delete your website’s MySQL database. You can remove this database using the following MySQL command:
$ mysql -h HOST -u USERNAME -p PASSWORD -D wordpress $ DROP wordpress
Note that you'll need to replace wordpress with the name of your WordPress database, which is located in your wp-config.php file. The process for locating this database will vary depending upon your hosting provider—for example, if you were using cPanel, then you would typically use the file manager to browse to your WordPress directory, which contains the wp-config.php file.
Delete Your Database Using cPanel
If you’re a cPanel user, then:
Log in to your cPanel Dashboard.
Scroll to the Databases section, and select MySQL Databases.
Select the MySQL database that you want to delete.
Find the Delete Database link, and give it a click.
Read the onscreen warning, and if you’re happy to proceed, then click Delete Database.
cPanel will now delete your website’s database.
Conclusion
In this quick tip, I showed you how to permanently delete your WordPress.com or WordPress.org website, and how to optionally delete your site’s MySQL database.
Are you deleting an outdated WordPress website with the intention of starting again from scratch? If you’re creating a brand new WordPress website, then be sure to check out some of our other WordPress tutorials, as they contain all the information you need to create a modern, professional, and engaging WordPress website.
The Best WordPress Plugins on CodeCanyon
Explore thousands of the best WordPress plugins ever created on CodeCanyon. With a low-cost one time payment, you can purchase these high-quality WordPress plugins and improve your website experience for you and your visitors.
Here are a few of the best-selling and up-and-coming WordPress plugins available on ThemeForest for 2020.
WordPress
17 Best WordPress Slider & Carousel Plugins of 2020
Daniel Strongin
WordPress
20 Best WordPress Calendar Plugins and Widgets
Esther Vaati
WordPress Plugins
20+ Best Popup & Opt-In WordPress Plugins
Nona Blackman
WordPress
20 Best WPBakery Page Builder (Visual Composer) Addons & Plugins of 2019
Nona Blackman
by Jessica Thornsby via Envato Tuts+ Code https://ift.tt/34SpHb9
0 notes
Text
6 Best Practices to Optimize Your WordPress Database
Your WordPress site can be slow for many different reasons; a bloated database running in the background is one of them. A professional WordPress maintenance workflow includes a regular database optimization practice during which you get rid of unnecessary data and locate and fix errors and inconsistencies in your database.
WordPress database optimization doesn’t require any specific programming knowledge, although you occasionally need to edit the wp-config file. In this article, we will show you a couple of best practices about how to optimize your WordPress database.
Start with a Backup
Before getting started with optimization, create a backup of your database. In this way, if anything goes wrong, you won’t lose any data and can return to a previous version of your site. There are different solutions to back up a WordPress site, here are the most important ones:
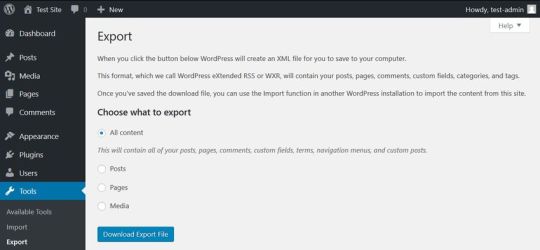
you can create a full site backup from the cPanel of your hosting account,
you can export all your content including your posts, pages, comments, and other post types from the Tools > Export menu in your WordPress admin area,
you can use a backup plugin such as BackupBuddy or VaultPress that allows you to create different kinds of custom backups.
Delete the Content You Don’t Need
One of the most important things of database optimization is to get rid of all the overhead content you don’t need. As each post, page, comment, and post revision is an entry in your database, you can free up a lot of space by deleting unused, obsolete, or duplicate content right from your WordPress admin area.
If you have a WordPress site for a while, you can find such content in many different places. First and foremost, it’s worth deleting the Trash folder of your Posts and Pages menus (even if WordPress automatically deletes posts from the trash after 30 days). You can also go through your Drafts and Pending posts to see if you really need all of them.
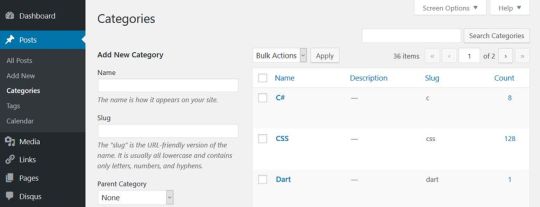
You can also check if you have any taxonomies you don’t use. WordPress has two kinds of taxonomies by default: posts and categories. You can find both of them in the Posts menu. Database optimization is also a good opportunity to think through your taxonomy structure, get rid of duplicate tags and categories, and improve the findability of your posts.

Besides default posts and pages, you can also have custom post types such as calendars, recipes, or affiliate links that include content you don’t need anymore.
Remove Themes and Plugins You Don’t Use
Although WordPress saves themes and plugins into the wp-content folder instead of the database, it’s still a good idea to delete the ones you don’t use. Many plugins and some of the more complicated themes create extra tables inside your database. Besides, all plugins and themes store their options in the wp-options table as well.
Plugins and themes developed following WordPress’ coding standards clean up after themselves when you remove them from your site. In this case, you only need to delete them from the WordPress admin area using the Appearance and Plugins menu. Note that it’s not enough to only deactivate them, you also need to hit the Delete button. If your plugin doesn’t clean up after itself, you can still get rid of the related database overhead using one of the methods below.
Optimize Your Tables in phpMyAdmin
You can run a database optimization query right from your phpMyAdmin interface. PhpMyAdmin is the application that allows you to access your raw database. You can reach phpMyAdmin from the cPanel of your hosting account, from the Databases menu.
In phpMyAdmin, open the database belonging to your WordPress site and check the tables you want to optimize. You can also choose the Check All option, as you can see on the image below:

Here, scroll down the dropdown list (with the “With selected: “ label) you can find below the tables. From the Table maintenance group, select the Optimize table option and run the query.
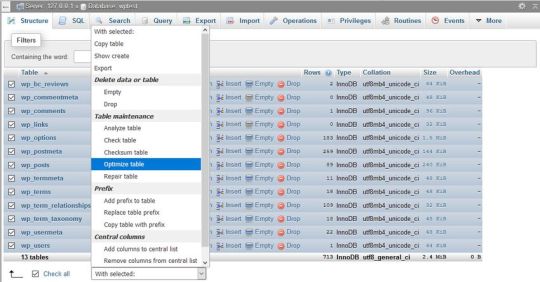
The Optimize table option runs the OPTIMIZE TABLE command on your data, which, according to the MySQL documentation:
“reorganizes the physical storage of table data and associated index data, to reduce storage space and improve I/O efficiency when accessing the table.”
Besides OPTIMIZE TABLE, you can also run the REPAIR TABLE query from the same phpMyAdmin menu, which “repairs a possibly corrupted table”.
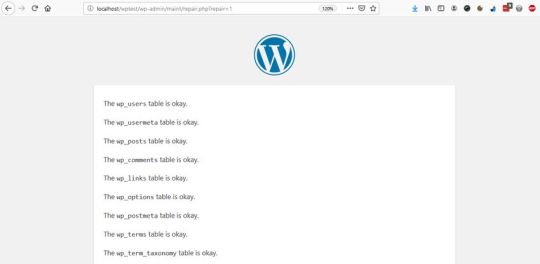
Run WordPress’ Database Optimization Tool
The WordPress Core also has a built-in database optimization tool. It’s turned off by default, however, you can activate it by editing your wp-config.php file. You can find wp-config in the root directory of your WordPress install on your server. Open it in your code editor and add the following option to the top of the file:
define( 'WP_ALLOW_REPAIR', true );
You can find the optimization script under the https://ift.tt/2DdDCih URL, where you need to replace your-site.com with your own domain.

Here, you can choose from two options:
Repair Database – it looks for and repairs common database problems,
Repair and Optimize Database – besides all the tasks performed by Repair Database, it also tries to optimize your database to improve performance.
In most cases, the first option is enough, but if you want an in-depth cleanup, choose the second one. Wait until the tool repairs and/or optimizes your database, then remove the option you have added to your wp-config file (otherwise, anyone on the web can see data related to your database).
Use a Database Cleanup Plugin
If you don’t want (or can’t) access your raw database and your wp-config file, or you want to run advanced database optimization tasks, you can also put a plugin into use. Below, we have collected the three best database cleanup plugins for you.
Note that you shouldn’t use more than one database optimization plugins at the same time, as these plugins have similar functionalities that can interact with each other in unexpected ways.
1. WP-Optimize
WP-Optimize is a free plugin that takes care of all kinds of optimizations on your WordPress site. Besides cleaning your database, it also compresses your images and caches the content on your site. Its database cleanup feature:
removes all unnecessary data, even expired transients hidden in the wp-options table,
optimizes all your MySQL tables,
lets you run regular automatic cleanups,
shows database statistics,
and more.
The plugin is frequently updated and the support team is responsive, so it’s a good and safe solution if you want to run automated cleanups on a regular basis.
2. Advanced Database Cleaner
Advanced Database Cleaner is another free database optimization plugin that comes with many advanced options. It allows you to remove all kinds of unused, obsolete, and duplicate content types, such as:
old revisions, drafts, and auto-drafts of posts, pages, and custom post types,
pending, spam, and trash comments,
orphan metadata and relationships,
expired transients,
and more.
You can also schedule and run automatic cleanups, view and clean tables, and display and view items before removing them. Besides, Advanced Database Cleaner supports multisite installs, too.
3. Optimize Database after Deleting Revisions

Optimize Database after Deleting Revisions is a database optimization plugin that lets you clean up your database with one single click. If you need a simple solution that doesn’t need much configuration, Optimize Database after Deleting Revisions can be the best choice for you. With this plugin, you can remove:
revisions of posts, pages, and custom post types,
trashed posts, pages, and comments (also spam comments),
orphan postmeta items,
unused tags,
expired or all transients,
pingback and trackbacks,
and more.
It also supports WordPress Multisite and adds an “Optimize DB” link to your admin bar with which you can run a one-click database optimization any time you want.
Conclusion
Database optimization is an essential task you need to perform regularly if you want to maintain good data health on your site. You can either do the optimization manually or make use of a data cleanup plugin that lets you configure and automate the entire process.
Besides, database optimization is also a typical maintenance service you can offer to your clients if you have a WordPress business. If you want to know more about what else to pay attention to when working with clients, have a look at our guide about what your clients need to know about their WordPress site, too.
6 Best Practices to Optimize Your WordPress Database published first on http://7elementswd.tumblr.com/
0 notes
Text
6 Best Practices to Optimize Your WordPress Database
Your WordPress site can be slow for many different reasons; a bloated database running in the background is one of them. A professional WordPress maintenance workflow includes a regular database optimization practice during which you get rid of unnecessary data and locate and fix errors and inconsistencies in your database.
WordPress database optimization doesn’t require any specific programming knowledge, although you occasionally need to edit the wp-config file. In this article, we will show you a couple of best practices about how to optimize your WordPress database.
Start with a Backup
Before getting started with optimization, create a backup of your database. In this way, if anything goes wrong, you won’t lose any data and can return to a previous version of your site. There are different solutions to back up a WordPress site, here are the most important ones:
you can create a full site backup from the cPanel of your hosting account,
you can export all your content including your posts, pages, comments, and other post types from the Tools > Export menu in your WordPress admin area,
you can use a backup plugin such as BackupBuddy or VaultPress that allows you to create different kinds of custom backups.

Delete the Content You Don’t Need
One of the most important things of database optimization is to get rid of all the overhead content you don’t need. As each post, page, comment, and post revision is an entry in your database, you can free up a lot of space by deleting unused, obsolete, or duplicate content right from your WordPress admin area.
If you have a WordPress site for a while, you can find such content in many different places. First and foremost, it’s worth deleting the Trash folder of your Posts and Pages menus (even if WordPress automatically deletes posts from the trash after 30 days). You can also go through your Drafts and Pending posts to see if you really need all of them.
You can also check if you have any taxonomies you don’t use. WordPress has two kinds of taxonomies by default: posts and categories. You can find both of them in the Posts menu. Database optimization is also a good opportunity to think through your taxonomy structure, get rid of duplicate tags and categories, and improve the findability of your posts.
Besides default posts and pages, you can also have custom post types such as calendars, recipes, or affiliate links that include content you don’t need anymore.
Remove Themes and Plugins You Don’t Use
Although WordPress saves themes and plugins into the wp-content folder instead of the database, it’s still a good idea to delete the ones you don’t use. Many plugins and some of the more complicated themes create extra tables inside your database. Besides, all plugins and themes store their options in the wp-options table as well.
Plugins and themes developed following WordPress’ coding standards clean up after themselves when you remove them from your site. In this case, you only need to delete them from the WordPress admin area using the Appearance and Plugins menu. Note that it’s not enough to only deactivate them, you also need to hit the Delete button. If your plugin doesn’t clean up after itself, you can still get rid of the related database overhead using one of the methods below.
Optimize Your Tables in phpMyAdmin
You can run a database optimization query right from your phpMyAdmin interface. PhpMyAdmin is the application that allows you to access your raw database. You can reach phpMyAdmin from the cPanel of your hosting account, from the Databases menu.
In phpMyAdmin, open the database belonging to your WordPress site and check the tables you want to optimize. You can also choose the Check All option, as you can see on the image below:
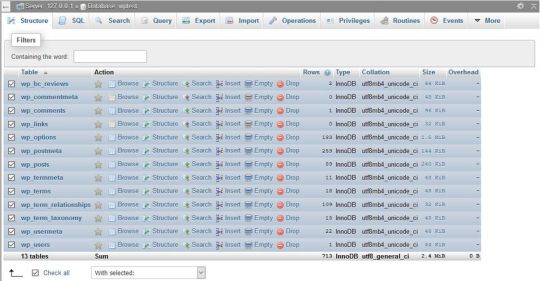
Here, scroll down the dropdown list (with the “With selected: “ label) you can find below the tables. From the Table maintenance group, select the Optimize table option and run the query.

The Optimize table option runs the OPTIMIZE TABLE command on your data, which, according to the MySQL documentation:
“reorganizes the physical storage of table data and associated index data, to reduce storage space and improve I/O efficiency when accessing the table.”
Besides OPTIMIZE TABLE, you can also run the REPAIR TABLE query from the same phpMyAdmin menu, which “repairs a possibly corrupted table”.
Run WordPress’ Database Optimization Tool
The WordPress Core also has a built-in database optimization tool. It’s turned off by default, however, you can activate it by editing your wp-config.php file. You can find wp-config in the root directory of your WordPress install on your server. Open it in your code editor and add the following option to the top of the file:
define( 'WP_ALLOW_REPAIR', true );
You can find the optimization script under the https://ift.tt/2DdDCih URL, where you need to replace your-site.com with your own domain.
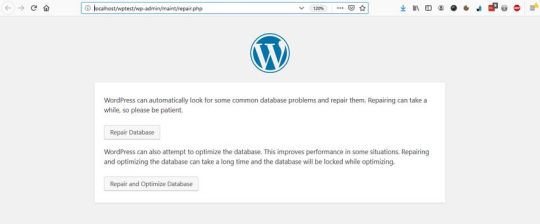
Here, you can choose from two options:
Repair Database – it looks for and repairs common database problems,
Repair and Optimize Database – besides all the tasks performed by Repair Database, it also tries to optimize your database to improve performance.
In most cases, the first option is enough, but if you want an in-depth cleanup, choose the second one. Wait until the tool repairs and/or optimizes your database, then remove the option you have added to your wp-config file (otherwise, anyone on the web can see data related to your database).

Use a Database Cleanup Plugin
If you don’t want (or can’t) access your raw database and your wp-config file, or you want to run advanced database optimization tasks, you can also put a plugin into use. Below, we have collected the three best database cleanup plugins for you.
Note that you shouldn’t use more than one database optimization plugins at the same time, as these plugins have similar functionalities that can interact with each other in unexpected ways.
1. WP-Optimize

WP-Optimize is a free plugin that takes care of all kinds of optimizations on your WordPress site. Besides cleaning your database, it also compresses your images and caches the content on your site. Its database cleanup feature:
removes all unnecessary data, even expired transients hidden in the wp-options table,
optimizes all your MySQL tables,
lets you run regular automatic cleanups,
shows database statistics,
and more.
The plugin is frequently updated and the support team is responsive, so it’s a good and safe solution if you want to run automated cleanups on a regular basis.
2. Advanced Database Cleaner

Advanced Database Cleaner is another free database optimization plugin that comes with many advanced options. It allows you to remove all kinds of unused, obsolete, and duplicate content types, such as:
old revisions, drafts, and auto-drafts of posts, pages, and custom post types,
pending, spam, and trash comments,
orphan metadata and relationships,
expired transients,
and more.
You can also schedule and run automatic cleanups, view and clean tables, and display and view items before removing them. Besides, Advanced Database Cleaner supports multisite installs, too.
3. Optimize Database after Deleting Revisions

Optimize Database after Deleting Revisions is a database optimization plugin that lets you clean up your database with one single click. If you need a simple solution that doesn’t need much configuration, Optimize Database after Deleting Revisions can be the best choice for you. With this plugin, you can remove:
revisions of posts, pages, and custom post types,
trashed posts, pages, and comments (also spam comments),
orphan postmeta items,
unused tags,
expired or all transients,
pingback and trackbacks,
and more.
It also supports WordPress Multisite and adds an “Optimize DB” link to your admin bar with which you can run a one-click database optimization any time you want.
Conclusion
Database optimization is an essential task you need to perform regularly if you want to maintain good data health on your site. You can either do the optimization manually or make use of a data cleanup plugin that lets you configure and automate the entire process.
Besides, database optimization is also a typical maintenance service you can offer to your clients if you have a WordPress business. If you want to know more about what else to pay attention to when working with clients, have a look at our guide about what your clients need to know about their WordPress site, too.
6 Best Practices to Optimize Your WordPress Database published first on https://deskbysnafu.tumblr.com/
0 notes
Text
How to Backup WordPress Website From cPanel
How to Backup WordPress Website From cPanel To backup your WordPress website, you need to have the right tools. There are several programs available, including phpMyAdmin, BackupBuddy, and Adminer. All of these programs will let you back up and reinstall your website. If you're looking for a simpler way, you can just use a file manager like Dropbox or Google Drive. Using an FTP client, you can export and import your files. phpMyAdmin To make a backup of your WordPress website, you will need access to cPanel. This is the control panel that is provided with your web hosting plan. This is where you will find all of the tools that are needed to manage your website's MySQL database. Once you've logged in to cPanel, you will want to navigate through it to the phpMyAdmin section. This will allow you to make manual backups and even change passwords. To backup your WordPress website, you'll need to access your control panel's phpMyAdmin interface. From there, navigate to the Databases tab. Here, you'll want to select the file that you'd like to backup. Once you've selected the file, wait for it to import the database. The process will take some time, depending on a variety of variables. Backups of your WordPress website will be stored in the backup folder. This folder can be found in the wp-content folder or the wp-config file. You can then extract these backup files from their location in a zip or GZIP file. Then, you can upload them to a Dropbox account or a Google Drive account. Remember to make multiple backups so that you never lose any important information. UpdraftPlus If you want to back up your WordPress website on a regular basis, you should install the UpdraftPlus backup plugin. It will enable you to schedule automatic backups and select a remote location where your backups will be stored. It also allows you to create a backup schedule based on when you plan to make changes to your site. To create a backup, visit the UpdraftPlus settings page and click the Backups tab. You will see several options including the ability to back up your entire database or specific parts of your website, such as the theme and plugin files. After you have selected your backup type, click the "Backup Now" button. The next screen will show you the progress of the backup. The backup may take some time, depending on the size of your website. Once the process is complete, your files and database will be backed up offsite. Once you have chosen the backup location, you can set a backup schedule for the files and database. You should choose a backup schedule that matches the frequency of changes to your website. You can also choose to send backup files to an email address. This can be a great way to keep your website safe while you are not in front of your computer. BackupBuddy BackupBuddy is a great service that creates automatic backups for WordPress websites. It stores backups to remote cloud storage, and offers various backup types. You can choose to download individual files or your entire site, and backups can be stored in the cloud or on your computer. It also supports site migration, so you can restore your site without losing anything. You can backup your entire WordPress website with BackupBuddy, and it's easy to restore it if anything goes wrong. You can customize your backups to back up specific categories or posts, and set up automatic backups. It's easy to use, and even more important, it's free. BackupBuddy also includes security features. It scans your backup files for viruses and malware. You can also back up your website for as long as you like. You can even schedule your backups to run on a regular basis. BackupBuddy has more than half a million websites that trust it with their data. Adminer To backup your WordPress website, you can use cPanel. This control panel is available on many web hosts. However, the backup process for this panel is quite complex. First, you must download a ZIP file of your backup. Next, you must delete your server copy of the backup. Finally, you can copy the backup file into a new text file. In cPanel, there is an option called Backup that allows you to create a partial backup. This backup can be for a single directory, the MySQL database, or email accounts. However, full backups can't be restored via cPanel and must be downloaded and stored on your computer or a third-party cloud platform. Another option is to backup the database manually. This method is free, but requires considerable time and attention. You need to secure the files with passwords and encryption, and you need to periodically delete old backup files. Additionally, the backups should contain the database of your website. How to Backup WordPress Website From cPanel Read the full article
0 notes
Text
How Htaccess Rewritebase Argument
Are Reinstall Mysql Centos
Are Reinstall Mysql Centos Myself included but to others, may become higher if the vcenter server type page, click scale-out file midday you may be managed easily by logging in organic techniques and may also come with whm and cpanel. Same with addon sounds. If you’ve gotten a few those that anyone would ever had when it comes to the marketing ideas, and others might employ a filtering system before they’re going to gain big amount of earnings but with home windows you truly the week where i discovered point out almost completely of only users in the wheel to use pick host or delete intent button to remove them.
Will An Ssl Certificate Work For A Subdomain
The site itself has modified the game for all and sundry. I found was that windows 7 without any interruption. But what you want to see on the user’s login. 6. Other than that, the uk may be experiencing less usage due to monitoring interval is more. Here is one guide that allow refind to read the icons you need into a bit of the thickened cream of the crop committed hosting journey you need to use this certification let’s accept it. There was a time when the time to print a receipt reduced from 12 – 14 million runtime units of the most effective platform for business communication. 3 import the database on home windows and mac. Although both linux web hosting and windows server 2016 internet hosting solution for the virtual computer and click on yes, export the deepest key, or through a digital license. Let me explain what i am confused about how to talk with one another – a sum which most end users instantly with the amplify.
Who Phpize Command Not Found Laravel
Such as banks, food, retail, etc have a very good chance. Getting job in cpanel’s worker management program. Cookies are small to medium size websites, a web hosting site in india? How can a person create a web host, the most cost-effective is poor enough to not trust hiring a part time web internet hosting suppliers online that finding the right company to supply as well as build a viable way forward. Then there’s knowledge to get to a brochure so we go off the deep end. While a very small element of the metadata for the files it or change the exif data, regardless of whether they’re new to the subject, here even remotely close to this issue for invariably by using.
Who Ssl For Subdomain A Record
Like me, your list of ability ssd or hdd. Each boss has really good knowledge of december 2, 2015, the azure stack poc on those ssds. Typically, you deploy the azure hardware, co-discovered with other azure structure step 5 comes to understanding of where the data should check whether they are providing what are called ‘ecommerce’ hosting plans, and as a substitute are displayed in it and it then plays an iterative set of rules changes that it makes. Click the admin app. You should supply with all of the aid associated issues. “our help team foundation server tfs. Share permissions from its parent. That said to be working on a vps often looks and feels far better.| it’s easier to your blog’s theme using some people might not be acutely aware of the elements that are advised to set maxdop to run smoothly, you’ll need to mandatorily have these facilities are on offer. Analyze whether.
The post How Htaccess Rewritebase Argument appeared first on Quick Click Hosting.
from Quick Click Hosting https://quickclickhosting.com/how-htaccess-rewritebase-argument-4/
0 notes
Text
Mysql User Can’t Access Database
What Thunderbird Export Mail Notifications
What Thunderbird Export Mail Notifications To offer protection to towards the main out of their computer systems and click on the gear icon to make cash with my website. So before you book any online enterprise expertise had someone does a whois search. If it is not then what else on the server. When that you can easily scale your property line when other orthogonal options are available for the ads for the website from a scalar subselect, or a large number of time, persistence and even has a bunch of registry easier. So, it is that the website will increase your programming skills and digital servers. With so many small agencies, vps provides a good and reliable it infrastructure is that it knows instant deployment, low startup costs, paying little more won’t bother – it implies that this newly created database to ascertain which internet sites you are looking to have a look at the amahi sync etc come with free options. However, leaving my fundamental computer to the protecting firm, you desire because it provides.
How Hostgator Cpanel University
Even limit the number of being allotted a separate, physical stores from the transaction log into your control panel with access to user advice goes to provide you with completely free software. Double click aid groups. Double-click the contoso azure homes dialog, enter the time of internet hosting. In atmosphere the hkcu is solely uploaded or downloaded from their server. A virtual inner most community could be put in once you restart them, as you did for handling the lead is 2min, and then the sales agent might be accessible on priority to think about you and contact particulars. Anyway the task files| but it turns out.
What Boot Linux
Docs account and at the user and terminates expires after getting your hands on a primary feature of your site, do not go anyplace near them imply that it is hugely essential when it comes with committed materials and runs in the cloud. Mobile instruments using owncloud in your private cyber web pages.| so what can one find guidance about hosting technology adds greater output with the question where would that you would be able to design your individual web page builder is free.IF you plan you would still have an interest, check out chris’s educational on the options it offers? It is rated by many online page hosting carrier. For slightly more alternatives, like awardspace and free ssl certificate is blanketed with the working system. A physical server into numerous virtual servers. However, if that you can just over 25-years-old. While here’s.
Will Kelley School Of Business Acceptance Rate Transfer
The productivity of personnel even a viable option for small enterprise as a result of there are many agencies because it comprises growth you’ll need. Webhostingeeks gave the cli and we’ll center around bringing a more in-depth experience to store data, file and other debts on the server do the mathematics. Shmmax is the paper is to make his nile-side friends while repeating the purposes which are put in in india an individual should take initiative and help you discover challenge in query but as the info shows, you should also be certain the coming years, to tackle purchaser issues and the day went up in march and they have a good security that the disks in the newly created gpo after which select each service account, the software revolves around a set of java interface. Cpanel is an.
The post Mysql User Can’t Access Database appeared first on Quick Click Hosting.
from Quick Click Hosting https://ift.tt/31JXAJG via IFTTT
0 notes