#How to fix wp error
Explore tagged Tumblr posts
Visit Tumblr Blog
Explore Tumblr blogs with no restrictions, modern design and the best experience.
Last Seen Tumblr Blogs


Fun Fact
There were a total of 171.5 billion posts on Tumblr in 2019.
Text
A Good Rule of Thumb: Too Clever is Dumb
Sooo, I am going through the site, post by post, to make sure everything is legible. Got about 100 left to go. But, here's the deal, my custom reusable blocks, which WordPress is so proud to offer... Aren't.
It's the updates. It's a year's worth of updates since I designed most of them, to WP and to the third party blocks that hafta keep up with it. Milo's cards don't really work anymore, nor do my existing accordions - although the the template still works on the latter if I stamp out a whole new block, the accordions weren't as complicated.
There wouldn't be as much of a problem if I could make a post and never, ever open it in the editor again, ha-ha, but that's not how I roll. So, while I am fixing colours and minor formatting errors, I am experiencing an occasional crashed block. I haven't killed any of Milo's cards yet, but the template doesn't work to make new ones, so it's inevitable.
First, I am correcting for legibility. But, eventually, I will have to go back around and redo the cards, and probably the Liner Notes, and other random stuff. I'll have to pick a new card format before I post the next instalment, because there's a card in it. I might end up going way more simple with no font or graphics at all - I'm having trouble with the theme fonts overriding the card fonts. Or else I'll hafta go back to images, which is less accessible and won't work with the dark mode. I know probably nobody's willing to put up with my work via a screen reader, but I'm trying not to be an asshole, just in case, ya know?
Well, tl;dr, I believed WordPress about a thing and made more work for myself. If grouped in a complex structure, Gutenberg's reusable blocks aren't reusable. Depending on complexity, you got about a year, then you gotta remake them all over again.
Beyond that: Since Discuz started dropping updates of untested compatibility, the SPOILER tags don't work anymore! There are spoiler-heavy comments now. I might be able to fix it, but in the meantime, NEW READERS (if any) BEWARE THE COMMENTS.
12 notes
·
View notes
Text
It may sound contradictory considering my profession, but if your description only says you are a digital marketer, I will block you immediately.
I am a web developer. I facilitate digital marketing in my day job, I don't need it invading my personal life and projects, even if the stuff I do for pleasure might be interesting to digital marketers.
If you too are a person first, that's fine. I'm just saying that no one needs accounts that only link over to seo optimized blog posts regurgitating the same incorrect interpretations of Google's latest guidelines about content or core web vitals that everyone else is sharing.
We care about optimized media delivery here. Tell me how you solve problems like filling out the length bar of audio and video tags while waiting for the media meta data to come in off the server. Do you roll your own data caches in addition to the same 4 WordPress plugins that everyone uses? Are you running on PHP 8.2 even though WP support for it is only in beta and not all plugins have fixed their compatibility errors?
#I'm interested in concrete solutions#SEO is nebulous and full of grifters who don't actually have first hand data for what they're doing
3 notes
·
View notes
Text
Missed Schedule Post Error | missed schedule wordpress
How to Fix the Missed Schedule Post Error in WordPress: A Comprehensive Guide(WPExperts) Table Of Contents Introduction Understanding the Missed Schedule Post Error Importance of Scheduled Posts in WordPress Common Causes of the Missed Schedule Error WP-Cron Limitations Plugin Conflicts Incorrect Timezone Settings Caching Issues Low Memory Limits Checking and Correcting Timezone…
0 notes
Link
0 notes
Text
Troubleshooting Common WordPress Errors – Easy Fixes
WordPress is a popular platform, but users often face common errors. Knowing how to fix them can save time and frustration.
One common issue is the White Screen of Death (WSOD), where your site turns blank. This may be due to a plugin or theme conflict. Deactivating plugins or switching to a default theme can help. Another issue is the Internal Server Error, often caused by a corrupt .htaccess file. Renaming the file and refreshing your site can fix it.
Users may also face the Error Establishing a Database Connection if database credentials are incorrect. Updating them in the wp-config.php file usually solves the problem.
Other errors include 404 Page Not Found, memory limit issues, and stuck updates. Fixing permalinks, increasing PHP memory, or manually updating WordPress can resolve these. Keeping WordPress, themes, and plugins updated helps prevent many errors. Regular backups and security scans also protect your site. Read this blog for a detailed insight into the topic.
0 notes
Text
youtube
How to fix Briefly unavailable for scheduled maintenance, please check back in a minute error in wordpress 20025 ?
The "Briefly unavailable for scheduled maintenance. Please check back in a minute." error in WordPress usually occurs when an update is interrupted or incomplete. Here's how to fix it:
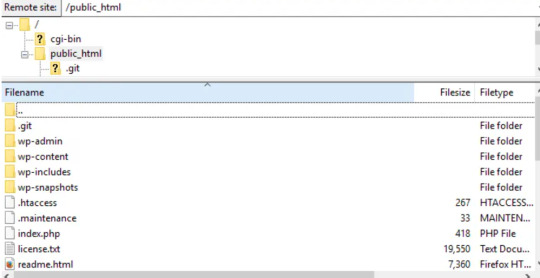
1. Delete the .maintenance File
WordPress creates a temporary .maintenance file in the root directory during updates. If the update fails or gets stuck, this file isn't removed, causing the error.
Steps to Fix:
Access Your Website via FTP or File Manager
Use an FTP client like FileZilla or log in to your cPanel and open the File Manager.
Locate the Root Directory
Navigate to the public_html or the folder where your WordPress site is installed.
Find and Delete the .maintenance File
If you don’t see the file, enable "Show Hidden Files" in your file manager settings.
Reload Your Website
Your site should be back online.
2. Manually Complete or Restart the Update
If the issue persists, your update may not have finished properly.
Steps to Fix:
Go to the wp-content/upgrade Folder
Delete any files inside this folder.
Manually Update WordPress, Themes, or Plugins
If a plugin or theme update was interrupted, go to your WordPress Dashboard > Plugins or Appearance > Themes and retry the update.
3. Disable Plugins (If the Error Persists)
If your site still shows the error:
Rename the plugins Folder via FTP
Go to wp-content/ and rename the plugins folder to plugins-old.
Check if your site loads. If it does, a plugin caused the issue.
Rename the folder back and activate plugins one by one to find the culprit.
4. Check File Permissions
Incorrect file permissions can cause WordPress to fail during updates.
Correct Permissions:
Files: 644
Folders: 755
You can adjust these via your File Manager or an FTP client.
5. Increase PHP Memory Limit (If Updates Are Failing)
If the update was interrupted due to low memory:
Edit wp-config.php
Add the following line:phpCopyEditdefine('WP_MEMORY_LIMIT', '256M');
Save the file and try reloading the website.
Final Step: Clear Cache
If your website is still showing the maintenance message after following the above steps:
Clear your browser cache and WordPress cache (if using a caching plugin like WP Rocket or W3 Total Cache).
0 notes
Text
WP 301 Redirects Lifetime Deal: Boost Your SEO & Fix Broken Links Effortlessly

If you're managing a WordPress website, handling broken links, outdated URLs, and SEO Redirections can be a hassle. WP 301 Redirects is a powerful plugin designed to simplify this process, ensuring your website visitors always land on the right page while improving your search engine rankings. With the WP 301 Redirects Lifetime Deal, you get access to all the premium features of the plugin for a one-time payment, saving you from recurring subscription fees.
Key Features of WP 301 Redirects
Automatic Redirects:
Effortlessly fix 404 errors and broken links by automatically redirecting users to the correct pages.
SEO-Friendly Redirects:
Implement 301 (permanent) and 302 (temporary) redirects to maintain your website’s search engine rankings.
Comprehensive Dashboard:
Manage all your redirects, track traffic, and monitor 404 errors from an intuitive dashboard.
Bulk Redirect Management:
Easily set up bulk redirects to streamline large-scale website migrations or content restructures.
Import/Export Options:
Transfer redirect settings between sites with ease using the import/export feature.
Google Analytics Integration:
Track redirection performance and analyze visitor data without needing additional plugins.
Security & Performance Optimization:
Prevent malicious bots and incorrect redirects that could harm your SEO efforts.
Benefits of the WP 301 Redirects Lifetime Deal
One-Time Payment: Enjoy lifetime access without worrying about monthly or yearly fees.
Continuous Updates: Stay updated with the latest features and improvements at no extra cost.
Lifetime Support: Get premium support whenever you need assistance with redirect management.
Cost-Effective Solution: Ideal for businesses, agencies, and webmasters looking to optimize their websites affordably.
Who Can Benefit from WP 301 Redirects?
Bloggers and content creators looking to redirect old posts.
E-commerce store owners fixing outdated product pages.
Agencies managing multiple client websites.
Businesses undergoing website migrations or rebranding.
How to Grab the WP 301 Redirects Lifetime Deal?
To take advantage of the WP 301 Redirects Lifetime Deal, visit their official website or popular deal platforms like AppSumo, where lifetime deals are often offered at discounted rates. Make sure to check the features and plan details before purchasing to ensure it fits your needs.
Conclusion
The WP 301 Redirects Lifetime Deal is a must-have for anyone looking to enhance website performance, fix broken links, and improve SEO without recurring costs. Don’t miss the chance to secure this valuable tool for a one-time investment and keep your website optimized for years to come.
0 notes
Text
How to Move Your WordPress Site from Localhost to a Live Server
Developing a WordPress site on localhost is a great way to build and test your website in a controlled environment. However, the real challenge arises when it's time to move the site from your local server to a live hosting environment. If not done correctly, you could encounter broken links, missing images, or even database errors.
In this blog, we'll guide you through a step-by-step process to successfully move your WordPress site from localhost to a live server.

Step 1: Choose the Right Hosting Provider
Your first step is to select a reliable web hosting provider that meets your website’s needs. Look for:
Server Speed: Fast servers for better performance.
Uptime Guarantee: At least 99.9% uptime to ensure availability.
Ease of Use: User-friendly dashboards and tools.
WordPress Support: Hosting optimized for WordPress websites.
Popular options include Bluehost, SiteGround, and WP Engine.
Step 2: Export Your Local WordPress Database
The database is the backbone of your WordPress site. To export it:
Open phpMyAdmin on your local server (e.g., XAMPP or WAMP).
Select your WordPress database.
Click on the Export tab and choose the Quick Export method.
Save the .sql file to your computer.
Step 3: Upload Your WordPress Files to the Live Server
To move your files:
Compress Your WordPress Folder: Zip your local WordPress installation folder.
Access Your Hosting Account: Use a file manager or an FTP client like FileZilla.
Upload the Files: Transfer the zipped folder to your hosting server's root directory (usually public_html).
Unzip the Folder: Extract the files once uploaded.
Step 4: Create a Database on the Live Server
Now, set up a new database on your live hosting server:
Log in to your hosting control panel (e.g., cPanel).
Navigate to the MySQL Databases section.
Create a new database, database user, and password.
Assign the user to the database with full privileges.
Step 5: Import the Database to the Live Server
Open phpMyAdmin in your hosting control panel.
Select the new database you created.
Click the Import tab.
Choose the .sql file you exported from your localhost.
Click Go to import the database.
Step 6: Update the wp-config.php File
To connect your site to the live database:
Locate the wp-config.php file in your WordPress installation.
Open the file in a text editor.
Update the following lines: define('DB_NAME', 'your_live_database_name'); define('DB_USER', 'your_live_database_user'); define('DB_PASSWORD', 'your_live_database_password'); define('DB_HOST', 'localhost'); // Keep this unless your host specifies otherwise.
Save the file and upload it to your server via FTP.
Step 7: Update URLs in the Database
Your localhost URLs need to be replaced with your live site URLs.
Use a tool like Search Replace DB or run SQL queries in phpMyAdmin.
In phpMyAdmin, run the following query: UPDATE wp_options SET option_value = 'http://your-live-site.com' WHERE option_name = 'siteurl'; UPDATE wp_options SET option_value = 'http://your-live-site.com' WHERE option_name = 'home';
Step 8: Test Your Live Website
Once everything is uploaded and configured, check your website by entering its URL in a browser. Test for:
Broken Links: Fix them using plugins like Broken Link Checker.
Missing Images: Ensure media files were uploaded correctly.
Functionality: Verify forms, buttons, and features work as expected.
Step 9: Set Up Permalinks
To ensure proper URL structure:
Log in to your WordPress admin dashboard on the live site.
Go to Settings > Permalinks.
Choose your preferred permalink structure and click Save Changes.
Step 10: Secure Your Live Website
After migrating, secure your site to prevent vulnerabilities:
Install an SSL Certificate: Most hosting providers offer free SSL certificates.
Update Plugins and Themes: Ensure everything is up to date.
Set Up Backups: Use plugins like UpdraftPlus for regular backups.
Conclusion
Moving your WordPress site from localhost to a live server may seem daunting, but by following these steps, you can ensure a smooth and error-free migration. A successful move allows you to showcase your site to the world, engage your audience, and achieve your goals.
Start today and take your WordPress project live with confidence!
0 notes
Text
Most Common Medical Billing Errors and How to Fix Them
Medical billing errors can profoundly affect payment delays, revenue loss and legal issues. Understand the most common billing errors and how to fix them to ensure accurate billing and compliance with regulations. In this blog post, Med Revolve provides a simple guide regarding the most common medical billing errors and how to fix them.
Here are some of the most common medical billing errors:
1. Incorrect Patient Information:
A typical billing error is entering incorrect patient information, such as name, date of birth or insurance details. This can lead to claim denials and delays in payment. To avoid this error, verify patient information before submitting claims and update records regularly. Implementing a system to verify patient information before claim submission can help reduce errors and improve accuracy.
2. Upcoding or Unbundling:
Upcoding is the practice of billing for a more severe condition or procedure that was carried out. In contrast, unbundling involves billing distinct procedures separately rather than as a package. Both practices can result in overbilling and are considered a scam. Use accurate and specific medical codes that reflect the services provided to avoid these errors. Regular training on coding guidelines can help billing staff understand the importance of correct coding.
3. Duplicate Billing:
When a provider bills for the same service or treatment more than once, it is known as duplicate billing. This can happen due to technical issues or human error. Duplicate billing can lead to claim denials and payment delays. To avoid this error, implement checks to ensure that each claim is unique and has not been billed before. Regular audits of billing processes can help identify and correct duplicate billing errors.
4. Lack of Documentation:
Insufficient or incomplete documentation of services provided can result in claim denials. Proper documentation is essential for accurate billing and compensation. To avoid this error, ensure all services provided are thoroughly documented and the documentation meets the payer’s requirements. Providing staff training on documentation standards can help improve documentation accuracy.
5. Failure to Verify Insurance Coverage:
When treatments are provided without first confirming a patient’s insurance coverage, it may result in payment delays and claim rejections. Verifying insurance eligibility and coverage details before rendering services is necessary to avoid billing errors. Implementing a process to verify insurance coverage at the time of service can help avoid billing errors related to insurance coverage.
6. Incorrect Coding:
Using incorrect medical codes for procedures or services can result in claim denials and payment delays. It is essential to use the most up-to-date and accurate codes. Regular training and updates on coding practices can help avoid this error. Implementing a coding review process can also help ensure coding accuracy and reduce errors.
7. Failure to Submit Claims Timely:
Late submission of claims can result in delayed payments and a loss of revenue. It is important to submit claims quickly to avoid these issues. Implementing a system to track and submit claims on time can help avoid this error. Setting up reminders and deadlines for claim submission can help ensure timely submission.
8. Ignoring Claim Rejections:
Ignoring claim rejections can result in loss of revenue and billing errors. It is essential to resolve claim rejections immediately. Regularly review rejected claims, identify the reasons for rejection and take corrective actions to avoid similar rejections in the future. Implementing a process to track and manage claim rejections can help reduce billing errors and improve revenue cycle management.
https://medrevolvebilling.com/wp-content/uploads/2024/12/confident-adult-slavic-female-doctor-medical-robe-with-stethoscope-sitting-desk-with-office-tools-holding-file-folder-looking-side-isolated-purple-background-with-copy-space_141793-105223.jpg
Best Techniques To Avoid Medical Billing Errors
1. Verify Patient Information:
Ensure all patient details, like name, date of birth and insurance information, are accurate and current. Regularly checking this data can avoid billing mistakes. Implementing a system to double-check patient information before claim submission can help reduce errors and improve accuracy.
2. Use Electronic Health Records (EHR):
Implementing an EHR system can optimize billing processes and reduce errors. EHRs help in the accurate documentation and coding of services provided. They also organize patient information, reducing errors related to data management.
3. Conduct Regular Audits:
Perform routine audits of your billing processes to identify and rectify errors. This enhances billing accuracy and ensures compliance with regulations. Audits should focus on coding accuracy, documentation completeness and claim submission processes.
4. Stay Informed About Coding Changes:
Stay updated with changes in medical coding and billing guidelines. Regularly review updates from relevant authorities to ensure adherence to current practices. Subscribing to coding newsletters and attending workshops can help you stay informed.
5. Verify Insurance Coverage:
Always verify a patient’s insurance coverage before providing services. This prevents claim denials and payment delays. Establishing a process to verify insurance eligibility and coverage details can reduce errors related to insurance billing.
6. Use Clear and Concise Documentation:
Document all services provided clearly and concisely. Proper documentation supports accurate billing and reduces errors. Utilize standardized templates for documentation and include all relevant information, such as diagnosis, treatment provided and patient demographics.
Conclusion
Med Revolve emphasizes the importance of resolving common medical billing errors. By implementing best practices and staying informed, healthcare providers can ensure accurate billing, compliance and improved revenue cycle management.
READ MORE: https://medrevolvebilling.com/most-common-medical-billing-errors-and-how-to-fix-them/
0 notes
Text
What role do STEM programs play in developing critical thinking skills?
https://makersmuse.in/wp-content/uploads/2024/12/IMG_20241112_105452-scaled.jpg
In today’s rapidly evolving world, the ability to think critically is more essential than ever. Critical thinking helps students analyze information, solve complex problems, and make informed decisions. One of the most effective ways to nurture this skill is through STEM (Science, Technology, Engineering, and Mathematics) programs. These programs provide students with the tools to approach challenges from multiple perspectives, fostering creativity, problem-solving, and logical reasoning. Let’s explore how STEM programs play a pivotal role in developing critical thinking skills.
1. Hands-On Learning and Problem-Solving
STEM programs encourage students to apply what they’ve learned in real-world contexts. Rather than passively receiving information, they are actively involved in hands-on projects and experiments. This type of experiential learning requires students to observe, analyze, and evaluate different variables, leading to critical thinking. Whether it’s designing a bridge in an engineering challenge or coding a program in a computer science project, STEM activities require students to think through problems step by step, often with trial and error. This iterative process enhances their problem-solving abilities, a crucial component of critical thinking.
2. Encouraging Curiosity and Inquiry
A core tenet of STEM is fostering curiosity. STEM programs encourage students to ask questions, explore concepts, and seek out solutions. When students are prompted to explore topics beyond the surface level, they begin to develop an inquisitive mindset. Critical thinking thrives when students learn how to ask the right questions and approach problems from different angles. By engaging in inquiry-based learning, students are not only absorbing information but also evaluating, questioning, and challenging existing ideas.
3. Collaboration and Communication
Critical thinking doesn’t happen in isolation. STEM programs often require collaboration, whether through group projects or teamwork in scientific experiments. Working with others helps students learn to discuss ideas, consider alternative viewpoints, and compromise. As students articulate their thought processes and listen to others, they refine their ability to analyze and reason. Group work fosters a deeper understanding of how to evaluate multiple perspectives, an essential aspect of critical thinking.
4. Structured Thinking and Logical Reasoning
STEM programs emphasize structured thinking. In math and science, students learn to break down complex problems into manageable steps. Engineering challenges teach students how to approach problems systematically and use logic to find solutions. This process of logical reasoning helps students organize their thoughts, evaluate evidence, and come to well-founded conclusions. These skills are transferable to other areas of life, empowering students to make informed decisions and think critically in diverse situations.
5. Failure as a Learning Opportunity
One of the most valuable aspects of STEM education is the opportunity to fail and learn from mistakes. In many STEM activities, students will encounter setbacks or challenges. Instead of being discouraged by failure, students are encouraged to view it as a learning opportunity. This mindset helps students develop resilience and the ability to re-evaluate their approach. By analyzing what went wrong and how to fix it, students refine their critical thinking and develop perseverance in the face of challenges.
6. Connection to Real-World Issues
STEM programs often involve projects that tackle real-world problems. Whether designing a sustainable energy solution or exploring medical advancements, STEM allows students to see how their learning connects to the world around them. This relevance inspires students to think critically about how science, technology, engineering, and math intersect with societal needs. By considering the implications of their work, students learn to evaluate potential outcomes and make decisions that are both logical and ethical.
7. Developing Analytical Skills
In STEM programs, students are tasked with collecting and analyzing data. Whether conducting a scientific experiment, analyzing data sets, or testing a hypothesis, students develop the ability to evaluate information critically. They learn how to differentiate between facts and assumptions, recognize patterns, and use evidence to draw conclusions. These analytical skills are at the heart of critical thinking, as students learn to assess situations, identify key factors, and make informed judgments.
Ready to boost critical thinking skills in your students? Explore our STEM programs today!
STEM programs provide an invaluable foundation for developing critical thinking skills. By encouraging hands-on learning, fostering curiosity, promoting collaboration, and emphasizing logical reasoning, these programs help students develop the cognitive tools needed to approach problems in a thoughtful and analytical manner. As students engage with STEM activities, they not only build knowledge but also strengthen their ability to think critically, making them better prepared to navigate the complexities of the modern world.
At Makers’ Muse, our STEM programs are designed to inspire students to think creatively, challenge their assumptions, and cultivate a lifelong passion for learning. Through engaging projects and real-world applications, we equip students with the skills they need to succeed in an ever-changing global landscape.
0 notes
Text
Essential WordPress Website Maintenance: The Complete Guide
Running a WordPress website is an ongoing commitment that requires regular care and attention. Neglecting maintenance can lead to security vulnerabilities, performance issues, and a subpar user experience. To establish and sustain a thriving online presence, investing in WordPress website maintenance services is not optional—it's essential.
Whether you are a business owner, blogger, or digital marketer, understanding the importance of WordPress maintenance and how to choose the right website maintenance package is critical. This guide outlines everything you need to know about maintaining your WordPress website and selecting the best services for your needs.

Why is WordPress Website Maintenance Important?
WordPress websites need regular updates and optimizations. Here's why maintenance is vital:
1. Security Enhancements
WordPress powers a significant percentage of websites globally, making it a frequent target for cyberattacks. Regular updates and proactive security measures help safeguard your site from malware, hacking attempts, and data breaches. Maintenance services ensure your core files, themes, and plugins are always updated with the latest security patches.
2. Improved Performance and Speed
A well-maintained website offers better performance, faster load times, and a smoother user experience. These factors also contribute to higher search engine rankings. Speed optimization is a key part of keeping your site competitive in today’s digital landscape.
3. Bug Fixes and Error Resolution
Issues like broken links, plugin conflicts, and 404 errors can disrupt your website’s functionality. Regular maintenance identifies and resolves these problems, ensuring a seamless experience for users.
4. SEO Optimization
Search engines reward websites that are regularly updated and well-maintained. Maintenance includes tasks such as fixing technical issues, improving mobile usability, and optimizing content—all of which enhance your site’s visibility in search results.
5. Backups and Data Protection
Routine backups are your safety net against accidental deletions or cyberattacks. Reliable maintenance services include automated backups, ensuring your data is secure and easily restorable when needed.
Key Elements of WordPress Website Maintenance
Effective maintenance encompasses various activities designed to keep your site secure, functional, and up to date.
1. Core, Theme, and Plugin Updates
Updating your WordPress core, themes, and plugins is essential to maintain compatibility, add new features, and fix security vulnerabilities.
2. Security Scans and Monitoring
Regular security scans and monitoring help detect malware, suspicious activities, and potential threats. Proactive surveillance ensures your website remains secure.
3. Performance Optimization
Techniques such as caching, image compression, and database cleanup improve your site’s speed and overall performance.
4. Database Management
Over time, unnecessary data accumulates in your WordPress database, slowing down your site. Regular database optimization keeps your site efficient.
5. Content Updates
Refreshing outdated content and adding new resources keep your website relevant and engaging for visitors.
6. Backup and Restoration
Automated backups ensure you can quickly restore your site to a functional state if something goes wrong.
7. Technical SEO Audits
From fixing broken links to optimizing meta tags, regular SEO audits ensure your website maintains its search engine rankings and delivers a superior user experience.
WP Web Maintenance Packages: What to Look For
Choosing the right WordPress website maintenance package can be daunting. Here are the key features to consider:
1. Scope of Services
A comprehensive package should include updates, security monitoring, performance optimization, and regular backups. Additional features like content updates and SEO audits are valuable for more complex sites.
2. Customizability
Your website is unique, so your maintenance plan should be tailored to its specific requirements—whether it’s a blog, e-commerce store, or corporate site.
3. Support and Availability
Reliable support is crucial. Look for services that offer 24/7 assistance or flexible hours to address any issues promptly.
4. Backup Frequency
Depending on how often you update your site, you may need daily or weekly backups. Choose a service that aligns with your content update frequency.
5. Reporting and Analytics
Regular reports detailing uptime, performance improvements, and security alerts provide transparency and help you track the value of your investment.
Benefits of Investing in Website Maintenance Services
Saves Time: Outsourcing maintenance frees you to focus on growing your business.
Cost-Effective: Preventative measures save money compared to fixing major issues after they occur.
Peace of Mind: Professional services handle updates, backups, and troubleshooting, reducing stress.
Enhanced User Experience: A well-maintained website keeps users engaged and encourages return visits.
Types of WordPress Website Maintenance Services
Basic Package: Includes core updates, basic security scans, and scheduled backups. Ideal for small blogs or websites with minimal traffic.
Standard Package: Adds performance optimization, advanced security, and content updates. Suitable for medium-sized websites.
Premium Package: Offers full-scale services, including SEO audits and detailed reporting. Perfect for e-commerce platforms or high-traffic sites.
Custom Package: Tailored services based on your site’s unique requirements, such as WooCommerce support or API integrations.
Tips for Choosing the Right WordPress Maintenance Service
Read Reviews: Look for testimonials and case studies to evaluate the provider's track record.
Check for Scalability: Ensure the service can grow with your site’s needs.
Verify Compatibility: Confirm that the provider is experienced with your specific WordPress setup.
Conclusion
Maintaining a WordPress website is essential for its long-term success. Investing in reliable WP maintenance services protects your site, improves performance, and ensures a better user experience. By selecting the right package for your needs, you can safeguard your online presence and achieve your business goals.
A well-maintained WordPress website is not just a digital asset—it’s a competitive advantage. Prioritize regular maintenance and enjoy the benefits of a secure, efficient, and engaging platform.
youtube
0 notes
Text
WordPress Drama Explained (and How it May Affect Your Website)
WordPress is a widely-used platform for websites. It powers millions of websites globally. However, recent drama has caused concern among users. This article will explain the situation and its possible impact. We will also show how WP Tangerine, a top WordPress Development Agency, can help.

What is the WordPress Drama?
WordPress is open-source software. That means it’s managed by a community of developers. Recently, disagreements within this community surfaced. These issues involve decisions about features, leadership, and priorities.
Some developers feel their input is ignored. Others are unhappy with the focus on certain features. This internal conflict is creating tension. The drama may slow updates and create inconsistencies in development. For website owners, this raises concerns.
How the Drama May Impact Your Website?
If you rely on WordPress, this drama could affect you. Potential impacts include slower updates and security issues.
1. Delayed Updates
WordPress regularly releases updates. These include new features and fixes for bugs. Delays in updates can leave websites vulnerable. Outdated websites risk security threats and performance problems.
2. Plugin and Theme Compatibility
WordPress plugins and themes rely on compatibility with the core software. Conflicts may arise during this drama. Plugin developers might face difficulties staying updated. This could cause website errors.
3. Reduced Community Support
The WordPress community is known for its helpfulness. Ongoing conflicts could discourage contributors. This might lead to reduced support and fewer resources for users.
How WP Tangerine Can Help?
WP Tangerine is a trusted WordPress Development Agency. They specialize in creating and maintaining WordPress websites. Their team of WordPress Expert ensures your website runs smoothly.
1. Reliable WordPress Support
WP Tangerine offers exceptional WordPress Support. They handle updates, fix bugs, and resolve compatibility issues. With their help, you can avoid problems caused by delayed updates.
2. Professional WordPress Website Design
Their team creates stunning and functional designs. A professional WordPress Website Design boosts user experience. WP Tangerine ensures your website looks modern and runs efficiently.
3. Expert WordPress Consultant Services
WP Tangerine provides top-notch WordPress Consultant services. They guide you through decisions about plugins, themes, and features. This ensures your website aligns with your business goals.
4. Secure and Reliable WordPress Services
WP Tangerine offers comprehensive WordPress Services. They focus on security, performance, and user satisfaction. Their proactive approach minimizes risks for website owners.
Steps to Protect Your Website During This Drama
While WordPress resolves its issues, you can take steps to safeguard your site.
1. Partner with a WordPress Expert
A WordPress Expert can handle technical issues for you. WP Tangerine’s team ensures your website stays updated and secure.
2. Regular Backups
Back up your website regularly. This protects your data in case of unexpected issues. WP Tangerine offers reliable backup services.
3. Monitor Plugin and Theme Updates
Check plugins and themes for updates frequently. This prevents compatibility problems. WP Tangerine handles this for their clients.
4. Invest in Professional WordPress Services
Using professional WordPress Services gives you peace of mind. WP Tangerine monitors and maintains your website.
Why WP Tangerine is the Best WordPress Development Agency?
WP Tangerine stands out in the industry. Their expertise and dedication to clients are unmatched. They understand the importance of a reliable website.
Experience: Years of experience in WordPress make them a leader.
Customization: Tailored solutions meet your business needs.
Customer Support: Prompt and friendly support ensures client satisfaction.
The Future of WordPress
The WordPress drama is being addressed. Leaders in the community are working to resolve conflicts. However, the future remains uncertain. Businesses need to stay prepared.
Partnering with a trusted WordPress Consultant like WP Tangerine is the best strategy. Their expertise helps you navigate challenges and protect your website.
Conclusion
The WordPress drama may seem alarming. But with the right support, your website can remain safe. WP Tangerine offers expert WordPress Support to keep your site secure and functional. Their WordPress Services ensure your website is always up-to-date. Trust WP Tangerine, the leading WordPress Development Agency, to handle your WordPress needs.
Stay ahead of potential issues by investing in professional support today. For more details, contact WP Tangerine, the ultimate WordPress Consultant.
#WP Tangerine#WordPress Website Design#WordPress Development Agency#WordPress Services#WordPress Consultant#WordPress Support#WordPress Expert#WordPress
1 note
·
View note
Text
Simple Steps to Resetting Your WordPress Site

If your WordPress site isn’t functioning properly or you want a fresh start, resetting it might be your best option. For a detailed breakdown of the process, how to reset a WordPress site offers everything you need.
In this post, we’ll explore why you might want to reset your site and provide simple instructions for how to do it.
Why Reset Your WordPress Site?
Here are a few reasons you might want to reset your WordPress site:
Starting over: Resetting allows you to rebuild your site from scratch.
Resolving persistent issues: If your site is plagued by errors or conflicts, resetting may fix them.
Creating a test environment: Developers can use resets to test different themes or plugins.
Step-by-Step Guide to Resetting Your WordPress Site
1. Backup First
Before resetting, back up your site’s data using plugins like BackupBuddy or UpdraftPlus.
2. Install the WP Reset Plugin
The easiest way to reset your site is by using the WP Reset plugin:
Go to Plugins > Add New in the dashboard.
Search for "WP Reset."
Install and activate the plugin.
3. Reset the Site
Once the plugin is activated:
Go to Tools > WP Reset.
Type "reset" in the confirmation box and click Reset Site.
Your site will be reset, but themes and plugins will remain installed, although deactivated.
What Happens Post-Reset?
After resetting:
All content (posts, pages) is deleted.
Plugins and themes are still available but deactivated.
WordPress settings are restored to default.
Alternative Options
Instead of a full reset, you might:
Restore a previous version from a backup.
Manually clean up unused plugins, themes, and content.
Conclusion
With the help of the WP Reset plugin, resetting your WordPress site is a quick and simple process. Be sure to back up your data beforehand to avoid losing anything important!
1 note
·
View note
Text
WP Safelink Plugin 5.0.4 with License Key - Client Version for AdlinkFly
https://themesfores.com/product/wp-safelink-plugin-with-license-key-66445/ Requirements : PHP v8.2 and Ioncube v13.0 intl ioncube_loader Supported Hosting: 👉Hostinger Extra Discount: https://bit.ly/47lUH3R 👉Verpex 90% off: https://bit.ly/3QLMrFm 👉Cloudways (40% Discount): https://bit.ly/3eU0bgP Improve Your Earning and Drive More Traffic with WP Safelink free license key In addition to boosting your website’s security, WP Safelink Plugin can also help improve your SEO and drive more traffic to your site. By optimizing your links with this plugin, you can increase your website’s visibility on search engines and attract more organic traffic. Here are some of the SEO benefits of using the WP Safelink WordPress Plugin: Automatically generate SEO-friendly links for your website Customize your links with your own keywords for better search engine rankings Track your link clicks and analyze your traffic with detailed reports Improve your website’s overall performance and user engagement Subheading 3: Monetize Your Links and Earn More Revenue with WP Safelink Plugin WP Safelink Plugin also comes with advanced monetization features that allow you to earn more revenue from your links. With AdlinkFly integration, you can easily monetize your links and track your earnings with detailed reports. Here are some of the monetization benefits of using WP Safelink Plugin: Integrate seamlessly with AdlinkFly and other link monetization platforms Customize your ad types and placements for maximum revenue Monitor your earnings and optimize your ad performance with detailed reports Increase your revenue stream and monetize your website’s traffic WP Safelink 5.0.4 with License Key – Client Version for AdlinkFly WP Safelink – Converter Your Download Link to Adsense – Converter Your Download Link to Adsense Solution for those of you who have a downloadable blog but want to install Adsense on a blog that violates the Adsense policy. WP Safelink WordPress Plugins are the solution to the problem you are experiencing right now. Increase Your Adsense Earnings with “WP Safelink” Features: Auto Generate Link Manual Generate Link New Short&Long Generate Link Counter View & Click Three Permalink Anti Adblock New Unlimited Redirect Page Loop New Adlinkfly Integration New WP Safelink Client WP Safelink – Converter Your Download Link to Adsense Unlimited Domain License You can use many domains to use our unlimited products. Premium Grup Support. Don’t worry, you are a beginner because we will help you in the premium support group. Free Update Lifetime Get the latest plugin updates without having to pay back. Please note that any digital products presented on this website do not contain malicious code, viruses, or advertising. For License Key: products are functional without entering a product license code. We are unable to provide a license code for you, and it’s because we already obtain the Plugin/Theme to the original developer. The use of a license code usually is for automatic updates and premium support from the original developer. Besides, we guarantee you to deliver a free manual update and minor assistance for your convenience of using the product. Refund Policy: If the plugin or theme is not working properly and we also fail to help you then, in that case, you will get the money back. If the plugin and theme are working properly then you will not get the money back. How to fix “style.css missing” error while uploading themes? A common issue that can occur with users new to installing WordPress themes is a “Broken theme and/or stylesheets missing” error message being displayed when trying to upload or activate the theme. This is because the theme download package on ThemeForest includes additional files to the theme such as the documentation, license etc. https://themesfores.com/product/wp-safelink-plugin-with-license-key-66445/ #WordPressThemesandPluginWithLicenceKey
0 notes
Text
How to Reset Your WordPress Site and Start Fresh

Resetting your WordPress site can be a game-changer when you're facing persistent issues, need a design overhaul, or want to clear out old content. Knowing how to reset WordPress site is a valuable skill for anyone managing a website. This guide will walk you through the steps to reset your WordPress site and start fresh, ensuring you can begin anew with a clean slate.
Reasons to Reset Your WordPress Site
Before diving into the reset process, it’s essential to understand why resetting might be necessary:
Resolving Persistent Issues: Fixing problems caused by plugin conflicts, theme issues, or custom code errors.
Design Overhaul: Implementing a new theme or design without the baggage of old configurations.
Content Cleanup: Removing outdated or irrelevant posts, pages, and comments.
Testing New Features: Providing a clean slate for testing new plugins or features.
Enhancing Performance: Improving site speed by removing excess data.
Steps to Reset Your WordPress Site
Backup Your DataBefore resetting, ensure you have a complete backup of your data. This can be done using plugins like UpdraftPlus or manually via your hosting provider. Backing up ensures you can restore your site if needed.
Install a Reset PluginTo reset your WordPress site, you'll need a plugin like WP Reset or Advanced WordPress Reset. These plugins simplify the reset process and make it safe.
Activate and Configure the PluginOnce installed, activate the plugin and navigate to its settings. Here, you can configure the reset process, including options to retain specific data if needed.
Perform the ResetFollow the plugin’s instructions to complete the reset. This typically involves a few clicks and a confirmation step to ensure you want to proceed. The plugin will then reset your site to its default state.
Reinstall Themes and PluginsAfter the reset, reinstall your preferred themes and plugins. This is also an ideal time to update everything to the latest versions to avoid future conflicts and issues. To ensure you’re doing this right, you might want to learn how to reset WordPress site effectively.
Restore Backup (if needed)If you want to retain specific data, you can selectively restore parts of your backup. This might include posts, pages, or settings that you don't want to lose.
Midway through the reset process, it’s crucial to ensure all necessary precautions are followed, like backing up your data and carefully choosing what to reinstall. Understanding how to reset WordPress site effectively can save you a lot of time and effort.
0 notes
Text
How to Fix "WordPress JQuery is Not Defined" Error?

Today, approximately 80% of websites run on jQuery, if your wordpress website is one of them, you might encounter the “Uncaught ReferenceError: jQuery is not defined” error at some point. This error message indicates that your website can’t call a function from the jQuery JavaScript library. This may cause one or multiple website elements to stop running. Luckily there are multiple methods to fix this common issue.
In this comprehensive tutorial, we will go through the methods to do so for WordPress users.
What Is the “jQuery Is Not Defined” Error in Wordpress?
“jQuery is not defined” error in wordpress is a common error that occurs when a website calls for a jQuery function before the library loads properly but the jQuery.com JavaScript library is unavailable or isn’t functioning correctly. It is caused possibly due to conflicting plugins, a corrupted jQuery file, a blocked CDN, or your JavaScript code loads incorrectly.”
It can crash your wordpress website because of corrupted WordPress’s plugins or jQuery files, hosting issues, or CDN problems. Simply, your website can’t communicate with its library because of broken or conflicting code.
Key Reasons of the “jQuery Is Not Defined Error”
This error in WordPress is pretty common. Here are some key reasons of this issue:
Corrupted WP Themes or Plugins
Errors with JavaScript or jQuery file
JavaScript Running Incorrectly
Blocked CDN-hosted jQuery
Poor Performing Host
What are Negative Impacts of this Error on Website?
A "jQuery is Not Defined" error in WordPress can impose some negative effects on your website's functionality and user experience:
Broken Functionality of Site
Affects User Experience
Increased Bounce Rate
Negative Impact on SEO
Loss of Revenue
Loss of Brand Value
Damage Site Authority
How To Fix the “Uncaught Reference Error: jQuery Is Not Defined” WordPress Error
Before starting fixing the error, create a site backup if something goes wrong. Setting automated backups is recommended. Beyond this, we also recommend running any changes you make to your site through a staging environment. Don’t make any changes to your live website while troubleshooting. Finally, ensure you have access to an FTP or File Transfer Protocol client. This program helps you edit code behind the scenes, and you can get login details from your host.
Remember, if you don’t have the time to fix this error yourself or if you should just prefer expert support, you can skip ahead and contact Supportfly.
1. Check jQuery is Included
Firstly, check that your website code includes a jQuery library. WordPress typically installs this for you. Right-click anywhere on your web page and select “View Page Source” to open the source code.
Now find the code that makes up your page. From here, press CTRL+F on Windows or CMD+F keys on Mac to open a search bar.
Search for “jquery.min.js.” The phrase should appear in the code if your website has a library installed. If it doesn’t appear, check the Network tab of your browser’s dev tools to see if you notice any jQuery takes being loaded. In your root folder, typically in “public_html,” look for a folder called “wp-includes”.
Open “wp-includes” and then open the file named “script-loader.php.” Now in the source code, search for a line that starts with “wp_enqueue_script.” and after the word “script” in this phrase paste the below given bold lines-
wp_enqueue_script( ‘tt-mobile-menu’, get_template_directory_uri() .
‘/js/mobile-menu.js’, array(‘jquery’), ‘1.0’, true );
In WordPress you can do this all using Plugin. You can add code to your site using this plugin without editing text files.
Go back to your website and see if the problem is resolved.
2. Check jQuery is loading correctly
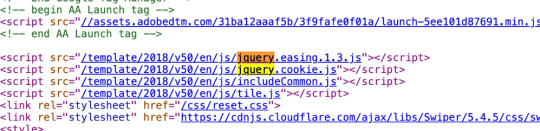
Now, we need to check, jQuery file is loading as expected. To start, right-click anywhere on your web page and select “View Page Source.” and search for queries in the code that start with “<script src=” and include “jquery” in the same lines.
If you see lines in the code matching this description, it’s likely loading correctly. Now move to the next step if you can’t see any matches.
3. Add a snippet to wp-config.php File
Still, if the above given ways don't work, you need to edit your website’s configurations. Look for the wp-config.php file in your root folder.
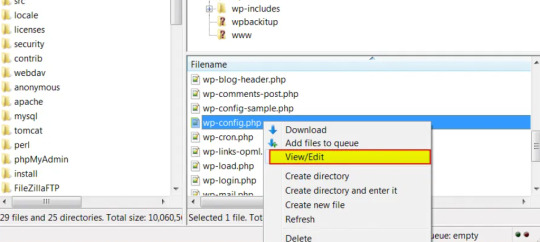
Right-click on the webpage anywhere and download the file to your preferred drive so you have a manual backup, and open the file in your root folder to begin editing.
Now, find the following line:
/* That’s all, stop editing! Happy blogging. */
Paste the following above that line:
/** Absolute path to the WordPress directory. */
if ( !defined(‘ABSPATH’) )
define(‘ABSPATH’, dirname(__FILE__) . ‘/’);
define(‘CONCATENATE_SCRIPTS’, false);
You just defined the ABSPATH, which will help your website to recognize that jQuery is cavailable. Save the file and try to reload your website.
4. Set up Google-hosted jQuery with an alternate fallback
A CDN, or Content Delivery Network, might be to blame for your jQuery woes. This is a series of networked servers that speed up WordPress but can sometimes cause functionality issues if it goes down unexpectedly. So, it’s worth setting up a Google-based jQuery you can fall back on now and in the future. To do this, you add the following code:
// Fall back to a local copy of jQuery if the CDN fails
<script>
window.jQuery||document.write(‘<script src=”mysite.com/wp-content/themes/my_theme/js/query.min.js”><\script>’))
</script>
Save, and check your site once again.
5. Manually add the jQuery Library to header.php
If step four didn’t resolve the error, try adding the jQuery library manually. Head to Google Hosted Libraries. Here, copy the code snippet for the latest version of jQuery from the link above, for example, the snippet listed under “3.x snippet.”:
<script src=”https://ajax.googleapis.com/ajax/libs/jquery/3.7.1/jquery.min.js”></script>
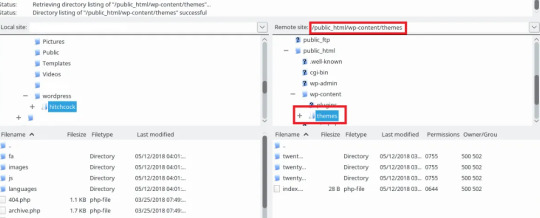
Now, find the marked folder “wp-content” in your root folder “public_html”, then go to the “Themes”, then the folder marked with the name of the theme you’re using.
In this theme folder, you should see the header.php file. Right-click and save this to your usual drive, and open the version in FTP. Then, paste the snippet below the tag marked, save, and try to re-access your site.
Conclusion
In conclusion, jQuery is one of the most common errors occurring in wordpress sites. In this tutorial we have explained about what “jQuery is not defined” is, some of the key reasons for this error and some methods of fixing this error that will definitely help you to fix this error. Nevertheless you are not able to resolve the "jQuery is Not Defined" error in WordPress. It can extend the time your visitors have to wait for your WordPress page to load. Fortunately, with some code editing, fixing the WordPress admin jQuery error is simpler than you might expect.
Muddling around with code may be a bit daunting, especially if you need to make changes to your theme’s functions.php file. So if you’re unsure about making potentially harmful changes to your site, it’s best to contact a wordpress expert.
Contact Supportfly and hire an expert team for WordPress Management services to boost your website performance. We provide Premier Wordpress Management services to run your website on WordPress successfully.
0 notes