#HowToFix
Explore tagged Tumblr posts
Visit Tumblr Blog
Explore Tumblr blogs with no restrictions, modern design and the best experience.
Last Seen Tumblr Blogs


Fun Fact
Forty percent of Tumblr users are between the ages of 18 to 25.
Text

We made an awesome epoxy table! #Shorts


#家具デザイン研究室#outdoors#5minutecraft#5minutecrafts#5minutecraftsmen#campinghacks#fixing#homerepair#howtofix#howtorepair#minorrepairs#outdoorcooking#woodworking#repair#Howtomake#repairing#5minutescraft#shorts#camp#tofix#camping#torepair
0 notes
Text
#HowToFix#GoogleAds#AdsAccountIssue#FixGoogleAds#GoogleAdsPromotion#AdAccountFix#GoogleAdsHelp#FixPromotionIssue#AdsAccountError#GoogleAdsSupport#AdsFix#PromotionTroubleshooting#GoogleAdsTips#FixGoogleAdsProblems#AdAccountSupport#GoogleAdsCampaign#AdsPromotion#GoogleAdsManagement#AdIssueResolution#AdsTroubleshooting#FixAdsAccount#GoogleAdsSolutions#PromotionProblems#GoogleAdsTroubleshoot#FixAdCampaign#GoogleAdsOptimization#AdAccountProblems#GoogleAdsTipsAndTricks#FixGoogleAccount#AdsCampaignFix
0 notes
Text
How to Replace a Dryer Thermal Fuse
youtube
A dryer thermal fuse is a safety device designed to protect the dryer from overheating. It is a small, heat-sensitive component that is typically located in the dryer's heating system or airflow path. The primary function of the thermal fuse is to open the electrical circuit and shut off power to the dryer if it detects excessively high temperatures. The thermal fuse is designed to open the circuit and cut off power to the dryer when it reaches a specific temperature threshold. This threshold is typically lower than the normal operating temperature of the dryer, ensuring that it only activates in the case of overheating.
0 notes
Text
8 Best Ways To Fix Your Keyboard Not Working Issues
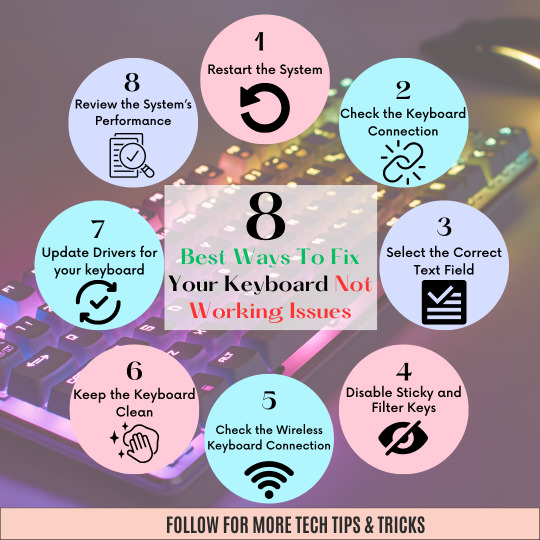
🤔Is your keyboard acting up?💻😰Don't panic!😨
🎱🔧We've got you covered with our top 8 solutions to get your typing back on track🛤
👉🚀From checking for hardware issues��to adjusting your settings📝we've got all the tips you need to get your keyboard working like new again🌟
👋Say goodbye to typing frustrations and hello to smooth sailing with our handy guide📚🤘
#keyboard#techtips#fixityourself#computerhelp#howtofix#technologyproblems#techlife#keyboardproblems#keyboardnotworking#laptopfix#computerrepair#techtutorial#needhelp#frustratedwithtechnology
0 notes
Text

Common Makeup Mistakes and How to Fix Them
Makeup is a wonderful way to enhance your natural beauty, express your personality, and boost your confidence. However, sometimes makeup can also go wrong and make you look less than your best. Whether you are a beginner or a pro, you may have made some of these common makeup mistakes at some point. Don't worry, though, because there are easy ways to fix them and prevent them from happening again. Here are some of the most common makeup mistakes and how to fix them.
1. Not prepping your skin properly. One of the most important steps in makeup application is to prepare your skin first. This means cleansing, toning, moisturizing, and using a primer if needed. Prepping your skin will ensure a smooth and flawless makeup application, as well as help your makeup last longer and look more natural. If you skip this step, your makeup may look cakey, patchy, or uneven, and it may also clog your pores and cause breakouts. To fix this mistake, always start with a clean and hydrated face, and use a primer that suits your skin type and concerns. A primer will create a smooth canvas for your makeup, fill in pores and fine lines, and help control oil and shine.
2. Using the wrong foundation shade or undertone. Another common makeup mistake is to use a foundation that does not match your skin tone or undertone. This can make your face look too light, too dark, too pink, or too yellow, and create a noticeable contrast with your neck and chest. To fix this mistake, always test your foundation on your jawline, not on your hand or wrist, and check it in natural light. You should also know your undertone, which is the subtle hue that shows through your skin. There are three main undertones: warm (yellow, golden, or peachy), cool (pink, red, or bluish), and neutral (a mix of both). Your foundation should match both your skin tone and your undertone for a seamless and natural look.
3. Applying too much or too little product. Another common makeup mistake is to apply too much or too little product, which can affect the balance and harmony of your makeup. For example, applying too much powder can make your skin look dry and dull, while applying too little blush can make you look pale and washed out. To fix this mistake, always start with a small amount of product and build it up gradually until you achieve the desired effect. You can also use a light hand and a fluffy brush to apply powder, and a stippling or tapping motion to apply blush, bronzer, and highlighter. This will help you avoid overloading your skin with product and create a more natural and blended look.
4. Not blending properly. Blending is one of the most essential skills in makeup, as it helps create a smooth and seamless transition between colors and textures. However, many people make the mistake of not blending enough or blending too much, which can result in harsh lines, muddy colors, or a lack of definition. To fix this mistake, always use the right tools and techniques for blending. For example, use a fluffy blending brush for eyeshadow, a damp sponge for foundation and concealer, and a clean brush for blush and bronzer. You should also blend in small circular motions, and use a light pressure and a back-and-forth motion. You can also use a clean tissue or cotton pad to wipe off any excess product or fallout.
5. Using the wrong colors or products for your features. Another common makeup mistake is to use colors or products that do not suit your features, such as your eye color, eye shape, face shape, or skin type. For example, using a dark or smoky eyeshadow on small or hooded eyes can make them look smaller and more closed, while using a matte lipstick on dry or chapped lips can make them look more cracked and flaky. To fix this mistake, always choose colors and products that enhance your features, not hide them. For example, use a light or shimmery eyeshadow on small or hooded eyes to make them look bigger and more open, and use a moisturizing or glossy lipstick on dry or chapped lips to make them look more plump and smooth. You can also use a color wheel to find complementary colors for your eye color, such as purple for green eyes, or orange for blue eyes.
These are some of the most common makeup mistakes and how to fix them. By following these tips, you can avoid these mistakes and achieve a flawless and beautiful makeup look every time.
#beauty#makeup#skin#hair#nails#lipstick#eyelashes#makeuptutorial#makeupartist#skincare#makeupmistakes#howtofix
0 notes
Text
youtube
[Hindi] | How to Download and Install AMD - Xilinx ISE v14.7 on Windows 11/10 for free |Step-by-Step
Welcome to our step-by-step tutorial on how to download and install Xilinx ISE for free. In this video, we will guide you through the entire process, ensuring a seamless installation experience. Xilinx ISE offers a comprehensive suite of tools for FPGA (Field-Programmable Gate Array) design, making it a must-have for electronic engineers and enthusiasts. By following our tutorial, you will have access to this powerful software in no time.
Subscribe to "Learn And Grow Community"
YouTube : https://www.youtube.com/@LearnAndGrowCommunity
LinkedIn Group : linkedin.com/company/LearnAndGrowCommunity
Blog : https://LearnAndGrowCommunity.blogspot.com/
Facebook : https://www.facebook.com/JoinLearnAndGrowCommunity/
Twitter Handle : https://twitter.com/LNG_Community
DailyMotion : https://www.dailymotion.com/LearnAndGrowCommunity
Instagram Handle : https://www.instagram.com/LearnAndGrowCommunity/
Follow #LearnAndGrowCommunity
#XilinxISE#DownloadFreeSoftware#FPGA#FieldProgrammableGateArray#SoftwareInstallation#FPGADesign#XilinxTutorials#ISEInstallation#vhdltutorial#vhdl#vhdlprogramming#verilog#veriloghdl#verilogtutorial#fpgadesign#howtodownload#howtofix#installation#installationguide#simulationsoftware#synthesis#HDLSoftware#learnandgrow#Youtube
1 note
·
View note
Text
youtube
In this comprehensive troubleshooting guide, we provide expert solutions to fix the dreaded "there has been a critical error on this website" issue. If you're encountering this error on your website and don't know where to begin, you've come to the right place!
We understand the frustration and urgency that comes with encountering critical errors on websites. In our step-by-step tutorial, we will walk you through various methods to diagnose and resolve this issue, ensuring your website gets back up and running smoothly in no time.
Our troubleshooting techniques cover a range of possibilities, including theme, plugin, or server-related conflicts that could lead to the critical error. We'll guide you in disabling problematic themes and plugins, checking for compatibility issues, and even identifying errors within your website's code.
Furthermore, we'll shed light on common critical error triggers, empowering you with the knowledge needed to prevent them from occurring in the future. We'll discuss best practices to maintain a secure and error-free website, ensuring your visitors always have a smooth browsing experience.
Join us in this engaging and informative tutorial as we demystify the process of troubleshooting and fixing critical errors on websites. Don't let technical glitches hold you back – conquer the 'Critical Error' challenge and enhance your website's functionality!
Subscribe to our channel for more valuable videos on website maintenance, optimization, and troubleshooting. Stay ahead of the curve with our expert tips and tricks.
Don't let critical errors disrupt your online presence – watch our troubleshooting guide now and say goodbye to website issues once and for all!
#troubleshooting#fixingwebsites#criticalerror#websitetroubleshooting#websitefix#howtofix#websiteerror#websitesupport#techsupport#webdevelopment#webdesign#weberrors#websiteissues#websiteproblems#websitetricks#webtech#errorfixing#websitehelp#weberrorsolution#weberrorfixing#Youtube
0 notes
Text
🔧 5 Simple Ways to Fix Location Expired iPhone — A Quick Fix Guide

Are you constantly getting the frustrating “Location Expired” error on your iPhone? You’re not alone — and the fix is easier than you think.
Here are 5 tried-and-tested solutions to help you resolve the issue in minutes:
Reset Your Network Settings — This can fix hidden connectivity issues.
Check Your Location Services — Make sure everything is toggled correctly.
Update Your iOS — Sometimes, bugs are fixed with a simple update.
Restart Your iPhone — A quick reboot often resolves location errors.
Toggle Location Sharing — Turning it off and back on refreshes the system.
📍 These steps will help you confidently solve how to fix location expired iPhone errors without stress.
🧠 Bonus Tip: Stay updated and review your settings regularly to prevent it from happening again.
📲 Read the full guide here: How to Fix Location Expired iPhone
#FixLocationExpired #iPhoneTips #iOSSupport #TechSolutions #DigitalFix #iPhoneErrors #MobileHelp #HowToFix #SmartphoneHacks #AppleSupport #TechTricks #ProductivityTools #Cellphoneclub
#iphonerepairshop#iphonescreenrepair#iphonerepairservice#iphonescreenreplacement#30minutesrepair#batteryreplacement#bayridgebrooklyn#androidrepair#blocknumber#brooklyn
0 notes
Video
youtube
🌌 How to fix loose keycaps by Keycap Universe! 🌌 #resinkeycaps #howtofix...
0 notes
Text
Products are not showing on the shop page?
Learn how to fix the products not displaying issues all by yourself.
2 notes
·
View notes
Video
youtube
DIY Project | How To Fix Laptop Cooling Pad Step by Step | Deep Cool Mul...
#FixDeepCool#DeepCool#FixLaptopCoolingPad#CleanLaptopCoolingPadFan#LaptopCoolingFan#LaptopCoolingPad#LaptopCoolingPadFanNoise#MultiCoreX6DeepCool#DeepCoolMulti-Core#FixTheFanNoise#howtoFix#DIY#DoItYourself#Crafts#UsefulThings#LifehacksTricksTips#DIYProjects
1 note
·
View note
Text

We made an awesome epoxy table! #Shorts


#家具デザイン研究室#Howtomake#repairing#5minutescraft#shorts#camp#tofix#camping#torepair#outdoors#5minutecraft#5minutecrafts#5minutecraftsmen#campinghacks#fixing#homerepair#howtofix#howtorepair#minorrepairs#outdoorcooking#woodworking#repair
0 notes
Link
For Mac Camera not working follow the simple steps or process check software and hardware peripherals properly and can fix it completely with no longer.
1 note
·
View note
Link
Are you Facing issue with Magento 2 “Add To Cart” Button in Homepage or Product Page? Don’t worry MageComp have solution for fixed Magento 2 “Add To Cart” Button Not Working.
1 note
·
View note
Text
🤔Experiencing issues with YouTube's Picture in Picture on your Apple or Android device?🏊Dive into our latest blog for quick fixes and troubleshooting tips! 📱🔧 Don't let glitches interrupt your viewing experience – find solutions now! 🚀
#youtubevideo#TechTroubles#FixItFast#youtube#pip#pictureinpicture#notworking#apple#android#techie#help#frustrated#howtofix#tutorial#techtips#mobile#smartphones#gadget
0 notes
Text
Why need vacuum when installing air conditioner?
Vacuum is an important step in the process of installing air conditioners to ensure that the air is filtered clean, free of impurities, and to avoid blockage of pipes during use. Learn how to properly vacuum your air conditioner during installation with BestAppliancesReviews.Com! https://bestappliancesreviews.com/why-is-vacuuming-necessary-during-air-conditioning-installation/
#bestappliances#homeappliances#airconditioner#BestAirConditioners#appliances#beattheheat#appliancesissues#howtofix
1 note
·
View note