#I don’t have any animation softwares i can use to speed it up
Text
more art posts-
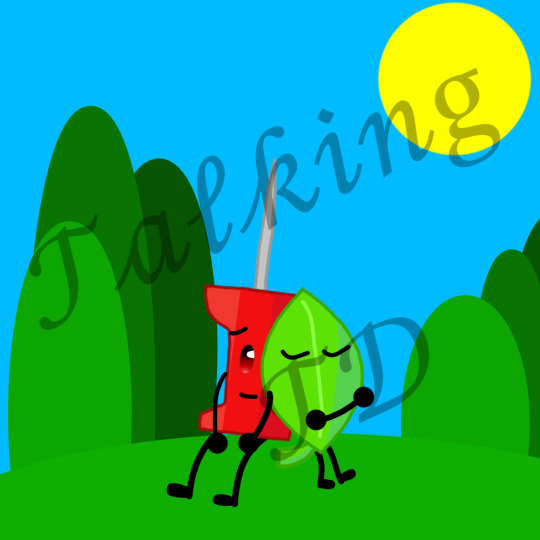

#ooc#bfdi#battle for bfdi#tpot#bfdia#pin bfdi#bfdi pin#bfb leafy#bfdi leafy#leafpin#peafy#eliza arts#AUGH I FORGOT LEAFYS MOUTH#Sorry the vids so long#I don’t have any animation softwares i can use to speed it up#:(#jesus so many tags
46 notes
·
View notes
Text

COLORING + SHARPENING TUTORIAL
someone asked for a coloring tutorial and my sharpening settings, so here it is! there are also a few tips to achieve more HQ gifs. :)
tutorial under the cut!
FOR HIGH-QUALITY GIFS
FILE SIZES
it doesn’t matter what your sharpening settings are if the file you’re using to gif is too low quality, so i tend to look for the best that i can get when downloading stuff.
usually, movies (+2h) look better if they’re 5GB or more, while an episode (40 min/1h) can look good with even 1GB. the minimum definition i try to find is 1080p, but i gif with 2160p (4k) when available. unfortunately, not every computer can handle 4k, but don’t worry, you can gif with 1080p files just fine if they are big enough. contrary to popular belief, size does matter! which means sometimes a bigger 1080p file is better than a smaller 2160p one, for example.
SCREENCAPPING METHOD
this can too influence the quality of your gifs. as a gifmaker, i’ve tried it all: video frames to layers, directly opening video clips, loading files into stack, and i’ve finally settled down with opening screencaps as an image sequence. with bigger files, it doesn’t matter much what technique you use, but i’ve noticed with smaller files you can do wonders if you screencap (either by loading files into stack or opening as an image sequence) instead of using video clips. for example, this gif’s original video file was only 4GB (so smaller than i’ve usually go for), if you can believe it!

here’s a tutorial for setting up and screencapping with MPV, the media player i use to screencap. again, you can keep using video clips for bigger files, but you’ll find this useful when dealing with dire causes. i don't file loads into stack, though, like the video does. i open as an image sequence (open > screencap folder > select any image > click the image sequence button). just select OK for the speed. this will open your screencaps as a video clip (blue bar) in timeline mode (i'm a timeline gifmaker, i don't know about you). you will need this action pack to convert the clip into frames if you're a frames gifmaker. i suggest you convert them into frames even if you're a timeline gifmaker, just convert them into a timeline again at the end. that way you can delete the screencaps right away, otherwise you will delete the screencaps and get a static image as a "gif".

ATTENTION if you’re a Mac Sonoma user, MPV won’t be an option for you unless you downgrade your system. that is, if you have an Intel chip. if you have M1 Max chip (or even a better one), here’s a fix for MPV you can try while keeping that MacOS, because nowadays MPV is skipping frames in its latest build. or you can use MPlayer instead for less hassle. here are two tutorials for setting and using MPlayer. Windows users are fine, you can use MPV without trouble.
FOR EVEN MORE QUALITY
ADD NOISE
here’s a tutorial for adding noise as a way to achieve more HQ gifs if your original material is too low quality.
REDUCE NOISE WITH CAMERA RAW
instead of adding noise, you can reduce it, especially if your gif is very noisy as it is.
the path is filter > camera raw > detail > nose reduction. i do this before sharpening, but only my video file isn't great to begin with. because it’s a smart filter, you can reduce or increase its opacity by clicking the bars next to its name in the layers panel.
TOPAZ AI
i use Topaz Photo AI to increase the quality of my screencaps when i need to. it’s paid software, but there are… ways to find it for free, usually on t0rrent websites. if someone’s interested, i can make a tutorial solely about it in the future.
SHARPENING SETTINGS
here are my sharpening settings (filter > sharpen > smart sharpen). i sharpen things twice: 500% 0.4px + 10% 10px. here's an action for it, for more convenience. here's a tutorial on how to use Photoshop actions. for animated stuff, i use this action pack.

COLORING
here’s the gif i'm gonna use as a base. it’s already sharpened like the way i always do it.

LIGHTNING THE SHOTS
half of the secret of a good coloring is good lightning. i always useCurves (layers > new adjustment layer > curves) and Brightness & Contrast (layers > new adjustment layer > brightness & contrast). the settings depend on the scene you’re giffing, but i always try make my gifs bright and with high contrast to make the colors pop.
CURVES
besides lighting your scene, the Curves adjustment layer has four automatic options that will color-correct it for you. it’s not always perfect and it doesn’t mean you won’t need to do further coloring, but it’s a great start. it’s a lifesaver for most ridiculously yellow scenes. look at the difference! this gif uses the 3rd automatic option (the screenshot below isn't mine btw so that's why the fourth option is the chosen one), from top to bottom. what automatic option you need to choose depends on the gif.


sometimes i like to tweak my Curves layer. not everybody does that, it’s not that necessary and if you’re not careful, it can screw your gif up. to modify your layer by hand, you will need to click and drag points of that straight line in the position you desire. this is the concept behind it:

basically, the lower part of the line handles the shadows, while the upper part handles the highlights of the image. if you pull a highlight point up, the image’s highlights will be brighter. if you pull it down, it will make them darker. same thing for the shadow points. you should play with it to get a grasp of it, that’s what i did when i first started giffing.
BRIGHTNESS & CONTRAST
then i added a bit of brightness and contrast.

CHANNEL MIXER
the scene looked a bit too yellow, so i used the Channel Mixer (layer > new adjustment layer > channel mixer) adjustment layer. here’s a tutorial of how it works. not every scene needs the Channel Mixer layer though, i mostly use it to remove heavy overall tints. in this particular case, the Curves layer got rid of most of the yellow, but i wanted the gif to be just a bit more blue so the Channel Mixer tweaks are very minimal.

SELECTIVE COLOR
now, this adjustment layer i always use: Selective Color (layer > new adjustment layer > selective color). this is THE adjustment layer to me, alongside the Curves one. this is how it works:

ie, you can separately edit a color this way, giving it tints. for this gif, i wanted to make the colors more vibrant. to achieve that, i edited the selected colors this way:

for the reds, i added even more red in them by moving the first slider to the right, making the color more vibrant. for his hat to have a more warm tint, i added yellow to the reds (third slider, moving it to the right). finally, to make the reds stronger, i moved the last slider to the right (more black).
for the yellows, i made them brighter by adding white to them, thus making the tile wall and Paddington more bright as well.
for the cyans and the blues, i just added the maximum (+100) of black that i could.
i wanted for Paddington's nose to be brighter, so i added more white to the whites.
lastly, i added depth to the blacks by increasing their own blackness.
you should always play with the Selective Colors sliders for a bit, before deciding what you want or need. with time, you will automatically know what to change to correct the color grading. it all takes practice!
HUE/SATURATION
i don’t know if you noticed, but there are some green spots on the blue wall behind Paddington. to correct that, i added a Hue/Saturation adjustment layer (layer > new adjustment layer > hue/saturation) and made the saturation of the greens 0%, making that unwanted green disappear from the background.

while the green spots on the wall are specific for this gif, i use hue/saturation a lot to tweak, well, hue and saturation. sometimes someone’s skin is too yellow, i made it redder by tweaking the reds and the yellows, or vice-versa. the hue bar follows the rainbow bar, so the maximum settings (+100 and -100) give the selected color to change its hue to something more red or pink (the rainbow extremities). changing hue can give pretty whacky results, like turning someone’s skin tone to green, so you will need to play with it to get the hang of it. you can also tweak the opacity of your hue/saturation layer to further improve your gif’s coloring. i didn’t do it in this case, the opacity is still 100%. the reds and the blues had their saturation increased to make them pop just a bit more, without affecting the other colors.
COLOR BALANCE
the highlights of the gif still had a green tint to it due to the automatic correction of the Curves layer, so i used Color Balance. this is how it works: instead of giving specific colors some tints, you can give them to the shadows, highlights, and mid-tones. if your shadows are too blue, you counterbalance them with the opposite color, yellow. same thing with the cyan-red and magenta-green pairings. in my case, i added a bit of magenta.


B&W GRADIENT MAP
now, if this gif was a dish, it’s time for the salt and pepper. i always add a Gradient Map (layer > new adjustment layer > gradient map) (black to white gradient) with the Soft Light blending mode, thus giving my shadows more depth without messing with the mid-tones and highlights. it also doesn’t “deep fry” (you know those memes?) the gif too much by adding even more contrast. usually, the opacity of the layer is between 30% to 70%, it all depends on the gif. it always does wonders, though!

COLOR FILTER
finally, i like to add Color Filters (layer > new adjustment layer > color filter) to my gifs. it’s very handy when giving different scenes for the same minimalistic set because it makes them kind of match despite having completely different colors. in this gif’s case, i added a “deep blue” filter, opacity 50% density 25. you can change the density and the opacity of the layer for further editing, again, it all depends on the gif.

VIBRANCE
if i feel like it, i add a vibrance layer (layer > new adjustment layer > vibrance) to make the colors pop. this can ruin your coloring sometimes, especially when regarding skin color, so be careful. i didn't do it in this gif because i felt i didn't need it.
TA-DA! 🥳
AN OTHER EXAMPLE
the color grading of the original scene it’s pretty good as it is, to be honest. let’s see a worse scenario, a VERY yellow one:


no channel mixer this time because the automatic curves option dealt with the yellowness, but you can see it made the gif too green. i needed to correct that with the following adjustment layers:
curves (automatic option) (gif 2) >> same curves layer (tweaks) (gif 3) >> brightness & contrast (gif 4) >> hue/saturation (tweaked cyan+blue+green) >> selective color >> color balance (gif 5) >> b&w gradient map >> (sepia) filter >> vibrance (gif 6)
i added a hue/saturation layer to remove the blues & greens before my selective color layer because i thought that was more urgent than tweaking the tint of all colors. color balance (gif 4) was the real hero here, though, by removing the green tint. the selective color layer was meant to make the red pop more than anything else, because the rest looked pretty good, especially her skin tone (despite the green tint). you can notice that tweaking the curves layer (small gif 3) also helped A LOT with the green problem.
tl;dr 😵💫😵💫😵💫
here's a list of my go-to's while coloring and lightning gifs. it's not a rule, just a guide. there are gifs in which i don't use all these adjustment layers, or use them in a different order. it all depends!
1. curves (automatic option + tweaks)
2. brightness & contrast
3. channel mixer
4. selective color
5. hue/saturation
6. color balance
7. b&w gradient map
8. color filter
9. vibrance
i'll suggest that you study each adjustment layer listed for more info, either with other Tumblr tutorials or YouTube ones. the YouTube ones focus on images, but you can translate what they teach to gif making very easily. you can ask me to further explain any adjustment layer, too! i was brief to keep this short (which i kinda failed lol).
feel free to ask me for clarification or something else about gifmaking wise, i always like to help. ❤️
#*#*tutorials#gifmaker tag#resources#resource: tutorials#ps help#uservivaldi#tuserjen#userrin#userelio#useralien#userzaynab#userchibi#userbuckleys#usertj#userbess#tuserlucie#useraljoscha#userdavid#usershreyu#usernolan#userhallie#userisaiah#tusergio#tusergeo#userjesslynn
540 notes
·
View notes
Text
Looking for a Deepfake Face Swap Alternative? Here are our 10 Best Picks!

If you have been active on social media, then you must have seen several viral deepfake photos and videos. With the rise in AI, deepfake technology has also evolved, letting us swap faces on any picture. Most people do deepfake face swap for entertainment and artistic purposes as it can save a lot of time in editing, but it can also have several pitfalls. In this post, I will let you know about the best deepfake face swap alternative tools that you can use for constructive purposes.
Why look for Deepfake Face Swap Alternatives?
You might be wondering if there are already deepfake face swap online tools, then why look for an alternative. Ideally, most people try to find trusted face swap solutions due to following reasons:
Ethical concerns: Deepfake tools raise serious ethical concerns regarding their potential misuse and can’t be used for commercial purposes.
Copyright issues: Most deepfake online tools end up violating privacy laws or intellectual property rights and don’t give copyright power to you.
Watermarks: A lot of deepfake face swap tools leave their watermarks on edited images and videos, making them not suitable for professional use.
Imperfect results: Several deepfake tools end up creating imperfect results by design, making the edited video and images look unnatural at times.
Impact on trust: If you use these imperfect images professionally, then it can be challenging for your audience, and you can even end up losing their trust.

What to Look for in a Deepfake Face Swap Alternative?
Due to these pitfalls, it is crucial to look for a reliable deepfake face swap alternative. However, here are a couple of things that you can consider while looking for a deepfake tool:
Features
Assess the features offered by the tool, including the ability to swap faces, manipulate facial expressions, or generate realistic facial animations. You can also look for advanced features such as customization options, real-time processing, or integration with other software tools.
Costing
Evaluate the pricing structure of the tool, including any subscription fees, licensing costs, or additional charges for premium features.
User-friendliness
Evaluate the ease of use and accessibility of the tool (particularly if you don’t have any editing background). Look for features such as drag-and-drop functionality, pre-built templates, or automated workflows to streamline the face-swapping process.
Performance
Assess the performance and reliability of the tool, including processing speed, accuracy of facial mapping, and stability of the AI model.
User reviews
Look for existing user reviews of the tool to evaluate its effectiveness in real-world scenarios. This will help you know about its pros and cons from its real users.
Privacy and security
Try to find alternatives that prioritize user privacy and offer features such as data anonymization and secure authentication.
Trial period
Take advantage of any trial period offered by the tool to test its functionality and suitability for your needs before making a purchase.
Top 10 Deepfake Face Swap Alternative Tools to Try
If you look for a deepfake face swap tool on the web, you will be bombarded by tons of irrelevant results and APIs. Don’t worry – to make things easier for you, I have shortlisted the 10 best deepfake face swap alternative tools that are trusted by experts.
#1: iFoto Face Swap
A part of the iFoto Studio, this has to be the most recommended deepfake face swap online tool out there. The best part is that iFoto Face Swap is extremely easy to use and will let you swap faces on photos without any technical hassle.
- You can just head to the iFoto website, load your image, and swap the individual’s face with anyone else.
- Apart from being user-friendly, iFoto Face Swap is also quite reliable and produces highly precise results.
- Since there are no imperfections or errors, you can easily use the modified image for professional use.
- Mostly, iFoto Face Swap is used by eCommerce brand owners who want to diversify their portfolio.
- iFoto Face Swap is safe to use and you can professionally use the edited images without any copyright issues.
Pros
- Extremely fast and reliable results
- No prior editing experience is needed
- Zero copyright problems
- Available on the web and mobile (iOS/Android) apps
Cons
- The free version will include a watermark
Available on: Web, iOS, and Android
Pricing: Free and credit-based after that
Rating: ★★★★★

#2: FaceSwapper AI
As the name suggests, this is a dedicated AI-based tool that can help you swap faces on your videos or photos. You can sign-up on FaceSwapper for free and enjoy 6 credits, but have to buy its premium version after that.
- The deepfake face swap online provides dedicated options to meet specific video and photo editing needs.
- There is a provision to make big head cutouts from your standard images by swapping faces.
- If you want, you can also convert your standard images into animated GIFs with FaceSwapper AI.
- With its Magic Avatar feature, you can create consistent characters by leveraging the power of AI.
Pros
- Overall results are accurate and realistic
- No editing experience is needed to use the tool
Cons
- Only 6 credits are given for free
- Expensive (compared to other tools)
Available on: Web
Pricing: $29 per year
Rating: ★★★★☆

#3: Remaker AI Face Swap
This deepfake face swap alternative by Remake AI is quite easy to use and offers an intuitive interface. You can use its readily available templates or upload your pictures to use its face swap features.
- As of now, Remaker AI offers three dedicated features – single picture face swap, multiple face swap, and video face swap.
- Using it is quite easy – you just have to upload the original media file and the file with your face to swap it.
- On the interface, you can also preview results of the face swap and make minor edits directly.
- Apart from photos, you can also use it to swap faces on a video (but the results are not that accurate).
Pros
- It offers several face-swapping features in one place
- Users can try the tool for free by getting credits
Cons
- Only face swapping features are provided (no other editing option is there)
- The results of video face swaps are not that precise
Available on: Web
Pricing: 5 free credits and 150 credits for $2.99 afterward
Rating: ★★★★☆

#4: Pica AI Face Swap
Pica AI offers a wide range of AI-powered visual editing tools, including a dedicated deepfake face swap online solution. You can use it to edit existing images or create new ones with its template.
- You can just upload both images (the original image and the one with the new face) and swap both faces.
- With the help of Pica AI, you can also do a bulk face swap or swap multiple faces at the same time.
- Besides swapping faces in photos, you can also do the same on videos and GIFs as well.
- You can also upload your clean face picture and then put your face on its multiple templates (like wizard, superhero, etc.)
Pros
- It provides tons of face-swapping options on videos and photos
- There are several AI-backed templates that you can readily use
- Users can maintain a dedicated history of their work
Cons
- No mobile app is available
Available on: Web
Pricing: 8 free credits and $9.99 per month afterward
Rating: ★★★★☆

#5: Reface AI
Reface AI is a fun and lightweight tool that can help you put your face on other media files. It is quite easy to use and also provides tons of existing animated templates to use.
- You can upload any existing video or photo on Reface AI and then upload your portrait image to do a deepfake face swap.
- With Reface AI, you can also animate yourself and make all kinds of cartoon videos.
- It also offers a wide range of existing templates in different formats that you can readily use to do face swaps.
- Apart from face swap, Reface AI also provides an interesting option to change the color of your clothing.
Pros
- Quite easy to use
- Results are also precise (and don’t look overly edited)
Cons
- A bit expensive
- No free version is provided (only demo is there)
Available on: Web, iOS, and Android
Pricing: $4.99 per week
Rating: ★★★★☆

#6: ArtGuru AI
If you want to explore your creative side, then you can simply explore this deepfake face swap alternative. While it has limited professional features, it can meet your individual AI editing needs.
- You can upload multiple photos on ArtGuru and swap faces on them by providing a clear portrait of yours.
- There are several trending templates that you can readily use to swap your face on those photos.
- It has also introduced an option to swap faces on videos that you can explore to get basic results.
- The most common use of ArtGuru is converting portraits into all kinds of animated versions.
Pros
- Reliable results for creating animated avatars
- Also supports multiple face swapping in group photos
Cons
- Limited features compared to other tools
- Video face swap results are not that precise
Available on: Web
Pricing: $4.99 per month (8 credits are given for free)
Rating: ★★★☆☆

#7: BasedLabs Face Swap
BasedLabs has come up with an entire suite of AI-powered products, including a popular deepfake face swap alternative. The online tool is easy to use and can help you swap faces on photos instantly.
- The AI model that is used by BasedLabs is one of the best in the industry and yields instant results.
- You can just upload your source and target image and let the tool do its magic or select its existing template.
- BasedLabs has a private online space for you to edit and store your work as well.
- You can access other AI tools like AI anime characters, hairstyle changer, tattoo generator, etc.
Pros
- Tons of powerful AI features in one place
- Results are instant and realistic
Cons
- No mobile app is available
- Expensive (and can be tough for beginners)
Available on: Web
Pricing: $12 per month
Rating: ★★★☆☆

#8: Fotor Face Swap
Fotor is another popular AI-based photo editing suite that offers several tools in one place. With its deepfake face swap online feature, you can edit your face on any photo of your choice.
- The Fotor face swap tool is easy to use and lets us get instant results for our photos.
- You can either upload your photos or pick from its readily available templates as well.
- Fotor also suggests multiple styles for your photos so that you can even customize the results.
- From enhancing your creative works to editing professional pictures, the tool can help you do multiple things.
Pros
- Easy to use
- Realistic results
- A free trial is available
Cons
- No support for swapping faces in a video
- Limited features (multiple face swap is also not supported)
Available on: Web
Pricing: $9.99 per month
Rating: ★★★☆☆

#9: Swap by ClipDrop
ClipDrop has also come up with dedicated AI-based editing tools, including Swap. This is a simple and lightweight deepfake face swap alternative that you can access on its website.
- It has a minimalist and user-friendly interface that can let you swap faces on photos instantly.
- Since ClipDrop is based on a powerful AI model, no prior editing experience is needed to use it.
- You can preview the results of the face swap and try other ClipDrop tools to fine-tune results.
- ClipDrop leverages the latest version of Stable Diffusion for various AI-based editing tasks.
Pros
- User-friendly
- It yields reliable results
Cons
- Doesn’t support multiple face swapping
- No mobile app is available
Available on: Web
Pricing: Free or $8.99 per month for pro version
Rating: ★★☆☆☆

#10: Pixble Face Swapper
The last deepfake face swap tool that you can consider using is Face Swapper by Pixble. The best part is that you can try it for free on any web browser.
- You can just upload the source and target image on Pixble for swapping faces and get instant results (without any manual efforts).
- Pixble will implement its AI model to swap faces and let you preview results before saving the image.
- As of now, the Pixble face swapper takes almost 60 seconds to process its results.
Pros
- Easy to use
- A free trial is available
Cons
- Limited features
- Its results are not that precise
Available on: Web
Pricing: Free trial and 11 images for $4.99 per month afterward
Rating: ★★☆☆☆

Conclusion
I’m sure that after going through this guide, you can easily pick the best deepfake face swap alternative tool to meet your AI-powered editing needs. Make sure you try the AI tool you are interested in and read its user reviews before buying a premium version. Out of all the listed options for deepfake face swap, iFoto Face Swap would be the best pick. It is packed with tons of features, is extremely easy to use, and will let you leverage the edited images without any copyright issues as well!
Read the full article
0 notes
Text
The first rebuilding blocks
Korczak Ziolkowski wakes up early on a bitter cold winter’s morning – the same way he has for several decades – after breakfasting and a few mugs of the hottest coffee his palette can stand, he shoulders his tool belt and trods his way in knee-high snow to the eastern wall of the Crazy Horse Memorial… his lifelong unfinished masterpiece.
I like to think that working on one’s own personal website is a lot like Korczak Ziolkowski’s pursuit of progress on the ambitious mountain-sized memorial he started in the late-1940s. He knew he’d never complete the work in his lifetime. He knew that each day’s progress would be measured in inches and pounds and that, only after a generation’s worth of effort, would he be able to look back and see that what he had begun to make was worth it.
In late-November 2023, I changed jobs from VP of Marketing to Senior Product Manager (and lead developer) of Hubbub. When I was working in marketing I needed technical side projects to scratch that particular itch I’ve always had. But now that I spend some amount of time every workday programming – I don’t need to be working on side projects as often. And I certainly don’t need to be building my own static site generator anymore. But I do need a better playground to test and improve Hubbub. So I’ve switched back to WordPress to power my blog.
If you were following along on my journey to build Tuff, the static site generator that powered my site for well over a year, you might be wondering whether I’m upset that I’m replacing it. Wasn’t it a waste of my time? I think it was a valuable project for me to work on.
Martiijn Doolaard, a web designer, musician, cyclist, and now successful YouTuber rebuilding stone animal structures in the alps (who I watch every Sunday with Eliza) recently had a similar reaction to one of his projects. Doolaard had spent a great deal of time building a crane to move large heavy stones on the roofs of his buildings. He spent several weeks honing the tool to work for his needs – only to set it aside when the day came to use it. He answered some questions about whether or not he felt that was wasted time and he said (I’m summarizing) that it wasn’t a waste of time because he enjoyed building the crane.
I enjoyed building Tuff. And that should be enough to consider it time well spent. Tuff is still currently powering a few of my other websites (though, I plan to move them all to WordPress over the course of this year). Imagine building something from scratch that you were able to use for more than a year on multiple websites? That isn’t wasted time. I learned a bunch, used my brain, and honed some of my skills that I use everyday.
In order to improve a software product, I need to be one of its most active users. We acquired Hubbub in December 2023 and for the last few months we’ve had a roadmap of low hanging fruit updates. We’ve fixed some bugs, patched some potential (albeit mild) security vulnerabilities, and added some new features. But our best work is definitely ahead of us. We’re now up-to-speed on the codebase, the issues, the customers, etc. and we’re in the phase where I’m using the product everyday. I’m beginning to have ideas of how the product can be much better, more capable, and more valuable for customers. It is also more likely that I will run into an issue by using the product daily so that I can fix the issue before customers even notice it.
My website is a child theme of the Twenty Twenty Four theme. When I set out to begin this rebuild my goal was to use WordPress’ full site editor (FSE) to complete my entire site with writing as little code as possible. I thought it would be a worthy exercise to help me understand the state of this part of the WordPress ecosystem.
The full site editor in WordPress has really improved a lot and at a fairly rapid pace. While I wasn’t able to complete my entire site without any code, it may not be long before I’ll be able to do so. I’ve seen a lot of complaints in the community about the direction that WordPress is taking with Gutenberg and the FSE. Alternative forks are being worked on. My opinion is that the FSE is the right direction to go, especially to enable non-technical users to build their own websites. I have a lot more to say about this but overall I’m bullish on the FSE.
My site uses a child theme so that I can enable custom post types, add custom styles, a Query Loop Block variation that adds custom taxonomies as filters, adds a template part for my new logo, enables some meta boxes for the metadata on portfolio items, adds support for the aside Post Format, and manipulates the guid in the database. A few of these features could have been done another way (perhaps by someone with more experience than me). I’m hoping that future versions of WordPress will allow me to remove code rather than add it.
Based on my experience rebuilding my website, I may write a separate post about some features that WordPress should have out-of-the-box that it currently does not. Maybe some of them are already underway.
My personal website is not as ambitious a project as Ziolkowski’s memorial of the Lokatan war leader, but I’m fairly certain that my website will never be truly finished. I’m glad that I spent the time to get to where it is today. There is a lot of work yet to be done (especially on mobile and the archive) but I’m excited to be publishing new stuff again. Recently I published a new portfolio piece, a podcast appearance, a new open source plugin, and some photos into my new snaps area.
Much more to come. Stay subscribed.
0 notes
Text
Aerial Video A to Z 2022 Information
The Ultimate Guide to Shooting, Editing, and Profiting from Epic Aerial Video
AVAZ is an online course that's designed to be your final source to learn Drone Videography - filming, flying, and editing, then how to get views and market.
Why Should I Sign Up?
Lessons are result driven, showing real world applications.
Courses are dynamic. When new drones, software, techniques, and equipment come out, AVAZ is updated with tried and true methods. Save yourself the time and maximize your drone's potential.
Community Facebook Group where you can discuss drones, share your work, post questions, find out how other people make money and handle job types, or just talk about anything related to aerial video.
What You’ll Learn In This Course?
What type of equipment (computers, software, drones) you do AND don’t need;
How to tweak the settings on your drone to capture the best looking picture (we cover all of the most popular DJI models and give you applicable advice, even if you have a different drone);
The basic of video: resolution, frame rate, the difference between .mp4 and .mov file formats and when is best to use each;
Pre-flight planning and how to avoid amateur mistakes;
Flying, filming, and cinematography – teaching you what to aim for and how to capture those super smooth drone shots;
How to CORRECTLY film slow motion footage;
Step-by-step walkthroughs of the editing software, so you know EXACTLY what to do and where to go (so it’s not overwhelming);
Pro tricks for speeding up the editing process and workarounds for dealing with 4k footage (note: 4k footage traditionally takes a LONG time to work with since its so big…but we have a shortcut);
Advanced editing techniques like…
How to arrange your footage to be the most visually appealing and keep viewers engaged;
How to fix shots when something ugly is in the corner of your frame;
How to fix shaky footage so it’s still usable;
The right way to put in titles, logos, and other graphic items;
How to go from flat and bland footage to video that pops with the perfect color balance;
Salvaging footage that is too bright (overexposed) or too dark (underexposed);
Adding music – where to find it, how to line it up with your video for maximum impact; and
How to export your work so that its shareable but still maintains great quality.
AND, as an added bonus…
About Author
Alex Harris is an accomplished videographer, editor, photographer, and commercial drone pilot. In addition to filming for networks such as HGTV, ESPN, and Discovery Health, Alex also has experience in filming live performances of artists like Pitbull and Benny Bennasi.
As a former Hollywood editor for network TV and film, Alex has edited everything from animated features to broadcast television to commercials. His work has carried him all over the world, working on projects from LA to Europe.
Alex is excited to partner with Drone Launch Academy in order to make professional aerial cinematography, video editing, and photography skills accessible to everyone, even those who don’t have any experience working with drones or professional editing software.
More courses from the same author: Alexander Harris
0 notes
Text
Week 10 -
Week 10 lecture notes -
Disneys 12 principles of animation -
Squash and stretch, manipulating to be dynamic
Anticipation - the waiting before GO, you don’t just stay still
Staging - how the object is in form, how it sits, where, staging the scene
Straight action/pose to pose - ptp keyframes, in-between frames - straight action
Follow through & overlapping action, having two different aspects going on with one asset - speed, the top is behind/slower than the bottom
Slow in & slow out - judging speeds, dropping ball… trail
Arc - bounces, anything with the use of velocity
Secondary action - what is the secondary thing doing to interact with the main character
Timing, allows you to case things - helps with audio
Exaggeration, giving animation the opportunity to be varied and lively, more dynamic
Solid drawing, pertains more to 3d and has to map out the width and length of the shape so it is correct in animation
Appeal, how to make it dynamic as a whole and aesthetically pleasing
Remember to look at blending with motion blur and zooming in and out, look at the polishing of your work.
If doing simple credits, make the above line bigger than the below to add differentiation between the text
Feedback next week in front of peers
Week 10 workshop notes - animation with audio
To make things look polished, use motion blur, on layer click 3 grey circles
Composition - composition settings - change background colour - doesn’t create an extra layer
The large timeline reflects on the time code by the bottom left corner
Text box, write starting word, undock layer, keyframe ‘source text’ move to wanted time ’3:24, 3 seconds 24 frames,’ double click the text, don’t press delete but start writing the new word, repeat later down - this is all in time with audio.
Can change colours and sizing etc
To change font over the word - click on the source text layer, go where the word keyframe is and start a little after it, highlight one letter at a time and make keyframes one after the other. Highlight, change the font, and do not do any deleting.
Option, left bracket (next to P) to cut/crop layer times
After finishing, click composition, add to render queue, ‘not yet specified,’ where you want it to go, and render.
Position, the graph icon next to the stopwatch, then the graph icon above that, you have the graph editor, which can edit speeds etc.

SCALE SCREEN TO FIT PROPERLY AGAIN:

Reflection -
I really struggle with getting back on track once I have messed up, with a new software, I don’t know my way around getting back to my original positioning, and this lesson ended up going down several unnecessary rabbit holes and losing my work. However even with that, once I got back on track and got the hang of what I was doing, I really enjoy animation and find it a fun challenge. Now I think I have my head around it and am liking this project.
0 notes
Text
Twixtor review

Twixtor review how to#
Twixtor review full#
And to check out more work great work by Mark Rober, be sure to see our previous posts on him by clicking here or you can go to his YouTube page by clicking here. In case you missed it, let me reemphasize: "NO TWIXTOR!" ( Your blogger here has no clue what that means, but it definitely sounds badge of honor-worthy.) Can I just say how lucky we are to have such amazing fans submit their work to us, and am happy to highlight this instructional using a ceiling fan and GoPro camera in order to pass the savings and knowledge on to you. Important to note that I did find several excellent video tutorials for using Twixtor in Adobe After Effects on YouTube that may be helpful to you. This means less tearing and stretching of objects as they cross or go. After having read a review of Twixtor Version 1 written in 2001, I noticed that the author had said approximately the same thing so I dont expect that documentation will be improved anytime soon. Twixtor is much more accurate, tracks objects farther, and exhibits fewer artifacts when there are objects crossing in the scene. it just seems like writing NO TWIXTOR is like a badge of honor for slow mo videos for some reason so I wanted to put it. Twixtor is an Adobe After Effects plugin that offers users the means to create slow-motion or acceleration effects using their own video footage. Twixtor is a plug-in program for the After Effects software that allows you to create slow-motion effects from any video clip by adjusting the settings of. but I did you use After Effects smooth motion thing in parts which is pretty much the same thing. I shot all off this footage with a GoPro Hero 3 at 240 fps. Wedding at Microfilmmaker Magazine, May 1, 2009.
Twixtor review full#
Read the full review of Twixtor 4.5 by A.J. Pro license also works with the regular product of any supported host. amv twixtor anime animeedit 4k Tik Tok: http://tiktok. Twixtor Pro license works with After Effects, Final Cut Pro, Flame, Smoke, Fusion Studio, Nucoda, Nuke, Premiere Pro, Scratch, and Silhouette.
Twixtor review how to#
The video was created and submitted to us by faithful friend and fan of The Feed ( and NASA engineer, too!), Mark Rober, who has been featured on here a few times now, and who writes about his latest work demonstrating how to create the effect on the cheap:Ī simple trick to get awesome Matrix-like "Bullet Time" footage for waaaaay less money than most people spend on it with huge camera arrays. are available use up and down arrows to review and enter to select Vido. Twixtor intelligently slows down, speeds up or changes the frame rate of your image sequences. And while the dizzying array of effects employed in the film pushed the boundaries of filmmaking, one item in particular stood out: bullet time! ( Seriously, just how cool was seeing that for the very first time!) Sadly, access to the resources used don't come cheap and so it largely remains a device for big-budget studios. (CBS News) The year was 1999 and audiences everywhere were blown away by an action-packed, science-fiction film by the name of The Matrix.
0 notes
Text
Ps2 bios usa v02.30

#Ps2 bios usa v02.30 how to
#Ps2 bios usa v02.30 pdf
#Ps2 bios usa v02.30 Patch
#Ps2 bios usa v02.30 full
The name of this Emulator is the PCSX2 Emulator which we will discuss below. So, it makes it difficult to run a Play Station Game on Windows Computer or Linux or even on MacOs.īut these dont work directly because both have different operating in this way we will be required to have an Emulator. With the help of BIOS, the application which you run (games in case of Play Station) will understand the hardware of your device ps2 bios rom.
#Ps2 bios usa v02.30 pdf
Vivaldi opera arias for mezzo soprano pdf
#Ps2 bios usa v02.30 how to
Now in todays topic, we will discuss how to install and use the PCSX2 Emulator and also tell you how you can install any games on your console. So, the problem which came here is that as I said above you cannot directly install and play games on Emulator and get also here ps2 bios usa.
#Ps2 bios usa v02.30 Patch
Workaround: Make sure to use the latest version of the patch 1.01 has been reported as resolving the crash issues.It is a great opportunityto ps2 bios download for those who want the PS2 games but they dont have the console.Įven though you cannot change the graphics settings to accelerate your gaming experience.yeah enjoy pcsx2 bios 2020.
Description: Some undub patch versions may cause the game to crash.
Description: Various transparency related issues such as battle shadows and flashing environment textures.
Workaround: Use the latest 1.5.0 dev builds.
Description: some shadows are flickering, or doesn't presented correctly like protagonist's shadow.
Workaround: Go to Config -> Video (GS) -> Plugin Settings, and set mipmapping set to full.
Description: Second floor of the school where all the windows on the upper walls will flash or strobe as the camera angel is changed.
Workaround: Go to Config -> Video (GS) -> Plugin Settings, and set Texture Filtering to any option except "Bilinear (Force)".
Description: Portrait animation glitches.
Or set Renderer to any of the "(Software)" options.
Workaround: Go to Config -> Video (GS) -> Plugin Settings, enable HW hacks, go to Advanced Settings and Hacks, and set Sprite hack to "Full".
Description: Incorrect text and S.Link portrait transparency.
Workaround: Go to Config -> Video (GS) -> Plugin Settings, and set renderer to any of the "(Software)" options.
Description: Disappearing or flashing dialog text.
Workaround: Go to Config -> Video (GS) -> Plugin Settings -> Advanced Settings and Hacks -> Texture offsets at 500 500.
(In any mode or setting besides workaround)
Description: The minimap is misaligned and has artifacts.
Game runs fine with default settings, setting the texture offset causes weird artifacts to show up when portraits blink. Test configurations on Linux: Environment This game runs great and stable, even when playing with graphics mods.
#Ps2 bios usa v02.30 full
Game runs at full speed at 6x Native Internal Resolution and 16x Anisotropic Filtering. You can play this game in Widescreen but DON'T use Widescreen Patches just go into the Window Settings or GS Window and change the Aspect Ratio to Widescreen (16:9)īIOS: USA v02.30. Advanced Settings and Hacks (anything not listed is default or off)īIOS: USA 1.60, RAM: 8GB DDR3, definitely playable at 720p, MAKE SURE YOUR PLAYING ON THE REVISON LISTED (or above) OR T HE INTRO AND ANIMATED CUTSCENES (FMVs) WILL SLOWDOWN!.GSdx Settings (anything not listed is default or off).The game can be run at full speed without speed hacks. However, the end of their quest is no longer the end of the story-witness for the first time the aftermath of the final battle and the students' struggle to find meaning in their new lives.ĭirector's Cut of Shin Megami Tensei: Persona 3 Game description: Lead a group of high school students with a dangerous extracurricular activity: exploring the mysterious tower Tartarus and fighting the sinister Shadows during the Dark Hour, a frozen span of time imperceptible to all but a select few. Game review links: GameRankings: 88/100, Metacritic: 89/100 Publisher(s): Atlus (JP, KO, US, EU), Koei (EU, AU) SCKA-20109 (Independent Starting Version) PERSONA-03 (Append, Konami Style Special Edition) PERSONA-02 (Konami Style Special Edition) SLPM-66690 (Independent Starting Version)
0 notes
Text
i was requested by anon to make a tutorial for this gifset and here it is!
DIFFICULTY intermediate/difficult. basic giffing knowledge is definitely required.
while my gifset has a fair amount of animation, the only handmade animations can be found in the second and fifth gif. the rest are assets (the checkmarks, the sharpie circles) (either gifs or videos) i found on the internet and pasted over my gif.
THE BASICS OF TIMELINE GIFFING
if you gif with frames, you will need to use a timeline for the animation to work (keyframes). i’m a timeline giffer anyway so this was another Tuesday for me. if you never used that method of giffing, however, it can be confusing, especially if you never used a video editing software before (the timeline works like video editing).
so, here’s a breakdown of what is the timeline:
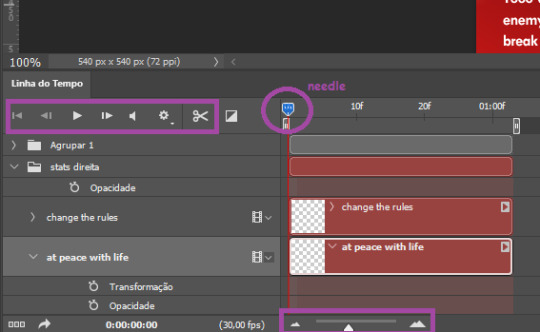
the player icons work like any video/music player in existence. ignore the volume icon.
the gear icon indicates the quality of the reproduction while editing it, not the quality of the end product. think like it’s Youtube reproduction settings on a video in order to save your 4G data, but with RAM power instead. this is very useful if your computer isn’t very powerful to begin with and gifs with VFX are very heavy to handle.
i always click the loop option inside the gear panel because i like to see how the gif will be viewed by the public, i find watching to play only once isn’t very productive. you can stop and restart the reproduction by pressing the space bar on your keyboard.
every layer of your PSD file will have its own bar. the length of the bar means the duration of the gif, so a longer bar means a longer gif and a shorter one, a shorter gif. for everything that isn’t your gif/screencap-based (ie, coloring, typography, lightning, shapes, etc) can be dragged by the extremities as much as you want, making the asset last as long as you want. the only layer that is limited by its maximum duration is naturally your gif, but you can also drag it to make it shorter.
you can also drag a whole layer bar by clicking it and dragging it, making the start and finishing point different from the rest. be careful while doing that otherwise you will end up with blank frames, messing up the looping of your gif completely.
there’s a needle you can drag across the timeline and it works just like on a vinyl disc, the moment the needle drops, it’s the moment/frame Photoshop will show you.
you can also trim your stuff by cutting and deleting snippets of the bar. for that, you will drag your needle to the desired moment, use the scissor tool and then press delete to erase the unwanted bit.
it’s important to point out that the timeline only allows 0.03x or 0.07px speed, no matter what the speed the gif was before converting to that method. if the original speed is closer to 0.03x, then PS will define the new speed as 0.03x. if it’s closer to 0.07x, then it’s 0.07x. i always change the speed to 0.03x before converting to timeline for the sake of not screwing stuff up, which means i see my gif looping while editing in a faster way than Tumblr users will see when the gifset is posted. this takes a while to adjust to if you’re new to timeline giffing, but eventually you don’t think it’s jarring anymore.
that also means you will need to correct the speed after your gif is completely finished. to do that, i use this action.
you can zoom in and zoom out using the little mountain sliding bar. this will be useful later in the tutorial.
if you zoom to the max, you will see all the numbers above your layer bar. these are time marks. the thing is, they seem a bit weird at first. the bigger numbers indicate SECONDS (01:00f, 02:00f, 03:00f, etc), while the smaller and repetitive numbers indicate frames (5f, 10f, 15f, 25f). that means that the smallest drag of your needle possible (from point A to point B) refers to an interval of 1 frame. you will need to take this into consideration while animating stuff.
you can color code your layers, if you think that makes it easier for you to see what you are doing. this is something i do, not only in Photoshop but every Adobe product with a timeline. to change the color of a layer bar (the default is purple), you can right-click on your layer in the layer panel and click the color you want. the colors are the very last thing in the list when you right-click it.
another organization tip is the use of folders. if you create a folder in the layers panel, a folder is created inside the timeline and any layer inside of that folder will disappear from the panel until you click the little arrow next to the name of the folder in the timeline panel. you can color code your folder as well, making every layer inside of it the same color or even different colors.
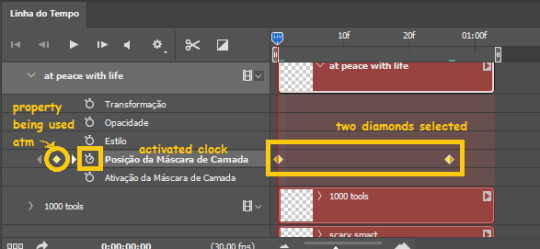
THE BASICS OF KEYFRAMES
every change related to any property selected (transformation, opacity, style, text warp, position of the layer mask, activation of the layer mask) will be computed in the exact moment in the gif you change it. if that doesn’t happen, you can force Photoshop to do it by clicking the small diamond next to the property name.
let’s say you want an animation to start 0.5 seconds after the gif starts, so you will drag your “needle” to 0.5 seconds and then make the change (making a text bigger, moving a shape, etc).
Photoshop will automatically bridge the gap between the state of the gif at 0 seconds and 0.5 seconds, thus animating your gif.
to start animating, you will need to click the little clock next to the property you want to animate. make sure you click the clock while your needle is at the exact beginning of the gif.
every change (keyframe) will be marked with a small diamond under the layer bar, at the exact moment you changed it. that means if you make jarring changes in a short amount of time/frames, the animation will be quick and abrupt. if the interval is very long, the animation will be slow and smooth.
the selected(s) keyframe(s) will have their diamond painted yellow, while the unselected ones will be grayed out.
you can right-click the diamonds to delete or copy them. if you have many diamonds and want to delete them all, you can click and drag to form a square and select all of them just like when you do to select many files at once on a PC folder. there’s also the option “select all” under the right-click panel.
you can also drag them and change their timing that way. if you have more than one diamond selected, if you drag them, their interval will remain the same, but the starting and finishing point of those two diamonds will change.
THE SQUARES BAR
the easiest of the two animations. this one doesn’t require keyframe animation, but i put this in the last bit of the tutorial for the sake of its flow.
first, i added the empty squares. they last as long as the gif lasts. after 6 frames, i added the first colored square and made that square last until the end of the gif. i repeated this in a staggered manner (+2 frames delay each colored square) so the colored squares appear at equal intervals.
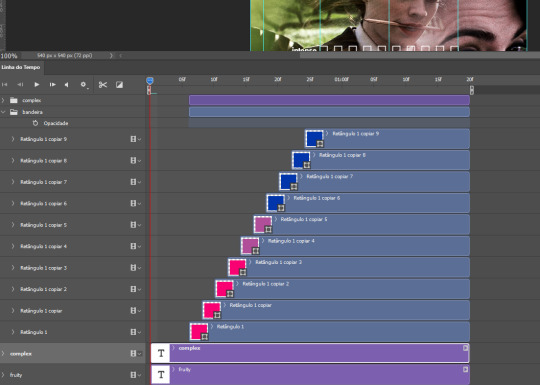
THE STATS BAR
the most difficult of the two, but don’t worry, you got this.
first, you will need to structure your stats, ie, add the text, the dividing line and the pointed lines. that is, if you want to follow the exact design i used in my gif, but you don’t have to if you don’t want to.
next, you will create rectangles that fill the entire stat bars. you will add a layer mask to each one of them and with a layer mask selected, select a rectangle about the size of your original rectangle, then paint it black. you will notice the original rectangle will disappear. if you delete the layer mask, the original rectangle will appear again. that is because you didn’t delete the original rectangle, you just hid it by using a layer mask.
there’s a chain icon between the layer and the layer mask in the layers panel, click it to unlink them.
click the clock next to “layer mask position” with your needle at 0 seconds/frames. drag your needle to the moment you want the stats to end and use the arrow keys to move the layer mask. you will notice the original rectangle will slowly be revealed by you moving the layer mask. you will also notice that a small diamond will appear in the “layer mask position” line in the timeline. you created a keyframe!
if you press play, you will see the animation from the bar going from null to full!
FURTHER READING/VIEWING
this tutorial uses layer mask animation to reveal text too!
a video tutorial for better visualization!
another keyframe tutorial, this time focusing on coloring!
if you still have any questions, feel free to contact me!
and if you (or anyone) else want, i can go in depth in animating each property, i just did a quick overview + explained the stats animation.
#*#*tutorials#completeresources#usergif#useralien#uservivaldi#usereme#userbess#userelio#usershreyu#userisaiah#useraljoscha#usersanshou#usermona#tuserju#userjaelyn#userabs#tusermalina#userbuckleys#tusermimi#tuserlucie#tusermira
208 notes
·
View notes
Text
Gideros or

GIDEROS OR HOW TO
GIDEROS OR FULL
GIDEROS OR ANDROID
GIDEROS OR SOFTWARE
GIDEROS OR ANDROID
So as a first project I'm going to translate my Android calculator apps into LUA to help me get started with the language, then re-release them on PLAY and now also iTunes. I've never done anything with physics or major animations. I've made some specialized calculators for Android, and PC based simple projects with Java in Uni. I'm a novice programmer, which mainly only experience in Java. LOVE is only PC and MOAI seems a little too much for a beginner. I have done searches and spent hours browsing similar topics. We have a lively, helpful team of Gideros experts, users and newcomers discussing the future of Gideros and games development.After searching and browsing I've come to the conclusion that LUA looks like a good language to learn for a beginner into making games. Gideros has an active, friendly community. Even more developer related documentation.
GIDEROS OR HOW TO
Gideros Wiki: The Gideros Wiki, containing a wealth of information with links to tutorials, community contributed classes and code snippets and tips and tricks on how to develop with Gideros.
Reference Guide: API information about every class, method, event, property and plugin available in Gideros with examples of how to use them.
Introduction: Everything from creating your first project and running it on device, to the basic concepts of OOP, File system and Events.
Then we create a Bitmap object with our Texture, position it at coordinates (100, 100) and add it to the stage, which is the main container for all objects that should be drawn on screen. To display an image, we first create the Texture object with its reference to an image file and an optional boolean parameter which indicates if the image should be anti-aliased. It is a fast and friendly language which is well established in the world of game development. Gideros uses Lua as its scripting language.
GIDEROS OR SOFTWARE
Well-established API Gideros is a mature software with years of development on its back and is influenced by the Flash API - as such it will be instantly familiar to seasoned developers and newcomers.
Clean OOP approach Gideros provides its own class system on top of Lua with all the basic OOP standards, enabling you to write clean and reusable code for any of your future games.
Fast development Easy learning curve, instant testing and the ability to create custom native plugins reduces development time.
Dozens of open-source plugins are already developed and ready to use: ads, in-app purchases, physics for 2d or 3d, Steam integration and many more. Import your existing (C, C++, Java or Obj-C) code, bind to Lua and interpret them directly.
Extensive plugins You can easily extend the core with plugins.
Cross-platform: Apart from supporting multiple platforms, Gideros also provides automatic screen scaling and automatic selection of proper image resolution, which makes supporting different screen resolutions, aspect ratios and universal projects an easy task.
GIDEROS OR FULL
Full development set: Get everything you need from the start, including a lightweight IDE, players for Desktop and mobile devices as well as tools to manage your assets (Texture Packer, Font Creator).Native speed: Developed on top of C/C++ and OpenGL or Metal, your game runs at native speed and fully utilizes the power of CPUs and GPUs underneath.Instant testing: While developing your game, it can be tested on a real device through Wifi in only 1 second – you don’t waste your time with an export or deploy process.It is completely free for personal and commercial projects. Free: Gideros is an open source project.Code your game once and deploy to Android, iOS, MacOS, tvOS, Windows, HTML 5 and more. It is easy to pick up, quick to develop and robust to deploy. Gideros is a cross-platform development environment for creating amazing games and interactive applications in 2D or 3D. Gideros Cross-Platform Development Environment
0 notes
Text
Windows 7 opera browser download

#Windows 7 opera browser download software
#Windows 7 opera browser download windows
Don´t there is problem, but I dont trust in this broser for the certificates, because the basiliks browser don´t notice me when a certificate is invalid or lapsed. I deleted the caché, and the problem continues. Note: I tried with Chrome (updated), Edge 90.0.818.51 and IE8, and there is the same problem. Thanks for any help than somebody can to give me. Even, I desable this ad-bloker, but the web pages continues show me as plain text. I have opera without extentions, only the opera extentions by default (ad-bloker Opera). I read others posts here in the opera forum, and the solutions don´t apply for me. In Opera Mini (android) I don´t have this problem. Is not the firts time than on the Opera browser in W7 some webs dont show correctly. And i don´t want to use a translate online for my bad experiences. We're happy to deliver this to millions of people around the world.Hi, sorry for my bad english. It's about your experience on the web - more info, more content, more fun, more communication. We constantly add smaller and bigger improvements, and we have a lot of updates in the pipeline.īut, Opera isn't just about cool features. * Once a new version is available, Opera updates automatically so that you don't miss the latest features and security improvements. * Pick up browsing in Opera on another computer or mobile device by syncing your bookmarks, open tabs and other browsing data in the cloud. * Also, you can add a personal touch to the browser by changing background themes (including animated ones!). From sidebar notes and in-browser messengers to advanced developer features - mix and match extensions to get a perfect browsing experience. * In Opera's add-ons catalog, you can get over 1,700 extensions to customize the browser. * The Speed Dial lets you keep the most important sites one click away: add sites' thumbnails to the browser's start page and group them in folders, as needed. * With Opera's visual bookmarks, not available in any other browser by default, you can organize your favorite sites in a gallery with page thumbnails. * Opera's news feature brings you the latest articles and other interesting content from all over the world straight to the browser's start page. * If you have a slow connection, for example, on congested Wi-Fi and 3G networks, you can speed up your browsing with the Opera Turbo feature.
#Windows 7 opera browser download windows
* Opera has an intuitive and elegant interface that is integrated with Windows platform. The freebie browser is fast to download, faster to configure, and instantly ready to navigate the web.
#Windows 7 opera browser download software
Here are some of the key features that will help you make the most of your internet surfing: Classed as one of the fastest web browsers on the market, Opera is loaded with features and tempting extras that place the software package up among the most popular browsers. Opera browser brings you more speed, more safety and more ways to discover content on the web. Also, with 1700+ available extensions, you can mix and match additional features to customize the browser the way you want. With the intuitive interface, Speed Dial and visual bookmarks for organizing favorite sites, news feature with fresh, relevant content, speed-boosting Opera Turbo mode and more handy features, Opera has everything you need to do more on the web. Opera for computers is a fast and secure browser trusted by millions of users.
0 notes
Text
Edmonton Printer Of Offset, Digital, Wide Format & Promotional Products: Acrylic
So you may want to take a position either time or cash in the proper know-how and in updating your systems and enterprise processes. Take benefit of food safety solutions, traceability, recall management, allergen reporting, and extra. Learn how 1000's of companies like yours are using Sage options to boost productiveness, save time, and drive revenue growth. The objective of this project is to position Quebec within the world manufacturing network and to compute Quebecs Product Complexity Index and Economic Complexity Index using Hidalgo and Hausmann methodology. Based on the rankings of PCI and ECI, we will have a transparent understanding of the economic...
Distribution is an important pillar of the beverage business. The gentle drink industry’s distinctive provide chain and distribution system is its best asset. It is the heart of our system of report and has performed extremely well for us over the last 18 years of food and beverage course of manufacturing. We have most recently taken on massive core and new product growth during our expedited capital funding plan and Ross ERP has sustained the expansion and speed of our implementation plan. Manufacturing resource planning techniques are adaptable to many various philosophies however favor the lean manufacturing and just-in-time system.
With the Companion Route Suite software, you provide your cellular workers with modern and easy-to-use tools that tremendously enhance their efficiency. To find the clever selection that can “make” you, step one would be to grasp the target market for each writer and ERP product. Learn how your corporation can leverage coaching for a successful ERP implementation. Small-sized manufacturing ERP techniques are more simple and designed to be simpler for first-time ERP customers. Large-sized manufacturing ERP techniques are inherently versatile technical platforms.
Automated customer invoice creation, revenue recognition entries, and finances adjustments assist organizations pace up accounting processes with greater accuracy. Improve visibility throughout the supply chain with Sage X3 by optimizing buy circumstances and margins, whereas enabling a cell sales force. At GetApp, our comprehensive software program listings, verified consumer critiques, software evaluation scorecards, product comparison pages and articles will empower you to make assured and well-informed buy selections.
They are especially suited to manufacturers which could be transitioning from less complicated accounting systems similar to QuickBooks or Xero. Unlike enterprise manufacturers, mid-market producers don’t have large IT budgets or assets. They choose an answer that may work out-of-the-box without sage x3 food and beverage costly customizations. At a broader stage, market segments are outlined primarily based on the size of the producers. Depending upon their measurement, the complexity of the enterprise processes would differ, and in consequence, they would require varying ranges of flexibility to accommodate their unique needs.
Its compact measurement matches completely into any purse or child bag and requires no exhausting work to make use of. The food will stay inside the leak-proof silicone tube till it is time for a snack. Simply remove the lid and gently squeeze the tube to dispense food onto the spoon. Once you have finished feeding your little sage x3 food and beverage one, put the lid back on and place it back in your bag. Food pans have many names - inserts, lodge pans, steam table pans and service pans to call a few. Cyanotoxins, produced by blooms of cyanobacteria, have been a explanation for concern, as they have the potential to compromise animal and human health.
I like the function and functionality enchancment process that the supplier uses and consider this ERP suite is reasonably priced and adequate for the million and billion dollar companies. A single cloud ERP answer for fast-growing, mid-market companies to scale and compete with out the complexity and cost. A proven ERP software resolution to help distributors and producers run efficiently.
At BAASS, we help growing firms reach their potential by enabling enterprise transformation by way of the alignment of individuals, processes and technology. With features like rate-shopping, Web-based cargo monitoring, and automatic customer e-mail cargo notifications, distributors can higher service customers and save money in shipping prices. You can even make effective use of the sophisticated inventory allocation routines towards incoming shipments in Sage X3, which even automates landed price calculations.
Sage X3 helps your company comply by offering a handy and environment friendly approach to gather and monitor relevant process information and eliminating handbook procedures all through the manufacturing course of. With the rising number of food security incidents, a mock recall is nothing in want of compulsory for producers critical about food security. Tailor behaviour, consumer experiences and automate business processes and operations simply. At the identical time, prospects count on consistency even sage x3 food and beverage as provide, demand, and the market itself adjustments. It's difficult to remain in management, hold costs down, and retain flexibility for reacting to these adjustments, but you can overcome it with the best resolution. Addressing these challenges will assist you figure out if your business is compliant, accountable, ready for recalls, and able to preserve constant product high quality.
The mid-market ERP publishers, then again, corresponding to Infor or Epicor, are probably to provide significantly better worth for the mid-market manufacturers. They present self-contained options and have industry-specific last-mile functionality in-built for several manufacturing verticals such as Industrial Automation or Machinery. Their products are technical to provide the needed flexibility for a lot larger manufacturing organizations.
0 notes
Text
EVER SINCE NEW YORK | MATTHEW GRAY GUBLER

Description: I was messaged saying: “If you don’t write a young Matthew enemies to lovers fic featuring an obsession with sucking on boobs then what’s the point 😔.” So, here it is, folks! The ultimate College!Matthew fic.
PART 1! - for Sara [@bravadostyles], the ultimate muse.
SOUNDTRACK:
Empire State of Mind - Jay Z.
Animals - Maroon 5.
Dopamine - Børns.
Word Count: 4,731.
Rating: M.
Warning/Includes: Sexual intercourse, recreational drug use, a bit of angst.
Spring, Freshman Year.
Tisch School of the Arts,
New York University.
New York City.
“You’ve got that face on,” Claire said.
“What face is that, Claire?”
“Your trademark ready-to-go-home face,” she giggled. “You tired?”
“Just a little,” you whispered, head resting on her shoulder, feet hanging off the bed. “Had a long day at rehearsal.”
“Ah,” she nodded. “Well, if you wanna go, we can go. I’ll walk you home.”
“No,” you shook your head, and placed your hand on her arm. “It’s fine. I’m having a good time.”
Soft music played through the small speakers on Jonathan’s desk, mixing in with the chatter of your friends. Everyone sat in different spaces around the room, some on the desk, some on John’s bed, and you and Claire rested on his roommate’s bed. Open solo cups of beer were scattered amongst the room. It was calm, chill, and then the door swung open.
“Yoooooo!” The entering voice rang, instantly earning a happy response from Johnathan, who hopped off his bed and ran towards the entrance.
“Gube!” John exclaimed, arms open wide to embrace his friend. He always got a little touchy-feely when he was tipsy. “Where the hell you been, man?”
“Consider my good time ruined,” you murmured to Claire.
“Be nice, [y/n],” she responded, patting your leg. “Everyone’s having a nice time, don’t start anything.”
“Me? Me? I don’t start anything, I never start anything. It’s him who starts it. That di—“
“Hey, [y/n],” Matthew greeted, taking a seat beside John. “Hey, Claire.”
“Hey, Gube,” Claire smiled. She gave you a gentle nudge with her elbow.
You rolled your eyes, “Hi, Matthew,” you reluctantly replied, refusing to make eye contact.
“Aw, c’mon, that’s all I get?” Matthew teased. “What’s wrong, sleeping beauty? You tired?”
“Oh, you have no idea,” you told him, finally looking over at him. He wore a white polo, paired with a busted pair of jeans and white converse with his mismatched socks poking out. On his chest sat his trademark gold chain, the medallion set in the center of his sternum.
“Might be past your bedtime,” he shrugged. “Really. Might be better if you just left.”
“Me?” You scoffed. “Why don’t you leave? We were perfectly fine before you got here.”
“Oh, God,” someone groaned. “Here they go.”
“John wants me here. I’m a little more fun than someone who falls asleep mid-conversation, so I can see why.”
“Matthew, why are you talking to me? Can you just pretend,” you waved your arms around. “Pretend there’s a wall here.”
“Don’t mind her,” Claire interjected. “She’s crabby because she hasn’t started editing her project yet.”
You gasped, “Why would you just announce that, Claire? I didn’t wanna be reminded of that.”
“[y/n], you’re gonna be fucked if you don’t get that shit done. It’s due next week.” Another friend told you.
You groaned, “Yes. I know that. But I’ve been killing myself practicing for the show every night. And when I finally sat down to start editing, I didn’t know how to work the damn software!”
“You don’t know how to work EasyEdit?”
“No,” you sighed. “I missed class that day. I tried to learn on YouTube, and that confused me even more. So, I have since then given up.”
“Hm,” John hummed. “You know who’s really good with EasyEdit?”
“Who?”
“Gube,” John answered. This prompted Matthew to lift his head up at astronomical speed, his eyebrows furrowed in confusion. “He taught me how to use it. He could help you, [y/n].”
“John...” Claire said.
“What, Claire?” John replied. “[y/n] needs help and Gube can help. I’m just saying.”
You cut your eyes over to Matthew, who was watching you, but he quickly turned away when you made eye contact.
“You’re not clever,” Claire shook her head. “You’re nosey is what you are.”
“Nosey?” You pipped, tapping Claire’s arm. “What do you mean nosey?”
“I mean, if you and Gube just...” John said. “I’m gonna say it - fucked - one good time, the two of you could get over this whole rivalry already.”
“And stop arguing all the damn time,” someone added. “The shit’s annoying.”
Your jaw had been dropped since the word ‘fucked’ was uttered. You looked up at Claire who gave you a sympathetic smile.
“I-“ You stuttered. “I...never say that again, John! Ever. Ew!”
“Ew?” Matthew exclaimed. “You’d be lucky if I tossed you a bone.”
Your jaw dropped even lower, stunned by Matthew’s words. “You arrogant son of a bitch,” you muttered. “And this is who you want me to allow near my final project?” You directed at John.
“Hey, if you don’t wanna fuck me, it shouldn’t be a problem, right?” Matthew taunted, biting his lip and tilting his head.
“No. I don’t wanna fuck you! I also don’t want to spend any more time with you than I absolutely have to. So I will learn EasyEdit by myself.”
“Okay,” Matthew shrugged. “You’re not gonna figure that shit out in time, but fine, princess. Be stubborn.”
You rolled your eyes at him, shaking your head in annoyance.
“[y/n], let Gube help,” Claire said. “You’re gonna drive yourself insane with that and the show coming up, plus finals? Just this once.”
You looked over at Matthew, instantly getting angry again. Hate is a strong word. It’s a very, very strong word. And you’d never use it against anybody. Ever. Except Matthew Gubler. That may sound a bit dramatic, so to clear up any confusion, here’s a composite list of every asshole, dick, bastard, bitch-ass move he’s made in one semester:
1. Broke your editing equipment trying to do magic tricks in class.
2. Didn’t apologize.
3. Called your last documentary “uninspired, dry, a little like a lullaby.”
4. Took the last spot for an internship over Christmas break.
5. Which he knew you wanted.
6. Refused to partner with you on a final project because “you can’t even get to class everyday.”
7. In front of everyone because he’s a jackass.
8. Told you that you were insane for majoring in film making AND ballet.
9. Proceeded to tell you that you look better in a leotard than a suit.
10. Fucked your roommate.
11. While you were in the room.
12. Insisted that Wes Craven is a better horror director than Tim Burton? Is he dumb?
13. Calls you ballerina barbie, short stack, princess, anything other than your actual name.
14. Won’t drop dead.
And, because you’re not going to let anyone treat you that way, here’s a list of things you’ve done in retaliation:
1. “Accidentally” stepped on his canvas.
2. 3 times.
3. Uploaded a video of you calling him a dick in place of his documentary.
4. Yes, he did play it for the class on accident.
5. Told him you didn’t want to be his partner anyway since he walks around stoned 24/7.
6. Laughed.
7. Told him he’d be a good ballerina. His tiny dick would fit perfectly in a leotard.
8. Fucked his friend. While said friend was supposed to help Matthew with his project.
9. Told him none of Edgar Allan Poe’s work was actually interesting enough for screen time. (He almost passed out, he got so mad.)
10. Told him his mismatch socks were dumb.
11. Consistently call him asshole, dick, jackass, or just Matthew. All synonyms.
12. Refuse to let him mess with you.
So, the idea of him helping you with your project, coming into your room, bothering you for hours on end, was a ridiculous thought. You should punch John for even mentioning it. Except. It wasn’t a bad idea.
“Hey, pants stay on,” Matthew said, giving you a smirk. “Boy Scouts honor.”
Everyone was looking at you. It made you queasy. Annoyed. Angry. And you couldn’t take it. So, you sighed heavily and cut your eyes towards Matthew. “Fine,” you grimaced. “Fine. Monday night. You will teach me how to use EasyEdit. And then we can all drop this.”
“Ah, success,” John cheered. “I’m not worried, though. Look at [y/n], she’s so innocent. She looks like she belongs on top of a Christmas tree. She does ballet for crying out loud. I doubt fucking is on her to-do list.”
“And on that note,” you pushed yourself off the bed. “I’m going to my room. Goodnight.”
Your room was just down the hall, and you showered, changed, brushed your teeth and got into bed in all of 30 minutes. Just about to fall asleep, you were disturbed by the sound of keys jingling in the door. Sloppy footsteps stumbled into the room, accompanied by silly giggles.
Thinking you were asleep, your roommate admired your sleeping frame, “Awwww,” she cooed. “Precious, precious, [y/n].” She walked over to you and rubbed your shoulder.
“You’re crazy to not wanna fuck Matthew,” she whispered, chuckling. “You don’t know what you’re missing, kid.”
And you stayed still, silent, pretended to snore. All while Claire crawled into her bed.
When Monday rolled around, you spent the entire day with a chip on your shoulder. Claire kissed the top of your head and insisted you’d be fine, that your project would be done by the end of the night and you’d be grateful for Matthew’s help. But she knew that was a dead cause in her heart of hearts. You both knew it’d be a miracle if Matthew and you made it through 15 minutes of editing.
When she left to go to a friend’s place, you changed into pajama pants, combined with a cozy cropped button sweater. You sat at your desk, and waited. You’d told Matthew to arrive at 7.
He got there at 7:59.
By then, you were laying in bed, pissed and upset that you’d actually been convinced to give Matthew a chance. He knocked on the door, and you answered with an attitude. “Go home, Matthew.”
“Don’t be like that, short stack,” he sighed, following you as you stomped into the room. “I got caught up. I’m sorry.”
“Yeah? What’d you get caught up with? A gram?” You spit.
He laughed, “Haha, so funny. No, I was not getting high. I was working on my own project. That I finished. Ahead of time. Can you relate, [y/n]?”
“Get out of my room,” you scoffed. “I asked you for one thing. One. And you couldn't even do that. You knew how important this project was to me, and you didn’t give a fuck. I wasted time waiting for you that I could’ve been working or rehearsing! I—Are you listening?”
Matthew’s eyes had been concentrated solely on your chest, “Are you wearing a bra?” He asked.
You took a step back, stunned, blinking rapidly as you searched around the room. “I’m sorry,” you said. “I’m just trying to find where the hell that came from?”
“It came from that itty bitty shirt you’re wearing,” he replied with a shrug. “Doesn’t really leave much to the imagination.”
“Stop staring at my tits!” You shouted, face turning red. “God, Matthew, I can’t stand to look at you right now. Just, leave. Please.”
He did not stop staring at your tits. Not for a very long time. But when he did, he had this look in his eyes. Like a wire had snapped. And he kissed you. Cupped your face in his hands, pulled you close, and kissed you. You pressed your hands against his chest, face contorting in shock and confusion.
You pushed him away, lips retracting with a sharp smacking noise. Saliva dripped from your lips, and you stood there, huffing and puffing like the two of you had just run a mile. “What the hell was that?” You snapped, your fingertips lightly touching your bottom lip.
He didn’t reply. He was just as speechless as you were. Speechless, and confused, and out of breath, and so, so pretty. He was so pretty. Has he always been that pretty?
You grabbed onto the hem of his shirt and pulled him back in, pressing your lips together in an aggressive collision. Matthew’s hand gripped onto your hair, his body pushing itself against yours in an eager attempt to get as close to you as possible. His other hand made its way to your waist, gripping onto your skin so hard, his nails left marks. Both his hands began to snake down your body, landing on the back of your thighs.
Very suddenly, Matthew scooped you up in his arms, yanking your feet off of the ground. You let out a breathy ‘oof’ as you found yourself perched in his grasp, your legs wrapped around his torso, your hands on his shoulders. He supported your weight so easily, all while sliding his tongue into your mouth.
He carried you over to your bed, where he abruptly dropped you onto the mattress, and looked down at you with a lustful grin. Standing beside the bed, he leaned in as if he was going to kiss you — slowly, with his hands reaching out to touch your body — but he didn’t. Instead, he placed his hands on your ribs and pushed your sweater up, over your breasts to reveal your chest.
“I knew it,” he whispered. “I knew you weren’t wearing a bra.”
Your breath caught in your throat, before you released it shakily. His lips wrapped around your nipple, wetting it with his tongue and applying light suction. A soft moan left your mouth, and you gripped onto his hair in ecstasy. He couldn’t stop himself from smiling. He sucked harder, to the point of pain, just to hear you make some noise. Any noise. When one nipple began to pulse between his lips, he moved to the other, leaving a trail of love bites between them.
The heat between your legs was suffocating, and you rubbed your thighs together for some relief. Matthew noticed this, and proceeded to stick his hands down your pants, fingers sliding underneath the band of your underwear. He smirked at how soaked you were already and rubbed your clit as he licked a trail up to your neck. You tightened your thighs around his hand, gasping at the friction and pulling at the bedsheets.
The sound caused Matthew to take in a sharp breath of air. His cock was pressed against the zipper of his jeans, and was getting to the point that it was excruciating. So, as he massaged your nerve, he undid his pants and pushed them down his legs.
He nibbled on your ear, and as you gave him a quiet moan, your eyes flickered down to look between your bodies. Flushed, and horny, and suddenly so desperate, you grabbed onto Matthew’s large erection and pressed the tip against your clit.
He grunted and pulled back to stare you in the eye, a sly grin creeping onto his face. He laughed, “I knew it. I fucking knew it. Innocent? Innocent, my ass.”
As you rolled your eyes at him, he kissed your lips softly, hands holding onto your thighs. You positioned his cock at your entranced and allowed him to press into you. He stood up straight, watching his cock disappear inside you, slowly, steadily, before he suddenly slammed into you. The sound of skin colliding on skin mixed in with your and Matthew’s moans, and he watched your head roll back in pleasure.
He licked his lips, smirking. And he did it again. And again. And again. Pulling out all the way and pushing back into you. Hard. The sensation struck your chest, and elicited vulnerable moans from you every time he pounded you. Matthew instantly began to speed his hips up, nails digging into your thighs as he pressed your legs open for him. His used all his strength to fuck you, your head knocking into the wall with every thrust. It was sloppy and messy and you couldn’t stop whimpering. Your eyes were screwed shut, and when you opened them again, the first thing you noticed with his chain. The gold medallion dangled in your face, Matthew’s lips pressed against your cheek.
Absentmindedly, you tangled your fingers in the chain, tugging on it as your volume increased. “Fuck,” you muttered. “Oh, fuck.”
He brought his hand up to your face, placing his thumb on your bottom lip. “Open your mouth,” he ordered, quietly, softly. And you did it without thinking. His thumb slid into your mouth, twirling around your tongue and stifling your moans.
He removed his hand and placed his thumb on your clit, wetting the skin with your own saliva. You let out a loud yelp at the new sensation, and a bubble instantly formed in your stomach.
Oh, no, not Matthew, you thought. Don’t let it be Matthew.
But with his cock and his hips and the way he kissed your neck and rubbed your sensitive nerve all at once. You came, you came with a fit of pornographic moans, trembling and writhing around on the bed.
And it was Matthew — the first guy to make you come. Ever.
He licked his lips as he watched you come undone beneath him, proud of himself — to the point of cockiness. Giving you a few more forceful pumps, he pulled out of you and released himself onto your chest, watching the fluid cover the hickies he’d left there.
He looked angelic on top of you, moaning, panting, swearing under his breath. But the moment he finished, he stepped back, fastened his pants and walked away. You propped yourself up on your elbows, watching him in a daze.
Matthew logged onto your computer, pressed a few buttons and then closed the laptop shut. Then he left.
However, the next day he sent you an email. Your project. Fully and perfectly edited.
Okay. So, that happened. They said it would happen and it happened. Didn’t necessarily make you hate Matthew any less, but it happened. It was good. You hated to admit it. And it was all you could think about. You couldn’t even touch yourself or hold your pillow without thinking of Matthew. It was bad.
Especially, given the fact that after the whole situation, he decided not to talk to you. At all. Not in class, not while hanging out with friends, not even to pick a fight. Complete and utter radio silence. He looked at you enough though. Not while you were looking at him, of course. So, as far as you knew, you were far off of his mind. But life had to go on. You had to focus on school, and on top of that, you were due to perform in NYU’s production of Swan Lake in less than two weeks.
You landed the main role of Odette, meaning for the next two weeks, you had to eat, sleep, breathe ballet. You practiced for hours on end, barely saw your friends, which gave you a good break from seeing Matthew.
Opening night rolled around and you were so nervous, you thought you might puke. Only a freshman, it was a miracle you landed the role in the first place, which meant your performance tonight was a make or break moment. Claire could tell you were sick to your stomach and tried to distract you by taking a bunch of pictures on her phone.
“Smile, pretty girl!” She beamed, the flashing going off in your face as you posed. “[y/n], you’re gonna kill it! I’m so excited! Aren’t you excited?”
“Yeah...” you whispered. “Deathly excited.”
“Aw, poor baby,” she swung her arm around your shoulder. “Don’t worry. I’m gonna be front and center, cheering you on. Just focus on me, okay?”
You smiled and nodded, taking in a deep breath. “Okay.”
Your body was on autopilot out on stage. The movements you’d practiced everyday, for hours and hours on end, just flowed. The lighting in the audience was dark, but you could just barely make out Claire’s figure under the soft hue.
It wasn’t until the finale, when you stood ready for your closing performance, that the lights switched to their full intensity and you noticed a hand resting on Claire’s shoulder. An arm resting behind her head. Someone whispering in her ear, making her laugh.
Matthew.
He was here. He was here and he was with Claire. He was with Claire and he was watching you. And it made your stomach feel weird. But then the music kicked up. So, you had to go. You fell into your dance, your rhythm and for some reason, you could not stop staring at Matthew.
Every twirl, you made him your focal point. Looking at him again, and again, and again. Until the lights went out.
Supporting ballerinas cheered you on as you walked offstage, throwing flowers at your feet and giving you applause. Your instructor marched right up to you, kissed both sides of your face and embraced you. It was a wonderful feeling, but right then, you were drained, emotionally, mentally, physically, you needed some rest.
You locked yourself away in your dressing room, taking a seat in the mirror and beginning to remove your tights. Pressing a makeup wipe to your skin, you jumped, startled by a knock on the door. You rose from your seat and walked to the entrance casually, expecting Claire to greet you.
But you froze, as soon as you opened the door. Eyes glazing over the person in front you, your breath caught in your throat. “Matthew.”
“Hey,” he smiled. He looked you up and down — your naked legs, your breasts poking through the thin material of the leotard. “You...you were amazing tonight.”
“Thank you,” you whispered. “Bye.”
You attempted to close the door on him, but his put his elbow against the frame, stopping it in motion. “Whoa,” he exclaimed, pushing his way into the room. “What the hell is your problem?” He closed the door behind him.
“My problem is that I’m very tired, and still need to change, and greet everyone waiting for me. So, I don’t have time for this.”
“Time for what?” He crossed his arms over his chest.
You ducked your head down, “Nothing. Nothing. You need to leave.”
“Hey, hey, hey, ballerina barbie,” he mocked. “What’s your deal?”
“I don’t have a deal! I have nothing to say to you Matthew. Same way you have nothing to say to me.” You scrunched up your face in a frown.
“I...” he paused, laughing under his breath. “I never said I didn’t have something to tell you. In fact, I’ve been meaning to tell you something.”
You looked up at him — the gel in his hair, his black button down shirt flowing over his belt buckle, his dark eyes, his lips and the way they were pouting just a little. And like a magnet, you found yourself being pulled towards him. You jumped into his arms, hands on his face, and connecting your lips, mouths open, tongues touching.
Matthew held you up, moaning against your lips. “Mm,” you hummed. “Wait, what if someone comes in?”
Matthew thought quickly, hiking you up in his arms and shoving your back against the door. “Well, now they can’t get in, can they?” He mumbled, leaving kisses along your neck.
Your jaw dropped and you started to undo his belt, freeing his cock from his pants. He grunted against your skin as you stroked him, your head leaned back against the door, your chest heaving. You used your other hand to pull your leotard to the side, revealing your throbbing core.
Matthew smirked, letting you guide his dick to your entrance, and pushed his way into you swiftly. You instinctively wrapped your arms around his shoulders, burying your face in his neck to keep yourself quiet. His thrusts were quick, rough, messy. He was much more vocal this time, making no effort to stay silent.
“Fuck,” he moaned in your ear. “F-fuck, I forgot how good your pussy is. Fuck.”
The feeling was mutual. For the past month, you’d be wondering what the hell about Matthew had you so stuck. So fixated on him. And this was it. He filled you up perfectly, could manhandle you however he wanted, and always, always made sure you came.
He fucked you harder when he noticed your orgasm nearing — your quickened breaths, frequent moans and whines, and your legs tightening against his torso. “Oh, my God,” you whimpered.
“Shit, are you gonna come?” He asked. “Good.”
Breathless, speechless, you stared into his eyes helplessly as your body began to crumble. All power left your body and you held onto his shirt for dear life. He gave you a small smile, and flipped his hair out of his face, looking down at his cock. He could pinpoint the exact stroke that did it. The one that sent you into a state of euphoria, sent your eyes rolling back, your body into intense shock.
You let out a long and weakened sigh as the wave washed over you, and Matthew continued to plow into you like nothing was happening.
“It’s so cool how your pussy tightens up when you come,” he chuckled. “It’s hot.”
You rolled your eyes at the sound of his voice, clawing at the back of his neck. His breathing became ragged and hoarse, and he had to pull out of you before he came. He jerked himself off until he exploded onto your clothing. And with you being dressed in all black, his stains stood out perfectly on your costume.
This time, he gave you a kiss on the cheek before he left.
The week after that was finals week. And neither of you could be bothered to reach out. Despite the not-so-subtle confession of bitterness and the very intense orgasms you shared, you and Matthew simply went back to not talking. Your friends thought it was strange, even commented that they missed the bickering. The two of you shrugged in response.
Most of your dorm room was in boxes by the time you finished your last final exam. Claire was slower to pack up than you were, considering she only lived an hour away, but she applauded you for your determination. The day Claire did start packing was the day before you left for the summer. The two of you spent the day getting everything cleared out, cleaned, squared away.
While the two of you sat on your bed, watching Netflix, a knock sounded from your door. Claire hopped up and headed towards the entrance, opening it with a grand smile. “Gube!” She shouted, instantly opening her arms for a hug. Matthew wrapped his arms around her waist and picked her up, carrying her into the room with a smile.
“Are you about to leave?” She asked him, holding onto his arms as he placed her feet back on the ground.
“Yeah, my mom’s here. So, I wanted to stop by and say goodbye,” he nodded.
“Aw, Gube, you softie,” she giggled. “[y/n], come say bye.”
“I can say bye from right here, Claire,” you replied. She gave you a look, and you felt compelled to get off the bed. So you did, you approached them, “Bye, Matthew.”
“Bye, shortcake,” he laughed. “Bye, Claire.” He pulled your roommate into another hug, while you stood there, crossing your arms in annoyance.
Matthew peeked at you over Claire’s shoulder. One hand rubbed her back and the other reached out to you, holding a small note.
Your eyes went wide as you looked at him, then the note, then Claire. You ripped the paper from his hand, and stuffed it into your pocket right away. He smirked at you, and turned his attention back to Claire.
“Hey,” he said to her. “Come back to my place, I want everyone there to show my mom I actually have friends.”
Claire chuckled and nodded, “Okay,” she shrugged. “Let’s go. [y/n], you coming?”
“Uh, no,” you shook your head. “I’m gonna keep packing, but I’ll text you later.”
“Okay,” Claire smiled, and she let Matthew whisk her away.
You sighed, and as soon as the door closed, you pulled the crumpled piece of paper from your pocket. You opened it up to reveal — not a meaningful message, not even a few words. Just one string of numbers, writing in his handwriting:
505.
[PART 2.]
#mine#matthew gray gubler#matthew gray gubler imagine#matthew gray gubler fanfiction#matthew gray gubler fic#matthew gray gubler x reader#matthew gray gubler/reader#matthew gray gubler smut#college!matthew#esny
1K notes
·
View notes
Text
Heretic/Hexen
I love Doom. I’ve never made an attempt to list my favorite video games in a numerical order, but if I did, Doom would likely be one of the highest, if not #1. I’m also a big fan of the “dark fantasy” aesthetic, so discovering the Heretic/Hexen series was a treat, to say the least.
Released in 1994, Heretic was built using the Doom engine by Raven Software, with John Romero himself having helped the team set up their computers and teaching them the basics of how he would make maps for the game. With this in mind, you’d be forgiven for saying what a lot of reviewers said at the time: this game looks like a Doom reskin with a fantasy theme.

This sentiment mostly applies to the first game, Heretic. But in a sea of other “Doom clones” released at the time, it is definitely one of the more competent ones. You play as Corvus, one of the few surviving elves in a world overtaken by the evil Serpent Riders, who have decided to exterminate all the elves because their magical powers make them resistant to the mind control spells the Serpent Riders use to conquer and subjugate realm after realm on their quest for world domination. Unsurprisingly, Corvus is out for revenge, and the end goal of the game is to hunt down and kill the first of the three Serpent Riders, D’Sparil.
The gameplay in Heretic is more similar to Doom than in the later games, but it does the Doom formula well. Most weapons have a distinct counterpart in the game it is based on: the Elven Wand is your pistol, the Dragon Claw is your chaingun, the Ethereal Crossbow is your shotgun, and so on. They are satisfying to use (save the wand, arguably), and look deliciously fantasy-eque, with beautiful spritework. The levels are split into a familiar structure, featuring three episodes with nine levels each (and two more episodes released as an expansion pack). The enemies are varied, with pretty animations and distinct sounds, and play into the Doom experience very well in that the combinations and locations of enemies in each area lends itself to very different strategies (although “run really fast and blast everyone with the crossbow” rarely fails on most difficulties). The two expansion episodes are considerably more challenging, and will require more quick thinking and ammo, sorry, mana conservation. Definitely a fun romp.
The sequel, Hexen, is where the series starts finding it’s own unique twist on the genre, and is the by many regarded as the “classic” that really put the franchise on the map. Again, you’re playing as a vindictive hero on a quest to liberate their realm from the Serpent Riders. This time it’s Korax, the second out of the three. However, now you’ve got to pick a class. This is the first big difference you’ll notice when starting the game. Corvus is MIA from his last adventure, and instead your choice of protagonist is between Baratus the Fighter, Parias the Cleric, and Daedolon the mage. While the game isn’t an RPG, these characters all have different stats when it comes to running speed and base HP. More importantly, they each have access to their own unique set of weapons. Mana is shared between the weapons, which are now split into green, blue and dual mana types, but they all behave very differently. For example, the fighter’s weapons are mostly of the melee variety and consume mana rapidly only for special attack modes, as they can still be swung without mana. The mage on the other hand uses his bare hands to cast a lot of his spells, but they do not burn through mana nearly as quickly. Unsurprisingly, the cleric is a hybrid, and uses both a spiked club and a mix of magical weapons. An “ultimate” weapon is also available to each class, which must be assembled from parts and consumes both blue and green mana, but has really devastating attacks (the cleric’s “Wraithverge” summons ghosts that scream like banshees and tear every nearby enemy to shreds; it’s just as metal as it sounds)!
Beyond the class differences, the level structure is the other major difference between Heretic and Hexen. Instead of a linear series of levels, each episode is now defined by a hub level with many branching areas that can usually be visited in any order. You need to find key items and activate switches in each one to open the way to the next world, and many areas within each sub-level are also locked until you find the right key/switch in a completely different area. As would be expected, this new spin on the level progression comes with both pros and cons. Few players today will be able to complete the game without ever looking at a walkthrough, and based on some comments I’ve read, this is one of those games that many people in the 90s would only dream of beating on their own. That said, there are very few instances where pulling a switch won’t at the very least give you a short message indicating it’s purpose (i.e. “A door has opened in the Wastelands”), and even then those with enough patience will rarely feel completely lost if they’re willing to backtrack systematically through every area over and over, taking note of every single locked door and unreachable area. I doubt it’s something the majority of gamers enjoy doing, but if you’re the type who would rather give up before accepting a hint, I’m happy to report that this game IS beatable even with your play style.
On the other hand, this structure also adds a lot to the feeling of being on a dangerous, epic quest. Metroidvania fans know that there are few things as satisfying as picking up a key and thinking “hey, I recognize this symbol! Now I can finally see what’s behind that door in the swamp!”. Uncovering the world bit by bit in this fashion really lends an air of mystery to the land of Cronos (where Hexen is set), and truly gives you that classic feeling of “pride and accomplishment” when you’re finally able to descend into that forbidding temple that’s been looming on the horizon for so long. And for those of you who are worried you won’t get to blast enough monsters to get your fill, this game still has you covered.
The enemies in Hexen are just as threatening as those in Heretic, and they look even better this time (seriously, if you enjoyed the visual aspect of Heretic, Hexen steps it up tenfold with truly gorgeous sprites, textures, animations and even some environmental visual effects, like thick mist and dead leaves blowing in the wind). You’ve got a fantastic cast of evil wizards, zombies, dog-like orcs, Minotaurs and more types of dragons and dragon hybrids than you could shake a Mace of Contrition at. A good amount of the baddies are initially very similar to those in Heretic, but their attacks are more distinct, varied and dangerous, and there are a whole lot more of these guys this time around. If you have the enemy counter turned on in your automap it won’t be uncommon to see the numbers exceed 400, and some of the weaker enemies will even respawn after a while. Don’t worry though, it’s not frequent enough to be stressful, but instead it really helps the backtracking from getting too tedious. Key hunting is a lot more intense when you never know if an Ettin is waiting around the corner to cave your skull in! However, if you’ve seen any other reviews of this game, you’ve heard a lot of grief expressed in regards to the Minotaurs (and their big brothers, the Maulotaurs). They aren’t the strongest foe in the game, but their shields, their surprise lighting bolts and their sheer numbers can definitely be a pain in the gluteus maximus. On the plus side, it makes killing them all the more satisfying, and you’ll find yourself experimenting quite a bit with your weapons and items to figure out the safest and quickest way to end their existence.
That’s right, I forgot to mention the items. The third and last major difference between Doom and these games is your inventory. The items are largely the same in all the games in the series, and using them can be a bit of a hassle unless you’re willing to fiddle around with your control settings to find a setup you prefer (I would usually bind the item selection keys to the scroll wheel and use them with the right mouse button). Visually, the inventory is similar to that seen in Duke Nukem 3D, and just like in that game, you’ll likely find yourself using some items a lot more frequently than others. Health and mana refills are a major aid, and beyond that you have things such as invisibility, invincibility, flechettes (despite what the name says, they’re more like grenades or mines, depending on your class), and a magical book that gives your weapons a much more powerful firing mode for a short time (although this item is mysteriously absent in Hexen). A special mention also goes to the Morph Ovum/Porkelator/Seal of the Ovinomancer, which transforms an enemy into a chicken/pig/sheep, respectively. A lot of fun to use, and and immense help against some stronger enemies if you’re low on health and/or mana.

If you didn’t find yourself using these items all too much in Heretic or Hexen, the following game might just give you a reason to. Hexen II is the third game in the series, and the final chapter in the Serpent Riders saga. This time you’re in the realm of Thyrion, and the last Serpent Rider, Eidolon, is the one who must be slain to free the land from his curse. In terms of gameplay, Hexen II is a lot more similar to Hexen than Hexen was to Heretic. You’ve got the same type of hub level structure, and you’ll again pick a class at the start, although now your choice has expanded, consisting of the Crusader, Paladin, Necromancer and Assassin, as well as the Demoness in the expansion (yes, all these games have expansion packs and they’re all worth playing in that they’re more of the same, but expanded, duh, and more polished).
The major difference this time around is one you can probably tell immediately from the screenshot: yes, Hexen II goes 3D (and in an exception to the common rule at the time, it is NOT titled “Hexen 3D” despite technically being the third installment). Specifically, the game uses a modified Quake engine. As mentioned, the core gameplay remains largely the same as in Hexen, but the level designers definitely did not waste that extra dimension. The levels are less expansive here, but a lot more complex and full of hidden passages, surprising loops and a whole lot of verticality. Scurring across a courtyard with archers raining arrows down on you from balconies is just as tense as it is satisfying later on to reach the same balcony and return the favor to any ghoul unlucky enough to find themselves below. Overall, the layout and progression in each area feels like it’s been given a lot more consideration and has endured more testing. Most of the time, the key hunting in each area feels more self-contained, and when it isn’t you rarely feel like you have no idea where to go. This is because every lock has been designed to feel more like a puzzle. In practice, your goal is still to find an item and bring it somewhere, but the locks and keys themselves are much more distinct, which helps you remember what to do and where to go. Instead of levers and typical keys, you find yourself looking for artefacts such as potion ingredients that will let you turn metal into wood, pieces of a broken mechanism or symbolic relics that must be placed in the hands of a statue to go in line with a prophecy. There are also more direct instructions in the form of book entries and inscribed stone tablets, which are very helpful in those cases where the puzzle might require a bit more than just item hunting, such as pulling switches in a certain order or lining objects up to create a pattern. It’s still unlikely that you’ll breeze through the whole game without getting confused, but you’ll rarely be at a complete loss; you’ll usually know what you’re looking for or what you’re trying to activate, even if you may need a walkthrough to find a specific hidden passage or to figure out exactly what a contraption does.
Overall, Hexen II feels like a refined Hexen, with more care put into making every area feel very distinct. It is absolutely not any less challenging though. The areas might be smaller in terms of actual units of measurement, and there are definitely fewer enemies on the screen at all times, but this is compensated for in spades. The third dimension adds a thick layer of complexity to every level, and the enemies hit HARD. If you got into a rhythm in Hexen of circle strafing, dodging and picking off targets in an order of perceived priority, you’ll have to learn to dance to a different tune here. Some enemies will close in on you incredibly quickly, and many of them have the ability to turn you into minced meat in a matter of seconds. Now more than ever is when you’ll want to shoot with a steady aim, use your items wisely, keep all the possible paths of retreat in your mental map, and scour every nook and cranny for health and mana to stand a chance against some of the stronger mooks. Hexen II as a whole is a lot more fast paced and tense and also has a more dramatic views and set pieces along with some extra bits of storytelling scattered around the world for those interested.

So, what are my thoughts on the Heretic/Hexen series as a whole? In short, it’s a treat. Combining classic fantasy tropes with the hectic action of Doom (and Quake) was an idea that was bound to happen sooner or later, and in this case, it worked out really well. There are of course other examples of this iconic clash of genres (check out Amid Evil for a totally kick-ass recent example!), but from what I know, the Serpent Riders saga is the one with the most lasting appeal. All the games strike a great balance between frantic, gory FPS action and the slower paced mystery and brooding sense of evil that only dark castles and dungeons can provide, with each game leaning a bit more toward one direction or the other. At a core gameplay level, there is nothing absolutely groundbreaking about Heretic/Hexen, but every element is done well and with care, and the presentation oozes of 20th century gothic fantasy charm, both the visuals and music. If the first paragraph of this review made you go “oh, those are both things I like!” then definitely check these games out. Same goes for anyone who is simply curious about the history of Id software and the impact Doom and Quake had on the gaming landscape. My only warning to you before playing these games is this: keep in mind that these games are from the 90s. There’s a reason many people have memories of booting these games up, getting completely stuck and then never playing them again. That said, as long as you have an internet connection (how else would you be reading this?) and an average amount of patience, there’s a whole lot of fun to be had here. All the games mentioned above are available on Steam (and GoG as well, I believe), and play excellently with modern source ports: gzdoom for Heretic and Hexen, and Hammer of Thyrion for Hexen II are my recommendations.
Finally, there is another game in the franchise. Heretic II returns to the story of Corvus (from the first game) and continues the story beyond the Serpent Riders arc, but due to some licensing issues it is not available on neither Steam nor GoG. Technically you could still buy a physical copy of the game, and I’ve seen mentions of at least one fan endeavor to make the game more accessible on modern computers, but I have yet to check it out. Maybe in the future. For now, I hope you enjoyed this dive into one of the slightly less famous, but still very popular classic 90s “Doom clones”!
34 notes
·
View notes
Text
Mobile Life Simulators, Ranked (Part 1)

I downloaded a whole ton of mobile life simulator games over the past couple weeks and I realized it wouldn’t be plausible to rank all of them in one go so I’m breaking it up into parts with more similar games grouped together (can’t say when the next part will be made but I’m definitely planning on doing more at some point). Thank you to @creativeghost51 for recommending I cover the Sims games and other life sims!
It’s hard to define what ties these Part 1 games together (as opposed to some other groups like idle life sims and text-based life sims) but I guess the biggest similarity would be that all of these games involve your sim characters living in a home where they can freely walk around, and can interact with objects and each other. With the exception of Virtual Families Lite you can also decorate, customize and expand your home.
Something I noticed about all of these games is that you don’t really have as much freedom to experiment and build your own storylines and such as you do with, for example, the Sims computer games. While the games aren’t completely linear and there is a variety of things you can do in each of these games, they don’t really have the same sandbox quality that I think about when I think about the Sims. Which is understandable - these games are free to play and they’re made to be played mostly on people’s phones so they are expectedly more on the casual side. But I just wanted to point that out in case anyone was looking for something like the Sims to play on their phones or tablets. I haven’t really seen a mobile game in existence yet that is going to give you that same life sim sandbox experience.
Anyway, here’s the ranking rubric for these games (I’ll go into more detail about all of these scores under the read more):

***
***
***
1. Home Street
Developer: Supersolid Ltd
Release Date: Oct. 10, 2017
I was actually really surprised by this game - while it is more marketed as a home design game than a life sim it has a lot of similarities to games like The Sims Mobile; you have a character you can customize and dress up in a wide variety of outfits, you can interact with and build relationships with other characters/players (although only friendships, not romantic relationships, and you can’t have kids) and you do hobby-like activities such as painting and cooking.
While there aren’t personality traits or careers in this game, you save up “ideas”corresponding to different emotions or attributes, which function as crafting materials to go toward your hobbies. Through your hobbies/crafting abilities you can complete jobs for other characters, like selling them vegetables from your garden or giving them something you’ve cooked.
🏡 Character Design: 3/4 (while the ability to customize your character’s facial features and such isn’t as advanced here as it is in The Sims Mobile, it still has a wider range of options than The Sims FreePlay and I prefer the art style of Home Street compared to FreePlay; there’s also a wide range of outfits and accessories and you can set different outfits for different activities)
🏡 Home Design: 4/4 (although you’ll probably notice from my screenshots that I’m not exactly a home design aficionado, I found placing decorations, walls and floors etc in this game to be a smoother and easier process than in any of the other games and I like the art style of the objects as well. There’s a good range of items, including ones your character can interact with in different ways, and I like having the various hobby workstations embedded into the home where you can place them wherever works best for you, which is also how it is in the Sims games. There’s a lot of potential for someone who’s more adept at home design than me to create really fun themed rooms and whatnot)
🏡 Gameplay: 9/10 (I really loved the gameplay concept in this game more than in any of the other games, I love leveling up to get new workstations and crafting items to fulfill tasks for other characters. The task concept kind of reminds me of Animal Crossing in a way. While the main screen can be a little busy at times, overall the game is really easy to navigate and does a good job of guiding you with goals and tasks without making it feel like you’re restricted to only following those exact tasks. The characters and dialog are also charming and make you feel like you’re progressing through a story as you level up)
🏡 Playtime vs. Wait Time (without paying to speed up tasks): 4/4 (while you do need to wait for your hobbies/crafting tasks to complete, they don’t really take that long and you can save time if you craft things ahead of time; also there are a lot of things you can do while you’re waiting. The wait times might get longer as you get further in the game but I played for about two weeks and so far I haven’t felt really stalled at any point)
🏡 Total: 20/22
2. The Sims Mobile
Developer: Electronic Arts
Release Date: March 6, 2018
I was also pleasantly surprised by this game, since I had played The Sims FreePlay years ago and didn’t really like it, but this one I liked a lot more and had quite a bit of fun with. As I mentioned before, it doesn’t have the same sandbox quality as the computer Sims games, but the character customization is the best out of all the life sims I played and there’s such an enormous catalog of different clothing and home design items to choose from, there are definitely a lot of fun possibilities.
There’s a fairly wide range of things to do although I did feel a little more confined to the tasks the game set out for me - for example I went with the careers that I had objectives for rather than picking careers I’d really want my character to have, plus you need to wait until you level up to unlock careers so you have less freedom in that aspect.
🦙 Character Design: 4/4 (This game actually uses sliding scales to customize different facial features and body types and such, and although it isn’t as advanced as in the computer games it is much more advanced than I’d expect for a casual mobile game and makes it a lot easier to make the characters look how you actually want them to. The catalog of things to dress your sims up in is also enormous and there’s a fun special fashion feature that creates unique clothes that boosts your stats for certain activities, which is why there are hearts floating around my sim in the screenshot. Oh and there’s a social feature to give other people’s sims stickers based on their outfits, which makes dressing up your sim more fun and exciting)
🦙 Home Design: 3/4 (The home design here is pretty fun and there is a wide range of items, and I also like how there’s a score that goes up as you add more items and complete furniture collections. However I personally found the controls for placing a moving things a little wonkier than in Home Street and FreePlay, i.e. I kept moving things on accident or couldn’t get things to easily snap where I wanted them to, and the collections and goals did make me feel a little confined to selecting certain objects or adding things I didn’t need to fulfill the goals rather than going with my own style, although I suppose you could just ignore the goals if you wanted to)
🦙 Gameplay: 7/10 (This game is fun although it can get quite repetitive since one of the main things you’ll be doing is “events,” which mostly involves just tapping things or waiting a certain amount of time for the tasks to complete themselves. The “events” in this game kind of reminded me of the tasks in the Kim Kardashian game which I also played years ago lol. However there are things to do besides events and the events do have a little more to them than just tapping; when I say tapping I mean tapping task options that sometimes have quirky, funny names and there are also “risky” tasks that have bigger rewards but a certain chance of succeeding or failing etc. There are little bits of dialogue as you progress through your career, relationship and hobby chapters and there are also seasonal/limited time activities you can do that add more fun and variety and chances for rewards. However I still wish there was a little more variety and flare to the “events” aspect, which made up the bulk of my playtime)
🦙 Playtime vs. Wait Time: 4/4 (Like in Home Street, there is waiting involved if you’re waiting for events to complete and you run out of energy to do the tasks that speed them up, but you can choose whether to have a longer event or a shorter event and you can also have one sim be running an event while doing something else with the other sim. I was able to choose shorter event times if I wanted to stick around for a bit and then run a longer event when I was logging off for a while so I could reap the rewards when I came back. The amount of time you can spend playing continuously here is much better than a lot of other mobile games that involve an energy system)
🦙 Total: 18/22
3. Virtual Families 3

Developer: LDW Software, LLC
Release Date: Sept. 17, 2020
(Note: Please disregard how barren my home looks here, this was the last game I started playing so I didn’t progress very far but I feel I can still base my scores on what I’ve played so far and what I can see available that I just haven’t unlocked/can’t afford yet)
The Virtual Families games are all pretty similar to each other to be honest, but the most recent version is definitely the most fleshed out and the least ugly. There are more things to do, more variety in the sim designs (here they’re called “adoptees”) and there are actually nonwhite characters which I’m pretty sure there weren’t any or were barely any in the last two games. You still can’t customize your adoptees though, just flip through the options to pick the ones you like the most.
I kind of struggled with the Virtual Families games because they run on real time and my adoptees would end up severely neglected when I just didn’t have time to play, but there is an option to pause when you’re away, I just didn’t want to and wanted the game to progress naturally.
What I do really like about Virtual Families is that the adoptees have minds of their own and you can kind of watch them lives their lives and imagine little personalities for them. It’s a lot more casual than the other games and you probably have the most freedom here to do whatever you want although there are not as many things to do.
👨👩👧👦 Character Design: 2/4 (You can’t customize your own characters but there’s more variety here in the randomized designs and the art isn’t as ugly and janky as in the previous two Virtual Families games)
👨👩👧👦 Home Design: 2/4 (Home design isn’t as big of a thing in the Virtual Families games but there is a decent variety in furniture and objects to put in your house and you could probably have some fun with it if you’re creative. The art style isn’t that great though)
👨👩👧👧 Gameplay: 7/10 (Like I said, what I like is watching the little adoptees go about their lives or dropping them around to pick up the debris on the floor to look for collectibles. In this game there are also a lot of little funny random events like getting random phone calls or being given random choices to make that can have positive or negative outcomes. Occasionally you’ll be given problems to solve like needing to repair or hire someone to repair something, or once I lost the TV remote and had to look around my house for it then send someone to retrieve it. It makes the experience more varied and engaging and makes you feel more involved in progressing)
👨👩👧👦 Playtime vs. Wait Time: 3/4 (You can pretty much play indefinitely watching your adoptees except that can get boring especially if they’re just eating or sleeping. My adoptees kept getting really tired and I would just send them to sleep and exit out, then when I came back they would be out of bed and still extremely tired lol. But once they did get enough sleep I got to spend more time with them until they had to do something else boring like work or eat)
👨👩👧👦 Total: 14/22
4. The Sims Freeplay

Developer: Electronic Arts
Release Date: Dec. 15, 2011
This game was pretty disappointing when I played it years and years ago hoping to be able to play the Sims while on the go, and it’s still pretty disappointing now even though I have more understanding of why they can’t put the actual full Sims game on my phone, especially not for free.
The most disappointing thing about this game is not just the long wait times, which are annoying on their own, but the constant ads that pop up any time you do a task that’s more than like 3 minutes. Some of these ads aren’t even skippable. This made it pretty much unplayable for me up to a point, until I figured out how to strategize to do the shortest tasks possible, and until a limited time special event thing came up that gave me something else to do without having to constantly wait or dodge ads.
That being said, this game does have the unique charm of being a lot more similar to the classic Sims computer games, with a similar art style and even the same or similar music and sound effects. If you have patience (or if you pay to play) I can see this being a lot more satisfying and I’ve seen people do really cool things on this game as far as building storylines around their sims and building really impressive houses. But I don’t think this game really works as a casual free-to-play game, it’s much too frustrating and monotonous for the average player.
💚 Character Design: 2/4 (limited options for facial features and not as many options for clothing as The Sims Mobile, plus the low-poly look is not very appealing; I know it’s an older game but since it’s still being maintained I’d think they would have upgraded it a little and added more variety over the last 10 years)
💚 Home Design: 4/4 (editing your home in this game feels a lot like in the Sims 3 and like I said I’ve seen people build awesome mansions in this game so I think this is definitely one of the best aspects of the game)
💚 Gameplay: 5/10 (I was going to give it a worse score given the insufferable, unskippable pop-up ads but I did give it credit for the limited time/seasonal events which are easier to play uninterrupted and add some variety to the game, at least the one I played did. I was able to find this game somewhat tolerable also by only doing the shortest tasks possible to avoid ads and then exiting out whenever an ad popped so I could just come back a little later, although the need to do that was also annoying in itself)
(Note/Edit: A very nice anon pointed out that you can avoid ads in games that don’t need a constant internet connection by turning off your wifi/internet while playing, and this seemed to work with FreePlay as long as you are connected to the main game before you turn off internet! You won’t be able to do everything in the game but you can still play in the main world with your Sims in their houses and do longer tasks without getting an ad pop-up if you temporarily disable internet on your device. I’m not going to fully change the score and ranking since I don’t think that’s how the game was intended to be played and needing to turn off wifi to play is kind of inconvenience in itself but the game definitely is definitely more like a 6/10 or 7/10 if you do this.)
💚 Playtime vs. Wait Time: 2/4 (Absolutely would have given it a 1/4 but the event saved it from that, you can play for longer stretches of time when there’s an event, but of course that only applies to playing the event and not the main game)
💚 Total: 13/22
5. Virtual Families 2

Developer: LDW Software, LLC
Release Date: Dec. 6, 2012
All of the Virtual Families games are pretty similar overall so I won’t go into a lot of detail for these last two but basically Virtual Families 2 has more variety in things to do than the first Virtual Families, especially in terms of home design and things to unlock throughout the game. It also has a slight visuals upgrade, although the character designs are still pretty janky for something that came out in the 2010s imo.
Also this game has a bug where if you do something the tutorial was supposed to teach you before the tutorial is over, you’re forever stuck in tutorial mode unless you completely start over, just a heads up.
👨👩👧 Character Design: 1/4 (While the janky character designs do kind of give it a retro charm for me this game really didn’t come out all THAT long ago and the designs and animations are pretty wonky. I know Last Day of Work/LDW isn’t an enormous company like EA or anything but from what I understand they had relatively good amount of success in the early casual mobile games sphere, and since this is a sequel I’d expect a little more of a visuals upgrade than this but that’s just me)
👨👩👧 Home Design: 2/4 (Same deal as Virtual Families 3, more furniture options and opportunity to expand your home but art style is lacking and doesn’t feel like a central aspect of the game)
👨👩👧 Gameplay: 6/10 (Just a little less varied than VF3 and a little more than VF1)
👨👩👧 Playtime vs. Wait Time: 3/4 (Same exact deal as VF3)
👨👩👧 Total: 12/22
6. Virtual Families Lite
Developer: LDW Software, LLC
Release Date: June 3, 2009
Phew, you know a game is old when it has “Lite” in the title. This is one of the first smartphone games I EVER played (though when I first played it I didn’t have a smartphone, just a 1st gen iPod Touch); in fact, I’m not 100% sure, but this might actually be the first smartphone game I ever played, and I do remember it fondly. I want to make it clear that I’m rating it now on the experience of playing it today in 2021 relative to the other mobile games I’ve played and reviewed, being that the purpose of this blog is to hopefully give people an idea of what games they’d like to play, and hyping up a 12-year-old game as though it holds up more than it does for nostalgia’s sake doesn’t fulfill that purpose imo.
That said, this game does hold up fairly well, but definitely pales in comparison to its sequels and other options now available. This game is still worth playing if all you want is to have a little virtual family to check in on from time to time and don’t really want to do much else. Otherwise it doesn’t offer anything that its sequels doesn’t save for its nostalgic charm and uniquely terrifying art style.
👩👦Character Design: 1/4 (Same as VF2 but uglier)
👩👦Home Design: 1/4 (The house already has everything in it and you can’t rearrange anything, which is convenient but boring. You can upgrade your work stations though)
👩👦Gameplay: 5/10 (Same as VF2 but a little less variety)
👩👦 Playtime vs. Wait Time: 3/4 (Same deal as the other two, although watching your family is arguably more boring when there are less things to do, but it’s also more convenient when you already have all the furniture and appliances you need right off the bat so it balances)
👩👦Total: 10/22
If you got here to the end, even if you just skimmed through, thank you so much for reading 😍 Follow me for more mobile game reviews, articles and commentary 🥳
#life sims#sims#the sims mobile#the sims freeplay#sims mobile#home street#virtual families#life simulation games#home design games#games ranked#full review
41 notes
·
View notes
Text
How To Make Dragon Age Origins Good And Fun and not riddled with bugs (Quick guide to modding and the best mods, with links)
I figured out how to fix most of the most common complaints about DAO, so I’ve compiled the resources I’ve used here (including the mods themselves, helpful programs, and the best tutorial I’ve found).
A lot of this can be quite intimidating, but it’s quite easy once you get rolling.
TL;DR: Fix Memory Leak+ Dain’s Fixes + Quinn’s Ultimate DAO Fixpack + Origins Faster Combat With Dexterity = :)
How to start modding (and fix the loading times)
1. If your computer can’t already extract zipped files (which is necessary to use them) grab software for that - I find 7ZIP works fine, and it’s free. This will come up a great deal in grabbing mods, as well as the program for installing them properly.
2. This video explains how to mod DAO very well, and also shows how to (very easily) fix DAO’s memory leak (which is responsible for its eventually hideous loading times, and very important to fix especially if you use mods).
3. Always use the DAO Modmanager to install mods, even if the installation instructions on a mod give you other instructions. The program will help put the mods in the right folders, can easily disable parts of a mod, and can remove and restore mods, all faster and easier than adjusting them around manually. It also checks for compatibility issues between your array of mods. Very few mods won’t work with this program and many outright require it (or an equivalent).
The really really good mods
I find this combination to fix a great deal without installing lots of different mods or experiencing compatibility issues. I’d strongly recommend all three.
Dain’s Fixes - To fix pretty much all of the numerous combat bugs, as well as a bunch of quality of life improvements, notably faster exploration and “conservative” autolooting (saves you manually looting corpses and takes everything unless you don’t have room, but disables itself for quest items).
Quinn’s Ultimate DAO Fixpack - To fix almost everything else that’s bugged in the original game, including lots of dialogue that doesn’t normally trigger
Origins Faster Combat With Dexterity - To speed up the very slow pace of combat. Also adjusts the balance of weaponry, but this isn’t quite as noticeable.
Quinn’s Fixpack doesn’t address Awakening content. There are a variety of fixes for the bugs in that DLC, but I haven’t played it so I can’t yet vouch for any particular ones.
Less important but lots of fun
Character Respecialization - Allows you to reset specializations, skills, talents, and stats at camp, and at Flemeth’s Hut in the brief segment after Ostagar before you can camp. This is great for trying out different builds, not worrying about talent choices, or for fixing characters whose default builds are Count Jankula, which is frankly most of them but especially poor Morrigan (who manages to start with nine spells without having a single good one). The ravens can be tricky to find, so if you have trouble, hit tab to highlight interactibles.
More Hairstyles - Excellent if you’re not crazy about the default options, you want a PC who looks like a Ferelden Anime Girl, or you just like messing around in the character creation a lot. (This is far from the only mod that gives you more character creation options, or even hair, but I’m particularly fond of a couple of the hairstyles in this one)
Universal Voices - Gives you all of the voice options (which are normally locked to each playable race). I personally like the very scratchy Violent Elf voice a little more than the Violent Dwarf one; it’s a very roguey voice.
51 notes
·
View notes
Last Seen Blogs

esther-asteria
I Am In Spain Without The A

duck-whistle
Another pixel art blog

erenluvb0t
promise you’ll lie

sillybluebirdpizza
Untitled

seinafukufuku
Fukuoka Seina