#Kubernetes dashboard interfaces
Explore tagged Tumblr posts
Visit Tumblr Blog
Explore Tumblr blogs with no restrictions, modern design and the best experience.
Last Seen Tumblr Blogs


Fun Fact
Users from the US are the majority of Tumblr visitors.
Text
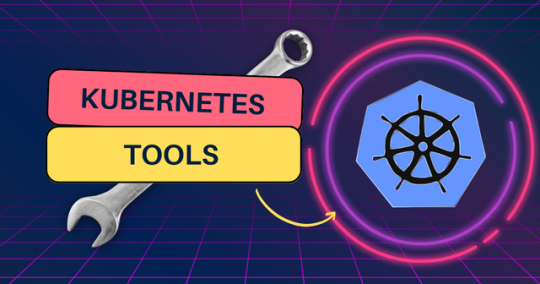
Best Kubernetes Management Tools in 2023
Best Kubernetes Management Tools in 2023 #homelab #vmwarecommunities #Kubernetesmanagementtools2023 #bestKubernetescommandlinetools #managingKubernetesclusters #Kubernetesdashboardinterfaces #kubernetesmanagementtools #Kubernetesdashboard
Kubernetes is everywhere these days. It is used in the enterprise and even in many home labs. It’s a skill that’s sought after, especially with today’s push for app modernization. Many tools help you manage things in Kubernetes, like clusters, pods, services, and apps. Here’s my list of the best Kubernetes management tools in 2023. Table of contentsWhat is Kubernetes?Understanding Kubernetes and…
View On WordPress
#best Kubernetes command line tools#containerized applications management#Kubernetes cluster management tools#Kubernetes cost monitoring#Kubernetes dashboard interfaces#Kubernetes deployment solutions#Kubernetes management tools 2023#large Kubernetes deployments#managing Kubernetes clusters#open-source Kubernetes tools
0 notes
Text
What Web Development Companies Do Differently for Fintech Clients
In the world of financial technology (fintech), innovation moves fast—but so do regulations, user expectations, and cyber threats. Building a fintech platform isn’t like building a regular business website. It requires a deeper understanding of compliance, performance, security, and user trust.
A professional Web Development Company that works with fintech clients follows a very different approach—tailoring everything from architecture to front-end design to meet the demands of the financial sector. So, what exactly do these companies do differently when working with fintech businesses?
Let’s break it down.
1. They Prioritize Security at Every Layer
Fintech platforms handle sensitive financial data—bank account details, personal identification, transaction histories, and more. A single breach can lead to massive financial and reputational damage.
That’s why development companies implement robust, multi-layered security from the ground up:
End-to-end encryption (both in transit and at rest)
Secure authentication (MFA, biometrics, or SSO)
Role-based access control (RBAC)
Real-time intrusion detection systems
Regular security audits and penetration testing
Security isn’t an afterthought—it’s embedded into every decision from architecture to deployment.
2. They Build for Compliance and Regulation
Fintech companies must comply with strict regulatory frameworks like:
PCI-DSS for handling payment data
GDPR and CCPA for user data privacy
KYC/AML requirements for financial onboarding
SOX, SOC 2, and more for enterprise-level platforms
Development teams work closely with compliance officers to ensure:
Data retention and consent mechanisms are implemented
Audit logs are stored securely and access-controlled
Reporting tools are available to meet regulatory checks
APIs and third-party tools also meet compliance standards
This legal alignment ensures the platform is launch-ready—not legally exposed.
3. They Design with User Trust in Mind
For fintech apps, user trust is everything. If your interface feels unsafe or confusing, users won’t even enter their phone number—let alone their banking details.
Fintech-focused development teams create clean, intuitive interfaces that:
Highlight transparency (e.g., fees, transaction histories)
Minimize cognitive load during onboarding
Offer instant confirmations and reassuring microinteractions
Use verified badges, secure design patterns, and trust signals
Every interaction is designed to build confidence and reduce friction.
4. They Optimize for Real-Time Performance
Fintech platforms often deal with real-time transactions—stock trading, payments, lending, crypto exchanges, etc. Slow performance or downtime isn’t just frustrating; it can cost users real money.
Agencies build highly responsive systems by:
Using event-driven architectures with real-time data flows
Integrating WebSockets for live updates (e.g., price changes)
Scaling via cloud-native infrastructure like AWS Lambda or Kubernetes
Leveraging CDNs and edge computing for global delivery
Performance is monitored continuously to ensure sub-second response times—even under load.
5. They Integrate Secure, Scalable APIs
APIs are the backbone of fintech platforms—from payment gateways to credit scoring services, loan underwriting, KYC checks, and more.
Web development companies build secure, scalable API layers that:
Authenticate via OAuth2 or JWT
Throttle requests to prevent abuse
Log every call for auditing and debugging
Easily plug into services like Plaid, Razorpay, Stripe, or banking APIs
They also document everything clearly for internal use or third-party developers who may build on top of your platform.
6. They Embrace Modular, Scalable Architecture
Fintech platforms evolve fast. New features—loan calculators, financial dashboards, user wallets—need to be rolled out frequently without breaking the system.
That’s why agencies use modular architecture principles:
Microservices for independent functionality
Scalable front-end frameworks (React, Angular)
Database sharding for performance at scale
Containerization (e.g., Docker) for easy deployment
This allows features to be developed, tested, and launched independently, enabling faster iteration and innovation.
7. They Build for Cross-Platform Access
Fintech users interact through mobile apps, web portals, embedded widgets, and sometimes even smartwatches. Development companies ensure consistent experiences across all platforms.
They use:
Responsive design with mobile-first approaches
Progressive Web Apps (PWAs) for fast, installable web portals
API-first design for reuse across multiple front-ends
Accessibility features (WCAG compliance) to serve all user groups
Cross-platform readiness expands your market and supports omnichannel experiences.
Conclusion
Fintech development is not just about great design or clean code—it’s about precision, trust, compliance, and performance. From data encryption and real-time APIs to regulatory compliance and user-centric UI, the stakes are much higher than in a standard website build.
That’s why working with a Web Development Company that understands the unique challenges of the financial sector is essential. With the right partner, you get more than a website—you get a secure, scalable, and regulation-ready platform built for real growth in a high-stakes industry.
0 notes
Text
Effective Kubernetes cluster monitoring simplifies containerized workload management by measuring uptime, resource use (such as memory, CPU, and storage), and interaction between cluster components. It also enables cluster managers to monitor the cluster and discover issues such as inadequate resources, errors, pods that fail to start, and nodes that cannot join the cluster. Essentially, Kubernetes monitoring enables you to discover issues and manage Kubernetes clusters more proactively. What Kubernetes Metrics Should You Measure? Monitoring Kubernetes metrics is critical for ensuring the reliability, performance, and efficiency of applications in a Kubernetes cluster. Because Kubernetes constantly expands and maintains containers, measuring critical metrics allows you to spot issues early on, optimize resource allocation, and preserve overall system integrity. Several factors are critical to watch with Kubernetes: Cluster monitoring - Monitors the health of the whole Kubernetes cluster. It helps you find out how many apps are running on a node, if it is performing efficiently and at the right capacity, and how much resource the cluster requires overall. Pod monitoring - Tracks issues impacting individual pods, including resource use, application metrics, and pod replication or auto scaling metrics. Ingress metrics - Monitoring ingress traffic can help in discovering and managing a variety of issues. Using controller-specific methods, ingress controllers can be set up to track network traffic information and workload health. Persistent storage - Monitoring volume health allows Kubernetes to implement CSI. You can also use the external health monitor controller to track node failures. Control plane metrics - With control plane metrics we can track and visualize cluster performance while troubleshooting by keeping an eye on schedulers, controllers, and API servers. Node metrics - Keeping an eye on each Kubernetes node's CPU and memory usage might help ensure that they never run out. A running node's status can be defined by a number of conditions, such as Ready, MemoryPressure, DiskPressure, OutOfDisk, and NetworkUnavailable. Monitoring and Troubleshooting Kubernetes Clusters Using the Kubernetes Dashboard The Kubernetes dashboard is a web-based user interface for Kubernetes. It allows you to deploy containerized apps to a Kubernetes cluster, see an overview of the applications operating on the cluster, and manage cluster resources. Additionally, it enables you to: Debug containerized applications by examining data on the health of your Kubernetes cluster's resources, as well as any anomalies that have occurred. Create and modify individual Kubernetes resources, including deployments, jobs, DaemonSets, and StatefulSets. Have direct control over your Kubernetes environment using the Kubernetes dashboard. The Kubernetes dashboard is built into Kubernetes by default and can be installed and viewed from the Kubernetes master node. Once deployed, you can visit the dashboard via a web browser to examine extensive information about your Kubernetes cluster and conduct different operations like scaling deployments, establishing new resources, and updating application configurations. Kubernetes Dashboard Essential Features Kubernetes Dashboard comes with some essential features that help manage and monitor your Kubernetes clusters efficiently: Cluster overview: The dashboard displays information about your Kubernetes cluster, including the number of nodes, pods, and services, as well as the current CPU and memory use. Resource management: The dashboard allows you to manage Kubernetes resources, including deployments, services, and pods. You can add, update, and delete resources while also seeing extensive information about them. Application monitoring: The dashboard allows you to monitor the status and performance of Kubernetes-based apps. You may see logs and stats, fix issues, and set alarms.
Customizable views: The dashboard allows you to create and preserve bespoke dashboards with the metrics and information that are most essential to you. Kubernetes Monitoring Best Practices Here are some recommended practices to help you properly monitor and debug Kubernetes installations: 1. Monitor Kubernetes Metrics Kubernetes microservices require understanding granular resource data like memory, CPU, and load. However, these metrics may be complex and challenging to leverage. API indicators such as request rate, call error, and latency are the most effective KPIs for identifying service faults. These metrics can immediately identify degradations in a microservices application's components. 2. Ensure Monitoring Systems Have Enough Data Retention Having scalable monitoring solutions helps you to efficiently monitor your Kubernetes cluster as it grows and evolves over time. As your Kubernetes cluster expands, so will the quantity of data it creates, and your monitoring systems must be capable of handling this rise. If your systems are not scalable, they may get overwhelmed by the volume of data and be unable to offer accurate or relevant results. 3. Integrate Monitoring Systems Into Your CI/CD Pipeline Source Integrating Kubernetes monitoring solutions with CI/CD pipelines enables you to monitor your apps and infrastructure as they are deployed, rather than afterward. By connecting your monitoring systems to your pipeline for continuous integration and delivery (CI/CD), you can automatically collect and process data from your infrastructure and applications as it is delivered. This enables you to identify potential issues early on and take action to stop them from getting worse. 4. Create Alerts You may identify the problems with your Kubernetes cluster early on and take action to fix them before they get worse by setting up the right alerts. For example, if you configure alerts for crucial metrics like CPU or memory use, you will be informed when those metrics hit specific thresholds, allowing you to take action before your cluster gets overwhelmed. Conclusion Kubernetes allows for the deployment of a large number of containerized applications within its clusters, each of which has nodes that manage the containers. Efficient observability across various machines and components is critical for successful Kubernetes container orchestration. Kubernetes has built-in monitoring facilities for its control plane, but they may not be sufficient for thorough analysis and granular insight into application workloads, event logging, and other microservice metrics within Kubernetes clusters.
0 notes
Text
Best Software Development Company in Chennai: Elevating Your Digital Journey

In today’s fast-paced business environment, having a robust, scalable, and secure software solution is non-negotiable. Companies across industries are on the lookout for a best software development company in Chennai—one that combines technical expertise, domain knowledge, and a client-centric approach. Here’s an in-depth look at why Chennai has emerged as a software hub, what to expect from a top-tier Software Development Company in Chennai, and how to choose the right partner for your project.
Why Chennai for Software Development?
Thriving IT Ecosystem Chennai boasts a vibrant IT corridor—OMR, SIPCOT, and the Old Mahabalipuram Road—home to global giants and agile startups alike. This ecosystem fosters innovation, collaboration, and access to a deep talent pool.
Cost-Effective Excellence Competitive labor costs combined with a high standard of engineering education mean you can secure world-class talent at attractive price points, maximizing your return on investment.
Strong Domain Expertise From healthcare and fintech to e-commerce and manufacturing, Chennai’s software firms have delivered successful projects across verticals. Decades of accumulated domain knowledge translate into faster onboarding and better risk mitigation.
Core Services Offered
A leading Software Development Company in Chennai typically provides end-to-end services, including:
Custom Software Development Tailored applications—desktop, web, and mobile—built using modern stacks such as .NET, Java, Python, and JavaScript frameworks (React, Angular, Vue).
Enterprise Solutions Large-scale ERP, CRM, and business intelligence platforms that automate workflows and provide real-time analytics.
Cloud & DevOps Containerization with Docker/Kubernetes, continuous integration/continuous deployment (CI/CD) pipelines, and multi-cloud architectures on AWS, Azure, or Google Cloud.
Quality Assurance & Testing Automated test scripts, performance tuning, security audits, and compliance testing (GDPR, HIPAA) ensure your software is bulletproof.
Maintenance & Support 24/7 helpdesk, performance monitoring, patch management, and feature upgrades to keep your solution current and secure.
Key Differentiators of the Best Software Development Company in Chennai
Agile & Transparent Processes Daily stand-ups, sprint demos, and shared dashboards keep you in the loop. Agile methodologies ensure rapid iterations and on-time delivery.
Dedicated, Experienced Teams Senior architects and seasoned developers collaborate under the guidance of certified project managers—ensuring high code quality, maintainability, and best practices.
User-Centric Design A world-class UX/UI team transforms requirements into intuitive interfaces, backed by user research, wireframes, and interactive prototypes.
Security First Mindset From threat modeling to secure coding and penetration testing, security is embedded at every phase of the software lifecycle.
Data-Driven Insights Integrated analytics and dashboarding provide actionable metrics—helping you refine features, improve performance, and boost ROI continuously.
How to Choose Your Chennai Software Partner
Portfolio & Case Studies Review their past projects for industry relevance, technology stack, and measurable outcomes (e.g., performance gains, revenue uplift).
Client Testimonials & Ratings Independent review platforms (Clutch, GoodFirms) reveal real feedback on delivery, communication, and post-launch support.
Cultural Fit & Communication Ensure overlapping working hours and a cultural affinity to foster seamless collaboration and minimize misunderstandings.
Scalability & Flexibility The right partner can ramp teams up or down quickly, adapting to scope changes without compromising timelines or quality.
IP & Confidentiality Verify strong NDA provisions, source-code escrow options, and clear ownership rights to safeguard your intellectual property.
Spotlight: Success Stories
Healthcare Platform Modernization A Chennai-based firm re-engineered a legacy hospital management system into a cloud-native microservices architecture—reducing downtime by 80% and slashing operational costs by 30%.
Fintech Mobile App Launch From concept to launch in 16 weeks, a rapid-delivery team built a secure, scalable payments app supporting 1M+ users and integrating with multiple banking APIs.
E-Commerce Replatforming Migrated a high-traffic retail site to a headless CMS + PWA stack, boosting page-load speeds by 60% and increasing conversion rates by 25%.
Conclusion
Choosing the best software development company in Chennai means partnering with a team that understands your vision, respects your budget, and guarantees results. By focusing on agile processes, technical excellence, and user-first design, Chennai’s top firms have cemented their reputation as reliable, innovative, and cost-effective partners for businesses worldwide.
Ready to elevate your digital strategy? Connect with a leading Software Development Company in Chennai today and turn your ideas into reality.
0 notes
Text
EKS Dashboard: Kubernetes cluster Access over AWS Regions

Kubernetes cluster visibility may be centralised across AWS regions and accounts using EKS Dashboard.
EKS Dashboard
EKS Dashboard is a new AWS feature. A centralised display allows cluster administrators and cloud architects monitor their Kubernetes clusters organisationally. Its major goal is to give clients a single view of clusters across AWS Regions and accounts. This single view helps track cluster inventories, compliance, operational activity planning, and version updates.
The EKS Dashboard helps companies scale Kubernetes deployments. Multiple clusters are often run for data sovereignty, business continuity, or better availability. This distributed technique makes visibility and control difficult, especially in decentralised systems with several regions and accounts. Clients have traditionally used external products for centralised cluster visibility. Third-party solutions' identification and access setup, licensing costs, and ongoing maintenance added complexity.
The EKS Dashboard simplifies this procedure with native AWS Console dashboard features. It offers data about clusters, regulated node groups, and EKS add-ons. Dashboard insights include cluster health indicators, predicted extended support EKS control plane charges, support status, account, version, and cluster distribution by region. Automatic filtering lets users explore certain data points. This feature makes clusters easier to find and focus on.
A brief tour of the EKS Dashboard shows tabular, graphical, and map representations of Kubernetes clusters. Advanced search and filtering are offered. There are several widgets for cluster visualisation. You can visualise managed node groups by AMI versions, launch templates, and instance type distribution. You can also map your clusters worldwide. Data from the dashboard can be exported for study or custom reports.
Setting up EKS Dashboard
According to reports, EKS Dashboard setup is easy. AWS Organisation management and administrator accounts grant clients access to the EKS interface Dashboard. Turning on trusted access on the organization's Amazon EKS settings page is the only setup requirement. Dashboard settings allow trusted access. The management account can view the Dashboard with trusted access. The official AWS Documentation provides setup and configuration details.
Importantly, the EKS Dashboard is not limited to Amazon EKS clusters. It can also provide visibility into linked Kubernetes clusters on-site or on other cloud providers. Even while hybrid or multi-cloud clusters may have inferior data quality than native Amazon EKS clusters, this functionality provides uniform visibility for enterprises.
Availability
The EKS Dashboard is currently available in the US East (N. Virginia). Use it to integrate data from all commercial AWS Regions. No additional fees apply to the EKS Dashboard.
This new functionality emphasises AWS's commitment to simplifying Kubernetes operations. To let clients focus on app development and growth, infrastructure management is removed.
Finally, the native AWS EKS Dashboard provides a unified view of Kubernetes clusters across accounts and regions. It provides basic visibility for linked non-EKS clusters, comprehensive visualisations, extensive insights, and quick setup at no additional cost.
#EKSDashboard#Kubernetesclusters#AmazonEKS#AmazonEKSclusters#AmazonEKSDashboard#AWSRegions#technology#technews#technologynews#news#govindhtech
0 notes
Text
Why Partnering with a Full Stack Development Company Is a Smart Move for Modern Businesses
In today's fast-paced digital landscape, businesses need agile, scalable, and reliable software solutions. Whether it's a responsive web application, an enterprise-grade system, or a mobile app, the key to building these solutions lies in leveraging both front-end and back-end technologies. This is where full stack development services come in.
A full stack development company brings together the expertise needed to handle every layer of the software stack—from user interfaces to server-side logic and database architecture. Let’s explore what that means, why it matters, and how it benefits your business.

What Are Full Stack Development Services?
Full stack development refers to the practice of working across both the front-end (client side) and back-end (server side) of an application. A full stack developer, or more commonly a team, is capable of handling all aspects of development—UI design, business logic, database interactions, and deployment.
Typical full stack development services include:
Front-End Development: Using HTML, CSS, JavaScript frameworks like React, Angular, or Vue to build intuitive interfaces.
Back-End Development: Leveraging technologies like Node.js, Python, Java, or PHP to handle server logic, APIs, and data processing.
Database Management: Designing and managing databases with SQL (e.g., PostgreSQL, MySQL) or NoSQL (e.g., MongoDB).
DevOps & Deployment: Setting up CI/CD pipelines, cloud infrastructure, and containerized deployments with Docker or Kubernetes.
API Integration: Connecting your system with third-party services or internal microservices.
A full stack approach allows developers to maintain control over the complete development lifecycle, ensuring better cohesion and quicker iteration.
Why Businesses Are Choosing Full Stack Development Companies
Hiring a specialized full stack development company offers significant advantages compared to working with separate front-end and back-end teams.
1. Speed and Agility
Since a single team handles all parts of the application, there’s better communication, faster development, and quicker decision-making. This is crucial for startups or companies with time-sensitive go-to-market plans.
2. Cost Efficiency
Instead of hiring multiple vendors or specialists, a full stack company offers a unified solution. This reduces overhead and simplifies project management without sacrificing quality.
3. Consistency Across the Stack
When the same team handles the full scope, there’s greater consistency in logic, style, and performance. Front-end components are more tightly aligned with back-end services, improving the overall user experience.
4. Scalability
Full stack teams can make better architectural decisions because they understand how all layers interact. This is critical when designing systems meant to scale as your business grows.
Real-World Applications of Full Stack Development
Full stack development services are applicable across a wide variety of industries:
eCommerce: Building end-to-end platforms with customer-facing interfaces, secure payment systems, and inventory management.
Healthcare: Developing HIPAA-compliant patient portals, appointment systems, and real-time analytics dashboards.
Fintech: Creating secure financial tools that integrate seamlessly with APIs and backend databases.
Education: Building interactive e-learning platforms and LMS tools that scale easily across devices.
SaaS Products: Launching software platforms with custom dashboards, user management, and performance monitoring.
No matter the industry, full stack development provides the flexibility needed to adapt to changing user needs and market trends.
What to Look for in a Full Stack Development Company
Choosing the right development partner is critical to project success. Here are a few criteria to guide your selection:
Technical Proficiency: Does the team have hands-on experience with both modern front-end and back-end technologies?
Portfolio & Case Studies: Can they show proven results in projects similar to yours?
Agile Processes: Are they capable of iterating quickly, with regular feedback and transparency?
Scalability: Do they build with future growth in mind?
Support & Maintenance: Will they be there for updates, optimizations, and issue resolution after launch?
A strong full stack partner will not only bring technical know-how but will also align with your business goals and vision.
Conclusion: Build Smarter with Full Stack Development
Whether you’re launching a new digital product or modernizing an existing one, full stack development services offer the strategic edge you need. A full stack development company brings the ability to deliver cohesive, scalable, and high-performing solutions—all under one roof.
From ideation to launch and beyond, the right full stack partner empowers you to build smarter, faster, and with confidence. At Perimattic, we specialize in delivering full stack development services tailored to your business needs—combining deep technical expertise with agile execution. If you're looking for a partner who can bring your vision to life from front to back, Perimattic is here to help you lead in a digital-first world.
0 notes
Text
How to Build a Scalable AI-Based LMS?
Creating a scalable AI-based Learning Management System (LMS) is a transformative opportunity for EdTech startups to deliver personalized, efficient, and future-ready educational platforms. Integrating artificial intelligence (AI) enhances learner engagement, automates processes, and provides data-driven insights, but scalability ensures the system can handle growth without compromising performance. Here’s a concise blueprint for building a scalable AI-based LMS.

1. Define Core Objectives and Audience Start by identifying the target audience—K-12, higher education, corporate trainees, or lifelong learners—and their specific needs. Define how AI will enhance the LMS, such as through personalized learning paths, automated grading, or predictive analytics. Align these objectives with scalability goals, ensuring the system can support increasing users, courses, and data volumes.
2. Leverage a Cloud-Based Architecture A cloud infrastructure, such as AWS, Google Cloud, or Azure, is essential for scalability. Use microservices to modularize components like user management, content delivery, and AI-driven analytics. This allows independent scaling of high-demand modules. Implement load balancers to distribute traffic and ensure consistent performance during peak usage. Cloud solutions also simplify maintenance and updates, reducing long-term costs.
3. Integrate AI for Personalization and Efficiency AI is the cornerstone of a modern LMS. Incorporate features like:
Adaptive Learning: AI algorithms adjust content difficulty based on learner performance, ensuring optimal engagement.
Recommendation Systems: Suggest relevant courses or resources using machine learning models trained on user behavior.
Automated Assessments: Use natural language processing (NLP) to grade open-ended responses and provide instant feedback.
Chatbots: Deploy AI-powered virtual assistants for 24/7 learner support, reducing instructor workload.
Train AI models on diverse datasets to ensure inclusivity and accuracy, and host them on scalable platforms like Kubernetes for efficient resource management.
4. Prioritize Data Management and Analytics AI relies on data, so choose a robust database like PostgreSQL for structured data or MongoDB for unstructured content. Implement data pipelines to process real-time analytics, tracking metrics like course completion rates and engagement. Use AI to identify at-risk learners and suggest interventions. Ensure data storage scales seamlessly with user growth by leveraging cloud-native solutions.
5. Ensure Security and Compliance Protect user data with encryption, secure APIs, and regular vulnerability assessments. Comply with regulations like GDPR, FERPA, or COPPA, depending on the audience. Implement single sign-on (SSO) and role-based access to enhance security without sacrificing usability.
6. Design for User Experience and Accessibility A scalable LMS must remain user-friendly. Use responsive design for mobile and desktop access, and ensure compliance with WCAG for accessibility. AI can enhance UX by offering personalized dashboards and predictive search. Conduct user testing to refine the interface and minimize friction.
7. Plan for Continuous Iteration Launch with a minimum viable product (MVP) and iterate based on user feedback. Monitor KPIs like system uptime and user retention to gauge scalability. Regularly update AI models and infrastructure to adapt to new technologies and user needs.
By combining a cloud-based, microservices architecture with AI-driven features, startups can build a scalable LMS that delivers personalized education while handling growth efficiently. Strategic planning and iterative Edtech development ensure long-term success in the competitive landscape.
0 notes
Text
What Tech Stack Is Ideal for Building a FinTech Banking Platform?

In the fast-evolving world of digital finance, choosing the right technology stack is a critical decision when building a fintech banking platform. The efficiency, scalability, security, and user experience of your solution hinge on how well your tech components align with the needs of modern banking users. As the demand for agile, customer-focused fintech banking solutions continues to grow, the technology behind these systems must be just as robust and innovative.
A well-structured tech stack not only supports essential banking operations but also empowers continuous innovation, integration with third-party services, and compliance with financial regulations. In this article, we break down the ideal tech stack for building a modern fintech banking platform.
1. Front-End Technologies
The front-end of a fintech platform plays a pivotal role in delivering intuitive and responsive user experiences. Given the high expectations of today’s users, the interface must be clean, secure, and mobile-first.
Key technologies:
React or Angular: These JavaScript frameworks provide flexibility, component reusability, and fast rendering, making them ideal for building dynamic and responsive interfaces.
Flutter or React Native: These cross-platform mobile development frameworks allow for the rapid development of Android and iOS apps using a single codebase.
User experience is a top priority in fintech software. Real-time dashboards, mobile-first design, and accessibility are essential for retaining users and building trust.
2. Back-End Technologies
The back-end is the backbone of any fintech system. It manages business logic, database operations, user authentication, and integrations with external services.
Preferred languages and frameworks:
Node.js (JavaScript), Python (Django/Flask), or Java (Spring Boot): These languages offer excellent scalability, developer support, and security features suitable for financial applications.
Golang is also becoming increasingly popular due to its performance and simplicity.
An effective back-end architecture should be modular and service-oriented, enabling the platform to scale efficiently as the user base grows.
3. Database Management
Data integrity and speed are crucial in fintech banking solutions. Choosing the right combination of databases ensures reliable transaction processing and flexible data handling.
Recommended databases:
PostgreSQL or MySQL: Reliable and ACID-compliant relational databases, ideal for storing transactional data.
MongoDB or Cassandra: Useful for handling non-structured data and logs with high scalability.
In most fintech platforms, a hybrid data storage strategy works best—leveraging both SQL and NoSQL databases to optimize performance and flexibility.
4. Cloud Infrastructure and DevOps
Modern fintech platforms are built in the cloud to ensure high availability, fault tolerance, and global scalability. Cloud infrastructure also simplifies maintenance and accelerates development cycles.
Key components:
Cloud providers: AWS, Microsoft Azure, or Google Cloud for hosting, scalability, and security.
DevOps tools: Docker for containerization, Kubernetes for orchestration, and Jenkins or GitHub Actions for continuous integration and deployment (CI/CD).
Cloud-based fintech software also benefits from automated backups, distributed computing, and seamless disaster recovery.
5. Security and Compliance
Security is a non-negotiable component in financial software. A fintech banking platform must be fortified with multi-layered security to protect sensitive user data and comply with global regulations.
Key practices and tools:
OAuth 2.0, JWT for secure authentication.
TLS encryption for secure data transmission.
WAFs (Web Application Firewalls) and intrusion detection systems.
Regular penetration testing and code audits.
Compliance libraries or services to support standards like PCI-DSS, GDPR, and KYC/AML requirements.
Security must be integrated at every layer of the tech stack, not treated as an afterthought.
6. APIs and Integrations
Open banking and ecosystem connectivity are central to fintech innovation. Your platform must be designed to communicate with external services through APIs.
API tools and standards:
REST and GraphQL for efficient communication.
API gateways like Kong or Apigee for rate limiting, monitoring, and security.
Webhooks and event-driven architecture for real-time data syncing.
With APIs, fintech software can integrate with payment processors, credit bureaus, digital wallets, and compliance services to create a more versatile product offering.
7. Analytics and Reporting
To stay competitive, fintech platforms must offer actionable insights. Analytics tools help track customer behavior, detect fraud, and inform business decisions.
Tech tools:
Elasticsearch for log indexing and real-time search.
Kibana or Grafana for dashboards and visualization.
Apache Kafka for real-time data streaming and processing.
These tools ensure that decision-makers can monitor platform performance and enhance services based on data-driven insights.
8. AI and Automation
Artificial Intelligence (AI) is becoming a cornerstone in fintech banking solutions. From automated support to predictive analytics and risk scoring, AI adds significant value.
Popular tools and frameworks:
TensorFlow, PyTorch for model building.
Scikit-learn, Pandas for lightweight data analysis.
Dialogflow or Rasa for chatbot development.
Automation tools like Robotic Process Automation (RPA) further streamline back-office operations and reduce manual workloads.
Conclusion
Building a robust and scalable fintech banking platform requires a thoughtfully chosen tech stack that balances performance, security, flexibility, and user experience. Each layer—from front-end frameworks and APIs to cloud infrastructure and compliance mechanisms—must work in harmony to deliver a seamless and secure digital banking experience.
Xettle Technologies, as an innovator in the digital finance space, emphasizes the importance of designing fintech software using a future-proof tech stack. This approach not only supports rapid growth but also ensures reliability, compliance, and customer satisfaction in an increasingly competitive landscape.
By investing in the right technologies, financial institutions can confidently meet the demands of modern users while staying ahead in the evolving world of digital finance.
0 notes
Text
Jenkins vs GitLab CI/CD: Key Differences Explained

In the world of DevOps and software automation, choosing the right CI/CD tool can significantly impact your team's productivity and the efficiency of your development pipeline. Two of the most popular tools in this space are Jenkins and GitLab CI/CD. While both are designed to automate the software delivery process, they differ in structure, usability, and integration capabilities. Below is a detailed look at the differences between Jenkins and GitLab CI/CD, helping you make an informed decision based on your project requirements.
1. Core integration and setup Jenkins is a stand-alone open-source automation server that requires you to set up everything manually, including integrations with source control systems, plugins, and build environments. This setup can be powerful but complex, especially for smaller teams or those new to CI/CD tools. GitLab CI/CD, on the other hand, comes as an integrated part of the GitLab platform. From code repositories to issue tracking and CI/CD pipelines, everything is included in one interface. This tight integration makes it more user-friendly and easier to manage from day one.
2. Plugin dependency vs built-in tools One of Jenkins’ biggest strengths—and weaknesses—is its plugin ecosystem. With over 1,800 plugins available, Jenkins allows deep customization and support for almost any development environment. However, this heavy reliance on plugins also means users must spend time managing compatibility, updates, and security. In contrast, GitLab CI/CD provides most essential features out of the box, reducing the need for third-party plugins. Whether you need container support, auto DevOps, or security testing, GitLab includes these tools natively, making maintenance much easier.
3. Pipeline configuration methods Jenkins pipelines can be configured using a web interface or through a Jenkinsfile written in Groovy. While powerful, this approach requires familiarity with Jenkins syntax and structure, which can add complexity to your workflow. GitLab CI/CD uses a YAML-based file named .gitlab-ci.yml placed in the root of your repository. This file is easy to read and version-controlled, allowing teams to manage pipeline changes along with their codebase. The simplicity of YAML makes GitLab pipelines more accessible, especially to developers with limited DevOps experience.
4. User interface and experience Jenkins’ UI is considered outdated by many users, with limited design improvements over the years. While functional, it’s not the most intuitive experience, especially when managing complex builds and pipeline jobs. GitLab CI/CD offers a modern and clean interface, providing real-time pipeline status, logs, and visual job traces directly from the dashboard. This improves transparency and makes debugging or monitoring easier for teams.
5. Scalability and performance Jenkins can scale to support complex builds and large organizations, especially with the right infrastructure. However, this flexibility comes at a cost: teams are responsible for maintaining, upgrading, and scaling Jenkins nodes manually. GitLab CI/CD supports scalable runners that can be configured for distributed builds. It also works well with Kubernetes and cloud environments, enabling easier scalability without extensive manual setup.
6. Community and support Jenkins, being older, has a large community and long-standing documentation. This makes it easier to find help or solutions for common problems. GitLab CI/CD, though newer, benefits from active development and enterprise support, with frequent updates and a growing user base.
To explore the topic in more depth, check out this guide on the differences between Jenkins and GitLab CI/CD, which breaks down the tools in more technical detail.
Conclusion The choice between Jenkins and GitLab CI/CD depends on your project size, team expertise, and need for customization. Jenkins is ideal for organizations that need deep flexibility and are prepared to handle manual configurations. GitLab CI/CD is perfect for teams looking for an all-in-one DevOps platform that’s easy to set up and manage. Both tools are powerful, but understanding the differences between Jenkins and GitLab CI/CD can help you choose the one that fits your workflow best.
1 note
·
View note
Text
Create Impactful and Smarter Learning with Custom MERN-Powered LMS Solutions
Introduction
Learning is evolving fast, and modern education businesses need smarter tools to keep up. As online training grows, a robust learning management software becomes essential for delivering courses, tracking progress, and certifying users. The global LMS market is booming – projected to hit about $70+ billion by 2030 – driven by demand for digital learning and AI-powered personalization. Off-the-shelf LMS platforms like Moodle or Canvas are popular, but they may not fit every startup’s unique needs. That’s why custom learning management solutions, built on flexible technology, are an attractive option for forward-looking EdTech companies. In this post, we’ll explore why Custom MERN-Powered LMS Solutions (using MongoDB, Express, React, Node) can create an impactful, smarter learning experience for modern businesses.
Understanding the MERN Stack for LMS Development
The MERN stack combines four open-source technologies: MongoDB (database), Express.js (backend framework), React.js (frontend library), and Node.js (server runtime). Together, they enable developers to write JavaScript across the entire application. For an LMS, MERN’s unified JavaScript stack means faster development and easier maintenance. React’s component-based UI makes creating interactive dashboards and course pages smoother, while Node.js and Express handle data and logic efficiently. Importantly, both Node and MongoDB are built for scale: Node’s non-blocking I/O can handle many users at once, and MongoDB can store huge volumes of course and user data. In practice, MERN apps can be deployed in a microservices or containerized architecture (using Docker/Kubernetes) to ensure high availability. This means your custom LMS can grow with your audience – for example, MongoDB supports sharding so the database can span multiple servers, ensuring the system stays up even if one server fails.
Key Features of Custom MERN-Powered LMS Solutions
A tailored LMS can include all the features your organization needs. Typical components of learning management platforms include:
Course Management: Create, organize, and update courses and modules.
User and Role Management: Register learners, assign roles (students, instructors, admins), and control access.
Interactive Content: Upload videos, presentations, PDFs, and embed quizzes or coding exercises.
Assessments & Certification: Build quizzes, track scores, and automatically issue certificates to successful students.
Discussion Forums & Collaboration: Facilitate peer-to-peer learning with chat, Q&A forums or group projects.
Reporting & Analytics: Dashboard insights into learner progress, completion rates, and engagement.
Integrations: Connect with other tools via APIs – for example, integrating Zoom or MS Teams for live classes, or embedding third-party content libraries.
Branding & Custom Interface: White-label design with your logo and color scheme, for a seamless brand experience.
Because the MERN stack is so flexible, a custom LMS can add niche features on demand. For instance, you could include gamification (points, badges, leaderboards) to boost engagement, or integrate e-commerce capabilities (Sell courses with Stripe or PayPal). These integrations and customizations may cost extra, but they let you align the system with your exact workflow and goals. In short, a MERN-based LMS can combine the best learning management systems features (like content libraries and mobile responsiveness) while still being fully under your control.
Leveraging AI to Enhance Learning Experiences in Custom MERN-Powered LMS Solutions
AI is transforming how students learn. In a MERN-powered LMS, you can embed AI tools to personalize and streamline education. For example, artificial tutors can adjust to each learner’s pace, and chatbots can answer questions 24/7. AI-driven adaptive learning platforms will tailor lesson plans based on a student’s strengths, weaknesses, and progress. They can suggest next steps or additional resources (“intelligent recommendations”) and even automatically generate or grade quizzes. Similarly, voice and chatbot assistants become “24/7 tutors, answering student queries, explaining concepts, and assisting with assignments,” making education more responsive.
These AI enhancements lead to higher engagement and better outcomes. For instance, personalized content delivery keeps learners motivated, and instant feedback accelerates their progress. Research shows personalization boosts achievement in core subjects, and AI is a key enabler. In practice, a custom MERN LMS could leverage AI services (via APIs or microservices) for recommendation engines, automated content tagging, and data-driven analytics. Over time, the system learns what works best for each user – a truly smarter learning platform that continuously improves itself.
Ensuring Multi-Device Accessibility and Integration Capabilities in Custom MERN-Powered LMS Solutions
Today’s learners switch between laptops, tablets, and phones, so any LMS must be mobile-friendly. A MERN-based platform can be built with responsive design or native mobile apps in mind. The frontend (React) easily adapts layouts for different screen sizes, ensuring the LMS looks and works well on desktops and smartphones. Offline modes (caching content on mobile apps) can be added for uninterrupted access even without internet.
Integration is another must-have. Modern LMS solutions rarely stand alone. A custom MERN LMS can include connectors or plugins for video conferencing (Zoom, Teams), calendars, HR systems, or content libraries. These LMS integrations ensure seamless workflows and a better user experience. For example, automatically syncing course rosters with your HR database saves admin time, and integrating payment gateways lets you monetize courses directly. Overall, a custom MERN LMS can act as a central hub, tying together video calls, documentation, social features, and more into one consistent platform.
Scalability and Deployment Strategies for Custom MERN-Powered LMS Solutions
A key advantage of MERN is scalability. MongoDB and Node.js were designed to grow with your needs. In practice, you would deploy your LMS on cloud infrastructure (AWS, Azure, GCP), using containerization (Docker, Kubernetes) to manage resources. This means you can scale horizontally: spin up more instances of your Node/Express servers or MongoDB shards as the user base grows. For example, MongoDB’s sharding lets the database distribute data across servers, so no single point of failure will crash your app. Likewise, stateless Node servers can be cloned behind a load balancer, handling thousands of concurrent users (ideal for a crash course day!).
For deployment, continuous integration and continuous deployment (CI/CD) pipelines automate updates: changes to code (React components or backend logic) can be tested and released rapidly. This agile pipeline means improvements are delivered safely and often. Cloud hosting also offers global content delivery networks (CDNs) and caching to speed up course content downloads worldwide. In short, a MERN LMS can start small but expand seamlessly – serving a few dozen students or millions – with careful cloud architecture and modern devops practices.
Agile Development Methodology in Custom MERN-Powered LMS Projects
Building a custom LMS with MERN is best done with agile development. Agile (Scrum or Kanban) means working in short sprints and constantly gathering feedback from stakeholders. This approach enables faster delivery of working software by breaking development into smaller iterations and focusing on high-priority features. For an EdTech startup, that means you can release a minimum viable LMS quickly (core courses and user login), then iteratively add features like assessments, forums, or mobile apps, based on user feedback.
Agile also keeps your team aligned with business goals. Regular demos let product leads and instructors see progress early and adjust priorities. The continuous feedback loop means the final LMS better meets expectations and achieves higher satisfaction. Crucially, Agile embraces change: if a new learning requirement or tech emerges, it can be planned into the next sprint. Using Agile in a MERN LMS project helps ensure the platform stays on track with both educational goals and evolving market demands, delivering value early and often.
Pricing Models and Customization Options for MERN-Powered LMS Solutions
Custom LMS pricing varies widely, depending on features and usage. Common models include subscription-based (per-user or per-active-user), pay-per-use, one-time license fees, or even open-source/free solutions. In a custom scenario, you might negotiate a flat development fee plus ongoing support, or an annual per-user fee once the LMS is built.
Be mindful of hidden costs. Beyond base licensing or development, extras often include setup, integrations, and maintenance. For example, integrating your MERN LMS with a CRM, single sign-on, or advanced analytics service usually comes at extra cost. Similarly, hosting fees (cloud servers, bandwidth) and support contracts add to the total. It’s wise to plan for these from the start. The upside is that a custom MERN-powered LMS solution can be tailored – you only pay for exactly the functionality you need, no more. Plus, you avoid paying for unnecessary modules that bloated commercial LMS platforms often include.
Conclusion
Custom MERN-powered LMS solutions offer a compelling path for EdTech startups and training companies. By leveraging a unified JavaScript stack (MongoDB, Express, React, Node), development teams can deliver a robust LMS learning platform that is modern, scalable, and finely tuned to your audience. These systems combine essential learning management software features (content delivery, assessments, analytics) with cutting-edge enhancements (AI personalization, seamless integrations, multi-device support) – all under your brand. With agile methods, the platform can evolve in step with your needs, while cloud deployment ensures it can grow effortlessly. In short, a custom MERN LMS gives you the best learning management system for your business: a solution built exactly for you. It’s a strategic investment in smarter learning that will pay off in engagement, effectiveness, and flexibility for years to come.
#learning management software#learning management solutions#LMS platforms#best learning management systems#best learning management software#LMS learning platform#Custom MERN-Powered LMS Solutions
0 notes
Text
Monitoring Kubernetes Clusters with Prometheus and Grafana
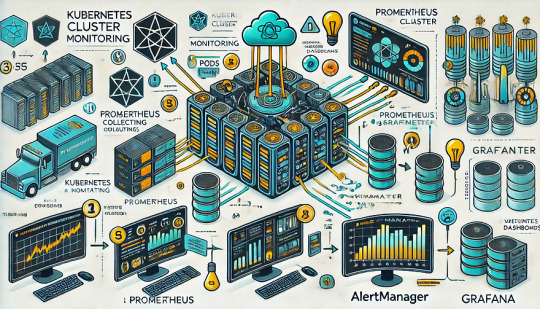
Introduction
Kubernetes is a powerful container orchestration platform, but monitoring it is crucial for ensuring reliability, performance, and scalability.
Prometheus and Grafana are two of the most popular open-source tools for monitoring and visualizing Kubernetes clusters.
In this guide, we’ll walk you through setting up Prometheus and Grafana on Kubernetes and configuring dashboards for real-time insights.
Why Use Prometheus and Grafana for Kubernetes Monitoring?
Prometheus: The Monitoring Backbone
Collects metrics from Kubernetes nodes, pods, and applications.
Uses a powerful query language (PromQL) for analyzing data.
Supports alerting based on predefined conditions.
Grafana: The Visualization Tool
Provides rich dashboards with graphs and metrics.
Allows integration with multiple data sources (e.g., Prometheus, Loki, Elasticsearch).
Enables alerting and notification management.
Step 1: Installing Prometheus and Grafana on Kubernetes
Prerequisites
Before starting, ensure you have:
A running Kubernetes cluster
kubectl and Helm installed
1. Add the Prometheus Helm Chart Repository
Helm makes it easy to deploy Prometheus and Grafana using predefined configurations.shhelm repo add prometheus-community https://prometheus-community.github.io/helm-charts helm repo update
2. Install Prometheus and Grafana Using Helm
shhelm install prometheus prometheus-community/kube-prometheus-stack --namespace monitoring --create-namespace
This command installs: ✅ Prometheus — For collecting metrics ✅ Grafana — For visualization ✅ Alertmanager — For notifications ✅ Node-exporter — To collect system-level metrics
Step 2: Accessing Prometheus and Grafana
Once deployed, we need to access the Prometheus and Grafana web interfaces.
1. Accessing Prometheus
Check the Prometheus service:shkubectl get svc -n monitoring
Forward the Prometheus server port:shkubectl port-forward svc/prometheus-kube-prometheus-prometheus 9090 -n monitoring
Now, open http://localhost:9090 in your browser.
2. Accessing Grafana
Retrieve the Grafana admin password:shkubectl get secret --namespace monitoring prometheus-grafana -o jsonpath="{.data.admin-password}" | base64 --decodeForward the Grafana service port:shkubectl port-forward svc/prometheus-grafana 3000:80 -n monitoring
Open http://localhost:3000, and log in with:
Username: admin
Password: (obtained from the previous command)
Step 3: Configuring Prometheus as a Data Source in Grafana
Open Grafana and navigate to Configuration > Data Sources.
Click Add data source and select Prometheus.
Set the URL to:
sh
http://prometheus-kube-prometheus-prometheus.monitoring.svc.cluster.local:9090
Click Save & Test to verify the connection.
Step 4: Importing Kubernetes Dashboards into Grafana
Grafana provides ready-made dashboards for Kubernetes monitoring.
Go to Dashboards > Import.
Enter a dashboard ID from Grafana’s dashboard repository.
Example: Use 3119 for Kubernetes cluster monitoring.
Select Prometheus as the data source and click Import.
You’ll now have a real-time Kubernetes monitoring dashboard! 🎯
Step 5: Setting Up Alerts in Prometheus and Grafana
Creating Prometheus Alerting Rules
Create a ConfigMap for alerts:yamlapiVersion: v1 kind: ConfigMap metadata: name: alert-rules namespace: monitoring data: alert.rules: | groups: - name: InstanceDown rules: - alert: InstanceDown expr: up == 0 for: 5m labels: severity: critical annotations: summary: "Instance {{ $labels.instance }} is down"
Apply it to the cluster:shkubectl apply -f alert-rules.yaml
Configuring Grafana Alerts
Navigate to Alerting > Notification Channels.
Set up a channel (Email, Slack, or PagerDuty).
Define alert rules based on metrics from Prometheus.
Step 6: Enabling Persistent Storage for Prometheus
By default, Prometheus stores data in memory. To make the data persistent, configure storage:
Modify the Helm values:yamlprometheus: server: persistentVolume: enabled: true size: 10Gi
Apply the changes:shhelm upgrade prometheus prometheus-community/kube-prometheus-stack -f values.yaml
Conclusion
In this guide, we’ve set up Prometheus and Grafana to monitor a Kubernetes cluster. You now have: ✅ Real-time dashboards in Grafana ✅ Prometheus alerts to detect failures ✅ Persistent storage for historical metrics
WEBSITE: https://www.ficusoft.in/devops-training-in-chennai/
0 notes
Text
OpenShift vs Kubernetes: Key Differences Explained
Kubernetes has become the de facto standard for container orchestration, enabling organizations to manage and scale containerized applications efficiently. However, OpenShift, built on top of Kubernetes, offers additional features that streamline development and deployment. While they share core functionalities, they have distinct differences that impact their usability. In this blog, we explore the key differences between OpenShift and Kubernetes.
1. Core Overview
Kubernetes:
Kubernetes is an open-source container orchestration platform that automates the deployment, scaling, and operation of application containers. It provides the building blocks for containerized workloads but requires additional tools for complete enterprise-level functionality.
OpenShift:
OpenShift is a Kubernetes-based container platform developed by Red Hat. It provides additional features such as a built-in CI/CD pipeline, enhanced security, and developer-friendly tools to simplify Kubernetes management.
2. Installation & Setup
Kubernetes:
Requires manual installation and configuration.
Cluster setup involves configuring multiple components such as kube-apiserver, kube-controller-manager, kube-scheduler, and networking.
Offers flexibility but requires expertise to manage.
OpenShift:
Provides an easier installation process with automated scripts.
Includes a fully integrated web console for management.
Requires Red Hat OpenShift subscriptions for enterprise-grade support.
3. Security & Authentication
Kubernetes:
Security policies and authentication need to be manually configured.
Role-Based Access Control (RBAC) is available but requires additional setup.
OpenShift:
Comes with built-in security features.
Uses Security Context Constraints (SCCs) for enhanced security.
Integrated authentication mechanisms, including OAuth and LDAP support.
4. Networking
Kubernetes:
Uses third-party plugins (e.g., Calico, Flannel, Cilium) for networking.
Network policies must be configured separately.
OpenShift:
Uses Open vSwitch-based SDN by default.
Provides automatic service discovery and routing.
Built-in router and HAProxy-based load balancing.
5. Development & CI/CD Integration
Kubernetes:
Requires third-party tools for CI/CD (e.g., Jenkins, ArgoCD, Tekton).
Developers must integrate CI/CD pipelines manually.
OpenShift:
Comes with built-in CI/CD capabilities via OpenShift Pipelines.
Source-to-Image (S2I) feature allows developers to build images directly from source code.
Supports GitOps methodologies out of the box.
6. User Interface & Management
Kubernetes:
Managed through the command line (kubectl) or third-party UI tools (e.g., Lens, Rancher).
No built-in dashboard; requires separate installation.
OpenShift:
Includes a built-in web console for easier management.
Provides graphical interfaces for monitoring applications, logs, and metrics.
7. Enterprise Support & Cost
Kubernetes:
Open-source and free to use.
Requires skilled teams to manage and maintain infrastructure.
Support is available from third-party providers.
OpenShift:
Requires a Red Hat subscription for enterprise support.
Offers enterprise-grade stability, support, and compliance features.
Managed OpenShift offerings are available via cloud providers (AWS, Azure, GCP).
Conclusion
Both OpenShift and Kubernetes serve as powerful container orchestration platforms. Kubernetes is highly flexible and widely adopted, but it demands expertise for setup and management. OpenShift, on the other hand, simplifies the experience with built-in security, networking, and developer tools, making it a strong choice for enterprises looking for a robust, supported Kubernetes distribution.
Choosing between them depends on your organization's needs: if you seek flexibility and open-source freedom, Kubernetes is ideal; if you prefer an enterprise-ready solution with out-of-the-box tools, OpenShift is the way to go.
For more details click www.hawkstack.com
0 notes
Text
Why Linode Accounts Are the Best Choice and Where to Buy Them
Linode has become a trusted name in the cloud hosting industry, offering high-quality services tailored for developers, businesses, and enterprises seeking reliable, scalable, and secure infrastructure. With its competitive pricing, exceptional customer support, and a wide range of features, Linode accounts are increasingly popular among IT professionals. If you're wondering why Linode is the best choice and where you can buy Linode account safely, this article will provide comprehensive insights.

Why Linode Accounts Are the Best Choice
1. Reliable Infrastructure
Linode is renowned for its robust and reliable infrastructure. With data centers located worldwide, it ensures high uptime and optimal performance. Businesses that rely on Linode accounts benefit from a stable environment for hosting applications, websites, and services.
Global Data Centers: Linode operates in 11 data centers worldwide, offering low-latency connections and redundancy.
99.99% Uptime SLA: Linode guarantees near-perfect uptime, making it an excellent choice for mission-critical applications.
2. Cost-Effective Pricing
Linode provides affordable pricing options compared to many other cloud providers. Its simple and transparent pricing structure allows users to plan their budgets effectively.
No Hidden Costs: Users pay only for what they use, with no unexpected charges.
Flexible Plans: From shared CPU instances to dedicated servers, Linode offers plans starting as low as $5 per month, making it suitable for businesses of all sizes.
3. Ease of Use
One of the standout features of Linode accounts is their user-friendly interface. The platform is designed to cater to beginners and seasoned developers alike.
Intuitive Dashboard: Manage your servers, monitor performance, and deploy applications easily.
One-Click Apps: Deploy popular applications like WordPress, Drupal, or databases with just one click.
4. High Performance
Linode ensures high performance through cutting-edge technology. Its SSD storage, fast processors, and optimized network infrastructure ensure lightning-fast speeds.
SSD Storage: All Linode plans come with SSDs for faster data access and improved performance.
Next-Generation Hardware: Regular updates to hardware ensure users benefit from the latest innovations.
5. Customizability and Scalability
Linode offers unparalleled flexibility, allowing users to customize their servers based on specific needs.
Custom Configurations: Tailor your server environment, operating system, and software stack.
Scalable Solutions: Scale up or down depending on your resource requirements, ensuring cost efficiency.
6. Developer-Friendly Tools
Linode is a developer-focused platform with robust tools and APIs that simplify deployment and management.
CLI and API Access: Automate server management tasks with Linode’s command-line interface and powerful APIs.
DevOps Ready: Supports tools like Kubernetes, Docker, and Terraform for seamless integration into CI/CD pipelines.
7. Exceptional Customer Support
Linode’s customer support is often highlighted as one of its strongest assets. Available 24/7, the support team assists users with technical and account-related issues.
Quick Response Times: Get answers within minutes through live chat or ticketing systems.
Extensive Documentation: Access tutorials, guides, and forums to resolve issues independently.
8. Security and Compliance
Linode prioritizes user security by providing features like DDoS protection, firewalls, and two-factor authentication.
DDoS Protection: Prevent downtime caused by malicious attacks.
Compliance: Linode complies with industry standards, ensuring data safety and privacy.
Conclusion
Linode accounts are an excellent choice for developers and businesses looking for high-performance, cost-effective, and reliable cloud hosting solutions. With its robust infrastructure, transparent pricing, and user-friendly tools, Linode stands out as a top-tier provider in the competitive cloud hosting market.
When buying Linode accounts, prioritize safety and authenticity by purchasing from the official website or verified sources. This ensures you benefit from Linode’s exceptional features and customer support. Avoid unverified sellers to minimize risks and guarantee a smooth experience.
Whether you’re a developer seeking scalable hosting or a business looking to streamline operations, Linode accounts are undoubtedly one of the best choices. Start exploring Linode today and take your cloud hosting experience to the next level!
0 notes
Text
How to Create a Binance Clone: A Comprehensive Guide for Developers
Binance is one of the world's leading cryptocurrency exchanges, providing a platform to buy, sell, and trade a wide variety of cryptocurrencies. creating a binance clone is an ambitious project that involves understanding both the core features of the exchange and the complex technologies required to manage secure financial transactions.
This guide will cover the features, technology stack, and step-by-step process required to develop a Binance clone.
1. Understanding the main features of Binance
Before diving into development, it is important to identify the key features of Binance that make it popular:
spot trading: The main feature of Binance where users can buy and sell cryptocurrencies.
Forward trading: Allows users to trade contracts based on the price of the cryptocurrency rather than the asset.
expressed: Users can lock their cryptocurrencies in exchange for rewards.
Peer-to-Peer (P2P) Trading: Binance allows users to buy and sell directly with each other.
wallet management: A secure and easy way for users to store and withdraw cryptocurrencies.
security features: Includes two-factor authentication (2FA), cold storage, and encryption to ensure secure transactions.
market data: Real-time updates on cryptocurrency prices, trading volumes and other market analysis.
API for trading:For advanced users to automate their trading strategies and integrate with third-party platforms.
2. Technology Stack to Build a Binance Clone
Building a Binance clone requires a strong technology stack, as the platform needs to handle millions of transactions, provide real-time market data, and ensure high-level security. Here is a recommended stack:
front end: React or Angular for building the user interface, ensuring it is interactive and responsive.
backend: Node.js with Express to handle user authentication, transaction management, and API requests. Alternatively, Python can be used with Django or Flask for better management of numerical data.
database: PostgreSQL or MySQL for relational data storage (user data, transaction logs, etc.). For cryptocurrency data, consider using a NoSQL database like MongoDB.
blockchain integration: Integrate with blockchain networks, like Bitcoin, Ethereum, and others, to handle cryptocurrency transactions.
websocket: To provide real-time updates on cryptocurrency prices and trades.
cloud storage: AWS, Google Cloud, or Microsoft Azure for secure file storage, especially for KYC documents or transaction logs.
payment gateway: Integrate with payment gateways like Stripe or PayPal to allow fiat currency deposits and withdrawals.
Security: SSL encryption, 2FA (Google Authenticator or SMS-based), IP whitelisting, and cold wallet for cryptocurrency storage.
Containerization and Scaling: Use Docker for containerization, Kubernetes for orchestration, and microservices to scale and handle traffic spikes.
crypto api: For real-time market data, price alerts and order book management. APIs like CoinGecko or CoinMarketCap can be integrated.
3. Designing the User Interface (UI)
The UI of a cryptocurrency exchange should be user-friendly, easy to navigate, and visually appealing. Here are the key components to focus on:
dashboard: A simple yet informative dashboard where users can view their portfolio, balance, recent transactions and price trends.
trading screen: An advanced trading view with options for spot trading, futures trading, limit orders, market orders and more. Include charts, graphs and candlestick patterns for real-time tracking.
account settings: Allow users to manage their personal information, KYC documents, two-factor authentication, and security settings.
Deposit/Withdrawal Screen: An interface for users to deposit and withdraw both fiat and cryptocurrencies.
Transaction History: A comprehensive history page where users can track all their deposits, withdrawals, trades and account activities.
Order Book and Market Data: Display buy/sell orders, trading volume and price charts in real time.
4. Key Features for Implementation
The key features that need to be implemented in your Binance clone include:
User Registration and Authentication: Users should be able to sign up via email or social login (Google, Facebook). Implement two-factor authentication (2FA) for added security.
KYC (Know Your Customer): Verify the identity of users before allowing them to trade or withdraw large amounts. You can integrate KYC services using third-party providers like Jumio or Onfido.
spot and futures trading: Implement spot and futures trading functionality where users can buy, sell or trade cryptocurrencies.
Order Types: Include different order types such as market orders, limit orders and stop-limit orders for advanced trading features.
real time data feed: Use WebSockets to provide real-time market data including price updates, order book and trade history.
wallet management: Create secure wallet for users to store their cryptocurrencies. You can use hot wallets for frequent transactions and cold wallets for long-term storage.
deposit and withdrawal system: Allow users to deposit and withdraw both fiat and cryptocurrencies. Make sure you integrate with a trusted third-party payment processor for fiat withdrawals.
Security: Implement multi-layered security measures like encryption, IP whitelisting, and DDoS protection. Cold storage for large amounts of cryptocurrencies and real-time fraud monitoring should also be prioritized.
5. Blockchain Integration
One of the most important aspects of building a Binance clone is integrating the right blockchain network for transaction processing. You will need to implement the following:
blockchain nodes: Set up nodes for popular cryptocurrencies like Bitcoin, Ethereum, Litecoin, etc. to process transactions and verify blocks.
smart contracts: Use smart contracts for secure transactions, especially for tokenized assets or ICOs (Initial Coin Offerings).
cryptocurrency wallet: Develop wallet solutions supporting major cryptocurrencies. Make sure wallets are secure and easy to use for transactions.
6. Security measures
Security is paramount when building a cryptocurrency exchange, and it is important to ensure that your platform is protected from potential threats. Here are the key security measures to implement:
ssl encryption: Encrypt all data exchanged between the server and the user's device.
Two-Factor Authentication (2FA): Implement Google Authenticator or SMS-based 2FA for user login and transaction verification.
Cold room: Store most user funds in cold storage wallets to reduce the risk of hacks.
anti phishing: Implement anti-phishing features to protect users from fraudulent websites and attacks.
audit trails: Keep detailed logs of all transactions and account activities for transparency and security audits.
7. Monetization Strategies for Your Binance Clone
There are several ways to earn from Binance clone:
trading fees: Charge a small fee (either fixed or percentage-based) for each trade made on the platform.
withdrawal fee: Charge a fee for cryptocurrency withdrawals or fiat withdrawals from bank accounts.
margin trading: Provide margin trading services for advanced users and charge interest on borrowed funds.
token lists: Charge projects a fee for listing their tokens on their platform.
Affiliate Program: Provide referral links for users to invite others to join the platform, thereby earning a percentage of their trading fees.
8. Challenges in creating a Binance clone
Creating a Binance clone is not without challenges:
Security: Handling the security of users' funds and data is important, as crypto exchanges are prime targets for cyber attacks.
rules: Depending on your target sector, you will need to comply with various financial and crypto regulations (e.g., AML/KYC regulations).
scalability: The platform must be able to handle millions of transactions, especially during market surges.
real time data: Handling real-time market data and ensuring low latency is crucial for a trading platform.
conclusion
Creating a Binance clone is a complex but rewarding project that requires advanced technical skills in blockchain integration, secure payment processing, and real-time data management. By focusing on key features, choosing the right tech stack, and implementing strong security measures, you can build a secure and feature-rich cryptocurrency exchange.
If you are involved in web development with WordPress and want to add a crypto payment system to your site, or if you want to integrate cryptocurrency features, feel free to get in touch! I will be happy to guide you in this.
0 notes
Text
How HawkStack Provides Seamless Integration and Support for Popular DevOps Tools
In today's fast-paced software development and deployment landscape, DevOps has become the backbone of modern IT operations. Organizations are leveraging DevOps tools to automate processes, improve collaboration between development and operations teams, and ensure smoother software delivery pipelines. HawkStack, a robust cloud-native platform, is designed to support and integrate with popular DevOps tools like Jenkins, Ansible, Kubernetes, and more. This blog explores how HawkStack facilitates seamless integration with these tools, making DevOps workflows faster, more efficient, and reliable.
1. HawkStack and Jenkins: Automating Continuous Integration and Delivery (CI/CD)
Jenkins has long been a key player in continuous integration and continuous delivery (CI/CD) pipelines. It allows developers to automate tasks such as code building, testing, and deployment, leading to faster and more reliable software releases. HawkStack enhances Jenkins by providing a unified environment that supports Jenkins jobs, ensuring smoother orchestration and execution of these tasks.
How HawkStack Integrates with Jenkins:
Pre-configured Jenkins Setup: HawkStack offers easy installation and configuration options for Jenkins, allowing users to get up and running quickly without worrying about the infrastructure.
Automated Scaling: HawkStack enables Jenkins to scale efficiently by dynamically provisioning and de-provisioning resources based on workload demands. This ensures optimal performance without manual intervention.
CI/CD Pipeline Optimization: HawkStack’s integration with Jenkins simplifies the setup of complex multi-stage pipelines. Developers can automate deployment workflows, including testing, building, and pushing to production, without worrying about the underlying infrastructure.
2. HawkStack and Ansible: Streamlining Infrastructure Automation
Ansible is a powerful configuration management and automation tool that helps IT teams manage complex environments. By automating repetitive tasks such as server provisioning, configuration management, and application deployment, Ansible boosts productivity and reduces the risk of human error.
How HawkStack Integrates with Ansible:
Infrastructure as Code (IaC): HawkStack’s native support for Ansible enables users to manage infrastructure as code. This integration allows for automated provisioning of cloud resources, application configurations, and environment setups, ensuring consistency across the entire system.
Seamless Playbook Execution: HawkStack allows users to execute Ansible playbooks across clusters and machines effortlessly. This ensures that any change or configuration applied in the playbook is automatically deployed, reducing manual effort.
Multi-cloud Support: Ansible’s multi-cloud capabilities are fully supported within HawkStack, making it easier to manage infrastructure across different cloud providers (AWS, Azure, GCP) within a unified platform.
3. HawkStack and Kubernetes: Simplifying Container Orchestration
Kubernetes has become the de facto standard for container orchestration, enabling developers to automate the deployment, scaling, and management of containerized applications. With its robust features, Kubernetes can manage large, complex application architectures in a distributed environment. However, managing Kubernetes clusters at scale can be challenging without proper tooling.
How HawkStack Integrates with Kubernetes:
Kubernetes Cluster Management: HawkStack simplifies Kubernetes cluster management by offering an intuitive interface to create, configure, and monitor clusters. This integration allows organizations to manage the entire Kubernetes lifecycle, from provisioning to scaling and monitoring.
Unified Dashboard: HawkStack provides a unified dashboard for monitoring and managing Kubernetes workloads, making it easier for DevOps teams to track performance, resource utilization, and issues within the cluster.
Continuous Deployment with Kubernetes: With HawkStack's integration with Jenkins and Kubernetes, DevOps teams can set up continuous deployment pipelines where containerized applications are built, tested, and deployed directly to Kubernetes clusters. This results in faster delivery cycles and higher quality software.
4. HawkStack and Docker: Containerization Made Easy
Docker, a key component of modern DevOps workflows, enables the packaging of applications and their dependencies into lightweight containers. By using containers, developers can ensure consistency across different environments and minimize deployment issues.
How HawkStack Integrates with Docker:
Containerized App Deployment: HawkStack facilitates easy deployment of Docker containers by integrating directly with container registries. Whether you're using Docker Hub or a private registry, HawkStack simplifies the process of pushing and pulling Docker images.
Automatic Container Scaling: With HawkStack, Docker containers can automatically scale based on demand. The platform ensures that enough resources are allocated to containers when the application load increases, ensuring high availability and performance.
5. HawkStack and Git: Version Control and Collaboration
Git is the most popular version control system used by developers for source code management. With continuous integration and continuous deployment, Git becomes the foundation for automating software delivery pipelines.
How HawkStack Integrates with Git:
Git-based Workflow: HawkStack supports Git-based workflows, enabling developers to manage branches, pull requests, and merges within the platform. This enhances collaboration and reduces the likelihood of errors during code integration.
Automated Triggering: HawkStack triggers Jenkins jobs automatically when code is committed to Git repositories. This allows teams to initiate testing, building, and deployment cycles instantly after a commit, ensuring rapid feedback and iteration.
6. HawkStack and Monitoring/Logging Tools: Keeping Track of DevOps Pipelines
DevOps success depends not only on automation but also on effective monitoring and logging to ensure that pipelines run smoothly. Tools like Prometheus, Grafana, and ELK Stack (Elasticsearch, Logstash, and Kibana) are widely used for monitoring, logging, and alerting.
How HawkStack Integrates with Monitoring and Logging Tools:
Prometheus & Grafana: HawkStack integrates seamlessly with Prometheus and Grafana to provide real-time monitoring and visual dashboards of DevOps pipelines, infrastructure, and applications. This integration allows DevOps teams to track performance metrics, identify bottlenecks, and ensure that everything is running as expected.
Centralized Logging: HawkStack’s integration with ELK Stack offers centralized logging for easy troubleshooting. Logs from Jenkins jobs, Kubernetes clusters, and Docker containers are collected and visualized, providing a holistic view of the system’s health.
7. Enhanced Security and Compliance Support
Security is a critical aspect of DevOps, and HawkStack ensures that all integrated tools operate within a secure environment. With built-in features like role-based access control (RBAC), secure secrets management, and compliance monitoring, HawkStack helps organizations meet their security and compliance requirements.
How HawkStack Supports Security and Compliance:
Role-based Access Control: HawkStack allows teams to define fine-grained access permissions for different users and tools, ensuring that only authorized personnel can modify critical configurations.
Automated Security Scanning: HawkStack integrates with popular security scanning tools to identify vulnerabilities in code, containers, and infrastructure, ensuring that security is embedded in every stage of the DevOps pipeline.
Compliance Auditing: HawkStack supports auditing and tracking of changes made to infrastructure and application deployments, which is crucial for compliance with industry standards such as GDPR, HIPAA, and SOC 2.
Conclusion
HawkStack stands out as a cloud-native platform that simplifies the integration and management of popular DevOps tools like Jenkins, Ansible, Kubernetes, Docker, and more. With its streamlined workflows, automated scaling, and robust security features, HawkStack helps organizations improve collaboration, accelerate software delivery, and optimize infrastructure management. Whether you're looking to enhance your CI/CD pipelines, streamline infrastructure automation, or gain better visibility into your DevOps processes, HawkStack is the comprehensive platform that can meet all your needs while integrating seamlessly with the tools you already use.
for more details visit
www.hawkstack.com
www.qcsdclabs.com
0 notes
Text
Monitoring Systems and Services with Prometheus
In today’s IT landscape, monitoring systems and services is not just important—it’s critical. With the rise of microservices, cloud-native architectures, and distributed systems, ensuring application uptime and performance has become more complex. Enter Prometheus, an open-source monitoring and alerting toolkit designed for modern systems.
What is Prometheus?
Prometheus is a powerful, feature-rich, and highly scalable monitoring system. It excels at collecting metrics, providing a flexible query language, and integrating seamlessly with a wide variety of systems. Developed originally by SoundCloud, it is now a Cloud Native Computing Foundation (CNCF) project.
Key Features of Prometheus
Multi-dimensional data model: Metrics are stored with key-value pairs (labels), allowing granular and flexible querying.
Pull-based scraping: Prometheus pulls metrics from defined endpoints, ensuring better control over the data.
Powerful query language (PromQL): Prometheus Query Language enables robust metric analysis.
Time-series database: It stores all data as time-stamped, making historical analysis and trend monitoring straightforward.
Alerting capabilities: Prometheus integrates with Alertmanager to provide notifications for defined thresholds or anomalies.
How Prometheus Works
Scraping Metrics: Prometheus scrapes metrics from targets (applications, services, or systems) by accessing exposed HTTP endpoints, typically /metrics.
Data Storage: The collected metrics are stored in Prometheus’s time-series database.
Querying with PromQL: Users can run queries to analyze trends, generate graphs, or inspect metrics for anomalies.
Alerting: Based on queries, Prometheus can trigger alerts via the Alertmanager, which supports integrations with tools like Slack, PagerDuty, and email.
Use Cases of Prometheus
Infrastructure Monitoring: Track CPU, memory, disk usage, and network performance of your servers and VMs.
Application Monitoring: Monitor application health, API latencies, error rates, and user request patterns.
Kubernetes Monitoring: Gain insights into Kubernetes clusters, including pod status, resource utilization, and deployments.
Business Metrics: Measure success indicators such as transactions per second, user growth, or conversion rates.
Getting Started with Prometheus
Install Prometheus: Download and install Prometheus from its official site.
Set up Scrape Targets: Define the endpoints of the services you want to monitor in the prometheus.yml configuration file.
Run Prometheus: Start the server, and it will begin collecting metrics.
Visualize Metrics: Use Prometheus’s web UI, Grafana (a popular visualization tool), or command-line queries for visualization and analysis.
Integrating Prometheus with Grafana
While Prometheus provides a basic web interface, its true potential shines when paired with Grafana for rich and interactive dashboards. Grafana supports PromQL natively and allows you to create stunning visualizations of your metrics.
Benefits of Using Prometheus
Open Source: Freely available, with a vast and active community.
Scalable: Works efficiently for both small setups and enterprise-level infrastructures.
Extensible: Compatible with many exporters, enabling monitoring of databases, message queues, and more.
Alerts and Insights: Real-time monitoring and customizable alerts ensure minimal downtime.
Challenges and How to Overcome Them
High Cardinality: Too many unique label combinations can lead to resource overuse. Optimize your labels to avoid this.
Scaling: Use Prometheus federation or remote storage solutions to handle extremely large environments.
Learning Curve: PromQL and setup can be complex initially, but online documentation and the Prometheus community offer ample resources.
Final Thoughts
Prometheus has transformed the way modern systems and services are monitored. Its powerful features, extensibility, and open-source nature make it a go-to choice for organizations of all sizes. Whether you’re monitoring a single server or a multi-cloud deployment, Prometheus can scale to meet your needs.
If you’re looking to harness the power of Prometheus for your systems, explore HawkStack’s monitoring solutions. Our expert team ensures seamless integration and optimized monitoring for all your infrastructure needs.
Ready to get started? Contact us today! www.hawkstack.com
#redhatcourses#information technology#containerorchestration#kubernetes#docker#linux#container#containersecurity#dockerswarm
0 notes