#MINECRAFT LAUNCHERS JAVA
Text
okay has anyone noticed that little loading screen before it brings up minecraft launcher where it's the little blue and yellow allays circling around?? it's so cute man
#this might just be a launcher with access to other version of minecraft only#or a java thing#but its so cute#minecraft#mineblr#jaymes talks
10 notes
·
View notes
Text

They took his crown :(
10 notes
·
View notes
Text
hydrogen bomb (forge with quark crashing every time i try to open it in the launcher) vs coughing baby (me)
#minecraft#the mods i wanna use are all 1.19.2 as well as the forge version.#i made sure i had the right ver of java installed.#literally what the fuck am i doing wrong. help me#i redownloaded the whole ass minecraft launcher.#man i just wanna play quark buzzier bees and supplimentaries dammit#are those guys not compatible??? cuz theyre listed on the quark website?????#help me
0 notes
Text
Lunar Client: El mejor Launcher para Minecraft del 2022
Lunar Client: El mejor Launcher para Minecraft del 2022
Descripción
En estos años minecraft ha pasado por muchos cambios que nos han beneficiado en hacer mucho más atractivo a la hora de jugar además de agregar diversas que ya eran requeridas o simplemente para agregar una nueva función o temática del mismo.
Pero con ello también se ha notado que cada vez el juego va pidiendo mucho más recursos que se esperan además que a veces suele ser algo difícil…

View On WordPress
#Java#Launcher para Minecraft#linux#Lunar Cliente#mac#Minecraft#multiplataforma#windows 10#Windows 11
0 notes
Text
A tribute to Techno has been added to the Java Minecraft Launcher.

[Image ID:
A cropped screenshot of the current banner displayed on the Java Minecraft launcher. It shows Steve and Alex running out of a cave in the side of a hill surrounded by a variety of peaceful and hostile mobs, including a pig wearing Technoblade's crown.
End ID]
11K notes
·
View notes
Note
What do you use to run/install/play mods? That's always been a barrier for me; it feels complicated and stressful to get them actually running.
the good news is that THIS ISN'T HARD THESE DAYS LET ME TALK TO YOU ABOUT HOW TO GET MODS!
the tl;dr here is "prism launcher is really easy to use and if you are playing a modpack, the people who made that modpack have already solved the 'making sure the mods run and don't crash together' problem, modded minecraft is actually pretty easy these days".
the longer answer with detailed instructions is below the cut, i just realized the many paragraphs seemed way too intimidating, and i want to be clear that "just install prism launcher" is 99% of what you need to do to have a smooth modded minecraft experience! you probably won't need most of this instruction i just talk too much.
so, since you want an easy answer to this, i am going to give you the easy version; if anyone wants the hard version, let me know. but. okay. you are either going to want to download the curseforge launcher or prism launcher; there are also a lot of other options out there (many, like prism, being a fork of multimc), but those two are the ones i recommend and that most other people will recommend.
i STRONGLY recommend downloading the prism launcher over the curseforge launcher (which is why its the only one i've linked); while this technically supports mod creators less (because you will not view the ads on curseforge), it gives you an easier way to download mods and modpacks that are only on modrinth, and also there are Good Reasons i don't want to get into why you might not want to monetarily support curseforge more than you have to in order to play modded minecraft. if there is a modpack you use a lot or a mod you use a lot, i highly encourage going to look for if that modder/team has a patreon you can support, if you have the money to do so! this is also, if you end up getting technical enough to need it, normally the place you get your first-class support for a given mod.
i am going to continue these instructions as though you've downloaded prism launcher, because that's the one i use and know best. luckily, it's really easy!
first, install prism. next, open prism. i... cannot remember if you're given some kind of setup screen at this point; if so, follow those instructions. if not, you will be greeted with a blank screen (i cannot remember if prism by default gives you a vanilla instance, you might have that, but otherwise you'll have an empty prism window). in the top right, there is a section for selecting what minecraft account you're using; log into your minecraft account by following the prompts. you will get a microsoft security alert about a new app connecting to your account that's able to read your account while you do this; this is normal, and what you want to happen.
now is a good time to make sure that you have prism set up with the correct java version and the correct minecraft installation. the easiest way to do this is to click the "add instance" button in the top left. you will be taken to a screen with a seemingly intimidating number of options. luckily, it's not actually that hard. for now, to test your installation, just immediately click "okay", which will create a vanilla minecraft instance with no mods on the latest version of vanilla minecraft. if this runs as expected, you're all good!
if this does NOT run as expected, the problem is normally either that prism needs you to give it the correct java version or you aren't actually authenticated with mojang. these can both be solved in settings! go to the "Java" tab. there, it will show both a minimum and maximum memory allocation. first, change that maximum to a much higher number; i have it at 4096 MiB by default, but if your modpacks aren't loading or are running extremely poorly, this is often going to be the culprit. it will also show a "Java path:"; check to make sure this is pointing to a Java 17 version minimum. if it isn't, you will likely need to download java 17; oracle's website sucks i'm sorry but despite it feeling sketchy i promise it's the right place.
also i know this makes setup sound overly technical but i promise it's not; you basically just have to know where files on your computer happen to be. i am just going into overly fine troubleshooting detail, just in case.
now that you know prism is set up correctly, it's time to install your mods or modpack! if you are intimidated by getting mods to work, i highly recommend playing a specific modpack rather than a random collection of mods. however, i'll go over how to do both.
if you want to install a modpack, click the "add instance" button. this pulls you to the "new instance" screen. on the side, you'll see several options. you'll want to click either the curseforge or modrinth tab; this will bring up a menu that allows you to search either of those websites for the modpack you want. click the modpack you want, hit "Okay", and congrats! you're done! you now have the modpack with all the mods, the correct Minecraft version, and the correct mod loader installed! prism's done all that for you! just start it up!
there is a chance while doing this prism will tell you that certain mods can't be downloaded before finishing making the instance. luckily, prism also makes THAT easy; it gives you direct links to those mods so you can download them yourself, and it, by default, checks the downloads folder for mods, so literally all you have to do is click all the links and then that potential hiccup is also solved. how handy!
as a bonus feature: if you want to update this modpack later, after an update, you can do this from either the "modrinth" or "curseforge" tab in the "edit" menu of the instance. there will be a dropdown with the pack version that allows you to select a specific version for prism to automatically update the instance to!
but if you want to install specific mods, NOT a modpack--say, you want to play vanilla minecraft, but you also want to add performance mods like optifine or sodium--this requires an extra step, but is just as easy.
click the "add instance" button. this time, stay on the "custom" tab. know, before creating this instance, which version of minecraft your mods work with. because you aren't using a designated pack, you ARE going to have to know that already! additionally, you're going to need to go to the second section on the bottom for "mod loader". know whether your mods are for forge or fabric, and select whatever the recommended version is by prism of one of those. (if you aren't sure where to figure this out, basically every mod will have this somewhere on the page you download it on, and both curseforge and modrinth have specific symbols on every mod for this; the community is aware that the loader split is a pain and tries to make clear which one you're meant to use.) hit "okay", and you'll create the instance!
next, right-click that instance. click the "edit" button in the menu. you'll see a number of useful tabs, but the one you want is the "mods" tab. this will list every mod you have on that instance! you have two options from here. the easier one for most purposes is the "Download mods" button. this opens a menu just like the modpack menu from before, except it searches individual mods, not packs. you can search mods, and prism will only show them if they're compatible with your current version of minecraft. hit the "select mod for download" button on every mod you want to add to the instance, and then "review and confirm". voila; you have added mods to the instance! you can even do this with pre-existing modpacks, too, if you are playing a modpack someone else made but want to add a specific mod.
and that's it! you've downloaded your mods! if you are playing with specific mods and not a pack, you may have more compatibility troubleshooting to do, but from there that's just standard stuff, not a prism launcher problem!
if you want to get more in the weeds from there, you can, but generally, this will be all you need! the nice thing about prism and other mod launchers is that it also makes different "instances" of minecraft, each with their own installation folders, which means you should never have to worry about any instance affecting another instance, or having to add or remove mods before logging into a server, for example. just make an instance in prism that matches that server and you'll be good to go!
so this is my overly detailed instructions on how to use prism launcher! I HOPE IT HELPS!
78 notes
·
View notes
Text
Custom Disc Installation Guide for Hermitcraft Season 9
I've seen a lot of people struggle with specifically the custom discs, so I made a guide on how to install the mods! It was originally posted as a twitter thread, along with a guide on how to get the world download.
How to install the Custom Discs mod for Decked Out / Hermitcraft 9 world download. Note: I'm assuming you already have the world installed. If you don't know how to do that, you can follow my previous guide here.
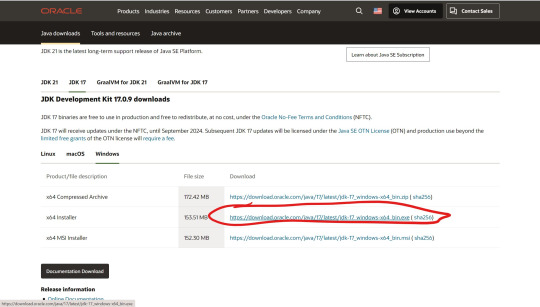
1) Follow this link https://oracle.com/java/technologies/downloads/#jdk17-windows…
2) Scroll down and download the "x64 Installer" (or whatever is more convenient for you).
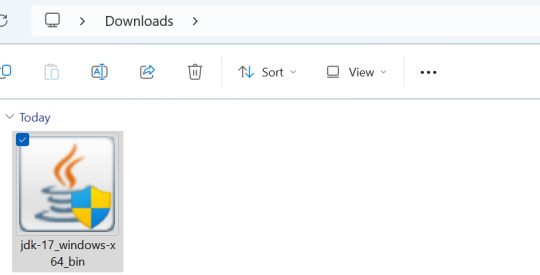
3) Open your Downloads folder and double click - you may need to right click and "Run as Administrator" if it's not working. Then, click Yes and install the program.
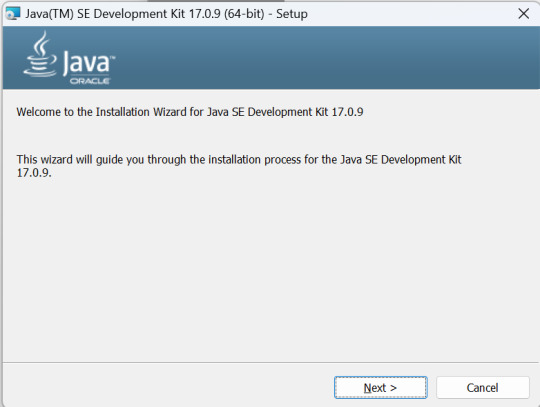
4) The installation software should then open. Just follow the instructions and press Next, Next, and then Close.
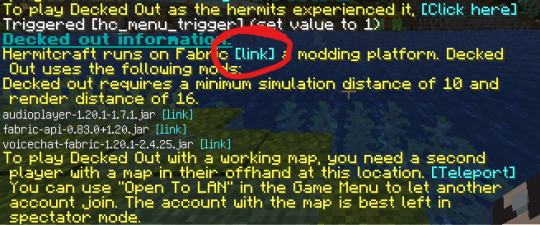
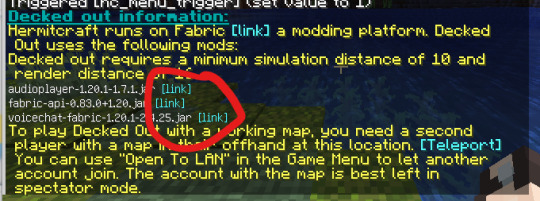
5) Open up the Hermitcraft world download. You may have seen the "To play Decked Out as the hermits experienced it..." message in chat. Click on "[Click here]".

6) Press the first link ("Hermitcraft runs on Fabric [link]")
7) Press the download button, then Download for Windows


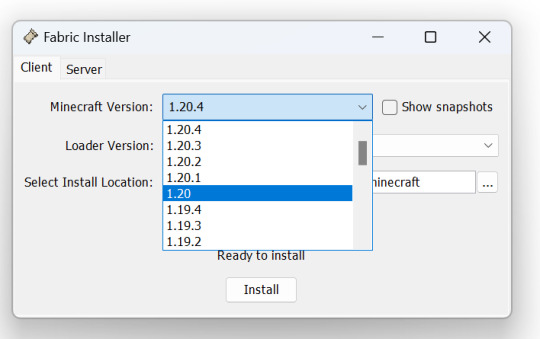
8) Double click the fabric-installer to open.

9) MAKE SURE THE VERSION IS 1.20! Leave everything else as their defaults. Make sure "Create Profile" is checked. Then, press "Install". - If you can't install, open your normal Minecraft launcher and run 1.20, then close Minecraft.
10) Go back to the Hermitcraft world and download the other three mods. Make sure you download all three of them!
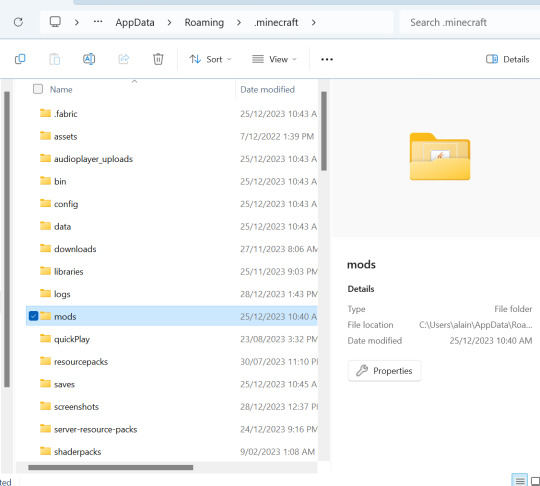
11) Open your Minecraft Launcher and go to Installations. You should see "fabric-loader-1.20". Hover over it and press the folder icon on the right hand side

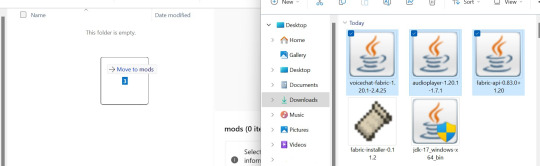
12) Open the "mods" folder. If you don't have one, create a new folder and name it "mods" (no capitals or punctuation)
13) Drag and drop the three mods you just downloaded into the "mods" folder.
14) Close Minecraft, and then press "Play" on the Fabric installation

Open Singleplayer, and then your hermitcraft world, and everything should be in working order! To get to Decked Out, you can either visit by the Nether Hub (DO is East/Red 2), or teleport by: /tp -523 103 2171
If you have any issues, feel free to reblog / comment with your problem (with a screenshot of your issue if you have one) and I'll be happy to help.
Good luck, and happy running!
#istg it's an entirely different experience when you get the custom sounds working it's like. amazing#hermitcraft#hermitcraft season 9#hermitcraft world download#decked out 2#scarland#sorry for clogging the tags these are just the two most sound-based experiences i've seen people struggle with#strbylmn posts
43 notes
·
View notes
Note
kind stranger on the internet, if u have the time and it is no inconvenience, a tutorial on how to make the yog world work would be amazing and immensely appreciated T^T
absolutely no problem! i'm here to serve :)
i'm gonna explain this with the assumption you have no idea what you're doing, just so it's thorough.
so, first thing's first, go to the ATLauncher downloads page choose one of the options that's under your operating system (windows, mac, linux) then run the program it gives you. (if it's a setup version, you'll have some stuff to click through but that's pretty easy)
once you've got ATLauncher up and running, you'll want to log in with your minecraft/microsoft account (unsure if it makes you do that at first startup anymore but if it doesn't, it'll be in the Accounts tab) then head over to the Packs tab on the right
go to the search bar and look for Yogscast Complete Pack, it'll be the one with the blue and orange icon, then hit New Instance and Install. it'll come up with a bunch of optional mods, but i personally just select everything except the minimaps and morph
once that's done installing (it might take a while) go over to the Instances tab, and it'll be there. you'll want to mess with it a little bit before opening it, though. there's be a bunch of buttons under the description and that's we're gonna be
you'll definitely want to give it more memory/ram by going to Settings > Java/Minecraft and messing with the very first option. the number you'll want to set it to depends on how beefy your computer is, so make sure you know how much ram it has
after that you'll want to hit Edit Mods and disable Flatsigns, Obsidiplates, and Switches, as the launcher doesn't like to allow them to run anymore
if everything goes right, you'll be ready to import the world save. go to the download link in my (currently) pinned post, save that wherever, and since it's a rar file you may need to have 7zip or winrar to open it but i'm unsure. i personally use 7zip
go back to the ATLauncher and hit Open Folder, that'll open your instance in your file explorer. open the saves folder (or make one if you don't have one yet, 'saves' all lowercase) and extract your world(1).rar into there. you should be left with a folder simply called "world"
go ahead and run the pack and see if everything works!
i have noticed a few other errors that come up, so:
if it's giving you an error along the lines of "two dimensions have the same id," try heading to the config folder (same directory as the saves) and find TwilightForest, open that and scroll down until you see # dimension, then change the number from 7 to 250 (or whatever else works)
if it's giving you an error along the lines of "can't connect to [whatever ip/url]" try editing the config of OpenBlocks and removing all radio stations
if it's something else entirely, try re-running/brute forcing it a couple times then come back and i'll see if i can figure it out
i hope this helps you and anyone else that happens to need it!! don't hesitate to ask for clarification on anything :)
23 notes
·
View notes
Note
do you have any tips or videos for beginners about Linux? and what would be best for like, idk Photoshop & CSP (maybe blender too) + Steam & Minecraft?
Steam runs on Linux natively - that's why the steam deck works. Same with Blender and Minecraft(Java). Minecraft Bedrock isn't officially supported but there is an unofficial launcher that runs the android version.
Photoshop isn't available, but photopea exists and iv heard good things. It's free, of course. Also, GIMP has you covered for 80% of edits. And if you do mostly vectors, Inkscape is great.
I hadn't heard of clip studio paint before this, but google says you should try Krita. It's available on every os too so no need to commit before trying it out.
Picking a linux distribution: i recommend Ubuntu. It's the most popular/common and has the most software available (arch and nix users, pretend you didn't hear that). Also the interface doesn't try to look like windows or macos, which puts your brain in learning mode.
This video seems like a good install walkthru, if a bit dry. Things have gotten quite straightforward in recent years...
27 notes
·
View notes
Text
Mod Malware Situation Update
Edit 2023-06-09: The researchers have updated their guidance to all-clear on unmodded versions of Minecraft Java, and work continues with both CurseForge and Modrinth to improve safeguards against new variants or copycat attacks. They are still advising staying away from mods a bit longer while this work continues.
As an additional note, I want to clarify something I don't think was clear in my original post: this was not a failure on CurseForge. What went down here has happened to other platforms. It's just the first time such a malicious package attack has been observed in the Minecraft modding scene. It may not be the last.
Original Post Follows:
As you may have seen yesterday, the modded Minecraft community is experiencing a malware incident.
The quick "do I need to worry" is if and only if all the following are true:
you are using Minecraft Java Edition
. . . and are using any mods or modpacks
. . . and those mods were downloaded/updated in the last 2-3 weeks or possibly as far back as March (timeline still unclear as of my post)
If any of the above were not true for you, then you should be clear. Investigators are advising maximum caution even of vanilla Minecraft, more on that at the end of this post.
If all of the above were true, don't panic. You just need to take a few extra steps to be sure.
A document for non-technical users explaining the situation in more detail and steps to take has been developed on github.
If you used any of the scripts from yesterday to verify your stuff, you may still want to try the new tools which will peak inside the mod files for that extra sure feeling.
The document provides links for checking yourself out, and what to do if the worst case happens.
CurseForge has an update on their twitter:

Modrinth is also in the process of verifying their site as well:
Okay, so, why is the document recommending not even running even vanilla Minecraft Java
There are a lot of brilliant people working on this incident, and they're all smart enough to not give an all-clear until all the facts are known.
Everyone wants fast results. Accuracy takes time.
The way this malware worked was to infect all Java jar files it finds on the system.
Including Minecraft itself.
Including things that have nothing to do with Minecraft.
This spreading to infect other jar files appears to be how it spread to infect legitimate mod files:
The malicious mods have upload dates multiple weeks in the past. Most of them were uploaded by single-use accounts with clearly autogenerated names, and were likely the seed of the infection. Luna Pixel Studios was compromised due to a dev testing one of these mods, as it was an interesting new upload.
At the end of the day, it's all about risk. They can't give a clean bill of health just yet, so they won't. If it turns out that something bigger and nastier was happening, they'd be on the line for that.
This is also why every list of mods published by the investigators comes with the "not comprehensive" disclaimer -- it's what we know. What we don't know can still hurt us.
So, running vanilla launcher for vanilla Minecraft Java is considered a risk. It may be low-risk.
Is it a risk I'm willing to take? Maybe next week, when I know more. (I often wait a week after an update, which coincidentally happened yesterday, so this just happens to align with how I do things normally)
If it's a risk you take, just be safe, stay vigilant, and keep an eye on the main repository of information for more news because I am not a reliable reporter.
#minecraft#minecraft java#modded minecraft#malware#fractureiser#curseforge#overwolf#modrinth#cyber security#minecraft mods#mineblr
47 notes
·
View notes
Text

Wow, thanks for the warning Minecraft Launcher!
Unfortunately I don't use Minecraft: for Windows, I use Minecraft Java Edition. Stop showing this warning.
9 notes
·
View notes
Note
Is the wizard server patron only? Where do I get the ip and also do u need mods
yup ! wizard minecraft server is a patreon benefit for the “cubed beast” tier but that tier also gets access to a community discord server with wizard resources, behind the scenes and speed paint videos, and sneak peeks at upcoming projects like merch and art stuff <|:•)
it’s accessible via java or bedrock and you don’t need mods installed, just an up to date launcher. you get the IP from the wizards after joining
gif: a 2d, looping animation of a green field of grass against a blue sky with 2 trees, a chicken, and a wizard in the background. another wizard, a white animal wearing a witch hat and simple smiley face with 2 front legs and a single, hairy rear leg, walks into frame, pauses, and looks at the camera before continuing offscreen. it’s legs swing in an imitation of how mobs walk in minecraft. the whole image has wobbly, blocky, blue lineart that changes with each frame. end ID.
#wizard mail#mindcraft#patreon#currently only 16 slots for minecraft but will open up more as the server grows#also tiers higher than cubed beast get minecraft access too that’s just the tier where you can start accessing it
286 notes
·
View notes
Text
how is the minecraft java launcher so fucking bad it is 2022
#hi welcome to minecraft please log in! oh noes not with that kind of login! please try the other one#here's a remember my login details button that will do absolutely fucking nothing#now do you want to download a version of minecraft that won't work#or do you want to browse your mod profiles with an interface we have only made exponentially worse over the years#wasn't this launcher powered by tumblr years and years ago#i 100% preferred that version#ugh#i should switch to bedrock.#dibi#minecraft
76 notes
·
View notes
Text
♡ how to make mob skins into resource packs minecraft java ♡
here's a super easy tutorial on how to add mob skins to ur game just like any other texture pack! (for java) (❀❛ ֊ ❛„)
first, open ur minecraft launcher. press on installations and find the game version you're using, (for example I'm using forge 1.18.2-forge-40.2.9). if you hover over it, next to the green play button should be a folder icon.
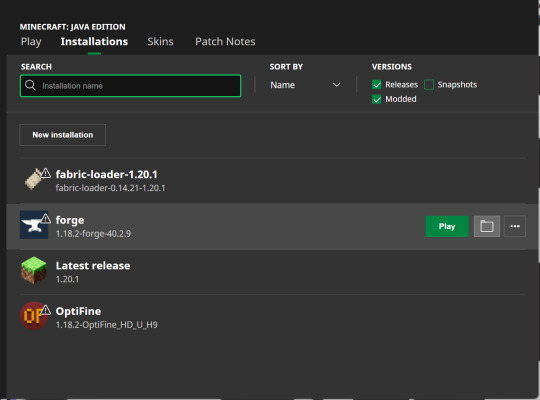
click the icon and find the folder titled 'versions'. click on your version of minecraft, (for example mine would say forge 1.18.2-forge-40.2.9). and click on it! inside should be a .jar file with your minecraft version.
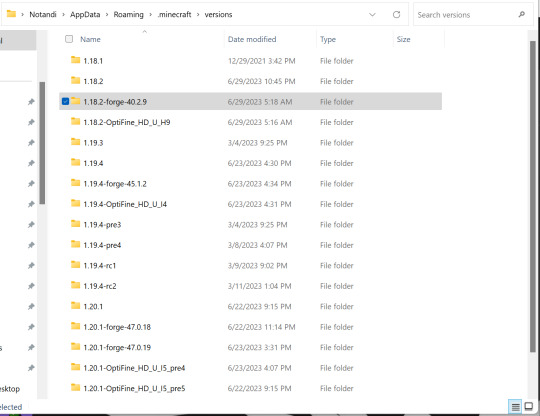
while keeping this tab open, create a folder on your desktop called minecraft mob skins and COPY and paste the .jar file inside. rename and change the .jar to .zip (you can now close the versions window).

open the zip file, it'll be easier in a new window (right click and press open in new window) and type pack in the search bar, find the file named pack.png (keep the tab open).
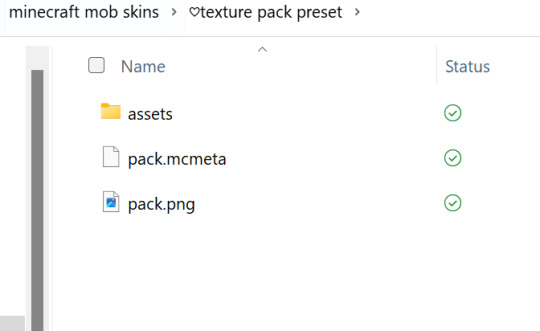
now going back to the minecraft mob skins folder we made, create a new folder called texture pack preset, open this folder and copy and paste the pack.png file inside.
we now have our resource pack icon that will show up in game ! ♡₊˚ 🦢・₊✧
next we need the pack.mcmeta file with our minecraft version so download that here!
once downloaded, drag and drop into your texture pack preset folder.
now, still inside the texture pack preset folder, create a folder called assets. inside that make a folder called minecraft then inside that textures and inside that entity. like this, assets > minecraft > textures > entity
YAYY we now have a preset folder that can be used for every mob!! *:・゚
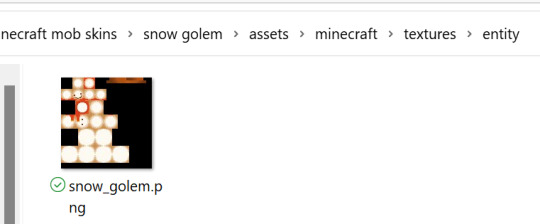
now back out of that and create another folder inside minecraft mob skins. name it after the mob you want to re-skin. (for example, cow, enderman, axolotl etc…)
inside of that create a folder and name it whatever you want. i always name mine the same name as the skin i want to use. for example 'toasted marshmallow golem'. (this is a super cute skin for your snow golems btw!) to make things easier I'll refer to this folder as the skin folder.
leaving the skin folder we just created open, go back to your desktop and click on minecraft mob skins. open up the texture pack preset folder and copy all the files inside, (assets, pack.mcmeta and pack.png should be highlighted). go back to the folder you have open and paste. (you can now close texture pack preset but keep still keep the skins folder open).
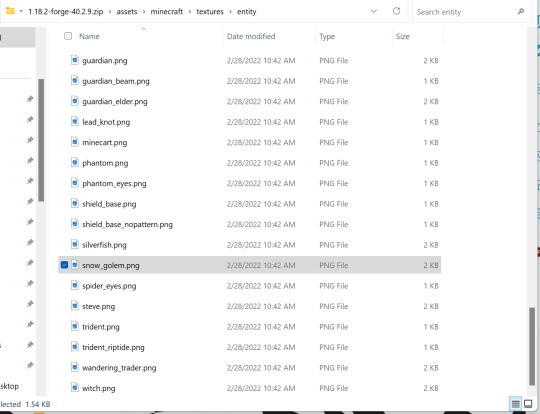
go back to your desktop and open minecraft mob skins again. click on the zip folder we pasted earlier with your game version, (open as a new window), and press on assets > minecraft > textures > entity, and find the mob you want.
at the top you'll notice the file path is exactly the same as our assets folder! that's because literally all you're doing is copying the exact file path so that minecraft can read it!
this means that if your mob has a folder with it's name on it, (for example assets > minecraft > textures > entity > goat) you'd create another folder named goat inside the entity folder YOU created
once you've found your mob or mob folder you should see one or multiple .png files.
if you only have one .png file (for example goat.png), then all you're going to do is rename the skin you want to use to goat.png and move it into the entity or mob folder YOU created.
(you can also keep a copy of the skin and keep it in your skins folder).
if you have two or more .png files (for example strider.png, strider_cold and strider_saddle or skeleton.png, stray.png, stray_overlay.png and wither_skeleton.png) then it's very simple.
with the strider example, strider.png would be your default strider when it's in lava. the strider_cold would be when it's on land and as the name implies 'cold', (which gives it a paler complexion). and strider_saddle.png is where a saddle has literally been pixel painted onto it.
if the skin you wanted to use only had one default .png file available yet you want for example the strider_saddle version, then you could open up the skin image in planetminecraft's PMCSkin3D or novaskin (which are both on browser) and to make it yourself!
if the skins resolution isnt too high it shouldn't take long, just search on google images, for example 'minecraft strider saddle' and try to copy it!
on the other hand, the skeleton example shows the different types of skeletons found, with stray_overlay refrencing the armour/apparel it wears.
if you come across a folder like rabbit which has black.png and brown.png etc… then all you have to do is name the skin you want to use as one of those file names, (for example black.png or brown.png), and it will replace that colour rabbit.
once you've renamed your skin to the file or files shown and made sure you've used the correct file path you're 80% done!!!
you can close the zip and back out of entity/your mob name folder till you can see assets, packmcmeta and pack.png
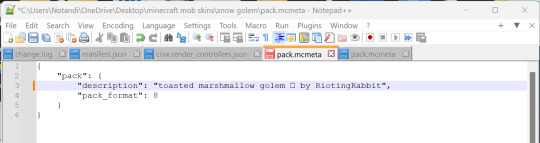
you'll need to download Notepad++ so you can edit the code in pack.mcmeta
once that's downloaded right click on pack.mcmeta and press edit with Notepad++
where it says description in quotation marks, type whatever description you want, (for example, "mossy axolotl by MeNylo"), and make sure pack_format is correct for your version. the pack_format for my version 1.18.2 is 8. it should be correct but just in case!
check here!
now press file and save!
if you'd like the resource pack to have a different icon I'd recommend downloading paint.net
click where it says, Get it now (free download):paint.net 5.0.7or whatever version it says.
now right click pack.png and press open with paint.net
to make a quick icon I use the snipping tool to cut an image of the mob, remove the background with
and paste that image to
where i made the pic cuter.
then going back to pack.png, open it up in paint.net and press on file then open the image you made. this will put it in a new tab which you then press edit and copy onto your pack.png image. make sure to paste into new layer and press keep canvas size!!!
zoom out a little as pack.png is quite small and scale the image you made so it lines up with the pack.png image.
now press save as and save to your skin folder. make sure it's .png!!!, (when it asks you if you want to replace the previous pack.png file say yes).
press OK and it will ask if you want to flatten which you say yes to. and your folder is all done!!!!!!!!!
the resource pack now has a custom image.
finally you just highlight all three files, assets, pack.mcmeta, pack.png, right click and press send to compressed zip folder. (i usually name it the name of the skin).
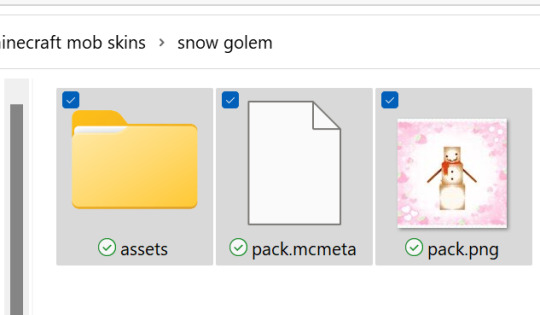
if you can't see the zip option just press show more options and it'll be there. ˶ᵔ ᵕ ᵔ˶
LAST STEP, copy and paste the zip folder into your minecraft resource pack folder (don't unzip) and load up your game!!! now just do the usual, open your game world > esc > options > resource packs and if it worked you should see the resource pack with the description and icon you set. add it and you're all done!<3 if this was helpful please save this for reference ♡

/ᐢ⑅ᐢ\ ♡ ₊˚
꒰ ˶• ༝ •˶꒱ ♡‧₊˚ ♡
./づ~ :¨·.·¨: ₊˚
`·..·‘ ₊˚ ♡ also i use
& for my snow golem/pumpkins
♡‧₊˚🍓
♡‧₊˚🍓thanks for reading!! good luck 🍵 ⋅* ‧₊
#minecraft#modded minecraft#minecraft skin#minecraft java#minecraft mobs#minecraft tutorial#minecraft texture pack#minecraft resource pack#tutorial#guide#cute
20 notes
·
View notes
Text

I posted 392 times in 2022
337 posts created (86%)
55 posts reblogged (14%)
Blogs I reblogged the most:
@technoblade-updates
@philza-updates
@sophietexas-updates
@wilbursoot-updates
@awesamponk-updates
I tagged 389 of my posts in 2022
Only 1% of my posts had no tags
#technoblade - 246 posts
#mcyt - 246 posts
#mod luna - 183 posts
#image id - 171 posts
#no id in alt text - 160 posts
#not an update - 142 posts
#asks - 134 posts
#dream smp - 65 posts
#dsmp - 65 posts
#youtube - 28 posts
Longest Tag: 127 characters
#i can add timestamps for scott too if y'all want but he joins pretty late and techno just says bye and leaves after wilbur ends
My Top Posts in 2022:
#5
MCC has added a monument to Techno in the MCC lobby!

[Image ID:
A cropped screenshot of Techno’s memorial in the MCC hub from the update video for MCC 23. It consists of a wooden slab with a custom diamond sword with a stone hilt embedded into it. The sword’s connection between guard and hilt is decorated with a golden pig face and a custom version of Techno’s crown hangs from one side of the guard.
End ID]
9,244 notes - Posted July 22, 2022
#4
A tribute to Techno has been added to the Java Minecraft Launcher.

[Image ID:
A cropped screenshot of the current banner displayed on the Java Minecraft launcher. It shows Steve and Alex running out of a cave in the side of a hill surrounded by a variety of peaceful and hostile mobs, including a pig wearing Technoblade's crown.
End ID]
10,770 notes - Posted July 2, 2022
#3
Techno’s plan for the Dream SMP was to have his main character “Technoblade” go off on a training arc while he plays a new character named “Cyberknife” who loves government in the new world of the Dream SMP that can be accessed via the special portal. He was going to involve as many smaller creators on the Dream SMP as he could and the Syndicate minus Techno would investigate this new character for anarchy related reasons!
10,903 notes - Posted August 4, 2022
#2
Some updates
- Techno will be receiving the Courage Award from the Sarcoma Foundation of America in September for his dedication to the cause. You can read about it here.
- A Mojang Community Manager on reddit has confirmed that Mojang is thinking of ways to honour Techno, but without any details as to how they will be doing so. Link to their reddit comment.
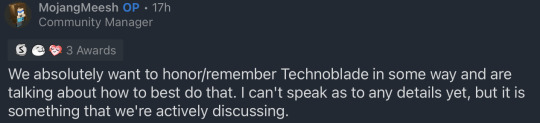
- Techno’s channel hit 12 million subscribers on YouTube! That means he’s overtaken Tommy again.
- Phil has built a monument to Techno in his hardcore world. It consists of a diamond sword rammed into an island, with Techno’s cape hung from the hilt. A Friendship Emerald hangs from one side of the sword’s hand guard. Techno’s crown sits around where the sword meets the earth, with Phil having tried to replicate the scuffedness of the gems as best he could. A trident named “Technoblade Never Dies” is hung in an item frame on the crown. There is a bell on an emerald block and 2 pigs tethered next to the monument.
See the full post
17,736 notes - Posted July 2, 2022
My #1 post of 2022
The splashtext “Technoblade Never Dies!” has been added to Minecraft!

20,312 notes - Posted July 6, 2022
Get your Tumblr 2022 Year in Review →
#tumblr2022#year in review#my 2022 tumblr year in review#your tumblr year in review#not an update#long post
233 notes
·
View notes
Note
Any advice for setting up prism launcher? It is. Being difficult. And telling me I need java? Which I have? Ack?
it’s been a WHILE since I set up prism on my own machine, but some generic “you’re having Java problems” notes:
start by running java -version on your command line to make sure you have an install of Java in your PATH. what COULD be happening is that you have a Java install, but don’t have it in your PATH so prism can’t find it, or you think you have an install but don’t.
note here that Minecraft Java edition DOES come bundled with the Java version it needs, but that prism isn’t always able to recognize that; you will need a Java install generically for your machine as well.
if you’re getting a Java error while launching the game, you may have the wrong version of Java. Minecraft 1.18+ uses Java 17, rather than Java 8 or 11, and you’ll need to go to oracle’s website and install the latest version of Java 17 for your computer.
alternately, you may have your Java install on a path prism doesn’t recognize—find the Java install and tell prism where it is!
alternately alternately, you could be me and have no less than four different Java versions installed on your machine in order to perform a variety of tasks (look Java 8 is still REALLY POPULAR in the work world). make sure prism is pointing to the correct install.
also I know oracle’s website is terrible, this is because oracle sucks.
don’t know if any of these will solve your problem, but I wish you luck!
71 notes
·
View notes
Last Seen Blogs

khoolkid
IBBY K

oh-the-misery
New Hyperfixation Just Dropped

billironfield
Billironfield

futureworldmissions-blog
Future World Missions

vmod
Yo