#Mac Password Removal
Explore tagged Tumblr posts
Visit Tumblr Blog
Explore Tumblr blogs with no restrictions, modern design and the best experience.
Last Seen Tumblr Blogs


Fun Fact
Tumblr has 4 main sources of revenue.
Text
Professional Hard Drive Repair Service
A malfunctioning or damaged hard drive can bring your productivity to a screeching halt, whether it's due to a business-related data loss, personal documents, or precious memories stored on your device. In the digital age, hard drives are essential for storing critical information, and when they fail, the consequences can be severe. Fortunately, professional hard drive repair services can help you recover your data and restore your hard drive’s functionality.
Hard Drive Failures
Hard drives are intricate mechanical devices composed of several parts, including magnetic platters, a read/write head, and an actuator arm. As with any mechanical system, hard drives can fail for a variety of reasons, often leading to the loss of valuable data. Hard drive failures generally fall into two categories:
1. Physical Failures
Physical failures occur when a hardware component inside the hard drive malfunctions or breaks down. These can be the result of:
Mechanical Wear and Tear: Over time, the internal components of the hard drive, such as the motor, actuator arm, or platters, may degrade, leading to failure.
Head Crashes: When the read/write head makes contact with the spinning platters, it can cause significant physical damage to the drive and the data stored on it.
Electrical Failures: Surge in power, faulty power supplies, or power outages can cause electrical failures, which may damage the hard drive's internal components.
Physical Impact: Dropping or physically damaging a hard drive can cause severe harm to its internal parts, rendering it inoperable.
Exposure to Extreme Conditions: Overheating, water damage, or exposure to dust can harm the sensitive components of a hard drive.
2. Logical Failures
Logical failures, on the other hand, happen when there is damage to the file system, software, or data. While the drive itself is still functional, the operating system may not be able to access or read the stored data. Logical failures can include:
Corrupt or Damaged Files: File corruption can result from malware attacks, improper shutdowns, or software errors.
Deleted Files: Accidental file deletion or formatting can make it difficult or impossible to access important data.
Bad Sectors: Hard drives may develop bad sectors over time, where data cannot be read or written correctly.
Partition Loss: Sometimes, a hard drive's partition structure can be lost, preventing access to the data on the disk.
Why Choose Professional Hard Drive Repair Services?
When faced with a damaged or malfunctioning hard drive, many users attempt to solve the problem themselves using DIY methods, such as using software tools or trying to physically repair the drive. However, in most cases, professional hard drive repair services offer significant advantages over self-repair attempts, including:
1. Expertise and Experience
Hard drive repair is a specialized field that requires technical expertise and experience. Professional repair services employ trained technicians who are familiar with the complex components and operation of hard drives. They understand how to diagnose and fix both mechanical and logical failures without further damaging the drive or losing data.
Attempting DIY repairs without the necessary skills or tools can lead to permanent data loss or make the drive even more difficult to repair. Professionals know the correct procedures to follow for different types of hard drive failure.
2. Data Recovery Expertise
In many cases, the primary goal of a hard drive repair service is to recover lost data. Whether your drive has suffered physical damage or file corruption, professional repair services have the tools and know-how to recover your files safely. Data recovery services often include the following techniques:
Cloning the Drive: In cases of physical failure, technicians can clone the damaged drive onto a working one to recover the data before attempting repairs.
Advanced Recovery Techniques: For logically damaged drives, professional services can use sophisticated software tools to scan and recover lost files, even if the drive is not bootable.
Clean Room Environments: For physical repairs, some services operate in controlled clean rooms to avoid dust or other contaminants that could make the damage worse.
3. Avoiding Further Damage
One of the primary risks of attempting DIY hard drive repairs is the potential to make things worse. Without proper knowledge or equipment, you could accidentally cause more damage, resulting in irreversible data loss. Professional hard drive repair services have the correct tools and procedures in place to ensure that the drive is handled with care and that the chances of successful recovery are maximized.
4. Specialized Equipment
Professional services often have access to highly specialized tools and technology that are not available to the average consumer. For example, they may have:
Clean rooms where the drive can be opened and repaired without the risk of contamination.
Advanced data recovery software that can extract data from drives with damaged file systems or bad sectors.
Disk imaging technology that can create exact copies of the original drive, preserving data during the recovery process.
5. No Data Loss Guarantee
Many professional hard drive repair services offer no data loss guarantees, meaning that they will not charge you if they cannot successfully recover the data from the drive. This adds a layer of security and peace of mind, especially when dealing with sensitive or irreplaceable data.
6. Timely Recovery
Hard drive failures can cause significant disruptions to both personal and professional activities. A professional service can typically offer a faster turnaround for repairs, often providing quick recovery services for urgent situations, such as business-critical data or vital personal documents.
The Hard Drive Repair Process
The process for repairing a damaged hard drive will vary depending on the type of failure. However, here’s a general overview of the typical steps involved in a professional hard drive repair service:
Step 1: Initial Diagnosis
Upon receiving the damaged hard drive, the repair technician will perform an initial diagnosis to determine the nature of the failure. This can involve both software-based diagnostics (for logical failures) and physical inspections (for mechanical issues). The technician will identify whether the failure is due to a physical or logical problem and determine whether data recovery is possible.
Step 2: Data Cloning and Backup (If Necessary)
If the issue is related to a physical failure, the technician will often create a clone of the damaged drive before attempting repairs. This ensures that data is preserved during the recovery process and prevents further damage to the original drive.
Step 3: Physical Repair (If Necessary)
If the failure is physical, the technician will repair or replace any damaged components inside the hard drive. This can involve fixing mechanical parts like the motor, actuator arm, or read/write head. In extreme cases, the drive may need to be disassembled in a clean room to prevent contamination.
Step 4: Logical Repair
For logical failures, the technician will use data recovery software to scan the drive for recoverable files. The technician may also repair damaged file systems, recover deleted files, or resolve issues with bad sectors.
Step 5: Data Restoration and Transfer
Once the data has been recovered, the technician will restore the files to a secure location, such as an external hard drive, cloud storage, or another safe medium. They will ensure that all data is intact and properly transferred without corruption.
Step 6: Testing and Final Verification
After the repair and data restoration process is complete, the technician will test the drive to ensure that it is fully functional. This can include verifying that the drive is properly recognized by the operating system and checking for any remaining errors or issues.
Why Professional Repair Services Are Crucial
When your hard drive fails, data loss can be catastrophic. Whether it’s personal memories, vital work documents, or business-critical data, the potential impact of losing your files cannot be overstated. Professional hard drive repair services not only help recover your lost files but also provide peace of mind, knowing that your drive is in the hands of experts who can get it back to working order.
By choosing a reliable and experienced service provider, you can ensure that your hard drive issues are resolved quickly and efficiently, without risking further damage to your data. Whether your drive has experienced a physical malfunction or logical corruption, a professional repair service offers the best chance of recovery.
#Mac Hard Drive Upgrade/Replacement#MacBook Pro Graphics Card Repair#Mac Password Removal#Mac Battery Replacement#Mac Keyboard Replacement
0 notes
Text

SFS Hack
For the sake of keeping this a bit shorter I've decided to create this post and link to the original, much reblogged post about this matter. its contains a lot of info thats definitely worth a read(!) but for now: Factsheet:
SFS uploads are currently NOT possible (see above).
CC (custom content) files ALWAYS end with .package.
Script mods files ALWAYS end in .ts4script
On Windows: if a CC folder on SFS or downloaded zip file contains a .exe do not run it! immediately remove it and empty your trashcan/bin.
On Mac: If a CC folder on SFS or downloaded ZIP file contains a .dmg do not open it and drag it into your App folder! Immediately remove it and empty your bin.
For creators: change your password if you have a SFS account, always use a randomly long(!) generated password (LastPass, Password (Apple)!
My own downloads are also stored on Dropbox.
I only use SFS as a 2nd link for all my downloads so if you download then use the Dropbox links for now. if you do use SFS then pay attention to the following:
If any zip or package file from me has been updated in march/April 2025 (at SFS):
Do not DOWNLOAD the file/zip from SFS and please let me know!!! ( I still have to check ALL folders manually for this...)
817 notes
·
View notes
Text
!Important Warning!
These Days some Mods containing Malware have been uploaded on various Sites.
The Sims After Dark Discord Server has posted the following Info regarding the Issue:
+++
Malware Update: What We Know Now To recap, here are the mods we know for sure were affected by the recent malware outbreak: "Cult Mod v2" uploaded to ModTheSims by PimpMySims (impostor account) "Social Events - Unlimited Time" uploaded to CurseForge by MySims4 (single-use account) "Weather and Forecast Cheat Menu" uploaded to The Sims Resource by MSQSIMS (hacked, real account) "Seasons Cheats Menu" uploaded to The Sims Resource by MSQSIMS (hacked, real account)
Due to this malware using an exe file, we believe that anyone using a Mac or Linux device is completely unaffected by this.
If the exe file was downloaded and executed on your Windows device, it has likely stolen a vast amount of your data and saved passwords from your operating system, your internet browser (Chrome, Edge, Opera, Firefox, and more all affected), Discord, Steam, Telegram, and certain crypto wallets. Thank you to anadius for decompiling the exe.
To quickly check if you have been compromised, press Windows + R on your keyboard to open the Run window. Enter %AppData%/Microsoft/Internet Explorer/UserData in the prompt and hit OK. This will open up the folder the malware was using. If there is a file in this folder called Updater.exe, you have unfortunately fallen victim to the malware. We are unware at this time if the malware has any function which would delete the file at a later time to cover its tracks.
To quickly remove the malware from your computer, Overwolf has put together a cleaner program to deal with it. This program should work even if you downloaded the malware outside of CurseForge. Download SimsVirusCleaner.exe from their github page linked here and run it. Once it has finished, it will give you an output about whether any files have been removed.
+++
For more Information please check the Sims After Dark Server News Channel! Or here https://scarletsrealm.com/malware-mod-information/
TwistedMexi made a Mod to help detect & block such Mods in the Future: https://www.patreon.com/posts/98126153
CurseForge took actions and added mechanics to prevent such Files to be uploaded, so downloading there should be safe.
In general be careful, where and what you download, and do not download my Mods at any other Places than my own Sites and my CurseForge Page.
2K notes
·
View notes
Text
Downloading fanfic from AO3
I've been downloading a lot of fanfic lately for personal archival purposes, and I figured I'd share how I do it in case it's useful to anyone else (and so I have it written down in case I forget!).
There are lots of different ways to save fic, including the file download built into AO3, but I find that this gives me the nicest ebooks in the most efficient way.
(Under a cut cause long.)
Download Calibre: https://calibre-ebook.com/ or (clickable link).
Calibre is about the best ebook management and control program around and it's free. You can get it for windows, mac, and linux or download and run it from a portable storage device (I'm using a windows PC).
Install it and run it. It's gonna ask you where you want to put your library. Dealer's choice on this one. I recommend your internal drive (and then back up to external/cloud), but YMMV.
If you want to keep fanfic separate from the rest of your ebooks, you can create multiple libraries. I do, and my libraries are creatively named 'Books' and 'Fic'.
Customise Calibre
Now you're gonna install some plugins. Go to Preferences on the menu bar (far right), click its little side arrow, then choose 'Get plugins to enhance Calibre'.
At the top right of the box that pops up is 'Filter by name'. The plugins you want to get are:
EpubMerge
FanFicFare
Install them one at a time. It will ask you where you want them. I recommend 'the main bar' and 'the main bar when device is attached' (should be selected by default). When you're done, close and reopen Calibre.
The plugins you just installed should appear on the far right of the toolbar, but if you can't see one or both of them, fear not! Just click Preferences (the button, not the side arrow), then Toolbars and Menus (in the 'Interface' section) then choose the main toolbar from the drop down menu. That will let you add and remove things - I suggest getting rid of Donate, Connect Share, and News. That'll leave you room to add your new plugins to the menu bar.
(Do donate, though, if you can afford it. This is a hell of a program.)
Now you're ready to start saving your fave fanfic!
Saving fanfic
I'll go through both methods I use, but pick whatever makes you happy (and/or works best for what you're downloading).
ETA: if the fics are locked you can't easily use FanFicFare. Skip down to the next section. (It does ask for a username/password if you try and get a locked fic, but it's never worked for me - I had to edit the personal.ini in the configuration options, and even then it skips locked fics in a series.)
Calibre and FanFicFare
You can work from entirely within Calibre using the FanFicFare plugin. Just click its side arrow and pick from the menu. The three main options I use are download from URL, make anthology from a webpage, and update story/anthology.
Download from URL: pick Download from URL (or just click the FanFicFare button) and paste the fic's URL into the box (if you've copied it to your clipboard, it will be there automatically). You can do more than one fic at a time - just paste the URLs in one after the other (each on a new line). When you're done, make sure you have the output format you want and then go.
Make Anthology Epub From Web Page: if you want a whole series as a single ebook, pick Anthology Options, then Make Anthology Epub From Webpage. Paste the series URL into the box (if you've copied it to your clipboard, it will be there automatically), click okay when it displays the story URLs, check your output format and go.
Update series/anthology: if you downloaded an unfinished fic or series and the author updates, you can automatically add the update to your ebook. Just click on the ebook in Calibre, open the FanFicFare menu using its side arrow, and select either Update Existing FanFic Books or Anthology Options, Update Anthology epub. Okay the URLs and/or the output format, then go.
Any fic downloaded using FanFicFare will be given an automatically generated Calibre cover. You can change the cover and the metadata by right clicking on the title and picking edit metadata. You can do it individually, to change the cover or anything else specific to that ebook, or in bulk, which is great for adding a tag or series name to multiple fics. Make sure you generate a new cover if you change the metadata.
Browser plugins, Calibre, and EpubMerge
You can also use a browser addon/plugin to download from AO3. I use FicLab (Firefox/Chrome), but I believe there's others. FicLab: https://www.ficlab.com/ (clickable link).
FicLab puts a 'Save' button next to fic when you're looking at a list of fics, eg search results, series page, author's work list etc. Just click the 'Save' button, adjust the settings, and download the fic. You can also use it from within the fic by clicking the toolbar icon and running it.
FicLab is great if you're reading and come across a fic you want to save. It also generates a much nicer (IMO) cover than Calibre.
You can add the downloaded fic to Calibre (just drag and drop) or save it wherever. The advantage to dropping it into Calibre is that all your fic stays nicely organised, you can adjust the metadata, and you can easily combine fics.
Combining fics
You can combine multiple fics into an anthology using EpubMerge. This is great if you want a single ebook of an author's short fics, or their AUs, or their fics in a specific ship that aren't part of a series. (It only works on epubs, so if you've saved as some other format, you'll need to convert using Calibre's Convert books button.)
Select the ones you want to combine, click EpubMerge, adjust the order if necessary, and go.
The cover of the merged epubs will be the cover of the first fic in the merge list. You can add a new cover by editing the metadata and generating a new cover.
Combing with FanFicFare
You can also combine nonseries fics using FanFicFare's Make Anthology ePub from URLs option by pasting the individual fic URLs into the box.
Where there's more than a few fics, I find it easier to download them with FicLab and combine them with EpubMerge, and I prefer keeping both the combined and the individual versions of fic, but again YMMV.
Reconverting and Converting
Once I'm done fussing, I reconvert the ebook to the same format, to ensure everything is embedded in the file. Is this necessary? YMMV, but it's a quick and easy step that does zero harm.
If you don't want your final ebook to be an epub, just convert it to whatever format you like.
Disclaimers
Save fanfic for your own personal enjoyment/offline reading/safeguarding against the future. If it's not your fic, don't distribute it, or upload it to other sites, or otherwise be a dick. Especially if the author deletes it. Respect their wishes and their rights.
This may work on other fanfic sites, eg FFN, but I've never tried so I don't know.
If you download a fic, do leave the author a kudo or a comment; you'll make them so happy.
This is how I save fic. I'm not pretending it's the only way, or even the best way! This is just the way that works for me.
#fanfic#fic#ao3#ficlab#calibre#fanficfare#epubmerge#downloading fanfic#adding the my fic tag so I can find this again#my fic
1K notes
·
View notes
Text
💖PLZ PLAY MY PROTOTYPE GAME💖
Me and a friend have been working on our master thesis project for a few months now, and you would be doing me a huge favour if you would play it and fill out a short form ☺️💖
✨ There's an aaoth reward at the end! ✨🥳
Sailor moon / persona inspired game:
(GAME LINK NOW REMOVED, testing is finished <3 )
Password: 1234
Windows only (we're looking into a Mac build).
300 notes
·
View notes
Text
Want to keep using Ad Blockers? Stop Using Chrome, Switch to Firefox.
So with the rollout of Manifest V3, Google Chrome is pretty much crippling all ad blockers on Chrome. Effectively, ad blockers can no longer update their lists without fully updating their plugins. It's pretty shitty.
And you may be asking yourself -- what can I do? The answer is simple:
Switch to Firefox. Now.
Now I've been a Firefox evangelist for a long time, I know, but it's a free, open source browser made by a nonprofit org. It's literally the most ethically developed any software could possibly be. It's on every major desktop platform, and it's just... good.
Why would you use a browser made by a corporation that literally removed "Don't be evil" from their mission instead of this? I know that, like, a long ass time ago Chrome was faster, but that's not remotely true anymore. Heck, on Mac Chrome eats way more RAM than Firefox. It's ridiculous.
That's not even mentioning the fact that the amount of Chromium engine browsers out there is kind of ruining the web. Mozilla has their own rendering engine built on open web standards, and diversity in rendering engines helps everyone.
So yeah. If you're using a computer, go get Firefox. They have an Android version too. (They sorta have an iOS app -- but that uses Webkit because of Apple's limitations on third party browser engines -- but it will let you access your sync'd Firefox passwords).
Make your life better.
190 notes
·
View notes
Text

⚠ beware of MALWARE that have infected multiple mods for the sims
Recently different mods were uploaded/updated under fake accounts or through hacking existing accounts of trusted creators, that have been infected with malware. The malware hides in the scripted package of the script mods, it downloads and run an unknown exe file silently without the user knowing. Because it's an exe file, Mac and Linux users might be exempted for now. The goal of the virus is to steal a vast amount of your data and saved passwords. (For a full explanation and to stay updated on the problem check out sims after dark: https://simsafterdark.com/malware-warning/) 🔸 the awesome modder TwistedMexi has recently released something called ModGuard, this tool scans your mods folder and blocks suspicious items. If you want to have it install it directly from TwistedMexi: https://www.patreon.com/posts/98126153 🔸 known mods to have been affected at some point recently:
“Cult Mod v2” uploaded to ModTheSims by PimpMySims (impostor account)
“Social Events – Unlimited Time” uploaded to CurseForge by MySims4 (single-use account)
“Weather and Forecast Cheat Menu” uploaded to The Sims Resource by MSQSIMS (hacked, real account)
“Seasons Cheats Menu” uploaded to The Sims Resource by MSQSIMS (hacked, real account)
“Motherlode Menu” by MSQSIMS (hacked, real account)
“Mood Cheat Menu” by MSQSIMS (hacked, real account)
“Mouth Preset N16” by PlayersWonderland (hacked, real account)
“Cult Sex Mod V1” from LoversLab
🔸 if you have downloaded these mods recently delete them ASAP!
Overwolf made a tool that can remove the installed virus: https://github.com/overwolf/sims4-social-events-cleaner/releases/tag/1.1
Change all your passwords etc immediately!
You might need to contact your bank to tell them your credit card info is no longer secure. Some banks give you the opportunity to report suspicious activity. In case you do not trust it, just block your card and request a new one.
55 notes
·
View notes
Text
How to host local Club Penguin Private Server (CPPS) on Silicon Mac (M1/M2/M3) thru play.localserver & Solero's Wand install.
I spent so long looking for a solution to this that I want to contribute what worked for me. I got so frustrated looking for something that worked, and I hope this guide will help others avoid that frustration.
This is NOT a guide on hosting or serving a CPPS. This is a guide on making a CPPS playable by locally hosting your server on your Silicon M1/M2/M3 Macbook. This worked on my M3 Macbook, and, in my experience, it seems the newer the hardware/operating system gets, the harder it is accomplish this.
DISCLAIMER *I do not know very much about this topic. I can paste commands into terminal and execute them, I know how to install DMG files I downloaded from the internet (the bar is in hell, I am aware), and I know how to enter play.localhost to run this in a browser. I am no expert; this guide is for beginners like myself who want a CPPS. This is beginner-level stuff. If you want advice or need help hosting, refer to the Wand Github page, Solero's Dash (an actual web-hosting solution for Houdini/Wand), Solero's discord, or, when in doubt, Google it. (I recommend only asking for help in Solero's discord for help AFTER trying your best to search for a solution, and even after that, trying to search key terms in their chat logs. They often have to repeat the same advice over, and over, and over again.)*
TLDR; IDK shit about shit
USING WAND INSTALLER
wand description from github: Wand makes it easy to configure dash, houdini and a media server utilizing docker & docker-compose.
All the assets are located here.
Installation instructions from the above link:
Installation script 1. run the script: bash <(curl -s https://raw.githubusercontent.com/solero/wand/master/install.sh) 2. Answer Questions which are: Database password (Leave blank for random password) Hostname (example: clubpenguin.com) (Leave empty for localhost) External IP Address (Leave empty for localhost) 3. Run and enjoy. Run this command: $ cd wand && sudo docker-compose up
The steps I took:
1. Install Docker via Terminal & Homebrew.
Installing the Docker DMG file did not work properly when I tried. I realized later that Docker is seperate from Docker Desktop (the DMG file). I got Docker to work by using Terminal to install Homebrew, and then using Homebrew to install Docker.
Indented text = paste into Terminal.
Command to install Homebrew:
/bin/bash -c "$(curl -fsSL https://raw.githubusercontent.com/Homebrew/install/HEAD/install.sh)"
Ensure Homebrew is installed:
brew --version
Install Docker:
brew install docker
Recommended: Install Docker Desktop (useful in determining if your server is running, stopped, or stuck in a restart loop).
brew install --cask docker
Run Docker Desktop:
open -a Docker
2. Run installation script:
bash <(curl -s https://raw.githubusercontent.com/solero/wand/master/install.sh)
From Github instructions:
Answer Questions which are:
Database password (Leave blank for random password)
Hostname (example: clubpenguin.com) (Leave empty for localhost)
External IP Address (Leave empty for localhost)
3. $ cd wand && sudo docker-compose up
This is what is provided in the Github. This command didn't work on Mac; I believe it's formatted for Linux OS. Here's how I broke it up and enabled it to run from Mac's Terminal.
Navigate to Wand directory:
cd wand
Double-check if you're in the right directory:
ls
Start Docker container:
docker-compose up
If the above doesn't work, try
docker compose up
or
brew install docker-compose
Takes a second...

Ensure Docker is running:
docker info
If it isn't, open the Docker Desktop application.
*After using compose up, this error may appear:*
WARN[0000] /Users/[user]/wand/docker-compose.yml: the attribute version is obsolete, it will be ignored, please remove it to avoid potential confusion
This is harmless. If you get annoyed by errors, this can be solved by:
nano docker-compose.yml

See Version 3.7 at the top? Delete that line.
Ctrl-X (NOT COMMAND-X) to exit, Y to save, Enter.
PLAY.LOCALHOST
Type http://PLAY.LOCALHOST into a browser.

Create a penguin.

Try logging in that penguin:

This step was agony. I'm not savvy with running obsolete or deprecated software, and, of course, Club Penguin (and Houdini/Wand's assest) uses Flash, which was discontinued, and timebombed by Adobe, in 2021.
I tried Ruffle. Club Penguin Journey uses Ruffle, so why can't I?
Running Ruffle in Firefox:


No luck.
In the Solero discord, they'll direct to this blog post:

This method does not work on Mac M1/M2/M3. The program is "out of date" and you cannot run it. It works on Macbook's running Sonoma and backward. I'm on an M3 running Sequoia.
they'll often post this video in the discord:

In theory, this method should work, and it does for many, but for whatever reason, not on my M3. I tried different versions of Ungoogled, I tried so many different patches of Pepperflash, and it never cooperated. I tried Pepperflash, I tried Fast Patch!, I tried dedicated Flash browsers, running Flash plugins for Pale Moon, Ungoogled, Waterfox, but I could never get past him.

Every time I see this stupid penguin's face I'm filled with rage. But I am going to save you that rage!!!
If you get this method to work, yay! I could not. Maybe I don't know enough about patching, maybe I'm a little tech stupid.
WHAT WORKED: Using a dedicated CPPS desktop application that allows you to plug in a URL.
I give you...

He is your solution, your answer to
I discovered this solution through Solero's Discord, when someone answered a question re: playing online.

Waddle Forever was not what I was looking forever, but I noticed in their credits:
The electron client is originally forked from the Club Penguin Avalanche client. The server is based in solero's works in reverse engineering the Club Penguin server (Houdini server emulator). The media server is also mostly from solero's media servers.
And that's how I found out the solution: Using CPA Client
Download the CPAvalanche Client
It runs Adode Flash x64. Easy peasy.
(the instructions are in Portuguese, but for English users:
Navigate to releases.

And download this one:

Once downloaded, open.

Drag into applications.
Run http://play.localhost through the client:
Open CPAvalanche Client. It will direct you to CPAvalance once loaded, but you're here because you want to play play.localhost.
Navigate to CPAvalanche Client next to your Apple. Click Mudar a URL do Club Penguin.

Press Sim.

URL: http://play.localhost
Ok.

Press Login once the page loads, and...

That's it! No more penguin! Have fun :)
CREDITS:
Solero Discord / Waddle Forever / Wand / CPA Client / Solero.Me
#solero/wand#wand#solero#cpps#club penguin private server#cpps localhost#club penguin#macbook#macbook silicon#mac m1#mac m2#mac m3#apple silicon
2 notes
·
View notes
Text
Complete Guide to Disable Find My iPhone on iOS 10 Without Any Password
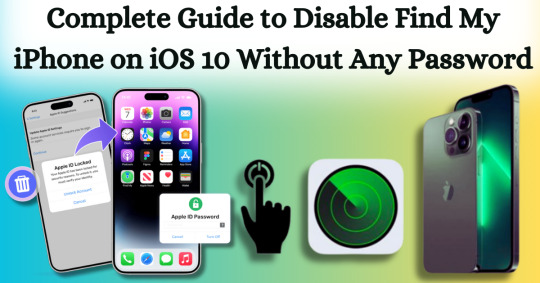
Disabling Find My iPhone on iOS 10 without any password can often seem like a daunting task, particularly if you’ve forgotten the Apple ID associated with your device. Apple's security measures are designed to protect user data, which can make the process feel intimidating. However, there are legitimate reasons for wanting to turn off this feature, such as when selling or giving away your device or dealing with a locked iPhone that you no longer use. This comprehensive guide aims to equip you with the necessary steps to navigate this challenge smoothly and effectively, focusing specifically on disabling Find My iPhone on iOS 10 without any password.
In this article, we will explore various methods to disable Find My iPhone on iOS 10 without any password required. From utilizing recovery options to employing specialized tools, we will outline the strategies you can employ to regain control over your device. Whether you’re a tech novice or a seasoned user, our step-by-step instructions will help ensure that you can disable this feature safely and effortlessly. By the end of this guide, you will have the confidence and knowledge to manage your iOS device and its security settings with ease, all while successfully disabling Find My iPhone on iOS 10 without any password.
What is Find My iPhone?
Find My iPhone is a robust feature developed by Apple that helps users locate, manage, and secure their Apple devices, including iPhones, iPads, Macs, Apple Watches, and AirPods. It is part of the larger Find My service, which combines location tracking for all Apple devices associated with an Apple ID. Below is a detailed overview of its functionalities, features, and requirements:
Key Features:
Location Tracking: Users can see the current location of their device on a map. If the device is nearby, they can play a sound to help locate it.
Lost Mode: If the device is lost or stolen, users can enable Lost Mode, which locks the device and displays a custom message with a contact number on the screen.
Remote Erase: In case of theft or loss, users can remotely erase all data on the device to protect their personal information.
Find Other Devices: Besides iPhones, Find My can also locate iPads, Macs, Apple Watches, and AirPods.
Activation Lock: When Find My iPhone is enabled, it also activates a security feature that prevents anyone from using the device without the owner’s Apple ID and password, making it harder for thieves to access or sell the device.
Why To Disable Find My iPhone on iOS 10?
Disabling Find My iPhone on iOS 10 can be useful in certain situations where you need to remove the security feature. Below are some common reasons why users might disable it, along with important considerations.
Preparing to Sell or Transfer the Device
If you're planning to sell, gift, or transfer your iPhone to someone else, it's crucial to disable Find My iPhone before doing so. This step is necessary to remove your Apple ID from the device and disable Activation Lock, which ties the iPhone to your Apple ID. Without disabling this feature, the new owner would be unable to access or use the iPhone fully, as they would need your Apple ID credentials to unlock it.
Restoring or Resetting the Device
When you need to perform a full restore or reset on your iPhone, whether for troubleshooting or preparing the device for resale, Find My iPhone must be turned off. iTunes or Finder on a Mac will not allow a full factory reset or software restore if Find My iPhone is enabled because of the Activation Lock feature, which is designed to prevent unauthorized use of the phone.
Without disabling Find My iPhone, any attempt to restore the phone would be halted, requiring you to first enter your Apple ID password to proceed with the process.
Troubleshooting and Repairs
Certain troubleshooting steps and repairs may also require disabling Find My iPhone. For example, if your iPhone encounters a serious issue and you need to restore it via recovery mode, the process won't fully work unless Find My iPhone is disabled first. Additionally, some third-party repair services may require it to be turned off before working on the device to ensure they can perform necessary functions like hardware testing or software restoration.
Reducing Battery Drain
Although less common, some users may disable Find My iPhone to reduce battery drain, particularly if location services are frequently active. Since Find My iPhone relies on tracking the device's location using GPS and other location services, it can cause a minor increase in battery usage. For users who don't find themselves frequently needing the feature, turning it off might help conserve battery power.
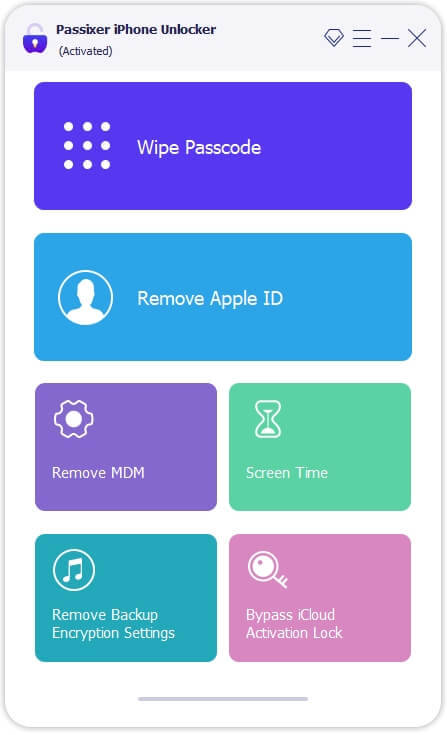
Disable Find My iPhone on iOS 10 With Passixer:
Here’s a simple and effective method to disable Find My iPhone on iOS 10 without any password with Passixer, using a trusted iOS unlocking tool like Passixer iPhone Unlocker and a reliable USB cable. This solution is perfect for users looking for a straightforward way to unlock their devices without hassle.
Passixer iPhone Unlocker is an intuitive application designed specifically for iPhone and iPad users who need to bypass security features effortlessly. Whether you’ve forgotten your passcode or need to dissociate an old Apple ID, this powerful software can effectively disable the Find My iPhone feature without the need for the original password. This capability is particularly advantageous for individuals purchasing second-hand devices still linked to a previous owner’s Apple ID.
Key Features
Unlock Any iOS Screen Lock: Easily removes screen locks like 4-digit/6-digit PINs, Face ID, and Touch ID, ensuring you can regain access to your device without complications.
Remove Apple ID Without Password: Unlink an Apple ID without needing the original password, enabling seamless access to all Apple services. This is especially helpful for users with second-hand devices still linked to a previous owner’s Apple ID.
Bypass iCloud Activation Lock: With Passixer, you can bypass the iCloud Activation Lock, simplifying the process of using previously owned devices.
Remove MDM Lock: This software offers two methods to remove Mobile Device Management (MDM) restrictions from devices that belong to companies or educational institutions, without needing passwords or jailbreaking.
Remove Screen Time Passcode: Quickly bypass the Screen Time passcode while ensuring no data is lost, making it ideal for managing family devices.
Remove iTunes Backup Encryption: Access encrypted iTunes backup passwords to retrieve your backup data without risk of information loss.
Device Compatibility: Supports a wide range of devices, including iPhone 4 to iPhone 15, all iPads, and iPod Touch models, and is compatible with iOS 17 and earlier versions.
Cross-Platform Support: Passixer works seamlessly on Windows (11/10/8.1/8/7) and Mac (OS X 10.7 and later, including macOS Big Sur and Monterey).
How To Use:
Step 1: Download and Install Passixer
Head to the official Passixer website to download the program. Complete the installation and launch the software, then select "Remove Apple ID" from the main menu.
Step 2: Connect Your iPhone
Use a USB cable to connect your iPhone (with Find My iPhone enabled) to your PC or Mac. Click "Start" in the software to initiate the unlocking process.
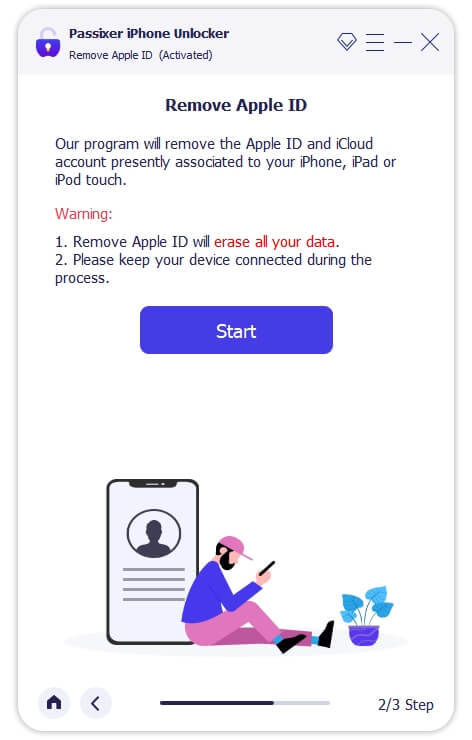
Step 3: Remove Your Apple ID
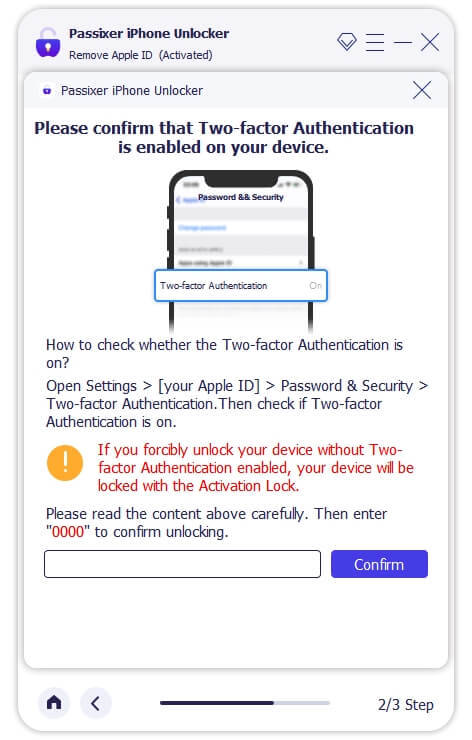
For iPhones running iOS 11.4 or later, ensure that Two-Factor Authentication is enabled. Verify device information, download the required firmware, and start the Apple ID removal process. This will also automatically deactivate the Find My iPhone feature.
Reset your iPhone settings by opening the Settings app, navigating to General, and selecting Reset > Reset All Settings. Once completed, Passixer will unlink the associated Apple ID.
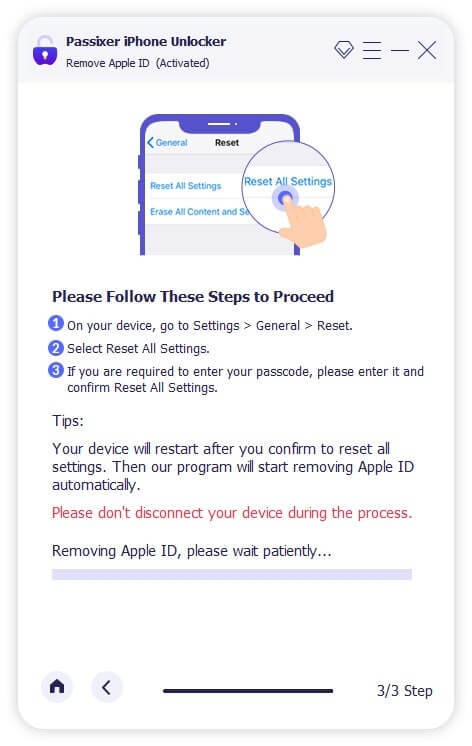
Disabling your Apple ID on an iPhone will also automatically turn off the Find My iPhone feature.
Pros:
No Password Needed: Removes the Apple ID without needing the original password, making it perfect for second-hand devices.
Bypasses Activation Lock: Unlocks iCloud Activation Lock to access devices linked to another user’s Apple ID.
Versatile: Also removes screen locks, bypasses MDM restrictions, and disables Screen Time passcodes without erasing data.
Broad Device Compatibility: Supports a wide range of devices, from iPhone 4 to iPhone 15, as well as iPads and iPod Touch devices.
Cross-Platform Availability: Works on both Windows and Mac.
Cons:
Costs Involved: While some versions offer free trials, full functionality typically requires a paid version.
Pricing Plan:
Enjoy secure and immediate email delivery, along with complimentary customer support. This software is designed specifically for Mac users.
Pricing Options: Select from the following plans: a 1-year license for $39.99, a 1-month license for $29.99, or a one-time lifetime license for $69.99. Each plan allows you to unlock up to 6 iOS devices on a single PC (taxes not included).
Discount Offers: Get up to $20 off on the 1-year and 1-month licenses, with original prices being $59.99 and $39.99, respectively.
Other Ways To Disbale Find My iPhone on iOS 10
Disabling Find My iPhone on iOS 10 without a password can be a complex process due to Apple's robust security measures. However, if you find yourself in a situation where you need to disable this feature, there are several methods you might consider. Below are detailed step-by-step instructions for each method, along with important considerations.
Method 1: Restore via iTunes
Requirements:
A computer with iTunes installed.
A USB cable to connect your iPhone to the computer.
How To Use:
Install iTunes: Make sure you have the latest version of iTunes installed on your computer. You can download it from the Apple website.
Connect Your iPhone: Use a USB cable to connect your iPhone to the computer. Launch iTunes once your device is connected.
Put iPhone into Recovery Mode:
For iPhone 6s and earlier: Press and hold the Home button and the Power button simultaneously until you see the recovery mode screen.
For iPhone 7 and 7 Plus: Press and hold the Volume Down and the Power buttons until you see the recovery mode screen.
For iPhone 8 and later: Quickly press and release the Volume Up button, then the Volume Down button, and finally press and hold the Side button until you see the recovery mode screen.
Restore iPhone: In iTunes, a message will appear indicating that a device in recovery mode has been detected. Choose the option to Restore. This will erase all content and settings from your iPhone, including the Find My iPhone setting.
Set Up iPhone: After the restore is complete, you can set up your iPhone as new or restore from a backup. Note that if Find My iPhone is still activated, it may ask for the Apple ID and password associated with the device.
Method 2: Jailbreak the Device
Warning: Jailbreaking voids your warranty and can expose your device to security risks. Use this method with caution.
Requirements:
A computer with a jailbreaking tool (e.g., Pangu, unc0ver).
How To Use:
Backup Your Data: Before attempting to jailbreak, make sure to back up your data using iTunes or iCloud, as this process may erase your device.
Download Jailbreaking Tool: Download a reputable jailbreaking tool that is compatible with iOS 10.
Connect Your iPhone: Use a USB cable to connect your iPhone to your computer.
Run the Jailbreaking Tool: Launch the jailbreaking software and follow the on-screen instructions to initiate the jailbreak. This usually involves clicking a button to start the process.
Complete the Jailbreak: Once the jailbreak is complete, your device will restart. You may need to install a Cydia app for further customization.
Disable Find My iPhone: After jailbreaking, you can use certain tweaks in Cydia to disable Find My iPhone. Search for relevant tools and follow their instructions.
Method 3: Contact Apple Support
How To Use:
Gather Documentation: Collect any documents that prove your ownership of the device, such as the original receipt or invoice.
Contact Apple Support: Visit the Apple Support website or call their support line. Explain your situation and provide the necessary documentation.
Follow Their Instructions: Apple Support may guide you through the process of disabling Find My iPhone. They may ask for your device's serial number and other identifying information.
Wait for Resolution: Depending on your situation, Apple may take some time to resolve the issue. Follow up as needed.
Conclusion:
In conclusion, disabling Find My iPhone on iOS 10 without a password may seem like a challenging endeavor, but with the right tools and guidance, it can be achieved effectively. Understanding the various legitimate reasons for wanting to disable this feature—such as preparing a device for sale, performing a factory reset, or troubleshooting issues—helps users navigate the process with purpose. By utilizing specialized tools like Passixer or following alternative methods, individuals can confidently regain access to their devices and manage their settings without the burden of forgotten passwords.
Ultimately, the key takeaway from this guide is that while Apple's security measures are designed to protect user data, there are practical solutions available for those in need. Whether you're a tech novice or an experienced user, our comprehensive instructions empower you to tackle this challenge head-on. By following the steps outlined in this guide, you can disable Find My iPhone on iOS 10, ensuring a smooth transition as you either pass on your device or regain control over it. With the right approach and resources, you can successfully navigate the complexities of Apple’s security features and regain full access to your device.
2 notes
·
View notes
Text
How to check if your computer is being monitored
In today's digital age, the issue of privacy and security is more pressing than ever. Whether you’re a casual user or a professional, understanding if your computer is being monitored is crucial. This guide will delve into the signs of monitoring, tools to detect it, and steps to safeguard your privacy.

Understanding Computer Monitoring
Before diving into the signs and detection methods, it’s essential to understand what computer monitoring entails. Monitoring can involve tracking your online activity, keystrokes, file access, and even webcam usage. This can be done by malicious software (malware), spyware, or legitimate monitoring software used by employers or parents.
Types of Monitoring
Malware and Spyware: These are malicious programs that can be installed without your knowledge. They can track your activities and send data back to an attacker.
Keyloggers: This type of software records keystrokes, capturing sensitive information like passwords and personal messages.
Remote Access Tools (RATs): These tools allow someone to control your computer remotely, monitoring your screen, accessing files, and even using your webcam.
Legitimate Monitoring Software: Often used in corporate environments, this software tracks employee activity for productivity or compliance reasons. While legal, it can still infringe on personal privacy.
Signs That Your Computer May Be Monitored
Recognizing the signs that your computer might be monitored is the first step in protecting yourself.
1. Unusual System Behavior
Slow Performance: If your computer suddenly becomes sluggish, it might be due to monitoring software consuming resources.
Frequent Crashes or Freezes: Unexpected system crashes can indicate underlying issues, including malware.
2. Suspicious Programs
Unknown Applications: Check your installed programs for any unfamiliar applications. Many monitoring tools disguise themselves as legitimate software.
High Resource Usage: Use the Task Manager (Windows) or Activity Monitor (Mac) to look for processes consuming excessive CPU or memory.
3. Network Activity
Unexplained Network Traffic: Use network monitoring tools to check for unusual data being sent or received. High outbound traffic could indicate that data is being transmitted without your consent.
Blocked Ports: Monitoring software often uses specific ports to communicate. If you notice blocked ports that you didn’t configure, it could be a red flag.
4. Webcam and Microphone Behavior
Indicator Light Activation: If your webcam or microphone is being accessed without your knowledge, the indicator light may be on even when you're not using it.
Unexpected Recordings: Check for unusual files that could be recordings made by your microphone or webcam.
5. Browser Behavior
Unusual Browser Extensions: Check for extensions you didn’t install. Some can track your browsing activity.
Unexpected Redirects: Frequent redirects to strange sites or altered search results can indicate tracking.
6. Security Alerts
Antivirus Notifications: If your antivirus software frequently alerts you about threats, it may indicate that monitoring software is present.
Firewall Alerts: Unusual outgoing connection attempts can suggest that an unauthorized program is trying to access the internet.
Tools to Detect Monitoring Software
If you suspect that your computer is being monitored, several tools can help you investigate further.
1. Antivirus and Anti-Malware Software
Using a reliable antivirus or anti-malware program can help detect and remove malicious software. Some popular options include:
Malwarebytes: Excellent for detecting and removing malware and spyware.
Norton: Offers comprehensive protection against various types of threats.
2. Network Monitoring Tools
Tools like Wireshark can help analyze network traffic and identify suspicious activity. You can monitor data packets to see if there are any unexpected connections.
3. Task Manager / Activity Monitor
Regularly check the Task Manager (Windows) or Activity Monitor (Mac) for processes that look unfamiliar or suspicious. Research any questionable applications before taking action.
4. System Scans
Use built-in tools to perform system scans:
Windows Defender: Run a full scan for malware and spyware.
Mac’s Built-in Security Features: Use the Malware Removal Tool for additional scanning.
5. Firewall Monitoring
Make sure your firewall is active and monitor logs for any unusual activity. A firewall can block unauthorized access attempts and alert you to potential threats.
Steps to Protect Your Privacy
If you determine that your computer is being monitored or you want to prevent it from happening, follow these steps to enhance your security.
1. Update Your Software Regularly
Keeping your operating system and all software up-to-date ensures that you have the latest security patches. This reduces vulnerabilities that can be exploited by monitoring tools.
2. Use Strong Passwords
Implement strong, unique passwords for all your accounts and devices. Consider using a password manager to generate and store complex passwords securely.
3. Enable Two-Factor Authentication
Two-factor authentication (2FA) adds an extra layer of security by requiring a second form of verification, making unauthorized access much more difficult.
4. Install a Firewall
Ensure you have a firewall activated, whether it’s built-in (like Windows Firewall) or third-party. This helps control incoming and outgoing network traffic.
5. Be Cautious with Downloads
Avoid downloading software from untrusted sources, as this can introduce malware to your system. Always verify the legitimacy of software before installing it.
6. Regularly Review Permissions
Check application permissions on your device regularly. Revoke access for any apps that do not need to access your camera, microphone, or location.
7. Use a VPN
A Virtual Private Network (VPN) encrypts your internet connection, making it difficult for anyone to monitor your online activities.
8. Educate Yourself
Stay informed about the latest cybersecurity threats and best practices. Knowledge is your best defense against monitoring.
When to Seek Professional Help
If you suspect your computer is being monitored and cannot identify or remove the software yourself, consider seeking professional help. Cybersecurity experts can perform a thorough analysis of your system and provide tailored solutions.
Conclusion
Understanding if your computer is being monitored is vital for protecting your privacy. By recognizing the signs, utilizing detection tools, and implementing security measures, you can safeguard your personal information. Remember, vigilance is key in the ever-evolving landscape of digital security. Stay informed, proactive, and secure in your online presence.
#Computer Security#Online Privacy#Cybersecurity#Monitoring Software#Malware Detection#Privacy Protection#Digital Security#Keyloggers#Network Monitoring#Antivirus#VPN#Internet Safety#Personal Data Security#Remote Access Tools#Digital Awareness
2 notes
·
View notes
Link
2 notes
·
View notes
Text
Affordable iPhone Fix Near You
A broken iPhone can be a major inconvenience, whether it’s a cracked screen, a dead battery, water damage, or a software glitch. But what's even more frustrating is the high cost of repairs from official channels or replacing your device altogether. If you’re searching for an affordable iPhone fix near you, you're not alone and fortunately, you have options.
In today’s tech-savvy world, affordable local repair services are rising in popularity, offering reliable solutions without the premium price tag. This article explores how you can find budget-friendly, professional iPhone repairs right in your area — without sacrificing quality.
Why People Seek Affordable iPhone Repair Services
iPhones are an investment, but even the most careful users can experience accidental drops, wear and tear, or technical issues over time. Getting your iPhone repaired through the manufacturer or carrier often comes with a high price and long wait times. For example:
A screen replacement at the Apple Store can cost $200 or more.
Battery replacements may take several days, especially if parts are not in stock.
Some repairs are not covered under warranty, making the cost unexpectedly high.
For many users, this makes local, affordable repair shops a far better alternative.
Common iPhone Problems Fixed Locally| Affordably
Local repair shops are often equipped to handle a wide range of issues, typically at lower prices than major retailers or manufacturers. Common repairs include:
Cracked or shattered screens
Battery replacement
Charging port repairs
Speaker or microphone issues
Water damage diagnostics
Software troubleshooting and resets
Camera or Face ID malfunctions
Most of these can be done the same day or even within an hour — and often at a fraction of the cost you’d expect.
What to Look for in an Affordable iPhone Repair Service
Finding a cheap repair service is easy. Finding one that’s affordable and reliable takes a little more effort. Here’s what you should look for:
1. Transparent Pricing
Reputable services will give you an upfront quote. Avoid places that add hidden fees or push unnecessary add-ons. Ask if the price includes parts, labor, and taxes.
2. Warranty on Repairs
Even affordable repairs should come with a warranty — usually 30 to 90 days. This shows the technician stands behind their work and uses quality components.
3. Experienced Technicians
Make sure the shop employs certified or highly experienced techs. iPhones are intricate devices, and unskilled repairs can do more harm than good.
4. OEM or High-Quality Parts
Low-quality parts might seem cheaper, but they often lead to more problems down the line. Look for shops that use OEM (Original Equipment Manufacturer) parts or premium aftermarket parts.
5. Positive Local Reviews
Search Google, Yelp, or Facebook to check reviews for repair shops near you. Satisfied customers and 4–5 star ratings are usually a green flag.
Benefits of Choosing Local, Affordable Repair Shops
Affordable doesn't mean low quality especially when you’re working with a trusted local shop. Here’s why choosing a nearby repair technician can be the best decision:
Cost Savings
You’ll typically save 30–50% compared to official Apple repair prices.
Quick Turnaround
Many local shops can repair your iPhone on the spot, often in under an hour.
Personalized Service
Unlike big-box stores, local businesses tend to offer friendlier, more customized service. You can ask questions, explain your problem directly, and even watch some of the repair process.
Supporting Local Economy
Choosing a local business means supporting your community and helping independent technicians thrive.
Tips for Finding an Affordable iPhone Fix Near You
Here are a few easy ways to locate a reliable and affordable iPhone repair service:
Search Google Maps or Yelp: Use keywords like “affordable iPhone repair near me” or “cheap iPhone fix [your city].”
Check Local Facebook Groups: Many towns and cities have community groups where people share recommendations.
Visit Local Tech Marketplaces: Shopping centers or electronics markets often house small but skilled repair booths.
Compare Quotes: Call two or three places, describe your problem, and ask for pricing. The best shops will give you a free estimate.
Questions to Ask Before You Commit
Before handing over your phone, ask the shop a few key questions:
“How much will the total repair cost?”
“Do you use original or aftermarket parts?”
“How long will the repair take?”
“Is there a warranty or guarantee?”
“What if the repair doesn’t work?”
A confident, professional shop will have clear answers to all of these.
Affordable Doesn’t Mean Low Quality
An iPhone is a valuable device, and when it breaks, you deserve fast, fair, and affordable service. The good news is that you don’t need to spend a fortune at the Apple Store or ship your phone off for days. With just a little research, you can find an affordable iPhone fix near you that restores your device to full functionality often in less than an hour.
So next time your screen shatters or your battery gives out, remember: expert help is probably just around the corner. Affordable iPhone repair is not just possible it's closer than you think.
#Mac Hard Drive Upgrade/Replacement#MacBook Pro Graphics Card Repair#Mac Password Removal#Mac Battery Replacement#Mac Keyboard Replacement
0 notes
Text
How to Delete Pages from PDF on Mac: A Step-by-Step Guide for Professionals
Working with PDF files is an everyday necessity for many professionals, whether you're in legal, finance, design, education, or consulting. Often, these documents include unnecessary pages—appendices, extra forms, or duplicated content—that you might want to get rid of before sharing or archiving. Fortunately, if you're using a Mac, you have several efficient ways to delete pages from PDF Mac without needing complex software or advanced technical skills.
This article walks you through the best methods to remove pages from PDF Mac, using built-in tools and advanced third-party applications. Whether you're looking for a quick edit or advanced batch processing, you’ll find a solution that fits your workflow.
Why Delete or Remove Pages from a PDF?
Before diving into the “how,” let’s consider the “why.” Here are some professional scenarios where removing PDF pages makes sense:
Client Reports: Eliminate draft pages or irrelevant data.
Legal Documents: Remove confidential or outdated clauses.
Marketing Collateral: Update brochures or slide decks with current information.
Educational Content: Share only relevant sections with students or colleagues.
Financial Reports: Exclude internal notes or calculations not meant for distribution.
Understanding how to efficiently delete pages from PDF on Mac can save time, protect sensitive information, and streamline document sharing.
Method 1: Use Preview – The Built-in PDF Tool on Mac
The Preview app is a native macOS utility that offers simple yet powerful PDF editing tools. It's completely free and pre-installed on every Mac.
How to Delete Pages from PDF Using Preview:
Open the PDF:
Double-click the file or open it via Preview (Right-click → Open With → Preview).
Open the Thumbnail Sidebar:
Go to View > Thumbnails or press Shift + Command + D to view all pages.
Select the Pages to Delete:
Click the page you want to remove. To select multiple pages, hold Command and click.
Delete the Page(s):
Press the Delete key on your keyboard or right-click and choose Delete.
Save the File:
Go to File > Save or File > Export as PDF to preserve your edited version.
✅ This method is perfect for quick edits without additional software.
Method 2: Use Adobe Acrobat Pro – Advanced Features for Power Users
If your work involves heavy PDF handling, Adobe Acrobat Pro offers more control over document editing, security, and collaboration.
Steps to Remove Pages from PDF on Mac Using Adobe Acrobat Pro:
Open Adobe Acrobat Pro and load your PDF.
Go to Tools > Organize Pages.
You’ll see page thumbnails—hover over the page and click the trash can icon to delete it.
Select Save As to retain the original file and save the edited one separately.
Key Features:
Delete, rearrange, or rotate pages
Merge multiple PDFs or split one into several
Add password protection or digital signatures
💼 Ideal for professionals in legal, finance, or enterprise roles who need secure and precise document control.
Method 3: Use Third-Party PDF Editors for Mac
There are several third-party PDF editors that allow you to delete or remove pages from PDF on Mac quickly and often with additional tools for annotations, signing, and conversions.
Recommended Apps:
1. PDF Expert by Readdle
Sleek interface and easy navigation
Drag-and-drop pages to reorder or delete
Sync with Dropbox, Google Drive, and OneDrive
2. PDFpen (now Nitro PDF Pro)
Robust editing tools
Built-in OCR for scanned documents
Secure file encryption and annotation
3. Foxit PDF Editor for Mac
Lightweight and fast
Cloud collaboration tools for teams
Excellent value for professional users
How to Delete Pages (General Steps):
Open the PDF file.
Access the page management or thumbnail view.
Select the unwanted pages.
Delete and save/export your final document.
These apps are well-suited for users who work with PDFs daily and need flexibility without the bulk of Adobe Acrobat.
Method 4: Delete Pages from PDF on Mac Using Online Tools
If you’re in a rush or working with a file that doesn’t contain sensitive data, online PDF editors are a convenient option. No installation required.
Popular Tools:
Smallpdf
ILovePDF
PDF24 Tools
Sejda
Steps to Remove Pages:
Visit one of the sites above.
Upload your PDF.
Select the pages to delete.
Click “Apply” and download the edited file.
⚠️ Caution: Avoid uploading confidential or business-sensitive documents to online platforms unless they are encrypted and secure.
Automation Tip: Use Automator to Remove PDF Pages
macOS includes Automator, a workflow tool that can handle repetitive tasks like file renaming, resizing images, or manipulating PDFs.
Use Automator to Remove Pages:
While more technical, you can create a script using Automator or Shortcuts to extract or delete certain pages from PDFs based on page numbers or criteria.
This is useful for batch operations and can be integrated into more complex workflows.
Tips for Professionals Managing PDF Files on Mac
Whether you're using Preview or a robust PDF suite, here are some tips to maintain professional document standards:
Backup Before Editing: Always duplicate your original PDF before making deletions.
Check File Security: Ensure edited PDFs don't expose hidden or redacted information.
Use Naming Conventions: Save versions with clear filenames like Report_Q1_Reviewed.pdf.
Compress After Editing: Use Preview or PDF compressors to reduce file size before sharing.
Validate Before Sending: Double-check page numbers, formatting, and content after edits.
Conclusion:
Professionals across industries handle PDFs every day, and knowing how to delete pages from PDF on Mac can streamline your workflow and eliminate the need for printing or scanning. Whether you need to clean up a draft, remove confidential pages, or prepare a document for presentation, macOS provides several reliable solutions to help you get the job done.
From the simplicity of Preview to the power of Adobe Acrobat Pro or the flexibility of PDF Expert, the choice depends on your editing needs and work volume. You can even use secure online tools or Automator for specialized tasks.
No matter your profession or file size, learning to remove pages from PDF on Mac ensures you maintain professional standards while working efficiently.
0 notes
Text
PC Repair in Chicago: What to Expect from a Professional Technician
When your PC stops working or starts performing poorly, it can disrupt everything from your work to your entertainment. In a bustling city like Chicago, where technology plays a vital role in both personal and professional life, finding reliable computer repair is essential. But what exactly should you expect from a professional PC repair technician in Chicago?
This guide will walk you through the process, from first contact to final fix, so you know what to look for and how to ensure a smooth experience.
Initial Consultation and Diagnosis
The first step in any PC repair process is the initial consultation or diagnostic check. When you bring your computer into a repair shop—or request an on-site or remote service—the technician will assess the issue. This may involve running diagnostics, asking you questions about recent symptoms, or checking physical components.
In Chicago, many local PC repair shops offer free or low-cost diagnostics, and this initial phase should always include:
A clear explanation of the problem
An estimate of repair time and cost
Transparency about whether the repair is worth doing (versus replacing the system)
A reputable technician won’t push you into repairs that aren’t cost-effective.
Common PC Issues Handled by Professionals
Professional technicians in Chicago are experienced with a wide variety of hardware and software issues. Here are some common problems they address:
Slow performance or freezing
Virus or malware infections
Blue screen errors (BSOD)
No power or failure to boot
Overheating and fan problems
Hard drive or SSD failure
Wi-Fi and connectivity issues
Software crashes or update failures
Broken screens or damaged ports
They may also help with data recovery, OS installation, and system upgrades.
What Sets Chicago Technicians Apart
Chicago is home to a competitive and tech-savvy PC repair market. Whether you're downtown, in the suburbs, or near a college campus, you’ll find experienced professionals offering personalized service.
Here’s what you can expect from a top-tier technician in the city:
1. Certified Expertise
Look for certifications like CompTIA A+, Microsoft Certified Professional (MCP), or Apple Certified Mac Technician (ACMT). These credentials ensure that the technician is trained in industry standards and best practices.
2. Fast Turnaround Times
Many Chicago-based repair shops prioritize speed. Depending on the issue, some repairs can be completed within a few hours or same-day, especially if it’s a common problem like RAM upgrades or virus removal.
3. Upfront Pricing
A professional technician will always provide a written quote after diagnostics and before starting repairs. This helps avoid surprise charges and gives you a chance to weigh your options.
4. Warranty and Guarantee
Most reliable PC repair services in Chicago offer a warranty on parts and labor, ranging from 30 to 90 days. This protects you in case the issue reoccurs.
In-Shop, On-Site, or Remote Service Options
Depending on your schedule and the severity of the issue, Chicago technicians offer several types of service:
In-Shop Repair: You bring the device in, and the techs fix it in-house.
On-Site Repair: A technician comes to your home or office, ideal for businesses or heavy desktop setups.
Remote Support: For software or performance issues, technicians can log in remotely to diagnose and fix the problem without needing physical access.
Many shops offer free pickup and delivery within certain Chicago neighborhoods to make things even more convenient.
Tips for a Smooth Repair Experience
To get the most out of your PC repair experience, follow these tips:
Back Up Your Data: If your system still powers on, try to back up important files before handing it over.
Take Note of Symptoms: Record error messages or behavior that led to the problem. This helps with diagnostics.
Remove Passwords or Share Login Info: If you’re comfortable, provide login credentials or remove passwords to allow the technician full access for repairs.
Ask About Parts: If replacements are needed, ask whether they’re using new, used, or refurbished parts.
Check Reviews: Always look up reviews of the technician or shop before committing to service.
Supporting Local Tech Experts
Choosing a local PC repair shop in Chicago not only gets your machine fixed quickly but also supports small businesses and independent professionals in your community. These experts rely on word-of-mouth, quality service, and long-term relationships to thrive—so they’re motivated to do the job right.
Whether you're a student, a remote worker, or a small business owner, finding a trustworthy PC technician can help you avoid unnecessary stress and keep your workflow running smoothly.
Conclusion
When your PC runs into trouble, knowing what to expect from a professional technician makes the repair process much less intimidating. In Chicago, experienced tech professionals provide prompt, reliable, and affordable solutions tailored to your needs.
From the initial diagnosis to final testing, a great technician will communicate clearly, charge fairly, and make your computer feel brand new. So the next time your system crashes or slows down, skip the guesswork and trust a local Chicago PC repair expert to get you back on track.
Let me know if you'd like to tailor this for a specific neighborhood or shop in Chicago, or optimize it for SEO!

youtube
#PC Repair Chicago#Laptop Repair Near Me#PC Repair Near Me#Computer Repair Chicago#Computer Repair Shop Chicago#Youtube
0 notes
Text
How to install Office 365 from portal.office.com on Mac?
Microsoft Office 365 is an essential suite of productivity applications that includes Word, Excel, PowerPoint, Outlook, and more. If you own a Mac and need to install Office 365, the process is straightforward and can be completed via the official Microsoft portal: portal.office.com. This guide will walk you through the steps required to install Office 365 on your Mac efficiently.
System Requirements for Office 365 on Mac
Before installing Office 365, ensure that your Mac meets the minimum system requirements:
Operating System: macOS Monterey (12), macOS Big Sur (11), macOS Catalina (10.15), or later.
Processor: Intel or Apple Silicon (M1/M2) with Rosetta 2.
RAM: At least 4GB.
Storage: Minimum of 10GB of free disk space.
Internet Connection: Required for downloading and activating Office 365.
You can check your macOS version by clicking Apple Menu > About This Mac.
Step-by-Step Guide to Installing Office 365 on Mac
Step 1: Sign in to Your Microsoft Account
Open your preferred web browser (Safari, Chrome, or Firefox).
Navigate to portal office com.
Enter your Microsoft account credentials (email and password) associated with your Office 365 subscription.
If prompted, complete the multi-factor authentication (MFA) process.
Note: If you do not have an active Office 365 subscription, you must purchase one before proceeding. You can subscribe through Microsoft 365 plans.
Step 2: Download the Office 365 Installer for Mac
Once signed in, you will be redirected to the Office 365 homepage.
Click on the Install Office button in the top-right corner.
Choose Office 365 apps to begin downloading the installer.
The download will start automatically, saving a .pkg file in your Mac's "Downloads" folder.
Tip: If the download does not start, refresh the page or try using a different browser.
Step 3: Install Office 365 on Mac
Open Finder and navigate to the Downloads folder.
Double-click the Microsoft_Office_Installer.pkg file.
The Microsoft Office installer will launch. Click Continue.
Read and accept the license agreement, then click Continue.
Select the Install Location (default location is recommended).
Click Install and enter your Mac’s administrator password if prompted.
Wait for the installation to complete.
Click Close once the installation is finished.
Tip: If you encounter a security warning, go to System Preferences > Security & Privacy and allow the installation under the "General" tab.
Step 4: Activate Office 365 on Mac
Open any Office application (e.g., Word, Excel, or PowerPoint).
A welcome screen will appear; click Sign In.
Enter the Microsoft account credentials used to purchase the subscription.
Follow the on-screen instructions to complete activation.
Once activated, click Start Using Office.
Note: If you see an error stating that your subscription cannot be verified, ensure you are connected to the internet and try signing in again.
Troubleshooting Common Installation Issues
1. Office 365 Installation is Stuck or Not Starting
Restart your Mac and try installing again.
Ensure that your internet connection is stable.
Clear your browser cache and try downloading the installer again.
2. macOS Blocks the Installation
Go to System Preferences > Security & Privacy > General.
Click Allow next to "Microsoft Corporation."
Restart the installation process.
3. Unable to Sign in to Activate Office 365
Double-check your Microsoft credentials.
Try signing in through a different browser.
Ensure that your Office 365 subscription is active.
Updating Office 365 on Mac
To keep Office 365 updated with the latest features and security patches:
Open any Office application (e.g., Word or Excel).
Click on Help in the menu bar.
Select Check for Updates.
Follow the on-screen prompts to install available updates.
Uninstalling Office 365 from Mac
If you need to remove Office 365 from your Mac, follow these steps:
Open Finder > Applications.
Locate Microsoft Office apps (Word, Excel, PowerPoint, Outlook, etc.).
Drag each app to the Trash.
Open Finder > Go > Go to Folder.
Type ~/Library and delete the following folders:
Containers/com.microsoft.*
Group Containers/UBF8T346G9.Office
Empty the Trash and restart your Mac.
Final Thoughts
Installing Office 365 on a Mac is a simple and quick process when done through portal.office.com. By following this guide, you can successfully download, install, and activate Microsoft Office 365 on your Mac.
If you encounter any issues, Microsoft's support team is available to help resolve installation or activation problems.
Now that you have Office 365 installed, you can enjoy seamless productivity and collaboration with its suite of powerful applications!
0 notes
Text
Amcrest NVR - Dahua App:


Even if you could zoom in on an image and it contained the MAC Address for the security cam...YOU WOULD STILL HAVE TO BE LOCALLY ON THE SAME HARD WIRED NETWORK.
For the wifi side...yes a mac could be spoofed as for communication between router and device..(NVR IS WIRED ONLY TO ROUTER)....but look up!!!


==========ONLY BELOW APPLIES=======


utilizing keypassxc to generate max length passwords that consist of alpha, numeric, symbol
I DO NOT EVEN KNOW THE ROUTER PASSWORD. IFFFF IT EVER GETS REVEALED BY ACCIDENT WITH THAT EYE ICON.....IT IS CHANGED IMMEDIATELY.
Ever watch the end of T2? That is best practice with passwords.
If I know my password, you can bet foreign intel does too.
youtube


CLEAR YOUR CLIPBOARD BEFORE GOING TO ANY OTHER WEB PAGE IF YOU LOGGED INTO YOUR ROUTER.

Alternative:

BUT HOW DO I GET MY PASSWORD INTO MY ZAQE DEVICE WITHOUT COPYING THAT PASSWORD INTO A TEXT FILE????!!!! DO NOT EVER COPY THAT PASSWORD TO TEXT FILE. I WILL HAND YOU THE CONTROL. SELF DESTRUCT.
USE GUI SRCCOPY AND CLICK THE BUTTON IN KEEPASSXC TO GRAB THE PASSWORD THEN CTRL V IN WIFI SETTINGS ON THE DEVICE. THE PASSWORD WILL BE REMOVED FROM CLIPBOARD IN 10 SECONDS. NEVER REVEAL IT ON THE DEVICE.
0 notes