#Mamp wordpress username
Explore tagged Tumblr posts
Visit Tumblr Blog
Explore Tumblr blogs with no restrictions, modern design and the best experience.
Last Seen Tumblr Blogs


Fun Fact
Tumblr’s reach among the 26-to-35-year-olds in the US is 11%.
Text

How to Set Up Your Local Development Environment for WordPress
Setting up a local development environment is one of the best ways to experiment with and build WordPress websites efficiently. It offers you a safe space to test themes, plugins, and updates before applying changes to a live site. Whether you’re a beginner or an experienced developer, having a local environment is essential in streamlining your workflow and minimizing website downtime.
Before we dive into the technical steps, it’s worth mentioning the benefits of WordPress for your business website. WordPress offers unmatched flexibility, scalability, and user-friendliness, making it an ideal platform for businesses of all sizes. When paired with a solid local development setup, WordPress becomes even more powerful in enabling fast and secure site builds.
Step 1: Choose Your Local Development Tool
There are several local development tools available that cater specifically to WordPress users:
Local by Flywheel (now Local WP): Extremely beginner-friendly with features like SSL support and one-click WordPress installs.
XAMPP: A more general-purpose tool offering Apache, MySQL, PHP, and Perl support.
MAMP: Ideal for macOS users.
DevKinsta: Built by Kinsta, it offers seamless WordPress development and staging capabilities.
Choose the one that suits your OS and comfort level.
Step 2: Install WordPress Locally
Once you’ve chosen your tool:
Install the software and launch it.
Create a new WordPress site through the interface.
Set up your site name, username, password, and email.
After setup, you’ll get access to your WordPress dashboard locally, allowing you to install themes, plugins, and begin your customizations.
Step 3: Configure Your Development Environment
To ensure an efficient workflow, consider these configurations:
Enable Debug Mode: Helps in identifying PHP errors.
Use Version Control (e.g., Git): Keeps your changes tracked and manageable.
Database Access: Tools like phpMyAdmin help manage your WordPress database locally.
If your project requires dynamic functionality, leveraging PHP Development Services during the setup phase can ensure custom features are implemented correctly from the beginning.
Step 4: Customize Themes and Plugins Safely
With your local environment set up, now's the time to begin theme development or customization. You can safely create or modify a child theme, experiment with new plugins, and write custom code without any risk of affecting your live site.
For those unfamiliar with theme structures or WordPress standards, it’s often wise to hire a professional WordPress developer who understands best practices and can ensure clean, maintainable code.
Step 5: Syncing to a Live Server
After building and testing your site locally, you'll eventually want to push it live. Popular methods include:
Using a plugin like Duplicator or All-in-One WP Migration
Manual migration via FTP and phpMyAdmin
Using version-controlled deployment tools
Syncing should always be done carefully to avoid overwriting crucial data. Regular backups and testing are essential.
Step 6: Maintain Your WordPress Site Post-Launch
Launching your website is only the beginning. Ongoing updates, security patches, and performance optimization are critical for long-term success. Enlisting website maintenance services ensures your site remains fast, secure, and up-to-date.
Services can include:
Core, plugin, and theme updates
Malware scans and security hardening
Site performance monitoring
Regular backups
Final Thoughts
A local WordPress development environment not only speeds up your development process but also protects your live website from unintended changes and errors. With tools and strategies now more accessible than ever, there's no reason not to use one.From learning the basics to running advanced builds, setting up locally gives you the confidence and space to grow your WordPress skills. And if you want to see real-world examples or follow along with tips and tricks I share, feel free to check out my work on Instagram for practical inspiration.
0 notes
Text
How do you edit WordPress on a localhost?
Editing a WordPress site on localhost involves setting up a local development environment on your computer. Here's a general guide on how to do this:
1. Install a Local Server Environment:
You can use software like XAMPP, MAMP, or Local by Flywheel. These tools provide a local server environment with Apache, MySQL, and PHP.
Download and install the software of your choice.
2. Download WordPress:
Visit the official WordPress website (https://wordpress.org/) and download the latest version of WordPress.
3. Set Up Database:
Open your local server software and start the server.
Create a new database for your WordPress installation. Note down the database name, username, and password.
4. Install WordPress:
Extract the WordPress zip file you downloaded.
Move the WordPress files to the root directory of your local server (e.g., htdocs in XAMPP).
Rename the wp-config-sample.php file to wp-config.php.
Open wp-config.php and enter your database details (database name, username, password).
5. Access Local WordPress Site:
Open your web browser and go to http://localhost/yourwordpressfolder (replace "yourwordpressfolder" with the actual folder name where you installed WordPress).
6. Edit Your WordPress Site:
Log in to your local WordPress site using the credentials you set during the installation.
You can now edit your WordPress site just like you would on a live server. Install themes, plugins, and make changes to content and settings.
7. Theme and Plugin Development:
If you are a developer and want to make theme or plugin changes, you can create a themes or plugins folder inside the wp-content directory and develop your code there.
8. Save Changes:
Any changes you make on your localhost won't affect your live site until you migrate the changes. For this, you might use a migration plugin or manually transfer files and the database.
Important Note: Always remember that changes made on your localhost won't reflect on the live site until you manually migrate the changes. Be cautious when making significant changes, and consider using a backup solution.
If you plan to move your site from localhost to a live server, you'll need to export your database and migrate your files. There are plugins and manual methods available for this purpose.
1 note
·
View note
Text
Mamp wordpress username

#Mamp wordpress username how to
#Mamp wordpress username install
#Mamp wordpress username install
How to Install WordPress Locally (3 Methods)
#Mamp wordpress username how to
If you’re looking how to install WordPress on your web server, feel free to check out our WordPress installation guide. You can learn the technical aspects of running a website with a local site before accumulating any monthly costs. It can be an excellent option for beginners who want to develop their website before purchasing a hosting plan or domain. This can enable you to develop your website offline, so you don’t need to wait for slow internet speeds or have access to a reliable connection.Ĭreating a local WordPress site is also completely free. One additional benefit is that running a local WordPress site on your computer doesn’t require an internet connection. Rather than editing your live site and potentially losing data, you can experiment with your local WordPress files in safety. With a local testing environment, you can also learn how to code.
Conduct troubleshooting, investigate errors and experiment with solutions to make WordPress more secure.
Experiment with redesigning part of your site.
Try out updates, new features, and third-party tools.
Test new themes or install WordPress plugins to ensure they work properly and don’t cause compatibility errors.
Here are just a few of the uses for this kind of local copy: However, you may also choose to create a local version of your existing live website. This will ensure that no search engines or human visitors will see it before it’s completed. At first, it may seem counterintuitive to create a private website in this way, but there are many reasons to do so.įor example, you can build a new website locally and then make it available online when it’s ready to be published. However, it can also be used to install WordPress locally.ĭoing this results in an offline website that’s stored on your computer and can only be seen by you or anyone else with access to that device. It makes building a website and getting it online quick and simple. WordPress is a flexible and user-friendly platform. Why Should You Want to Install WordPress Locally?
Method 3: Install WordPress Locally with XAMPP.
Method 2: Install WordPress Locally on macOS.
Method 1: Install WordPress Locally on Windows.
How to Install WordPress Locally (3 Methods).
Why Should You Want to Install WordPress Locally?.
0 notes
Text
How to Set Up a Local Server on Mac for Beginners #NotADeveloper #WordPress
Let’s start by inserting a disclaimer, I am not a developer or coder in any way. I am not “tech savvy” or futuristic. I can work a computer enough to get online and manage my daily tasks or watch youtube videos. Oh ,and of course email. But l wanted to learn more about what Landon and Cliff do, to enter their world and understand their nerd talk. So they walked me through setting up a local server running WordPress on my mac laptop, and I took notes. Stay tuned for more blogs to come, including setting up divi builder (the fun stuff)! It was difficult to understand at some points, and others straight up made no sense, but alas! We made it through and I am here to share that experience. Sharing it with the hope that someone out there like me, can find this useful and motivating. Or the rest of you smarties find it amusing!
First things first, download WordPress. This is a commonly used CMS or content management system where you can login in to your site and make changes etc.

Once you download WordPress, you will want to move the file into your Sites Folder in Finder. (You can check for the download on your desktop or in Finder under downloads.) This is located in the Home folder. ( the one with the little house next to it.) If this folder does not yet exist, just right click and create a new one.

Once you add the WordPress download (drag and drop the folder here), you can rename if you’d like. Here in my test run, I named it “HairByKelseyAnn”. This can keep you more organized if you want to create multiple sites. (This will be talked about in another blog post to come. For now, let’s just stick with one!)

Next, download MAMP (”Stands for "Mac OS X, Apache, MySQL, and PHP." MAMP is a variation of the LAMP software package that can be installed on Mac OS X. It can be used to run a live web server from a Mac, but is most commonly used for web development and local testing purposes” Description from techterms.com) In this case, we are using it for testing purposes. You can download MAMP (I downloaded MAMP instead of MAMP pro because it’s free) Once you have that downloaded, open it up . If you are having trouble finding it, or any applications, hit command key (⌘) and the space bar at the same time. This will pull up a search bar so you can just type in MAMP and hit enter.

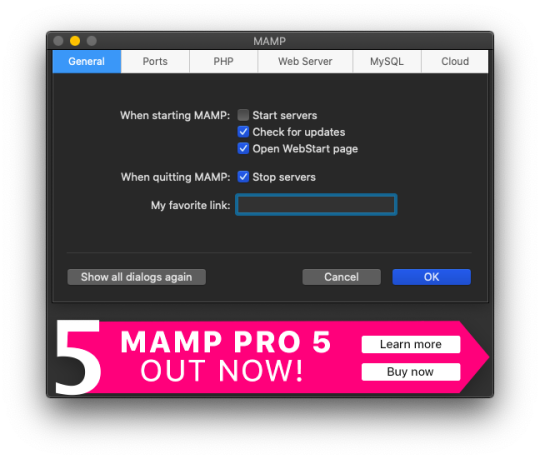
Once you have MAMP open, there are two ways to get to your preferences. You can either select MAMP in the top bar of your computer (next to the apple in the top left corner) or you can hit command key (⌘) and comma(,) at the same time. You will get a drop down like in the image below.
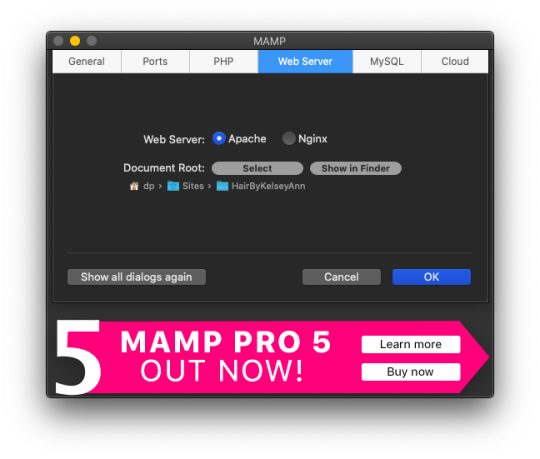
Select the Web Server tab, and this is where you make your document root to the folder you created. (Hit select and add the folder you created from your WordPress download.) This is basically creating a starting point for your localhost server so it knows what files to work from.
After you have your document root folder linked, click ok and it will bring you back to the “home screen”. At this point, you can click Start Servers.

Open a new tab or window, and go to- http://localhost:8888/phpMyAdmin From here you will click the database tab and create new. I chose to name my new DB the same name as the other folders I created. (This is where you create a custom database that WordPress will use. This is highly advanced and you should not find yourself here, beyond initial creation. )

After you have created your DB (DataBase), go to http://localhost:8888/ and follow through the WordPress setup. This is where you are setting up the foundation for your site.
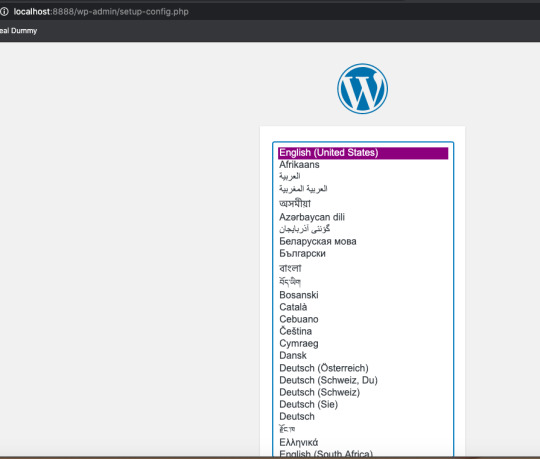
Once you get to this screen (see below) your DataBase Name should be the same as the DB name you previously created a local host file for. Username and Password set to “root” This is a general password for WordPress to login. This is not your personal account or information. Submit this, and on the next screen, click Run the Installation.

The next page will ask you for your Site name and username/ password. This is your personal information. Do Not Share! There is a checkbox asking if you want to discourage search engines ( Google, Yahoo, Bing, etc) from finding your site. You want to check this box because you are only trying to build your website on your computer (For now!). Launching your website to “go live” is separate documentation. This is for building your “rough draft” so you make sure your site is perfect before you let the world see it. After you submit this, you should have this screen.

At this point, you have set up a local server (YAY!) and created the skeleton of a WordPress website, on your computer. From here you can see my next blog post on how to customize and what your different sidebar tabs can do.
Setting up a local host on your computer gives you the ability to work on your website without being connected to the internet. The link below is how you can visualize your saved changes. (Refresh the page to see new changes made)
http://localhost:8888/
Below is the link to your WordPress dashboard. This is where you can start to mess around with themes and layouts. You can end here, or you can download the divi theme builder to really customize your site. Divi builder makes it easier to see the layout and customize as you’re looking at your site.
http://localhost:8888/wp-admin/index.php
Be sure to have your server turned on in MAMP to access your site!
I hope that you enjoyed this article and found it useful! Ideal Dummy is all about sharing knowledge and educating people on how to manage their websites. Or just computer knowledge in general! This is a tech savvy era, and we are here to help! So from one beginner to another, you can do it!
For more information, check out our website.
Written and Documented By: Kelsey Ann
#idealdummy#wordpress#computer#localhost#serversetup#localserver#software development#phpmyadmin#MAMP#macintosh#mac#database#website build#education#computer education#developers & startups#beginner#technology#kansascity
1 note
·
View note
Text
Wordpress localhost ampps alternative

#Wordpress localhost ampps alternative how to#
#Wordpress localhost ampps alternative install#
#Wordpress localhost ampps alternative update#
I had mega problems getting the XAMPP Server working locally, so I decided to try the WAMP. In “Step 5”, you say “With your browser go to Should this be: Thanks so much for your assistance! In “Step 4”, you say “…… the username is root, enter nothing between the ‘.’, and host……” What is the “enter nothing between the ‘…’ referring to? The password?ģ. In “Step 3″, you say ” Go to wamp / www”… This directory does not exist. (get “IE cannot display this webpage” error on this one. No luck on either front, as constant “The requested URL was not found on this server” errors.
#Wordpress localhost ampps alternative install#
Having endless problems with the install and have tried both Nicks and your directions. If you’re having a problem getting your WAMP or XAMPP server online, that’s a whole ‘nother issue, but check to make sure you’re not using IIS infact disable IIS if possible. Step5.)With your browser go to Hope that helps! New file structure will be wamp / Step4.)Unless you’ve changed the db username, password or host name then the db_name is whatever you created in Step 2, the username is root, enter nothing between the ‘.’, and host is localhost. Step 3.) Go to wamp / to a folder ( mysite) with only the content of the wordpress folder dumped directly into ( mysite). With WAMP installed (or XAMPP) your Step 3, 4 and 5 will look different then, our gracious host has suggested, with a MAMP install.
#Wordpress localhost ampps alternative how to#
In the next chapter, I’m going to show you how to create a custom WordPress theme in designer way (no PHP skill is required).įor anyone using WAMP (and possibly XAMPP, have not tested) who has any issues related to Step 3-5, here is your solution: With your browser, go to and follow the instructions to install WordPress.
#Wordpress localhost ampps alternative update#
Open wp-config.php and update the database details (db_name, user, password, host) according to your local server. In the folder, rename the wp-config-sample.php to wp-config.php. Go to the htdocs folder (where you installed the MAMP), extract the wordpress.zip to a new folder (eg. Go to and download the latest build of WordPress. In the phpMyAdmin page, create a new database (eg. Create a New DatabaseĪfter you’ve installed MAMP, run it and it should take you to the start page. I’m using Mac here, so I’m going to install MAMP. In order to run any PHP/database application on a local computer, you need a local host (ie. Run wp-admin/install.php and follow the instructions to install WordPress.īefore you start, let’s look at the requirements to run WordPress: Rename the wp-config-sample.php file to wp-config.php and update the database details according to your local server. Install a local server ( Mac: MAMP, PC: XAMPP or WAMP).ĭownload WordPress from and extract the files to a new folder under the htdocs folder. Here are the simplified steps on how to install WordPress on a local computer: If you have some technical background, you can skip the detailed steps in this tutorial. This tutorial is intended for beginners who want to learn how to run WordPress locally. You can also use the local version to test new plugins, themes, and upgrades. By doing so, it will save you time from updating and previewing files (so, you don’t have to frequently upload files on every change). In this chapter, you will learn how to install WordPress on a local computer. This is the first chapter of the Complete WordPress Theme Guide series.
0 notes
Photo

How to Install WordPress
What You'll Be Creating
So you want a WordPress site?
That’s great. WordPress is the world’s most popular content management system (or CMS), and for good reason.
With WordPress you can get yourself a flexible, scaleable and user-friendly website. The software itself is free and all you have to pay for is the hosting you’ll put it on.
But before you can start, there is one thing you’ll have to do, and that’s set up WordPress. This puts a lot of people off: they think it’s tricky, or long-winded, or requires writing code.
None of these are true. You have two options for installing WordPress, both of which are designed to be quick and easy. I’ll show you how to do both of them in this guide.
Premium WordPress Themes and Plugins
Once you've got your site set up, you'll want to explore the thousands of WordPress themes on ThemeForest and WordPress plugins on CodeCanyon. Purchase these high-quality WordPress themes and plugins can and improve your website experience for you and your visitors.
Options for Installing WordPress
There are two ways of installing WordPress: manually, or with the click of a button.
For most non-techies, the click of a button option is the preferred option. But just in case you are prefer the more thorough way, I’m going to help you to do it manually too.
Each method has its own advantages and disadvantages.
Automatic Installation
Pros:
It’s easy.
It works.
Cons:
Your hosting provider might add some extra code or plugins, which could cause you problems in the long run. Or might just annoy you. For most people, this isn’t an issue.
A poor hosting provider might not install the latest version of WordPress. A good one will. (Hint: you should only go with a good one.)
If your hosting provider doesn’t provide cPanel (or something like it) as part of your package, you might not have access to an auto-installer (which is why this is an important criterion when choosing hosting).
Manual Installation
Pros:
You get a clean installation with no extra code or plugins.
Cons:
It takes longer.
It’s not as easy.
Sometimes it doesn’t work properly (although that’s normally due to user error).
For 90% of website owners, the automatic installation is absolutely fine. It’s only if you’re planning to customize the code in your site that you may have issues.
If you fancy trying your hand at manual installation, read through the instructions below and give it a go. But if you prefer an easy life, go with the automatic option.
Installing WordPress With an Auto-installer
Let’s start with the quick and easy option.
First, you’ll need to access your control panel with your hosting provider. This is normally called cPanel, although some providers give it a name of their own.
If you’re not sure how to get to this, check the email you received when you set up your hosting account. It should contain a link to cPanel. And if that fails, ask your hosting provider to tell you or google ‘access cPanel [my hosting provider]’.
The hosting provider I use is Siteground. To access cPanel via their client area, I go to My Accounts > Go to cPanel.
You’re then presented with the cPanel screen.
At this point, you might panic. So many options! Databases! Joomla! Mail! Security! How on earth do you know where to start?
You only need to find the WordPress auto installer. Ignore everything else. Just blank it out. Pretend it isn’t there.
You should find a section called Autoinstallers. In that section you’re looking for an icon with the word WordPress beneath it. If you can’t find that, you’ll need to use Softaculous instead.
Let me start by demonstrating the process with the dedicated WordPress installer.
Installing WordPress With the WordPress Auto-installer
Click on the WordPress logo. This will take you to a set of screens for installing WordPress.
If the Install tab isn’t already open, click on it.
Now complete the fields as below.
Version: lLave this as the default.
Protocol: If you have SSL already set up for your site (some providers give you this when you register the domain), select https://. If not or if in doubt, select https:// Note that SSL makes your site more secure and is worth using if possible.
Choose Domain: If you have more than one domain registered, choose the one you want to use.
In Directory: Leave this blank.
Site Name: Enter the name of your site. You can change this later.
Site Description: Your tagline. Again, you can change this later.
Enable Multisite: Leave this unchecked. Some auto-installers don’t have this: don’t worry if you can’t see it.
Admin Username: Type in the username you want to use. Don’t use admin as this isn’t very secure. You can’t change this later so make sure it’s what you intend to use forever.
Admin Password: Type in the password you want to use. Use something different from your username, with a few upper-case letters and numbers for extra security. You want to make it as hard as possible for people to get into your site. You can change your password later via the WordPress admin screens, to make it more secure.
Admin Email: Type in the email address you want to use for any emails relating to your site. This isn’t publicly displayed.
Select Language: Choose your language.
Select Plugins: Leave all of these unchecked. This will only be an option with some hosting providers: don’t worry if it isn’t there.
WordPress Starter: Uncheck this. Again, this is specific to some hosting providers and you might not have it.
If there are any other options, just leave them unchecked. And ignore any advanced settings: you don’t need to worry about them.
Once you’ve filled out the fields, click the Install button.
The auto-installer will take some time to set up your new WordPress site and then you’ll be taken to a screen with details of your new site. There will be a link to the site itself and a link to your dashboard. In the screenshot below I’ve installed WordPress in a subdirectory.
Congratulations, you now have a WordPress site!
Installing WordPress With Softaculous
If your cPanel doesn’t have a dedicated WordPress installer, you can use Softaculous instead. Follow these steps:
Click on the Softaculous icon in cPanel.
From the menu on the left, select WordPress.
Click the WordPress icon at the top of the screen.
Follow the steps in the previous section.
In fact, the WordPress auto-installer is nothing more than a shortcut to the Softaculous installer. So the process is the same.
Once you’ve done that, you can follow the link to your shiny new site and start getting it ready.
Installing WordPress Manually
Alternatively, you can use the "famous five minute install" to install WordPress manually.
To install WordPress manually you’ll need:
A web browser.
An FTP client. This will let you upload files to the server where your website is hosted. Personally, I use Coda, a code editing application with FTP client included, but if you just need FTP you can choose from our list of the top five FTP clients out there.
Access to your server to create databases—your hosting provider will likely provide you with a tool called phpMyAdmin to do this. If in doubt, ask them!
Note that you won’t need an FTP client if you’re running WordPress locally—that is if you're running it on your computer instead of on the internet.
To install WordPress you’ll need to follow three steps:
create a database on your server
download WordPress and copy it to your server
run the WordPress installation
Create a Database
The database will hold all of your site’s content and without it, WordPress and your WordPress site won’t work. You can create yours in one of two ways, depending on your hosting provider’s setup:
via your hosting admin screens
using phpMyAdmin
With my hosting provider, I use their admin screens to create a database, so let’s look at that first.
Using Your Hosting Admin to Create a Database
In your hosting admin screens, find an option called databases, SQL databases or similar. The exact name will vary depending on your provider.
For example, here’s the screen I use:
If you’re using a similar admin screen, follow these steps:
Give your database a name and type it in the field.
Click on Create Database.
You’ll then be asked to enter a password for the new user associated with this database. Choose a password, type it in, and click OK.
Make a note of the database name, username and password. You’ll need these later.
And, that’s it—your database is ready!
Using phpMyAdmin to Create a Database
If your hosting provider gives you phpMyAdmin as part of your package, or you’re using MAMP to install WordPress locally, you can use this to create your database.
In your hosting admin screens or the MAMP welcome screen, click the link to phpMyAdmin, which might look something like this:
The phpMyAdmin welcome screen will open. Click on the Databases tab at the top left to open the databases screen:
In the Create Database field, type the name of your database.
Click the Create button.
And with that, your database will be created. Make a note of the database name for later. The username and password will default to root.
Step 1 is done—and that’s the trickiest part. It’s plain sailing from here on in!
Download and Upload WordPress
Now you need to download the latest version of WordPress.
Go to the WordPress download page.
Click the Download WordPress button to download a zip file containing all of the WordPress files to your computer.
Unzip the file on your computer in exactly the same way you would normally unzip any other file. You’ll now have a folder called wordpress with all of the WordPress files in it. Make a note of where that folder is.
Next, you need to upload WordPress to your server.
Open your FTP client. Sign in to the FTP on your server using the FTP login details your hosting provider gave you when you created your account. If you’re not sure about these, ask them. You’ll need the server address, your username and the password.
In your FTP client, find the wordpress folder on your local machine and the public_html folder on your server. You should be able to see the two of them side by side. As an example, here’s mine in Coda:
Note that my folder on the remote server is empty because I’m installing WordPress in a subdirectory. Yours will have other files in there—ignore those.
Now drag the contents of the wordpress folder (not the folder itself) to your public_html folder. Your FTP client will copy the files to your server.
Wait for the files to finish copying. Now you’re ready for the third and final stage: Running the WordPress installation.
Run the WordPress Installation
Your database and files are in place and you’re ready to install WordPress!
Open your browser and go to your website. You’ll see the first WordPress installation screen.
You should have all this information noted down from when you were creating your database. Click Let’s Go!
On the next screen, input your database name, username and password. If you’re working locally, the username and password will default to root. Otherwise they’ll be what you specified when you created your database.
Leave the Database Host and Table Prefix fields as they are (note: if in any doubt, ask your host for what to enter as the Database Host, as this can vary between hosting providers—assuming they haven’t already let you know in a previous email when you initially signed up for their services) and click Submit.
Next, you’ll see my favorite screen—the one that tells you WordPress is ready to install. Well done!
Note: If you’re in the US, it will say ‘All right sparky!’. I’m in the UK so it uses the more sedate ‘sunshine’. I prefer ‘sparky’ to be honest.
Click Run the install to access the site details screen.
Finally, enter your site details: the site title, your username and password and email address. If you want Google to find your site, leave the Privacy box checked. Click Install WordPress.
WordPress will be installed and you’ll see a success screen. Hurray!
Now you can log in to your site by clicking the Log In button and entering the credentials you provided when you were installing WordPress.
This will take you to the WordPress dashboard.
Congratulations, you’ve successfully installed WordPress and can now start managing your site!
Installing WordPress isn’t as tricky as you may think. By following the advice above, you can get yourself a brand new site with the world’s favorite CMS. Enjoy!
The Best WordPress Themes and Plugins on Envato Market
Explore thousands of the best WordPress themes ever created on ThemeForest and leading WordPress plugins CodeCanyon. Purchase these high-quality WordPress themes and plugins can and improve your website experience for you and your visitors.
Here are a few of the best-selling and up-and-coming WordPress themes and plugins available for 2020.
Inspiration
15+ Best WordPress Portfolio Themes for Creatives
Brenda Barron
WordPress
17 Best WordPress Slider & Carousel Plugins of 2020
Daniel Strongin
WordPress
20 Best WordPress Calendar Plugins and Widgets
Daniel Strongin
WordPress Themes
23+ Best Responsive WordPress Themes (For Sites in 2020)
Brenda Barron
WordPress
20 Best WPBakery Page Builder (Visual Composer) Addons & Plugins of 2019
Nona Blackman
WordPress Themes
20+ Best Coaching & Consulting WordPress Themes (2020)
Brenda Barron
by Rachel McCollin via Envato Tuts+ Code https://ift.tt/2RHR6bv
0 notes
Video
youtube
How to Install WordPress 4.8.2 on Windows 10/8/7 First, you need to install PHP, HTTP or Apache, and MySQL servers. And make sure they are running. To make it an easy process you can download and install XAMPP (http://ift.tt/ZLGUiN) or MAMP (http://mamp.info) server that is freely available for Mac, Windows, and Linux as well. Then, create a SQL database, username, grant privileges to the user. Now, Go ahead and download WordPress core 4.8.2 from www.wordpress.org by TapTube
0 notes
Text
How to use WordPress API Authentication with Ionic
If you want to use the WordPress API and connect your Ionic app to it, most likely you also want to make user of the users your page already has (or use it as a simple backend for your next app).
But instead of using the basic authentication from WordPress, a more elegant way is to use JWT authentication, which is possible with the help of a simple plugin.
In this tutorial we will prepare a WordPress instance for JWT and also build an Ionic app to register new users, and to also sign them in and make authorised requests to the WordPress API using an interceptor.
There’s also a full blown course on using Ionic with WordPress that even covers push notifications with OneSignal, so if you really want to get into this topic, check out the Ionic Academy and the course library!
WordPress Preparation
Before we get started with our app we need to prepare WordPress. First of all, we can install 2 plugins:
JWT Authentication for WP-API
WP REST User
These plugins will help us to set up JWT authentication for the WordPress API, and also allow registeration of new users directly through the API.
Now we also need some small changes, the first one could be added to your wp-content/themes/{yourthemename}/functions.php
function add_cors_http_header(){ header("Access-Control-Allow-Origin: *"); } add_action('init','add_cors_http_header'); add_filter('kses_allowed_protocols', function($protocols) { $protocols[] = 'capacitor'; return $protocols; }); add_filter('kses_allowed_protocols', function($protocols) { $protocols[] = 'ionic'; return $protocols; });
This fix enables CORS and also allows different protocols – and issue a lot of you encountered with my last Ionic + WordPress tutorial on real devices!
In order to set up the JWT part, we also need to add these 2 lines to the wp-config.php file:
define('JWT_AUTH_CORS_ENABLE', true); define('JWT_AUTH_SECRET_KEY', 'your-top-secret-key');
Generate a key or use a dummy string while testing, and then move on to the last changes.
As described in the setup guide of the JWT plugin, we also need to add the highlighted lines to our .htaccess like this:
<IfModule mod_rewrite.c> RewriteEngine On RewriteBase /wordpress/ RewriteRule ^index\.php$ - [L] RewriteCond %{REQUEST_FILENAME} !-f RewriteCond %{REQUEST_FILENAME} !-d RewriteRule . /wordpress/index.php [L] RewriteCond %{HTTP:Authorization} ^(.*) RewriteRule ^(.*) - [E=HTTP_AUTHORIZATION:%1] </IfModule>
Now the WordPress instance is ready, and hopefully everything still works with your page!
Ionic App Setup
Let’s kick off the Ionic app with a blank template, one additional service for all of our API interaction and also install Ionic storage to store our JWT later down the road:
ionic start devdacticWP blank --type=angular cd ./devdacticWP ionic g service services/api npm i @ionic/storage
To make our WordPress URL easily accessible, we can set it directly inside our environments/environment.ts:
export const environment = { production: false, apiUrl: 'http://192.168.2.123:8888/wordpress/wp-json' };
I’ve used a local MAMP testing instance and the blog was running in a folder “wordpress” – change your URL according to your settings!
Note: I recommend adding your local IP (or public website if possible), localhost won’t work once you deploy your app to a device!
Now we just need to import all relevant modules to our main module, and don’t worry the error about the interceptor, we’ll get to that file soon.
Go ahead and change your app.module.ts to:
import { NgModule } from '@angular/core'; import { BrowserModule } from '@angular/platform-browser'; import { RouteReuseStrategy } from '@angular/router'; import { IonicModule, IonicRouteStrategy } from '@ionic/angular'; import { SplashScreen } from '@ionic-native/splash-screen/ngx'; import { StatusBar } from '@ionic-native/status-bar/ngx'; import { AppComponent } from './app.component'; import { AppRoutingModule } from './app-routing.module'; import { HttpClientModule, HTTP_INTERCEPTORS } from '@angular/common/http'; import { IonicStorageModule } from '@ionic/storage'; import { JwtInterceptor } from './interceptors/jwt.interceptor'; @NgModule({ declarations: [AppComponent], entryComponents: [], imports: [ BrowserModule, IonicModule.forRoot(), AppRoutingModule, HttpClientModule, IonicStorageModule.forRoot() ], providers: [ StatusBar, SplashScreen, { provide: RouteReuseStrategy, useClass: IonicRouteStrategy }, { provide: HTTP_INTERCEPTORS, useClass: JwtInterceptor, multi: true } ], bootstrap: [AppComponent] }) export class AppModule {}
The interceptor will be used whenever we make a HTTP request later, but for now let’s get a token first of all.
Service and Interceptor
In our service we will handle all API interaction, and also create a BehaviorSubject which represents the current state of the user. You might have used Events in the past, but since Ionic 5 you should move to RxJS instead.
Let’s go through all of our service functions quickly:
constructor: Load any previously stored JWT and emit the data on our Subject
signIn: Call the API route to sign in a user and retrieve a JWT. This token will be written to our Storage, and once this operation is finished we emit the new value on our Subject
signUp: Call the API route to create a new users, which is added through the plugin we installed
resetPassword: Call the API route to send out a reset password email, which is added through the plugin we installed
getPrivatePosts: Get a list of private posts from the WordPress blog – the user needs to be authenticated for this and have at least the role Editor!
getCurrentUser / getUserValue: Helper functions to get an Observable or the current value from our Subject
logout: Remove any stored token from our storage
Not a lot of logic, basically we make simply use of the WordPress API, so go ahead and add the following to your services/api.service.ts:
import { Injectable } from '@angular/core'; import { BehaviorSubject, from } from 'rxjs'; import { HttpClient } from '@angular/common/http'; import { Platform } from '@ionic/angular'; import { environment } from '../../environments/environment'; import { map, switchMap, tap } from 'rxjs/operators'; import { Storage } from '@ionic/storage'; const JWT_KEY = 'myjwtstoragekey'; @Injectable({ providedIn: 'root' }) export class ApiService { private user = new BehaviorSubject(null); constructor(private http: HttpClient, private storage: Storage, private plt: Platform) { this.plt.ready().then(() => { this.storage.get(JWT_KEY).then(data => { if (data) { this.user.next(data); } }) }) } signIn(username, password) { return this.http.post(`${environment.apiUrl}/jwt-auth/v1/token`, { username, password }).pipe( switchMap(data => { return from(this.storage.set(JWT_KEY, data)); }), tap(data => { this.user.next(data); }) ); } signUp(username, email, password) { return this.http.post(`${environment.apiUrl}/wp/v2/users/register`, { username, email, password }); } resetPassword(usernameOrEmail) { return this.http.post(`${environment.apiUrl}/wp/v2/users/lostpassword`, { user_login: usernameOrEmail }); } getPrivatePosts() { return this.http.get<any[]>(`${environment.apiUrl}/wp/v2/posts?_embed&status=private`).pipe( map(data => { for (let post of data) { if (post['_embedded']['wp:featuredmedia']) { post.media_url = post['_embedded']['wp:featuredmedia'][0]['media_details'].sizes['medium'].source_url; } } return data; }) ); } getCurrentUser() { return this.user.asObservable(); } getUserValue() { return this.user.getValue(); } logout() { this.storage.remove(JWT_KEY).then(() => { this.user.next(null); }); } }
So the idea is to sign in a user, store the token, and whenever we make a following request (in our case only to load private posts), we attach the JWT to the header of our request.
And we can do this easily by implementing an interceptor, that will load the token value and if available, add it to the headers of our request.
The following code performs exactly this operation, so we don’t need any additional JWT library and can simply create a new file at app/interceptors/jwt.interceptor.ts like this:
import { Injectable } from '@angular/core'; import { HttpRequest, HttpHandler, HttpEvent, HttpInterceptor } from '@angular/common/http'; import { Observable } from 'rxjs'; import { ApiService } from '../services/api.service'; @Injectable() export class JwtInterceptor implements HttpInterceptor { constructor(private api: ApiService) { } intercept(request: HttpRequest<any>, next: HttpHandler): Observable<HttpEvent<any>> { let currentUser = this.api.getUserValue(); if (currentUser && currentUser.token) { request = request.clone({ setHeaders: { Authorization: `Bearer ${currentUser.token}` } }); } return next.handle(request); } }
That’s it – now we will attach the token to all requests if the user is authenticated! This means, it will not only work for the one special request that requires authentication, but all other requests to the WP API that you might make that would need authentication.
Login, Signup and Authenticated WordPress Requests
Now we basically just need to hook up our view with the functonality of our service. First of all, we need to add the ReactiveFormsModule since we will use a reactive form
Therefore go ahead and add it to the home/home.module.ts of our app:
import { NgModule } from '@angular/core'; import { CommonModule } from '@angular/common'; import { IonicModule } from '@ionic/angular'; import { FormsModule, ReactiveFormsModule } from '@angular/forms'; import { RouterModule } from '@angular/router'; import { HomePage } from './home.page'; @NgModule({ imports: [ CommonModule, FormsModule, IonicModule, RouterModule.forChild([ { path: '', component: HomePage } ]), ReactiveFormsModule ], declarations: [HomePage] }) export class HomePageModule {}
With that in place we can create our form for the login or sign up credentials, and for simplicity we will simply create just one form for both cases.
Just note that you need to send all 3 values (username, email, password) if you want to register a new user!
Besides that we can integrate our service functionality and handle the results and errors of these calls. For the forgot password dialog we can use a simple alert, which is already the most exiting thing about our class.
We subscribe to the Observable of the user, and once we have a real user we will also trigger a reload of the private posts.
Go ahead and change your home/home.page.ts to:
import { Component, OnInit } from '@angular/core'; import { ApiService } from '../services/api.service'; import { FormGroup, FormBuilder, Validators } from '@angular/forms'; import { AlertController, ToastController } from '@ionic/angular'; @Component({ selector: 'app-home', templateUrl: 'home.page.html', styleUrls: ['home.page.scss'] }) export class HomePage implements OnInit { userForm: FormGroup; user = this.api.getCurrentUser(); posts = []; constructor( private api: ApiService, private fb: FormBuilder, private alertCtrl: AlertController, private toastCtrl: ToastController ) { this.user.subscribe(user => { if (user) { this.loadPrivatePosts(); } else { this.posts = []; } }); } ngOnInit() { this.userForm = this.fb.group({ username: ['', Validators.required], email: '', password: ['', Validators.required] }); } login() { this.api.signIn(this.userForm.value.username, this.userForm.value.password).subscribe( res => {}, err => { this.showError(err); } ); } signUp() { this.api.signUp(this.userForm.value.username, this.userForm.value.email, this.userForm.value.password).subscribe( async res => { const toast = await this.toastCtrl.create({ message: res['message'], duration: 3000 }); toast.present(); }, err => { this.showError(err); } ); } async openPwReset() { const alert = await this.alertCtrl.create({ header: 'Forgot password?', message: 'Enter your email or username to retrieve a new password', inputs: [ { type: 'text', name: 'usernameOrEmail' } ], buttons: [ { role: 'cancel', text: 'Back' }, { text: 'Reset Password', handler: (data) => { this.resetPw(data['usernameOrEmail']); } } ] }); await alert.present(); } resetPw(usernameOrEmail) { this.api.resetPassword(usernameOrEmail).subscribe( async res => { const toast = await this.toastCtrl.create({ message: res['message'], duration: 2000 }); toast.present(); }, err => { this.showError(err); } ); } loadPrivatePosts() { this.api.getPrivatePosts().subscribe(res => { this.posts = res; }); } logout() { this.api.logout(); } async showError(err) { const alert = await this.alertCtrl.create({ header: err.error.code, subHeader: err.error.data.status, message: err.error.message, buttons: ['OK'] }); await alert.present(); } }
The last missing piece is our view, which basically shows our form for data plus the according buttons to trigger the actions.
We can also add a little if/else logic using ng-template to show either the card with our input fields, or a dummy card with the user value printed out as JSON.
Since the user object is an Observable we also need the async pipe, which makes the if statement looks kinda tricky (which it actually isn’t).
Below our cards we can also create a very basic list to show all private posts. Of course that’s just one idea and quick example of how to present it, you can also find a more detailed version in my previous WordPress tutorial!
Finish your app by changing the home/home.page.html to:
<ion-header> <ion-toolbar color="primary"> <ion-title> Devdactic Wordpress </ion-title> </ion-toolbar> </ion-header> <ion-content> <ion-card *ngIf="!(user | async); else welcome"> <ion-card-content> <form [formGroup]="userForm" (ngSubmit)="login()"> <ion-item> <ion-label position="floating">Username</ion-label> <ion-input formControlName="username"></ion-input> </ion-item> <ion-item> <ion-label position="floating">Email</ion-label> <ion-input formControlName="email"></ion-input> </ion-item> <ion-item> <ion-label position="floating">Password</ion-label> <ion-input type="password" formControlName="password"></ion-input> </ion-item> <ion-button expand="full" [disabled]="!userForm.valid" type="submit">Sign in</ion-button> <ion-button expand="full" [disabled]="!userForm.valid" type="button" color="secondary" (click)="signUp()"> Register</ion-button> <ion-button expand="full" type="button" color="tertiary" (click)="openPwReset()">Forgot password?</ion-button> </form> </ion-card-content> </ion-card> <ng-template #welcome> <ion-card> <ion-card-header> <ion-card-title>Welcome back!</ion-card-title> </ion-card-header> <ion-card-content> <ion-button expand="full" (click)="logout()">Logout</ion-button> </ion-card-content> </ion-card> </ng-template> <ion-card *ngFor="let post of posts"> <ion-card-header> <ion-card-title [innerHTML]="post.title.rendered"></ion-card-title> <ion-card-subtitle>Liquid error: wrong number of arguments (given 1, expected 2)</ion-card-subtitle> </ion-card-header> <ion-card-content> <img [src]="post.media_url" *ngIf="post.media_url"> <div [innerHTML]="post.excerpt.rendered"></div> <!-- Example logic to open a details page below --> <!-- <ion-button expand="full" fill="clear" [routerLink]="['/', 'posts', post.id]" text-right>Read More...</ion-button> --> </ion-card-content> </ion-card> </ion-content>
Now go ahead and enjoy your authentication flow from Ionic with WordPress backend!
Conclusion
Adding REST API authentication to your WordPress blog isn’t that hard and helps to create powerful apps using Ionic.
Just keep in mind that the initial role of a new user might be something that has no access to private posts yet, so you would have to manually promote users in that case.
Anyway, using WordPress as a simple backend is a great alternative to other systems if you already have a WordPress blog or know a thing or two about PHP!
You can also find a video version of this tutorial below.
youtube
The post How to use WordPress API Authentication with Ionic appeared first on Devdactic.
via Devdactic https://ift.tt/3aRAvu3
0 notes
Text
How to Install WordPress in 5 Minutes or Less (2019)
New Post has been published on https://computerguideto.com/awesome/how-to-install-wordpress-in-5-minutes-or-less-2019/
How to Install WordPress in 5 Minutes or Less (2019)
Looking for a tutorial depict you how to install WordPress, but keep finding resources that tackle every method except the one you need?
We’ve got your back.
In this post, we break down every conceivable route there is to install WordPress.
You’ll learn how to install WordPress utilizing cPanel, Softaculous, MOJO, Fantastico, and QuickInstall; locally on both Windows and Mac; manually utilizing FTP; and we’ll break down popular hosting providers like GoDaddy, Bluehost, and HostGator.
You’ll also learn how to install WordPress Multisite, how to install WordPress in different languages, and more.
Just click the appropriate connection in our Table of Contents to jump to the section you need.
Ready?
Let’s go.
Table of Contents
How to Install WordPress on cPanel( Softaculous , MOJO, Fantastico, and QuickInstall)
How to Install WordPress on Localhost( Or, How to Install WordPress Locally )
How to Install WordPress on Windows How to Install WordPress on Mac
How to Install WordPress via FTP( Or, How to Install WordPress Manually ) How to Install WordPress Multisite How to Install WordPress in Your Language
How to Install WordPress on 12 Popular Web Hosts
How to Install WordPress on SiteGround How to Install WordPress on Bluehost How to Install WordPress on GoDaddy How to Install WordPress on WP Engine How to Install WordPress on Flywheel How to Install WordPress on Kinsta How to Install WordPress on HostGator How to Install WordPress on DreamHost How to Install WordPress on A2Hosting How to Install WordPress on InMotion Hosting How to Install WordPress on iPage How to Install WordPress on Hostinger
Frequently Asked Questions
Back to Top
How to Install WordPress on cPanel( Softaculous , MOJO, Fantastico, and QuickInstall)
So, you decided to start a blog.
Awesome. Now it’s time to roll up your sleeves and get to work installing WordPress.
Thankfully, many of the popular WordPress hosts offer some kind of simplified( or even automatic) installation.
If you’re employ a “shared” WordPress hosting plan, there’s a good chance your host will use cPanel.
Editor’s Note: cPanel is an online control panel many web hosts use to simplify the whole “how to host a website” thing for users. Go here to learn more about it.
Let’s walk through the cPanel process…
Step# 1. Find Out How to Access Your Host’s cPanel
Unfortunately, the way you get to cPanel is not standardized across the web. Different hosts access it differently.
So, before you can do anything, you need to find out how to access your host’s cPanel.
The easiest method is to find the emails your hosting provider sent you when you signed up for your account. Among other valuable bits of information, the URL to your cPanel will be in one of those initial emails.
But if you can’t find the right email, don’t worry.
Just Google the name of your web host and “cPanel login”.
That should do the trick.
Step# 2. Get to Know cPanel
The main cPanel dashboard can be a little intimidating.
Relax.
You don’t have to understand all cPanel has to offer. We’re here to do one thing — learn how to install WordPress.
For that, let’s look for the cPanel installer tools, who the hell is usually located near the bottom of the page.
Your host might be using any of the following installers: Softaculous, Fantastico, QuickInstall, or MOJO Marketplace.
We’re going to focus on Softaculous since it’s the most popular.
But don’t worry if your host uses a different installer.
While the specific interfaces might be a bit different, the idea behind every installer is the same.
Plus, they all ask you for the same define of data and inputs.
Step# 3. How to Install WordPress Using Softaculous
To begin, look for the Softaculous section in cPanel.
Click on the WordPress logo. The installer tool will open :P TAGEND
Click on the Install Now button to begin the installation process.
Softaculous needs only a handful of details from you. Here are the fields you should pay special attention to :P TAGEND
“Choose the version you want to install” — Always go for the most-recent version available.
“Choose Protocol” — “https :// ” is the option preferred by Google. “Choose Domain” — Leave unchanged if you have just one domain assigned to your server; if you have more than one domain, select the desired one for this installation.
“In Directory” — Leave empty if you want to install WordPress in the main directory of your domain name (which most people do ).
“Select Plugin( s) ” — Optional( but as a general rule: the fewer plugins, the better ).
Here’s what the kind looks like :P TAGEND
Click Install to proceed.
When the process finishes, Softaculous will show you a final confirmation screen along with links to your WordPress dashboard.
And that’s it!
You’ve installed WordPress using cPanel.
Note: The WordPress dashboard of your newly-installed site should be available at yoursite.com/wp-admin/. Back to Top
How to Install WordPress on Localhost( Or, How to Install WordPress Locally)
The instructions for how to install WordPress locally depends on whether you’re using a PC( Windows) or a Mac.
We’ll go over both methods.
First up: Windows.
( If you’re on a Mac, click here to jump ahead .)
How to Install WordPress on Windows
WordPress is a great tool for local web development.
Here’s how you install WordPress locally on Windows :P TAGEND Step# 1. Get XAMPP
XAMPP is a local web server for your computer. It’s an all-in-one package with everything you will need to run software (such as WordPress) locally.
What About WAMP?
You might have heard of a similar tool called WAMP.
Under the hood, WAMP and XAMPP do the same thing. However, in my opinion, WAMP isn’t as reliable as XAMPP.
For this reason and others, we’ll focus on XAMPP in this tutorial.
From the XAMPP website, click on the download button for Windows and save the XAMPP package to your desktop.
Launch the XAMPP installer and follow the prompts on the screen.
First, select the individual components you want to have installed. To be safe, you can choose all of them :P TAGEND
Next, select the installation folder for XAMPP.
Note: Avoid installing XAMPP in Program Files. The read/ write restrictions of Windows might prevent it from working correctly. Installing in C :\ xampp is a safer wager.
XAMPP will take a minute or two to install.
When it’s finished, you’ll see this confirmation screen :P TAGEND
When you click on Finish, you’ll consider the main XAMPP config panel.
In it, click on the two Start buttons next to Apache and MySQL.
Like so :P TAGEND
You should consider the two labels change to green :P TAGEND
When you consider green, your local server is working!
Step# 2. Create a Blank Database for WordPress
From the control panel of XAMPP, click on the Admin button in the MySQL row :P TAGEND
This will launch a tool called PHPMyAdmin, which is an open-source database management tool.
Go into Databases( from the top menu ).
Enter a name for your new WordPress database( something simple) and click the Create button :P TAGEND
You should see your new blank database in the sidebar :P TAGEND
You can now exit PHPMyAdmin.
Step# 3. Download WordPress
Go to WordPress.org and download the most recent version of the software.
Don’t worry. It’s free :P TAGEND
Next :P TAGEND
Save the file to your desktop or downloads folder. Extract it. Go to the folder where you installed XAMPP( C :\ xampp) and find the htdocs subfolder. Make a new subfolder inside htdocs. This is where your site is going to live. For the purpose of this demo, I’ll name the folder mynewsite.
Note: The name of this folder will also become part of the local address of the site. With mynewsite being the folder name, the address of the site is soon to be localhost/mynewsite.
Take the contents of the WordPress archive and move them to this new subfolder( “mynewsite” or what it is you named yours ).
It should look like this :P TAGEND
Step# 4. Install WordPress Locally on Windows
Open your web browser and navigate to localhost/ mynewsite.
What you’ll see is the on-screen WordPress Installation Wizard.
The first step is opting your language :P TAGEND
The next screen is an info card to get you up to velocity with what’s going to happen. Click on Let’s go! once you’ve read it.
The next step is a crucial one in the installation.
This is where you get to enter the details of your WordPress connection to the database.
Here are my decideds based on everything I’ve set in the previous steps so far :P TAGEND
Important components :P TAGEND
Database Name — This is the name you set in PHPMyAdmin in order to establish the database in Step# 2.
Username — Set to root.
Password — Leave blank.
Database Host — Set to localhost.
Table Prefix — Leave as is.
The next step is where you get to set the name of your site and the details of your main admin account :P TAGEND
Note: With the exception of username, you’ll be able to easily change these later in your WordPress dashboard.
Click on Install WordPress to finalise everything.
And that’s it. You’ve installed WordPress locally on Windows.
How to Install WordPress on Mac
While installing WordPress locally on Mac isn’t the usual “get app from App Store” experience we’re used to, it can still be done with relative ease.
Here’s how to install WordPress on Mac :P TAGEND Step# 1. Get MAMP
MAMP is a local web server that works quite well on Mac.
( It’s also easier to install than some of its alternatives.).
From the MAMP website, go to the downloads section and opt the option for macOS :P TAGEND
Save the package..
Read more: smartblogger.com
0 notes
Text
How to Install WordPress in 5 Minutes or Less (2019)
Looking for a tutorial showing you how to install WordPress, but keep finding resources that tackle every method except the one you need?
We’ve got your back.
In this post, we break down every conceivable way there is to install WordPress.
You’ll learn how to install WordPress using cPanel, Softaculous, MOJO, Fantastico, and QuickInstall; locally on both Windows and Mac; manually using FTP; and we’ll break down popular hosting providers like GoDaddy, Bluehost, and HostGator.
You’ll also learn how to install WordPress Multisite, how to install WordPress in different languages, and more.
Just click the appropriate link in our Table of Contents to jump to the section you need.
Ready?
Let’s go.
Table of Contents
How to Install WordPress on cPanel (Softaculous, MOJO, Fantastico, and QuickInstall)
How to Install WordPress on Localhost (Or, How to Install WordPress Locally)
How to Install WordPress on Windows
How to Install WordPress on Mac
How to Install WordPress via FTP (Or, How to Install WordPress Manually)
How to Install WordPress Multisite
How to Install WordPress in Your Language
How to Install WordPress on 12 Popular Web Hosts
How to Install WordPress on SiteGround
How to Install WordPress on Bluehost
How to Install WordPress on GoDaddy
How to Install WordPress on WP Engine
How to Install WordPress on Flywheel
How to Install WordPress on Kinsta
How to Install WordPress on HostGator
How to Install WordPress on DreamHost
How to Install WordPress on A2Hosting
How to Install WordPress on InMotion Hosting
How to Install WordPress on iPage
How to Install WordPress on Hostinger
Frequently Asked Questions
Back to Top
How to Install WordPress on cPanel (Softaculous, MOJO, Fantastico, and QuickInstall)
So, you decided to start a blog.
Awesome. Now it’s time to roll up your sleeves and get to work installing WordPress.
Thankfully, many of the popular WordPress hosts offer some form of simplified (or even automatic) installation.
If you’re using a “shared” WordPress hosting plan, there’s a good chance your host will use cPanel.
Editor’s Note: cPanel is an online control panel many web hosts use to simplify the whole “how to host a website” thing for users. Go here to learn more about it.
Let’s walk through the cPanel process…
Step #1. Find Out How to Access Your Host’s cPanel
Unfortunately, the way you get to cPanel is not standardized across the web. Different hosts access it differently.
So, before you can do anything, you need to find out how to access your host’s cPanel.
The easiest method is to find the emails your hosting provider sent you when you signed up for your account. Among other valuable bits of information, the URL to your cPanel will be in one of those initial emails.
But if you can’t find the right email, don’t worry.
Just Google the name of your web host and “cPanel login”.
That should do the trick.
Step #2. Get to Know cPanel
The main cPanel dashboard can be a little intimidating.
Relax.
You don’t have to understand all cPanel has to offer. We’re here to do one thing — learn how to install WordPress.
For that, let’s look for the cPanel installer tools, which are usually located near the bottom of the page.
Your host might be using any of the following installers: Softaculous, Fantastico, QuickInstall, or MOJO Marketplace.
We’re going to focus on Softaculous since it’s the most popular.
But don’t worry if your host uses a different installer.
While the specific interfaces might be a bit different, the idea behind every installer is the same.
Plus, they all ask you for the same set of data and inputs.
Step #3. How to Install WordPress Using Softaculous
To begin, look for the Softaculous section in cPanel.
Click on the WordPress logo. The installer tool will open:
Click on the Install Now button to begin the installation process.
Softaculous needs only a handful of details from you. Here are the fields you should pay special attention to:
“Choose the version you want to install” — Always go for the most-recent version available.
“Choose Protocol” — “https://” is the option preferred by Google.
“Choose Domain” — Leave unchanged if you have just one domain assigned to your server; if you have more than one domain, select the desired one for this installation.
“In Directory” — Leave empty if you want to install WordPress in the main directory of your domain name (which most people do).
“Select Plugin(s)” — Optional (but as a general rule: the fewer plugins, the better).
Here’s what the form looks like:
Click Install to proceed.
When the process finishes, Softaculous will show you a final confirmation screen along with links to your WordPress dashboard.
And that’s it!
You’ve installed WordPress using cPanel.
Note: The WordPress dashboard of your newly-installed site should be available at yoursite.com/wp-admin/.
Back to Top
How to Install WordPress on Localhost (Or, How to Install WordPress Locally)
The instructions for how to install WordPress locally depends on whether you’re using a PC (Windows) or a Mac.
We’ll go over both methods.
First up: Windows.
(If you’re on a Mac, click here to jump ahead.)
How to Install WordPress on Windows
WordPress is a great tool for local web development.
Here’s how you install WordPress locally on Windows:
Step #1. Get XAMPP
XAMPP is a local web server for your computer. It’s an all-in-one package with everything you will need to run software (such as WordPress) locally.
What About WAMP?
You might have heard of a similar tool called WAMP.
Under the hood, WAMP and XAMPP do the same thing. However, in my opinion, WAMP isn’t as reliable as XAMPP.
For this reason and others, we’ll focus on XAMPP in this tutorial.
From the XAMPP website, click on the download button for Windows and save the XAMPP package to your desktop.
Launch the XAMPP installer and follow the prompts on the screen.
First, select the individual components you want to have installed. To be safe, you can choose all of them:
Next, select the installation folder for XAMPP.
Note: Avoid installing XAMPP in Program Files. The read/write restrictions of Windows might prevent it from working correctly. Installing in C:\xampp is a safer bet.
XAMPP will take a minute or two to install.
When it’s finished, you’ll see this confirmation screen:
When you click on Finish, you’ll see the main XAMPP config panel.
In it, click on the two Start buttons next to Apache and MySQL.
Like so:
You should see the two labels change to green:
When you see green, your local server is working!
Step #2. Create a Blank Database for WordPress
From the control panel of XAMPP, click on the Admin button in the MySQL row:
This will launch a tool called PHPMyAdmin, which is an open-source database management tool.
Go into Databases (from the top menu).
Enter a name for your new WordPress database (something simple) and click the Create button:
You should see your new blank database in the sidebar:
You can now exit PHPMyAdmin.
Step #3. Download WordPress
Go to WordPress.org and download the most recent version of the software.
Don’t worry. It’s free:
Next:
Save the file to your desktop or downloads folder. Extract it.
Go to the folder where you installed XAMPP (C:\xampp) and find the htdocs subfolder.
Create a new subfolder inside htdocs. This is where your site is going to live. For the purpose of this demo, I’ll name the folder mynewsite.
Note: The name of this folder will also become part of the local address of the site. With mynewsite being the folder name, the address of the site is going to be localhost/mynewsite.
Take the contents of the WordPress archive and move them to this new subfolder (“mynewsite” or whatever you named yours).
It should look like this:
Step #4. Install WordPress Locally on Windows
Open your web browser and navigate to localhost/mynewsite.
What you’ll see is the on-screen WordPress Installation Wizard.
The first step is choosing your language:
The next screen is an info card to get you up to speed with what’s going to happen. Click on Let’s go! once you’ve read it.
The next step is a crucial one in the installation.
This is where you get to enter the details of your WordPress connection to the database.
Here are my settings based on everything I’ve set in the previous steps so far:
Important parts:
Database Name — This is the name you set in PHPMyAdmin when creating the database in Step #2.
Username — Set to root.
Password — Leave blank.
Database Host — Set to localhost.
Table Prefix — Leave as is.
The next step is where you get to set the name of your site and the details of your main admin account:
Note: With the exception of username, you’ll be able to easily change these later in your WordPress dashboard.
Click on Install WordPress to finalize everything.
And that’s it. You’ve installed WordPress locally on Windows.
How to Install WordPress on Mac
While installing WordPress locally on Mac isn’t the usual “get app from App Store” experience we’re used to, it can still be done with relative ease.
Here’s how to install WordPress on Mac:
Step #1. Get MAMP
MAMP is a local web server that works quite well on Mac.
(It’s also easier to install than some of its alternatives.).
From the MAMP website, go to the downloads section and choose the option for macOS:
Save the package to your computer.
Launch the MAMP installer and proceed through the on-screen wizard.
When the installation finishes, open MAMP from Mac’s Launchpad.
In the config panel, click on the main Start Servers button.
Congrats! Your local server is working.
Step #2. Create a Blank Database for WordPress
As soon as you start your server in MAMP, you will be taken to the server’s homepage.
Usually, it’s “http://localhost:8888/MAMP/” (without the quotes).
From there, click on PHPMYADMIN under TOOLS:
As mentioned earlier in the post, PHPMyAdmin is a handy, open-source database management tool.
We use it to create a new database for WordPress.
Go into Databases (from the top menu):
Enter a name for your new WordPress database (something simple) and click on Create.
Like so:
You should see your new blank database in the sidebar.
You can now exit PHPMyAdmin.
Step #3. Download WordPress
Go to WordPress.org and download the most recent version of the software.
Next:
Save the archive to your Mac and extract it.
Go to the default web folder of your server. That’s usually in Applications/MAMP/htdocs. You can check the location of your default web folder by going into MAMP settings and choosing the Web Server tab:
Create a new subfolder. This is where your site is going to live. For the purpose of this demo, I’ll name my subfolder mynewsite.
Note: The name of this folder will also be part of the local address of the site. With mynewsite being the folder name, the address of the site is going to be localhost:8888/mynewsite.
Take the contents of the WordPress archive and move them to the new folder you created. It should look like this:
Step #4. Install WordPress Locally on Mac
Open your web browser and go to localhost:8888/mynewsite.
What you’ll see is the on-screen WordPress installation wizard. The first step is choosing your language:
The next screen is an info card to get you up to speed with what’s going to happen. Click Let’s go! once you’ve read it.
In the next step, you will enter the details of your WordPress connection to the database.
Here are my settings based on everything I’ve set in the previous steps:
Important parts:
Database Name — This is the name you set in PHPMyAdmin when creating the database in Step #2
Username — Set to root.
Password — Set to root.
Database Host — Set to localhost.
Table Prefix — Leave as is.
The next step is where you get to set the name of your site and the details of your main admin account:
Note: With the exception of username, you’ll be able to easily change these later in your WordPress dashboard.
Click on Install WordPress to finalize everything.
And that’s it. You’ve installed WordPress locally on a Mac
Back to Top
How to Install WordPress via FTP (Or, How to Install WordPress Manually)
Installing WordPress via FTP takes only minutes, but you do need to have a couple of things ready beforehand.
Chiefly, you need to have access to a web server — aka, a web hosting account.
Editor’s Note: Two WordPress hosting options we recommend to our Smart Blogger students are SiteGround (affiliate link) and WP Engine (affiliate link). Both are great options.
Start by going to your host of choice and purchasing one of the available web hosting plans. If you already have a web host, you’re ahead of the game!
Next:
Step #1. Download WordPress
Go to WordPress.org and download the latest version of WordPress.
Save the package to your computer and extract its contents.
Step #2. Upload WordPress Files to Your Server
The next step involves connecting to your web server via FTP and uploading your just-downloaded WordPress files.
You’re going to need to use a third-party FTP tool to do that.
FileZilla is a popular one. We’ll use it for the purposes of this demo.
Now, in order to connect to your server, you’ll need your connection details.
This information should have been provided via email when you first signed up for your hosting account. But if you can’t find it, no worries. You can find your FTP information inside your host’s cPanel.
Go to the FTP Accounts section (under FILES):
You’ll find your FTP accounts there. Or, alternatively, you can create your FTP account if one doesn’t already exist.
Next to your FTP account, there’s a link labeled Configure FTP Client.
Click on it:
This will reveal a new section.
In it, click on the FTP Configuration File button under FileZilla:
You can open that file with FileZilla and set up your connection details immediately.
With that done, the only thing left to do is upload your WordPress files to the server.
Depending on your hosting setup, you might need to upload WordPress to a specific directory.
However, for most users the directory will be called public_html or public_www.
If in doubt, verify with your web host.
Step #3. Create a New Database for WordPress in cPanel
WordPress, just like any other modern CMS, cannot work without a database.
The database is where all your posts, pages, comments, and other site content are kept.
To create a new database, go back to cPanel, scroll down to the DATABASES section, and click on MySQL Database Wizard:
From there, you’ll be guided through the steps to create a new database.
First, pick a name for your database:
Next, create a new user account that WordPress will use to access the database.
Note: Be sure to jot down the username and the password. You’ll need them in the next step.
Lastly, assign sufficient access rights to the new user account.
It’s best to do that by simply selecting ALL PRIVILEGES, like so:
Your database setup is now complete!
Step #4. Install WordPress Through the Online Installer
This is the last step on your journey to getting WordPress installed via FTP.
Simply fire up your browser and navigate to your site’s URL.
You’ll see the main page of the WordPress installer.
First, choose the language of your site:
The next step is a crucial one, and it’s where you’ll need to provide your database details.
(Hopefully you jotted those details down earlier!)
Here’s a breakdown for each:
Database Name — The name of your database (from the previous step).
Username — Your chosen username (from the previous step).
Password — Your chosen password (from the previous step).
Database Host — In most cases, set this to localhost. If your hosting setup requires a different value here, they can provide this info.
Table Prefix — You can safely ignore this field and leave as is.
The next step is where you get to set the name of your site and the details of your main admin account:
Note: With the exception of username, you’ll be able to easily change these later in your WordPress dashboard.
Click on Install WordPress to finalize everything.
And that’s it! You’ve successfully installed WordPress manually using FTP.
Back to Top
How to Install WordPress Multisite
WordPress Multisite is an interesting feature built into WordPress.
Simply speaking, with WordPress Multisite, you can launch multiple WordPress websites, all working on the same WordPress install.
This is great for businesses and organizations that need multiple websites, but want to keep the cost of managing them low.
WordPress Multisite is also a great choice for universities where it’s very common for individual courses or teachers to have their own sites.
Here’s how to set up and install WordPress Multisite:
Step #1. Install WordPress Locally, via cPanel, or via FTP
To begin your journey with WordPress Multisite, you first need to install WordPress using any of the methods described earlier in this guide.
Go here to install WordPress using Softaculous, MOJO, Fantastico, QuickInstall, or any other installer tool offered by your host’s cPanel.
Go here to install WordPress locally on Windows or here to install WordPress locally on a Mac.
Finally, go here to install WordPress using FTP.
Once you’ve installed WordPress, you’re ready for the next step.
Step #2. Enable WordPress Multisite
Connect to your server via FTP (explained previously in this guide), and download the wp-config.php file from your main WordPress directory.
Open the file in Notepad (or similar software) and add the following line at the bottom:
define (‘WP_ALLOW_MULTISITE’, true);
Save the file and re-upload it to your main WordPress directory via FTP. You’ll want to overwrite the original file.
Step #3. Set up Your WordPress Multisite Network
At this stage, WordPress is ready to let you configure your network of sites. Here’s how:
First, go to your plugins and deactivate all of them.
Next, go to Tools > Network Setup. This is where you create your network of WordPress sites.
Click on the Install button to begin.
On the next screen, WordPress will give you specific instructions for finalizing the setup.
This will involve editing two files in your WordPress directory (similarly to how we did it a minute ago with wp-config.php).
Example setup:
Step #4. Create your WordPress Multisite Sites
Once you log back into WordPress, you’ll see an updated version of the admin interface with one new section in the top left corner:
This menu is where you can switch between your WordPress sites (and where you can add new sites to the network).
Each website is independent, can feature different content, different user accounts, different themes, different plugins, and so on.
Congrats! You’ve successfully set up WordPress Multisite.
(Feel free to re-activate all your plugins!)
Back to Top
How to Install WordPress in Your Language
Did you know WordPress has been translated into 113 (and counting) languages?
It’s true. You can install WordPress in everything from Afrikaans (South Africa) to 香港中文版 (Simplified Chinese).
In short:
You can install WordPress in your language, no matter what that language might be.
Here’s how to do it:
#1. Download WordPress in Your Language
Go to WordPress.org.
Since WordPress is quite predictive and helpful with international users, based on your location, you’ll see a note encouraging you to download WordPress in your language.
Here’s an example:
What the above box says is:
“WordPress is also available in Polish.”
When you click on the language — in this example, “Polski” — you’ll get redirected to a new, localized WordPress website.
Once there, download the WordPress package and save the ZIP file to your desktop and extract its contents.
#2. Install WordPress via FTP
Next, follow the same instructions we discussed earlier in this guide.
Click here to jump to Upload WordPress Files to Your Server.
Bonus Tip: Installing Language Files from the Admin Dashboard
If you’ve already installed WordPress in one language, but you’d like to use a different language, don’t fret.
WordPress makes switching your language a breeze.
In your Dashboard, go to Settings > General > Site Language.
Then simply choose the language you’d like to use.
And that’s it! You’re done.
Back to Top
How to Install WordPress on 12 Popular Web Hosts
The following section covers how to install WordPress on 12 popular hosting providers. Click on a link below to jump to your host:
How to Install WordPress on SiteGround
How to Install WordPress on Bluehost
How to Install WordPress on GoDaddy
How to Install WordPress on WP Engine
How to Install WordPress on Flywheel
How to Install WordPress on Kinsta
How to Install WordPress on HostGator
How to Install WordPress on DreamHost
How to Install WordPress on A2Hosting
How to Install WordPress on InMotion Hosting
How to Install WordPress on iPage
How to Install WordPress on Hostinger
How to Install WordPress on SiteGround
SiteGround (affiliate link) offers a cool wizard tool to get your WordPress installed in minutes. There’s no need to deal with any coding, settings, or uploading things a server.
Here’s a video showing you the process:
But, if you prefer written instructions, here are the steps:
When you log into your SiteGround user panel for the first time, you’ll be greeted by a message asking if you’d like to have a new website set up for you:
Click on the option labeled “Start a new website” and select WordPress as your platform.
SiteGround will also create a new admin account for you. All you need to do is provide the login details:
That’s all there is to it.
How to Install WordPress on Bluehost
When you sign up for a Bluehost WordPress Hosting plan, the latest version of WordPress is installed automatically for you. All you have to do is configure it.
Here are the steps:
If you’d like to set up additional WordPress sites, it’s easy to do so via the Bluehost dashboard.
Go to My Sites, and then click on Create a Site.
Enter your site details and proceed through the individual screens.
First, you’ll need to pick a name for your WordPress installation:
You will then enter the domain name and directory, plus any optional plugins you might want:
Finally, set your admin user login and password.
How to Install WordPress on GoDaddy
GoDaddy uses cPanel for installing WordPress on their hosting plans.
Here’s their official video walking you through the entire (simple) process:
And if you need to add another WordPress site, that’s easy too.
Log into your GoDaddy user panel, go to Managed WordPress > Manage All. Click Add Site.
From this point on, GoDaddy will take you by the hand and do most of the work for you. All you’ll need to do is enter a name for your site and your desired login credentials for the admin user.
When the installation finishes, GoDaddy will show you a WordPress Setup Wizard to help you customize your site:
You can click No thanks or Continue.
How to Install WordPress on WP Engine
WP Engine (affiliate link) is one of the original “managed” WordPress hosting platforms. They handle all the technical heavy lifting for you, so you can focus on what’s important for your website’s success.
What this means in practice is WP Engine will install WordPress for you when you create an account. You don’t have to lift a finger.
You access the site from your user panel:
If you want to add additional sites to your WP Engine setup, it’s pretty easy. Here’s a video tutorial showing you how:
If you prefer written instructions, here’s WP Engine’s official guide for adding or deleting WordPress installs.
How to Install WordPress on Flywheel
Like WP Engine, Flywheel is a managed WordPress hosting platform. They take care of the technical aspects — including installing WordPress — for you. All you have to do is provide a few pieces of info.
Here’s a video walking you through the process:
If you would like to create additional sites, from your user profile click the Create a New Site button:
Next, provide all the necessary details such as site name, admin user login, password, and your preferred payment method.
Once you’ve completed the form, your site will become visible in your user profile.
That’s all there is to it.
Here’s Flywheel’s official guide for adding new sites if you need more information.
How to Install WordPress on Kinsta
Kinsta is a newcomer to the managed WordPress hosting market. Like WP Engine and Flywheel, Kinsta installs WordPress for you when you create your account.
If you’d like to add additional WordPress sites to your Kinsta plan, follow the steps in this video:
If you prefer written instructions, here’s Kinsta’s official guide for adding WordPress sites.
How to Install WordPress on HostGator
Like many shared WordPress hosts, HostGator gives you access to cPanel. With it, you can easily install WordPress using the steps in the video below:
Can’t play the video? No worries.
HostGator also offers an extensive how-to article for installing WordPress on their platform.
How to Install WordPress on DreamHost
For each of their WordPress hosting plans, DreamHost provides WordPress pre-installed. All the work is done for you.
If you’d like to add additional WordPress sites, here’s a video showing you how it’s done:
Prefer written instructions?
Here is Dreamhost’s how-to article for using their handy 1-Click WordPress Install.
How to Install WordPress on A2Hosting
A2Hosting offers both shared and managed WordPress hosting.
For shared hosting, they offer 1-Click WordPress installation using Softaculous. Here’s a video to walk you through the steps:
If you opt for one of their managed hosting plans, WordPress will come pre-installed with your A2Hosting account.
If you’d like to add more WordPress installs to your account, here’s the official A2Hosting video to show you how:
How to Install WordPress on InMotion Hosting
Like its managed-hosting competitors, InMotion Hosting provides pre-installed WordPress on your hosting account from the get-go. This means that you don’t need to install WordPress on your own.
If you’d like to install WordPress on an add-on domain, InMotion offers this handy tutorial video:
How to Install WordPress on iPage
Just like other “managed” WordPress hosting companies, iPage provides WordPress pre-installed with your account. (You also get a set of pre-installed WordPress themes and plugins.)
Here’s a helpful video showing you how to configure your iPage WordPress site:
If you need to install some additional WordPress sites on iPage, click here to read their guide.
How to Install WordPress on Hostinger
Hostinger offers a quick-and-easy auto installer for WordPress.
Here’s their official video showing you how it’s done:
If you prefer written directions, here’s Hostinger’s tutorial for installing WordPress (using various methods).
Back to Top
Frequently Asked Questions
Before we wrap things up, let’s go over a few common, related questions we often hear:
Do I Need to Install WordPress?
Answer: It depends.
If you use a “managed” web host like WP Engine, installing WordPress is taken care of for you. You don’t have to do anything (beyond filling in a few pieces of information).
However, if you’re using a “shared” hosting plan, you’ll need to install WordPress.
The good news is that most web hosts have made the process easy. A few clicks and you’re finished.
Editor’s Note: This is all assuming, of course, you want a WordPress site. WordPress is awesome, but it’s not the only game in town — there are many blogging platforms out there.
Does WordPress Cost Money?
No, the WordPress software is 100% free. Anyone can go to WordPress.org and download it for free at any time.
The typical costs for running a WordPress website come from other factors, such as purchasing a domain name and choosing a hosting provider.
Does WordPress Include Hosting? (Or, Does WordPress Host Your Site?)
If you’re using WordPress.com, the answer is yes.
WordPress.com is a free, hosted version of the WordPress software offered by the company. (You can upgrade to various paid plans if you need more features.)
However, if you’re using the self-hosted version of the software available for free at WordPress.org, the answer is no. You’ll need a hosting provider.
Which Hosting is Best for WordPress?
WordPress.org officially recommends Bluehost, DreamHost, and SiteGround.
At Smart Blogger, we recommend SiteGround (affiliate link) and WP Engine (affiliate link).
Since SiteGround is on both lists, it’s safe to say it’s a solid option.
How to Install WordPress Themes?
Your WordPress installation will come with several free themes (designs), but there are thousands of additional themes — both free and premium — you can add.
Here’s a quick guide for how to install WordPress themes from inside your WordPress dashboard.
How to Install WordPress Plugins?
Though you have to be careful not to go overboard with them, WordPress plugins are one of the software’s best features — they allow you to add all sorts of functionality to your WordPress site that’s not available out of the box.
SiteGround has published a helpful tutorial for how to install WordPress plugins if you would like step-by-step instructions.
How to Install Facebook Pixel on WordPress?
If you’re interested in running Facebook Ads (either now or in the future), you need to install a Facebook Pixel on your WordPress site.
What’s a Facebook Pixel? It’s a piece of tracking code you add to your website that collects data whenever someone visits your site or takes a specific action.
Here’s a video explaining it in more detail (including how to install it):
If you prefer written instructions, here is Facebook’s help article on Facebook Pixel, which includes steps for creating and installing them.
Back to Top
It’s Time to Install WordPress
Installing WordPress can be overwhelming — especially if you’ve never done it before.
Hopefully, this in-depth guide has been able to point you in the right direction. Use it, bookmark it, and feel free to share it with a friend.
And if there’s an installation method we missed, tweet us or let us know about it in the comments. We’ll happily add it.
About the Author: Karol K. (@carlosinho) is a WordPress figure-outer, blogger, and published author of WordPress Complete. His work has been featured all over the web on sites like: Ahrefs.com, Smashing Magazine, Adobe.com, CodeinWP.com, and others.
The post How to Install WordPress in 5 Minutes or Less (2019) appeared first on Smart Blogger.
from SEO and SM Tips https://smartblogger.com/how-to-install-wordpress/
0 notes
Text
How to Install WordPress in 5 Minutes or Less (2019)
Looking for a tutorial showing you how to install WordPress, but keep finding resources that tackle every method except the one you need?
We’ve got your back.
In this post, we break down every conceivable way there is to install WordPress.
You’ll learn how to install WordPress using cPanel, Softaculous, MOJO, Fantastico, and QuickInstall; locally on both Windows and Mac; manually using FTP; and we’ll break down popular hosting providers like GoDaddy, Bluehost, and HostGator.
You’ll also learn how to install WordPress Multisite, how to install WordPress in different languages, and more.
Just click the appropriate link in our Table of Contents to jump to the section you need.
Ready?
Let’s go.
Table of Contents
How to Install WordPress on cPanel (Softaculous, MOJO, Fantastico, and QuickInstall)
How to Install WordPress on Localhost (Or, How to Install WordPress Locally)
How to Install WordPress on Windows
How to Install WordPress on Mac
How to Install WordPress via FTP (Or, How to Install WordPress Manually)
How to Install WordPress Multisite
How to Install WordPress in Your Language
How to Install WordPress on 12 Popular Web Hosts
How to Install WordPress on SiteGround
How to Install WordPress on Bluehost
How to Install WordPress on GoDaddy
How to Install WordPress on WP Engine
How to Install WordPress on Flywheel
How to Install WordPress on Kinsta
How to Install WordPress on HostGator
How to Install WordPress on DreamHost
How to Install WordPress on A2Hosting
How to Install WordPress on InMotion Hosting
How to Install WordPress on iPage
How to Install WordPress on Hostinger
Frequently Asked Questions
Back to Top
How to Install WordPress on cPanel (Softaculous, MOJO, Fantastico, and QuickInstall)
So, you decided to start a blog.
Awesome. Now it’s time to roll up your sleeves and get to work installing WordPress.
Thankfully, many of the popular WordPress hosts offer some form of simplified (or even automatic) installation.
If you’re using a “shared” WordPress hosting plan, there’s a good chance your host will use cPanel.
Editor’s Note: cPanel is an online control panel many web hosts use to simplify the whole “how to host a website” thing for users. Go here to learn more about it.
Let’s walk through the cPanel process…
Step #1. Find Out How to Access Your Host’s cPanel
Unfortunately, the way you get to cPanel is not standardized across the web. Different hosts access it differently.
So, before you can do anything, you need to find out how to access your host’s cPanel.
The easiest method is to find the emails your hosting provider sent you when you signed up for your account. Among other valuable bits of information, the URL to your cPanel will be in one of those initial emails.
But if you can’t find the right email, don’t worry.
Just Google the name of your web host and “cPanel login”.
That should do the trick.
Step #2. Get to Know cPanel
The main cPanel dashboard can be a little intimidating.
Relax.
You don’t have to understand all cPanel has to offer. We’re here to do one thing — learn how to install WordPress.
For that, let’s look for the cPanel installer tools, which are usually located near the bottom of the page.
Your host might be using any of the following installers: Softaculous, Fantastico, QuickInstall, or MOJO Marketplace.
We’re going to focus on Softaculous since it’s the most popular.
But don’t worry if your host uses a different installer.
While the specific interfaces might be a bit different, the idea behind every installer is the same.
Plus, they all ask you for the same set of data and inputs.
Step #3. How to Install WordPress Using Softaculous
To begin, look for the Softaculous section in cPanel.
Click on the WordPress logo. The installer tool will open:
Click on the Install Now button to begin the installation process.
Softaculous needs only a handful of details from you. Here are the fields you should pay special attention to:
“Choose the version you want to install” — Always go for the most-recent version available.
“Choose Protocol” — “https://” is the option preferred by Google.
“Choose Domain” — Leave unchanged if you have just one domain assigned to your server; if you have more than one domain, select the desired one for this installation.
“In Directory” — Leave empty if you want to install WordPress in the main directory of your domain name (which most people do).
“Select Plugin(s)” — Optional (but as a general rule: the fewer plugins, the better).
Here’s what the form looks like:
Click Install to proceed.
When the process finishes, Softaculous will show you a final confirmation screen along with links to your WordPress dashboard.
And that’s it!
You’ve installed WordPress using cPanel.
Note: The WordPress dashboard of your newly-installed site should be available at yoursite.com/wp-admin/.
Back to Top
How to Install WordPress on Localhost (Or, How to Install WordPress Locally)
The instructions for how to install WordPress locally depends on whether you’re using a PC (Windows) or a Mac.
We’ll go over both methods.
First up: Windows.
(If you’re on a Mac, click here to jump ahead.)
How to Install WordPress on Windows
WordPress is a great tool for local web development.
Here’s how you install WordPress locally on Windows:
Step #1. Get XAMPP
XAMPP is a local web server for your computer. It’s an all-in-one package with everything you will need to run software (such as WordPress) locally.
What About WAMP?
You might have heard of a similar tool called WAMP.
Under the hood, WAMP and XAMPP do the same thing. However, in my opinion, WAMP isn’t as reliable as XAMPP.
For this reason and others, we’ll focus on XAMPP in this tutorial.
From the XAMPP website, click on the download button for Windows and save the XAMPP package to your desktop.
Launch the XAMPP installer and follow the prompts on the screen.
First, select the individual components you want to have installed. To be safe, you can choose all of them:
Next, select the installation folder for XAMPP.
Note: Avoid installing XAMPP in Program Files. The read/write restrictions of Windows might prevent it from working correctly. Installing in C:\xampp is a safer bet.
XAMPP will take a minute or two to install.
When it’s finished, you’ll see this confirmation screen:
When you click on Finish, you’ll see the main XAMPP config panel.
In it, click on the two Start buttons next to Apache and MySQL.
Like so:
You should see the two labels change to green:
When you see green, your local server is working!
Step #2. Create a Blank Database for WordPress
From the control panel of XAMPP, click on the Admin button in the MySQL row:
This will launch a tool called PHPMyAdmin, which is an open-source database management tool.
Go into Databases (from the top menu).
Enter a name for your new WordPress database (something simple) and click the Create button:
You should see your new blank database in the sidebar:
You can now exit PHPMyAdmin.
Step #3. Download WordPress
Go to WordPress.org and download the most recent version of the software.
Don’t worry. It’s free:
Next:
Save the file to your desktop or downloads folder. Extract it.
Go to the folder where you installed XAMPP (C:\xampp) and find the htdocs subfolder.
Create a new subfolder inside htdocs. This is where your site is going to live. For the purpose of this demo, I’ll name the folder mynewsite.
Note: The name of this folder will also become part of the local address of the site. With mynewsite being the folder name, the address of the site is going to be localhost/mynewsite.
Take the contents of the WordPress archive and move them to this new subfolder (“mynewsite” or whatever you named yours).
It should look like this:
Step #4. Install WordPress Locally on Windows
Open your web browser and navigate to localhost/mynewsite.
What you’ll see is the on-screen WordPress Installation Wizard.
The first step is choosing your language:
The next screen is an info card to get you up to speed with what’s going to happen. Click on Let’s go! once you’ve read it.
The next step is a crucial one in the installation.
This is where you get to enter the details of your WordPress connection to the database.
Here are my settings based on everything I’ve set in the previous steps so far:
Important parts:
Database Name — This is the name you set in PHPMyAdmin when creating the database in Step #2.
Username — Set to root.
Password — Leave blank.
Database Host — Set to localhost.
Table Prefix — Leave as is.
The next step is where you get to set the name of your site and the details of your main admin account:
Note: With the exception of username, you’ll be able to easily change these later in your WordPress dashboard.
Click on Install WordPress to finalize everything.
And that’s it. You’ve installed WordPress locally on Windows.
How to Install WordPress on Mac
While installing WordPress locally on Mac isn’t the usual “get app from App Store” experience we’re used to, it can still be done with relative ease.
Here’s how to install WordPress on Mac:
Step #1. Get MAMP
MAMP is a local web server that works quite well on Mac.
(It’s also easier to install than some of its alternatives.).
From the MAMP website, go to the downloads section and choose the option for macOS:
Save the package to your computer.
Launch the MAMP installer and proceed through the on-screen wizard.
When the installation finishes, open MAMP from Mac’s Launchpad.
In the config panel, click on the main Start Servers button.
Congrats! Your local server is working.
Step #2. Create a Blank Database for WordPress
As soon as you start your server in MAMP, you will be taken to the server’s homepage.
Usually, it’s “http://localhost:8888/MAMP/” (without the quotes).
From there, click on PHPMYADMIN under TOOLS:
As mentioned earlier in the post, PHPMyAdmin is a handy, open-source database management tool.
We use it to create a new database for WordPress.
Go into Databases (from the top menu):
Enter a name for your new WordPress database (something simple) and click on Create.
Like so:
You should see your new blank database in the sidebar.
You can now exit PHPMyAdmin.
Step #3. Download WordPress
Go to WordPress.org and download the most recent version of the software.
Next:
Save the archive to your Mac and extract it.
Go to the default web folder of your server. That’s usually in Applications/MAMP/htdocs. You can check the location of your default web folder by going into MAMP settings and choosing the Web Server tab:
Create a new subfolder. This is where your site is going to live. For the purpose of this demo, I’ll name my subfolder mynewsite.
Note: The name of this folder will also be part of the local address of the site. With mynewsite being the folder name, the address of the site is going to be localhost:8888/mynewsite.
Take the contents of the WordPress archive and move them to the new folder you created. It should look like this:
Step #4. Install WordPress Locally on Mac
Open your web browser and go to localhost:8888/mynewsite.
What you’ll see is the on-screen WordPress installation wizard. The first step is choosing your language:
The next screen is an info card to get you up to speed with what’s going to happen. Click Let’s go! once you’ve read it.
In the next step, you will enter the details of your WordPress connection to the database.
Here are my settings based on everything I’ve set in the previous steps:
Important parts:
Database Name — This is the name you set in PHPMyAdmin when creating the database in Step #2
Username — Set to root.
Password — Set to root.
Database Host — Set to localhost.
Table Prefix — Leave as is.
The next step is where you get to set the name of your site and the details of your main admin account:
Note: With the exception of username, you’ll be able to easily change these later in your WordPress dashboard.
Click on Install WordPress to finalize everything.
And that’s it. You’ve installed WordPress locally on a Mac
Back to Top
How to Install WordPress via FTP (Or, How to Install WordPress Manually)
Installing WordPress via FTP takes only minutes, but you do need to have a couple of things ready beforehand.
Chiefly, you need to have access to a web server — aka, a web hosting account.
Editor’s Note: Two WordPress hosting options we recommend to our Smart Blogger students are SiteGround (affiliate link) and WP Engine (affiliate link). Both are great options.
Start by going to your host of choice and purchasing one of the available web hosting plans. If you already have a web host, you’re ahead of the game!
Next:
Step #1. Download WordPress
Go to WordPress.org and download the latest version of WordPress.
Save the package to your computer and extract its contents.
Step #2. Upload WordPress Files to Your Server
The next step involves connecting to your web server via FTP and uploading your just-downloaded WordPress files.
You’re going to need to use a third-party FTP tool to do that.
FileZilla is a popular one. We’ll use it for the purposes of this demo.
Now, in order to connect to your server, you’ll need your connection details.
This information should have been provided via email when you first signed up for your hosting account. But if you can’t find it, no worries. You can find your FTP information inside your host’s cPanel.
Go to the FTP Accounts section (under FILES):
You’ll find your FTP accounts there. Or, alternatively, you can create your FTP account if one doesn’t already exist.
Next to your FTP account, there’s a link labeled Configure FTP Client.
Click on it:
This will reveal a new section.
In it, click on the FTP Configuration File button under FileZilla:
You can open that file with FileZilla and set up your connection details immediately.
With that done, the only thing left to do is upload your WordPress files to the server.
Depending on your hosting setup, you might need to upload WordPress to a specific directory.
However, for most users the directory will be called public_html or public_www.
If in doubt, verify with your web host.
Step #3. Create a New Database for WordPress in cPanel
WordPress, just like any other modern CMS, cannot work without a database.
The database is where all your posts, pages, comments, and other site content are kept.
To create a new database, go back to cPanel, scroll down to the DATABASES section, and click on MySQL Database Wizard:
From there, you’ll be guided through the steps to create a new database.
First, pick a name for your database:
Next, create a new user account that WordPress will use to access the database.
Note: Be sure to jot down the username and the password. You’ll need them in the next step.
Lastly, assign sufficient access rights to the new user account.
It’s best to do that by simply selecting ALL PRIVILEGES, like so:
Your database setup is now complete!
Step #4. Install WordPress Through the Online Installer
This is the last step on your journey to getting WordPress installed via FTP.
Simply fire up your browser and navigate to your site’s URL.
You’ll see the main page of the WordPress installer.
First, choose the language of your site:
The next step is a crucial one, and it’s where you’ll need to provide your database details.
(Hopefully you jotted those details down earlier!)
Here’s a breakdown for each:
Database Name — The name of your database (from the previous step).
Username — Your chosen username (from the previous step).
Password — Your chosen password (from the previous step).
Database Host — In most cases, set this to localhost. If your hosting setup requires a different value here, they can provide this info.
Table Prefix — You can safely ignore this field and leave as is.
The next step is where you get to set the name of your site and the details of your main admin account:
Note: With the exception of username, you’ll be able to easily change these later in your WordPress dashboard.
Click on Install WordPress to finalize everything.
And that’s it! You’ve successfully installed WordPress manually using FTP.
Back to Top
How to Install WordPress Multisite
WordPress Multisite is an interesting feature built into WordPress.
Simply speaking, with WordPress Multisite, you can launch multiple WordPress websites, all working on the same WordPress install.
This is great for businesses and organizations that need multiple websites, but want to keep the cost of managing them low.
WordPress Multisite is also a great choice for universities where it’s very common for individual courses or teachers to have their own sites.
Here’s how to set up and install WordPress Multisite:
Step #1. Install WordPress Locally, via cPanel, or via FTP
To begin your journey with WordPress Multisite, you first need to install WordPress using any of the methods described earlier in this guide.
Go here to install WordPress using Softaculous, MOJO, Fantastico, QuickInstall, or any other installer tool offered by your host’s cPanel.
Go here to install WordPress locally on Windows or here to install WordPress locally on a Mac.
Finally, go here to install WordPress using FTP.
Once you’ve installed WordPress, you’re ready for the next step.
Step #2. Enable WordPress Multisite
Connect to your server via FTP (explained previously in this guide), and download the wp-config.php file from your main WordPress directory.
Open the file in Notepad (or similar software) and add the following line at the bottom:
define (‘WP_ALLOW_MULTISITE’, true);
Save the file and re-upload it to your main WordPress directory via FTP. You’ll want to overwrite the original file.
Step #3. Set up Your WordPress Multisite Network
At this stage, WordPress is ready to let you configure your network of sites. Here’s how:
First, go to your plugins and deactivate all of them.
Next, go to Tools > Network Setup. This is where you create your network of WordPress sites.
Click on the Install button to begin.
On the next screen, WordPress will give you specific instructions for finalizing the setup.
This will involve editing two files in your WordPress directory (similarly to how we did it a minute ago with wp-config.php).
Example setup:
Step #4. Create your WordPress Multisite Sites
Once you log back into WordPress, you’ll see an updated version of the admin interface with one new section in the top left corner:
This menu is where you can switch between your WordPress sites (and where you can add new sites to the network).
Each website is independent, can feature different content, different user accounts, different themes, different plugins, and so on.
Congrats! You’ve successfully set up WordPress Multisite.
(Feel free to re-activate all your plugins!)
Back to Top
How to Install WordPress in Your Language
Did you know WordPress has been translated into 113 (and counting) languages?
It’s true. You can install WordPress in everything from Afrikaans (South Africa) to 香港中文版 (Simplified Chinese).
In short:
You can install WordPress in your language, no matter what that language might be.
Here’s how to do it:
#1. Download WordPress in Your Language
Go to WordPress.org.
Since WordPress is quite predictive and helpful with international users, based on your location, you’ll see a note encouraging you to download WordPress in your language.
Here’s an example:
What the above box says is:
“WordPress is also available in Polish.”
When you click on the language — in this example, “Polski” — you’ll get redirected to a new, localized WordPress website.
Once there, download the WordPress package and save the ZIP file to your desktop and extract its contents.
#2. Install WordPress via FTP
Next, follow the same instructions we discussed earlier in this guide.
Click here to jump to Upload WordPress Files to Your Server.
Bonus Tip: Installing Language Files from the Admin Dashboard
If you’ve already installed WordPress in one language, but you’d like to use a different language, don’t fret.
WordPress makes switching your language a breeze.
In your Dashboard, go to Settings > General > Site Language.
Then simply choose the language you’d like to use.
And that’s it! You’re done.
Back to Top
How to Install WordPress on 12 Popular Web Hosts
The following section covers how to install WordPress on 12 popular hosting providers. Click on a link below to jump to your host:
How to Install WordPress on SiteGround
How to Install WordPress on Bluehost
How to Install WordPress on GoDaddy
How to Install WordPress on WP Engine
How to Install WordPress on Flywheel
How to Install WordPress on Kinsta
How to Install WordPress on HostGator
How to Install WordPress on DreamHost
How to Install WordPress on A2Hosting
How to Install WordPress on InMotion Hosting
How to Install WordPress on iPage
How to Install WordPress on Hostinger
How to Install WordPress on SiteGround
SiteGround (affiliate link) offers a cool wizard tool to get your WordPress installed in minutes. There’s no need to deal with any coding, settings, or uploading things a server.
Here’s a video showing you the process:
But, if you prefer written instructions, here are the steps:
When you log into your SiteGround user panel for the first time, you’ll be greeted by a message asking if you’d like to have a new website set up for you:
Click on the option labeled “Start a new website” and select WordPress as your platform.
SiteGround will also create a new admin account for you. All you need to do is provide the login details:
That’s all there is to it.
How to Install WordPress on Bluehost
When you sign up for a Bluehost WordPress Hosting plan, the latest version of WordPress is installed automatically for you. All you have to do is configure it.
Here are the steps:
If you’d like to set up additional WordPress sites, it’s easy to do so via the Bluehost dashboard.
Go to My Sites, and then click on Create a Site.
Enter your site details and proceed through the individual screens.
First, you’ll need to pick a name for your WordPress installation:
You will then enter the domain name and directory, plus any optional plugins you might want:
Finally, set your admin user login and password.
How to Install WordPress on GoDaddy
GoDaddy uses cPanel for installing WordPress on their hosting plans.
Here’s their official video walking you through the entire (simple) process:
And if you need to add another WordPress site, that’s easy too.
Log into your GoDaddy user panel, go to Managed WordPress > Manage All. Click Add Site.
From this point on, GoDaddy will take you by the hand and do most of the work for you. All you’ll need to do is enter a name for your site and your desired login credentials for the admin user.
When the installation finishes, GoDaddy will show you a WordPress Setup Wizard to help you customize your site:
You can click No thanks or Continue.
How to Install WordPress on WP Engine
WP Engine (affiliate link) is one of the original “managed” WordPress hosting platforms. They handle all the technical heavy lifting for you, so you can focus on what’s important for your website’s success.
What this means in practice is WP Engine will install WordPress for you when you create an account. You don’t have to lift a finger.
You access the site from your user panel:
If you want to add additional sites to your WP Engine setup, it’s pretty easy. Here’s a video tutorial showing you how:
If you prefer written instructions, here’s WP Engine’s official guide for adding or deleting WordPress installs.
How to Install WordPress on Flywheel
Like WP Engine, Flywheel is a managed WordPress hosting platform. They take care of the technical aspects — including installing WordPress — for you. All you have to do is provide a few pieces of info.
Here’s a video walking you through the process:
If you would like to create additional sites, from your user profile click the Create a New Site button:
Next, provide all the necessary details such as site name, admin user login, password, and your preferred payment method.
Once you’ve completed the form, your site will become visible in your user profile.
That’s all there is to it.
Here’s Flywheel’s official guide for adding new sites if you need more information.
How to Install WordPress on Kinsta
Kinsta is a newcomer to the managed WordPress hosting market. Like WP Engine and Flywheel, Kinsta installs WordPress for you when you create your account.
If you’d like to add additional WordPress sites to your Kinsta plan, follow the steps in this video:
If you prefer written instructions, here’s Kinsta’s official guide for adding WordPress sites.
How to Install WordPress on HostGator
Like many shared WordPress hosts, HostGator gives you access to cPanel. With it, you can easily install WordPress using the steps in the video below:
Can’t play the video? No worries.
HostGator also offers an extensive how-to article for installing WordPress on their platform.
How to Install WordPress on DreamHost
For each of their WordPress hosting plans, DreamHost provides WordPress pre-installed. All the work is done for you.
If you’d like to add additional WordPress sites, here’s a video showing you how it’s done:
Prefer written instructions?
Here is Dreamhost’s how-to article for using their handy 1-Click WordPress Install.
How to Install WordPress on A2Hosting
A2Hosting offers both shared and managed WordPress hosting.
For shared hosting, they offer 1-Click WordPress installation using Softaculous. Here’s a video to walk you through the steps:
If you opt for one of their managed hosting plans, WordPress will come pre-installed with your A2Hosting account.
If you’d like to add more WordPress installs to your account, here’s the official A2Hosting video to show you how:
How to Install WordPress on InMotion Hosting
Like its managed-hosting competitors, InMotion Hosting provides pre-installed WordPress on your hosting account from the get-go. This means that you don’t need to install WordPress on your own.
If you’d like to install WordPress on an add-on domain, InMotion offers this handy tutorial video:
How to Install WordPress on iPage
Just like other “managed” WordPress hosting companies, iPage provides WordPress pre-installed with your account. (You also get a set of pre-installed WordPress themes and plugins.)
Here’s a helpful video showing you how to configure your iPage WordPress site:
If you need to install some additional WordPress sites on iPage, click here to read their guide.
How to Install WordPress on Hostinger
Hostinger offers a quick-and-easy auto installer for WordPress.
Here’s their official video showing you how it’s done:
If you prefer written directions, here’s Hostinger’s tutorial for installing WordPress (using various methods).
Back to Top
Frequently Asked Questions
Before we wrap things up, let’s go over a few common, related questions we often hear:
Do I Need to Install WordPress?
Answer: It depends.
If you use a “managed” web host like WP Engine, installing WordPress is taken care of for you. You don’t have to do anything (beyond filling in a few pieces of information).
However, if you’re using a “shared” hosting plan, you’ll need to install WordPress.
The good news is that most web hosts have made the process easy. A few clicks and you’re finished.
Editor’s Note: This is all assuming, of course, you want a WordPress site. WordPress is awesome, but it’s not the only game in town — there are many blogging platforms out there.
Does WordPress Cost Money?
No, the WordPress software is 100% free. Anyone can go to WordPress.org and download it for free at any time.
The typical costs for running a WordPress website come from other factors, such as purchasing a domain name and choosing a hosting provider.
Does WordPress Include Hosting? (Or, Does WordPress Host Your Site?)
If you’re using WordPress.com, the answer is yes.
WordPress.com is a free, hosted version of the WordPress software offered by the company. (You can upgrade to various paid plans if you need more features.)
However, if you’re using the self-hosted version of the software available for free at WordPress.org, the answer is no. You’ll need a hosting provider.
Which Hosting is Best for WordPress?
WordPress.org officially recommends Bluehost, DreamHost, and SiteGround.
At Smart Blogger, we recommend SiteGround (affiliate link) and WP Engine (affiliate link).
Since SiteGround is on both lists, it’s safe to say it’s a solid option.
How to Install WordPress Themes?
Your WordPress installation will come with several free themes (designs), but there are thousands of additional themes — both free and premium — you can add.
Here’s a quick guide for how to install WordPress themes from inside your WordPress dashboard.
How to Install WordPress Plugins?
Though you have to be careful not to go overboard with them, WordPress plugins are one of the software’s best features — they allow you to add all sorts of functionality to your WordPress site that’s not available out of the box.
SiteGround has published a helpful tutorial for how to install WordPress plugins if you would like step-by-step instructions.
How to Install Facebook Pixel on WordPress?
If you’re interested in running Facebook Ads (either now or in the future), you need to install a Facebook Pixel on your WordPress site.
What’s a Facebook Pixel? It’s a piece of tracking code you add to your website that collects data whenever someone visits your site or takes a specific action.
Here’s a video explaining it in more detail (including how to install it):
If you prefer written instructions, here is Facebook’s help article on Facebook Pixel, which includes steps for creating and installing them.
Back to Top
It’s Time to Install WordPress
Installing WordPress can be overwhelming — especially if you’ve never done it before.
Hopefully, this in-depth guide has been able to point you in the right direction. Use it, bookmark it, and feel free to share it with a friend.
And if there’s an installation method we missed, tweet us or let us know about it in the comments. We’ll happily add it.
About the Author: Karol K. (@carlosinho) is a WordPress figure-outer, blogger, and published author of WordPress Complete. His work has been featured all over the web on sites like: Ahrefs.com, Smashing Magazine, Adobe.com, CodeinWP.com, and others.
The post How to Install WordPress in 5 Minutes or Less (2019) appeared first on Smart Blogger.
from Lauren Cameron Updates https://smartblogger.com/how-to-install-wordpress/
0 notes
Text
How to Install WordPress in 5 Minutes or Less (2019)
Looking for a tutorial showing you how to install WordPress, but keep finding resources that tackle every method except the one you need?
We’ve got your back.
In this post, we break down every conceivable way there is to install WordPress.
You’ll learn how to install WordPress using cPanel, Softaculous, MOJO, Fantastico, and QuickInstall; locally on both Windows and Mac; manually using FTP; and we’ll break down popular hosting providers like GoDaddy, Bluehost, and HostGator.
You’ll also learn how to install WordPress Multisite, how to install WordPress in different languages, and more.
Just click the appropriate link in our Table of Contents to jump to the section you need.
Ready?
Let’s go.
Table of Contents
How to Install WordPress on cPanel (Softaculous, MOJO, Fantastico, and QuickInstall)
How to Install WordPress on Localhost (Or, How to Install WordPress Locally)
How to Install WordPress on Windows
How to Install WordPress on Mac
How to Install WordPress via FTP (Or, How to Install WordPress Manually)
How to Install WordPress Multisite
How to Install WordPress in Your Language
How to Install WordPress on 12 Popular Web Hosts
How to Install WordPress on SiteGround
How to Install WordPress on Bluehost
How to Install WordPress on GoDaddy
How to Install WordPress on WP Engine
How to Install WordPress on Flywheel
How to Install WordPress on Kinsta
How to Install WordPress on HostGator
How to Install WordPress on DreamHost
How to Install WordPress on A2Hosting
How to Install WordPress on InMotion Hosting
How to Install WordPress on iPage
How to Install WordPress on Hostinger
Frequently Asked Questions
Back to Top
How to Install WordPress on cPanel (Softaculous, MOJO, Fantastico, and QuickInstall)
So, you decided to start a blog.
Awesome. Now it’s time to roll up your sleeves and get to work installing WordPress.
Thankfully, many of the popular WordPress hosts offer some form of simplified (or even automatic) installation.
If you’re using a “shared” WordPress hosting plan, there’s a good chance your host will use cPanel.
Editor’s Note: cPanel is an online control panel many web hosts use to simplify the whole “how to host a website” thing for users. Go here to learn more about it.
Let’s walk through the cPanel process…
Step #1. Find Out How to Access Your Host’s cPanel
Unfortunately, the way you get to cPanel is not standardized across the web. Different hosts access it differently.
So, before you can do anything, you need to find out how to access your host’s cPanel.
The easiest method is to find the emails your hosting provider sent you when you signed up for your account. Among other valuable bits of information, the URL to your cPanel will be in one of those initial emails.
But if you can’t find the right email, don’t worry.
Just Google the name of your web host and “cPanel login”.
That should do the trick.
Step #2. Get to Know cPanel
The main cPanel dashboard can be a little intimidating.
Relax.
You don’t have to understand all cPanel has to offer. We’re here to do one thing — learn how to install WordPress.
For that, let’s look for the cPanel installer tools, which are usually located near the bottom of the page.
Your host might be using any of the following installers: Softaculous, Fantastico, QuickInstall, or MOJO Marketplace.
We’re going to focus on Softaculous since it’s the most popular.
But don’t worry if your host uses a different installer.
While the specific interfaces might be a bit different, the idea behind every installer is the same.
Plus, they all ask you for the same set of data and inputs.
Step #3. How to Install WordPress Using Softaculous
To begin, look for the Softaculous section in cPanel.
Click on the WordPress logo. The installer tool will open:
Click on the Install Now button to begin the installation process.
Softaculous needs only a handful of details from you. Here are the fields you should pay special attention to:
“Choose the version you want to install” — Always go for the most-recent version available.
“Choose Protocol” — “https://” is the option preferred by Google.
“Choose Domain” — Leave unchanged if you have just one domain assigned to your server; if you have more than one domain, select the desired one for this installation.
“In Directory” — Leave empty if you want to install WordPress in the main directory of your domain name (which most people do).
“Select Plugin(s)” — Optional (but as a general rule: the fewer plugins, the better).
Here’s what the form looks like:
Click Install to proceed.
When the process finishes, Softaculous will show you a final confirmation screen along with links to your WordPress dashboard.
And that’s it!
You’ve installed WordPress using cPanel.
Note: The WordPress dashboard of your newly-installed site should be available at yoursite.com/wp-admin/.
Back to Top
How to Install WordPress on Localhost (Or, How to Install WordPress Locally)
The instructions for how to install WordPress locally depends on whether you’re using a PC (Windows) or a Mac.
We’ll go over both methods.
First up: Windows.
(If you’re on a Mac, click here to jump ahead.)
How to Install WordPress on Windows
WordPress is a great tool for local web development.
Here’s how you install WordPress locally on Windows:
Step #1. Get XAMPP
XAMPP is a local web server for your computer. It’s an all-in-one package with everything you will need to run software (such as WordPress) locally.
What About WAMP?
You might have heard of a similar tool called WAMP.
Under the hood, WAMP and XAMPP do the same thing. However, in my opinion, WAMP isn’t as reliable as XAMPP.
For this reason and others, we’ll focus on XAMPP in this tutorial.
From the XAMPP website, click on the download button for Windows and save the XAMPP package to your desktop.
Launch the XAMPP installer and follow the prompts on the screen.
First, select the individual components you want to have installed. To be safe, you can choose all of them:
Next, select the installation folder for XAMPP.
Note: Avoid installing XAMPP in Program Files. The read/write restrictions of Windows might prevent it from working correctly. Installing in C:\xampp is a safer bet.
XAMPP will take a minute or two to install.
When it’s finished, you’ll see this confirmation screen:
When you click on Finish, you’ll see the main XAMPP config panel.
In it, click on the two Start buttons next to Apache and MySQL.
Like so:
You should see the two labels change to green:
When you see green, your local server is working!
Step #2. Create a Blank Database for WordPress
From the control panel of XAMPP, click on the Admin button in the MySQL row:
This will launch a tool called PHPMyAdmin, which is an open-source database management tool.
Go into Databases (from the top menu).
Enter a name for your new WordPress database (something simple) and click the Create button:
You should see your new blank database in the sidebar:
You can now exit PHPMyAdmin.
Step #3. Download WordPress
Go to WordPress.org and download the most recent version of the software.
Don’t worry. It’s free:
Next:
Save the file to your desktop or downloads folder. Extract it.
Go to the folder where you installed XAMPP (C:\xampp) and find the htdocs subfolder.
Create a new subfolder inside htdocs. This is where your site is going to live. For the purpose of this demo, I’ll name the folder mynewsite.
Note: The name of this folder will also become part of the local address of the site. With mynewsite being the folder name, the address of the site is going to be localhost/mynewsite.
Take the contents of the WordPress archive and move them to this new subfolder (“mynewsite” or whatever you named yours).
It should look like this:
Step #4. Install WordPress Locally on Windows
Open your web browser and navigate to localhost/mynewsite.
What you’ll see is the on-screen WordPress Installation Wizard.
The first step is choosing your language:
The next screen is an info card to get you up to speed with what’s going to happen. Click on Let’s go! once you’ve read it.
The next step is a crucial one in the installation.
This is where you get to enter the details of your WordPress connection to the database.
Here are my settings based on everything I’ve set in the previous steps so far:
Important parts:
Database Name — This is the name you set in PHPMyAdmin when creating the database in Step #2.
Username — Set to root.
Password — Leave blank.
Database Host — Set to localhost.
Table Prefix — Leave as is.
The next step is where you get to set the name of your site and the details of your main admin account:
Note: With the exception of username, you’ll be able to easily change these later in your WordPress dashboard.
Click on Install WordPress to finalize everything.
And that’s it. You’ve installed WordPress locally on Windows.
How to Install WordPress on Mac
While installing WordPress locally on Mac isn’t the usual “get app from App Store” experience we’re used to, it can still be done with relative ease.
Here’s how to install WordPress on Mac:
Step #1. Get MAMP
MAMP is a local web server that works quite well on Mac.
(It’s also easier to install than some of its alternatives.).
From the MAMP website, go to the downloads section and choose the option for macOS:
Save the package to your computer.
Launch the MAMP installer and proceed through the on-screen wizard.
When the installation finishes, open MAMP from Mac’s Launchpad.
In the config panel, click on the main Start Servers button.
Congrats! Your local server is working.
Step #2. Create a Blank Database for WordPress
As soon as you start your server in MAMP, you will be taken to the server’s homepage.
Usually, it’s “http://localhost:8888/MAMP/” (without the quotes).
From there, click on PHPMYADMIN under TOOLS:
As mentioned earlier in the post, PHPMyAdmin is a handy, open-source database management tool.
We use it to create a new database for WordPress.
Go into Databases (from the top menu):
Enter a name for your new WordPress database (something simple) and click on Create.
Like so:
You should see your new blank database in the sidebar.
You can now exit PHPMyAdmin.
Step #3. Download WordPress
Go to WordPress.org and download the most recent version of the software.
Next:
Save the archive to your Mac and extract it.
Go to the default web folder of your server. That’s usually in Applications/MAMP/htdocs. You can check the location of your default web folder by going into MAMP settings and choosing the Web Server tab:
Create a new subfolder. This is where your site is going to live. For the purpose of this demo, I’ll name my subfolder mynewsite.
Note: The name of this folder will also be part of the local address of the site. With mynewsite being the folder name, the address of the site is going to be localhost:8888/mynewsite.
Take the contents of the WordPress archive and move them to the new folder you created. It should look like this:
Step #4. Install WordPress Locally on Mac
Open your web browser and go to localhost:8888/mynewsite.
What you’ll see is the on-screen WordPress installation wizard. The first step is choosing your language:
The next screen is an info card to get you up to speed with what’s going to happen. Click Let’s go! once you’ve read it.
In the next step, you will enter the details of your WordPress connection to the database.
Here are my settings based on everything I’ve set in the previous steps:
Important parts:
Database Name — This is the name you set in PHPMyAdmin when creating the database in Step #2
Username — Set to root.
Password — Set to root.
Database Host — Set to localhost.
Table Prefix — Leave as is.
The next step is where you get to set the name of your site and the details of your main admin account:
Note: With the exception of username, you’ll be able to easily change these later in your WordPress dashboard.
Click on Install WordPress to finalize everything.
And that’s it. You’ve installed WordPress locally on a Mac
Back to Top
How to Install WordPress via FTP (Or, How to Install WordPress Manually)
Installing WordPress via FTP takes only minutes, but you do need to have a couple of things ready beforehand.
Chiefly, you need to have access to a web server — aka, a web hosting account.
Editor’s Note: Two WordPress hosting options we recommend to our Smart Blogger students are SiteGround (affiliate link) and WP Engine (affiliate link). Both are great options.
Start by going to your host of choice and purchasing one of the available web hosting plans. If you already have a web host, you’re ahead of the game!
Next:
Step #1. Download WordPress
Go to WordPress.org and download the latest version of WordPress.
Save the package to your computer and extract its contents.
Step #2. Upload WordPress Files to Your Server
The next step involves connecting to your web server via FTP and uploading your just-downloaded WordPress files.
You’re going to need to use a third-party FTP tool to do that.
FileZilla is a popular one. We’ll use it for the purposes of this demo.
Now, in order to connect to your server, you’ll need your connection details.
This information should have been provided via email when you first signed up for your hosting account. But if you can’t find it, no worries. You can find your FTP information inside your host’s cPanel.
Go to the FTP Accounts section (under FILES):
You’ll find your FTP accounts there. Or, alternatively, you can create your FTP account if one doesn’t already exist.
Next to your FTP account, there’s a link labeled Configure FTP Client.
Click on it:
This will reveal a new section.
In it, click on the FTP Configuration File button under FileZilla:
You can open that file with FileZilla and set up your connection details immediately.
With that done, the only thing left to do is upload your WordPress files to the server.
Depending on your hosting setup, you might need to upload WordPress to a specific directory.
However, for most users the directory will be called public_html or public_www.
If in doubt, verify with your web host.
Step #3. Create a New Database for WordPress in cPanel
WordPress, just like any other modern CMS, cannot work without a database.
The database is where all your posts, pages, comments, and other site content are kept.
To create a new database, go back to cPanel, scroll down to the DATABASES section, and click on MySQL Database Wizard:
From there, you’ll be guided through the steps to create a new database.
First, pick a name for your database:
Next, create a new user account that WordPress will use to access the database.
Note: Be sure to jot down the username and the password. You’ll need them in the next step.
Lastly, assign sufficient access rights to the new user account.
It’s best to do that by simply selecting ALL PRIVILEGES, like so:
Your database setup is now complete!
Step #4. Install WordPress Through the Online Installer
This is the last step on your journey to getting WordPress installed via FTP.
Simply fire up your browser and navigate to your site’s URL.
You’ll see the main page of the WordPress installer.
First, choose the language of your site:
The next step is a crucial one, and it’s where you’ll need to provide your database details.
(Hopefully you jotted those details down earlier!)
Here’s a breakdown for each:
Database Name — The name of your database (from the previous step).
Username — Your chosen username (from the previous step).
Password — Your chosen password (from the previous step).
Database Host — In most cases, set this to localhost. If your hosting setup requires a different value here, they can provide this info.
Table Prefix — You can safely ignore this field and leave as is.
The next step is where you get to set the name of your site and the details of your main admin account:
Note: With the exception of username, you’ll be able to easily change these later in your WordPress dashboard.
Click on Install WordPress to finalize everything.
And that’s it! You’ve successfully installed WordPress manually using FTP.
Back to Top
How to Install WordPress Multisite
WordPress Multisite is an interesting feature built into WordPress.
Simply speaking, with WordPress Multisite, you can launch multiple WordPress websites, all working on the same WordPress install.
This is great for businesses and organizations that need multiple websites, but want to keep the cost of managing them low.
WordPress Multisite is also a great choice for universities where it’s very common for individual courses or teachers to have their own sites.
Here’s how to set up and install WordPress Multisite:
Step #1. Install WordPress Locally, via cPanel, or via FTP
To begin your journey with WordPress Multisite, you first need to install WordPress using any of the methods described earlier in this guide.
Go here to install WordPress using Softaculous, MOJO, Fantastico, QuickInstall, or any other installer tool offered by your host’s cPanel.
Go here to install WordPress locally on Windows or here to install WordPress locally on a Mac.
Finally, go here to install WordPress using FTP.
Once you’ve installed WordPress, you’re ready for the next step.
Step #2. Enable WordPress Multisite
Connect to your server via FTP (explained previously in this guide), and download the wp-config.php file from your main WordPress directory.
Open the file in Notepad (or similar software) and add the following line at the bottom:
define (‘WP_ALLOW_MULTISITE’, true);
Save the file and re-upload it to your main WordPress directory via FTP. You’ll want to overwrite the original file.
Step #3. Set up Your WordPress Multisite Network
At this stage, WordPress is ready to let you configure your network of sites. Here’s how:
First, go to your plugins and deactivate all of them.
Next, go to Tools > Network Setup. This is where you create your network of WordPress sites.
Click on the Install button to begin.
On the next screen, WordPress will give you specific instructions for finalizing the setup.
This will involve editing two files in your WordPress directory (similarly to how we did it a minute ago with wp-config.php).
Example setup:
Step #4. Create your WordPress Multisite Sites
Once you log back into WordPress, you’ll see an updated version of the admin interface with one new section in the top left corner:
This menu is where you can switch between your WordPress sites (and where you can add new sites to the network).
Each website is independent, can feature different content, different user accounts, different themes, different plugins, and so on.
Congrats! You’ve successfully set up WordPress Multisite.
(Feel free to re-activate all your plugins!)
Back to Top
How to Install WordPress in Your Language
Did you know WordPress has been translated into 113 (and counting) languages?
It’s true. You can install WordPress in everything from Afrikaans (South Africa) to 香港中文版 (Simplified Chinese).
In short:
You can install WordPress in your language, no matter what that language might be.
Here’s how to do it:
#1. Download WordPress in Your Language
Go to WordPress.org.
Since WordPress is quite predictive and helpful with international users, based on your location, you’ll see a note encouraging you to download WordPress in your language.
Here’s an example:
What the above box says is:
“WordPress is also available in Polish.”
When you click on the language — in this example, “Polski” — you’ll get redirected to a new, localized WordPress website.
Once there, download the WordPress package and save the ZIP file to your desktop and extract its contents.
#2. Install WordPress via FTP
Next, follow the same instructions we discussed earlier in this guide.
Click here to jump to Upload WordPress Files to Your Server.
Bonus Tip: Installing Language Files from the Admin Dashboard
If you’ve already installed WordPress in one language, but you’d like to use a different language, don’t fret.
WordPress makes switching your language a breeze.
In your Dashboard, go to Settings > General > Site Language.
Then simply choose the language you’d like to use.
And that’s it! You’re done.
Back to Top
How to Install WordPress on 12 Popular Web Hosts
The following section covers how to install WordPress on 12 popular hosting providers. Click on a link below to jump to your host:
How to Install WordPress on SiteGround
How to Install WordPress on Bluehost
How to Install WordPress on GoDaddy
How to Install WordPress on WP Engine
How to Install WordPress on Flywheel
How to Install WordPress on Kinsta
How to Install WordPress on HostGator
How to Install WordPress on DreamHost
How to Install WordPress on A2Hosting
How to Install WordPress on InMotion Hosting
How to Install WordPress on iPage
How to Install WordPress on Hostinger
How to Install WordPress on SiteGround
SiteGround (affiliate link) offers a cool wizard tool to get your WordPress installed in minutes. There’s no need to deal with any coding, settings, or uploading things a server.
Here’s a video showing you the process:
But, if you prefer written instructions, here are the steps:
When you log into your SiteGround user panel for the first time, you’ll be greeted by a message asking if you’d like to have a new website set up for you:
Click on the option labeled “Start a new website” and select WordPress as your platform.
SiteGround will also create a new admin account for you. All you need to do is provide the login details:
That’s all there is to it.
How to Install WordPress on Bluehost
When you sign up for a Bluehost WordPress Hosting plan, the latest version of WordPress is installed automatically for you. All you have to do is configure it.
Here are the steps:
If you’d like to set up additional WordPress sites, it’s easy to do so via the Bluehost dashboard.
Go to My Sites, and then click on Create a Site.
Enter your site details and proceed through the individual screens.
First, you’ll need to pick a name for your WordPress installation:
You will then enter the domain name and directory, plus any optional plugins you might want:
Finally, set your admin user login and password.
How to Install WordPress on GoDaddy
GoDaddy uses cPanel for installing WordPress on their hosting plans.
Here’s their official video walking you through the entire (simple) process:
And if you need to add another WordPress site, that’s easy too.
Log into your GoDaddy user panel, go to Managed WordPress > Manage All. Click Add Site.
From this point on, GoDaddy will take you by the hand and do most of the work for you. All you’ll need to do is enter a name for your site and your desired login credentials for the admin user.
When the installation finishes, GoDaddy will show you a WordPress Setup Wizard to help you customize your site:
You can click No thanks or Continue.
How to Install WordPress on WP Engine
WP Engine (affiliate link) is one of the original “managed” WordPress hosting platforms. They handle all the technical heavy lifting for you, so you can focus on what’s important for your website’s success.
What this means in practice is WP Engine will install WordPress for you when you create an account. You don’t have to lift a finger.
You access the site from your user panel:
If you want to add additional sites to your WP Engine setup, it’s pretty easy. Here’s a video tutorial showing you how:
If you prefer written instructions, here’s WP Engine’s official guide for adding or deleting WordPress installs.
How to Install WordPress on Flywheel
Like WP Engine, Flywheel is a managed WordPress hosting platform. They take care of the technical aspects — including installing WordPress — for you. All you have to do is provide a few pieces of info.
Here’s a video walking you through the process:
If you would like to create additional sites, from your user profile click the Create a New Site button:
Next, provide all the necessary details such as site name, admin user login, password, and your preferred payment method.
Once you’ve completed the form, your site will become visible in your user profile.
That’s all there is to it.
Here’s Flywheel’s official guide for adding new sites if you need more information.
How to Install WordPress on Kinsta
Kinsta is a newcomer to the managed WordPress hosting market. Like WP Engine and Flywheel, Kinsta installs WordPress for you when you create your account.
If you’d like to add additional WordPress sites to your Kinsta plan, follow the steps in this video:
If you prefer written instructions, here’s Kinsta’s official guide for adding WordPress sites.
How to Install WordPress on HostGator
Like many shared WordPress hosts, HostGator gives you access to cPanel. With it, you can easily install WordPress using the steps in the video below:
Can’t play the video? No worries.
HostGator also offers an extensive how-to article for installing WordPress on their platform.
How to Install WordPress on DreamHost
For each of their WordPress hosting plans, DreamHost provides WordPress pre-installed. All the work is done for you.
If you’d like to add additional WordPress sites, here’s a video showing you how it’s done:
Prefer written instructions?
Here is Dreamhost’s how-to article for using their handy 1-Click WordPress Install.
How to Install WordPress on A2Hosting
A2Hosting offers both shared and managed WordPress hosting.
For shared hosting, they offer 1-Click WordPress installation using Softaculous. Here’s a video to walk you through the steps:
If you opt for one of their managed hosting plans, WordPress will come pre-installed with your A2Hosting account.
If you’d like to add more WordPress installs to your account, here’s the official A2Hosting video to show you how:
How to Install WordPress on InMotion Hosting
Like its managed-hosting competitors, InMotion Hosting provides pre-installed WordPress on your hosting account from the get-go. This means that you don’t need to install WordPress on your own.
If you’d like to install WordPress on an add-on domain, InMotion offers this handy tutorial video:
How to Install WordPress on iPage
Just like other “managed” WordPress hosting companies, iPage provides WordPress pre-installed with your account. (You also get a set of pre-installed WordPress themes and plugins.)
Here’s a helpful video showing you how to configure your iPage WordPress site:
If you need to install some additional WordPress sites on iPage, click here to read their guide.
How to Install WordPress on Hostinger
Hostinger offers a quick-and-easy auto installer for WordPress.
Here’s their official video showing you how it’s done:
If you prefer written directions, here’s Hostinger’s tutorial for installing WordPress (using various methods).
Back to Top
Frequently Asked Questions
Before we wrap things up, let’s go over a few common, related questions we often hear:
Do I Need to Install WordPress?
Answer: It depends.
If you use a “managed” web host like WP Engine, installing WordPress is taken care of for you. You don’t have to do anything (beyond filling in a few pieces of information).
However, if you’re using a “shared” hosting plan, you’ll need to install WordPress.
The good news is that most web hosts have made the process easy. A few clicks and you’re finished.
Editor’s Note: This is all assuming, of course, you want a WordPress site. WordPress is awesome, but it’s not the only game in town — there are many blogging platforms out there.
Does WordPress Cost Money?
No, the WordPress software is 100% free. Anyone can go to WordPress.org and download it for free at any time.
The typical costs for running a WordPress website come from other factors, such as purchasing a domain name and choosing a hosting provider.
Does WordPress Include Hosting? (Or, Does WordPress Host Your Site?)
If you’re using WordPress.com, the answer is yes.
WordPress.com is a free, hosted version of the WordPress software offered by the company. (You can upgrade to various paid plans if you need more features.)
However, if you’re using the self-hosted version of the software available for free at WordPress.org, the answer is no. You’ll need a hosting provider.
Which Hosting is Best for WordPress?
WordPress.org officially recommends Bluehost, DreamHost, and SiteGround.
At Smart Blogger, we recommend SiteGround (affiliate link) and WP Engine (affiliate link).
Since SiteGround is on both lists, it’s safe to say it’s a solid option.
How to Install WordPress Themes?
Your WordPress installation will come with several free themes (designs), but there are thousands of additional themes — both free and premium — you can add.
Here’s a quick guide for how to install WordPress themes from inside your WordPress dashboard.
How to Install WordPress Plugins?
Though you have to be careful not to go overboard with them, WordPress plugins are one of the software’s best features — they allow you to add all sorts of functionality to your WordPress site that’s not available out of the box.
SiteGround has published a helpful tutorial for how to install WordPress plugins if you would like step-by-step instructions.
How to Install Facebook Pixel on WordPress?
If you’re interested in running Facebook Ads (either now or in the future), you need to install a Facebook Pixel on your WordPress site.
What’s a Facebook Pixel? It’s a piece of tracking code you add to your website that collects data whenever someone visits your site or takes a specific action.
Here’s a video explaining it in more detail (including how to install it):
If you prefer written instructions, here is Facebook’s help article on Facebook Pixel, which includes steps for creating and installing them.
Back to Top
It’s Time to Install WordPress
Installing WordPress can be overwhelming — especially if you’ve never done it before.
Hopefully, this in-depth guide has been able to point you in the right direction. Use it, bookmark it, and feel free to share it with a friend.
And if there’s an installation method we missed, tweet us or let us know about it in the comments. We’ll happily add it.
About the Author: Karol K. (@carlosinho) is a WordPress figure-outer, blogger, and published author of WordPress Complete. His work has been featured all over the web on sites like: Ahrefs.com, Smashing Magazine, Adobe.com, CodeinWP.com, and others.
The post How to Install WordPress in 5 Minutes or Less (2019) appeared first on Smart Blogger.
from SEO and SM Tips https://smartblogger.com/how-to-install-wordpress/
0 notes
Text
How to Install WordPress in 5 Minutes or Less (2019)
Looking for a tutorial showing you how to install WordPress, but keep finding resources that tackle every method except the one you need?
We’ve got your back.
In this post, we break down every conceivable way there is to install WordPress.
You’ll learn how to install WordPress using cPanel, Softaculous, MOJO, Fantastico, and QuickInstall; locally on both Windows and Mac; manually using FTP; and we’ll break down popular hosting providers like GoDaddy, Bluehost, and HostGator.
You’ll also learn how to install WordPress Multisite, how to install WordPress in different languages, and more.
Just click the appropriate link in our Table of Contents to jump to the section you need.
Ready?
Let’s go.
Table of Contents
How to Install WordPress on cPanel (Softaculous, MOJO, Fantastico, and QuickInstall)
How to Install WordPress on Localhost (Or, How to Install WordPress Locally)
How to Install WordPress on Windows
How to Install WordPress on Mac
How to Install WordPress via FTP (Or, How to Install WordPress Manually)
How to Install WordPress Multisite
How to Install WordPress in Your Language
How to Install WordPress on 12 Popular Web Hosts
How to Install WordPress on SiteGround
How to Install WordPress on Bluehost
How to Install WordPress on GoDaddy
How to Install WordPress on WP Engine
How to Install WordPress on Flywheel
How to Install WordPress on Kinsta
How to Install WordPress on HostGator
How to Install WordPress on DreamHost
How to Install WordPress on A2Hosting
How to Install WordPress on InMotion Hosting
How to Install WordPress on iPage
How to Install WordPress on Hostinger
Frequently Asked Questions
Back to Top
How to Install WordPress on cPanel (Softaculous, MOJO, Fantastico, and QuickInstall)
So, you decided to start a blog.
Awesome. Now it’s time to roll up your sleeves and get to work installing WordPress.
Thankfully, many of the popular WordPress hosts offer some form of simplified (or even automatic) installation.
If you’re using a “shared” WordPress hosting plan, there’s a good chance your host will use cPanel.
Editor’s Note: cPanel is an online control panel many web hosts use to simplify the whole “how to host a website” thing for users. Go here to learn more about it.
Let’s walk through the cPanel process…
Step #1. Find Out How to Access Your Host’s cPanel
Unfortunately, the way you get to cPanel is not standardized across the web. Different hosts access it differently.
So, before you can do anything, you need to find out how to access your host’s cPanel.
The easiest method is to find the emails your hosting provider sent you when you signed up for your account. Among other valuable bits of information, the URL to your cPanel will be in one of those initial emails.
But if you can’t find the right email, don’t worry.
Just Google the name of your web host and “cPanel login”.
That should do the trick.
Step #2. Get to Know cPanel
The main cPanel dashboard can be a little intimidating.
Relax.
You don’t have to understand all cPanel has to offer. We’re here to do one thing — learn how to install WordPress.
For that, let’s look for the cPanel installer tools, which are usually located near the bottom of the page.
Your host might be using any of the following installers: Softaculous, Fantastico, QuickInstall, or MOJO Marketplace.
We’re going to focus on Softaculous since it’s the most popular.
But don’t worry if your host uses a different installer.
While the specific interfaces might be a bit different, the idea behind every installer is the same.
Plus, they all ask you for the same set of data and inputs.
Step #3. How to Install WordPress Using Softaculous
To begin, look for the Softaculous section in cPanel.
Click on the WordPress logo. The installer tool will open:
Click on the Install Now button to begin the installation process.
Softaculous needs only a handful of details from you. Here are the fields you should pay special attention to:
“Choose the version you want to install” — Always go for the most-recent version available.
“Choose Protocol” — “https://” is the option preferred by Google.
“Choose Domain” — Leave unchanged if you have just one domain assigned to your server; if you have more than one domain, select the desired one for this installation.
“In Directory” — Leave empty if you want to install WordPress in the main directory of your domain name (which most people do).
“Select Plugin(s)” — Optional (but as a general rule: the fewer plugins, the better).
Here’s what the form looks like:
Click Install to proceed.
When the process finishes, Softaculous will show you a final confirmation screen along with links to your WordPress dashboard.
And that’s it!
You’ve installed WordPress using cPanel.
Note: The WordPress dashboard of your newly-installed site should be available at yoursite.com/wp-admin/.
Back to Top
How to Install WordPress on Localhost (Or, How to Install WordPress Locally)
The instructions for how to install WordPress locally depends on whether you’re using a PC (Windows) or a Mac.
We’ll go over both methods.
First up: Windows.
(If you’re on a Mac, click here to jump ahead.)
How to Install WordPress on Windows
WordPress is a great tool for local web development.
Here’s how you install WordPress locally on Windows:
Step #1. Get XAMPP
XAMPP is a local web server for your computer. It’s an all-in-one package with everything you will need to run software (such as WordPress) locally.
What About WAMP?
You might have heard of a similar tool called WAMP.
Under the hood, WAMP and XAMPP do the same thing. However, in my opinion, WAMP isn’t as reliable as XAMPP.
For this reason and others, we’ll focus on XAMPP in this tutorial.
From the XAMPP website, click on the download button for Windows and save the XAMPP package to your desktop.
Launch the XAMPP installer and follow the prompts on the screen.
First, select the individual components you want to have installed. To be safe, you can choose all of them:
Next, select the installation folder for XAMPP.
Note: Avoid installing XAMPP in Program Files. The read/write restrictions of Windows might prevent it from working correctly. Installing in C:\xampp is a safer bet.
XAMPP will take a minute or two to install.
When it’s finished, you’ll see this confirmation screen:
When you click on Finish, you’ll see the main XAMPP config panel.
In it, click on the two Start buttons next to Apache and MySQL.
Like so:
You should see the two labels change to green:
When you see green, your local server is working!
Step #2. Create a Blank Database for WordPress
From the control panel of XAMPP, click on the Admin button in the MySQL row:
This will launch a tool called PHPMyAdmin, which is an open-source database management tool.
Go into Databases (from the top menu).
Enter a name for your new WordPress database (something simple) and click the Create button:
You should see your new blank database in the sidebar:
You can now exit PHPMyAdmin.
Step #3. Download WordPress
Go to WordPress.org and download the most recent version of the software.
Don’t worry. It’s free:
Next:
Save the file to your desktop or downloads folder. Extract it.
Go to the folder where you installed XAMPP (C:\xampp) and find the htdocs subfolder.
Create a new subfolder inside htdocs. This is where your site is going to live. For the purpose of this demo, I’ll name the folder mynewsite.
Note: The name of this folder will also become part of the local address of the site. With mynewsite being the folder name, the address of the site is going to be localhost/mynewsite.
Take the contents of the WordPress archive and move them to this new subfolder (“mynewsite” or whatever you named yours).
It should look like this:
Step #4. Install WordPress Locally on Windows
Open your web browser and navigate to localhost/mynewsite.
What you’ll see is the on-screen WordPress Installation Wizard.
The first step is choosing your language:
The next screen is an info card to get you up to speed with what’s going to happen. Click on Let’s go! once you’ve read it.
The next step is a crucial one in the installation.
This is where you get to enter the details of your WordPress connection to the database.
Here are my settings based on everything I’ve set in the previous steps so far:
Important parts:
Database Name — This is the name you set in PHPMyAdmin when creating the database in Step #2.
Username — Set to root.
Password — Leave blank.
Database Host — Set to localhost.
Table Prefix — Leave as is.
The next step is where you get to set the name of your site and the details of your main admin account:
Note: With the exception of username, you’ll be able to easily change these later in your WordPress dashboard.
Click on Install WordPress to finalize everything.
And that’s it. You’ve installed WordPress locally on Windows.
How to Install WordPress on Mac
While installing WordPress locally on Mac isn’t the usual “get app from App Store” experience we’re used to, it can still be done with relative ease.
Here’s how to install WordPress on Mac:
Step #1. Get MAMP
MAMP is a local web server that works quite well on Mac.
(It’s also easier to install than some of its alternatives.).
From the MAMP website, go to the downloads section and choose the option for macOS:
Save the package to your computer.
Launch the MAMP installer and proceed through the on-screen wizard.
When the installation finishes, open MAMP from Mac’s Launchpad.
In the config panel, click on the main Start Servers button.
Congrats! Your local server is working.
Step #2. Create a Blank Database for WordPress
As soon as you start your server in MAMP, you will be taken to the server’s homepage.
Usually, it’s “http://localhost:8888/MAMP/” (without the quotes).
From there, click on PHPMYADMIN under TOOLS:
As mentioned earlier in the post, PHPMyAdmin is a handy, open-source database management tool.
We use it to create a new database for WordPress.
Go into Databases (from the top menu):
Enter a name for your new WordPress database (something simple) and click on Create.
Like so:
You should see your new blank database in the sidebar.
You can now exit PHPMyAdmin.
Step #3. Download WordPress
Go to WordPress.org and download the most recent version of the software.
Next:
Save the archive to your Mac and extract it.
Go to the default web folder of your server. That’s usually in Applications/MAMP/htdocs. You can check the location of your default web folder by going into MAMP settings and choosing the Web Server tab:
Create a new subfolder. This is where your site is going to live. For the purpose of this demo, I’ll name my subfolder mynewsite.
Note: The name of this folder will also be part of the local address of the site. With mynewsite being the folder name, the address of the site is going to be localhost:8888/mynewsite.
Take the contents of the WordPress archive and move them to the new folder you created. It should look like this:
Step #4. Install WordPress Locally on Mac
Open your web browser and go to localhost:8888/mynewsite.
What you’ll see is the on-screen WordPress installation wizard. The first step is choosing your language:
The next screen is an info card to get you up to speed with what’s going to happen. Click Let’s go! once you’ve read it.
In the next step, you will enter the details of your WordPress connection to the database.
Here are my settings based on everything I’ve set in the previous steps:
Important parts:
Database Name — This is the name you set in PHPMyAdmin when creating the database in Step #2
Username — Set to root.
Password — Set to root.
Database Host — Set to localhost.
Table Prefix — Leave as is.
The next step is where you get to set the name of your site and the details of your main admin account:
Note: With the exception of username, you’ll be able to easily change these later in your WordPress dashboard.
Click on Install WordPress to finalize everything.
And that’s it. You’ve installed WordPress locally on a Mac
Back to Top
How to Install WordPress via FTP (Or, How to Install WordPress Manually)
Installing WordPress via FTP takes only minutes, but you do need to have a couple of things ready beforehand.
Chiefly, you need to have access to a web server — aka, a web hosting account.
Editor’s Note: Two WordPress hosting options we recommend to our Smart Blogger students are SiteGround (affiliate link) and WP Engine (affiliate link). Both are great options.
Start by going to your host of choice and purchasing one of the available web hosting plans. If you already have a web host, you’re ahead of the game!
Next:
Step #1. Download WordPress
Go to WordPress.org and download the latest version of WordPress.
Save the package to your computer and extract its contents.
Step #2. Upload WordPress Files to Your Server
The next step involves connecting to your web server via FTP and uploading your just-downloaded WordPress files.
You’re going to need to use a third-party FTP tool to do that.
FileZilla is a popular one. We’ll use it for the purposes of this demo.
Now, in order to connect to your server, you’ll need your connection details.
This information should have been provided via email when you first signed up for your hosting account. But if you can’t find it, no worries. You can find your FTP information inside your host’s cPanel.
Go to the FTP Accounts section (under FILES):
You’ll find your FTP accounts there. Or, alternatively, you can create your FTP account if one doesn’t already exist.
Next to your FTP account, there’s a link labeled Configure FTP Client.
Click on it:
This will reveal a new section.
In it, click on the FTP Configuration File button under FileZilla:
You can open that file with FileZilla and set up your connection details immediately.
With that done, the only thing left to do is upload your WordPress files to the server.
Depending on your hosting setup, you might need to upload WordPress to a specific directory.
However, for most users the directory will be called public_html or public_www.
If in doubt, verify with your web host.
Step #3. Create a New Database for WordPress in cPanel
WordPress, just like any other modern CMS, cannot work without a database.
The database is where all your posts, pages, comments, and other site content are kept.
To create a new database, go back to cPanel, scroll down to the DATABASES section, and click on MySQL Database Wizard:
From there, you’ll be guided through the steps to create a new database.
First, pick a name for your database:
Next, create a new user account that WordPress will use to access the database.
Note: Be sure to jot down the username and the password. You’ll need them in the next step.
Lastly, assign sufficient access rights to the new user account.
It’s best to do that by simply selecting ALL PRIVILEGES, like so:
Your database setup is now complete!
Step #4. Install WordPress Through the Online Installer
This is the last step on your journey to getting WordPress installed via FTP.
Simply fire up your browser and navigate to your site’s URL.
You’ll see the main page of the WordPress installer.
First, choose the language of your site:
The next step is a crucial one, and it’s where you’ll need to provide your database details.
(Hopefully you jotted those details down earlier!)
Here’s a breakdown for each:
Database Name — The name of your database (from the previous step).
Username — Your chosen username (from the previous step).
Password — Your chosen password (from the previous step).
Database Host — In most cases, set this to localhost. If your hosting setup requires a different value here, they can provide this info.
Table Prefix — You can safely ignore this field and leave as is.
The next step is where you get to set the name of your site and the details of your main admin account:
Note: With the exception of username, you’ll be able to easily change these later in your WordPress dashboard.
Click on Install WordPress to finalize everything.
And that’s it! You’ve successfully installed WordPress manually using FTP.
Back to Top
How to Install WordPress Multisite
WordPress Multisite is an interesting feature built into WordPress.
Simply speaking, with WordPress Multisite, you can launch multiple WordPress websites, all working on the same WordPress install.
This is great for businesses and organizations that need multiple websites, but want to keep the cost of managing them low.
WordPress Multisite is also a great choice for universities where it’s very common for individual courses or teachers to have their own sites.
Here’s how to set up and install WordPress Multisite:
Step #1. Install WordPress Locally, via cPanel, or via FTP
To begin your journey with WordPress Multisite, you first need to install WordPress using any of the methods described earlier in this guide.
Go here to install WordPress using Softaculous, MOJO, Fantastico, QuickInstall, or any other installer tool offered by your host’s cPanel.
Go here to install WordPress locally on Windows or here to install WordPress locally on a Mac.
Finally, go here to install WordPress using FTP.
Once you’ve installed WordPress, you’re ready for the next step.
Step #2. Enable WordPress Multisite
Connect to your server via FTP (explained previously in this guide), and download the wp-config.php file from your main WordPress directory.
Open the file in Notepad (or similar software) and add the following line at the bottom:
define (‘WP_ALLOW_MULTISITE’, true);
Save the file and re-upload it to your main WordPress directory via FTP. You’ll want to overwrite the original file.
Step #3. Set up Your WordPress Multisite Network
At this stage, WordPress is ready to let you configure your network of sites. Here’s how:
First, go to your plugins and deactivate all of them.
Next, go to Tools > Network Setup. This is where you create your network of WordPress sites.
Click on the Install button to begin.
On the next screen, WordPress will give you specific instructions for finalizing the setup.
This will involve editing two files in your WordPress directory (similarly to how we did it a minute ago with wp-config.php).
Example setup:
Step #4. Create your WordPress Multisite Sites
Once you log back into WordPress, you’ll see an updated version of the admin interface with one new section in the top left corner:
This menu is where you can switch between your WordPress sites (and where you can add new sites to the network).
Each website is independent, can feature different content, different user accounts, different themes, different plugins, and so on.
Congrats! You’ve successfully set up WordPress Multisite.
(Feel free to re-activate all your plugins!)
Back to Top
How to Install WordPress in Your Language
Did you know WordPress has been translated into 113 (and counting) languages?
It’s true. You can install WordPress in everything from Afrikaans (South Africa) to 香港中文版 (Simplified Chinese).
In short:
You can install WordPress in your language, no matter what that language might be.
Here’s how to do it:
#1. Download WordPress in Your Language
Go to WordPress.org.
Since WordPress is quite predictive and helpful with international users, based on your location, you’ll see a note encouraging you to download WordPress in your language.
Here’s an example:
What the above box says is:
“WordPress is also available in Polish.”
When you click on the language — in this example, “Polski” — you’ll get redirected to a new, localized WordPress website.
Once there, download the WordPress package and save the ZIP file to your desktop and extract its contents.
#2. Install WordPress via FTP
Next, follow the same instructions we discussed earlier in this guide.
Click here to jump to Upload WordPress Files to Your Server.
Bonus Tip: Installing Language Files from the Admin Dashboard
If you’ve already installed WordPress in one language, but you’d like to use a different language, don’t fret.
WordPress makes switching your language a breeze.
In your Dashboard, go to Settings > General > Site Language.
Then simply choose the language you’d like to use.
And that’s it! You’re done.
Back to Top
How to Install WordPress on 12 Popular Web Hosts
The following section covers how to install WordPress on 12 popular hosting providers. Click on a link below to jump to your host:
How to Install WordPress on SiteGround
How to Install WordPress on Bluehost
How to Install WordPress on GoDaddy
How to Install WordPress on WP Engine
How to Install WordPress on Flywheel
How to Install WordPress on Kinsta
How to Install WordPress on HostGator
How to Install WordPress on DreamHost
How to Install WordPress on A2Hosting
How to Install WordPress on InMotion Hosting
How to Install WordPress on iPage
How to Install WordPress on Hostinger
How to Install WordPress on SiteGround
SiteGround (affiliate link) offers a cool wizard tool to get your WordPress installed in minutes. There’s no need to deal with any coding, settings, or uploading things a server.
Here’s a video showing you the process:
But, if you prefer written instructions, here are the steps:
When you log into your SiteGround user panel for the first time, you’ll be greeted by a message asking if you’d like to have a new website set up for you:
Click on the option labeled “Start a new website” and select WordPress as your platform.
SiteGround will also create a new admin account for you. All you need to do is provide the login details:
That’s all there is to it.
How to Install WordPress on Bluehost
When you sign up for a Bluehost WordPress Hosting plan, the latest version of WordPress is installed automatically for you. All you have to do is configure it.
Here are the steps:
If you’d like to set up additional WordPress sites, it’s easy to do so via the Bluehost dashboard.
Go to My Sites, and then click on Create a Site.
Enter your site details and proceed through the individual screens.
First, you’ll need to pick a name for your WordPress installation:
You will then enter the domain name and directory, plus any optional plugins you might want:
Finally, set your admin user login and password.
How to Install WordPress on GoDaddy
GoDaddy uses cPanel for installing WordPress on their hosting plans.
Here’s their official video walking you through the entire (simple) process:
And if you need to add another WordPress site, that’s easy too.
Log into your GoDaddy user panel, go to Managed WordPress > Manage All. Click Add Site.
From this point on, GoDaddy will take you by the hand and do most of the work for you. All you’ll need to do is enter a name for your site and your desired login credentials for the admin user.
When the installation finishes, GoDaddy will show you a WordPress Setup Wizard to help you customize your site:
You can click No thanks or Continue.
How to Install WordPress on WP Engine
WP Engine (affiliate link) is one of the original “managed” WordPress hosting platforms. They handle all the technical heavy lifting for you, so you can focus on what’s important for your website’s success.
What this means in practice is WP Engine will install WordPress for you when you create an account. You don’t have to lift a finger.
You access the site from your user panel:
If you want to add additional sites to your WP Engine setup, it’s pretty easy. Here’s a video tutorial showing you how:
If you prefer written instructions, here’s WP Engine’s official guide for adding or deleting WordPress installs.
How to Install WordPress on Flywheel
Like WP Engine, Flywheel is a managed WordPress hosting platform. They take care of the technical aspects — including installing WordPress — for you. All you have to do is provide a few pieces of info.
Here’s a video walking you through the process:
If you would like to create additional sites, from your user profile click the Create a New Site button:
Next, provide all the necessary details such as site name, admin user login, password, and your preferred payment method.
Once you’ve completed the form, your site will become visible in your user profile.
That’s all there is to it.
Here’s Flywheel’s official guide for adding new sites if you need more information.
How to Install WordPress on Kinsta
Kinsta is a newcomer to the managed WordPress hosting market. Like WP Engine and Flywheel, Kinsta installs WordPress for you when you create your account.
If you’d like to add additional WordPress sites to your Kinsta plan, follow the steps in this video:
If you prefer written instructions, here’s Kinsta’s official guide for adding WordPress sites.
How to Install WordPress on HostGator
Like many shared WordPress hosts, HostGator gives you access to cPanel. With it, you can easily install WordPress using the steps in the video below:
Can’t play the video? No worries.
HostGator also offers an extensive how-to article for installing WordPress on their platform.
How to Install WordPress on DreamHost
For each of their WordPress hosting plans, DreamHost provides WordPress pre-installed. All the work is done for you.
If you’d like to add additional WordPress sites, here’s a video showing you how it’s done:
Prefer written instructions?
Here is Dreamhost’s how-to article for using their handy 1-Click WordPress Install.
How to Install WordPress on A2Hosting
A2Hosting offers both shared and managed WordPress hosting.
For shared hosting, they offer 1-Click WordPress installation using Softaculous. Here’s a video to walk you through the steps:
If you opt for one of their managed hosting plans, WordPress will come pre-installed with your A2Hosting account.
If you’d like to add more WordPress installs to your account, here’s the official A2Hosting video to show you how:
How to Install WordPress on InMotion Hosting
Like its managed-hosting competitors, InMotion Hosting provides pre-installed WordPress on your hosting account from the get-go. This means that you don’t need to install WordPress on your own.
If you’d like to install WordPress on an add-on domain, InMotion offers this handy tutorial video:
How to Install WordPress on iPage
Just like other “managed” WordPress hosting companies, iPage provides WordPress pre-installed with your account. (You also get a set of pre-installed WordPress themes and plugins.)
Here’s a helpful video showing you how to configure your iPage WordPress site:
If you need to install some additional WordPress sites on iPage, click here to read their guide.
How to Install WordPress on Hostinger
Hostinger offers a quick-and-easy auto installer for WordPress.
Here’s their official video showing you how it’s done:
If you prefer written directions, here’s Hostinger’s tutorial for installing WordPress (using various methods).
Back to Top
Frequently Asked Questions
Before we wrap things up, let’s go over a few common, related questions we often hear:
Do I Need to Install WordPress?
Answer: It depends.
If you use a “managed” web host like WP Engine, installing WordPress is taken care of for you. You don’t have to do anything (beyond filling in a few pieces of information).
However, if you’re using a “shared” hosting plan, you’ll need to install WordPress.
The good news is that most web hosts have made the process easy. A few clicks and you’re finished.
Editor’s Note: This is all assuming, of course, you want a WordPress site. WordPress is awesome, but it’s not the only game in town — there are many blogging platforms out there.
Does WordPress Cost Money?
No, the WordPress software is 100% free. Anyone can go to WordPress.org and download it for free at any time.
The typical costs for running a WordPress website come from other factors, such as purchasing a domain name and choosing a hosting provider.
Does WordPress Include Hosting? (Or, Does WordPress Host Your Site?)
If you’re using WordPress.com, the answer is yes.
WordPress.com is a free, hosted version of the WordPress software offered by the company. (You can upgrade to various paid plans if you need more features.)
However, if you’re using the self-hosted version of the software available for free at WordPress.org, the answer is no. You’ll need a hosting provider.
Which Hosting is Best for WordPress?
WordPress.org officially recommends Bluehost, DreamHost, and SiteGround.
At Smart Blogger, we recommend SiteGround (affiliate link) and WP Engine (affiliate link).
Since SiteGround is on both lists, it’s safe to say it’s a solid option.
How to Install WordPress Themes?
Your WordPress installation will come with several free themes (designs), but there are thousands of additional themes — both free and premium — you can add.
Here’s a quick guide for how to install WordPress themes from inside your WordPress dashboard.
How to Install WordPress Plugins?
Though you have to be careful not to go overboard with them, WordPress plugins are one of the software’s best features — they allow you to add all sorts of functionality to your WordPress site that’s not available out of the box.
SiteGround has published a helpful tutorial for how to install WordPress plugins if you would like step-by-step instructions.
How to Install Facebook Pixel on WordPress?
If you’re interested in running Facebook Ads (either now or in the future), you need to install a Facebook Pixel on your WordPress site.
What’s a Facebook Pixel? It’s a piece of tracking code you add to your website that collects data whenever someone visits your site or takes a specific action.
Here’s a video explaining it in more detail (including how to install it):
If you prefer written instructions, here is Facebook’s help article on Facebook Pixel, which includes steps for creating and installing them.
Back to Top
It’s Time to Install WordPress
Installing WordPress can be overwhelming — especially if you’ve never done it before.
Hopefully, this in-depth guide has been able to point you in the right direction. Use it, bookmark it, and feel free to share it with a friend.
And if there’s an installation method we missed, tweet us or let us know about it in the comments. We’ll happily add it.
About the Author: Karol K. (@carlosinho) is a WordPress figure-outer, blogger, and published author of WordPress Complete. His work has been featured all over the web on sites like: Ahrefs.com, Smashing Magazine, Adobe.com, CodeinWP.com, and others.
The post How to Install WordPress in 5 Minutes or Less (2019) appeared first on Smart Blogger.
from Julia Garza Social Media Tips https://smartblogger.com/how-to-install-wordpress/
0 notes