#Manipulate Objects in 3D Scene
Explore tagged Tumblr posts
Visit Tumblr Blog
Explore Tumblr blogs with no restrictions, modern design and the best experience.
Last Seen Tumblr Blogs


Fun Fact
Tumblr.com rank in the US is 25.
Text
My "hot-take":
FUCK. THESE. THINGS.
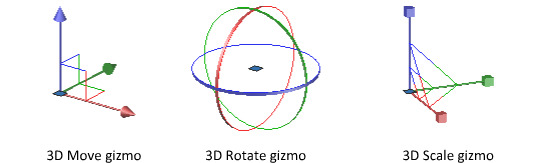
I have never encountered a gizmo nor gimbal that I enjoyed interfacing with, not even once. They are the most cumbersome way to interact with anything in 3D space; I would rather chop off my limbs than have to laggardly click, hold, and drag these teeny tiny little tools (for often subtle and precise transformations!).
It is incredibly common to be at an angle where an entire axis is unavailable or unreasonably difficult for you to manipulate. When you're composing a scene of 3D objects, it's not unusual to want to do it in a way that is informed by the current position of your camera. I could rotate the viewport to reach whatever axis is being obscured, but fuck you! I don't want to! Most programs with gizmos have a way to enlarge the axes for this reason—which is great, if you're a fan of having vast portions of the model you're working on obscured by STUPID COLORFUL ARROWS.
So, if not gizmos, then what? I argue that Blender has the best alternative, but Unreal has a pretty compelling one as well. (There are probably other inventive ways of forgoing gizmos in 3D, but these are the two I'm most familiar with. If you know of any other unique control methods for 3D software, I would love to hear about them.)
For Blender, you simply have to press the X, Y, or Z key to constrain the transformation to the corresponding axis; the following manipulation is controlled entirely by the movement of your mouse. You don't have to hold down anything! It is precise, agile, and ergonomic. These controls might be less immediately intuitive than having a literal, visual representation of the axes, but it SIGNIFICANTLY reduces strain on the hands, and with practice, allows you to model so much faster than any gizmo could ever let you.
Unreal, while not a modelling tool, has a similar method of manipulation available. You hold Ctrl, then press a mouse button and drag—left click controls X, right click controls Y, and both simultaneously control Z. It feels very sexy and sleek, like operating a jet. For me, it isn't perfectly ideal (it still involves holding buttons for extended periods of time, and it occupies both hands), but it is infinitely more enjoyable than dealing with gizmos.
I do feel guilty about the sheer extent of my hatred for these poor things. They're so colorful and visually appealing, and certainly the most intuitive way to represent transformations in 3D space. But they suck. They just suck. And they hurt me.
#I definitely do recognize that the intuitiveness of gizmos is their greatest appeal; I taught a friend Blender basics not that long ago‚#and completely forgot to tell him that gizmos were an option until we were done.#And doing so probably would've alleviated like 75% of the navigation struggle. Oops.#Listen you just have to trust me. Learn this weird control scheme to increase your efficiency in the long term.#And to make you passionately hate any 3D software that doesn't let you use it. This will only benefit you
58 notes
·
View notes
Note
weird question maybe but isnt your art literally just painting over game screengrabs and photos?
Short answer: Nope
9 times out of 10, I create my own 3d poses with Daz for a reference image, then look at a dozen or so photo references for other elements, like specific faces or objects. For example, the following image was posed with Daz, then I found an image of a baseball bat, an image of Spaulding for the clown make-up, and an image of the two actors faces for the heads. Then the background was made using a variety of stamps and brushes from Ron's Apacolypse collection, available for download on deviant art. I guarantee you that you will not find this as a screen grab anywhere in the entire universe.

The following is another example of something that I created the reference using my own 3d posing with Daz models. again you will not find this anywhere as a screen grab.
From time to time I *do* end up doing a scene redraw or use a grab as reference, but there is a lot more that goes into it than simply painting on top of a picture. My poor arthritic hand can attest to that. If you spend 20+ hours on an image, you can get it looking pretty damned close to the original.
Hopefully that answers your question.
As an end note, I would just like to say that it is not cool to try and belittle someone's hard work and labor because you don't like the style, or whatever reason you had for that ask. Artists come from all backgrounds and skill levels, and whether the end product was drawn freehand with a pencil, or a photo that was chopily manipulated, it shouldn't matter. We artists love what we do and try to show it the best we can. I'm no Rembrandt or savant, but I'm proud of the little things that I do accomplish. Keep that in mind before you go trolling.
26 notes
·
View notes
Text
How do i manifest WITHOUT a method?
As always, I will love to hear your thoughts! and if you have any questions, I will be more than happy to answer them! If you liked it, leave a comment or reblog (that is always appreciated!). If you are interested in more methods, check the masterlist!

Many times, especially when we start this journey to learn how to manifest, we tend to believe that the methods are necessary to manifest. which is not true; the methods and technology are a plus, a premium version, a booster, whatever you want to define them as
On this blog, I explain methods over methods, especially because I generally believe that some methods really help us understand what we have around us and help us be grateful before we reach our desires and be grateful even then.
HOW DO I DO IT?
Every experience is different, and what I am going to write is all to be taken as suggestions because you have to live your own experience, and if you have any problems or struggles, I am here to help. One-by-one, I'm going to explain every step based on my personal experience that still helps me manifest even in my darkest times.
Change of mindset: There HAS to be a change of mindset, and for that, I mean to not self-doubt or doubt your inner potential. You are a star, in the literal sense. We come from the universe; we are part of it. Why should we not listen to the universe? Why should we not listen to ourselves? How do you change the mindset? The way that I changed my mindset is a game of play and pretend. Every time i cauth myself having a negative thought, I replaced it with a vocal or mental one by refusing and changing it into a positive phrase. Example: "I'm manifesting a great body, but I'm still a potato." I catch myself having this thought, "No, it is not true that I look like a potato. Some people will envy my body, and my body does a lot for me! I can only manifest to take care of it."I replace it with a positive remark.

By changing my mindset, I also bring it into existence: How can we know what we want if we don't speak it or say it clearly, not even to ourselves? How can the universe know? How can we change what we don't know? That's why we have to speak about it, reflect on it, and write about it. The clearer it is in our minds, the better. Let me give you a practical example: Person A (me) and person B (the universe) are friends; person B does something that upsets person A; person A does not say that it is upset about person B's behavior; person B tries to insist because it can be seen that person A is upset about something. Person B and Person A get into a fight because Person A didn't communicate. If person A had been clear about how they felt from the start, person B would have known how to react and help better.
I always had a really active imagination,which is not the same as visualizing, but it helps, so visualizing my dream life was always easy, and I always did that even before I found out what it was. Visualization is something I truly believe you can develop with time too. Becoming able to close your eyes and having scenes play in your head is the most powerful tool that we can have to manipulate our 3D reality. Quick and easy visualization can be done everywhere. (Except if you are driving or working with heavy machinery, be aware of your surroundings and when it is time to manifest or not.)
But the thing that helped me manifest most of all was faking and acting: I faked the most of my confidence and beauty until it became true—until it became my reality. I acted, taking actions towards my manifestation. In this way, not only did I impersonate who I wanted to be, but I also took action as them. Let me be more clear than this: I desire to be A, so I fake being A until I don't believe it. I desire an object, thing, body, etc. and for that I have to take action, i do the action!
I hope I was clear with my explanations, and I am so sorry because I have been more absent on my blog. I will try my best to be as present as possible. Have a nice day or night!
#manifestation#manifestation method#journal#manifesting#shifting methods#manifesation#loa methods#spiritual development#explain the method#explained#law of manifestation#manifestación#manifest abundance#manifestação#manifestaciones#manifest#law of assumption#neville goddard#how to manifest#manifestation list#manifestation blog#manifestation success story#law of attraction#loa#loablr#loa tumblr#loassumption#loassblog#loa blog#loa success
91 notes
·
View notes
Text
Holy shit so. Apparently, hyperphantasia is???? A thing that has a specific name and like most people don’t have???
This is quite literally how I write. I create a mental space and then move around it, checking out how it would look/feel/etc. I can bring up an image in my mind pretty easily and I’m good with spatial manipulation - like, show me a 3D object and I can rotate it in my mind or walk around it, looking at it from 100 different angles.
So I’ve known all that for years I just??? Never knew it wasn’t normal???
Back when I was writing TINRH, someone asked me how I came up with the blocking for a fight scene and I was just like?? Idk bro I just watch it go down in my head 😂 I just work here 😄
Anyway, I didn’t know that there’s a name for this, and that it’s not super common! (1 in 30 people have it, according to the article.)
I think it also explains why some ppl can tolerate horror and gore in media, and others can’t. I avoid it mostly, bc literally anything I’ve ever seen can influence my inner landscape, and it’s a delicate ecosystem in there.
Anyway. The more you know! 😄
15 notes
·
View notes
Text

Beginner Blender Tutorial Basic Render: Part One (Importing a Sim and Adjusting Textures)
To learn the basics, we'll begin with a super simple render: one sim, one pose, one background.
But first, the anatomy of blender.
(image & list courtesy of Blender's online manual)
Yellow - 3D viewport (workspace) The 3D Viewport is used to interact with the 3D scene for a variety of purposes, such as modeling, animating, texture painting, etc.
Green - Outliner The Outliner is a list that organizes data in the blend-file, i.e. the scene data, Video Sequencer data, or anything that gets stored in a blend-file.
Blue - Properties The Properties shows and allows editing of many active data, including the active scene and object.
Red - Timeline The Timeline editor, identified by a clock icon, is used for manipulating keyframes and scrubbing the Playhead.
The tools I use most I've highlighted below:
I won't outline their uses just now, but we'll be going over them as we use them.
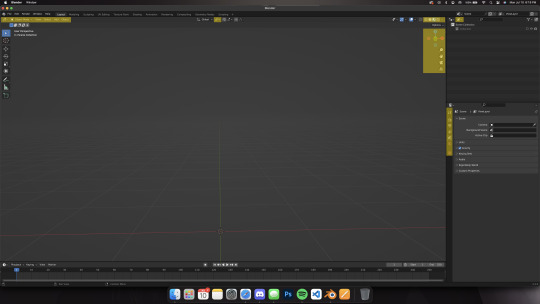
Different creators like to split their blender window up in different ways, but this is my preferred setup when I'm working:
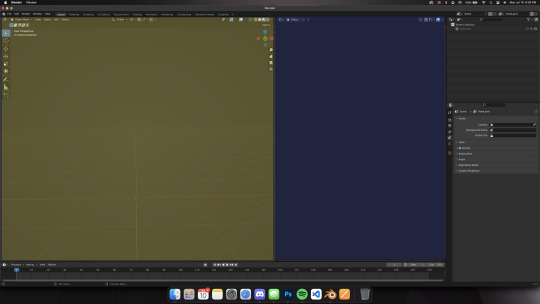
I use the yellow half of the screen as a render preview/3D workspace
I use the blue half for shader editing, posing, etc.
You can set yours up like mine or find what's comfortable for you.
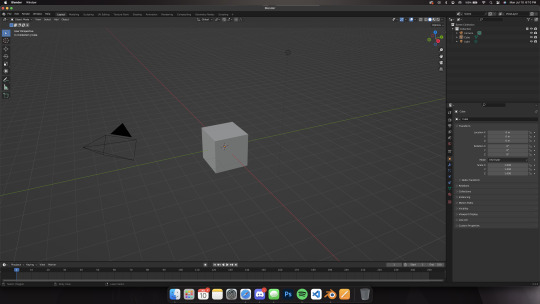
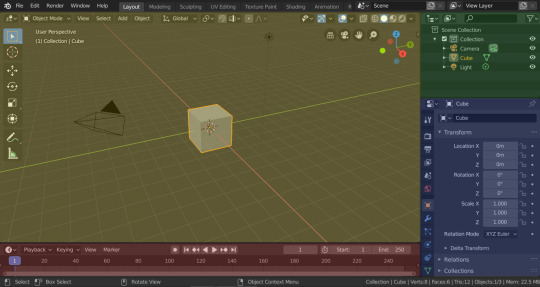
When you first open blender, you'll be greeted by the default cube, lamp, and camera.
Delete them! You can do this two ways:
Click and drag your mouse over all 3 and delete or Select all 3 in the side menu and hit x on your keyboard
Step 1: Importing our Sim
After deleting the default items, we'll import our sim. This tutorial assumes you've already ripped your sim (if you haven't, check here for how to do so!)
Now, let's import.
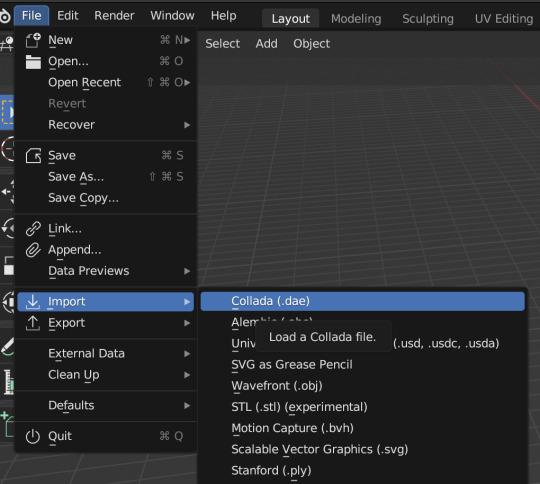
Click file -> import -> collada (dae) Select your DAE and click "import"
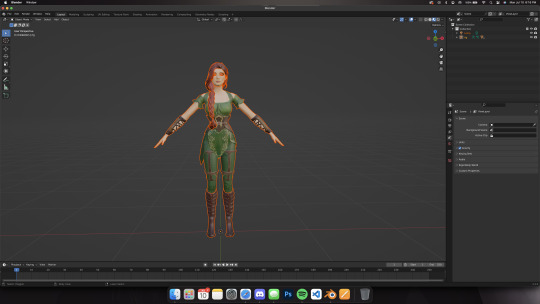
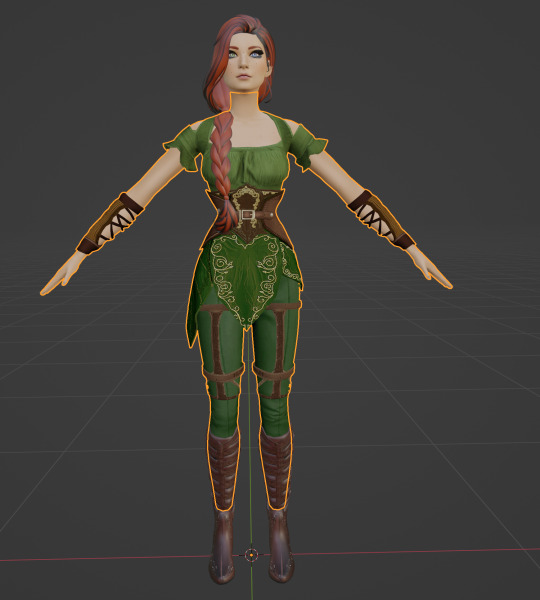
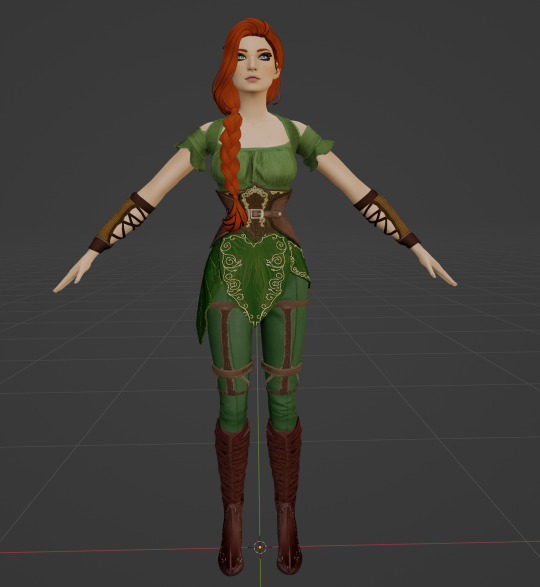
Your sim will look a little... off (thick eyelashes and a weird shine), but that's okay we're going to fix it! Your sim might also look solid white. If that's the case, make sure you're in the right mode. You can adjust modes by clicking on one of the four circles in the top right of the screen.

These are your viewport modes.
Wireframe (far left) - good for mesh editing Solid (middle left) - good for posing Material Preview (middle right) - what we work in most, shows everything with textures (color) Rendered (far right) - this shows your render preview We'll be working mostly in Material Preview
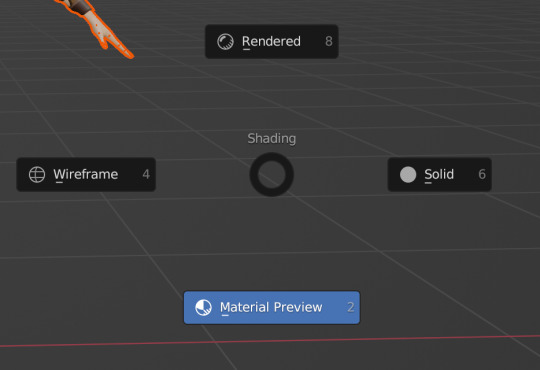
You can also switch between modes by hitting z on your keyboard then selecting which one you want I'll be using mostly keyboard shortcuts but I'll show you how to do both as we go along
Step 2: Adjusting Our Sim's Textures
Let's fix our sim's textures.
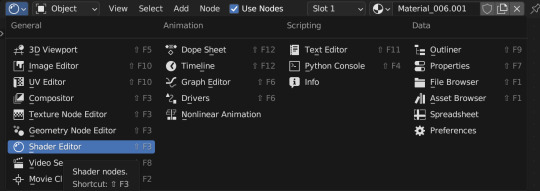
First. set up your workspace. Separate your workspace into two windows (as shown in the picture above with a yellow half and a blue half) and select "shader editor" in your right-side window. Like this:
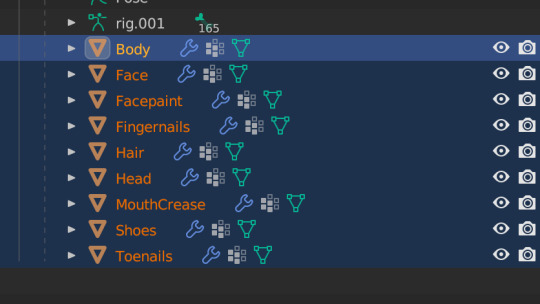
Next, navigate to your Outliner and click the little dropdown beside "rig"

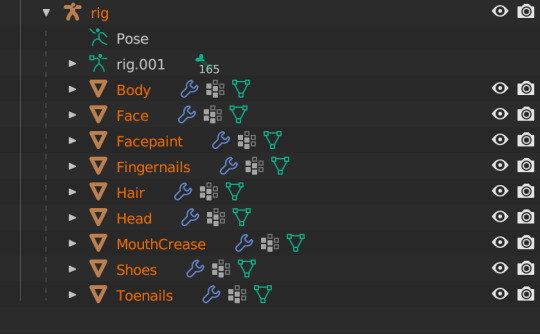
Under "rig" you'll see your sim's body parts listed. We're going to select "Body" When we click "Body", these colored blocks will appear in our shader editor window.

These are called Nodes. We use Nodes to adjust textures for various items in blender (sims, walls, furniture, etc). To add a new Node, you can select "add" in the top bar, or hit Shift+A on your keyboard and add in the node you need.


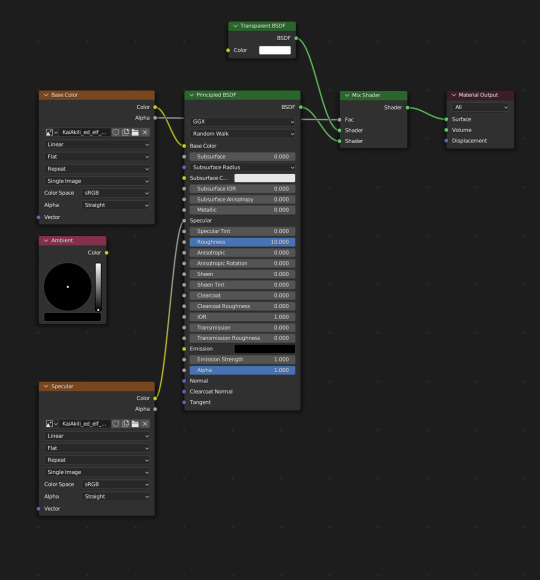
We're going to add in a Mix Shader and a Transparent Shader (both found under the Shader tab) and adjust our nodes this way:

Snug the Mix Shader between the Principled BSDF and the Material Output. Now we have to connect our Nodes and adjust our Principled BSDF. For the sake of this tutorial, I'll show the basic Node & Shader adjustments, but we'll go into each of them in a later tutorial.
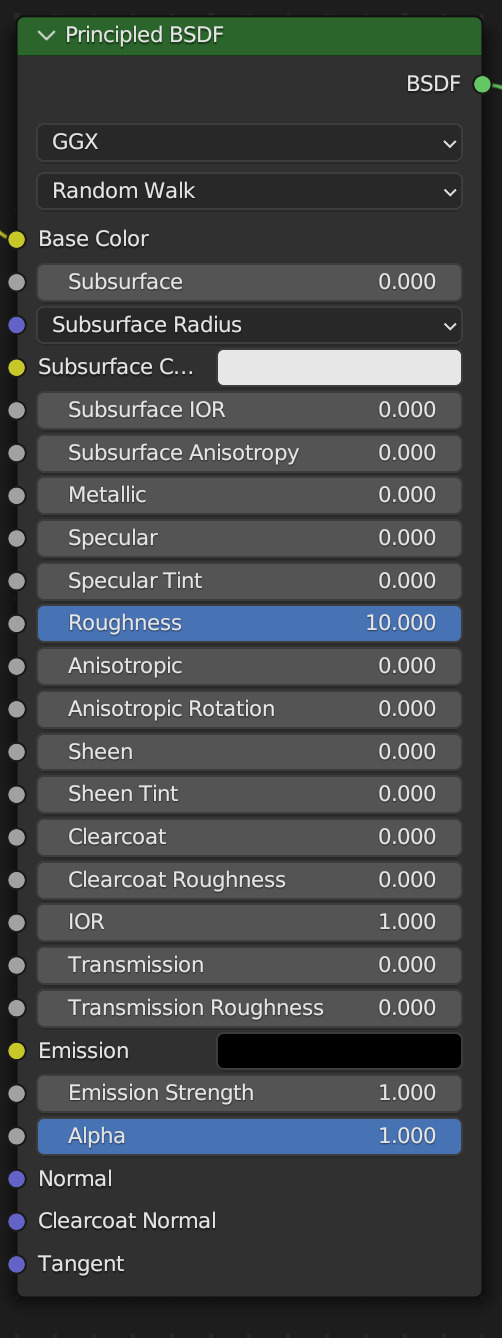
Adjust your Principled BSDF like this, then connect your Node lines exactly like this:
You'll see that our SIm's body looks a bit different from her head, hair and shoes. That's good! Now we need to duplicate that texture to the rest of our sim.
Navigate to your Outliner again, and use Shift+Click to select the rest of the body parts in the list Don't select pose or rig.001 and make sure the Body is selected first EDIT: You'll only see "body" if your sim has a full body outfit on! If they have a shirt and pants, you'll have "Bottom" and "Top" instead! In this case, select "bottom"!
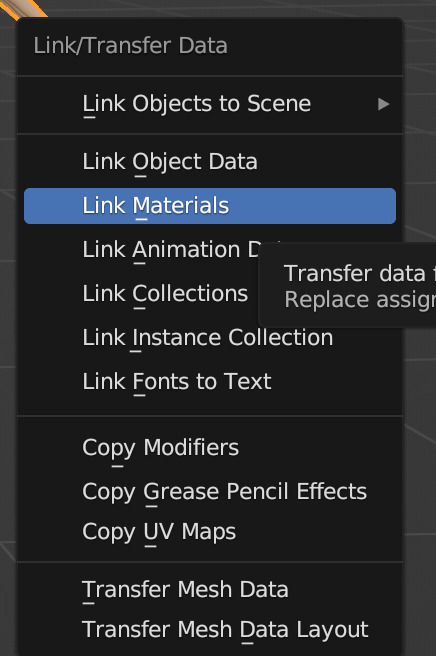
Now, hover your cursor over your sim/the 3D viewport window, and press Ctrl+L on your keyboard. This brings up the Link/Transfer data window. Select "Link Materials"
Our sim is looking better, but her eyelashes are still dark, let's fix that now.
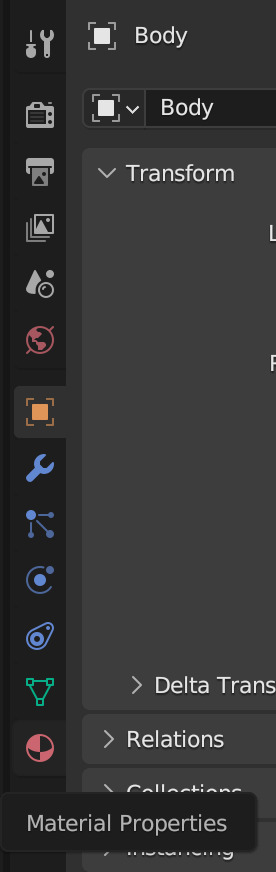
In your Properties area, navigate to Material Properties (the little red ball)
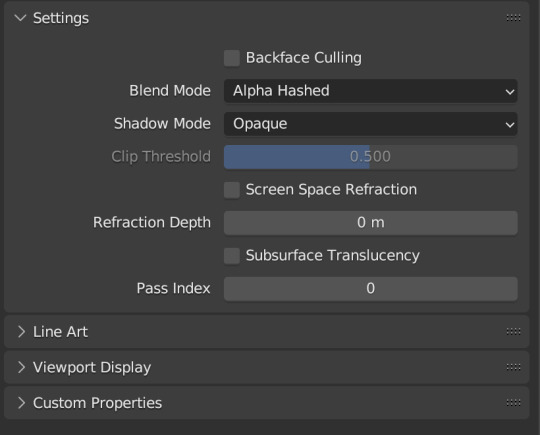
Change your Blend Mode to Alpha Hashed We will always set Blend Mode to Alpha Hashed
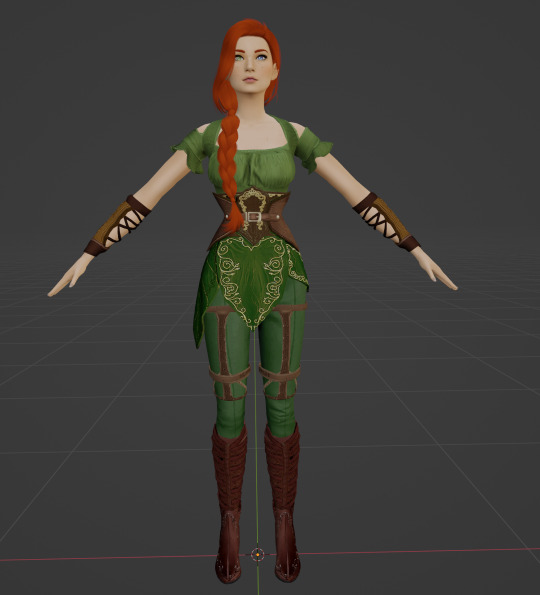
Now our sim looks right!
In Part Two, we'll pose her, set up the scene, and run the render!
#salemsims tutorial#render school tutorial#sims 4 render tutorial#sims 4 blender tutorial#blender#render tutorial#sims render tutorial
164 notes
·
View notes
Note
i demand the 3D objects thoughts
Well I put it off to the absolute last possible moment. If you're reading this it's already too late. Paint 3d is dead

You will not be able to download it from the Microsoft store, and let's be honest, it's too shit for anyone to actually archive it (not that I'd even know how given it's a uwp distributed through the store and never offered as a standalone exe)
But let's not dance on paint 3d's untimely grave. As the world's first ever Kafkaesque photo editor it gave something very special to us all. I've come to love it, even if every time I use it I feel a deep and unending desire to become the joker. So let us Eulogize this beautiful mix failed start of a future we were promised but was failed to be born. Let's pour one out for Paint 3d, and explain once and for all what it really means to paint 3d.
What is paint 3d?
Before you can understand Paint 3d, you must first understand ms paint. Microsoft paint, often just referred to as "Paint" is one of the oldest standard programs to come with any windows installation. It's a bitmap editor that was begun long before most tiktok users were even born. It holds a special place in a lot of 90s and 00s kid's hearts for two reasons.
without fail, it will be installed on every windows machine. You will always have paint. It's dependable, fast, easy to get into, and will open corrupted or mislabeled images. It's the notepad of images, quick, dirty and gets the job done. You can copy and paste screenshots into there to quickly crop them
It's a little bit shit. It doesn't support transparency (well it does now but lets not get ahead of ourselves) so if you tried to make a minecraft skin with it you'd get all these solid color blobs. It doesn't support layers, so anything made on it is going to have a level of earnest shittyness to it. Text can't be rotated, bounding boxes have to be predefined shapes, and once something is on the page it's on the fucking page. MS. Paint will put pixels on the page for you, but after that point it won't hold your hand.
Point 2 is really a larger part of how ms. Paint is remembered. Ms. Paint is synonymous with youth, it's synonymous with limited computer time, with ignorance, with having nothing better. The spectacle of doing anything in Ms. Paint lead to the selling point of ms paint adventures which became homestuck. If you want to strawman someone's political opinions, you draw them in MS paint. The early, edgy, ugly look of the 00s web was defined by MS paint just as much as it was defined by adobe flash. The limitations of this piece of shit software defined a generation's artistic identity. We love it because it is shit. We would not have it any other way
Okay but you didn't explain Paint 3d!
Well, gosh, don't interrupt me. Yeah, so what is paint 3d? In 2017 Paint was added to the deprecated feature list. A special update was pushed so if you opened up paint it would ask you if you'd rather switch to paint 3d
Paint 3d put a fresh new stab at the utility, redoing it in the new UWP format and dressing it up in the company's then standard design language. The refresh also added a whole host of nice, modern features such as:

An updated set of tools, some but not all of which are pressure sensitive when used with tablets/touch

The ability to use transparency!
Hurray those are great new features wait what do those other buttons do?

Yes paint 3d lives up to it's name, you can add stock 3d models to any of your drawings and they're all kinda awful

3d text, 3d models, go ahead and place them in your scene. They put the whole project spark asset library in there last year, if you can think of it it's probably not in there but hey there'll be something and it may or may not have a texture because the model may have been intended for 3d printing
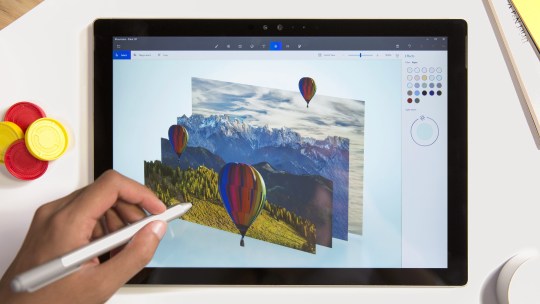
You can manipulate these objects with a slick interface that's completely non industry standard but hey it at least looks nice.

Models can also be painted on and you can pick from these options to decide the albedo/metalic values. No I don't know how to set the custom values, sometimes it's there and if you click off it's gone forever. Good luck


Oh and also when you're painting you're given a very convenient gizmo to rotate the object that isn't available in normal mode. You can multi select objects and group them together but beware it doesn't always work and using the undo key sometimes spawns a new copy at the wrong position and scale but don't worry this is a small bug in a new program and certainly won't be present in the final version on November 4th I promise.

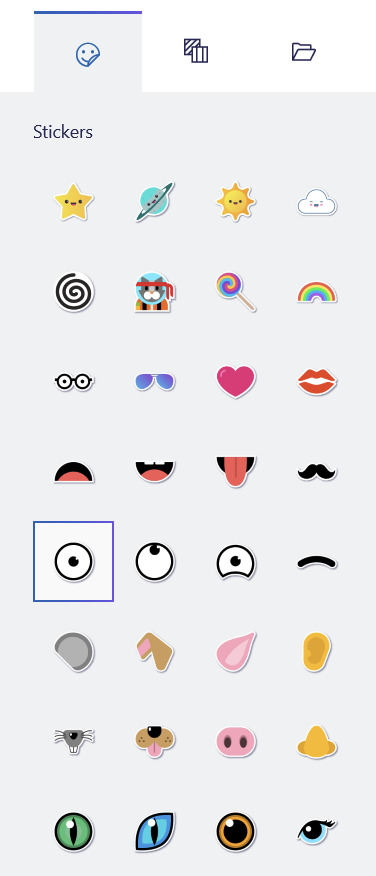
You can put stickers on models and there's a nice little UI to stamp it if you want to put multiple here are all the stock standard stickers
You can also use these pretty tiling textures

Or you can add any png from your hardrive

Those are the only options you'll ever get or need. You can also spawn arbitrary shapes, like cubes and spheres

And in a post launch update they even added the fucking TUBE BRUSH

Look how many tube there is. So many tube You can also edit the points individually after they're created but each tube has a maximum number of points that it can contain and you have no way of knowing until it's too late.
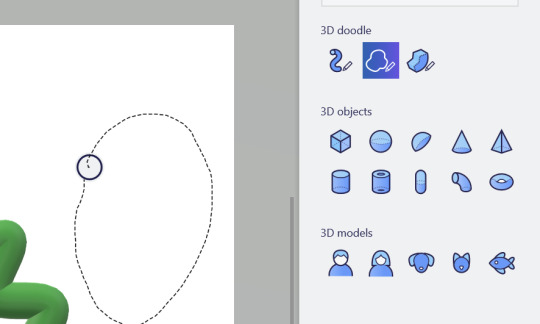
You can also use the 3d doodle to make a shitty potato looking thing, but if you browse the #paint3d tag you'll see a lot of people more talented than me using that tool to it's fullest

As you saw you also have the option to round or point the corners.

At any point you can click the 3d view button and suddenly you're no longer head on, you can orbit the camera and view the scene from any angle. Is it actually good to work with 3d scenes in this program? God fucking no

This scene nearly killed my computer to make, and that thing had okay specs for the time. Placing objects with the non standard (but touch friendly) controls is a pain and the camera cannot be oriented in any meaningful way. There is no frecam, there is no camera scale, you can orbit, you can pan. If you want more go learn blender.
You can also change the time of day

Go ahead, rotate the sun or change the filter, some of them are even minecraft specific. Most of them are objectively worse than the default, but hey you get a lot of options
Okay yes these are all cool features, but I've been dancing around paint 3d's one actually cool feature, the one that drives me mad... because it's a good idea
great even...
...too bad it's shackled to this program.
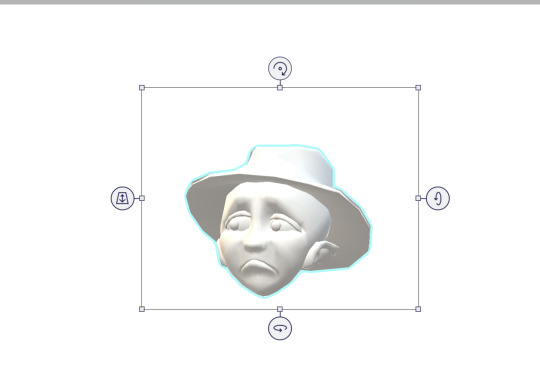
Oh this? This? yeah we can fuck with this. Now we're fucking talking

Now I can move my objects around in 3d, scale them, reorent them and make all kind of cool 3d compositions out of cut out pieces of my 2d artwork. If you look at any cool marketing material this is by far the feature they're most proud of
The possibilities are endless... unfortunately they're also frustrating.
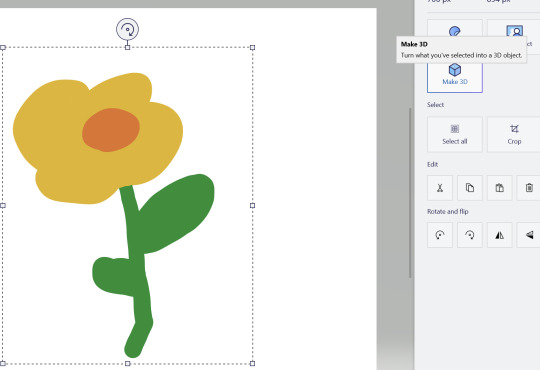
See that flower I made has a white background, and there's no magic eraser so I'd need to manually cut it out with the eraser... or use magic select

If you're in a video call while this UI is active and you're sharing your screen it will only show the gif and not the program itsself
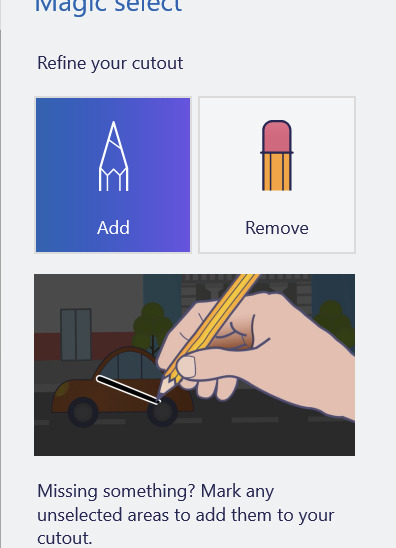

With the add and subtract tools you can provide hints about what should and should not be included. That's fine for something as simple as this drawn with a pen tool, but... well if you like to draw with the pencil? Get ready for pain buckeraroo. You can't manually slice out what you want, you just have to get the AI to guess and it will never guess perfectly. Part of your bat will be left behind on the canvas or it'll start picking up a few extra white pixels
but hey, it's 3d now, sometimes it works. You can choose to content aware fill whatever was behind on the canvas, or leave a weird white empty space behind

But now I have a field of flowers I can move however I like, okay but I think I want to add an extra leaf to one of them
Get fucked. Idiot. Once you cut it out, it's like paper. These 3d canvasses can never be grown, only shrunk and only by the eraser tool which carves in a perfect circle like a bull in a china shop. Now, it's actually very cool how you can recursively create new 3d canvasses out of existing ones, and I'm sure you could do cool stuff but any time the canvas shrinks that's as big as it'll ever be it can never grow
Also, yeah you can't just make a canvas in place, you either have to reserve space on your main canvas or clip it off of a second canvas you make earlier and just... I don't know stash it off to the side out of frame? this is how you use layers and if you want to re-order them put them in literal 3d space? Want to hide a layer? Put it behind your canvas.
This is what experts are calling: "technically a workflow, I guess"
This would be a really cool feature, unfortunately it's just not finished. It's missing that extra 20% that would make it at home in real software versus just a toy. Just like paint you have to sort of plan ahead and make all of your layers. In order... but in reverse bob ross order. See you need to make all of your foregrounds first, then and only then can you start working on your background canvas, and should you ever change your mind and want another foreground you must destroy a space of your background to create it. Oh, also, once it's 3d it can never be re-projected back into 2d... well you can turn it into a sticker, which kicks ass, but that will be flattened, if you wanted to retain the 3d rotation of it too bad. Also, making something into a sticker physically consumes it, so you'll need to copy and paste it first just in case otherwise it's gone forever
oh yeah and sometimes copy and pasting doesn't work, creates extra clones, or places them at the wrong space.
Okay let's save our work

You can actually save it as a project folder. You heard me right, folder. Paint 3d stores projects as individual folders

And they're all just called checkpoint, there's no association with like, which project each one is

And they're all full of undocumented binary files, with the exception of a png thumbnail at the very bottom.
So uhhh, why? You can't send project files to other people, at least not easilly. Is this some library that I don't know about? This all boggles my mind. I mean a .docx file is just a renamed zip file was it too much to ask to make these all renamed zips? Why would you leave it half finished like that and just not make a "new" file type?
Okay sorry I got lost in the weeds. Also I hit the image limit for this post so you're just gonna have to bear with me and use your imagination. You can do this I believe in you.
You can export as a .glb file that goes to your 3d objects folder (put a pin in that), or you can export it as a video/gif. There are few pre-canned animations like bobbing back and forth or rotating on a turntable. They can be sped up or slowed down, but that's about it.
Okay but why 3d?
God damnit I'm going to need more images for this so I'm gonna post this as is and hope I can add more photos on the reblog...
8 notes
·
View notes
Note
Unpopular opinion: Lost World's story is better than most people think, and it didn't deserve to be the turning point in the fandom from "hoho I love that now Sonic doesn't take himself too seriously like in '06" to "Pontaff are a bitch ass motherfucker and they pissed on my fucking wife".
The D6 aren't winning any Best Villain award any time soon but they're harmless (and I still say that Zor is unironically very entertaining). Sonic and Eggman teaming up since the beginning of the game lead to some pretty interesting scenes like the one where they discuss about destroying Lost Hex. Eggman using Sonic and Tails to claw back to his final boss position shows how quick he is at planning and how ready to manipulate others he is (and his scene where he destroys the ice wall by punching it is raw). Sonic has some believable emotional moments, such as getting furious when Tails gets kidnapped or feeling alone and guilty when he believes everyone died. Hell, I will even defend Tails' behavior, because it makes sense that he'd irrationally feel insecure that Sonic (in his mind) would rather team up with Eggman than leave everything to him. (I don't like the resolution of that conflict though)
It's not Best Story in the franchise, but you know what? It is more solid than many stories in the franchise.
strongly agree | agree | neutral | disagree | strongly disagree
While we're on this subject, let me add a second controversial opinion on top of this one: all the 3D Sonic stories have flaws. All of them. "But what about-" Yes, even that one.
That's not to say they're all bad - some of them are good, some of them are much better than others, and it goes without saying that I happen to enjoy some of them personally - but putting on my objective lens, I wouldn't say any of them are truly S-tier. There's always something pretty major holding it back, and not just of the minor nitpick variety. Like the non-Sonic characters that make an appearance not being used as well as they could have been, or too many plotholes to ignore, or tonal issues, or certain trends that desperately need to die out. Among other things, depending on the game.
This does NOT mean I think they shouldn't bother with stories period. That wouldn't make sense coming from someone who takes his Sonic universe know-how fairly seriously, and the Classics still had a story anyway despite their lack of dialogue. I also don't demand literal perfection, since that's always going to be subjective. It just means they need to try a little bit harder, so that I can praise a story without having to add a noteworthy "but" or "despite" anywhere in the sentence.
12 notes
·
View notes
Text
Mastering Realism: A Comprehensive Guide to Creating, Texturing, Animating, and Rendering in Autodesk Maya
Autodesk Maya stands as a premier 3D computer graphics software that has been an industry standard for years. Its versatile capabilities have allowed artists, animators, and designers to bring their imagination to life in breathtaking detail. In this blog post, we will delve into the world of Maya, exploring how to create realistic models, texture them, animate scenes, and achieve stunning renders that captivate audiences.
Creating Realistic Models
The foundation of any 3D project in Maya is the creation of lifelike models. With its robust set of modeling tools, Maya empowers creators to shape their ideas into three-dimensional objects that mimic real-world counterparts. Whether it's character models, architectural designs, or intricate props, Maya's toolkit offers both polygonal and NURBS-based modeling techniques to suit various project needs.
Polygonal Modeling: This method involves building models by connecting vertices, edges, and faces to form complex shapes. Maya's polygon modeling tools provide precision and control, enabling you to sculpt organic or mechanical structures with ease.
NURBS Modeling: Non-Uniform Rational B-Splines (NURBS) offer a mathematical approach to modeling, which is particularly suited for creating smooth and curvilinear surfaces. This technique is often used for vehicles, product design, and architectural elements.
Texturing for Realism
Texturing breathes life into models, giving them the appearance of materials and surfaces found in the real world. Maya offers an array of tools and workflows for applying textures to models, simulating materials like wood, metal, fabric, and skin.
UV Mapping: Properly unwrapping a model's UVs is essential for applying textures accurately. Maya provides tools for efficient UV unwrapping, allowing you to paint or apply textures in 2D editing software before bringing them back into Maya.
Shader Networks: Creating realistic materials involves combining various texture maps within shader networks. Maya's Hypershade editor makes it simple to connect textures to shaders and simulate intricate material properties like roughness, reflectivity, and translucency.
Animating with Depth
Maya's animation capabilities open the door to dynamic storytelling and captivating visual experiences. From character animations to complex motion graphics, the animation tools in Maya cater to a wide range of creative ambitions.
Keyframing: Keyframing is the foundation of animation, allowing you to set specific poses and positions for objects over time. Maya's Graph Editor provides granular control over keyframes, easing in and out of motions for a more organic feel.
Rigging: Rigging involves creating a skeleton or structure within a model, allowing it to be manipulated like a puppet. Maya's robust rigging tools facilitate the creation of intricate character rigs, enabling movements that closely resemble real-life actions.
Rendering Brilliance
The final step in the 3D creation process is rendering—transforming your 3D scene into a stunning 2D image or animation. Maya's rendering capabilities are powered by Arnold, a sophisticated rendering engine known for its realism and efficiency.
Arnold Renderer: Arnold provides a physically accurate rendering process, simulating lighting, shadows, reflections, and global illumination. Its integration with Maya makes achieving photorealistic results more accessible than ever.
Render Settings: Maya's Render Settings give you full control over image resolution, quality, and effects. You can adjust settings to match your project's requirements, whether you're rendering for print, web, or animation.
Conclusion
Autodesk Maya has long been an essential tool for artists and creators seeking to bring their visions to life with unparalleled realism. With its powerful modeling, texturing, animation, and rendering capabilities, Maya empowers users to create lifelike scenes and characters that resonate with audiences. By mastering these techniques, you can unlock a world of creative possibilities and take your projects to new heights of visual excellence. Whether you're a seasoned professional or just starting on your 3D journey, Maya remains a valuable companion in your pursuit of digital artistry.
3 notes
·
View notes
Text
Top 10 FAQ for Beginners: Mastering Metal Textures in Digital Art
Question: What are metal textures? Answer: Metal textures are digital images or designs that replicate the appearance of different types of metals. They can be used in various applications, including graphic design, gaming, and 3D modeling, to give objects a realistic metallic look.
Question: How do I apply metal textures to my 3D objects? Answer: Metal textures can be applied using 3D software like Blender, Maya, or 3ds Max. Typically, you’ll import the texture into the software and then map it onto your 3D object's surface as a material.
Question: What are the most common types of metal textures? Answer: Common types include brushed metal, chrome, gold, silver, steel, copper, and rusted textures. Each texture has distinct characteristics that can affect the visual appeal of a design.
Question: Can I create my own metal textures? Answer: Yes, you can create metal textures using graphic design software like Photoshop or GIMP by manipulating various filters and layers to achieve the desired look.
Question: Are metal textures free to use? Answer: Some metal textures are free to use, while others may require a purchase or subscription. Websites like Textures.com or freestocktextures.com offer a variety of free and paid textures.
Question: What is PBR metal texture? Answer: PBR stands for Physically Based Rendering, a method that aims to render images in a way that more accurately models the interaction between light and materials. PBR metal textures follow this principle to achieve more realistic results.
Question: Why do I need HDR images for metal textures? Answer: HDR (High Dynamic Range) images provide a wider range of lighting information, which is crucial for accurately reflecting light in metal textures, enhancing realism in renders and scenes.
Question: How can I make sure my metal textures look realistic? Answer: Ensure proper lighting setup and adjust material properties such as roughness and reflectiveness in your rendering software. Utilizing high-resolution textures can also greatly enhance realism.
Question: What is the difference between seamless and non-seamless metal textures? Answer: Seamless textures can be tiled or repeated without visible borders, making them ideal for large surfaces. Non-seamless textures may have distinct edges, which can be noticeable when tiled.
Question: Can metal textures be used in 2D design? Answer: Absolutely! Metal textures can add depth and dimension to 2D designs like posters, flyers, and web graphics, giving them a shiny or metallic effect.
0 notes
Text
Understanding the Basics of VFX: How Visual Effects Work in Movies

In the world of modern cinema, visual storytelling has reached new heights—thanks largely to Visual Effects (VFX). From breathtaking alien worlds to explosive battle scenes and shape-shifting characters, VFX allows filmmakers to bring extraordinary visions to life that would be impossible, dangerous, or too costly to shoot in real life.
Whether you’re an aspiring filmmaker, an artist, or simply a curious movie lover, understanding the basics of VFX can deepen your appreciation of how movies are made. For those serious about entering the industry, enrolling in specialized programs like VFX Film Making Courses in Udaipur or VFX Prime Courses in Udaipur can be the first step toward an exciting and in-demand career.
What Is VFX?
Visual Effects (VFX) refers to the process of creating or manipulating imagery that is added to live-action footage. These effects are created digitally using software, green screens, and compositing techniques. While many assume VFX is only about big explosions or space battles, it also includes subtle effects—like aging a character, replacing a background, or enhancing weather.
VFX differs from special effects (SFX), which are practical effects done on set—like squibs, prosthetics, or real pyrotechnics. VFX happens in post-production, after the scenes have been filmed.
Types of VFX in Movies
Understanding the types of VFX helps break down the process:
1. Computer-Generated Imagery (CGI)
CGI is perhaps the most commonly recognized form of VFX. It involves using 3D modeling and animation to create objects, characters, environments, and even entire scenes. Think of the dinosaurs in Jurassic Park or the dragons in Game of Thrones—all brought to life using CGI.
2. Compositing
Compositing involves combining multiple visual elements from separate sources into a single image. This is where green screen work comes in. Actors perform in front of a green screen, and digital backgrounds are added later using chroma key technology.
3. Matte Painting
Matte paintings are digitally created environments or landscapes that are integrated into the live-action footage. These are often used to create vast cityscapes, fantasy worlds, or historical settings.
4. Motion Capture (MoCap)
Used for characters like Gollum in The Lord of the Rings or Caesar in Planet of the Apes, MoCap involves actors wearing suits with sensors that capture their movements, which are then applied to digital models.
5. Rotoscoping
This technique involves tracing over live-action footage to isolate elements or create stylized effects. It’s often used to remove green screens or enhance motion.
The VFX Pipeline: How It All Comes Together
Creating visual effects is a structured process that follows a specific pipeline. Here are the key stages:
Pre-Production – Planning scenes that require VFX, including storyboarding and pre-visualization.
Production – Shooting scenes with placeholders or green screens, using motion tracking or stand-in props.
Post-Production – The VFX team takes over. This includes modeling, animating, compositing, rendering, and final touches.
The entire process requires collaboration between artists, technicians, and directors to maintain visual continuity and story coherence.
Why Learn VFX?
As demand for high-quality visual content grows across streaming platforms, advertising, gaming, and film, so does the need for skilled VFX professionals. VFX is no longer limited to Hollywood; even regional cinema and web content now heavily rely on visual effects.
Pursuing VFX Film Making Courses in Udaipur offers structured training in tools like Adobe After Effects, Nuke, Maya, Blender, and more. These courses provide the technical knowledge, hands-on experience, and portfolio-building opportunities needed to break into the industry.
Benefits of VFX Courses in Udaipur
Udaipur has emerged as a growing center for creative education in India. Here’s why enrolling in VFX Prime Courses in Udaipur can be a game-changer:
Expert Faculty: Learn from industry-experienced professionals who understand the latest trends and technologies.
Modern Infrastructure: Access to high-end systems and software needed for real-time learning.
Portfolio Development: Work on live projects to build a job-ready showreel.
Career Support: Many institutes offer placement assistance, internships, and guidance for freelancing or remote work.
These courses cater to a wide range of learners—from high school graduates to working professionals looking to upskill or shift careers.
Real-World Applications of VFX
VFX is used far beyond blockbuster films. Here are a few industries where VFX plays a critical role:
Advertising: To create visually engaging commercials that capture attention.
Education: VFX brings abstract concepts to life in e-learning modules.
Gaming: Realistic environments and characters depend on VFX and 3D modeling.
Architecture & Real Estate: Virtual walkthroughs and visualizations use similar techniques.
Virtual and Augmented Reality (VR/AR): Expanding VFX into immersive experiences.
The skills you gain from VFX Prime Courses in Udaipur can be applied to any of these fast-growing fields.
Final Thoughts
Visual effects are no longer just movie magic—they are essential to modern storytelling. From subtle enhancements to entire digital worlds, VFX enables filmmakers to create stories limited only by imagination.
If you’re fascinated by how these visuals come to life, it’s time to explore formal training through VFX Film Making Courses in Udaipur or specialized VFX Prime Courses in Udaipur. These programs not only teach the technical side of VFX but also help nurture your creativity, critical thinking, and problem-solving skills.
Whether you dream of working in Bollywood, Hollywood, advertising, or indie cinema, a solid foundation in VFX can be your launchpad into a thrilling and future-proof career.
0 notes
Text
Virtual Reality Development: The Next Big Thing in Tech Innovation

Over the past decade, the world has witnessed incredible advances in technology—from smartphones and cloud computing to artificial intelligence and blockchain. But among these innovations, one stands out for its ability to fundamentally change how we interact with digital content: Virtual Reality (VR). As VR hardware improves and development tools evolve, virtual reality development is rapidly emerging as the next big thing in tech innovation, reshaping industries from entertainment and education to healthcare and design.
What Is Virtual Reality Development?
Virtual reality development refers to the process of creating immersive, interactive 3D environments that simulate physical presence. These environments are experienced through VR headsets, which track head and body movement and often include haptic feedback and spatial audio to enhance immersion.
At its core, VR development combines elements of game design, software engineering, user experience (UX) design, and 3D modeling. Developers use platforms like Unity or Unreal Engine to build virtual environments, program interactivity, and fine-tune the user experience.
Why VR Is More Than Just a Buzzword
While virtual reality has existed in some form since the 1960s, recent advancements have made it more practical, portable, and affordable. What once required an entire room and expensive hardware can now be experienced with standalone devices like the Meta Quest, HTC Vive, or Apple Vision Pro.
This accessibility is fueling a surge in VR innovation, leading to breakthroughs in a wide range of industries:
Gaming and Entertainment: VR is revolutionizing the gaming world by offering immersive gameplay that puts players directly inside the story. Games like Half-Life: Alyx, Beat Saber, and Resident Evil 4 VR demonstrate how developers can create rich, dynamic experiences that far surpass traditional screen-based gaming.
Education and Training: From virtual classrooms to flight simulators, VR offers experiential learning that boosts engagement and retention. Medical students can practice surgeries, engineers can explore 3D blueprints, and history students can walk through ancient civilizations.
Healthcare: VR is being used for pain management, exposure therapy, physical rehabilitation, and even surgical training. Its ability to create controlled, repeatable scenarios makes it a powerful tool for mental health and recovery.
Architecture and Real Estate: Architects use VR to prototype buildings and allow clients to “walk through” them before construction. Real estate agents can offer remote, interactive tours that make property shopping more accessible.
Remote Collaboration: VR meetings are becoming a real alternative to video calls, allowing teams to collaborate in shared virtual spaces. Companies like Meta and Microsoft are investing heavily in virtual workspaces to support the future of remote and hybrid work.
What Makes VR Development Unique?
Developing for VR is very different from traditional app or game development. The immersive nature of VR introduces new challenges and opportunities that developers must address.
Presence and Embodiment
In VR, users aren’t just watching a scene—they’re in it. This sense of presence requires a different design mindset. Everything from lighting and spatial sound to physics and motion must feel natural to avoid breaking the illusion.
Interactivity
VR users expect to interact with objects using natural gestures. This requires developers to think deeply about hand tracking, controller input, and physics-based interactions. Touching, grabbing, throwing, or manipulating objects should feel as close to real life as possible.
Performance Demands
VR requires high frame rates—ideally 90 FPS or more—to prevent motion sickness. This makes optimization critical. Developers must carefully manage resources, simplify 3D models, and reduce latency to deliver smooth, responsive experiences.
New UX Paradigms
Flat menus and buttons don’t work well in 3D space. VR developers must design interfaces that users can navigate intuitively—often by mimicking real-world objects like dashboards, control panels, or tools.
Barriers and Breakthroughs
Despite its promise, VR still faces hurdles:
Cost and Accessibility: While prices have dropped, high-quality VR hardware can still be expensive. However, mobile and standalone VR options are helping bridge the gap.
Content Creation: VR development requires specialized skills in 3D modeling, animation, and interaction design, which can raise costs and timelines.
User Comfort: Motion sickness remains a challenge, especially for new users. Developers must design comfort-first experiences with careful attention to motion, perspective, and interaction.
But with these challenges come opportunities. As AI and machine learning are integrated into VR development, content generation and personalization are becoming faster and more scalable. Procedural environments, intelligent NPCs, and adaptive storytelling are on the horizon, promising even richer virtual experiences.
The Future of VR Development
The next wave of VR innovation will be defined by:
Mixed and Augmented Reality (MR/AR): The lines between VR, AR, and MR are blurring. Devices that seamlessly transition between virtual and real-world views—like Apple’s Vision Pro—are expanding the potential use cases.
Social VR and the Metaverse: Persistent, shared virtual worlds are paving the way for social and economic ecosystems within VR. While the term “metaverse” is still evolving, the concept has energized developers and investors alike.
VR for All Ages and Abilities: Accessibility features and age-appropriate design are opening VR to more people, ensuring that the technology doesn’t leave anyone behind.
Conclusion
Virtual reality development is at the forefront of tech innovation—not as a passing trend, but as a foundational shift in how we experience the digital world. Whether it's transforming entertainment, enhancing education, or revolutionizing design, VR is setting the stage for the next generation of immersive technology.
As tools improve and creative minds continue to experiment, virtual reality will become more than just a platform—it will become a new reality. And developers are the architects shaping that future, one pixel, one experience, and one breakthrough at a time.
Get to us
VR Duct Aldwych, London WC2B 4HN
Ph: 020 8050 6021
0 notes
Text
Visual Effects VFX Services
Understanding Visual Effects (VFX) Services in Modern Media Production
Introduction to VFX Services
Visual Effects (VFX) services are an essential component of contemporary media production, playing a central role in creating immersive and dynamic visual content across film, television, advertising, and gaming. These services involve the integration of computer-generated imagery (CGI) with live-action footage to enhance storytelling, simulate environments, and create visuals that would be difficult or impossible to capture with practical effects alone. As digital content consumption grows, the demand for high-quality visual effects continues to expand across various industries.
Key Components of VFX Services
VFX services encompass several specialized areas, each focusing on a specific aspect of visual enhancement. One of the foundational elements is compositing, which involves combining multiple visual elements into a single cohesive frame. This process is critical for seamless scene integration, especially when blending CGI with real-world footage. Motion tracking and rotoscoping are also integral, enabling precise alignment and isolation of moving objects within a shot.
Another significant area is 3D modeling and animation. This process allows artists to create digital representations of characters, objects, or environments that can be animated and manipulated in post-production. Texture mapping, rigging, and lighting design further enhance the realism of these models. VFX services also include simulation effects such as explosions, fire, smoke, and water, often generated using specialized software to replicate physical phenomena convincingly.
Applications Across Industries
Visual effects VFX services are most commonly associated with the entertainment industry, particularly big-budget films and television series. However, their use extends beyond cinema. In advertising, VFX helps create compelling visuals that capture consumer attention and convey complex messages in seconds. The gaming industry heavily relies on VFX for cinematic cut-scenes, realistic environments, and dynamic gameplay visuals.
VFX also plays a role in architectural visualization, allowing developers to present lifelike renderings of buildings before construction begins. Education and healthcare industries have begun to utilize VFX in simulations and training modules, where visual accuracy and interactivity enhance learning outcomes. As virtual reality and augmented reality technologies grow, the need for specialized VFX continues to rise in these immersive platforms.
Process and Workflow
The creation of visual effects involves a structured workflow beginning with concept development and storyboarding. This stage outlines how VFX will support the narrative and defines the artistic direction. Pre-visualization tools allow clients and artists to see a rough version of the final product before full production begins.
Production involves capturing live-action elements using green screens, camera tracking, and data collection to ensure proper alignment with the digital components. In post-production, the actual visual effects are created, rendered, and composited into the final footage. The process requires collaboration between directors, VFX supervisors, animators, and technical artists to ensure the final result aligns with the creative vision.
Technology and Innovation in VFX
The rapid advancement of technology has significantly influenced the capabilities of visual effects VFX services. High-performance computing, AI-driven tools, and real-time rendering engines have transformed how effects are developed and implemented. Cloud-based workflows allow remote collaboration among global teams, making the process more efficient and scalable.
Virtual production, using LED walls and real-time rendering software, is redefining how scenes are filmed. Instead of relying solely on post-production, some effects are created live on set, allowing for immediate feedback and adjustments. These innovations reduce time and cost while increasing the creative possibilities available to directors and producers.
Conclusion
The scope and importance of visual effects VFX services have grown dramatically with technological advancement and increased content demands. From cinematic storytelling to advertising and training simulations, these services provide the tools necessary to push creative boundaries. As new platforms emerge and audience expectations evolve, VFX will remain a driving force behind visually compelling media production.
1 note
·
View note
Text
AR/VR for Remote Work: A New Era

Telecommuting is quickly becoming popular globally. In recent years it has become the standard model for many industries. In this regard, the new forms of communication such as Zoom, Microsoft Teams, and Slack perfect the shift. However, these tools still have their limitations in simulating the real work experience of the candidates. Well, welcome AR (Augmented Reality) and VR (Virtual Reality) – technologies that are changing the meaning of remote work. AR/VR has the potential to close the gap between virtual and physical working environments and can support more engaging and realistic remote collaboration.
What is AR/VR?
Now, it would be pertinent to discuss what AR/VR means before we move a step forward to understand their effects on remote work. Augmented Reality (AR) puts additional computer-generated information on an existing scene. Just as in Pokémon GO or those filters on SnapChat – the two overlay something on what we see. Virtual Reality (VR), on the other hand, environments are completely created virtually. VR headsets like Oculus Quest or HTC Vive are examples that let users go into completely virtual environments. The two technologies make it possible to have experiences within the environment but in different ways.
The Need for Immersive Remote Work Solutions
The conventional organizational structure has advantages that absent themselves in remote work. All of them can chat with each other, come up with ideas in face-to-face conversations, and even get to know one another. Remote working, as wonderful as it is, can sometimes completely miss out on these qualities. This is where AR/VR steps in. It improves communications, participation, and to an extent, work efficiency for people working away from the office. AR/VR can present many opportunities to enhance remote work, which exists and will continue to exist to a significant extent even after the COVID-19 pandemic is over, mainly by making virtual work environments more dynamic.
How AR/VR Elevates Remote Work
1. Virtual Meetings That Feel Real
Even though virtually all the businesses have engaged in virtual meetings instead of face to face via video calls, it is often shallow. Meetings are not the same anymore with the use of AR/VR. Colleagues can be presented in virtual meeting rooms via VR. They see the avatars of their colleagues, and this gives some feeling of presence. For example, while using Facebook, and Horizon Workrooms, they are able to get into virtual offices. And it is so different from the flat call experience that people are used to with video calls.
2. Collaborative Whiteboards and 3D Models
People who work remotely often need some illustrations for effective collaboration. AR/VR allows for distributed illustrated collaborative ideation on such tools as ideation boards. It also permits 3D models and this assists in viewing the prototypes and manipulating them. Spatial and Microsoft Mesh have integration features for designing and evaluating objects in a common area. These platforms encourage freedom of expression because individuals are not limited within a certain time constraint of showing every idea on camera.
3. Enhanced Training and Skill Development
Training is essential, more so if the employees are newly hired or if the organization wants to improve employees’ skills. Regardless of the above-discussed implementing approaches, there is no denying that AR/VR provides training possibilities that conventional tactics cannot provide. For instance, an employee can onboard themselves through a virtual reality session. They can familiarise themselves with the actual environment and can learn more about organizational culture through a simulated tour. Other big companies like Walmart and UPS have empowered their employees with virtual reality training for exposure to real-life events. This is especially true if the training involves jobs that require the use of practical skills such as operating large machines.
4. Immersive Project Management and Planning
Communication and visualization also play important roles in project management where project managers play a vital role. AR/VR can help project managers to model projects based on an ideal model of projects. They can monitor phases and vices, and vice versa without physically visiting the site of construction. This is particularly helpful in construction or manufacturing because of the carefully designed layouts of elements and principles. AR/VR enables the project managers to see the model and designs in 3D hence improving remote planning.
5. Social Interaction and Team Building
The social relations can hurt due to remote work and negative consequences may result in reduced morale and productivity of the team. Thus, AR/VR may help to restore the social component. Businesses can always plan virtual reality-based crew-building exercises. People can assemble virtually to play games or to commemorate certain accomplishments. VR social apps also include AltspaceVR through which employees can casually communicate or converse with each other. These interactions foster team development more so given that people could be working from different time zones.
6. Remote Assistance and Troubleshooting
AR, in particular, is best useful for distant diagnosing of problems and issues. Technicians can even instruct users in real-time and have instructions pop up in the real world. When a user is donning AR glasses, they may be given instruction from an expert one step at a time. This approach is efficient in organizations such as manufacturing organizations because early troubleshooting is crucial. Examples of applications of AR in today’s society include remote support services as in TeamViewer Pilot.
Key Benefits of AR/VR in Remote Work
1. Reduced Travel Costs
AR/VR can do away with regular physical conferences which, can save much on traveling costs. One of the alternatives to an expensive and time-consuming journey is a VR meeting. This benefit goes as far as training and inspections which have always necessitated physical presence. AR/VR facilitates users’ interaction in a way that does not require physical presence and preserves the quality of the process.
2.Improved Engagement and Retention
Normal video communications can be rather draining, getting into the “Zoom, fatigue” territory. Whereas traditional calls do not have the same creative spin as AR/VR does. In VR, the participants are more immersed, and so meetings are much more interesting. This assertion indicates that organizations that have engaged employees will likely have high productivity and a high level of organizational commitment.
3. Increased Productivity
AR/VR can only improve focus because it allows users to have a separate virtual working environment. One particular benefit of VR users is that they can easily eliminate interference and focus only on work. The flexibility offered in the application of AR/VR also impacts productivity in that the interaction of the two keeps everyone at work, particularly in the group.
4. Better Communication and Collaboration
Since there is little face-to-face contact, misunderstandings occur frequently in jobs that are done remotely. As in a face-to-face manner, misunderstandings are dealt with due to the use of an AR/VR connection. Group members can explain one another’s project progress on a single board, and the ideas become easier to understand.
Challenges and Limitations of AR/VR in Remote Work
1. High Equipment Costs
This means quality VR headsets & AR devices are still expensive. If anything prices of equipment that support AR/VR are going down, however, the prices always stay high since it is an investment. On this account, this can be a restrictive factor for entry for small businesses.
2. Bandwidth and Technical Requirements
AR/VR calls for the use of the internet since it is one of the essential requirements in the running of a firm. This can cause lag and/or buffering which will increase the detriments to the extent of compromising the VR experience. However, some of them may not be able to get access to a high-speed internet connection. These are some of the limitations that firms have to deliberate before adopting AR/VR.
3. User Comfort and Health Concerns
While using the VR headsets, wearers can develop motion sickness or discomfort in case they use them for some time. Certain people continue to complain of eyestrain or headaches after they use VR often or for long durations. Such health issues can reduce the length of time in which people spend in virtual reality-based meetings or training.
4. Learning Curve
For this reason, people are not familiar with AR/VR technology. This can mean that some of the people that you have in your organization will require some time before they can get used to new tools. Employers and companies have to provide guidance and training programs that put people at ease.
Future of AR/VR in Remote Work
AR/VR in remote work will have a better Future. Increased technology will help in making the AR/VR solution more affordable. H MDs will soon be able to wear lightweight VR glasses and AR contact lenses. These developments could turn AR/VR into one of the standard tools of remote work environments. AR/VR is one of the technologies that is in the development phase; many companies are investing in it, such as Meta, Microsoft, and Google. This investment shows greater convergence into a more digitized work environment. There is another effective trend, which is the combination of AI and AR/VR. AI would also be able to execute responsibilities within virtual reality spaces thus increasing the efficiency of remote work. This can be visualized as an AI-based virtual driver of meetings or project timekeeping. Merging Artificial Intelligence with AR/VR can make a great impact on the efficiency of the remote working environment.
Industries Leading the Way in AR/VR Remote Work
1. Manufacturing
AR is most valuable in the manufacturing process since it provides remote support and monitors work quality. AR helps supervisors to monitor the processes remotely so as to improve their effectiveness.
2. Healthcare
Telemedicine has seen a boost with AR/VR, enabling doctors to consult with patients remotely. Surgeons can even practice complex procedures in VR, improving patient care.
3. Real Estate
Virtual Reality has revolutionized the way property viewings are done. It can be noted that buyers can access properties wanted by visiting without physically visiting the premises. The area coverage option is particularly helpful to those clients who are moving to new cities.
4. Education and Training
Schools and companies are using virtual reality systems to enhance the learning environment and make the classrooms virtual. Education is not left behind when it comes to being touched by the incident, students can even learn interactively from home.
Getting Started with AR/VR for Remote Work
If your company is only considering implementing AR/VR, don’t rush into it, rather take baby steps. Start with VR meetings to evaluate the effects of the technology to the interaction of teams. Ensure that they have worked at optimum cost so that your company can be able to afford them. The platforms are Spatial, Engage, or Horizon Workrooms research. Both are vastly different and hold some features that may suit a business type of the market as against the other. Moreover, guarantees that employs are well-trained to handle and use the above tools of project management.
Conclusion
AR/VR has shown a new dimension in remote working. Interactive, including meetings, and training, remote communication is boosted by these technology advancements. Nonetheless, although it’s not without challenges, the effectiveness of AR/VR remains great. Thus, AR/VR can become a new way of perceiving remote work that concerns not only its effectiveness enhancement but also the quality of the interactions between representatives of different organizations. Implementing AR/VR now also has a potential to provide a competitive advantage in the future, so businesses should consider it. What’s new is that this is not your typical remote work – it’s live and it’s 3D.
0 notes
Text
Spatial Reasoning in AI Agents: Understanding the Physical World

Some agents must reason about physical layout, location, and space—especially in robotics, AR/VR, and simulation-based environments.
This includes:
Path planning
Object manipulation
Map reading or generation
By integrating spatial awareness modules (like 3D maps or scene graphs), AI agents can navigate, manipulate, and describe physical worlds.
Use diagrams or floor plans as input—agents with spatial prompts perform better on movement and interaction tasks.
1 note
·
View note
Text
What is Vulcan Amazon? Types And Vulcan robots price

Describe Vulcan Amazon
Amazon's first touch-sensitive robot is Vulcan. Vulcan is improving physical AI, engineering, and robotics to make our people safer and more efficient at order movement. Next time you drop a coin on the floor, consider how to retrieve it.
In Amazon fulfilment centres, Vulcan Amazon robots collect and store items from fabric storage pods. These robots debuted at Amazon's Dortmund Delivering the Future summit. They develop robotics by introducing touch.
Former Amazon FC robotic arms moved goods from open-topped bins or conveyor belts, but Vulcan interacts with fabric pods. A fabric pod resembles cubbyholes and is exclusively accessible from the front, according to one description. These cubbies hold stacked, random items held with elastic bands. Vulcan robots control physical interaction with other objects and pod walls when removing or inserting goods in these cubbies.
Touch in addition to vision is Vulcan robots' main innovation. Traditional industrial automation, like Amazon manipulation, uses shared position information and vision without touching. Insensitive to touch, these “numb and dumb” robots may stop or smash when touched. Vulcan robots are designed to touch any object in their workspace.
Sensors measure torque and force in all six axes on their end-of-arm equipment. They can use these sensors to measure their force on items and stop before using too much. This procedure is like touching a coin to find it. This “force-in-the-loop, high-contact style of manipulation” is a new robotic manipulation paradigm that can last 20 years.
The Vulcan project's main robots are Pick and Stow.
Vulcan stash
The Vulcan Stow Robot stores fresh items in fabric pods.
Post-conveyor belt item reception: A computer vision system adjusts gripper width based on item measurements.
Vision System: Three pairs of stereo cameras on a tower create a three-dimensional model of the pod and its contents.
Imaging Algorithm: A generative-AI model was used to mimic bin images with elastic bands to teach the algorithm to image elastic bands.
Bin photos are segmented into bins, elastic bands, and items inside the bands using three deep learning models. Projecting these segments onto a 3-D point cloud creates a composite segmentation.
Space Identification: Calculates bounding boxes to find bin space. If space is available, the bin is chosen. If the empty space is not contiguous, the robot can push stuff away.
Planning Insertion: Convolution with a kernel representing the requisite space determines insertion spots in a two-dimensional image. A machine learning model produces affordances when projecting this onto the three-dimensional model to indicate where to insert the item and extensible blade.
End-Of-Arm Tool (EOAT): A conveyor belt-driven gripper with two parallel plates that slides things into the bin. A kitchen spatula-like extensible aluminium attachment moves items.
Strings control primitives like approach, extend blade, sweep, and eject_item based on affordances. It may swivel 90 degrees and insert the blade horizontally to make room.
Justification: The system considers the physics of squishy vs. stiff materials and predicts how a pile of things will move when swept to compute the required force.
Pick robot Vulcan
Selects items from fabric storage pods.
Eligibility Check: If an item cannot be retrieved robotically, it is passed to human pickers. This check uses metadata-enhanced FC images.
Vision System: An integrated camera on its EOAT measures depth using structured light or infrared.
One MaskDINO neural model segments and classifies. An additional layer divides segmented objects into four groups: not an item, great item, below others, and obstructed item.The divided image is projected onto a 3D point cloud. characterises the three-dimensional scene using a signed distance function, where empty space is positive and occupied space behind a surface is negative.
This approach instantaneously matches target photos to sample product photos to identify the target object without barcodes. A contrastive learning-trained product-matching model is used.
Adhesion Point Selection: Finds flat target object regions for suction using the 3-D composite. These surfaces are ranked by their neighbours' signed distances, which indicate collision likelihood.Suction tools include the End-Of-Arm Tool.
Extraction: Uses the suction tool on the top candidate. Suction pressure is monitored during extraction. To detect bin shape changes, the camera takes 10 low-resolution images every second. If the initial choice fails, it tries others. If the item fails too often, humans remove it.
Vulcan Stow and Vulcan Pick robots employ a hook EOAT on their second arms to push or pull up or down bin front elastic bands.
Products are randomly distributed to pods and shelves to promote efficiency and limit the chance that many stations use the same pod.
Key objectives and impacts of these robots:
To improve worker safety and ergonomics, manage jobs on the tallest and lowest shelves that might otherwise require stepladders or less ergonomic work locations.
Allowing workers to focus on centre shelves, hard-to-reach items, or tightly packed containers.
Making operations more efficient.
Revolutionising operations by allowing robots to function in inconceivable settings and items.
Six Vulcan Stow robots completed a Spokane test project. They are ready for beta testing at the same facility with 30 more robots. A German plant will use Vulcan Stow and Vulcan Pick robots together. Managing 75% of FCs' item types, they must work at front-line speeds.
FAQs
Is Vulcan robotic?
Restocking was automated by Amazon's Vulcan robot. It moves bulk items to mobile shelves. AI and force feedback sensors make Vulcan tactile.
Price of Vulcan robots
The type and use of “Vulcan” robots affect their price. The pricing of the various “Vulcan” robots are listed here: Amazon’s “Vulcan” warehouse robot: Amazon designed an advanced, touch-sensitive robot to monitor fulfilment centre inventories. Price: Vulcan Amazon robot's pricing isn't disclosed. This is part of Amazon's $25 billion automation project. Large initial investments are needed for industrial robots.
#VulcanAmazon#VulcanStow#VulcanPickrobot#Vulcanrobotsprice#Vulcanrobots#VulcanPick#Technology#TechNews#technologynews#news#govindhtech
1 note
·
View note
Text
Blender donut
I've picked up a lot of useful tasks from this tutorial I watched. Here's a breakdown of what I've learned so far:
Navigating the Interface: I got comfortable with Blender’s interface, figuring out how to move around in the 3D viewport, select and manipulate objects, and use the toolbar. It took a little time, but I feel pretty confident now.
Creating Basic Shapes: I learned how to add primitive shapes like cubes, spheres, and cones to my scene. From there, I practiced scaling, rotating, and moving these objects to position them just right.
Mesh Editing: One big thing I picked up was using tools like extrude and loop cuts to add detail to my models. I also started using the Subdivision Surface modifier to smooth things out and make them look cleaner.
Modifiers and Sculpting: I played around with modifiers like Mirror, Subdivision Surface, and Boolean to make the process more efficient. I even dove into sculpting a bit, learning how to use different brushes and dynamic topology for more detailed work.
Texturing and Shading: I practiced UV mapping to unwrap my models and apply textures. Also, I got into the Shader Editor to make materials and shaders. The node system took a little time to get used to, but it’s a really powerful tool for creating cool effects.
Lighting and Rendering: I learned how to set up different lights in the scene to make it look more realistic. I also played with the rendering settings, switching between Eevee and Cycles, and tweaking them for the best results.
Animation Basics: I started animating by setting keyframes for objects. I even explored the Graph Editor to get the timing and movements just right.
Finalizing the Scene: I figured out how to set up the camera to get the perfect shot of my scene. Finally, I learned how to export my models in formats like .FBX, .OBJ, and .STL.

To add icing to my donut model in Blender, I started by selecting the top face of the donut where I wanted the icing to go. I switched to edit mode and used face select to pick the top face of the donut. Then, I pressed E to extrude and started pulling the icing up from the donut's surface. As I extruded, I moved the new geometry slightly upwards and outwards, making sure the icing flowed over the edges. I used S to scale the icing and give it a nice, smooth, flowing look around the donut. After extruding, I smoothed out the icing shape by tweaking the vertices and adding some small adjustments, making it look like the icing was naturally draped over the donut. Finally, I exited edit mode to see the whole result, and it looked just like a donut with a perfect layer of icing on top
I also learnt how to make object smooth. As you can see the icing of tis donut was very pointy and not realistic. Therefore, I learnt from this to do that I have to be on edit mode to click on each dots then play around to see what looks best.


I managed to make the icing and I am proud of how well I did this for first time.
However after making the icing drip I realized the top bit got messed up. probably because the dots were pulled down too much.
0 notes