#Max and the junkmen
Text
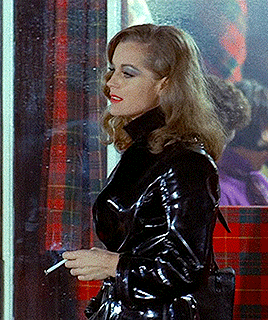


Romy Schneider's YSL wardrobe in Max and the Junkmen (1971) Dir: Claude Sautet
#max and the junkmen#tw: smoking#costumeedit#1970s#filmgifs#moviegifs#filmedit#uservintage#france#worldcinemaedit#romy schneider#userkraina#cinemapix#fyeahmovies#ours#by natty
860 notes
·
View notes
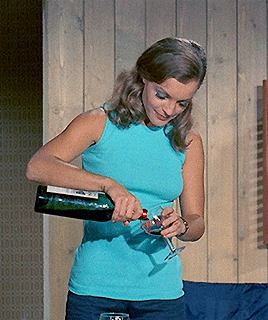
Photo


Max et les ferrailleurs (1971)
14 notes
·
View notes
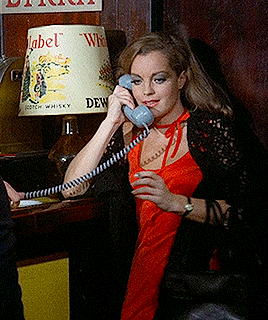
Text


Romy Schneider wearing Yves Saint Laurent in Max et les Ferrailleurs (1971).
#her birthday#romy schneider#yves saint laurent#ysl#max et les ferrailleurs#max anf the junkmen#1970s#fashion#french cinema
10 notes
·
View notes
Note
how does one approach toron mine 7? even after the nerf i can't seem to make it work
Alright so here's the thing, even after the nerf (and the nerf is huge by the way, at Danger Level 20 enemies used to have +160% higher max HP and +20% more DEF than they do now) Toron mine is still a lot of bullshit entirely due to its stage design and enemy comps being a brutal mix.
To make life easier, I strongly suggest bringing at least one of the three gods of Toron Mine. These are: Leizi, Suzuran, and Goldenglow.
All three of them have the same strategy: equip S2, then stack 5 Snipers with equipment A to get +200 ASPD for them to use (Leizi will need Module Level 2 as well.)
Goldenglow has the widest range and very high damage with her RES ignore and drone crits, Suzuran hits 3 targets at once while slowing and inflicting a 20% fragile debuff on slowed enemies, while Leizi with a level 2 module is just legitimately one of THE strongest carries in SSS, her bouncing attacks, slows, gigantic +150% ATK on S2M3, and her module recharging SP on unblocked enemies make her recharge extremely quickly.
Just one of these three can carry your team to the boss, but having all of them in the squad with a proper amount of snipers is the easiest way I can think of for scoring Toron Mine's secret medal.
Now on to Toron mine LT-7 itself. This map is a killbox, and needs you to set up in a particular way so that everyone in the stage specifically attacks inside that killbox.

The black lines show the enemy routes, red arrows show possible ranged damage placements, green arrows for crowd control placements, and orange for a melee operator that has a wide AOE attack such as Mlynar S3, Gavial S2, Tequila S2, etc. I've also included the Ifrit tile in case you are using Ifrit (block as necessary), though I wouldn't recommend bringing her from the start since she's not quite as good in the previous stages.
Here are a few things to note:
The top lane goes first. These enemies are going to be mostly Breakers who are super speedy, so it's important that you either set up a ground defense early, or can full stack 5 snipers and get that upper left red arrow set up immediately (I recommend placing Leizi here if you have her.) Take note that regenerating junkmen will join the Breakers eventually in this lane.
The leftmost green arrow is the optimal place to put Suzuran with S2. Take note that Suzu will still need to charge her S2, so it's not wise to set her up as the first damage unit as these Breakers WILL come in droves and run fast,
The right green arrow is a place where any ground unit with an AOE attack like Mudrock can slap at the enemies passing by, but a really strong pick here is Ethan, whose bind can really save your ass, especially when he has ASPD buffs.
The rightmost red arrow needs the biggest amount of Arts damage. This is where I put my Goldenglow, though other Arts DPS options can work as well. The bottom lane only comes into play in the latter half of the stage, but after the usual Breakers, you will see Demolitionists cross here. These are the biggest threat of the stage, as their large base DEF gets turbo high when buffed by Danger levels, and their attacks can deal AOE splash damage and kill your ranged units as well (which is why I advocate for not blocking the bottom lane and simply trying to control it)
If you happen to be able to spare the extra resources (like say, you got super lucky in the card draw and set up your ranged damage and control easily), this is where the orange arrow comes in. Liberators are my favoritechoice here as they're extremely DP cheap while also being blockless when not attacking (and thus not being murdered by the breakers and junkmen), though someone like Gavial the Invincible or even a second specialist like Mizuki can do wonders. I like buffing them with guard equipment B (+20% ATK and +20 ASPD) to get that ASPD boost.
TL;DR
This stage is bullshit, prepare for Breaker waves early.
Bottom lane spawns Demolitionists (Defense Crushers with exploding hammers), plan Arts DPS accordingly.
Try to set up the ranged DPS in order: the top leftmost red arrow (make sure it can kill the top lane waves), then the leftmost green arrow, then the rightmost red arrow. Improvise your defenses until you can create a killbox with those three units.
Let me know if you need more help!
47 notes
·
View notes
Text
0 notes
Text


Max and the Junkmen (1971)
49 notes
·
View notes
Photo


Romy Schneider’s costumes in Max and the Junkmen (1971) | requested by anonymous
#max and the junkmen#romy schneider#filmedit#costumeedit#ours#gifs*#1970s#csenge#filmgifs#moviegifs#cinemapix#dailyworldcinema#ladiesofcinema#userfilm
429 notes
·
View notes
Photo


Romy Schneider’s outfits designed by Yves Saint Laurent for Max et les Ferrailleurs, 1971.
#romy schneider#ysl#yves saint laurent#max et les ferrailleurs#max and the junkmen#claude sautet#costume design#1970s style#70s style#leather trench coat#leather trench#french cinema#fashion in film
743 notes
·
View notes
Photo

#max et les ferrailleurs#max and the junkmen#claude sautet#romy schneider#michel piccoli#film#poster#1971
10 notes
·
View notes
Photo


"Max en de kruimeldieven", "Il commissario Pelissier", "Max and the junkmen”, "H tpotez kai oi aiapphktee", "Max y los chatarreros", "El inspector Max", "El inspector y su amiga", "Sátáni ötlet", "Max i ferajna" : "Max et les ferrailleurs" (Claude Sautet - 1971)
#movie poster#max et les ferrailleurs#claude sautet#1971#romy schneider#michel piccoli#Max en de kruimeldieven#Il commissario Pelissier#Max y los chatarreros#El inspector Max#El inspector y su amiga#Max and the junkmen#Sátáni ötlet#H tpotez kai oi aiapphktee#Max i ferajna
27 notes
·
View notes
Photo


"I wish to present myself in front of the camera, each time under the features of a different woman, I would like to live and apprehend the problems, the conflicts, the feelings and the impulses of women radically different from me."
♡ Happy Birthday, Romy Schneider (23 September 1938 - 29 May 1982)
#romy schneider#the trial#l'enfer#les choses de la vie#christine#max and the junkmen#la piscine#le combat dans l'ile#boccaccio 70#m*#p: romy schneider#etc: bday
520 notes
·
View notes
Photo


Jacques Daniel Michel Piccoli (27 December 1925 - 12 May 2020)
We pay tribute to one of the great French actors, who has worked everyone from Alfred Hitchcock to Jean-Luc Godard, Agnès Varda and Luis Buñuel.
With a career spanning over 170 films, Michel Piccoli is one of the finest, most versatile actors in cinema. From artists to everymen, killers to popes, his style is malleable, but his presence is singular.
After beginning his film career in the mid-1950s, he worked with some of the greatest directors in the medium, often multiple times.
His trajectory speaks of a certain faith in auteurs which is prevalent in the careers of many of the great French actors, showing a willingness to feature in lead or supporting roles, with established names or newcomers.
Les Choses de la Vie (The Things of Life), 1970, Director: Claude Sautet,
Max et les Ferrailleurs (Max and the Junkmen),1971, Director: Claude Sautet,
Le Journal d'une Femme de Chambre (Diary of a Chambermaid),1964, Director: Luis Buñuel,
Les Demoiselles de Rochefort (The Young Girls of Rochefort),1967, Director: Jacques Demy,
Le Mépris (Contempt), 1963, Director: Jean-Luc Godard,
Habemus Papam (We have a Pope), 2011, Director: Nanni Moretti,
La Grande Abbuffata (The Big Feast), 1973, Director: Marco Ferreri avec Marcello Mastroianni, Michel Piccoli, Philippe Noiret
Topaz, 1969, Director: Alfred Hitchcock,
Belle de Jour (Beautiful Lady of the Day), 1967, Director: Luis Buñuel,
La Belle Noiseuse (The Beautiful Troublemaker), 1991, Director: Jacques Rivette,
And so Much More...
#art#movies#star#legend#michel piccoli#rip#rip michel piccoli#the things of life#claude sautet#romy schneider#max#junkmen#jeanne moreau#catherine deneuve#francoise dorleac#brigitte bardot#jack palance#alfred hitchcock#jean-luc godard#habemus papam#pope#philippe noiret#nanni moretti#topaz#marco ferreri#the big feast#jacques rivette#troublemaker
57 notes
·
View notes
Photo

Max et les ferrailleurs (1971)
7 notes
·
View notes
Photo

French poster for MAX AND THE JUNKMEN (Claude Sautet, France, 1971)
Designer: uncredited
Poster source: Cinematerial
See more posters for the films of Claude Sautet currently playing on MUBI USA at Movie Poster of the Week.
48 notes
·
View notes
Text
I'm sure you've all beaten Interlocking Competition by now, but just in case, here's a simple guide from my own experience drafting and solving the event!

So the primary challenge of IC is defeating the five stages without repeating any operators and without any access to support, only a modest special deputy Pallas. You will thus need to dig into your roster and use only exactly as much power as you need to solve the initial 4 stages, leaving you with all your best operators to take on the difficult Twilight stage.
Let's talk about the stages!
LK-DP-A

LK-DP-A is a freebie. The strongest enemies that spawn here are Junkmen, which can easily be taken down by any sufficiently leveled melee unit. I highly recommend simply spawncamping the gates.
Suggested Operators:
Jaye with S2 equipped deals a lot of damage, and provides sustain to any nearby allies whenever he attacks.
Scene can solo the entire stage with S1 equipped, spawncamping the gates with her summons.
Zima is very tough, and her S2 allows you to buff other vanguards, letting even low rarity vanguards like Plume and Fang rip through enemies with ease.
LK-DP-B

LK-DP-B can pose some difficulties if you're somewhat lacking in arts damage units and you're saving them for the final stage. The final wave also spawns an Armed Militant who could pose a huge threat to underleveled operators. Remember to bring at least one E1 level Sniper to shoot down the defense drone that hovers near the left gate, an E0 sniper like Rangers does not have the range to reach them.
Suggested Operators:
Steward or any other decently strong casters you might have are great in this level since this stage is designed to burn through your arts units to leave you lacking for the final stage. Click in particular is a great choice for dealing with the Armed Militant, as stunning him will improve the odds of your melee units surviving.
Melee arts units such as Mousse or Astesia are great frontliners without using up Guard Amiya or Surtr. Unlike the latter two, Mousse and Astesia also have defense or attack downs built into their skillsets, allowing you to use weaker medics to sustain them.
Use Rangers facing downwards to hit the defense drone on the right side of the gate. He can kill it quite fast and you might as well use the guy rather than use up a precious Anti-air sniper.
Like Scene before her, a very strong Mayer can almost solo this stage since her robotters can actually hit flying units when they explode. All she needs is backup from a couple of casters and she can save you a ridiculous amount of slots.
LK-DP-C

You have two main threats in this stage: Marksmen that will try to break your terminals to take out a life, and a Bully that you need to deal with. If you don't have many powerful units to spare, you may be tempted to start using some of them here (I know I just busted out the Thorns to zero-brain this stage). Try to hold out though! You'll need them for the next two levels.
Instead, spawncamp the top left and bottom right gate, which is where the Marksmen will come from. They dont deal too much damage to operators, so any melee will do. Prepare one decently levelled defender in the upper left tile next to the right terminal to block the Bully as it passes and take it out with any caster and medic combo. They will also block the Fanatic that spawns from the Upper Right gate at the end of the level. Another Fanatic will spawn in the Lower Left, you will need to kill that quickly as it may walk too close to the left terminal.
Suggested Operators:
This is where you'll need a Defender Operator capable of holding out against a Bully. Beagle maxed out or a decent Cuora can do it, though you may want to save Cuora for later. If your Defender isn't very strong, don't scrimp on the Medic.
An E2 AOE Guard can also block the bully, but you'll probably want to save powerhouses like Blaze or Specter for the final stage. Still, in case you don't plan to, it's an option!
Perfumer is great in this stage because she can be placed in the range tile below the right most terminal to heal your defender while healing everyone else on the map with her talent. Since Marksmen dont really deal much damage, you can leave any melee Operator to spawncamp them without worry with Perfumer's regen.
I really like Siege in this stage because she's not suited to dealing with the final stage nor LK-DP-D, but she CAN practically solo spawncamp the lower left gate. Any other high damage cheap melee will do the trick as well, but you might want to save Bagpipe.
LK-DP-D

This can be a real pain in the ass if you're not ready for it. The challenge in this stage is taking down Frostnova while she alters enemy pathing by destroying all the blocks and without simply burning all of your powerful operators on her. Learn her walk pattern, use multiple snipers, remember that wide-range medics provide Resistance to freeze, and you can always buy some time vs Frostnova by blocking her in melee.
Suggested Operators
If you haven't used Kroos yet, use her here. Kroos does a lot of cheap physical damage, and you'll need as much of this as you can because Frostnova spawns early. May is also particularly fantastic since she comes with CC.
Like the other summoners, Magallan utterly crushes this stage. Since her drones spawn with camoflauge, they cannot be slowed down by Frostnova nor the ice crystals for a short time, allowing Magallan to deal full damage to most targets and then retreating them with S3 for a redeployment.
You CAN use Frostnova's eternal nemesis Exusiai if you want to make things easier, but I do greatly recommend saving both Exu and Ash for the last stage.
I really love Beanstalk in this stage with S2 equipped. Not only can the crabs draw Frostnova's aggro and even force her to cast her skills too early, but Beanstalk's unique range lets her attack Frostnova from safety just like a sniper while also shooting down the many drones in the level.
FIN-TS

At last, you're here in the final proving ground. Hopefully you've saved up enough of your best operators to fight it out here, as this one is actually pretty difficult.
You have three main threats:


The Sarkaz Centurions spawn in middle and then later spawn in left and right gates and finally in the upper left and upper right gates, always going towards the middle.
The Hymnoi Heroes always spawn in the left gate and run through the upper middle lane towards the right gate.
The Hymnoi Warriors spawn in the lower middle, and then in the right gate walking towards the lower middle.
If there's anything you've probably noticed from this, it's that all the bosses attempt to contest your control of the middle of the stage. This is because you can intercept every single enemy route in this map through controlling the middle.
With this in mind, you have two general strategies for how to approach this level:
Wrestle control of the middle away from the enemy then defend it the entire stage
A redeploy strategy where you take the enemy out from range then shift your formation to take the enemy out as they spawn.
Personally I went with mostly the latter, as all my attempts at trying to ungga bungga the middle ended up with me unable to put up a solid defensive line before the enemy took it all back. After the first Hymnoi Warrior and Hymnoi hero were dealt with though, Carnelian in the exact middle tile proved critical to my solution for the stage like so

General tips (because you should be using your best squad now):
The wiki claims that the Hymnoi Warrior's 50 second shield that grants immunity to all damage and CC prevents them from being stalled in any way. This is not true. The Warriors can be stalled by any unit that can block them without attacking them, such as Cuora with S2, or Saria with S3. This is vital to stalling out the second Warrior, as they will begin moving even before their shield runs out, hoping to deal a ton of damage to your team. Block him and buy yourself extra time to prepare!
The Hymnoi Hero can only be blocked by Block-3 units just like a Bully, but their pocket sand skill lowers block count by 1. This can be countered by skills that increase block count such as Nian's S3 or Cuora's S2, or baited out with fast redeploys like Gravel. The skill has a cooldown of 20 seconds, so getting them to waste it gives you some time to kill them!
The healing field a defeated Hymnoi Hero drops is NOT enough to outheal the Hymnoi Warrior's arrow rain. The Hero's field heals for 50 HP per second, while the Warrior's arrows deal 100 pure damage per second. The healing fields will slow down the damage you take, but don't rely on them for survival!
If both a Hero and a Warrior is on the field at once, kill the Hero first. They heal all enemies on the map for 100 HP per second, and killing a Hero with this regeneration means taking way more pure damage than you need to.
The Sarkaz Centurions have a very short range of one tile, but they can hit multiple units and heal per unit they hit. This makes them actually quite tanky against operators all grouped together. Fortunately their defense is very low, and Exusiai or Ash or even Special Deputy Pallas should have no trouble killing them from long range.
Don't be afraid to use Special Deputy Pallas for support, as using her will still let you save an auto-deploy!
The Hymnoi Warrior has a cooldown of a single second on their arrow rain, which means that any Operator with extremely fast attacks can get multiple hits in without triggering arrow rain. Buffing up Ash is one of the most effective ways of quickly bursting the Warrior (their base defense of 1000 makes them a poor matchup for Exusiai unless you have DEF reduction)
Carnelian with S3 equipped on the center ranged tiles can hit almost everything, and a charged S3 will kill the Elite Bullies and Centurions and heavily injure Heroes and Warriors.
Corrupting Heart with S3 equipped can pull double duty, buffing your DPS to shred bosses while also dealing damage around herself and the Seaborn. I used S3 both to buff Ash and Exusiai to kill the Hymnoi Warriors and Heroes, and as an extra source of damage to take out a very low HP Hero that almost made it to the right gate.
Kal'tsit is a greedy option because you're kind of starved for deployment limit on this map, but Mon3tr destroys... Everything but the drones. Get used to treating Mon3tr as a fast redeploy mega assassin and you can be assured Kal'tsit will more than make up for her two deployment slots.
Beat of luck, and I really enjoyed reading about all your drafts! I hope we get more events like this one.
85 notes
·
View notes
Text
Max and the Junkmen
Max and the Junkmen is a film from 1971 about a man who’s an ex magistrate who chooses to join the police force, as he wants to bring justice. He sets up a prostitute to get her criminal boyfriend. Based on what I’ve read for the plot this has several elements that are heavily featured in my idea, the police and being framed.

I think I view my protagonist as being a bit younger, he also didn’t decide after to become a police officer it was always his ambition.
0 notes
Last Seen Blogs

mrwillietussey
Willie B. Tussey Tumblr

topidea
Untitled

liutangcong
ins.V.

shineofcherrycreekco
Shine Window Cleaning of Cherry Creek

universumbacteria
Universum Bacteria Festival