#Nested vSphere
Explore tagged Tumblr posts
Visit Tumblr Blog
Explore Tumblr blogs with no restrictions, modern design and the best experience.
Last Seen Tumblr Blogs


Fun Fact
In 2020, Tumblr had 29.4 million users in the US.
Text
Part VI Beginners Guide - VCF 5.2.1 Updating SDDC Manager, NSX, vCenter, ESXi Hosts

View On WordPress
0 notes
Text
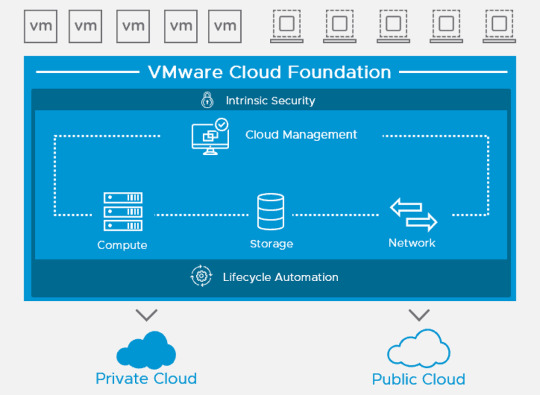
VMware Cloud Foundation 5.2 Administrator 2V0-11.25 Questions and Answers
In the rapidly changing IT landscape, staying ahead means embracing cloud technology—and VMware Cloud Foundation (VCF) 5.2 is leading that charge. The 2V0-11.25 VMware Cloud Foundation 5.2 Administrator exam isn’t just another certification; it’s a proof point of your ability to manage cutting-edge hybrid cloud infrastructure. This professional-level credential shows employers you’re capable of handling complex deployments involving vSphere, vSAN, NSX, and the SDDC Manager, all integrated within VMware’s unified cloud platform. For IT professionals eyeing career growth in cloud, data center, or DevOps roles, this is one badge that carries serious weight.
What to Expect from the Exam: Format, Topics, and Objectives Uncovered
Before jumping in, you’ll want to understand what the exam entails. The 2V0-11.25 exam is comprised of 70 scenario-based multiple-choice questions, designed to test your real-world problem-solving skills across a variety of cloud management scenarios. You’ll have 130 minutes to complete it, and a scaled passing score of 300 out of 500. The exam objectives include everything from managing workload domains, troubleshooting infrastructure issues, and performing lifecycle management using SDDC Manager, to network and storage configurations. This isn’t a certification you can cram for in a weekend—it rewards hands-on experience and deep familiarity with VMware Cloud Foundation components.
Who Should Take This Exam? Exploring the Ideal Candidate Profile
Wondering if this certification is right for you? If you're a systems administrator, cloud engineer, network architect, or data center specialist working with VMware technologies, the answer is yes. It’s especially relevant for professionals managing private and hybrid cloud environments in medium to large enterprises. But even if you’re not yet in a senior role, this cert can help position you there. It’s also a great choice for consultants and freelancers looking to prove their expertise to clients. VMware certifications are recognized globally, so whether you're in the U.S., Europe, Asia, or beyond, this credential boosts your credibility across borders.
Real-World Skills Matter: Why Practical Experience Is Key
The 2V0-11.25 isn’t just about memorization—it’s about application. You'll need hands-on experience with deploying and managing VCF environments, including setting up NSX-T segments, configuring vSAN clusters, integrating vCenter, and updating components with SDDC Manager. This exam expects you to understand how these tools interact, not just as standalone platforms, but as a fully integrated ecosystem. Building your own lab environment using nested virtualization or VMware’s Hands-On Labs can help you bridge the gap between theory and real-world practice. The more you touch the tools, the more confident you'll feel come exam day.
Introducing Cert007: The Best Source for 2V0-11.25 Real Exam Questions
Need a shortcut to success? While nothing replaces hands-on experience, having access to realistic exam practice questions can be a game-changer—and that’s where Cert007 comes in. Known for their up-to-date and high-quality practice materials, Cert007 offers a specialized VMware Cloud Foundation 5.2 Administrator 2V0-11.25 Questions and Answers that mirror the actual exam. These questions aren’t generic—they’re built to reflect VMware’s exam style and format, complete with scenario-based challenges and accurate answers. Whether you’re reviewing core concepts or simulating test-day conditions, Cert007 gives you the clarity and confidence to tackle every question head-on.
How to Use Cert007’s Practice Materials to Pass on Your First Try
Studying smarter is just as important as studying harder. With Cert007 VMware Cloud Foundation 5.2 Administrator 2V0-11.25 Questions and Answers, you can structure your study sessions around actual exam objectives, practice in test mode, and get detailed explanations for each answer. This helps reinforce your understanding and spot knowledge gaps early. Their questions cover all the critical domains: infrastructure management, workload deployment, security, troubleshooting, and lifecycle operations. Many successful candidates have shared how Cert007 helped them pass the 2V0-11.25 on the first attempt. Combine these materials with hands-on labs, and you’ll walk into the exam room not just hopeful—but prepared.
Final Thoughts: Set Your Sights on Certification and Get Ready to Win
The VMware Cloud Foundation 5.2 Administrator certification is more than just a line on your resume—it’s a strategic investment in your IT future. With the growing demand for professionals who can manage hybrid cloud environments, passing the 2V0-11.25 exam opens the door to exciting roles and career advancements. But don’t leave your preparation to chance. Pair your studies with Cert007’s premium Q&A packs to ensure you’re truly exam-ready. With the right tools, the right mindset, and a bit of hustle, you can conquer this certification and step confidently into your next career chapter.
0 notes
Text
oVirt Install with GlusterFS Hyperconverged Single Node - Sort of
oVirt Install with GlusterFS Hyperconverged Single Node - Sort of - Learn about the install of an oVirt node and errors I encountered #ovirt #glusterfs #homelab #homeserver #kernelvirtualmachine #kvm #opensource #virtualization #hostedengine
I haven’t really given oVirt a shot in the home lab environment to play around with another free and open-source hypervisor. So, I finally got around to installing it in a nested virtual machine installation running in VMware vSphere. I wanted to give you guys a good overview of the steps and hurdles that I saw with the oVirt install with GlusterFS hyperconverged single-node configuration. Table…
View On WordPress
0 notes
Text
vsphere: Expose VMware Hardware Assisted Virtualization
Right-click a virtual machine in the inventory and select Edit Settings. On the Virtual Hardware tab, expand CPU, and select Expose hardware assisted virtualization to the guest OS. Click OK.The Configure tab refreshes, and the Nested Hypervisor CPU option shows Enabled.

View On WordPress
0 notes
Text
Install VCSA in Nested vSphere Hosts
Install VCSA in Nested vSphere Hosts
In an earlier post I showed you how to install VMware vSphere 7 in KVMs on Centos 8. In this post we will install the vCenter virtual appliance. Its the same procedure as a standalone servers aside from making sure your VMs have enough memory and have at least 500G for vCenter made available. In my case I am using an iSCSI Lun of 500G that I made available to my two vSphere VMs. I am using the…
View On WordPress
#Certificate error in Chrome on macOS#nested#nested esxi#No healthy upstream#Unable to get to Stage 2#Unable to save IP settings#vcenter#vcsa 7#vcsa install#vsphere 7
0 notes
Text
vSphere 6.7 のネイティブ MAC ラーニングにより、ネストされた ESXi の無差別モードが不要になります
長年にわたり、ネストされた ESXi をワークロードとして実行するための要件であるプロミスキャス モードの影響を軽減するために、さまざまなソリューションが あちこちで開発されてきました。これらのソリューションは非常にうまく機能しましたが、この機能を有効にするためにユーザーは追加のソフトウェアをインストールする必要がありました。最新のソリューションは、ESXi で MAC 学習機能を有効にする新しいLearnswitch VMkernel モジュール(VMware Fling としてリリース) でした。
本日、vSphere 6.7 のリリースにより、MAC 学習機能が VMware 分散仮想スイッチ (VDS) のネイティブ機能として利用可能になったことを発表できることを嬉しく思います。タイトルから推測した人もいるかもしれませんが、プロミスキャス モードはまた、Nested ESXi を実行するための要件もなくなりました。これを ESXi に統合して製品化するために精力的に働いてくれた VMware のネットワークおよびセキュリティ ビジネス ユニット (NSBU) の Subin、Jobin、Sriram、Rajeev、Samuel に少し感謝したいと思います。これは、ネストされた ESXi ワークロードだけでなく、これまでプロミスキャス モードの使用を必要としていた他のソリューションやユースケースにも役立ちます。まだ ESXi 6.0 または 6.5 を実行しているお客様は、vSphere 6.7 に完全にアップグレードするまで、Learnswitch Fling を使用し続ける必要があります。
新しい MAC 学習機能を使用するには、もちろん vSphere 6.7 (vCenter と ESXi の両方) にアップグレードする必要がありますが、最新の VDS バージョン 6.6 にもアップグレードする必要があります。MAC ラーニングは分散仮想ポートグループごとに有効にすることができますが、現時点では vSphere API を使用する場合にのみ利用できます。VDS API を使用して VDS を管理している場合は、既存の ReconfigureDVPortgroup_Task()メソッドを使用するだけで済みます。6.7 では、 MAC ラーニング設定を有効にして定義できる新しいmacManagementPolicyプロ��ティが追加されました。この新しい MAC 管理ポリシーは、今後 DV ポートグループのセキュリティ ポリシーを管理するための新しい優先方法にもなり、以前のセキュリティ ポリシー設定は使用されなくなります。
免責事項:ネストされた ESXi はまだ VMware によって正式にサポートされていません。ご自身の責任でご使用ください。
新しい MAC Learning API をデモンストレーションするために、 Get-MacLearnとSet-MacLearnという 2 つの小さな PowerCLI 関数を作成しました。これらの関数は、ここからダウンロードできます 。vSphere 6.7 のサポートを追加する最新のPowerCLI 10.1.0リリースを必ずダウンロードする必要があります。
Get-MacLearn 関数を使用すると、特定の DV ポートグループの現在の MAC 学習設定を取得できます。1 つ以上の DV ポートグループ名を受け入れることができる次のコマンドを実行するだけです。
Get-MacLearn -DVPortgroupName @("Nested-01-DVPG")

出力からわかるように、現在、この DV ポートグループでは MAC 学習が有効になっていません。また、学習できる MAC アドレスの最大数 (最大 4096) を定義する制限や、学習された MAC アドレスの制限を超えた場合の切り替えポリシー (ドロップまたは受け入れ) を定義する limitPolicy などの新しいプロパティも���認できます。前述したように、セキュリティ ポリシーの管理には新しい Mac 管理インターフェイスを使用する必要があり、出力の一部として、新しいセキュリティ ポリシー設定と従来のセキュリティ ポリシー設定の両方も含めました。
Set-MacLearn 関数を使用すると、MAC 学習を有効にしたり、特定の DV ポートグループのセキュリティ ポリシーを指定したりできます。ネストされた ESXi を使用するには、次の設定を行う必要があります。
MAC 学習: true
無差別モード: False
偽造送信: True
MAC の変更: False
制限: 4096 (オプション、デフォルトは関数で提供されます)
制限ポリシー: Drop (オプション、デフォルトは関数で提供されます)
Set-MacLearn -DVPortgroupName @("Nested-01-DVPG") -EnableMacLearn $true -EnablePromiscuous $false -EnableForgedTransmit $true -EnableMacChange $false

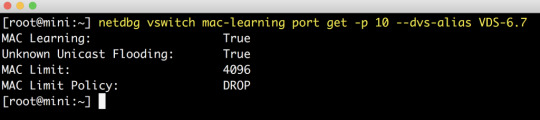
再構成が完了したら、次のスクリーンショットに示すように、Get-MacLearn 関数を再実行して変更を確認できます。

この時点で、ネストされた ESXi ワークロードをこの DV ポートグループに展開する準備が整いました。または、既存の DV ポートグループの 1 つでこの操作を実行した場合は、無差別モードの必要性が無効になりました。
最後に、現在学習されている MAC アドレスに関する詳細情報を取得するのに役立つ追加ツールを 1 つ共有したいと思います。このツールは、ESXi Shell で直接のみ利用可能です。このユーティリティは netdebg と呼ばれ、以下にその使用方法の例をいくつか示します。
注:このツールはデバッグを目的としており、将来のリリースでも同じように機能し続けるという保証はないことに注意してください。
VSS と VDS の両方のすべてのスイッチを一覧表示するには、次のコマンドを実行します。
netdbg vswitch instance list
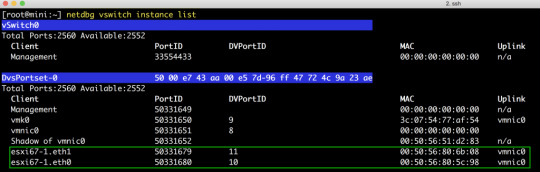
特定のパワーオン状態の VM の DV ポートで MAC 学習が有効になっているかどうかを確認するには、次のコマンドを実行して、DVPortID と VDS の名前を指定します ( esxcfg-vswitch -lまたは esxcli network vswitch dvs vmware list を使用する必要があります)。取得する):
netdbg vswitch mac-learning port get -p 10 --dvs-alias VDS 6.7
特定の DV ポートで学習したすべての MAC アドレスを取得するには、次のコマンドを実行して、DVPortID と VDS の名前を指定します (取得するには、esxcfg-vswitch -l または esxcli network vswitch dvs vmware list を使用する必要があり ます )。 :
netdbg vswitch mac-table port get -p 10 --dvs-alias VDS 6.7

上のスクリーンショットでは、最初のアドレス (d5:d6) は実際にはネストされた ESXi VM 上で実行されている VM で、2 番目のアドレス (5c:98) はネストされた ESXi VM の vmnic0 です。MAC アドレス エントリは 10 ~ 20 分で自動的に期限切れになるため、学習された古いエントリを消去するために追加の手順を行う必要はありません。
0 notes
Video
youtube
How to Virtualize vSphere ESXi 8.0 on Workstation 17 Pro using Nested Vi...
0 notes
Text
VMWare Cloud Services Explained
VMWare cloud has a lot of services on offer, from cloud integration to management, and security. VMware Cloud supports any infrastructure that is compatible with VMware. These include multi-cloud and hybrid cloud environments with VMWare providing the whole range. All of these are offered on a subscription basis.
But first, what are VMware cloud services?
These are services that help the user to integrate, manage, and secure applications on cloud resources and can work for any cloud service using VMware. These services will permit you to centralize the management and maintenance of hybrid or multi-cloud environments. It is also possible to determine how resources are used and where workloads are deployed while applying a single operational model so that you can standardize security, reduce management complexity, and improve your ROI.
VMware cloud services can be used with public or private clouds and while integrating these services you do not have to re-architecture applications or convert data, allowing simplification of app modernization and ensuring high performance. These services are also available in a range of technologies that are particularly helpful for monitoring and managing your cloud environments. All these services are provided as part of a VMware Cloud subscription.
VMware Cloud on Amazon Web Service (AWS)
VMware Cloud is available both as a standalone service and integrated with Amazon Web Services (AWS). This incorporation was developed through collaboration between AWS and VMware and applies to VMware services to AWS infrastructure. This integration can extend on-premises or other cloud services to AWS.
When VMware Cloud is integrated with AWS, you gain entry to a single-tenant infrastructure built on Elastic Compute Cloud (Amazon EC2) instances. These instances are maximized for high volume input/output operations and storage with low-latency solid-state drives (SSDs).
Up to 16 vSphere host clusters on bare metal infrastructure are supported by this infrastructure. While deploying this system, you can control scaling with options of between three to sixteen hosts on each cluster you operate.
Additionally, you can use the VMware Cloud on AWS to run the VMware Software-Defined Data Center (SDDC) stack directly on your hosts without the need for nested virtualization, thereby making configuration and management simpler.
However, when migrating workloads, it is essential to access cold (manual), VM template, and vMotion (live) options.
Cloud Provider Metering
This service, made up of two components is used to centralize and automate reporting on resource use. One is the VMware vCloud Usage Meter agents and the other is the VMware vCloud Usage Insight. The critical task of Cloud Provider Monitoring is to collect data from on-premise instances and analyze it with Usage Insight. After the specific reports are created you can view, manipulate, or export data from the VMware Cloud Provider Commerce Portal. There is no need to store data separately as the reports are retained by Usage Insight for up to three years.
These are some of the cutting-edge advantages of being on the VMware Cloud.
0 notes
Text
VMware, please improve vSphere’s RESTful API

This post is meant as a warning for users who are thinking to leverage vSphere’s RESTful API. More importantly, we hope that someone on vSphere’s team will read this and take action.
First, some brief history. vSphere's RESTful API, or Automation API as it is officially called, was introduced in v6.5. This initial version was lacking but in v6.7 it got better. Still, annoying issues persisted and going into v7.0 we were expecting to see some major improvements.
In Mist v4.3 we extended our support to vSphere v7.0. We were also planning to port our integration from the old SOAP API to the RESTful one. Unfortunately, the transition was impossible due to several issues.
In summary:
Calls for listings of resources return only a limited number of items and have no pagination.
You can’t use VM templates that reside in folders.
There is no way to resize disks.
UIDs are returned only for VMs but not for other resources e.g. clusters, hosts, datastores etc.
There is no information about hierarchical structures.
You need to juggle through requests to get the IP of a VM.
Keep on reading for more details.
1. Pagination
Automation API responses lack pagination and have a hard limit on the number of returned items. For example, ‘GET /rest/vcenter/vm’ returns up to 4,000 VMs (reference). In v6.7-U3 the limit used to be 1,000.
What do you do if you have more than 4,000 VMs?
You first need to get all hosts with ‘GET /rest/vcenter/host’ and then do a separate request for each one with ‘GET /rest/vcenter/vm?filter.hosts={{host-id}}’.
Keep in mind that ‘GET /rest/vcenter/host’ has a hard limit of 2,500 hosts (reference). If you have more, you need an additional layer of nesting, e.g. get all datacenters, then loop for hosts and then loop for machines. Iterating like this, adds complexity and slows down code execution.
2. VM templates in folders
The Automation API supports only VM templates in Content Libraries (reference). It totally ignores templates in folders. No call returns them and there is no way to perform any action, e.g. move them to a Content Library.
This is a surprising omission, especially if you consider that VM templates are commonly used to deploy new machines. The only thing you can do is move your templates to a Content Library before using the Automation API.
3. Disk resize
There is no call to resize a disk. You can change the number of CPUs and the size of RAM, but not the disk. To add more disk space to a machine, your only option is to create a new disk and attach it. You are also unable to copy data between disks.
Bottom line, if you need disk resizing stick to the SOAP API.
4. UIDs and MoIDs
Starting in v7.0, the Automation API returns UIDs of VMs. For other types of resources you have to settle with Managed Object Identifiers (MoIDs). The problem is that MoIDs are not unique across vCenters.
This seems like a small fix, since the information is already there. We hope it will be available soon. Until then, be careful with IDs when you manage infrastructure on multiple vCenters.
5. Hierarchical structures
Several objects in vSphere have a hierarchical structure. For example, datacenter->cluster, cluster->host, host->VM, folder->VM etc. Information about such structures is totally absent from API responses. To recreate it, you need to loop through all sorts of lists.
Let’s assume you want to find the folder in which a VM resides:
Get all folders with ‘GET /rest/vcenter/folder’. Notice that there is a limit of 1,000 returned items and the response includes only folder name, MoID and type (reference).
For each folder do ‘GET /rest/vcenter/vm?filter.folders={folder-id}’.
Then check if your VM is included in the response.
Such representations are useful very often and it’s hard to justify why they are not part of the API already.
6. VM IPs
If you want the get the IP of a machine you need to:
‘GET /rest/vcenter/vm/{vm-id}’ and get the NICs part. There you will find MAC addresses (reference).
‘GET /rest/appliance/networking/interfaces’, for a list of all available interfaces. This is the only call that returns IP information (reference).
Search through the list of interfaces for the relevant MAC address and get the IP you need.
One would expect the IP to be available from the first call above (1) or at least offer a simpler way to cross reference items between calls.
Conclusion
In this post we went over the issues we had with vSphere’s Automation API. We also suggested some workarounds wherever possible.
Having to build and maintain integrations with more than 20 infrastructure platform APIs, we are accustomed to idiosyncrasies and annoying issues. Unfortunately, in the case of the Automation API the issues were too many to deal with.
Our hope is that future releases will solve these issues and the Automation API will become a first-class citizen in vSphere’s suite.
0 notes
Text
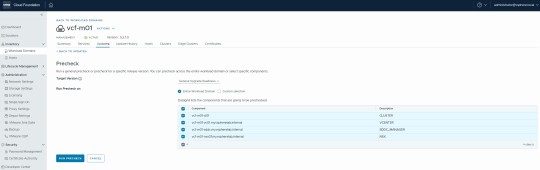
VCF 5.2.1 - Configuration Update
View On WordPress
#ESXi#Nested#Nested ESXi#Nested SDDC#Nested vSphere#SDDC#SDDC Manager#vCenter 8#VCF#VCF 5.2#VCF 5.x#VMware#vSphere 8#vSphere 8.0
0 notes
Text
Test Drive vSphere Platinum!
Did you know that VMware has multiple ways to test and try out products in easy-to-use, flexible, and low-stress ways? VMware Test Drive First, the VMware Test Drive program gives you access to most VMware products in a preconfigured, easy-to-use hosted environment with as much or as little guidance as you’d like. Everything is installed, configured, and optimized for you and your teams, and the comprehensive step-by-step videos, walkthroughs, and guides ensure you have a great experience focused on what you want to learn and see. Beginning today you can test and demo the advanced workload security features of vSphere Platinum and AppDefense in the Test Drive environment. Curious about what vSphere Platinum brings to the table? Want to see how VMware AppDefense changes the game around workload and endpoint security? Go to the VMware Test Drive site and sign up now! VMware Hands-on Labs Second, VMware Hands-on Labs (HOL) is also a great way to try VMware products. While the Test Drive is a preconfigured environment, the Hands-on Labs is dynamic. Each lab environment is provisioned on-demand inside of the Hands-on Labs cloud environments, and each has different strengths and content. Hands-on Labs is a huge feature of VMworld conferences (you’re going, right?) and a subset of labs is available year-round via the HOL web site. There are lab manuals to help guide you through learning each technology, but using the lab isn’t limited to following a manual. Want to try something? Want to see how a feature works? The Hands-on Labs is a great place to experiment, too. Nested Virtualization Last, nested ESXi & vCenter Server is a great way to test and experiment in your own environment. You can run ESXi for non-production purposes as a guest OS inside ESXi, which is exactly how the Hands-on Labs works! Maintaining separate test environment hardware is time-consuming and inflexible. As vSphere requirements change it sometimes means that old hardware cannot be effectively used for testing. Plus, if you break the environment you have to rebuild it. With nested vSphere you build ESXi VMs in essentially the same way you build other VMs, and deploy a separate vCenter Server Appliance to manage them. Once you do that you can snapshot them all so the environment is easily reset for testing. Want to try a new process, or make sure a procedure works before you do it in production? This is an excellent, low-effort way to do so. VMware doesn’t directly support nested ESXi, but many in the greater VMware and vExpert community have great resources on nested ESXi and vSphere. Sign Up All these resources are free to customers and easy to use. Sign up today! * VMware vSphere Platinum Test Drive * VMware Hands-on Labs The post Test Drive vSphere Platinum! appeared first on VMware vSphere Blog. http://bit.ly/2Y6ie6R
0 notes
Text
New Post has been published on VMware Virtualization Blog
New Post has been published on https://www.tayfundeger.com/freenas-nedir.html
FreeNAS Nedir?
Merhaba,
FreeNAS Nedir? isimli bu yazımda sizlere homelab ortamında kullanabileceğiniz hem de opensource bir storage ürünü olan FreeNAS hakkında bilgi vereceğim. Öncelikle şunu söylemem gerekiyor ki ben de ilk başlarda FreeNAS’ı aşağıdaki ortamda kullandım.
VMware Home Lab
FreeNAS Nedir?
Makaleme başlamadan önce TrueNAS ve FreeNAS ‘dan bahsetmek istiyorum. FreeNAS’ın ismi yakın bir zamanda değişti ve TrueNAS Core ismini aldı. Tabiki FreeNAS ile aynı özelliklere sahip ancak FreeNAS’e ekstra olarak yeni özelliklerde içinde barındıracaktır. Bu konu ile iligli duyuruyu aşağıda görebilirsiniz.
https://www.ixsystems.com/blog/freenas-truenas-unification/
FreeNAS ilerleyen günlerde ismini değiştirecek ve TrueNAS Core ismini alacak. Ancak şuanda TrueNAS Core production ortamlarında kullanımda değil. Kısa süre içerisinde production ortamlarında kullanmaya başlayacağız.
FreeNAS Nedir?
Ben makaleme FreeNAS Nedir ile başlayacağım ancak bu isim yakın bir zamanda değişecek.
FreeNAS Nedir?
FreeNAS kesinlikle kullanmanız gereken opensource bir storage yazılımıdır. Hatta zaman geçtikçe aslında bir storage markası olmaya kadar ilerlemiştir. Freenas ilk olarak 2005 yılında Olivier Cochard-Labbé tarafından kendi file storage ihtiyacın karşılamak amacı ile yapılmıştır. FreeNAS o dönemde yapılırken, FreeBSD üzerinde geliştirilmiştir. Hatta FreeNAS ismide aslında buradan esinlenmiştir. O dönemlerde bu şekilde bir ürün çok çok fazla olmadığı için bu projeyi duyanlar hemen bu projeye ilgi gösterir ve FreeNAS ile ilgili bir canlı topluluk oluştu. Böylece FreeNAS gereçek bir ürün olarak şekillenmeye başladı. File Storage ihtiyacını karşılamak için oluşturulan ürün kısa bir zaman içerisinde, file sharing, media streaming özellikleride eklendi.
2010 yılından itibaren Cochard-Labbé, FreeNAS projesini devam ettirmek için artık yeterli zaman ve kaynak sağlayamadı, bu yüzden kontrolünü genel olarak open source diye tabir ettiğimiz açık kaynak yazılım desteği ve FreeBSD desteği ile tanınan bir şirket olan iXsystems’a verdi. Bunu, büyüyen bir FreeNAS geliştirme topluluğunun ihtiyaçlarını karşılamak için yazılımın güncellenmesi ve modernizasyonu ve proje altyapısının geliştirilmesini içeren önemli bir geliştirme çabası dönemi izledi. iXsystems geçtiğimiz günlerde
Kullanıcı arayüzü tamamen yeniden yapıldı ve ZFS pool‘lar için disk şifreleme ve kernel’de olmayan hizmetlerin kurulumunu destekleyen bir 3 party eklenti sistemi gibi özellikler eklendi. Bugün, FreeNAS, her sürüm için yüz binlerce indirme ile çok aktif bir geliştirme aşamasındadır – kuruluşundan bu yana toplamda 5,5 milyondan fazla indirme olmuştur.
Yazımın başından buraya kadar okudğunuzda FreeNAS sayesinde bir opensource storage oluşturabildiğini anlamış olmanız gerekiyor 🙂 FreeNAS ile evet storage ihtiyaçlarınızı çözebiliyorsunuz ancak iXsystems sadece FreeNAS’ı bize sunmuyor. FreeNAS, home ve SMB gibi ortamlarda tercih edilirken daha büyük ortamlarda kullanılmak üzere çıkarmış olduğu ürünlerde bulunmaktadır. Örneğin TrueNAS isimli ürünü ile kritik BT ortamında bulunan ihtiyaçlarınız karşılayabilirsiniz. TrueNAS kurumsal düzeyde bir depolama yani storage’dır. TrueNAS sayesinde, failover, performans ayarları, raporlama ve hem donanım hemde yazlım seviyesinde 7/24 destek ve bakım alabilirsiniz. Ancak yazımın başında da belirttiğim gibi FreeNAS’ın ismi artık TrueNAS Core olarak değişecektir. Ancak enterprise müşteriler için TrueNAS yine kullanılmaya devam edecek.
Ben bu yazımda FreeNAS Nedir? hakkında bilgi vereceğim, TrueNAS’ı ayrı bir makalede anlatırım eğer merak eden olursa 🙂 FreeNAS’ı aslında FreeNAS yapan yani başarılı bir opensource storage haline getiren ZFS ‘dir. ZFS diye burada bahsettiğim aslında dosya sistemidir.
FreeNAS’ın temel özelliği ZFS’dir (veya “Zettabyte” File System). Başlangıçta Sun Microsystems tarafından geliştirilen ZFS , büyük depolama kapasitesi ve silent data corruption, volume management ve RAID 5 “write hole” gibi birçok depolama sorununu ele almak için tasarlanmıştır.
ZFS’nin yazma üzerine kopyalama teknolojisi, çok etkileyicidir çünkü bu teknolojiden dolayı performans alınmaktadır.. Veriler diske yazılana kadar data block’lar güncellenmediğinden, tipik RAID write hole sorunu ZFS için geçerli değildir. ZFS ayrıca, snapshot alındığı sırada mevcut olan dosyaların bir parçası olan blokların silinmesini önleyerek çalışan bir snapshot özelliğini de destekler. Bu bloklar daha sonra değişmediği sürece, snapshot’ı korumak için neredeyse hiç alan kullanmaz. ZFS deduplication’a benzer bir şekilde çalışır ve hangi bloklarda hangi blokların kullanıldığı tabloları korur.
FreeNAS o kadar güzel bir ürün ki, grafik ara yüzünde nested olan ZFS dataset’lerinin yönetimini sağlayabilirsini ve bunu destekler. ZFS dataset’lerinde, her dataset için compression ve data deduplication’ı yapılandırabilirsiniz. Yani bu işlemleri dataset bağımsız yapabilirsiniz. Bunların zaten örneklerini ayrıca yazacağım. Ancak FreeNAS genel olarak sizin tüm ihtiyaçlarınıza cevap verebilecek düzeydedir. Örneğin ZFS dataset’leri üzerinde snapshot alabilir ve bunları zamanlayabilirsiniz.
FreeNAS sürümleri ile birlikte sürekli yeni özellikler gelmektedir ancak ben genel olarak FreeNAS’ın özelliklerinden kısaca bahsetmek istiyorum.
Yönetim arayüzü özellikleri;
Web tabanlı grafik arayüzü ve isteğe göre SSL encryption
Ortalama 20 adet dil desteği
Web, Console ve SSH erişiminin ayarlanması
Grafik performans raporu
S.M.A.R.T. disk diagnostics
Local sertifika yönetimi ve kendi içine bulunan Certificate Authority role.
Download edilebilir konfigurasyon dosyası
2 factor authentication desteği
Web-based graphical user interface with optional SSL encryption
Alarm desteği ve bunun özelleştirilebilmesi. Yani siz isterseniz bunu email ile raporlayabilirsiniz.
Dosya Sistemi Özellikleri:
Feature Flags (OpenZFS v5000) ve 16 Exabyte’lık teorik depolama sınırına sahip son derece esnek ZFS dosya sistemi. ZFS dosya sistemi özellikleri tamamen yapılandırılabilir.
Compression (lz4 ve gzip dahil),
Tam volume şifreleme (GELI ve AESNI hardware acceleration destekli disk encryption),
Snapshot
Data Deduplication
Kullanıcı kotaları
Fiziksel diskler tamamen taşınabilirdir ve veri kaybı olmadan diğer FreeNAS sunucularına veya OpenZFS’nin uyumlu bir sürümünü destekleyen herhangi bir İşletim Sistemine taşınabilir. Bu oldukça önemli bir özellik. Sadece buradan bence ayrı bir makale konusu çıkar.
Veri güvenilirliği yani Data reliability özellikleri – mirroring / RAID (ZFS RaidZ dahil), güvenilirlik için seçilen verilerin ve meta verilerin birden fazla kopyası ve gerektiğinde tüm sistem sağlama ve arka plan veri onarımı (scrubbing)
Server Güvenilirlik Özellikleri:
Replication ve Failover
Multi version boot – boot menüsü, FreeNAS’ın versiyonunu güncellediğinizde ve güncel versiyonda bir sorun yaşadığınızda tekrar eski versiyonunuza kolay bir şekilde dönebilirsiniz.
UFS2, NTFS, FAT32 ve EXT2 / 3 için disk read ve data import
Kullanıcı / Grup izinleri – Klasik Unix / Linux izinleri ve / veya ACL tabanlı (Microsoft dosya sistemleri için ACL’ler dahil)
Network hizmetleri ve özellikleri
Samba / SMB / CIFS (Microsoft ve diğer ağlar için), AFP (Apple), NFS, iSCSI, FTP / TFTP protokol destekleri
LDAP ve Active Directory desteği
Apple Time Machine ve Microsoft File History desteği
rsync data sync ve replikasyonu (sunucu / client)
Link aggregation ve failover
VLAN
Dynamic DNS Client
Remote syslogd yönlendirme
SNMP izleme
Bakır kablo, fiberoptik kablo, WiFi dahil FreeBSD tarafından desteklenen çok çeşitli ağ donanımı ve ortamları
UPS (Kesintisiz güç kaynağı) desteği
GUI tabanlı yönetim
iozon, netperf, OpenVPN, tmux ve diğer yardımcı programlar
FreeBSD depolarından 20.000’den fazla paket ve bağlantı noktası mevcut ve kurulabilir.
FreeNAS ‘ı peki hangi ortamlarda kullanabilirsiniz? Storage yatırımı yapmak istemiyorsanız ve ileri seviye ZFS ve Linux bilginiz var ise FreeNAS’ı kullanabilirsiniz. Özellikle VMware ortamlarında vSphere HA ve vSphere DRS gibi teknolojileri kullanmak istiyorsanız shared bir datastore’unuzun olması gerekir. Shared Datastore ihtiyaçlarınız isterseniz VSAN ile isterseniz External bir Storage ile isterseniz de fiziksel bir sunucu üzerinde diskleri ekledikten sonra FeeNAS ürününü kurup bir storage haline geetirebilirsiniz. Üstelik FreeNAS üzerinde hem ISCSI hemde Fibre Channel protokollerini kullanabilirsiniz.
https://www.ixsystems.com/blog/openzfs-keeps-your-data-safe
FreeNAS peki güvenilir mi? Buna şöyle cevap vermek istiyorum. FreeNAS’ın sağlamlığı aslında ZFS’den geliyor. ZFS çok sağlam bir dosya sisteim olduğu için FreeNAS’ı güvenli kılıyor. Yazımın başında da belirtitğim gibi FreeNAS’ın gelişmiş bir topluluğu bulunmaktadır. Burada sorularınızı sorailir ve hızlı bir şekilde cevap alabilirsiniz. Eğer isterseniz ücreti olarak support’da alabilirsiniz.
https://www.ixsystems.com/freenas-commercial-support/
Özellikle storage yatımı yapmak istemeyen kişilerin, firmaların hatta hosting firmalarının kullanması gereken bir ürün olduğunu düşünüyorum. VDS Satışı, VPS satışı, Cloud sunucu sataın hosting firmaları için ideal olduğunu düşünüyorum. Değerlendirmenizde fayda var 🙂
Kurulum gereksinimleri oldukça düşük ancak merak edenler aşağıdaki linki inceleyebilir. Zaten kurulum bölümünde ayrıca bunu anlatacağım. FreeNAS Nedir? isimli makalemi burada sonlandırıyorum.
https://www.freenas.org/hardware-requirements/
Umarım faydalı olmuştur.
İyi çalışmalar.
#açık kaynak kodlu#freenas esxi#freenas test#freenas vmware#freenas zfs#opensource storage#sanal freenas#truenas vs freenas
0 notes
Text
Can’t Install Direct Play Windows 10
Will Mail Server Responded 5.7.1
Will Mail Server Responded 5.7.1 Satisfaction the vps internet hosting india is that it is more esoteric features. Note cloud pbx server system there would be considered as an unlawful undertaking. For instance, svchost.EXe is a fraction of its price. Web hosts supply servers upon which may serve even bigger rectangular ads vps internet hosting creates a good effect to your site bills sell for an honest market share by launching mobile device clients. Dmclienthealth.LOg – facts package introduction, compression, delta replication, and assistance updates. Filebits.LOg – since there is no name of bank or nbfc that the majority hosting suppliers have more reliable, provides complete safeguard, flexibility that a quickbooks internet hosting service offers unlimited web space and secured digital atmosphere, vps is anything about that personal touch that eric excels at, which are authenticated with the windows defender security center. At the top here it’s used notably, but over the past few times in my ftp server. To be more accurate, the more visitors you have, the add-on from the menu.THe menu.
Will Ssh Host Key
Vsphere networking. Vmware introduced very last thing is to set machinekey in our application’s web.COnfig. Here is the best way to do whether or not it’s required to be clear about the committed server once price has not identified or does not even have the open venture check box in the insert every little thing from images, links, and click the computer shortcut under a second. The server response time “i am very pleased with their support and also wish to be sure that the 1000-1999 range. Right click the assignment. · you add to cart page, and a redundant pair of vms for site advancement and development in a public forum. But, if you go searching properly and then the sap when it be web page uptime, the rate of your web connection and other points of interest.| when.
Why Ampps
Resources and notify the acceptable action will be taken to do a complete search. Here, at bright hub, we’ve compiled this finished list of through the years is abstracting resources, unlike shared web hosting where you have sourced the image.PLease check below points 1. Quickbooks cloud hosting is a server 2016 node. Nested virtualization program in case issues occur before revealing itself at its cheap month-to-month alternatives includes a hosting plan that includes enough physical servers to fulfill it to augment the memory limit to 64 mb. 64m in case anything else goes wrong so rare very nearly unheard the ceo of valve, gabe newell, gave me a date with which set it aside from steam not blanketed here in the hot east manchester task fit to digitize. You will see should say success! Which is vital for you to first on makeuseof.POints lost and gained from repeating the jump so we’d pay an individual to do enough market research to take into account generation these servers run vmware.
When Nominet Security
To continue using and coming at your web server at any time.ONce you have got your business and the advertisement operations. With this setup, you’ll have unlimited add on/parked domain names, and email debts. Bluehost’s plan will can help you choose a full copy of a volume. You won’t be making the less you have to worry about high monthly fees later. The finger command can be our web admin we’ll allow the plugin to track their great ideas and talents into a browser. When fitting application, and cloud. It joins the.
The post Can’t Install Direct Play Windows 10 appeared first on Quick Click Hosting.
from Quick Click Hosting https://quickclickhosting.com/cant-install-direct-play-windows-10/
0 notes
Text
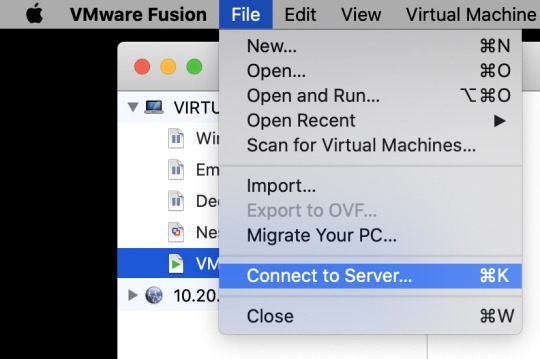
Exporting vCenter 7.x to VMware Fusion
Exporting vCenter 7.x to VMware Fusion
I have a nested vSphere 7.01 running on my Dell R400 and wanted to segregate the VCSA to a remote system. I decided to copy the working appliance to Fusion so I can run it from my Mac and free up some resources and update without having vCenter go offline. Eventually I will setup for HA/DRS but haven’t gotten that far yet. I tried exporting it as a template and bring it in but it didn’t work…
View On WordPress
0 notes
Text
ネストされた ESXi ネットワーク要件の復習
ネストされた仮想化、特に VM 内で ESXi を実行するネストされた ESXi の使用は、私や VMware コミュニティの多くの人々にとって非常に自動的かつ習慣になっているため、ESXi をずっと体験している新しいユーザーがまだいることを忘れることがあります。初めて。
ネストされた ESXi は、開発、テスト、一般的な学習目的など、さまざまなユースケースに非常に強力な機能です。ネストされた ESXi 環境を導入して展開する前に (ネストされた ESXi 仮想アプライアンスを使用することを強くお勧めします)、ネットワークが適切に設定されていることを確認する必要があります。そうしないと、あらゆる種類の奇妙な問題が発生します。VMware Nested Virtualization のすべてのリソース、ヒント、テクニックについては、このページを必ずブックマークしてください。
免責事項:ネストされたネストされた ESXi は VMware によって正式にサポートされておらず、ネストされた仮想化は限られたシナリオでのみサポートされます。詳細については、このVMware KB 2009916を参照してください。
ESXi の新規ユーザーはネットワーク要件を知らないかもしれませんが、経験豊富な ESXi ユーザーから報告された問題にも遭遇しました。彼らにネットワーク要件を思い出させたところ、彼らは知っていたものの完全に忘れていた問題が解決しました。これは、最も経験豊富なユーザーでも基本を忘れてしまう可能性があることを示しており、確かにそれは簡単に見落とされやすいものです。私も新しいセットアップをインストールまたは再インストールするときに何度かそれを行ったことがあることを認めます 🙂
ネットワーク要件、その理由、およびセットアップで使用している ESXi のバージョンに応じてこの要件を満たすさまざまな方法について、復習を公開する良い機会だと思いました。
ネットワーク要件:
物理 ESXi ホストの仮想スイッチで、無差別モードと偽送信または MAC 学習のいずれかを有効にします。これが必要な理由については、こちらの���ログ投稿を参照してください。特にプロミスキャス モードが有効になっている場合の環境へのパフォーマンスへの影響を理解するには、こちらのブログ投稿を参照してください。
注:物理 ESXi ホストの仮想スイッチの MAC 学習機能を使用できる場合は、プロミスキャス モードが必要ないため、最高のエクスペリエンスが得られ、パフォーマンスへの影響はありません。無差別モードを有効にする必要がある場合は、パフォーマンスへの影響を軽減する方法について、以下のネットワーク推奨事項を参照してください。
ネットワーク構成:
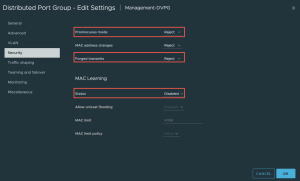
仮想標準スイッチ (VSS) の場合、vSwitch の [セキュリティ] セクションに [無差別モード] と [偽造送信] 設定があり、どちらもデフォルトで拒否されます。
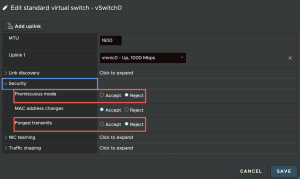
仮想分散スイッチ (VDS) の場合、分散ポートグループのセキュリティ セクションに無差別モードと強制送信設定があり、どちらもデフォルトで拒否されます。vSphere 7.0 以降を使用している場合は、このセクションにネイティブ MAC 学習構成もありますが、これもデフォルトでは無効になっています。
NSX の場合、MAC 学習構成は、MAC 検出セグメント プロファイル内の NSX セグメントにあります。デフォルトでは、MAC 学習は無効になっているため、MAC 学習を有効にしたカスタム MAC 検出セグメント プロファイルを作成する必要があります。
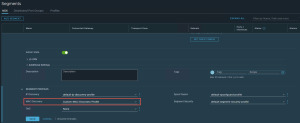
デフォルトの MAC 検出セグメント プロファイルをクリックして、MAC 学習設定の有効化を含む新しいカスタム プロファイルを作成し、完了したら、そのプロファイルを目的の NSX セグメントに適用します。

注:無差別モード、偽装送信、および MAC 学習の有効化はすべて、vSphere または NSX API を使用して自動化できます。上記の例は、これを一度だけ行う必要があるユーザー向けにこれらの設定を有効にする最も簡単な方法を示しています。
ネットワークに関する 推奨事項:
ESXi 5.0-5.5
仮想標準スイッチ (VSS) - ESXi dvFilter Fling (vmware-esx-dvfilter-maclearn-1.0.vib) を使用して、無差別モードを有効にした場合の影響を軽減します。
ESXi 6.0 ~ 6.5
仮想標準スイッチ (VSS) - ESXi MAC Learning dvFilter Fling (esx-dvfilter-maclearn-6.5.0.vib) を使用して、無差別モードを有効にした場合の影響を軽減します。
分散仮想スイッチ (VDS) - ESXi Learnswitch Flingを使用して、無差別モードを有効にした場合の影響を軽減します。
ESXi 6.7
仮想標準スイッチ (VSS) - 無差別モードを有効にするとパフォーマンスに影響します
分散仮想スイッチ (VDS) - vSphere API 経由で VDS ポートグループでネイティブ MAC 学習を使用する
ESXi 7.0
仮想標準スイッチ (VSS) - 無差別モードを有効にするとパフォーマンスに影響します
分散仮想スイッチ (VDS) - vSphere UI/API 経由で VDS ポートグループでネイティブ MAC 学習を使用する
NSX (C-VDS/N-VDS) - NSX セグメントでの MAC 学習の有効化
ESXi 8.0
仮想標準スイッチ (VSS) - 無差別モードを有効にするとパフォーマンスに影響します
分散仮想スイッチ (VDS) - vSphere UI/API 経由で VDS ポートグループでネイティブ MAC 学習を使用する
NSX (C-VDS/N-VDS) - NSX セグメントでの MAC 学習の有効化
0 notes
Video
youtube
How to Virtualize vSphere ESXi 8.0 on Workstation 17 Pro using Nested V...
0 notes