#nested esxi
Explore tagged Tumblr posts
Visit Tumblr Blog
Explore Tumblr blogs with no restrictions, modern design and the best experience.
Last Seen Tumblr Blogs


Fun Fact
After the announcement of the deal with Yahoo!, there were 170K signatures of unhappy Tumblr users petitioning to prevent the sale in 2013.
Text
Part VI Beginners Guide - VCF 5.2.1 Updating SDDC Manager, NSX, vCenter, ESXi Hosts

View On WordPress
0 notes
Text
Top VMware Home Lab Configurations in 2023
Top VMware Home Lab Configurations in 2023 @vexpert #vmwarecommunities #100daysofhomelab #VMwareHomeLabSetup #VMwareWorkstationHomeLab #ESXiHostConfiguration #NestedVirtualizationVMware #vSANClusterConfiguration #BestVMwareHomeLabConfigurations2023
In 2023, many great options exist for delving into a home lab. Many get into running a home server to learn more skills for their day job, or they like to tinker and play around with technology as a hobby. For many, it is a mix of both. VMware vSphere is the market leader hypervisor in the enterprise. It arguably provides the most features and capabilities of any hypervisor on the market. This…
View On WordPress
#Best VMware Home Lab Configurations 2023.#ESXi Host Configuration#Nested Virtualization VMware#vCenter Server Deployment#VMUG Advantage for Home Labs#VMware Home Lab Setup#VMware vs Open Source Hypervisors#VMware vSAN Explanation#VMware Workstation Home Lab#vSAN Cluster Configuration
0 notes
Text
Nested Sunucu Ne İşe Yarar?
Nested Sunucu Ne İşe Yarar?
Günümüz teknolojisinde, işletmelerin altyapı ihtiyaçlarına esneklik ve ölçeklenebilirlik kazandıran çözümler arasında nested sunucu önemli bir yer tutmaktadır. Peki, nested sunucular tam olarak ne işe yarar? Bu yazıda, nested sunucuların kullanım alanlarını, avantajlarını ve sunduğu çözümleri detaylı bir şekilde inceleyeceğiz.
Nested Sunucu Nedir?
Nested sunucu, bir sanal makine (VM) içinde başka bir sanal makine çalıştırılmasını sağlayan bir teknolojidir. Bu, fiziksel bir sunucu üzerinde çalışan bir sanallaştırma platformu (örneğin VMware ESXi, Hyper-V, KVM) içerisinde başka bir sanallaştırma platformu kurma olanağı tanır. Kısacası, "sanallaştırma içinde sanallaştırma" anlamına gelir.
Nested Sunucuların Kullanım Alanları ve Avantajları
Test Ortamlarının Yaratılması: Nested sunucu, farklı yazılım ve konfigürasyonları test etmek için izole bir ortam sağlar. Özellikle yeni sistem güncellemeleri veya yazılımlar için güvenli bir alan yaratır. Örneğin, bir IT ekibi, nested bir sanal makine üzerinde güncellemeleri önce test edebilir, böylece ana sistemlerin etkilenmesini önler.
Eğitim ve Simülasyon: Eğitim için ideal bir yapı sunar. Sistem yöneticileri veya sanallaştırma platformu eğitimi alan kişiler, nested sunucu ortamlarında pratik yaparak farklı senaryoları deneyebilir. Gerçek donanım üzerinde işlem yapmaya gerek kalmadan sistem yönetimi ve yapılandırma öğrenilebilir.
Geliştiriciler İçin İzolasyon: Yazılım geliştiricileri, nested sunucu sayesinde projelerini tamamen izole edilmiş bir ortamda çalıştırabilir. Böylece, farklı projeler arasında oluşabilecek uyumsuzluklar önlenir ve hata riskleri minimuma indirilir.
Çoklu Hypervisor Testleri: Nested sunucu, birden fazla hypervisor (örneğin VMware ESXi, Hyper-V) test etmek isteyen ekipler için harika bir çözüm sunar. Aynı fiziksel donanım üzerinde farklı sanallaştırma yazılımlarını deneyerek performans ve uyumluluk testleri yapılabilir.
Kaynakların Daha Verimli Kullanımı: Fiziksel sunucu kaynaklarını daha verimli kullanarak, birden fazla sanal altyapı oluşturma imkânı tanır. Özellikle sınırlı donanıma sahip işletmeler, nested sunucular sayesinde çok daha fazla işlem gerçekleştirebilir.
Nested Sunucu Avantajları
Maliyet Tasarrufu: Fiziksel donanıma yatırım yapmadan, farklı sanallaştırma platformlarını test edebilir veya kullanabilirsiniz.
Esneklik: Nested sunucular, birden fazla işletim sistemi ve sanallaştırma platformu arasında geçiş yapmayı kolaylaştırır.
Güvenlik: İzole ortamlar sunarak, hataların veya kötü niyetli yazılımların ana sisteme zarar vermesini engeller.
Etkili Eğitim ve Geliştirme Ortamı: Nested sunucular, yazılım geliştiricileri ve IT yöneticileri için risksiz bir çalışma alanı yaratır.
Nested Sunucu ve Ryzen VDS Kombinasyonu
Nested sunucuların performansı, kullanılan donanımla doğrudan ilişkilidir. Özellikle AMD Ryzen işlemcili VDS’ler, yüksek performans ve düşük gecikme süreleri ile nested sanallaştırma ortamlarında büyük avantaj sağlar. Eğer nested sunucu kurulumlarını maksimum performansla çalıştırmak istiyorsanız, Ryzen VDS’ler mükemmel bir seçim olacaktır. Ryzen işlemciler, çok çekirdekli yapısı sayesinde sanal makineler arasında yük dengelemesini etkin bir şekilde gerçekleştirir.
Ryzen VDS hakkında daha fazla bilgi almak için Ryzen VDS sayfasını ziyaret edebilirsiniz. Ayrıca, nested sunucu çözümleri için profesyonel destek almak isterseniz Nested Sunucu hakkında detaylı bilgi bulabilirsiniz.
Sonuç
Nested sunucular, test, geliştirme, eğitim ve izolasyon gibi birçok kullanım alanında eşsiz bir çözüm sunar. İster bireysel projeleriniz için, ister kurumsal altyapılarınız için kullanın, nested sunucular işletmenize esneklik ve güvenlik kazandırır. Ryzen işlemcili VDS’lerle birleştirildiğinde ise performans çıtasını çok daha yükseğe taşır. Nested sunucu teknolojisini keşfedin ve altyapınızı bir adım öteye taşıyın!
0 notes
Text
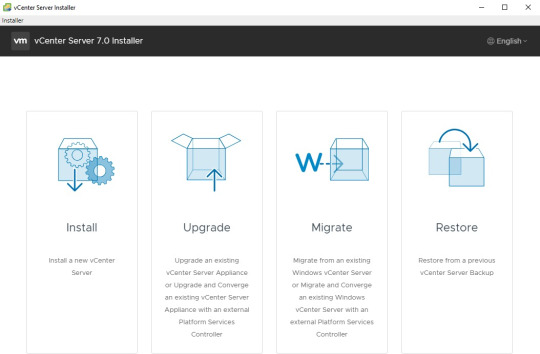
Install VCSA in Nested vSphere Hosts
Install VCSA in Nested vSphere Hosts
In an earlier post I showed you how to install VMware vSphere 7 in KVMs on Centos 8. In this post we will install the vCenter virtual appliance. Its the same procedure as a standalone servers aside from making sure your VMs have enough memory and have at least 500G for vCenter made available. In my case I am using an iSCSI Lun of 500G that I made available to my two vSphere VMs. I am using the…
View On WordPress
#Certificate error in Chrome on macOS#nested#nested esxi#No healthy upstream#Unable to get to Stage 2#Unable to save IP settings#vcenter#vcsa 7#vcsa install#vsphere 7
0 notes
Text
vSphere 6.7 のネイティブ MAC ラーニングにより、ネストされた ESXi の無差別モードが不要になります
長年にわたり、ネストされた ESXi をワークロードとして実行するための要件であるプロミスキャス モードの���響を軽減するために、さまざまなソリューションが あちこちで開発されてきました。これらのソリューションは非常にうまく機能しましたが、この機能を有効にするためにユーザーは追加のソフトウェアをインストールする必要がありました。最新のソリューションは、ESXi で MAC 学習機能を有効にする新しいLearnswitch VMkernel モジュール(VMware Fling としてリリース) でした。
本日、vSphere 6.7 のリリースにより、MAC 学習機能が VMware 分散仮想スイッチ (VDS) のネイティブ機能として利用可能になったことを発表できることを嬉しく思います。タイトルから推測した人もいるかもしれませんが、プロミスキャス モードはまた、Nested ESXi を実行するための要件もなくなりました。これを ESXi に統合して製品化するために精力的に働いてくれた VMware のネットワークおよびセキュリティ ビジネス ユニット (NSBU) の Subin、Jobin、Sriram、Rajeev、Samuel に少し感謝したいと思います。これは、ネストされた ESXi ワークロードだけでなく、これまでプロミスキャス モードの使用を必要としていた他のソリューションやユースケースにも役立ちます。まだ ESXi 6.0 または 6.5 を実行しているお客様は、vSphere 6.7 に完全にアップグレードするまで、Learnswitch Fling を使用し続ける必要があります。
新しい MAC 学習機能を使用するには、もちろん vSphere 6.7 (vCenter と ESXi の両方) にアップグレードする必要がありますが、最新の VDS バージョン 6.6 にもアップグレードする必要があります。MAC ラーニングは分散仮想ポートグループごとに有効にすることができますが、現時点では vSphere API を使用する場合にのみ利用できます。VDS API を使用して VDS を管理している場合は、既存の ReconfigureDVPortgroup_Task()メソッドを使用するだけで済みます。6.7 では、 MAC ラーニング設定を有効にして定義できる新しいmacManagementPolicyプロパティが追加されました。この新しい MAC 管理ポリシーは、今後 DV ポートグループのセキュリティ ポリシーを管理するための新しい優先方法にもなり、以前のセキュリティ ポリシー設定は使用されなくなります。
免責事項:ネストされた ESXi はまだ VMware によって正式にサポートされていません。ご自身の責任でご使用ください。
新しい MAC Learning API をデモンストレーションするために、 Get-MacLearnとSet-MacLearnという 2 つの小さな PowerCLI 関数を作成しました。これらの関数は、ここからダウンロードできます 。vSphere 6.7 のサポートを追加する最新のPowerCLI 10.1.0リリースを必ずダウンロードする必要があります。
Get-MacLearn 関数を使用すると、特定の DV ポートグループの現在の MAC 学習設定を取得できます。1 つ以上の DV ポートグループ名を受け入れることができる次のコマンドを実行するだけです。
Get-MacLearn -DVPortgroupName @("Nested-01-DVPG")

出力からわかるように、現在、この DV ポートグループでは MAC 学習が有効になっていません。また、学習できる MAC アドレスの最大数 (最大 4096) を定義する制限や、学習された MAC アドレスの制限を超えた場合の切り替えポリシー (ドロップまたは受け入れ) を定義する limitPolicy などの新しいプロパティも確認できます。前述したように、セキュリティ ポリシーの管理には新しい Mac 管理インターフェイスを使用する必要があり、出力の一部として、新しいセキュリティ ポリシー設定と従来のセキュリティ ポリシー設定の両方も含めました。
Set-MacLearn 関数を使用すると、MAC 学習を有効にしたり、特定の DV ポートグループのセキュリティ ポリシーを指定したりできます。ネストされた ESXi を使用するには、次の設定を行う必要があります。
MAC 学習: true
無差別モード: False
偽造送信: True
MAC の変更: False
制限: 4096 (オプション、デフォルトは関数で提���されます)
制限ポリシー: Drop (オプション、デフォルトは関数で提供されます)
Set-MacLearn -DVPortgroupName @("Nested-01-DVPG") -EnableMacLearn $true -EnablePromiscuous $false -EnableForgedTransmit $true -EnableMacChange $false

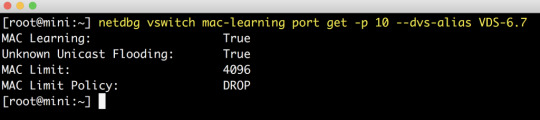
再構成が完了したら、次のスクリーンショットに示すように、Get-MacLearn 関数を再実行して変更を確認できます。

この時点で、ネストされた ESXi ワークロードをこの DV ポートグループに展開する準備が整いました。または、既存の DV ポートグループの 1 つでこの操作を実行した場合は、無差別モードの必要性が無効になりました。
最後に、現在学習されている MAC アドレスに関する詳細情報を取得するのに役立つ追加ツールを 1 つ共有したいと思います。このツールは、ESXi Shell で直接のみ利用可能です。このユーティリティは netdebg と呼ばれ、以下にその使用方法の例をいくつか示します。
注:このツールはデバッグを目的としており、将来のリリースでも同じように機能し続けるという保証はないことに注意してください。
VSS と VDS の両方のすべてのスイッチを一覧表示するには、次のコマンドを実行します。
netdbg vswitch instance list
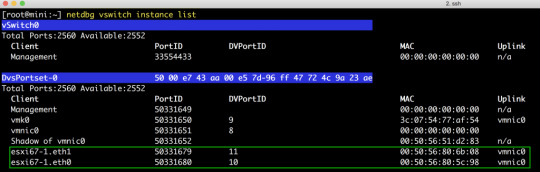
特定のパワーオン状態の VM の DV ポートで MAC 学習が有効になっているかどうかを確認するには、次のコマンドを実行して、DVPortID と VDS の名前を指定します ( esxcfg-vswitch -lまたは esxcli network vswitch dvs vmware list を使用する必要があります)。取得する):
netdbg vswitch mac-learning port get -p 10 --dvs-alias VDS 6.7
特定の DV ポートで学習したすべての MAC アドレスを取得するには、次のコマンドを実行して、DVPortID と VDS の名前を指定します (取得するには、esxcfg-vswitch -l または esxcli network vswitch dvs vmware list を使用する必要があり ます )。 :
netdbg vswitch mac-table port get -p 10 --dvs-alias VDS 6.7

上のスクリーンショットでは、最初のアドレス (d5:d6) は実際にはネストされた ESXi VM 上で実行されている VM で、2 番目のアドレス (5c:98) はネストされた ESXi VM の vmnic0 です。MAC アドレス エントリは 10 ~ 20 分で自動的に期限切れになるため、学習された古いエントリを消去するために追加の手順を行う必要はありません。
0 notes
Video
youtube
How to Virtualize vSphere ESXi 8.0 on Workstation 17 Pro using Nested Vi...
0 notes
Text
Ciberataque "massivo" em Itália provoca problemas informáticos
O serviço de Internet em Itália sofreu ontem interrupções devido a um "ataque massivo", que também terá afetado outros países europeus e a América do Norte, sendo a sua origem desconhecida, segundo a Agência Nacional de Cibersegurança.

Especialistas italianos explicaram que poderá tratar-se de um ataque de ‘ransomware’ e identificaram os servidores VMware ESXi como o alvo, que já tinham mostrado alguma vulnerabilidade noutros incidentes semelhantes no passado, relata a rede Rai.
A Agência Nacional de Cibersegurança já inspecionou “dezenas de sistemas” que podem ter sido comprometidos e pediu atualizações “imediatamente” no caso de alguns servidores que foram “expostos” ao ataque, mas que não foi possível rastrear.
O método ‘ransomware’, que é comummente usado por ‘hackers’ e também é usado neste caso, envolve o bloqueio do sistema sob a premissa de solicitar dinheiro ao usuário em troca de libertá-lo.
0 notes
Text
Virtualization is one of the oldest technology in the tech field but is still very useful up to date. It can simply be defined as dividing and sharing the resources of a computer locally. This helps in creating virtual/software versions of the resources on a system such as storage, networks, applications e.t.c. Many people/organizations use Virtualization in different methods to divide a single machine into several VMs that run independently. For virtualization to occur, a Hypervisor is required. There tow major types of Hypervisors, i.e Type 1/Bare Metal Hypervisors: They are normally installed directly on a physical machine. They include the open-source Kernel-based VMs (KVMs), VMware ESXi, Microsoft Hyper-V e.t.c Type 2/Hosted Hypervisors: They earn the name “hosted” because they are installed on top of an Operating system. These include the Oracle VirtualBox and VMware Workstation In this guide we will learn how to install and use VirtualBox 6.1 on Rocky Linux 9. What is VirtualBox? Virtualbox is an open-source hosted/type 2 hypervisor for both enterprise and home use. It can be used to create and run Virtual Machines on an Operating system such as Windows, Linux, OS/2, Solaris, macOS e.t.c. This tool was first released in 2007. It not only offers high performance but also a rich feature set. The latest release version is 6.1, which was made in December 2019. The cool features associated with VirtualBox 6.1 are: Nested virtualization on Intel CPUs Offers the ability to create multiple VM instances Has imported VM groups and storage settings Updated and extensible Firmware Interfaces and use Allows importing and exporting a VM from OCI Before you Begin In order to install VirtualBox on your system, you need to ensure that Virtualization is enabled on your processor. This is normally made in BIOS/UEFI configurations. To check if it is enabled, execute the command: $ lscpu | grep Virtualization Virtualization: VT-x Virtualization type: full Also, verify that you are running a 64-bit system. $ lscpu Architecture: x86_64 CPU op-mode(s): 32-bit, 64-bit Address sizes: 39 bits physical, 48 bits virtual Byte Order: Little Endian CPU(s): 1 On-line CPU(s) list: 0 Vendor ID: GenuineIntel Model name: Intel(R) Xeon(R) CPU E3-1275 v5 @ 3.60GHz CPU family: 6 Model: 94 #1. Add Virtualbox Repository on Rocky Linux 9 Virtualbox does not reside in the default Rocky Linux 9 repositories. To be able to install it, you need to add the official repositories. First, enable the EPEL repository: sudo dnf install epel-release Install the required build tools: sudo dnf install gcc make perl bzip2 dkms kernel-devel kernel-headers Once installed, compare the kernel-devel versions and the kernel versions: $ rpm -q kernel-devel kernel-devel-5.14.0-70.17.1.el9_0.x86_64 $ uname -r 5.14.0-70.13.1.el9_0.x86_64 Since the two do not match, we need to update the Linux Kernel sudo dnf update kernel-* Reboot the system for the Kernel updates to apply: sudo reboot now Once the system boots, verify if the Kernel and kernel-devel are of the same version. Then add the VirtualBox repositories to the system: sudo dnf config-manager --add-repo=https://download.virtualbox.org/virtualbox/rpm/el/virtualbox.repo #2. Install VirtualBox 6.1 on Rocky Linux 9 Once the repository has been added, identify the available VirtualBox versions dnf search virtualbox Sample Output: Oracle Linux / RHEL / CentOS-9 / x86_64 - Virtu 125 kB/s | 7.8 kB 00:00 ====================== Name & Summary Matched: virtualbox ====================== VirtualBox-6.1.x86_64 : Oracle VM VirtualBox As seen, we have VirtualBox 6.1 provided, proceed and install it using the command: sudo dnf install VirtualBox-6.1 Dependency Tree: Dependencies resolved. ================================================================================
Package Arch Version Repository Size ================================================================================ Installing: VirtualBox-6.1 x86_64 6.1.36_152435_el9-1 virtualbox 90 M Upgrading: pcre2 x86_64 10.37-5.el9_0 baseos 229 k pcre2-syntax noarch 10.37-5.el9_0 baseos 139 k pcre2-utf32 x86_64 10.37-5.el9_0 appstream 199 k Installing dependencies: SDL2 x86_64 2.0.20-2.el9 appstream 606 k libdecor x86_64 0.1.0-3.el9 appstream 40 k pcre2-utf16 x86_64 10.37-5.el9_0 appstream 208 k qt5-qtbase x86_64 5.15.2-29.el9 appstream 3.6 M qt5-qtbase-common noarch 5.15.2-29.el9 appstream 12 k qt5-qtbase-gui x86_64 5.15.2-29.el9 appstream 6.3 M qt5-qtx11extras x86_64 5.15.2-6.el9 appstream 35 k sdl12-compat x86_64 0.0.1~git.20211125.4e4527a-4.el9 appstream 83 k xcb-util-image x86_64 0.4.0-19.el9 appstream 19 k xcb-util-keysyms x86_64 0.4.0-17.el9 appstream 14 k xcb-util-renderutil x86_64 0.3.9-20.el9 appstream 17 k xcb-util-wm x86_64 0.4.1-22.el9 appstream 31 k Transaction Summary ================================================================================ Install 13 Packages Upgrade 3 Packages Total download size: 102 M Is this ok [y/N]: y Accept the GPG key to be imported: Oracle Linux / RHEL / CentOS-9 / x86_64 - Virtu 3.0 kB/s | 1.7 kB 00:00 Importing GPG key 0x98AB5139: Userid : "Oracle Corporation (VirtualBox archive signing key) " Fingerprint: 7B0F AB3A 13B9 0743 5925 D9C9 5442 2A4B 98AB 5139 From : https://www.virtualbox.org/download/oracle_vbox.asc Is this ok [y/N]: y #3. Install Virtualbox Extension Pack on Rocky Linux 9 Wait until the installation has been completed then proceed and install the Virtualbox Extension Pack. This provides features such as Virtualbox RDP, disk encryption, NVMe and PXE boot for intel cards, USB 2.0, USB 3.0 devices to VirtualBox. To download the Virtualbox Extension Pack, visit the official Virtualbox downloads page. On the page, download the “all supported platforms” pack It is also possible to download the pack via wget wget https://download.virtualbox.org/virtualbox/6.1.36/Oracle_VM_VirtualBox_Extension_Pack-6.1.36a-152435.vbox-extpack Now build the kernel modules using the command: $ sudo /sbin/vboxconfig vboxdrv.sh: Stopping VirtualBox services. vboxdrv.sh: Starting VirtualBox services. vboxdrv.sh: Building VirtualBox kernel modules. Once downloaded, navigate to the location of the file and install it with the command: sudo VBoxManage extpack install Oracle_VM_VirtualBox_Extension_Pack-*.vbox-extpack Proceed as shown; VirtualBox Extension Pack Personal Use and Evaluation License (PUEL) License version 11, 21 May 2020 PLEASE READ THE FOLLOWING ORACLE VM VIRTUALBOX EXTENSION PACK PERSONAL USE AND EVALUATION LICENSE CAREFULLY BEFORE DOWNLOADING OR USING THE ORACLE SOFTWARE. THESE TERMS AND CONDITIONS CONSTITUTE A LEGAL AGREEMENT BETWEEN YOU AND ORACLE. ORACLE AMERICA, INC. ("ORACLE") IS WILLING TO LICENSE THE PRODUCT DEFINED IN SECTION 1 BELOW ONLY ON THE CONDITION THAT YOU ACCEPT ALL OF THE TERMS CONTAINED IN THIS VIRTUALBOX EXTENSION PACK PERSONAL USE AND EVALUATION LICENSE AGREEMENT ("AGREEMENT"). ...... Do you agree to these license terms and conditions (y/n)? y #4. How to Use VirtualBox 6.1 Once installed, Virtualbox 6.1 is ready for use. Launch it from the App Menu as shown: To create a Virtual Machine, click on New and set the name of the VM as shown. Assign the memory size for your Virtual Machine.
Create a hard disk for the VM. This will act as storage for your VM Set the disk size. Now you will have your VM created. There are some configurations you can make before you begin the installation. Navigate to the VM’s Settings -> Storage and load the ISO file to be used to install the required Operating System. It is also possible to configure the Network. Here, you can choose between NAT, bridged,l internal Network, host-only e.t.c Transfer Files Between Virtual Machine To Host There are three ways how to transfer files between the Host and VM. These are: Drag and drop & Shared Clipboard USB drive Shared Folder Top configure Drag and Drop, which is typically copy and paste, navigate to the VM’s settings-> General settings-> Advanced settings and enable it as shown. To allow data to be copied from USB Stick to your VM, enable the USB controller and set the controller. You can now click on + to add the USB device. To configure a shared folder between the host and VM, click on Shared Folders and set the host folder to be shared, the share name then the required permissions. You also need to specify a mount point on the VM as shown. Once the desired configurations have been made click Ok and start the VM. The installation will begin as shown: VirtualBox Networking VirtualBox supports several network modes that include: NAT NAT Network Bridged Adapter Internal Network Host-Only Adapter Generic Driver In this guide, we will discuss and learn how to set 3 commonly used modes which are: NAT Networking This is the default enabled mode, the VM is able to access hosts in a physical area network using the virtual NAT. The internet is also accessible from the guest OS. Using this mode, allows the VM to be accessed internally and cannot be accessed remotely. The NAT mode has a internal DHCP server with the default IP address as 10.0.2.2 Bridged Networking With this mode, the VM’s adapter is connected to the host’s physical network adapter. The VM now uses the hots network interface for internet connection. Here, the VMs are fully accessible from the physical LAN. The IP is assigned from your physical network using the IP address of the default gateway in the physical network. Host-only Networking This mode is used to establish communication between the host and the guest. The VM is also able to communicate with other VMs that are connected to the host-only network. The host-only network can be created on Virtualbox by navigating to File > Host Network Manager. Create the network and check the properties. You can edit them manually or configure them automatically. Once the host-only network has been created, you can now use it on VMs as shown. That is it, now proceed and install the VirtualBox Guest Additions that consist of a set of device drivers and system applications used to optimize the performance of the VM. They provide a number of features such as Mouse pointer integration, shared folders, shared clipboards e.t.c This can be achieved using the aid in the guide below How To Install VirtualBox guest additions on Rocky Linux 9 Closing Thoughts That marks the end of this guide on how to install and use VirtualBox 6.1 on Rocky Linux 9. You are now able to create and use VMs on your system as desired. I hope this was significant.
0 notes
Text
VCF 5.2.1 - Configuration Update
View On WordPress
#ESXi#Nested#Nested ESXi#Nested SDDC#Nested vSphere#SDDC#SDDC Manager#vCenter 8#VCF#VCF 5.2#VCF 5.x#VMware#vSphere 8#vSphere 8.0
0 notes
Text
Nested ESXi install in Proxmox: Step-by-Step
Nested ESXi install in Proxmox: Step-by-Step #NestedESXiInProxmoxGuide #VMwareESXIVirtualization #ProxmoxVMSetup #NestedVirtualMachineConfiguration #VMwareESXiNestedVMs #ProxmoxNestedVirtualizationTips #virtualizationhowto #homelab #homeserver #learning
If you have a Proxmox VE server in your home lab or production environment and want to play around with VMware ESXi, you can easily do that with Proxmox nested virtualization. Let’s look at the steps required for a nested ESXi server install in Proxmox. Table of contentsNested Virtualization in ProxmoxPreparing your Proxmox VE host to enable nested virtualization for ESXiCreating the ESXi VM in…

View On WordPress
0 notes
Text
Download vmware fusion 7 pro 無料ダウンロード.Mac用のVMWare Fusion Pro
Download vmware fusion 7 pro 無料ダウンロード.Mac – VMware Fusion のダウンロードとインストール

Mac用のVMWare Fusion Pro.Mac用のVMWare Fusion Pro をダウンロード -
VMware Workstation Pro のダウンロード. VMware Workstation Pro は、Linux または Windows PC 上で仮想マシンを実行するための業界標準のデスクトップ ハイパーバイザーです。. 全機能が利用可能な 30 日間の無償評価を今すぐ開始してください。. お問い合わせ VMware Fusion Pro および VMware Fusion Player を使用すると、Windows、Linux、macOS、コンテナ、Kubernetes クラスタなどを Mac 上で実行できます。 | VMware JPMissing: download 無料版をダウンロードする. VMware Fusion Proを使用すると、再起動することなく、だれでもMacでWindowsや他の何百ものオペレーティングシステムを実行できます。. このアプリは、新規ユーザーにとっては十分にシンプルでありながら、ITプロフェッショナル
Download vmware fusion 7 pro 無料ダウンロード.Vmware Fusion 7 ダウンロード
Mac Vmware Fusion のダウンロードとインストール Pc設定のカルマ. Vmware Fusion 7 0 0 へアップグレード Workfront. Vmware Fusion 7 Full Version Free Download For Mac Youtube. Vmware Fusion 7 Pro を使って Vmware Esxi 5 5 Update2 のテスト環境を構築する VMware Workstation Pro のダウンロード. VMware Workstation Pro は、Linux または Windows PC 上で仮想マシンを実行するための業界標準のデスクトップ ハイパーバイザーです。. 全機能が利用可能な 30 日間の無償評価を今すぐ開始してください。. お問い合わせ VMware Fusion Pro および VMware Fusion Player を使用すると、Windows、Linux、macOS、コンテナ、Kubernetes クラスタなどを Mac 上で実行できます。 | VMware JPMissing: download
��矢報いる Vmware Fusion 5 で Windows 10 Technical Preview を動かせてみた. Mac Vmware Fusion のダウンロードとインストール Pc設定のカルマ. Vmware Fusion 7 0 0 へアップグレード Workfront. Vmware Fusion 7 Full Version Free Download For Mac Youtube. Vmware Fusion 7 Pro を使って Vmware Esxi 5 5 Update2 のテスト環境を構築する Nested Esxi Qiita.
Mac上で仮想windows Vmware Fusionのインストール作業 ネオくん日誌. Mac Os X Yosemite Version 10 10 使い方. Vmware Fusion 11 1 0へのアップデート Rhel 8 0 Esxi 6 7 U2などに対応 一馬力のメモ帳. Macに Vmware Fusion 12 Player を無料でインストールする方法 Naosuyo Blog. Ascii Jp Mac上でwindows 10が動かせる Vmware Fusion 8 登場.
Vmware Fusion 7 ダウンロード. Get link Facebook Twitter Pinterest Email Other Apps. 一矢報いる Vmware Fusion 5 で Windows 10 Technical Preview を動かせてみた 9 28 アクト ツー Mac上でwindowsを実行する仮想化ソフトウェア Vmware Fusion 5 のパッケージ版 円 を販売開始 Apple Brothers Loves Mac Mac Vmware Fusion のダウンロードとインストール Pc設定のカルマ Vmware Fusion 7 0 0 へアップグレード Workfront Vmware Fusion 7 Full Version Free Download For Mac Youtube Vmware Fusion 7 Pro を使って Vmware Esxi 5 5 Update2 のテスト環境を構築する Nested Esxi Qiita Mac上で仮想windows Vmware Fusionのインストール作業 ネオくん日誌 Mac Os X Yosemite Version 10 10 使い方 Vmware Fusion 11 1 0へのアップデート Rhel 8 0 Esxi 6 7 U2などに対応 一馬力のメモ帳 Macに Vmware Fusion 12 Player を無料でインストールする方法 Naosuyo Blog Ascii Jp Mac上でwindows 10が動かせる Vmware Fusion 8 登場.
Popular Posts Adobe Flash Professional Cs6 体験版 ダウンロード. Adobe Cs6 0等の体験版はamtlib Dll書き換えで永久に使える Crojpのblog Amazon Adobe Flash Professional Cs5 Windows版 旧製品 イラスト ペイント ソフトウェア アドビ Adobe イラストレーター フォトショップ Cs6 を無料で入手する方法. Read more. スズキ 四輪車 全方位モニター付メモリーナビゲーション 3 中古 取扱説明書 Spacia スペーシア Mk42s 印刷 年3月 取説 取扱書 スズキ車 の落札情報詳細 ヤフオク落札価格情報 オークフリー スマートフォン版.
B Casカード改造 B Casカード書き換え Hashigozakura B Cas改造 Bカスカード化書き換えツール配布所 画像 15枚. 無料の日本語フォント Noto Sans ブランディングデザイン事務所 Re Simple Inc リシンプル Amazon Co Jp Opentype ヒラギノ角ゴ 簡体中文 W6 ダウンロード ソフトウェア ヒラギノ角ゴ にソックリ 無料で使えるopen Type フォント Noto Sans Jp Web上手. Adobeacrobat Adobeacrobatreaderアップデート手順 Doldoworkz Acrobat Xi X 9 8 Pro 起動時に落ちるときの解決法 Office Photoshop Illustratorなどの買い切りライセンスソフトの格安販売情報サイト インストール手順 Windows 版 Acrobat 9 Pro Standard.
Http Www Hiroshima Med Or Jp Ishi Docs Pdf 訪問看護指示書 記入例 Eyecatch 訪問看護ステーションgift 訪問看護報告書の様式が変更 書き方を解説します 令和3年度介護報酬改定 訪問看護経営マガジン. つけ襟 型紙 パターンのハンドメイド 手作り通販 Minne 日本最大級のハンドメイドサイト 丸い襟 フラットカラー の型紙 ダウンロードの型紙屋さん組み合わせパーツ 楽天ブログ ビブカラー 付け襟 の作り方と型紙. 株式会社淀工業 ヨドフロンgl 間取り家03 On Twitter 今工事中の住宅の外壁の色見本 ガルバリウム鋼板を使うことが多いです ガルバリウム鋼板 ガルバリウム鋼板の色は結局どれがいい 見本とオススメを紹介 ヌリカエ. コロナ エアコンの取扱説明書 マニュアル Pdf ダウンロード 全16ページ 1 16mb コロナ エアコンの取扱説明書 マニュアル Pdf ダウンロード 全16ページ 1 16mb エアコン 運転ランプが点滅して暖房が止まる エアコン Panasonic.
0 notes
Text
Como atribuir a chave de licença VMware ESXi
Como atribuir a chave de licença VMware ESXi
Sem dúvida, a VMware é a pioneira no mundo da virtualização. O VMware pode ser usado premium ou gratuito com base no licenciamento. Obtendo a chave de licença do VMware ESXi premium ou gratuita, às vezes podemos ficar confusos sobre como atribuir a chave de licença no host VMware ESXi. Portanto, neste artigo, mostrarei as etapas para atribuir a chave de licença do VMware ESXi no VMware ESXi 7…

View On WordPress
0 notes
Text
Cibercriminosos usam ransomware para atacar VMWare ESXi e criptografar discos rígidos virtuais
Pelo menos um grande grupo cibercriminoso de ransomware está explorando de vulnerabilidades no produto VMWare ESXi. Assim, eles assumem o controle de máquinas virtuais em ambientes corporativos. Objetivo é criptografar os discos rígidos virtuais. Esses ataques não são necessariamente novos. São registrados pelo menos desde outubro passado. Os cibercriminosos implantaram o ransomware RansomExx.
Os invasores usaram CVE-2019-5544 e CVE-2020-3992, duas vulnerabilidades no VMware ESXi. Trata-se de uma solução de hipervisor que permite que várias máquinas virtuais compartilhem o mesmo armazenamento no disco rígido. Ambos os bugs afetam o Service Location Protocol (SLP). Este é um protocolo usado por dispositivos na mesma rede para descobrir uns aos outros; também incluído no ESXi.
Cibercriminosos usam ransomware para atacar VMWare ESXi e criptografar discos rígidos virtuais
As vulnerabilidades permitem que um invasor na mesma rede envie solicitações SLP maliciosas para um dispositivo ESXi. Então, assumem o controle dele. Isso ocorre mesmo que o invasor não tenha comprometido o servidor VMWare vCenter ao qual as instâncias ESXi geralmente se reportam.
Em ataques que ocorreram no ano passado, a gangue RansomExx obteve acesso a um dispositivo em uma rede corporativa. A partir deste ponto, atacaram instâncias ESXi locais. Então, criptografaram os discos rígidos virtuais, usados ??para armazenar dados de máquinas virtuais. Assim, causaram grandes problemas para as empresas. É que os discos virtuais ESXi geralmente servem ??para centralizar dados de vários outros sistemas.
Além disso, relatos desses ataques foram documentados no Reddit, compartilhados no Twitter, apresentados em uma conferência de segurança no mês passado.
Por enquanto, apenas a gangue RansomExx (ou Defray777) foi vista usando desse truque. Porém, no mês passado, o operador do ransomware Babuk Locker também anunciou um recurso semelhante. Neste caso, entretanto, o ataque não obteve confirmação.
Além disso, os agentes de ameaças também observaram a venda de acesso a instâncias do ESXi em fóruns clandestinos de crimes cibernéticos. A informação é d da empresa de inteligência de ameaças KELA.

Imagem: KELA
Os administradores de sistema em empresas que dependem do VMWare ESXi para gerenciar o espaço de armazenamento das máquinas virtuais devem aplicar os patches ESXi. Do mesmo modo, outra opção é desativar o suporte a SLP para evitar ataques se o protocolo não for necessário.
ZDNet
O post Cibercriminosos usam ransomware para atacar VMWare ESXi e criptografar discos rígidos virtuais apareceu primeiro em SempreUpdate.
source https://sempreupdate.com.br/cibercriminosos-usam-ransomware-para-atacar-vmware-esxi-e-criptografar-discos-rigidos-virtuais/
0 notes
Text
ネストされた ESXi ネットワーク要件の復習
ネストされた仮想化、特に VM 内で ESXi を実行するネストされた ESXi の使用は、私や VMware コミュニティの多くの人々にとって非常に自動的かつ習慣になっているため、ESXi をずっと体験している新しいユーザーがまだいることを忘れることがあります。初めて。
ネストされた ESXi は、開発、テスト、一般的な学習目的など、さまざまなユースケースに非常に強力な機能です。ネストされた ESXi 環境を導入して展開する前に (ネストされた ESXi 仮想アプライアンスを使用することを強くお勧めします)、ネットワークが適切に設定されていることを確認する必要があります。そうしないと、あらゆる種類の奇妙な問題が発生します。VMware Nested Virtualization のすべてのリソース、ヒント、テクニックについては、このページを必ずブックマークしてください。
免責事項:ネストされたネストされた ESXi は VMware によって正式にサポートされておらず、ネストされた仮想化は限られたシナリオでのみサポートされます。詳細については、このVMware KB 2009916を参照してください。
ESXi の新規ユーザーはネットワーク要件を知らないかもしれませんが、経験豊富な ESXi ユーザーから報告された問題にも遭遇しました。彼らにネットワーク要件を思い出させたところ、彼らは知っていたものの完全に忘れていた問題が解決しました。これは、最も経験豊富なユーザーでも基本を忘れてしまう可能性があることを示しており、確かにそれは簡単に見落とされやすいものです。私も新しいセットアップをインストールまたは再インストールするときに何度かそれを行ったことがあることを認めます 🙂
ネットワーク要件、その理由、およびセットアップで使用している ESXi のバージョンに応じてこ���要件を満たすさまざまな方法について、復習を公開する良い機会だと思いました。
ネットワーク要件:
物理 ESXi ホストの仮想スイッチで、無差別モードと偽送信または MAC 学習のいずれかを有効にします。これが必要な理由については、こちらのブログ投稿を参照してください。特にプロミスキャス モードが有効になっている場合の環境へのパフォーマンスへの影響を理解するには、こちらのブログ投稿を参照してください。
注:物理 ESXi ホストの仮想スイッチの MAC 学習機能を使用できる場合は、プロミスキャス モードが必要ないため、最高のエクスペリエンスが得られ、パフォーマンスへの影響はありません。無差別モードを有効にする必要がある場合は、パフォーマンスへの影響を軽減する方法について、以下のネットワーク推奨事項を参照してください。
ネットワーク構成:
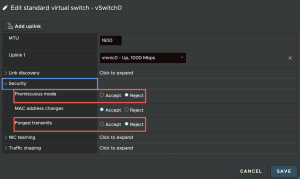
仮想標準スイッチ (VSS) の場合、vSwitch の [セキュリティ] セクションに [無差別モード] と [偽造送信] 設定があり、どちらもデフォルトで拒否されます。
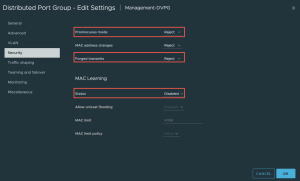
仮想分散スイッチ (VDS) の場合、分散ポートグループのセキュリティ セクションに無差別モードと強制送信設定があり、どちらもデフォルトで拒否されます。vSphere 7.0 以降を使用している場合は、このセクションにネイティブ MAC 学習構成もありますが、これもデフォルトでは無効になっています。
NSX の場合、MAC 学習構成は、MAC 検出セグメント プロファイル内の NSX セグメントにあります。デフォルトでは、MAC 学習は無効になっているため、MAC 学習を有効にしたカスタム MAC 検出セグメント プロファイルを作成する必要があります。
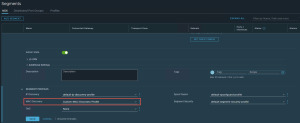
デフォルトの MAC 検出セグメント プロファイルをクリックして、MAC 学習設定の有効化を含む新しいカスタム プロファイルを作成し、完了したら、そのプロファイルを目的の NSX セグメントに適用します。

注:無差別モード、偽装送信、および MAC 学習の有効化はすべて、vSphere または NSX API を使用して自動化できます。上記の例は、これを一度だけ行う必要があるユーザー向けにこれらの設定を有効にする最も簡単な方法を示しています。
ネットワークに関する 推奨事項:
ESXi 5.0-5.5
仮想標準スイッチ (VSS) - ESXi dvFilter Fling (vmware-esx-dvfilter-maclearn-1.0.vib) を使用して、無差別モードを有効にした場合の影響を軽減します。
ESXi 6.0 ~ 6.5
仮想標準スイッチ (VSS) - ESXi MAC Learning dvFilter Fling (esx-dvfilter-maclearn-6.5.0.vib) を使用して、無差別モードを有効にした場合の影響を軽減します。
分散仮想スイッチ (VDS) - ESXi Learnswitch Flingを使用して、無差別モードを有効にした場合の影響を軽減します。
ESXi 6.7
仮想標準スイッチ (VSS) - 無差別モードを有効にするとパフォーマンスに影響します
分散仮想スイッチ (VDS) - vSphere API 経由で VDS ポートグループでネイティブ MAC 学習を使用する
ESXi 7.0
仮想標準スイッチ (VSS) - 無差別モードを有効にするとパフォーマンスに影響します
分散仮想スイッチ (VDS) - vSphere UI/API 経由で VDS ポートグループでネイティブ MAC 学習を使用する
NSX (C-VDS/N-VDS) - NSX セグメントでの MAC 学習の有効化
ESXi 8.0
仮想標準スイッチ (VSS) - 無差別モードを有効にするとパフォーマンスに影響します
分散仮想スイッチ (VDS) - vSphere UI/API 経由で VDS ポートグループでネイティブ MAC 学習を使用する
NSX (C-VDS/N-VDS) - NSX セグメントでの MAC 学習の有効化
0 notes