#PCBuildGuide
Explore tagged Tumblr posts
Visit Tumblr Blog
Explore Tumblr blogs with no restrictions, modern design and the best experience.
Last Seen Tumblr Blogs


Fun Fact
Tumblr was attacked by a cross-site scripting worm deployed by the Internet troll group GNAA on Dec 3, 2012.
Text
Building Dreams with Graphics – The Power of RTX 5060 Ti | Yom Computer
At Yom Computer, we don’t just sell graphic cards — we help you build the machine that powers your passion.
From GIGABYTE to ZOTAC RTX 5060 Ti (16GB GDDR7), we offer the best solutions for gamers, editors, and streamers who want performance without compromise.
Whether you’re upgrading or starting fresh, we’re here to build the best gaming computer in Ahmedabad, just for you.
🧑💻 Genuine Components 🛠️ Expert PC Builds 🎮 Future-Ready Performance
💬 “Great service, best rates & latest products. Fast & friendly!” — Krunal Bhatt, a happy customer.
📞 Call Us: +91 77779 97309 / +91 90678 80976 🌐 Visit: www.yomcomputer.com
#BestGamingComputerInAhmedabad#RTX5060Ti#GamingPCIndia#ZotacGraphicsCard#GigabyteRTX#CustomPCBuild#YomComputer#AhmedabadGamers#PCBuildGuide#GamerSetup
1 note
·
View note
Text

Close-up of a CPU being aligned and installed into a motherboard socket, demonstrating proper handling for LGA/AM5 processors. Useful for custom PC builders, hardware enthusiasts, and system integrators.
#CPUInstallation#BuildYourPC#PCBuilding#PCBuildGuide#HowToInstallCPU#TechTutorial#BeginnerTech#StepByStepGuide
0 notes
Text
How To Build A PC Pt1: Choosing Parts
So as you may know one of my goals back in July was to build a PC. It seemed like such a daunting, expensive task and there were so many components to consider that it was easy to drag my feet. But I knew I had to just push through all that and just do it.
And so I did.
Building a PC isn’t as hard as it may seem and it’s actually a lot of fun! And based on my Instagram poll last week, you guys seem interested in learning about the process. So in this post I’ll outline the first step of building a pc: how to pick the parts.
I’m going to preface this by saying that this is by no means everything you can ever know, so I’ll do my best to leave links to places where you can learn more about things to supplement what I talk about. Tech is also constantly changing and evolving so keep in mind that depending on when you read this, some of these things might not be the newest anymore. I’m also going to be focusing on my build specifically and the parts I used.
So with that out of the way, let’s get started!
I’m going to start off with the different components and a baseline of what they do. To build a PC you only really need 7-8 things:
Motherboard: This connects all the different parts together to make everything run. This needs to be compatible with all the other components of your build.
GPU (Graphics Card): This is the component that handles all the graphics based things for your computer. For gaming or video editing, it’s especially important.
CPU (Central Processing Unit): This is responsible for interpreting and executing the commands you give your computer. So the more cores and threads your CPU has the faster your computer can compute everything.
CPU Cooler (optional): Depending on the CPU you’re getting and the workload you’re putting it under, you might be able to use the stock cooler that comes with some CPUs, so you need to buy a CPU cooler to make sure your CPU doesn’t overheat.
RAM (Random Access Memory): This is what stores the computer’s working memory. So if you have more RAM the computer will be able to process more things at once.
PSU (Power Supply): This supplies power to your whole system.
HDD (Hard drive) or SSD (Solid State Drive) or both: This is the storage on your computer. Hard drives, or traditional spinning drives tend to have more storage but are more easily broken if you bang it around. Solid State Drives are also storage, but they don’t have any moving parts like the hard drives so they’re faster and more stable but usually more expensive. I’d recommend having both if your budget allows for it.
Chassis (case): This is the case that your components are going to live in. Beyond aesthetics it’s good to make sure your case is big enough to house your parts, if it has any fans and what the ventilation is like.
Cooling solutions: Your pc will get super hot and there are many ways to cool it. Fans, AIOs, water cooling. To keep things simple I’ll just focus on fans, since that’s what’s on my build. You need at least three fans, two in the front as an intake and one in the back as an exhaust, but may need more depending on your parts.
Okay, so those are the main parts and a little about them. This is by no means an exhaustive explanation and you should do more research and reading on these parts. (I'll be attaching links to articles that further explain all this in the next part).
Alright, so now lets get a little deeper into it!
CPU:
This is the CPU I chose. Let me run through why I chose it so you can see the decision making process.
There are two main companies to buy a CPU from: Intel (which I’m sure is a familiar name) and AMD. I would say that at this point, both are pretty comparable. Intel is generally more expensive, and AMD is cheaper and usually offers more cores and threads. (Here is a link that explains cores and threads: https://www.lifewire.com/what-is-a-cpu-2618150 )
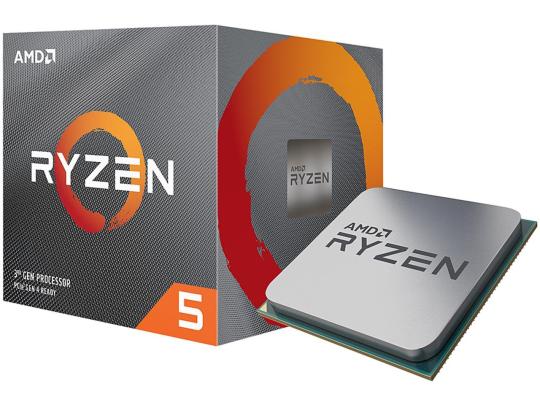
Basically, the more cores and threads the faster the CPU will run. So I went with an AMD CPU. Specifically the Ryzen 5 3600x. Let me explain those numbers.
Ryzen is just the name of the CPU, 3600 means it’s the 3000 series for AMD (the higher the series the newer CPU). Ryzen 5 has six cores and 12 threads. You can go higher and get the Ryzen 7 3700x which has 8 cores or go down and get the Ryzen 3 which has 4 cores.
But for me I went middle of the road with the newest series that was out at the time because not only did it give me 6 cores and 12 threads but it was cheaper than Intel. The Ryzen 5 3600x also can run with the stock CPU cooler that comes with it, especially if you aren’t doing anything crazy with it, so I didn’t have to buy a CPU cooler the way I would have had to do if I went with a Ryzen 7.
Here are some links explaining Ryzen and Intel CPUs:
https://www.windowscentral.com/amd-ryzen-which-processor-best-you
https://www.goodgearguide.com.au/article/633263/which-intel-core-cpu-best-how-do-decide-between-core-i3-i5-i7-i9/?
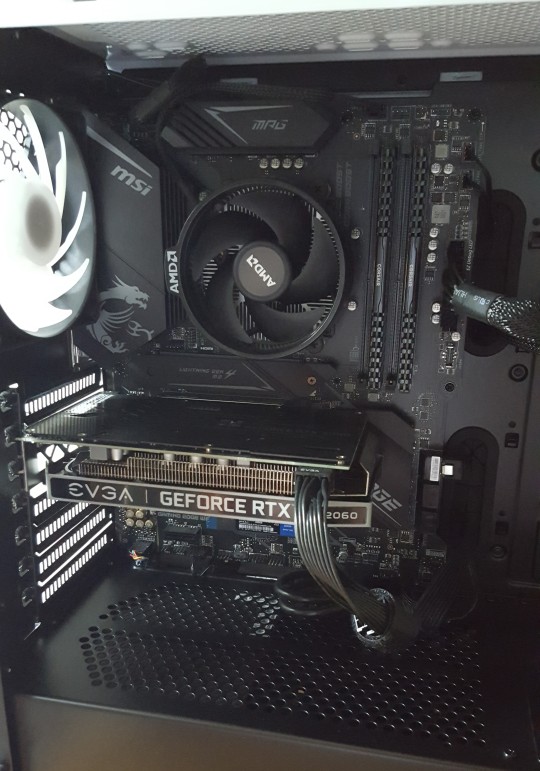
GPU:
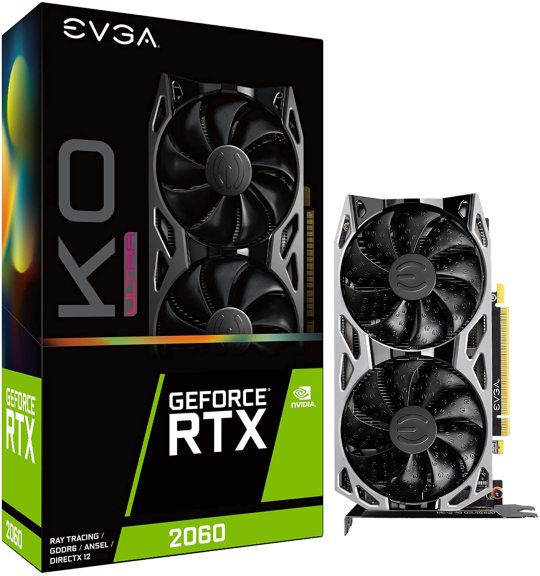
The graphics card I chose was the EVGA KO Ultra RTX 2060. Let’s break that down.
Nvidia is one of the biggest companies that makes graphics cards (AMD is the other big one). Currently, the latest series are the Geforce RTX 2000 series, RTX 2040 (lower end), RTX 2060 (middle of the road) and RTX 2080 (super powerful) and the RTX 2080ti (even more powerful).
Nvidia makes the graphics chip and then other companies incorporate that into their own designs to make a GPU. In my case EVGA is the company and one of the GPUs they have for the RTX 2060 is the KO Ultra which I chose cause it was compact and had good reviews.
It’s really beneficial to look at tech reviews for components like the GPU since there are multiple companies making them and they all have their own quirks.
I chose the RTX 2060 because it’s powerful and can handle a lot of gaming and rendering but I’m also not overclocking or doing anything too intense so it didn’t warrant the more money an RTX 2080 would have cost.
Links:
https://www.pcmag.com/encyclopedia/term/gpu
https://www.tomshardware.com/reviews/gpu-buying-guide,5844.html
RAM:
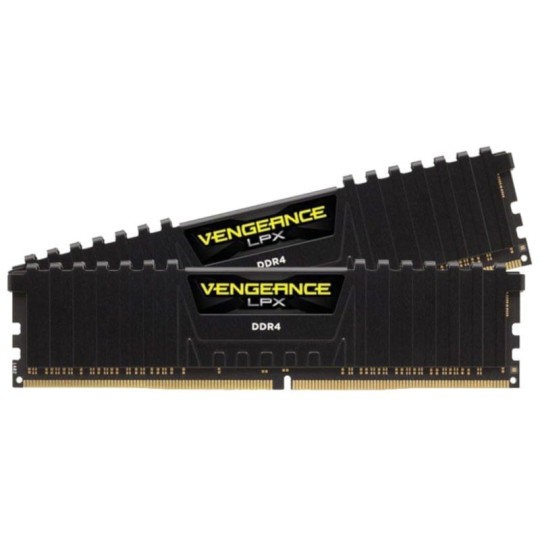
I chose the Corsair Vengeance LPX 16GB DDRR RAM at 3200MHz. DDR4 RAM is the newest kind of RAM you can get. I have links below that explain more about DDR4.
16GB is a sweet spot for how much RAM you’re generally going to need. 4GB and 8GB are a bit low (Windows needs 4GB just to run) and 32GB is obviously better but usually overkill for most people.
32000MHz is the frequency of how fast the RAM can run. A RAM at 1.6MHz or 2.6MHz is not as fast as 3.2MHz, which is why I chose it.
Corsair Vengeance LPX is the name of the brand and type of RAM I got. Corsair is a pretty well-known brand and the RAM was rated well, but there are many other companies that make this. Again, I recommend looking into reviews.
Links:
https://www.lifewire.com/what-is-random-access-memory-ram-2618159
https://www.lifewire.com/types-of-ram-4150713
HDD:

I have the 2TB Seagate Barracuda hard drive in my build. There’s not much to say about it and I chose it because Seagate Barracuda is a well-known brand and I wanted at least 2TB of storage on my computer.
Links:
https://www.lifewire.com/what-is-a-hard-disk-drive-2618152
SSD:
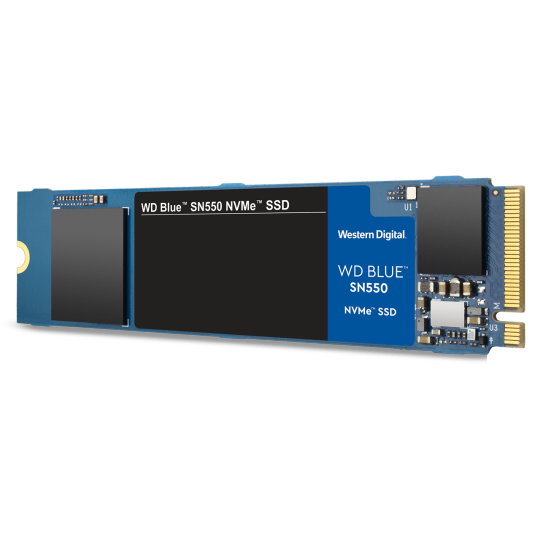
I also decided to also put a SSD in my build. I’d recommend getting both an SSD and HDD if your budget allows because you can have a bulk of your storage on your hard drive but install your operating system on your Solid State Drive so that everything will boot up and run faster.
I chose the Western Digital M.2 500GB NvMe SSD. Western Digital is a good brand, 500GB is a good amount, especially since I also have an additional 2TB of storage and NvMe is faster than a SATA connected SSD.
Links:
https://www.lifewire.com/solid-state-drive-833448
https://searchstorage.techtarget.com/definition/M2-SSD?amp=1
https://www.partitionwizard.com/partitionmagic/m2-ssd-vs-sata.html
https://techterms.com/amp/definition/sata
Motherboard:
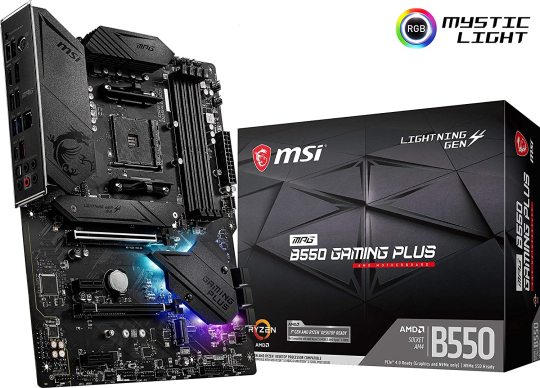
I went with the MSI B550 Gaming Edge with WiFi motherboard for my build. Now firstly, this motherboard is compatible with my AMD Ryzen 5 CPU. Secondly, it comes with wifi, which is important to me since I don’t have access to an Ethernet port where my PC is. Thirdly, B550 means that this board is compatible with PCIe Gen 4 connections, so I’m accounting for the future. Now PCIe Gen 4 isn’t the standard right now, but it will be in the future and basically it just means that connections are going to be faster.
Here is a link explaining what PCIe Gen 4 is:
https://www.tomshardware.com/reviews/pcie-definition,5754.html
It was also rated pretty well by tech reviewers. Once again, I highly recommend looking into reviews especially with a motherboard since so many brands make them and it can be hard to figure out what you want.
Things to keep in mind: make sure your motherboard is compatible with your CPU. Make sure that there’s at least two SATA ports for your HDD and SSD. If you’re going to use an M.2 NVME SSD make sure that there’s room on the motherboard for that. Motherboards come in three sizes or form factors: ATX, Micro ATX and Mini ATX. Make sure that whatever size it is, it will fit into your case. Also, make sure your motherboard has ports for any connections on your case (like USB ports).
Links:
https://www.tomshardware.com/reviews/motherboard-buying-guide,5682.html
PSU:
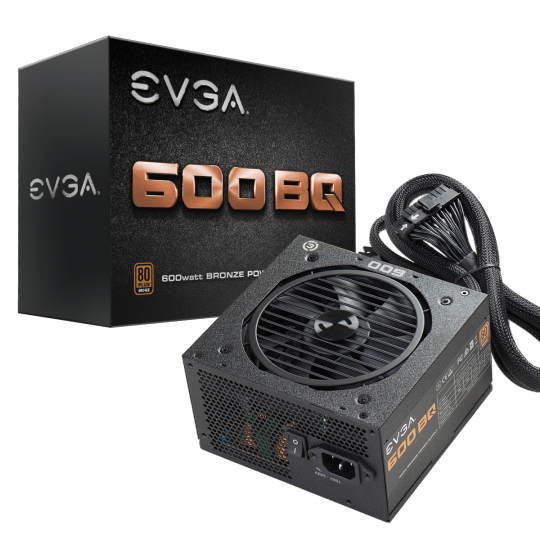
The power supply I chose was the EVGA BQ 600 W 80+ Bronze Certified Semi-modular ATX Power Supply. EVGA is the name of the brand and BQ is what EVGA calls this version of PSU.
Wattage is important and I chose 600W because it’s a 100W more than what the GPU requires, that’s a good rule of thumb to follow. You never want to be under the required wattage.
You also want to choose a power supply that has some 80+ certification. In my case it’s bronze but even just 80+ is better than nothing and obviously silver or gold is even better.
The last part of that name is the Semi-Modular. PSUs can be completely modular, semi-modular or not modular at all. And what that really means is how many connections are already built in and how many you need to make yourself. I chose Semi-modular because I just preferred it and it was easier than making all the connections myself.
Links:
https://www.wepc.com/tips/full-semi-vs-non-modular-power-supply/
https://techguided.com/how-to-choose-a-power-supply/
Case:
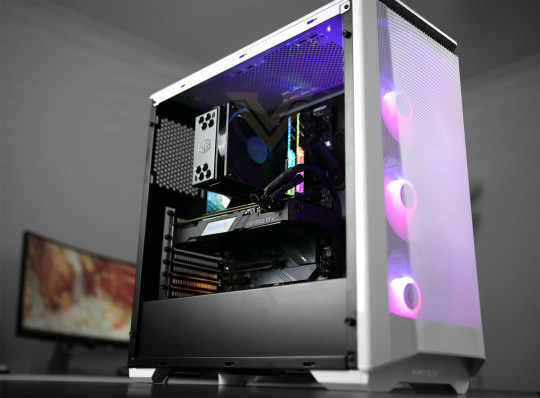
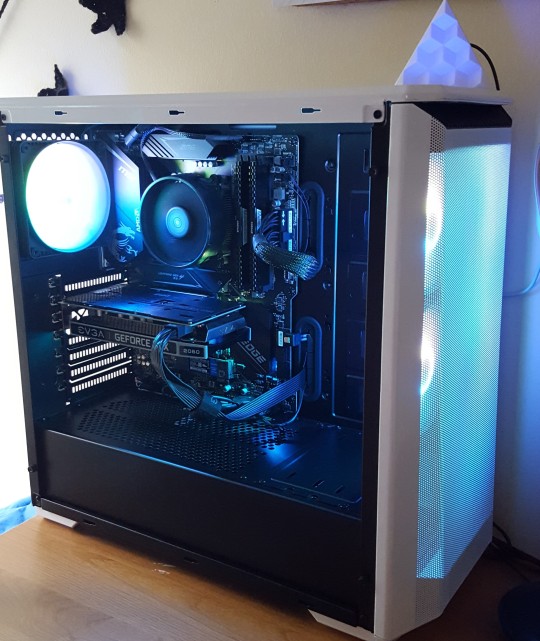
Finally, we come to the case. I chose a Phanteks Eclipse P400A. Things I was looking for: a mesh front panel for proper ventilation, a PSU shroud (so you cant see the PSU on the bottom, a tempered glass side panel (cause I like the look) and thee fans.
I didn’t want to buy any extra fans and this not only came with 3 fans but 3 RGB fans. (RGB just means it as pretty rainbow lights). All three were installed in the front so all I did was remove the bottom one from the front and put it on the back as an exhaust fan. It saved me some money and now I have matching RGB fans.
The case is also ATX form factor, which is also the size of my motherboard so I knew it would fit. There are two USB ports on the case and my motherboard has USB ports so I can connect the two. It also fit my GPU and Power Supply.
Always look at the specifications sheets for all the components your buying to get the sizes to make sure everything will fit.
Links:
https://www.pcworld.com/article/3226748/how-to-buy-pc-case.html
-.-.-
And that’s how I chose all the parts for my build. I know there’s a lot that goes into it, but it’s not too bad if you have some guidance.
Here is a link to an extremely helpful video on choosing parts and how everything connects:
https://www.youtube.com/watch?v=AiVWQthb-20
My budget was roughly $1,000 through by no means do you have to spend that much on a PC. I’ve seen builds for $500 dollars that are still awesome. But given my budget, these were the parts that worked for me.
Here’s a link to a very helpful video on different parts list at different price points:
https://www.youtube.com/watch?v=93SwSYQL9D4
I learned all of this from watching the videos I have linked. Three channels in particular taught me everything I needed to know, I’ll link them here:
https://www.youtube.com/channel/UCftcLVz-jtPXoH3cWUUDwYw
https://www.youtube.com/channel/UCXuqSBlHAE6Xw-yeJA0Tunw
https://www.youtube.com/user/paulshardware
The website I used to create my parts list (which also has some good resources):
https://pcpartpicker.com/
This blog post has gone on long enough, so I’ll stop it here and do another post on the actual build part because that was also quite an experience. Stay tuned for that to see how all the parts I’ve mentioned came together in the build!
I hope you found this helpful and educational. By no means have I covered everything and tech is constantly changing, even as I write this there is a new series of GPUS and CPUs out that are better and faster than the ones I used. But nevertheless, I hope you guys liked this!
Please share your thoughts! I’d love to hear your experiences or questions!
And as always, thank you for taking the time to read this!
See you in the next one!
#pcbuild#pc#pcparts#computers#computerparts#howto#pcbuildguide#pcresearch#lifestyle#blog#lifestyleblog
0 notes
Photo

Component Wars #1 GTX 1060 3GB VS RX 570 4GB Many were asking me which GPU is better between these two. So, I made a new series which is called Component Wars where we compare 2 pieces of Computer Component and make a direct comparison between the two. Here is the first Component War! Both are considered to be one of the best mid end GPU so chose for yourself which is suitable for you! I hope if you like this post. If you do, please like, comment your choice and share this. #gaming #pc #pcbuild #pcbuildguide #componentwars #innomightscomponentwars #pcbuildingguide #pcbuilds #pchardware #gaminghardware #gamingcomponents #computers #tech #technology #gpu #graphiccards #gpuvsgpu #amdvsnvidia #gtx1060 #rx570 #1060vs570 #gtx1060vsrx570 #amd #nvidia #geforce #nvidiageforce https://www.instagram.com/p/CDCA73XFlRl/?igshid=xr5p02srov0y
#1#gaming#pc#pcbuild#pcbuildguide#componentwars#innomightscomponentwars#pcbuildingguide#pcbuilds#pchardware#gaminghardware#gamingcomponents#computers#tech#technology#gpu#graphiccards#gpuvsgpu#amdvsnvidia#gtx1060#rx570#1060vs570#gtx1060vsrx570#amd#nvidia#geforce#nvidiageforce
0 notes
Text
FIRST PC BUILD for TEENAGERS
So you are wondering that i will straightaway tell you the PC SPECS according to the budget range ,but this is going to be a bit DIFFERENT.
Building a PC can be really EMOTIONAL at the first time for the enthusiast ,u get fine hardware assemble it, with no matter if it has an RGB or not you LOVE it with all your heart.
And if you think, Why Build A PC? ,when you can get a Console or a PRE- BUILD , you can exit the blog asap:/
OH! you still here maybe i can change your mind about building a PC
Guidelines to build a PC:-
1. Use of the build : GAMING/PRODUCTIVITY
2.Your BUDGET (DUH!)
3.Who do you favour the most in CPU section INTEL/AMD
4.Who do you favour the most in GPU section AMD/NVIDIA
5.Going cheapskate on the motherboard if on a TIGHT BUDGET
6.DO NOT BUY A HARDWARE ON THE BASIS OF RGB (unless you belong to ROCKEFELLER FAMILY )
LETS START THE BUILD :-
1. MOTHERBOARD :- This part is has many checkpoints to go through before you make your mind to splurge money on this part:
.FUTURE PROOFING :Many people think that if they buy a EXPENSIVE MOTHERBOARD they are future proof for all latest CPU’s , it is true but till an extent
both the manufacturers tend to bring several changes after a generation which may or may not work with your motherboard SO you should think before buying a $700 MOTHERBOARD which you could have been used for a BETTER CPU OF A GPU which is a better investment
SOME OF THE BEST BUDGET MOTHERBOARDS
INTEL :- MSI MPG Z390 GAMING PLUS
AMD :- MSI B450 TOMAHAWK MAX
2.CPU:- BE HONEST TO YOURSELF NOW!, you always tend to buy CPU with better brand image and name FOR EXAMPLE:- You buy an INTEL i7 8700K but you have spended majority of your budget on a freaking CPU and now you are left with a weaker GPU and RAM which is going to BOTTLENECK your system and you dont even have a good cooler for your HOT! CPU which is eventually decreasing the life of your CPU
3.GPU:-The best part of a PC , GPU is basically going to be expensive and you should buy a good GPU in your budget section, i dont have any advice for this section but i made a easy list for you to understand:-
LOW BUDGET SEGMENT :- NVIDIA GTX 1650 SUPER
MID BUDGET SEGMENT :- NVIDIA GTX 1660 SUPER (DON’T BUY A GTX 1660 TI VARIANT IT BARELY MAKES SOME DIFFERENCE)
PREMIUM MID BUDGET SEGMENT :- RTX 2060 SUPER /RTX 2060 OR RX 5600XT
HIGH END BUDGET SEGMENT :- RTX 2070 / RTX 2070 SUPER OR RX 5700XT
KIDNEY SECTION :- RTX 2080 / RTX 2080 SUPER /RTX 2080 TI
SELL YOUR LIFE SECTION :-TITAN RTX
4.RAM:-So basically it depends on your use
VIDEO EDITING / ANIMATION :-THE MORE YOU HAVE THE BETTER
GAMING :-12GB-16GB CLOCKED AT 3200MHZ IS MORE THAN ENOUGH FOR CURRENT GEN GAMES
OPENING CHROME TABS :- 1.5 TB OF RAM (MINIMUM)
5.CPU COOLER:- This section involves the last 2 brain cells of your brain left after reading this much for a commonsense thing:
IT’S LIKE WHY THE HELL WILL YOU PUT AN WATER COOLER TO A 4 CORE CPU
USE YOUR BRAIN
6.PSU:- HAVING A GOOD PSU IS THE MAIN THING .NO PSU NO PC BRO
7.WINDOWS :- WHY AM I EVEN DISCUSSING THIS BUT MANY OF YOU END UP BUYING AN OFFICIAL WINDOWS KEY WHICH BASICALLY COSTS AS MUCH AS A MOTHERBOARD , SO IF YOU WANT TO MAKE THE RICH BILLGATES RICHER GO AHEAD ,BUT IF YOU USE YOUR COMMONSENSE YOU CAN GET AN WINDOWS KEY ONLINE UNDER $20
YOU ARE ALL SET TO BUILD A PC
CABINET AND RGB ARE YOUR PERSONAL PREFERENCES EVERY BUILD SHOULD BE UNIQUE IN MY OPINION
GET AN INSPIRATION BUT DONT COPY A BUILD
BUY YOUR PARTS WISELY
THIS IS YOUR FRIEND SHLOK, YOU CAN DROP ME SOME QUESTIONS ON MY INSTAGRAM @sshlokkk_
2 notes
·
View notes
Photo

Component Wars #2 RTX 2060 VS GTX 1070 TI Phew! This one was tough. Both are selling out at similar prices right now and we know the specs tell us the GTX 1070 TI is better but RTX 2060 performs better in some areas as you can see. I really cannot decide if you ask me to decide for a customer but personally, I would chose RTX 2060 as it is newer and it has RTX and the benchmarks are rather similar. Tell me in the comments which one would you chose out of the two. If you want me to compare any components, you can tell me in the comments and I will do so. Thank you for checking this out. If you liked my post, Like Comment and follow @innomight for more tech and gaming posts. . . . #componentwars #rtx #gtx #nvidia #amd #nvidiartx #rtx2060 #gpubenchmarks #benchmarks #gpu #graphiccard #gpuwars #gpucomparison #rtxvsgtx #rtx2060vs1070ti #nvidiagpu #gaming #gamingcomponent #gamingcomponents #pcbuild #pcbuildguide #pcsetup #pcsetupguide #gamingpc #pccomponents #tech #technology #computertech #computerhardware https://www.instagram.com/p/CDOshlKlFTv/?igshid=b6o0ccuac6cm
#2#componentwars#rtx#gtx#nvidia#amd#nvidiartx#rtx2060#gpubenchmarks#benchmarks#gpu#graphiccard#gpuwars#gpucomparison#rtxvsgtx#rtx2060vs1070ti#nvidiagpu#gaming#gamingcomponent#gamingcomponents#pcbuild#pcbuildguide#pcsetup#pcsetupguide#gamingpc#pccomponents#tech#technology#computertech#computerhardware
0 notes