#Pushbullet
Explore tagged Tumblr posts
Visit Tumblr Blog
Explore Tumblr blogs with no restrictions, modern design and the best experience.
Last Seen Tumblr Blogs


Fun Fact
Tumblr was attacked by a cross-site scripting worm deployed by the Internet troll group GNAA on Dec 3, 2012.
Text
Arduino UNO R4 WiFi Push-Benachrichtigungen: Verbindung zu Pushbullet per IFTTT erstellen

In diesem Beitrag werde ich dir Schritt für Schritt zeigen, wie du eine Verbindung zwischen deinem Arduino UNO R4 WiFi und Pushbullet über IFTTT herstellen kannst. Das bedeutet, dass du deinem Arduino beibringst, dir eine Nachricht auf dein Smartphone zu schicken, sobald etwas Bestimmtes passiert – sei es das Erreichen einer bestimmten Temperatur, das Auslösen eines Sensors oder etwas ganz anderes.

Aber keine Sorge, du musst kein erfahrener Entwickler sein, um das zu schaffen. Ich werde dir alles haarklein erklären – von der Einrichtung deines Arduino UNO R4 WiFi bis hin zur Erstellung eines IFTTT-Applets, das die Magie geschehen lässt. Also schnapp dir deinen Kaffee (oder deinen Tee) und lass uns loslegen!
Der neue Arduino UNO R4 WiFi im Überblick
Schauen wir uns zunächst den neuen Arduino UNO R4 WiFi kurz an. Dieser neue Mikrocontroller der Arduino Familie kommt mit deutlich mehr Power & Schnittstellen daher: - eine Renesas RA4M1 (Arm Cortex-M4) MCU mit 48 MHz, - 256 KB Flash Speicher und 32 KB RAM, - Unterstützt WiFi & Bluetooth 5.0 Wenn du noch mehr über diesen Mikrocontroller lesen möchtest, dann habe ich dir im Beitrag Schneller, stärker, drahtloser: Der Vergleich von Arduino UNO R4 WiFi und R3 alles über diesen gesondert zusammengetragen.


Was ist der Service IFTTT?
Die Abkürzung IFTTT steht für "If this, than that" und kannst du in einer kostenfreien Version nutzen, um über Schnittstellen mit anderen Services zu kommunizieren. In diesem Beitrag möchte ich diesen Service nutzen um über einen Webhook den Service Pushbullet zu bedienen. Du kannst über IFTTT verschiedene vorkonfigurierte Applets verwenden oder dein eigenes erstellen, beides ist mit wenigen Klicks sehr schnell und vor allem intuitiv erledigt.
Aufbau einer Schaltung und Konfigurieren von IFTTT & Pushbullet am Arduino
Im nachfolgenden YouTube-Video erläutere ich dir, wie du eine Schaltung für das Absenden einer Push-Benachrichtigung am Arduino UNO R4 WiFi absendest. Dabei zeige ich dir im Detail, wie du in IFTTT & Pushbullet vorgehen musst. https://youtu.be/SuuvNOZHqUw
Einrichten eines Kontos in Pushbullet
Bevor wir den Service für Pushbullet in IFTTT verbinden können, müssen wir uns erst einmal ein Konto unter https://www.pushbullet.com/ einrichten. Hier kannst du die mit einem bestehenden Google oder Facebook sehr schnell verbinden. (In meinem Fall habe ich dieses mit meinem Google-Konto getan.)

Webseite Pushbullet
Installieren der App auf dem Handy
Zusätzlich kannst du dir noch eine App für dein Handy herunterladen. Diese bietet dir somit die Möglichkeit deine Push-Benachrichtigungen nicht nur am PC zu empfangen, sondern auch mobil unterwegs. Für die Einrichtung steht ein Wizard bereit, welcher beim ersten Starten der App ausgeführt wird. Hier musst du besonders acht geben, denn die App möchte sehr viele Berechtigungen. In meinem Fall gebe ich keine Berechtigungen für den Zugriff auf meine Kontakte und den SMS Speicher (ich möchte ja lediglich eine Benachrichtigung von meinem Mikrocontroller erhalten).


Wenn die App eingerichtet ist, kannst du zu IFTTT wechseln und den Webhook erstellen. Dabei solltest du dein Handy nicht ganz so weit weglegen, denn du musst dem Service noch die Berechtigung erteilen, mit Pushbullet zu kommunizieren.
Einrichten eines Applets in IFTTT für Pushbullet
Wie du dir ein Konto in IFTTT einrichtest, habe ich dir bereits im Beitrag AZ-Envy – Benachrichtigung per IFTTT versenden erläutert. Hier soll es nun darum gehen, wie du ein Webhook für Pushbullet erstellst. Schritt 1 - Erstellen eines Applets mit Webhook Als Erstes klicken wir auf die Schaltfläche "CREATE" und wählen dann im nächsten Fenster "ADD". Nun müssen wir nach "webhook" suchen und diesen auswählen. Jetzt haben wir die Wahl zwischen einem Webhook mit JsonPayload und einem einfachen Webhook als Request. Wir wählen hier letzteren aus und vergeben diesem einen Namen. Damit ist der Trigger auch fertiggestellt und wir können diese Konfiguration mit "Create trigger" bestätigen.


Webhook mit JsonPayload Es gibt einen speziellen Webhook, mit welchem du zusätzlich ein JSON übergeben kannst. Um jedoch einen Filter zu erstellen, um dieses JSON zu parsen, musst du die bezahlte Version Pro besitzen. Hier möchte ich jedoch darauf eingehen, wie du quasi kostenfrei deine Nachricht benutzerdefiniert aufbauen kannst. Schritt 2 - einbinden von Pushbullet als Aktion Im nächsten Schritt binden wir Pushbullet als Aktion des Applets ein. Hier klicken wir auf die Schaltfläche "ADD" im Bereich "Then That" und suchen im nächsten Fenster nach "Pushbullet". Wir sehen dann, welche Möglichkeiten wir mit Pushbullet haben, wir können eine einfache Nachricht, einen Link, eine Datei sowie einen Ort senden. In unserem Fall möchten wir eine einfache Nachricht senden und wählen somit die Kachel "Push a note" aus. Nun muss dem Service IFTTT die Berechtigung gegeben werden, auf den Account von Pushbullet zuzugreifen. Wenn dieses gegeben ist, können wir abschließend die Nachricht konfigurieren. Hier haben wir die 3 verschiedene Werte welche wir mit eigenen Daten belegen können (value1, value2, value3). Zusätzlich können wir noch den Zeitstempel des Events (OccuredAt) einbinden und den EventName. In meinem Fall nutze ich folgende Maske für meine Nachricht: Nachricht:"{{Value1}}" von " {{Value2}}" um {{OccurredAt}} empfangen. Wenn die Auswahl getroffen wurde, dann bestätigen wir dieses Fenster mit der Schaltfläche "Create action".


Schritt 3 - Fertigstellen des Applets Mit Ende des zweiten Schrittes ist das Applet nun fertiggestellt, nun müssen wir nacheinander auf "Continue" & "Finish" klicken. Im letzten Fenster müssen wir noch sicherstellen, dass der Schieberegler auf "Connected" steht.


Adresse für den Webhook ermitteln Damit wir unseren Webhook benutzen können, müssen wir die Adresse ermitteln. Dazu navigieren wir oben rechts über das Avatarsymbol zu "My services". Dort scrollen wir dann nach unten zu den Link "Webhooks" und klicken im neuen Fenster dann auf "Documentation". Im neuen Fenster sehen wir dann Beispiele inkl. APIKey für unseren erstellten Webhook. Natürlich habe ich meinen ApiKey vor Veröffentlichung des Beitrages gelöscht! Wichtig ist hier, dass der Webhook mit der Methode POST bedient wird!


Testen des Webhooks mit Postman Bevor wir jedoch unser Programm für den Arduino UNO schreiben, testen wir diesen Webhook mit der Anwendung Postman. Dieses nützliche Tool kannst du dir unter https://www.postman.com/downloads/ für Microsoft Windows, macOS und Linux herunterladen. Zunächst fügen wir die Adresse (1) ein (ohne die Parameter), danach setzen wir die Parameter "value1" & "value2" (2) und klicken auf "Send" (3).

Wenn alles geklappt hat, dann erhalten wir die Ausgabe (4). Congratulations! You've fired the simpleMessage event
Aufbauen der Schaltung am Arduino UNO
Bevor wir mit dem Programmieren beginnen, bauen wir fix die Schaltung auf. Ich verwende hier einen Taster für das manuelle und einen Quecksilberschalter für das automatische Absenden eines Requests.

Schaltung - Arduino UNO mit Quecksilberschalter & Taster
Erstellen des Programmes für den Arduino, um eine Push-Benachrichtigung via IFTTT an Pushbullet zu senden
Nun haben wir alle Vorkehrungen geschaffen, um unser Programm für den Arduino UNO zu schreiben. Hier nutze ich das Beispiel "Wi-Fi® Web Client" von https://docs.arduino.cc/tutorials/uno-r4-wifi/wifi-examples als Basis. Zusätzlich binde ich die Bibliothek "UrlEncode" ein, welche mit der Funktion "encodeUrl" eine einfache Möglichkeit bietet, die Parameter zu formatieren. //Bibliotheken zum Aufbau der WiFi-Verbindung #include #include //Bibliothek für das encoding der Parameter #include //Verbindungsdaten zum lokalen WiFi-Netzwerk #define WIFI_SSID "abcd" #define WIFI_PASSWORD "1234" //Taster am digitalen Pin D8 angeschlossen #define taster 8 //Quecksilberschalter am digitalen Pin D2 angeschlossen #define sensor 2 //Der Quecksilberschalter liefert mehrere Signale gleichzeitig, //das würde bedeuten das wir mehrere Push-Benachrichtungen gleichzeitig //erhalten würden. Mit diesen Feldern möchte ich sicherstellen das //nur maximale alle 10 Sekunden eine Nachricht geschickt wird. const int PAUSE_BETWEEN_SENSOR_ACTION = 10000; long lastSensorAction = 0; WiFiClient client; void setup() { //beginn der seriellen Kommunikation mit 9600 baud Serial.begin(9600); //Taster am internen 10 kOhm Pullup Widerstand verbunden pinMode(taster, INPUT_PULLUP); //Pin des Quecksilberschalters als einfachen Eingang definiert pinMode(sensor, INPUT); //Aufbauen der WiFi-Verbindung Serial.print("Verbindungsaufbau zu: "); Serial.println(WIFI_SSID); WiFi.begin(WIFI_SSID, WIFI_PASSWORD); while (WiFi.status() != WL_CONNECTED) { Serial.print("."); delay(500); } IPAddress ip = WiFi.localIP(); Serial.print("IP Address: "); Serial.println(ip); } //Funktion zum absenden eines Requests mit den //Parametern value1 & value2 void sendSimpleHttpMessage(String value1, String value2) { //Wenn eine aktive WiFi-Verbindung existiert, dann... if (WiFi.status() == WL_CONNECTED) { //Adresse des Services char a = "maker.ifttt.com"; //Parameter String getParams = "/trigger/simpleMessage/with/key/{apiKey}?value1=" + urlEncode(value1) + "&value2=" + urlEncode(value2); //Aufbau der Verbindung zum Server über HTTP (Port 80) if (client.connect(a, 80)) { Serial.println("connected to server"); //Absenden der Parameter mit der Methode POST client.println("POST " + getParams + " HTTP/1.1"); client.println("Host: maker.ifttt.com"); client.println("Connection: close"); client.println(); Read the full article
0 notes
Text
cloud win i procrastinated on finding a pushbullet alternative n pushbullet started back working!
2 notes
·
View notes
Text
Just use Pushbullet:
I've been using it for close to a decade now across multiple computers and phones all running different OSes. It's fantastic, and you can even enable remote file access for those with a desktop at home.
does anybody else have a discord server thats only yourself and nobody else exclusively used to send images from your mobile phone to your tablet or computer
43K notes
·
View notes
Text
Meta’s Third Party Messages App To WhatsApp and Messenger

Third-Party Apps
Meta announced plans to provide third party messages to WhatsApp and Messenger. Meta is a digital gatekeeper and must ensure WhatsApp and Messenger operate with iMessage, Telegram, Google Messages, Signal, and others under the EU’s Digital Markets Act (DMA). This year, the DMA went into action early. Meta has long worked on WhatsApp third-party talks.
EU users may soon opt to merge WhatsApp and Messenger communications into one mailbox. Additionally, Meta is developing new alerts for WhatsApp and Messenger that will notify users when they may link conversations from third-party apps that are supported. Users will get notifications whenever a third-party chat app becomes accessible, according to Meta.
Additionally, they have created a straightforward onboarding process that enables customers to activate the functionality and discover more about third party messages. According to Meta’s blog, users will have the ability to choose which third-party applications to get messages from and how to handle their inbox.
WhatsApp and Messenger
Meta is going to launch group formation with users from third party messages early next year. By 2027, Meta also intends to enable audio and video communications from third parties. Additionally, the business wants to provide extensive messaging capabilities including read receipts, typing indications, emotions, and direct answers.
But there are issues to deal with. To protect communication privacy, businesses who want to interface with Messenger and WhatsApp must utilize the Signal Protocol. Apps from third parties will have to sign a contract, and Meta has promised to provide partners with access to the Signal Protocol upon request.
Communication has diversified in the digital age. WhatsApp and Messenger are popular, but many users want to manage their messages across applications. Allowing third-party app communications on these popular platforms centralizes all discussions, improving the user experience. This article explains how to enable third party messages on WhatsApp and Messenger to improve communication.
Integrating third-party messages is crucial
Before meta go into the processes, they need to understand why WhatsApp and Messenger are progressively incorporating third-party communications. Users communicate via email, social media, and customer support chats. Using these applications streamlines communication without switching platforms.
This saves time and simplifies conversation management, particularly in professional or commercial environments. Since all conversations are in one place, you never miss critical messages.
What is a third party app?
WhatsApp, a worldwide communications leader, does not natively enable third-party direct messaging applications. However, workarounds and other programs allow third party messages service integration.
Integrations using WhatsApp Business API
WhatsApp’s Business API integrates CRM systems, chat platforms, and other apps for companies. It’s designed for huge enterprises, but small firms may use it to manage WhatsApp app conversations.
Start by creating a WhatsApp Business API account
Select a WhatsApp-compatible CRM or messaging software. Popular possibilities include Zendesk, Twilio, and HubSpot.
Configure the API with the platform to receive third-party WhatsApp messages. The WhatsApp Business API is a powerful tool for centralizing company communications.
Please note that this function is intended for professional and corporate usage.
What are third party apps?
Personal users may find third party messages programs that handle numerous communications channels easier.
Download Pushbullet or IFTTT to handle notifications.
Connect WhatsApp to the app. Connect email or SMS to get alerts.
Use the app’s UI to manage and react to messages and consolidate WhatsApp and other app alerts.
This system is flexible and easy to use for managing several chats, but it does not integrate third-party communications into WhatsApp.
Messenger Third-Party Message Enablement
Another popular personal and professional communication channel is Facebook Messenger, with its large user base. Thankfully, it integrates with third party messages more easily than WhatsApp.
Messenger bot support
Chatbots are a popular method to connect third party massages with Facebook Messenger. Messenger bots let you send and receive messages from other platforms straight from Messenger.
Choose a Messenger- and app-integrated chatbot platform like ManyChat, Chatfuel, or Botsify.
Register the bot with your Messenger account using the platform’s interface.
Set the bot to accept messages from the third-party app (CRM, e-commerce, email alerts).
Messenger bots may handle consumer requests, automated answers, and cross-app communications.
Businesses that need to manage several discussions should use this configuration.
Messenger-App Integration Using IFTTT
Messenger may be connected to other applications using IFTTT, a free online service. Conditional statements activate actions on other apps based on one app’s activity.
Register and log in to IFTTT.
Select “Messenger” to integrate.
Select an email, Slack, or WhatsApp app to integrate.
Trigger a Messenger notification: Receive a new message on the third-party app.
Using IFTTT, you can send real-time updates from other platforms to Messenger, eliminating app switching.
Facebook Business Suite
Facebook Business Suite integrates third-party applications with Messenger well for Facebook Pages and businesses. It manages Facebook, Instagram, and other linked app communications in one place.
Link your Facebook Page and Messenger to set up Facebook Business Suite.
Allow email and Instagram DM integrations.
Centralize communications on the Business Suite dashboard.
This strategy is great for companies and offers cross-platform communication handling.
Reasons to Enable WhatsApp and Messenger Third Party Messages
Third-party texting in WhatsApp and Messenger has several benefits:
Centralized Communication: No more app switching. Work and personal discussions are all in one spot.
Improved Efficiency: One app for many platform communications lets you reply quicker and decrease downtime.
Chatbots and API connections may automate repetitive processes, saving time.
Seamless Notification Management: Third-party notification managers keep you updated even while you’re gone from the primary app.
Conclusion
Adding third party messages to WhatsApp and Messenger may transform your personal and commercial interactions. Many API connections, chatbots, and notification management tools are available. Following the procedures above will centralize all your communications, improving productivity and communication efficiency.
Read more on govindhtech.com
#MetaThirdParty#MessagesApp#WhatsApp#accordingtoMeta#FacebookBusiness#api#APIconnections#chatbots#thirdpartymessages#technology#technews#news#govindhtech
0 notes
Text
أفضل ملحقات جوجل كروم | 14 أداة مذهلة Google Chrome Extensions
Google Chrome هو متصفح رائع سريع ومصمم جيدًا ومليء بالميزات الأساسية، كما أن جوجل كروم هو متصفح الويب الأكثر استخدامًا في جميع أنحاء العالم، وفقًا لـ Stat Counter. تكمن القوة الحقيقية لـ Chrome في المكتبة الضخمة من الإضافات والملحقات Extension التي تمنحه وظائف وقدرات جديدة لا نهاية لها. لكن سوق Chrome الالكتروني مليء بكم هائل من الإضافات التي يصعب معرفة أيها سيحدث فرقًا في تصفحك اليومي.وعلينا أن نعلم أن الإضافات يمكن أن تبطئ متصفحك، لذا تأكد من الالتزام بما تعتقد أنه سيكون أكثر فائدة. ولهذا السبب قمنا بتجميع هذه القائمة التي تضم أفضل ملحقات Chrome الموجودة.
أفضل ملحقات جوجل كروم Google Chrome Extensions
1. LastPass Extension من أفضل ملحقات جوجل كروم فالان يمكنك أن تحتفظ بكلمات المرور الخاصة بك في مكان واحد وتقم بتسجيل الدخول إلى الحسابات تلقائيًا يحل LastPass المشكلة من خلال إنشاء كلمة مرور قوية مختلفة لكل موقع، وتخزينها محليًا في مكان مشفر، إضافة لملء نماذج الويب وتسجيلات الدخول تلقائيًا بدون عناء كتابة كل واحدة على حدة. تحتاج فقط إلى تذكر كلمة المرور الرئيسية لهذه الإضافة، وسيهتم LastPass بكل شيء تقريبًا بمفرده. ليست هناك حاجة لإضافة جميع أسماء المستخدمين وكلمات المرور الخاصة بك إلى LastPass، يكفي أن تقوم بتسجيل الدخول إلى أي حساب عبر الإنترنت، وسيسألك عما إذا كنت تريد حفظه. يتضمن LastPass أيضًا القدرة على استيراد وتصدير كلمات المرور، من خدمات تخزين كلمات المرور الرئيسية مثل RoboForm �� 1Password و KeePass، بالإضافة إلى مديري كلمات المرور المضمنة في Chrome و Firefox و IE. 2. Evernote Web Clipper Extension قص صفحات الويب أو أجزاء من النص أو الإشارات المرجعية وقراءتها لاحقًا. إذا كنت تبحث عن مشروع ما، أو تجد نفسك مشتتًا بمقالات مثيرة للاهتمام أثناء محاولتك العمل، فإن Evernote Web Clipper رائع. عندما تجد شيئًا تريد قراءته ، انقر فوق رمز الفيل وسيسمح لك Evernote بحفظ المقالة بأكملها ، أو نسخة مبسطة منها (بدون صور أو تنسيق)، أو صفحة كاملة، أو لقطة شاشة، أو مجرد إشارة مرجعية. إذا كنت في عجلة من أمرك، فيمكنك قص شيء بنقرتين فقط. كما يتكامل Evernote Web Clipper أيضًا في قائمة السياق، مما يتيح لك قص صفحة أو لقطة شاشة أو إشارة مرجعية عن طريق النقر بزر الماوس الأيمن فوق الصفحة، وهناك أيضًا اختصارات لوحة مفاتيح قابلة للتخصيص. قم بتسجيل الدخول إلى حسابك على Evernote.com أو باستخدام تطبيق الويب، وسيكون كل ما قمت بقصه موجودًا هناك. 3. Pushbullet Extension إرسال واستقبال الرسائل والحصول على إشعارات المكالمات في متصفحك. هل يصرفك الهاتف الذكي على مكتبك؟ يضع Pushbullet جميع خدمات الدردشة الخاصة بك في متصفحك، بما في ذلك WhatsApp و Kik و Facebook Messenger وحتى رسائل SMS. ستتلقى إشعارات عندما تتلقى رسائل ومكالمات (بشرط أن يكون لديك هاتف يعمل بنظام Android)، وسيؤدي رفضها على سطح المكتب إلى مسحها من هاتفك أيضًا. 4. Stylish Extension بعض صفحات الويب مفيدة بشكل لا يصدق لكنها قبيحة بصراحة. هذا هو المكان الذي يأتي فيه Stylish. يتيح لك امتداد Chrome المفيد هذا تطبيق أشكال مخصصة على صفحات الويب، مما يمنحها تغييرًا فوريًا حتى تكون أسهل على العين. إذا كانت قراءة نص أسود على خلفية بيضاء تسبب لك الصداع ، فسوف تكون ممتن لوفرة السمات المصممة خصيصًا للمواقع، بما في ذلك Reddit و Facebook و Google. هناك أيضًا سمات لجميع أكبر مواقع استضافة الفيديو للحصول على تجربة مشاهدة ممتعة على YouTube و Vimeo وغيرها. 5. CrxMouse Gestures Extension إذا كنت تملك ماوس عادية ولا تحتوي العديد من الأزرار، أو أنك لا ترغب بامتلاك مثل تلك الماواسات، لكنك تريد استخدام مزاياها للتنقل عبر صفحات الويب، أو كتابة رموز معينة على الشاشة للوصل السريع إلى المواقع المفضلة، أو الرجوع إلى صفحة البحث من خلال النقر والسحب على زر الماوس الأيمن، يمكن أن تكون CrxMouse Gestures هي أفضل إضافة تتعرف عليها. تضيف CrxMouse Gestures وحدات ماكرو مفيدة لإيماءات الماوس للمساعدة في التنقل عبر الويب، مع اختصارات الماوس لفتح وإغلاق علامات تبويب جديدة، والتنقل للخلف أو للأمام، ونسخ الروابط أ�� النص. إنها إضافة مفيدة إلى Chrome، حيث تعمل على تسريع العديد من مهام التنقل الصغيرة والشائعة. 6. Checker Plus Extension لـ Gmail تحافظ Checker Plus for Gmail على رسائل Gmail الخاصة بك في متناول اليد، مع صندوق الوارد الخاص بك والرسائل المستلمة حديثًا بنقرة واحدة. يمكنك عرض رسائلك دون الحاجة إلى مغادرة صفحتك الحالية لتشغيل Gmail، ويمكنك وضع علامة على رسالة كمقروءة أو حذفها أو إرسالها إلى الأرشيف، كما يمكنك أيضًا تشغيل Gmail لاتخاذ إجراءات أكثر تفصيلاً. يمكن تعيين الوظيفة الإضافية لعرض إشعارات سطح المكتب حتى عندما لا تكون نافذة Chrome مفتوحة، ويمكن تعيينها لمراقبة حسابات Gmail المتعددة. 7. Great Suspender Extension يمكن أن يكون Chrome مستهلكًا للذاكرة، ويمكن أن يؤدي فتح الكثير من علامات التبويب إلى استنزاف ذاكرة الكمبيوتر بسرعة. هنا يأتي دور Great Suspender للإنقاذ من خلال مراقبة علامات التبويب المفتوحة، وإفراغ علامات التبويب التي لم يتم استخدامها منذ فترة من الذاكرة تلقائيًا (أو يدويًا)، لكن يمكنك وضع بعض عناوين URL في القائمة البيضاء كي لا يتم تعليقها. يمكن للمستخدمين بعد ذلك إعادة تحميل علامة التبويب بسرعة من خلال النقر على الشاشة. وبذلك يقدم Great Suspender وظيفتين مهمتين في آن واحد: تخفيف حمل ذاكرة جهازك، مع الاحتفاظ بعلامة تبويب في متناول اليد. 8. Pablo Extension Pablo هو تطبيق مجاني تم تصميمه لمساعدتك على إنشاء صور مصحوبة بتعليقات فنية وصديقة للوسائط الاجتماعية، والتي يمكنك إضافتها إلى مواقع الشبكات الاجتماعية مثل Facebook و LinkedIn و Twitter. تم تصميم Pablo بحيث يسمح بتمييز مقتطفات النص بسرعة، واختيار الصور من المصادر المحلية أو عبر الإنترنت. يمكنك تخصيص تفضيلاتك بعد ذلك باستخدام الخطوط والتأثيرات والتنسيق، لتتناسب مع نظام الوسائط الاجتماعية الذي تختاره . 9. Screencastify Extension يعمل Screencastify كأداة قائمة على المستعرض لتسجيل نافذة المتصفح أو علامة التبويب الخاصة بك، مما يتيح لك إنشاء تسجيلات بسهولة (كاملة مع سرد الميكروفون وصوت المتصفح وحتى عرض كاميرا الويب). تتيح لك أدوات التعليقات التوضيحية إبراز مؤشر الماوس، بالإضافة إلى الرسم بالقلم أو تمييز نقرات الماوس. بمجرد الانتهاء من التسجيل، يتم حفظه تلقائيًا إلى حسابك في Google Drive برابط قابل للمشاركة، أو يمكنك تحميل الفيديو الخاص بك مباشرة على Youtube. تحدد النسخة المجانية لأفضل امتداد لـ Google Chrome مقاطع الفيديو لمدة 10 دقائق لكل منها، بحد 50 مقطع فيديو شهريًا وعلامة مائية على الفيديو؛ بينما يسمح الاشتراك السنوي البالغ 29 دولارًا أمريكيًا بمدة غير محدودة للفيديو وتحرير الفيديو وخيارات تصدير موسعة. 10. OneNote Web Clipper Extension يعد OneNote من Microsoft أداة إنتاجية رائعة في مكان العمل، خاصة عند دمجه مع باقي حزمة Office. يتيح ملحق OneNote Web Clipper لـ Chrome للمستخدمين قص صفحة ويب بالكامل أو جزء منها بسرعة، للرجوع إليها وتحريرها بسهولة في OneNote، والتي تتم مزامنتها عبر أجهزتك. أداة قص الويب عبارة عن أداة مليئة بالميزات، حيث يمكنها إزالة الإعلانات والفوضى، أو ضبط الخطوط أو تمييز النص أو انتزاع صور أو مقاطع فيديو محددة يمكنك الرجوع إليها بعد ذلك في تطبيق OneNote. 11. Colorblind – Dalton for Chrome Extension يمكن أن يعاني ما يصل إلى 1 من كل 10 أشخاص من بعض أشكال عمى الألوان، مما قد يجعل من الصعب إدراك ألوان معينة في الصور أو واجهة مستخدم موقع الويب. يمكن لمرفق Colorblind – Dalton for Chrome أن يوفر اختبارات لأكثر أشكال عمى الألوان شيوعًا، ويمكنه ضبط إعدادات ألوان المتصفح ديناميكيًا للمساعدة في تصور الألوان في الصور أو مواقع الويب التي قد يصعب على المستخدم رؤيتها، مما يؤدي إلى تحسين ملحوظ في إمكانية وصول المستخدم. 12. Google Translate Extension بينما تعد خدمة الترجمة من Google بالفعل خدمة ويب ممتازة لترجمة مقتطفات النص من اللغات وإليها ، فإن إضافة أفضل امتداد لـ Google Chrome إلى متصفحك يسمح لك بترجمة صفحات كاملة باستخدام زر شريط الأدوات. يكتشف الامتداد تلقائيًا ما إذا كان الموقع الذي تتصفحه يستخدم لغة مختلفة عن لغة Chrome الافتراضية، ويمكنه عرض ترجمتها تلقائيًا. يمكن للمستخدمين أيضًا ترجمة كلمات أو مقتطفات من النص بسهولة، بالإضافة للاستماع إلى النطق الصحيح للكلمات والعبارات المترجمة. 13. TinEye Extension عكس البحث عن الصور على غرار البحث بالصور من Google ، يجد TinEye إصدارات أخرى من الصورة المحددة. اكتشف الأماكن الأخرى التي تم فيها استخدام الصورة أو حدد مواقع الإصدارات عالية الدقة. البحث العكسي البسيط عن الصور هو مجرد نقرة بزر الماوس الأيمن مع أفضل امتداد لـ Google Chrome. 14. SimilarWeb Extension إذا كنت تقوم بأي عمل في تصميم الويب أو التسويق أو المحتوى ، فيمكن أن تكون SimilarWeb Extension أداة قيمة بشكل خاص. تتيح لك هذه الوظيفة الإضافية الاطلاع على أرقام الزيارات والمصادر والنشاط بمرور الوقت وغيرها من البيانات التحليلية القيمة التي ستساعدك على اتخاذ قرارات ويب مهمة. إنها ليست متعمقة مثل الدخول إلى Google Analytics، ولكنها سريعة جدًا ومثالية لإجراء مقارنات سريعة. هناك مئات الإضافات والملحقات Extension التي يمكن تنصيبها على متصفح Google جوجل كروم، ومن الصعب جداً حصرها في مقال واحد، لكننا اخترنا أفضل هذه الإضافات Extension التي تسهّل وتسرّع العمل على متصفح Google Chrome. إذا كانت لديكم تجربة مع بعض الإضافات غير المذكورة، نتمنى أن تزودونا بتعليقاتكم أسفل هذه المقالة، وسنقوم بتحديث هذا المقال باستمرار لضمان أضافة أهم الملحقات والإضافات التي تجعل تجربة جوجل كروم ممتعة. Read the full article
0 notes
Text
Software of the Week: MagicPods

If you have the misfortune of having both a Windows computer and an Apple phone/tablet, you are probably familiar with how hard it is to get them to work well together (or at all). I've tried SO many programs claiming to be the fastest and easiest way to get things between Windows and iOS - Intel Unison, AirDroid, Pushbullet, personal messages on Telegram - without much success. But one place I HAVE had a lot of success is with my AirPods, thanks to the lifesaving MagicPods Windows app from Aleksandr Maslov.
Details:
Purpose: Bring the "iOS experience" of AirPods usage to Windows (along with many other headphones from multiple brands)
OS Supported: Windows 10, 11
Installer Size: 127.9 MB
Country of Origin: Russia
Languages Supported: 36 languages
License: One-time cost - $1.99 USD (on sale for $0.99 USD as of Nov. 18, 2023)
Download Link: https://magicpods.app/
This app really does replicate most of the iOS experience of using AirPods on Windows. It will show the battery levels for each earbud in the system tray while you're using them, it will pause when you take the earbuds out, it even shows the popup with the case and bud battery levels when you flip the case top open. Most of these work with Beats headphones as well.

The developer has also been adding support for headphones/earbuds from other manufacturers too. It currently supports many of the common brands of fake/cheap AirPods as well as top of the line competitors like the Sony WF-1000XM3 and 4 (my go-to over ears). For the Sony headphones, MagicPods primarily focuses on being a nice interface for showing battery levels at a glance and switching your connection between different pairs of headphones with one click, but I am hopeful that more features will be added in the future (example: toggling noise cancelation or Adaptive Sound Control). The program is under very active development - 13 updates so far this year.
MagicPods is a very welcome addition to my arsenal of programs doing what Apple won't: making their devices interoperable with other OSes.
0 notes
Text
PushBulletを使い始めた
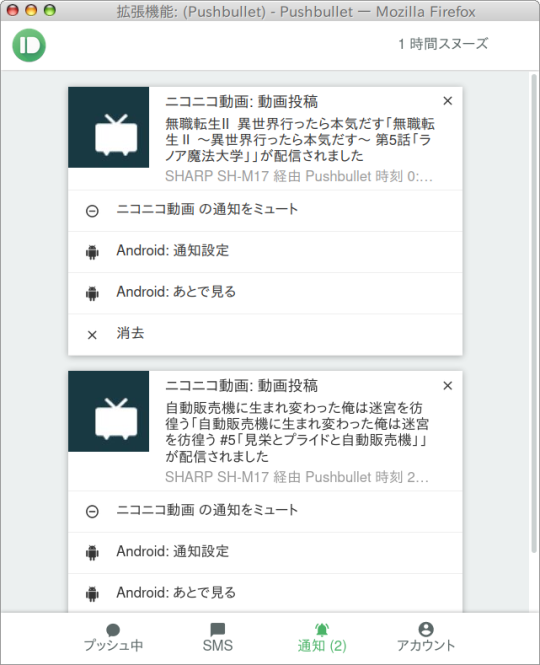
PCを使っていて、スマホになにかの通知が届いた音が聞こえて、なんの通知だろう?と思ってスマホを見る…という普段当たり前のようにやっていたことに、ふと、スマホの通知をPCでも確認できたら便利なのになぁ…と思い始め、なんとなくググってみたら、ご存知の方はとっくにご存知なんでしょうが、PushBulletというかなり昔から存在しているらしいスマホアプリと、PC用のFirefoxの拡張機能があることを知り早速試してみた次第。
使ってみると、なぜ今までこれを知らなかったのか!?と思うほど、すごく便利だったというお話し。
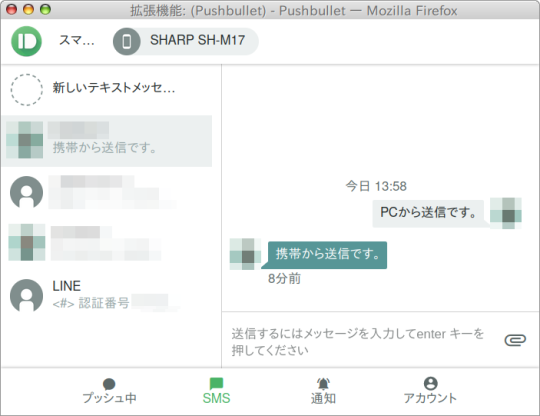
スマホの通知をPCでも確認できるようになるだけでなく、スマホに届いたSMSをPCで確認したり、PCからSMSをスマホ経由で送信できたり、PCとスマホの間で簡単にメッセージやファイルのやりとりができたり、本当になぜ今までこれを使っていなかったのかと思うほど便利です。
スマホの通知は見るだけでなく、PCからスマホの通知を消去することもできます。ただニコニコ動画の通知のように「あとで見る」をPCから操作する場合は、PushBulletのPro版を使わないとダメみたいですが、私はそこまで必要としていないので無料版でも十分です。
SMSに関しては正直私はあまり使うことがないんですけれど、PCを使っていて2段階認証が必要なサービスにログインとかする際に、スマホにSMSでパスコードなどが送られてきたら、スマホを見ることなくPCで確認できるので便利だとは思います。
で、スマホとPC間でメッセージやファイルを簡単にやり取りできる機能について、私は今までGoogle KeepやGoogle Driveを使ってやり取りすることが多かったんですが、PushBulletで済ませられるのが大変にありがたいです。
ただ、先程のSMSで送られてくる2段階認証のパスコードとか、PCとスマホとの間でやり取りするメッセージやファイルとか、場合によってはセキュリティ的に大丈夫かなぁ?と思うところもあったりはします。
使用は自己責任で、ということで。
0 notes
Text
"Effortlessly Transfer Photos from Android to PC in 5 Simple Steps" Table of Content. 1. Use a USB cable to connect your Android phone to your PC and transfer photos directly. 2. Use a cloud storage service like Google Drive or Dropbox to upload photos from your Android phone and then download them to your PC. 3. Use a file transfer app like AirDroid or Pushbullet to transfer photos wirelessly between your Android phone and PC. 4. Use a third-party software like Syncios or Mobiledit to transfer photos from your Android phone to your PC. 5. Use a microSD card to transfer photos from your... Read More. https://statesandcounties.com/2023/06/23/best-way-to-transfer-photos-from-android-to-pc-efficient-method-for-transferring-pictures-from-android-device-to-personal-computer/?feed_id=4643&_unique_id=649a2f7a4fdd0
0 notes
Text
Aka ms yourpc
Introduction: In today's interconnected world, being able to link your phone to your computer can greatly enhance your productivity and convenience. Whether you want to transfer files, access messages, or mirror your phone's screen, establishing a seamless connection between these devices is essential. In this article, we'll explore various methods to link your phone to your computer.

USB Cable Connection: The most straightforward method to connect your phone to your computer is by using a USB cable. Here's how you can do it:
Connect one end of the USB cable to your phone and the other end to an available USB port on your computer.
Your phone might prompt you to allow USB debugging or grant access to the computer. Follow the on-screen instructions and grant the necessary permissions.
Once connected, your computer should recognize your phone as an external storage device, allowing you to transfer files back and forth.
Wireless Connection via Bluetooth: Bluetooth enables wireless communication between devices. Follow these steps to link your phone to your computer using Bluetooth:
Ensure that both your phone and computer have Bluetooth capabilities and are turned on.
On your phone, go to the Bluetooth settings and enable Bluetooth visibility.
On your computer, access the Bluetooth settings and search for nearby devices.
When your phone appears on the list, select it and follow any additional pairing instructions.
Once the pairing is successful, you can transfer files wirelessly between your phone and computer.
Wi-Fi Network Connection: By connecting your phone and computer to the same Wi-Fi network, you can establish a seamless link. Here's how:
On your phone, go to the Wi-Fi settings and connect to your home or office network.
On your computer, ensure that Wi-Fi is enabled and connect to the same network.
Install a file transfer or synchronization application like AirDroid or Pushbullet on both devices.
Follow the application's instructions to pair your phone and computer.
Once connected, you can transfer files, view notifications, and even mirror your phone's screen on your computer.
Cloud Storage Services: Cloud storage services like Google Drive, Dropbox, and OneDrive provide a convenient way to link your phone and computer. Here's how to use them:
Install the respective cloud storage app on your phone and computer.
Sign in to the app on both devices using the same account credentials.
Upload files from your phone to the cloud storage app.
On your computer, access the cloud storage app and download the files you need.
Changes made to files on either device will automatically sync, ensuring you have the most up-to-date version.
Conclusion: Linking your phone to your computer opens up a world of possibilities, enabling seamless file transfer, communication, and device synchronization. Whether you choose a USB cable, Bluetooth, Wi-Fi, or cloud storage services, the method you prefer will largely depend on your specific needs and available resources. Experiment with different options to find the most convenient and efficient way to connect your devices.
For more information, visit https://akamsremoteconnect.org/www-aka-ms-yourpc/.
1 note
·
View note
Text
2019, seit mehreren Jahren
Note to Self: _____
Ich verwende Pushbullet, um Informationen (bzw. eigentlich fast nur URLs) zwischen meinem Smartphone und meinen Desktop-PCs zu teilen.
Mein hauptsächlicher Use Case ist das Verschicken von Links vom Smartphone an den Desktop zum späteren/komfortableren Lesen – ich lese insbesondere Twitter fast nur am Handy und will aber nicht alles, was mir dort als potenziell interessant unterkommt, dann auch tatsächlich zu dem Zeitpunkt am Handybildschirm konsumieren. (Videos z. B. schaue ich dann eigentlich fast nur am PC.)
Gelegentlich will ich auch Informationen (z. B. Erinnerungen oder Aufgaben, die ich dann irgendwann später erledigen will) vom Smartphone an den Desktop-PC teilen – seit einigen Jahren bockt Google Keep allerdings auf meinem Handy, sodass ich Umwege gehen muss. Ich stelle dann meist einfach eine Suchanfrage mit dem entsprechenden Notizinhalt im Smartphone-Browser und schicke die Ergebnisseite dann als URL via Pushbullet an den Desktop.
(Lukas Daniel Klausner)
3 notes
·
View notes
Photo

Pushbullet
Pushbullet is a great app for those who spend a lot of time on the computer and don't like to keep checking the smartphone all the time to see your notifications. With it installed on your device and browser, notifications will appear on the PC automatically.

You can even see if someone is texting you or calling you without looking at the smartphone, which is very useful. In addition, you can use the app to send files and documents directly to your smartphone.
1 note
·
View note
Text
21st century life
So I just
was watching my daughter smile on Skype
on my iPod Touch
because she heard my mother laughing over my speakerphone
at a video of my daughter’s cat
that she had taken with her mobile phone
and made a post with on Instagram
which she told me over Skype
(on my iPod Touch)
to tell my mother (over the phone)
to find on her Pushbullet
on her PC.
And here I am telling you about it on tumblr.
1 note
·
View note
Text
How to Share Files Between Android and Windows Using Free Apps
How to Share Files Between Android and Windows Using Free Apps
[ad_1]
Transferring files from your Android smartphone to your Windows PC, or vice versa, used to be a tricky affair earlier. You connected your phone to the PC via a USB cable, looked over the file system till you found what you were looking for, and then copied with the hope that nothing disconnected or hung in the process. Alternatively, you used the slow file transfer process to share files…
View On WordPress
#airdroid#Android#dropbox#feem#google drive#pushbullet#share files android phone windows laptop free apps transfer files mobile pc apps#your phone
0 notes
Text
Application mobile: Comment partager des fichiers entre Android et Windows à l'aide d'applications gratuites
Application mobile: Comment partager des fichiers entre Android et Windows à l’aide d’applications gratuites
Le transfert de fichiers de votre smartphone Android vers votre PC Windows, ou vice versa, était auparavant une affaire délicate. Vous avez connecté votre téléphone au PC via un câble USB, parcouru le système de fichiers jusqu’à ce que vous trouviez ce que vous cherchiez, puis copié avec l’espoir que rien ne se déconnecte ou ne se bloque dans le processus. Alternativement, vous avez utilisé le…
View On WordPress
#airdroid#Android#Application#Comment#dapplications#dropbox#entre#feem#fichiers#Google Drive#mobile#mobile app#partager#partager des fichiers android téléphone windows ordinateur portable applications gratuites transférer des fichiers applications pc mobiles#pushbullet#smartphone app#ton téléphone#Windows
0 notes
Link
#control android from pc#Control Android from PC Remotely#how control android from pc#how to control android from pc#Control Android from PC WiFi#Control Android from PC Teamviewer#Control Android from PC USB#can you control android from pc#app to control android from pc#Join#Pushbullet#Scrcpy#Vysor#DeskDock#AirDroid#Tasker#TeamViewer QuickSupport#Samsung SideSync
0 notes