#S4Studios tutorials
Explore tagged Tumblr posts
Visit Tumblr Blog
Explore Tumblr blogs with no restrictions, modern design and the best experience.
Last Seen Tumblr Blogs


Fun Fact
Tumblr has a low social media market share in South America.
Text
WHile sorting thru my CAS to make it make sense, as one does on a Tuesday night. I had reached the point of no return for annoyances with SKIRTS! DENIM SKIRTS as formal wear, swimsuits, BATHING ffs! Who does that?
So off I went to S4MM to try & see if there was a way to fix it there since S4S hates me & loads slower than my game does. I noticed when I can right click on the picture of a CAS item & it will show me all the categories it will go to & there is an S4S button that will open up just for this item. I thought I had corrected things but then this morning I went back in & the same dang things I had removed from the swim category are still showing there.
Exhibit A:

Is there a tutorial out there somewhere that I just haven't found that tells me how to fix it all so they can finally make sense when I am looking for items to wear? I get why creators would put everything in every list but my brain implodes when I get tank tops & shorts in cold weather wear & parka's in hot weather.
2 notes
·
View notes
Note
hello and happy new year! ceci, do you happen to have or could you please make a tutorial on creating teeth if it's not a big hassle? i wanted to make a very particulat teeth shape for my sim, but apparently i do something wrong because the result morphs the whole face in a weird way
gurl the "happy new year" is beating my ass rn, not this exposing the state of my inbox...... 😭😭😭
but ok more seriously, I'll get on with the tutorial 😳
Step 1
first, we're going to use s4studio to create our package. we're going to clone the EA teeth to use as our base.

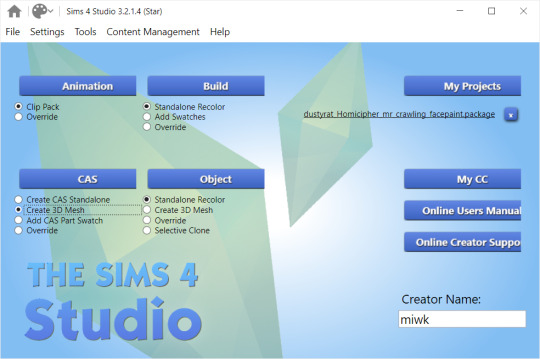
open s4studio and select "create 3D mesh" under "CAS"
click the blue "CAS" button
Step 2

select "Face" from the Part Type dropdown menu. this will make only the teeth files show up.
we're interested in both "yuTeeth" and "yuTeeth_Snaggle", but select yuTeeth first! (you can hover over each picture to see the names too)
click next, and save your package file as whatever you want.
Step 3

zoom in close to the model with mouse wheel until you can see the teeth, to make sure everything is correct, then go to the "meshes" tab on the right side
export your mesh and save it where you can find it.
note: if you've never used s4s or blender before, make sure your blender location is set up correctly in the s4s settings. otherwise, the sims4studio tools won't show up in blender & we won't be able to edit our cut numbers later.
Step 4
now that we have our mesh, we need to edit it in blender. I'm currently using version 4.2. the controls are different in different versions, so feel free to ask me about it if you're using another version and something isn't working right.

open your mesh in blender. press the N key to get rid of the side panel and Numpad 5 to make the view better/less disorienting. you can zoom in and out with the mouse wheel, and move around by holding the mouse wheel and moving the mouse.
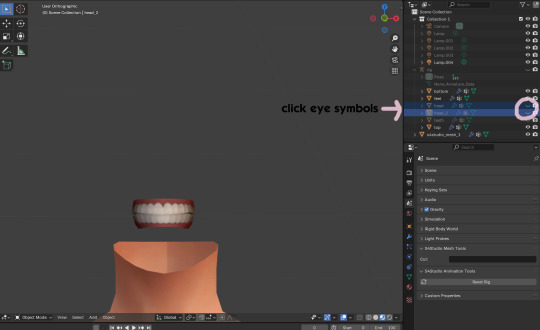
look to the right panel where "rig" is listed. click the arrow to expand the list so you can see all parts of the rig.
click the eye symbols next to "head" and "head_2" to make them invisible so you can easily see the teeth!
Step 5
there are many ways of editing teeth, of course, but what i'm going to show you is basically how to frankenmesh them. this is a good way of creating subtle variety in MM style, without it being overly difficult! we're going to combine the regular and snaggle teeth as an example.
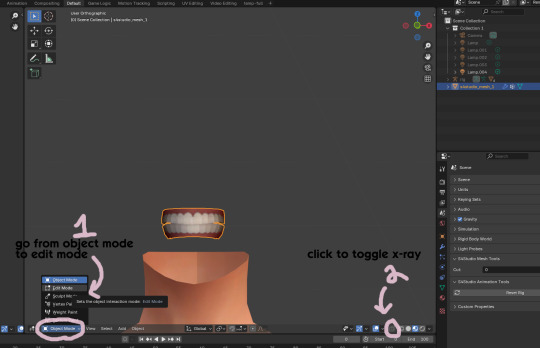
go from object mode to edit mode by clicking the menu at the bottom and selecting "edit mode"
afterwards, click the symbol on the bottom right to toggle "x-ray" so you can see all your vertices when editing.
Step 6

left click in the gray space to deselect all. there will be no orange left anywhere on the mesh.
then, hover over the top teeth and press the "L" key over a vertice (the small black dots) to start selecting the top half only. you should only have to select a couple vertices until everything on the top half is highlighted orange. you can change your view by holding down the mouse wheel and moving the mouse.
Step 7

now, press "X" key to bring up the delete menu.
click "vertices" to delete the parts of the mesh we've highlighted. only the bottom half of the teeth will be left behind. if there's any floating parts left over, highlight those with L and delete them the same way.
Now, repeat Steps 1-3 with "yuTeeth_Snaggle". when you have that mesh exported and saved where you can find it, continue to the next step.
Step 8

go back into object mode. you must be in object mode to append meshes.
go to file -> append to bring up another window

double click your snaggle mesh you just exported
double click "object"
double click "s4studio_mesh_1"
click "append" (if the window didn't close already) and the snaggle mesh will be added to your current mesh!
Step 9
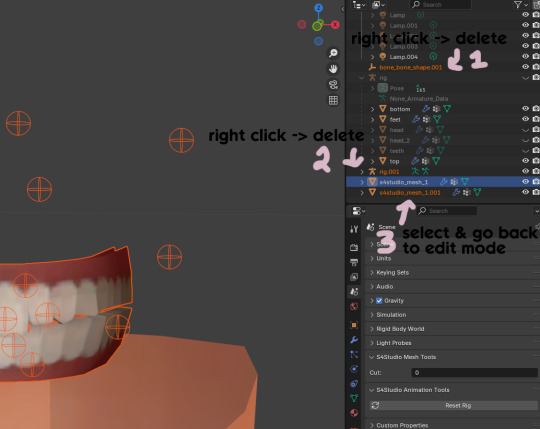
you will see several new mesh parts in the list on the right. right click over "bone_bone_shape.001" and click delete to remove it, since it's just a duplicate.
do the same thing with "rig.001" to delete it as well
select the mesh part you just appended- which is "s4studio_mesh_1.001" to select it and go back to object mode (you can also rename it now by double clicking it if you want)
Step 10

repeat what we did in Steps 6-7 to remove the bottom teeth of the snaggle mesh. you may need to be more careful since these teeth are less straight & overlap more. take your time, and if you make a mistake, you can press CTRL+ Z to undo. you can also click the eye icon next to our first mesh part to hide it so you can see better.
when you're done deleting, unhide the first mesh part to see how it looks together. you now have the top teeth from yuTeethSnaggle and the bottom teeth from yuTeeth on the same mesh! you can mix and match many teeth parts this way.

I decided to rename my mesh parts to top & bottom to keep them organized. you can click the eye symbols to hide either one and see how each part looks. when you're ready, select the top teeth mesh part and return to edit mode.
Step 11
some of EA's meshes have very few polys, so they can be hard to edit, especially if you want to move individual teeth. but, teeth are so small that they don't need/shouldn't have too high of a poly count. having every single tooth be super detailed is overkill, so it's a good idea to only increase polys in the specific areas you want to edit. for this example, i'm going to mainly focus on the front teeth.

select the front teeth by right clicking + dragging over the area you want to select, and it will highlight orange.
go to "edge -> subdivide" to increase the polys in the selected area only, which will give you more to work with. DO NOT SUBDIVIDE TOO MUCH! once should be plenty for this.
Step 12
now for the fun part- actually editing the teeth to be unique! you don't have to do this if you only want to mix & match EA parts, but it's neat to toy around with, even if you just do tiny edits. there's a variety of ways to do this, and I like to do a mixture, but for this example I'm going to use proportional editing.
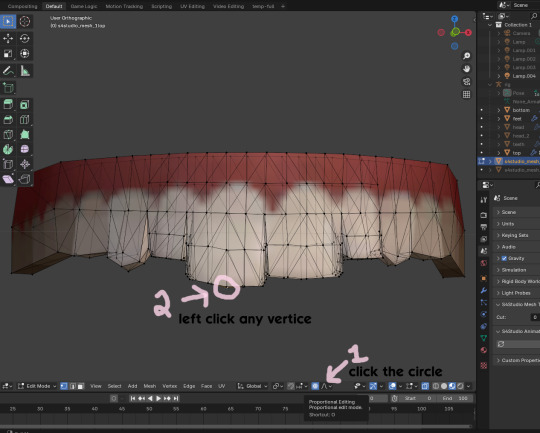
click the circle button to turn on proportional editing
left click any vertice you'd like to edit
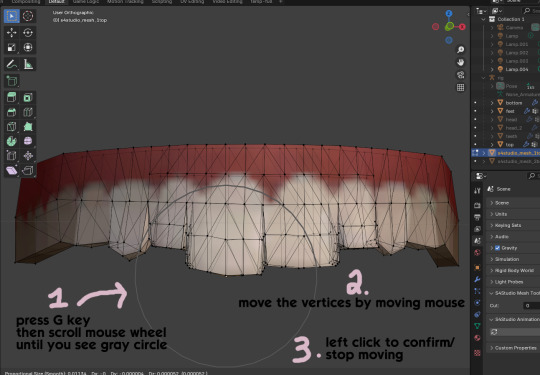
press the G key (move tool) and scroll the mouse wheel forward until the gray circle appears on your screen. this circle represents the influence of editing- the bigger the circle, the wider range of vertices will be moved around that point. the smaller the circle, the smaller/more detailed the change.
move the vertices around by moving your mouse. you'll see right away how it moves. play around with it by using a combination of scrolling the wheel back and forth and moving the mouse.
left click to confirm/stop moving the vertices. you can undo using CTRL + Z if you need to. keep repeating this step by selecting vertices, pressing G, and moving them around how you want. you can also use proportional editing with the S key (scale tool) to make areas bigger or smaller. in blender 4.2, you can also click the tools on the top left side of the window if you want to mostly use your mouse, but I usually use the keyboard.
when you're done editing your mesh and you're ready to test it out, save your file before moving to the next step. keep a copy to the side so you have something to come back to later if you want to change anything!
Step 13
now we're going to prepare our mesh to be game-ready. some of the most important aspects of that is ensuring a) the mesh part is correctly named and b) the "cut" number is correct. if these things are off, the game won't know how to read it, and we'll get odd bugs like missing heads or our mesh just not showing up at all. we currently have two mesh parts and teeth only need one, so we'll fix that first.
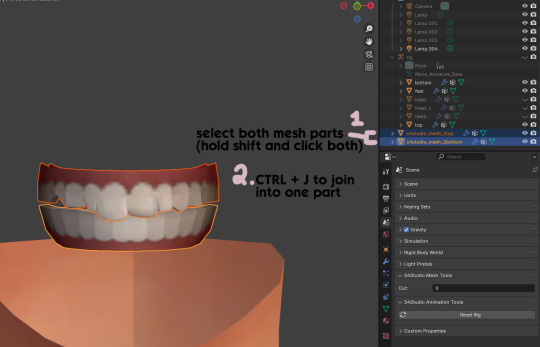
first, go to object mode and select both mesh parts by holding shift and clicking each one.
press CTRL + J to join them together into one part.
Step 14
another thing we need to do is remove doubles so our mesh doesn't look weird or have any odd shadows in-game. in blender 4, it's "merge by distance", but in earlier versions it's just "remove doubles". you should do this when you're done editing, because it'll be difficult to edit after this step. I always do it after I merge all my mesh parts & am about to import for testing. I also double check the cut numbers after this to be sure they're right.
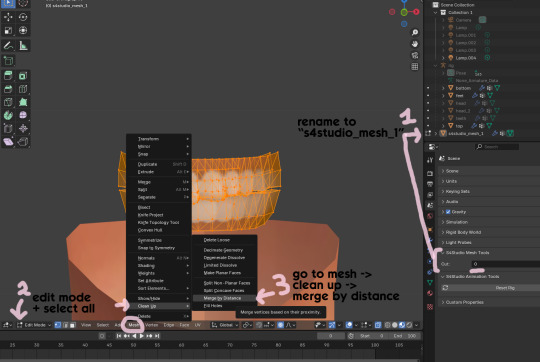
rename your combined mesh part to "s4studio_mesh_1" and ensure the cut number is 0.
go to edit mode and select all by pressing the A key
go to mesh -> clean up -> merge by distance
unhide the "head" and "head_2" parts of the rig you hid in Step 4
save your mesh as a new file name so you don't overwrite your working mesh, in case you want to go back and change something
Step 15
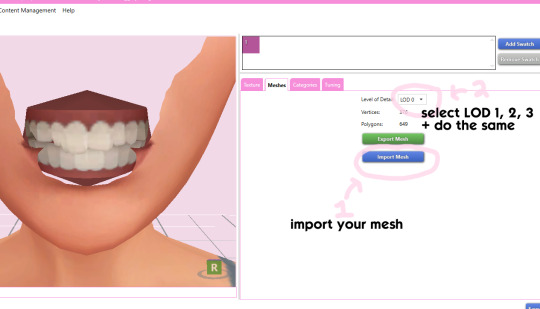
go back into your package in s4studio and import your new mesh
if you like how it looks & are done editing, select LODs 1, 2, and 3 in the dropdown menu and import your mesh there too. these are normally different meshes, but since EA based teeth are so insanely low poly, there isn't much point making individual LODs for them. but it's not that difficult to make them if you want to- if anyone wants a quick tutorial for that, let me know!
Step 16
you can stop here if you want- the teeth will take on the texture of your defaults if you used the yuTeeth package as a base. however, since we've used the Snaggle teeth on top, I think an adjusted texture might look better. I always use the textures by @ice-creamforbreakfast for my teeth, so head over there and grab their defaults if you haven't already! then grab the "uneven teeth" package file and open it in s4s.
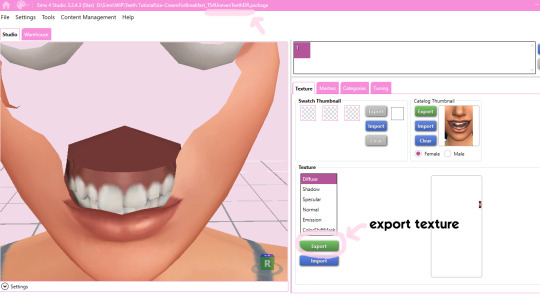
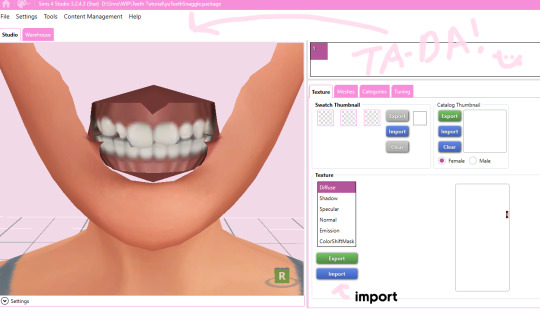
export the texture from the uneven teeth package file as dds
go back to your package file and import it! (and don't forget to credit ice-cream if you post your teeth publicly ;3)
Step 17
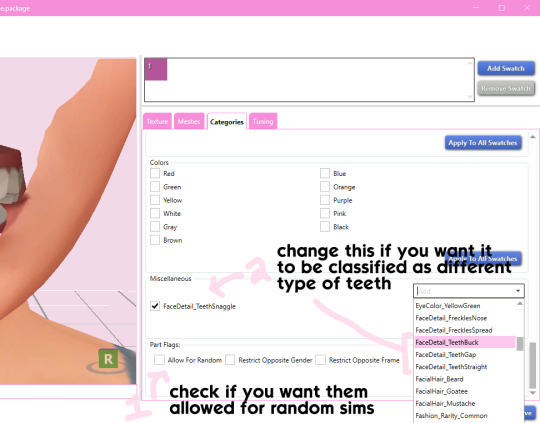
lastly, go to categories tab and scroll to the bottom. if you want your teeth to be enabled for random sims, check the box
if you want the teeth to be considered a certain type (like buck teeth), change the miscellaneous to that type. if it doesn't matter or you're not sure, just keep it as TeethStraight.
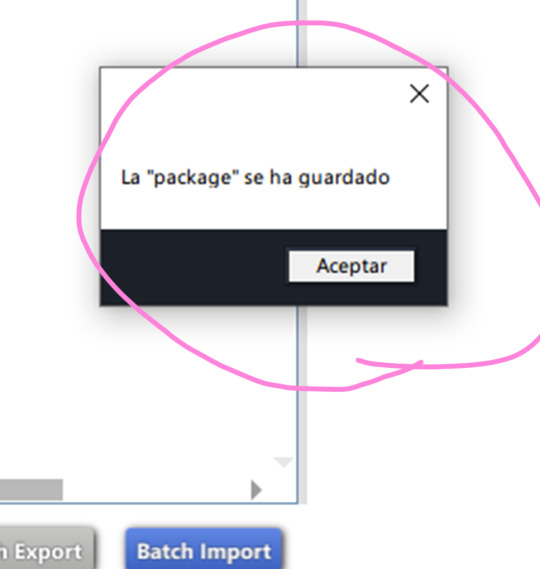
Finally, save your package and you're done! :)
#asks#adelarsims#ceci speaks#tutorial#reference#phewph!#long post#i don't think i missed anything#let me know of any questions!
65 notes
·
View notes
Text
How to Add 3D Models to TS4
Required Applications:
S4Studio - https://sims4studio.com/
Blender - https://www.blender.org/download/releases/4-3/
Note: Make sure the blender path is set up in your S4Studio settings
*This tutorial assumes you know your way around blender*
Step 1: Open S4Studio
Step 2: Under Object, select Create 3D Mesh
Step 3: Check 'Show Debug Items', change 'Mesh Groups' to 1 and search for arch. Choose the following object:
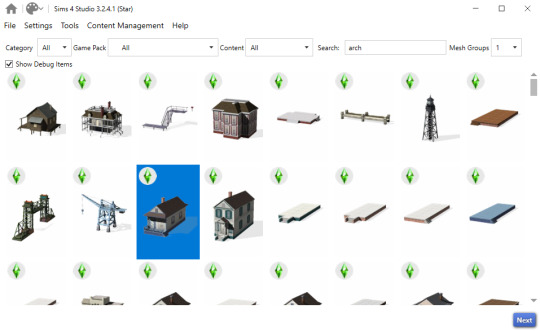
Step 3: Click next, name your package and hit save.
Step 4: Name your object. I suggest adding your creator name or initials in the front so that you can search for it in the catalog faster (ex. creatorname_objectname)
Step 5: Import your textures. The diffuse will be the main texture and the material_lighttex will be what will be illuminated on the mesh. If you don't want an illumination map, just import a plain black image or choose a different object to clone that doesn't have one (eg. the wooden slab/pole??) Ex:

Step 6: Go to the meshes tab and export LOD 0.
Step 7: Open the LODs .blend file.
Step 8: Tab into edit mode and delete the object. Do not delete it in object mode or else you'll lose all the mesh data and S4Studio will throw you an error. Tab out of edit mode.
Step 9: Import your object.
Step 10: Under the object's scene properties, you will see a tab that reads 'S4Studio Mesh Tools'. Add the number 0 to the blank space beside 'Cut'.

Step 11: Go to the data properties and change the UVMap's name to uv_0
Step 12: In the side panel where it displays the name of the objects in your scene, click on the object and then ctrl click on 's4studio_mesh_0'. Make sure your mouse is hovering over the 3D viewport window and hold ctrl+j to join the objects together. The name of your object should now be s4studio_mesh_0.
Step 13: In the modifiers tab add the 'Edge Split' modifier and then apply it. Before I do this, I tend to go into edit mode, select all vertices, click m and merge by distance just to make sure there are no double vertices. Note: If you do not add the modifier, the object will look weird in game, trust me.
Step 14: Save your blend file as 'objectname'_mesh
Step 15: Once you have saved it, go to the data properties again and change the UV from uv_0 to uv_1, this will be the shadow mesh.
Step 16: Save file as 'objectname'_shadowmesh. Choose save as and not save because it will overwrite your main mesh blend file.
Step 17: Back in S4Studio import your main mesh into LOD 0. Once that has loaded in, click on the dropdown and choose the Shadow LOD 0. Import your shadow mesh.
Step 18: Under the tags tab you can change where you'd like your object to show up in the catalog. If you leave it as is, your object will show up in the debug menu, which will have to have the debug/live edit cheat to be able to see. If you'd like it to show up as a decor object instead, uncheck world object, scroll down until you see the 'Decorative' drop down menu and choose where you'd like it to show up. I suggest the Decoration (misc) option.
Step 19: Save your package and test in game
I use this same process for all world/decor objects I make/convert. Let me know if you have any questions.
21 notes
·
View notes
Note
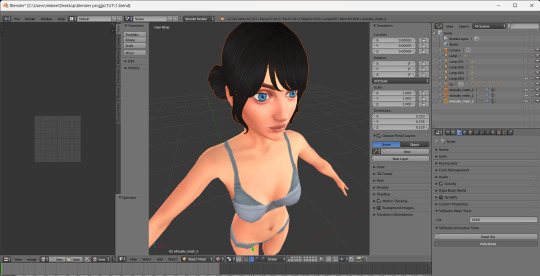
hi!! this is probably a hard question so its ok if you dont answer but how do you make bang edits from hairs? i saw on one of your hair cc finds you said you used a kikiw bangs edit, and ive always wanted to make some from my favorite hair ccs but i dont know a thing about 3d modelling or meshes so i was wondering if you had a tutorial or something similar? ;; i love your sims btw theyre so cute!!


hai ty def don't mind this question so no sweat ^^)9 here's something I made to help

**huge disclaimer for all cc edits pls get permission from the original creator(s) before sharing or distributing also do not charge for them that's never allowed** ^^)pp
I still don't know a lot about cc creation lol... but I'll still share stuff I do know atm if it helps ^^)b
first thing is I copy the cc I want to edit into the s4studio "mods" folder (I created a subfolder for this tut alr directly within the s4studio mod folder so it's less crowded with files)

I open s4studio and click "my projects" to locate the cc I js copied over and click "open"

when it opens I click "export" under the texture tab and "export mesh" under the meshes tab (save as wtv I usually name them one digit numbers so they're easy to refind ^^)
next I open the exported mesh in blender (ver 2.78b for me)
there (in object mode) I click "studio_mesh_1" and shift-click the remaining 2 studio meshes (studio_mesh_2 & studio_mesh_3) when all are selected I push "ctrl + j" to join all into one
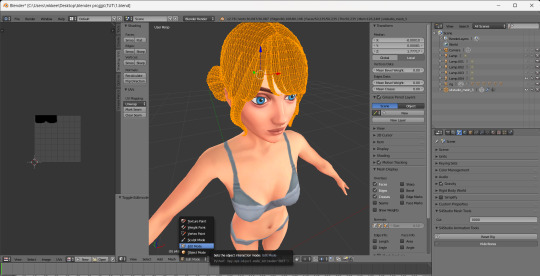
next I open "edit mode" in the bottom left
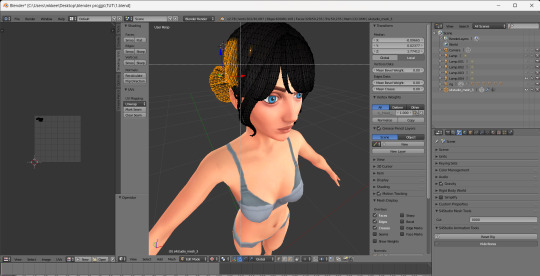
then I press "b" and drag and click my cursor to select areas I want to delete... once selected press "x" and select "vertices" from the drop menu to delete the highlighted areas
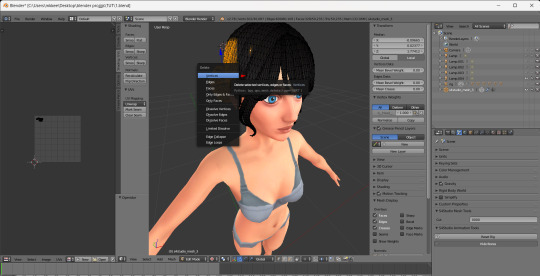

I repeat this until everything I want to delete is deleted and check that the "cut" value on the bottom right is set to 0 (0000) then click "file>save as" name file whatevs
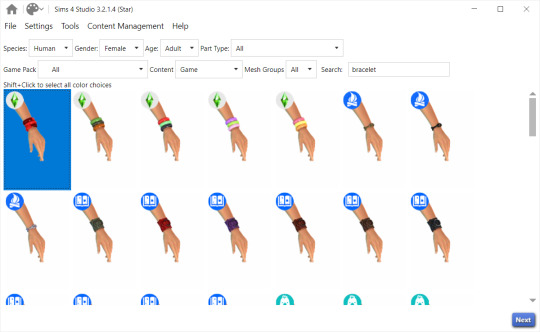
next depending on what cas category I want the edit to appear in (lowk left wrist personally) I open s4s again and under "CAS" click "create 3D mesh"
In the s4studio searchbar I find a basegame file with the same cas category (left wrist) and click "next" (hovering shows the specific name and cas category)

once it opens I import back the exported png texture under "texture" and import the new saved blend under "meshes" (LOD 0)
or if I want the edit to generally take the same color as a cc hair ingame I open the original exported png in a photo edit software (paint.net for me) and delete everything ^^ importing back js a blank texture that looks like this

ok finished ^^)bb hope this helps some way
+++
finished peek at bangs in-game on sim rey
(👇^^)

23 notes
·
View notes
Text
How To Convert Eyelashes
I was asked to make a tutorial on converting eyelashes. Well, here it is. Dirty, badly explained tutorial by Rollo. I'm assuming you know how to work with required programs, it won't teach you the basics, just a process of converting eyelashes from ts4 to ts3.
Requirements:
S4Studio
s3pe
TSR Workshop
Sims 3 Pack Multi-Extracter
These files (full credit goes to @gruesim)
Graphical program that works with .dds files
Let's go:
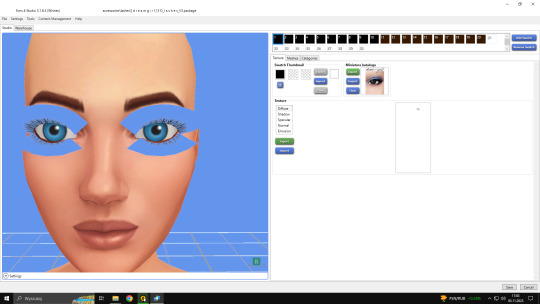
Open the desired lashes in S4Studio. Export diffuse of the ones you want to convert (you only need the black ones). You can also export the thumbnail. Close the program.
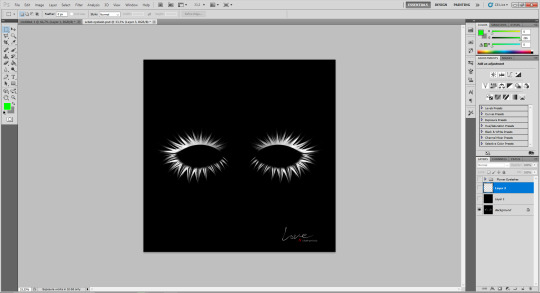
2. Unzip the folder that you downloaded from this tutorial. You will find a .dds files called "sclub eyelash". Open it up in the graphical program. Make a black layer above it and hide it for now.

3. Now open up your ts4 eyelashes file. Start from the upper eyelash, crop it and go to the sclub eyelash.
4. Paste it, click ctrl+i, it will make ts4 eyelash white.

5. This is the worst part. You have to make the ts4 eyelash fit to the sclub one as close as possible. Use every method possible!
6. Unhide the black layer and see if your eyelash look alright. It may need some sharpening.
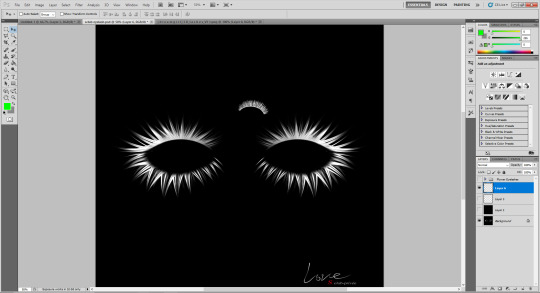
7. Now crop the bottom eyelash and follow the exact same steps as for the upper eyelash.
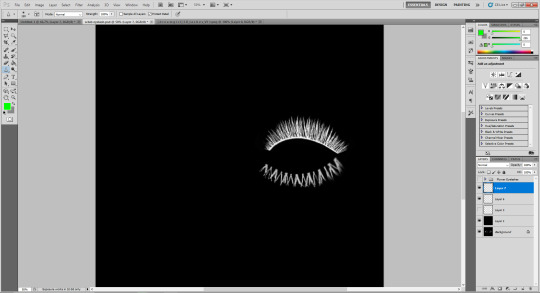
8. It should look more or less like this. Bottom eyelashes are always harder to adjust and may need even more sharpening.

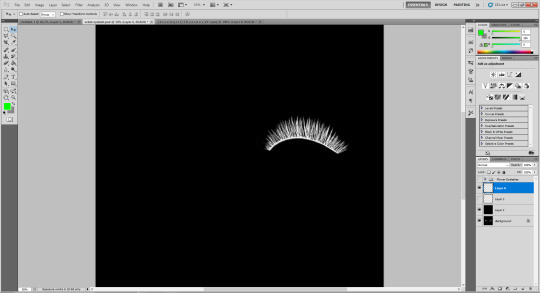
9. Merge your upper and bottom eyelashes, duplicate the layer. Click ctrl+a, ctrl+t, then right mouse button and choose "Flip Horizontal".

10. Voila. You should have a complete set of your new shiny eyelashes! Save them as .dds. You can close the program. We're moving to TSR Workshop.
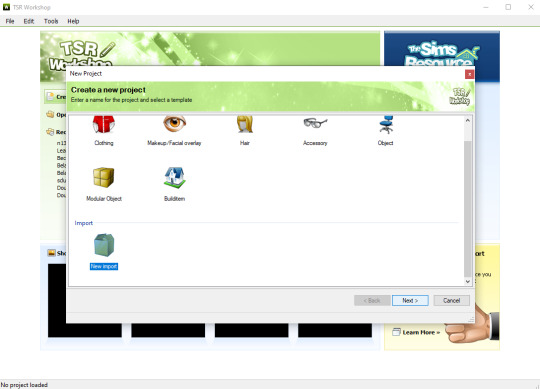
11. New Project -> New Import. Import Eyelashes AFBase from the downloaded folder.

12. Name your project, name your file and click "Next".

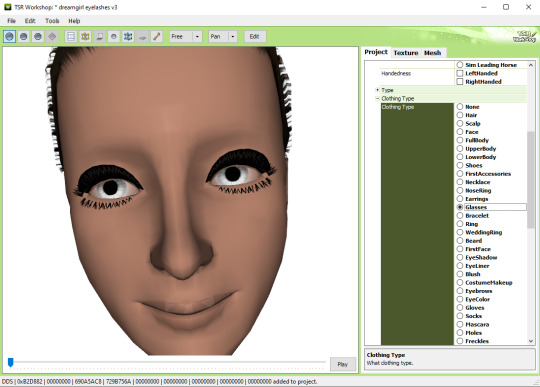
13. You should see this. Go to Texture tab and click "Edit" on the Transparency Map.
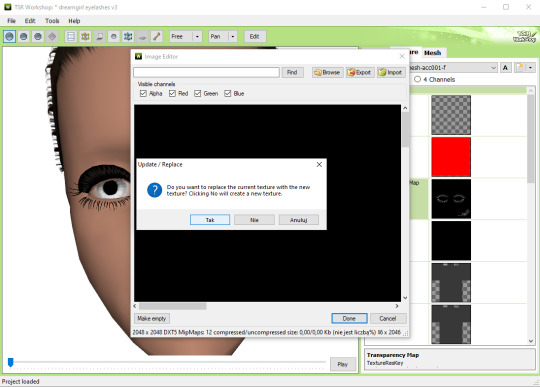
14. Import your eyelashes and click "Yes" when asked.
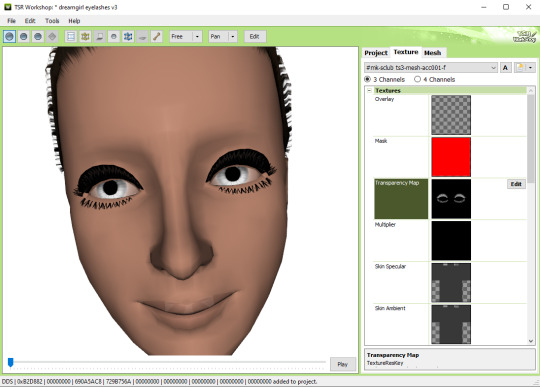
15. You should see your lashes, yay! But this is TSRW, they won't look exactly the same in game, as they look here. If you want a set of eyelashes, add more presets.
16. Now this is important. If you want to see your eyelashes in Accessories, go to Project tab, Clothing Type and change it from eyeliner to glasses. You also have to do this if you have more than one preset in one file. They won't show up in Eyeliner section. If you want to have set of eyelashes in Eyeliner category, you have to make each preset into seperate file. Also, eyelashes are recolorable ONLY in Accessories section. Don't forget to check Categories section to see which outfit has the eyelashes available.
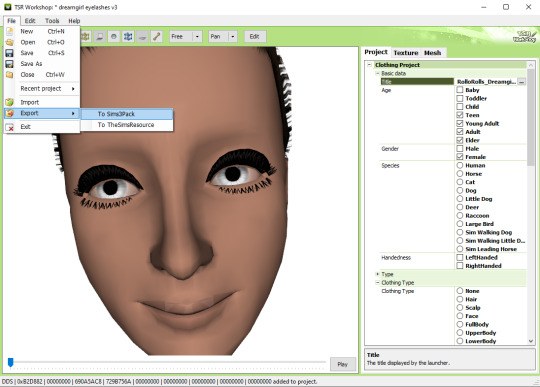
17. Now you're ready to export your file! Export -> To Sims3Pack. Use the Sims 3 Pack Multi-Extracter to convert your sims3pack to package file. We're moving to s3pe.
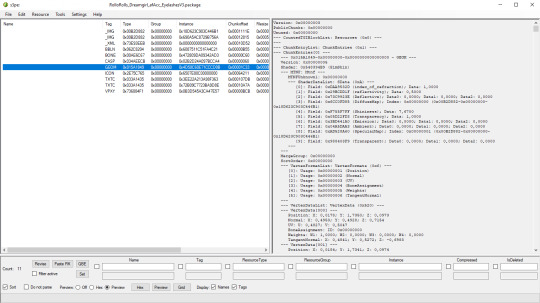
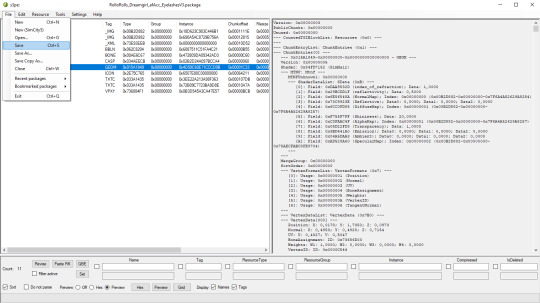
18. THESE STEPS ARE ESSENTIAL! Open up your shiny new package in s3pe. Click on the GEOM with the right mouse button.

19. Click Replace and choose AUID.simgeom from the downloaded folder. AUID is for adults, CUID for kids and PUID for toddlers. We have one more step to do.
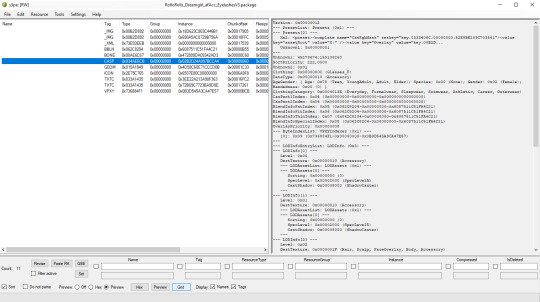
20. Now click on the CASP normally (left mouse button) and click Grid on the bottom of the program.
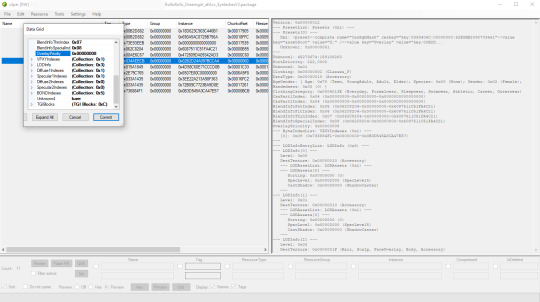
21. A small pop up window appears. Scroll to the very bottom and find a line called OverlayPriority.

22. Change the 8 to 2. This will make eyelashes not being visible through hair that's covering eyes.
23. Save your package. You're ready to test your converted eyelashes in game!

Here they are. Nothing fancy, it was a quick conversion :D They're also compatible with S-Club eyelash sliders ^^
Btw, you don't necessarily have to convert both upper and bottom eyelashes. You can have upper or bottom only. Play with the lenght, not all eyelashes have to be very long. Convert it for males, kids, toddlers. You just have to remember to change the options in TSRW and replace the correct .simgeom file in s3pe. There is a lot of possibilities and you'll probably get better in this than me :D
Good luck! ♥
207 notes
·
View notes
Text
TS4 Moon Riser Loading Screen & Silent Midnight Plumbob Recolor


Reminder - Only install ONE Custom Load Screen & ONE Plumbob Replacement at a time. Simply download and drop the package files into your Mods folder. Grab the goodies Under the Cut ⬇️
Moon Riser Loading Screen [google drive] Silent Midnight Plumbob Recolor [google drive] CREDITS & RESOURCES ✨S4Studio, UI Texture Squasher (CmarNYC) ✨Image Viewer (luniversims), JPEXS Flash Decompiler
✨Loading Screen Tutorial ✨Plumbob Recolor Tutorial
#sims4#the sims 4#ts4#ts4 download#sims 4 download#custom loading screen#custom plumbob#sims 4 custom content#ts4 simblr
23 notes
·
View notes
Text
Side Quests
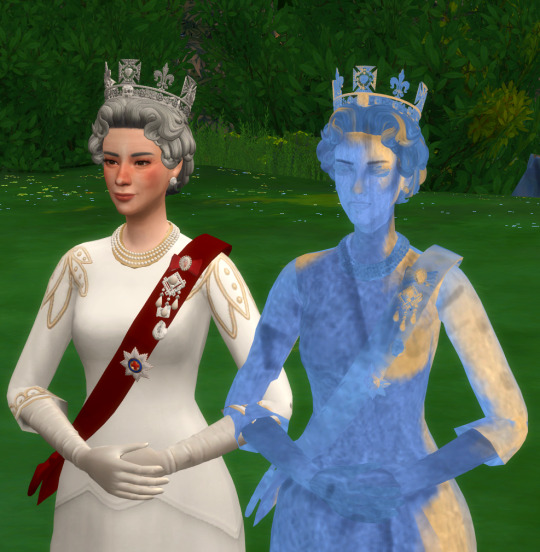
ive been on a little side quest lol, creating a commemorative statue of HM Queen Victoria II who as of 2024 is not alive. This statue (in progress) was commisioned by HM Queen Anastasia and unveiled on Her late Majesties death anniversary. i am very excited to be making more for those of my descendant royals who have tombs and such for eg Queen Elizabeth I Tomb has a statue of her. However this took ages to make, somewhat like two days to import and export the files lmao and as of 5 minutes ago the texturer which ive roughly added some shadows as you can see, if anyone needs help creating there own feel free to message me i have some helpful tutorials and i wouldnt suggest doing this if you have a lower end pc, my vertices ended up being 101353! and the poly 136192! bare in mind im using very high poly cc aswell such as the brooches on the sash and the diadem aswell as the custom hair i made. aka if you do try this use low poly items and if they are to be statues i wouldnt stress about textures as youll have to readd the facial shadows and such anyways.

Update : soo its been no time and i have an update lol. ive managed to make the texture more relaistic to the queen. my tip when doing this would be to grab your stone texture and the sim template you should have after 'ripping ur sim'. take your stone texture and make it the same size as your template, i used Procreate for this but you can use photoshop etc (any program u can do these steps in will work just save as png) and then add your template(sim texture) over the stone texture and turn the opacity of it down to your liking and merge the layers making sure to keep your template on top (the less opacity the more prominant the original texture) then save and import it in s4studio and hit save again and ur good to go after putting the package in ur mods folder.
God Save The Queen!
15 notes
·
View notes
Text

Some WIPS Im working on.
Hello. Im finishing this CAS items that I was working time ago.
A retexture of the open skull hat. The dead Fred brain head. An a skibidi toilet outfit. These will be ready on the soon days.
Also Im woking on more morphable earrings and preparing the wanted tutorial of morphing earrings that you want =) I was creating the tut, but now that Cmar has passed away I need a new way of the earrings to morph, because I have used her CasTools for morphing them. And dont know the future of S4pe that I used too and Cmar was updating it. but i have find a way with s4studio and going to create the tut on the coming days.
Also on the coming days Im going to show some sneak peeks of the cannibal mod, that is impossible to finish due to the patches that they broke one thing or another. but i have some progress.
29 notes
·
View notes
Note
HII!! first of all, I really love your cc I COULD LITERALLY BREATHE THEM!! THEY'RE SO ETHEREAL 😭😭🙏 I REALLY LOVE YOUR WORK!! Also, if it's not too much, can you ever consider doing meshes from life makeover game? They got pretty good outfits, and it's mostly similar to shining Nikki ones, just a little more varied. There's a tutorial outta there on ripping lm meshes , if that helps! https://docs.google.com/document/d/1qCtVgpn_cYZu5InKwje7dQAx5oszt8ia3xNWfiUjS7A/edit?usp=drivesdk
Love your cc again!! Thank you so much for your efforts!!(ノ◕ヮ◕)ノ*.✧
Hiii, omg I'm very glad you enjoy my conversions!!! (⁄ ⁄•⁄ω⁄•⁄ ⁄) I appreciate the tutorial! I did look into LM, and I did find a way to rip some of the meshes but the tutorial you sent me might be even better so I will take a look at it for sure.
I'm currently converting some shoes from the game.
WIP:
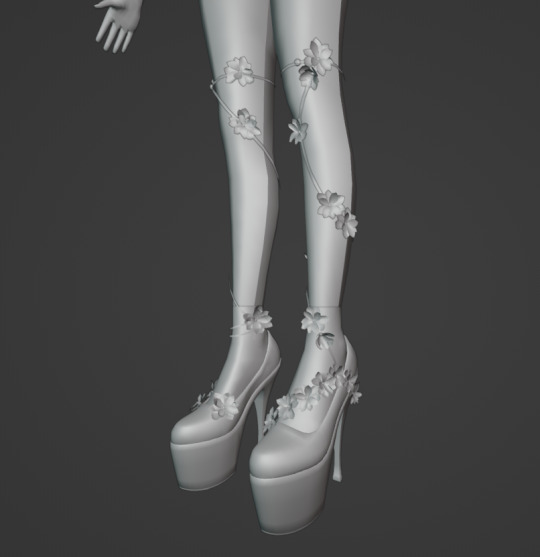
However, the outfits are a different story...they are too high poly for the Sims to handle. Well, most of them are. It depends on the dress, but the more intricate ones are so high poly they don't even load into S4Studio.
I was thinking about converting some of the more simple meshes, but it's a shame because the bigger dresses/suits are so gorgeous and detailed.
If anyone has found a solution for this, or a way to make the meshes into a lower poly version (without decimating it, because I tried that too and it looked awful), let me know!
10 notes
·
View notes
Note
Duu, I apologize if I'm asking too much, but would you mind doing a tutorial on how you use Rig Plus? The creator's tutorial is too complicated for me to understand :(
omg, okay. this is how I do it, but I'm fairly new to using this, so it might not be perfect. Still, it might help you get started 👇🏽
I'm going to make it as beginner-friendly as possible and include a lot of pictures because maybe you're like me, anon and you're more of a visual learner 🙃
First, let's check that we have the correct version of TS4 Studio and Blender (this is important, trust me). Following the creator's instructions: "It's compatible with any recent Sims4Studio Star (beta) that supports Blender v3.3 & v3.6". so I have Sims4Studio v3.2.1.2 and Blender 3.6 (Is that the latest S4S? I don't know, but it works for me).
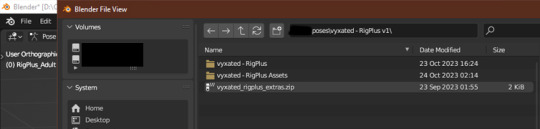
you need to download both files. Only extract the one that says 'vyxated - RigPlus v1' (if you extract the other one, Blender won't recognize it. Don't ask me why, I have no idea, but I extracted it and it didn't work, so I had to leave it as it is. we learn from mistakes, I guess). It should look like this:

Ok, can we make the poses now, Du? No, I mean, you can if you want. But first, we need to make sure we have everything ready to export it when we're done. For that, we need this:
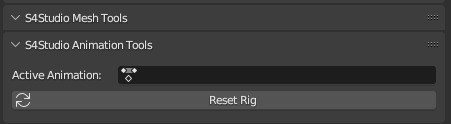
You can see this in the right column of the Blender window, under the 'Scene' section at the bottom
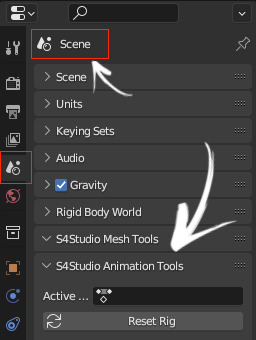
Do you have it in your Blender? If you do, yay, then you can make your pose. If you're like me and you don't have it, don't panic yet! I'll tell you how to get it. It's as easy as opening an exported rig from S4S in Blender, and magically, the little window appears. Now I'll show you how (assuming you previously synced your S4S with Blender from 'settings'. I'll assume you know how to do that; if not, send me another ask, and I'll tell you how).
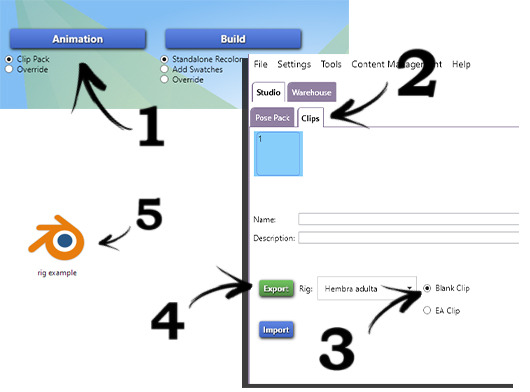
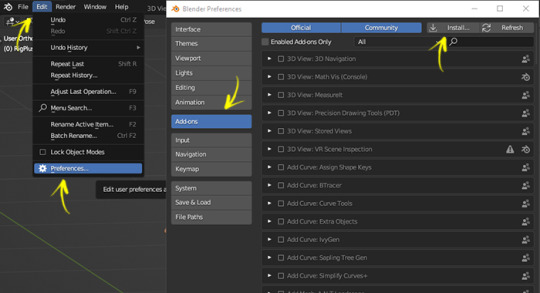
now what? nothing. you SHOULD have that S4S tab (when I first opened the EA Rig+ it didn't show up for me until I did that. You can close that blank rig; you won't need it anymore). ok NOW can we make the poses? yes! wait, no. the Add-ons. that's pretty easy: "File > Blender Preferences > Add-ons > Install… > select vyxated_RigPlus_extras.zip /.py"
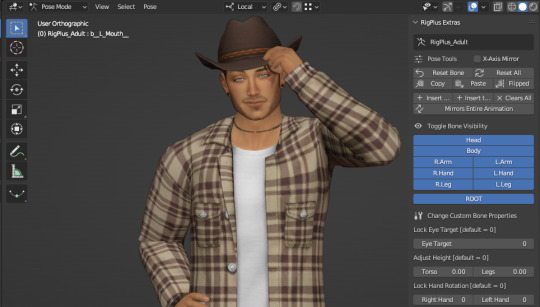
NOW you are ready to make a pose. here's mine 🤠
We're going to save the pose. For this, the process is a bit different from saving a pose normally. Just follow the steps and you should be fine. You can check if it's saved correctly at the end; I'll show you how, don't worry.
fist, HIDE 'the RigPlus_Adult' (that's the one with all the controls to move the sim).

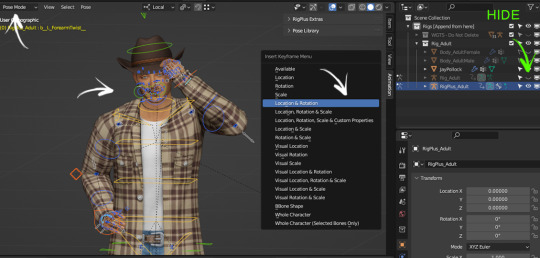
It should appear orange, both the selected parts and the points on the sim body. According to the creator's instructions, you MUSTN´T insert keyframes while in Object Mode or you'll end up with the T-pose in the game. Orange = OBJECT MODE, blue = POSE MODE. You need to be in POSE MODE (all blue dots) to insert keyframes. let's see some pictures.
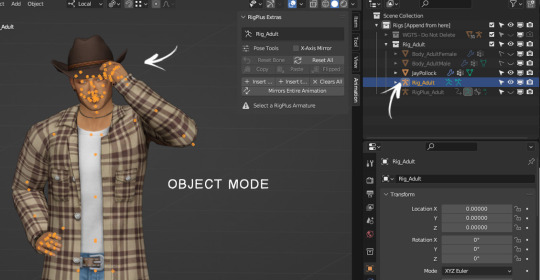
don't insert keyframes here ☝🏽
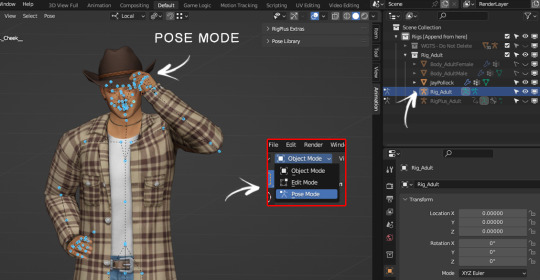
NOW you can inser keyframes (in other words: on your keyboard, you press A and then I > Location & Rotation). IMPORTANT: always remember to have Rig_Adult selected to insert keyframes.
Now hide Rig_Adult and leave only RigPlus_Adult visible because we're going to insert the keyframes there too. Same process: make sure you're in POSE MODE > A (to select all) > I > Location & Rotation.
You're ready to export your pose. But wait! Remember I told you we needed that S4S window? Here's where that comes in. To export your pose, you need to have 'Rig_Adult' selected, otherwise, it won't save properly. The way to check if you're selecting the right one is by looking at that S4S window. Let me show you how:
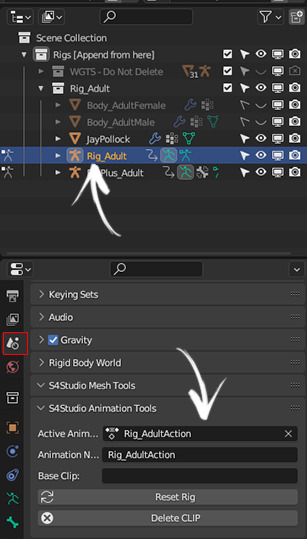
You go to Scene, and at the bottom where it says 'S4Studio Animation Tools,' it should say 'Rig_AdultAction.' If you have the right one selected, you can now save your pose as you would normally do.(you know, going to Files > Save As…)"
That would be basically everything!! ✨Now, Some tips:
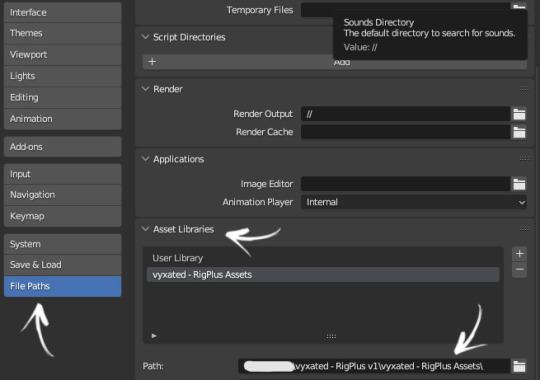
to view/use the Asset Browser (where you can find objects), you have to go here:
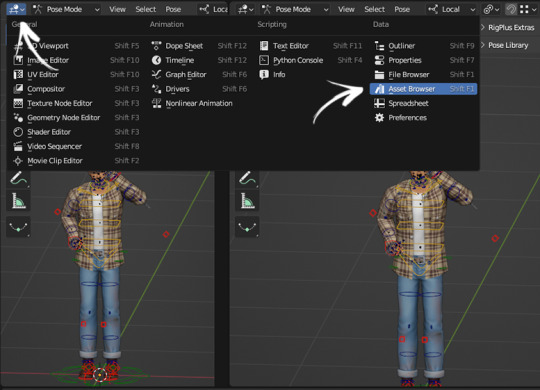
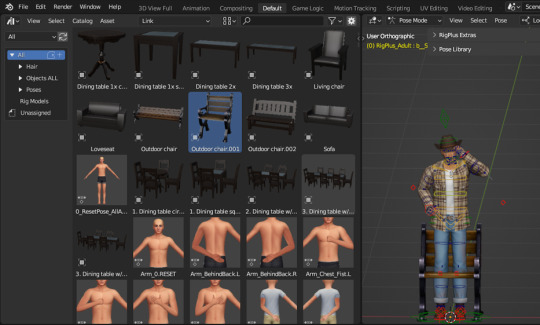
And to install it, in the creator's words: 'Edit > Blender Preferences > File Paths > Asset Libraries > add the vyxated - RigPlus Assets folder you've extracted'
I don't know how much you know about Blender, anon, so I'm going to be super basic here. To move the "bones" use R, RR, and G. Just press one of these keys and see if it moves where you want. Doesn't work with R? Then Ctrl+Z and try RR. Still no? Ctrl+Z and G. Just try until it looks the way you want 😁
Oh, right! I mentioned you could check if the pose was exported correctly and almost forgot to tell you how lol. Once you put the pose in your pose pack in S4S, all you have to do is export the pose you made from there (in the same way I explained to you above). I export it to the desktop, double click and open it. If the pose looks exactly like what you made, then congratulations! You've done it right. If all you see is the T-pose, then go back to the saving step because you've done something wrong (in my case, I was saving the pose in Object Mode, but I also had issues when I didn't have Rig_Adult selected when saving the pose 😆)
Alright, that's all! I hope it's not too confusing and that it helps you! Let me know if something isn't clear, nonny! 💖
51 notes
·
View notes
Note
If you don't mind me asking but do you have any way you could make like a how to make sims 4 CC process or anyone that you recommend for that has a good one because I want to try and make my own CC but don't know how.
Please and thank you 😊
i was thinking about that for like last several days and i hope one day i'll make tutorials too, cause there's not a lot of them (especially in video format)
the ones that i personally used to learn are:
— @bluecravingcc has a series of video tutorials on their YouTube channel about making clothes. although i make maxis match (or at least maxis mix) cc, whereas Blue Craving mostly makes alpha cc, the overall process is pretty much well explained in those tutorials
— a lot of times (most of the times) to make maxis match cc you need to modify or even merge several items from the game, and this tutorial covers this pretty well
— the tutorial that helped me learn how to make clay (maxis match) hair is made by @aler-ii
also, i'll give a typical "artist" advice — learn by watching and analyzing what other people do. you can watch other people's speedmeshing videos. i personally love @raccoonium's vids, you can find them on their Tutorial page
— while we're still talking about hair, i also learned how to make hat chops thanks to this tutorial. although, i would really recommend to use several completely different hats to adjust the hat chops and RE-check everything after you finished. i use like 10 different hats (5 per hat chop) to make sure it works with all (or at least most of) hats
— this tutorial by @nell-le is very helpful to understand how to work with the specular map (the one that adds shine to cloth/hair/etc)
a lot of stuff like emission maps, cuts, thumbnails and etc. are not covered in those tutorials, so i learned through tears, suffering and pain lol
there's a text explanation about the emission map on s4studio forum but i firstly found it to be very confusing
i thiiiink that's it for now or at least those are the ones that first come to my mind
remember, a lot of cc creators have their own tutorial pages on their tumblr blogs, so go check them out, im pretty sure there's a lot of good stuff i haven't mentioned here
you can share other tutorials if you know any that are really useful and that i haven't talked about here
also, don't be afraid to ask people on s4s forum, they're really nice and friendly and always give advice when needed
and yes i will definitely make tutorials or a whole ass process video one day, i promise!
10 notes
·
View notes
Text
How to reduce the shininess/specular of an object in TS4:


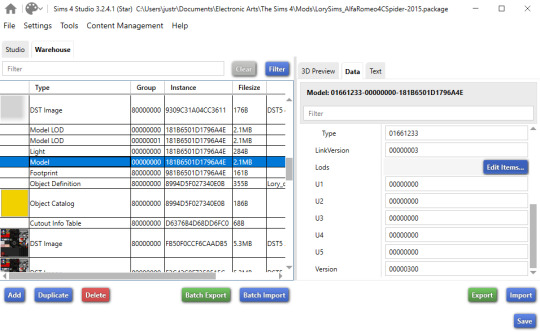
Open the object's package file in S4Studio. Do to the warehouse tab and find the Model layer (?). Scroll down on the Model data properties until you find LODs.
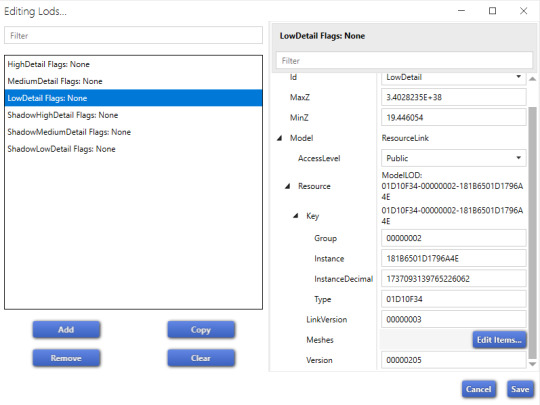
Click to open the tab, then find which lod has the meshes tab.

Once you open the meshes tab, you'll see this screen. Under Phong, scroll down until you see the material/resource area. Click on the edit items button beside entries.
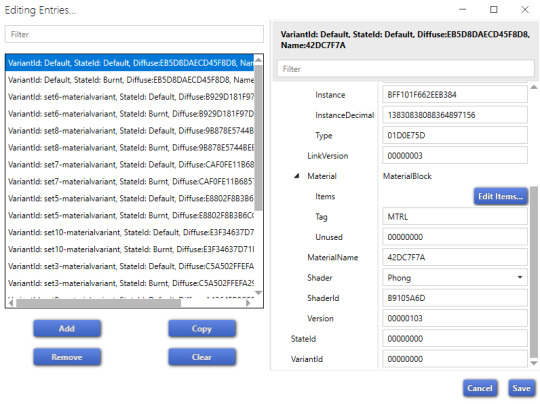
Scroll down to find the material tab. Click on the edit items button.

Find the specular. On the right you can see that there are 3 values; make sure to change all three values. I suggest keeping these values from 0-1. 0 is completely matte and 1 is shiny. I personally have the values for mine at either .75 or .5.
You must do this for entries you see on the entries tab. They each represent the different swatches. I've noticed that there are two of the same variants for each swatch, at least in this object (not sure if it's the same for others). There's a default and burnt version. You do not need to change the burnt variants.
Once you've done all of those, the next step is to do the same process on the rest of the lods. Don't forget to press save on each of the screens/pages you've made edits on or your edits will not be saved. Of course, make sure to also save the package itself.
If you have any questions, feel free to ask in the comments/replies.
@thesimslums Here you are! I hope this is easy to follow.
Notes: I learned how to do this on the S4Studio website, but I couldn't find the page again. It was kind of difficult to find in the first place. Anyway, credits to whoever posted the mini tutorial on there.
16 notes
·
View notes
Note
you're lowkey my motivation to start cc creating, any tips or tutorial recs for recoloring and cc creation?
Honestly I got tired of not having the things I wanted in my game. I started off with learning how to move my make up eyes to non defaults then I went to the extremes and learned how to make a wrench override LOL
I usually watch tuts on YouTube. Pixified Tips will be your life savor trust me. Just start off with something small. Recording is super easy!! s4studios may look intimidating but don’t let it get to you ^-^
2 notes
·
View notes
Note
https://www.tumblr.com/saturngalore/770315714432253952/i-feel-like-if-you-have-people-paying-for-your-cc
Okay do you know how to fix this problem on sims 4 studio? Because I started trying to fix things on my own. Because I HATE when people don’t consider plus size sims. Because I had this problem a lot like you mentioned and I was always confused..
hi anon! and yes but you will have to use blender (and probably know how to use blender) in order to actually fix this and then you just updated the mesh in s4studio! i followed this tutorial below ⬇️ and it helped a lot since i was having trouble doing the vertex painting myself. please lemme know if this helps or if you have any trouble! im no expert but this did help fix my distortion issue with large/fat sims 🙏🏾


6 notes
·
View notes
Note
hi mikayla ! love ur blog, use your skin details religiously, and so sorry if this has been asked b4 BUT -- Do you have a tutorial you watched for how to make the 4LIENS posters ? or easy guides ? im curious how u did the tape effect & trying to make some posters for my in game band rn! <3 <3 tysm tysm
hi there! thank you so much ily <33
i found this tutorial which basically explains everything i did to make them! i just searched for posters in s4studio, exported the textures and edited them with in-game screenshots or edits using Clip Studio Paint.
you can make all kinds of custom painting or posters this way (this is also what i did for the cds and things)
10 notes
·
View notes
Text
How to install / Use default Underwear in to the sims 4 with the HQ mod
For what reason my underwear doesn't work??
If you use the HQ mod, you know that to have it work correctly you need to install replacement HQ files, the problem with them is that when you install a cas override mod your game looks as if you had never put the mods on your mods file, this happens because you have two overrides at the same time and for overrides you can only have 1, so in this tutorial I will show you how to remove the Hq override that does not allow you to use the default mod of your underwear.
First
U must have to have the latest versions of the Hq file replacement of the base game. If you want to install the default HQ skin, check out my tutorial. The creator of these repalaces only has skin IDs, not default underwear IDs. To be more specific, the IDs are a list of numbers and letters that contain the names of the textures that we will need to delete from the packages: BG_HQ_6, BG_HQ_7, BG_HQ_8 (How to get these IDs in the second step)
Second
U must be donwload a text file that I created with the name of the Hq package replaces and their respective IDs. Donwload
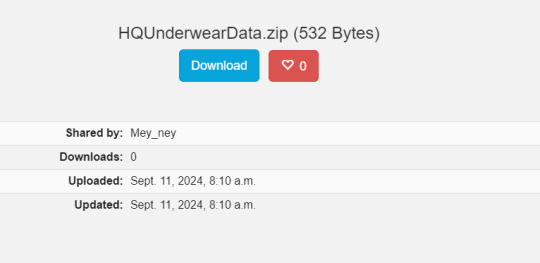
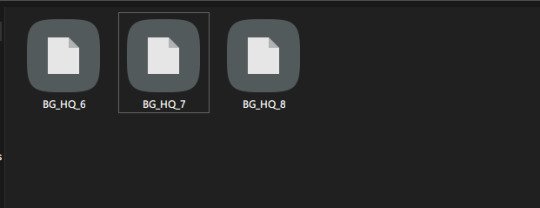
And you will uncompress the zip; on that, you will have 3 files with the name of the 3 Hq base game replaces.
Third
Now i´ll explain u how use those files on the packages replaces. i´ll make the tutorial whit BG_HQ_6 but THE PROCESS IS THE SAME WHIT ALL PACKAGE I´LL ONLY SHOW U WHIT THIS BECAUSE IS LITERALLY THE SAME WHIT THE LEFT OVER!!
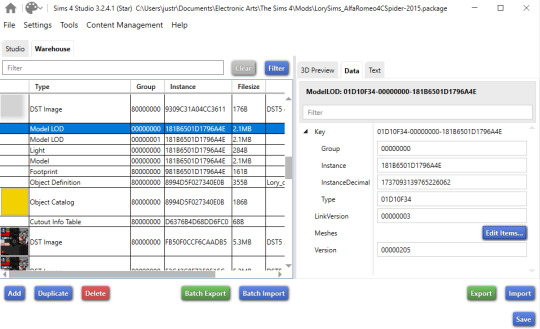
so.... we i´ll open whit the S4studio the package BG_HQ_6

With the opened package, we will copy the ID that is in the text file that has the same name as the package, and we will paste these on the S4 searcher.
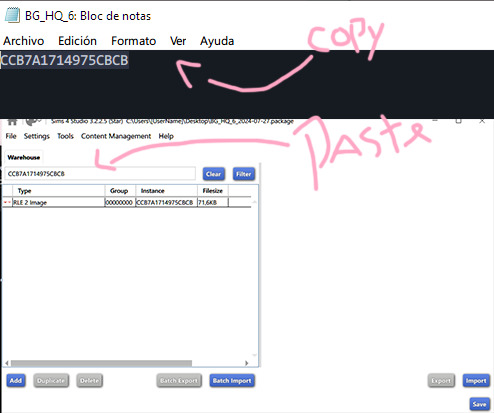
After you paste the ID, you need to click on filter, select the image, and click on delete:

Remember save the changes!!!!
IMPORTANT

⚠To be careful at hour of deleting texture, you must be pretty sure that you are downloading an override for this texture. For example, if you delete all texture but only downloaded a CC default underwear for women, the left-over ages will have a black texture on their underwear, so when you delete the textures on the s4studio, check the age of the image (I suppose that you recognize the ages of the underwear textures)⚠
⚠I have only taken out a single swatch, more specifically the texture that appears when you remove the clothes from the sim for all ages. If the CC that you downloaded contains more than one swatch, it will not be seen in the game; the original texture that corresponds to it will appear. Taking out these IDs is very complicated; if you want more samples, you will have to do it manually⚠
Literally, that's all. It's not that complicated, just slow. If for some reason the S4 Studio is slow when you hit save, it's normal. Just let it load. Even if it doesn't respond, eventually it will. Keep in mind that you are deleting textures from a file. about 3 or 2 gb.
And that's all!! I hope that if you are having a problem with this, that tut can be useful, and if you want, you can see my default underwear for all ages that is compatible here ୨ৎ
#sims 4#the sims 4#ts4cc#ts4 alpha#ts4 simblr#ts4#simblr#sims 4 gameplay#sims 4 tutorial#sims4 hq mod#sims4 cas
5 notes
·
View notes