
29 / he/they / ts4 maxis mix simblr | wcif friendly yoongi art credit: @finnchios
Don't wanna be here? Send us removal request.
Statistics
We looked inside some of the posts by yooniesim and here's what we found interesting.
Average Info
Notes Per Post
65K
Likes Per Post
39K
Reblog Per Post
26K
Reply Per Post
118
Time Between Posts
7 days
Number of Posts By Type
Text
13
Note
4
Last Seen Tumblr Blogs


Fun Fact
Hackers stole 65M passwords from Tumblr in 2013.
Text
why is it that every time I peek in here I see some BS that kills off another one of my dwindling brain cells... what are yall doing

#ceci speaks#nonsims#text#delete later#ive been fixing my game and working on cc to post#and that part is fun#but my god peeking in here and seeing the sheer stupidity causes me psychic damage#lol yall that are still here and normal are wading thru the trenches#gods strongest soldiers#i salute u
7 notes
·
View notes
Text

are we... supposed to be taking this reply seriously? girl what 🤣
can we all agree that pointing out the fact that someone wishing death upon our families in Chinese is not a Sinophobia thing
can we also agree that cursing people is actually a terrible anti-piracy measure?
or am i like....taking crazy pills
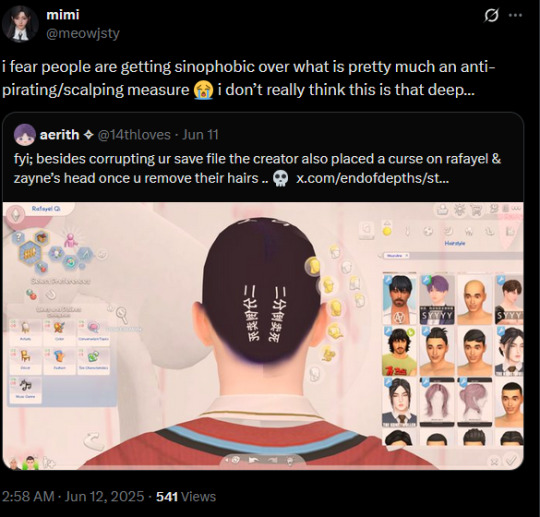
#reblogs#gif warning#negative#the patreon issue#touching copius amounts of grass and then seeing this is the biggest whiplash#do ppl really not realize how stupid they sound#sinophobia is when u like ur cc to be death threat free#lmfaooooooo#peoples heads have traveled too far into the rectum i fear#also anyone notice its on the scalp#and they called it anti scalping measure#LOL#this is comedy#tbh i wouldnt even respond to this bad faith take atp theyre either extremely stupid or#intentionally wasting ur time/distracting from the actual point#everyone with half a brain knows that isnt sinophobia theyre just being a cunt#main point is this is wrong and no one should download from... whoever this is
83 notes
·
View notes
Note
hello and happy new year! ceci, do you happen to have or could you please make a tutorial on creating teeth if it's not a big hassle? i wanted to make a very particulat teeth shape for my sim, but apparently i do something wrong because the result morphs the whole face in a weird way
gurl the "happy new year" is beating my ass rn, not this exposing the state of my inbox...... 😭😭😭
but ok more seriously, I'll get on with the tutorial 😳
Step 1
first, we're going to use s4studio to create our package. we're going to clone the EA teeth to use as our base.

open s4studio and select "create 3D mesh" under "CAS"
click the blue "CAS" button
Step 2

select "Face" from the Part Type dropdown menu. this will make only the teeth files show up.
we're interested in both "yuTeeth" and "yuTeeth_Snaggle", but select yuTeeth first! (you can hover over each picture to see the names too)
click next, and save your package file as whatever you want.
Step 3

zoom in close to the model with mouse wheel until you can see the teeth, to make sure everything is correct, then go to the "meshes" tab on the right side
export your mesh and save it where you can find it.
note: if you've never used s4s or blender before, make sure your blender location is set up correctly in the s4s settings. otherwise, the sims4studio tools won't show up in blender & we won't be able to edit our cut numbers later.
Step 4
now that we have our mesh, we need to edit it in blender. I'm currently using version 4.2. the controls are different in different versions, so feel free to ask me about it if you're using another version and something isn't working right.

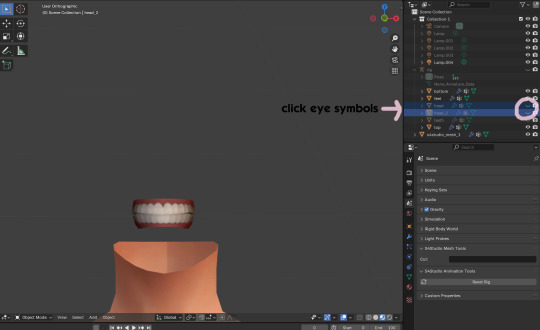
open your mesh in blender. press the N key to get rid of the side panel and Numpad 5 to make the view better/less disorienting. you can zoom in and out with the mouse wheel, and move around by holding the mouse wheel and moving the mouse.
look to the right panel where "rig" is listed. click the arrow to expand the list so you can see all parts of the rig.
click the eye symbols next to "head" and "head_2" to make them invisible so you can easily see the teeth!
Step 5
there are many ways of editing teeth, of course, but what i'm going to show you is basically how to frankenmesh them. this is a good way of creating subtle variety in MM style, without it being overly difficult! we're going to combine the regular and snaggle teeth as an example.
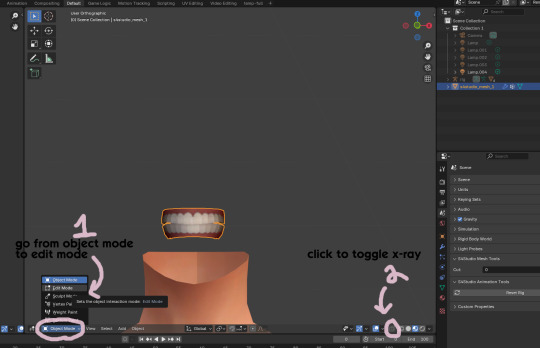
go from object mode to edit mode by clicking the menu at the bottom and selecting "edit mode"
afterwards, click the symbol on the bottom right to toggle "x-ray" so you can see all your vertices when editing.
Step 6

left click in the gray space to deselect all. there will be no orange left anywhere on the mesh.
then, hover over the top teeth and press the "L" key over a vertice (the small black dots) to start selecting the top half only. you should only have to select a couple vertices until everything on the top half is highlighted orange. you can change your view by holding down the mouse wheel and moving the mouse.
Step 7

now, press "X" key to bring up the delete menu.
click "vertices" to delete the parts of the mesh we've highlighted. only the bottom half of the teeth will be left behind. if there's any floating parts left over, highlight those with L and delete them the same way.
Now, repeat Steps 1-3 with "yuTeeth_Snaggle". when you have that mesh exported and saved where you can find it, continue to the next step.
Step 8

go back into object mode. you must be in object mode to append meshes.
go to file -> append to bring up another window

double click your snaggle mesh you just exported
double click "object"
double click "s4studio_mesh_1"
click "append" (if the window didn't close already) and the snaggle mesh will be added to your current mesh!
Step 9
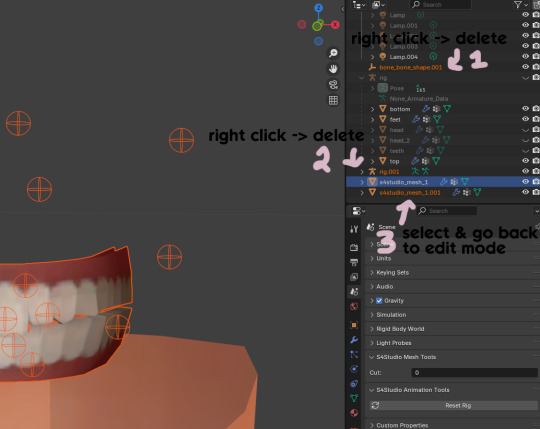
you will see several new mesh parts in the list on the right. right click over "bone_bone_shape.001" and click delete to remove it, since it's just a duplicate.
do the same thing with "rig.001" to delete it as well
select the mesh part you just appended- which is "s4studio_mesh_1.001" to select it and go back to object mode (you can also rename it now by double clicking it if you want)
Step 10

repeat what we did in Steps 6-7 to remove the bottom teeth of the snaggle mesh. you may need to be more careful since these teeth are less straight & overlap more. take your time, and if you make a mistake, you can press CTRL+ Z to undo. you can also click the eye icon next to our first mesh part to hide it so you can see better.
when you're done deleting, unhide the first mesh part to see how it looks together. you now have the top teeth from yuTeethSnaggle and the bottom teeth from yuTeeth on the same mesh! you can mix and match many teeth parts this way.

I decided to rename my mesh parts to top & bottom to keep them organized. you can click the eye symbols to hide either one and see how each part looks. when you're ready, select the top teeth mesh part and return to edit mode.
Step 11
some of EA's meshes have very few polys, so they can be hard to edit, especially if you want to move individual teeth. but, teeth are so small that they don't need/shouldn't have too high of a poly count. having every single tooth be super detailed is overkill, so it's a good idea to only increase polys in the specific areas you want to edit. for this example, i'm going to mainly focus on the front teeth.

select the front teeth by right clicking + dragging over the area you want to select, and it will highlight orange.
go to "edge -> subdivide" to increase the polys in the selected area only, which will give you more to work with. DO NOT SUBDIVIDE TOO MUCH! once should be plenty for this.
Step 12
now for the fun part- actually editing the teeth to be unique! you don't have to do this if you only want to mix & match EA parts, but it's neat to toy around with, even if you just do tiny edits. there's a variety of ways to do this, and I like to do a mixture, but for this example I'm going to use proportional editing.
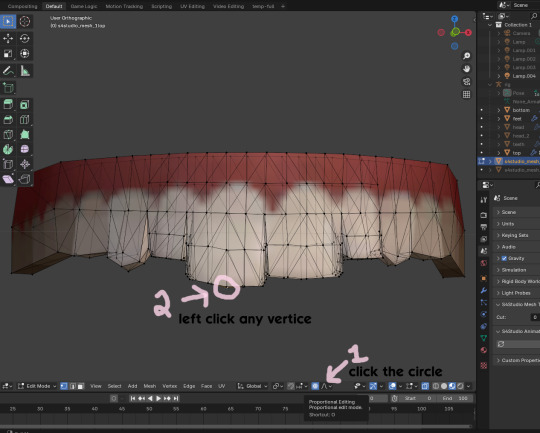
click the circle button to turn on proportional editing
left click any vertice you'd like to edit
press the G key (move tool) and scroll the mouse wheel forward until the gray circle appears on your screen. this circle represents the influence of editing- the bigger the circle, the wider range of vertices will be moved around that point. the smaller the circle, the smaller/more detailed the change.
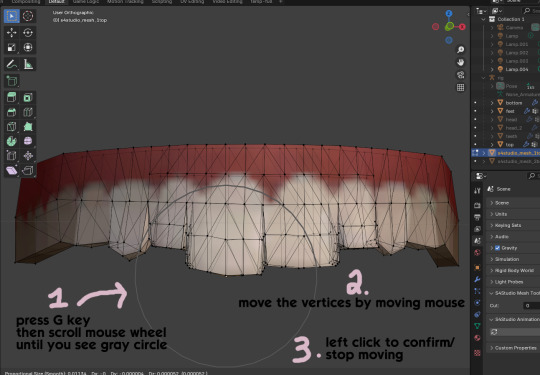
move the vertices around by moving your mouse. you'll see right away how it moves. play around with it by using a combination of scrolling the wheel back and forth and moving the mouse.
left click to confirm/stop moving the vertices. you can undo using CTRL + Z if you need to. keep repeating this step by selecting vertices, pressing G, and moving them around how you want. you can also use proportional editing with the S key (scale tool) to make areas bigger or smaller. in blender 4.2, you can also click the tools on the top left side of the window if you want to mostly use your mouse, but I usually use the keyboard.
when you're done editing your mesh and you're ready to test it out, save your file before moving to the next step. keep a copy to the side so you have something to come back to later if you want to change anything!
Step 13
now we're going to prepare our mesh to be game-ready. some of the most important aspects of that is ensuring a) the mesh part is correctly named and b) the "cut" number is correct. if these things are off, the game won't know how to read it, and we'll get odd bugs like missing heads or our mesh just not showing up at all. we currently have two mesh parts and teeth only need one, so we'll fix that first.
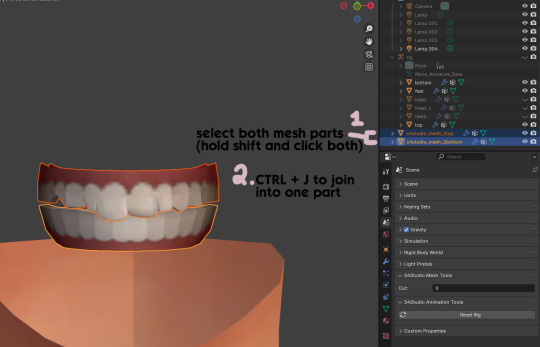
first, go to object mode and select both mesh parts by holding shift and clicking each one.
press CTRL + J to join them together into one part.
Step 14
another thing we need to do is remove doubles so our mesh doesn't look weird or have any odd shadows in-game. in blender 4, it's "merge by distance", but in earlier versions it's just "remove doubles". you should do this when you're done editing, because it'll be difficult to edit after this step. I always do it after I merge all my mesh parts & am about to import for testing. I also double check the cut numbers after this to be sure they're right.
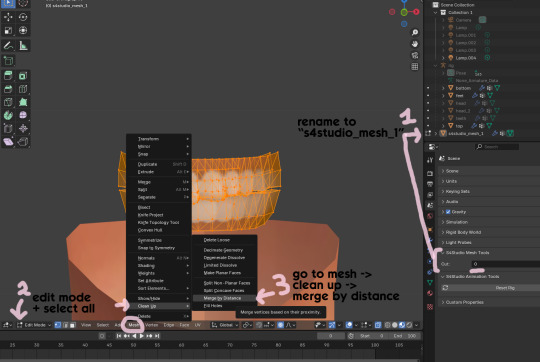
rename your combined mesh part to "s4studio_mesh_1" and ensure the cut number is 0.
go to edit mode and select all by pressing the A key
go to mesh -> clean up -> merge by distance
unhide the "head" and "head_2" parts of the rig you hid in Step 4
save your mesh as a new file name so you don't overwrite your working mesh, in case you want to go back and change something
Step 15
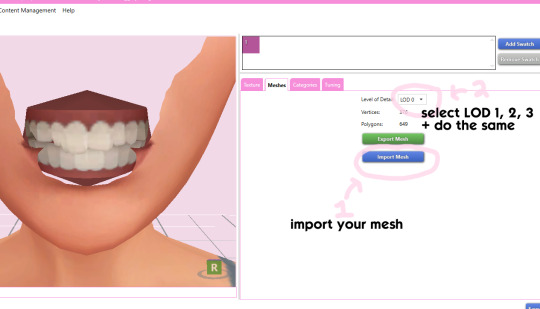
go back into your package in s4studio and import your new mesh
if you like how it looks & are done editing, select LODs 1, 2, and 3 in the dropdown menu and import your mesh there too. these are normally different meshes, but since EA based teeth are so insanely low poly, there isn't much point making individual LODs for them. but it's not that difficult to make them if you want to- if anyone wants a quick tutorial for that, let me know!
Step 16
you can stop here if you want- the teeth will take on the texture of your defaults if you used the yuTeeth package as a base. however, since we've used the Snaggle teeth on top, I think an adjusted texture might look better. I always use the textures by @ice-creamforbreakfast for my teeth, so head over there and grab their defaults if you haven't already! then grab the "uneven teeth" package file and open it in s4s.
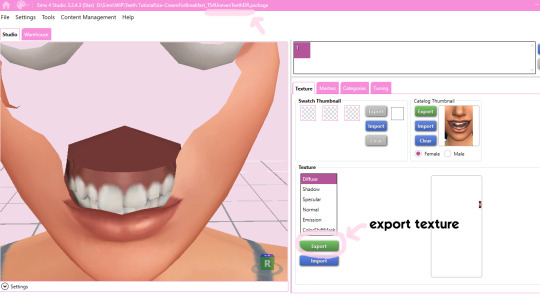
export the texture from the uneven teeth package file as dds
go back to your package file and import it! (and don't forget to credit ice-cream if you post your teeth publicly ;3)
Step 17
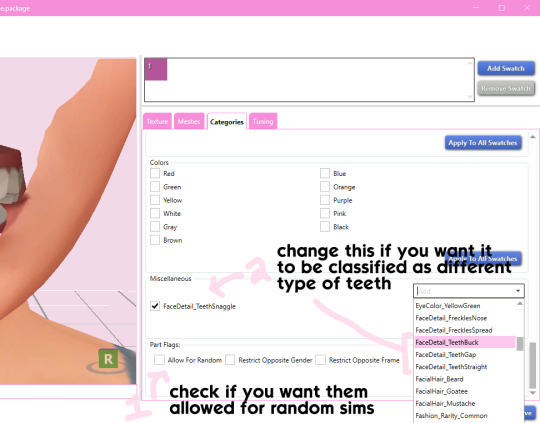
lastly, go to categories tab and scroll to the bottom. if you want your teeth to be enabled for random sims, check the box
if you want the teeth to be considered a certain type (like buck teeth), change the miscellaneous to that type. if it doesn't matter or you're not sure, just keep it as TeethStraight.
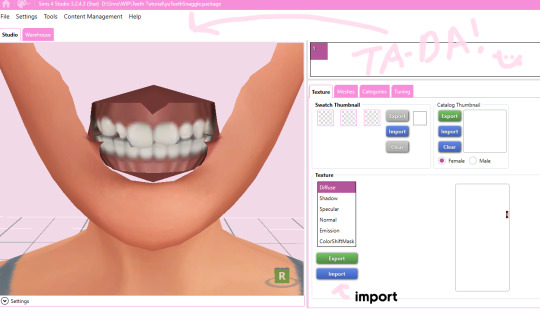
Finally, save your package and you're done! :)
#asks#adelarsims#ceci speaks#tutorial#reference#phewph!#long post#i don't think i missed anything#let me know of any questions!
65 notes
·
View notes
Note
Hi! This is a little weird so feel free to ignore.
But I’ve been trying to figure out how to fix the no texture pp issue with my occult skintones and wicked whims. I saw you commented on one of lamatisse’s asks a few years ago saying it was an easy fix. I was just wondering if you had a tutorial you could share?
If not, no worries and have a great weekend! 🌷
Hello nonny! :) It has been a while since I worked on skintones, I edited a few for personal use & then promptly forgot to finish them (story of my life lol!). Lamatisse's are updated for WW now, but I'll use the old version as an example. I'll share what I know/can remember to help you out! (Also, you may know much of what I talk about here already, but I'm going to speak as if a beginner is reading, so bear with me! :3)
From what I can understand, this issue occurs because custom skintones need to have their texture extended to be compatible with wicked whims. This isn't a difficult fix, mostly just time consuming depending on the amount of skintones you are fixing. Turbodriver has a tutorial about custom skintones here, which I'll be referencing.
As turbo explains in his post, the WW pp texture space is located in the green box circled below:
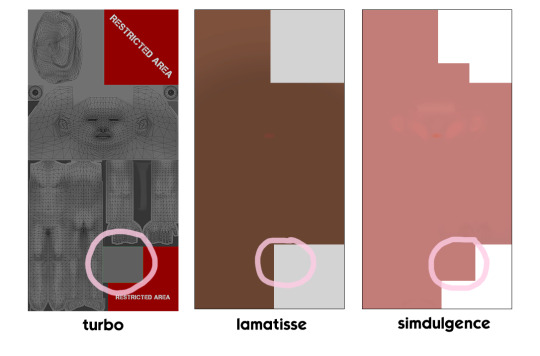
In lamatisse's old skintone texture, there's no color in that spot, making it incompatible- there's just a void texture since the game isn't told any to display on the mesh. Simdulgence's skintones, meanwhile, are compatible because they added that spot. So how do we fix a skintone that's missing it?
Step 1
If you're trying to edit someone else's skintones, there's a couple different ways to get the textures in order to edit them. You can use sims4studio, ts4 skininator, or both. s4studio is handy for seeing the image type quickly (DDS, RLE2, LRLE, etc), but ts4 skininator will automatically update the package when you open it & is generally best for editing skintones. I'll show how to export & import from S4S, but it's a good idea to run the package through skininator and get familiar with how it works, since s4studio can sometimes be wonky/show things differently. I recommend using S4S to take note of the image type & how the package is set up and then working through skininator. From my limited knowledge, skintones are supposed to be LRLE, but I've seen different formats whilst poking around various files, so I'll mention all I've seen. An important detail is that you will have different save settings in Step 5 depending on your image type, so pay careful attention when you're about to save!
Exporting in Sims4Studio:
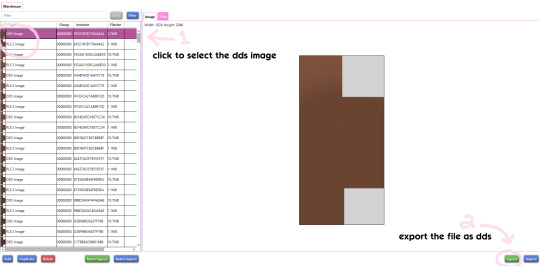
open your skintone package in s4studio, and under the warehouse tab, select the DDS image of your first skintone
export the file as dds & save it where you can find it
Exporting in TS4 Skininator:


open skininator and click the "Cloned Package Editor" tab
click select to choose the package file you want and open it
once the package loads (and updates if needed), click the skintone in the left window
click "skin image" to make another window pop up
in the new window, click "export image" and save the dds file
IMPORTANT: next, download this psd file I made. it has some examples of edited and unedited textures, as well as a couple guides (including turbo's) to help you edit the texture in the right spot. i'll be using the "small guide" in this tutorial.
Step 2

open your dds file you just saved as well as the psd file in photoshop, and select the "small guide" layer in the psd (small blue square)
select all (CTRL + A) and copy (CTRL + C) before going to your dds file and pasting in place (shift + CTRL + V). it'll make a new layer, so rename it to "small guide" by double clicking it so you don't get confused!
note: if your skintone file isn't the same size, the square may go in the wrong place. lamatisse's skintones are 1024 x 2048. you can check image size in photoshop by clicking "image" in the top toolbar and then "image size".
Step 3
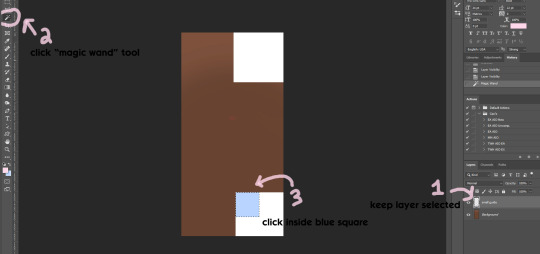
make sure the "small guide" layer is selected
click the "magic wand" tool in the sidebar
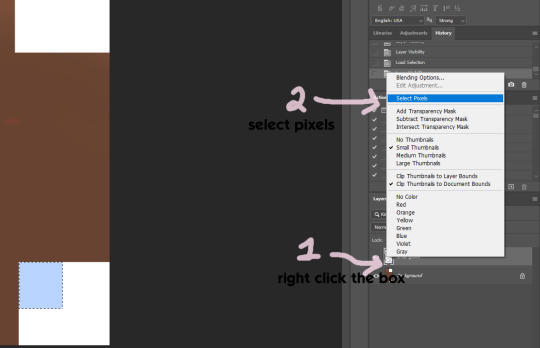
click inside the blue square to select those pixels
note: if you're fancy, you can also right-click the little white box next to the layer name, then click "select pixels" to do this quicker.
Step 4
If you've never worked with dds textures before, you may not know about the alpha channel. what you see when you first open your dds is the color part of the image, aka what you probably expect when you think about a texture. in lamatisse's texture, it is brown- the color of the skintone. and yet, even if you fill in brown where the square turbo described is, it still doesn't show up on the pp in game. that's because of the alpha channel, which manages transparency. if you don't edit this channel, your edits may not show up at all in s4s or in game, which can be very confusing and frustrating!
in the alpha, black = no transparency and white = full transparency. you can use shades of gray for see-through items, but we don't need that right now. we basically just need to change the pp square to white so that our skintone will show up. right now, it is black, which is why the pp just looks like a void in-game. when making a texture, always check the alpha to make sure it lines up with your main texture!

click the "channels" tab next to "layers". you'll see all channels except Alpha 1 (RGB, Red, Green, & Blue) are currently selected.
select the "Alpha 1" layer
make sure your foreground color is pure white (#ffffff)
go to edit -> "fill..."
click "ok" when the window pops up- the square will fill with white!
select "RGB" channel again now that you're done editing the alpha layer and go back to the "layers" tab, so we can fix the color layer next.
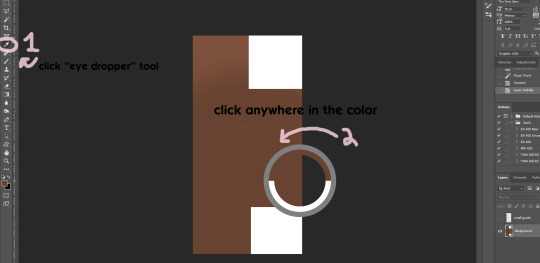

select the "eye dropper" tool
click anywhere in your color to select it/make it your foreground color
repeat Step 3 if your "small guide" square isn't selected anymore
make sure the "background" layer is selected
edit -> "fill" to fill the square with color
IMPORTANT: make sure to hide your "small guide" layer by clicking the eye symbol next to the layer name before saving! otherwise the pp will be blue lol
Step 5

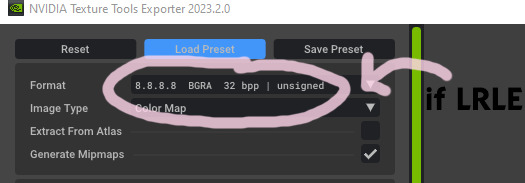
save as (shift + CTRL + s) and make sure the file type is dds (if it doesn't appear, you need a plugin for photoshop- i have the one from nvidia here).
if you have nvidia dds plugin, a window will pop up with a lot of settings. if the image you exported in Step 1 is DDS or RLE2, make sure the format is BC3/DXT5 file compression! (select it from the dropdown window if it isn't) If it was LRLE, it needs to be saved as "8.8.8.8 BGRA" instead.
click save! (I also recommend saving your file as a PSD too for easiness sake later!!!!)
Step 6
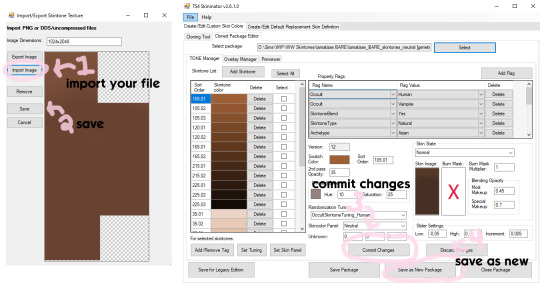
go back into skininator, click "skin image" like you did in Step 1, and import your file in the window that pops up
click save to close the window
click "commit changes" to confirm your changes in that swatch
click "save as new package" to save your progress as a new package file, so you can always go back to the original one if you mess up somehow
and with that, you've finished the first swatch! :) now you just have to go back and do the same thing for the rest of the swatches. however, it should be a bit easier now. if you saved your file as a psd, you just have to keep copying & pasting each exported texture into that same psd file as you go along. you'll need to edit the color layer for each one, but the alpha layer will stay the same each time, so you don't have to keep editing it over and over. continue doing this until all of the skintones are updated, and you're done!
#asks#anonymous#ceci speaks#tutorial#reference#i hope this helps nonny#i don't usually do tutorials & i'm not an expert on skin cc but#i tried this method on a few different packages and it worked well#i just did lamatisse's lore skintones while working out this tutorial if you want those lol
22 notes
·
View notes
Text
yall out here charging for tutorials now??? that's already been posted for free for years??? I-

STOP IT
#ceci speaks#nonsims#text#negative#gif warning#im logging back off!!!#the patreon issue#every time i peek back in its more depressing ahsjdkd
19 notes
·
View notes
Text
me popping in to say hi before I disappear for another few months

Ive been touching so much grass lately smh i bet ive missed so much..... what's tea 👀 what's been going onnnnn i need to know
#ceci speaks#nonsims#delete later#gif warning#im even way behind on discord now sorry yall#lol#pls catch me up on anything interesting thats happened i beg#ill get to my notifs and stuff as i can!!#irl has been distracting and difficult but its slowly getting better#so hoping to get back to sims soon
33 notes
·
View notes
Text
SIMXNDY <- new temporary account!!
I don't know how many of you can read this or are even still alive lol but I've made an alt account. Please follow me in there and only communicate with me in there, as this one will remain as an archive while my issue isn't fixed.
422 notes
·
View notes
Text
Compromised Accounts on SFS
At least two creator accounts on SimFileShare are compromised (SimAndy, TheNinthWaveSim). Downloads may include executable .bat and .exe files (which obviously CC should not!!). For now, consider not downloading from SFS.
892 notes
·
View notes
Note
AxA gets away with making the same crop tops and pairs of jeans for every CC pack and ppl really pay for it wow
the new pack looks really nice to me at first glance but there's a good amount of recycled items in it. by that I mean, a lot of meshes and textures that are from previous packs they've made.


items in the new pack on the left beside older items on the right. The hairs are inexcusable to me. the last one especially, it's literally the same hair as the latest one up for free on his page, just with the hairline moved over slightly. Literally doesn't even need new hair chops.
If it was free I'd have no complaints at all, but AH00B is literally making a minimum of $6,444 a month if all of his 3,222 patrons are there for his $2 early access. And if it wasn't for Ayoshi, it seems, patrons would be getting 3 hairs a month only. Can you imagine making 6K+ a month to make 3 small hair edits?
On that note though... AH00B/Austin has had me blocked since I answered this ask yesterday, saying that no one would call him out for still doing early access when it seemed EA had banned it (for fear of getting hate or blocked), without me ever interacting with him otherwise. Ironic, I know. Which was extra strange because Ayoshi and I were having a long conversation about clearing the air regarding the early access situation, and in the middle of that I realized I was blocked. I sat on it a bit, because I have to say that Ayoshi was extremely patient in his conversation with me and I truly believe he wanted to have a genuine discussion. But he is not the owner of the patreon and all the responsibility does not lie with him. Even if they are best friends, Ayoshi is not the one that should be handling this for him. And since then, Austin still has not unblocked me or made any move to indicate that he wants to discuss this with anyone or hear any sort of criticism. He has no obligation to speak with me or anyone else, but I can't understand how the air can be cleared if everyone involved isn't willing to communicate with one another, and Ayoshi was the one to reach out to me rather than the other way around.
I understand having anxiety and not wanting to be criticized. But this isn't drama. These people are running businesses, with a good amount of cash involved, but not wanting to actually manage their business. Business owners need to put out statements and hold high standards to match that of their customers, and if they don't, what happens? They go under. Even if the community itself doesn't matter to you, a time comes when you have to put your big boy pants on and do something to at least protect your income. Either by changing your model and actions or looking for another job. If EA's latest flip flopping made you panic, good. As I said in the DMs, it should be a wake-up call. And if getting criticism against your business is causing you such unrest and anxiety that you cannot eat, sleep, or function properly, you need to pause your patreon and cc making and seek help for you mental health immediately. If that's not the case, and you're still able to function here, you need to get a handle on your business.
I don't see Austin or any of the other top cc creators saying a word about any of the problems with early access, not even to call out the "bad ones" they like to point to so often to deflect from themselves. Within the past couple days, eacc creators have been sharing patron's personal information and setting crazy long "reasonable" time periods, and I haven't heard a word from any of them about it. Why? It doesn't matter to them. The community doesn't matter to them. Just like it didn't when exclusive creators were doxxing and harassing and all any eacc creator could do was say, "well that's awful, but I'm not like that, don't forget early access is okay and we're not scammers". They got more angry about someone making a list of everyone that was continuing early access, which was publicly available on each of their blogs, than they did about the list of patrons' private information being passed around. All that's important is avoiding criticism and protecting their bottom line, and it shows every time something like this happens.
It honestly makes me sad. Many of the creators that have acted the way we've seen in the past few days, are ones I previously admired. AH00B is a creator that I've downloaded almost all the cc of, and his hairs were some of the first I recolored when I first started making cc. I use his and Ayoshi's clothing often in lookbooks. But because I expressed disappointment in him and others over early access, I'm considered a hater that needs to be blocked and silenced. Sorry, but that doesn't work for me. If we can't speak privately, I have to at least make my thoughts known on my own blog.
I don't think users are getting anything better from him now that he's getting paid, than they were when he was creating for free. The content is repeatedly recycled, and not worth paying for in my opinion. There is no engagement with anyone here other than to promote patreon. I don't think he's an active member of this community whatsoever, and like I said in the DMs: these creators are not people I can consider friends or peers anymore. AH00B is not a simblr, it's a brand. Its only purpose here is to make money and nothing else. And because of that, I can no longer support it.
I highly recommend giving the [deleted] a read, because I express more of my thoughts on early access and its effect on the community there. I have no ill will towards Ayoshi or Austin, but I hope that they realize the community is tired of all this. It's been drained dry, and whether any of these creators want to believe it or not, it isn't going to last much longer.
Edit: Ayoshi asked me to remove the conversation between us, so the links have been removed.
#ceci speaks#long post#the patreon issue#negative#I FOUND IT#can yall believe this is the post that got me jumped by okrue stans 💀#reading it again i was kinda shocked cos it seems really tame looking back#in my memory i thought i MUST have cursed one of em out in this or something but wow no#thats wild#not me cartoon villainizing MYSELF atp jajajaja#ok ill go now#thank reddit for reminding me of this 😂
492 notes
·
View notes
Text
when I'm browsing reddit and see a post about ah00b reusing mesh parts from other packs for his kit... yall i could've told u that would happen lol

#ceci speaks#nonsims#text#negative#the patreon issue#did yall know my post about him reusing items in multiple of his early access packs was like the first thing#that ever made a whoooole bunch of big ppl angry at me lol#that was like my first chain block ever#and i got like 100+ anons after one of his friends vague posted me over it#only real yoon goons remember 😂#i gotta see if i can find that post#but yea dang#thats embarassing ngl
37 notes
·
View notes
Text
I have finally obtained the one thing that is sure to strike fear into every enemy that stalks my page......

KPOP MINION 😱
the combination of the two things they hate the most... nothing bad will ever happen here from now on 😌
15 notes
·
View notes
Text

me every time I come back to sims after being away again (I forget how absolutely everything works) 😵💫
How have yall been? I just got finished up moving house (its been a looong few months) and kinda still picking up the pieces after another loss in the family. My phone also broke and it took a few weeks to get it fixed so i didn't check here at all then. I'm just now getting to where I have a little time for extra things, though I'm still organizing a lot lol. I played a bit of inzoi (let's say, a friend's copy...) and it made me want to play sims again 😂 I still need to finish up my sims 3 modding (got cut off halfway through by Life... lol) so maybe I'll get to play that soon. Otherwise I'm gonna jump back into my wips for the thousandth time. What about you guys? Are you playing inzoi or do you still prefer the sims? Or both? I'm curious... 🤔
12 notes
·
View notes
Note
Hello! I'm not sure if it's against your TOU but a creator by the name of RolandSimmer used one of your teeth sets on a sim that's locked behind a perma paywall and the only way to access the cc list is by giving the creator money with no mention of your cc being used unless you pay for it. I believe the sim is named Laguna. Please spread the word to other cc creators that he's stealing their work!
Hi nonny, yes this is against my TOU and a scummy thing for people to do in general! Thanks for letting me know. Also, it's a bad idea to download sims like these because I doubt the creators care about making sure the cc is up to date, and I've updated my teeth files several times to avoid the bugs EA introduced with teeth over the years. This can also be an issue with eyes, skins, defaults etc because of how often EA changes things. So not only are these creators charging for other people's work, you could also be paying for broken cc! 😨
18 notes
·
View notes
Text
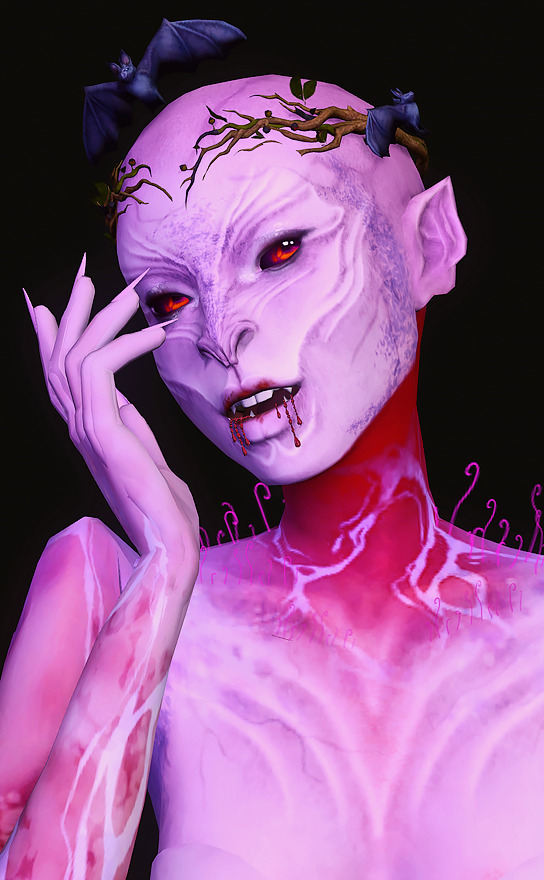


Plasma Fruit
For @j3lly-fish's Create a Plant Cas Challenge. I wanted a little nod to the fact that originally Plasma Fruit used to be red and it changed for the Sims 4 so we ended up with blood under the surface ever shifting and ready to be fed on by the local vampire bats.
CC ↓
skintone ● skin details ● shoulders ● overlay 2 3 ● gradient ● veins ● body highlight ● nose ● eyes ● teeth ● ears ● eyeshadow ● eyeliner ● lips ● lip piercing ● branches 2 ● dress ● nails ● mycelium ● bats
Thank you to all the CC creators!
@regina-raven @pralinesims @satterlly @ssspringroll j3lly-fish @yooniesim @pictureamoebae @pyxiidis @auralixx @evilquinzel @nv-games @lady-moriel @dizzyrobinsims @octetsica @evoxyr @grimmbats
#reblogs#hwedhel#other people's edits#just popped in for the first time in a while and saw this awesome sim!#so i had to reblog#very cool!!!#using my cc#thought they were a nossie at first#very fitting
238 notes
·
View notes
Text


Marie McKinney
(cc links below!!!)
______________________________
Skin overlay by @obscurus-sims 💖
Heart shaped moles by peachyfaerie (can't link it because she has deactivated her social media accounts)
Lip preset by @angissi 💖
Nose preset by @northernsiberiawinds 💖
Eyes preset by @stretchskeleton 💖
Teeth by @yooniesim 💖
Eyes by @simsenshi 💖
Eyebrows by @asansan3 💖
Eyelashes by @dream-girl 💖
Eyeshadow by @eunosims 💖
Eyeliner by @magbay 💖
Blush by @twisted-cat 💖
Lipstick by @remussirion 💖
Hair by @cazhan 💖
Dress by @atomiclight 💖
Tights by @kumikya 💖
Shoes with legwarmers by @jius-sims 💖
Nails by SHOP ACE 💖
Kuromi choker by PYX (CAN'T FIND THE LINK 😭)
My Melody background CAS by @cutesheepmie 💖
__________________________
(in game cc links!!!)
Bed (including the set) by @kirikasims 💖
Pose by @l3--00 💖
Miffy plumbob by @jelliberri 💖 (I KNOW IT DOESN'T SHOW IN THE THIRD PIC BUT JUST WANT TO LINK IT IN CASE IF Y'ALL WANT A REPLACEMENT FOR THE DEFAULT PLUMBOB :3)
__________________________
That's it and I hope you like my sim!!! Thanks so much to all cc creators 🫶🏻
#reblogs#gojossotoru#other people's lookbooks#using my cc#omg cyoooooot#im in love#also love ur pfp lol
39 notes
·
View notes
Text
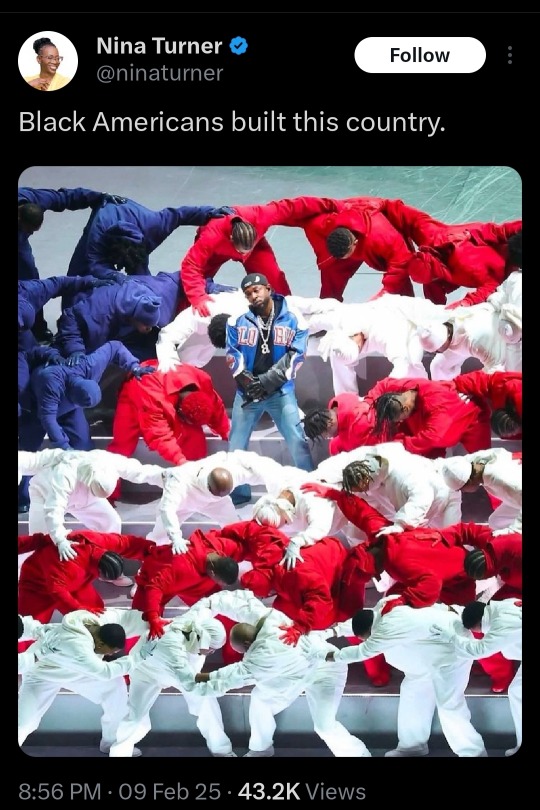

What a time to be alive.
Happy Black History Month to all and to all a good night ❤️🖤💚
62K notes
·
View notes