#Samyang 12mm Lens
Text
THERE ARE TWO TRAIN STATIONS IN LEIXLIP AND I USED BOTH TODAY
Confey is a townland in the civil parish of Leixlip, County Kildare, Ireland. It is located on the Royal Canal, about 3 kilometers (1.9 mi) southeast of Leixlip town centre.
THIS ONE IS CONFEY
Confey is a townland in the civil parish of Leixlip, County Kildare, Ireland. It is located on the Royal Canal, about 3 kilometers (1.9 mi) southeast of Leixlip town centre.
The Battle of Confey or Cenn Fuait was a battle fought in Ireland in 917 between the Vikings of Dublin and the Irish King of Leinster, Augaire mac Ailella. It led to the recapture of Dublin by the Norse…

View On WordPress
#confey#County Kildare#Fotonique#FX30#Infomatique#Intel is located nearby#Ireland#Leiklip#One Of Two Stations In Leixlip#Public Transport#Railway Station#Royal Canal#Samyang 12mm Lens#Sony#Train#William Murphy
1 note
·
View note
Text

Midday at the pond. August 2024.
Fujifilm X-T50 with Samyang 12mm f/2 lens.
#yzshot#travel#america#new england#massachusetts#fujifilm#clouds#nature#naturecore#summer#pond#lily pads#flowers#lake#reflection#ripples#fujifilm x series#fujifilm xt50#photography#photographers on tumblr#original photography on tumblr#original photogrpahy
35 notes
·
View notes
Text

perspective
@ hyman_roger
Milky Way from my back garden in SW England. Fuji XPro-2 with 12mm Samyang lens at f2.0. Exposure 13 seconds at 3200 iso. @MoonHourSocial #Astrophotography
8.1.24 • 8:51pm • X
0 notes
Link
Check out this listing I just added to my Poshmark closet: Samyang AF 12mm f/2 - Sony E Fit Includes Case and Cover.
0 notes
Text
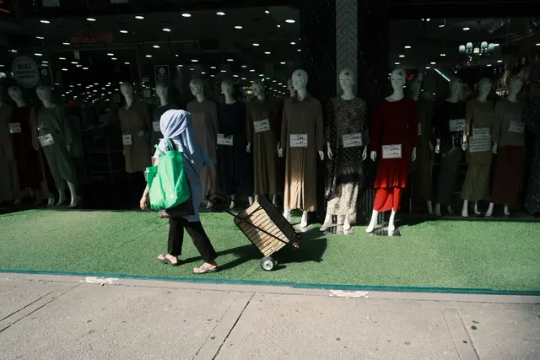
Best Street Photography in Kuala Lumpur Photo Collection #2
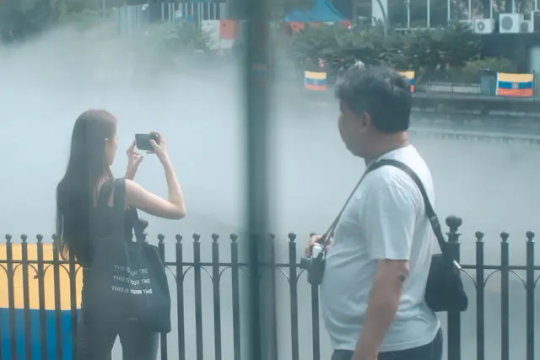
Exploring street photography in Kuala Lumpur and walking through the busy streets with my camera, here I handpicked the best moments to share in this 2024 series. I roamed from the lively Chinatown KL to the cultural richness of Masjid India, the tranquil Thean Hou Temple, and the scenic wonders of Genting Highlands with my friend Dom – capturing both indoor and outdoor scenes. My tools of choice were the Samyang 12mm f2 and the beloved SIRUI Sniper 23mm f1.2 lenses for the Fujifilm X-Mount.Using wide-angle lenses posed a challenge when transitioning from expansive views to close-up shots. To simplify, I mostly relied on Aperture Priority mode, letting the camera handle settings like ISO and shutter speed, except for tricky situations like capturing fast movements or handling harsh sunlight.Previously, I shared my experiences with the Samyang lens during adventures in Pudu and Chinatown KL. I'm drawn to creating visually appealing compositions using leading lines, and I experimented with Fujifilm settings like Teal Obscure and Neon Obscura, avoiding extensive post-processing as I shot in SOOC JPEG.Beyond the technicalities, street photography is a delightful way to express creativity. Trying out different lenses allows me to discover unique moments on the streets and observe how each lens captures the essence of Kuala Lumpur. It's an enjoyable exploration, each photograph telling a story of the city's vibrant life through my lens.
Shooting in Low-Light, Indoor Street Photography. What?
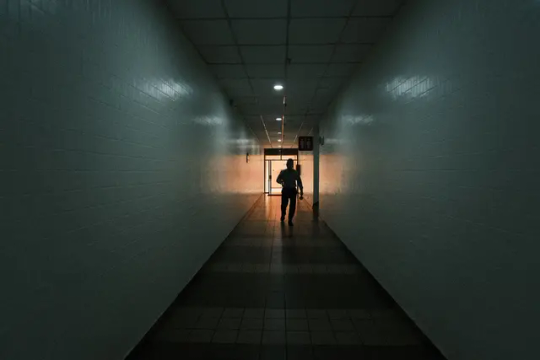
Fujifilm X-T4 - Pudu KL // January 2024
I enjoy taking pictures in low light using my SIRUI Sniper 23mm f1.2, especially when I'm indoors. It allows me to experiment with my Fujifilm film simulation settings, creating some cool effects. Even though I'm not an expert in street photography in Kuala Lumpur, I love searching for interesting moments. Typically, I only end up with 2 or 3 good photos out of 200, but that's what makes it enjoyable for me. Every time I go out to Kuala Lumpur for street photography, I'm still learning.Using the SIRUI Sniper 23mm f1.2 can be a bit challenging for me. Sometimes, the view is too wide unless I get close to my subjects. It depends on the scene I'm capturing. Despite the challenges, it adds a bit of excitement and unpredictability to my street photography adventures in Kuala Lumpur.I tried something new with my SIRUI Sniper 23mm f1.2 lens – I took neon light portraits in the dark. The results were amazing! The colorful glow from the neon lights made the pictures look cool and exciting. The way the shadows and lights played together, along with the lens's wide aperture, helped create awesome and unforgettable photos. It was a fun experiment that showed how creative you can get with the SIRUI Sniper lens. I'm looking forward to trying more cool photo ideas soon!
Shooting Street Photography in Kuala Lumpur With Telephoto Lens
Fujifilm X-T4 - Thean Hou Temple KL // January 2024
Exploring street photography in Kuala Lumpur with a telephoto lens was a completely new experience for me, and I must say, it was a lot of fun! What I found most enjoyable was the convenience that comes with using a telephoto lens. It makes capturing shots from a distance a breeze, eliminating the need to get up close and personal with strangers. This not only makes composition easier but also ensures I can capture the exact shot I have in mind without any awkward encounters.One of the perks I discovered was the reduced anxiety about approaching potentially unfriendly-looking individuals. As an INFJ-T, I tend to be a bit reserved, and the telephoto lens provided a comforting buffer. I could capture intriguing moments without feeling the need to intrude into someone's personal space or risk awkward glances from passersby. It allowed me to observe and document without becoming the center of attention.However, as much as I enjoyed the convenience of the telephoto lens, I still have a soft spot for shooting with my prime lenses up close. There's a different level of intimacy and connection when you're right there in the midst of the action. So, while the telephoto lens opened up new possibilities and made the process less intimidating, I find joy in both approaches, each offering its own unique perspective on the vibrant streets of Kuala Lumpur.
Petaling Street - Street Photography in Kuala Lumpur
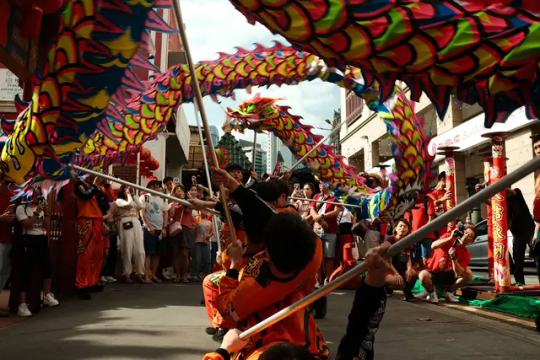
Fujifilm X-T4 // SIRUI Sniper 23mm f1.2 // YOLO Vision recipe
I took this picture on the second day of Chinese New Year in 2024, and I love it. The background was a bit busy, but I enjoyed how the 'dragon dancers' lying down—if that's what they're called—were swinging the pole, creating the illusion of the dragon moving quickly. The people in the middle, looking amazed, add to the magic of the moment, making this one of my favorite photos from this year. I used the SIRUI Sniper 23mm at f8 to capture this photo, and the lighting at that moment was just perfect!This is where I usually go – exploring Petaling Street almost every weekend to capture moments. Just a reminder, I'm no expert, and I often face challenges whenever I'm out on the street. LOL! Petaling Street is widely recognized as one of the best street photography locations in Kuala Lumpur. It's a fantastic spot to capture vibrant moments. Plus, you're likely to meet and make new friends while exploring this iconic street.I've been taking pictures at Petaling Street since 2020, and you know what? I can't say if my street photography has gotten better or not. Maybe a bit, maybe not at all. What I do know is the basic techniques, which is useful for shooting street photography in Kuala Lumpur like how to frame a shot, use the rule of thirds, and all that. These things help me take what I think are good photos, at least in my own opinion.
Exploring Masjid India - Street Photography in Kuala Lumpur
Fujifilm X-T4 - Masjid India KL // January 2024
I decided to extensively explore every nook and cranny of the hidden areas in Masjid India. Capturing photos here posed a significant challenge for me, shooting face to face with subjects, only works if you are brave enough or use the fishing techniques—a recent trend in the street photography Malaysia community.Interestingly, I have yet to try using this street photography technique in Kuala Lumpur due to the scorching weather and my attempt to avoid sunburn. LOL! So far, I've only experimented with this technique at the Thean Hou Temple. This approach adds a unique perspective to my street photography adventures, and I'm excited to continue experimenting with it in the future.
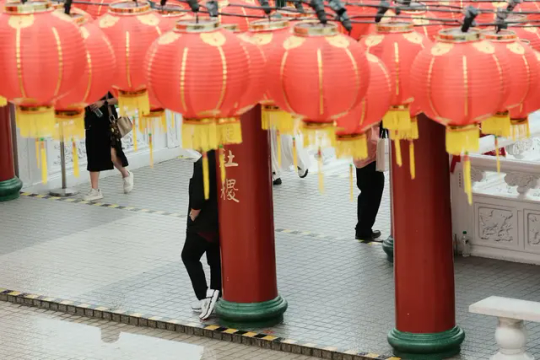
'Camping & Fishing' At The Thean Hou Temple in Kuala Lumpur
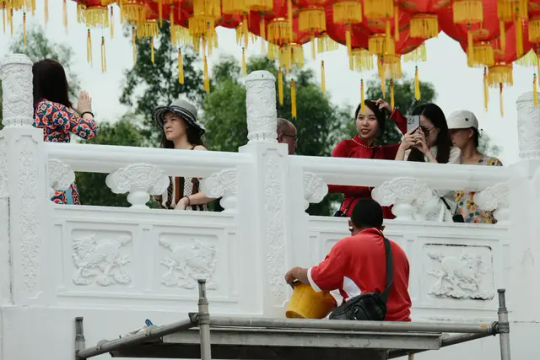
Fujifilm X-T4 - Thean Hou Temple KL // January 2024
I'm considering introducing a new topic on street photography fishing techniques in my blog soon, complete with some sample photos, of course. Well again, I'm no expert, I'll just write what I have experienced. But before diving into that, let me share my camping and fishing experience at the Thean Hou Temple for capturing some amazing shots. I spent about 2-3 hours there, camping out to make the most of my Fujinon XC50-230mm telephoto lens. It was a unique adventure, and the results were well worth the time spent.There are numerous 'camping spots,' whether positioned below or above, that provide ample opportunities to employ this technique at the location. The use of a telephoto lens further simplifies the process, allowing for easy zooming from a distance without causing any disturbance to others. This approach not only offers a unique perspective but also ensures the capture of candid moments without intruding on the natural flow of the surroundings.
Conclusion

Shot with Ricoh GR III
Wow! Such a great experience so far. I got to try out the Ricoh GR III for street photography in Kuala Lumpur, and I got some cool shots! It was mostly luck and timing. I called it one of the best street photography cameras. LOL! Don't you think? For a first-timer trying street photography with the Ricoh GR III, it was challenging, and you might end up with a bunch of snapshots like I did!In conclusion, this journey through Kuala Lumpur's vibrant streets has been a delightful exploration of moments captured through my lens. From the lively Chinatown KL to the cultural richness of Masjid India, the tranquil Thien Hou Temple, and the scenic wonders of Genting Highlands, each location brought a unique charm to the series.The choice of lenses, such as the Samyang 12mm f2 and the SIRUI Sniper 23mm f1.2, added a technical layer to the creative process. Overcoming challenges, particularly with wide-angle lenses and experimenting with various Fujifilm settings, further enriched the storytelling aspect of the photographs.Engaging in street photography in Kuala Lumpur, whether with the SIRUI Sniper 23mm f1.2, a telephoto lens, or the Ricoh GR III, presented different perspectives and challenges. From low-light shots to neon light experiments, each endeavor contributed to the diversity of the collection.
Fujifilm X-T4 - Pasar Karat KL // January 2024
To enhance your street photography skills, consider enrolling in online courses, drawing inspiration from the best street photography photo books, and hitting the streets to capture more moments. Online photography courses provide valuable insights and techniques, while photo books offer a visual feast of diverse styles. However, the most significant growth comes from hands-on experience, so get out there, observe, and shoot to refine your craft and develop a unique perspective.While the learning curve was evident, whether using a telephoto lens for distance shots or facing the unpredictability of a wide-angle lens, each experience added a layer of excitement to the street photography journey. The spontaneity and unpredictability became integral elements, fostering a connection between the lens and the lively streets of Kuala Lumpur.Despite the technical aspects and varied lens experiments, at its core, street photography remained an avenue for expressing creativity. Whether shooting up close or from a distance, the essence of capturing unique moments and stories unfolded naturally.Reflecting on Petaling Street, a renowned location for the best street photography in Kuala Lumpur, the journey continued. While acknowledging personal growth in basic techniques, the heart of the matter remained the enjoyment of capturing moments. The challenges faced in each shot, the excitement of trying new lenses, and the exploration of different settings encapsulated the joy found in the art of street photography.As the photographic journey unfolds, it becomes a testament to the evolving connection between the photographer and the vibrant life of Kuala Lumpur's streets. Each photograph encapsulates a story, a moment frozen in time, and a reflection of the photographer's unique perspective on the dynamic tapestry of the city's life.
Fujifilm X-T4 - Chinatown KL // January 2024
Read the full article
0 notes
Text
youtube
2 weeks in Italy a cinematic travel film Salim Lonard 2023. So we went back to Italy which is my favorite place in the whole world. Love the mix between classic narrow roads and majestic mountains, and there are so many new things to explore every time. And of course, it's a paradise for anyone with a camera - so I hope you enjoy this little travel recap, and if you like it, please like this video and consider subscribing.
Subscribe to my channel to stay tuned;@DMmahfuz14318
italy is the best Gear we use for our videos: Best Zoom lens - Tamron 17-70 2.8 - https://amzn.to/2OtPJQ2 Main workhorse - Sony A6500 - https://amzn.to/3dD8qe7 Best Portrait lens - Sigma 30mm 1.4 - https://amzn.to/39KjTFY Best Wide Angle - Sigma 16mm 1.4 - https://amzn.to/2PVFKDo Best ULTRA wide angle lens - Samyang 12mm 2.0 - https://amzn.to/3dHtuyD Sony 85mm 1.8 - https://amzn.to/3upEtDn Sony A6300 / A6500 Cage - https://amzn.to/3dBRyCU Gimbal - Zhiyun Weebill-S - https://amzn.to/3uso4OM Drone - Mavic 2 Pro - https://amzn.to/3uqDQcL
In the charming streets of Rome, the film unfolds, capturing the essence of Italy's rich history and vibrant culture. From the Colosseum's grandeur to the quaint alleys of Florence, each frame tells a tale of art and romance. As the camera pans across the
vineyards of Tuscany, viewers are transported to a world where sunsets dance on rolling hills. In Venice, gondolas glide through canals, mirroring the timeless beauty of this cinematic journey through Italy's heart and soul.
#weeks in italy#italy travel tips#2 weeks in italy a cinematic travel film#travel italy vlog 2023#cinematic travel film tutorial#cinematic travel film italy#how much should I budget for 2 weeks in Italy#places to see in italy#how can I see the most of Italy in 2 weeks#cinematic travel films#how to create travel videos#topten italy in place#Youtube
0 notes
Text

Coolum beach, Qld, Australia.
Here's a picture of the Milky way I shot last year around June that I haven't shared before which I'm not sure why haha.
I shot the sky with my Skywatcher Star Adventurer tracker and stacked 15 frames in sequator and then I shot a long exposure image for the foreground and blended them together in Photoshop and used Photoshop and Lightroom to do the final edits.
Sky: 15 frames stacked.
Iso-640 I f2.8 I 2mins I 12mm
Foreground: Single exposure.
Iso-1000 I f2.8 I 2mins I 12mm
Fujifilm X-T3
Samyang 12mm lens
Skywatcher Star Adventurer
No filters.
0 notes
Text
Testing the Samyang 12mm F2 lens on Kilve beach

View On WordPress
0 notes
Link
The Rokinon 12mm T2.2 Cine Lens for Micro Four Thirds Mount is a wide-angle lens optimized for digital cinematography. The lens produces an image circle that will cover APS-C sized sensors or smaller. For use with a follow focus unit, the focus and aperture rings feature industry-standard 0.8 pitch gearing. The aperture ring is also de-clicked to allow for smooth iris pulls while shooting. Focus, aperture, and depth of field markings are on the side of the lens to aid focus pullers, who typically operates on the side of the camera.
0 notes
Text
THE INTERIOR OF ST PATRICK'S CATHOLIC CHURCH IN RINGSEND
I entered into this church from Thorncastle Street which features a complex of flats designed by Herbert G Simms.
16 AUGUST 2023
I entered into this church from Thorncastle Street which features a complex of flats designed by Herbert G Simms.
There were two people inside but they immediately left which is a pity because I do not like disturbing people at prayer.
The name Thorncastle dates back to the 1200s, when the Fitzwilliams granted land to their ally, Walter de Ridelford the Lord of Bray. On this…

View On WordPress
#12mm lens#Dublin#Fotonique#FX30#Herbert G Simms#Infomatique#interior#Ireland#religion#ringsend#Roman Catholic church#Samyang#Sony#St Patrick&039;s Church#Thorncastle Street#William Murphy
0 notes
Text


The incredible pastel colors of the Dead Sea.
Spring 2022.
Shot with a Fujifilm X-T20 with Samyang 12mm F/2.0 lens.
#yzshot#travel#israel#the Dead Sea#dead sea#judean desert#pastel#pastel colors#original photographers#photographers on tumblr#fujifilm#fuji xt20#fujixseries#samyang
8 notes
·
View notes
Photo

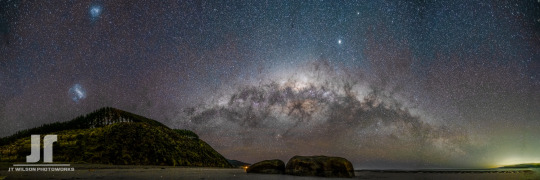

The JarredSpec Introduction to Milkyway Landscape Photography for beginners. Part I: Gear!
This is a series of posts i’ll be posting over on Patreon and my Website over the next few weeks. Patrons get them a week earlier than anyone else :)
Part II coming Next week!
If you’ve been following me for the past few years you’ll have noticed that I do enjoy going out at ridiculous times of night in the freezing cold to point my camera at the stars. The shot above is from my first real attempt at deliberately shooting the Milkyway.So. With the intent of going out this season and dragging a few people out with me, I thought i’d write a quick blog post covering what gear you need (plus some gear that makes the job easier), the basics of shooting and some basic tips on composition.
GEAR
MUST HAVES:
An interchangeable lens camera and a wide angle lens. Not saying that this sort of stuff can’t be done with point and shoots to some extent and even smartphones these days, but we’re going to start with people who have already invested in some dedicated photography gear. The lens ideally should be wide angle and have a maximum aperture of f/3.5 or faster at its widest focal length. This is still not ideal, but I’m aiming this at beginners who most likely have an 18-55mm kit lens with their camera.
Tripod: This is a must. Shooting the milkyway comes under the umbrella of “Long Exposure Photography” and as we will be having our shutters open for up to and sometimes longer than 30 seconds, the camera needs to be held in place without it being able to be shaken. I use the Sirui AM-254 with A10R Ballhead - a fantastic sub $500NZD Carbon Fibre tripod. Look forward to a Youtube video with an overview of this guy!
WARM CLOTHES. You’re going out at night, probably in winter. No ones needs to bring Hypothermia home along with their epic Milkyway shot.Editing Software: To bring the best out of the Milkyway, we will be shooting RAW and processing the Image. Adobe Lightroom and Photoshop are probably the most popular editing tools worldwide and are what I use to edit all of my images. Worth the purchase!
BONUS EQUIPMENT:
A remote shutter release. These are handy to make sure you don’t introduce and camera shake while you’re pressing the shutter button, and to allow precise shutter durations in bulb mode. Sometimes a lens might be optimal at something like 19 seconds, and your camera might only have 15sec and 20sec available to select while in manual mode. Setting it to the longer might introduce unacceptable levels of star movement. I use an old school Cable release with my Fujifilm X-T4, but if you shoot with any other main brands you can probably get your hands on a wireless remote if you shoot Canon, Nikon or Sony
A fast, wide angle lens. When we describe a lens as “fast” were are speaking about its maximum aperture. A “fast” lens will generally have an aperture of f/2.8 or larger (remember, the lower the “f/X.X” number, the wider/larger the aperture). Fast wide angle lenses usually don’t come cheap, especially from the main camera companies themselves. Thankfully third party options are out there and offer fantastic value while performing very well. Tokina and Samyang are notable examples of this. If you shooting Nikon or Canon Id recommend looking at the Samyang 14mm f/2.8 or the Tokina 11-20mm f/2.8 (or its older version, the 11-16mm f2/8 on the second hand market). If shooting Fujifilm or Sony the Samyang 12mm f2.0 is fantastic and is currently my chosen lens. Caveat: The Samyang lenses are manual focus only, something to consider if you intend on using the lens for anything other than Astrolandscapes.
A Light pollution filter. This is bottom of the list. Not even slightly necessary to shoot the Milkyway, but at times can be handy to filter out the spectrum of light cities tend to produce. These are becoming less and less useful as the world moves more towards LED lighting. Up until recently I have been using a Hoya RA54 “Red Enhancer/Intensifier” but have since moved to a Kase Clip in “Neutral Night” filter via Meghan Maloney Photography here in NZ. These are nifty lil suckers - look forward to a video on this guy too. Stay tuned for Part II where we talk about planning, composition and shooting! Comment below with any further questions you might have and ill do my best to answer them!
#milkyway#milkyway photography#photographers of new zealand#photographers on tumblr#astrophotography#dark skies#night skies#join my patreon#landscape photography#new zealand
5 notes
·
View notes
Text
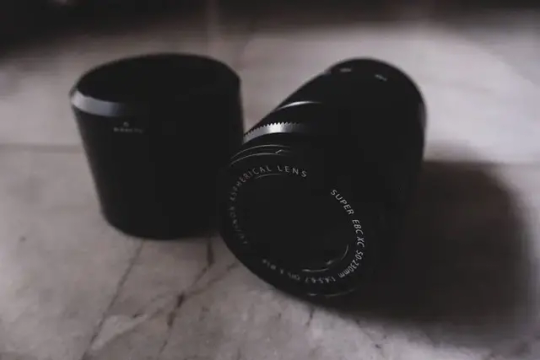
Samyang 12mm f2 X-Mount AF Lens Review

IvanYolo
Having had the privilege to loan the Samyang 12mm lens for Fuji X-mount, thanks to Dominic from Futuromic Photo AV. I embarked on a photographic exploration through the vibrant urban landscapes of Kuala Lumpur and the scenic elevations of Genting Highlands. This lens proved to be a versatile companion, effortlessly capturing the essence of various photography genres, including street photography, landscape shots, architectural geometry, and compositions with compelling leading lines.The 12mm f2 Samyang fuji lens, with its focal length and wide aperture, showcased its capabilities across diverse scenarios. From the bustling streets of Kuala Lumpur, where it adeptly framed candid moments in street photography, to the sweeping vistas of Genting Highlands, where its wide-angle perspective brought out the grandeur of the mountainous terrain, the lens excelled in delivering impressive results.Whether I aimed to encapsulate the intricate details of urban architecture, and the sprawling landscapes of Genting Highlands or sought to emphasize the visual impact of geometric patterns, the Samyang 12mm lens matched with the Fujifilm X-T4 consistently demonstrated its ability to meet the demands of different photographic styles. Its performance in capturing leading lines, an essential element in composition, further solidified its reputation as a reliable and effective tool for creative expression.In this journey through two distinctive locations, the Samyang 12mm lens emerged as more than just a piece of gear; it became a conduit for visual storytelling, offering a seamless blend of optical excellence and creative flexibility. The following exploration delves deeper into the lens's specific attributes, its application in astrophotography, the art of mastering manual focus, and a comparative analysis with other wide-angle lenses for Fuji X-mount—a comprehensive guide for those seeking to harness the full potential of the Samyang 12mm lens.
The Wide-Angle Samyang 12mm f2 Lens
The Samyang 12mm f/2 lens for Fuji X-mount cameras is popular among photographers seeking a wide-angle perspective and a large aperture. With a focal length of 12mm and a maximum aperture of f/2, this lens is well-suited for various photographic applications.One notable characteristic of Samyang lenses, including the 12mm f/2, is their manual focus design. Users need to adjust the focus manually, which can benefit those who prefer precise control over their focus settings. The lens typically incorporates multiple elements arranged in various groups, contributing to its ability to deliver sharp and distortion-free images.In terms of build quality, Samyang lenses are known for their robust construction, often featuring a durable metal build. This sturdiness contributes to the overall reliability of the lens, making it suitable for outdoor and challenging shooting conditions. The Samyang 12mm lens has a 62mm filter thread size. If you want to use filters, make sure to get ones of this size, or use a special size adapter called a step-up ring.The Samyang 12mm f/2 is designed for Fuji X-mount cameras, ensuring compatibility with Fuji's X-series mirrorless cameras. This lens is particularly favored by photographers engaged in landscape photography, architectural photography, and astrophotography due to its wide-angle perspective and the f/2 aperture, which excels in capturing low-light scenes.
Pros
Compact & Lightweight: The Samyang 12mm for X-Mount is a fantastic lens that boasts a wide range of features which make it a top choice for photographers. One of the key advantages of the lens is its excellent autofocus, which ensures that shots are always in focus. Additionally, the lens is lightweight and compact, making it easy to carry around and use for extended periods of time.Sharp Images: Whether you're hiking to get the perfect shot, or just out for a casual day of photography, this lens won't weigh you down. Finally, the resulting images are incredibly sharp, with stunning detail that will impress even the pickiest of viewers.Weather-sealed: This outstanding lens has been crafted to withstand tough weather conditions, ensuring you can capture remarkable photographs in even the most challenging environments. The 12mm F2 lens boasts a remarkable angle-of-view range that is on par with the capabilities of an 18mm optic in a 35mm full-frame system, providing you with unmatched flexibility in your photography endeavors.You can now effortlessly explore the most beautiful sceneries, even in the most cramped spaces, thanks to this lens's unique constructions.
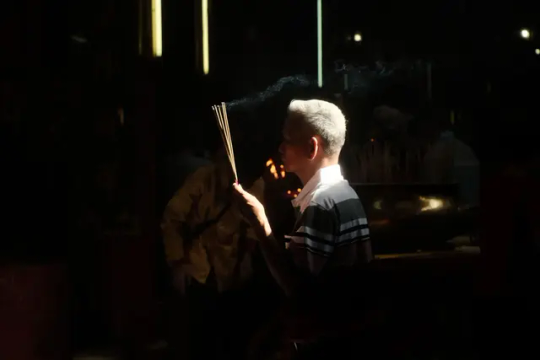
Embracing the Grandeur of Landscapes at Chin Swee Temple

Fujifilm X-T4 // Samyang 12mm f2
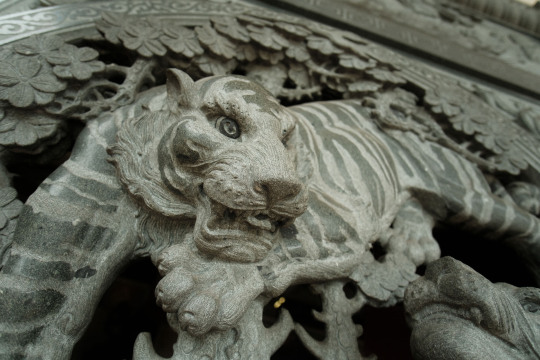
I was back in Chin Swee Temple to test out this wide-angle Samyang lens with the upcoming 4-in-1 YOLO film recipe. Nestled amidst the hills of Genting Highlands, Chin Swee Temple emerges as a serene architectural marvel. The Samyang 12mm lens allows me to capture the temple's intricate details while embracing the surrounding landscape. By framing the temple against the vastness of the hills, photographers can emphasize the harmonious coexistence of spiritual and natural elements. The wide-angle perspective ensures that every architectural nuance, from the ornate decorations to the temple's silhouette against the sky, is impeccably captured.The scenic expanse of Genting Highlands, with its lush greenery and rolling hills, presents an idyllic canvas for landscape photographers wielding the Samyang 12mm lens. As the lens captures the essence of this high-altitude retreat, photographers can stand amidst the serenity of the elevated terrain, using the 12mm focal length to unfold panoramic vistas with unparalleled clarity and detail. This lens becomes an extension of the photographer's vision, translating the tranquility of the Genting Highlands into images that evoke a sense of peaceful escape.
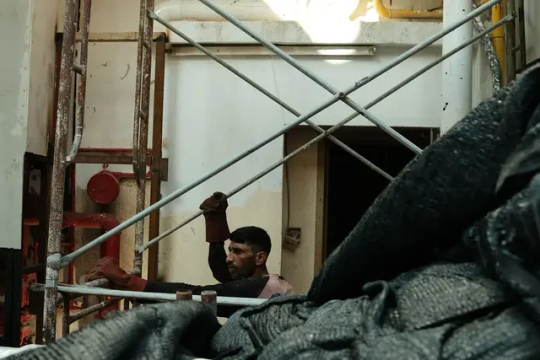
Unveiling Urban Symmetry in the Pudu Area
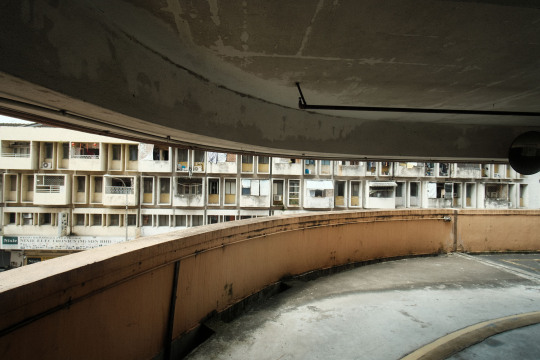
Fujifilm X-T4 // Samyang 12mm f2
In the realm of architectural photography, where a keen eye for composition is paramount, the Samyang 12mm lens emerges as an indispensable ally for photographers seeking to reveal the captivating intricacies of urban landscapes. This lens excels in accentuating the bold lines, patterns, and symmetries inherent in modern structures, historical landmarks, and bustling cityscapes, providing a canvas for photographers to craft visually compelling and harmonious images.Pudu, an area brimming with urban vibrancy in Kuala Lumpur, becomes an intriguing canvas for architectural exploration with the Samyang 12mm lens, using Teal Obscure recipe for indoor shots. From the bustling streets to the towering structures, this lens captures the essence of urban symmetry with unparalleled precision. I can utilize the lens to frame the converging lines of bustling streets, creating dynamic compositions that showcase the rhythm and flow of city life.Pudu Plaza, a prominent landmark in Kuala Lumpur, stands as an ideal backdrop for experimenting with leading lines using the Samyang 12mm lens. This lens allows me to skillfully capture the linear elements of the plaza's architecture, such as the clean lines of its facade, staircases, or walkways. By strategically composing shots to emphasize these leading lines, I can infuse a sense of depth and perspective into the images, creating a visually engaging narrative.
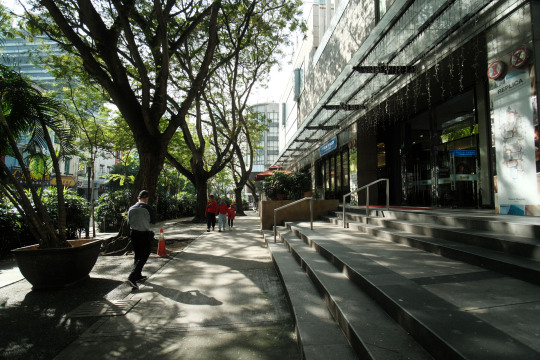
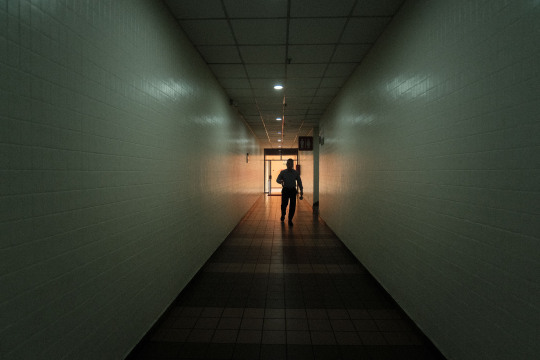
Sample Photos
Fujifilm X-T4 // Samyang 12mm f2

Fujifilm X-T4 // Samyang 12mm f2
Fujifilm X-T4 // Samyang 12mm f2
Fujifilm X-T4 // Samyang 12mm f2

Fujifilm X-T4 // Samyang 12mm f2

Fujifilm X-T4 // Samyang 12mm f2
Fujifilm X-T4 // Samyang 12mm f2
Share This:
Samyang 12mm f2 X-Mount AF Lens Review

SIRUI Sniper 23mm F1.2 Lens Fujifilm X Mount Review

Fujifilm 50-230mm Telephoto Lens Review With Sample Images
You Might Also Like
Read the full article
0 notes
Text
Đánh giá Laowa 105mm f/2 T3.2 Smooth Trans Focus – ống kính STF bình dân
Cái tên Laowa hẳn là còn xa lạ với nhiều người dùng máy ảnh ở Việt Nam nhưng trên thế giới công ty mới 4 năm tuổi đời này của Trung Quốc đã ghi dấu ấn với những sản phẩm độc đáo có chất lượng tốt. Laowa là tên thương hiệu gần đây mới được sử dụng, còn trước đó người ta biết đến sản phẩm của công ty này dưới cái tên Venus (Anhui Changgeng Optics Technology Co., Ltd, hay Venus Optics). Một đặc đi��m nổi bật của Venus là hãng chuyên sản xuất các ống kính lấy nét bằng tay (MF) để phục vụ cho các nhu cầu chuyên dụng như chụp Macro hay Chân dung đặc tả. Điểm qua 6 ống kính Venus từng sản xuất cho đến nay, chúng ta sẽ thấy điều này rất rõ: 60mm f/2.8 2X Ultra Macro (cho tỷ lệ phóng đại 2:1); 15mm f/4 Macro (macro góc rộng); 12mm f/2.8 Zero-D (ống siêu rộng ít méo), 7.5mm f/2 và 15mm f/2 Zero-D (hai ống góc rộng khẩu lớn nhất từ trước tới nay), và ống kính Vsion sẽ đánh giá trong bài viết này: 105mm f/2 Smooth Trans Focus (STF) chuyên chụp chân dung với hiệu ứng làm mịn bokeh. Laowa 105mm f/2 STF được giới thiệu vào năm 2016 và có thể nói là sản phẩm chủ lực của công ty cho tới nay, cũng là sản phẩm khiến nhiều người biết tới tên tuổi công ty. Trong bài viết này, mình sẽ tiến hành đánh giá ống kính này với phiên bản ngàm Sony E khi dùng với máy Sony A7 mark II.
Các ống kính hiện đã có mặt trên thị trường của Laowa (Nguồn: http://www.venuslens.net)
Trước hết mình sẽ giúp các bạn hiểu về đặc tính Smooth Trans Focus (STF) của ống kính này và tại sao nó là điểm khác biệt nhất của ống kính này.
Laowa 105mm f/2 không phải ống kính đầu tiên có thiết kế STF mà đây là phát minh (và đăng ký bản quyền) của Minolta vào những năm 1980. STF có thể làm cho vùng bokeh (vùng không nét) trở nên mịn màng hơn, với các nét viền bokeh bị làm nhòe và không còn ranh giới sắc nét giữa các mảng màu. Cơ chế của STF được giải thích trong hình minh họa ở bên dưới.
Giải thích cơ chế làm mềm bokeh của ống kính STF với kính lọc Apodization (APD)
Trong các ống kính bình thường (hình trên), ánh sáng từ một điểm sáng khi đi qua thấu kính sẽ hội tụ ở phía bên kia thấu kính và nếu điểm này nằm trên mặt phẳng nhận hình ảnh (film hay cảm biến) hay nằm trong giới hạn độ sâu trường ảnh DOF thì chúng ta sẽ nhận được một điểm nét, còn nếu không thì nón ánh sáng tạo bởi điểm sáng này đi qua thấu kính sẽ cắt mặt phẳng nhận sáng theo một thiết diện có hình tròn hoặc bầu dục (thông thường). Hình tròn này chúng ta vẫn thường gọi là bokeh (hay chính xác hơn thì nó là bóng bokeh và là điểm nhấn của bokeh vì bokeh thực ra là toàn bộ phần hình ảnh không nằm trong vùng nét). Do ánh sáng đi qua thấu kính thường có mức độ truyền qua gần tương đương nhau ở vùng tâm và rìa thấu kính nên chúng ta sẽ nhận được bóng bokeh có độ sáng đồng đều từ tâm ra rìa hình tròn (hoặc đôi khi có viền sáng do thấu kính chữa cầu sai).
Khi ống kính được trang bị kính lọc Apodization (APD) với bản chất là một dạng kính lọc ND (Neutral density) với gradient màu đen tăng dần từ tâm ra phía viền bao của hình tròn. Với dạng gradient này, ánh sáng đi qua rìa ngoài thấu kính sẽ có mức độ truyền sáng thấp hơn phần tâm hình, và mức độ thay đổi này rất đều (mức độ tùy thuộc khả năng gia công kính lọc APD của công ty). Hệ quả của việc sử dụng kính lọc này là nón ánh sáng sẽ có cường độ sáng ra phía ngoài biên giảm dần và bóng bokeh khi hình thành cũng có có phần rìa biến mất dần, hay nói cách khác là bokeh được làm mịn để xóa đi ranh giới giữa các chi tiết.
Cho tới nay, đã có 5 ống kính sử dụng công nghệ STF:
Minolta AF (ngàm Sony A) 135mm f/2.8 T4.5 (1999) – giá $1100
Sony (ngàm Sony A) 135mm f/2.8 T4.5 (phiên bản thay vỏ của Minolta AF, công bố vào năm 2006) – giá $1400
Fujifilm XF 56mm f/1.2 R APD (2014) – giá $1500
Laowa 105mm f/2 STF T3.2 (2016) – giá $699
Sony FE 100mm f/2.8 STF OSS GM T5.6 (2017)- giá $1500
Trong đó, Laowa 105mm f/2 hiện nay là ống kính STF duy nhất có thể dùng được với cả máy ảnh DSLR (Canon, Nikon, Pentax) và mirrorless, cũng là ống STF rẻ nhất trên thị trường.
Khi mua ống kính Laowa 105mm f/2 STF, các bạn sẽ nhận được ống kính đi kèm nắp trước, sau và hood rời đường kính 67mm bằng nhựa (tuy nhiên trong bản mình có để đánh giá thì không có hood). Nếu các bạn đang không dùng một trong các máy ảnh Canon DSLR, Nikon DSLR, Pentax DSLR, Sony DSLT, Sony ngàm E thì các bạn có thể mua các bản DSLR và dùng thêm ngàm chuyển. Giống như các ống kính DSLR của Samyang, mặc dù Laowa 105mm f/2 có ngàm cho máy Sony không gương lật ngàm E, thực chất đây chỉ là bản nối dài ống kính được thiết kế cho máy DSLR (đây là hạn chế của các công ty nhỏ không đủ khả năng sản xuất nhiều ống kính thiết kế riêng cho các loại máy khác nhau).
Ống kính Laowa 105mm f/2 STF khá nặng và hơi dài so với thân máy A7ii nên sẽ bị chúc xuống dưới nếu ống kính không được đỡ.
Với thiết kế sử dụng phần lớn là kim loại, ống kính này khá nặng (gần 800 g) mặc dù chỉ dài bằng 1 gang bàn tay. Bản ngàm E mà mình dùng được gia công ngàm rất chuẩn nên ghi gắn lên Sony A7ii thì ống kính rất chắc chắn. Cũng vì khối lượng khá nặng nên khi sử dụng mình luôn phải đỡ phần đầu của ống kính để cả bộ máy ảnh không bị chúc về phía trước. Là một ống kính MF nên thiết kế ống kính cũng không có nhiều điểm đặc biệt ngoài 2 vòng khẩu độ thay vì một vòng như các ống kính thông thường khác. Một vòng khẩu độ nằm ở phía trước được đánh dấu T-stop (tạm gọi là vòng khẩu T-stop
) xoay ngược chiều kim đồng hồ để giảm khẩu và không phát ra tiếng khi xoay (clickless). Vòng khẩu này chỉ hạ được T-stop xuống T8 và được thiết kế chủ yếu cho quay phim (có thể thay đổi khẩu độ rất êm mà không phát ra tiếng). Vòng khẩu độ thứ hai nằm gần phía sau ống kính hơn, là vòng khẩu độ bình thường với đánh dấu khẩu độ từ f/2 xuống f/22 (khép được khẩu sâu hơn nhiều vòng khẩu T-stop). Vòng khẩu này phát ra tiếng click mỗi khi hạ một khẩu và bạn phải xoay nó theo chiều kim đồng hồ (ngược với vòng khẩu T-stop) để hạ khẩu. Chúng ta tạm gọi vòng này là vòng khẩu f-stop
.
Để tạo ra bóng bokeh tròn trịa ở tất cả mọi khẩu độ, hai lỗ khẩu tương ứng với hai vòng chỉnh khẩu này đều có rất nhiều lá khẩu cong xếp sít nhau (13 lá khẩu ở lỗ khẩu f-stop và 14 lá khẩu ở lỗ khẩu T-stop). Chúng ta có thể khép hai vòng khẩu ở mức độ khác nhau, tuy nhiên chỉ vòng khẩu nào có giá trị T-stop/f-stop nhỏ hơn mới tác động tới hình ảnh nhận được. Để phân biệt rõ hơn T-stop và f-stop, mời các bạn đọc bài viết của Vsion.
Vòng lấy nét của Laowa 105mm rất rộng, có dạng họa tiết song song khá bám tay, cùng với vòng quay rất rộng (khoảng 270 độ để xoay từ điểm gần nhất tới vô cực) nên việc lấy nét bằng tay với ống kính này khá thoải mái. Tuy thế, độ lỳ của vòng lấy nét khá cao nên cần dùng lực nhiều hơn bình thường để xoay vòng. Với thiết kế này, mình có thể lấy nét rất chính xác, nhưng do khối lượng khá lớn của ống kính (không cân bằng với máy) và độ lỳ của vòng lấy nét hơi cao nên rất dễ mỏi tay khi phải chụp liên tục và thao tác không được nhanh cho lắm. Nếu Laowa làm vòng này dễ xoay hơn một chút thì chắc sẽ hợp lý hơn.
Khi nhìn từ đằng trước hoặc đằng sau ống kính Laowa 105mm, các bạn có thể dễ dàng nhìn thấy hiệu ứng của kính lọc APD với viền tối xung quanh phần rìa thấu kính và gradient sáng dần vào tâm thấu kính. Mức độ cản ánh sáng của kính lọc này hiện nay tương đương của Minolta AF (làm giảm khoảng 1.35-1.37 stop, tuy nhiên vẫn không bằng Sony GM 100mm f/2.8 STF OSS (khoảng 2 stop), nên khi nhìn qua ống kính Sony GM 100mm, các bạn sẽ thấy còn tối hơn thế này. Để đạt hiệu quả cao nhất thì vòng khẩu T-stop được đặt ngay sát kính lọc APD này.
Có một điều cần lưu ý khi sử dụng Laowa 105mm STF là mặc dù ống kính không thay đổi độ dài thân ống khi lấy nét (không thò thụt) nhưng các nhóm thấu kính vẫn di chuyển. Nhóm thấu kính trước sẽ nhô ra sát vành trước ống kính khi lấy nét gần và thụt sâu vào thân ống kính khi lấy nét xa. Khi kính trước thụt vào, các bạn sẽ để ý thấy có một rãnh hở giữa nhóm thấu kính và thân ống kính (mũi tên màu cam ở hình dưới) để lộ cấu tạo bên trong với vòng bi và khá nhiều dầu bôi trơn. Nếu các bạn không cẩn thận thì phần dầu bôi trơn này có thể dính ra ngoài, làm bẩn tay và bẩn ống kính, cũng như tiềm ẩn việc hút bụi bẩn vào bên trong ống kính trong quá trình sử dụng. Vì thế nên nếu bạn đang không dùng ống kính, tốt nhất là để nó ở mức nét gần, sao cho phẩn rãnh này bị che đi.
Nhóm thấu kính trước và sau của Laowa 105mm STF di chuyển khi thay đổi điểm lấy nét (nhưng vỏ ống kính không thay đổi chiều dài). Ở khoảng cách lấy nét xa, có một rãnh hở giữa thân ống kính và thấu kính trước, có thể bị lan dầu bôi trơn làm bẩn lens.
Các ống kính của Laowa hiện nay đều có một vòng màu xanh da trời để đánh dấu đặc trưng cho ống kính. Trên thân ống kính, ngoài màu xanh nước biển còn có màu da cam đánh dấu khoảng cách lấy nét (đơn vị inch) và chữ Smooth Trans Focus màu xanh lá nên mặc dù thiết kế ống kính rất chắc chắn, diện mạo này khá lòe loẹt và nó nói cho người dùng đây không phải một sản phẩm đắt tiền… Và đúng là Laowa 105mm f/2 mặc dù giá không thấp (khoảng 15 triệu đồng) nhưng vẫn là ống kính STF rẻ nhất hiện nay. Tuy vậy, đôi lúc chất lượng ống kính không đồng nhất với ấn tượng bề ngoài.
Thân ống kính được làm bằng kim loại chắc chắn, sơn đen bóng và dòng chữ Smooth Trans Focus được tô màu xanh lá rất nổi bật.
Ấn tượng đầu tiên về ống kính này là màu tạo ra hơi lạnh so với nhiều ống kính khác (nhưng vẫn chưa lạnh như màu của Zeiss). Khi so sánh cùng Samyang 135mm f/2 (bản cine T2.2), các bạn có thể thấy màu của Laowa 105mm ngoài lạnh hơn còn nhạt hơn và kém tương phản hơn một chút.
Xét về độ nét, mình so sánh độ nét tâm hình với Samyang 135mm f/2 vì đây là một trong những ống kính có độ nét cao nhất mình từng dùng và tiêu cự cũng khá gần 105mm. Như ở hình dưới các bạn có thể thấy là độ nét của cả hai ống kính này đều rất tuyệt vời và ngang ngửa nhau. Mặc dù Samyang có nhỉnh hơn một chút ở độ phóng đại cao này, chúng ta sẽ không thể phân biệt được sai khác ở kích cỡ ảnh thông dụng. Ngoài ra, cả hai ống kính đều được thiết kế để chụp ở khẩu lớn nhất nên độ nét không có thay đổi đáng kể khi hạ khẩu ống kính. Một điều thú vị là cả hai ống kính này đều có biểu hiện của nhiễu xạ nhẹ làm giảm độ nét từ khá sớm (từ f/8 trở đi). Với độ nét tốt như thế này, Laowa 105mm STF hoàn toàn có thể so với các ống kính chất lượng cao nhất trên thị trường hiện nay.

"QC" Dịch vụ quay video chuyên nghiệp, quay phim sự kiện, quay video clip, quay phim hd, tất cả các dịch vụ về quay phim…
Hotline + Viber + Zalo: 0972.123.018 (Cameraman)
Website: https://www.heytv.vn
Fb: https://vi-vn.facebook.com/heytv.vn
TC: https://trungdan.com/dich-vu-san-xuat-quay-video-phim-hoi-nghi-chup-anh-hd.html
Là đơn vị cung cấp các dịch vụ quay phim tự giới thiệu doanh nghiệp, Quay video clip viral, Quay video quảng cáo – TVC, quay phóng sự… Chuyên Quay Phim Chụp Hình Full HD – Giá Cạnh Tranh – Uy Tín, Chất Lượng Cao. Cam Kết Chất Lượng Cao – Tư Vấn Hỗ Trợ 24/7. Dịch Vụ Hoàn Hảo. Đội Ngũ Kinh Nghiệm Cao. Thiết Bị Hiện Đại. Giàu Kinh Nghiệm. Ưu Đãi Tốt Về Giá.
Rô Phi Studio
“RÔ PHI STUDIO – Nhận làm clip, quay clip, Slideshow ảnh, Chụp ngoại cảnh, Quay ngoại cảnh, làm theo yêu cầu Tp.HCM. Dịch vụ làm clip sinh nhật, Clip tặng người yêu, Quay video cưới hỏi, liên hoan, hội nghị…
Dịch vụ làm video, nhận làm video quảng cáo doanh nghiệp, chụp ảnh sản phẩm, chụp anh xoay 360, dịch vụ video Tp.HCM, ảnh quảng cáo …”
Hotline ☎️: 0972.123.018 – 0931.436.637
Dịch Vụ Sản Xuất, Quay Video, Phim & Hội Nghị, Chụp Ảnh HD
Dịch vụ quay phim quảng cáo spa, tmv, giới thiệu công ty, phóng sự… 0972 123 018 Dịch Vụ Quay Phim, Quay Video Clip, MV, Làm Viral Cho Nhãn Hàng Độc Đáo Sáng Tạo. Đảm Bảo Uy Tín Chất Lượng. Đội Ngũ Chuyên Nghiệp. Thiết Bị Quay Hiện Đại. Cam Kết Giá Trị Cho KH./…
– DỊCH VỤ QUAY PHIM CHUYÊN NGHIỆP TẠI TP.HCM
– DỊCH VỤ QUAY PHIM SỰ KIỆN
– DỊCH VỤ QUAY PHIM HỘI NGHỊ, HỘI THẢO
– DỊCH VỤ QUAY PHIM VIRAL VIDEO
– DỊCH VỤ QUAY PHIM REVIEW SẢN PHẨM
– DỊCH VỤ QUAY PHIM CƯỚI HỎI
– DỊCH VỤ QUAY PHIM SINH NHẬT
– DỊCH VỤ QUAY PHIM BÀI GIẢNG
– DỊCH VỤ QUAY PHIM TEAM BUILDING
– DỊCH VỤ QUAY PHIM GIỚI THIỆU DOANH NGHIỆP
– DỊCH VỤ QUAY PHIM CA NHẠC
Hotline: 0972.123.018 Cameraman
Website: https://www.heytv.vn
https://vi-vn.facebook.com/rophistudio
https://www.listpaint.com
1 note
·
View note
Video
vimeo
Original caption:
Experience a beautiful timelapse journey through the amazing landscapes of Norway.
Photographer, editor and sounddesigner: Casper Rolsted Music: Peter Nanasi
FOLLOW MY WORK YouTube.com/CasperRolsted?sub_confirmation=1 Facebook.com/CasperRolstedVisuals Instagram.com/CasperRolsted Twitter.com/CasperRolsted
FILM LOCATIONS IN "NORWAY in motion" 0:00 Sognefjorden, Balestrand (July) 0:06 Trollstigen (July). Shot early morning at 4 o'clock from the top of the Trollstigen. 0:11 Forest at the Hardangerfjord (May) 0:17 Trollstigen (July) 0:22 Geiranger (July). Shot from Dalsnibba Mountain Plateau. 0:33 Geiranger (July). Shot from Ørnesvingen viewing point (eagle road). The cruise ship Marella Explorer (formerly "Mein Schiff 1" with TUI Cruises), build 1996, length 262 meter, width 32 meter. 0:44 Strynevatnet (July) 0:59 Aurlandsfjorden (July). Shot from Stegastein viewpoint. 1:06 Geiranger (July). The popular Flydalsjuvet Rock is to the right. It is now protected with a fence after several accidents on places like these, please don't climb the fence. 1:09 Nærøyfjord (July). This beautiful fjord which is part of the Sognefjord is on the UNESCO World Heritage list. Nærøyfjord is 17 km long and the narrowest point is only 250 m wide. 1:14 Hardangerfjord (May). The famous Appletrees are blooming at the Hardangerfjord in the end of May. 1:17 Rondane (July, April). Seen from Sohlbergplassen at Atnsjøen lake. First part is shot in July 2017 and second part is shot in April 2018. 1:28 Valdresflye (April). The road is closed in the winter and usually opens for traffic in April. 1:39 Sognefjellet (May). The road is closed in the winter and usually opens for traffic in May. 1:44 Dalsnibba (July). Shot from Dalsnibba Mountain Plateau. 1:50 Oldevatnet (May) 1:55 Mountains at Geiranger (July). Shot from Dalsnibba Mountain Plateau. 2:01 Sognefjellet (July) 2:06 Leknes (April) 2:14 Urke (April) 2:28 Ålesund (April). Shot from Byrampen Viewpoint. 2:33 Sunnylvsfjorden (April). Shot close to the town Hellesylt. 2:55 Sykkylven, Aure, Ikornnes (April). Sunnmørsalpane in the distans. Sunnmørsalpene is a collective term for the mountains range in the Sunnmøre region of Møre og Romsdal county. 3:01 Oppstrynsvatnet (April) 3:06 Oldevatnet (April) 3:11 Sognefjellet, Fannaraaki (July) 3:17 Valdresflye, Vinstr (July) 3:23 Myrheim (May) 3:26 Nes (May) 3:28 Oldevatnet (May) 3:29 Folgefonna (July) 3:31 Aurlandsvangen (July). Shot from Stegastein viewpoint. 3:32 Gamle Strynefjellsvegen (July) 3:33 Sognefjellet, Fannaraaki (July) 3:35 Nigardsbreen (May). Kayaking at the glacier lake. 3:39 Sunnmørsalpane. Shot from Ålesund (April). 3:44 Sunnmørsalpane. Shot from Solavågen (April). 3:50 Solavågen and Sunnmørsalpane (April). Shot from Eidsnes. 3:54 Hardangerfjord (May) 3:55 Sognefjorden (July) 4:00 Geirangerfjord (July) 4:06 Gamle Strynefjellsvegen (July). The road is closed in the winter and usually opens for traffic in the middle of June. 4:10 Hardangerfjord (May) 4:11 Sognefjellet (July) 4:17 Norheimsund (July). Town at the Hardangerfjord and close to Steinsdalsfossen. 4:22 Ålesund (April). Shot from Byrampen Viewpoint.
CAMERA EQUIPTMENT USED Sony A6300 Mirrorless Digital Camera Body Samyang 12mm f/2.0 NCS CS lens Samyang 21mm F1.4 ED AS UMC CS lens Samyang 50mm F1.2 AS UMC CS lens Samyang 100mm F2.8 ED UMC MACRO lens Carl-Zeiss Vario-Tessar T* E 16-70mm f/4 ZA OSS Edelkrone SliderPLUS Medium with Action & Target Module Digislider 2 Axis Auto-Pan Video, Time Lapse & Stop Motion Camera Slider
78 notes
·
View notes
Photo

Sony Alpha a6400 w/Samyang 12mm f/2.0 lens. https://ift.tt/2BtesKa
1 note
·
View note
Last Seen Blogs

harunrhimu
my rule my way✅

leschosesetlesfantomes
Les choses et les fantômes

gabrielferaud
I LOVE DEAD GUYS

gabe8899
hello