#Save Meshes in Custom Binary
Explore tagged Tumblr posts
Visit Tumblr Blog
Explore Tumblr blogs with no restrictions, modern design and the best experience.
Last Seen Tumblr Blogs


Fun Fact
In 2020, 27% of US Tumblr users had an annual household income of over $100,000.
Text
I started creating 3D models for the game. I began with a simple enemy model: The Turret.

It is a low-poly, pixel-art UV'd static mesh. The model was initially made in a program called Blockbench.
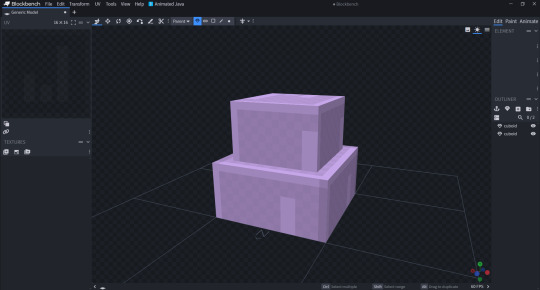
Blockbench is a modelling software similar to Maya and MagicaVoxel. But like MagicaVoxel, it was built to make a certain style of mesh. In this case: Low-Poly, Pixel-Art texured. This software does make it easy to do that. To make the textures, I needed a software that is easier to use when it comes to simple pixel-art. In this case I used the program: Paint.net. This is a image editing software based on the Microsoft product: Paint. It is much more lightweight and easier to manage individual pixels than Photoshop, whilst still having all of the adjustment tools that Photoshop uses.

This makes it much easier to create pixel-art UVs for meshes I create. There was an issue with using this combination of software to produce assets however. It was an extremely long process that I couldn't even animate properly. Blockbench does not support the same type of FBX file that Unreal does. Along with this, Blockbench would export all faces to have "Smooth Shading" on. This feature is great for high detail models. It essentially allows faces that connect to have lighting ignore soft edges. For low-poly meshes, we don't want this. It makes the edges blur together and make them less defined and ultimately looks terrible. This means I have to use a mediator to convert it from ASCII to Binary. And to turn smooth shading off. I simply used another modelling software called "Blender" to do this. This itself was annoying but not too difficult or time consuming. The issue came when I wanted to rig and animate the models.
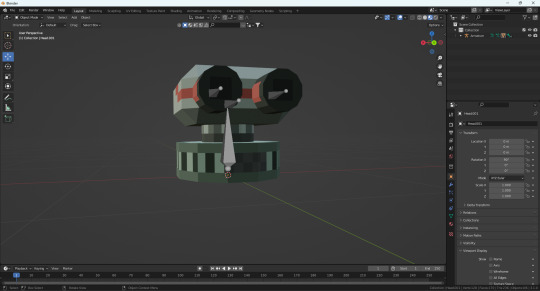

I wanted to set up an armature in blender and weight paint onto certain parts of the mesh. This was not too hard to do. Because of the low-poly nature of the object, weight painting onto it was much simpler than if it were a much more detailed model. The biggest issue came when I wanted to animate and export the animation into Unreal.

None of the animations or armatures would come through correctly if at all. Sometimes bones would in completely different places to where I wanted them to be, and sometimes they wouldn't even be exported. In the instance above, none got exported with the mesh. Sometimes some armature bones would come through correctly, but then have strange deformations. I checked in blender and everything seemed to be perfect on there. I searched online for answers to this and saw that there was not really one good solution to this. This one model at this point had taken just under 2 hours to complete and export into Unreal. Only for none of the animations or armatures to come in correctly. As an unfortunate result to this, I either have to spend time figuring out what I did wrong and spend time fixing it and any other strange problems for future meshes and animations, or abandon this idea. I only have 3 weeks remaining to complete the full project, so I don't really have a choice unless I want to risk running into more issues along with a longer development time. I decided to go with an quicker and easier art style for now, that being one similar to the original 3 DOOM games.

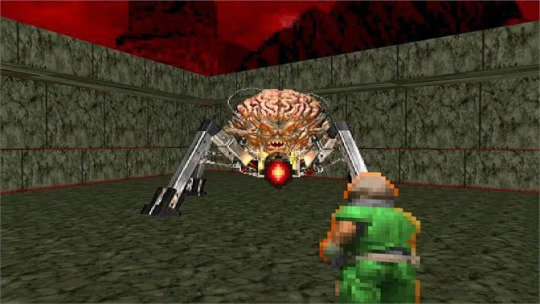
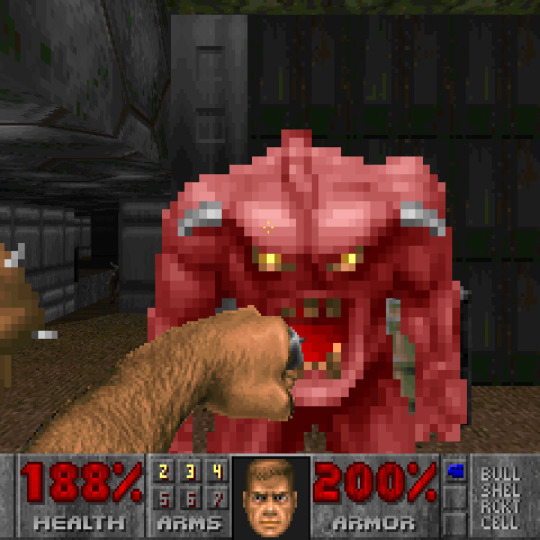
This is a concept known as: "Bill-Boarding". This style uses 2D images in a 3D space. By propping them up and having them face certain directions, it can mimic actual 3D elements. This style would work perfectly since my arcade idea only has one viewpoint. Meaning I can always guarantee that the player will see the textures from the correct side.
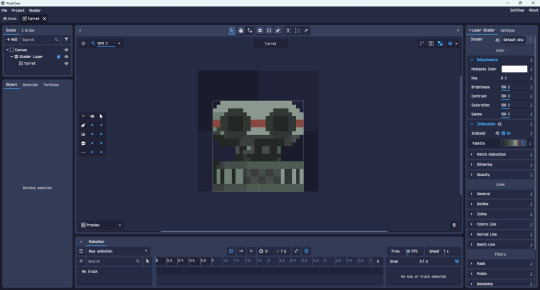
I saved time with the turret by turning the 3D object into a pixel-art 2D sprite using a program called: "Pixelover". This program applies custom shaders to 3D and 2D spaces to give them the impression that they are custom pixel-art. It uses down-scaling for the pixels and indexation for the colour pallete. With this system, I can keep making 3D models in Blockbench, make UVs in Paint.net and then create the sprite animations using Pixelover.

I can use key-frames, armatures and other effects in this software to produce animations in a much quicker fashion. Now I can work on the rest of the game.
0 notes
Text
Load 3D File & Save Meshes in Custom Binary Format & Import an Existing PLY File in .NET Apps
What’s new in this release?
Aspose team is pleased to announce the release of Aspose.3D for .NET 17.01. The new version adds support of importing PLY models. Developers can import PLY (ASCII and Binary) models into the Aspose.3D API, and then export them in any supported 3D format. The new version also integrates the feature of writing 3D file in the custom binary mode. All the regular bug fixes and enhancements have also been included. Using Aspose.3D for .NET API, developers can already load all supported 3D files. Developers can also retrieve meshes and the new public API changes allow to save the meshes in custom binary format. The binary file size remains same as the data we store like the minimum workable size. This feature would also help Aspose clients manipulate bigger 3D models more effectively. PLY is a computer file format known as the Polygon File Format or the Stanford Triangle Format. It is one of simplest format to read and write a 3D mesh. Using Aspose.3D API, developers can now import any existing PLY (ASCII or Binary) model. Developers would also be able to load a PLY file, and then save in any supported 3D file format. Please check these help topics to know how to import an existing PLY file: Reading a 3D Scene and Specify Load Options of 3D PLY. This release includes plenty of new features as listed below
Add support of importing the PLY models
Load 3D File and Save Meshes in Custom Binary Format
Import an Existing PLY File into the Aspose.3D API
Add support of importing the DXF.
Newly added documentation pages and articles
Some new tips and articles have now been added into Aspose.3D for .NET documentation that may guide users briefly how to use Aspose.3D for performing different tasks like the followings.
Save 3D Meshes in Custom Binary Format
Use of the Ply Load Options
Overview: Aspose.3D for .NET
Aspose.3D for .NET is a feature-rich component and class library for .NET that empowers Mono and .NET application including ASP.NET, Windows Forms and Web Services to connect with prevalent 3D document formats automatically without the 3D modeling and rendering software being installed on the server. It supports FBX (ASCII, Binary) and STL (ASCII, Binary) file formats and developers can easily create, read, convert, modify and control the substance of these 3D document formats using Aspose.3D API.
More about Aspose.OCR for .NET
Homepage of Aspose.3D for .NET
Download Aspose.3D for .NET
#Load 3D File#Save Meshes in Custom Binary#Import Existing PLY File#Load Options of 3D PLY#write 3D file in custom binary#.NET 3d API#.NET 3D Component#read and write 3D mesh
0 notes
Text
Paraview plugins

#Paraview plugins serial
#Paraview plugins code
In order to limit its memory consumption, this light version of Gmsh only embarks the internal data reader and the visualization procedure described above and customized for this particular application. In order to be able to use this plugin, one requires to compile a light version of Gmsh compiled as an external library as well as compiling ParaView itself with the plugin enabled. Note that this plugin is not provided in the binary release of ParaView.
#Paraview plugins code
The resulting new ParaView plugin named “GmshReader” is now provided with the official ParaView source code (version 5.7.0 and above). Note that contrary to Gmsh, VTK supports exclusively Lagrange polynomials and ParaView provides uniform h-refinement to visualize these polynomials. Although it has not been tested yet within this work, this new feature opens up additional promising perspectives for the visualization of high-order meshes and solutions. Recently, the support for arbitrary-order Lagrange polynomials has also been introduced in ParaView. Consequently, memory requirement can be significantly reduced for the selective h-refinement procedure compared to uniform h-refinement. In the second case, recursive h-refinements is applied to the parent elements and their child elements until this error is locally minimized. The recursive h-refinement of the initial mesh which generates the visualization grid can be either uniform (every edge of the parent element is split in the same way) or selective, based on a local visualization error. Afterwards, traditional visualization of the solution occurs through a straightforward piecewise linear interpolation on the Then, the high-order polynomial solution is interpolated on the new nodes of the refined visualization grid. First, a recursive h-refinement of high-order elements based on classical automatic mesh refinement (AMR) is applied and defines a refined linear visualization grid. The visualization capabilities of Gmsh rely on a two-step strategy further described in. This allows to encode any polynomial basis using the same framework. Moreover, a major asset of the native file format of Gmsh consists in the use of an explicit description of the polynomial basis functions within the file, instead of an imposed convention. Historically, few open source tools provide high-order meshing and visualization capabilities. 1 – Illustration of the usage of the GmshReader plugin in ParaView. This coupling enables parallel visualization of massive high-order solution in parallel, in client-server mode.įig. This plugin combines respectively ParaView’s scalability in parallel and Gmsh’s ability to apply h-refinement of the initial mesh followed by the interpolation of any arbitrary high-order polynomial solutions on the resulting visualization grid. In this context, a new ParaView plugin which integrates Gmsh as an external library has been implemented for off-line post-processing and visualization of high-order solutions saved under the Gmsh format, see Figure 1. Only very recently, arbitrary-order Lagrange polynomials have been introduced in VTK and their support in ParaView for both high-order meshes and solutions is gaining traction, which confirms the growing interest and need for such features. However, ParaView relies on the Visualization Toolkit (VTK) whose data models have historically mainly supported linear elements. On the other hand, ParaView is an efficient open source parallel visualization tool which has been used successfully for post hoc visualization of large scale, unstructured data sets up to several billions of dof.
#Paraview plugins serial
However, Gmsh is in essence a serial tool and is therefore limited to a relatively low number of dof and level of h-refinements. The high-order solution is then interpolated at the new mesh nodes in order to provide an optimal visualization grid. This method relies on recursive h-refinements of the initial mesh, coupled to a projection error estimation. The open source mesh and visualization tool Gmsh provides a general method for the post-processing of high-order finite element fields. However, the lack of visualization tools able to handle a large number of degrees of freedom (dof) has been a major bottleneck for the analysis of high-order finite element solutions generated by massively parallel simulations. Recently high-order finite element methods initially introduced in the research community such as discontinuous Galerkin (DG) and flux reconstruction (FR) have gained considerable attention in industry, thanks to their high-accuracy on unstructured meshes, their efficiency and scalability.
0 notes
Text
MW3D-Solutions Cheetah3D 7.3.3
The powerful 3D modeling, rendering and animation software for Mac. MW3D Solutions has released Cheetah3D 7.3, an update of the modeling, rendering, and animation software for the Mac. The most noticeable change is support for macOS Mojave’s Dark Mode.
The next big addition is support of PBR shaders. PBR shaders and texture collections have become the de facto standard for creating physically based materials. The Falcon renderer now offers integration of PBR materials into Cheetah3D.
Cheetah3D 7.3 also adds support for the glTF file format. glTF is shaping up to become the industry standard for 3D content delivery to games, web, and VR/AR. Finally, Falcon adds support for rendering refractive caustics.
Cheetah3D 7.3 requires macOS 10.8.5 or later. It costs $99 for a single-user license. Customers may upgrade from older versions for $49. If you purchased Cheetah3D after April 1, 2015, the upgrade to v7.3 is free. You can order Cheetah3D 7.3 at MW3D’s
Features
Built for Mac
Cheetah3D is a powerful and easy to learn 3D modeling, rendering and animation software which was developed from the ground up for Mac.
So jump right into the world of computer generated imaging, create 3D artwork for your next iPhone game or make your first animated character.
Modeling
With a full set of polygon, subdivision surface and spline modeling tools the artists can focus on creating, safe in the knowledge that Cheetah3D has a breadth of features for the task.
Cheetah3D makes modeling in 3D a breeze for new and experienced users alike.
Animation
Character rigging is part of the seamless animation system of Cheetah3D where just about every property of an object can be animated.
Breathe life into a character for your next iPhone game or animate an architectural fly-through by the powerful animation system built into Cheetah3D.
Dynamics
Cheetah3D smoothly integrates the industrial strength Bullet physics engine to simulate rigid body and soft body dynamics.
No matter if you want to spill a bowl of marbles on the floor or simulate a waving flag in the wind. Cheetah3D can handle it with just a few mouse clicks.
UV Editing
So you’ve modeled a nice character or a new product design, it’s time to get decorating and Cheetah3D is ready to get to work.
With a powerful UV editor combined with a node based materials system you can paint and texture every model you make.
Rendering
Raytracing, Global Illumination, HDRI, Caustics and much much more means Cheetah3D can produce stunning images and movies using advanced techniques.
Create amazing pictures with Cheetah3D: mesmerize friends, colleagues and clients.
Scripting
An easy to learn yet powerful Javascript API allows you to extend the feature set of Cheetah3D by custom object types, file loaders or tools.
File exchange
Import and export 3D models using 3D file formats like fbx, stl, 3ds, obj, dae, etc. enables sharing of content produced with Cheetah3D. Use you 3D models in popular game engines or send you artwork to a 3D printing service.
Images and movies created with Cheetah3D can be exported to a wide range of popular image and movie file types (jpg, tiff, png, mov etc.). The support of the macOS sharing services even allow you to upload your creations straight to various social media sites.
Extra Features
General Features
Written from the ground-up in Cocoa!
Universal Binary application
64-bit version for Intel Macs
Full support of Retina displays
Highly intuitive, thoroughly Macintosh-like user interface
OpenGL preview
Customisable UI layout
Almost all parameters can be animated
Polygons can have any number of edges (ngons)
Full set of object, polygon and point selection tools
Full transformation hierarchy
Additional features can be assigned to objects using tags
Intuitive editors for objects, materials and properties
Up to 16 different materials per mesh
A Fully integrated, multi-threaded renderer
Drag and drop materials onto your polygon selections
Link external 3D files into the scene
Multi object selection
Character animation tools
Snapping
Customisable hot keys
Customisable mouse controls
Customisable toolbar
Scene Objects
Cameras
Point lights
Area lights
Distant lights
Spot lights
Physical sky lights
Folders
Smart Folders
Joint
Parametric Polygon Objects
Polygon object (ngon support)
Ball
Capsule
Cube
Cone
Cylinder
Disc
Fractal
Plane
Polyhedra ( [truncated] Tetra-, Octa-, Dedeca- and Icosahedra)
Relief
Stair
Torus
Tube
Parametric Spline Objects
Spline Curve (linear, Bezier curve, Bezier spline, NURBS)
Circle
Cog
Flower
Helix
Line
n-Edge
Rect
Star
Text (through any installed True Type Font)
Tags
HDRI tag
Radiosity tag
Render tag
Mode tag
Spline Tracking tag
Target tag
UV tag
Skeleton tag
Morph tag
IK Angle Constraint tag
IK Point Constraint tag
Scripting
Uses the Javascript language —leverage your existing knowledge of JavaScript to automate Cheetah3D!
Uses the rock solid WebKit Javascript engine
JIT compiler for ultra fast script execution
Generate your own objects
Write custom file loaders and exporters
Write your own tools
Automate repetitive tasks
Animation Tools
Key frame animation
Joint based character animation
Auto-Keying
Fly through animations along splines
Almost every object, tag or material property can be animated!
Animation of mesh vertices and spline control-points
Powerful time line
F-Curve editor
Key editor
Various key interpolation types
Linear
Smooth
Bezier spline
Flat
Forward kinematics (FK)
Inverse kinematics (IK)
Spline IK
Heat weighting
Vertex weight painting
Constraints (Angle, Point, Position, etc.)
Poses
Take Manager
OpenGL animation preview
Dynamics
Uses industry proven Bullet physics engine
Riggid body dynamics
Support for various collision shapes
Box
Convex (sphere, capsule, cylinder,…)
Convex hull
Concave
Soft body dynamics
Rope dynamics
Very fast simulations
Supports editable particle systems
Forces interact with dynamics
Anchors to connect soft bodies with rigid bodies
Interactive preview of physical simulation
Dynamics backing for complex scenens
Full Set Of Polygon Tools
Cheetah3D Devil
Polygon, edge and point mode
Set and Reset crease
Create polygon
Fill hole
Bridge
Insert point
Magnet
Extrude
Inner extrude (point/edge/polygon)
Shell
Jigsaw
Scalpel
Ring cut
Weld
Move, Scale and Rotate points, edges and polygons
Move, Scale and Rotate along normal
Rotate edge
Collapse polygon
Flip normals
Triangulate polygons
Array
Split
Clone
Mirror
Separate
Crumple
Set value
Quantize
Burn transform
Import child
Point slide
Cover
Catmull- Clark Subdivide (partial or full mesh; with creases)
Linear Subdivide (partial or full mesh)
UV Tools
Powerful UV Editor
Various selection types
Move, Scale and Rotate
Save UV Mesh to PDF
ABF UV Unwrapping
LSCM UV Unwrapping
Autoseam
Different mapping types
spheric
cubic
cylindric
flat
frontal
Texture Painting
Live OpenGL preview of painting
Brush
Rubber
Fill
Rect
Circle
Line
Various brush types
Supports solid and texture colours
Support for pressure sensitive graphic tablets
Paint displacement and relief maps with live 3D preview
Spline Tools
Create spline
Insert point
Soft interpolation
Hard interpolation
Equal tangent direction
Equal tangent length
Join segments
Break segment
Reverse sequence
Mirror
Set value
Quantize
Burn transform
Import child
Renderer
Fully integrated ray-tracer
Multi-threaded to support up to 18 CPU cores
Powerful node based material system
Many procedural textures and materials
HDRI backgrounds (probe, cross and panorama format)
Ambient occlusion for fast image based lightning (IBL)
Radiosity for indirect diffuse illumination
Caustics
Adaptive antialiasing (over- and under-sampling)
Anisotropic EWA texture filtering
Texture baking
Lightmap baking
Environment mapping
Bump mapping
Fog
Blurred reflections and refractions
Ray traced depth of field
Ray traced shadows
Roloured shadows
Exact soft shadows via area light
Ray traced refraction (with fresnel term)
Ray traced reflection
Panorama projection
Localisations
English
System Requirements
macOS 10.8.5 or newer
64Bit Intel processor
1 GByte RAM
What’s New
3D Modeling
UV Unwrapping, Texture Painting
Joint Based Character Animation
Global Illumination Renderer
Node Based Material System
fix bug in paint tool (mirrored brush texture)
fixed crashing bug (trigger by material menu update)
fixed auto-highlight bug (depth test didn’t work properly)
fixed drawing bug in loop select tool
fixed drawing bug in ring select tool
worked around a bug in Mojave (greyed out pull down button in material browser)
Screenshots
This slideshow requires JavaScript.
MW3D-Solutions Cheetah3D 7.3.3 MW3D-Solutions Cheetah3D 7.3.3 The powerful 3D modeling, rendering and animation software for Mac. MW3D Solutions has released Cheetah3D 7.3, an update of the modeling, rendering, and animation software for the Mac.
0 notes
Link
How to set up a private ethereum blockchain using open-source tools and a look at some markets and industries where blockchain technologies can add value.
In Part I, I spent quite a bit of time exploring cryptocurrency and the mechanism that makes it possible: the blockchain. I covered details on how the blockchain works and why it is so secure and powerful. In this second part, I describe how to set up and configure your very own private ethereum blockchain using open-source tools. I also look at where this technology can bring some value or help redefine how people transact across a more open web.
In this section, I explore the mechanics of an ethereum-based blockchain network-specifically, how to create a private ethereum blockchain, a private network to host and share this blockchain, an account, and then how to do some interesting things with the blockchain.
What is ethereum, again? Ethereum is an open-source and public blockchain platform featuring smart contract (that is, scripting) functionality. It is similar to bitcoin but differs in that it extends beyond monetary transactions.
Smart contracts are written in programming languages, such as Solidity (similar to C and JavaScript), Serpent (similar to Python), LLL (a Lisp-like language) and Mutan (Go-based). Smart contracts are compiled into EVM (see below) bytecode and deployed across the ethereum blockchain for execution. Smart contracts help in the exchange of money, property, shares or anything of value, and it does so in a transparent and conflict-free way avoiding the traditional middleman.
If you recall from Part I, a typical layout for any blockchain is one where all nodes are connected to every other node, creating a mesh. In the world of ethereum, these nodes are referred to as Ethereum Virtual Machines (EVMs), and each EVM will host a copy of the entire blockchain. Each EVM also will compete to mine the next block or validate a transaction. Once the new block is appended to the blockchain, the updates are propagated to the entire network, so that each node is synchronized.
In order to become an EVM node on an ethereum network, you'll need to download and install the proper software. To accomplish this, you'll be using Geth (Go Ethereum). Geth is the official Go implementation of the ethereum protocol. It is one of three such implementations; the other two are written in C++ and Python. These open-source software packages are licensed under the GNU Lesser General Public License (LGPL) version 3. The standalone Geth client packages for all supported operating systems and architectures, including Linux, are available here. The source code for the package is hosted on GitHub.
Geth is a command-line interface (CLI) tool that's used to communicate with the ethereum network. It's designed to act as a link between your computer and all other nodes across the ethereum network. When a block is being mined by another node on the network, your Geth installation will be notified of the update and then pass the information along to update your local copy of the blockchain. With the Geth utility, you'll be able to mine ether (similar to bitcoin but the cryptocurrency of the ethereum network), transfer funds between two addresses, create smart contracts and more.
In my examples here, I'm configuring this ethereum blockchain on the latest LTS release of Ubuntu. Note that the tools themselves are not restricted to this distribution or release.
Downloading and Installing the Binary from the Project Website
Download the latest stable release, extract it and copy it to a proper directory:
If you are building from source code, you need to install both Go and C compilers:
Change into the directory and do:
If you are running on Ubuntu and decide to install the package from a public repository, run the following commands:
Here is the thing, you don't have any ether to start with. With that in mind, let's limit this deployment to a "private" blockchain network that will sort of run as a development or staging version of the main ethereum network. From a functionality standpoint, this private network will be identical to the main blockchain, with the exception that all transactions and smart contracts deployed on this network will be accessible only to the nodes connected in this private network. Geth will aid in this private or "testnet" setup. Using the tool, you'll be able to do everything the ethereum platform advertises, without needing real ether.
Remember, the blockchain is nothing more than a digital and public ledger preserving transactions in their chronological order. When new transactions are verified and configured into a block, the block is then appended to the chain, which is then distributed across the network. Every node on that network will update its local copy of the chain to the latest copy. But you need to start from some point-a beginning or a genesis. Every blockchain starts with a genesis block, that is, a block "zero" or the very first block of the chain. It will be the only block without a predecessor. To create your private blockchain, you need to create this genesis block. To do this, you need to create a custom genesis file and then tell Geth to use that file to create your own genesis block.
Create a directory path to host all of your ethereum-related data and configurations and change into the config subdirectory:
Open your preferred text editor and save the following contents to a file named Genesis.json in that same directory:
This is what your genesis file will look like. This simple JSON-formatted string describes the following:
Now it's time to instantiate the data directory. Open a terminal window, and assuming you have the Geth binary installed and that it's accessible via your working path, type the following:
The command will need to reference a working data directory to store your private chain data. Here, I have specified eth-evm/data/PrivateBlockchain subdirectories in my home directory. You'll also need to tell the utility to initialize using your genesis file.
This command populates your data directory with a tree of subdirectories and files:
Your private blockchain is now created. The next step involves starting the private network that will allow you to mine new blocks and have them added to your blockchain. To do this, type:
Notice the use of the new parameter, . This helps ensure the privacy of your network. Any number can be used here. I have decided to use 9999. Note that other peers joining your network will need to use the same ID.
Your private network is now live! Remember, every time you need to access your private blockchain, you will need to use these last two commands with the exact same parameters (the Geth tool will not remember it for you):
So, now that your private blockchain network is up and running, you can start interacting with it. But in order to do so, you need to attach to the running Geth process. Open a second terminal window. The following command will attach to the instance running in the first terminal window and bring you to a JavaScript console:
Time to create a new account that will manipulate the Blockchain network:
Remember this string. You'll need it shortly. If you forget this hexadecimal string, you can reprint it to the console by typing:
Check your ether balance by typing the following script:
Here's another way to check your balance without needing to type the entire hexadecimal string:
Doing real mining in the main ethereum blockchain requires some very specialized hardware, such as dedicated Graphics Processing Units (GPU), like the ones found on the high-end graphics cards mentioned in Part I. However, since you're mining for blocks on a private chain with a low difficulty level, you can do without that requirement. To begin mining, run the following script on the JavaScript console:
Updates in the First Terminal Window
You'll observe mining activity in the output logs displayed in the first terminal window:
Back to the Second Terminal Window
Wait 10-20 seconds, and on the JavaScript console, start checking your balance:
Wait some more, and list it again:
Remember, this is fake ether, so don't open that bottle of champagne, yet. You are unable to use this ether in the main ethereum network.
To stop the miner, invoke the following script:
Well, you did it. You created your own private blockchain and mined some ether.
Although the blockchain originally was developed around cryptocurrency (more specifically, bitcoin), its uses don't end there. Today, it may seem like that's the case, but there are untapped industries and markets where blockchain technologies can redefine how transactions are processed. The following are some examples that come to mind.
Ethereum, the same open-source blockchain project deployed earlier, already is doing the whole smart-contract thing, but the idea is still in its infancy, and as it matures, it will evolve to meet consumer demands. There's plenty of room for growth in this area. It probably and eventually will creep into governance of companies (such as verifying digital assets, equity and so on), trading stocks, handling intellectual property and managing property ownership, such as land title registration.
Think of eBay but refocused to be peer-to-peer. This would mean no more transaction fees, but it also will emphasize the importance of your personal reputation, since there will be no single body governing the market in which goods or services are being traded or exchanged.
Following in the same direction as my previous remarks about a decentralized marketplace, there also are opportunities for individuals or companies to raise the capital necessary to help "kickstart" their initiatives. Think of a more open and global Kickstarter or GoFundMe.
A peer-to-peer network for aspiring or established musicians definitely could go a long way here-one where the content will reach its intended audiences directly and also avoid those hefty royalty costs paid out to the studios, record labels and content distributors. The same applies to video and image content.
By enabling a global peer-to-peer network, blockchain technology takes cloud computing to a whole new level. As the technology continues to push itself into existing cloud service markets, it will challenge traditional vendors, including Amazon AWS and even Dropbox and others-and it will do so at a fraction of the price. For example, cold storage data offerings are a multi-hundred billion dollar market today. By distributing your encrypted archives across a global and decentralized network, the need to maintain local data-center equipment by a single entity is reduced significantly.
Social media and how your posted content is managed would change under this model as well. Under the blockchain, Facebook or Twitter or anyone else cannot lay claim to what you choose to share.
Another added benefit to leveraging blockchain here is making use of the cryptography securing your valuable data from getting hacked or lost.
What is the Internet of Things (IoT)? It is a broad term describing the networked management of very specific electronic devices, which include heating and cooling thermostats, lights, garage doors and more. Using a combination of software, sensors and networking facilities, people can easily enable an environment where they can automate and monitor home and/or business equipment.
With a distributed public ledger made available to consumers, retailers can't falsify claims made against their products. Consumers will have the ability to verify their sources, be it food, jewelry or anything else.
There isn't much to explain here. The threat is very real. Identity theft never takes a day off. The dated user name/password systems of today have run their course, and it's about time that existing authentication frameworks leverage the cryptographic capabilities offered by the blockchain.
This revolutionary technology has enabled organizations in ways that weren't possible a decade ago. Its possibilities are enormous, and it seems that any industry dealing with some sort of transaction-based model will be disrupted by the technology. It's only a matter of time until it happens.
Now, what will the future for blockchain look like? At this stage, it's difficult to say. One thing is for certain though; large companies, such as IBM, are investing big into the technology and building their own blockchain infrastructure that can be sold to and used by corporate enterprises and financial institutions. This may create some issues, however. As these large companies build their blockchain infrastructures, they will file for patents to protect their technologies. And with those patents in their arsenal, there exists the possibility that they may move aggressively against the competition in an attempt to discredit them and their value.
Anyway, if you will excuse me, I need to go make some crypto-coin.
https://ift.tt/2u6qoAo
0 notes
Text
Blockchain, Part II: Configuring a Blockchain Network and Leveraging the Technology
Blockchain, Part II: Configuring a Blockchain Network and Leveraging the Technology
Image
Petros Koutoupis Tue, 04/24/2018 - 11:30
Blockchain
HOW-TOs
Cryptocurrency
Cryptominig
How to set up a private ethereum blockchain using open-source tools and a look at some markets and industries where blockchain technologies can add value.
In Part I, I spent quite a bit of time exploring cryptocurrency and the mechanism that makes it possible: the blockchain. I covered details on how the blockchain works and why it is so secure and powerful. In this second part, I describe how to set up and configure your very own private ethereum blockchain using open-source tools. I also look at where this technology can bring some value or help redefine how people transact across a more open web.
Setting Up Your Very Own Private Blockchain Network
In this section, I explore the mechanics of an ethereum-based blockchain network—specifically, how to create a private ethereum blockchain, a private network to host and share this blockchain, an account, and then how to do some interesting things with the blockchain.
What is ethereum, again? Ethereum is an open-source and public blockchain platform featuring smart contract (that is, scripting) functionality. It is similar to bitcoin but differs in that it extends beyond monetary transactions.
Smart contracts are written in programming languages, such as Solidity (similar to C and JavaScript), Serpent (similar to Python), LLL (a Lisp-like language) and Mutan (Go-based). Smart contracts are compiled into EVM (see below) bytecode and deployed across the ethereum blockchain for execution. Smart contracts help in the exchange of money, property, shares or anything of value, and it does so in a transparent and conflict-free way avoiding the traditional middleman.
If you recall from Part I, a typical layout for any blockchain is one where all nodes are connected to every other node, creating a mesh. In the world of ethereum, these nodes are referred to as Ethereum Virtual Machines (EVMs), and each EVM will host a copy of the entire blockchain. Each EVM also will compete to mine the next block or validate a transaction. Once the new block is appended to the blockchain, the updates are propagated to the entire network, so that each node is synchronized.
In order to become an EVM node on an ethereum network, you'll need to download and install the proper software. To accomplish this, you'll be using Geth (Go Ethereum). Geth is the official Go implementation of the ethereum protocol. It is one of three such implementations; the other two are written in C++ and Python. These open-source software packages are licensed under the GNU Lesser General Public License (LGPL) version 3. The standalone Geth client packages for all supported operating systems and architectures, including Linux, are available here. The source code for the package is hosted on GitHub.
Geth is a command-line interface (CLI) tool that's used to communicate with the ethereum network. It's designed to act as a link between your computer and all other nodes across the ethereum network. When a block is being mined by another node on the network, your Geth installation will be notified of the update and then pass the information along to update your local copy of the blockchain. With the Geth utility, you'll be able to mine ether (similar to bitcoin but the cryptocurrency of the ethereum network), transfer funds between two addresses, create smart contracts and more.
Download and Installation
In my examples here, I'm configuring this ethereum blockchain on the latest LTS release of Ubuntu. Note that the tools themselves are not restricted to this distribution or release.
Downloading and Installing the Binary from the Project Website
Download the latest stable release, extract it and copy it to a proper directory:
$ wget https://gethstore.blob.core.windows.net/builds/ ↪geth-linux-amd64-1.7.3-4bb3c89d.tar.gz $ tar xzf geth-linux-amd64-1.7.3-4bb3c89d.tar.gz $ cd geth-linux-amd64-1.7.3-4bb3c89d/ $ sudo cp geth /usr/bin/
Building from Source Code
If you are building from source code, you need to install both Go and C compilers:
$ sudo apt-get install -y build-essential golang
Change into the directory and do:
$ make geth
Installing from a Public Repository
If you are running on Ubuntu and decide to install the package from a public repository, run the following commands:
$ sudo apt-get install software-properties-common $ sudo add-apt-repository -y ppa:ethereum/ethereum $ sudo apt-get update $ sudo apt-get install ethereum
Getting Started
Here is the thing, you don't have any ether to start with. With that in mind, let's limit this deployment to a "private" blockchain network that will sort of run as a development or staging version of the main ethereum network. From a functionality standpoint, this private network will be identical to the main blockchain, with the exception that all transactions and smart contracts deployed on this network will be accessible only to the nodes connected in this private network. Geth will aid in this private or "testnet" setup. Using the tool, you'll be able to do everything the ethereum platform advertises, without needing real ether.
Remember, the blockchain is nothing more than a digital and public ledger preserving transactions in their chronological order. When new transactions are verified and configured into a block, the block is then appended to the chain, which is then distributed across the network. Every node on that network will update its local copy of the chain to the latest copy. But you need to start from some point—a beginning or a genesis. Every blockchain starts with a genesis block, that is, a block "zero" or the very first block of the chain. It will be the only block without a predecessor. To create your private blockchain, you need to create this genesis block. To do this, you need to create a custom genesis file and then tell Geth to use that file to create your own genesis block.
Create a directory path to host all of your ethereum-related data and configurations and change into the config subdirectory:
$ mkdir ~/eth-evm $ cd ~/eth-evm $ mkdir config data $ cd config
Open your preferred text editor and save the following contents to a file named Genesis.json in that same directory:
{ "config": { "chainId": 999, "homesteadBlock": 0, "eip155Block": 0, "eip158Block": 0 }, "difficulty": "0x400", "gasLimit": "0x8000000", "alloc": {} }
This is what your genesis file will look like. This simple JSON-formatted string describes the following:
config — this block defines the settings for your custom chain.
chainId — this identifies your Blockchain, and because the main ethereum network has its own, you need to configure your own unique value for your private chain.
homesteadBlock — defines the version and protocol of the ethereum platform.
eip155Block / eip158Block — these fields add support for non-backward-compatible protocol changes to the Homestead version used. For the purposes of this example, you won't be leveraging these, so they are set to "0".
difficulty — this value controls block generation time of the blockchain. The higher the value, the more calculations a miner must perform to discover a valid block. Because this example is simply deploying a test network, let's keep this value low to reduce wait times.
gasLimit — gas is ethereum's fuel spent during transactions. As you do not want to be limited in your tests, keep this value high.
alloc — this section prefunds accounts, but because you'll be mining your ether locally, you don't need this option.
Now it's time to instantiate the data directory. Open a terminal window, and assuming you have the Geth binary installed and that it's accessible via your working path, type the following:
$ geth --datadir /home/petros/eth-evm/data/PrivateBlockchain ↪init /home/petros/eth-evm/config/Genesis.json WARN [02-10|15:11:41] No etherbase set and no accounts found ↪as default INFO [02-10|15:11:41] Allocated cache and file handles ↪database=/home/petros/eth-evm/data/PrivateBlockchain/ ↪geth/chaindata cache=16 handles=16 INFO [02-10|15:11:41] Writing custom genesis block INFO [02-10|15:11:41] Successfully wrote genesis state ↪database=chaindata hash=d1a12d...4c8725 INFO [02-10|15:11:41] Allocated cache and file handles ↪database=/home/petros/eth-evm/data/PrivateBlockchain/ ↪geth/lightchaindata cache=16 handles=16 INFO [02-10|15:11:41] Writing custom genesis block INFO [02-10|15:11:41] Successfully wrote genesis state ↪database=lightchaindata
The command will need to reference a working data directory to store your private chain data. Here, I have specified eth-evm/data/PrivateBlockchain subdirectories in my home directory. You'll also need to tell the utility to initialize using your genesis file.
This command populates your data directory with a tree of subdirectories and files:
$ ls -R /home/petros/eth-evm/ .: config data ./config: Genesis.json ./data: PrivateBlockchain ./data/PrivateBlockchain: geth keystore ./data/PrivateBlockchain/geth: chaindata lightchaindata LOCK nodekey nodes transactions.rlp ./data/PrivateBlockchain/geth/chaindata: 000002.ldb 000003.log CURRENT LOCK LOG MANIFEST-000004 ./data/PrivateBlockchain/geth/lightchaindata: 000001.log CURRENT LOCK LOG MANIFEST-000000 ./data/PrivateBlockchain/geth/nodes: 000001.log CURRENT LOCK LOG MANIFEST-000000 ./data/PrivateBlockchain/keystore:
Your private blockchain is now created. The next step involves starting the private network that will allow you to mine new blocks and have them added to your blockchain. To do this, type:
petros@ubuntu-evm1:~/eth-evm$ geth --datadir ↪/home/petros/eth-evm/data/PrivateBlockchain --networkid 9999 WARN [02-10|15:11:59] No etherbase set and no accounts found ↪as default INFO [02-10|15:11:59] Starting peer-to-peer node ↪instance=Geth/v1.7.3-stable-4bb3c89d/linux-amd64/go1.9.2 INFO [02-10|15:11:59] Allocated cache and file handles ↪database=/home/petros/eth-evm/data/PrivateBlockchain/ ↪geth/chaindata cache=128 handles=1024 WARN [02-10|15:11:59] Upgrading database to use lookup entries INFO [02-10|15:11:59] Initialised chain configuration ↪config="{ChainID: 999 Homestead: 0 DAO: DAOSupport: ↪false EIP150: EIP155: 0 EIP158: 0 Byzantium: ↪Engine: unknown}" INFO [02-10|15:11:59] Disk storage enabled for ethash caches ↪dir=/home/petros/eth-evm/data/PrivateBlockchain/ ↪geth/ethash count=3 INFO [02-10|15:11:59] Disk storage enabled for ethash DAGs ↪dir=/home/petros/.ethash count=2 INFO [02-10|15:11:59] Initialising Ethereum protocol ↪versions="[63 62]" network=9999 INFO [02-10|15:11:59] Database deduplication successful ↪deduped=0 INFO [02-10|15:11:59] Loaded most recent local header ↪number=0 hash=d1a12d...4c8725 td=1024 INFO [02-10|15:11:59] Loaded most recent local full block ↪number=0 hash=d1a12d...4c8725 td=1024 INFO [02-10|15:11:59] Loaded most recent local fast block ↪number=0 hash=d1a12d...4c8725 td=1024 INFO [02-10|15:11:59] Regenerated local transaction journal ↪transactions=0 accounts=0 INFO [02-10|15:11:59] Starting P2P networking INFO [02-10|15:12:01] UDP listener up ↪self=enode://f51957cd4441f19d187f9601541d66dcbaf560 ↪770d3da1db4e71ce5ba3ebc66e60ffe73c2ff01ae683be0527b77c0f96 ↪a178e53b925968b7aea824796e36ad27@[::]:30303 INFO [02-10|15:12:01] IPC endpoint opened: /home/petros/eth-evm/ ↪data/PrivateBlockchain/geth.ipc INFO [02-10|15:12:01] RLPx listener up ↪self=enode://f51957cd4441f19d187f9601541d66dcbaf560 ↪770d3da1db4e71ce5ba3ebc66e60ffe73c2ff01ae683be0527b77c0f96 ↪a178e53b925968b7aea824796e36ad27@[::]:30303
Notice the use of the new parameter, networkid. This networkid helps ensure the privacy of your network. Any number can be used here. I have decided to use 9999. Note that other peers joining your network will need to use the same ID.
Your private network is now live! Remember, every time you need to access your private blockchain, you will need to use these last two commands with the exact same parameters (the Geth tool will not remember it for you):
$ geth --datadir /home/petros/eth-evm/data/PrivateBlockchain ↪init /home/petros/eth-evm/config/Genesis.json $ geth --datadir /home/petros/eth-evm/data/PrivateBlockchain ↪--networkid 9999
Configuring a User Account
So, now that your private blockchain network is up and running, you can start interacting with it. But in order to do so, you need to attach to the running Geth process. Open a second terminal window. The following command will attach to the instance running in the first terminal window and bring you to a JavaScript console:
$ geth attach /home/petros/eth-evm/data/PrivateBlockchain/geth.ipc Welcome to the Geth JavaScript console! instance: Geth/v1.7.3-stable-4bb3c89d/linux-amd64/go1.9.2 modules: admin:1.0 debug:1.0 eth:1.0 miner:1.0 net:1.0 ↪personal:1.0 rpc:1.0 txpool:1.0 web3:1.0 >
Time to create a new account that will manipulate the Blockchain network:
> personal.newAccount() Passphrase: Repeat passphrase: "0x92619f0bf91c9a786b8e7570cc538995b163652d"
Remember this string. You'll need it shortly. If you forget this hexadecimal string, you can reprint it to the console by typing:
> eth.coinbase "0x92619f0bf91c9a786b8e7570cc538995b163652d"
Check your ether balance by typing the following script:
> eth.getBalance("0x92619f0bf91c9a786b8e7570cc538995b163652d") 0
Here's another way to check your balance without needing to type the entire hexadecimal string:
> eth.getBalance(eth.coinbase) 0
Mining
Doing real mining in the main ethereum blockchain requires some very specialized hardware, such as dedicated Graphics Processing Units (GPU), like the ones found on the high-end graphics cards mentioned in Part I. However, since you're mining for blocks on a private chain with a low difficulty level, you can do without that requirement. To begin mining, run the following script on the JavaScript console:
> miner.start() null
Updates in the First Terminal Window
You'll observe mining activity in the output logs displayed in the first terminal window:
INFO [02-10|15:14:47] Updated mining threads ↪threads=0 INFO [02-10|15:14:47] Transaction pool price threshold ↪updated price=18000000000 INFO [02-10|15:14:47] Starting mining operation INFO [02-10|15:14:47] Commit new mining work ↪number=1 txs=0 uncles=0 elapsed=186.855us INFO [02-10|15:14:57] Generating DAG in progress ↪epoch=1 percentage=0 elapsed=7.083s INFO [02-10|15:14:59] Successfully sealed new block ↪number=1 hash=c81539...dc9691 INFO [02-10|15:14:59] mined potential block ↪number=1 hash=c81539...dc9691 INFO [02-10|15:14:59] Commit new mining work ↪number=2 txs=0 uncles=0 elapsed=211.208us INFO [02-10|15:15:04] Generating DAG in progress ↪epoch=1 percentage=1 elapsed=13.690s INFO [02-10|15:15:06] Successfully sealed new block ↪number=2 hash=d26dda...e3b26c INFO [02-10|15:15:06] mined potential block ↪number=2 hash=d26dda...e3b26c INFO [02-10|15:15:06] Commit new mining work ↪number=3 txs=0 uncles=0 elapsed=510.357us [ ... ] INFO [02-10|15:15:52] Generating DAG in progress ↪epoch=1 percentage=8 elapsed=1m2.166s INFO [02-10|15:15:55] Successfully sealed new block ↪number=15 hash=d7979f...e89610 INFO [02-10|15:15:55] block reached canonical chain ↪number=10 hash=aedd46...913b66 INFO [02-10|15:15:55] mined potential block ↪number=15 hash=d7979f...e89610 INFO [02-10|15:15:55] Commit new mining work ↪number=16 txs=0 uncles=0 elapsed=105.111us INFO [02-10|15:15:57] Successfully sealed new block ↪number=16 hash=61cf68...b16bf2 INFO [02-10|15:15:57] block reached canonical chain ↪number=11 hash=6b89ff...de8f88 INFO [02-10|15:15:57] mined potential block ↪number=16 hash=61cf68...b16bf2 INFO [02-10|15:15:57] Commit new mining work ↪number=17 txs=0 uncles=0 elapsed=147.31us
Back to the Second Terminal Window
Wait 10–20 seconds, and on the JavaScript console, start checking your balance:
> eth.getBalance(eth.coinbase) 10000000000000000000
Wait some more, and list it again:
> eth.getBalance(eth.coinbase) 75000000000000000000
Remember, this is fake ether, so don't open that bottle of champagne, yet. You are unable to use this ether in the main ethereum network.
To stop the miner, invoke the following script:
> miner.stop() true
Well, you did it. You created your own private blockchain and mined some ether.
Who Will Benefit from This Technology Today and in the Future?
Although the blockchain originally was developed around cryptocurrency (more specifically, bitcoin), its uses don't end there. Today, it may seem like that's the case, but there are untapped industries and markets where blockchain technologies can redefine how transactions are processed. The following are some examples that come to mind.
Improving Smart Contracts
Ethereum, the same open-source blockchain project deployed earlier, already is doing the whole smart-contract thing, but the idea is still in its infancy, and as it matures, it will evolve to meet consumer demands. There's plenty of room for growth in this area. It probably and eventually will creep into governance of companies (such as verifying digital assets, equity and so on), trading stocks, handling intellectual property and managing property ownership, such as land title registration.
Enabling Market Places and Shared Economies
Think of eBay but refocused to be peer-to-peer. This would mean no more transaction fees, but it also will emphasize the importance of your personal reputation, since there will be no single body governing the market in which goods or services are being traded or exchanged.
Crowdfunding
Following in the same direction as my previous remarks about a decentralized marketplace, there also are opportunities for individuals or companies to raise the capital necessary to help "kickstart" their initiatives. Think of a more open and global Kickstarter or GoFundMe.
Multimedia Sharing or Hosting
A peer-to-peer network for aspiring or established musicians definitely could go a long way here—one where the content will reach its intended audiences directly and also avoid those hefty royalty costs paid out to the studios, record labels and content distributors. The same applies to video and image content.
File Storage and Data Management
By enabling a global peer-to-peer network, blockchain technology takes cloud computing to a whole new level. As the technology continues to push itself into existing cloud service markets, it will challenge traditional vendors, including Amazon AWS and even Dropbox and others—and it will do so at a fraction of the price. For example, cold storage data offerings are a multi-hundred billion dollar market today. By distributing your encrypted archives across a global and decentralized network, the need to maintain local data-center equipment by a single entity is reduced significantly.
Social media and how your posted content is managed would change under this model as well. Under the blockchain, Facebook or Twitter or anyone else cannot lay claim to what you choose to share.
Another added benefit to leveraging blockchain here is making use of the cryptography securing your valuable data from getting hacked or lost.
Internet of Things
What is the Internet of Things (IoT)? It is a broad term describing the networked management of very specific electronic devices, which include heating and cooling thermostats, lights, garage doors and more. Using a combination of software, sensors and networking facilities, people can easily enable an environment where they can automate and monitor home and/or business equipment.
Supply Chain Audits
With a distributed public ledger made available to consumers, retailers can't falsify claims made against their products. Consumers will have the ability to verify their sources, be it food, jewelry or anything else.
Identity Management
There isn't much to explain here. The threat is very real. Identity theft never takes a day off. The dated user name/password systems of today have run their course, and it's about time that existing authentication frameworks leverage the cryptographic capabilities offered by the blockchain.
Summary
This revolutionary technology has enabled organizations in ways that weren't possible a decade ago. Its possibilities are enormous, and it seems that any industry dealing with some sort of transaction-based model will be disrupted by the technology. It's only a matter of time until it happens.
Now, what will the future for blockchain look like? At this stage, it's difficult to say. One thing is for certain though; large companies, such as IBM, are investing big into the technology and building their own blockchain infrastructure that can be sold to and used by corporate enterprises and financial institutions. This may create some issues, however. As these large companies build their blockchain infrastructures, they will file for patents to protect their technologies. And with those patents in their arsenal, there exists the possibility that they may move aggressively against the competition in an attempt to discredit them and their value.
Anyway, if you will excuse me, I need to go make some crypto-coin.
https://ift.tt/2qXdL6a via @johanlouwers . follow me also on twitter
0 notes
Text
3D Printing with Autodesk Inventor
Autodesk Inventor is a 3D CAD software program focused on product development processes, and is often used for 3D mechanical design, simulation, visualization and documentation. Inventor is the Autodesk solution for prototyping and it offers the possibility to design and build models in less time.
This software is widely used for professionals who use 3D printing and it’s constantly improved and updated with new features.
Today we would like to introduce you to this 3D program, explain how to prepare your 3D files to 3D print them with Autodesk Inventor and highlight some of its main features.
How to 3D print with Autodesk Inventor
There are three different methods to 3D print your files with Autodesk Inventor, depending on the printer technology that you are using.
Option 1: Export your files for 3D printing
If you print your models with a professional 3D printing service like i.materialise, you need to export your files to a supported 3D file format. This is the best option if you are looking for a professional and high-quality finish for your models.
When you have your 3D designs ready, you can export them to an .STL file and upload it to the i.materialise online platform. These are the 3D file formats supported by our platform for uploading your designs.
How to export your files to 3D print with Autodesk Inventor:
Click the I button
Select Export
Select CAD format
Export files to 3D print with Autodesk Inventor
How to save the files to 3D print with Autodesk Inventor:
Select STL as the file type in the Save As dialog box
Click on the options button
Select the type of file (Binary or ASCII 3)
Select units
Choose the resolution (number of triangles describing the geometry)
Click OK
Click Preview to verify your selection
Toggle mesh view to see vertices and ensure that they match the expectations for resolution
Option2: Use Inventor’s 3D printing environment
Since its 2016 version, Inventor includes a 3D printing environment that allows designers to 3D print their models easily, as part of the creation process. This option is more suitable for those who print at home or at work with small FDM 3D printers
The 3D printing environment of Autodesk Inventor provides more control over the export process of the 3D files and allows functions like editing, orientation changes and scaling without affecting the native file.
The main advantage of this environment is that it includes preset printers and it’s also possible to add new customized ones. The build spaces will give the users a sense of scale and allow them to optimize the orientation of the parts inside a specific build volume, before exporting the STL format.
The Autodesk 3D Printing environment also allows other functions: edit, move, set orientation, direct edit and export to STL.
Autodesk 3D Printing Environment
Option 3: Use Autodesk Print Studio
Another option to 3D print your files with Autodesk Inventor is the Autodesk Print Studio, a print preparation software that heals, prepares and prints 3D models. It is linked to Autodesk cloud storage and file sharing A360.
Once the Print Studio is installed, Inventor will launch it from the 3D print environment and place the model into the build space.
The software will show the necessary steps to verify and print the model, shown in a timeline progression to intuitively prepare the files to 3D print: Import, Layout, Repair, Support, Preview and Export.
Autodesk Print Studio
As mentioned, the first option is the best if you are looking for a professional finish for your models and prototypes. 3D printing from the 3D printing environment or the 3D Print Studio is an easier approach, and more suitable if you are printing with small home printers.
Main Features of Autodesk Inventor
Design and Validate Products Digitally
Autodesk Inventor software products include a parametric design environment that allows the development of initial concept sketches and models. Inventor software automates the advanced geometry creation of intelligent components so users can rapidly build and refine digital prototypes.
The Inventor product line includes easy-to-use and integrated part and assembly-level motion simulation and stress analysis functionality. By simulating stress, deflection, and motion, you can optimize and validate your design under real-world conditions, before the product or part is ever printed.
Autodesk Inventor
Design Communication in Workgroups
With Inventor it is possible to associate engineering change orders before manufacturing by generating documentation directly from a 3D digital prototype. Inventor offers an accurate output of production-ready drawings directly from the 3D model. Inventor product bundles also include software for 2D mechanical drafting tools.
This software is tightly integrated with Autodesk data management applications, making it a good option for an easy and secure exchange of design data. It facilitates collaboration between designs and manufacturing workgroups: different teams can manage and track all components of a digital prototype with the Design Review software. The product configurations will offer specific levels of functionality to fit different design needs.
Autodesk Inventor – From 2D to 3D data
What’s more, Inventors AnyCAD technology allows data to be brought in from different sources and native formats maintaining the links to the original data at the same time.
Digital prototyping
With Autodesk Inventor software it’s possible and easy to integrate AutoCAD® and 3D data into a single digital model to create a virtual representation of the final product. The software will provide direct reading and writing of native DWG™ files, so there’s no risk of inaccurate translations.
Autodesk Illustrator works with a subscription system but you can get a free trial for 30 days to start designing and printing your models.
This software is used by professional 3D designers and engineers but there are many different options for 3D design and 3D printing software, for beginners and advanced users: discover them in our 3D printing tutorials.
When you have exported your 3D files from Autodesk Inventor, it’s possible to print them with i.materialise by uploading them onto our platform.
Sources: Autodesk Inventor Autodesk 3D Printing Autodesk University
© All images belong to Autodesk
3D Printing with Autodesk Inventor published first on http://ift.tt/2vVn0YZ
0 notes
Text
3D Printing with Autodesk Inventor
Autodesk Inventor is a 3D CAD software program focused on product development processes, and is often used for 3D mechanical design, simulation, visualization and documentation. Inventor is the Autodesk solution for prototyping and it offers the possibility to design and build models in less time.
This software is widely used for professionals who use 3D printing and it’s constantly improved and updated with new features.
Today we would like to introduce you to this 3D program, explain how to prepare your 3D files to 3D print them with Autodesk Inventor and highlight some of its main features.
How to 3D print with Autodesk Inventor
There are three different methods to 3D print your files with Autodesk Inventor, depending on the printer technology that you are using.
Option 1: Export your files for 3D printing
If you print your models with a professional 3D printing service like i.materialise, you need to export your files to a supported 3D file format. This is the best option if you are looking for a professional and high-quality finish for your models.
When you have your 3D designs ready, you can export them to an .STL file and upload it to the i.materialise online platform. These are the 3D file formats supported by our platform for uploading your designs.
How to export your files to 3D print with Autodesk Inventor:
Click the I button
Select Export
Select CAD format
Export files to 3D print with Autodesk Inventor
How to save the files to 3D print with Autodesk Inventor:
Select STL as the file type in the Save As dialog box
Click on the options button
Select the type of file (Binary or ASCII 3)
Select units
Choose the resolution (number of triangles describing the geometry)
Click OK
Click Preview to verify your selection
Toggle mesh view to see vertices and ensure that they match the expectations for resolution
Option2: Use Inventor’s 3D printing environment
Since its 2016 version, Inventor includes a 3D printing environment that allows designers to 3D print their models easily, as part of the creation process. This option is more suitable for those who print at home or at work with small FDM 3D printers
The 3D printing environment of Autodesk Inventor provides more control over the export process of the 3D files and allows functions like editing, orientation changes and scaling without affecting the native file.
The main advantage of this environment is that it includes preset printers and it’s also possible to add new customized ones. The build spaces will give the users a sense of scale and allow them to optimize the orientation of the parts inside a specific build volume, before exporting the STL format.
The Autodesk 3D Printing environment also allows other functions: edit, move, set orientation, direct edit and export to STL.
Autodesk 3D Printing Environment
Option 3: Use Autodesk Print Studio
Another option to 3D print your files with Autodesk Inventor is the Autodesk Print Studio, a print preparation software that heals, prepares and prints 3D models. It is linked to Autodesk cloud storage and file sharing A360.
Once the Print Studio is installed, Inventor will launch it from the 3D print environment and place the model into the build space.
The software will show the necessary steps to verify and print the model, shown in a timeline progression to intuitively prepare the files to 3D print: Import, Layout, Repair, Support, Preview and Export.
Autodesk Print Studio
As mentioned, the first option is the best if you are looking for a professional finish for your models and prototypes. 3D printing from the 3D printing environment or the 3D Print Studio is an easier approach, and more suitable if you are printing with small home printers.
Main Features of Autodesk Inventor
Design and Validate Products Digitally
Autodesk Inventor software products include a parametric design environment that allows the development of initial concept sketches and models. Inventor software automates the advanced geometry creation of intelligent components so users can rapidly build and refine digital prototypes.
The Inventor product line includes easy-to-use and integrated part and assembly-level motion simulation and stress analysis functionality. By simulating stress, deflection, and motion, you can optimize and validate your design under real-world conditions, before the product or part is ever printed.
Autodesk Inventor
Design Communication in Workgroups
With Inventor it is possible to associate engineering change orders before manufacturing by generating documentation directly from a 3D digital prototype. Inventor offers an accurate output of production-ready drawings directly from the 3D model. Inventor product bundles also include software for 2D mechanical drafting tools.
This software is tightly integrated with Autodesk data management applications, making it a good option for an easy and secure exchange of design data. It facilitates collaboration between designs and manufacturing workgroups: different teams can manage and track all components of a digital prototype with the Design Review software. The product configurations will offer specific levels of functionality to fit different design needs.
Autodesk Inventor – From 2D to 3D data
What’s more, Inventors AnyCAD technology allows data to be brought in from different sources and native formats maintaining the links to the original data at the same time.
Digital prototyping
With Autodesk Inventor software it’s possible and easy to integrate AutoCAD® and 3D data into a single digital model to create a virtual representation of the final product. The software will provide direct reading and writing of native DWG™ files, so there’s no risk of inaccurate translations.
Autodesk Illustrator works with a subscription system but you can get a free trial for 30 days to start designing and printing your models.
This software is used by professional 3D designers and engineers but there are many different options for 3D design and 3D printing software, for beginners and advanced users: discover them in our 3D printing tutorials.
When you have exported your 3D files from Autodesk Inventor, it’s possible to print them with i.materialise by uploading them onto our platform.
Sources: Autodesk Inventor Autodesk 3D Printing Autodesk University
© All images belong to Autodesk
from 3D Printing Blog | i.materialise https://i.materialise.com/blog/3d-printing-autodesk-inventor/
0 notes
Text
Load 3D File & Save Meshes in Custom Binary Format & Import an Existing PLY File in Using Aspose.3D for .NET 17.01
Load 3D File & Save Meshes in Custom Binary Format & Import an Existing PLY File in Using Aspose.3D for .NET 17.01
Load 3D File & Save Meshes in Custom Binary Format & Import an Existing PLY File in Using Aspose.3D for .NET 17.01 It adds support for loading 3D file & save Meshes in custom binary format. This feature would also help clients manipulate bigger 3D models more effectively. PLY is a computer file format known as the Polygon File Format or the Stanford Triangle Format. It is one of simplest format…
View On WordPress
0 notes
Text
Create Animated Scene, Create Primitive 3D Shapes & Convert Meshes to Binary Format using Java
What’s new in this release?
Aspose is proud to expand its components family with the addition of a new product known as Aspose.3D for Java 18.5. Aspose.3D for Java API has incorporated import and export features, and developers would be able to convert their 3D models to any supported 3D formats. All readable and writable supported file formats are listed in the documentation help topics "Read 3D document" and |Save 3D document" on blog announcements page. Aspose.3D for Java API includes support of creating 3D scene from scratch, defining Metadata of the 3D scene, creating primitive 3D Shapes and visiting sub nodes to convert meshes to custom binary format. With Aspose.3D for Java API, developers can generate and store tangent and binormal data for all meshes. The tangent and bitangent are orthogonal vectors with the Normal, and instruct about the rate of change of the texture coordinates over the mesh surface. Developers can also triangulate mesh, split mesh, convert primitive shapes to meshes, encode 3D mesh in the Google Draco file, convert all Polygons to triangles and generate normal data for all meshes of 3D scene. Aspose.3D for Java API supports rendering the animated scene, and the help topic narrates prerequisites to move an object. Developers can also set up the Camera with a target to constrain. Aspose.3D for Java API supports rotating objects in a 3D scene, add node hierarchy, share geometry data of mesh between multiple nodes, concatenate Quaternions apply to 3D objects, define Mesh from scratch, set up normals or UV on objects and also add Material. This release includes plenty of new features as listed below
Define Metadata, create Primitive 3D Shapes and convert Meshes to binary format
Add Asset Information to 3D document
Create Scene with Primitive 3D Shapes
Save 3D Meshes in Custom Binary Format
Manipulate Objects in 3D Scene
Create an Animated Scene
Work with Geometric data of 3D Scene
Generate Normal Data for All Meshes of 3D Model
Convert all Polygons to triangles in 3D Model
Newly added documentation pages and articles
Some new tips and articles have now been added into Aspose.3D for Java documentation that may guide users briefly how to use Aspose.3D for performing different tasks like the followings.
Save 3D Document
Read 3D document
Overview: Aspose.3D for Java
Aspose.3D for Java is a feature-rich Gameware and Computer-Aided-Designing (CAD) API that empowers Java applications to connect with 3D document formats without requiring any 3D modeling software being installed on the server. It supports most of the popular 3D file formats, allowing developers to easily create, read, convert & modify 3D files. It helps developers in building mesh of various 3D geometric shapes; define control points and polygons in the simplest way to create 3D meshes. It empowers programmers to easily generate 3D scenes from scratch without needing to install any 3D modeling software.
More about Aspose.OCR for Java
Homepage of Aspose.3D for Java
Download Aspose.3D for Java
Online documentation of Aspose.3D for Java
#Java 3d API#Java 3d library#create Primitive 3D Shapes#convert Meshes to binary format#Define Metadata#Manipulate Objects in 3D Scene#Create an Animated Scene#Work with Geometric data of 3D Scene
0 notes
Text
Tutorial Tuesday 38: Lightning-Fast Lithophanes With Cura
The 3D printing slicer Cura has a cool hidden feature: It turns out that you can upload an image and it will turn dark/light contrast into high/low elevation. You can use this feature to make a quick 3D-printable lithophane. Black and white images work the best, but you can get amazingly detailed photographic quality from lithophanes, so they don’t necessarily have to be simple.
Lithophanes don’t look like much sitting on your desk, but when you a shine light through them you can get a really realistic image. For example, check out this Han Solo lithophane we printed a few years ago using the Thingiverse Lithophane Customizer; the first photo shows the print lying on a table, and the second photo shows the same object with light coming through the back from the window.
The method used to get the lithophane above works, but it isn’t always easy to use. The new method using Cura that we’ll describe in this post is much easier, and seems to work better on detailed images without the need for any pre-processing.
Hey, ho, let’s go!
For our new lithophane example we’ll use the iconic Ramones debut album cover from 1976:
Download the latest version of Cura and click on the folder icon to open any image file. Our image was in JPG format. A dialog box will pop up that allows you to set the minimum and maximum heights, and whether darker parts of the image will be considered high points or low points. For a lithophane to work you’ll want to use the “Darker is higher” selection, so that less light will pass through the darker parts of your image. The minimum unsupported wall thickness for Shapeways Strong and Flexible Nylon is 0.7mm, so we set the minimum to 0.8mm in this example.
Make sure that the Smoothing slider is all the way down; even a little bit of smoothing can deform your image significantly. On the other hand, if you have a “thin walls” problem later on in the process that can’t be fixed, then you might try moving that slider the smallest possible amount. The Height setting will depend on how dark you want the dark parts of your image to be. We’re trying 2.0mm here, but we also made a Thickness Tester that you can order if you want to see how opaque the Strong and Flexible nylon is at different thicknesses from 0.8mm to 3.0mm.
Here’s how the image looks after importing into Cura:
At this point you can test-print the lithophane at home on an FDM printer, if you have one. When you’re ready to send a print to Shapeways, use the menu File / Save All / Save to File, and choose “Binary STL” as the file format.
Unify Duplicated Vertices in MeshLab
You could upload your lithophane STL file to Shapways right now, but the following step will make your life a lot easier. Open up MeshLab, and choose Import Mesh from the file menu. As your file is importing, a dialogue window will pop up asking if you want to Unify Duplicated Vertices. You definitely do, so press “OK”.
Before pressing OK our model had a million and a half vertices:
Some of those vertices were right on top of each other, or so close as to be indistinguishable. After “unifying”, the number of vertices is reduced to about a fifth of the original amount, and our file now has just 300,000 vertices.
That was in fact the only thing we needed to do in MeshLab. Our file looks the same, but it now has a much simpler mesh:
Now select “Export Mesh As” from the file menu, and save your reduced-vertex file again in STL format. This new file will upload and process at Shapeways faster, and it will be simple enough for Shapeways to repair if there are printability problems.
Upload and Print
Okay, now you’re ready to upload to Shapeways! However, depending on the complexity of the photo you chose, there may be some problems with the printability of your model. This happened to us; note the yellow triangles in the material list for our uploaded model:
Usually, the printability issues are very small at this stage, and you should be able to fix them from within Shapeways. To do this, click on View Issues, and then select the Wall Thickness option from the left menu. The iffy parts of your model will be shown in a different color. In the image below, the thin walls are marked in red, and were mostly on the lips and knees of the Ramones):
These problems are small enough that clicking the “Fix Thin Walls” button should do the trick. Fingers crossed that the Ramones won’t have puffy lips after this fix! We’ll post an photo of our printed Ramones Lithophane once we get it back from Shapeways.
For now, check out this smaller FDM version we prototyped at home. Again, the printed version is not much to look at unless you hold it up to the light, but then, WOW! I can’t this stress enough: these are photographs of the SAME OBJECT:
Have you used the image-to-elevation feature in Cura? Let us know what you’re up to and you could be featured in a future Tutorial Tuesday post. In the meantime, enjoy some Ramones.
youtube
The post Tutorial Tuesday 38: Lightning-Fast Lithophanes With Cura appeared first on Shapeways Magazine.
Tutorial Tuesday 38: Lightning-Fast Lithophanes With Cura published first on http://ift.tt/2vVn0YZ
0 notes