#read and write 3D mesh
Explore tagged Tumblr posts
Visit Tumblr Blog
Explore Tumblr blogs with no restrictions, modern design and the best experience.
Last Seen Tumblr Blogs


Fun Fact
Users from the US are the majority of Tumblr visitors.
Text

Boutique Mod - DOWNLOAD
Inspired by the sims 2 shopping for clothes system, I present a sims 3 take on buying clothes, accessories and running a thriving boutique! Set up shifts, keep the racks stocked, and you might find yourself in profit!
Required:
Ambitions
NRAAS Master Controller + Integration Module
Optional:
ITF if you want to use the clothes mannequin and some visual effects.
Late Night if you want the animations for the security guard.
Seasons for extra interactions on the mannequin.
Savvy Seller Set for some visual and audio effects.
Full Documentation is included in the download. I spent a while writing it out, so please read thoroughly!

How Stores Work:
Set up a shift
Hire Employees (bosses count as employees so stores are fully functional with only one sim!)
Link at least one rack to the register
Open for business!

Employees:
Store employees can be given three types of roles: register attendant, sales attendant and security guard.
Employees will do their jobs automatically but you can always manually tell them to do things too like: restocking, dressing up mannequins, helping customers, among other things.

Customers:
Inactive and active sims can browse through the racks and have the ability to purchase items. They'll interact differently depending on if they are shopping at a clothes rack, accessory rack, or at a mannequin.
Inactives won't purchase outfits from mannequins unless you direct them to (or you enable auto-purchasing in the XML). However, they may "fake" buy clothes.
Once finished shopping, customers hold their bags and wait to be rung up! Take too long and they may abandon their purchase.
Shopping:
Adjust prices and restrict customers by age and gender to customise your store!

Clothes Racks:
Buy Clothes for your own sim, sims in your household, or (if you're an employee) suggest clothes for customers.
Employees that suggest clothes for customers can fulfil Ambition Stylist jobs this way.

Accessories Racks:
Choose accessories to be sold by adding them to the XML in the package file. The XML comes loaded with a few base game items already plus a couple modded items (Arsil's Sunglasses and lipstick - that won't be loaded unless you have them installed).
Sell buy-mode items as well as CAS items!
Make your CAS items wearable from your sim's inventory using your own meshes or my dummy accessory (see Documentation and XML for details).
Blacklist certain categories from being shown. If you want a dedicated shoe shop or an opticians, you can have it!
Try on products before buying them to see if they suit your sim. If there's a mirror in the room, they'll check themselves out in it.

Clothing Mannequin:
Try on the mannequin outfits to see if they suit your sim.
Plan different outfits to display and even set them to be rotated through seasonally.
Let your employees be creative and choose a random outfit for the mannequin to wear.
Buy clothes for your own sim, household members, or customers.
Allow or disallow inactives from automatically purchasing display outfits.

Security Gates:
Give your security guards something to stand and look threatening by.
You can try your luck at stealing from the shop. If you're caught, you'll have to pay up. If you get past the gates (or if there are no gates), enjoy your bounty!
Boutique Door:
Cloned from the Savvy Seller doors without the annoying 'kick-every-last-person-out-the-building-come-closing-time' feature.
Link this to a register and let the open and close sign automatically flip itself. Also, close the store or rename it, straight from the door.
Phone Interactions:
Ask for time off work (paid or unpaid).
Call in sick.
Cancel vacation days.

Credits and Thanks:
@dhalsims for adding geostates to the ITF rack for me. Modders, I really recommend her if you need any 3D models made also!
DouglasVeiga for the BG rack with the geostates.
@aroundthesims for allowing me to use her objects in my mod as always!
Sims 4 for all the animations that I converted.
Simstate & merchant mods for the idea to go into a mode to link racks to the register.
The OG shop for clothes mod and pedestal by @anitmb.
Arsil and @zoeoe-sims for wearable CAS items idea that I adapted.
Ani's Candle mod & Amb. Makeover XML which I looked at for inspo on how to do accessory rack xml.
Compatibility:
All new objects so shouldn't conflict with anything really.
Removes the 'plan outfit' interaction from dressers.
Made on version 1.67.

If you would like to donate as thanks, please feel free to do so at: my kofi! I don't take your generosity for granted!
Download: - Simblr.cc - 2t3 Boutique Mod Suggested Extra CC: - Lyralei's TS2 Conversions (incl. clothes changing booth) - More ATS3 Security Gates - ATS3 Friperie Set
Known issues, prop information and the full feature breakdown are all in the documentation.
Please be patient with me if there are bugs to fix. Also, anyone who DMs me "I don't know how to create a new shift" will be immediately fined £150.
With that said, please enjoy the mod and tag me in your beautiful boutiques,
Phoebe :)
#sims 3#phoebejaysims#boutique mod#ts3#ts3 mods#sims 3 mod#sims 3 cc#simblr#sims 3 download#2t3#functional obj
906 notes
·
View notes
Text

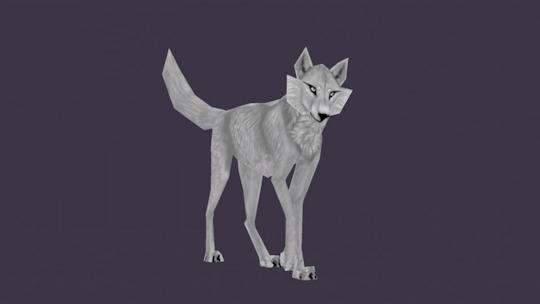
Time for something new! - or old, since here could be your wolf character in retro games' style, low-poly and with pixelated texture.
🐺 Multi-slot (3 slots) YCH – 3D low-poly wolf character model
🔸 Price per slot: 50$
🔸READ THE INFO BELOW BEFORE CLAIM! ⏬⏬⏬

No additional accessories or extra parts (wings, horns, tufts, etc.)
Non-symmetrical coloring is okay
Minor model adjustments are possible (like body thickness, cheeks shape, tail length)
Fine details may be simplified or lost due to the low texture resolution
If you're unsure whether your character fits, please ask before claiming a slot!
🔸 What you get:
poses list (see the 2nd image)
38 static renders
3 turnaround animations (mp4 & transparent gifs) ⏩[look at them!]⏪
.blend files included (you should have a PC & Blender 3.6+ to open them)
10 static poses
256x256 px texture (I'll colour the original grayscale base)
.txt file with simply guide
***
🔸 Model usage rules
Allowed Uses
You may use the model for personal projects, renders, animations and non-commercial purposes*
You may modify the textures and rigging for customization (please don’t heavily redesign the model into something unrecognizable)
You may showcase renders of the model in your portfolio, social media, or online galleries (crediting me optional but appreciated)
Prohibited Uses
Do not resell, trade, or share the .blend files or textures with others
Do not claim the original model as your own
Do not use the model for NFTs or AI training
Additional Terms
I keep the right to use the base model for my portfolio and other personal projects
I keep the right to use coloured base model for my portfolio
* Purchasing the YCH grants you a custom-colored version of the model, but not exclusive rights to the base mesh. Write me a note before claiming if you want to use it for commercial purposes.
🔸 By purchasing this model, you agree to these terms.
***
🔸 Payment within 48 hours after claiming. After payment I'll start the work & send the files to you after finishing.
I use folders on Google Drive.
🔸 Payment via PayPal this time!
(via my intermediary)
No refunds after receiving the files.
🔸 or via Hipolink
(using !bank cards)
No refunds after receiving the files.


#verbrannt74#3D#blender3d#3d modeling#3d model#3d artwork#3d art#low poly#low poly 3d#lowpoly#lowpoly aesthetic#gif#3d gif#wolf#wolf art#wolf ych#wolf commission#canine#canine art#canine ych#canine commission#3d ych#3d commission#retro#retro aesthetic#retro gaming#retro gaming aesthetic#pixel art#pixel#furry ych
170 notes
·
View notes
Text
Sayonara FreeSO

Yo! At the time I am writing this, FreeSO officially shut down about a month ago. I started making remeshes a little over seven years ago when 3D mode first released as a way to contribute to a game that I loved and to hone my 3D modeling and texturing skills. But that time has come to an end, and I will no longer be making remeshes for FreeSO or Simitone.
During this time I kept (nearly) all of my original work files, this includes the .PSD files for textures and .BLEND files for the models. I didn't want to let all of these files just go to waste and collect virtual dust on my hard drives. FreeSO was designed to be an open source project after all, and in the spirit of that, I am releasing all of the work files I have kept over the years of the nearly 60 remeshes I worked on for anyone to use.
These files are licensed under Creative Commons Attribution 4.0. Meaning that you may use them for any of your projects, including games, animation, and more so long as proper credit and attribution are given to myself (S1ndle) as the creator of the meshes and textures.
You can download the archive at the link below, please make sure to look at the various READ ME files.
Download
32 notes
·
View notes
Text

For anyone who was curious what my version of the Temple looks like in The Man in the Forest, here is a rough sketch and a floorplan :3 Excuse my awful handwriting, I hope y'all can read it. Red Merida silhouette for scale.

Bonus, the 3D model I worked up in DesignDoll to make art/writing easier :3 It took me HOURS to do this since I had to make all the pieces by hand. I used furniture dimensions from different online shopping sites so I knew I was making everything to-scale. With the exception of the beds which I was able to download off of Poliigon for free and add their meshes in. Everything else though... yikes. It took ages.
24 notes
·
View notes
Text
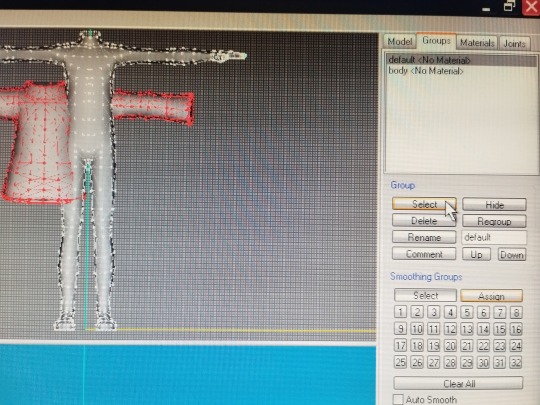
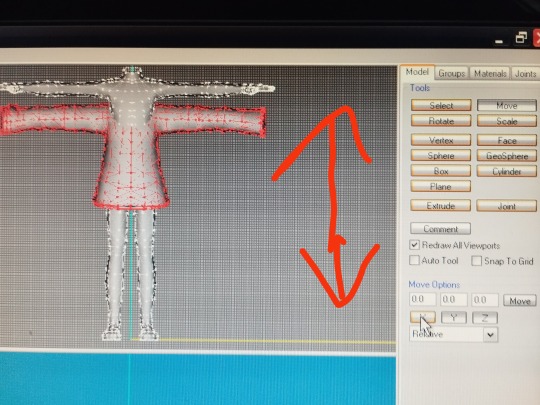
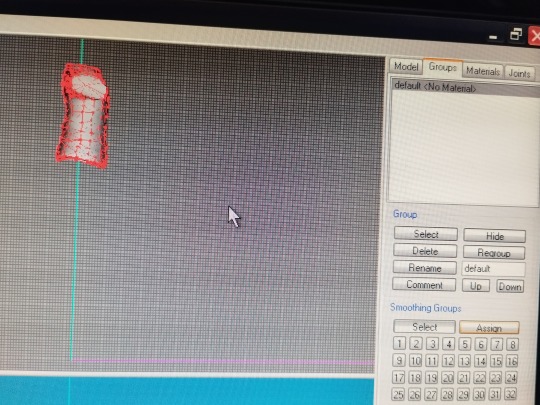
Tutorial 3D model to sims2
second part
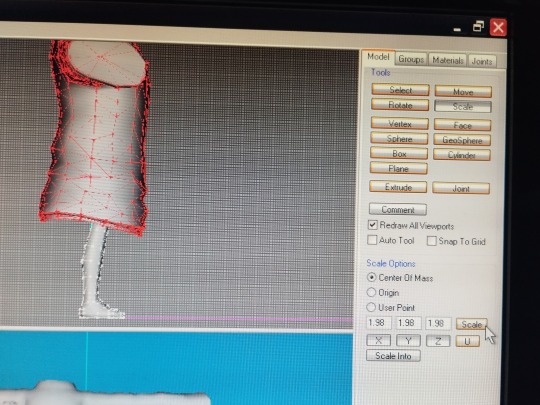
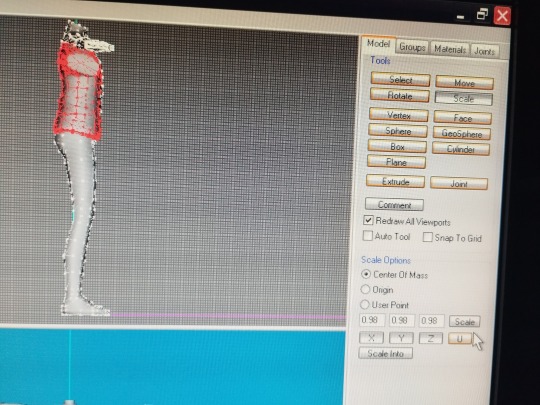
Now we are going to move our clothes to place them more or less in their corresponding place and to be able to continue increasing and decreasing their size until we find the perfect size
(groups, click in the name of our clothes : "default" , click select ...the clothes will turn red , click model, click move)
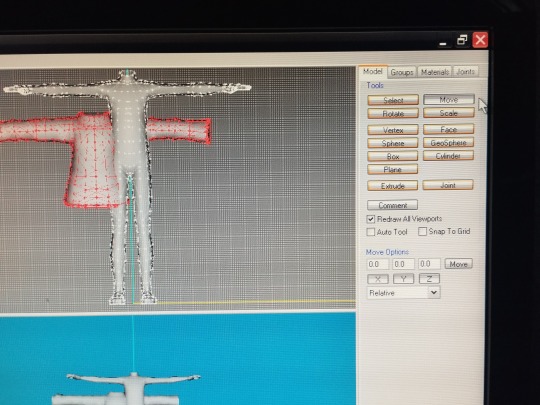
and now ... If you click on X and move the mouse, the clothes move up and down but in a straight line. If you click on Y, the clothes move right left in a straight line.If you click on Z it moves wherever you want without control (This works like this when you have chosen the front view, if you choose the left or right view things change, I will explain it later) It is important to say that you must have only one letter pressed, that letter will turn orange when you are using it, and the other two letters will remain gray
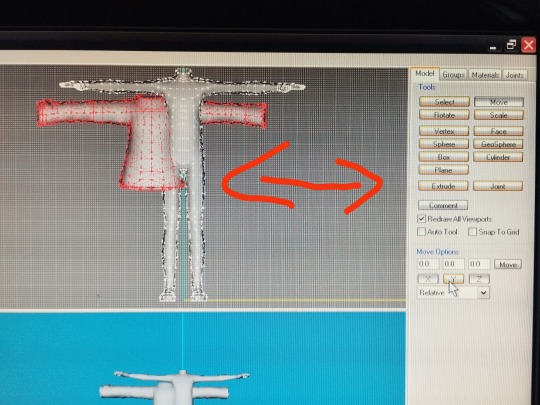
move the clothes until you have them placed more or less in the place you want and change the size until you have the desired one.
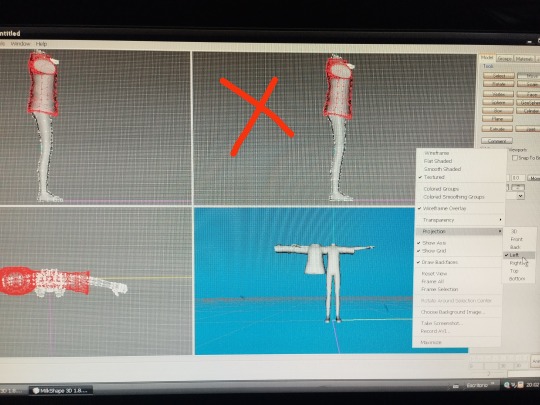
To keep in mind, if you are not very familiar with milkshape, there are 4 windows that are the views or projections of the model, left , front , top and 3D .They come by default when you open the program, but you can change the view you want whenever you want
you click on a window, right-click with the mouse, click on projection and choose the view you want… 3D front back left right top or bottom
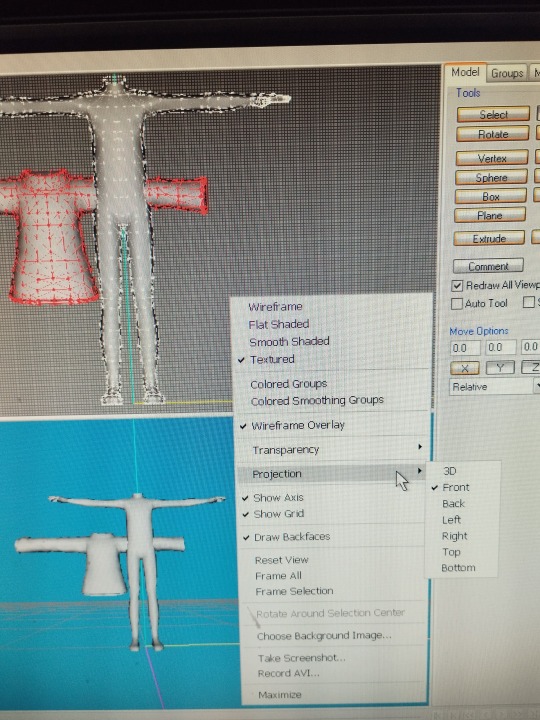
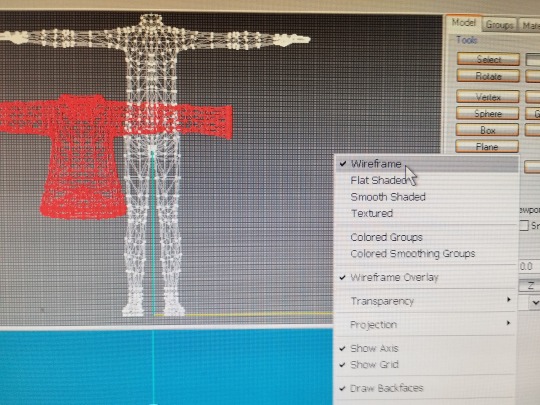
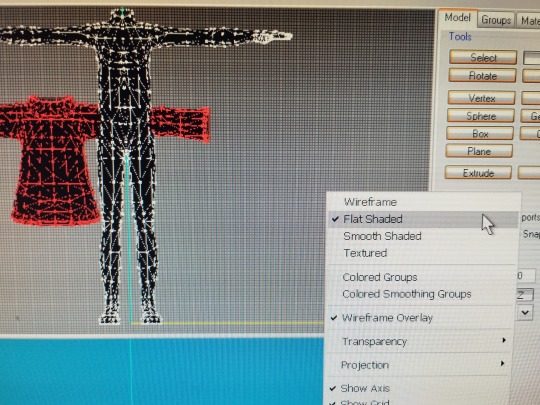
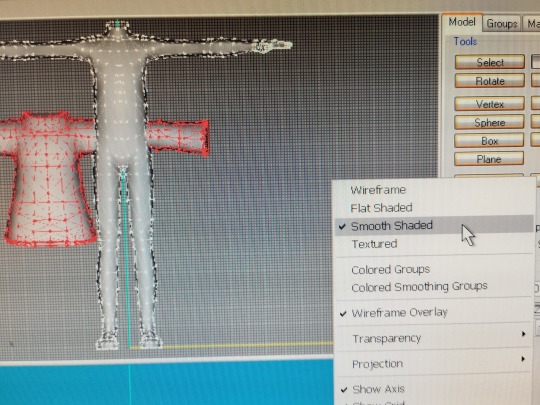
You can also choose the way you see your model… also in the same window you choose wirefame, flat shaded, smooth shaded or textured (textured I will explain it later because for this we need the png with the texture of the clothes)

we can change the view and choose right or left to continue adjusting our clothes to the body
now the way to move the clothes by choosing the letters X and Z changes, if we click on X we will move the clothes where we want without control, if we click on Y we will move them left or right, if we click on Z we will move them up or down
we move it until we place it as we wish, if we see that the clothes are still too wide, we can narrow it, we continue with the right or left view, click on scale, and the same as the other time … 1.98 in the three letters will make the clothes wider and 0.98 in the three letters will make the clothes smaller.
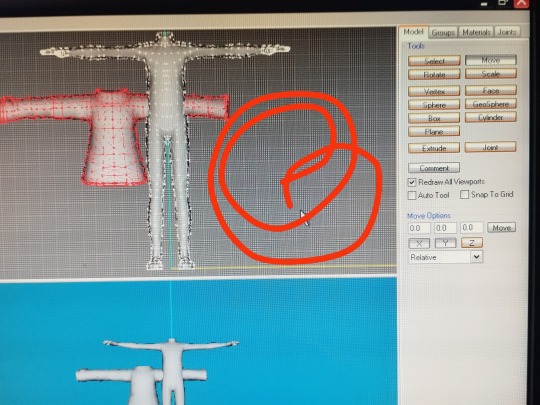
when you have the perfect size, it's time to save our project … in case we mess something up we don't have to start again from scratch.
file, save as ... name you want and save it in the folder you want to save it in
but we have not closed the project yet 😅
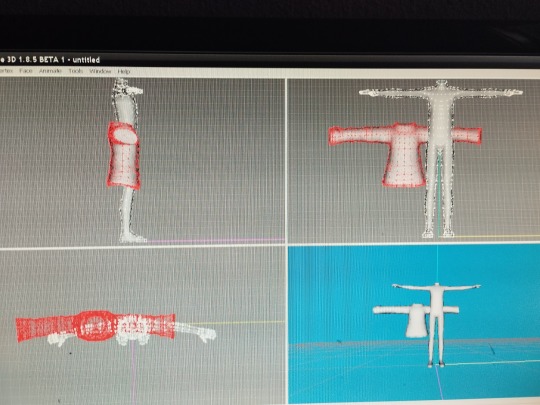
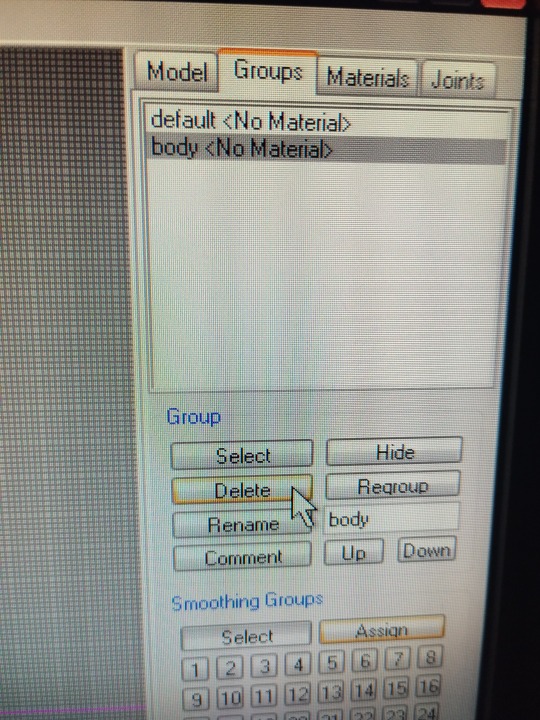
now we delete the base body ... group, click on body name and delete only our clothes have to be seen
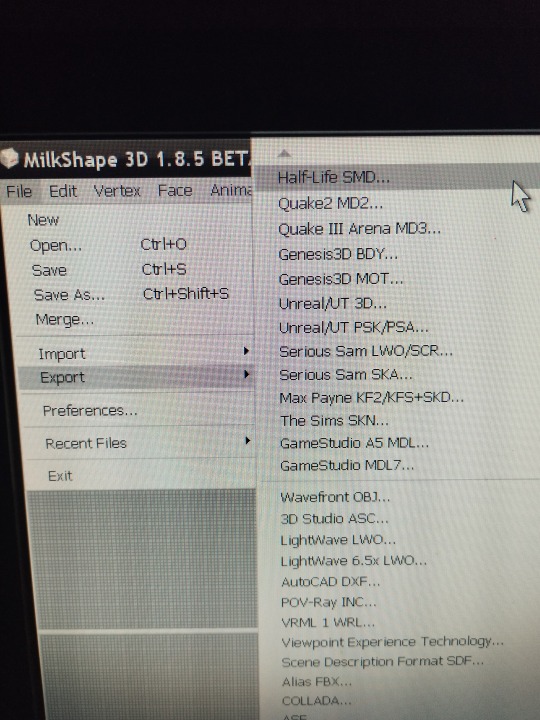
now is the time to bring it to life, we need bones 🦴
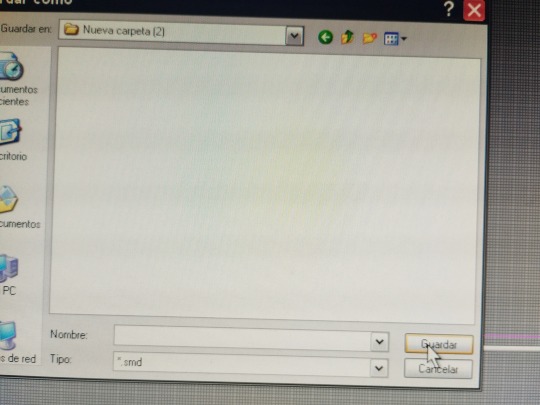
click on file export half-life SMD (at the top of the page), enter the name of our project and save it in our folder, you can use the same name as before, nothing happens because this is a different format and it will not delete the previous one.
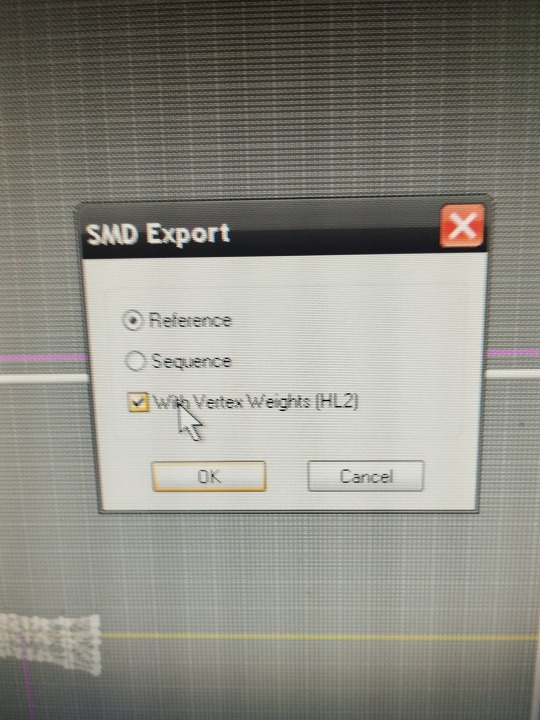
important , check the box " with vertex weights". and click ok , close the milkshape
now we need a model, a piece of clothing, from the sims game, that is similar to the one we are working on, or any clothing that you have downloaded from another simmer, but that is similar, for example, if it is a long-sleeved sweater … look for a long sleeve sweater, if it is a short sleeve t-shirt look for a short sleeve t-shirt.
we need the mesh of these clothes to extract the GMDC... this is done with the SimPe program
if you already know how to do it, perfect, you save me the explanation and you save yourself from reading all this part, but if you have never done it … I am going to explain it , I have learned it following tutorials that I recommend you to read (and that I thank enormously to the simmers that have made them) to familiarize yourself with the programs we use.
tutorials needed in your life :
3t2 clothes tutorial of Serenity falls @rented-space
4t2 clothing tutorial of @vulrien-sims
all tutorial of @blueheavensims
tutorial of @deedee-sims
4t2 clothing tutorial (video) @mdpthatsme
....to be continued
21 notes
·
View notes
Text

This rock is shaped like OKLAHOMA. It’s labradorite. Reminds me of something. I left a rock shaped like Oklahoma out by your work one time. It was the biggest rock of Oklahoma I had ever seen. I believe it may have been granite….. I can’t remember though.
Anyway~ I am at the hospital. Been here since before 3pm. It’s like 8 something now. Uncle Earl is getting a pace maker. I asked if someone could walk me out to the car cuz I’m driving him home. I am parked so freaking far away. Anyway~ my nerves are a little shot. I asked if when he’s ready to be released if someone could walk me to the truck. Uncle Earl made me drive his truck~ and it’s a huge p.o.s. I tried to tell him I didn’t want to drive that truck. He wanted me to be familiar with it in case anything ever happens?! I’m like huh?! He’s even more of a weirdo than me. Or you. I love him to death~ but fuck. I was always worried you might not mesh with my family. Just cuz they are a such a shit show. I love them all, but fuck. Processing a lot of input the last few days. (Me) like a lot of energies and a lot of shit is popping up for me. Cryptic much? As always.
I was reading an old journal earlier about tea. I’ll leave it in another post. I wish I could just put a picture in the comments. I don’t know how to do that.
Is Fritz spelled with an F or a PH? I was wondering that earlier when I was eating dinner. It popped into my head. I ate in the hospital cafe. I was scrolling on YouTube~ without being signed in cuz I took it off my phone. I found some interesting videos about Aquarius stelliums. Damn dawg. I knew Aquarius people were the most psychic out of the air signs but I was tripping out. Especially if your stellium is really in the 12th house like I was suspecting. I’m not sure about that anymore though. It’s still trippy~ that you have such an awesome stellium.
How much older are you than me in 3d? Much? I used to tell my therapist that I wouldn’t even care if you were 20 years older than me. I just don’t give a shit. She said I wouldn’t get your cultural references…and you wouldn’t get mine. I’m like…..ok. So? But honestly I wouldn’t even care if you were older than 20 years older than me. I just don’t care. I have very few reasons I’d be against getting to know you. Most of them are just shit like~ a heavy drug user. And shit like that. This coming from me~ total pot head. I’ve been cutting way way way back. I’ve only smoked twice in the last few days and before that I went like 12 days. Honestly sometimes pot scares me a little~ but sometimes I like being a little scared. Is that weird? lol I just tell myself to dial down the psycho. I learned that from my friend E. From highschool. I meant for this to be a blog about free flowing consciousness………. Cuz I write long free flowing consciousness without punctuation sometimes when I get on a roll. Like a ton of free flowing consciousness.
3 notes
·
View notes
Note
Hey! Big fan of your work - I've recently started delving into Blender animation, is there any way you could share the workflow u use when animating stuff?
Of course, but be warned that my workflow is highly idiosyncratic!
First off: Rigging. How I do it depends on exactly what I'm animating. If I'm rigging Sophodra, Gregorsa, or one of the humans, I'll use Rigify, which ships with Blender (though you'll have to enable it in add-ons). It's free, and for roughly human-shaped figures, it gets the job done.
For the other insects, and especially for the arachnids, it gets a little harder. See, arachnid limbs have a lot of joints, and most rigging add-ons aren't equipped to handle limbs more than three bones long--and I definitely wouldn't want to set up inverse kinematics for that many legs manually. So for those, I use an add-on called FreeIK, which you can get on Blender Market for only $30 (but be sure to read the docs!): https://blendermarket.com/products/freeik
FreeIK is amazing! It uses a method called "ephemeral rigging," which lets me pin any bone in place whenever I please, making it much more like animating a puppet and allowing a much finer level of control than traditional rigs. Sadly, that can be a little too much control on some model--hips on humanoid rigs will shoot out at random. For something like a spider, however, it's absolutely perfect! (I recommend using it in tandem with Selection Sets, another add-on that ships with Blender, to keep track of which bones you want pinned.)
Moving on from rigging, I also use an add-on called Onion Skin Tools. This one is only $10 on Blender Market: https://blendermarket.com/products/onion-skin-tools
As the name suggests, it lets you use onion skinning like in 2D animation. I couldn't imagine doing a walk cycle without it! With its help, I'm easily able to make a repeating walk cycle that loops in place while I move a parent empty around. (And if you're using FreeIK, you'll definitely want to be using a parent empty for placement. It's powerful, but bones can start behaving unpredictably if you get too far from the model's origin. I use two nested parent empties--one for walking, parented in turn to a master empty used for general placement.)
As of work on episode seven, I've also start incorporating Grease Pencil. Grease Pencil is an excellent tool all around, allowing you to do 2D animation in Blender! My style is cel-shaded enough that I can combine it with 2D. Not only do I use it for storyboard reference, but I also use it to draw on top of the scene, for where the 3D just isn't cutting it. I import the storyboards and other drawings with an add-on I made myself--Blender by default only lets you import black-and-white shapes, but my add-on imports as strokes, and can handle color: https://github.com/revereche/lineart_to_gp
I've also started incorporating AnimAll, which is fantastic (and also ships with Blender!). Shapekeys are already powerful tools, allow you to tweak the mesh manually when the rig isn't doing what you need. AnimAll lets you give each Shapekey multiple frames, so you don't need to set up a ton of Shapekeys to do one complex chain of movement. (Be warned it can cause file bloat, though, so use it wisely!)
As for the workflow itself, I go in this order, more or less (after writing the script and making any needed model adjustments, of course):
1.) Storyboarding. Since it's just me, they don't need to be great quality. The most important thing is making sure of the placements, getting the poses down in gestural strokes, and most importantly, getting the expressions just right.
2.) Recording voices. This can also be done before storyboarding, but I like to be sure of the scene flow before I commit. I used to start with rough placeholder voices, but ended up with awkward timing when the length of the final lines didn't match the original well enough. (Good thing none of my characters lip sync!) So, now I do the final audio on this step.
3.) Staging. Previously, this meant eyeballing the storyboard while I roughly placed the characters in the scene. Now, I import the storyboards in a Grease Pencil parented to the camera, so I can pose the characters to the storyboards more precisely. It preserves vivid gestures that would be easily lost in the CG stage otherwise!
4.) Props and backgrounds. Sometimes, I put this off until after animation, but it's really best to do it now. This can be mesh objects, planes I've painted on--or, often, planes I've painted on and extruded partially into mesh. I like to use Geometry Nodes for mesh wherever possible, especially when instancing many objects! It makes dealing with tons of vines (and humans) much easier. Also experiment with Shader Nodes, since generated textures are crisper than you would get with anything but very large texture images. (And if you're using Cycles, don't overlook displacement! Though you'll have to remember to turn that on in the sidebar preferences. That said, I mostly use Eevee, but am starting to look into Cycles for backgrounds.)
5.) Finally, final animation! I've already put the rough poses down, so I begin by cleaning those up, then adding any needed transitional poses. Then, I manually tweak the speed of the tweening, and offset the movements of parts that drag or bounce more than the rest (e.g. antennae). When a character needs to stand mostly still, I'll add a very slight bob for a moving hold, so they don't look like a mannequin.
After this, I render the image sequences, then put them all together in a video sequencing file. There, I add the citation blips, credits, and Gregorsa's Notes, as well as do some editing in post. Then, it's time to render the final video!
Hope that helps. I wish you luck in your future Blender endeavors!
34 notes
·
View notes
Text
Movement Project Week 3 - Animation 02 - More Animation
Above: Peak Performance...
I made a quick video of me recreating the staircase in Blender. Having already figured out the process last week it only took three and a half minutes this time, and that's including me navigating my way through menus at a glacial pace. This speaks more to how unskilled I was at first, rather than how skilled I've become since. I basically graduated to a level of basic competence. That being said in my haste to do it fast I made some obvious mistakes, like not making the steps long enough rotate gracefully and only eyeballing the step height instead of actually measuring it.
I forgot to mention it last time but the great thing about modifier in Blender, such as the array modifier I used so extensively, is that they are a non-destructive form of editing. If I were to model each step individually, even duplicated from a single mesh, and decided I wanted them to be a different length, I would have to edit them one by one. With a modifier all I have to do it edit the original and the duplicates will follow suit. There's a million time-saving tips like this in 3D modelling but unfortunately practice very few of them.
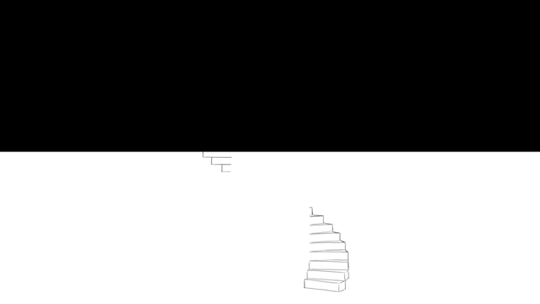
Above: More time than it was worth...
Here's a animation of the spiral staircase I rotoscoped in Krita. Even doing it on two's(12 frames per second, opposed to 24, or one's, in the 3D render) it took soooooo long. What's worse is I only drew half the goddamn staircase cause I though I could flip and reverse the footage to create the top half. I actually kind of thing I could still do that and blame my general incompetence.
Regardless the animation, as incomplete as it is, showcases a lot of what I wish to accomplish with this project. I love the trippy, dreamlike quality of the endless loop. I love how the staircase's central pillar can be inferred from the negative space between where one drawing ends and another begins. And although it was only done to mask out the top half for practical purposes, I love the duality of the split screen. The staircase disappears in the darkness like smoke in the night air.
As I've promised in the last couple of posts, I will return to these ideas and flesh them out further. As well as give a more thorough answer on what exactly my thesis is and why I chose the spiral for movement. The reason I haven't gone too in-depth so far is that I'm currently writing in retrospect and trying to explain my thoughts before they were as fully formed as they are now. I guess I'll say to whoever is forced to read this, thanks for your patience so far.
2 notes
·
View notes
Note
Hi, I love your functional books sm that I'm trying to create my own! I'm hoping you could explain how to 1. create an almost identical cover but in simlish, and 2. make the book cover hq so I can read the title when zoomed in? My images always turn blurry lol Thanks! <3
Hello ^^ Oh, I'm glad you like them <3
Sure, I''ll try to help you :) Read down below ^^

1- OBJECT/MESH USED:
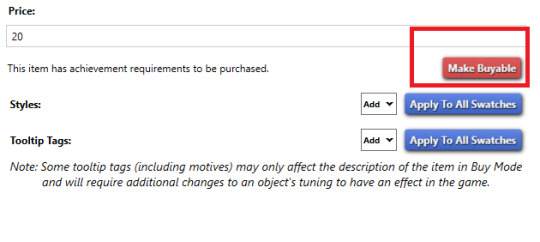
Open Sims 4 Studio, then choose "Create 3D mesh".
Type "manual" in the search bar and choose the scouting manual that comes with Seasons. That's the object I used as a base. It's also good to create a new tuning, in case you want to change other things.
Also, remember to click on "make buyable", or your Sims won't be able to buy it.
2- HQ TEXTURE:
The standard texture of books in the game is very small. It's usually 128x128.
To make it HQ, you'll have to use a 1024x1024.
Another thing you'll have to do it to separate the pages. While your Sims are reading, 4 pages of the book will be visible.
If you check EA's mesh, these 4 pages are stacked in the texture. That's why all pages look the same.
To have 4 different pages, you have to separate and reposition the pages in the texture window (Blender).


3- SIMLISH COVERS:
For this one, you'll need a little image editing skill.
First you have to download Simlish fonts and install them on your computer. There's a very nice list here :)
Then open the book cover image in a editing software.
Everywhere there's something written, erase and replace the texts with Simlish ones. Write the exact same thing, but use the Simlish font.

For example, here I wrote the same texts: "Have Courage, Be Brave"/ THE TALE OF Disney/ Cinderella." But since I changed the font to Simlish it appears in Simlish :)
Also, try to use the same text colors as the original :)

I hope this helps you :) Fell free to open my files in the Studio and check them if you need, and also to send me another message :)
2 notes
·
View notes
Text
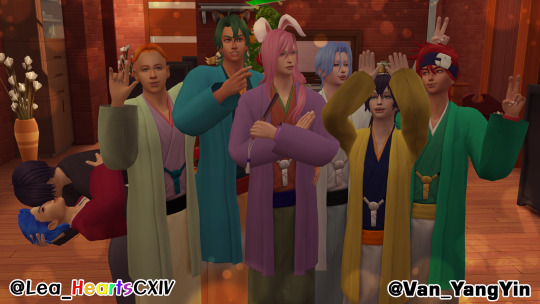
We're Lea (@lea-heartscxiv) and Van (@van-yangyin) and this is our sideblog where we publish everything related to our SK8 the Infinity Sims 4 🛹♾
Until the current story is reached, the main story will usually be published three times a week (Tuesdays, Thursdays and Saturdays). However, if it's divided into more than one part, all parts will be published on the same day. Also will be posting at present time from Tadashi's Birthday, together with past main story.
Here you can see all about our SK8 the Infinity Sims Project (Non-official, only from fans for fans), like: [You can click on the tag to go directly to the wanted one]
Single screenshots [tagged as #SK8 SS]
3D renders made from Blender [tagged as #SK8 renders]
WIPs (Work in Progress) of what will appear in our main story/ AUs [tagged as #SK8 WIPs]
Family trees (canon and OCs characters) diagrams [tagged as #SK8 FamilyTrees and when it's about SK8 OCs with #OCs and #Original Characters]
Short or a little long AUs stories using official as base. It's a kind of visual fanfic. [tagged as #SK8 OAUs and tagged with name of story that can be viewed in story post if it has more than one part]
Short or a little long AUs stories non-official compilant. It's a kind of visual fanfic. [tagged as #SK8 nonOAUs and tagged with name of story that can be viewed in story post if it has more than one part]
Our main sims story in an organized way and from the beginning (when we start it in 2021 on Twitter) although here it will be only in English (We also write it in Spanish, you can go to our blogger if you want to read it in that language to know what is written here in case you have problems with English and you're interested), so whoever wants can read it. It won't have the same amount of images that Blogger has per publication (since we can't publish more than 30 here) but it will have all the story and separated by the parts that are necessary. It's a kind of visual fanfic. [tagged as #SK8 MainStory]
Fanarts about our SK8 content [tagged as #SK8 FanArt, #reblog and #username, mainly from us with our art accounts when we draw something inspired by or related to the content we do here, since for the moment we can't know if or how many people will be interested enough in our content to inspire them to draw about it. But if our content inspires you enough to make art go for it, we will be very happy to see it and reblog it. THO HAVE IN MIND THAT ANY "FANART" THAT IS GENERATE WITH AI WE DON'T REBLOG NOR SUPPORT THEM AND WILL BE BLOCKED ON SIGHT, we're artists and don't support content generate with AI. All we made is always with our own hands (either draw and write because have our passion and our artistic vision in them)]
Some other personal tags: SOLE CILIEGIO (Matchablossom/JoeCherry), TRUE EDEN (TadaAi), TULIP WRENCH (Shadoka) and SNOW SKATE (Renga)
We're also planning to organize events, raffles of screenshots/renders made by us by request (you choose theme/ship), also that you can be part of our story/stories by choosing between several options at certain points of stories and much more...
All our content about Sims 4 is tagged as #SK8_TS4LeaVan
As this is a sideblog, we can't give likes or follow anyone, so the likes would be given from our accounts and if you want us to be mutuals will have to be from our main accounts. Or if your interest is only in SK8 fandom, our art/theory/analysis account.
Lea's SNS | Van's SNS | Blogger (to see there our content in Spanish, search for #SK8ESP_TS4LeaVan)
All custom content related to SK8 the Inifinty, both recolors and meshes, is 100% made by us. Meshes and recolors based on official content by @van-yangyin and recolors of non-official content with artistic freedoms by @lea-heartscxiv. Such content is for family use only, thank you for your understanding, if that's all you're looking for then please be on your way. If you're interested in the stories we tell or content we upload (such as screenshots or renders), you're more than welcome. Also we use custom content from other creators when are "similar" but not identical (when we're in the process of creating it from scratch), we're wcif friendly so feel free to ask us. 🛹
4 notes
·
View notes
Text
System Shock 2 in Unreal Engine 5
Tools, tools, tools
Back when I worked in the games industry, I was a tools guy by trade. It was a bit of a mix between developing APIs and toolkits for other developers, designing database frontends and automated scripts to visualise memory usage in a game's world, or reverse engineering obscure file formats to create time-saving gadgets for art creation.
I still tend to do a lot of that now in my spare time to relax and unwind, whether it's figuring out the binary data and protocols that makes up the art and assets from my favourite games, or recreating systems and solutions for the satisfaction of figuring it all out.
A Shock to the System
A while back I spent a week or so writing importer tools, logic systems and some basic functionality to recreate System Shock 2 in Unreal Engine 5. It got to the stage where importing the data from the game was a one-click process - I clicked import and could literally run around the game in UE5 within seconds, story-missions and ship systems all working.
Most of Dark engine's logic is supported but I haven't had the time to implement AI or enemies yet. Quite a bit of 3D art is still a bit sketchy, too. The craziest thing to me is that there are no light entities or baked lightmaps placed in the levels. All the illumination you can feast your eyes on is Lumen's indirect lighting from the emissive textures I'd dropped into the game. It has been a fun little exercise in getting me back into Unreal Engine development and I've learnt a lot of stuff as usual.
Here is a video of me playing all the way up to the ops deck (and then getting lost before I decided to cut the video short - it's actually possible to all the way through the game now). Lots of spoilers in this video, obviously, for those that haven't played the game.
youtube
What it is
At it's core, it's just a recreation of the various logic-subsystems in System Shock 2 and an assortment of art that has been crudely bashed into Unreal Engine 5. Pretty much all the textures, materials, meshes and maps are converted over and most of the work remaining is just tying them together with bits of C++ string. I hope you also appreciate that I sprinkled on some motion-blur and depth of field to enhance the gameplay a little. Just kidding - I just didn't get around to turning that off in the prefab Unreal Engine template I regularly use.
Tool-wise, it's a mishmash of different things working together:
There's an asset converter that organises the art into an Unreal-Engine-compatible pipeline. It's a mix of Python scripting, mind numbingly dull NodeJS and 3dsmaxscript that juggles data. It recreates all the animated (and inanimate) textures as Unreal materials, meshifies and models the map of the ship, and processes the objects and items into file formats that can be read by the engine.
A DB to Unreal converter takes in DarkDBs and spits out JSON that Unreal Engine and my other tools can understand and then brings it into the Engine. This is the secret sauce that takes all the levels and logic from the original game and recreates it in the Unreal-Dark-hybrid-of-an-engine. It places the logical boundaries for rooms and traps, lays down all the objects (and sets their properties) and keys in those parameters to materialise the missions and set up the story gameplay.
Another tool also weeds through the JSON thats been spat out previously and weaves it into complex databases in Unreal Engine. This arranges all the audio logs, mission texts and more into organised collections that can be referenced and relayed through the UI.
The last part is the Unreal Engine integration. This is the actual recreation of much of the Dark Engine in UE, ranging all the way from the PDA that powers the player's journey through the game, to the traps, buttons and systems that bring the Von Braun to life. It has save-game systems to store the state of objects, inventories and all your stats, levels and progress. This is all C++ and is built in a (hopefully) modular way that I can build on easily should the project progress.
Where it's at
As I mentioned, the levels themselves are a one-click import process. Most of Dark engine's logic, quirks and all, is implemented now (level persistence and transitions, links, traps, triggers, questvars, stats and levelling, inventory, signals/responses, PDA, hacking, etc.) but I still haven't got around to any kid of AI yet. I haven't bought much in the way of animation in from the original game yet, either, as I need to work out the best way to do it. I need to pull together the separate systems and fix little bugs here and there and iron it out with a little testing at some point.
Lighting-wise, this is all just Lumen and emissive textures. I don't think it'll ever not impress me how big of a step forward this is in terms of realistic lighting. No baking of lightmaps, no manually placing lighting. It's all just emissive materials, global/indirect illumination and bounce lighting. It gets a little overly dark here and there (a mixture of emissive textures not quite capturing the original baked lighting, and a limitation in Lumen right now for cached surfaces on complex meshes, aka the level) so could probably benefit with a manual pass at some point, but 'ain't nobody got time for that for a spare-time project.
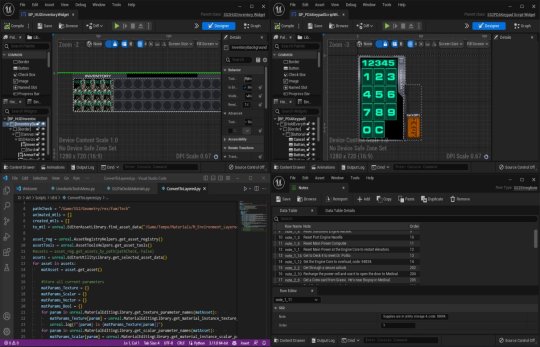
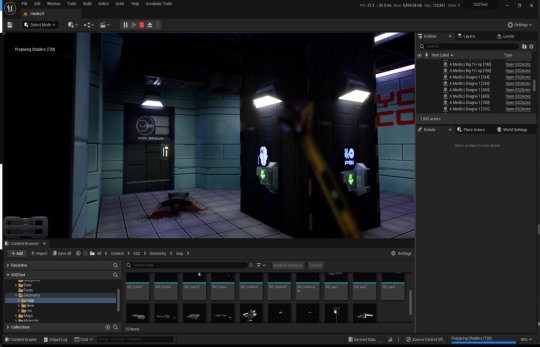
The unreal editor showcasing some of the systems and levels.
Where it's going
I kind of need to figure out exactly what I'm doing with this project and where to stop. My initial goal was just to have an explorable version of the Von Braun in Unreal Engine 5 to sharpen my game dev skills and stop them from going rusty, but it's gotten a bit further than that now. I'm also thinking of doing something much more in-depth video/blog-wise in some way - let me know in the comments if that's something you'd be interested in and what kind of stuff you'd want to see/hear about.
The DB to JSON tool that churns out System Shock 2 game data as readable info
Anyway - I began to expand out with the project and recreate assets and art to integrate into Unreal Engine 5. I'll add more as I get more written up.
#game development#development#programming#video game art#3ds max#retro gaming#unreal engine#ue5#indiedev#unreal engine 5#unreal editor#system shock 2#system shock#dark engine#remake#conversion#visual code#c++#json#javascript#nodejs#tools#game tools#Youtube
1 note
·
View note
Text
(I apologize in advance for whoever decides to commit to reading all of this, It’s a word skyscraper and I am only checking on it now while I was checking for misspellings or unneeded repetition)
Now originally I wanted to do something similar to what some other people have been doing, Where they have alternate versions of their character and whatnot for specific things. Like a dragon version of a croc gal for a medieval setting, Etc
But my main problem there is that besides me being dumb, I neither have the money, resources or know-how to properly write down certain things. Nor do I have what is needed for specific things like making a 3d model because I can’t draw for shite anymore
This is also why I have the Argonian version of Aeris, because as mentioned already. I use Skyrim like a 3d software most of the time. (I’ll talk more about that in a bit)
Chugs, As I’ve said previously. Is the Argonian version of Aeris’Xuxhlaith. I have ideas for different versions stuck in me head, A-e, One for a shitty futuristic setting where the lass is a sort of cyborg (got some help from me pal VillagerKing for fleshing out some parts of that actually). And more “primordial” or just archaic looking version that’s more fitting for a Bronze Age thing I’ve had stuck in me head for ages (Casimyrcsko definitely didnt make that get bigger or anything due to Paenitentia)
As I am currently writing this, It’s both due to being unable to yesterday, But also because I saw some art on Twitter of a dragon lass that just looked basically identical to what I had in mind for Aeris when came up with her. Minus a few things like 2 missing horns, No fins/flaps, And the dreads (Keep in mind, and I know this is probably the first time I’ve mentioned it, I wanted Aeris to have hair or pseudo-hair/fewthers that looked like dreads). Basically perfect from what I had in me head. So now I’m just a tiny bit worried that if I ever get a commission, Or fanart/gift art and it looks a bit too much like that specific piece. People will think I’ve stolen someone’s OC.
———
But anyways I am rambling about nonsense, I thought I would just be poorly writing about Aeris on here. But that’s probably not what’s gonna fully happen. I’m both too lazy and stupid to use this site full time so bah.
I’m plannning on finding some of my old notes I’ve written about Aeris and the futuristic version of her, Since I haven’t written anything down about the bronze age thingamajig I’ll have to do that later. For now, It’s stuck in my head.
Aeris is just Aeris, Now me being a Norwegian. I’m saying it with an Æ.
Zakh’Tra is the cyborg mess future nonsense
The Bronze Age version is just Arris’Xuxhlaith (creative I know) since it’s more of a parallel I guess to the other stuff I have stuck in here. It’s more just a look at an older time in Aers’s species history. Now yes of course it was just gonna be more HMOFA stuff with that, But I feel slightly bad since I don’t want to be accidentally ripping off Upai or Casimyrcsko
———
Now onto another poorly written tangent or whatever you’d call me writing. The Skyrim nonsense
I make character presets in modded Skyrim, It’s what I’m good at. It’s how I first “fortified” Aeris’s look. Now l plan on updating this as I do, Later this year. Maybe even next week. Although it’s difficult.
I’ve been unhappy for a short while with my direction when it comes to this, As I used to go for a “Looks plausibly natural” but over time I’ve been making thicker lasses, For stuff like twitter and whatnot.
I think I’ve done as much as is possibly with Chugs, I do want to make her even closer to my vision of Aeris, But I’m afraid if fucking up the head shape/snout shape if I try. It probably doesn’t help that the mouth mesh is a bit jank due to Skyrim being Skyrim.
This will probably all be somewhat rectified in the future whenever it is that I can commission an artist or two to make a 3d model or just a drawing of the lass.
———
Anyhow, I’ve rambled on long enough, Next time I’ll be posting the stuff from me notes (if I find them) after I’ve proof read them and such. And I’ll include a few more pictures of Chugs. All these variations of one character probably isn’t helping but eh, I’ll figure out out

0 notes
Text
Ok so exactly one (1) person expressed an interest in making cc of other characters so uhhh extra tutorials beneath the cut
I am going to (try) and write this as if the person reading has never touched a 3d software before
So first of all, the tutorials I used are for blender 2.79, but the rips are current blender files and old blender does not like current blender, so you'll need to open them in the most recent version, go to file and export them as an fbx to make them compatible
You'll also need to make sure that when you export from sims 4 studio, the meshes are for blender 2.79 for the same reason. To do this, in sims 4 studio go to settings, blender path, and then make sure blender 2.79 is selected
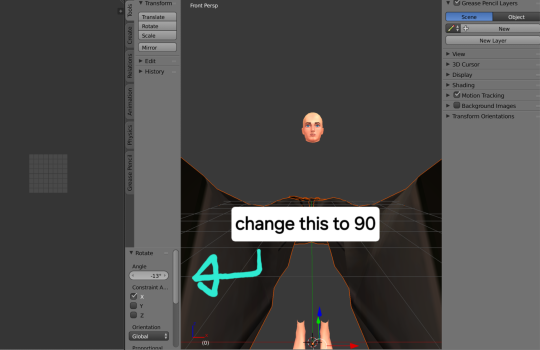
Once you have the model in blender 2.79, hide all the sims 4 studio meshes. This is because when you delete the bones, the tgaa model will fall over and it makes putting them upright again easier lmao. Just press a to select all, then r, then x. Rotate it a little, then this box will come up and you can put 90 in it to make it perfectly upright
At this point, you can delete the stuff you don't need. Ik the tutorial says to separate by material or whatever but all the geometry is separate anyways so you don't really need to do that. Also, if the character has bare arms/legs, I usually keep those for now to help with scaling.
Before setting the geometry to origin, combine them all into one thing, otherwise it will all fall apart and be virtually impossible to put together.
The next parts I think are only relevant for doing outfits
Firstly. If you want to do boots/shoes, you'll probably have to do them separately. I think it is possible to do them together but I tried and uhhh

Just. Just do them separately.
Anyways.
Once you have it all scaled down, you'll need to change the pose from T pose to A pose. To do this, go to edit mode, select any vertice on the parts of the mesh that are connected to the arm and press ctrl L. Then press p to separate your selection into a separate layer. Keep doing this until you have all the parts of the arm separated, and combine them into one layer. Press r, then y to rotate it into place. Sometimes you will need to rotate it along the x axis a bit too, it depends. Then you just need to adjust the arm holes until it fits again.
Once you've done one arm, you can copy and paste it to the other side. Use ctrl L to delete the entire other arm. Then, copy and paste the layer with the correctly positioned arm. Go to edit mode - select all - mesh - mirror - x axis (it's the first option). Then press enter. This turns the mesh inside out tho, so you'll then need to go to mesh - normals - flip normals to make it normal again. Position it where it needs to be, then combine everything back together again.
If you've looked at the UVs at all while the whole thing is combined, you may have noticed that they're FUCKED. This is because the tgaa models (mostly) have 3 textures for the model, and so they're all overlapping each other. You need to look at each texture file you have, and figure out which parts correlate with each part of the model. Then use ctrl L and p like with the arms to separate the model out, and combine them into 3 different layers, one for each texture. Once you're done, they should look normal, like this:

Then, go to one of the UVs, press a on the uv panel to select all, press s, then .5 to make it half the size. Position each texture into a different corner.
Then, once you combine them, they should be separate. Just make sure the textures are all the same size and in that order when you put them on the UV map and you can do it like normal
If the character has gloves, you can usually just leave them and have them wear gloves already in the game (I mostly did this) but if you want their exactly gloves, you can just put the texture on the bit for the hands on the uv map. Be aware that if the character has bare skin anywhere, you will need to make sure that part of the texture is blank otherwise it will be weird.
Oh also, the models can be quite high poly, if you want to try and reduce the poly count a bit, go to edit mode, select everything, then mesh -> clean up -> decimate geometry. In the lower left, a thing that says 'ratio' will come up. I tend not to go below 0.75 because the models lose too much detail
5 notes
·
View notes
Text
NVIDIA fVDB: AI-ready Virtual-world Deep-learning Framework

At SIGGRAPH, NVIDIA unveiled fVDB, a new deep-learning framework designed to produce virtual worlds that are AI-ready.
fVDB
It is an open-source deep learning framework for sparse, large-scale, high-performance spatial intelligence that was created by NVIDIA. On top of OpenVDB, it constructs NVIDIA-accelerated AI operators to enable 3D generative AI, neural radiance fields, digital twins at the scale of reality, and other features.
The fVDB PyTorch extension can be accessed through the fVDB Early Access program.
youtube
Generative Artificial Intelligence with Spatial Perception
It offers high resolution and large datasets for 3D deep learning infrastructure. Based on the VDB format, it integrates essential AI operators into a unified, cohesive framework. The foundation for generative physical AI with spatial intelligence is provided by fVDB.
Superior Capabilities, Elevated Resolution
On top of NanoVDB, which offers OpenVDB GPU acceleration, are created fVDB AI operators. Real-time optimised ray tracing and sparse convolution are among the functions supported by the framework. Throughput of data processing is maximised and memory footprint is minimised with fVDB, enabling faster training and real-time inference.
Smooth Integration
It has the ability to read and write VDB datasets right out of the box if you’re already using the VDB format. It is compatible with various tools and libraries, including the Kaolin Library for 3D deep learning and Warp for Pythonic spatial computation. It’s easy to integrate fVDB into your current AI workflow.
Examine Important Elements
Entire Operator Set
Differentiable operators such as convolution, pooling, attention, and meshing are available in fVDB and are specifically tailored for high-performance 3D deep learning applications. With the help of these operators, you may create intricate neural networks for spatial intelligence applications, such as 3D generative modelling and large-scale point cloud reconstruction.
Quicker Ray Tracing
To provide quick and precise ray tracing, it makes use of the Hierarchical Digital Differential Analyser (HDDA) technique included in OpenVDB. Neural radiance fields (NeRFs) can be quickly trained at the city-scale to produce ray-traced visualisations.
Sparse Convolution Optimisation
Sparse convolution operators in fVDB are capable of handling large 3D datasets. For activities like volumetric data analysis and physics simulation, fVDB provides quick and high-accuracy spatial data processing by optimising memory access patterns and computing burden.
Coming Soon: fVDB NIMs
Soon, NVIDIA NIM inference microservices with fVDB capability will be available, allowing developers to integrate the fVDB core architecture into USD processes. In NVIDIA Omniverse, fVDB NIMs produce geometry based on OpenUSD.
It is built on top of OpenVDB, the industry standard framework for modelling and visualising sparse volumetric data, like smoke, water, fire, and clouds.
Physical AI that is generated through generative means, like self-driving cars and real-world robots, must possess “spatial intelligence,” or the capacity to perceive, comprehend, and act in three dimensions.
It is crucial to capture both the vast scope and incredibly minute details of the environment we live in. However, it is challenging to turn reality into a virtual representation for AI training.
There are numerous ways to gather raw data for real-world settings, including lidar and neural radiance fields (NeRFs). This data is translated into huge, AI-ready settings that are displayed in real time by fVDB.
The debut of fVDB at SIGGRAPH marks a significant advancement in the ways that sectors can profit from digital twins of the real world, building on a decade of progress in the OpenVDB standard.
Agents are trained in virtual worlds that are realistically scaled. Drones are used to collect city-scale 3D models for disaster preparedness and climate science. These days, smart cities and metropolitan areas are even planned using 3D generative AI.
By utilising this, industries may leverage spatial intelligence at a greater scale and resolution than previously possible, resulting in even more intelligent physical AI.
Based on NanoVDB, a GPU-accelerated data structure for effective 3D simulations, the framework constructs NVIDIA-accelerated AI operators. Convolution, pooling, attention, and meshing are some of the operators in this group; they are all intended for use in high-performance 3D deep learning applications.
Businesses can create sophisticated neural networks for spatial intelligence, such as 3D generative modelling and large-scale point cloud reconstruction, by using AI operators.
The outcome of a protracted endeavour by NVIDIA’s research team, It is currently utilised to assist projects under NVIDIA Research, NVIDIA DRIVE, and NVIDIA Omniverse that necessitate high-fidelity representations of expansive, intricate real-world environments.
Principal Benefits of fVDB
Larger: Four times the geographical dimension of earlier frameworks
Quicker: 3.5 times quicker than earlier frameworks
Interoperable: Companies have complete access to enormous real-world datasets. VDB datasets are read into full-sized 3D environments with fVDB. Real-time rendered and AI-ready for developing spatially intelligent physical AI.
Greater power: Ten times as many operators as previous frameworks. By merging features that previously needed several deep-learning libraries, fVDB streamlines procedures.
It will soon be offered as microservices for NVIDIA NIM inference. Three of the microservices will let companies integrate fVDB into OpenUSD workflows and produce AI-ready OpenUSD geometry in NVIDIA Omniverse, a platform for developing generative physical AI applications for industrial digitalisation. They are as follows:
fVDB Mesh Generation NIM: Creates virtual 3D worlds based on reality
fVDB NeRF-XL NIM: Utilising Omniverse Cloud APIs, it creates extensive NeRFs in OpenUSD.
fVDB Physics Super-Res NIM Produces an OpenUSD-based, high-resolution physics simulation by performing super-resolution.
OpenVDB, a key technology utilised by the visual effects industry, has won many Academy Awards in the last ten years while being headquartered in the Academy Software Foundation. Since then, its applications in industry and science have expanded to include robots and industrial design in addition to entertainment.
NVIDIA keeps improving the OpenVDB library, which is available for free. The startup released NanoVDB four years ago, which gave OpenVDB GPU capability. This resulted in an order-of-magnitude speed increase, making real-time simulation and rendering possible as well as quicker performance and simpler programming.
NeuralVDB
A large-scale volume representation using AI-enabled data compression technology is called NeuralVDB. Compared to OpenVDB, the industry-standard library for modelling and rendering sparse volumetric data, like water, fire, smoke, and clouds, it offers a noticeable increase in efficiency.
With the release of NeuralVDB two years ago, NVIDIA expanded its machine learning capabilities beyond NanoVDB to compress VDB volumes’ memory footprint by up to 100 times. This has made it possible for researchers, developers, and producers to work with incredibly complicated and huge datasets.
On top of NanoVDB, fVDB creates AI operators to enable spatial intelligence at the scale of reality. Submit an application to the fVDB PyTorch extension early-access program. Additionally, fVDB will be accessible through the OpenVDB GitHub repository.
Read more on Govindhtech.com
#technologytrends#nvidia#govindhtech#fvdb#ai#deeplearning#deeplrearningframework#Openvdb#NeuralVDB#NanoVDB#vdb#news#technews#technology#technologynews#Youtube
0 notes
Text
Multimedia Course in Delhi.
https://picklesanimation.in/
Creating a "Best Animation Campus" course involves designing a curriculum that covers a wide range of topics and skills necessary for students to excel in the field of animation. This course outline includes fundamental principles, advanced techniques, and professional practices to ensure a comprehensive education.
Best Animation Campus Course Outline
Module 1: Introduction to Animation
Overview of Animation
History of animation
Types of animation (2D, 3D, stop-motion, etc.)
Applications in various industries (film, television, video games, advertising)
Fundamentals of Animation
The 12 principles of animation
Basic animation techniques and workflows
Animation Software Introduction
Overview of popular animation software (Toon Boom, Adobe Animate, Autodesk Maya, Blender)
Installing and setting up software
Module 2: Drawing and Design for Animation
Basic Drawing Skills
Understanding shapes, forms, and perspective
Gesture drawing and anatomy
Character Design
Creating original characters
Designing characters with personality and appeal
Environment and Background Design
Creating dynamic backgrounds and settings
Understanding perspective and composition
Module 3: 2D Animation
Traditional 2D Animation Techniques
Frame-by-frame animation
Timing and spacing
Digital 2D Animation
Using digital tools for 2D animation
Rigging and animating 2D characters
Advanced 2D Animation Techniques
Lip-syncing and facial expressions
Special effects in 2D animation
Module 4: 3D Animation
3D Modeling Basics
Creating and manipulating 3D models
Understanding topology and mesh flow
Rigging and Skinning
Creating a rig for 3D characters
Binding models to skeletons and weight painting
3D Animation Principles
Keyframe animation
Using the graph editor for smooth animations
Advanced 3D Animation
Character animation and walk cycles
Animating complex scenes and interactions
Module 5: Storytelling and Storyboarding
Storytelling in Animation
Elements of a good story
Writing scripts for animation
Storyboarding Techniques
Creating effective storyboards
Visual storytelling and pacing
Animatics
Creating animatics from storyboards
Timing and refining the story
Module 6: Visual Effects (VFX) and Compositing
Introduction to VFX
Types of visual effects
VFX software overview (After Effects, Nuke)
Creating Visual Effects
Particle systems, dynamics, and simulations
Green screen and chroma key techniques
Compositing Techniques
Layering and blending elements
Color correction and grading
Module 7: Sound Design and Music for Animation
Sound Design Basics
Importance of sound in animation
Recording and editing sound effects
Music for Animation
Composing music for different scenes
Synchronizing music with animation
Voice Acting and Dialogue
Recording and editing voiceovers
Lip-syncing techniques
Module 8: Professional Practices and Portfolio Development
Project Management in Animation
Planning and organizing animation projects
Working in teams and collaboration
Industry Insights and Trends
Understanding the animation industry
Keeping up with current trends and technologies
Creating a Professional Portfolio
Selecting and presenting work
Building a demo reel
Career Development
Job search strategies
Networking and professional development
Additional Resources
Recommended Reading
"The Animator's Survival Kit" by Richard Williams
"Animation: The Mechanics of Motion" by Chris Webster
Online Tutorials and Courses
LinkedIn Learning
Coursera
Udemy
Course Delivery
Lectures and Demonstrations
Hands-On Projects
Peer Reviews and Critiques
Guest Lectures from Industry Professionals
Assessment and Evaluation
Quizzes and Tests
Project Submissions
Final Portfolio Review
This course structure aims to provide students with a comprehensive education in animation, covering essential technical skills, creative techniques, and professional practices to ensure they are well-prepared for a successful career in the animation industry.
Multimedia Course content picklesanimation ChatGPT
Creating a comprehensive multimedia course involves designing a curriculum that covers various aspects of multimedia, including graphic design, web design, video production, animation, and interactive media. Below is a detailed course outline that provides students with the skills and knowledge needed to excel in the field of multimedia.
Multimedia Course Outline
Module 1: Introduction to Multimedia
Overview of Multimedia
Definition and scope of multimedia
History and evolution of multimedia
Applications in various industries (advertising, entertainment, education, etc.)
Elements of Multimedia
Text, images, audio, video, and animation
Integrating multimedia elements
Multimedia Tools and Software
Overview of popular multimedia software (Adobe Creative Suite, Final Cut Pro, Blender)
Installing and setting up software
Module 2: Graphic Design
Principles of Graphic Design
Design elements (line, shape, color, texture, space, form)
Design principles (balance, contrast, emphasis, rhythm, scale, harmony)
Typography
Basics of typography
Choosing and pairing fonts
Creating readable and aesthetically pleasing text
Image Editing
Using Adobe Photoshop and Illustrator
Photo editing and manipulation
Creating digital illustrations
Layout Design
Creating layouts for print and digital media
Using grids and guides
Module 3: Web Design and Development
Introduction to Web Design
Principles of effective web design
User experience (UX) and user interface (UI) design
HTML and CSS
Basics of HTML5
Styling with CSS3
Responsive design techniques
Web Development
Introduction to JavaScript
Using web development frameworks (Bootstrap, React)
Content Management Systems
Overview of CMS (WordPress, Joomla, Drupal)
Creating and managing websites with CMS
Module 4: Video Production and Editing
Basics of Video Production
Understanding the video production process
Pre-production planning (scripting, storyboarding)
Shooting Video
Camera types and functions
Lighting and sound techniques
Video Editing
Using Adobe Premiere Pro and Final Cut Pro
Editing techniques (cutting, transitions, color correction)
Adding effects and titles
Module 5: Animation
Introduction to Animation
History and types of animation (2D, 3D, stop-motion)
Principles of animation
2D Animation
Using Adobe Animate and Toon Boom Harmony
Frame-by-frame animation and tweening
3D Animation
Using Autodesk Maya and Blender
3D modeling, rigging, and animation
Module 6: Audio Production
Introduction to Audio Production
Basics of sound and audio production
Recording techniques
Audio Editing
Using Adobe Audition and Audacity
Editing and mixing audio
Adding sound effects and music
Podcasting and Voiceover
Recording and editing podcasts
Techniques for voiceover work
Module 7: Interactive Media
Introduction to Interactive Media
Overview of interactive media
Applications in web, mobile, and gaming
Creating Interactive Content
Using Adobe Animate and Unity
Developing interactive animations and games
Virtual Reality (VR) and Augmented Reality (AR)
Basics of VR and AR
Creating VR and AR experiences
Module 8: Professional Practices and Portfolio Development
Project Management
Planning and organizing multimedia projects
Working in teams and collaboration
Industry Insights and Trends
Understanding the multimedia industry
Keeping up with current trends and technologies
Creating a Professional Portfolio
Selecting and presenting work
Building a digital portfolio
Career Development
Job search strategies
Networking and professional development
Additional Resources
Recommended Reading
"The Principles of Beautiful Web Design" by Jason Beaird
"Adobe Photoshop Classroom in a Book" by Andrew Faulkner
Online Tutorials and Courses
LinkedIn Learning
Coursera
Udemy
Course Delivery
Lectures and Demonstrations
Hands-On Projects
Peer Reviews and Critiques
Guest Lectures from Industry Professionals
Assessment and Evaluation
Quizzes and Tests
Project Submissions
Final Portfolio Review

This course structure aims to provide students with a comprehensive education in multimedia, covering essential technical skills, creative techniques, and professional practices to ensure they are well-prepared for a successful career in the multimedia industry.
0 notes
Text
in fact lemme fish this discussion out of the comments bc it's interesting!
@baeddel wrote:
i feel like writing is a place that big studios cut corners but isn't a place you actually need to cut corners at all. we have visual novels three times as long as the Bible, we have light novelists churning out millions of words per year, etc. just put a novelist on a game and you can give it ten, or a hundred times as much writing as most triple a games at very little extra cost or time. there was a game that did that, it was called Disco Elysium… so i feel like the lack of intensive amounts of text hasn't really been a technical problem for triple a, just an aesthetic/business/whatever one. therefore we haven't even advanced to the stage with writing where we have a technical problem that AI would be needed to solve!
I wrote:
mmm, I don't think the LLM would be useful from a perspective of just, generating loads of text to fill out a game with, that would entirely suck shit because it would all be bland nothing. ideally, and I am thinking very speculatively here, you would want to have a development process where you try and get the best out of the combination of an LLM and a human. so the writer might be providing interesting, nuanced, characterful text that is specific to that project, and the game would treat that writing-data as something like assets the way a 3D artist would author texture files and models and so on for the game's algorithms to process further. so you'd use the LLM to modify/interpolate it to permutations of game state, questions they never thought the player could ask, etc. etc.; the writer would be involved in an iterative process where they try out how their writing makes the LLM respond, and modify it to get the desired artistic effect, but know it could be extended into unexpected domains. that writing could be used in the form of prompts, finetuning weights, generating control vectors etc.
Like, it's widely observed that LLMs are broadly derivative, right? If an LLM pulls out an interesting expression when instructed to write creatively, especially in a niche genre where the data in the training set is sparse, there's a high probability it's essentially plagiarised from somewhere you don't know about. If it doesn't do this, since it's built on a statistical model of all human writing available, it will instead probably produce something very generic. Although you can fiddle the temperature and such, I think using an LLM like this instead of a writer is a deeply wrong-headed way to use the technology (which doesn't mean people won't try, because capital gonna capital).
But if you set it up to 'plagiarise' your own writing, you're using it in a different way. We don't create a separate 3D model for every combination of bone angles and positions and camera views; we create some data (vertices, skinning weights, bone keyframes) which the skinned mesh renderer can combine to generate an animated character. The resulting animated character is no less human-authored for being designed to pass through an algorithm before it's seen. (Of course, many AAA games use huge libraries of mocap data and techniques like 'motion matching' instead of hand authored animation, but the principle is similar.)
I think this is probably the way LLMs could actually be useful for games. Going with the 'simulator' metaphor I've been reading about recently, where the LLM weights are the 'laws of motion' for extending out (roleplaying) from the given input, you could use your writing as a tool to probe the space of LLM embeddings and movements through its state space, and in this way, prime it to generate text that has a similar relationship to your own writing as an animated, skinned mesh has to the T-posing model in Blender.
Simply writing prompts to 'off the shelf' language models that have been set up to work as chatbots is unlikely to be effective I think; you would probably need a pretty custom model that has been finetuned on the sample of writing you provide it, and to further condition the model using techniques like 'control vectors'. The text seen at runtime by any given player would be specific to their session, and be able to respond much more organically than NPCs mostly reciting canned responses, but the overall tone and style of the text would derive primarily from your writing.
Would this actually work in practice? It would probably take quite a lot of work and experimentation by someone with both a good amount of experience with writing, and a pretty technical understanding of how to control LLM output at runtime, to get a good result. Probably the vast majority of writers would strongly prefer their writing be used directly, rather than potentially mangled by a highly unpredictable robot. I think it's an interesting avenue to think about, though. Certainly seems like a more interesting use for the technology than just churning it for slop.
using LLMs to control a game character's dialogue seems an obvious use for the technology. and indeed people have tried, for example nVidia made a demo where the player interacts with AI-voiced NPCs:
youtube
this looks bad, right? like idk about you but I am not raring to play a game with LLM bots instead of human-scripted characters. they don't seem to have anything interesting to say that a normal NPC wouldn't, and the acting is super wooden.
so, the attempts to do this so far that I've seen have some pretty obvious faults:
relying on external API calls to process the data (expensive!)
presumably relying on generic 'you are xyz' prompt engineering to try to get a model to respond 'in character', resulting in bland, flavourless output
limited connection between game state and model state (you would need to translate the relevant game state into a text prompt)
responding to freeform input, models may not be very good at staying 'in character', with the default 'chatbot' persona emerging unexpectedly. or they might just make uncreative choices in general.
AI voice generation, while it's moved very fast in the last couple years, is still very poor at 'acting', producing very flat, emotionless performances, or uncanny mismatches of tone, inflection, etc.
although the model may generate contextually appropriate dialogue, it is difficult to link that back to the behaviour of characters in game
so how could we do better?
the first one could be solved by running LLMs locally on the user's hardware. that has some obvious drawbacks: running on the user's GPU means the LLM is competing with the game's graphics, meaning both must be more limited. ideally you would spread the LLM processing over multiple frames, but you still are limited by available VRAM, which is contested by the game's texture data and so on, and LLMs are very thirsty for VRAM. still, imo this is way more promising than having to talk to the internet and pay for compute time to get your NPC's dialogue lmao
second one might be improved by using a tool like control vectors to more granularly and consistently shape the tone of the output. I heard about this technique today (thanks @cherrvak)
third one is an interesting challenge - but perhaps a control-vector approach could also be relevant here? if you could figure out how a description of some relevant piece of game state affects the processing of the model, you could then apply that as a control vector when generating output. so the bridge between the game state and the LLM would be a set of weights for control vectors that are applied during generation.
this one is probably something where finetuning the model, and using control vectors to maintain a consistent 'pressure' to act a certain way even as the context window gets longer, could help a lot.
probably the vocal performance problem will improve in the next generation of voice generators, I'm certainly not solving it. a purely text-based game would avoid the problem entirely of course.
this one is tricky. perhaps the model could be taught to generate a description of a plan or intention, but linking that back to commands to perform by traditional agentic game 'AI' is not trivial. ideally, if there are various high-level commands that a game character might want to perform (like 'navigate to a specific location' or 'target an enemy') that are usually selected using some other kind of algorithm like weighted utilities, you could train the model to generate tokens that correspond to those actions and then feed them back in to the 'bot' side? I'm sure people have tried this kind of thing in robotics. you could just have the LLM stuff go 'one way', and rely on traditional game AI for everything besides dialogue, but it would be interesting to complete that feedback loop.
I doubt I'll be using this anytime soon (models are just too demanding to run on anything but a high-end PC, which is too niche, and I'll need to spend time playing with these models to determine if these ideas are even feasible), but maybe something to come back to in the future. first step is to figure out how to drive the control-vector thing locally.
48 notes
·
View notes