#Setup Windows Admin Center
Explore tagged Tumblr posts
Visit Tumblr Blog
Explore Tumblr blogs with no restrictions, modern design and the best experience.
Last Seen Tumblr Blogs


Fun Fact
Tumblr was the first site to host the blog for President Barack Obama in 2011.
Text
Upgrade Windows Admin Center 2306 - 2311: Run WACmg v2401
In this article, we shall discuss “how to Upgrade Windows Admin Center 2306 – 2311: Run WACmg v2401”. Windows Admin Center is a versatile tool for managing Windows Clients, Windows Servers, and Windows Clusters. In December 2023, Microsoft released the Windows Admin Center modernized gateway (WACmg) to public preview through the Windows Server Insider program. This new v2401 release serves as an…
#Microsoft Windows#Setup Windows Admin Center#upgrade Windows Admin Center#Windows#Windows Admin Center#Windows Admin Center Error#Windows Admin Center Installation#Windows Server 2016
0 notes
Text
VPS Hosting consulting in Bhubaneswar

In today’s digital era, having a reliable and scalable hosting solution is crucial for businesses that demand more power and performance than traditional shared hosting. That’s where VPS (Virtual Private Server) hosting comes in—a smart and flexible hosting option that bridges the gap between shared and dedicated servers.
At Lexmetech Systems Pvt. Ltd., we offer enterprise-grade VPS hosting in Bhubaneswar that delivers superior performance, better control, and enhanced security—all at affordable prices. Whether you're a startup, an established business, or a developer looking for dedicated resources, our VPS hosting plans are designed to match your needs.
What is VPS Hosting?
VPS hosting provides you with a private section of a physical server, offering dedicated resources like CPU, RAM, and storage. Unlike shared hosting, VPS ensures that your website's performance isn't affected by other users on the server. It's an ideal solution for businesses with medium to high traffic, web applications, or growing eCommerce stores.
Why Choose VPS Hosting in Bhubaneswar?
As businesses in Bhubaneswar continue to grow digitally, many are turning to VPS hosting for the following reasons:
Dedicated Resources: Your website gets its own CPU, RAM, and storage, leading to faster load times and higher uptime.
Full Root Access: You get complete control to install software, run custom scripts, or configure the server as you wish.
Scalability: Easily upgrade your server resources as your business grows.
Security: Your virtual server is isolated, reducing risks from other websites or users.
Cost-Effective: Get near-dedicated server performance without the high costs.
Lexmetech – The Go-To Choice for VPS Hosting in Bhubaneswar
At Lexmetech, we offer fully managed and self-managed VPS hosting solutions in Bhubaneswar. Our services are powered by high-performance SSD storage, top-tier processors, and secure network infrastructure to provide fast and reliable hosting experiences.
🖥️ 1. Managed VPS Hosting
Perfect for business owners who want technical peace of mind. We handle server setup, updates, security patches, monitoring, and support—so you can focus on your business.
🧑💻 2. Unmanaged VPS Hosting
Ideal for developers and experienced users who want full control over server configurations. You manage everything, and we provide the reliable infrastructure.
🔐 3. Secure VPS Hosting
All our VPS plans come with built-in DDoS protection, regular security scans, firewall configurations, and optional SSL certificates.
☁️ 4. Cloud-Based VPS
Our cloud VPS hosting combines the flexibility of cloud computing with the power of virtual private servers. Enjoy high availability, fast performance, and automatic failover.
VPS Hosting Features at Lexmetech
We provide best-in-class features with every VPS hosting plan:
✅ SSD-Based Storage for Ultra-Fast Speed ✅ Root Access and Full Admin Control ✅ 99.99% Uptime Guarantee ✅ Free SSL Certificate ✅ Firewall & DDoS Protection ✅ Choice of OS (Linux/Windows) ✅ Scalable Resources (RAM, CPU, Bandwidth) ✅ 24/7 Technical Support from Our Bhubaneswar Office ✅ Instant Setup & Free Migration ✅ cPanel / Plesk Available (Optional)
Who Needs VPS Hosting?
Lexmetech’s VPS hosting is ideal for:
Growing Business Websites
E-commerce Platforms
Web Developers & Designers
SaaS & Custom Web Applications
Educational Portals
Bloggers with High Traffic
Agencies Hosting Client Projects
If your website has outgrown shared hosting or you need more control and customization, VPS hosting is the right choice.
Why Lexmetech for VPS Hosting in Bhubaneswar?
As a Bhubaneswar-based company, Lexmetech understands local business needs while offering hosting that competes globally. Here’s why clients choose us:
🌐 Local Support, Global Infrastructure Our hosting services are backed by robust data centers, but we provide personalized local support from our Bhubaneswar office.
🔧 Custom VPS Solutions Need a unique setup? We offer tailor-made VPS configurations based on your application and budget.
🛠️ Free Server Migration Switching from another host? We’ll handle your migration with zero downtime and no extra cost.
💰 Affordable Plans High-quality VPS hosting doesn’t have to break the bank. We offer feature-rich plans at competitive prices for Bhubaneswar businesses.
🧑💼 Dedicated Account Managers Our clients enjoy priority support and consulting to optimize their hosting experience.
Customer Testimonials
“We needed a high-performance server for our eCommerce store in Bhubaneswar. Lexmetech’s VPS hosting exceeded our expectations in speed, uptime, and support.” – Retail Business Owner
“Lexmetech made it easy for us to move to VPS from shared hosting. Their Bhubaneswar team was always available and handled our queries promptly.” – Local Tech Entrepreneur
VPS Hosting Plans – Starting at ₹999/month
We offer flexible pricing for VPS hosting to suit your technical and financial needs. Basic plans start at ₹999/month with options to scale up RAM, disk space, and bandwidth as needed.
Our team will guide you in selecting the right VPS package based on your website or application requirements.
Conclusion: Supercharge Your Website with VPS Hosting in Bhubaneswar
Whether you're a growing business, a developer, or an agency—VPS hosting gives you the power, performance, and control you need to succeed online. With Lexmetech, you get not just hosting, but a partner who understands your growth needs.
Our VPS hosting in Bhubaneswar is designed to support fast-growing websites and applications with reliable infrastructure, top-notch security, and unmatched local support. Take the next step in digital transformation with hosting that truly works for you.
📞 Ready to upgrade your hosting? Contact us today or visit https://lexmetech.com to explore our VPS hosting plans.
0 notes
Text
“High-Performance RDP for Enterprise Use: Inside RHosting’s Capabilities”
In the enterprise world, remote desktop access isn’t just a convenience — it’s a mission-critical capability. Performance, security, and scalability must be non-negotiable. Traditional RDP setups often fall short when faced with real-time workloads, distributed teams, and high-security demands.
Enter RHosting — a next-generation RDP platform designed specifically to meet the needs of modern enterprises. With cloud-optimized infrastructure, enterprise-grade security, and advanced customization, RHosting delivers high-performance remote access at scale.
Here’s a deep dive into the capabilities that make RHosting ideal for enterprise environments.
⚡ 1. Optimized for Speed and Performance
Enterprise users often run resource-heavy applications — from ERPs and CRMs to analytics dashboards and virtual design tools. RHosting is optimized to handle these intensive workloads without lag or downtime.
Low-latency connections, even over long distances
Load balancing and autoscaling for peak efficiency
Seamless access to Windows desktops and apps on-demand
GPU support for graphic-intensive workloads (optional tiers)
Whether your team is working from a remote branch office or across continents, RHosting ensures a consistent, high-speed user experience.
🛡️ 2. Enterprise-Grade Security Architecture
Security is a top priority for any business. RHosting offers a zero-trust-ready environment with multiple layers of protection:
End-to-end encryption (AES 256-bit)
Multi-factor authentication (MFA)
IP whitelisting & geofencing
Role-based access control (RBAC)
No open ports, no public RDP exposure
Activity logging and session monitoring also help your IT teams stay compliant and audit-ready.
🧩 3. Custom Configuration for Any Use Case
Every enterprise has different needs. RHosting provides flexible configuration options to fit your organization’s workflows:
Isolated server environments for teams, departments, or clients
Custom app publishing — provide access only to Tally, AutoCAD, QuickBooks, etc.
Folder-level permission management
SSO and Active Directory integration (on request)
Our platform supports fully managed or self-managed deployment models — giving you the control you need.
📊 4. Centralized Administration with Granular Controls
Managing large teams doesn’t have to mean IT overload. With RHosting’s intuitive admin portal, your IT department can:
Create and manage users in bulk
Assign or revoke access instantly
Monitor usage, generate reports, and set usage limits
Push updates or roll back configurations without disruption
It’s enterprise-level control without enterprise-level complexity.
🌐 5. Global Availability with Cloud-First Infrastructure
RHosting is hosted on high-speed data centers strategically located worldwide, allowing global teams to connect to the nearest server for optimal performance.
Geo-optimized routing
High availability architecture
Disaster recovery options and backups
24/7 infrastructure monitoring
Whether you’re operating in the U.S., Europe, India, or across multiple continents — RHosting keeps your business connected.
🚀 6. Seamless Scaling for Growing Teams
As your business grows, RHosting scales with you — without new hardware, license limits, or long onboarding cycles.
Add new users or environments in minutes
Easily scale resources (RAM, CPU, storage) as demand increases
Monthly billing with transparent enterprise pricing
✅ Built for the Demands of the Modern Enterprise
RHosting delivers more than just remote access — it’s a platform for agile, secure, and scalable work environments. With a laser focus on performance and security, RHosting empowers enterprises to support remote operations without compromise.
0 notes
Text
Cloud Computing Solutions: Which Private Cloud Platform is Right for You?
If you’ve been navigating the world of IT or digital infrastructure, chances are you’ve come across the term cloud computing solutions more than once. From running websites and apps to storing sensitive data — everything is shifting to the cloud. But with so many options out there, how do you know which one fits your business needs best?
Let’s talk about it — especially if you're considering private or hybrid cloud setups.
Whether you’re an enterprise looking for better performance or a growing business wanting more control over your infrastructure, private cloud hosting might be your perfect match. In this post, we’ll break down some of the most powerful platforms out there, including VMware Cloud Hosting, Nutanix, H
yper-V, Proxmox, KVM, OpenStack, and OpenShift Private Cloud Hosting.
First Things First: What Are Cloud Computing Solutions?
In simple terms, cloud computing solutions provide you with access to computing resources like servers, storage, and software — but instead of managing physical hardware, you rent them virtually, usually on a pay-as-you-go model.
There are three main types of cloud environments:
Public Cloud – Shared resources with others (like Google Cloud or AWS)
Private Cloud – Resources are dedicated just to you
Hybrid Cloud – A mix of both, giving you flexibility
Private cloud platforms offer a high level of control, customization, and security — ideal for industries where uptime and data privacy are critical.
Let’s Dive Into the Top Private Cloud Hosting Platforms
1. VMware Cloud Hosting
VMware is a veteran in the cloud space. It allows you to replicate your on-premise data center environment in the cloud, so there’s no need to learn new tools. If you already use tools like vSphere or vSAN, VMware Cloud Hosting is a natural fit.
It’s highly scalable and secure — a great choice for businesses of any size that want cloud flexibility without completely overhauling their systems.
2. Nutanix Private Cloud Hosting
If you're looking for simplicity and power packed together, Nutanix Private Cloud Hosting might just be your best friend. Nutanix shines when it comes to user-friendly dashboards, automation, and managing hybrid environments. It's ideal for teams who want performance without spending hours managing infrastructure.
3. Hyper-V Private Cloud Hosting
For businesses using a lot of Microsoft products, Hyper-V Private Cloud Hosting makes perfect sense. Built by Microsoft, Hyper-V integrates smoothly with Windows Server and Microsoft System Center, making virtualization easy and reliable.
It's a go-to for companies already in the Microsoft ecosystem who want private cloud flexibility without leaving their comfort zone.
4. Proxmox Private Cloud Hosting
If you’re someone who appreciates open-source platforms, Proxmox Private Cloud Hosting might be right up your alley. It combines KVM virtualization and Linux containers (LXC) in one neat package.
Proxmox is lightweight, secure, and customizable. Plus, its web-based dashboard is super intuitive — making it a favorite among IT admins and developers alike.
5. KVM Private Cloud Hosting
KVM (Kernel-based Virtual Machine) is another open-source option that’s fast, reliable, and secure. It’s built into Linux, so if you’re already in the Linux world, it integrates seamlessly.
KVM Private Cloud Hosting is perfect for businesses that want a lightweight, customizable, and high-performing virtualization environment.
6. OpenStack Private Cloud Hosting
Need full control and want to scale massively? OpenStack Private Cloud Hosting is worth a look. It’s open-source, flexible, and designed for large-scale environments.
OpenStack works great for telecom, research institutions, or any organization that needs a lot of flexibility and power across private or public cloud deployments.
7. OpenShift Private Cloud Hosting
If you're building and deploying apps in containers, OpenShift Private Cloud Hosting In serverbasket is a dream come true. Developed by Red Hat, it's built on Kubernetes and focuses on DevOps, automation, and rapid application development.
It’s ideal for teams running CI/CD pipelines, microservices, or containerized workloads — especially when consistency and speed are top priorities.
So, Which One Should You Choose?
The right private cloud hosting solution really depends on your business needs. Here’s a quick cheat sheet:
Go for VMware if you want enterprise-grade features with familiar tools.
Try Nutanix if you want something powerful but easy to manage.
Hyper-V is perfect if you’re already using Microsoft tech.
Proxmox and KVM are great for tech-savvy teams that love open source.
OpenStack is ideal for large-scale, customizable deployments.
OpenShift is built for developers who live in the container world.
Final Thoughts
Cloud computing isn’t a one-size-fits-all solution. But with platforms like VMware, Nutanix, Hyper-V, Proxmox, KVM, OpenStack, and OpenShift Private Cloud Hosting, you’ve got options that can scale with you — whether you're running a small development team or a global enterprise.
Choosing the right platform means looking at your current infrastructure, your team's expertise, and where you want to be a year from now. Whatever your path, the right cloud solution can drive efficiency, reduce overhead, and set your business up for long-term success.
#Top Cloud Computing Solutions#Nutanix Private Cloud#VMware Cloud Server Hosting#Proxmox Private Cloud#KVM Private Cloud
1 note
·
View note
Text
Is It Possible to Add Blogger Accounts in GMB Briefcase Without Errors?
youtube
Managing multiple platforms can be a challenge, but GMB Briefcase makes it easy to streamline your blogging workflow by allowing you to integrate Blogger accounts seamlessly. If you’re wondering whether it’s possible to add Blogger accounts to GMB Briefcase without errors, the answer is yes! With the right approach and resources like the GMB Briefcase | Help Center, you can enjoy a hassle-free integration process.
This article explores the steps, common pitfalls, and tips for a smooth Blogger account integration with GMB Briefcase.
Why Add Blogger Accounts to GMB Briefcase? Integrating Blogger accounts into GMB Briefcase offers numerous advantages:
Centralized Management: Control all your blogs from a single dashboard. Enhanced Productivity: Save time by managing, scheduling, and analyzing content in one place. Team Collaboration: Assign roles and manage permissions for streamlined teamwork. Error-Free Operations: Avoid common login and synchronization issues with a unified system. To ensure a smooth experience, the GMB Briefcase | Help Center provides detailed guides and troubleshooting tips.
Steps to Add Blogger Accounts in GMB Briefcase Without Errors Follow these steps to ensure a seamless integration:
Log In to Your GMB Briefcase Account Start by logging into your GMB Briefcase account. If you’re new to the platform, create an account to get started.
Access the Integration Settings Navigate to the settings menu in your dashboard. Click on the Integrations tab to view the list of available platforms.
Select Blogger From the list of integrations, choose Blogger. This will initiate the setup process.
Authenticate Your Blogger Account A pop-up window will prompt you to log into your Blogger account. Grant GMB Briefcase the necessary permissions to access your Blogger account. Tip: Ensure you’re using the correct Blogger credentials and have administrative access to the account.
Assign Team Roles Once the account is linked, assign specific roles (e.g., Admin, Editor, Viewer) to team members. Role-based access ensures secure and efficient collaboration.
Verify the Integration Check your GMB Briefcase dashboard to confirm the Blogger accounts are successfully integrated. You should see your blogs listed and ready for management.
Start Managing Your Blogger Accounts Begin using GMB Briefcase to manage, schedule, and analyze your Blogger content with ease.
For more detailed guidance, visit the GMB Briefcase | Help Center for step-by-step instructions.
Tips to Avoid Errors During Integration Even though GMB Briefcase simplifies the process, it’s important to take precautions to avoid potential errors:
Update Your Software: Ensure you’re using the latest version of GMB Briefcase to avoid compatibility issues.
Use Correct Credentials: Double-check your Blogger login details before authentication.
Grant Necessary Permissions: Make sure to allow GMB Briefcase access to your Blogger account during the setup process.
Stable Internet Connection: A reliable internet connection is crucial to prevent interruptions during integration.
Check Account Settings: Verify that your Blogger account has administrative rights to make changes and link external platforms.
For troubleshooting assistance, the GMB Briefcase | Help Center is your go-to resource.
Common Issues and Their Solutions While integrating Blogger accounts is usually error-free, here are some common issues and solutions:
Authentication Failures: Ensure the correct credentials are used, and grant all requested permissions. Missing Blogs: Double-check that you’ve linked the correct Blogger account. Integration Errors: Update your GMB Briefcase software and retry the process. For additional troubleshooting steps, refer to the GMB Briefcase | Help Center for expert guidance.
Benefits of a Smooth Integration By successfully adding Blogger accounts to GMB Briefcase without errors, you unlock the following benefits: Simplified Operations: Manage all blogs from one intuitive dashboard. Enhanced Efficiency: Streamline workflows with built-in scheduling and analytics tools. Secure Access: Protect sensitive login credentials while enabling team collaboration.
Conclusion So, is it possible to add Blogger accounts in GMB Briefcase without errors? Absolutely! By following the steps outlined in this article and leveraging resources like the GMB Briefcase | Help Center, you can ensure a smooth and error-free integration process. Take advantage of GMB Briefcase to centralize your blogging operations, boost productivity, and manage your team more effectively. Start integrating your Blogger accounts today and experience the benefits of a streamlined workflow!
Find Us Online
Facebook
LinkedIn
Twitter
YouTube Channel
0 notes
Text

What is Microsoft Hyper-V?
Microsoft Hyper-V, or simply Hyper-V, is a virtualization platform developed by Microsoft. As part of Microsoft's suite of virtualization products, Hyper-V allows users to create and manage virtual machines (VMs) on Windows-based systems.
This guide is an essential part of the Microsoft Hyper-V Management service, and with this, we’ll guide you on What is Microsoft Hyper-V in an easy way. Let's delve into the key aspects of Hyper-V and its role in the virtualization landscape.
Virtualization Essentials
Virtualization is a technology that enables the creation of multiple virtual instances or environments on a single physical server. This helps optimize resource utilization, improve scalability, and enhance overall efficiency in IT infrastructures.
Key Features of Microsoft Hyper-V
Hypervisor Technology:
Hyper-V operates as a hypervisor, which is a layer of software that facilitates the creation and management of virtual machines. It sits between the hardware and the operating system, allowing multiple operating systems to run on a single physical server.
Server Virtualization:
The primary function of Hyper-V is server virtualization. It enables the creation of virtual servers within a physical server, each running its own operating system. This consolidation of servers optimizes hardware resources and enhances the flexibility of IT environments.
Isolation of Environments:
Hyper-V ensures isolation between virtual machines. Each VM operates independently, with its own set of resources, applications, and configurations. This isolation prevents interference between VMs, enhancing security and stability.
Snapshot and Cloning:
Hyper-V offers snapshot and cloning features, allowing users to capture the current state of a VM (snapshot) or duplicate VM configurations (cloning). This is valuable for backup purposes, testing scenarios, or rapidly deploying multiple instances.
Live Migration:
One of Hyper-V's advanced features is live migration, enabling the transfer of a running VM from one physical server to another without downtime. This ensures continuous availability of applications and services during server maintenance or load balancing.
Integration with Windows Server:
Hyper-V is seamlessly integrated with Windows Server editions, making it an integral part of Microsoft's server virtualization strategy. It can be managed using tools such as Hyper-V Manager and System Center Virtual Machine Manager (SCVMM).
Support for Various Operating Systems:
Hyper-V supports a wide range of operating systems, including various Windows Server editions and several Linux distributions. This flexibility makes it suitable for diverse IT environments with mixed operating system requirements.
Resource Management:
Administrators can allocate and manage resources such as CPU, memory, and storage for each VM, ensuring optimal performance and resource utilization across the virtualized environment.
Conclusion:
Microsoft Hyper-V plays a significant role in the virtualization landscape, offering robust features for server virtualization and efficient management of virtualized environments. Its integration with Windows Server, support for diverse operating systems, and advanced capabilities like live migration contribute to its popularity as a virtualization platform. Whether used in enterprise data centers or smaller IT setups, Hyper-V provides a foundation for building flexible, scalable, and resilient virtual infrastructures.
With this detailed guide, we explored Microsoft Hyper-V, in which we covered What is Microsoft Hyper-V, its features, and so on. In the event that you require support or want to find out further information regarding Microsoft Hyper-V, you can connect with the SupportFly server management organization. If you have any problems, our expert help admins are available 24 hours a day, seven days a week.
1 note
·
View note
Text
4 Common Server Issues and Troubleshooting Examples
You may be tasked with maintaining a corporate data center or providing client hosting, but either way, outages can leave a pit in your stomach. When downtime strikes, your servers and networking hardware are the usual culprits. In fact, 80% of all outages in data centers result from server hardware.
By far the most common form of server hardware failure is hard drive malfunction. In fact, 80.9% of all failures come from HDD malfunctions, so it’s always the first place to look.
The likelihood of failure also climbs as the server ages. Starting with an average 5% server hardware failure rate at year one and an 18% rate when seven years in, aging hardware is definitely something to watch.
Navigator System offers multi vendor IT server support for your post-warranty equipment.
When it comes to server problems, there are four main categories that you should consider to quickly resolve any issues, Certainly, here are four common server issues and troubleshooting examples:
Slow Server Performance:
Issue: Users complain about slow response times from the server.
Troubleshooting:
Check Server Resources: Use tools like top or Task Manager to monitor CPU, memory, and disk usage. High utilization may indicate a resource bottleneck.
Review Logs: Examine server logs (e.g., /var/log/syslog, /var/log/nginx/error.log) for error messages or unusual activity.
Network Issues: Test network latency and bandwidth using tools like ping and iperf. Check for network congestion or hardware failures.
Software Optimization: Ensure that software and applications running on the server are optimized. Update and patch software, and consider optimizing database queries.
Server Not Responding:
Issue: The server is unresponsive, and users cannot access it.
Troubleshooting:
Check Hardware: Ensure that the server hardware is operational. Look for physical issues like loose cables, power outages, or overheating.
Remote Access: Try to access the server remotely via SSH or remote desktop. If you can't connect, it might be a network or firewall issue.
Restart Services: If the server is responding but services aren't working, try restarting relevant services using commands like systemctl restart .
Server Logs: Examine server logs for any errors that might explain the unresponsiveness.
Disk Space Exhaustion:
Issue: The server's disk space is running low.
Troubleshooting:
Disk Usage: Check disk space utilization using df -h. Identify which directories or files are consuming the most space.
Clean Unnecessary Files: Delete log files, temporary files, and old backups that are no longer needed.
Resize Partitions: If necessary, resize partitions or add additional storage to accommodate the growing data.
Monitor Usage: Implement a disk space monitoring system to alert you before the disk becomes critically full.
Security Breach or Unauthorized Access:
Issue: Suspected unauthorized access or a security breach on the server.
Troubleshooting:
Disconnect from Network: Isolate the compromised server by disconnecting it from the network to prevent further damage.
Change Passwords: Change all user passwords, especially for admin accounts. Ensure strong password policies.
Scan for Malware: Run a malware scan using antivirus software or tools like rkhunter or clamscan.
Review Logs: Examine system and security logs for suspicious activity and unauthorized access attempts.
Remember that server troubleshooting can vary depending on the specific server setup (e.g., web server, database server) and the operating system (e.g., Linux, Windows). It's crucial to have a well-documented and regularly updated server maintenance plan to address and prevent common issues. Additionally, consider implementing proactive monitoring and backup solutions to minimize downtime and data loss.
Avoid Server Failure with a Trusted Partner
Troubleshooting your server hardware is frustrating, but it doesn’t have to happen at all when you have the right data center and networking optimization partner in your corner. Navigator System has been providing third party data center maintenance for over 30 years and can help you maximize your uptime.
Whether your operations are better suited for post-warranty support paired with 24/7 data center hardware monitoring, or fully managed server management services, we can provide the support you need.
Contact us today to learn how we can help your team do less with more!
1 note
·
View note
Text
Spss Mac Os X Download
Download
This is a guide that shows how to download, install and license SPSS Statistics 23 on a private Mac. On client (hosted) Mac computers, please use Managed Software Center. Download SPSS for Mac free for 14 days. Click the following link to access the official IBM SPSS downloads page for Mac OS X. DOWNLOAD SPSS MAC OS. Once inside the IBM page, you will only have to provide your data, including an email that will receive a 7-digit code that will allow you to download the program for free in a later step for a.
Mac OS X: Install a DMG bundle for recent versions of Mac OS, or use MacPorts to build and install PSPP on a wider range of Mac OS version. With MacPorts, run port install pspp-devel to get the latest and most featureful version of PSPP, or port install pspp to get an older but possibly better tested version ( more information ).
Spss 20 For Mac Free Download Crack; Free Download SPSS 25 Full Crack for PC – One of the most popular statistics software in the world. Used by many organization, business company, government, and many others institution. Sep 07, 2019 Download the latest version of SPSS Crack 26.0 with full setup and verified SPPS License Code free.
Abstract
This Fix Pack will upgrade your SPSS Statistics 23.0 installation to SPSS Statistics 23.0 FP2 (23.0.0.2)
Download Description
This Fix Pack provides important product corrections for SPSS Statistics 23.0. Issues Corrected and Release Note(s): Fix List NOTE: The 23.0.0.2 Fix Pack contains all Interim Fixes made available for 23.0.0.0 as well as other corrected issues, and can be installed over any of the earlier Interim Fixes with no conflict.
If you are searching for the IBM SPSS Statistics Subscription download, please refer to IBM Docs SaaS Documentation.
Prerequisites
This Fix Pack is language independent but can only be installed over existing client and server installations of IBM SPSS Statistics 23.0.0.0
Installation Instructions
Installation Windows
Log in as a local administrator.
Download the Fix Pack to a temporary location on your hard drive.
Ensure that no versions of Statistics are running.
Run the Statistics 23.0.0.2 Fix Pack executable. Note: If you are installing on a Windows Server 2008, Windows Vista, Windows 7 or Windows 8 operating system, you must use 'Run as Admin' by first right-clicking on the executable.
Allow a reboot.
Statistics 23.0.0.2 is ready to run. Use the Help -> About menu to verify that 23.0.0.2 is now the installed version.
Guidelines for unattended/pushed installations for Windows-based clients:
NOTE: This FixPack may require the machine to be rebooted to complete the installation. Please be aware that 'pushing' the installation in unattended, silent mode may therefore force an unexpected machine reboot on a user, and schedule such installations accordingly.
The SPSS Statistics 23.0.0.2 for Windows Fix Pack obeys the same rules documented in the Site and Network License Administrator's Guides regarding 'Extracting the Contents of a Downloaded Installer file' and 'Pushing an Installation to Windows Computers'.
In this case:
Download the appropriate installer file to a temporary location on your hard drive.
Open a command window as the local Administrator account and change directory to the temporary download location.
Extract the 'SPSSStatistics23.0.0.2Patch.msi' and locale-specific .mst file into a specified location from the downloaded FixPack installer file, '23.0-IM-S23STATC-<OS>-FP002.exe',using the documented '/b' switch: 23.0-IM-S23STATC-<OS>-FP002.exe /b'c:Stats23002FixPack' (where <OS> is your operating system)
You can then copy the two extracted files to a network share for easier distribution.
Install the patch: msiexec /i 'c:Stats23002FixPackSPSS_Statistics_23002_<OS>_Patch.msi' /qn /L*V '%temp%SPSSStatistics23002PatchLog.txt' PYTHON_EXISTS='1' TRANSFORMS='c:Stats23002FixPack1033.mst' (where <OS> is the same operating system specification as in step 3)
Installation Mac OS X 10.9 (Mavericks) through Mac OS X 10.10 (Yosemite)
Download and save the Statistics 23.0.0.2 Fix Pack to your local hard drive.
Ensure that no versions of Statistics are running.
Execute the Statistics 23.0.0.2 Fix Pack installer from the downloaded .dmg file.
Statistics 23.0.0.2 is ready to run. Use the About Statistics 23 menu to verify that 23.0.0.2 is the installed version.
IBM SPSS Statistics 23 release is supported on Apple Macintosh OS X 10.9 (Mavericks) and 10.10. (Yosemite) with Intel processor.
Guidelines for unattended/pushed installations for Macintosh-based clients:
IBM SPSS Statistics 23 FixPack 2 for Mac OS X has a silent (push) installer. To install this FixPack on Mac systems, do the following:
Open the 23.0-IM-S23STATC-Mac-Silent-FP002.dmg disk image and copy the two files to your desktop (or any writable location).
Open a Terminal window and change directories to the location of the patch installer and installer.properties file.
Edit the installer.properties file to suit your needs. The USER_INSTALL_DIR parameter must be defined. For example, if the current SPSS Statistics 23 install is in the default /Applications/IBM/SPSS/Statistics/23, USER_INSTALL_DIR would be: USER_INSTALL_DIR=/Applications/IBM/SPSS/Statistics/23
Uncomment and modify other parameters as needed.
To execute the installer, use the following command: ./SPSS_Statistics_Installer_Silent.bin -f installer.properties
Installation Linux
Download the Fix Pack to a temporary location on your hard drive.
Ensure that no versions of Statistics are running.
Open a terminal window and execute the 23.0-IM-S23STATC-Linux8664-FP002.bin executable file as the ‘root’ user.
Statistics 23.0.0.2 is ready to run. Use the Help -> About menu to verify that 23.0.0.2 is the installed version.
Guidelines for unattended/pushed installations for Linux-based clients:
The SPSS Statistics 23.0.0.2 for Linux Fix Pack obeys the same rules documented in the Site and Network License Administrator's Guides regarding 'Running a Silent Installation on Mac and Linux Computers'.
Note: Please contact IBM SPSS Technical Support to obtain the appropriate installer.properties file for the Linux platform.
SPSS Statistics Server - 23.0 FP2 Installation Instructions
Installation Windows
Log in as a local administrator.
Download the Fix Pack contents to a temporary location.
Ensure that the same version of Statistics Server is not running, as multiple versions can be installed on the server.
Run the Statistics Server 23.0.0.2 Fix Pack executable. Note: If you are installing on Windows Server 2003 or 2008 Server, right-click setup.exe in the Windows sub folder and choose “Run as Administrator”.
Allow a reboot.
SPSS Statistics Server 23.0.0.2 is ready to run. Check the service name or add/remove programs, or launch statisticsb and run the SHOW VERSION command to verify 23.0.0.2 as the installed version.
Installation UNIX/Linux
Note: On UNIX and Linux, the Statistics Server upgrade is now a true incremental upgrade and not a complete, fresh installation. Installing the Fix Pack for the appropriate platform should be similar to the instructions for installing your server given in the SPSS Statistics Server Installation Instructions. It is suggested to copy off the spssdxcfg.ini prior to the installation on the UNIX / Linux server as the installation may remove the R section in spssdxcfg.ini and may require manual updating after FP2 installation
Download the Fix Pack to a directory on the server machine.
Shut down Statistics Server prior to applying the Fix Pack.
You need to ensure the ownership and permissions for the /bin, /lib and /common subdirectories of the Statistics installation directory. For example, if you installed as root, to change the ownership and permissions, go to Statistics installation directory and run the following commands at the UNIX prompt: chown -R root:root bin lib commonchmod -R 777 bin lib common
When running SPSS Statistics Server with internal authentication, a regular user can be the owner of these directories. Refer to the SPSS Statistics Server Administrator’s Guide for more information.
The Fix Pack can be installed silently using the installer.properties file that comes with the 23.0 release (on the DVD): ./<installer_name> -f installer.properties where <installer_name> is the installer .bin file that you ftp'ed to the server.
You can also execute the installer directly to launch a graphical version of the installer. (Note: You will need an X Window System to do so): ./<installer_name> Note for graphical installer: You should change the default installer directory for the patch in the Install Wizard to point it to the directory on the server where Statistics Server 23.0 is installed.
Start the Statistics Server after the Fix Pack installation is complete.
Run ./statisticsb and enter SHOW VERSION. The response should indicate 23.00.00.02
(('DNLabel':'All packages','DNDate':'30 Sep 2015','DNLang':'Language Independent','DNSize':'1','DNPlat':('label':'Platform Independent','code':'PF025'),'DNURL':'http://www-933.ibm.com/support/fixcentral/swg/selectFixes?parent=SPSS&product=ibm/Information+Management/SPSS+Statistics&release=23.0.0.0&platform=All&function=all','DNURL_FTP':' ','DDURL':null),('DNLabel':'IBM SPSS Statistics Server zLinux','DNDate':'30 Sep 2015','DNLang':'Language Independent','DNSize':'538875524','DNPlat':('label':'Linux','code':'PF016'),'DNURL':'http://www-933.ibm.com/support/fixcentral/swg/selectFixes?parent=SPSS&product=ibm/Information+Management/SPSS+Statistics&release=23.0.0.0&platform=All&function=fixId&fixids=23.0-IM-S23STATS-zLinux-FP002&includeRequisites=1&includeSupersedes=0&downloadMet','DNURL_FTP':' ','DDURL':null),('DNLabel':'IBM SPSS Statistics Server Windows 64','DNDate':'30 Sep 2015','DNLang':'Language Independent','DNSize':'274593280','DNPlat':('label':'Windows','code':'PF033'),'DNURL':'http://www-933.ibm.com/support/fixcentral/swg/selectFixes?parent=SPSS&product=ibm/Information+Management/SPSS+Statistics&release=23.0.0.0&platform=All&function=fixId&fixids=23.0-IM-S23STATS-WIN64-FP002&includeRequisites=1&includeSupersedes=0&downloadMeth','DNURL_FTP':' ','DDURL':null),('DNLabel':'IBM SPSS Statistics Server Solaris','DNDate':'30 Sep 2015','DNLang':'Language Independent','DNSize':'716124277','DNPlat':('label':'Solaris','code':'PF027'),'DNURL':'http://www-933.ibm.com/support/fixcentral/swg/selectFixes?parent=SPSS&product=ibm/Information+Management/SPSS+Statistics&release=23.0.0.0&platform=All&function=fixId&fixids=23.0-IM-S23STATS-Solaris-FP002&includeRequisites=1&includeSupersedes=0&downloadMe','DNURL_FTP':' ','DDURL':null),('DNLabel':'IBM SPSS Statistics Server Linux','DNDate':'30 Sep 2015','DNLang':'Language Independent','DNSize':'536023063','DNPlat':('label':'Linux','code':'PF016'),'DNURL':'http://www-933.ibm.com/support/fixcentral/swg/selectFixes?parent=SPSS&product=ibm/Information+Management/SPSS+Statistics&release=23.0.0.0&platform=All&function=fixId&fixids=23.0-IM-S23STATS-Linux8664-FP002&includeRequisites=1&includeSupersedes=0&download','DNURL_FTP':' ','DDURL':null),('DNLabel':'IBM SPSS Statistics Server AIX','DNDate':'30 Sep 2015','DNLang':'Language Independent','DNSize':'614701866','DNPlat':('label':'AIX','code':'PF002'),'DNURL':'http://www-933.ibm.com/support/fixcentral/swg/selectFixes?parent=SPSS&product=ibm/Information+Management/SPSS+Statistics&release=23.0.0.0&platform=All&function=fixId&fixids=23.0-IM-S23STATS-AIX-FP002&includeRequisites=1&includeSupersedes=0&downloadMethod','DNURL_FTP':' ','DDURL':null),('DNLabel':'IBM SPSS Statistics Client Windows 64','DNDate':'30 Sep 2015','DNLang':'Language Independent','DNSize':'381513808','DNPlat':('label':'Windows','code':'PF033'),'DNURL':'http://www-933.ibm.com/support/fixcentral/swg/selectFixes?parent=SPSS&product=ibm/Information+Management/SPSS+Statistics&release=23.0.0.0&platform=All&function=fixId&fixids=23.0-IM-S23STATC-WIN64-FP002&includeRequisites=1&includeSupersedes=0&downloadMeth','DNURL_FTP':' ','DDURL':null),('DNLabel':'IBM SPSS Statistics Client Windows 32','DNDate':'30 Sep 2015','DNLang':'Language Independent','DNSize':'373719672','DNPlat':('label':'Windows','code':'PF033'),'DNURL':'http://www-933.ibm.com/support/fixcentral/swg/selectFixes?parent=SPSS&product=ibm/Information+Management/SPSS+Statistics&release=23.0.0.0&platform=All&function=fixId&fixids=23.0-IM-S23STATC-WIN32-FP002&includeRequisites=1&includeSupersedes=0&downloadMeth','DNURL_FTP':' ','DDURL':null),('DNLabel':'IBM SPSS Statistics Client Mac Silent','DNDate':'30 Sep 2015','DNLang':'Language Independent','DNSize':'409960578','DNPlat':('label':'Mac OS','code':'PF017'),'DNURL':'http://www-933.ibm.com/support/fixcentral/swg/selectFixes?parent=SPSS&product=ibm/Information+Management/SPSS+Statistics&release=23.0.0.0&platform=All&function=fixId&fixids=23.0-IM-S23STATC-Mac-Silent-FP002&includeRequisites=1&includeSupersedes=0&downloa','DNURL_FTP':' ','DDURL':null),('DNLabel':'IBM SPSS Statistics Client Mac','DNDate':'30 Sep 2015','DNLang':'Language Independent','DNSize':'460036534','DNPlat':('label':'Mac OS','code':'PF017'),'DNURL':'http://www-933.ibm.com/support/fixcentral/swg/selectFixes?parent=SPSS&product=ibm/Information+Management/SPSS+Statistics&release=23.0.0.0&platform=All&function=fixId&fixids=23.0-IM-S23STATC-Mac-FP002&includeRequisites=1&includeSupersedes=0&downloadMethod','DNURL_FTP':' ','DDURL':null),('DNLabel':'IBM SPSS Statistics Client Linux','DNDate':'30 Sep 2015','DNLang':'Language Independent','DNSize':'538875524','DNPlat':('label':'Mac OS','code':'PF017'),'DNURL':'http://www-933.ibm.com/support/fixcentral/swg/selectFixes?parent=SPSS&product=ibm/Information+Management/SPSS+Statistics&release=23.0.0.0&platform=All&function=fixId&fixids=23.0-IM-S23STATC-Linux8664-FP002&includeRequisites=1&includeSupersedes=0&download','DNURL_FTP':' ','DDURL':null))
(('Product':('code':'SSLVMB','label':'IBM SPSS Statistics'),'Business Unit':('code':'BU053','label':'Cloud & Data Platform'),'Component':'--','Platform':(('code':'PF002','label':'AIX'),('code':'PF016','label':'Linux'),('code':'PF014','label':'iOS'),('code':'PF027','label':'Solaris'),('code':'PF033','label':'Windows'),('code':'PF025','label':'Platform Independent')),'Version':'23.0','Edition':','Line of Business':('code':'LOB10','label':'Data and AI')))
Document Information
Modified date: 21 May 2021
Downloading & Installing SPSS for macOS. Go to the University Software Downloads page and download the ' IBM SPSS Statistics ' link. Take note of where your web browser will download the .zip file so that you can access it after the download completes.
My files > Soft > IBM SPSS 27 > Mac Name IBM SPSS STATISTICS CLIENT 27.0.1.pkg history SS CLIENT _26.0 MAC OS MULTILINGUAdmg Hmm.„ looks like this file doesn't hase a previav we can shoe' you. Introduction python Essentia s License Agreement Choose Install Folder Pre -Installation Summary Installing. nstall Complete instal(Anywhere Ca ncel
Can you install IBM SPSS Statistics on a Mac?
IBM SPSS Statistics 23 release is supported on Apple Macintosh OS X 10.9 through OS X 10.11 with Intel processor. Guidelines for unattended/pushed installations for Macintosh-based clients: IBM SPSS Statistics 23 FixPack 3 for Mac OS X has a silent (push) installer. To install this FixPack on Mac systems, do the following:
What do I need to download SPSS in Spanish for Mac?
Before downloading SPSS in Spanish for Mac for free, make sure your Apple Mac OS X meets the minimum system requirements for Macintosh. Operating system: Mac OS X 10.10 or later. Memory (RAM): 4 GB of RAM is required. Hard disk space: 2.5 GB of free space required. Network: adapters, drivers, protocols: IPv6 is supported and not necessary.
How can I install SPSS on my computer?
On the IBM SPSS Statistics screen, click OK. On the IBM SPSS Statistics – Introduction screen, click Next. On the IBM SPSS Statistics – Software License Agreement screen, select I accept the terms in the license agreement and click Next.
How can I uninstall SPSS from my Mac?
Open up Launchpad, and type SPSS in the search box on the top. Click and hold SPSS icon with your mouse button until it starts to wiggle. Then click the “X” that appears on the left upper corner of SPSS to perform the uninstall.
Downloading & Installing SPSS for macOS
Download SPSS 27.0 for Mac from our website for free. The software lies within Education Tools, more precisely Science. The bundle id for SPSS for Mac is com.ibm.SPSS.Statistics. SPSS for Mac is sometimes distributed under different names, such as 'SPSS Installer', 'SPSS16', 'SPSS 11'.
This is a guide that shows how to download, install and license SPSS Statistics 23 on a private Mac. On client (hosted) Mac computers, please use Managed Software Center.
Click on 'Download IBM SPSS'. 2. Select the 'IBM SPSS Statistics' folder, then select 'Mac'. 3. Select the installation file; click on 'Download' then 'Direct Download'. Tip: The download button is located in the top right of the web page.

The top menu of SPSS 25 may disappear if the Mac OS system is set to Non-English. The official MacOSX 10.13.1 version do not have this issue. So, if you encountert this issue you need to update your Mac OS version to latest official 10.13.1 build from Apple.
DOWNLOAD SPSS MAC OS. Once inside the IBM page, you will only have to provide your data, including an email that will receive a 7-digit code that will allow you to download the program for free in a later step for a trial without limitations for 14 days. .
How to Install SPSS (MacOS)
SPSS for Mac Installation Instructions Click on the “SPPS Mac Download” link on the Resources webpage. Once you have clicked on the link, follow these instructions for installation: 1. Enter your University of Wisconsin - Superior credentials and click “Login.” 2.
license. A single-user license allows you to install SPSS Statistics on up to two computers, if those computers are used by one user. System Requirements for IBM SPSS Statistics The minimum hardware and software requirements for IBM® SPSS® Statistics are as follows: Operating System Mac OS X 10.5 or higher (32- or 64-bit).
Installing SPSS v21 on Mac OS X for MSc Students. 1. From the USB flash drive provided, open the file 'SPSS_Statistics_21_mac_.dmg'. 2. Wait while the file is verified. This may take up to 5 minutes to complete. 3. Double click ' SPSS_Statistics_Installer '.
The following set of instructions will walk you through installing IBM SPSS version 21 on your computer. Version 21 is supported on the following Mac Operating Systems: • Mac OS X Snow Leopard 10.6 • OS X Lion 10.7 • OS X Mountain Lion 10.8 For newer Operating Systems, it is recommended that you use SPSS version 24.
Installing SPSS v21 on Mac OS X for MSc Students. 000001501 . 1. From the USB flash drive provided, open the file 'SPSS_Statistics_21_mac_.dmg'. 2. Wait while the file is verified. This may take up to 5 minutes to complete. 3. Double click 'SPSS_Statistics_Installer'. 4. When prompted, select your language and press OK.
Installing SPSS 27 for Mac

3. Navigate to the SPSS folder, and click to open it. Click the file named SS_CLIENT_26.0_MAC_OS_MULTILINGUA.dmg, and then the Download button. Note: Depending on your network speed, it may take a while for the file to download. 4. Once the file has been downloaded, navigate to the Downloads folder on your local hard drive. Find the
IBM SPSS Statistics 23 FixPack 3 for Mac OS X has a silent (push) installer. To install this FixPack on Mac systems, do the following: Open the 23.0-IM-S23STATC-Mac-Silent-FP003.dmg disk image and copy the two files to your desktop (or any writable location).
IBM SPSS Statistics 23 FixPack 2 for Mac OS X has a silent (push) installer. To install this FixPack on Mac systems, do the following: Open the 23.0-IM-S23STATC-Mac-Silent-FP002.dmg disk image and copy the two files to your desktop (or any writable location).
Later on we will start covering Mac OS X issues as well. So if your IBM SPSS Statistics 25 for Mac won’t start after installation. Then don’t worry because of IBM SPSS Statistics 25 for Mac errors and problems. So if you get any errors such as IBM SPSS Statistics 25 for Mac is crashed.
Display 1280 x 800 or higher resolution monitor Operating System Mac OS X version 10.6 or later Network You must be connected to the University of Southern California network (physically or through VPN
SPSS (free version) download for Mac OS X
Installation Procedure SPSS 24,23,22,21 (Mac) Locate the 'SPSS_Statistics_25_mac.dmg' file that you downloaded from the Campus Software Library. Double click on this file to mount it, and then double click on the installer icon that will pop up in the new window below.
This article covers how to install SPSS Statistics on a PC (Windows) or Mac computer. Installing SPSS Statistics (Mac) Installing SPSS Statistics (Windows) ** This is CSUs official SPSS software. The trial download is the FULL VERSION of SPSS Statistis once activated with your CSUF Authorized Software Code.
Licensing SPSS for Mac OS X Last modified: October 18, 2016 If you have downloaded a trial version of IBM SPSS Statistics and have now received your SPSS authorization code from ITS, follow the instructions below to license your software on the Macintosh operating system.
about potential difficulties in using SPSS 13 for Mac OS X, solutions to problem, hints, and tricks. Files installed with SPSS 13.0 for Mac OS X Installer SPSS 13.0 files are installed in the following folders: /Applications SPSS 13 for Mac OS X application folder This destination is suggested by default. It can be changed during installation.
For connecting with an SPSS Server, a network adapter running the TCP/IP network protocol Software: Internet Explorer 6 For SPSS 16.0 for Mac Operating system: Apple Mac OS X 10.4.x (Tiger) Processor: Intel processor RAM: 512MB RAM; 1GB recommended 800 MB of available hard-disk space CD-ROM drive Super VGA (800x600) or a higher-resolution monitor
SPSS 24 MAC INSTALLATION
Do not install the product if you use any applications, which extend standard Finder . functionality (such as Path Finder, SNAX, etc.) If you already have some of these applications, disable them first, and then install SPSS 13 for Mac OS X. Installation may not be completed
SPSS version Operating System FixPack Description Posted here; v.27 : Mac OS-X 27.0-IM-S27STATC-Mac-MD001 : IBM SPSS Statistics 27.0 Mac Modified Release 1
Install SPSS. 1) Download SPSS v25 using the appropriate link for your operating system from below: SPSS for Windows 32 bit. SPSS for Windows 64 bit. SPSS for Mac OS X. 2) Installing SPSS. Windows users: Right-click the downloaded file and choose 'extract all.' Open the resulting folder and run 'setup.exe.'
OS X 10.11 El Capitan Retail by TechReviews. OS X 10.11 El Capitan Retail.vmdk 9,880 MB; Mac OSX 10.11 EL Capitan Image and Instructions AMD Chipset ONLY. Install OS X El Capitan 10.11 on VirtualBox on Windows PC (Download links).avi 37 MB; Instructon

Spss 21 Mac Os X Download
Solve business and research problems using SPSS for Mac OS X. Designed to run on your Mac, this data analysis and data management package enables you to uncover key facts, patterns, and trends.
Reinstalling SPSS on Mac OS X
Turn on Finder integration. If you’re on OSX 10.10 or higher, get sync status directly from Finder by enabling Finder overlays in Settings. First, click the Apple logo in the top left corner of your Mac Desktop and select System Preferences, then select Extensions in the top-level menu (shown in the 3rd row from the top).. Toggle on the OneDrive Finder Integration to enable Finder overlays.
Open your browser and go to SPSS Statistics System Requirements to find more detailed requirements on specific systems, hardware and operating systems. You will need to know this information to make sure your system meets the software's minimum requirements.
SPSS version 23 is compatible on the following Mac Operating Systems: • OS X Mountain Lion 10.8 • OS X Mavericks 10.9 • OS X Yosemite 10.10 • OS X El Capitan 10.11 o El Capitan is only supported with several pre-requisites: Install the El Capitan Fix Pack Install legacy Apple Java 6 to prevent from possible problems with
Mac OS X: Install a DMG bundle for recent versions of Mac OS, or use MacPorts to build and install PSPP on a wider range of Mac OS version. With MacPorts, run port install pspp-devel to get the latest and most featureful version of PSPP, or port install pspp to get an older but possibly better tested version ( more information ).
If installing SPSS, the license wizard should launch automatically following the SPSS installation. (If it does not, then start the wizard manually, as described in Step b below.) If re-licensing SPSS, then launch the license wizard manually from your Mac Applications folder. The default location is:
SPSS for Mac 【 IBM Statistical Software
IBM SPSS Statistics Grad Pack 26.0 STANDARD- 2 year license-Windows or Mac DOWNLOAD- install on up to 2 computers SPSS, Standard, V26, Version 26 $ 2,300.00 $ 149.00 Need a previous version?
Spss For Mac Os
Also, locking the file via Finder or removing write permissions. Does fix the sitution because SPSS 11.0.4 will use the plist inside the application package instead.
For Mac Operating system Mac OS Catalina 10.15, Mac OS Mojave 10.14, OS High Sierra 10.13 Note: Java JRE must already be installed before you can run the SPSS Statistics Mac silent installer. Processor 1.6 GHz or faster Display 1024.768 or higher screen resolution Memory.
My purpose is to use propensity score matching in SPSS (from source forge). I am using SPSS version 22 on my mac OS X yosemite 10.10.5. After reading a lot on the different sites I need to use R.2.15 for SPSS 22 in order to use the psmatching 3.03 on source forge. However, I cannot seem to install R 2.15 when I run the installation package.
Spss Mac Os X Download Free
Since OS X 10.3 Panther, every Mac has used a journaled version of HFS Plus (HFSJ) to reinforce data reliability. Since OS X 10.6 ounce, HFS Plus has automatically compressed files. You can also like better to format partitions with HFSX, a case-sensitive variant of HFS Plus intended for compatibility with UNIX software.

SPSS for Mac Installation Instructions
Download Mac Sierra Installer Mac Disk Cleaner Free App Store Adware Cleaner Mac Outlast Download Mac Mac Download Torrents Line Mac Dmg Spss Download For Mac Os X El Capitan 10.11 Download Dmg Onmoyji Reduced Crit Dmg Camtasia Free Download Mac Dmg Fleas Can Do To Dogs Mac Dmg Downloads.
1 note
·
View note
Text
Tp-link extender setup-Tp-link wifi range extender setup
Tp-link Extender Setup
Account administration requires the TP Link wifi extender login. If you have an account, you may view the information at any time.The TP Link wifi extender may be accessed via a web browser. Only by logging in to the Wi-Fi extender can we access the device.If we have signed in to the TP-Link Wi-Fi Extender, we may receive notifications about upgrades or difficulties. It's mostly used to manage your TP Wi-Fi extender account. The steps for accessing the TP-Link Wi-Fi Extender are outlined below.
To Login To A TP-Link WiFi Extender, Follow These Steps
With the Ethernet cable, connect the computer to the TP-LAN link's port.
Manually assign the Static IP address on the PC.
Follow the guidelines below if you're not sure how to allocate. If you have a Windows 7 computer, follow the steps outlined here.
Select the choices using the left mouse button. Change Adapter Start->Control Panel->Network and Internet->Network and Sharing Center to change the settings.
Double-click the option Internet Protocol Version 4(TCP/IPv4) under Local Area Connection-> Properties.
If your static IP address is 192.168.0.254, you may now adjust the static IP address to 192.168.1x.
Open any web browser and put the extender's IP address into the address bar.
Type the username and password in the corresponding fields.
admin is the default username and password.Click OK when you've finished entering your information.
The IP settings provided above are used to access the TP-web-based Link's setup interface.
What Is The Best Way To Set Up My Range Extender?
Check whether you have the following information for TP Link wifi extender login before setting up the Range Extender setup. IP address, encryption type, SSID, and password
To begin, go to the TP Link wifi extender management page and log in.
The Network option should be selected. Check that the Range Extender IP Address matches the router's IP section.
You may also select the Save button after changing the IP address to 192.168.1.250.
Select Quick Setup->Next->Wireless from the drop-down menu.
After selecting Range Extender as the operating mode, click Search.
Find your router's SSID in the list, click it, and then select Connect. Select Save from the File menu to save it.
Wireless Security may be found by going to Wirelss-> Wireless Security. Select WPA-PSK/WPA-PSK and AES as the encryption method, then click Save.
To confirm, select one of the choices. Type your router's IP address, 192.168.1.254, in the IP address bar, and then select the Start option under System Tools-> Diagnostic.
Set your computer to acquire the IP address as soon as possible.
How To Set Up A Range Extender With A WPS Button
Connect a power outlet near your main router to your Range Extender.
Then, on the primary router, press the WPS button, followed by the WPS button on the Range Extender.
Wait until both the router and the Range Extender's WPS button lights blink.
The WPS process failed if the wireless signal LED on your Range Extender is still off after two minutes. Press the WPS button one more.
Rep the steps above till you achieve your goal. You may leave the Range Extender where you wish to extend your wireless network's range.
You may use the wireless network connection after plugging in the Range Extender.
TP-Link Extender Login Procedures
Use a web browser such as Safari, Internet Explorer, or Google Chrome to log in to your TP Link wifi extender.
Type the default IP address of the TP-Link Modem router, such as 192.168.1.1, at the top of the browser window, and then hit the Enter key.
Depending on the product, the LAN IP address changes. The IP address can be seen at the bottom of each label product.
In the login page, input the Username and Password.
Admin is the default user name and password for D-Link devices. Enter your password in lowercase letters.
To log in to your TP Link wifi extender, choose the option OK.
1 note
·
View note
Text
How to fix Error Code 0X80071A90

You are introducing the ".net structure" on your Windows 10, and out of nowhere there is a mistake on the screen. The mistake for this situation liable to be Error Code: 0X80071A90, trailed by the accompanying message:
The capacity endeavored to utilize a name that is held for use by another Transaction"
There may be a case when you are attempting to add the Hyper-V in Windows 8 or Windows 10, and you get a similar blunder. This could be incredibly irritating for the client. Fortunately, there are some fixes accessible, which can be attempt.
4 techniques To Fix Error Code Ox80071A90
1-Check the framework records
the primary strategy to fix 0X80071A90
The principal technique which can be attempted to fix Error Code 0X80071A90 is to check the framework documents. This should be possible by dispatching System File Checker. Framework File Checker(SFC) will identify tainted framework documents. Once recognized, System File Checker will endeavor to fix the adulterated framework documents. On the off chance that Windows Resource Protection (WRP) is undermined or assuming it is absent from the framework, the working probably won't work as expected. To dispatch SFC, you can follow the means given underneath:
Right-click on the Windows symbol and afterward select the alternative "order brief (Admin)"
The order brief window will spring up on the screen.
In the order brief, type the order "sfc/scannow", trailed by enter.
When the order is executed, it's anything but an output on the ensured framework records. In the event that a tainted record is discovered, it will be supplanted by a duplicate of the document put away in the store.
The store organizer is situated at the %WinDir%\System32\dllcache. Every one of the records are packed and put away in this envelope. When the interaction is finished 100%, and the message will spring up on the screening referencing that every one of the tainted records. When the cycle is finished and every one of the records are fixed, the ERROR CODE 0X80071A90should be fixed. In any case, it is likewise conceivable that SFC probably won't have the option to fix every one of the undermined documents. In the present circumstance, you need to fix this physically. You need to go to the catalog, where the debased records are found, and supplant those documents with a duplicate of something very similar.
Impair Antivirus To Fix ERROR CODE 0X80071A90
On the off chance that the Error Code 0X80071A90 comes up during an endeavor to introduce the Hyper-V component, and it turns out that you have introduced Avast as antivirus on the framework. For this situation, the issue could be handily settled by just incapacitating the antivirus, which may be utilizing the virtual machine. This should be possible by right-tapping on antivirus symbol showed on the framework tray.These antivirus frameworks, in the manner in which they capacity can likewise cause other such mistake code issues, for instance, the Error Code oxcoooooof and Error Code 0x80070002.It can be because of wrong arrangements or different reasons, which you can settle all alone. With far reaching informative aides as this.
2. Attempt Safe Mode
You can likewise fix Error Code 0X80071A90, by booting the framework into protected mode. For this, you need to restart the framework and continue tapping F8 key while the framework is booting up. Once more, if it's not too much trouble, allude to the motherboard manual as the key for the experimental mode may be unique. When the F8 menu, you can choose "experimental mode" and afterward continue with booting.
It is very conceivable that a portion of the outsider programming may influence the PC. Once signed into experimental mode, all the outsider programming will be incapacitated of course. Assuming the Error Code 0X80071A90, isn't coming up in experimental mode, it is very conceivable that some outsider programming may be liable for this. Henceforth, you can have a go at crippling a portion of the outsider programming and foundation applications, including the antivirus programming and check if the mistake is as yet coming or not. On the off chance that not, the issue is settled
3. Play out a spotless boot
In the event that you don't know which outsider programming is causing the ERROR CODE 0X80071A90, then, at that point performing clean boot will be the most ideal alternative. To play out a perfect boot, one necessities to impair all the outsider administrations. This should be possible by right-tapping on the taskbar, then, at that point going to task director and tapping on more subtleties. For additional subtleties, select the startup tab. When you are on the startup tab, incapacitate every one of the applications that are empowered on startup.
To debilitate the applications, one requirements to choose the application, and snap on Disable. Whenever this is done, all the outsider administrations are needed to be crippled, without contacting the Microsoft administrations. For this, you need to go to "MSCONFIG". To dispatch MSCONFIG, you need to squeeze "Windows + R" to dispatch the run window. When the run window shows up, type "MSCONFIG" and press enter. This will open the framework setup window. Go to the administrations tab, check the choice "conceal all Microsoft administrations" and afterward cripple every one of the administrations. Whenever this is done, restart the framework, Post restarts the issue ought to be settled.
4.Use the investigator to fix ERROR CODE 0X80071A90
The last update will be to utilize "Windows Update Troubleshooter" device. This will attempt to find the framework blunders and attempt to determine them. For this, first press "windows + x" should be squeezed together, then, at that point the control board should be chosen. In the pursuit bar, type "Investigating" and press enter. Go to the choice to investigate PC issues, and snap on "framework and security". On the following screen, click on windows update which will be situated under windows. Presently click on cutting edge, and afterward select the alternative "run as overseer". Simply click on straightaway, and adhere to the on-screen directions to investigate the issue. There may be circumstances where the investigator probably won't work or fix the issue, however certainly, it merits attempting.
Every one of the recommended steps in this article need the direction of a tech master, and it's anything but proposed to perform with no assistance from a certified tech. This is significant, since you are working with center working framework records, and on the off chance that any of the framework documents erased or altered unintentionally, the entire working framework may get tainted.
There are simply such countless individuals out there that utilization Windows. What's more, as such are defenseless against such blunder message issues. On the off chance that you utilize large numbers of the various Windows items, it tends to be something very similar for you.
What's more, on the off chance that you need data on the best way to investigate these blunders. Then, at that point you can get that from this site microsoft error code 0x80071a90.
#error code 0x80071a90 hyper v#0x80071a90 .net framework#hyper-v 0x80071a90#windows 10 error 0x80071a90
1 note
·
View note
Text
These 10 Hacks Will Certainly Make You(R) Coin Master Spins ( Appearance) Like A Pro
Top Android Games Which Assist You Obtain Settlements In Bitcoin.
#toc background: #f9f9f9;border: 1px solid #aaa;display: table;margin-bottom: 1em;padding: 1em;width: 350px; .toctitle font-weight: 700;text-align: center;
Content
Xmas Shop Online.
Gamings You May Not Know About
Gameanalytics Places All Of Our Kpis In One Location, As Well As Assists Us To Track Layout Occasions As Well As Maximize Our Game Circulation.
The 50 Best Gamecube Games Of Perpetuity.
Mahjong Games.
Xmas Shop Online.
I reflected to the R&D team and also all the great individuals I utilized to deal with. There were just a couple of computer systems in the department and prototypes were assembled with black and white xeroxes, pens as well as paste.
Gamings You Might Not Know Regarding
Thats all, this is fun, you can alter at all times of "gameplay". You see what buddies are online and see what they're playing, right? You can see the games you have actually downloaded, surf for even more video games and launch games as well. If you take all that and placed it in an Android app for Google Play Gaming Services, you have this application.
It's not gratuitously fierce like the M-rated Phone call of Obligation collection. It's rated "T" as being proper for teens and also up, by the ESRB. Players are "removing" instead of "eliminating" various other gamers.
Gameanalytics Puts Every One Of Our Kpis In One Area, And Also Aids Us To Track Layout Occasions And Optimize Our Game Circulation.
Which Roblox admin sadly died?
This was a sad moment for the beloved ROBLOX Admin to die of cancer On February 11th, 2013, the ROBLOX staff said on Twitter that Erik Cassel had lost his fight with cancer earlier in the day at age of 45.
The sequence of games, nonetheless, is different, as the model complies with a "Southern Start" with early-season games played either at domes or at institutions in the southern-most part of the league footprint. Commonly, MVFC colleges would certainly not play more than two-straight games at home or two-straight games on the road, yet it will happen three times following springtime as a result of center disputes at some websites.
Why are league players so bad?
One of the main reason is toxicity, league of legends community is greatly known for its amazing, supreme flaming towards other players. And this causes the people playing to tilt easily, troll or afk. Tilt - means not playing as well as they could have been due to reading these type of messages.
On-line domino video games make it possible to play either versus a computerized opponent or players from around the globe. There are both one-on-one video games and also multiplayer events available on lots of sites.
What is the most downloaded game?

The Facebook app itself came in as the most-downloaded app, followed by Facebook Messenger, WhatsApp, and Instagram in second, third, and fourth places, respectively.
Subway Surfers.
Candy Crush Saga.
Temple Run 2.
My Talking Tom.
Clash of Clans.
Pou.
Hill Climb Racing.

Minion Rush.
More items•
Otherwise, make sure to set up these safety and security setups before your kid starts gaming.
In addition to being fun, playing video games can reduce stress and anxiety, lighten anxiety, boost vision, enhance the ability to multi-task and also improve decision-making skillsi.
On the internet video gaming is additionally connected to obesity, enhancing depression, bad qualities, addictive habits and enhanced aggressive or terrible behaviorii.
So you're most likely wondering exactly how you can use Google Play Games. This is for gamers only as well as non-gamers will certainly have a very tough time finding anything useful regarding this application. Games reported on by gamer count as opposed to official sales figures, such as registered accounts, memberships, or free-to-play ownership, are consisted of on the checklist of most-played video games by gamer matter instead. Gamings reported on by gross earnings are included on the checklist of highest-grossing game video games, checklist of highest-grossing mobile games as well as listing of highest-grossing video game franchises. The best-selling video game to day is Minecraft, a sandbox computer game originally released for Microsoft Windows, Mac OS X, as well as Linux in 2011.
The 50 Finest Gamecube Games Of Perpetuity.
Is GTA 5 the highest grossing game ever?
Grand Theft Auto V's world of guns, gore and gangs has topped the ranks as the highest grossing media title of all time, according to a report from Marketwatch. Since the game's release in 2013 'GTA V' has made a ridiculous $6 billion off the back of its $265 million budget.
You will not need to download and install a game straight to your gadget or own any specialized equipment. Cloud gaming is still in its early stage, of course, and also every major player is trying out business model to figure out what sticks. With the introduction of Luna as well as Amazon's channel-based approach, we're seeing yet another wager on how the future of game circulation will certainly be structured.
Modern Times Team Promotes Redin To Ceo.
All functions, performance, and various other product requirements undergo change without notification. The technicians of play will excite any individual who has actually dreaded lengthy download times or lack storage room on their console. When you open up the Luna app or websites, it lets you play games immediately after picking them.
Agos: A Video Game Of Area.
This is compounded by the truth that all of us are sitting a fair bit these days-- in school, at the workplace, on commutes, viewing TELEVISION, on the sofa on our phones, etc . Fortnite ends up being one more sedentary task that displaces exercise. We need to remember though that, for lots of people, if they were not playing Fortnite, they free spins coin master links would certainly just be making use of some other kind of screen time.
Although this time around, Amazon.com is following a successful design template in how much of television is packed and sold on the internet today. Whether that's a smart action will certainly rely on whether consumers see enough benefit in Luna and what it has to offer to add yet much more fees to the ever-growing list of monthly registrations. Many publishers have considering that opted back into Nvidia's system, complying with some top-level separations like Activision Snowstorm and also Take-Two Interactive.
Mahjong Gamings.

Yet in this scorching heat of Summertime, no parents enable their kids to go out as well as play in the Sun. Hrs as well as hrs of less active time playing video games may also contribute to some negative results.
2 notes
·
View notes
Text
192.168.1.1
You most likely know that your computer and your telephone have an IP address. A new version of the Web Protocol has also been created, known as IPv6. In contrast to its predecessor, IPv6 uses a 128-bit address, enabling for roughly three.4×1038 addresses, which is sufficient to assign a unique IPv6 address to each single atom on the surface of the Earth. Step four: Log in to the D-Hyperlink router with the administrator username and password. Go to this web site for more detailed directions and tools on finding your router's IP address.
To discover your router's IP quantity, look subsequent to "Default Gateway" (listed final). Step 1: Initial of all, connect the Netgear router with your Windows Pc and then open Browser and sort 192.168.1.1 > Enter. Examine regardless of whether the LAN wire is appropriately connected to your router and your pc or not. IP Address 192.168.1.1 belongs to a Private or Reserved variety, most of the IP Address specifics are not available.
Step 4: Go to Wireless Setting and modify settings that you want. Step four: Modify WiFi Password and Router Username. Step two: Sort 192.168.1.1 in browser > Enter. The router uses a diverse address than 192.168.1.1. Open a browser and kind that IP address to log into the router using the administrative ID and password. In case you can't access your router admin configuration web page by means of , let's find out which IP address your router is employing.
A much better option is to give the printer a private IP address so that only devices on the same network can reach it. Even so, the 192.168.0.1 IP address isn't usually utilized for printers but routers. All routers come with a internet interface that tends to make it possible to far more or less very easily modify various settings, and IP addresses such as 192.168.0.1 , 192.168.1.1 , or 192.168.. let you access it.
As we've just mentioned, it really is not possible to enter the 192.168.1. IP address unless you're connected to the exact same local network as the router to which the IP address is assigned. That should not be a dilemma if you are attempting to connect to your own property router. In some instances, it really is essential to connect straight through an Ethernet cable for security causes. I did the original setup, changed the admin admin password, designed a wifi network, it worked fine for a year (changins passwords after in a even though).
Following profitable login, you need to change the WiFi password and router username. Pick a strong password, a mixture of letters, symbols, and numbers. Here are some examples of how different router modes and switches would assign IP addresses to computer systems in a network. You will see the IP address next to default” (in the example under, the IP address is: 192.168.137.1). If you do not bear in mind your username and password, you can take benefit of default login specifics that are presented on the globe wide web. When it's worked, you ought to be asked for your password. Then you have to enter a username and password. Determine on a mix of letters and numbers to develop the password powerful.
Well, your Computer is showing a routable IP address as properly as default gateway so it would appear your router isn't carrying out considerably of anything. To access the RT-N12D1 settings, reconnect to the wireless network and use the updated IP address and port number. If you would like to make use of a specific router behind your ISP's router, you have two options: change your default IP address or keep the present configuration. Nonetheless, if you want to use a router behind your ISP's box, it is not necessary to have the router mode enabled on the existing configuration.
Sadly, most users don't even know how to log into router let alone how to adjust the default router password to one thing more safe. As told, the ip 192.168.1.11 is portion of a private class C network The range of this network is 192.168.. - 192.168.255.255. This make the quantity of attainable IP addresses 65,535. This range is typically employed on private networks simply because several routers are configured with 192.168.0.1 or 192.168.1.1 as their default address.
When you discover the correct address, you'll have to sign in making use of the router's managerial password. To seek out the IP Address, an person can adhere to any 1 of the next three methods. Public IP addresses are exclusive on the world wide web, but the personal ones aren't. Your router is the center of your network. Everything from the laptop you use to make on the internet purchases and handle your savings account to the baby monitor in your child's space connects to it. Cybercriminals are nicely aware of the central importance of routers, and they've created several sorts of malware to exploit weak router passwords.
As soon as you have accessed the admin panel of your router, you can modify numerous possibilities there, which includes PPOE, DNS, LAN, WAN, WLAN settings, IP QoS, Proxy, safety alternatives, network management, MAC, WPS , DHCP client or even your modem or wireless router's default IP address. Comment your situation if you are facing any. Thanks for reading this report on 192.168.0.1 IP address Login and Router Default Username and password. Also, Share us on Social Media.
Step 1: Plug D-Link router with your laptop or desktop with Ethernet cable. The number 192.168.0.1 is the default internet protocol address (or IP address) for all types of TP-hyperlink, D-Link and Netgear models. This private IPv4 network address can be changed at any time utilizing your network router's management console. In the case of other routers, you can variety ‘admin' as the default username and password. Often, you can also type ‘pass' or ‘password' in the password box.
Step three. Click the Network & Internet” choice. Step five. Select how you are connected to your router. If you are hardwired to your router choose Ethernet. If you are connected to your router via WiFi decide on Wi-Fi. Please post back right here with the outcomes of the test and the information on exactly exactly where your Computer network cable connects. But in most cases, the default IP Address for Modems and Routers is 192.168.0.1. Now you also need to have to Enter Default username and password in order to access its admin web page. The default username and password are diverse for a distinct manufacturer. Right here we are going to share all the possible Default Username and Password for 192.168.01 IP address.
Once you have carried out that, here's one thing else you can do. Disconnect your router from the world wide web and then guarantee you have your Pc plugged straight into a LAN port on the router. (NOTE: make note of exactly where each cable connects so you can place them back into the identical location after your accomplished. Make a diagram, take pic's with your smart phone etc.) As soon as you have the the two devices connected as I recommend, they will be isolated from almost everything else and this will aid to maintain troubleshooting as simple as possible.
192.1681.1 Router Admin Passwords and Login IP 192.1681.1 is an IP address which routers like Linksys and other network brands use as an access point or gateway.Firms set up router admin access in this address to enable network administrators to configure their routers and networks.Concretely one can manage Security Possibilities, Network Management, IP QoS, DNS, proxy, LAN, WAN, WLAN settings, DSL, ADSL, MAC, WPS block amongst others.
In this example the router's IP address is 192.168.1.1. Now, if you want to adjust Router Password, then go to advanced settings, and from there, choose admin password > Modify it > Save Settings, and it's accomplished. You must now see a login window with two input fields: one for the admin username and 1 for the admin password. Often due to improper connection or broken cable, you can't access the Router house web page. In that case, change the cable. If you forgot your router username and password, then you have to reset it.
1 note
·
View note
Text
Error Code 0x2 bdf5f for OneNote Couldn’t Sync

What is Office OneNote Error Code 0x2 bdf5f?
Office OneNote Error Code 0x2 bdf5f generally occurs during the installation/Uninstalling of Microsoft Office 365. This Error code will also applicable to Microsoft Office Suite, 2016, Office 2019, 2013, 2010 and Office 365. This may happen due to the following reasons.
Might Your Microsoft Office Suite setup file got corrupt?
The current version of the Microsoft Office suite has Updated.
Your new Updates of OneNote have not properly installed.
Some virus infected your system.
Your PC 3rd party Antivirus program blocking your Office installation files.
Windows firewall blocking your Office due to some infected files.
Now here I am going to explain possible ways to resolve Office Error Code: 0x2 bdf5f. So follow the below steps.

Now as per image you can see Microsoft Office error message that used to come on your system screen.
We can’t access this section file or the attached file because the file was moved, the file name is invalid, or the file permissions have been changed. (Error code: 0x2 bdf5f)
If you are getting the same Office Error message then you follow the below steps to resolve these issues. See here more info Error Code 0x2 bdf5f for OneNote Couldn’t Sync
How to Fix Microsoft OneNote Error Code 0x2 bdf5f?
First, you have to get to the Microsoft Office suite website (www.office.com) and login to your account then download offline installer and install it in your system.
Method 1: Turn off the Proxy Setting of your Computer
Are you using LAN or wired connection for internet then our suggestion to turn off your proxy setting while installing/uninstalling MS Office suite. To do this follow these steps (For Windows 10):
Steps 1. Go to Start > Settings > Network & Internet and in the left side menu click on Proxy.
Steps 2. Turn off automatic proxy settings and Use setup Script.

Now try again then check whether you are getting the same Error Code 0x2 bdf5f or not. If you still getting then try below method:
Method 2: To Resolve 0x2 bdf5f error by System File Checker
Find Command Prompt in the Search box, right-click Command Prompt.
Then Right Click and Run as administrator
Now on command prompt, type the command sfc /scannow, and then press ENTER:
This sfc /scannow command will do a scan of all protected system files, and your system replace corrupted files with a corresponding cached copy of that file.
Method 3: To Resolve Error Code 0x2 bdf5f:
Steps 1:
Try to close your Microsoft Office suite installation setup and retry again. Still, you are getting the same method then check your registry keys of Microsoft Office 2019
Steps 2:
Go to the Windows Updates center and check for updates. To check, your Windows update clicks on Windows key then type Windows Update. Then click on check for Windows update (For Windows 10).
Steps 3:
Then click on the Check update button once you click wait for get update your system/PC once your computer gets updated then install the update.
Note: Before performing the above steps please make sure you have a good internet connection and your computer connected to adapter/charging.
Steps 4:
Once all install gets done then restart your system and don’t turn off your system While it is updating and installing your updates. Once all done check once again to open your Microsoft Office 2019 and check whether you are getting the same Error Code: 0x2 bdf5f or not if still, you are getting Microsoft Office Error Code 0x2 bdf5f then follow the below methods.
Method 4: Try direct installation of Microsoft Office Suite instead of Network installation
If you are using a Public or Private network to install Microsoft Office for your system at your system or remote system then you might also get the same Error Code: 0x2 bdf5f. So why not try to direct installation instead of network installation, for that you just have to copy your mail MS Office suite installation file and copy to the current system and install as the same procedure. If you follow this way you may not get his error.
Now again check whether you get rid of it or not. In case you are still getting the same error then you have to follow the below methods.
Method 5: Disable Antivirus and Windows Firewall of your System
It is not always good to do disable Antivirus and Windows firewall, but you are getting Office installation error then we suggest temporary you can disable while your installing/uninstalling of Microsoft Office suite component does not get it done. Once it is done then you have to again enable your antivirus and firewall.
Method 6: Try to install Offline Microsoft Office suite Installer
If you are using an online Office suite installer then your antivirus and firewall may block serve file while fetching during the installation of Office 2019 and you not going to ends with an Error Code: 0x2 bdf5f. So why not you can give a try to Offline Office Installer. It is so easy to do it.
Last now still you are getting the same error then you do full refresh installation of your Microsoft Office 2019 suite.
Error Code 0x2 bdf5f Applicable for the following version of Microsoft Office OneNote:
OneNote 2016, Office 2019 2016 Excel 2016, Word 2016, Outlook 2016, PowerPoint 2016, Office 2019 for business, Office 365 Admin, Office 365 Small Business, Office 365 Small Business, Admin Office 365 operated by 21Vianet, Office 365 operated by 21Vianet – Small Business Admin, Office 365 operated by 21Vianet – Admin Click2Run Office 365 Germany – Enterprise, Office 365 Germany – Enterprise admin Office 2019.com.
This Also Known as:
code d’erreur 0x2 bdf5f
código de Error Code 0x2 bdf5f
Fehler 0x2 bdf5f
mac onenote error code 0x2 bdf5f
onenote content not yet available
onenote we couldn’t open this section
onenote saved offline error
onenote sync error
onenote mac error 0x2 bdf5f
Conclusion:
In this article, we tried to explain about What is Error Code 0x2 bdf5f for Microsoft Office Suite & provide easy and max possible way that you can perform easily with no technical expertise to troubleshoot this error. If still, you are getting the same error then you may have to consult with a technician or you can do a live session with us. Just click on the Chat button and start a live session with our tech expert.
FAQs about Microsoft Office Error Code 0x2 bdf5f
Do the above troubleshooting steps fix this Error Code 0x2 bdf5f? Yes, in most cases it does fix this Microsoft Office error code 0x2 bdf5f.
How much time it will take to resolve this Office suite Error? Usually, it takes around 45-65 min, but it can vary depends on your system and internet speed.
Does it cause any other error code? Yes, It might be causing/create any other Office suite error code.
Do we have to consult with an expert to fix this error, if I am not good to perform the above steps? If you are not good to perform the above steps then you should contact Live Support Chat or contact your local technician to do your job. You just click to your right on chat and get our Microsoft Professional Support.
1 note
·
View note
Text
What's Therefore Exciting About Dedicated Server Cost in India?
There can be numerous security policy and other restrictions in cloud servers as compared with specialized server holding. Dedicated server resources are 100% booked for your usages; it is not a VPS hosting or cloud hosting where the very same equipment is made use of for other users. So if you are trying to find CPanel reseller holding, Linux hosting services or Windows organizing solutions for your high bandwidth or high system sources needed web application after that Dedicated web server with excellent uptime and network is recommended for the objective. Note-- If you order a devoted web server without the control panel then it will certainly be unmanaged committed web server only as our taken care of support solution is offered only to devoted servers bought and also made use of with control panel only. We offer complete as well as total administrator access to all our Dedicated Web servers. With the Linux OS, you can attach to your server as the omniscient origin individual, and in Windows OS, you will certainly have the venerable administrator individual's powers available. Simply placed, you will certainly have full freedom to mount any application that you may involve require. Your service might well depend on customer fulfilment at blazing speeds, as well as unmatched security.
State-of-the-art Data Center.
You would certainly additionally have the ability to connect with customer support a lot more quickly, owing to the exact same time zones and language element. Dedicated organizing servers are highly extensive than a Virtual Private Server or any kind of other kind of hosting along with one requirement to be extremely proficient to manage a specialized web server as well as related tasks. There are numerous organizing companies are there in India, supplying organizing at numerous rates. There are some little affordable web hosting companies that provides organizing for more affordable price, They have the ability to attend to more affordable rate as a result of poor quality of assistance & reselling of various other's holding. Mainly, You can have a suitable running site with the transmission capacity given in the common hosting. A typical cost of server comes between Rs 6 to 8 Lacs. dedicated holding. However, making the decision to jump to dedicated organizing should not be ignored. Our committed web server is particularly built for data back-up facilities, organizing companies or firms which need an entirely safeguarded environment for their mission-critical information. A committed web server or took care of server is a server that a person can lease the entire web server without sharing it with any person. Our Dedicated servers feature a committed IP as well as provides you with a blazing rapid rate while supplying maximum protection and control without sustaining the expense of possessing an internal web server. You can be fully guaranteed by running your critical applications/websites as our web server is loaded with tons of attributes and resources. Our servers are able to easily manage your web site's website traffic, several domain names, photos with high resolution and video clips really quickly. A committed web server may verify to be the best solution for your business if your organisation has actually grown jumps and bounds over the past couple of years. Just as the name suggests, the web server will stay committed to take care of only your company sites as well as applications. read what he said In case your web site or the applications are operated on shared or VPS organizing services that are outdated, this is the about time to select a committed server. You can additionally utilize our committed server plans to start your Linux VPS or Windows VPS company. Give us a try for one month as well as see the distinction if you are looking for Top WordPress hosting or finest rates Dedicated web server in 2019. We also provide SSL certificate and also Securedash sort of internet site safety cum software program firewall program system to offer you further outstanding service experience. Organizing Windows web server is challenging, Windows always require much more technological support, however with ever-increasing demands of Windows hosting among customers or consumers, we have our know-how to host Windows web server with finest support experience ensured. Yes, you can mount personalized software program in your Linux/ Java Dedicated Server. Nevertheless, please speak with our expert System Admins to see to it that it is secure to set up such a software program in your dedicated web server. 1 Gbps port speed hosted in network foundation of 160 Gbps comes requirement in all our Linux Dedicated Web server setups.
Dedicated Web Server Organizing Pricing Plans.
We have actually come to be a relied on name in the host sector with 50000+ customers all over India. Our reducing side modern technology in webhosting, Makes us leaders in offering uninterrupted service to all our consumers. With complete transparency and exposure into your functional atmosphere, get most out of your dedicated server financial investment. Call us today to subscribe for the best Dedicated holding strategies. Organisation Email is an expert, entry-level e-mail solution for every type of companies. Appreciate plentiful storage with 5 GB room as well as the ability to access your email on any type of tool. Managed devoted servers have an even more thorough support group that can aid you through any kind of technical concerns, along with having access to even more easy to use devices like control panel setup, backups, and also server optimization. This is most likely one of one of the most vital factors which you must take into consideration while buying a committed server. According to the looks into that have been done at various points of time, it has been verified that cloud settings set you back much more as compared to the specialized web servers. Dedicated service makes use of the SuperMicro bald chassis and it is also small impact with the lowered power usage as well as the cooling needs. dedicated windows server hosting India These effectiveness let to pass cost-saving procedure and also as outcome, it lessen the called for price. This web server is powered with the Intel Xeon hyper thread process and SATA drives. We offer one specialized IP with each Dedicated server in India as well as United States.
What is the most inexpensive means to organize a website?
I've listed several of the least pricey ways to organize your startup website, considering expense, system and company size: Hostwinds. This VPS holding solution is just one of the least expensive host carriers you will certainly be able to locate. Bluehost. FatCow. A Small Orange. 1 & 1. GreenGeeks. Hostgator. InMotion Hosting.
#dedicated server hosting in India#cheapest dedicated server hosting in India#low cost dedicated serv
1 note
·
View note
Text
How to Upload Outlook PST to Office 365 Exchange Online
Migrating Outlook data to Office 365?? Then you are in the correct place where you will get aware of the various methods to transfer the PST data to o365. You will learn How to Convert and Upload data from PST to Exchange Online with all emails, notes, calendar, contacts, and attachments.
Follow the below methods for PST to Office 365 Migration:
• Network Upload Method
• Third-party solution
Here, I am going to explain all the above three methods in the detail which is going to help you to choose the best way of PST to Office 365migration. Before, starting with the manual process give the Import and Export role to the o365 mailbox where you want to migrate the PST data.
Method 1: Network Upload Method to transfer PST file in Office 365
Step 1: Go to the Office 365 Admin center page and import the job
Login to o365 account and through Admin center go to Setup icon--> Data Migration--> Upload PST file--> import new job. Provide the job name-->Next. Hit on Upload PST file.
Step 2: Get the SAS URL copied to the clipboard for future use.
The Microsoft provides you with the destination link to transfer the PST file. This link allows importing the PST data remotely.
Step 3: Download and Install the Azure Tool
You need to download the AzCopy tool where you need to upload PST files using the commands. For this, you require the source path, SAS URL and the destination location to save the log file.
Step 4: Execute the commands to the Azure tool.
Run the given commands to the tool, it will Upload the PST data in the Azure storage tool.
AzCopy.exe /Source: network path /Dest: ”SAS URL” /V: give a location where you want to save the log file \AzCopy.log /Y
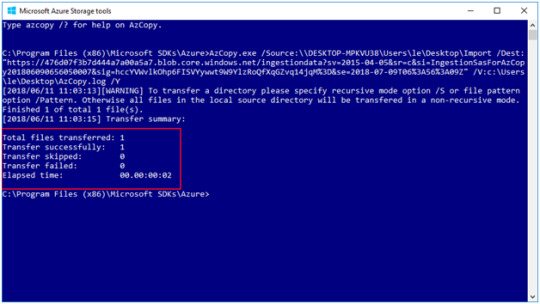
Step 5: Create the CSV file in a particular format and validate it.
We need to create the CSV file in a specific format and browse that CSV file to the process and validate it to check that all the data provided in the CSV file is correct.

Step 6: Filter the imported data
After validating the Azure tool make the PST file ready to import. Here, you need to click on Ready to import to Office 365. Then you can even filter the PST data and then move to Office 365.
Method 2: Upload the Outlook PST to Exchange Online Admin portal using a tool.
Here, I discuss how one can import single or the multiple PST files to MS Office 365 using MailsDaddy PST to Office 365 Migration Tool. This helps you to upload PST to Office 365 accounts without any issue.
Single PST file migration
Adds a single file and preview it. Click on the export to migrate in primary or the archive mailbox. If you want to create a new folder then you can mark check on the create folder option specifying its name. You can do this either for primary or the In-Place archive mailbox. After exporting data when you log in to the exchange online, you will find a new folder with the same specified name under the selected mailbox. You can also select the Date Range which allows you to export the data of a particular Date range. The most important part of it is creating a log file which is very helpful for any organizations especially in large organizations. But you can also uncheck it as it is optional. Then again click on Export. The tool exports the single PST file.
Bulk Export
To add multiple PST file you need to make the CSV file in Microsoft Excel containing PST file path, Username, and Password. You need to save it to .csv format. Now, click on Bulk Export, a window will open where you need to browse the comma separated value file. The tool takes all the PST files where you need to select it. After selecting the file you need to choose the mailbox of o365 and click on Export.
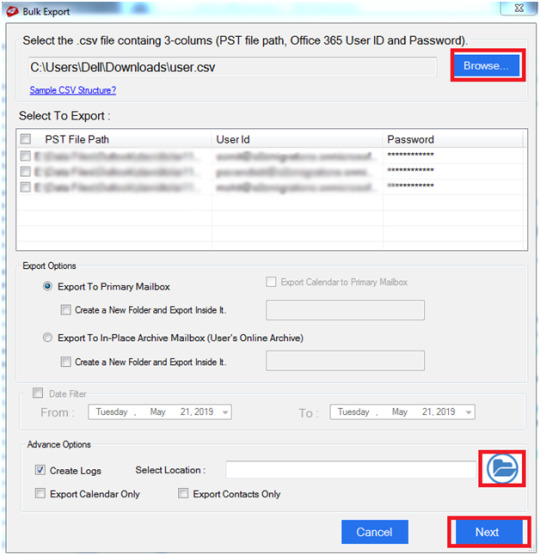
Impersonate Export
The tool import PST to Office 365 mailbox having the Impersonation rights. Here, you do not require to have a password. You just need to go to the Impersonate Export option and browse the CSV file with PST file path and username after clicking on Impersonate Export. Choose the exchange online mailbox and click on export.
Note: For this option, it is required that you should give the Impersonation rights and Full access to the o365 mailbox.

Conclusion: In this blog, I tried to explain how one can Convert and Upload data from PST to Exchange Online with different methods. If you have any query let me know by leaving a message in the comment section.
#PST to Office 365#Import PST to Office 365#Upload PST to Office 365#Migrate PST to Office 365#Convert PST to Office 365#Transfer PST to Office 365#Outlook PST to Ofice 365#PST to Office 365 Migration#PST to Office 365 Migration Tool#Office 365#Exchange Online#PST to Exchange Online#o365#PST to o365#PST to Office 365 conversion#Move PST to Office 365#Upload PST to Officxe 365 Primary or Archive mailbox#Import PST to Exchange Online#PST to Office 365 accounts#PST to Office 365 mailbox
1 note
·
View note
Text
Repair microsoft office 365 mac

Repair microsoft office 365 mac how to#
Repair microsoft office 365 mac for mac#
Repair microsoft office 365 mac install#
Repair microsoft office 365 mac windows 8.1#
Repair microsoft office 365 mac how to#
See How to remove Office license files on a Mac. Make sure you are signed in with your Work or School account, not your personal Microsoft account.Select your name and profile picture or icon at the top.If the license is already assigned, uncheck it, select Save changes, then check it again and select Save changes again.Expand the Licenses section, select the boxes for the licenses that you want to assign, then select Save changes.In the right pane, select Licenses and Apps.Select the row of the user that you want to assign a license to.In the Microsoft 365 Admin Center, go to the Users > Active users page.If you aren’t an admin, see How do I find my Microsoft 365 admin? Make sure user licenses are assigned uses many files via internet (MS servers) for repairing. But sometimes Office cannot be fully repaired. Note Some of these troubleshooting methods can only be performed by a Microsoft 365 admin. difference between (a)Quick Repair and (b)Online Repair: (a) does not require internet connection. Try the following troubleshooting methods to solve the problem. Your account doesn’t allow editing on a Mac. Complete the steps in the wizard to finish activating Office.When you try to activate Microsoft 365 apps, you encounter the error message: Note: The Activation Wizard appears if Office has trouble activating. When the Office app opens, accept the license agreement. Repairing Disk Permissions Choose Utilities on the Go menu and launch Disk Utility Select your computers main hard drive and select the First Aid tab.
Repair microsoft office 365 mac for mac#
To open the Office app, select its icon in the search results. 2020 Comprehensive Guide: How to Repair Outlook on Mac/Windows Solution 1: Microsoft Autodate for Mac Solution 2: Create a New Outlook Account Solution 3.
Repair microsoft office 365 mac windows 8.1#
If you have Windows 8.1 or 8.0, type the name of an Office app on the Start screen. To open an Office app, select the Start button (lower-left corner of your screen) and type the name of an Office app, like Word. Run the following command in the command console: PowerShell. If your issue is about a work account, you have to fix the Azure AD WAM plugin package. If youre prompted by a User Account Control ( UAC) window, select Yes to start PowerShell. In the Windows PowerShell window that you opened in step 1, re-create the deleted trust object. Right-click the Windows icon in your task bar, and then select Windows PowerShell (Admin).
Repair microsoft office 365 mac install#
Your install is finished when you see the phrase, "You're all set! Office is installed now" and an animation plays to show you where to find Office applications on your computer. In the rightmost pane, delete the Microsoft Office 365 Identity Platform entry. If you see the User Account Control prompt that says, Do you want to allow this app to make changes to your device? select Yes. To complete the installation, follow the prompts in the "Install Office" section below.ĭepending on your browser, select Run (in Edge or Internet Explorer), Setup (in Chrome), or Save File (in Firefox). This completes the download of Office to your device. Once the uninstall is complete, sign in again and select Other install options, choose the language and version you want (64 or 32-bit), and then select Install. To change from a 32-bit version to a 64-bit version or vice versa, you need to uninstall Office first (including any stand-alone Office apps you have such as Project of Visio). After completing the Online Repair process, the Office 365 is installed now message will appear on the screen. Click Repair to start the repairing process. Once complete reinstall the Office Suite from the Windows App Store. A notification will appear: We’ll download files to repair your installation. In this case, the 32-bit version of Office will be installed instead. Find Microsoft Office Desktop Apps on the list and select it. Note: The 64-bit version is installed by default unless Office detects you already have a 32-bit version of Office (or a stand-alone Office app such as Project or Visio) installed. Run disk first aid Show the Library folder Duplicate the Main Profile Restore from timemachine backup Recreate the email database Set the main profile as.
0 notes