#Windows Admin Center Error
Explore tagged Tumblr posts
Visit Tumblr Blog
Explore Tumblr blogs with no restrictions, modern design and the best experience.
Last Seen Tumblr Blogs


Fun Fact
Tumblr has 16.74 million mobile monthly users in the US.
Text
Upgrade Windows Admin Center 2306 - 2311: Run WACmg v2401
In this article, we shall discuss “how to Upgrade Windows Admin Center 2306 – 2311: Run WACmg v2401”. Windows Admin Center is a versatile tool for managing Windows Clients, Windows Servers, and Windows Clusters. In December 2023, Microsoft released the Windows Admin Center modernized gateway (WACmg) to public preview through the Windows Server Insider program. This new v2401 release serves as an…
#Microsoft Windows#Setup Windows Admin Center#upgrade Windows Admin Center#Windows#Windows Admin Center#Windows Admin Center Error#Windows Admin Center Installation#Windows Server 2016
0 notes
Text
Is It Possible to Add Blogger Accounts in GMB Briefcase Without Errors?
youtube
Managing multiple platforms can be a challenge, but GMB Briefcase makes it easy to streamline your blogging workflow by allowing you to integrate Blogger accounts seamlessly. If you’re wondering whether it’s possible to add Blogger accounts to GMB Briefcase without errors, the answer is yes! With the right approach and resources like the GMB Briefcase | Help Center, you can enjoy a hassle-free integration process.
This article explores the steps, common pitfalls, and tips for a smooth Blogger account integration with GMB Briefcase.
Why Add Blogger Accounts to GMB Briefcase? Integrating Blogger accounts into GMB Briefcase offers numerous advantages:
Centralized Management: Control all your blogs from a single dashboard. Enhanced Productivity: Save time by managing, scheduling, and analyzing content in one place. Team Collaboration: Assign roles and manage permissions for streamlined teamwork. Error-Free Operations: Avoid common login and synchronization issues with a unified system. To ensure a smooth experience, the GMB Briefcase | Help Center provides detailed guides and troubleshooting tips.
Steps to Add Blogger Accounts in GMB Briefcase Without Errors Follow these steps to ensure a seamless integration:
Log In to Your GMB Briefcase Account Start by logging into your GMB Briefcase account. If you’re new to the platform, create an account to get started.
Access the Integration Settings Navigate to the settings menu in your dashboard. Click on the Integrations tab to view the list of available platforms.
Select Blogger From the list of integrations, choose Blogger. This will initiate the setup process.
Authenticate Your Blogger Account A pop-up window will prompt you to log into your Blogger account. Grant GMB Briefcase the necessary permissions to access your Blogger account. Tip: Ensure you’re using the correct Blogger credentials and have administrative access to the account.
Assign Team Roles Once the account is linked, assign specific roles (e.g., Admin, Editor, Viewer) to team members. Role-based access ensures secure and efficient collaboration.
Verify the Integration Check your GMB Briefcase dashboard to confirm the Blogger accounts are successfully integrated. You should see your blogs listed and ready for management.
Start Managing Your Blogger Accounts Begin using GMB Briefcase to manage, schedule, and analyze your Blogger content with ease.
For more detailed guidance, visit the GMB Briefcase | Help Center for step-by-step instructions.
Tips to Avoid Errors During Integration Even though GMB Briefcase simplifies the process, it’s important to take precautions to avoid potential errors:
Update Your Software: Ensure you’re using the latest version of GMB Briefcase to avoid compatibility issues.
Use Correct Credentials: Double-check your Blogger login details before authentication.
Grant Necessary Permissions: Make sure to allow GMB Briefcase access to your Blogger account during the setup process.
Stable Internet Connection: A reliable internet connection is crucial to prevent interruptions during integration.
Check Account Settings: Verify that your Blogger account has administrative rights to make changes and link external platforms.
For troubleshooting assistance, the GMB Briefcase | Help Center is your go-to resource.
Common Issues and Their Solutions While integrating Blogger accounts is usually error-free, here are some common issues and solutions:
Authentication Failures: Ensure the correct credentials are used, and grant all requested permissions. Missing Blogs: Double-check that you’ve linked the correct Blogger account. Integration Errors: Update your GMB Briefcase software and retry the process. For additional troubleshooting steps, refer to the GMB Briefcase | Help Center for expert guidance.
Benefits of a Smooth Integration By successfully adding Blogger accounts to GMB Briefcase without errors, you unlock the following benefits: Simplified Operations: Manage all blogs from one intuitive dashboard. Enhanced Efficiency: Streamline workflows with built-in scheduling and analytics tools. Secure Access: Protect sensitive login credentials while enabling team collaboration.
Conclusion So, is it possible to add Blogger accounts in GMB Briefcase without errors? Absolutely! By following the steps outlined in this article and leveraging resources like the GMB Briefcase | Help Center, you can ensure a smooth and error-free integration process. Take advantage of GMB Briefcase to centralize your blogging operations, boost productivity, and manage your team more effectively. Start integrating your Blogger accounts today and experience the benefits of a streamlined workflow!
Find Us Online
Facebook
LinkedIn
Twitter
YouTube Channel
0 notes
Text
Microsoft Azure Administrator Training | MS Azure Admin Online Training
Streamlining Operations with Azure: A Guide for Azure Administrators
Introduction:
In today's dynamic business landscape, cloud computing has become an indispensable part of IT infrastructure. Microsoft Azure, a leading cloud platform, empowers organizations to scale, innovate, and operate efficiently. Azure administrators play a crucial role in managing and optimizing Azure resources to ensure smooth operations. In this article, we'll explore key responsibilities and best practices for Azure administrators.
Microsoft Azure Administrator Training

1. Resource Management:
Azure administrators are responsible for overseeing and optimizing the usage of Azure resources. This involves creating and managing virtual machines, storage accounts, and networking components. Utilizing Azure Resource Manager (ARM) templates can streamline resource deployment and ensure consistency across environments.
2. Security and Compliance:
Ensuring the security of Azure resources is paramount. Azure provides robust security features, and administrators must implement access controls, monitor security policies, and conduct regular audits. Azure Policy and Azure Security Center are tools that can aid administrators in enforcing compliance and enhancing the overall security posture. - MS Azure Admin Online Training
3. Monitoring and Optimization:
Effective monitoring is essential for identifying performance issues and optimizing resource utilization. Azure Monitor provides a comprehensive set of tools for monitoring applications, infrastructure, and network performance.
4. Automation:
Azure administrators can significantly enhance efficiency by automating routine tasks. Azure Automation allows for the creation of runbooks to automate processes such as backups, patch management, and scaling. Leveraging Azure Logic Apps and Azure Functions further extends automation capabilities, reducing manual intervention and minimizing errors.
- Microsoft Azure Online Training
5. Disaster Recovery:
Azure offers robust solutions for disaster recovery, and administrators must design and implement effective disaster recovery plans. Azure Site Recovery enables the replication of virtual machines to a secondary Azure region, ensuring business continuity in the event of a disaster.
6. Collaboration and Communication:
Effective communication and collaboration are vital for Azure administrators. Collaborating with development teams, operations teams, and other stakeholders ensures that Azure resources are aligned with business objectives.
- Azure Admin Training in Hyderabad
7. Training and Certification:
Azure is continually evolving, and administrators must stay abreast of new features and best practices. Microsoft offers a range of certifications, such as the Microsoft Certified: Azure Administrator Associate, which validates the skills required to manage Azure resources effectively.
Conclusion:
Azure administrators play a pivotal role in enabling organizations to harness the full potential of Microsoft Azure. By embracing best practices in resource management, security, automation, and collaboration, administrators contribute to the seamless operation of cloud environments.
Visualpath is the Leading and Best Software Online Training Institute in Ameerpet, Hyderabad. Avail complete job oriented Microsoft Azure Training by simply enrolling in our institute in Ameerpet, Hyderabad. You will get the best course at an affordable cost.
Attend Free Demo
Call on - +91-9989971070.
Visit: https://www.visualpath.in/windows-azure-online-training.html
#Azure Admin Training in Hyderabad#Azure Admin Online Training#MS Azure Training in Hyderabad#MS Azure Training in Ameerpet#Microsoft Azure Training in Hyderabad#Azure Training#MS Azure Online Training#Azure Online Training
0 notes
Text
4 Common Server Issues and Troubleshooting Examples
You may be tasked with maintaining a corporate data center or providing client hosting, but either way, outages can leave a pit in your stomach. When downtime strikes, your servers and networking hardware are the usual culprits. In fact, 80% of all outages in data centers result from server hardware.
By far the most common form of server hardware failure is hard drive malfunction. In fact, 80.9% of all failures come from HDD malfunctions, so it’s always the first place to look.
The likelihood of failure also climbs as the server ages. Starting with an average 5% server hardware failure rate at year one and an 18% rate when seven years in, aging hardware is definitely something to watch.
Navigator System offers multi vendor IT server support for your post-warranty equipment.
When it comes to server problems, there are four main categories that you should consider to quickly resolve any issues, Certainly, here are four common server issues and troubleshooting examples:
Slow Server Performance:
Issue: Users complain about slow response times from the server.
Troubleshooting:
Check Server Resources: Use tools like top or Task Manager to monitor CPU, memory, and disk usage. High utilization may indicate a resource bottleneck.
Review Logs: Examine server logs (e.g., /var/log/syslog, /var/log/nginx/error.log) for error messages or unusual activity.
Network Issues: Test network latency and bandwidth using tools like ping and iperf. Check for network congestion or hardware failures.
Software Optimization: Ensure that software and applications running on the server are optimized. Update and patch software, and consider optimizing database queries.
Server Not Responding:
Issue: The server is unresponsive, and users cannot access it.
Troubleshooting:
Check Hardware: Ensure that the server hardware is operational. Look for physical issues like loose cables, power outages, or overheating.
Remote Access: Try to access the server remotely via SSH or remote desktop. If you can't connect, it might be a network or firewall issue.
Restart Services: If the server is responding but services aren't working, try restarting relevant services using commands like systemctl restart .
Server Logs: Examine server logs for any errors that might explain the unresponsiveness.
Disk Space Exhaustion:
Issue: The server's disk space is running low.
Troubleshooting:
Disk Usage: Check disk space utilization using df -h. Identify which directories or files are consuming the most space.
Clean Unnecessary Files: Delete log files, temporary files, and old backups that are no longer needed.
Resize Partitions: If necessary, resize partitions or add additional storage to accommodate the growing data.
Monitor Usage: Implement a disk space monitoring system to alert you before the disk becomes critically full.
Security Breach or Unauthorized Access:
Issue: Suspected unauthorized access or a security breach on the server.
Troubleshooting:
Disconnect from Network: Isolate the compromised server by disconnecting it from the network to prevent further damage.
Change Passwords: Change all user passwords, especially for admin accounts. Ensure strong password policies.
Scan for Malware: Run a malware scan using antivirus software or tools like rkhunter or clamscan.
Review Logs: Examine system and security logs for suspicious activity and unauthorized access attempts.
Remember that server troubleshooting can vary depending on the specific server setup (e.g., web server, database server) and the operating system (e.g., Linux, Windows). It's crucial to have a well-documented and regularly updated server maintenance plan to address and prevent common issues. Additionally, consider implementing proactive monitoring and backup solutions to minimize downtime and data loss.
Avoid Server Failure with a Trusted Partner
Troubleshooting your server hardware is frustrating, but it doesn’t have to happen at all when you have the right data center and networking optimization partner in your corner. Navigator System has been providing third party data center maintenance for over 30 years and can help you maximize your uptime.
Whether your operations are better suited for post-warranty support paired with 24/7 data center hardware monitoring, or fully managed server management services, we can provide the support you need.
Contact us today to learn how we can help your team do less with more!
1 note
·
View note
Text
Xisuma and Xelqua
I was thinking about how Grian used to be an admin (Wynncraft) and we’ve ended up here so... ficlet time!

As nights went on Hermitcraft, this was one of the quieter ones. Many of the hermits had gone to bed (Bdubs having been asleep for hours), with only a few still awake tinkering at some redstone project or growing vines for a build. The lights in the shopping district had gone dark, one by one, as shops closed up for the night amidst the smell of newly laid grass. The diamonds hanging from the trees caught the light of a star here and there, but most of the movement in the cowmercial district had long since died down.
A flickering window blinked in the distance. Any passerby who found it worth taking another look would see that the flicker came from a cozy flame dancing in the glass confines of a lantern, resting on a desk. The window in question was a small opening looking out into the thick jungle, just large enough for someone to rest on the sill and watch the parrots. It was also over 100 blocks off the ground.
The flame began to die out, flickering slowly and sadly downwards, only to spring up again as if given a shot of espresso. Or a shot of coal, in this case, because the admin who refueled it wouldn’t be caught dead with coffee. A strong black tea was another thing altogether.
Xisuma sighed and leaned back in his chair. Rubbing his eyes, he checked the time for the first time in a few hours. One in the morning wasn’t bad, he reasoned, and turned back to his work. Earlier today, he had relocated some administrative panels to this room in his jungle base, the least concrete-y of them. He silently thanked his past self; working on admin duties was at least 50% less fun on the concrete floor. His helmet lay switched off on the cozier, carpeted floor of the preferred room.
The panels themselves were resting between a desk and the wall behind it, propped up by their sturdy bedrock stands. Xisuma didn’t often think about that rare material that his panels were made of; many high-level admins required hardware (literally hard-ware) of that caliber, and though bedrock was almost impossible to obtain, it was well worth it for the administrative abilities of the panels.
Tonight was not a night for appreciating the panels, however; in fact, X was beginning to question if his work tonight was worth it in the first place. He was trying a particularly frustrating string of commands, as he was only halfway sure of how to accomplish the work he was trying to do.
Xisuma briefly stretched his neck and back, cracked his knuckles, and tried another combination. The usual [ERROR: Action not recognized] message appeared in urgent red over his screens, and he let out a short breath and considered hitting the panels in a last-ditch effort.
He didn’t have the chance to hit the panels, though, because another object hit a different panel very nearby- a Grian-shaped figure slammed into the window beside him at top speed.
X, not even surprised, slid open the glass and looked down. There was a thin ledge about five blocks below, and as Xisuma had expected, a heap of elytra wings and red sweater was sprawled atop it. He chuckled, shaking his head incredulously, and grabbed a water bucket so Grian could swim up the stream.
“Do I even want to ask what you’re doing up?”
Xisuma passed Grian a cup of chamomile tea, which the red-sweatered man immediately dumped 6 sugar packets into, cancelling out the calming chamomile effect.
“Well, you see, I was simply minding my own business over at Grumbot when I saw a light on over here- knew it was you immediately, definitely didn’t think there was a giant firefly hiding in the jungle.” Grian took a gulp of his tea. “Anyways, you’re up, and I’m up, so I may as well talk to you, Eck-sai-zooma.”
X rolled his eyes playfully at the mispronunciation. “Alright, but why were you at the Grumbot? That thing’s broken, ain’t it?”
“He was lonely!” Grian protested. “I wanted to visit my robot son.”
Xisuma raised an eyebrow.
“Aaaand I might’ve left a shulker box full of wool there.” Grian shrugged. “But it was a whole box!”
He looked around the room that he had crash-landed into and noticed the administrative panels. “You’re not working, are you, X? At this hour?”
Xisuma turned to look at the panels, still glowing red with error text. He sighed, and moved to switch them off. “I was working on a personal project, but you’re here, and I really need to take a break anyway.”
His finger was on the off switch when Grian spoke up. “Hey, I know how to fix this. It’s a perception chain, right? You just gotta-” He typed in a string of commands deftly with his head tilted sideways. “There! Got it!”
Xisuma stared at the message that had just popped up on the screen, glowing green. [Action approved. Enter commands to continue chain.] He turned back to look at Grian, who was now trying to hang his elytra upside-down from the ceiling.
“How’d you do that?”
Without turning around, Grian replied, “Oh, it was pretty easy! Just entered some combos that you hadn’t tried. The keywords on these change wayyy too often.”
Xisuma stared at Grian, looked back at the panels, and looked back at Grian. After a moment, he collected his thoughts enough to ask again.
“No, how did you know what to do? I’ve been an admin for years and even I couldn’t figure it out.” X was surprised that his question came out so calmly, when his brain was currently a mess of ‘HOW DID HE DO THAT’ and ‘WHAT THE HECK’.
“Oh!” Grian turned around, smiling sheepishly. “I don’t think I ever told you- I’m sure it was on my list, right after fixing that chest monster- I used to be an admin!”
He dropped to the floor, legs crossed, and took another swig of tea. “I used to moderate a server called Wynncraft. We had all kinds of people, but not like Hermitcraft- they came and went, played and left. Some came back, some didn’t, but everyone had a great time!”
He wrinkled his nose. “Or, they better have at least, I spent a long time on those maps.”
“Anyways, we had a ton of quests, and loot, and all that stuff! It was a pretty cool place. You learn a lot about being an admin when you have to mod ghosts.” Grian grinned. “Hah! Those were pretty terrifying.”
Xisuma was even more dumbstruck, but didn’t show it. Ghosts? No wonder Grian had known how to fix his problem- he was somehow experienced in some of the most complicated areas of administrating?
Grian leaned over to look at a different panel as Xisuma’s mouth moved silently, trying to think of something to say. The smaller man lightly tapped a thread of commands and looked up at X.
“What’re you trying to do with these? This looks like a ban bypass. Did you accidentally ban someone?” His eyes grew wide. “If you did we need to fix it right now! Which hermit was it?”
Xisuma collected himself and sat down by Grian. “No, it’s- it wasn’t unintentional.” He stared at the wall. “I banned him on purpose.”
Grian was halfway to asking X who it was when he saw the look on his face. Xisuma looked stoic and almost sad, gazing off into the distance. Grian turned back to the panels, and read the commands on them thoroughly. The former admin recognized most of the threads, but some of them, covered in error messages, weren’t commands he knew that worked. After a minute, he realized what Xisuma was trying to do. The actions entered seemed to be working towards an uncoded goal- the objective being to see someone in another dimension. Specifically, the void under the end islands. X wanted to see someone who had been banned and sent into the void.
Grian may not have known why, but he did know how to help. He began typing in another string of commands, the sound of which brought X back to reality. He leaned over Grian’s shoulder as Grian continued to type, talking as he went.
“The problem you had needed a bit of a workaround. I think the issue was in the way you went about it. See, to see the person, you can’t just open a window into where they are, you need to bring them here. Or at least a part of them, or- here, I’ll just show you.” He stopped typing and turned to Xisuma as the screen flashed the message [Enter administrative ID to give permissions.] “You’ve gotta enter me into your system so it lets me do this. Username should be Xelqua.”
X, distracted, looked at Grian after a minute. “Xelqua?”
“Old username. It’s what they called me when I got my administrative license.”
“Ah.” X reached for the panels. /permit user [Xelqua] }access_all
Grian finished up the last of the commands and held his finger over the enter key. “Ready to see whoever this is?”
Xisuma took a deep breath and didn’t respond.
Grian took that as a yes, and clicked the final button, looking anticipatorily at the spot where he had entered the coordinates for arrival.
Nothing happened for a moment. Then, the lantern dimmed of its own accord, and a fuzzy shape that looked a lot like Xisuma began to materialise in the center of the room. As the image became clearer, the person it showed did so too. Their face was just as shocked as Grian’s.
Xisuma’s face, however, was misty. He looked quietly at the projection now standing in his base.
“Hi, Ex.”
#grian#xisuma#xelqua#evil x#evil xisuma#xisumavoid#grianmc#hermitcraft#hermitblr#minecraft#mineblr#fanfic#hermitcraft fanfic#hermitcraft fic#hermitcraft fanfiction#my writing#xisuma and xelqua
318 notes
·
View notes
Note
I just installed your SiMidge, but I get the error message "failed to execute script SiMidge". I have a custom location for the Downloads folder, but no locations.txt was generated. What should I try next?
And from an anon with the same issue:
Hi, I can't get SiMidge to work. When I launch it, it gives me a fatal error: "Failed to execute script SiMidge". When I launch it in debug, it doesn't even give me that, just opens the command prompt for a second then closes it. I'm using Windows 10. The error log has two "Errno 2" instances and two "Errno 13" instances, all centering on the locations.txt file not existing, and "Permission denied" (to create it?). Should I be running it in a specific way/place? Thanks!
Having an entire error log would've been much more helpful, but it does sound like SiMidge was not given permission to create locations.txt and that has been causing issues. One solution might be to move SiMidge, another might be to use admin permissions to manually create locations.txt yourself. Here's what it should look like, be sure to change the folder paths to match your computer & sims 2 installation:
C:/Program Files (x86)/Origin Games/The Sims 2 Ultimate Collection/Fun with Pets/SP9/TSData/Res/Objects/objects.package C:/Users/[PUTYOURUSERNAMEHERE]/Documents/EA Games/The Sims™ 2 Ultimate Collection/Downloads
If those don't help, please send me the full error log.
6 notes
·
View notes
Text
How to fix Error Code 0X80071A90

You are introducing the ".net structure" on your Windows 10, and out of nowhere there is a mistake on the screen. The mistake for this situation liable to be Error Code: 0X80071A90, trailed by the accompanying message:
The capacity endeavored to utilize a name that is held for use by another Transaction"
There may be a case when you are attempting to add the Hyper-V in Windows 8 or Windows 10, and you get a similar blunder. This could be incredibly irritating for the client. Fortunately, there are some fixes accessible, which can be attempt.
4 techniques To Fix Error Code Ox80071A90
1-Check the framework records
the primary strategy to fix 0X80071A90
The principal technique which can be attempted to fix Error Code 0X80071A90 is to check the framework documents. This should be possible by dispatching System File Checker. Framework File Checker(SFC) will identify tainted framework documents. Once recognized, System File Checker will endeavor to fix the adulterated framework documents. On the off chance that Windows Resource Protection (WRP) is undermined or assuming it is absent from the framework, the working probably won't work as expected. To dispatch SFC, you can follow the means given underneath:
Right-click on the Windows symbol and afterward select the alternative "order brief (Admin)"
The order brief window will spring up on the screen.
In the order brief, type the order "sfc/scannow", trailed by enter.
When the order is executed, it's anything but an output on the ensured framework records. In the event that a tainted record is discovered, it will be supplanted by a duplicate of the document put away in the store.
The store organizer is situated at the %WinDir%\System32\dllcache. Every one of the records are packed and put away in this envelope. When the interaction is finished 100%, and the message will spring up on the screening referencing that every one of the tainted records. When the cycle is finished and every one of the records are fixed, the ERROR CODE 0X80071A90should be fixed. In any case, it is likewise conceivable that SFC probably won't have the option to fix every one of the undermined documents. In the present circumstance, you need to fix this physically. You need to go to the catalog, where the debased records are found, and supplant those documents with a duplicate of something very similar.
Impair Antivirus To Fix ERROR CODE 0X80071A90
On the off chance that the Error Code 0X80071A90 comes up during an endeavor to introduce the Hyper-V component, and it turns out that you have introduced Avast as antivirus on the framework. For this situation, the issue could be handily settled by just incapacitating the antivirus, which may be utilizing the virtual machine. This should be possible by right-tapping on antivirus symbol showed on the framework tray.These antivirus frameworks, in the manner in which they capacity can likewise cause other such mistake code issues, for instance, the Error Code oxcoooooof and Error Code 0x80070002.It can be because of wrong arrangements or different reasons, which you can settle all alone. With far reaching informative aides as this.
2. Attempt Safe Mode
You can likewise fix Error Code 0X80071A90, by booting the framework into protected mode. For this, you need to restart the framework and continue tapping F8 key while the framework is booting up. Once more, if it's not too much trouble, allude to the motherboard manual as the key for the experimental mode may be unique. When the F8 menu, you can choose "experimental mode" and afterward continue with booting.
It is very conceivable that a portion of the outsider programming may influence the PC. Once signed into experimental mode, all the outsider programming will be incapacitated of course. Assuming the Error Code 0X80071A90, isn't coming up in experimental mode, it is very conceivable that some outsider programming may be liable for this. Henceforth, you can have a go at crippling a portion of the outsider programming and foundation applications, including the antivirus programming and check if the mistake is as yet coming or not. On the off chance that not, the issue is settled
3. Play out a spotless boot
In the event that you don't know which outsider programming is causing the ERROR CODE 0X80071A90, then, at that point performing clean boot will be the most ideal alternative. To play out a perfect boot, one necessities to impair all the outsider administrations. This should be possible by right-tapping on the taskbar, then, at that point going to task director and tapping on more subtleties. For additional subtleties, select the startup tab. When you are on the startup tab, incapacitate every one of the applications that are empowered on startup.
To debilitate the applications, one requirements to choose the application, and snap on Disable. Whenever this is done, all the outsider administrations are needed to be crippled, without contacting the Microsoft administrations. For this, you need to go to "MSCONFIG". To dispatch MSCONFIG, you need to squeeze "Windows + R" to dispatch the run window. When the run window shows up, type "MSCONFIG" and press enter. This will open the framework setup window. Go to the administrations tab, check the choice "conceal all Microsoft administrations" and afterward cripple every one of the administrations. Whenever this is done, restart the framework, Post restarts the issue ought to be settled.
4.Use the investigator to fix ERROR CODE 0X80071A90
The last update will be to utilize "Windows Update Troubleshooter" device. This will attempt to find the framework blunders and attempt to determine them. For this, first press "windows + x" should be squeezed together, then, at that point the control board should be chosen. In the pursuit bar, type "Investigating" and press enter. Go to the choice to investigate PC issues, and snap on "framework and security". On the following screen, click on windows update which will be situated under windows. Presently click on cutting edge, and afterward select the alternative "run as overseer". Simply click on straightaway, and adhere to the on-screen directions to investigate the issue. There may be circumstances where the investigator probably won't work or fix the issue, however certainly, it merits attempting.
Every one of the recommended steps in this article need the direction of a tech master, and it's anything but proposed to perform with no assistance from a certified tech. This is significant, since you are working with center working framework records, and on the off chance that any of the framework documents erased or altered unintentionally, the entire working framework may get tainted.
There are simply such countless individuals out there that utilization Windows. What's more, as such are defenseless against such blunder message issues. On the off chance that you utilize large numbers of the various Windows items, it tends to be something very similar for you.
What's more, on the off chance that you need data on the best way to investigate these blunders. Then, at that point you can get that from this site microsoft error code 0x80071a90.
#error code 0x80071a90 hyper v#0x80071a90 .net framework#hyper-v 0x80071a90#windows 10 error 0x80071a90
1 note
·
View note
Photo

OUR SONGS: EPISODES 1 & 2
Timeline: July 25, 2020, to September 5, 2020
On-Set Filming Dates: July 28, (July 31,) August 18, September 5
Deadline: August 27, 11:59PM KST (note: the audition deadline was in EDT by error—deadlines for Our Songs, as with all base schedules and monthly schedules, going forth will be in KST)
Those involved in Our Songs this month may earn up to 8 points total for writing, by the end of August 27 KST:
Completions of the two interviews included in the in-character prompt. (1 point each, up to 2 points total)
Up to two solo paras of 400+ words based on filming for episodes 1 & 2. (2 points each, up to 4 points total).
A thread of six posts (three per participant, including the starter) with another competing muse based on the Our Songs episode 1 and 2 schedule. (2 points)
These do not count toward monthly limits or toward normal schedule points. All posts for this task block should be tagged with #fmdos1. Please remember the number of the above tasks completed by each muse will factor into eliminations during blocks with eliminations.
There are not tasks available for muses outside of the main cast for this task block.
IN-’VERSE INFO
The following idols are informed they’ve been chosen on July 25 and will be sent a contract to sign: @fmdjoosung, @eunahfmd, @fmdjoohwan, @fmdjaewon, @fmdxsuji, @fmdtaeyong, @fmdxyoungjoo. @fmdkami. They will be told not to share the news of their casting with anyone yet and sharing the news with anyone outside of their management before they’ve been officially announced will result in them being removed from the cast and replaced.
The first day of filming takes place on July 28. Each cast member will arrive at the building that the show’s set is in in a separate van at separate times so that the identities of the other cast members are kept secret. They will be filmed arriving at the building. They will then go through hair and makeup off-camera and will each be assigned a waiting room of their own.
Once filming begins, the cast will be brought out and walked into a set resembling a recording studio with nine chairs (one for each competitor and one in the center for the host) in the following order: Youngjoo → Suji → Taeyong → Jaewon → Joohwan → Eunah → Sun → Kami. They will be able to pick their own seat, though they aren’t told any significance to this yet. Once every competitor is in the room, the host arrives — a well-known senior singer-songwriter named Choi Jihoon (born 1987, debuted in 2005). All competitors are then invited to give a short introduction of themselves in the order of seat they chose, beginning with the seat to the right hand of the host.
They will then be introduced to how the winners and losers of each round will be determined: a mix of online votes based on the track alone and in-person audience votes based on a live performance of the track. Choi Jihoon explains a songwriter who performs their own songs should be able to capture an audience through both their ears alone as well as affect their hearts with a powerful live performance.
Choi Jihoon then informs the competitors of the prize the winner will receive: ₩10,000,000 and all expenses covered for a special promotion period and official single release for a song they create in the final round of the competition. The competitors are given time to react, and then Choi Jihoon continues. He asks rhetorically if they’re surprised by the cast and questions whether they feel impressed or intimidated. Attention is then grabbed by a screen behind the window of the “recording booth” flickering to life. A compilation video begins to play with brief clips of those who named other members of the cast as songwriters they look up to in their audition videos, with the camera team making sure to get reaction shots of those who are shown and named, and then the audition cover video of the seniormost idol in the cast, begins to play. Clips of each competitor’s audition cover video are played in succession from most senior to most junior (Youngjoo (”Aloha” cover) → Kami (”No” cover) → Taeyong (”Needed Me” cover) → Joohwan (”Zombie” cover) → Suji (”Love Shot” cover) → Eunah (”Irony” cover) → Jaewon (”Q” cover) → Sun (”Artist” cover)) before the screen flickers back to black with white text: “Who will win?” and the lights go back up.
Choi Jihoon has the spotlight again, and he uses it to give everyone a reminder: all of the competitors have their own skill set and each of them can only get to the end of the competition by working hard and winning over the love of audiences, so it’s time to announce their first task. The host reads from a “theme card” as follows:
“Some of you have made a name for yourselves with the public already, while some of you are still working hard to earn recognition as songwriters. No matter how famous you get or how talented you are, nothing is more important to earning the love of the public than having a unique identity as a songwriter and performer. For your first task, you will be asked to create a song that introduces yourself to both the audiences that will decide your fate and your fellow competitors. If you had to make a song to convince everyone to listen to the rest of the music you’ve created, what would it be? What is the song that speaks to who you are as a person and a songwriter? What do you have as a songwriter that makes you stand out from the competition? Answering those questions is your very first songwriting mission. Those who fail to win over the audiences may be eliminated and, if they are, will not be able to move forth in the competition.”
The competitors are given time to react to the prompt before the first filming ends. Before leaving the building, each musician will film a talking head interview in a private room with a small team of cameras and producers where they are asked the following questions:
What are your opinions of all of the other competitors? What did you think of what you got to see of their audition cover videos?
Now that you’ve met your competitors, who are you most afraid to compete against?
What strength do you have that will make you stand out from your competitors?
What are your immediate thoughts on how you plan to approach your first task?
From July 29 to August 17, all competitors are given time to work on their songs. Staff from the show will come and install cameras in the studio they will be working in at their respective company buildings and will also give each competitor a camera to self-film with and are instructed to record their creative process and their thoughts as they create. They are allowed to work on their songs at home, if they have a studio there, but stationary cameras will not be installed in their homes.
On July 31, all of the competitors will be scheduled for individual photo sessions and a group photo session to shoot their profile images for the show (reference). Each competitor will work with the stylist on set to pick from the available wardrobe to pick a casual look that represents them.
On August 18, all competitors will return to the recording studio set. Choi Jihoon will remind everyone of the aim of the show and the tasks and briefly ask everyone to discuss how their songwriting went among each other as a group conversation. Each competitor will then be asked to go back into the recording booth part of the set and give a live “recording” performance of the demo version of their song in front of the rest of the cast (reference). They will go in order of seniority again (reminder: Youngjoo → Kami → Taeyong → Joohwan → Suji → Eunah → Jaewon → Sun). The rest of the cast will be filmed reacting to the performance and will be allowed to comment and give constructive criticism or praise following the end of each demo performance.
Final mastered versions of all songs are due to the production team by August 23.
On August 30, the final version of each competitor’s song will be released onto streaming sites and voting will open for online audiences.
On September 5, all competitors will come back to the same building again—this time on a different set, which is the stage where they’ll perform their song for the live audiences (reference 1, reference 2). Minor set and prop elements are permitted, but they should be easy for the staff to get on and off the stage. The idols’ respective companies will be responsible for the styling and performance preparation of the idol.
Once filming begins, the competitors will be informed they will be performing in order of the seat they chose on the first day of filming. In case anyone has forgotten, the host will remind everyone what this order is, and performances will proceed.
Sun - “Smile”
Joohwan - “That’s Not Me”
Youngjoo - “E.T”
Kami - “Crazy Diamond” [performance reference]
Suji - “Little Wildflower” [performance reference]
Eunah - Swim Away [performance reference]
Jaewon - “Alarm”
Taeyong - “Noid” [performance reference]
As each competitor is performing, the other seven songwriters will sit in raised chairs to the back/side of the stage and their reactions will be filmed. At the conclusion of each stage, the host will ask each competitor the thoughts on the song that was just performed. In the final airing of the episode, only one to three competitors’ comments will be aired per song.
During the break following all eight song performances, each competitor will be pulled into a room for another talking head interview (admin note: please wait to complete this interview until all songs have been chosen and listed above):
Talk about your song. How does it match the theme of “Introduction / Identity”?
How do you feel you did with your performance? What regrets do you have?
Which of the other songs/performances caught your attention the most?
Who do you think got the most votes from the online audience based on the track and who do you think got the most votes from the offline audience based on the performance?
OUT OF ‘VERSE INFO
As stated in the audition post, since the number of submitted muses who completed all necessary steps exceeded eight, the final cast was decided by random name generator. Proof shots of the name picker can be found here.
For the eight muns with muses in the show, congratulations and welcome to this event! For each episode block, you will need to choose at least one song for your muse to write, and there will often be other information you must submit, so a form will be put up for each filming block that you must submit to. For this task block you will need to submit the following information: which seat your muse chose on the first day of filming, the song you would like to claim for them to create for this round’s task (and a performance reference if one is available), and the creative claims on it.
The form link will be uploaded here at 12AM KST July 25/11AM EDT July 24, twelve hours after this post goes up. The form link can be found here. A reminder of the limits of creative claims on each muse for the show can be found here. If you think there is a mistake or if a song is released that leads to a necessary update, please contact the main.
Seats (note: Seat One is the seat to the right hand of the host. from there, all odd numbers are next to each other and all even numbers are next to each other):
Seat One: Sun
Seat Two: Joohwan
Seat Three: Youngjoo
Seat Four: Kami
Seat Five: Suji
Seat Six: Eunah
Seat Seven: Jaewon
Seat Eight: Taeyong
Songs Claimed:
E.T (Heize)
Little Wildflower (Suzy)
Noid (WOODZ)
Alarm (Mino)
That’s Not Me (The Black Skirts)
Swim Away (Sejeong)
Smile (Nafla)
Crazy Diamond (Cheetah)
SONG LIMITATIONS/REQUIREMENTS
The simplified theme for this round is “Introduction / Identity”. Please read the prompt in the in-’verse info for full details on what this means.
For all rounds, a song must fit all general rules of music claims (i.e. matches muse position, is not too explicit, must be by an artist in the Korean music industry, etc.) and must receive admin approval.
For this round, these are the additional limitations and requirements on songs that can be chosen:
The song must be solo. This means it cannot be a collab or have a feature.
In real life, the song must not be a title track according to Melon and cannot have an official MV. Special clips, live clips, and minimal production lyric videos are acceptable, but the song will have to be re-released on an album in the future to claim such videos as canon to the universe.
In real life, the song cannot have charted within the top 100 of Gaon’s Weekly Digital Chart at any point.
You may claim songs with choreography, but choreography creative claims are not available. Choreography will only be performed during the final stage with the live audience, not the demo performance for the cast. As usual, songs with more emphasis on choreography should be reserved for muses with dance positions.
#fmdbase#fmdoursongs#fmdos1#fmdjoosung#eunahfmd#fmdjoohwan#fmdjaewon#fmdxsuji#fmdtaeyong#fmdxyoungjoo#fmdkami#queued post
6 notes
·
View notes
Text
Framing has begun!
Stopped by the site last weekend and got to see the beginning of the framing process!

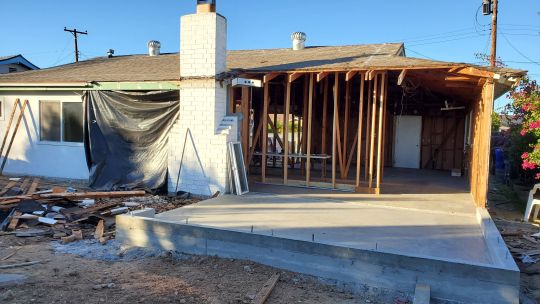
Here’s the driveway (above) with a bunch of framing material waiting to be nailed into place, and beyond you can see our new bedroom and bathroom addition! The window opening on the left will be the bathroom (small toilet room area), and the two windows on the right are our bedroom.

At the corners you can see our Simpson Stongwalls - structural steel used to stiffen the north façade framing that is mostly window openings. You can also see that only 1 top plate has been added so far. Once they add the second top plate the top of the wall will align with the top of the large header over the center window and everything will be strapped together.
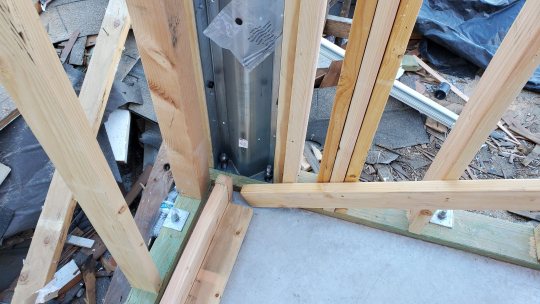
You can see the hold downs bolted through the strongwall base and the sill plate framing. The sill plates (bottom pieces of wood on the concrete slab) are pressure treated wood (looks green) to avoid water and rot issues where the wood framing is most susceptible to water intrusion.
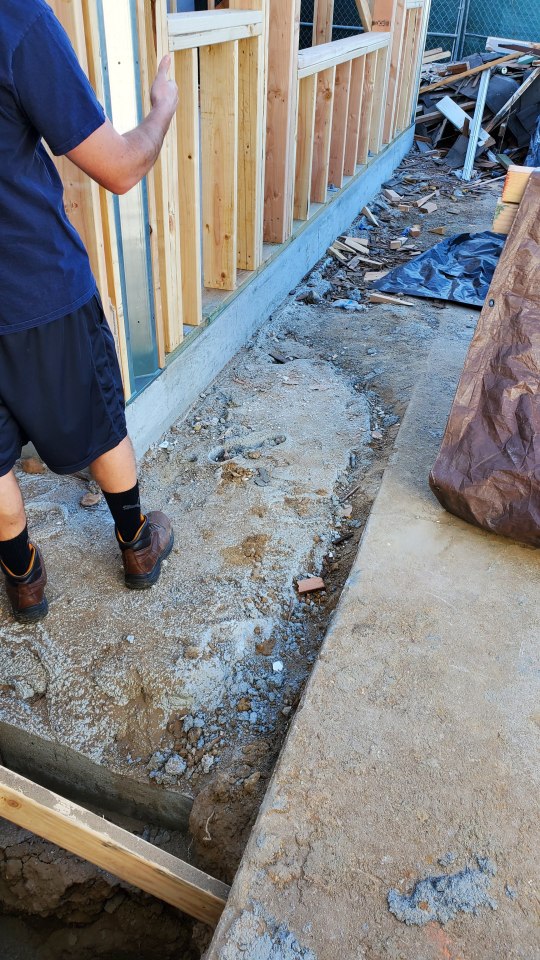
Here you have Brett (and I) critiquing the less than stellar concrete skills of our contractor. Not to mention his sweet tall socks with the shorts (LOL), yes I married him for his keen eye for fashion... ahem I mean construction errors. The concrete edge of our slab bows out toward the driveway and at the center point is about 1/2 inch proud of the sill plate, but it aligns at the corners. Yes we are perfectionists in our work... but even more so when it’s our house! Meanwhile I am also wondering how the hell we are going to be able to plant anything between our addition and the driveway?? Our design left room for an approximately 30″ wide planting strip between the addition and the driveway. BUT the contractor poured the large footings for the strongwall at this corner (that thing he’s standing on) just about level with the top of the driveway! Last time I checked, you can’t grow anything in a concrete footing. And we didn’t construct this addition to allow a raised planter against the wall... I guess I’ll be stuck with potted plants here and I’m not pleased. I also don’t know how they are going to pour the new walkway up to our porch when this blob of footing concrete is about level with where that walk needs to be. The contractor is likely going to have to chip some of this concrete out of there to do it right... ugh!
Here’s the back addition (above) - they had not started framing that area yet when we visited, but they have taken the back wall and part of the roof off. The rest of that roof on the right side needs to be removed to get rid of the dutch-gable and will be re-framed with a standard gable to facilitate our vaulted ceiling in the great room.

Above you can see the recess in the new slab where it meets our existing slab. This recess is for the new sliding door track!

Here’s a sample piece of that track in the recess. Once all the flooring is installed, all you will see will be less than a 1/4-inch tall section of the top silver part of the track, and the base will be buried below. They better set that track more level than they poured that recess... We paid $250 for this recess as a part of change order #2... Looking at how uneven it is, I’m thinking we were overcharged!
We did argue with our contractor about some items in change order #2: he was trying to double charge us for structural items that were in our permit set and the plans showing those items were sent to him prior to his first bid. It was super annoying to argue this with him... lots of #rantsbybrett were endured by all! During our meeting with the contractor I had to shush the ranting husband so that I could talk reasonably with contractor about how he was completely wrong... but you know, in a professional way. Then we had to send a bunch more emails proving our case which was totally BS because the structural items were in the bid set and the permit set! If this change order went to court, 10 times out of 10 we would have been declared right! I even got personally offended that the contractor tried to sick his admin lady on me to try to get me to back down... as if I’m a push over - think again! HA! Their only argument was, “none of our other home owners contest our change orders.” Uhhh... then your other home owners are idiots! We are architects AND it’s our money we’re talking about here so he better bring a better excuse than that if you want us to pay. He finally agreed to revise the change order after I bitched that we are paying them hundreds of thousands of dollars and they are trying to argue about a couple grand, and furthermore, we are spending far too much of our valuable time even arguing about this item that seems pretty clear. Very frustrating.
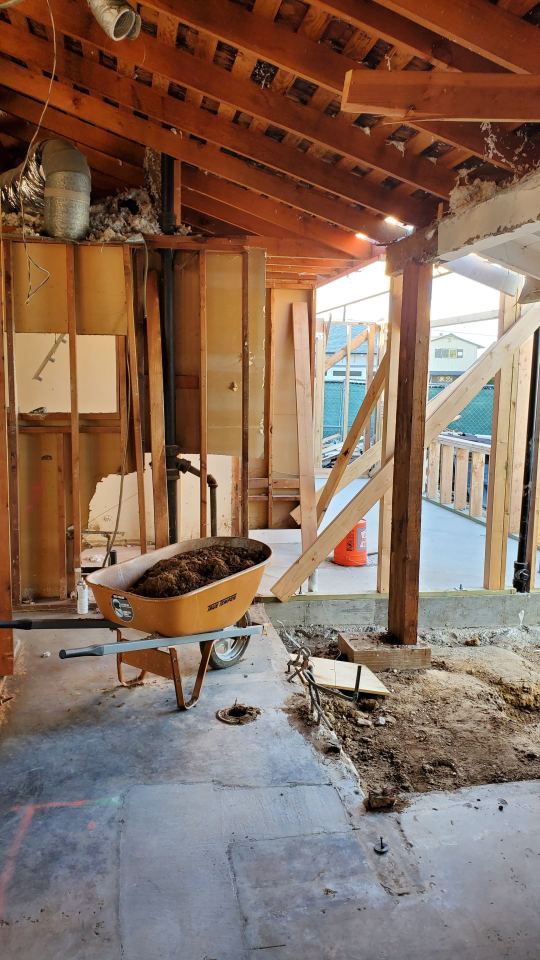
Above you can see where they demolished the front door wall that had that funky plumbing pipe that was going at a 45-degree angle through the framing of the wall. Our new front door will be in the same location, but we are raising the header over the door all the way up to the underside of the rafters and that will allow us to have an 8′ tall front door! The door will be centered on the front porch with an operable side light on either side. The roof over the porch is getting removed and re-framed for a 10′ tall ceiling above the porch. So that beam with the white paint being supported by a another piece of wood, sitting on another scrap block of wood on the ground is all going away!
It was admittedly a little scary to walk around the house in this condition because structurally some items are not really braced at the moment in their temp condition... we were very cautious not to touch anything and I mentioned that if I felt an earthquake I was going to run for it!
We are both really disappointed that our contractor is trying to charge us for ticky-tacky shit that we have to argue against! We didn’t think we hired the “Change Order Contractor” but it’s starting to look that way... ugh! We are already arguing about change order #3 as well.

He’s trying to charge us an extra $4,270.50 to replace our 60 year old sewer line from the front porch to the street. This scope of work was clearly requested by us in our first bid addendum that we sent the contractor a month before his final bid. In the final project budget there is even a $4,400 line item #1300 that verbatim states, “Replace Main Water Line and Sewer Line Will be going as far as we can to the city hookup.” Again we argued that he is trying to double charge us for this scope that was clearly requested in the bid documents and shown in the budget! I asked for him to tell us what the budget line item #1300 is for if it’s not the sewer and water line replacement and he tried to tell us some horseshit that it’s for replacing the sewer and water lines inside the house. I called BS on that immediately and reminded him that the plumbing scope inside the house is covered in the $21,000 line item for rough plumbing!! We are still waiting on his revised argument for why he needs to double the cost to replace the sewer line? I know we are getting all heated about this... but if he had come to us and said that he forgot to bid the excavation for the new sewer line, or that he needs a change order because the sewer line is deeper than he though we would be able to agree or meet him in the middle. I mean we are not unreasonable. But don’t lie to me that sewer replacement isn’t in your bid... you will not win that argument and instead he’s just pissing us both off! Not to mention, who the hell bids replacement of a sewer pipe and doesn’t include the cost to dig it up? If this was a commercial construction project the contractor would have to eat that cost he “forgot” to bid. How would we even know that it wasn’t included when we reviewed his bid? Brett already just wants to hire another contractor to replace our sewer line after our contractor is done so he doesn’t have to pay our contractor another dime over our budget. If the contractor keeps being a prick this might happen, but I’m not willing to burn that bridge yet... I’m still hoping that the contractor comes to his senses.
Then there’s the lovely change order #4! Apparently our contractor only bid the removal and re-sheeting of half of our roof?!?! Did he know we were planning to re-roof the whole thing... yes! Did his bid state he was planning to leave half the existing roof in place... no! BUT since we are having Brett’s Dad, who has owned his own roofing business for the past 40 years, install our new roof we agreed to the change order just because we don’t want to do the tear off ourselves. Cha-ching... extra $4,130 there... smh!
We don’t like arguing. It’s not a fun or comfortable thing to be doing with a contractor that still has 80% of the project to finish. Maybe we won the argument for change order #2 (which isn’t really a win when those structural items should never have been a change order in the first place), but now we are concerned that the contractor is going to try to make that money back on future changes or cut corners to make up the perceived “difference.” We are already 2+ weeks behind schedule and our contract doesn’t have a lot of teeth to compel our contractor to finish by a certain date. Not to mention that we still don’t even have a fucking schedule for the duration of the project! Here we are 2 months into a supposedly 6 month project and all he can give us is a 4-week look ahead... ugh! Lots of stress and frustration happening in our house these last couple weeks. Time for a drink!
1 note
·
View note
Text
About Us Satyam Solutions Pvt. Ltd. is a professional Data Center solutions provider company, having a glorious history of over 10 years. We are catering world class services to our customers round the globe. Over the years, we have been successful in establishing ourselves as a leading data center services provider offering top solutions at the most affordable price range. Our hosting solutions come with superior technology and quality support so that you experience what effective web hosting is all about. Our Customer Service Our team comprises of dedicated professionals, experienced and knowledgeable in their domain. Our 24 X 7 prompt technical support will ensure uninterrupted server performance and maximum uptime for your servers. We are contactable through phone and email. Server Performance We only use original hardware from the best brands in the market which seals our server reliability. Our fast and reliable servers come with 99.95% uptime guarantee. For any unprecedented errors our tech experts are available 24 x 7. Our back-up system ascertains complete safety for your important website files. Our highly redundant networking ensures comprehensive reliability and consistency in your server performance. Dedicated Data Center Solutions: Server Advance Features • Admin Control • Users Creation • Users Dashboard • Users Wise Security • Data Auto Backup • Windows Snapshot Prominent Features • Tier III data center • Centrally managed services. • 24 * 7 Multiple Layered Support. • 99.95% Uptime ensured. • Provision for carrier redundancy. • High-end hardware & Network Equipment. Power • Fully redundant with Direct and DG power • Dual power source from UPS to each Server and Network racks for redundancy. • N+1 configuration for PDU and UPS • Choice between the AC or DC power. • 1 MvA on 33kva line Security • Five Zone Security. • Facility tracked with closed circuit digital cameras. • Fire detection VESDA, 3D Sensors • Access Controls • Biometric Hand Geometric Readers Prominent Features • Tier III data center • Centrally managed services. • 24 * 7 Multiple Layered Support. • 99.95% Uptime ensured. • Provision for carrier redundancy. • High-end hardware & Network Equipment. Data Center Services COLOCATION SERVICES • Co-locate your mission critical Application servers in our Tier-III Data center DEDICATED SERVER HOSTING • Get enterprise grade fully managed servers on a monthly rental model VPS • Backed with 99.999% uptime Guarantee CLOUD • (Infrastructure as a Service) Powered by VMW are, offering computing and storage on the cloud DATACENTER MANAGED SERVICES • Complete suite of managed services to compliment the above offerings HOSTED MESSAGING • Hosted Microsoft Exchange Hosted Zimbra Communication Suite Our Service Delivery Approach Solution • - Customized & on- demand Solutions Quality • -Robust Infrastructure-Reliable Network -Branded Hardware - High Uptime Delivery • - Prompt- Responsive- Flawless- Up to the Mark Cost • - High value for money- Cost Leadership in Indian market Our Key Differentiators Optimised Performance • - 100% network uptime & SLA at 99.95% uptime Our Customer Service • - 24x7 Prompt, 4 Layered Support Value for Money • - Guaranteed Price Protection Flexibility & Scalability • - Customized turn – key solutions

2 notes
·
View notes
Text
Error Code 0x2 bdf5f for OneNote Couldn’t Sync

What is Office OneNote Error Code 0x2 bdf5f?
Office OneNote Error Code 0x2 bdf5f generally occurs during the installation/Uninstalling of Microsoft Office 365. This Error code will also applicable to Microsoft Office Suite, 2016, Office 2019, 2013, 2010 and Office 365. This may happen due to the following reasons.
Might Your Microsoft Office Suite setup file got corrupt?
The current version of the Microsoft Office suite has Updated.
Your new Updates of OneNote have not properly installed.
Some virus infected your system.
Your PC 3rd party Antivirus program blocking your Office installation files.
Windows firewall blocking your Office due to some infected files.
Now here I am going to explain possible ways to resolve Office Error Code: 0x2 bdf5f. So follow the below steps.

Now as per image you can see Microsoft Office error message that used to come on your system screen.
We can’t access this section file or the attached file because the file was moved, the file name is invalid, or the file permissions have been changed. (Error code: 0x2 bdf5f)
If you are getting the same Office Error message then you follow the below steps to resolve these issues. See here more info Error Code 0x2 bdf5f for OneNote Couldn’t Sync
How to Fix Microsoft OneNote Error Code 0x2 bdf5f?
First, you have to get to the Microsoft Office suite website (www.office.com) and login to your account then download offline installer and install it in your system.
Method 1: Turn off the Proxy Setting of your Computer
Are you using LAN or wired connection for internet then our suggestion to turn off your proxy setting while installing/uninstalling MS Office suite. To do this follow these steps (For Windows 10):
Steps 1. Go to Start > Settings > Network & Internet and in the left side menu click on Proxy.
Steps 2. Turn off automatic proxy settings and Use setup Script.

Now try again then check whether you are getting the same Error Code 0x2 bdf5f or not. If you still getting then try below method:
Method 2: To Resolve 0x2 bdf5f error by System File Checker
Find Command Prompt in the Search box, right-click Command Prompt.
Then Right Click and Run as administrator
Now on command prompt, type the command sfc /scannow, and then press ENTER:
This sfc /scannow command will do a scan of all protected system files, and your system replace corrupted files with a corresponding cached copy of that file.
Method 3: To Resolve Error Code 0x2 bdf5f:
Steps 1:
Try to close your Microsoft Office suite installation setup and retry again. Still, you are getting the same method then check your registry keys of Microsoft Office 2019
Steps 2:
Go to the Windows Updates center and check for updates. To check, your Windows update clicks on Windows key then type Windows Update. Then click on check for Windows update (For Windows 10).
Steps 3:
Then click on the Check update button once you click wait for get update your system/PC once your computer gets updated then install the update.
Note: Before performing the above steps please make sure you have a good internet connection and your computer connected to adapter/charging.
Steps 4:
Once all install gets done then restart your system and don’t turn off your system While it is updating and installing your updates. Once all done check once again to open your Microsoft Office 2019 and check whether you are getting the same Error Code: 0x2 bdf5f or not if still, you are getting Microsoft Office Error Code 0x2 bdf5f then follow the below methods.
Method 4: Try direct installation of Microsoft Office Suite instead of Network installation
If you are using a Public or Private network to install Microsoft Office for your system at your system or remote system then you might also get the same Error Code: 0x2 bdf5f. So why not try to direct installation instead of network installation, for that you just have to copy your mail MS Office suite installation file and copy to the current system and install as the same procedure. If you follow this way you may not get his error.
Now again check whether you get rid of it or not. In case you are still getting the same error then you have to follow the below methods.
Method 5: Disable Antivirus and Windows Firewall of your System
It is not always good to do disable Antivirus and Windows firewall, but you are getting Office installation error then we suggest temporary you can disable while your installing/uninstalling of Microsoft Office suite component does not get it done. Once it is done then you have to again enable your antivirus and firewall.
Method 6: Try to install Offline Microsoft Office suite Installer
If you are using an online Office suite installer then your antivirus and firewall may block serve file while fetching during the installation of Office 2019 and you not going to ends with an Error Code: 0x2 bdf5f. So why not you can give a try to Offline Office Installer. It is so easy to do it.
Last now still you are getting the same error then you do full refresh installation of your Microsoft Office 2019 suite.
Error Code 0x2 bdf5f Applicable for the following version of Microsoft Office OneNote:
OneNote 2016, Office 2019 2016 Excel 2016, Word 2016, Outlook 2016, PowerPoint 2016, Office 2019 for business, Office 365 Admin, Office 365 Small Business, Office 365 Small Business, Admin Office 365 operated by 21Vianet, Office 365 operated by 21Vianet – Small Business Admin, Office 365 operated by 21Vianet – Admin Click2Run Office 365 Germany – Enterprise, Office 365 Germany – Enterprise admin Office 2019.com.
This Also Known as:
code d’erreur 0x2 bdf5f
código de Error Code 0x2 bdf5f
Fehler 0x2 bdf5f
mac onenote error code 0x2 bdf5f
onenote content not yet available
onenote we couldn’t open this section
onenote saved offline error
onenote sync error
onenote mac error 0x2 bdf5f
Conclusion:
In this article, we tried to explain about What is Error Code 0x2 bdf5f for Microsoft Office Suite & provide easy and max possible way that you can perform easily with no technical expertise to troubleshoot this error. If still, you are getting the same error then you may have to consult with a technician or you can do a live session with us. Just click on the Chat button and start a live session with our tech expert.
FAQs about Microsoft Office Error Code 0x2 bdf5f
Do the above troubleshooting steps fix this Error Code 0x2 bdf5f? Yes, in most cases it does fix this Microsoft Office error code 0x2 bdf5f.
How much time it will take to resolve this Office suite Error? Usually, it takes around 45-65 min, but it can vary depends on your system and internet speed.
Does it cause any other error code? Yes, It might be causing/create any other Office suite error code.
Do we have to consult with an expert to fix this error, if I am not good to perform the above steps? If you are not good to perform the above steps then you should contact Live Support Chat or contact your local technician to do your job. You just click to your right on chat and get our Microsoft Professional Support.
1 note
·
View note
Link
#API#Information#microsoft#microsoft365#MicrosoftAccess#MicrosoftOffice#MicrosoftProject#Phrase#security#Toolbar
1 note
·
View note
Text
EDB to PST converter to recover and rebuild Exchange server
How to Convert from Exchange EDB to PST
When your EDB file is corrupted hence, you want to recover it. And, it is a tedious job for you. But I would suggest you two methods Exchange Admin Center and Free Tool, that recover your EDB file successfully. The methods convert your EDB file to PST file format; after that, you can easily open the recovered mailboxes with your Outlook application.
Extracts Data from Corrupt Exchange EDB Files and Converts them to Outlook PST
EDB to PST Converter is the best and most reliable tool to convert the EDB to Outlook PST format. The software converts corrupt EDB files to PST or Save to MSG, PDF, MSG Unicode, EML, MBOX, TXT, RTF, and HTML formats. It allows users to convert all the mailbox items like Emails, Calendars, Contacts, Tasks, Notes, Journals with 100% precision.
Recover data from Exchange backup and convert exchange EDB to PST file.
Preserve the mailbox folder hierarchy and data integrity.
Convert EDB to PST and other saving formats.
It includes three advanced recovery modes for the recovery of EDB files data.
Benefits of EDB to PST Converter
Instant preview of mailbox items like Emails, Calendars, Contacts, Tasks, Notes, Journals, etc.
It can also extract attachments separately from EDB mailbox emails into PST.
The software is compatible with all the versions of the Exchange Server.
Have an option to handle alignment errors in Exchange EDB files.
Feature to exclude the duplicate emails based on several categories.
Support all the versions of Outlook and Windows operating systems.
EDB to PST conversion, recovery and export
Syscurve is the professional software for EDB to PST to recover and export mailboxes from EDB file to PST file. It can also migrate mailboxes to Office 365 and live Exchange server
0 notes
Text
Repair microsoft office 365 mac

Repair microsoft office 365 mac how to#
Repair microsoft office 365 mac for mac#
Repair microsoft office 365 mac install#
Repair microsoft office 365 mac windows 8.1#
Repair microsoft office 365 mac how to#
See How to remove Office license files on a Mac. Make sure you are signed in with your Work or School account, not your personal Microsoft account.Select your name and profile picture or icon at the top.If the license is already assigned, uncheck it, select Save changes, then check it again and select Save changes again.Expand the Licenses section, select the boxes for the licenses that you want to assign, then select Save changes.In the right pane, select Licenses and Apps.Select the row of the user that you want to assign a license to.In the Microsoft 365 Admin Center, go to the Users > Active users page.If you aren’t an admin, see How do I find my Microsoft 365 admin? Make sure user licenses are assigned uses many files via internet (MS servers) for repairing. But sometimes Office cannot be fully repaired. Note Some of these troubleshooting methods can only be performed by a Microsoft 365 admin. difference between (a)Quick Repair and (b)Online Repair: (a) does not require internet connection. Try the following troubleshooting methods to solve the problem. Your account doesn’t allow editing on a Mac. Complete the steps in the wizard to finish activating Office.When you try to activate Microsoft 365 apps, you encounter the error message: Note: The Activation Wizard appears if Office has trouble activating. When the Office app opens, accept the license agreement. Repairing Disk Permissions Choose Utilities on the Go menu and launch Disk Utility Select your computers main hard drive and select the First Aid tab.
Repair microsoft office 365 mac for mac#
To open the Office app, select its icon in the search results. 2020 Comprehensive Guide: How to Repair Outlook on Mac/Windows Solution 1: Microsoft Autodate for Mac Solution 2: Create a New Outlook Account Solution 3.
Repair microsoft office 365 mac windows 8.1#
If you have Windows 8.1 or 8.0, type the name of an Office app on the Start screen. To open an Office app, select the Start button (lower-left corner of your screen) and type the name of an Office app, like Word. Run the following command in the command console: PowerShell. If your issue is about a work account, you have to fix the Azure AD WAM plugin package. If youre prompted by a User Account Control ( UAC) window, select Yes to start PowerShell. In the Windows PowerShell window that you opened in step 1, re-create the deleted trust object. Right-click the Windows icon in your task bar, and then select Windows PowerShell (Admin).
Repair microsoft office 365 mac install#
Your install is finished when you see the phrase, "You're all set! Office is installed now" and an animation plays to show you where to find Office applications on your computer. In the rightmost pane, delete the Microsoft Office 365 Identity Platform entry. If you see the User Account Control prompt that says, Do you want to allow this app to make changes to your device? select Yes. To complete the installation, follow the prompts in the "Install Office" section below.ĭepending on your browser, select Run (in Edge or Internet Explorer), Setup (in Chrome), or Save File (in Firefox). This completes the download of Office to your device. Once the uninstall is complete, sign in again and select Other install options, choose the language and version you want (64 or 32-bit), and then select Install. To change from a 32-bit version to a 64-bit version or vice versa, you need to uninstall Office first (including any stand-alone Office apps you have such as Project of Visio). After completing the Online Repair process, the Office 365 is installed now message will appear on the screen. Click Repair to start the repairing process. Once complete reinstall the Office Suite from the Windows App Store. A notification will appear: We’ll download files to repair your installation. In this case, the 32-bit version of Office will be installed instead. Find Microsoft Office Desktop Apps on the list and select it. Note: The 64-bit version is installed by default unless Office detects you already have a 32-bit version of Office (or a stand-alone Office app such as Project or Visio) installed. Run disk first aid Show the Library folder Duplicate the Main Profile Restore from timemachine backup Recreate the email database Set the main profile as.
0 notes
Text
Windows 7 ultimate 64 bit download mstek

#Windows 7 ultimate 64 bit download mstek install#
#Windows 7 ultimate 64 bit download mstek software#
#Windows 7 ultimate 64 bit download mstek password#
#Windows 7 ultimate 64 bit download mstek Pc#
It might take a few minutes for the tool to download and install. On the Microsoft Download Center page, select your language and then select Download. Select the link in the table that corresponds with the version of Windows running on your PC.
#Windows 7 ultimate 64 bit download mstek install#
To try and fix the problem, follow these steps and then try to install SP1 again.ĭownload and run the System Update Readiness Tool
#Windows 7 ultimate 64 bit download mstek software#
If you try to install SP1 and see an error message that the installation wasn’t successful, this might be because there’s a problem with the Windows Servicing Store that is used to install updates or because your antivirus software is preventing the update from being installed. Troubleshoot problems installing Windows SP1
#Windows 7 ultimate 64 bit download mstek Pc#
Your PC might restart a few times during the installation. Select the packages you need to install, select Next, and then follow the instructions to install SP1. Select the appropriate language from the drop-down list, and then select Download. Select Install Instructions to see which packages are available for download, and make note of the one that you need. Go to the Windows 7 Service Pack 1 download page on the Microsoft website. If you’re unable to install SP1 from Windows Update, you can download the installation package from the Microsoft Download Center and then install SP1 manually. If you disabled your antivirus software before the installation, make sure you turn it back on.ĭownloading and installing Windows SP1 from the Microsoft Download Center You might see a notification indicating whether the update was successful.
#Windows 7 ultimate 64 bit download mstek password#
You might be asked for an admin password or to confirm your choice.Īfter SP1 is installed, sign in to your PC. Install any important updates and then follow these steps again to check for SP1. Note: If SP1 isn’t listed, you might need to install some other updates before installing SP1. In the list of updates, select Service Pack for Microsoft Windows (KB976932) and then select OK. If any important updates are found, select the link to view available updates. In the left pane, select Check for updates. Select the Start button > All programs > Windows Update. To manually install SP1 from Windows Update: Follow the instructions to install the update. If your PC is set to automatically install updates, you’ll be prompted by Windows Update to install SP1. Installing Windows 7 SP1 using Windows Update (recommended) If you do so, make sure you’re aware of the risks that might be involved and re-enable the antivirus software as soon as SP1 is done installing. You can temporarily disable your antivirus software before the installation. Some antivirus software might prevent SP1 from installing or slow down the installation. Make sure your PC is plugged in to power and you’re connected to the Internet. It’s a good idea to back up your important files, photos, and videos to an external hard disk, USB flash drive, or the cloud before installing the update. Disk space requirementsĬheck to make sure your PC has enough free disk space to install SP1.Įstimated amount of free disk space neededĭownloading SP1 from the Microsoft website The version of Windows 7 is displayed next to System type. Select the Start button, right-click Computer, and then select Properties. You’ll need to know if your PC is running a 32-bit (x86) or 64-bit (圆4) version of Windows 7. Before you begin Check if your PC is 32-bit or 64-bit If Service Pack 1 is listed under Windows edition, SP1 is already installed on your PC. To check if Windows 7 SP1 is already installed on your PC, select the Start button, right-click Computer, and then select Properties. It takes about 30 minutes to install, and you'll need to restart your computer about halfway through the installation. The recommended (and easiest) way to get SP1 is to turn on automatic updating in Windows Update in Control Panel and wait for Windows 7 to notify you that SP1 is ready to install. We recommend you move to a Windows 11 PC to continue to receive security updates from Microsoft. Support for Windows 7 ended on January 14, 2020
0 notes
Text
How to install spiceworks on server

How to install spiceworks on server install#
How to install spiceworks on server software#
How to install spiceworks on server windows#
Or use an account that's already a member of that group.īlock Group Policy inheritance on the target computer, or the user account performing the installation. If the credentials specified in the wizard don't have local administrator permissions, add the account to the local Administrators security group on the target computer.
Required services on the target computer aren't running.
How to install spiceworks on server windows#
The Windows Firewall is blocking ports between the management server and the target computer.For example, Group Policy Objects prevent the accounts from accessing the Windows folder, the registry, WMI, or administrative shares on the target computer. Group Policy restrictions on the management server computer account or the account used for agent push are preventing successful installation.This requires local administrator permissions due to the requirement to write to the registry.
How to install spiceworks on server install#
The account previously specified to perform the agent installation in the Discovery Wizard doesn't have permissions to connect to the target computer and install a Windows service.
These errors can be caused by one of the following reasons: The Discovery Wizard encounters an error when trying to install the agentĮrror Description: Unknown error 0xC000296EĮrror Description: Unknown error 0xC0002976Įrror Description: Fatal error during installation. Otherwise, reject the pending action, then rerun the discovery wizard. If the existing installation settings are sufficient, approve the pending installation from the console. If the target computer is listed under Administration > Pending Actions in the Operations console, the existing action must either be approved or rejected before a new action can be performed. Or, the computer is listed under Pending Actions in the Operations console. In this case, the computer may already be identified in the database as part of the management group. The target computer isn't in the list of potential agents after the initial discovery runs The Agent Management Operation Agent Install failed for remote computer ĭuring discovery, specify an account that has both domain administrator permissions and is a member of the Operations Manager Admins group.Īdditionally, if the LDAP query times out or is unable to resolve the potential agents in Active Directory, discovery can be performed via the Operations Manager Command Shell. The semaphore timeout period has expired. The MOM Server failed to perform specified operation on computer. The credentials specified in the wizard during the initial discovery must have permission to search Active Directory for potential agents.Įrror Description: The RPC server is unavailable. In this case, the most likely cause is that the account is having trouble accessing Active Directory. The wizard doesn't display a list of potential agents to install Or, a different management server or gateway should be specified during the wizard to see if the same error occurs. Therefore, any testing should be conducted from the management server or gateway specified when the wizard runs. It's not the server the Operations console was connected to when it opened. If the agent will be deployed via discovery from the Operations Manager console, the agent will be installed from the management server or gateway server specified in the Discovery Wizard to manage the agent. Supported UNIX and Linux Operating System Versions Troubleshoot agent deployment via the Discovery Wizard The following article lists the supported versions of Unix/Linux: If the target client is a Unix/Linux computer, verify that both the distribution and version are supported. System Requirements for System Center 2012 - Operations Manager The following article lists the requirements for a System Center 2012 Operations Manager client:
How to install spiceworks on server software#
The first step is to verify that the potential client computer meets the supported hardware and software configuration. Original product version: System Center 2012 Operations Manager, System Center 2012 R2 Operations Manager Original KB number: 10147 This guide helps you troubleshoot issues that the client agent of System Center 2012 Operations Manager (OpsMgr 2012 and OpsMgr 2012 R2) can't be installed.
0 notes