#Shutter Speed 1/40 s
Text

Assignment 3: The Golden Hour, Aperture priority mode
Photo # 17
Nikon D90
AF-S DX VR Zoom-Nikkor 18-105mm ƒ3.5-5.6G ED
ISO 400, f3.8, 1/40 s
The aperture of f/3.8, combined with a shutter speed of 1/40 second and ISO 400 allowed for a wider opening that gathers more light, which was important to capture the dense, plant-rich environment. Although the picture appears slightly out of focus, the blurring kind of melds the scene together in a way that makes it visually relaxing to me.
0 notes
Video
2016-10-22-14.49.39 ZS PMax Selaginella bigelovii-1 by John Rusk
Via Flickr:
Selaginella bigelovii—Bushy spikemoss. A fern ally and not a moss despite the name, Selaginella bigelovii is found from Sonoma County south to Baja California. It reaches inland to the San Joaquin Valley and the edges of the southern California deserts. The plant is much more common in southern California than in the San Francisco Bay Area. The photo shows an aging plant. S. bigelovii grows at Regional Parks Botanic Garden located in Tilden Regional Park near Berkeley, CA
#Olympus Pen E-PL1 Body#Canon FD 100 mm Macro Lens#ISO 100#F/stop f4#Shutter Speed 1/40 s#Zerene Stacker#Stack of 11 images#taxonomy:kingdom=Plantae#Plantae#taxonomy:phylum=Tracheophyta#Tracheophyta#taxonomy:phylum=Lycopodiophyta#Lycopodiophyta#taxonomy:class=Lycopodiopsida#Lycopodiopsida#taxonomy:order=Selaginellales#Selaginellales#taxonomy:family=Selaginellaceae#Selaginellaceae#taxonomy:genus=Selaginella#Selaginella#taxonomy:species=bigelovii#taxonomy:binomial=Selaginella bigelovii#Selaginella bigelovii#Bigelow's spike moss#taxonomy:common=Bigelow's spike moss
1 note
·
View note
Text
Catch Me If You Can
SPORTING EVENT..RESEARCH
Adults running about a field chasing a ball, or running very fast, jumping over things of varying heights, throwing things, catching things, hitting various things with a stick. In a small confined space punching each other. Or swimming up and down and up and down. Sitting on the back of a running horse.The list is almost endless. This world of needless physical exercise is called Sport...and is full of drama and emotion, both for those who do it and those who watch it...apparently!!
In this project I will show a selection of these people, both participants and spectators in the “moment”, engaged in their chosen activity.
Using a variety of photographic techniques I will attempt to make a visually appealing assortment of images....So here goes, first things first...
How to do it!
With every sport there will be a differing set of challenges facing the photographer.. The size of the area, is it the size of a boxing ring (for two people punching each other) or the size of a football field (for 22 people kicking a ball) or even bigger.
How close can you get to the action
How many people are taking part..just two or a whole lot.
Is it indoors or outdoors
Natural lighting or specially constructed lighting specifically for the sport in question.
All of these different scenarios will dictate what kind of equipment the photographer will need and the way the camera should be set up.
So before you can really start it’s helpful to know what sport you will be photographing. Sometimes you will just have to learn quick and work it out on the job.
SOUND ADVICE FROM PEOPLE WHO DO THIS FOR A LIVING
Having just read a google’s worth of ‘Top ten essentials for sports photography’ and for the basics there seems to be a general consensus with the preferred functions on the camera. The main factor for professionals is continuous burst speed with some of the present crop of top the range sports oriented DSLR’s shooting 14fps or more. With the speed of the action things are changing in those fractions of a second and having the ability to be able to follow those changes so closely is a highly sought after function. With most prosumer cameras these days the ISO capabilities are becoming increasingly impressive with ISO32000 in the native range of the camera becoming the norm and with that also stunning reductions in the noise at these high ISO levels. These ISO levels really assist in reaching the shutter speeds used in a lot for freezing this high speed action. Starting at 500th of a second and going up. 2000th of a second is not unusual. Along with high ISO the next thing to assist in these high shutter speeds is the next topic of general agreement....
Lenses.....lenses should be fast, as fast as can be. The aperture of a good lens for sport if using a zoom is f2.8. It’s not uncommon for a professional sports photographer to have 3 camera bodies.The most common, and most versatile, setup for most professional sports photographers is to start with the trio of 16-35mm ƒ/2.8, 24-70mm ƒ/2.8 and 70-200mm ƒ/2.8 lenses. These three options provide all the coverage needed to shoot everything from wide-angle shots of a packed stadium through any action happening up to midway down most sporting venues. Though these lenses are not cheap, when it starts to get to the bigger fast primes that will allow you to see the action close up at the other side of a stadium or football field they can cost the same as a nice family car. For those beginning their sports photography there are some great lenses that along with the high ISO capabilities just talked about it will do a great job without having to be so wide open. A 70-300mm f4-5.6 or even 150-600mm f5-6.3 will do a great job of covering that far away action.
Another piece of advice where there is general agreement is in positioning. Get to the venue early and have a good look at all the potential spots and make sure you’re good to go with your settings before the action starts....But don’t stay in the one place and don’t just focus on the action. In the audience there is as much drama as on the field of play, or after some high point of action...the reaction. There are winners and losers and both have equal visual weight and potential to produce the image that encapsulates the moment and the whole event.
Another is ..You are a photographer first and foremost, the subject is sport but the intent is a striking image with light and shadow, composition, balance, colour, story all fundamentals.
WHERE TO SHOOT.
If you are not inclined to sports then it is apparently very easy to block it out of your daily experience and be blissfully unaware but as it happens, open your eyes to sports and its everywhere, EVERYWHERE!
Local newspaper for local events, google to check out what's on in your local area and further afield. Amateur or professional. Check out sporting arenas, sports and athletic clubs, football stadiums. If there is a particular sport you are interested in you can refine your search. If you’re not to bothered which sport to start with then prepare a general polite letter asking whether you can come and take photos. Send it out to as many events as you can find. Cast the net far and wide and the chances are you would be spoiled for choice.
Here we are about two months later...It’s taken a while to get access to sports, longer than I had at first thought but now I have I’m hoping for a variety of sports to shoot. I made contact with Glasgow University Sports Association which is the umbrella organisation for more than 40 sports clubs at the University. The Association has recently been actively seeking Photographers to shoot all the club games.
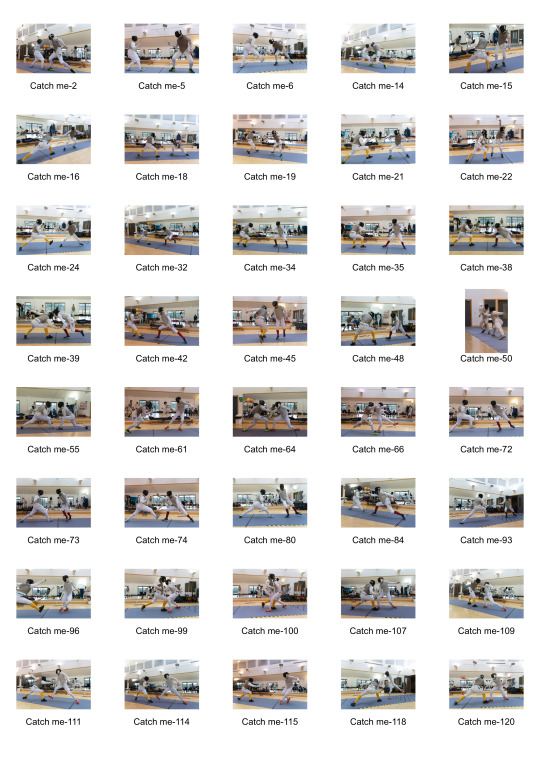
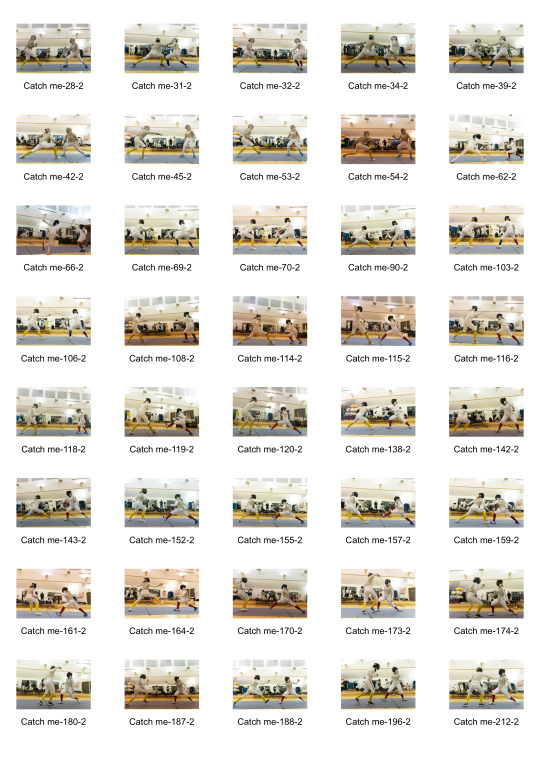
Seeing as time was running out on the brief I took the first possible opportunity to shoot. It was an inter-university fencing tournament Men and Women. Men against Bath University..cant remember the women's opposition University.
As soon as I was confirmed to shoot I started to watch some YouTube videos on the rules of the sport, the moves and the scoring.
It was quite a challenging shoot. It was in a large, bright gym hall. A long (14m) rubber mat with the essential markings for the game was rolled out and taped to the floor about two meters from the wall. Too close to the wall to be able to shoot from the wall side, just too near the swishing blades. The problem was that this wall was one vast mirror reflecting not just those fencing but the spectators and myself. This made for a challenge to minimise the distraction of everything else in the reflection.
In fencing the action is fast. In Olympic sports second fastest behind shooting I was told by one competitor. I was set to f4 and to get the quick exposures I needed to freeze the action (1/1000th/s) the ISO was pushed up to 6400.

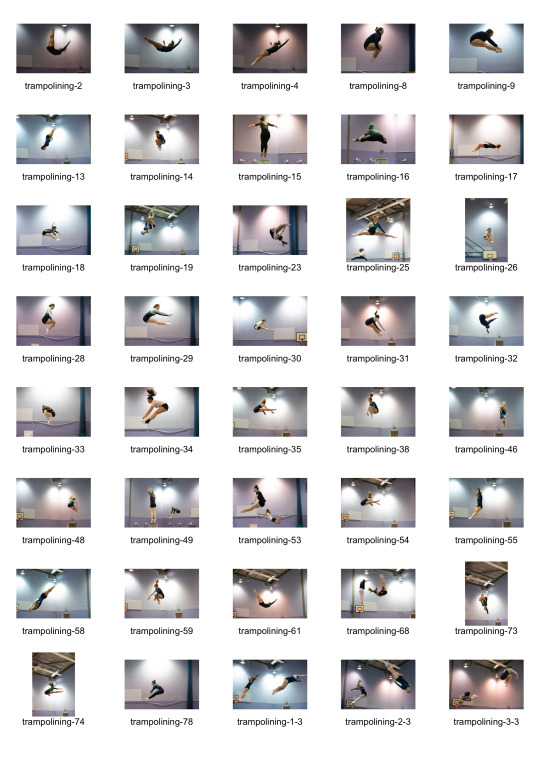
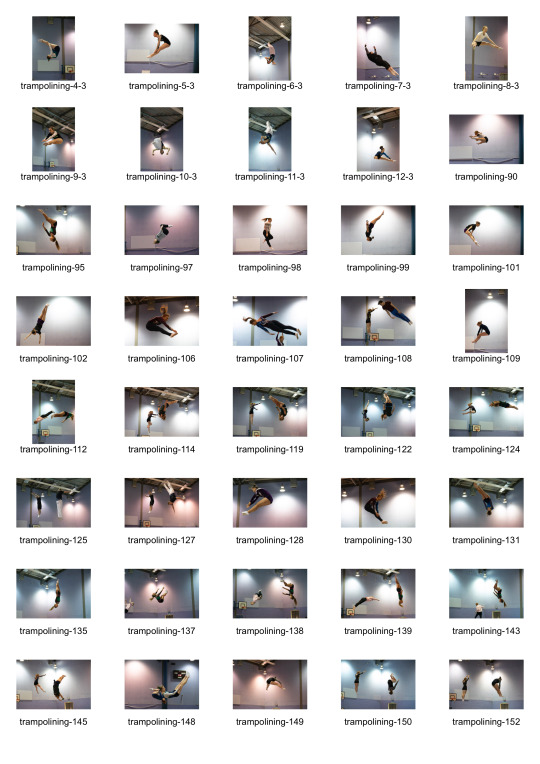
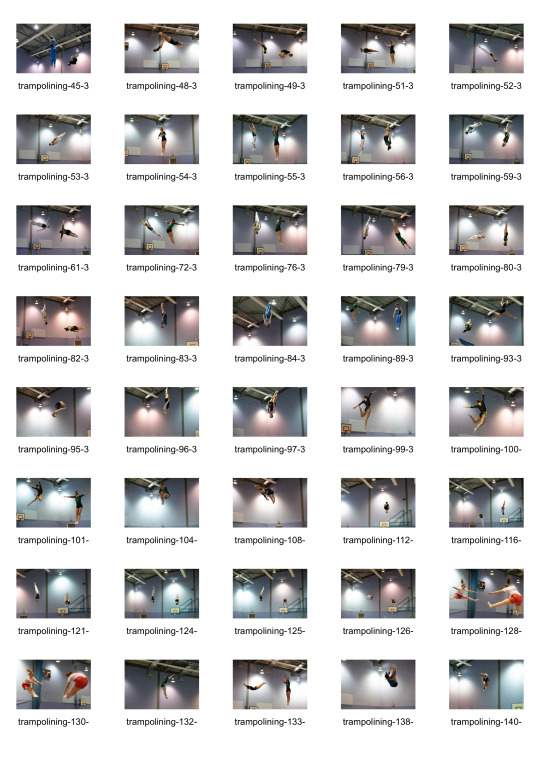
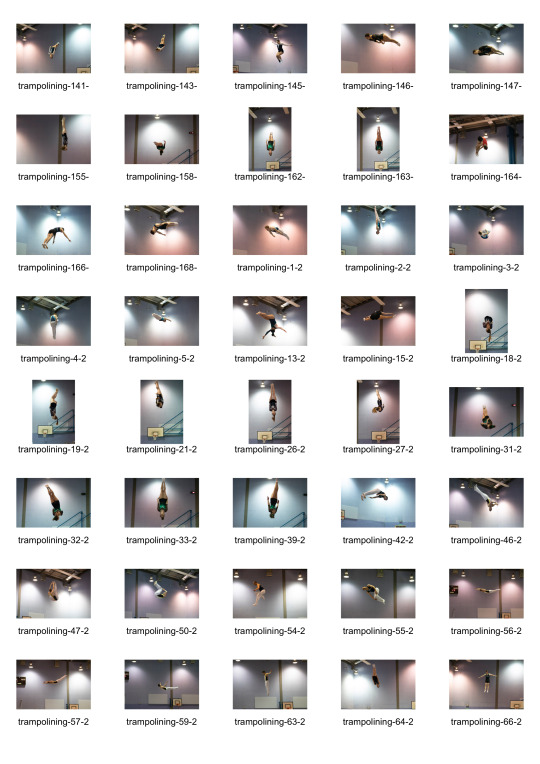
Saturday 8th March. 9am-5pm. Glasgow Caledonia University. Today I shot a trampolining tournament with all Scottish Universities competing. It was in a large high gym hall with what looks like big halogen spotlights. There’s about 200 people in the hall, mostly either competing, judging or organising. Its not open to the public. After some shots my exposure settings settle at 1/320th f4 ISO6400. I didn’t want to push the ISO much higher and had to make a compromise with shutter speed. In many of the images there is movement in the feet of the athletes. I made a decision based on the aesthetics. I liked this slight movement in many of the images, a suggestion of movement. There was no high vantage point so I made do with standing on a chair. It gave me enough of a height advantage to clear the images of the people walking about in the hall. They really didn’t add to any of the images. I did include one or two all the same that didn't distract from the action.
I’m much happier with this set of images than with the fencing from the previous sports shoot. With that shoot the large wall mirror behind the 🤺 that ran the length of the hall was so distracting..reflecting everything in the hall..the fencers, the other competitors...and me! It made it almost impossible to get simple, strong images being much too busy.
This time around it was a far easier shoot to get a more aesthetically pleasing result. Often against a background of a large plain wall with few distractions and with lighting that also had a dramatic quality.
Overall i’m extremely pleased with the results. There are some possible portfolio contenders.


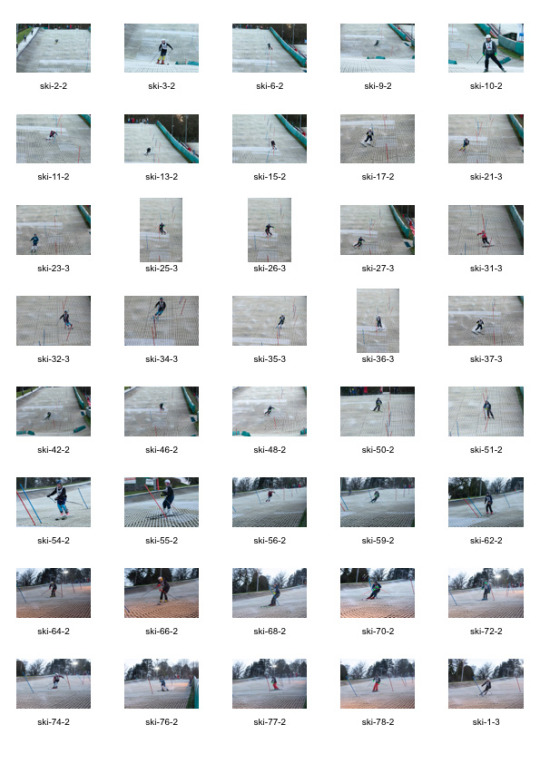
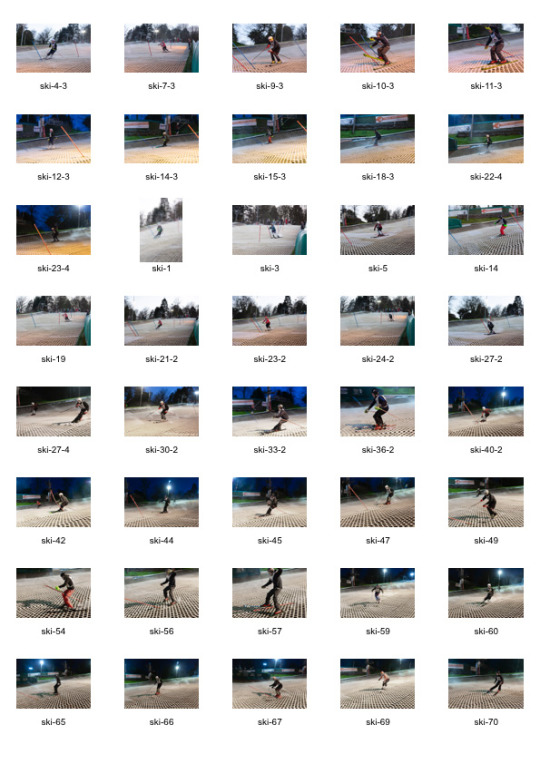
Third and final set of photos for the brief. This time it was outdoors, in the evening, cold and pouring of rain. Bellahouston outdoors ski and snowboarding center. Again it was an inter universities event sponsored by Glasgow Taxis.
It was a difficult shoot. Unevenly lit, there were pools of light and areas of dark. The area was large and the athletes were going at speed. This demanded several skills. The most challenging was to get a handle of the AF system on my new camera. Sports are generally demanding on AF and this was no different. Using 2 camera bodies..Canon 5dmk3 and 5dmk4 with a 24-105 f4 on one and a 70-300 f4.5-5.6 on the other.
The action started just as it was beginning to darken so the exposure needed to be adjusted over the first half hour or so until well after sunset and the only light was artificial. Because of the layout of the slope and the nature of the contest there wasn’t much variety of movement and routes taken down the course. At the end of the ski tournament there was some snowboarding a ski freestyle which promised a lot more exciting images but unfortunately the heavens opened as this began and the rain poured down. Having been out in the bitter cold with no gloves for 3 hours (lesson learned) and the lenses not being weather sealed to a Scottish downpour level I decided to retreat.
This has been a thoroughly enjoyable brief, much against expectation. There have been challenges at every event that I would like to think I have dealt with and overcome to produce many images I'm very happy with. I have become more aware of the reasons why sports photographers need that extra quality in their gear. Proper weather sealing and fast f2.8 lenses are just near essential for any professionals working in this area. Knowing something of the sport you are shooting helps. Getting to the venue early and checking it out, finding where the good light is, also helps enormously. And moving about to get different points of view.
There have been many photos taken for this brief-in total probably near 5000. Of those I have whittled it down to 500 or so. The final challenge is to choose the final 6 for printing and submission.
Of the 3 sports I shot for this brief the trampolining was by far the most enjoyable and i’d say successful. Producing the most images I was happy with. Well lit venue with not too many visual distractions and the sport itself was so conducive to aesthetic interpretation.
The time spent has been quite considerable for this brief with two full days and one half day of shooting and then because of the huge number of shots another 3 full days of choosing, deleting and optimising the images. That said, there has in fact been very little optimisation in post. In all three sessions I have used lens correction, in some a tweak of white balance. And in very few a touch more, lightening shadows or reducing highlights but very little else.
On revising everything I see that after 5000 photos I've forgotten one of the requests of the brief..to have a panning shot!!! This is bad news. Time is very short and to shoot some more sports is a days worth of work. First getting some sports to shoot, shooting and then picking and processing. For not reading the brief properly I’ve lost a day at a very crucial point in time where I need every second. One big lesson learned. Less than 2 weeks to go.
SOURCES .. So Far
https://artsandculture.google.com/exhibit/the-art-of-sports-photography-from-prints-to-images-1835-2017-the-olympic-museum/MwKStrCJtolhKg?hl=en
https://www.amateurphotographer.co.uk/technique/how-to-shoot-action-and-sports-photography-625
https://photographylife.com/getting-started-with-sports-photography
https://improvephotography.com/52236/15-tips-get-started-sports-photography/
https://petapixel.com/2018/12/06/6-simple-tips-for-getting-started-in-sports-photography/
https://expertphotography.com/complete-guide-sports-photography-87-tips/
2 notes
·
View notes
Photo

“And now for something completely different” -Taking some time away from #hiking and throwing an assist to @creep_geeks & @manddparanormal at the #georgiabigfootconference. At least I can “play” #photographer while I’m here, and possibly sell some of my #handmade swag! Hey, maybe I’ll catch #Bigfoot on camera 😉 📷: #CanonEOS T7i Lens: EF-S 18-135mm STM Aperture: f/4.5 ISO: 3200 Shutter Speed: 1/40 #smallbusinesssaturday #weird #sasquatch (at Rabun County Civic Center) https://www.instagram.com/p/Bww3mKql_lC/?utm_source=ig_tumblr_share&igshid=1h6fzv6ko6ns0
#hiking#georgiabigfootconference#photographer#handmade#bigfoot#canoneos#smallbusinesssaturday#weird#sasquatch
1 note
·
View note
Text
Documentary Homework Task
What did you do
During this shoot I took photographs of a friend of mine; Bryndon Rice, around All Saint’s Church in Kirk Hallam.
Why did you choose to shoot in that way
I had chosen to shoot in the way that I did because I thought that it had more of an effect on the photograph that it did if I chose to do it in colour. However, I did not do it in colour; as I shoot all in monochrome which helps with the image as it helps you think of how old the vampire is than he looks.
What went well?
I think that the entire shoot went well because I was happy with how my photographs came out and I was also happy with the model that I had because he really helped capture on how the vampire would probably be feeling.
What didn’t do well? Why?
I think that a couple of photograph that I had taken didn’t come out too well because I had either accidentally moved while the camera was taking the photograph; which caused me to have some motion blur. Another thing that I think didn’t too well is how a couple of my photographs within the church came out too dark because I hadn’t set up the settings that I needed.
So how would you improve it?
To improve the photographs that I had taken I would probably test my camera setting before attempting to take a shot. Alongside that, with the outside photograph I was thinking of editing a low fog in there to add to the supernatural feel of the photograph. With that, for the inside photograph I would probably also have a ‘dead’ body in like a corner of the photograph as well to help address the fact that the vampire is not a holy creature.

Why did you choose the location?
I chose this location; All Saint’s Church Graveyard, because I wanted the photograph to be taken to evoke the idea that a vampire; who was turned in about the 1700’s, has come to visit his love who died around the time that the vampire was turned. Alongside that, I also wanted to present the idea that the vampire visits the gravestone once every year; or when something major happens, and I thought that all of this would be best portrayed at a graveyard and I thought that this gravestone would be the best for what I wanted to present.
What settings did you need and why?
I set my aperture to: F/5.6 because the weather was pretty gloomy and we were also in a shaded area, so I set my aperture low so I could try and get as much light as possible. Alongside that, I also set my shutter speed at: 1/40 so that I had a shutter speed that would let in enough light for a long enough time so I could get the photograph in the amount of light that I had and that it would also still not have any motion blur within the photograph. As for the ISO I decided to set that at: ISO-400 this was because I wanted to have a sharp image; but not have it too sharp so you can sort of see the pain that the vampire is in through the quality of the photograph, so you are able to see the detail within the photograph. With that, I also shot in monochrome because I thought that the photograph would look good with this setting because it may emphasise on the loneliness and emptiness the vampire may feel.
What focal length did you use? Why?
The focal length that I used in this photograph was 55MM because I was stood quite a bit away from my main subjects and I wanted to evoke the idea that the vampire felt alone, so I didn’t want to be too close. I also chose this focal length because I also wanted to portray the idea that the vampire was once quite close with the person whose grave he his visiting.
What equipment did you need and why?
The equipment that I used was just my camera because I didn’t have any other equipment because I didn’t think that I needed any and I also don’t own any other equipment that I could have used.
What would have made it work better?
I think what would have made this photograph better if the cross; that should have been standing on the rest of the headstone, was actually stood up and if I had a model; that was slightly see through, and looking at the vampire with sorrow.
Why did you frame it the way you did?
I framed it this way because I wanted to demonstrate the separation the vampire feels from the rest of the world because he is the un-dead, while everyone is either dead or alive while he is both. I also had my model stand at the opposite end of the gravestone to attempt to evoke the idea that the vampire is attempting to fight the urge to go to the gravestone to see if they can find any trace of the person who broke it.
How did you find the shoot?
I found the shoot quite fun because I have never really had a model in my photography before because I am never quite sure on what to do with them. But during the shoot my model was also changing how they were standing; after I had told them to go and stand at the bottom of the grave and look sad.

Why did you choose the location?
I chose this location; All Saint’s Church, because I wanted my vampire to be quite a religious person; as he was raised about the 1700’s, and goes to any church that he is near to him on his travels, so he can pray for one day his immortal days to be over for good. So, I also chose this location because it could be the church that was closet to him while he was travelling.
What settings did you need and why?
The aperture that I used was set at: F/4.5 because I was inside a pretty dark area inside the church as it was a pretty dark day. As for the shutter speed I set that at: 1/30 because I needed a speed that was able to fit all the light that I needed to have in for the photograph, so it wouldn’t be too dark. Alongside that, I also set the ISO to: ISO-400 because I wanted a sharp image for my photograph within the limited light source that I had. With that, I also shit in monochrome because I wanted to present the idea that the vampire may be living in a black and white world because he has lost his way and until he finds his way again, he will spend the rest of eternity in black and white.
What focal length did you use? Why?
The focal length that I used was: 27MM because I wanted to allow the viewer to see the all of the hope from the vampires face gone because as he praying for centuries for his life to change God has not granted it because the vampire drinks the blood of his creations to keep the vampire in an endless slumber until someone or something gives the vampire their blood. I also chose this focal length because I wanted to present the fact that; despite the fang, cold skin, super speed and everything else that comes with being a vampire, the vampire still looks human.
What equipment did you need and why?
For the equipment that I used for this photograph, I used my flash because despite me going as far as I could on my aperture and setting up my camera settings the way I did I still wasn’t getting enough light, so I used the flash to attempt to get a better shot.
What would have made it work better?
To make it work better I would have placed a load of empty blood bags that surrounded the vampire to demonstrate the idea that the vampire sort of lost control of his thirst and drank a crazy amount of blood.
Why did you frame it the way you did?
I framed it the way did to demonstrate the idea that the vampire cannot go any farther than that because the church is a holy place, whereas vampires are unholy creatures.
How did you find the shoot?
I enjoyed this shoot because I was able to capture the models face with a look on their face which was how the vampire may have been feeling because he had lost everything and everyone.
And thank you for Christine French.
1 note
·
View note
Photo

Shutter speed: 1/40
F-Stop: 29
ISO: 1,600
Lens: Zoom Lens EF-S 18 – 55mm 1:3.5-5.6
0 notes
Text
cafuné.

pairing: bucky barnes x fem!reader.
summary: bucky always asked you to play with his hair and when you finally question why he does it his answers surprises you.
genre: fluff.
warnings: none aside from some swearing and Sam being a major dick.
a/n: this is the first time I write on english so please have in mind that this is not my first language.
You were used to it at this point. It was a regular thing that everyone in the team thought was weird while you didn't wanted to put too much thought into it. It was nothing. He just liked having his hair played with and you were the only one from the team friendly enough to ask that to. That's exactly what you told yourself every time Bucky would request your hands on his long, soft brown locks so you wouldn't fall deeper in the dark hole that was being in love and not being corresponded.
Of curse you didn't told a soul about it, not that you were really friends with anyone in the compound, unlike what the word seemed to think you didn't gossip with Wanda and Natasha while painting each others nails, so you didn't exactly had someone to talk about it, which only made it worst.
Movie night was something you actually did, most of the time the whole team was in the common room getting ready to watch whatever movie has been picked and just silently enjoy it together. You would usually bring your own pillow from your room and that one big fluffy blanket that everyone would try to steal from you throughout the movie and sit on the huge couch while some of the guys preferred to lay on top of the furry carped on the floor. tonight was no different.
"Come on (Y/N), you need to learn how to share, girl" Sam shouted at you from the floor trying to pul the blanket from your legs.
"Fuck you, Sam. The blanket is mine I don't have to share anything" With that he let go of the blanket and murmured something under his breath.
"Can you stop acting like children?" Natasha entered the room wearing her black pajama shorts that usually made Steve's eyes go wide. But he was nowhere to be around.
"F.R.I.D.A.Y can you tell antique 1 and antique 2 to move their asses down here so we can start the movie?" Tony ordered the AI.
That's when your anxiety started to show up. Because movie night was the most common occasion for Bucky to put his head on you lap as soon as he could and you knew tonight wouldn't be an exception, which made you nervous, even if you did it every sunday.
The two super soldiers finally appeared and it was pretty obvious they were in the training room before since they looked somewhat tired. They both looked like they just got out of their showers and were wearing clean comfy clothes. Steve's hair was still wet from what you could see but Bucky's was completely dry and looked like a mess which was a certain indication that he just used the hair dryer on his bathroom and didn't bothered to brush his hair afterwards. He was wearing grey sweatpants and a plain black V neck and fuck did he looked good on them.
"Jeez, Tony, we're here. Calm down" Steve said as he sat down in the empty space between Natasha and Tony.
That only free spot left on the couch was between Wanda and Clint, but Bucky just let himself fall in the carpet right in front of you and without a word he placed his head on you lap.
"What are we watching?" Steve asked, to which Tony was quick to answer.
"We're watching Narnia and you two don't have a say on it because you're late. F.R.I.D.A.Y roll the movie" After Tony's command the screen came to life and the lights went down.
A couple of minutes later you were really into the movie and the beautiful cinematography of it when you felt the head on your lap constantly moving and shifting it's position. You knew it was just a matter of time befor-
"Doll?" He kept his voice down so he wouldn't disturb the movie for the rest.
"Hmmm?" You eyes remind on the screen but your heartbeat was going faster.
"Would you mind putting your hands in my hair? I mean, if it doesn't bothers you..." He was always nice about it, even if you have never deny it since the first time he asked you, he would always make sure you were comfortable with it.
You didn't say anything, just letting your fingers get lose in his hair, it felt fresh clean because of his shower and it was super soft as usual. Your nails ran lightly over his scalp and behind his ears, you didn't have to look down to know that made him close his eyes and relax his whole expression.
"Why do you only let Y/N touch your hair, Bucky?" Wanda's voice caught everyone's attention.
"What?" Was Bucky's only response as he opened his eyes and pulled his head up from your lap to look at her.
"I mean... you always ask her to play with your hair but you don't let any of us even come close to touch it. Why?" You watched carefully for any odd reaction but he just shrugged and ignored the question.
"Come on, man. When are you going to have the balls to actually show some of your feelings?" Sam stated, apparently bothered for some reason.
"Sam, shut up!" Steve used his captain voice and that meant he was serious.
"No, I mean it, he's never going to adapt if he doesn't stop being such a pussy". The room fell silent after that.
You felt Bucky tense up against you legs, the darkness in the room didn't let you see much of his face but he didn't gave you, or anyone, a chance to try to see closer. He stood up and left without a world.
"That's just fucking great, guys, brilliant!" You glared at Sam and Wanda before standing on your feet and following the soldier.
Running through the hallway where the rooms were you stopped in front of Bucky's door and hesitated before knocking. Wanda made valid point, you never saw anyone else touch his hair, not even steve. So why let you do it? If it was a thing he would only let girls do, the why not let Natasha and Wanda do it? After all he wasn't much more intimate with her than he was with them apart from letting her play with his hair.
So why?!
Finally you let you knuckles hit the hard wood of the door and waited to heard something from the other side but you didn't.
"Buck, it's me... open up, please" You keep you voice soft so he wouldn't feel threatened.
The knob made a noise and the door was open, all the light inside seemed off but you still stepped in slowly. There was a soft light coming from a little lamp on his night stand that let you see him sitting on the edge of the bed, his face hanging low, probably so you wouldn't see his face. If the situation was reverse you would for sure be embarrassed too. Closing the door behind you, you walked getting closer to him till you were right in front of his figure but not a word was said. Your hands felt the silky texture of his locks and your fingers ran through it letting you thumbs slightly rest over his cheekbones.
"Hey..." He didn't answer but you could see the light pink bush covering his face. "Are you going to talk to me?"
His eyes went up and stared right into yours, if you didn't knew better you would say he was staring through your bare soul, your heart rate speeded up and your chest went up and down with each breath you took. It was an intense moment for both of you. You could tell he was affected too.
"What do you want me to say, doll?" His voice sounded raspy.
"Actually... I'm really curious as to why you only let me touch your hair" You caressed his hair a little more, almost encouraging him to tell you. He sighed before speaking again.
"Before the war I used to take a lot of ladies out on dates, as you probably have heard, and my hair was something that they all were fascinated with for some unknown reason" He frowned.
"Maybe because is soft and cute" You smiled at him while messing his hair with both hands.
"Well, point is, after I could finally scape from Hydra I was constantly moving from city to city, and I realized than people had become a lot bolder these times." You felt him shiver before he could continue. "I could be on a supermarket in Vienna, buying protein bars and some random girl would come and ask if she could run her hands through my hair, in the 40's I would have laugh and say yes, in that moment? I had a panic attack and ended up running away from the place without saying a single word." He sounded extremely sad, even if that was a memory from years ago it still hurted him. "Even when I got here, everyone kept asking, boys and girls... I even through about cutting it so I didn't have to face that problem anymore, but I never actually got around that".
"I'm glad you didn't". You mumbled as your grip of his hair got a little more firm.
"And then when you came around I started to feel this urge..." You breath got caught in your throat when you felt his hands firmly grab your hips and pull you a closer. "I wanted you close, I wanted to have your scent always around and... well I did wanted you play with my hair." His words warmed your heart and leave you totally speechless but he wasn't over yet. "At first I didn't knew why I felt like that, but the it was pretty obvious I had developed feeling your you, doll"
"Y-you have feeling for me, Buck?" The words shuttered their way out and he giggled at that.
"Of course, Y/N, it's pretty damn obvious" he smiled at you, apparently not embarrass anymore. "So I couldn't resist anymore, I asked and you said yes, from then every time I have the chance to have you close I took it".
He just displayed his feeing for you and there was not a single muscle on your body that wasn't shaking, you crush of 3 years have confess he had feelings for you and now the only thing you could think about was kissing him.
"So you don't have any urges left?" You asked with your stare glued to his lips and his fingers dipped in the skin of your hips.
"Fuck. Doll, don't go there" His breath became superficial and you let your thumb ran over his lower lip as a result of the rush of feelings going through you at the moment.
"Why not?" Looking at his eyes again so you wouldn't miss the feelings they displayed.
"I've wanted to kiss you for so long, (Y/N). Don't play with me like tha-" You cut him off by kissing him finally.
You had anticipated the moment for so long it didn't felt real at first so both of you were afraid to move and break whatever kind of spell was in the air. Until you did and everything became so real, the intensity of the kiss went up and you could feel each others breaths against the skin of your faces. His arms closed around your waist and all you could do was hold onto his shoulders so you wouldn't fall down on his arms. But finally you both gasped for air, breaking the kiss but remaining close.
"Woah..." You giggle and hide you face in the croak of his neck. "Doll face?"
"Hmmm?" Your smile pressed against his skin.
"Would you mind playing with my hair for a while?" The smile could be heard in his voice and when you pulled back you saw he had a smirk on his lips.
"Only you would let me kiss you some more, Sergeant".
And then the only thing that was heard on the room was your scream when Bucky grabbed your waist and pulled you with him towards the bed behind you.
#bucky x reader#bucky barnes x reader#avengers au#james barnes#one shot#fluff#hair#fic#the winter soldier#domestic bucky#fem!reader#Steve Rogers#natasha romanoff#tony stark#sam wilson#The Avengers#bucky barnes fic#marvel fanfic#sebastian stan#sebastian stan x reader#bucky barnes#bucky barnes fluff#my writing#mcu#fanfic#fics#steve rogers fic#james buchanan barnes
817 notes
·
View notes
Text
Shoot - Reflection
I also tried to photograph light through a window at night. I had to use a high ISO to do so. I had to used quite a slow shutter speed (between 1/40 s. and 1/80 s.) and I didn’t have any tripod so I tried to use a chair or even the radiator around me. I unfortunately don’t remember what my aperture was due to the fact that I was using a really old manual lens and haven’t taken any note of what it was. I played around with the focus of my lens so I could try and get different result. Most of the light were street light outside apart from the red light on one of the image which came from a car.

I never really intended on using those images when I shot them but I still tried after seeing the light one evening through window with the condensation on the window, it just attracted my eyes.


1 note
·
View note
Text
Shooting with a 21-Year-Old Camera: The Fujifilm S1 Pro
I find it incredibly fun to use older, especially unique, digital cameras both as a challenge and for sheer enjoyment.
I think part of it is psychological. With archaic cameras sporting outdated technology we anticipate subpar results, and so we focus more on what we can control: composition, lighting (when applicable), exposure, and so on — the things we should always be focusing on.
Conversely, when we have a Hasselblad in our hands, we may let go a bit in the unconscious belief that the camera can make up the difference for our lack of talent or effort. Of course, we all know it can’t.
I won’t get into the boring history of why I own a lot of early to mid-2000s digital cameras, but at some point, I found myself the owner of a Fujifilm Finepix S1 Pro — the first in a five-model line of Fujifilm DSLRs that housed some incredibly unique sensor technology that it dubbed “SuperCCD.”
Apologies for the subpar product photos. I didn’t have access to my full setup.
In the S1 Pro, the photodiodes of the 3.1-megapixel SuperCCD sensor took the form of a honeycomb tessellation, oriented in a zig-zag array rather than a simple vertical/horizontal mosaic. Because of this, the distance between cells is smaller, making for about 40% more (square root of 2 = 1.41) sensor cell rows horizontally and vertically than a regular Bayer sensor.
The camera then uses an interpolation algorithm that supposedly results in a resolution equivalent to a 6.2 megapixel Bayer sensor. The 45-degree orientation also allows for improved capture of horizontal and vertical detail. This is good because most of the world, thanks to gravity, exists in horizontal and vertical planes — however, this happens at the expense of diagonal resolution, which is where traditional sensor layouts excel.
The honeycomb design of the SuperCCD sensors.
Released in January 2000, the Fujifilm S1 Pro is based on the Nikon N60 (aka F60) film camera body (with modifications by Fuji). It logically sports a Nikon F mount and can use AI, AI-S, AI-P, AF, AF-D, or G type lens — however, only AF and AF-D lenses will autofocus. AI and AI-S lenses can only be used in manual exposure mode as there is no meter coupling.
Most of these photos were shot with either the Nikon AF-D 24-120/3.5-5.6 or Nikon AF-D 50/1.8. While the 24-120 is not a quality optic, it’s a more than sufficient match for this sensor, especially stopped down a bit — and you can stop down to your heart’s content without hitting diffraction on this camera.
I had initially gone out shooting with some superior G-type lenses, however, accurate manual focusing is impossible for me through the straw-like OVF (wearing glasses doesn’t help either) and the focus confirmation dot is totally unreliable. Strangely, I had more issues manually focusing on distant objects stopped down than closer ones wide open — the photo above was manually focused with the Sigma Art 35mm wide open at f/1.4, yet the below photo (slightly out of focus) was at 24mm and f/8 with the Nikon 24-120mm f/4G VR.
Shutter speeds top out at 1/2000th. There are several metering modes (3D 6-zone, 6-zone, center-weight), a pop-up flash and hot-shoe (Nikon TTL compatible), and ISO options of 320, 400, 800, and 1600. There is no auto ISO function, and you have to menu dive each time you want to adjust it.
File choices are JPEG or TIFF only — no RAW, unfortunately — recorded to either CompactFlash or SmartMedia. The camera certainly did not accept my 64 or 128GB cards, but I was able to dig up an old 1GB card that can hold a whopping 56 TIFF files in the highest quality mode available (“Hi RGB TIFF”).
This is easily the slowest camera I have ever used. The menu is the antithesis of intuitive; it’s mostly just a collection of symbols and abbreviations and my hat is off to you if you can guess their meaning without reading the manual.
Forget chimping. Just murder that idea and bury it. It takes a solid 31 seconds (yes, I timed it) for an image to populate the screen. Once it does, just about the only thing you can confirm is that a photo was indeed taken, though a histogram is available for more accurate analysis. JPEGs, however, are significantly faster to review.
In a way, if you choose TIFF over JPEG, using the camera is akin to shooting a bulked-up Nikon N60 loaded with a roll and a half of film — no image review, roughly 55 maximum shots, and no quick adjustment of the ISO.
The S1 Pro allows you to choose between either 3.1MP or 6.2MP output. To produce a traditional image file — which exists in rows and columns — the camera must interpolate by using adjacent photosites to generate data between existing pixels. After all, the recorded file can’t exist in the same zig-zag honeycomb pattern as the sensor. After each line is read out and the missing data is filled, you end up with twice the spatial resolution (6.2MP).
Compared to the Nikon D40, which uses a 6.1-megapixel Bayer sensor, the S1 Pro doesn’t quite reach the same level of pixel acuity. However, side by side with the 4.1 megapixel Nikon D2Hs, there isn’t much in it between the two. So, I think the real Bayer-equivalent resolution sits somewhere in the middle of 3.1 and 6.2MP — around 4-4.5 megapixels. As it would happen, this is exactly in line with the roughly 40% increase in sensor cell rows (3.1 * 1.41 = 4.37). It also depends on the scene — some benefit from the unusual sensor design much more than others.
CCD sensors are not forgiving of sloppy exposure. Pushing or pulling can quickly result in blotchy chroma noise, severe color shifts, and compromised roll-off from the quartertones into the highlights. It is not unlike slide film in this way.
The colors are phenomenally accurate and neutral out of the camera. “ORG” tone and color produce a lovely, neutral file that’s perfect for editing, and “STD” (standard) tone and color make for a pleasingly usable straight-out-of-camera file. Even with color set to “HIGH” and tone set to “HARD,” the images aren’t bombastically oversaturated and Disneyland like we often see with the “Vivid” setting in modern cameras. In fact, High Color/Hard Tone photos exhibit only a very modest bump in saturation and contrast compared to Standard Color/Tone. One thing is perfectly clear: Fujifilm was producing cameras with beautiful color output long before X-Trans.
All the images here were shot at ISO 320, 800, or 1600. ISO 400 is completely pointless given that it’s a mere quarter stop gain over base. It would be easier to just dial in a third of a stop of exposure compensation rather than clicking through the menu. I really wish there was a lower base ISO of 160, as well as intermediate options like 640 and 1280.
The camera’s high native sensitivity — combined with early CCD architecture — means that there is a noticeable level of noise even at base ISO. Thankfully, the noise is quite pleasing and mostly luminance up through ISO 800 — even 1600 has very minimal chroma noise straight out of the camera. Anecdotally, I’ve found this to be a running theme with CCD sensors — considerable noise even at base ISO, but the noise presents very favorably through most, if not all, of the sensitivity range depending on the camera. It also makes for astonishingly appealing black and white photos, especially given the finely grained texture from what is largely high-frequency noise. “Film-like” would be an apt descriptor for the results.
The considerable noise in this image is the result of bringing up an underexposed photo in post. Black and white helps cover the color shifts and chroma noise.
If you nail exposure in camera, ISO 1600 will produce remarkably great results with an unexpectedly low amount of noise for a sensor of this type and age — there isn’t much to speak of in terms of offensive noise and photos are completely usable without any noise reduction. However, at this point, you’ve lost a good bit of dynamic range and if you try to push the image in any way, blocked up patches of low-frequency chroma noise and banding immediately rear their head. There is essentially zero room for pushing the files at all if shot at ISO 800 or higher.
Quite impressively, there is almost nothing in terms of color shift throughout the entire sensitivity range — what is accurate or pleasing at base ISO will be accurate or pleasing at 1600. Again, this is something I have noticed on more than one occasion with CCD cameras — the Pentax 645D behaves almost identically throughout its ISO range.
ISO 1600, SOOC “Standard” color and tone, auto WB. Noise reduction and sharpening zeroed out in ACR. No adjustments aside from downsizing.
While restrictive by modern standards, a highly usable ISO 1600 in an APS-C camera in the year 2000 was exceptionally good. Fujifilm claimed the SuperCCD cameras to have superior sensitivity performance — the honeycomb photosites allow for more pixels to be packed within a given area and their shape more closely mirrors the circular microlenses that sit above them. I think Fuji’s assertation bears out in practice.
I would estimate roughly 7.5-8 stops of usable dynamic range, which is up against what I presume is an 8-bit ADC (analog to digital converter). Given this, along with the unforgiving nature of CCD sensors and processing latitude further limited by the lack of RAW, you need to be very deliberate with your exposure choices. Even in a scene of moderate contrast, you will almost certainly have either crushed blacks or clipped highlights.
However, like most CCD cameras, you do start to lose dynamic range quickly once you boost the ISO by a couple of stops. There also isn’t much in the shadows — modern cameras (CMOS) tend to have a lot of their dynamic range bunched up in the shadows, allowing for some truly incredible detail recovery. CCD sensors do not work the same way, and even with a full-blown RAW file, I doubt you’d find much usable information at that end of the histogram. You can mitigate this somewhat via ETTR (“expose to the right”), but with what is already a suboptimal amount of dynamic range, you’ll only have a small amount of latitude for ETTR, if any.
Oops, highway patrol got me. High contrast scenes like this are difficult – the whites are just on the cusp of clipping, but the blacks are gone in numerous areas.
While the camera’s light meter, particularly the 3D 6-zone multipattern meter, is exceptionally adept at balancing exposure in difficult scenes, the auto white balance is a duality: it’s either one of the most accurate I have ever seen or it’s the worst. Almost all the photos I took required zero tint adjustment and usually only +1 to +4 temperature adjustment. However, on three occasions the images were off by so much I’m still baffled as to exactly why.
The most egregious were photos taken about two hours before sunset in the shade — they were rendered extremely blue and about half a stop underexposed. The white balance went so far off the map that most of a plain white T-shirt measured blue values from 240 on up to completely clipped! I assume the culprit for this error is a combination of the camera’s CCD light meter design and spectral response — the infrared filter may be causing issues in certain situations too. IR filters can strongly affect the blue channel and it’s possible there was a bit of Rayleigh scattering at work.
The major issue is that without a RAW file, your options are extremely limited — those botched files required +76 temperature to correct. Such a massive shift in an 8-bit TIFF file results in horrendous noise — especially bad because the blue channel is always the noisiest — and extreme spectral shifts across the entire image. Strangely, a separate shot of a red step ladder taken five feet away at the same time required only -3 tint and zero temperature adjustment.
Using the S1 Pro reminds me of shooting with the original 18-megapixel Leica M9 and Leica M Monochrom cameras — both with Kodak CCD designs. Neither those cameras nor the S1 Pro has any tolerance for “underexpose to protect the highlights” or similar approaches in the same way that CMOS sensors allow — not unlike how slide film doesn’t take kindly to push processing. People who worry about how a camera handles being pushed five stops will need to adjust — it’ll help them in the long run so they can finally learn to stop underexposing so much.
Ultimately, while the files from the S1 Pro don’t contain anywhere near the latitude of even modern JPEGs, let alone the power of RAW, my biggest takeaway while using this camera was how much I adore and value transparency as a starting point out of the camera. In a way, the naturality of colors and tones from this camera makes it even more aggravating that the files can’t stand up to much manipulation — I would absolutely LOVE results like this out of my Nikon Z7, and every other camera I have for that matter.
My father assisting in the repair of a Pentax 6×7. In scenes like this, you just have to expose for your subject and let the extreme ends clip.
What I would love to see is a universal “Natural Color Solution” (to steal a term from Hasselblad) adopted by all manufacturers and implemented in their cameras as an option. If you want that “Natural Color” RAW file, you can have it. If you want the look that you’ve come to love from your manufacturer, you can pick that too. Aside from Hasselblad, I’m not sure what would be the risk for manufacturers to do this — other than that it would take some effort and time.
I would not call the Fujifilm S1 Pro a fun or pleasant camera to use at all. To be honest, I probably immediately deleted 99% of the photos I took while doing this review. And even among the ones you see here, there are more than a few that I am not happy with. Normally, I would not settle for posting simply passable images, but in this case, I think even the lesser photos here do have value by showing both the warts and the ornaments.
Have no doubt, this is a challenging camera to use. I’m sure my images would greatly improve with continued use, but how much I am not sure — I feel like you hit the ceiling quicker than you might imagine.
Perhaps I can follow this up with a retrospective review of 2005’s Fujifilm S3 Pro, which sports a new SuperCCD SR sensor with two photodiodes per photosite — one of normal sensitivity and a smaller one of lower sensitivity. Both are combined to produce enhanced dynamic range (and it works very, very well). The general principle behind such a design comes from the structure of the crystal coating in silver halide film. The S3 also has a 14-bit ADC and produces 14-bit RAW files! That’s just a few of the improvements, but I’ll tell you this much: the SuperCCD SR sensor does NOT disappoint.
from PetaPixel https://ift.tt/3Ambu6I
0 notes
Video
2017-10-21-16.52.02 ZS PMax Arctostaphylos auriculata-1—DxO by John Rusk
Via Flickr:
Arctostaphylos auriculata—Mt. Diablo manzanita. Included in the CNPS Inventory of Rare and Endangered Plants on list 1B.3 (rare, threatened, or endangered in CA and elsewhere). An attractive manzanita from the western slopes of Mount Diablo and environs. 17 populations exist in the wild. The photo shows the tips of a hairy inflorescence. The black spots are aphids The plant the provided the sprig photographed resides at Regional Parks Botanic Garden located in Tilden Regional Park near Berkeley, CA.
#Olympus Pen E-PL7 body#Canon FD 50 mm Macro Lens#Canon FD 50 mm extension tube#F/stop 3.5#Shutter Speed 1/40 s#ISO 100#Zerene Stacker#Stack of 18 images#Inflorescence#ebparksok#DxO Film Pack#DxO Fuji Velvia 50 Preset#taxonomy:kingdom=Plantae#Plantae#taxonomy:subkingdom=Tracheophyta#Tracheophyta#taxonomy:phylum=Magnoliophyta#Magnoliophyta#taxonomy:class=Magnoliopsida#Magnoliopsida#taxonomy:order=Ericales#Ericales#taxonomy:family=Ericaceae#Ericaceae#taxonomy:genus=Arctostaphylos#Arctostaphylos#taxonomy:species=auriculata#taxonomy:binomial=Arctostaphylos auriculata#Arctostaphylos auriculata#Mount Diablo manzanita
0 notes
Text
秋咲きの額紫陽花
このページの Photograph はこちらをクリック
山を上る道すがら
時季外れの額紫陽花が
眼に飛び込んできた
「みんなは違うと言うけれど
僕は、この季節が好きなんだ」
と
控え目ながらも
懸命に主張しているようだった
————————
もう、かれこれ1ヶ月ほど前になるんですが… (^^;)
箱根路の途中で、秋咲きの額紫陽花が咲いているのを見付けました。
この時季にも咲く紫陽花があるんですねぇ。初めて知りました。
秋咲きの額紫陽花は、何人かの方が箱根で目撃されているのを、ネットで検索中に見付けました。
ネットであちこち調べてみたのですが、「 Hydrangea strigosa ストリゴーサ」という外来種の山紫陽花で秋咲きのものがあるようです。
花の感じでは「 Hydrangea villosa ヴィローサ」のほうが近い印象なのですが、葉っぱが違うようです。
情報が少なく、これ以上はよく判りませんでした。
残念! (TT_TT)
この花に関する詳しい情報は、川島榮生さんの 日本産の主なアジサイ科植物 Hydrangeaceae のページの アスペラの仲間 で見付けました。
☆ Shooting Data
————————
○ camera : CANON EOS 20D with Olympus ME-1
○ lens : CANON EF-S 10-22 mm F3.5-4.5 USM
○ focal length : 22 mm ( compared to 35mm format : 35 mm )
○ shooting mode : Aperture-Priority AE
○ Tv ( Shutter Speed ) : 1/40 sec.
○ Av ( Aperture Value ) : F 6.3
○ ISO speed rate : 100
☆ Developing Data ( RAW )
————————
○ development : RAW image developed by SILKYPIX Developer Studio ver. 3.0.14.2
○ taste : manual
○ exposure compensation ( by camera ) : -1/3 EV
○ exposure compensation ( by developer ) : +5/6 EV
○ total exposure compensation : +½ EV
○ white balance : 4,389 K
○ color deviation : +8/50
○ sharpness : pure detail emphasis
○ tone adjustment : a little strong contrast
○ saturation : vivid [ 1.18 ]
○ color mode : expected color mode 2
○ fine color controller : default
○ high light controller : manual
color tone - brightness control : 25/100
saturation - hue control : 70/100
high light compensation : 50/100
○ dynamic range expansion : +1.0 EV
☆ Location & Target
————————
○ location : 恩賜箱根公園
○ target : 額紫陽花
#Plants#flowers#額紫陽花#hydrangea#マクロ#macro#恩賜箱根公園#hakone#撮影ノート#annotations#CANON#EOS 20D#EF-S 10-22 mm F3.5-4.5 USM#photographers on tumblr
0 notes
Text
Minolta Cameras

Mousecomputer laptops & desktops driver. VicTsing Wireless Mouse for Laptop, 2.4G Portable USB Mouse Computer Mouse, Fit Hand Nicely, 5 Adjustable DPI, Page Down/Up Buttons, 20 Months Battery Life, Designed for PC, Desktop, Laptop(Black) 4.6 out of 5 stars 19,973. VicTsing Wireless Mouse for Laptop, 2.4G Portable USB Mouse Computer Mouse, Fit Hand Nicely, 5 Adjustable DPI, Page Down/Up Buttons, 20 Months Battery Life, Designed for PC, Desktop, Laptop(Black) 4.6 out of 5 stars 19,923.
List of products manufactured by electronics company Minolta.
Cameras(edit)
Minolta (ミノルタ, minoruta) was a Japanese company that, under one name or another, manufactured cameras from 1929 to 2003. It produced cameras for many film formats, from 16mm film to medium format. Minolta 9000 - This camera features center-weighted focusing and spot light-metering and was capable of +-4 exposure value in 0.5 exposure steps. Minolta 5000 - This fully automatic Minolta film camera offers +1 exposure value and shutter speeds of 1/2000 to four seconds. Minolta 7000i - This Minolta camera is the first to offer autofocus, and you can find it when you shop for new or used Minoltas for sale on eBay with a card expansion system allowing you to automatically preset shooting modes.
16 mm film cameras(edit)
The first camera manufactured by this company was the 'Nifcalette' (NIFCA being an acronym for Nippon Foto Cameras). The company name changed several times: in 1931 it became Molta; in 1937 it became Chiyoda; and in 1962 it was changed again to Minolta.
Minolta Alpha 7XI (Japanese Maxxum 7XI) 35mm Camera Body. Add to Wish List Add to Compare. Minolta SR-1 Chrome 35mm Camera Body.
Minolta 16 series
110 film cameras(edit)
Minolta Weathermatic A (bright yellow waterproof case)
126 film cameras(edit)
Minolta Autopak 400X
Minolta Autopak 500
Minolta Autopak 550
Minolta Autopak 600X
Minolta Autopak 700
Minolta Autopak 800
35 mm rangefinder and viewfinder cameras(edit)
Minolta Hi-Matic series
Minoltina (S and P)
Minolta repo (Half frame 35mm)
Minolta 24 Rapid (Square format 35mm)
Leica CL (Also sold as the Leitz Minolta CL)
35 mm SLRs(edit)
Minolta Cameras
Manual focus (SR, SR-T and X series):
Minolta SR-2 (1958-1960)(1)
Minolta SR-1 (variants 1959, 1960, 1961, 1962, 1963, 1965) (1959-1971)
Minolta SR-3 (variants 1960, 1961) (1960-1962)
Minolta SR-7 (variants 1962, 1963, 1965) (1962-1966) / Minolta SR 777 (prototype 1965)
Minolta SR-1s (1967-?)
Minolta SRM (1970-1975) (Integral motor 3.5 fps with battery handle)
Minolta SR-T 101 (variants 1966, 1969, 1971) (1966-1975)
Minolta SR-T 100 (variants 1970, 1971) (1970-1975)(2)
Minolta SR-T 102 / SR-T 303 / SR-T Super (1973-1975)
Minolta SR-T SC (1973-1975) (exclusively sold by Sears)
Minolta SR-T MC (1973-1975) (exclusively sold by J.C. Penney)
Minolta SR-T 201 / SR-T 101b / SR 101 / SR 101s (1975-1977)
Minolta SR-T 202 / SR-T 303b / SR 505 (1975-1977)
Minolta SR-T 200 (variants 1975, 1977, 1978, 1979) (1975-1981) / SR-T 100b (1975-1977), SR-T 100x (1977–81)
Minolta SR-T 202 / SR-T 303b / SR 505s (1977)
Minolta SR-T 101b / SR-T 201 / SR 101s (1977, 1978, 1979)
Minolta SR-T SC-II (1977-1980) (exclusively sold by Sears)
Minolta SR-T MC-II (1977-1980) (exclusively sold by J.C. Penny and K-Mart in the U.S., and K-Mart only in Europe)
Minolta Ritz SR-T 201 (1978)
Minolta XK / XM / X-1 (variants 1972, 1976) (1972-1981), Minolta Ritz XK (1978)
Minolta XE / XE-1 / XE-7 (1974)
Minolta XE-5 / XEb (1975)
Minolta XK Motor / XM Motor / X-1 Motor (1976)
Minolta XG 7 / XG 2 / XG-E (variants 1977, 1978)
Minolta XD 5 (variants 1977, 1979)
Minolta XD 7 / XD 11 / XD (variants 1977, 1978, 1979, 1980, 1981) (1977-1984), XD 11 Medical (variants 1980, 1981)
Minolta XG-SE (1978)
Minolta XG 1 (1978-1981)
Minolta XG 9 / XG-S (1979)
Minolta XD-s (variants 1980, 1981), XD-s Medical (variants 1980, 1981)
Minolta X-7 (1980 - 1982)
Minolta XG-A (1981)
Minolta XG-M / X-70 (1981)
Minolta X-700 (1981)
Minolta XG-1(n) (variants 1981, 1982)
Minolta X-570 / X-500 (1983)
Minolta X-600 (1983)
Minolta X-300 / X-370 (1984), Minolta X-7A(3) (1985), Minolta X-370s (1995), Minolta X-300x
Minolta X-300s (1990), X-370n (1990), X-9 (1990)
Autofocus (α/Dynax/Maxxum series)(edit)
Autofocus (α/Dynax/Maxxum series):
MinoltaDynax/Maxxumfilm SLR timeline
Class1985198619871988198919901991199219931994199519961997199819992000200120022003200420052006Higher flagship9000 AF9xi9/9Ti77 LimitedLower flagship800siEnthusiast7000 AF7000i8000i7xi700siHigher entry-Level50005000i5xi400si500si505si5600si classic505si super70/60Lower entry-Level3000i3xi2xi300si404si43 Limited50/40
1st generation | 2nd generation | 3rd generation | 4th generation | 5th generation | 6th generation
supports SSM lenses and D function (ADI)
See also:Minolta A-mount system
Drivers minolta cameras wireless. Downloadable Software for Minolta Camera Products. VLC (Video Lan) Media Player. Playback software for all video media file types. Windows OS Download Link.
Maxxum
United StatesDynax
European Unionα (Alpha)
JapanRelease YearMinolta Maxxum 9000Minolta 9000 AFMinolta α-90001985-09Minolta Maxxum 7000 (with and without 'crossed XX')Minolta 7000 AF, 7000 AF 'Das Zwei-Millionen-Ding', 7000 AF 'transparent'Minolta α-70001985-02Minolta Maxxum 5000Minolta 5000 AFMinolta α-500019867000i7700i19883000i3700i19885000i5700i19898000i, 8000i Prestige8700i, 8700i Prestige19907xi7xi, 7xi Panorama19913xi3xi, 3xi Panorama1991SPxi1991/1992?9xi19925xi5xi, 5xi Panorama19922xi1992700si707si, 707si Japan1993400si, 450si Panorama Date, RZ430si500si303si1994600si Classic, 650si Panorama Date600si Classic507si1995500si, 500si Super, 550si Panorama Date, RZ530si500si Super303si Super1995300si, 350si Panorama Date, Panorama Elite, RZ330si300si101si1995800si807si199791998XTsi505si SuperSweet1998HTsi, HTsi Plus505si19989Ti9Ti, 9Ti II9Ti1999STsi404siSweet S1999QTsi303si360si1999720007 Limited7 Limited, 7 Limited II, 7 CNM20015, 5 QDSweet II200143, 43, Sweet II L20023, GT3L200370607020045030, 405020047D7 Digital20045D5 Digital, Sweet Digital2005Maxxum
United StatesDynax
European Unionα (Alpha)
JapanRelease Year
Digital SLRs(edit)
Minolta RD-175 (also sold as Agfa ActionCam) (1996) with Minolta A-mount
Minolta Dimâge RD 3000 with Minolta V-mount
APS film and digital cameras - Vectis series(edit)
Minolta Dimâge RD 3000 with Minolta V-mount
Digital viewfinder cameras(edit)
Minolta Dimâge EX Wide 1500 / Minolta Dimâge EX Zoom 1500 / Minolta MetaFlash 3D 1500
Minolta DiMAGE 7 / Minolta DiMAGE 7UG
Konica Minolta DiMAGE A200
(Konica) Minolta DiMAGE Z1
Konica Minolta DiMAGE Z2
Konica Minolta DiMAGE Z3
Konica Minolta DiMAGE Z5
Konica Minolta DiMAGE Z6
Konica Minolta DiMAGE Z10
Konica Minolta DiMAGE Z20
Minolta DiMAGE X
Minolta DiMAGE Xi
Minolta DiMAGE Xt / Xt BIZ
Konica Minolta DiMAGE Xg
Konica Minolta DiMAGE X20
Konica Minolta DiMAGE X21
Konica Minolta DiMAGE X31
Konica Minolta DiMAGE X50
Konica Minolta DiMAGE X60
Konica Minolta DiMAGE X1
Minolta DiMAGE S304
Minolta DiMAGE S404
Minolta DiMAGE S414
Minolta DiMAGE G400
Minolta DiMAGE G500
Konica Minolta DiMAGE G530
Konica Minolta DiMAGE G600
Minolta DiMAGE F100
Minolta DiMAGE F200
Minolta DiMAGE F300
Minolta DiMAGE E201
Minolta DiMAGE E203
Minolta DiMAGE E223
Minolta DiMAGE E323
Konica Minolta DiMAGE E40
Konica Minolta DiMAGE E50
Konica Minolta DiMAGE E500
Minolta Dimâge 2300
Minolta Dimâge 2330
Minolta Dimâge V
Minolta Dimâge-Pic
Exposure meters(edit)
Autometer IIIF, IVF, VF
Flashmeter III, IV, V, VI
Spotmeter M, F
Film scanners(edit)
Minolta QuickScan 35 (2880) / Minolta QuickScan 35 Plus QS-2800 / QS-35
Minolta Dimage Scan Dual F-2400 (2882)
Minolta Dimage Scan Dual II AF-2820U (2886)
Minolta Dimage Scan Dual III AF-2840 (2889)
Konica Minolta Dimage Scan Dual IV AF-3200 (2891)
Minolta Dimage Scan Speed F-2800 (2884)
Minolta Dimage Scan Multi F-3000 (2883-102)
Minolta Dimage Scan Multi II F-3100 (2883-121)
Minolta Dimage Scan Multi Pro AF-5000 (2887)
Minolta Dimage Scan Elite F-2900 (2885)
Minolta Dimage Scan Elite II AF-2920 (2888)
Minolta Dimage Scan Elite 5400 (2890)
Konica Minolta Dimage Scan Elite 5400 II (2892)
Flatbed scanners(edit)
Binoculars(edit)
ACTIVA D WP XL 8x42, 10x42 (Roof, BaK-4)
ACTIVA D WP XL POCKET 8x25, 10x25 (Roof, BaK-4)
ACTIVA D WP SPORT 8x42, 10x42 (Roof, BaK-4)
ACTIVA WP 8x25, 10x25, 12x25 (Porro, BaK-4)
ACTIVA COMPACT FM 8-22x27, 10-30x27 (Porro, BaK-4)
ACTIVA WP FP 7x35, 7x50, 8x40, 10x50, 12x50 (Porro, BaK-4)
ACTIVA STANDARD ZOOM 7-15x35, 8-20x50 (Porro, BaK-4)
ULTRA COMPACT UC III 6x16, 8x18 (Roof)
COMPACT II SUPER 8x25, 10x25L (Porro, BaK-4)
CLASSIC III WR 7x35, 7x50, 8x40 (Porro, BaK-4)
CLASSIC WP SPORT for USA/Canada 8x42, 10x50, 12x50 (Porro, BK-7)
CLASSIC WP SPORT for Europe 8x42, 10x50, 12x50 (Porro, BaK-4)
CLASSIC II ZOOM 7-15x35, 8-20x50 (Porro, BK-7)
SPORT MINI WP 8x25, 10x25 (Roof, BK-7)
STANDARD EZ 10x50 Wide Angle 6.5' (Porro, BK-7)
STANDARD XL 10x50 Wide Angle 6.5' (Porro, BaK-4)
STANDARD ZOOM EZ 7-15x35, 8-20x50 (Porro, BK-7)
STANDARD ZOOM XL 7-15x35, 8-20x50 (Porro, BaK-4)
STANDARD 7x35EW, 7x50, 8x40EW, 10x50EW (Porro, BaK-4)
STANDARD ZOOM 7-15x35, 7-21x50 (Porro, BaK-4)
WEATHERMATIC-YELLOW 7x42, 10x42 (Roof, BaK-4)
WEATHERMATIC-BLACK 7x42, 10x42 (Roof, BaK-4)
WEATHERMATIC COMPACT 8x23, 10x23 (Porro, BaK-4)
POCKET 7x21, 8x22WA, 9x24, 10x25WA (Roof, BK-7)
POCKET II (Roof, BK-7)
AUTOFOCUS 8x22, 10x25 (Roof)
AUTOFOCUS COMPACT 8x22, 10x25
Photo copiers(edit)
Di151
Di152
Di181
Di183
Di250/350
Di251/351
Di2510/3010/3510
Di450/550
Di470 * Di520/620
Di551
Di650
Di750
Di850
Di1610
Di1611
Di2011
Di5510
Di7210
CF1501
CF2001
CF2002
CF3102
CF5001
CF9001
bizhub 164
bizhub 195
bizhub 215
bizhub 25e
bizhub 227
bizhub 287
bizhub 308
bizhub 368
bizhub 308e
Bizhub 181
Bizhub 200
Bizhub 223
Bizhub 224e
Bizhub 227
Bizhub 25
Bizhub 25e
Bizhub 282
Bizhub 283
Bizhub 284e
Bizhub 287
Bizhub 308
Bizhub 3301
Bizhub 3320
Bizhub 350
Bizhub 36
Bizhub 360
Bizhub 361
Bizhub 362
Bizhub 363
Bizhub 363
Bizhub 364e
Bizhub 368
Bizhub 368e
Bizhub 4020
Bizhub 4050
Bizhub 42
Bizhub 420
Bizhub 421
Bizhub 423
Bizhub 454e
Bizhub 458
Bizhub 458e
Bizhub 4750
Bizhub 500
Bizhub 501
Bizhub 552
Bizhub 554e
Bizhub 558
Bizhub 558e
Bizhub 600
Bizhub 601
Bizhub 652
Bizhub 654
Bizhub 654e
Bizhub 658
Bizhub 658e
Bizhub 700
Bizhub 751
Bizhub 754
Bizhub 754e
Bizhub 808
Bizhub 958
Bizhub C203
Bizhub C220
Bizhub C224
Bizhub C224e
Bizhub C227
Bizhub C25
Bizhub C253
Bizhub C258
Bizhub C280
Bizhub C284
Bizhub C284e
Bizhub C287
Bizhub C308
Bizhub C3350
Bizhub C3351
Bizhub C35
Bizhub C350
Bizhub C351
Bizhub C353
Bizhub C360
Bizhub C364
Bizhub C364e
Bizhub C368
Bizhub C3850
Bizhub C3850FS
Bizhub C3851
Bizhub C3851FS
Bizhub C450
Bizhub C451
Bizhub C452
Bizhub C454
Bizhub C454e
Bizhub C458
Bizhub C550
Bizhub C552
Bizhub C552DS
Bizhub C554
Bizhub C554e
Bizhub C558
Bizhub C558e
Bizhub C650
Bizhub C652
Bizhub C652DS
Bizhub C654
Bizhub C654e
Bizhub C658
Bizhub C659
Bizhub C754
Bizhub C754e
Bizhub C759
Planetariums
MS-6 (for six meter domes)
MS-8 (for eight meter domes)
Mediaglobe, Super Mediaglobe, Super Mediaglobe II
Series II
Series IIb
Printers(edit)
bizhub 3300P
bizhub 4000P
bizhub 4700P
bizhub C3100P
magicolor 3730DN
magicolor 4750EN 4750DN
magicolor 7450 II
magicolor 7450 II grafx
magicolor 8650DN
pagepro 4650EN
Minolta PT-2
Chlorophyll meters(edit)
Minolta Cameras
SPAD-501
SPAD-502
Spectrometers for colour measurement(edit)
Word processors(edit)
PCW1(4)
References(edit)
^(1) Rokkor Files, The SR Series
^(2) Rokkor Files, The SR-T Series
^(3) Flickr discussion 'Minolta X-7A'
^Cooper Hewitt, Smithsonian Design Museum. 'Minolta PCW1 Word Processor Word Processor, 1983'. Smithsonian Institution. Retrieved 2017-12-12.
Retrieved from 'https://en.wikipedia.org/w/index.php?title=List_of_Minolta_products&oldid=980786156'
0 notes
Text
Borrar datos Exif de una imagen en terminal

Borrar datos Exif de una imagen en terminal Linux.
Las imágenes tomadas con cámaras fotográficas digitales u otro tipo de dispositivos, contienen lo que conocemos como metadatos Exif. Estos metadatos, nos informan entre otras cosas de cuándo y dónde se tomó una fotografía, además de la marca y modelo del dispositivo utilizado.
Si bien los Exif son una excelente característica para obtener información valiosa, también puede suponer un problema en el peso final de la imagen y, aún más si hablamos de privacidad. Nadie quiere exponer al público imágenes, donde se incluyan datos privados.
Existen muchas herramientas con la capacidad de borrar los Exif, pero por encima de todas... por su velocidad, porque no requiere recomprimir la imagen y por su facilidad de uso, destacamos una sencilla herramienta en línea de comandos llamada, ExifTool.

Borrar datos Exif de una imagen
Borrar datos Exif de una imagen en terminal
Puedes descargar la herramienta ExifTool desde su página oficial, o instalarla desde los repositorios oficiales de tu distribución linux preferida.
En Debian, Ubuntu, Mint y todos sus derivados:
sudo apt install libimage-exiftool-perl
En Arch Linux, Manjaro y todos sus derivados:
sudo pacman -S perl-image-exiftool
En CentOS, Alma, Rocky, Rhel y todos sus derivados:
sudo dnf install perl-Image-ExifTool
Imagen de ejemplo...

Instalar ExifTool en Linux
Una vez instalado ExifTool, puedes ver todos los metadatos de una imagen con el siguiente comando.
exiftool
Ejemplo de comando y resultado.
sergio@sololinux:~$ exiftool IMG_2130.JPG
ExifTool Version Number : 10.80
File Name : IMG_2130.JPG
Directory : .
File Size : 1787 kB
File Modification Date/Time : 2020:09:05 12:56:02+03:00
File Access Date/Time : 2021:07:05 17:27:08+03:00
File Inode Change Date/Time : 2021:07:05 17:20:57+03:00
File Permissions : rw-rw-r--
File Type : JPEG
File Type Extension : jpg
MIME Type : image/jpeg
Exif Byte Order : Little-endian (Intel, II)
Image Description : My beautiful picture
Make : BenQ
Camera Model Name : DC X720
Orientation : Horizontal (normal)
X Resolution : 96
Y Resolution : 96
Resolution Unit : inches
Software : 101.08.00
Modify Date : 2013:09:17 19:47:44
Y Cb Cr Positioning : Co-sited
Copyright : Copyright 2002
Exposure Time : 1/40
F Number : 2.7
Exposure Program : Not Defined
ISO : 160
Exif Version : 0220
Date/Time Original : 2013:09:17 19:47:44
Create Date : 2013:09:17 19:47:44
Components Configuration : Y, Cb, Cr, -
Compressed Bits Per Pixel : 2.01643089
Shutter Speed Value : 1
Aperture Value : 1.0
Exposure Compensation : 0
Max Aperture Value : 3.6
Metering Mode : Multi-segment
Light Source : Unknown
Flash : Auto, Fired
Focal Length : 6.2 mm
Preview Image : (Binary data 32768 bytes, use -b option to extract)
etc..............
etc..............
Ahora borramos los datos Exif de una imagen.
exiftool -EXIF=
La herramienta guarda una copia del archivo, agregando como terminación la palabra "original". Borra los datos Exif que son los más pesados, pero no todos los metadatos.

Borrar solo los Exif
Verificamos los metadatos de la imagen de nuevo, podrás comprobar que solo quedan algunos metadatos, los Exif ya no están.
exiftool IMG_2130.JPG
Salida.
sergio@sololinux:~$ exiftool IMG_2130.JPG
ExifTool Version Number : 10.80
File Name : IMG_2130.JPG
Directory : .
File Size : 1743 kB
File Modification Date/Time : 2021:07:05 17:34:17+03:00
File Access Date/Time : 2021:07:05 17:34:17+03:00
File Inode Change Date/Time : 2021:07:05 17:34:17+03:00
File Permissions : rw-rw-r--
File Type : JPEG
File Type Extension : jpg
MIME Type : image/jpeg
Image Width : 3072
Image Height : 2304
Encoding Process : Baseline DCT, Huffman coding
Bits Per Sample : 8
Color Components : 3
Y Cb Cr Sub Sampling : YCbCr4:2:2 (2 1)
Image Size : 3072x2304
Megapixels : 7.1
sergio@sololinux:~$
ExifTool dispone de varias opciones, agregando "all" podemos borrar absolutamente todos los metadatos de una imagen, evidentemente se incluyen los Exif.
exiftool -all=
Aviso: Siempre quedan algunos datos que son imprescindibles para la detección y correcta operación de la imagen.
Si quieres saber más sobre esta fabulosa herramienta, puedes revisar su manual integrado con el siguiente comando.
man exiftool

Manual de ExifTool
Canales de Telegram: Canal SoloLinux – Canal SoloWordpress
Espero que este artículo te sea de utilidad, puedes ayudarnos a mantener el servidor con una donación (paypal), o también colaborar con el simple gesto de compartir nuestros artículos en tu sitio web, blog, foro o redes sociales.
Chat de SoloLinux en Telegram
Read the full article
#BorrardatosEXIF#borrarlosExif#cámarasfotográficasdigitales#datosEXIF#distribucionlinux#EXIF#ManualdeExifTool#metadatos#metadatosExif
0 notes
Photo

Braun Nizo S40 Super 8 Cine Film Movie Camera - Fully Working #S8-3027
Inspection report
Tested and fully working, in great working condition.
Lens - clean, free of mould, dust, haze or damage
Focus - smooth, works well
Zoom - works well (both manual and power zoom)
Motor - runs well at all film rates
Exposure - working well (manual and automatic)
Body - in good condition, some light scratching
Battery compartment/s – tested and working well (there is some corrosion in the battery holder however it doesn't affect use).
Other features - all tested and working well.
We fully inspect all our cameras to ensure they’re fully working and offer a 60 day warranty giving you plenty of time to have a play with your purchase and make sure you’re totally satisfied.
Product Specification
Lens: Schneider-Kreuznach Variogon f: 21.8 \ F: 8-40 mm
Zooming ratio: 5x
Zooming: auto and manual
Filter size: 49 mm
Exposure: auto and manual exposure meter
Filming speed: 18, 24, 54 fps, single frame
Shutter opening angle: <180 degrees
Remote control socket: yes
Cable release socket: yes
Film counter: 1-15 m
Battery checker: yes
Power source: 6 x AA \ 2 x PX13 button cell for exposure meter
UK shipping
CameraCrate.com offer free tracked shipping on all items being delivered to the UK. Due to the high value of our items, we require a signature on delivery for the vast majority of orders. Please note, that although the vast majority of items are delivered within 48-72 hours of dispatch, we’re unable to guarantee it.
We aim to dispatch orders within 24 hours of ordering (Monday-Saturday) although this can occasionally take slightly longer over bank holidays and during peak periods. If you require an item urgently, please contact us to discuss delivery options.
Worldwide shipping
CameraCrate.com are proud to deliver worldwide. Prices and times vary depending on size and location. Import duties, taxes, and brokerage fees are not included in the product price or shipping and handling cost. These charges are the buyer’s responsibility as we are only charging the transportation fee for your order. You may check with your country’s customs office to determine if there will be additional costs.
Returns and warranty
All our items are vigorously inspected by our team of experts before listing. Unless noted otherwise, all our items have been fully tested and are working correctly and come with a full 30 day no-quibble returns policy and 60 day warranty.
In the unlikely case that an item arrives not working correctly, please get in touch BEFORE LEAVING FEEDBACK and we’ll do our best to resolve things quickly and efficiently.
Model: S40
Modified Item: No
Country/Region of Manufacture: Germany
Custom Bundle: No
Product Type: Movie
Lens: fixed
Material: aluminum (body), plastic (hand grip)
Type: Zoom Reflex
Film drive power supply:: 6x AA size batteries (not included)
Color: silver
Light meter power supply: 2x 1.35V MRB PX 625 batteries
Lens brand: Schneider Kreuznach
Macro:: none
Film Format: Super 8
Brand: Nizo http://nemb.it/p/nXZIPxYrGp/tumblr
0 notes
Photo


Yashica Lynx 1000: Newest arrival! This fine looking little Lynx arrive a few days ago. I purchased it off eBay for under $40. The seller indicated that the light meter still functioned, but was mistaken. I don’t consider this bad, it’s a bonus to find a selenium meter on a 60’s classic camera still operating. The shutter speeds all seem to be working perfectly, even the 1/1000 speed. I used the Slo-Mo feature of my phones camera to capture the shutter firing. It’s too fast to see at 1/1000!
The aperture moves freely. The film advance lever operates smoothly as well. I gave the camera cursory cleaning and ran a roll of Fuji 400 color through today. I used my own experience to gauge the exposure, then checked with the light meter on my phone to help me learn.
I have learned a fairly good technique for film testing a manual camera that is new to me:
I select 8 different scenes, I compose then take one shot. Next, I bracket a second shot one (or two depending on the light) f-stop under. Then a third shot is taken one f-stop over.
I quickly get through a test roll, I record each shots exposure data to refer back to once the film is back.
1 note
·
View note
Video
2015-08-29-14.12.05 ZS PMax Acer macrophyllum-1 by John Rusk
Via Flickr:
Acer macrophyllum—big leaf maple. Nearly ripe samaras that measure about 1 1/2 inches long . There are a few aphids shown in the photo. The tree that bore these seeds is at Regional Parks Botanic Garden located in Tilden Regional Park near Berkeley, CA.
#Olympus Pen E-PL7 body#Canon FD 100 mm Macro Lens#Canon FD 50 mm extension tube#Shutter Speed 1/40 s#F/stop f4#ISO 100#Stack of 21 images#taxonomy:kingdom=Plantae#Plantae#taxonomy:superphylum=Tracheophyta#Tracheophyta#taxonomy:phylum=Magnoliophyta#Magnoliophyta#taxonomy:class=Magnoliopsida#Magnoliopsida#taxonomy:order=Sapindales#Sapindales#taxonomy:family=Sapindaceae#Sapindaceae#taxonomy:genus=Acer#Acer#taxonomy:species=macrophyllum#taxonomy:binomial=Acer macrophyllum#canyon maple#big-leaf maple#Acer macrophyllum#Oregon maple#taxonomy:common=canyon maple#taxonomy:common=big-leaf maple#taxonomy:common=Oregon maple
0 notes
Last Seen Blogs

qwerty-keyboard
Untitled

ratfinity
colapso

ravreine114
Rav

wh0-is-lily
Who's Lily?

larsity
chest toch