#Sphagnum Moss For Reptiles
Text
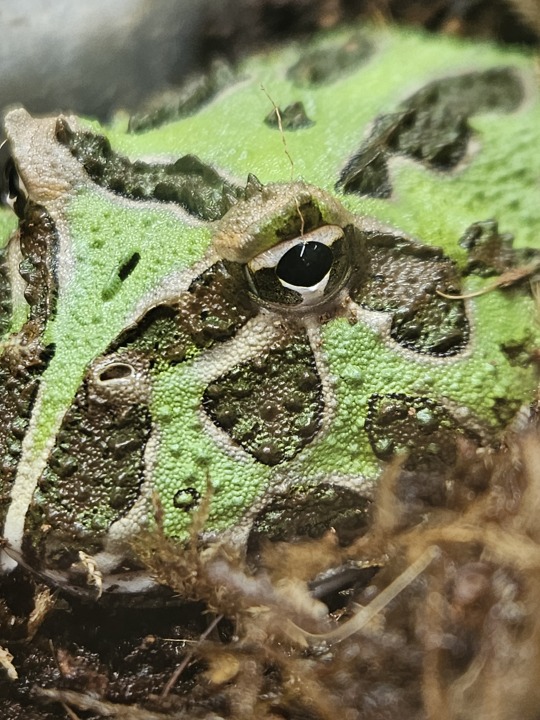
I..... bought this pacman frog today... his name is Herbert.
#ooc#Am i addicted to collecting reasonable* exotic animals?#Yes.#I think it's time to accept that i just AM one of those guys.#One of those covered in tats and piercings who will take you to his reptile room on a first date#And give you an edible#That's me.#At least it will be once i get more tattoos & piercings#Just saving up for em#Drug mention tw#*I'll accept that my view of what 'reasonable' means is pretty much not in line with the general public's idea of that#But i think that's more a problem with the gen pop than it is with me#Yes herbert does have sphagnum moss in his eye#But dw i got it off him
1 note
·
View note
Note
Okay I’ve never asked on tumblr but I just found your page and I’m OBSESSED!!! I want to get/make a Vivarium/bioterrarium for millipedes and isopods and I can’t WAIT!! Please please if you have any advice at all, I’d love to hear it! Where to get supplies, the buggies themselves, how to handle them, what do you do if they get sick, how much space to they need for how many there are, etc? Your buggy babies are so cute!!
First off thank you! I love all my little guys as well <3
I ramble kinda a lot so I'll put this under a read more.
For advice I'm still very much a novice when it comes to keeping but I'll tell you what I can!
For tanks I got my glass ones second hand or ones made my the store I buy used to buy my millipedes from, you'd be surprised how cheap you can get a nice big one! For Acrylic THESE are the ones I've had the best luck with not warping BUT they sometimes have kinda blurry parts on the plastic, but still I'd say good for the price if you can't afford glass. I tape up some of the ventilation holes to keep more moisture in.
For soil that ISN'T bought from a specialist stores(Sometimes I can't afford it) I use Peat free compost, paired with leaves and rot wood I buy off ebay stores that sell bug/reptile products, I mix them together with some water and leave them in a tub for 1 week to soften up the leaves. Some people go out and get their own leaves and wood but I'm not really in an area to do that so I can't give advice on that. It's important to keep it moist BUT NOT WET!
Heat mat! You want one to put on the SIDE of the tank and not under it, just one would be enough. I have a timer plug for mine so they're on a few hours a day on and off all day. If you REALLY wanna spoil them then I've seen a few people use reptile headlamps.
For moss and plants I again just buy it off ebay in sheets and give it a cheap over to make sure there are no hitchhikers on it before I put it in the tank. It needs watered and looked after for a while for it to take to the tank. Carpet moss is mostly for looks while sphagnum moss is used to keep moisture in areas and should be water/sprayed often. I have a little fern plant in my tank rn they seem to leave alone. I know a lot of people use fake plants as well for decor!
You should make a point to put a little temp and humidity monitor in your set-ups as well. The special reptile ones can be expensive so I just but the little ones you put in rooms and have had no issues with them.
Don't forget to give them hides! Cork wood/bark or coconut shells are nice and cheap. You can also use man made items just make sure they can handle the moisture and aren't made of anything toxic to your new friends. Also give them little sticks and things to climb up on. Just make sure the lid is secured so they can't escape.
For food I just use kitchen scraps like carrot peel, cucumber, apples and melon, give them a cuttlefish bone and some dried tiny shrimps in small amounts once a week or so, but you can also use fish flacks instead. But remember! Leaf litter and rot wood is meant to be their main diet for most species.
For the millipedes I would recommend Ivory millipedes as a good starter one, they're lovely in colour and are often up top, hardy as well, and usually you can get them captive bred which I've had much higher survival rates with vs wild caught. For each species you'll have to look up their needs yourself though, there isn't a 100% catch all set up for all species.
Woodlice/isopods I'd suggest dairy cows as they're lovely and also very easy to get a hold of. I will say species of Armadillidium(roly poly/pill bugs) are my fave and I'm very biased and want 500 of them.
For handling just be gentle! I wear gloves in a lot of my videos but that because I've incredibly sensitive skin and can't stand soil under my nails. The worse they can do to you is them staining your skin(not all species), or give you a little nibble. Make sure if you're handling to wash your hands off BUT be careful what hand soaps you use! Wash hands after as well some can be toxic to bugs from what I've heard.
For tank size hmm that's hard, usually you want soil as deep as their body but that can be hard, 10-15cm is what I aim for my BIG boys and 7-10cm for my others, deeper is better but sometimes you'll also just never see them again! You'll want a tank at least a few times longer than your pets body or at least big enough for them to filly stretch out in if you get really big millipedes like giants and a 120cm tank is just kinda unrealistic haha.
I do not have a lot of advice for if they get sick sadly, it's kinda of hard to tell honestly and usually when you can it's too late. I would just say don't beat yourself up too much if some pass away sometimes bugs just do that especially if you don't know their history.
Where to get them depends on where you're from and what you want. A ton of reptile/specialist stores will have wild caught which isn't great but they will have the largest range of species and usually also sell all the stuff you need to tank care of them. Ebay is where I've gotten most of my captive bred and I just message people if I've questions about their bugs there.
I think that's everything I can think of,
Again I'm a big novice when it comes to bugs, @onenicebugperday and @crevicedwelling likely know way more than me, though idk if they're open to questions but they likely already have a lot of info on their blogs.
#bug babbles#again! I'm a big novice still so please also do your own research online about this#just googling some things can help find some sites#more sites that sell them will info pages about the species you're buying as well
144 notes
·
View notes
Note
Ooo I have a question
Do you have any (fun!) enrichment ideas for corn snakes
OMG yes there are so so so so many ways to enrich a corn snake!
They're curious and enjoy climbing, exploring, and digging, though each snake will have their own individual preferences, so try a few things and see what gets your snake moving the most and then tailor future offerings towards what they seem to react most positively towards.
Make sure all plant-based enrichment is safe for reptiles and fertilizer and pesticide-free!
In-cage:
Brown lunch bag, left open on its side, stuffed with hay, cut grass, leaf litter, a pinch of fresh herbs, flowers, etc.
Wiffle ball with a pinch of herbs, clean feathers, or used rodent bedding wrapped in a paper towel stuffed inside (if you ask a pet store employee nicely they'll usually give you a little bit of bedding from a rodent or bird cage)
Tennis ball rolled in something a little stinky (see wiffle ball above)
Climbing branches with something a little stinky hung on
Deep tray of dirt and sphagnum moss for digging in
A live plant in clean dirt (to dig up, sit on, and probably ruin)
Pie plate of sprouted grass seed
A tee shirt or sock you've worn
Bit of shed from another healthy snake
Change your cage layout, swap hides
Switch bedding or offer a dig box of different bedding
Hide f/t food items in a lunch bag or drag it around a bit to have your snake "hunt" their meal
Offer different food items, as long as they're appropriately sized! Quail chicks or eggs, Reptilinks, etc.
Out of cage:
Storage tote full of dirt/leaf litter for Serious Digging
Ye olde Laundry Pile (only if it's not super gross tho)
Outdoors adventures if you feel safe with your snake and have good control over them
Peg board for climbing
Stairs if you live in a two-story
Walk around with your snake and let them sniff things they seem interested in!
This is just scratching the surface of what's possible. As long as your snake is safe and you're both having a good time, feel free to experiment with different enrichment opportunities!
#snake#snakes#reptile#reptiles#reptiblr#corn snake#corn snakes#snake enrichment#snake keeping#snake husbandry#snake care#reptile husbandry#answers to questions#text post#long post
97 notes
·
View notes
Text
Cornsnake Shopping List
So, you've decided on a cornsnake - great choice! Cornsnakes, Pantherophis guttatus, are great pets, and they're popular for a reason! You can expect an adult cornsnake to grow 3-5 feet long, with males being generally bigger than females. Cornsnakes can live to be around 20 years old with proper care.
Enclosure setup shopping list:
You will want to set up your enclosure so your snake has room to stretch out, climb, and explore! You will need to set up a temperature gradient of 88-75 Fahrenheit.
Enclosure. For a young corn, a 20 gallon is fine, and a 40 gallon works well for yearlings. As an adult, your snake will need a 4x2x2 enclosure at the absolute minimum, and bigger is better! Check out Animal Plastics for affordable, high-quality enclosures.
If your enclosure has a screen lid, two sets of screen clips. Never bring a snake home without screen clips!
A dome heat lamp with ceramic sockets. Any big reptile brand is fine - Fluker's, Zoo Med, and Exo Terra are all trustworthy brands here. Make sure your dome lamp is rated for the wattage of bulb you will be using - 150 is usually a safe bet.
Heat bulbs. I use ceramic heat emitters for my corns. You can choose to provide halogen light and UVB if you'd like. Arcadia makes high-quality heat sources your pet will love. The wattage you choose will depend on your enclosure size and the temperature in your home.
A thermostat to plug your heat source into. Vivarium Electronics thermostats are excellent but pricey; you can go as expensive as you like but here is a cheap one I swear by.
Digital thermometer/hygrometer reader with probes - Zoo Med and Exo Terra make great dual gauges
At least two identical hides, one on either side
A container to make a humidity hide. Simply cut a hole in the lid, fill with damp moss, and you're set! Providing your snake with a humid hide will help them have perfect sheds every time!
A large water bowl
(Insider tip: if you go to the grocery store and buy a pack of black plastic food storage containers, you can easily make hides, humidity hides, and a water bowl out of them! Here's my go-to option, you can easily take care of all that for one baby snake for like 5 dollars!)
Sphagnum moss for your humid hide
Substrate - for corns, you have a lot of options. You can use aspen shavings if you like, but coconut fibers, cypress mulch, and coconut husk are all great options. Whatever you choose, provide your snake with at least a couple inches so they can dig.
Climbing branches and other decor - climbing is a must, and vines, rocks, and tunnels made from cardboard tubes are other great options.
General care:
Feeding tongs.
Food for your snake. Even baby corns can eat whole pinky mice. Your offered food should be about 10% of your snake's body weight.
A soldering iron, believe it or not! A cheap soldering iron will serve you well throughout your snake's life - you can use it to easily melt holes in bowls and containers to make hides.
A small snake hook can help you with handling your snake, especially if you're nervous.
And some common beginner mistakes:
Don't move your snake to a separate enclosure to feed. It's a myth that will make your snake "aggressive" - it can actually cause more mistaken feeding bites as they associate handling with being fed!
Don't worry if your snake spends most of their time hiding, especially while young. A hiding snake is a happy snake!
Don't over-handle your snake, and always give them at least a week to settle in before offering food for the first time.
Never handle your snake for two days after they've eaten - that could cause a regurgitation.
Cornsnakes are some of the best pet snakes out there! With proper enclosure setup, you're all set for many happy years together with your new friend.

385 notes
·
View notes
Note
Hello! I have a garden snail that had lots of babies and was hoping for some advice please! :) I want to make their enclosure as comfy as possible for them but I don't know how. Do they prefer dark environments? Hidey holes? What kind of substrate is best? Etc. Thank you!
(I'm in Southern California)
Congrats on your snabies! Firstly I would not take any substrate or decor for the tank from outside unless you want a lot of hitchhiker creatures in your snail tank. If you do, you'll want to bake it first.
A standard 10 (or larger) gallon aquarium with a mesh lid works great, but you'll want to modify the lid to cover most of the mesh to keep the inside humid. I just bought a squeeze tube of silicone and attached some plastic sheeting inside the lid to cover about 75% of the mesh.
Substrate can be any sort of animal-safe soil-like substrate - so soils meant for bioactive reptile and amphibian enclosures or for isopods. Repti-soil, Creature Soil, organic potting mix, etc. I personally have my snails in with my millipedes, and use a combination of eco earth and Josh's Frogs milli mix - can't recommend milli mix enough! Josh's Frogs ABG mix or isopod substrate would also be appropriate.
No matter which soil you choose, it should be 4-5 inches deep both to hold humidity and for burrowing. 10 quarts will fill a 10 gallon aquarium to the proper depth.
As for decor, I would avoid rocks since snails WILL climb the glass and other decor and probably will fall off from time to time. Rocks can shatter their shells. I would stick to wood - any aquarium safe wood is fine. Cork bark, mopani, spider wood, etc. I'd also recommend some dry/dead reptile-type sphagnum moss to keep up humidity and for nibbling, and some kind of leaf litter - I buy bags of dry/brown live oak leaves on amazon for pretty cheap. My snails don't seem to hide in holes or crevices much - when they're not active, they mostly hang out on the lid or the top glass of the tank.
You do not need lighting or heating unless your house gets particularly cold in the winter - they may be less active if it's too cold. You can put a low watt reptile heating pad on the side of the tank to keep the temp up around 70+ if need be. They are primarily active at night, so if you want to see what they're up to, a small light that doesn't give off heat near the tank would be okay.
Most important is humidity. Get all of the substrate and moss damp as you put it into the tank with distilled water. I use a reptile mister bottle and buy gallons of distilled water at the grocery store. They last a long time so not a big investment. You'll also have to mist the whole enclosure probably daily, maybe twice daily. It should be moist and humid but not sopping wet. Don't let the substrate dry out entirely. Occasionally you may have to stick your finger into the soil to make sure it's staying damp under the surface.
And finally, snails need calcium for their shells! I occasionally dust the top of the substrate with powdered reptile calcium, or you can throw a cuttlebone in there for them to nibble on.
Here's a list of safe/not safe foods for snails.
If you ever have more questions about setup that I didn't answer here, feel free to IM me! Happy to share creature keeping tips.
78 notes
·
View notes
Text
Cheap custom backgrounds?
Hi! Want to give your enclosure something like this?
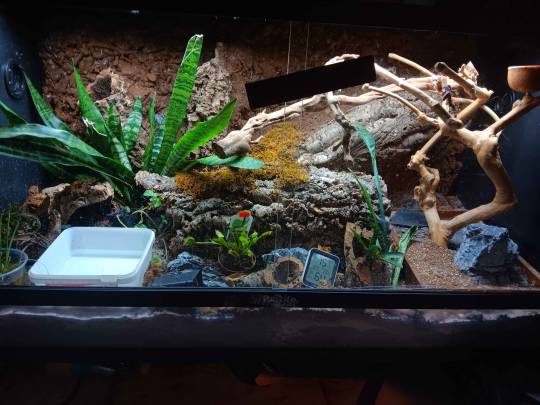
Well let me help you do this in a affordable way to give your animal some new enrichment and climbing opportunities!! Theres a misconception fancy backgrounds are hard to do or are expensive to do. This is... Very much not true! So lets do the one above together!
Heres an overview of the supplies you'll need:
-Your Enclosure of choice
-Cocofiber and Sphagnum moss(OPTIONAL, can opt to paint)
-Aquarium grade Silicone
-Great stuff pond and Stone
-Cork bark, roots, sticks, small rocks(OPTIONAL)
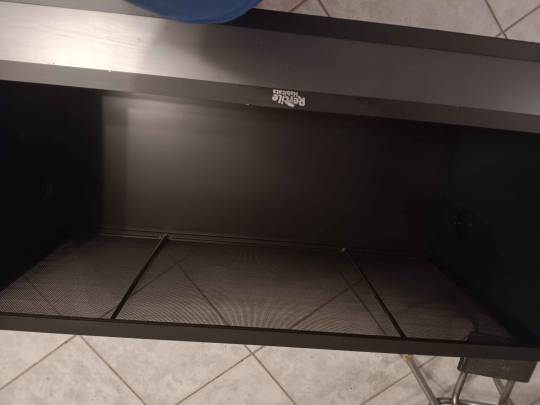
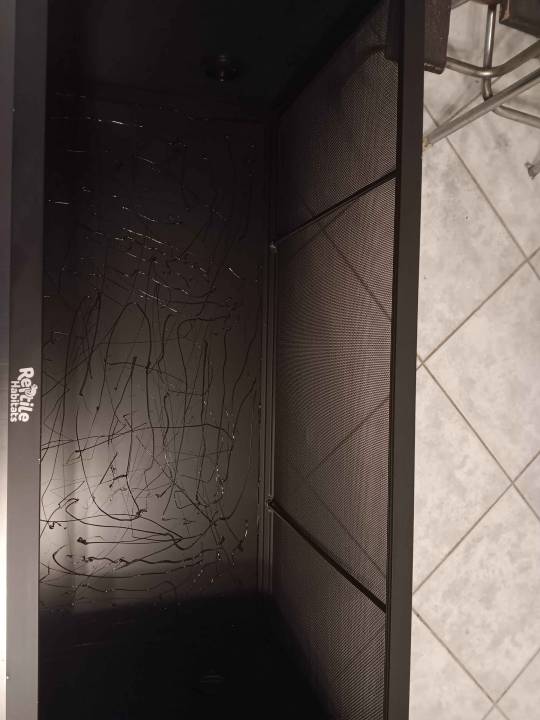
First things first, you're going to want an enclosure.
This is a DUBIA 4ftX2ftx2ft[LengthsXwidthXHeight), Also known as a 48"L x 24"W x 24"H(Inches) or a 120 Gallon Enclosure. This is considered the researched minimum size for common exotics like Ball pythons, Corn snakes, Bearded Dragons and the like to thrive. *Disclaimer: Im aware there is several groups and movements who are pushing for a 5x3x2(ft) minimum for Bearded dragons, I ultimately agree with them and the advancement of exotic keeping, but a Bearded won't suffer in a 4x2x2.
Dubia Enclosures are some of the cheapest in the market, however they're decent for the price. They are stackable which makes it great for saving space, but please note they can NOT hold a lot of weight, so be mindful of that.
I own 3 of these. Two Version 1s and on Version 2, which is the one above. The V2s are generally nicer in design in my opinion, theyre functional more importantly.
Once you have your enclosure of choice, lay it on its back as shown in in the first image. Next, you're going to want to prep your dry background. I use Organic Cocofiber and Sphagnum moss. I buy these extremely cheaply from Home depot or in bulk off Amazon. Make sure your material is COMPLETELY DRY! It will NOT stick if it has any moisture. Break apart your Cocofiber block and mix it with your dried Sphagnum moss in a container and have it ready on the side.
I use the bulk Coco fiber, which costs about $23 for 5 bricks on Amazon. You can get them cheaper if you dont buy bulk, I do a lot of gardening and have a lot enclosures so its easier for me!
https://www.amazon.com/Organic-Coco-Coir-Bricks-Compressed/dp/B01N1YP8O6?th=1
for a 4x2x2, I only use 2 bricks.
Likewise, I buy Bulk moss for the same reason:
https://www.amazon.com/dp/B0BK7XMNWL?ref=nb_sb_ss_w_as-reorder_k0_1_10&=&crid=1RDHFNSAUX0DF&sprefix=spaghnum%2Bm&th=1
You will only need. ONE BRICK. For the Sphagnum moss. Maybe even less than a brick. You're going to want to wet this then dry it before use. Dont be me. Dont be fooled over how small and thin those moss bricks are.
I made the mistake of trying to wet an entire brick and I had to use a deep soup pot to contain it. It *explodes*. You will be buried in moss. You will scream and cry and beg for mercy as you are overwhelmed by the amount of moss Expanding from a singular brick. I am not exaggerating, I learned my lesson, please god, do not make the same mistakes I made. I still have. So, so much moss. Sometimes I still find Moss from my Mossaggeden.
NOTE: Please make sure to use organic, and do not used DYED moss! Double check your ingredients, Dyed moss can be toxic to your animals!
Next,
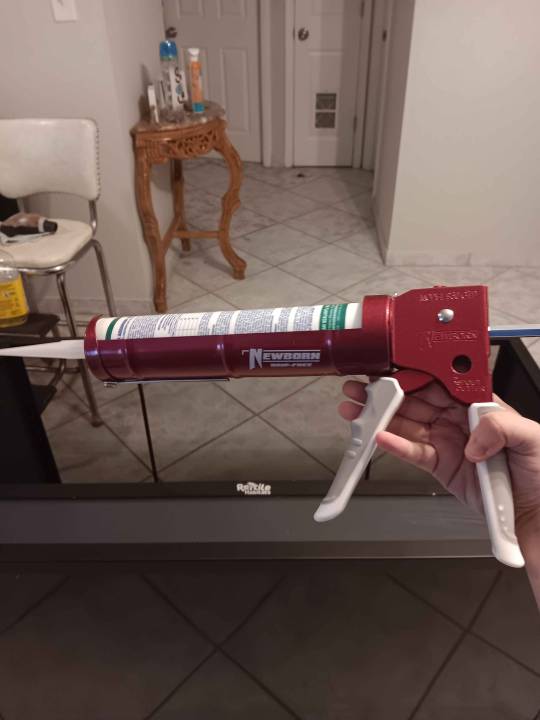
Silicone time, baby!
You're going to want to use Aquarium grade Silicone from Home depot, please double check to make sure you're getting Aquarium grade! This will cost you a whopping $3 At Homedepot. The Caulking gun was an additional $12 if you dont have one already, however, it is re-usable so its a great one time purchase because I use that bad boy for a lot of my projects lmao. Once you struggle to open your stupid bottle of Silicone without exploding it like I have on several occasions; time to be silly!
We're going to Silicone this bad boy up reaaaaal good. Dont be me, USE GLOVES! It makes your life so much better I promise. So why are we doing this exactly?
Its simple, this will help your background last! It gives it texture and helps the spray foam stay in place. It also keeps your background from peeling so easily, texture matters! Your hands going to be very tired after this.
Youre going to want to leave this alone for the next 24-48 hours. Minimum. You want your silicone to dry and want to make sure the smell is gone before continuing to the next step!
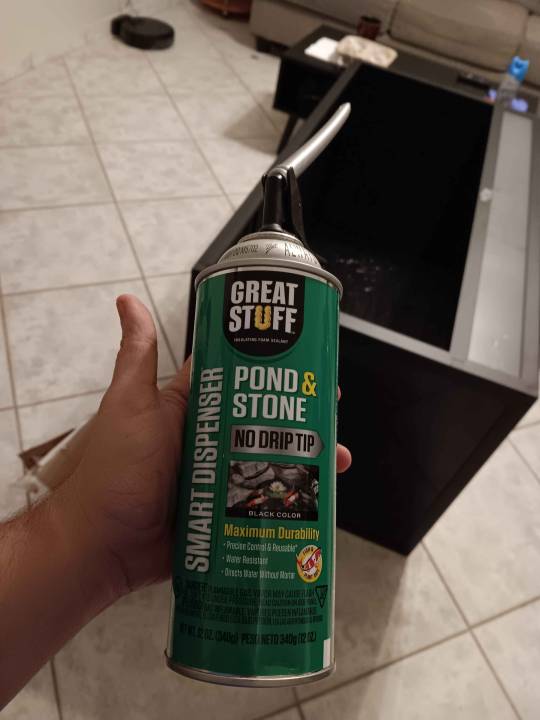
This is the funnest part. Spray foam time!
For the 4x2x2, I use about 3 Bottles of this stuff. Make sure you're using NON-TOXIC Spray foam! Pond and Stone is my favorite to work with. When I add things into the background, I make sure to have a 4th can of this stuff on me. This will be the most pricey part about it. Lowes has it for $12-14 a can, but its $15 a can on Amazon. This is really the only big 'expense' when it comes to backgrounding. Smaller enclosures use less, but bigger enclosures will need more.
!!!!!!!THE NEXT STEPS NEED TO BE DONE TOGETHER!!!!!!!!
Youre going to want to be fast about it if youre using my method. Start spraying random patterns into the background. Youre going to want to make sure youre covering every inch of the enclosure, you can do zigzags, cut it into triangles, squares, it doesnt matter. Different shapes give you different background textures, so go nuts!!! Dont leave space between the foam, and go ham. Theres no wrong way to do this. Once thats done though, you're going to want to do the next step IMMEDIATELY:
Adding your background texture and features!!
This step MUST be done while the spray foam is still wet.
First, take any rocks, cork, sticks, ext if youre adding them and shove them into the background. Dont have money to pay for expensive Reptile decor? You can sanitize your own rocks and sticks from outside yourself for free. I will make a guide about how I do that soon ahah.
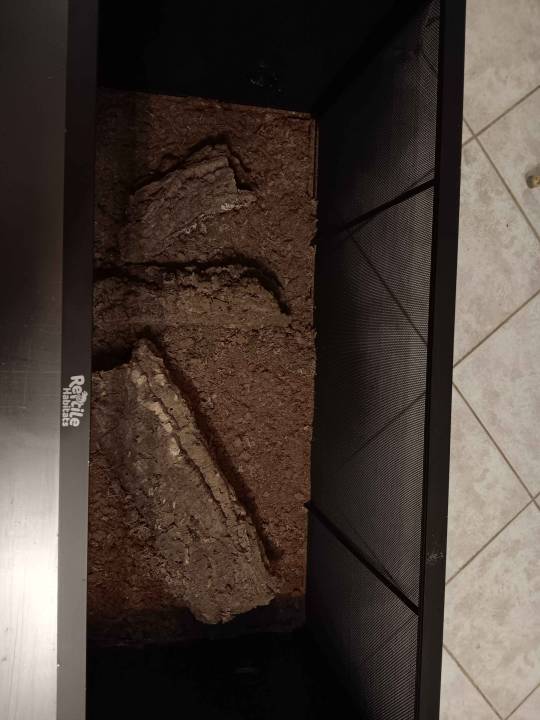
Press any features you want into the spray foam background nice and firm, then use the extra to spray around the items to secure them in place. Once you got your features in, its time to take your pre-prepped background and begin pouring it in!
Spread it evenly across the enclosure. Do NOT worry if you have excess, poor it in anyway. Once you've poured the background in. GENTLY pat it over the sprayfoam. Next, you'll want to leave this to dry for the next 24 hours minimum. Leave it laying on its back so nothing drips or sags where you dont want it to!!!
After 24hours, lift the enclosure and gently tap the back of it to knock off your excess background to reveal your background!
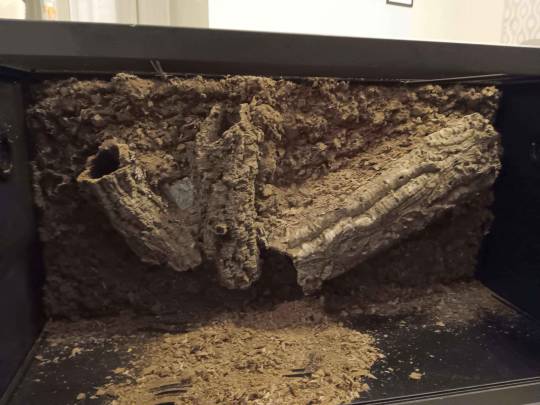
Annnnnnd you're done!!! Now you're free to add your lighting, real or fake plants, heating, substrate and other decor as you please!
This can add so much more enrichment to your animal and give them so much more room to utalize their space. My individual personally loves his background and utilizes it all of the time! Contrary to belief, a lot of snakes aren't 'pet rocks' if you give them stuff to explore and climb. My guys out pretty often! Of course it comes down to personality too ahah.
Heres some pics of him using his climbing features! He prefers the middle climbing feature here and the one off to the right, where he uses to bask when he doesnt want to be seen and hangs out the top of it, or his bird perch when he doesn't mind being right there out in the open. c:
#reptiles#snake#herpetology#ball python#background#How to craft#Custom enclosure#Mossaggeden still haunts me#And my hands have known no peace since I started doing these#I hate silicone#More so I hate caulking#bioactive#tutorial#I picked up that little bird stand for like $15 at a local owned exotics store and thats been his favorite thing ever#Sanitized it real good and I have hundreds of pictures of him on that thing#I have a big one for my tree boa its like 5 ft tall#I cant wait to use that when shes ready for her adult enclosure#Did you know you can get a 10x10 growtent for like $300?#Thats a steal actually#Modify it real good and boom#perfect enclosure for like a 8ft tree boa#Im going to try growing a tree in it#Godspeed#dont let this flop#My hands will never recover from the amount of caulking ive done in my life
9 notes
·
View notes
Text
Hello fellow lads and lasses.
This marks my first post about my houseplant collection. My favorite plant in my collection is my Nepenthes Pitcher Plants. These tropical plants are carnivorous and the pitchers are used to trap and digest insects. Botanical carnivores are not able to gain nutrients through their roots due to evolving in nutrientless soils and environments.
To care for these plants I use sphagnum moss as the potting mix, but any carnivorous soils can be used just be sure that no soils or potting mixes contain any fertilizers. Most carnivores require high amounts of light, and frequent watering. Only water with rainwater, distilled, or reverse osmosis water. When indoors plants must be fed by hand with many common pet store insects like crickets or mealworms. Comment on any questions regarding carnivorous plants which are my specialty.
Hope everyone has an amazing and magical day.
Extra Reminders
My Etsy Store is Open with plants and reptile supplies available for purchase
Commissions, Customs, and Character Sheets Open on My Fiverr Store
https://www.fiverr.com/calebacker?public_mode=true


#cottage aesthetic#cottagecore#plantcore#plantbased#plants#carnivorous plants#pitcher#pitcher plants#nepenthes#carnivores#houseplants#botany#moss#tropical plants#tropical#plant collection#plant photography#plant blog
11 notes
·
View notes
Text
How to make a humid hide. Easy & Cheap
First, get a tupperware or other small container. It should be big enough to fit your reptile but not super large. The most important part is it's a nonporous material, not clear and has a top and a bottom section that can come apart. I use cleaned out bowls from instant noodles for mine! They fit the bill and are free. Cut/Melt out a hole in the top or side of the container (depending on your reptile's preferences) I usually use a cheap soldering iron that's only used for melting plastic. (Don't use a nice soldering iron) and make sure to do it in a well ventilated space away from pets and young children. I do mine outside. You can also use a dremel/drill or knife to cut it however you'll have to use sandpaper to smooth the edges. You're now 50% done!
Next you need to choose your humid hide material. You can use paper towel, coco fibre or moss. I use and highly recommend moss. I use dried (dye free) sphagnum moss. It's a few dollars for a big bag from any gardening store and in my experience it's the best humid hide substrate. If using cocofibre add maybe 1/2 an inch, if using moss fill it up enough your reptile will fit with a little but not much extra room. Keep the moss hydrated at all times, there shouldn't be more than a few drops of standing water though.
There you have it! A super easy and cheap humid hide.
#snake#snakes#lizard#lizards#geckos#gecko#boas#pythons#python#leopard gecko#ball python#royal python#corn snake#reptiles#reptile#reptile care#snake care#herp care#lizard care#pet care#animal care#humid hide#herp#herps#tutorial#pets#herpblr#reptiblr#snakeblr#petblr
35 notes
·
View notes
Note
Are there any good places to get soft hides? if not, are there any ways to make something hard safer for a snail? Could I use Styrofoam/memory foam and like non toxic fabric paint or like a sealing spray of some sort to make some softer things for it?
I'd like to decorate the terrarium(spookily(skull, spider prop, web, and like a coffin-idk-) and/or with like fake mushrooms and such made of the foams) but the saftey and happiness of the (future) snail comes first of course!
hihi! thanks for the question!
Styrofoam is not a good idea for snail tanks, as they will attempt to eat it lmao. I don't know of any sealing products that would make it safe either unfortunately, and I dont believe any non toxic paints would survive (snails rasp EVERYTHING). If you're a vulture culture homie and have real skulls those are fairly safe with some moss on top as long as they're cleaned naturally and whitened with peroxide, but your snails may try to rasp on them and make holes.
Try looking at reptile hides, there's some neat skull ones that could work and they're often made out of a sort of resin I've found to be safe for falls. The resin ones will feel lighter than the concrete or stone ones! if there's a harder decoration youve got your heart set on, a nice thick layer of sphagnum or other moss on top to break any potential falls works!
The best hides in my opinion are either resin reptile hides or plastic plant pots! I've had many a snail fall onto these with no injuries. Thanks again for the question and I hope this helps!!
14 notes
·
View notes
Note
Could you post a picture (or even better several) of your leech setup?
YES thank you for giving me a reason to talk about my babies


front view, above the waterline to the left there's a little shower basket I got from the dollar store filled with sphagnum moss and to the right is a little floating island you can get for turtles, also covered in sphagnum moss. gives them an area to hang out out of the water if they wish, and a spot to lay cocoons if they wish.
The notable bits underwater are the fake plants, log tube and rocks. Fake plants are decoration, log tube is a nice little hidey place and the rocks are to provide a rough surface to help them shed


on the side we got a thermometer. in the back corner, to the right you can see the top of the sponge filter. leeches don't like much water flow bc they're stagnant water dwellers (except for Peach.. I find her cuddled up to the damn filter half the time) so it is the literal smallest filter I could possibly find. Filter isn't essential, but gives some more time between water changes.
It's a 30x30x30cm reptile tank. I'm not a fan of the super simplistic jars people keep leeches in, particularly after seeing how much my leeches enjoy digging around in the gravel, hiding under the decor and exploring all the various things in there. They need something to rub against to help them shed too, but also I just think some enclosures I see are so boring.
The cloth on top is to make 100% sure they are not gonna escape bc they are very very good at it, and can get through very small gaps. I've never seen my girls try to escape, but just in case lol.
Thank u again <3 bonus leech pic. Ft. Peach, of course, hanging out next to the sponge filter.

1 note
·
View note
Photo
Shop Affordable Reptile Products Online in Medford
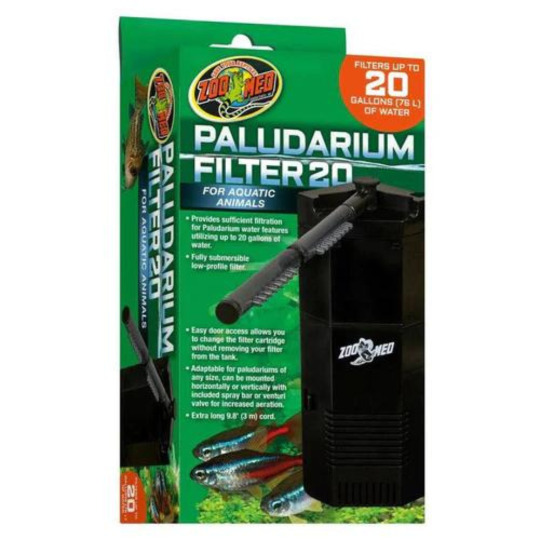
Want to shop Reptile Products Online? Scales & Tails Exotic Pets is the right choice for you. At this time, Scales & Tails Exotic Pets provides affordable Sphagnum Moss For Reptiles for sale. These filters may be adapted to paludariums of almost any size, with horizontal or vertical mounting and an included spray bar or venturi valve. Call us at +1 800-559-8838 or visit https://www.scalesandtailspets.com/collections/moss
0 notes
Text


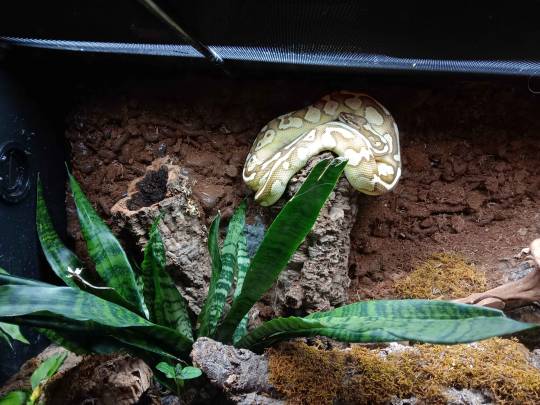
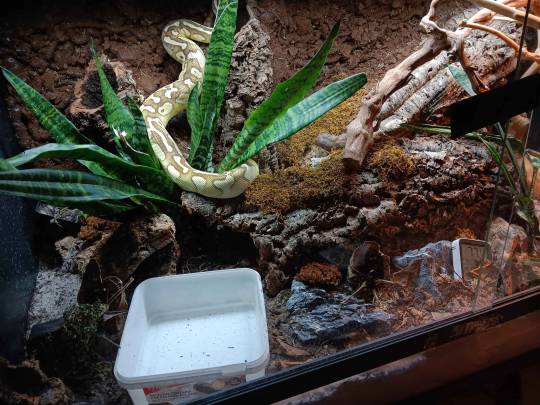
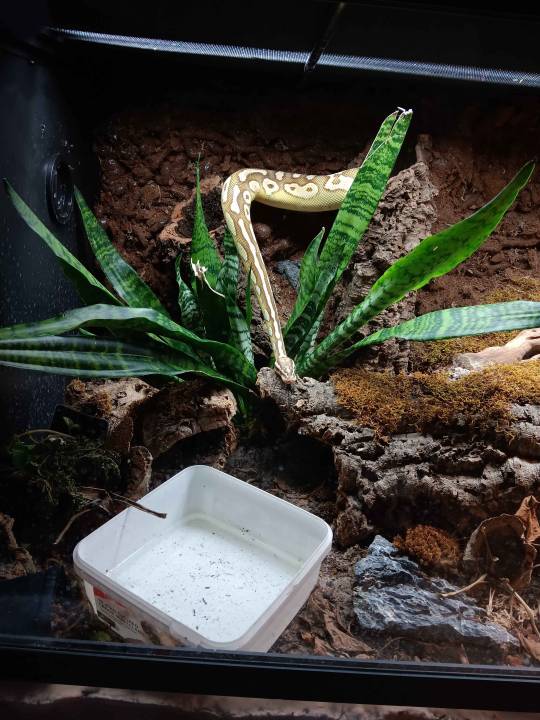
A handsome man enjoys his moss 🐢
27 notes
·
View notes
Text
Western Hognose Shopping List
Thanks to their big, fun personalities and small size, western hognose snakes (Heterodon nasicus) are becoming a more and more popular choice for a first pet snake. Though they're not as easy as some other good beginner-level snakes, hoggies are absolutely doable first snakes as long as you do lots of research and plan thoroughly! These adorable little snakes average around 2 feet long for females and just over 1 foot long for males, and can live to be up to 20 years old with proper care.
Before buying your hognose snake, it is extremely important to make sure you find a snake who is well-established and eating consistently on frozen/thawed, unscented mice. Don't overlook this - hoggies can be difficult to get eating on your own!
An important note of caution: hognoses are venomous snakes. Their venom is not medically significant to humans and usually results in no more than mild swelling and itching, but this is something to be very aware of! Hognose snakes almost never bite in self-defense, but mistaken feeding bites can happen so it's important to be aware and prepared.
Enclosure setup shopping list:
It's essential to make sure your hognose snake has plenty deep substrate to dig in! You will need to set up a temperature gradient of 88-78 Fahrenheit. Hoggies are not picky about humidity, and as long as you always make sure they have access to fresh, clean water, humidity shouldn't be a concern for you.
Enclosure. Adult hognose snakes can thrive in a 40 gallon enclosure. You can get away with a 20 gallon for males since they are considerably smaller, but bigger is better! For a baby snake, you and your snake will likely have an easier time if you get them set up in a 10 gallon enclosure until they put on some size.
If your enclosure has a screen lid, don't forget the screen clips. Never bring a snake home without screen clips!
A dome heat lamp with ceramic sockets. Any big reptile brand is fine - Fluker's, Zoo Med, and Exo Terra are all trustworthy brands here. Make sure your dome lamp is rated for the wattage of bulb you will be using - 150 is usually a safe bet.
Heat bulbs. I use ceramic heat emitters for most of my hognose snakes, but some respond very well to halogen lighting and UVB. The choice of providing visible heat and UVB is yours; the only snakes I would avoid it with are snakes with melanin-reducing morphs (like albinos and toffees) because it can damage their more sensitive eyes. Arcadia makes high-quality heat sources your pet will love. The wattage you choose will depend on your enclosure size and the temperature in your home.
A thermostat to plug your heat source into. Vivarium Electronics thermostats are excellent but pricey; you can go as expensive as you like but here is a cheap one I swear by. Never use a heat source without a thermostat!
Digital thermometer/hygrometer reader with probes - Zoo Med and Exo Terra make great dual gauges. Avoid stick-on dials!
At least two identical hides, one on either side. A proper hide has three solid walls and a smallish entrance - you want your snake to feel snug and secure. Baby hognoses especially will do best with lots of extra hides.
A container to make a humidity hide. Simply cut a hole in the lid, fill with damp moss, and you're set! Providing your snake with a humid hide will help them have perfect sheds every time!
A large water bowl
(Insider tip: if you go to the grocery store and buy a pack of black plastic food storage containers, you can easily make hides, humidity hides, and a water bowl out of them! Here's my go-to option, you can easily take care of all that for one baby snake for like 5 dollars! Baby hognoses are extra tiny, so if you're buying a young baby, sugar caddies make perfect, cheap hides.)
Sphagnum moss for your humid hide
Substrate - for hognoses, I prefer aspen fiber because it holds hides well and isn't terribly dusty. Playsand/topsoil mixtures also work well. Whatever you choose, be sure to provide your snake with at least a few inches to burrow in!
Lots of clutter. Paper towel tubes are great, fun enrichment, and empty cardboard boxes are hits with lots of hoggies. They aren't big climbers, but giving them a few branches never hurts! It's very important to keep your enclosure cluttered so your snake feels safe. Crumpled balls of paper towel make for great extra clutter for small snakes.
Consider a blanket or other visual barrier to put over the enclosure to help your snake feel safe and hidden. Hognoses can be very sensitive and often benefit from a little extra privacy.
General care:
Feeding tongs.
Food for your snake. Baby hognoses can usually handle whole pinky mice. Your offered food should be about 10-15% of your snake's body weight.
A soldering iron, believe it or not! A cheap soldering iron will serve you well throughout your snake's life - you can use it to easily melt holes in bowls and containers to make hides.
And some common beginner mistakes:
Don't move your snake to a separate enclosure to feed. It's a myth that will make your snake "aggressive" - it can actually cause more mistaken feeding bites as they associate handling with being fed!
Don't worry if your snake spends most of their time hiding, especially while young. A hiding snake is a happy snake! It's very normal for hognose snakes to spend a lot of their time in their burrows.
Don't over-handle your snake, and always give them at least a week to settle in before offering food for the first time.
Never handle your snake for two days after they've eaten - that could cause a regurgitation.
Avoid heat mats as a heat source for hognose snakes. Because they need such thick substrate, the heat mat can cause dangerous hot pockets within the substrate.
And be prepared to be flexible! Hognose snakes are such wonderful, fun pets, but they certainly have a bit of a dramatic streak. Expect some hissing, puffy cheeks, and a few theatrics! These are snakes with opinions about how you should care for them, so listen to what they're telling you.
I don't know what life would be like without my pet hognose snakes! They're fun, engaging pets who will make you laugh every day, and if you do your research to get them set up properly, you're well on your way to many awesome years together.
182 notes
·
View notes
Note
So i have a germaphobia issue, my doctor recommends i get a pet to both help with my exposure therapy, and to give me a companion to help with depression, i’m currently considering a crested gecko? Basically what i’m asking is are they messy animals? And if so should i consider something else?
Hi, mod @release-the-hound here!
All animals are going to eat, so all animals are going to poop. All animals will require some amount of cleaning. Whether or not that's a mess you can handle is sort of up to you. For example, I find bird poop way ickier to deal with than dog poop, so I don't own birds! You may find lizard poop not that bad, or it may be the worst thing in the world (in which case I'd recommend an animal that is not a reptile).
I can't tell you what animal you should get. But I can tell you "ick" factors that you'll have to deal with if you own a crested gecko, and ways you might be able to overcome them.
Lamellae are the hair like structures that allow crested geckos to stick to things and climb so well. They might feel weird on your skin. The good news is you don't have to handle your geckos a lot if you don't want to, and you can wear gloves and long sleeves so you don't have skin to skin contact with your gecko.
Crested geckos like to lick stuff! Watch some videos of them online to see if that grosses you out and if it's something you can tolerate seeing in your own home.
Crested gecko diets include fruit puree, powdered diet, and live insects. Make sure you are comfortable handling all of these substances before purchasing a gecko. Crickets and dubia roaches are probably the insects you will be feeding your gecko. The fruit puree can sometimes develop bacterial growths if you leave it out for too long, remove it after about 4 to 6 hours to prevent this.
Humidity in an enclosure should be 50% during the day and 80% at night. Crested geckos sleep during the day and only start to wake up around sunset. Therefore you're going to have to mist their enclosure on a daily basis.
A hot (ideal temp is 72F to 80F) and humid environment is an environment that bacteria love to live in. Your geckos will need hides. Cork wood is less prone to rot than other types of wood hides. PVC pipe hides are also an option. You will still have to clean these hides on occasion. You could also use disposable hides made from paper towel rolls and tissue boxes, and simply throw them out whenever they get gross. Crested geckos also need driftwood for climbing, which may need to be cleaned.
Crested geckos need plant life in their enclosures. You can develop a vivarium (aka. bioactive) enclosure, if handling dirt and dealing with plant care is tolerable to you. This lets you use live plants for your setup! Fake, plastic plants won't need much maintenance though, and can also be easily cleaned if they get dirty.
Crested geckos need to be provided with clean water on a daily basis in a shallow dish. These dishes will end up with bits of dirt in them so you have to be ok with cleaning them.
Crested geckos will shed, so you have to be ok with seeing that.
Substrates are tricky. An easy and common substrate for keepers early on is paper towel. It's great because it's quick to throw out and replace when it gets dirty. However, it makes it extremely visually obvious where your lizard has pooped, which might be difficult for you.
A natural substrate (ex. vermiculite or sphagnum moss) is a great option, because when set up properly, this "bioactive" enclosure naturally cleans up waste for you. However, this is very complicated to set up initially, and you'll have to be comfortable introducing fungi, and insects (typically springtails and isopods) into your enclosure (they're the ones doing all the cleaning up!). You will still have to clean the glass and hides on occasion, just as you would with a paper-towel substrate set up.
I'll also add some links that might help you:
Overview of basic crested gecko requirements.
Guide to setting up a bioactive enclosure.
Hope this helps!
56 notes
·
View notes
Text
If you ever feel like being angry you should look up big brand pet store chain animal care guides. I’m looking at the Petco tarantula one now and jfc.

ah yes. “The Spider Family.” we definitely have someone who knows what they’re talking about.

please dont feed your tarantulas every day. I’m pretty sure that shady breeders do this to force their tarantulas to grow faster so they can sell faster, but doing that shortens their lifespan.

dear god don’t use anything chunky for substrate. no mulch or bark. and don’t use just plain sphagnum moss either. why would you do that. sometimes. a species might like it drier. amazing.
why would you need a nocturnal or infrared light. I keep a normal flashlight on my nightstand so I can look at Buttercup when she’s out and about at 2am and she literally doesn’t care. remember that whenever a pet store tells you to buy so much unnecessary stuff they definitely have your money more in mind than your pet’s health and safety.

HOLY SHIT OH MY GOD DON’T DO THIS. DON’T USE BLEACH. AND CLEAN ONCE A WEEK????? IS THIS FOR REAL???? YOU ARE GOING TO ENCOURAGE PEOPLE TO DESTROY THEIR TARANTULAS BURROWS EVERY WEEK JUST SO YOU CAN SELL THEM SUBSTRATE OVER AND OVER. THEY DON’T EVEN GET THAT DIRTY. UNLESS THERE IS A MOLD ISSUE YOU CAN PROBABLY GET AWAY WITH CLEANING THEM YEARLY.
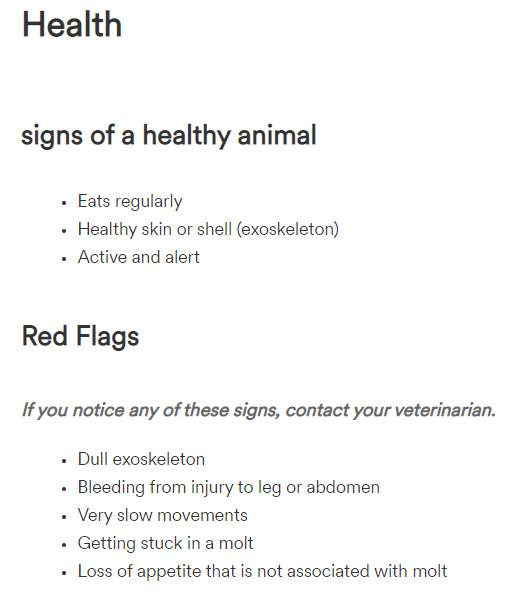
uhhh tarantulas are extremely weird and unpredictable. eating regularly is definitely not a good way to tell if they are healthy. the species I keep (A. chalcodes) for example is notorious for going on ridiculous fasting periods for months because they are bastards but they are just fine.
dull exoskeleton likewise is not a red flag, but a sign that they are in premolt. not a bad thing. and like I said before tarantulas are bastards that go on hunger strikes for no reason so loss of appetite isn’t out of the ordinary either. At the bug zoo I volunteer at we had one tarantula who refused to eat for an entire year yet she did just fine.
Are there tarantula vets????? I feel like if I contacted my vet about a spider they would laugh at me?? there must be like 3 of them in the world if there are. you are better off contacting a tarantula forum or the tarantula subreddit for help.
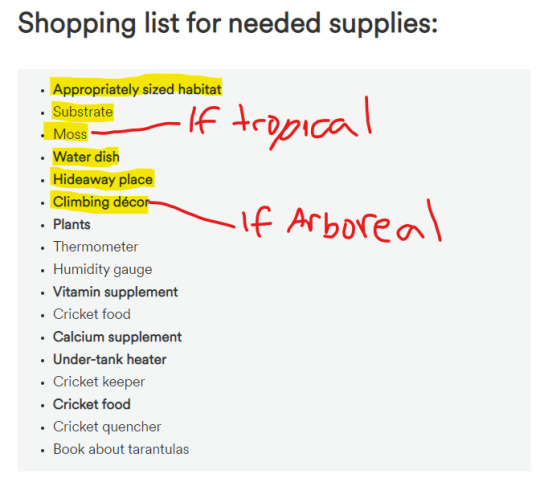
Look at all of this unnecessary crap they want to sell you. I highlighted the only things you need. Of course you need crickets or another food source, preferably roaches cause crickets can be disease magnets. my friend who runs the bug zoo is very against using crickets as feeders.
what are you even supposed to do with vitamin or calcium supplements? Petco does know that tarantulas aren’t reptiles right? and don’t. just. don’t use a tank heater. they thrive just fine at room temperature and if they burrow on top of the heater it is going to be way too hot for them. they could burn themselves or become dehydrated and dry up.
1K notes
·
View notes
Text

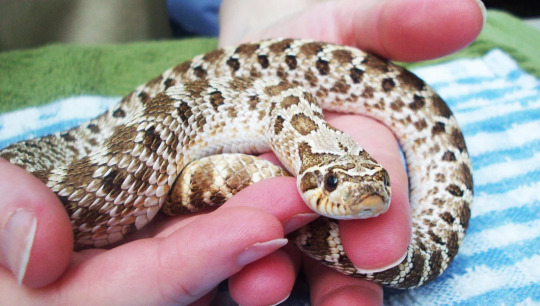
A neonate box, ready to welcome an entire clutch of itty bitty spaghetti friends while they learn the basics of how to snake. They get a sphagnum moss humid hide (plastic gelato container with a hole drilled in the lid), a bit of rough grapewood to help with their first shed, a smooshed toilet roll (smooshing makes more of a hidey spot, less of a gaping cavern), and a water dish.
Once they've shed their neonate skins and started eating, I will add substrate beyond paper towel and gradually split them into smaller and smaller groups over a few months. Gradual dispersal seems to result in calmer, more human-socialized, better adjusted babies than instantaneous separation from hatching. It's fun to watch their social hierarchy develop and see how they dance to greet each other after being temporarily separated. It's potentially harmful to anthropomorphize reptiles, but they really do seem to learn from each other?
My pet hypothesis is that they're faster to trust humans when they see me handling their siblings and not eating anybody.
#It could just be me#how I have learned their body language and changed my handling techniques to give them a sense of autonomy and safety#but who knows#snake#snakes#reptile#reptiles#reptiblr#corn snake#corn snakes#corn snake husbandry#corn snake keeping#corn snake breeding#corn snake care#corn snake housing#neonate#baby snake
107 notes
·
View notes
Last Seen Blogs

venkateswarlu-mallepaka
Mallepaka Venkateshwarlu

nonbianarykirby
⇨ Ready? GO!

tearsofcalamity
as fate casts its eye on humanity


jack-o-cel
= )