#Straight Line Connectors Support
Explore tagged Tumblr posts
Visit Tumblr Blog
Explore Tumblr blogs with no restrictions, modern design and the best experience.
Last Seen Tumblr Blogs


Fun Fact
28.6 is the average number of monthly visits per US mobile user.
Text
Ere tried not to notice her surroundings as she was funneled through the preparation process to be loaded into EM. Closing her eyes to the blinding lights, she took a deep breath. It did not help. The engineer removing Ere’s mechanical legs pushed her back into the pilot seat, squishing her into the impact dampening gel. Almost unconsciously, Ere lined her leg sockets up with the recessed connectors in the cockpit. Her arms clicked off, sending a momentary jolt through the rest of her nerves. Her shoulders met with their sockets as well. An involuntary shiver ran through her as the spinal connector slid needle-like plugs into ports on her back.
Her next deep breath faded as her lungs switched over to their involuntary rate. Her senses faded for a moment, her body becoming an afterthought as her new shape took hold. That brought her some measure of comfort.
New sensation seeped into her mind, all feeling from her actual body fading into the background. Ere finally flicked EM’s eyes open. She towered over the hangar and over the small team of engineers moving away on the floor below, now small enough that they would barely come up to her knees. Indicator lights blazed as she began running through the usual diagnostic tests. Flex right arm. Flex left arm. Now the hands. Now the legs.
Pilot Connection: OK.
Comms: Disabled.
She’d been given an order and her employer knew she’d follow it. Test thrusters.
Rear Thrusters: Online and primed.
Continuous Thrust Array: Online and primed.
Detonation Thrusters: Online and primed.
The support scaffold lowered from beneath her, letting the weight fall onto her legs. Cables hissed as they withdrew from ports along EM’s back.
Final Support Test: OK
The light on the wall in front of her flashed green. Slowly, carefully, she walked to the hangar door. An enormous rifle sat, handle sticking straight up, in a holder beside the door. Taking hold of the grip, Ere felt it sink into her hands, the final familiar weight she was missing. Stepping, finally, out of the hangar, she ramped up her thrusters, increasing her pace to a run. Her colossal chassis crashed across the ground with each step, the gleaming, white exterior a sharp contrast to the grey world around her.
Ere crouched, legs compressing their launching mechanisms. With a crashing whoosh, she flared her thrusters, releasing her legs. She catapulted into the air, up the side of the nearest of the surrounding plateaus. Following her momentum, she leaped and scrambled toward the peak, rifle held securely across her shoulder. When she popped up over the edge, she stopped for a moment. She had her orders, but she took in the cracked expanse below, mirrored by the impossibly deep blue above.
That worked far better than any failed attempt at a breathing exercise.
But she’d been ordered to patrol. She had to patrol. She had to. She-
13 notes
·
View notes
Text
Enhancing Bottle Production with Precision: Blow Moulds for Linear Machines by Awanti Polymoulds
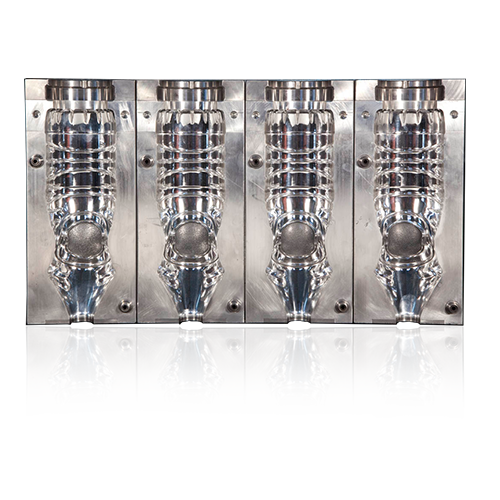
In the dynamic world of plastic packaging, bottle manufacturing continues to evolve with demand for faster, more efficient, and high-quality production processes. One such revolutionizing innovation is the use of linear blowing machines, and standing at the forefront of this technology is Awanti Polymoulds – a trusted name in precision mould manufacturing.
What Are Linear Blowing Machines?
Linear blowing machines are high-speed systems designed to produce PET bottles using multiple cavities arranged in a straight-line configuration on a common plate. Unlike rotary systems, these machines offer flexibility, cost-effectiveness, and ease of maintenance – making them ideal for mid- to high-volume production units.
Why Blow Moulds Matter
At the heart of every bottle-blowing system lies the blow mould – a crucial component responsible for the final shape, size, and quality of the bottle. For linear machines, the accuracy, surface finish, and cooling efficiency of the mould can make or break the production cycle. This is where Awanti Polymoulds delivers excellence.
Awanti Polymoulds: Leading the Way
Awanti Polymoulds designs and manufactures blow moulds specifically tailored for linear machines. With a keen focus on precision engineering, premium materials, and superior craftsmanship, Awanti provides moulds that meet the rigorous demands of today’s bottling industry.
Key Highlights:
• Wide Compatibility: Awanti moulds are compatible with leading linear blowing machine brands such as Sidel Synergy, Shyam Plastic, SMF Germany, Electropneumatics, Chumpower, and Longsun.
• Cavity Options: Moulds are available from 2-cavity up to 10-cavity configurations, ensuring solutions for all scales of production.
• High-Speed Performance: The moulds are designed to support machines that can produce up to 250 bottles per minute, without compromising on quality.
• Material Excellence: Made from high-grade imported aluminium alloys with mirror-finish diamond polishing on inner surfaces, ensuring flawless bottles and extended mould life.
• Efficient Cooling: Engineered with integrated cooling connectors for efficient thermal management and cycle consistency.
Applications Across Industries
Awanti’s blow moulds are used across a broad spectrum of industries, including:
• Carbonated soft drinks (CSD)
• Packaged drinking water
• Pharmaceutical bottles
• Edible oil containers
• Household cleaning products
Why Choose Awanti?
With a legacy of engineering excellence and a reputation for delivering reliable solutions, Awanti Polymoulds stands out due to:
• In-house design and CNC machining capabilities
• Strict quality control protocols
• On-time delivery and global shipping support
• Dedicated customer service and technical assistance
Conclusion
Whether you are upgrading your production line or expanding capacity, high-quality blow moulds are critical for achieving operational efficiency and consistent bottle quality. With Awanti Polymoulds, you get not just a product, but a partner in your growth. Discover the power of precision with Awanti’s moulds for linear blowing machines – crafted for performance, built to last.
#blow mould manufacturer#mould manufacturer in india#mould manufacturer#awantipolymoulds#awanti polymoulds#high speed bottle moulds#blow mold manufacturers#plastic mould maker#pet blow mould#mouldmanufacturers
0 notes
Text
Revolutionizing Reinforcement: Why SNTp Rebar Couplers Are the Future of Concrete Construction
In the ever-evolving world of construction, innovation is the key to achieving strength, efficiency, and sustainability. Among the critical components ensuring structural integrity in modern concrete construction are rebar couplers. These small yet powerful devices have redefined how steel reinforcements are connected, offering an efficient alternative to the traditional method of lapping. At the forefront of this innovation stands SNTp, a trusted brand delivering high-quality rebar couplers engineered for durability, performance, and reliability.
What Are Rebar Couplers?
Rebar couplers are mechanical devices used to join two steel reinforcing bars (rebars) together in a straight line, without the need for lap splicing. These couplers facilitate a mechanical connection by screwing, swaging, or threading both bars into a common sleeve or connector. The result is a continuous load path with enhanced strength, reduced congestion, and improved alignment of reinforcement.
The Problem with Lap Splicing
Traditional lap splicing requires overlapping steel bars by a specific length to ensure load transfer, which:
Increases steel consumption.
Adds unnecessary congestion to the reinforcement cage.
Leads to material wastage.
Requires additional labor and time for precise execution.
In contrast, rebar couplers offer a neat, compact, and more efficient alternative.
Advantages of SNTp Rebar Couplers
SNTp has designed and manufactured rebar couplers that meet the highest standards in safety, precision, and performance. Here’s why SNTp couplers are the preferred choice among engineers and contractors:
1. Superior Strength and Durability
SNTp rebar couplers are designed to exceed the tensile strength of the connected rebar. Whether used in seismic zones or high-load bearing structures, these couplers ensure a continuous stress transfer mechanism for optimal performance.
2. Time and Cost Efficiency
Using couplers significantly reduces installation time and labor. With SNTp’s precisely engineered designs, contractors experience faster execution and lower overall costs, especially in high-rise buildings and complex structures.
3. Less Steel, More Savings
By eliminating the need for overlapping lengths, SNTp couplers reduce steel usage by up to 40%, making them a cost-effective and sustainable option in today’s resource-conscious industry.
4. Compact Design for Congested Areas
In columns, beams, and other congested reinforcement areas, SNTp’s compact coupler design ensures easy installation without compromising the layout or concrete flow.
5. Versatility and Compatibility
SNTp offers a wide range of coupler types — standard, position, transition, and weldable couplers — that cater to different rebar diameters and project specifications. Whether you’re working with vertical connections, extensions, or retrofitting, there’s an SNTp solution to match.
Applications Across the Industry
SNTp rebar couplers are widely used in:
High-rise buildings: For vertical continuity of rebars.
Bridges and flyovers: Where long rebar continuity and minimal steel congestion are essential.
Dams and tunnels: For structural safety in high-pressure zones.
Industrial and infrastructure projects: Where speed and strength are vital.
Why Choose SNTp?
At SNTp, innovation meets quality. Every product is thoroughly tested, meeting both national and international standards for tensile strength, fatigue resistance, and corrosion protection. With a commitment to precision engineering and continuous research and development, SNTp delivers couplers that exceed expectations in real-world performance.
Moreover, SNTp offers technical support, customized solutions, and on-site training, ensuring that clients get not only a product but a full-fledged support system to streamline their construction process.
Final Thoughts
As the construction industry pushes the boundaries of design and durability, adopting smarter solutions like SNTp Rebar Couplers is no longer optional — it’s essential. By enabling stronger, faster, and more economical connections, these couplers are laying the foundation for a new era in concrete reinforcement. Build stronger. Build smarter. Build with SNTp.
1 note
·
View note
Text
Electromagnetic Flow Meters: Troubleshooting Common Issues
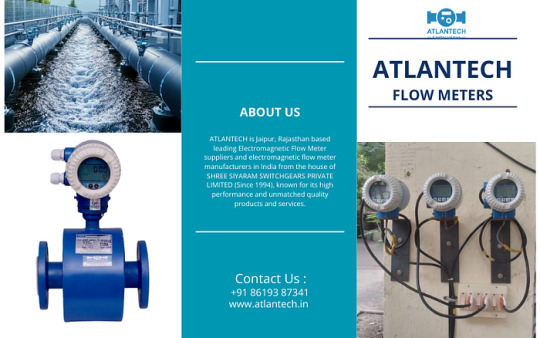
Electromagnetic flow meters, often called magmeters, are widely used in various industries for accurate flow measurement of conductive fluids. Known for their high precision and minimal maintenance, these meters are ideal for applications in water treatment, food processing, chemicals, and more. However, like any other instrumentation device, magmeters can occasionally run into issues.
As one of the most trusted names in the industry, Atlantech believes that understanding common problems and knowing how to troubleshoot them can save valuable time and prevent costly downtime. In this blog, we will explore frequent issues with electromagnetic flow meters and how to resolve them effectively.
1. No Flow Reading (Zero Output)
Possible Causes:
No actual flow in the pipeline
Faulty power supply or disconnected wiring
Incorrect grounding or poor earth connection
Sensor or transmitter failure
Troubleshooting Tips:
Check if there is actual fluid flow in the pipe.
Inspect the wiring and power connections.
Ensure that the flow meter is properly grounded.
If the problem persists, verify the transmitter and sensor functionality using a diagnostic tool.
2. Inaccurate Flow Readings
Possible Causes:
Partially filled pipe
Air bubbles or gas entrainment in the fluid
Magnetic or electrical interference
Incorrect calibration or settings
Troubleshooting Tips:
Make sure the pipe is completely filled with liquid.
Install air release valves if air bubbles are present.
Keep the magmeter away from high-voltage lines and magnetic sources.
Recheck the calibration settings and perform a zero-point calibration if needed.
3. Fluctuating Readings
Possible Causes:
Unstable fluid flow
Loose electrical connections
Ground loop problems
Interference from nearby equipment
Troubleshooting Tips:
Ensure the fluid flow is steady and not pulsating.
Tighten all electrical connections and shield the signal cables.
Use isolated power supplies and proper grounding techniques to eliminate ground loops.
Physically separate the flow meter wiring from other control cables.
4. Display or Output Failure
Possible Causes:
Power issues
Faulty display unit
Damaged cables or connectors
Corrupted firmware
Troubleshooting Tips:
Test the power supply and confirm voltage levels.
Replace or repair the display panel if needed.
Check for damaged cables or loose connections.
Update or reflash the firmware under expert guidance.
5. Coating or Scaling of Electrodes
Possible Causes:
Buildup of materials like lime, iron, or biological matter
Use in high-solid or sticky fluid applications
Troubleshooting Tips:
Periodically inspect and clean the electrodes using suitable cleaning agents.
Use electrode cleaning functions if your magmeter model supports it.
For difficult fluids, consider using flow meters with self-cleaning electrodes.
6. Error Codes or Diagnostic Messages
Modern electromagnetic flow meters often have diagnostic features that display error codes or messages for easier troubleshooting.
Troubleshooting Tips:
Refer to the user manual for the meaning of each error code.
Reset the device if required.
Contact the manufacturer for support if you are unable to resolve the issue.
Best Practices to Prevent Flow Meter Issues
Always install the flow meter according to the manufacturer’s instructions.
Maintain a straight pipe length upstream and downstream for accurate readings.
Ensure proper grounding and shielding of cables.
Schedule regular maintenance and calibration checks.
Train staff on basic troubleshooting steps.
Conclusion
Electromagnetic flow meters are highly reliable, but like any device, they can encounter problems. By understanding the common issues and following proper troubleshooting techniques, you can ensure the longevity and performance of your flow meter system.
If you’re looking for high-quality and durable magmeters, Atlantech stands out among the top Electromagnetic Flow meter manufacturers in India. With cutting-edge technology, expert support, and decades of experience, we ensure seamless flow measurement for your critical operations.
Need help with your electromagnetic flow meter? Contact Atlantech today for expert advice, custom solutions, and unmatched service support.
#electromagnetic flow meter#flow meters#electromagnetic flow meter suppliers in india#electromagnetic water meter#electromagnetic flow meter manufacturers in india#electromagnetic flow meters#digital water flow meter india
0 notes
Text
How to Connect MySQL to Power BI (Without Writing a Single Line of Code!)
Data is a big deal. No, scratch that data is everything when it comes to making smart business moves. And that’s exactly why 80% of companies are investing heavily in data analytics.
If you’re still stuck manually exporting and importing data between MySQL and Power BI, you’re wasting valuable time. The good news? You can automate the entire process and get real-time insights without writing a single line of code. Sounds amazing, right?
This guide will walk you through how to integrate MySQL with Power BI, automate data syncs, and level up your analytics game effortlessly.

Why Should You Connect Power BI with MySQL?
Before we jump into the steps, let’s break down why this integration is a game-changer.
Power BI & MySQL: A Perfect Match
🔹 Power BI → A top-tier data visualization tool that helps you create stunning dashboards and reports.
🔹 MySQL → One of the most widely used open-source databases, perfect for handling massive amounts of structured data.
When you connect MySQL to Power BI, you get the best of both worlds—rock-solid data storage with real-time, interactive visualizations. Imagine not having to manually refresh reports or pull CSV files every time your data updates.
The best part? Thanks to SaaS integration platforms like Konnectify, you don’t need a developer to make it happen.
💡 Fact: Automating data syncs can save up to 50% of the time spent on manual reporting.
How to Connect MySQL to Power BI (Step-by-Step Guide)
What You’ll Need
✔️ A Power BI account ✔️ A MySQL database ✔️ MySQL ODBC Connector (This acts as the bridge between MySQL and Power BI) ✔️ A Konnectify account to automate the integration
Step 1: Install MySQL ODBC Connector
1️⃣ Head over to the MySQL official website and download MySQL Workbench if you don’t have it. 2️⃣ Install the MySQL ODBC Connector this is what allows Power BI to talk to MySQL.
Step 2: Connect MySQL Database to Power BI
1️⃣ Open Power BI Desktop 2️⃣ Click on Get Data → MySQL Database 3️⃣ Enter your server details and credentials 4️⃣ Click Connect to pull in your MySQL tables
🚀 Boom! Your data is now inside Power BI. But let’s take it a step further—let’s automate the entire process so you never have to manually refresh again.
Automate MySQL Data Sync with Power BI Using SaaS Integration
Here’s where Konnectify makes life ridiculously easy.
Instead of manually updating reports, Konnectify automates everything with zero coding.
How to Set Up Konnectify for MySQL → Power BI Automation
1️⃣ Log into Konnectify 2️⃣ Select MySQL from the app marketplace 3️⃣ Set up a trigger like “New data entry in MySQL” 4️⃣ Choose an action like “Create row in Power BI” so your reports update automatically 5️⃣ Customize your workflow with Konnectify’s drag-and-drop builder and hit Activate
And that’s it! Your Power BI dashboard now updates in real-time whenever MySQL gets new data. 🎉
💡 Real-World Example: A finance team using MySQL to store transactions can automatically generate financial reports in Power BI without touching a spreadsheet.
🔗 Want a more detailed walkthrough? Check out this step-by-step guide from the Konnectify blog.
5 Game-Changing Use Cases for Power BI + MySQL Integration
Still wondering why this setup is worth it? Here’s how real businesses are using it:
1. Automate Financial Reports 💰
Sync MySQL’s financial data with Power BI to auto-generate revenue dashboards and track expenses in real-time.
✅ Fact: Real-time analytics can boost operational efficiency by 20%.
2. Analyze Sales Data 📊
Use Power BI to visualize sales trends, customer acquisition costs, and churn rates straight from MySQL.
3. Manage Inventory in Real-Time 📦
No more stockouts! Set up dashboards to track inventory levels and trigger alerts when stock is low.
4. Monitor Customer Support Performance 🎧
Track response times, ticket volume, and resolution rates with live MySQL data in Power BI.
5. Improve Project Management 🚀
Connect Power BI and MySQL to track deadlines, workloads, and team performance all automated!
Frequently Asked Questions (FAQs)
1. Can I Connect Power BI to MySQL Without Coding?
Yes! With SaaS integration via Konnectify, you can set up MySQL-Power BI sync without writing a single line of code.
2. How Can I Get Real-Time Updates in Power BI from MySQL?
Automate it using Konnectify. Any updates in MySQL will instantly reflect in Power BI dashboards no manual refresh needed.
3. Why Use Konnectify for MySQL + Power BI?
No coding needed—anyone can use it
Automates reporting so you don’t have to
Works with 150+ apps, making it the best SaaS integration tool for automation
Final Thoughts
Let’s be real—manual data exports are a waste of time. If you want real-time Power BI dashboards, integrating MySQL is a must. And with SaaS integration tools like Konnectify, you can set up automated syncs in minutes—no coding required.
🔗 Want to see how it works? Check out the full guide here: How to Connect Power BI to MySQL Database.
Now go automate your analytics and thank yourself later! 🚀
#it services#saas development company#saas platform#saas#saas technology#software#b2b saas#information technology#software development#ipaas
0 notes
Text
Understanding the Different Types of Forged Garden Fittings

Understanding the Different Types of Forged Garden Fittings
Forged garden fittings are the unsung heroes of a beautiful and functional garden. From securing trellises and supporting climbing plants to connecting irrigation systems and building sturdy garden structures, these robust components play a crucial role. Understanding the different types of forged garden fittings available is essential for any gardener, DIY enthusiast, or landscape professional. This guide, brought to you by IQS Engineering Solutions, your authorized distributor for custom-forged garden fittings, will break down the various options and help you choose the perfect fittings for your next project.
What are Forged Garden Fittings?
Forged garden fittings are metal components crafted through a forging process. This process involves shaping heated metal using compressive forces, resulting in exceptionally strong and durable fittings. Unlike cast fittings, forged fittings offer superior resistance to stress, impact, and weathering, making them ideal for outdoor applications. At IQS Engineering Solutions, we specialize in providing high-quality forged garden fittings tailored to our clients' specific requirements.
Common Types of Forged Garden Fittings:
The world of forged garden fittings is diverse, offering a range of options to suit various needs. Here are some of the most common types:
Connectors: These fittings are designed to join different elements of your garden structure. Examples include:
Tee Connectors: Used to create three-way connections, ideal for building frames and supports.
Elbow Connectors: Perfect for creating 90-degree angles in structures like trellises and pergolas.
Straight Connectors: Used to join two pieces of pipe or tubing in a straight line.
Brackets: These provide support and stability to various garden features. Common types include:
Wall Brackets: Used to attach structures like shelves or trellises to walls or fences.
Post Brackets: Designed to secure posts to a foundation or other surface.
Clamps: These versatile fittings are used to grip and secure various materials. Examples include:
Hose Clamps: Used to secure hoses to spigots or other fittings in irrigation systems.
Pipe Clamps: Designed to secure pipes and tubing in place.
Hinges: These allow for movement between two connected parts, ideal for gates, doors, and other moving elements in your garden.
Rings and Hooks: These provide anchor points for hanging plants, tools, or other garden accessories.
Choosing the Right Forged Garden Fittings:
Selecting the appropriate forged garden fittings depends on several factors:
Material: While various metals can be forged, consider factors like corrosion resistance and strength. At IQS Engineering Solutions, we can advise on the best materials for your specific application.
Size and Dimensions: Ensure the fittings are compatible with the other components you're using in your project.
Strength and Durability: Choose fittings that can withstand the weight and stress of your garden structure. Forged fittings, in general, offer excellent strength.
Aesthetics: While functionality is paramount, consider the visual appeal of the fittings and how they complement your garden design.
Why Choose IQS Engineering Solutions?
IQS Engineering Solutions is your trusted partner for high-quality, custom-forged garden fittings. As an authorized distributor, we offer:
Bespoke Solutions: We understand that every garden project is unique. We work closely with our clients to understand their specific requirements and provide tailored solutions. 1 1. services.samuibuild.com services.samuibuild.com
Expertise and Experience: Our team has extensive knowledge of forging techniques and can advise you on the best materials and designs for your needs.
Quality Assurance: We are committed to providing top-quality forged garden fittings that meet the highest standards of durability and performance.
Contact Us Today!
For all your forged garden fitting needs, contact IQS Engineering Solutions. We are here to help you bring your garden vision to life with durable, reliable, and aesthetically pleasing fittings. Let us create the perfect forged solutions for your next project. We forge your ideas into reality.
0 notes
Text
Tools Needed for Busbar Trunking Installation

Busbar trunking systems are an efficient and reliable way to distribute electrical power in buildings and industrial facilities. Installing a busbar trunking system requires specific tools to ensure the process is smooth, safe, and efficient. This guide explains the essential tools needed for a successful busbar trunking system installation. Whether you are a professional or new to the process, understanding these tools will help you achieve better results.
1. Measuring Tools
Accurate measurements are crucial in any installation project, and busbar trunking system installation is no exception. Tools like measuring tapes, laser distance meters, and spirit levels ensure precise alignment and proper positioning of busbars. Errors in measurement can lead to misalignment, which can cause operational inefficiencies or safety hazards.
2. Drilling Tools
Drilling tools are essential for creating holes to mount support structures and secure the busbar trunking system. Power drills and hammer drills are commonly used, depending on the material of the mounting surface. Ensure you use the right drill bits to match the surface type, such as concrete, metal, or wood. Proper drilling ensures that the system is firmly anchored, enhancing its durability and reliability.
3. Cutting Tools
During the installation process, busbars or support structures may need to be adjusted to fit specific dimensions. Cutting tools like hacksaws, circular saws, or metal shears are used for this purpose. These tools help in achieving clean cuts, ensuring that the components fit together seamlessly. Using the right cutting tool is vital to avoid damaging the busbars, which can affect the system's efficiency.
4. Torque Wrenches
Torque wrenches are essential for tightening bolts and screws to the correct torque specification. Over-tightening or under-tightening can compromise the integrity of the busbar trunking system. Properly torqued connections ensure that the system operates safely and efficiently, reducing the risk of electrical faults.
5. Insulation Testing Equipment
Testing the insulation of the busbar trunking system is a critical step in the installation process. Insulation testers or megohmmeters are used to verify that the insulation resistance meets the required standards. This step ensures the system is safe to operate and reduces the risk of electrical hazards.
6. Alignment Tools
Alignment tools like laser levels or plumb bobs are used to ensure that the busbar trunking system is installed in a straight line and at the correct angle. Proper alignment not only enhances the appearance of the system but also ensures that electrical connections are stable and reliable.
7. Cable Crimping Tools
Busbar trunking systems often require connections to be made with cables. Cable crimping tools are used to attach connectors securely to the cables. High-quality crimping ensures a strong and reliable connection, which is essential for the system's performance. Investing in durable crimping tools can make the installation process easier and more efficient.
8. Lifting and Handling Equipment
Busbars and their support structures can be heavy, especially in large-scale installations. Lifting and handling equipment such as hoists, pulleys, or forklifts may be required to move and position the components safely. Using the right equipment reduces the risk of accidents and ensures that the installation is carried out smoothly.
9. Marking Tools
Marking tools such as chalk, markers, or pencils are used to indicate measurements and alignment points on surfaces. These markings guide the installation process and help avoid mistakes. Clear and precise markings ensure that all components are installed in the correct positions.
10. Safety Equipment
Safety should always be a priority during busbar trunking system installation. Personal protective equipment (PPE) such as gloves, helmets, safety goggles, and insulated boots protects installers from potential hazards. Additionally, tools like voltage detectors and circuit testers are used to ensure the working environment is safe.
11. Electrical Testing Tools
After installation, electrical testing tools like multimeters and clamp meters are used to check the system's functionality. These tools help verify that the busbar trunking system is operating correctly and efficiently. Regular testing during and after installation ensures the system's reliability.
12. Fastening Tools
Fastening tools like spanners, screwdrivers, and impact drivers are used to secure various components of the busbar trunking system. These tools come in different sizes and types, so it’s important to use the right tool for each task to ensure a secure fit.
13. Documentation Tools
Keeping proper records during installation is crucial. Tools like notebooks, digital tablets, or smartphones can be used to document measurements, test results, and other important details. This documentation helps in future maintenance and troubleshooting.
The Role of Professionals in Installation
Installing a busbar trunking system is a specialized task that requires expertise and precision. Professional service providers like Manikaran Enterprises offer reliable Busbar Trunking System Installation Services in India, ensuring the process is carried out efficiently and safely. By using the right tools and following proper procedures, professionals can guarantee optimal performance of the system.
Conclusion
The installation of a busbar trunking system involves various tools and steps to ensure its success. From measuring and cutting to testing and fastening, each tool plays a vital role in achieving a safe and efficient setup. Partnering with experts like Manikaran Enterprises ensures access to top-notch Busbar Trunking System Installation Services in India, making the process hassle-free and reliable. With the right tools and professional assistance, you can ensure your busbar trunking system operates smoothly and safely for years to come.
0 notes
Text
1. Pipe Cutters
Purpose: Used for cutting gas pipes to the required length.
Types:
Manual Pipe Cutters: Ideal for smaller pipes.
Rotary Pipe Cutters: Provide a clean, precise cut for larger diameters.
Benefits: Ensures a smooth, straight cut, which is essential for leak-proof connections.
2. Pipe Benders
Purpose: Used to bend gas pipes without causing kinks or cracks.
Types:
Handheld Pipe Benders: Suitable for smaller pipes.
Hydraulic Pipe Benders: Used for larger or more rigid pipes.
Benefits: Allows installers to navigate pipes through tight spaces and around obstacles.
3. Pipe Wrenches
Purpose: Essential for tightening and loosening pipe fittings and connections.
Features:
Adjustable Jaws: Can grip pipes of various sizes.
Heavy-Duty Build: Designed to provide strong leverage without damaging the pipe.
Benefits: Provides a secure grip, reducing the risk of leaks.
4. Threading Machine
Purpose: Creates threads on the ends of pipes, allowing them to be screwed into fittings and connectors.
Features:
Electric or Manual: Options available depending on the scale of the job.
Adjustable Die Heads: For threading pipes of different diameters.
Benefits: Ensures a tight, leak-proof seal between pipes and fittings.
5. Pipe Fitting Tools
Purpose: Used to fit and join pipes together securely.
Includes:
Flaring Tools: For creating flared pipe ends.
Crimping Tools: Used for compression fittings.
Deburring Tools: Smooth out the edges of cut pipes.
Benefits: Ensures a secure connection, reducing the risk of leaks.
6. Gas Leak Detectors
Purpose: Detects the presence of gas leaks during and after installation.
Types:
Electronic Gas Leak Detectors: Provides immediate, accurate readings.
Handheld Gas Sniffers: Portable devices for on-site inspections.
Benefits: Enhances safety by identifying potential leaks before they become hazardous.
7. Pressure Testing Equipment
Purpose: Used to test the integrity of the gas pipeline before it's put into service.
Types:
Pressure Gauges: Monitor the pressure levels within the pipeline.
Hydrostatic Test Pumps: Used for testing the pressure capacity of the pipes.
Benefits: Ensures the pipeline can handle operational pressures without leaking.
8. Torque Wrenches
Purpose: Ensures that bolts and fittings are tightened to the manufacturer's specifications.
Features:
Adjustable Torque Settings: Provides precise control over the amount of force applied.
Benefits: Prevents over-tightening, which can damage fittings and cause leaks.
9. Pipe Locators
Purpose: Helps identify the location of existing underground gas pipelines to avoid damaging them during installation.
Features:
Electromagnetic Detection: Pinpoints the location of metallic pipelines.
Benefits: Prevents accidental damage to existing utilities, enhancing safety and efficiency.
10. Personal Protective Equipment (PPE)
Includes:
Safety Gloves: Protects hands from sharp edges and hot surfaces.
Safety Goggles: Shields eyes from debris during cutting and threading.
Flame-Resistant Clothing: Reduces the risk of injury in case of a gas-related fire.
Benefits: Ensures the safety of installers throughout the installation process.
11. Welding Machines and Soldering Equipment
Purpose: For joining metal pipes securely.
Types:
Arc Welders: Ideal for heavy-duty pipelines.
Soldering Tools: For copper and smaller pipelines.
Benefits: Provides strong, leak-proof joints essential for gas lines.
12. Pipe Clamps and Supports
Purpose: Holds pipes in place during installation and testing.
Features:
Adjustable Sizes: Can accommodate various pipe diameters.
Benefits: Ensures stability and reduces stress on pipeline connections.
Conclusion
Gas pipeline installation is a specialized field that requires precision, expertise, and the right set of tools and equipment. From cutting and bending pipes to testing for leaks, each step of the process is critical to ensure the safety and efficiency of the gas supply. By understanding the tools used, homeowners can gain a better appreciation for the professionalism involved in setting up a gas pipeline system.
Whether you’re planning a new installation or considering an upgrade, it's essential to rely on experts who have the right tools and experience. If you’re looking for a reliable gas pipeline installation service, get in touch with our team today for a safe and efficient solution!
#GasPipelineInstallation#HyderabadGasServices#SafeGasInstallation#HomeSafetyFirst#GasPipelineExperts#HyderabadHomes#LPGPipelineInstallation#ApartmentGasSafety#VillaGasSolutions#HyderabadLiving#HomeSafetyHyderabad#EfficientGasSolutions#GasPipelineForHomes#HyderabadApartments#TrustedGasInstallers#SmartHomeSafety#ResidentialGasPipeline#HyderabadRealEstate#ExpertGasTechnicians#SafeLivingHyderabad#LPGSafety#HomeGasSolutions#PipelineExpert#GasTech#DomesticGasServices#EnergyEfficiency#SmartHomeGas#SustainableEnergy#ProfessionalInstallers#GasPipelinePros
0 notes
Text
How to Choose the Right Accessories for Your Wire Mesh Cable Tray Installation by Madewithless

Installing a wire mesh cable tray system is a reliable way to organize and protect your cables. But to ensure it functions at its best, choosing the right accessories is essential. The right accessories can make installation smoother, enhance system durability, and add layers of protection for cables in various environments. Here’s a guide from Madewithless to help you choose the best accessories for your wire mesh cable tray installation.
Wire Mesh Cable Tray
1. Know Your Installation Environment
The environment where the wire mesh cable tray will be installed impacts which accessories you’ll need. Consider:
Corrosive environments (like factories and outdoor installations) where stainless steel accessories or corrosion-resistant finishes may be necessary.
High-temperature areas may require heat-resistant materials.
Moisture-prone areas benefit from galvanized or coated accessories to prevent rusting.
Choosing accessories tailored to your installation environment improves the system's resilience and lifespan.
2. Choosing the Right Support Brackets
Support brackets are essential to keep your wire mesh cable tray securely in place. At Madewithless, we recommend:
Wall-mounted brackets for easy access along walls.
Ceiling-mounted brackets if the cable tray is overhead.
Floor-mounted brackets for raised floors.
By selecting the right support brackets for your setup, you create a stable system that prevents sagging and protects your cables from strain.
Wire Cable Tray
3. Connectors and Splice Plates for Stronger Joints
Splice plates connect tray sections and create smooth transitions:
Straight splice plates join trays in a straight line.
Angle splice plates allow for 90° and other turns.
Look for high-quality plates that reduce vibration and securely link each tray section for a seamless connection, which also minimizes strain on cables.
4. Dropouts for Better Cable Flow
Dropouts are essential accessories that let cables enter and exit trays smoothly. These help to:
Organize cables at entry and exit points.
Reduce wear and tear by preventing sharp bends.
Minimize strain, prolonging cable life.
Properly placed dropouts prevent tangled cables, ensuring easier access when updates or maintenance are needed.
Wire Cable Tray Manufacturer
5. Cover Plates for Added Protection
Cover plates are a must for installations where cables need extra protection from dust, debris, or moisture. They also:
Improve safety by keeping cables covered, reducing risks of accidental contact.
Enhance appearance for professional, finished setups in offices or commercial areas.
Choose cover plates that fit snugly and provide a sturdy shield for your cables.
6. Compatibility and Quality Standards
Make sure all accessories are compatible with your tray system and meet industry standards. Quality accessories:
Fit securely without gaps.
Enhance load-bearing capacity for larger cable bundles.
Comply with safety regulations to ensure reliable performance.
At Madewithless, our accessories are designed to be fully compatible with our wire mesh cable trays, offering customers a high-quality, consistent solution.
SS Wire Cable Tray
7. Easy Installation Accessories
Select accessories that are easy to install, as they save on both time and labor costs. Quick-mount or pre-assembled options can make your project go more smoothly and reduce the chance of installation errors.
Conclusion
Selecting the right accessories for your wire mesh cable tray installation can transform your setup from standard to exceptional. By taking the time to choose support brackets, splice plates, dropouts, and cover plates that fit your environment and installation style, you’ll create a safer, more efficient cable management system. At Madewithless, our high-quality accessories ensure that your wire mesh cable tray installation is built to last, meeting the unique needs of every workspace.
#wire mesh cable tray#stainless steel wire mesh cable tray#wire mesh cable tray manufacturer#wire cable trays
0 notes
Text
Short answer: Designed objects that are not based on IRL objects will *always* fail somewhere in the cosplay construction phase, be they props OR costumes, and the solution is to simply: simplify. Fearne's staff is a series of very pretty arcs and lines, but since it is not based on a simple IRL object like a stick, its weight and balance get really tricky. There are ways to combat this with some careful material choices and some serious design simplification.
Long answer: Since the staff bends away from a load-bearing structure (like a straight line), has the same visual weight all the way down, is TALLER than the wielder, and has a lot of weight at the top, the whole design is destined to fail in a lot of places. MANY cosplayers way smarter than me have already simplified it into a working IRL object that solves its weight and balance issues, but here's my take on why it's failing.
I want to point out first off that there are lots of things about costume design that are not taught in normal art courses, nor in vis dev, and many things that are taught in costume design do not translate to costume CONSTRUCTION and vice versa. No one is an enemy here, nor am I advocating for a Fearne staff overhaul in the design stage (hi agarthan, BIG RESPECT), I just like doing breakdowns and I make a lot of things in and out of theatrical costuming and cosplay, so let's break it down where an "accuracy or bust" approach may be hindering the practical magic. There is definitely a good and genuine "I want to see people succeed in their pursuit for accuracy" angle here, and I want to honor and fully celebrate that. In some cases with large companies, like PlayStation's "Aloy cosplay guide" page linked here, suggestions and designs are well-meaning but not really practical. Why would Aloy from HZW wear velvet in the technofuture? Is velvet next to the skin practical for an area that sweats as lot, like your neck? Does this material actually look and drape like velvet? (the answer to all these questions are: no.)

That said, I love this sort of guide, and I'm glad to see CR artists continuing in the tradition of putting out explainers to help cosplayers out.
Back to Fearne's staff. The design itself? Breathtaking, but not based in a physical use case (it didn't really *need* to be designed that way, but if we're making it physical, we gotta get picky here). In the grand tradition of many high fantasy designs, we're departing from reality in a way that makes it difficult to construct in an "accurate" or semi-accurate way:
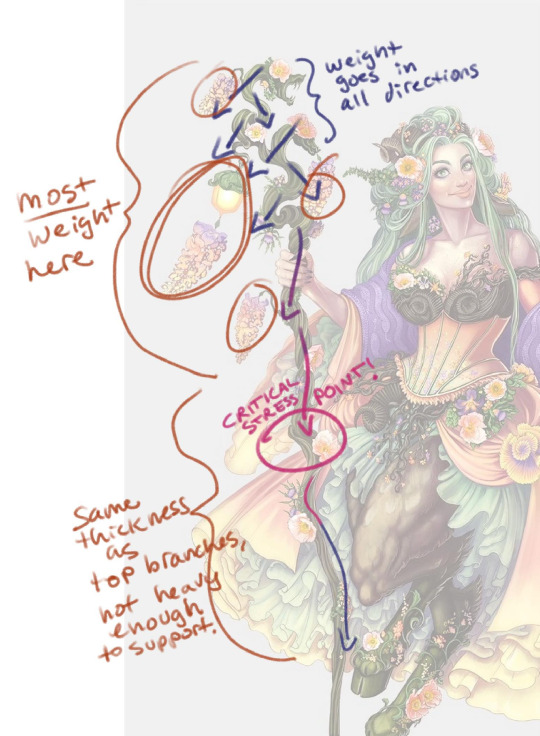
As I illustrate in the sketch above, the weight of each piece follows gravity downwards, and the staff's top is pointing out in all directions. The first 1/3 of the staff seems to have no central structure or cantilever for each bend, so we're in tricky territory already- a branch like this IRL would balance itself with leaves, small twigs, or be supported by a thick central trunk, but neither exist in its now-dead state. There are also thin areas in the top of the staff that would fail to support these bends. To my eyes, I would try to find a central structure to build off first, like a piece of PVC pipe. Weight issues can usually be solved by making the material LIGHTER than the central structure.
To solve this weight and strucutre issues, it's smart to start with a normal and lightweight cosplay material like foam, PVC piping or 3D printed plastic. But, then we're in hot water- you attach PVC pipes together with connectors and 3D prints and foam with glue. PVC connectors are usually heavier than the pipe itself, which makes adding all those bends in the top half very tricky, since they are supporting themselves against MORE bends and no central pipe. Foam could be used, but would not stand up on its own very well, and would end up needing a central structure somewhere before it shakes off your flowers like dead leaves. Gluing 3D prints together with 2-part epoxy creates brittle failure points and adds weight, so we're looking at at least a handful of heavy attachments. At this point, we are gluing connectors to connectors and angles to angles, with no central supporting force, which makes it a HUGE challenge to balance without tipping over or breaking.
Adding hot glue, texture elements like foam or thermoplastic, flowers, and then the lantern to the top adds MORE weight, which means a cosplayer making this would be essentially carrying around more than 3/4 of the weight in the top 1/3 of the staff. PVC or ABS (printed) plastic are simply not strong enough to carry that much weight and distribute it downwards with that many bends and failure points, hence the snappage. Constructing this out of steel or other metal would solve this, but that's not really an accessible cosplay material, so that's out.
Then, about halfway down the staff we have one big critical bend- essentially one big stress point, where you'd have to add glue or a big weighty PVC connector or both. Bad news. The rest of the staff goes on in the same thickness as the top half, which fails to support the weight of the top or direct the gravity of said weight downwards, ending the whole thing in a wobbly, weightless flange that makes it difficult to carry. If you've ever cosplayed a character with a staff, you may know exactly what I mean- you've worked so hard and added so much detail on the top half that you end up with a wet noodle of a staff that neither supports your weight nor supports itself. In the end, you're carrying around an upside-down broom that makes your arms hurt.
But wait, not all is lost! The solution for me is to simplify the staff down, and consider weight, length, and distribution.
A great example of an ultra-simple top-heavy staff design that I think solves these issues is Marceille from dunmeshi:
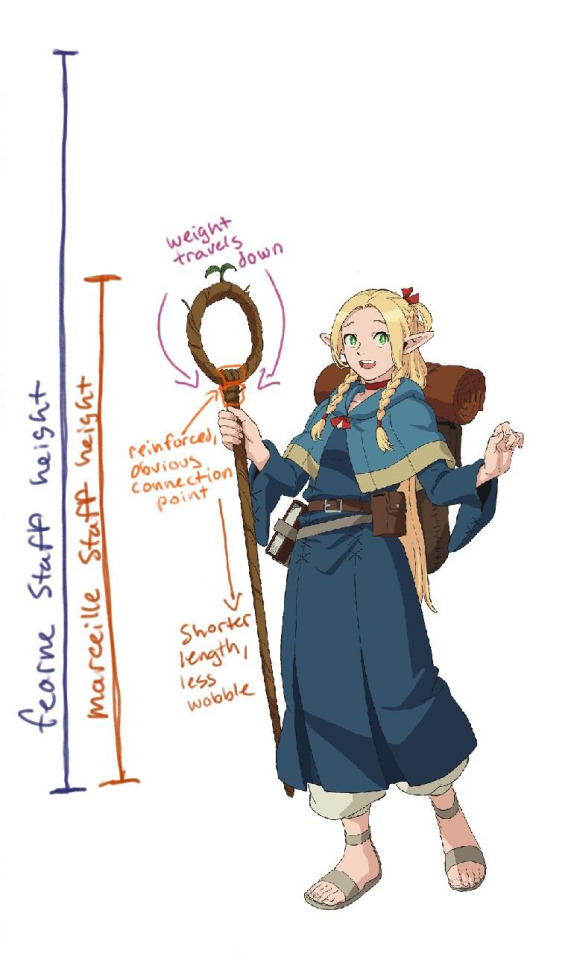
There we go, an obvious connection point, weight distribution, and a short staff that's easier to carry without bonking it against stuff until it breaks.
The suggestions here can absolutely be applied to Fearne's staff without totally redesigning it, and many cosplayers have already simplified it enough to make it work. TinkeringPixie's Fearne staff has dramatic bends that make the staff a real showstopper, even while simplifying the bends and lengthening their arcs for support, i believe using PVC pipe:

Seirin Cosplay's Fearne staff utilizes a strong central structure to evoke the same design of the OG without creating many failure points:

And there are tons of other examples and ways to approach this staff without losing the overall design language of the thing.
Since we're creating something based on a FANTASY object, and it's ultimately up to cosplayers who are passionate about these characters to really sit down and problem-solve even totally unreal designs. If it's fun for you to make something accurate, have at it. It's my personal goal to throw away accuracy in many cases and warp them so that they work for me, but both approaches absolutely work. Starting with simple shapes and IRL garments is always, always easier for me than starting with a design and trying to troubleshoot.
I always appreciate it when designers break down their work, but more often than not, actually constructing an object will reveal its limitations, and trying to reverse engineer a fantasy object is more of a headache than it is a help. Start with something real and time-tested, then add rather than subtract, and the difference in your costume will definitely show through.
A Fearne Cosplayer told me that the 3d prints of the staff- and often the non-3d prints of the staff- break with almost certain regularity.
Is this true? Has anyone noted a definite weak point? What is wrong with the design that causes that? Where does it break?
Help me help you. What can we do, here?
401 notes
·
View notes
Text
Breathe Easy with Flexibility: Exploring the Power of Flexible Ducts (Ducting Supplies Epping)
At Advanced Duct Systems, your trusted supplier of ducting supplies in Epping, we understand the importance of efficient airflow in your home or business. While rigid ducting remains a popular choice, flexible ducts, also known as flex ducts, offer a unique set of advantages, particularly when dealing with tight spaces or intricate layouts. Let's delve into the world of flexible ducting and explore how it can benefit your ventilation project.

Beyond the Straight and Narrow: Unveiling the Advantages of Flexible Ducts
While rigid ducting offers a robust and reliable solution, its inflexibility can pose challenges in certain scenarios. Here's where flexible ducting shines:
Conquering Tight Spaces: Flexible ducts, as the name suggests, can bend and maneuver around obstacles,��making them ideal for navigating cramped crawl spaces, attics, or areas with existing plumbing or electrical lines.
Simplified Installation: The bendable nature of flex ducts allows for easier installation, especially in retrofit projects where modifying existing structures might not be feasible.
Reduced Labor Costs: The ease of installation often translates to faster completion times, potentially leading to lower labor costs for your ventilation project.
Noise Reduction: Certain types of flexible ducts can dampen sound transmission, contributing to a quieter ventilation system.
Ducting Supplies Epping: Unpacking the World of Flexible Ducts
Not all flexible ducts are created equal. At Advanced Duct Systems, we offer a variety of flex duct options to suit your specific needs:
Insulated vs. Non-Insulated: Insulated flex ducts minimize heat gain or loss during air transmission, improving energy efficiency. Non-insulated ducts are suitable for short runs or applications where temperature control isn't a major concern.
Material Options: We offer flexible ducts constructed from different materials, each with its own advantages. Common choices include aluminum foil, laminated foil/metalized polyester, and PVC-coated polyester.
Diameter and Length: Flexible ducts come in various diameters and lengths to accommodate diverse ventilation requirements. Our team can help you determine the right size for your project.
Advanced Duct Systems Epping: Your Partner in Flexible Solutions
Looking for the best ducting supplies in Epping, including flexible ducts? Here's why Advanced Duct Systems is your ideal partner:
Extensive Product Range: We offer a comprehensive selection of flexible ducts, along with all the necessary accessories for a successful installation.
Expert Guidance: Our knowledgeable staff is here to answer your questions, recommend the most suitable flex duct option for your project, and guide you through the selection process.
Competitive Prices: We provide high-quality ducting supplies at competitive prices, ensuring you get the best value for your investment.
Commitment to Customer Satisfaction: We prioritize your satisfaction and are here to support you throughout your ventilation project.
Imagine Efficient Ventilation Made Easy
Imagine a seamless ventilation system installation, navigating tight spaces with ease thanks to the flexibility of flex ducts. Picture reduced labor costs and a quieter ventilation system contributing to a more comfortable environment. That's the power of flexible ducts!
Beyond Flexible Ducts: A Comprehensive Ducting Solution
While flexible ducts offer unique advantages, Advanced Duct Systems Epping is your one-stop shop for all your ducting needs:
Rigid Ducts: We offer a variety of rigid duct options, perfect for situations requiring a more robust solution.
Ducting Accessories: From connectors and clamps to dampers and grilles, we have all the necessary accessories for a complete ventilation system.
Ventilation System Design: Our team can assist with designing an efficient and effective ventilation system for your home or business.
Contact Advanced Duct Systems Epping Today!
Ready to explore the world of flexible ducts and find the perfect solution for your ventilation project? Contact Advanced Duct Systems Epping today! Browse our extensive selection of ducting supplies, discuss your project requirements with our knowledgeable staff, and get expert advice to achieve optimal airflow in your home or business.
Contact Web - https://ductsystems.com.au/duct-felxible-stainless-steel-suppliers-epping/ Mail - [email protected] Ph - 1300 382848 Address - 3/11 Cooper St Campbellfield VIC 3061 AU
0 notes
Text
CORSAIR’s Hydro X Series custom cooling solutions iCUE LINK

CORSAIR for its Hydro X Series
CORSAIR now offers elements that are enabled with iCUE LINK as part of its unique cooling solutions lineup for the Hydro X Series.
Currently, CORSAIR, a global leader in high-performance gear and systems for gamers, content producers, and PC enthusiasts, revealed the newest additions to the legendary Hydro X Series. These additions include a new water cooling system and a new RGB lighting kit. These items are completely linked with the ground-breaking iCUE LINK Smart Component Ecosystem, which further improves both the functionality and the aesthetics of custom cooling.
iCUE LINK XD5 RGB ELITE LCD
This integration is in line with the company’s dedication to revolutionize DIY custom cooling. With the inclusion of theCORSAIR for its Hydro X SeriesPump/Reservoir and the iCUE LINK XG7 RGB 40-Series GPU Water Blocks, the Hydro X Series now provides even more iCUE LINK-enabled devices, which makes the process of constructing a world-class custom cooling loop simpler than it has ever been before.
iCUE LINK XD5 RGB ELITE LCD is the latest addition to the Pump/Reservoir Combo product family. It follows in the footsteps of the very successful and critically praised CORSAIR XD5 RGB as well as the more recent release of the XD5 RGB ELITE. This model has a market-first 2.1-inch IPS LCD pump screen that has a resolution of 480 by 480 and can dynamically show real-time coolant temps, still photos, or animated GIFs.
The XD5 RGB ELITE LCD’s integration of revolutionary iCUE LINK technology ensures a streamlined build process, eliminating the traditional MOLEX connectors, reducing cable clutter, and enhancing connectivity. The XD5 RGB ELITE LCD is a mix of performance, convenience, and style. At its core, the XD5 RGB ELITE LCD is powered by a Xylem D5 PWM pump motor, which is known for its dependability. It is available in both Stealth Gray and White, accentuated with a gunmetal gray zinc-alloy finish.
GPU Cable for CORSAIR iCUE LINK XG7 RGB 40-SERIES The newest building material to usher in an age of unprecedented ease in construction is called Water Blocks. The improved XG7 RGBs, in contrast to their predecessors, now come equipped with native support for iCUE LINK connection straight out of the box. These water blocks provide complete coverage, ensuring optimum performance while simultaneously lowering temperatures.
The new XG7 RGB series has an emphasis on adaptability, and it continues to provide a number of connection choices. This ensures that the requirements of a wide variety of DIY builders can be addressed without a hitch. In the next weeks and months, a variety of different models that are engineered to accommodate an expanding selection of graphics cards will be made available for purchase.
The new Hydro X Series XT Softline Mesh Tubing is a creative innovation that has been constructed from robust EPDM rubber. It has a loop design that redefines the term. Because of its one-of-a-kind mesh layer, it boasts a sturdy and fashionable appearance that is unrivaled in the custom cooling industry. This tubing, which comes in both black and white, has a unique look while also delivering on its promise of endurance.
By incorporating these most recent advancements, CORSAIR is bringing the Hydro X Series one step closer to meeting the ever-evolving requirements of DIY enthusiasts. The Hydro X Series assures that every component will not only fit together, but will also harmonize with one another to provide an ensemble that is unified, high-performing, and visually stunning. The Hydro X Series symbolizes a symphony of perfection in both performance and design, much as how iCUE LINK brings together a comprehensive selection of components via the use of a uniform cable standard.
Read more on Govindhtech.com
0 notes
Note
okay so uhhhhhh theory (??) for your too many thads fic (which is very cool so far by the way holy shit)
I think the character tree has a lot of significance it's almost definitely true that the "connections" between hexes in the circuit patterns are relations first two (one of which is definitely bart but idk the other, maybe pres. Thawne?) are connected to 2, 3, 4 3 is connected to 5, 6, he cloned them 7 connects back to 6, and 8+9 have connections to no other clone but instead to the bottom of the image (indicating CRAYDL)
but then after that I start wondering if there are other meanings also so here's a list of potential theories (some of which contradict each other) that make me sound like the charlie day conspiracy board meme - solid vs open dots indicate who's going to die and who's not (possible support: 4, 9, 7 (?) all have odd number of solid dots) - actually the death indicator is the placement: the ones who have connectors that seem to go straight off to the side (9, 7, 6, 5, 4) will die - number of connections mean something - solid vs open dots mean something in general (binary???) - direction (vaguely who the non-touching connectors point at) means something - double connectors (like the ones going left off 7) vs single connectors (like the one going left off 5) mean something
of course it could also just be "it looks cool" which if so Extremely Fair They Do Look Very Cool but overthinking is fun so uhhhhhhh here you go LOL
hope you have a great day!
first off i am beyond hyped that ppl care about this fic enough to make theories about it!!????! oh my god???? highest honour, truly
secondly I'll tell you that you are right on the money in regards to the connections between clones denoting who was made from who (or who was made by who). I've been calling it a Character Tree because it also functions as a "family tree" for all these losers
and I'll tell u for free that i didnt actually put a whole lot of thought into open/closed dots or the number of lines beyond the aesthetic, but damn now im wishing i had!!! thats such a smart breakdown it would've been an awesome place to hide a hidden message
#asks#anonymous#im so beyond stoked whenever ppl send me theories#i feel like a grand wizard on my throne hoarding all the secrets
24 notes
·
View notes
Note
Heya! I wanted to cosplay Winter Lissa from Fire Emblem Heroes but I’m having trouble figuring out, well a lot. Mostly a sewing pattern for the top of the dress, the leather corset and figuring out how make a ‘solid’ steel like crinoline. I have one make of boning I believe and velcro and it’s a nightmare to wear but that’s the only thing I see recommended. If you have any advice it would be much appreciated please (*・ω・)ノ
Hello there!

Oh, Fire Emblem designs.
Bodice of the dress:
The type of neckline on this is called a “sweetheart neckline,” so that should help you in your search. To get the most support, you will want to add at least some light boning to the bodice.
I would recommend getting a corset or corset-like pattern for the bodice, and then using the same pattern (but ever so slightly sized up to accommodate the fabric underneath) for the visible corset piece. All you would need to do is stop the corset piece just below the bustline, rather than using the full pattern.
The sleeves you probably won’t need a pattern for – you can use rectangles with elastic in the top and bottom for the puffed part, and then swing a fabric tape measure in an arc to get the bell sleeve pattern or use slash and spread on a rectangle the size of your arm – but if you want to find a pattern for a bell-sleeved blouse or dress and just splice the lower portion of that onto the puffed part, that would work as well.
A very cursory glance at some corset patterns yielded these, but I’m sure there are many more options if you flip through a pattern book: 1 2
Leather corset:
For the corset, you probably won’t find a pattern that is exactly like the shape on the bottom, so you’ll have to create that yourself. If you can find a corset that goes over your hips, it will be easier, but if not, it’s not a big deal.
I would make a mockup with extra fabric at the bottom for the hips, figure out how wide each panel needs to be from there (measure the gaps between the panels and add that amount to the pattern), making sure to wear it over your hoop skirt. Make a second mockup with the added fabric, fine-tune the fit, and create the decorative shaping on the bottom – just draw on the mockup with a marker where you think it looks best, and then transfer that to your paper pattern with a ruler.
You very likely aren’t going to be able to get the perfectly straight panels of dark and light that you see on hers. That’s fine. A corset, by necessity, is cut very curvy, so those lines aren’t going to be perfectly straight while also giving you shape. If you want to create straighter lines or don’t want to have to worry about creating an extra panel for the light parts in the middle, you can applique a lighter fabric on top of the corset.
Make sure that whatever pattern you use, you add boning! I tend to stay away from the pre-cased plastic stuff from most chain fabric stores. If you can access spiral steel, that would be best. Yes, bone it even if you bone the bodice underneath.
Hoop skirt:
The good thing about her hoop is that it’s fully circular – there aren’t any gaps in the horizontal bars – so you can take advantage of normal hoop skirt functioning.
How hoop skirts work is that there are pieces of flat, flexible steel forced into a circular shape by a connector. These pieces of steel want to spring open and stay flat, so connecting them into a hoop directs all that force into keeping the steel in a circular shape. Then, several of these rings of varying diameters are arranged vertically into a skirt – typically by sewing them into fabric, but in this case, you will need thinner vertical supports than a full skirt. The relative sizes of the hoops and how far apart you make them will create the shape – hoops with a large difference between their diameters will create a more triangular look, so you probably want to keep them close to the same size near the bottom and then make them smaller as you go up for her bell shape.
As for tutorials, you’ll probably get more relevant results if you search for “cage skirt tutorial” than it you look for “hoop skirt��� or for Lissa specifically.
Whatever your base material (I recommend steel hoop boning, but that can be hard to work with, so a thin plastic or a plastic boning may also work), you will need to create some kind of decorative exterior to create the metallic look. If you use thin plastic, you can simply paint directly on it. If you use another material, you can case it in metallic silver fabric or you can create an exterior facing of a rigid material (such as posterboard or thin plastic).
And yes, hoop skirts suck to wear. Make sure you have a good waistband on yours so it doesn’t dig in at the waist. It will always be a bit heavy, but if you wore a corset underneath the hoop, it would help distribute some of that weight. For sitting, find chairs with no backs or arms when possible, and if you don’t use a rigid material for the vertical supports, you can collapse it onto itself like a paper lantern. When walking, many materials will allow you to slightly squeeze the hoop skirt in at the sides into a more elliptical shape so that you can fit through doors and not hit people with your skirt and such. Make sure that whatever you use for decorative facing on the cage skirt, if using a flexible material and want to use this technique, is also flexible.
Another tip if you haven’t already thought of it: be sure to purchase plastic ornaments instead of glass! If one falls off during the con or someone bumps into you, you don’t want to end up with shattered glass everywhere.
I hope that helps! Good luck :]
—Fabrickind / Q&A Staff / Twitter
30 notes
·
View notes
Text
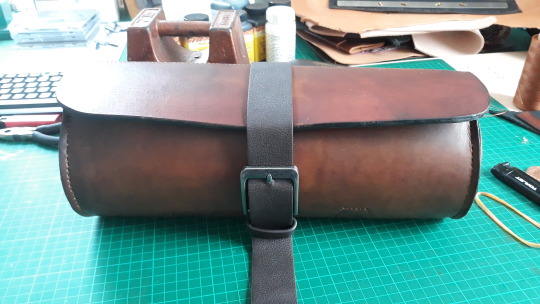
Crown Green Bowls bag build.
( Try saying that after a few drinks hahahahaha )
Hi Guys, real sorry for the long delay on this one, unfortunately real life hit us hard with the passing of our Mother which as I’m sure a lot of you can understand ..it takes it’s toll. However, we are getting back on track and I’m feeling the need to return to the leather. So, as promised, here is the bowls bag. Let’s get straight in.
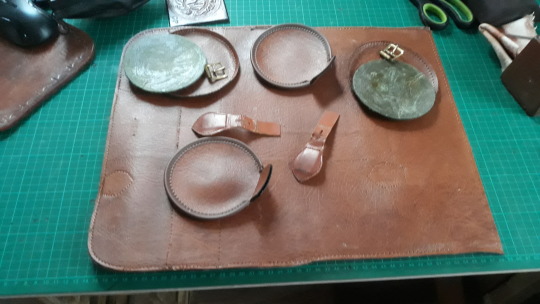
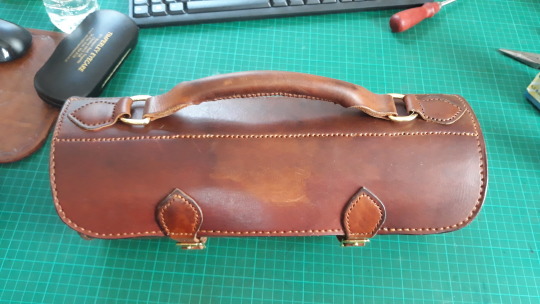
Pic 1 : This project came about as a request from a family member to fix a Bowls carry bag, turned out it was beyond repair so as a surprise I re-made one completely using the old pieces as the pattern.
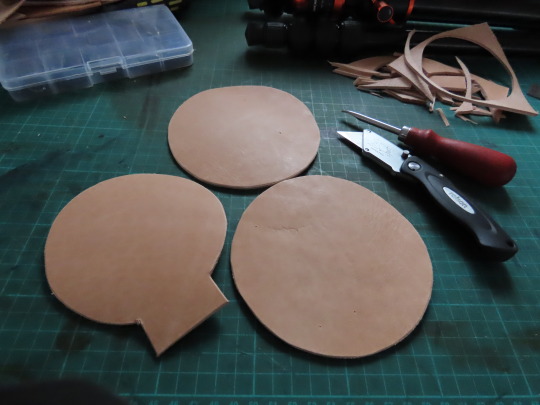
Pic 2 : These are the two end sections and one of the inner ‘dividers’ just cut from new veg tan leather 1.5mm thick.
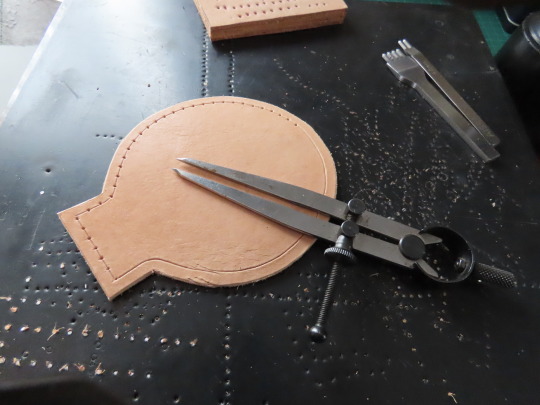
Pic 3 : using dividers I marked a line around the edge and then marked for the new holes.
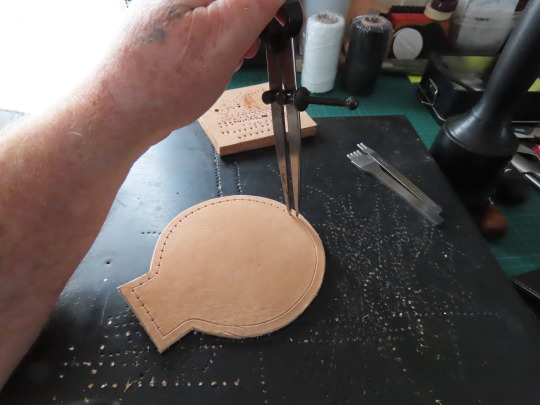
Pic 4 : finishing the marking out, the same proceedure applies for marking all the holes on all the new pieces.

Pic 5 : next step was to punch all holes on all pieces using a 1.5mm single punch.
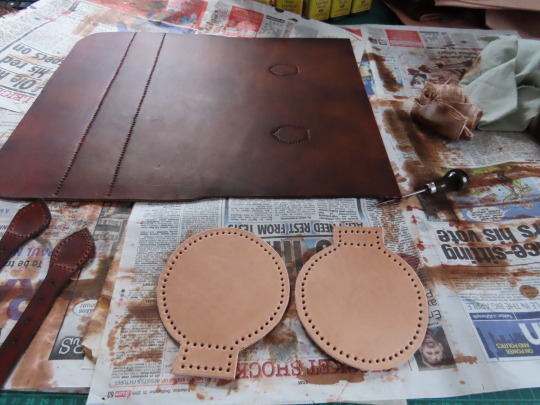
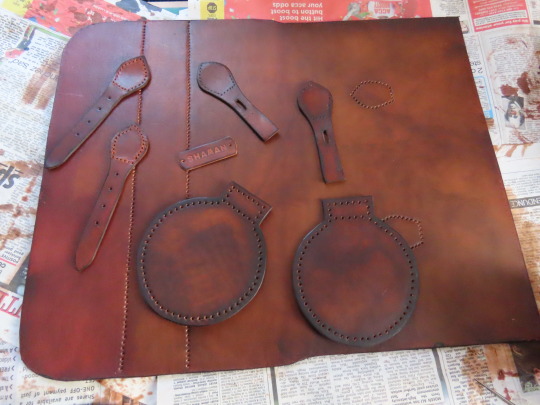
Pic 6 : When all the new pieces were cut out marked and punched, it was time to dye them, I chose a walnut color and gave it 3 coats.
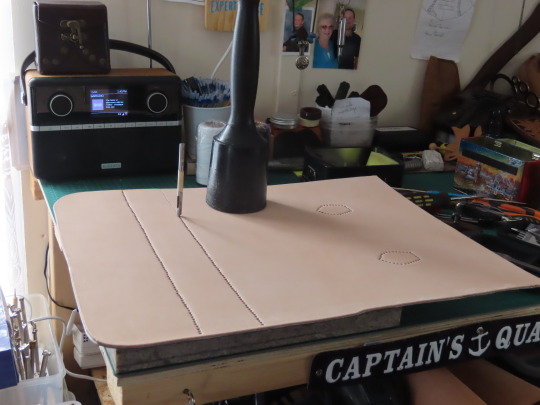
Pic 7 : I cut out a new main body section, transfered all the holes marking with an awl then followed up with the 1.5mm single punch untill i had all the holes made.
Pic 8 : Now all the pieces are ready for the build.
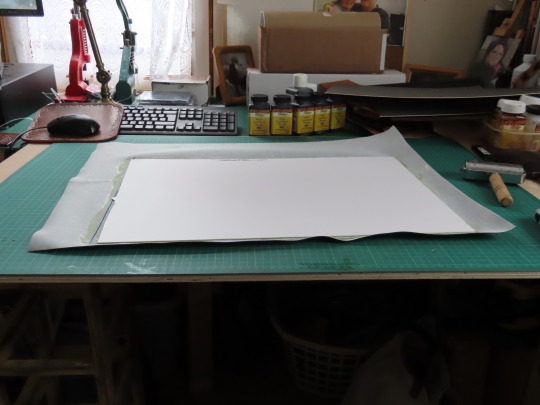
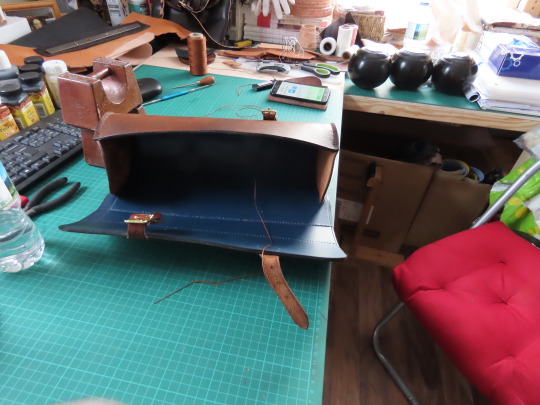
Pic 9 :The main body needs to be thickened up, so, as per the original, I cut a section of card in the shape of the main body and glued it to a nice blue vinyl sheet as shown here, this will eventually become the inner lining. Once dried I trimmed it round the edges glued it to the main body section and continued all holes through these new pieces.
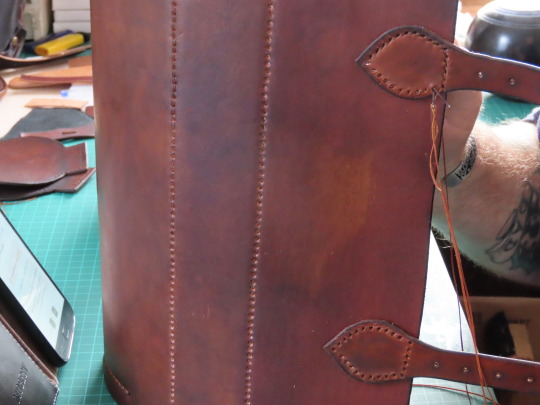
Pic 10 : , I wet the whole thing with a water spray and slowly folded / rolled it and ‘convinced’ it to take the shape I needed, next the end sections were stitched in place using a saddle stitch then I fastened a strap around it to maintain the shape whilst it dried over night. ( I haven’t shown the stitching of these end sections as there are many projects on my blog at ‘Shamencraftprojects showing the procedure, feel free to drop by there and have a look.)
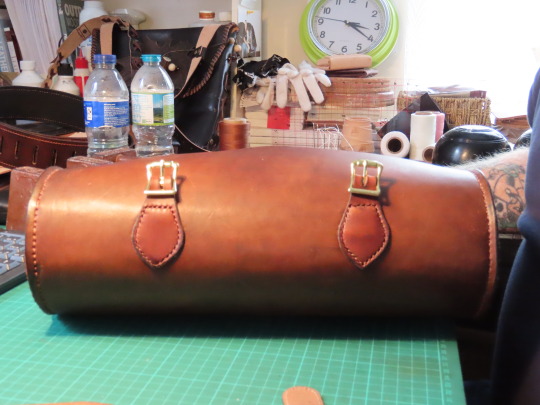
pic 11 : Next day the strap was removed and the case was now dry and holding its shape well.
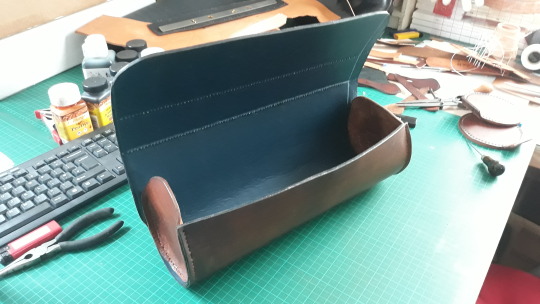
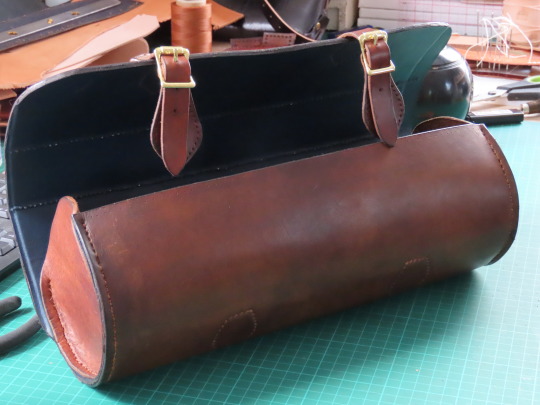
Pic 12 : view of the inner blue vinyl liner.
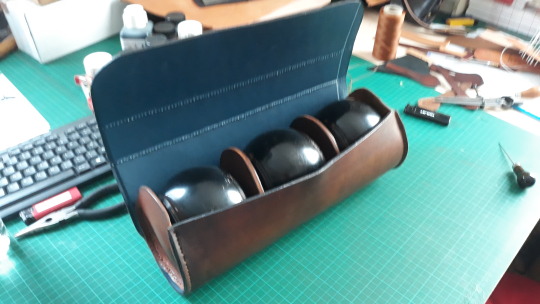
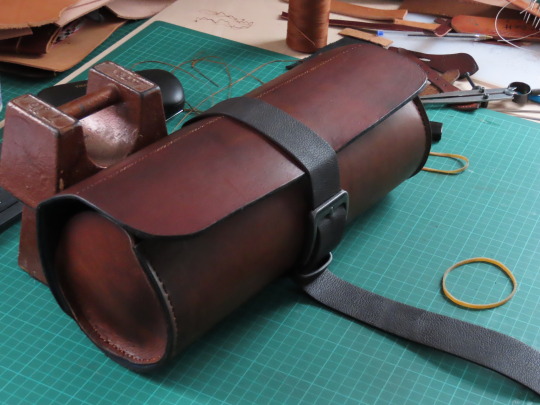
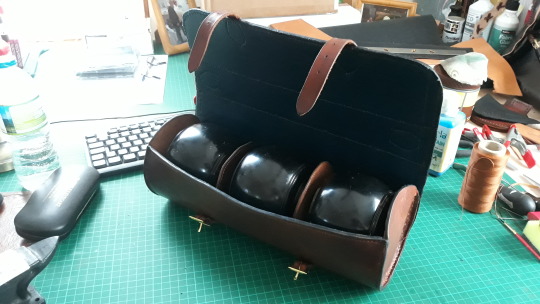
Pic 13 : I placed the Bowls in the case and slotted the dividers in between just to give it some time to stretch, for this I lightly sprayed the outside leather with water. ( As the inner vinyl is water proof ). Again..once dried completely the bowls had done their job and they now fitted in easily.

Pic 14 :I positioned the upper straps, marked lightly, ‘scratched / roughed the area they would sit and then glued them in place, here you see me using an awl to carry the holes through
Pic 15 : Here I’m saddle stitching the upper straps to permanently fix them into place.

Pic 16 : The straps fixed in place.
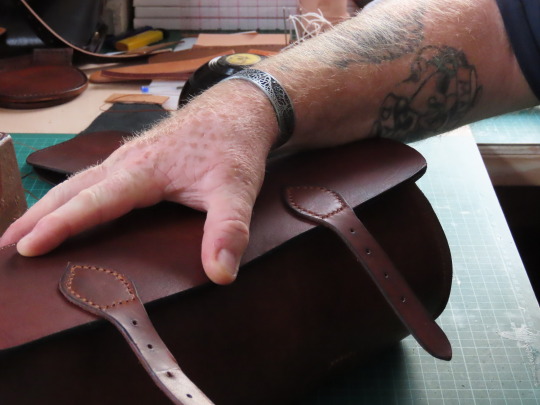
Pic 17 : Folding to see if everything is still lining up,...all ok.
Pic 18 : Now for thelower buckle straps.
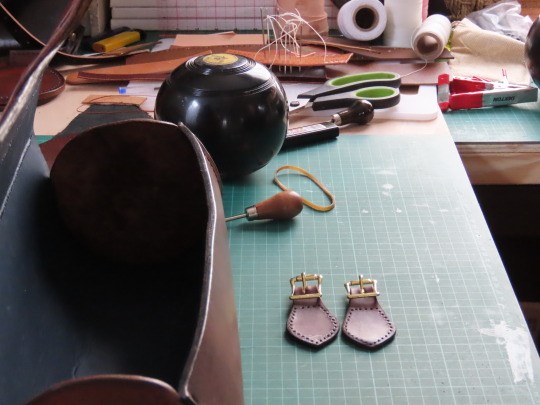
Pic19 : Buckles attached ready to close the case and mark their positions, I use the same tecnique to fit these straps as with the uppers.
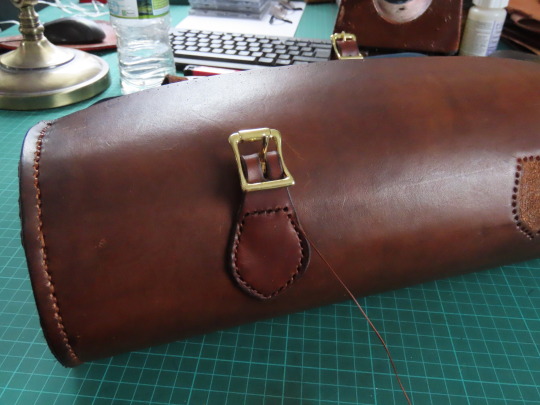
Pic 20 : Once glued into place Icarry the holes through with an Awl and here I’m Saddle stitching it. I chose Gold colored buckles as I personally think it looks good with the dye color.
Pic 21 : view of the inside during stitching of the lower straps.
Pic 22 : All done, permanently fixed.
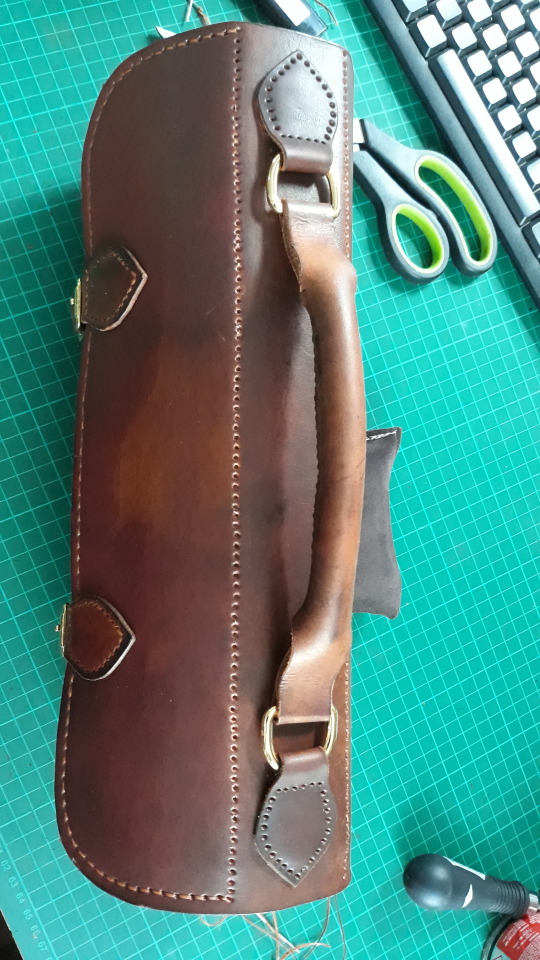
Pic 23 : The buckles and straps fit well together and are looking good. N ow for the handle.
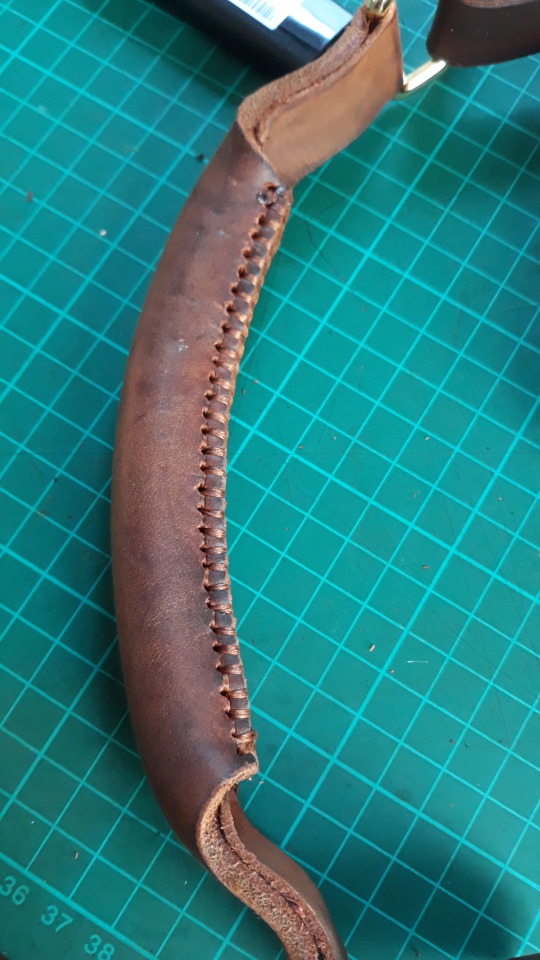
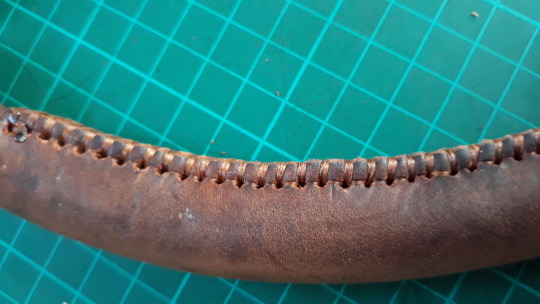
Pic 24 : I decided to make a handle from scratch. I folded a piece of leather then..using my own stitch, which is a basic saddle stitch, but after each saddle stitch you take the stitch over the top passing both needles across each other then move to the next and repeat. It holds the leather very well and you end up with a nice looking and very solid stitch, I folded extra end material over on itself to attach the connectors.
Pic 25 : side view.
Pic 26 : You can see here, I have punched stitch holes all around the edges and along the top, these are to hold the vinyl into place but are decorative too. I’ve glued the handle into position with decorative leather pieces to hold the D-rings.

Pic 26a : During the stitching along the top.
Pic 27 : Another angle.
Pic 27a : Here you can see the stitching around the edges and the handle in place. now for the inside.
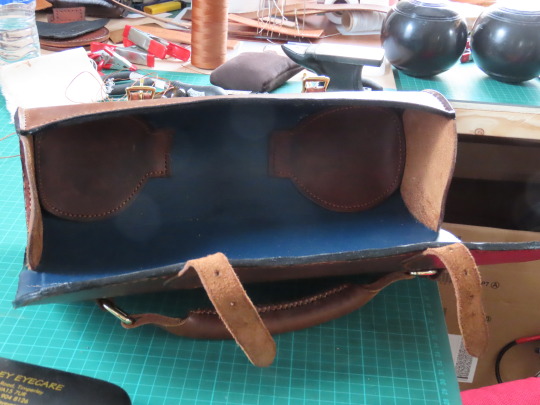
Pic 28 : You can see here the two ‘dividers’ stitched into the case and with decorative stitching around the edges. these can either lie flat as seen here or can be pulled up and placed between thebowls to protect them.

Pic 29 : this initials tag will be fitted later but this shows where it will go.
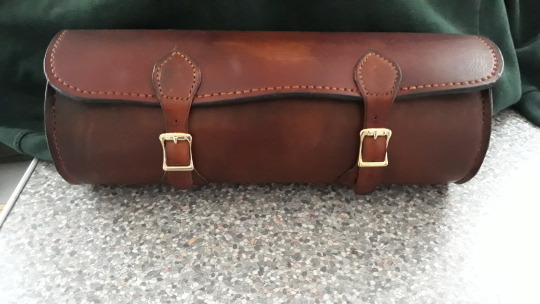
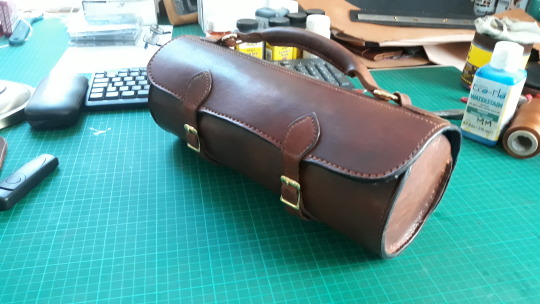
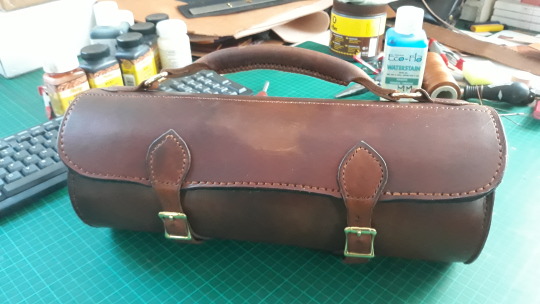
Pic 30 : All that remains to be done is to coat the whole thing in Effax leather balm and then buff to a shine,
Pic 31 : and Pic 32 : All done, one new useable and..even if I say so myself, a good looking leather bowls case.
Pic 32 : Well, I finally got to it, sorry about that, I hope you can understand, it’s been a very hard few years, we lost both my parents, two aunties and 2 cousins all close together, but leathercraft is a fantastic hobby for distracting the mind and I am so glad to be back, thanks for waiting. I have a new project starting in the next day or so..I am making a set of saddle bags hopefully to fit on my new motorbike, I will be making a video of the build as I go along and once done and edited I will put it up on youtube under Shamancraft projects so it would be great if you guys could check out my other vids..only a few at the moment but every like and subscribe etc helps me to build on it and each vid gets longer and better as I gain experience. thanks for your support. See you on the next one..watch this space and as always..Stay Crafty.
16 notes
·
View notes
Text
Cold Snap: Chapter 8
Sorry for the delay, it’s been a rough couple of weeks but I’m starting to bounce back a little. This probably isn’t my best, but I hope you enjoy it all the same.
Story Index
Cold Snap : Chapter 1 | Chapter 2 | Chapter 3 | Chapter 4 | Chapter 5 | Chapter 6 | Chapter 7
* * *
Carl couldn't take his eyes off of Anna as they pushed the gurney around a corner. She looked... Amazing. The way she rocked back and forth, compressing their patient’s chest, making her ponytail bounce each time. Her face was a picture of focus, gaze locked on the young woman beneath her as she forced blood through Shona's ice-cold body. Damn, she was so gorgeous. The way she put her entire soul through her interwoven fingers, into those chest compressions that bent in Shona's ribs rhythmically. He could see she was doing what he had suggested. Putting her passion, their shared passion, into her efforts.
He took a moment, just one moment, to let a small thrill of pleasure shoot through him. Images flashed through his mind, memories of last night and ideas for when they got home. All the toys they could play with. He took a deep breath, first things first, get their patient back. He let out the breath as they crashed through the doors into Trauma 4.
They pulled the gurney across, lining it up next to the trauma bed. Carl let Anna maintain compressions, as the rest of the team unclipped the straps of the backboard. It was a small risk, but they couldn't get Shona into the vest that was spread on the bed while she was still strapped down. The vest was capable of keeping her immobilised, the reinforced back and its own means of being secured doing a close enough job.
"Let's get ready to move her, nice and easy now." Carl commanded, watching as his other nurses and the paramedic got in position. The ambubag was disconnected and dropped on the gurney as Dave gets his hands underneath Shona's shoulders, Kirstie gently supporting her head. Others held her arms and legs, kneeling on the bed so they could reach. "Ok, we're all ready Anna, we'll move on your call."
She nodded, her lips moving, as she started to announce her compressions. "43...44...45...46...47...48...49...50!" She finished, pulling her hands away and rising on one knee, un-straddling Shona's ghostly white body. Anna helped with the transfer, her hands beneath Shona's waist and thighs. They moved her over as fast as they safely could placing her on the already warm vest. Everyone could feel the contrast, between the heat of the water filling the ribbed plastic, and the chill of the flesh of the young woman they were trying to save. They all knew it meant they had time, but there was still a primitive part of each of them that was scared by that cold.
As soon as they placed her down Anna stood on a step and placed her hands back on Shona's chest, resuming her barrage, counting in her head once more, to allow Carl to give his orders. "Let's ready the combo pads, A/P positions in case we need to pace her, then we'll get her wrapped up." Anna kept going with her compressions, in the rhythm enough to be able to look around and watch as Trish tore open some sterile packaging and removed a pair of large square electrodes. Trish peeled off the backing of the first pad, revealing the thick layer of electro-conductive gel. Without being asked Anna raised her hands from the ice-cold sternum beneath them and grabbed the other pad. Like a well-oiled machine, Trish placed the first pad, smoothing the edges to make sure the foam stuck well, a split second before the others log rolled the young woman, allowing Anna to slap the other pad onto Shona's back, similarly fixing it well.
Shona was rolled flat, and Anna's hands immediately settled back in their prior position, though the pad was now between her fingers and Shona's flesh. It had little effect on Anna's compressions. While flexible, the gel was thick and viscous enough that it held its shape enough to allow the force of Anna's professional chest compressions to translate straight through to Shona's sternum, forcing it down and simulating a pulse as her heart was squeezed against her spine. Around her hands Trish was folding in the various panels of the vest and clipping them together, tightening the straps to provide a little bit of immobilisation.
Carl continued to run the code. "Roger, grab me the central line, with the temperature catheter. Kirstie get the monitors changed over; did you get anything from upstairs?"
"No luck on the full ECMO, dialysis machine is on it's way though." Kirstie told him, as she pulled the thick lead from the portable monitor, connecting it to the large one that hung above the bed. It instantly began to whine the monotone cry of asystole and was quickly muted. Everyone knew the situation.
Carl didn't reply to Kirstie as she moved onto the other parts of the monitors. He took in the information, then focused on his next task. He moved around to Shona's head, Dave shifting out of the way. Roger placed a sterile wrapped pack on the corner of the bed, then retreated to the side of the room, where a dozen IV bags were being kept warmed. Carl took the large wide needle from the tray, lining it up along Shona's neck. He pressed it against the large jugular vein, barely visible thanks to the girl's blue skin, then in a smooth motion he pushed it in, sliding the length of the needle neatly into the vein. He wasn't finished though.
Also on the tray was a 20cm long tube, with a spiral that seemed to twist around the thin core, and a bunch of connectors at one end. Carl grabbed it, feeding it into the large opening on the central line, easing it forward, into Shona's body, deep down the vein, towards her heart. Her heart that only moved because Anna was still pressing down, rapidly and rhythmically, squeezing the organ that refused to beat on its own.
* * *
Anna was starting to feel the effect of her compressions on her arms as she crossed the 3-minute mark. She reached 100 in her head, then started over again, going for a fourth round. She could feel the way Shona's chest swelled against her hands as Dave squeezed the ambubag, forcing in air that was promptly forced back out by the actions of her own hands. The thick rubbery temperature vest surrounded the circle left for her hands, Trish having strapped it together, before working on the lower sections until Shona was wrapped up from her neck to her knees.
Anna watched Carl work, seeing his concentration as he slid the catheter into the central line, feeling the way it advanced, making sure it was going in correctly. Eventually the plug where it split into a half dozen connectors nestled into the port that stuck from Shona's neck. Two of the connectors were attached to a small device that began to circulate warmed saline, the device in turn was linked to the monitoring system and, after a few seconds of calibration, Shona's core temperature was displayed for the whole team to see.
"Core temperature of just 19..." Carl said, trailing off slightly with a frown on his face. Anna knew that signified he was thinking hard about a decision. It took a few seconds, then he gave a small nod to himself. Anna was pretty sure it was totally unconscious on his part. "Let's go ahead with the thoracic lavage, Roger, get me 4 chest tubes." Anna cringed internally, but she knew that it was probably Shona's best chance. Carl continued. "Anna, switch off after this round, Kirstie, you take over, Trish go ahead with the NG tube and then place a urinary catheter." It would be needed Anna thought, as warmed saline was being pushed into all of Shona's IV's, including the central line via one of the dangling connectors.
As her internal count approached 100, Anna began to count out loud again. "94...95...96" Kirstie stood up on a step on the opposite side of the bed and shared a nod with Anna as she wove her fingers together and straightened her arms. "...97...98...99...Switch" Anna finished, pulling her arms away. She stepped aside making sure she wasn't in anyone’s way as she shook out her arms, trying to recover quickly. She then set about the task that Carl hadn't spoken out loud.
In the corner of the room were two tall infusers. IV bags could be hung from the top, like a standard drip, but were instead fed into a console that managed the temperature, pressure and flow rate. Anna grabbed them both, one for each side. She placed them by the head of the bed, then headed for a different corner. There, she grabbed two chest drain units, carrying them to the bed, hooking one on each side roughly in the middle of the bed, just next to Kirstie’s legs as she leaned over Shona and delivered compressions.
In the meantime, Carl had almost gotten setup on Shona's other side, the small surgical kit laid out on a small metal trolley. Anna stepped forward, unclipping the straps of the vest and opening one side, revealing Shona's chest. Her skin was still ghostly white, the only visible colour being the soft blues and purples of the bruise forming in the valley between her breasts, caused by the compressions that continued to make her ribs flex inwards.
Roger had been waiting, an iodine-soaked swab on a stick in his hand. A moment after Anna revealed Shona's chest, he smeared the brown disinfectant across it, from up towards her collar bone, down alongside the soft curve of her breast, and over her lower ribs.
"Kirstie, hold compressions." Carl ordered, armed with a gleaming scalpel. As soon as Kirstie lifted her hands Carl lowered the scalpel towards the space between Shona's 2nd and 3rd ribs. He made a few decisive cuts, cutting through the layers of tissue. "Tube." He held out the scalpel, which Anna carefully took, while Roger slapped the chest tube into his other hand. Carl pushed the tube through the hole he had made, sliding it into Shona's chest, between her ribs and the front of her lung. It had taken 10 seconds since compressions stopped to get the tube in.
12 seconds later another tube stuck out, this one lower down between Shona's 5th and 6th ribs, basically on the opposite side of her lung. "Ok, Go." Carl said, prompting Kirstie to resume her barrage. The ends of the two chest tubes swayed and bounced for a few moments but were soon taken in hand by Anna and Carl and connected into what was effectively a loop. From the infuser warmed saline was pumped through the upper tube into Shona's chest cavity, washing over and around her lungs, providing warming throughout her chest, before draining out of the second tube into the sealed container. This container then fed back into the infuser, which would be able to keep the saline warm enough to be effective.
Carl monitored the loop until it was running through fully, ensuring the compressions were causing no problems. He nodded, satisfied. "Right, let's get ready to do the other side, Trish, take over compressions as soon as Anna has arranged the vest." Anna was already folding the vest back over, lining up the tubes to meet gaps and checking that nothing was kinked. As soon as she was done, she slipped around the bed and took position to repeat the entire process on Shona's left-hand side.
* * *
Lucy had guided Jones through the triage area, gratefully handing the wheel chair off to a nurse who came to assist. Zainab also approached, having just finished an exam on one of the collared patients.
"Hey Lucy, who do you have for me?"
"Zee, this is Matt Jones. Spent 5 minutes in near freezing water. No signs of inhalation or injury, just moderate hypothermia. He's been responsive throughout, but I'd recommend a full exam and observation." Lucy said professionally, despite her weariness. They were guided into an empty cubicle and Jones was assisted onto the bed. Lucy leaned against a pillar relaxing a little as Zainab took a chart and started to note things down. "You might want to give psych a call." Lucy's voice carried a joking tone. "I'm pretty sure charging further into a sinking ship falls under crazy."
Jones smirked a little, leaning back on the bed. "I'd say the crazy one is the one who followed me after being told to get off the boat." He still sounded tired but was definitely recovering.
Lucy shrugged. "Someone had to save your ass. You'd be at the bottom of the river if I hadn't."
"True...True..." Jones smiled faded, his tone becoming a little more subdued. "I just hope it was worth it."
Lucy nodded, looking at the floor. "They'll do their best. Just like you did. You gave her a chance if nothing else."
Jones bit his lip, nodding, but his gaze had drifted away from her, staring at nothing. Lucy knew what he was seeing. A mental image of Shona, pale and lifeless. She felt the same way.
Zainab broke them both out of their solemn contemplation. "We should really get you out of those wet clothes Mr Jones, they won't be helping you to warm up."
Jones nodded, groaning as he leaned forward and started to fumble with his uniform. A nurse moved in to assist him. Lucy glanced at him. "I'll be back." She told him, before nodding to Zainab and the nurse. Lucy left the cubicle, initially planning to get a coffee, but with her mind she drifting she was a little surprised to find herself standing outside Trauma 4. Her eyes were drawn to the table. Tracy was performing chest compressions on the young woman on the table. The vest covered most of her chest, but Lucy could see the tubes running out through slits to the containers.
She could see the doctor tidying away the surgical kit and giving more orders. She could see Dave, still rhythmically squeezing the ambu-bag connected to the breathing tube, stood at the head of the bed. And she could see the monitor, that constant, unbroken line that proclaimed Shona's heart was still completely inactive.
51 notes
·
View notes