#UNUserNotificationCenter
Explore tagged Tumblr posts
Visit Tumblr Blog
Explore Tumblr blogs with no restrictions, modern design and the best experience.
Last Seen Tumblr Blogs


Fun Fact
28.6 is the average number of monthly visits per US mobile user.
Text
Giả lập Push Notification trên iOS Simulator
Phiên bản Xcode 11.4 đã cho phép giả lập push notification trên iOS Simulator. Sau đây là hướng dẫn của mình về tính năng mới này.
Yêu cầu
Xcode version >= 11.4
Sample app với chức năng request push notification permission
APNS (Apple Push Notification Service) Payload File
Giả lập push notification bằng cách kéo thả
1. Download Xcode 11.4
Vào thời điểm của bài viết này (23/2/2020), Xcode 11.4 mới ra bản beta, bạn có thể download ở đây.
Nếu bạn đọc được bài viết này vào khi Xcode 11.4 đã release bản chính thức, bạn lên Mac App Store mà download nhé
2. Tạo sample app và request permission để nhận push notification
Trong AppDelegate, import UserNotifications framework:
import UserNotifications
Request permission trong application(_:didFinishLaunchingWithOptions:):
UNUserNotificationCenter.current() .requestAuthorization(options: [.alert, .sound]) {(granted, error) in print("Permission is granted: \(granted)") }
Chạy app và grant permission khi hiện thông báo.
3. Đưa sample app vào background
Nhấn tổ hợp phím Shift + ⌘ + H để đưa app chạy ở background. Để banner của push notification hiển thị trên màn hình, bắt buộc phải thực hiện bước này.
Chúng ta sẽ thực hiện việc hiển thị push notification khi simulator ở foreground sau.
4. Tạo APNS payload file và kéo vào iOS Simulator
APNS payload file là một JSON file chứa các thông tin hiển thị của push notification. Tìm hiểu thêm ở đây.
Đây là file APNS mình tạo cho sample app này.
{ "aps": { "alert": { "title": "Hello", "body": "This is an push notification", "sound": "default" }, "badge": 10 }, "Simulator Target Bundle": "com.tumblr.whoistuanhai.PushNotificationDemo" }
Lưu ý: Giá trị của key Simulator Target Bundle chính là bundle identifier của project.
Giờ thì chỉ việc kéo thả file vừa tạo vào simulator thôi.
Giả lập push notification sử dụng Terminal
Đầu tiên, cần tìm identifier của simulator đang chạy. Trong Xcode, nhấn tổ hợp phím Shift + ⌘ + 2 để cửa sổ "Devices and Simulators". Right click vào simulator đang sử dụng trong list các simulator, chọn Copy Identifier.
Lấy được identifier rồi, chạy câu lệnh sau trong Termial:
xcrun simctl push <simulator-identifier><bundle-identifier><path-to-apns-payload-file>
Nếu muốn bỏ qua bước tìm identifier của simulator và simulator của bạn đang chạy, chạy lệnh sau:
xcrun simctl push --booted <bundle-identifier><path-to-apns-payload-file>
Lưu ý: Nếu APNS payload file đã có key Simulator Target Bundle thì có thể bỏ qua trong câu lệnh.
Ngoài ra, developer @twannl có viết ra Poes - một command line tool giúp ta dễ dàng giả lập push notification mà không cần phải tạo APNS payload file.
Cài đặt Poes sử dụng Mint:
mint install AvdLee/Poes
Send notification:
Poes --bundle-identifier <your-app-bundle-identifier> --verbose
Giả lập push notification khi app đang ở foreground
Implement userNotificationCenter(_:willPresent:withCompletionHandler:) function của UNUserNotificationCenterDelegate protocol trong AppDelegate:
func userNotificationCenter(_ center: UNUserNotificationCenter, willPresent notification: UNNotification, withCompletionHandler completionHandler: @escaping (UNNotificationPresentationOptions) -> Void) { print("Push notification received in foreground.") completionHandler([.alert, .sound, .badge]) }
Set AppDelegate là delegate của UNUserNotificationCenter trong application(_:didFinishLaunchingWithOptions:):
UNUserNotificationCenter.current().delegate = self
0 notes
Text
Preparing Your App For iOS 12 Notifications
Preparing Your App For iOS 12 Notifications
Kaya Thomas
2018-09-05T13:30:35+02:00 2018-09-05T11:37:48+00:00
In 2016, Apple announced a new extension that will allow developers to better customize their push and local notifications called the UNNotificationContentExtension. The extension gets triggered when a user long presses or 3D touches on a notification whenever it is delivered to the phone or from the lock/home screen. In the content extension, developers can use a view controller to structure the UI of their notification, but there was no user interaction enabled within the view controller — until now. With the release of iOS 12 and XCode 10, the view controller in the content extension now enables user interaction which means notifications will become even more powerful and customizable.
At WWDC 2018, Apple also announced several changes to notification settings and how they appear on the home screen. In an effort to make users more aware of how they are using apps and allowing more user control of their app usage, there is a new notification setting called “Deliver Quietly.” Users can set your app to Delivery Quietly from the Notification Center, which means they will not receive banners or sound notifications from your app, but they will appear in the Notification Center. Apple using an in-house algorithm, which presumably tracks often you interact with notifications, will also ask users if they still want to receive notifications from particular apps and encourage you to turn on Deliver Quietly or turn them off completely.
Notifications are getting a big refresh in iOS 12, and I’ve only scratched the surface. In the rest of this article, we’ll go over the rest of the new notification features coming to iOS 12 and how you can implement them in your own app.
Recommended reading: WWDC 2018 Diary Of An iOS Developer
Remote vs Local Notifications
There are two ways to send push notifications to a device: remotely or locally. To send notifications remotely, you need a server that can send JSON payloads to Apple’s Push Notification Service. Along with a payload, you also need to send the device token and any other authentication certificate or tokens that verify your server is allowed to send the push notification through Apple. For this article, we focus on local notifications which do not need a separate server. Local notifications are requested and sent through the UNUserNotificationCenter. We’ll go over later how specifically to make the request for a local notification.
In order to send a notification, you first need to get permission from the user on whether or not they want you to send them notifications. With the release of iOS 12, there are a lot of changes to notification settings and permissions so let’s break it down. To test out any of the code yourself, make sure you have the Xcode 10 beta installed.
Getting the process just right ain't an easy task. That's why we've set up 'this-is-how-I-work'-sessions — with smart cookies sharing what works really well for them. A part of the Smashing Membership, of course.
Explore features →
Notification Settings And Permissions
Deliver Quietly
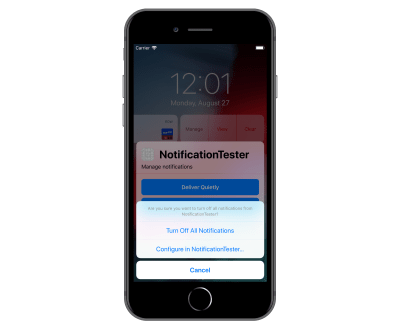
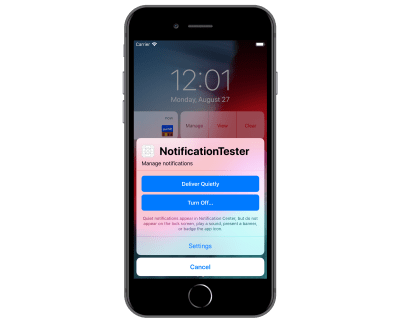
Delivery Quietly is Apple’s attempt to allow users more control over the noise they may receive from notifications. Instead of going into the settings app and looking for the app whose notification settings you want to change, you can now change the setting directly from the notification. This means that a lot more users may turn off notifications for your app or just delivery them quietly which means the app will get badged and notifications only show up in the Notification Center. If your app has its own custom notification settings, Apple is allowing you to link directly to that screen from the settings management view pictured below.

Delivery quietly feature. (Large preview)
In order to link to your custom notification setting screen, you must set providesAppNotificationSettings as a UNAuthorizationOption when you are requesting notification permissions in the app delegate.
In didFinishLaunchingWithOptions, add the following code:
UNUserNotificationCenter.current().requestAuthorization(options: [.alert, .badge, .sound, .providesAppNotificationSettings]) { ... }
When you do this, you’ll now see your custom notification settings in two places:
If the user selects Turn Off when they go to manage settings directly from the notification;
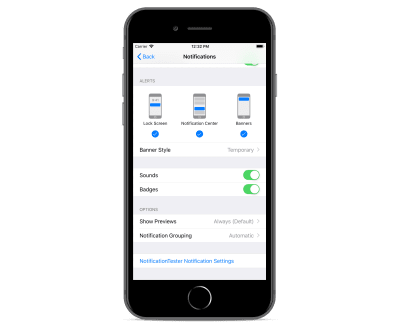
In the notification settings within the system’s Settings app.
Deep link to to custom notification settings for NotificationTester from notification in the Notification Center. (Large preview)

Deep link to custom notification settings for NotificationTester from system’s Settings app. (Large preview)
You also have to make sure to handle the callback for when the user selects on either way to get to your notification settings. Your app delegate or an extension of your app delegate has to conform to the protocol UNUserNotificationCenterDelegate so you can then implement the following callback method:
func userNotificationCenter(_ center: UNUserNotificationCenter, openSettingsFor notification: UNNotification?) { let navController = self.window?.rootViewController as! UINavigationController let notificationSettingsVC = NotificationSettingsViewController() navController.pushViewController(notificationSettingsVC, animated: true) }
Another new UNAuthorizationOption is provisional authorization. If you don’t mind your notifications being delivered quietly, you can set add .provisional to your authorization options as shown below. This means that you don’t have to prompt the user to allow notifications — the notifications will still show up in the Notification Center.
UNUserNotificationCenter.current().requestAuthorization(options: [.alert, .badge, .provisional]) { ... }
So now that you’ve determined how to request permission from the user to deliver notifications and how to navigate users to your own customized settings view, let’s go more into more detail about the actual notifications.
Sending Grouped Notifications
Before we get into the customization of the UI of a notification, let’s go over how to make the request for a local notification. First, you have to register any UNNotificationCategory, which are like templates for the notifications you want to send. Any notification set to a particular category will inherit any actions or options that were registered with that category. After you’ve requested permission to send notifications in didFinishLaunchingWithOptions, you can register your categories in the same method.
let hiddenPreviewsPlaceholder = "%u new podcast episodes available" let summaryFormat = "%u more episodes of %@" let podcastCategory = UNNotificationCategory(identifier: "podcast", actions: [], intentIdentifiers: [], hiddenPreviewsBodyPlaceholder: hiddenPreviewsPlaceholder, categorySummaryFormat: summaryFormat, options: []) UNUserNotificationCenter.current().setNotificationCategories([podcastCategory])
In the above code, I start by initiating two variables:
hiddenPreviewsPlaceholder This placeholder is used in case the user has “Show Previews” off for your app; if we don’t have a placeholder there, your notification will show with only “Notification” also the text.
summaryFormat This string is new for iOS 12 and coincides with the new feature called “Group Notifications” that will help the Notification Center look a lot cleaner. All notifications will show up in stacks which will be either representing all notifications from the app or specific groups that the developer has set for there app.
The code below shows how we associate a notification with a group.
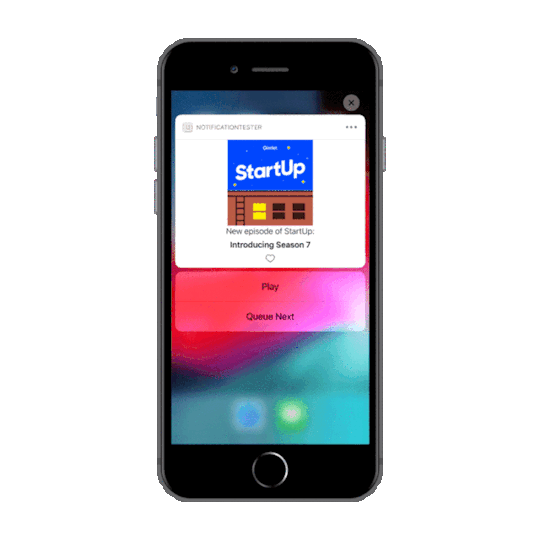
@objc func sendPodcastNotification(for podcastName: String) { let content = UNMutableNotificationContent() content.body = "Introducing Season 7" content.title = "New episode of \(podcastName):" content.threadIdentifier = podcastName.lowercased() content.summaryArgument = podcastName content.categoryIdentifier = NotificationCategoryType.podcast.rawValue sendNotification(with: content) }
For now, I’ve hardcoded the text of the notification just for the example. The threadIdentifier is what creates the groups that we show as stacks in the Notification Center. In this example, I want the notifications grouped by podcast so each notification you get is separated by what podcast it’s associated with. The summaryArgument matches back to our categorySummaryFormat we set in the app delegate. In this case, we want the string for the format: "%u more episodes of %@" to be the podcast name. Lastly, we have to set the category identifier to ensure the notification has the template we set in the app delegate.
func sendNotification(for category: String, with content: UNNotificationContent) { let uuid = UUID().uuidString let trigger = UNTimeIntervalNotificationTrigger(timeInterval: 5, repeats: false) let request = UNNotificationRequest(identifier: uuid, content: content, trigger: trigger) UNUserNotificationCenter.current().add(request, withCompletionHandler: nil) }
The above method is how we request the notification to be sent to the device. The identifier for the request is just a random unique string; the content is passed in and we create the content in our sendPodcastNotification method, and lastly, the trigger is when you want the notification to send. If you want the notification to send immediately, you can set that parameter to nil.

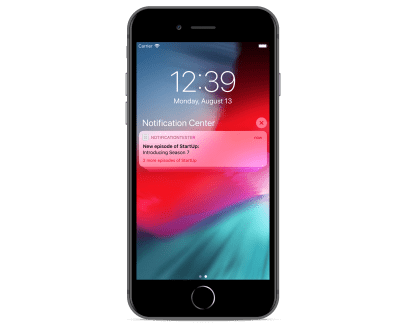
Grouped notifications for NotificationTester. (Large preview)

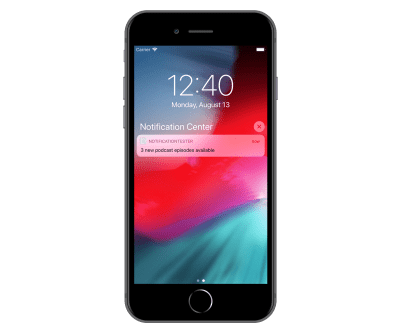
Notification grouped with previews turned off. (Large preview)
Using the methods we’ve described above, here’s the result on the simulator. I have a button that has the sendPodcastNotification method as a target. I tapped the button three times to have the notifications sent to the device. In the first photo, I have “Show Previews” set to “Always” so I see the podcast and the name of the new episodes along with the summary that shows I have two more new episodes to check out. When “Show Previews” is set to “Never,” the result is the second image above. The user won’t see which podcast it is to respect the “No Preview” setting, but they can still see that I have three new episodes to check out.
Notification Content Extension
Now that we understand how to set our notification categories and make the request for them to be sent, we can go over how to customize the look of the notification using the Notification Service and Notification Content extensions. The Notification Service extension allows you to edit the notification content and download any attachments in your notification like images, audio or video files. The Notification Content extension contains a view controller and storyboard that allows you to customize the look of your notification as well as handle any user interaction within the view controller or taps on notification actions.
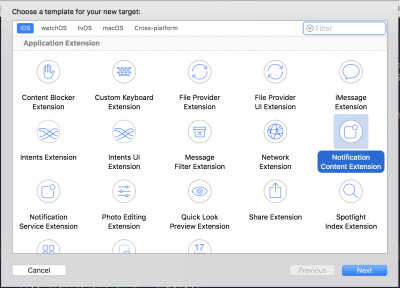
To add these extensions to your app go File → New → Target.

Adding new target to app for the Notification Content Extension. (Large preview)
You can only add them one at a time, so name your extension and repeat the process to add the other. If a pop-up appears asking you to activate your new scheme, click the “Activate” button to set it up for debugging.
For the purpose of this tutorial, we will be focusing on the Notification Content Extension. For local notifications, we can include the attachments in the request, which we’ll go over later.
First, go to the Info.plist file in the Notification Content Extension target.

Info.plist for the Notification Content Extension. (Large preview)
The following attributes are required:
UNNotificationExtensionCategory A string value equal to the notification category which we created and set in the app delegate. This will let the content extension know which notification you want to have custom UI for.
UNNotificationExtensionInitialContentSizeRatio A number between 0 and 1 which determines the aspect ratio of your UI. The default value is 1 which will allow your interface to have its total height equal to its width.
I’ve also set UNNotificationExtensionDefaultContentHidden to “YES” so that the default notification does not show when the content extension is running.
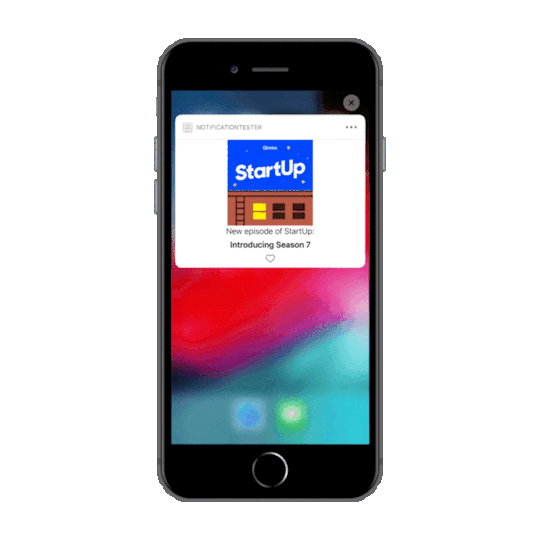
You can use the storyboard to set up your view or create the UI programmatically in the view controller. For this example I’ve set up my storyboard with an image view which will show the podcast logo, two labels for the title and body of the notification content, and a “Like” button which will show a heart image.
Now, in order to get the image showing for the podcast logo and the button, we need to go back to our notification request:
guard let pathUrlForPodcastImg = Bundle.main.url(forResource: "startup", withExtension: "jpg") else { return } let imgAttachment = try! UNNotificationAttachment(identifier: "image", url: pathUrlForPodcastImg, options: nil) guard let pathUrlForButtonNormal = Bundle.main.url(forResource: "heart-outline", withExtension: "png") else { return } let buttonNormalStateImgAtt = try! UNNotificationAttachment(identifier: "button-normal-image", url: pathUrlForButtonNormal, options: nil) guard let pathUrlForButtonHighlighted = Bundle.main.url(forResource: "heart-filled", withExtension: "png") else { return } let buttonHighlightStateImgAtt = try! UNNotificationAttachment(identifier: "button-highlight-image", url: pathUrlForButtonHighlighted, options: nil) content.attachments = [imgAttachment, buttonNormalStateImgAtt, buttonHighlightStateImgAtt]
I added a folder in my project that contains all the images we need for the notification so we can access them through the main bundle.
Xcode project navigator. (Large preview)
For each image, we get the file path and use that to create a UNNotificationAttachment. Added that to our notification content allows us to access the images in the Notification Content Extension in the didReceive method shown below.
func didReceive(_ notification: UNNotification) { self.newEpisodeLabel.text = notification.request.content.title self.episodeNameLabel.text = notification.request.content.body let imgAttachment = notification.request.content.attachments[0] let buttonNormalStateAtt = notification.request.content.attachments[1] let buttonHighlightStateAtt = notification.request.content.attachments[2] guard let imageData = NSData(contentsOf: imgAttachment.url), let buttonNormalStateImgData = NSData(contentsOf: buttonNormalStateAtt.url), let buttonHighlightStateImgData = NSData(contentsOf: buttonHighlightStateAtt.url) else { return } let image = UIImage(data: imageData as Data) let buttonNormalStateImg = UIImage(data: buttonNormalStateImgData as Data)?.withRenderingMode(.alwaysOriginal) let buttonHighlightStateImg = UIImage(data: buttonHighlightStateImgData as Data)?.withRenderingMode(.alwaysOriginal) imageView.image = image likeButton.setImage(buttonNormalStateImg, for: .normal) likeButton.setImage(buttonHighlightStateImg, for: .selected) }
Now we can use the file path URLs we set in the request to grab the data for the URL and turn them into images. Notice that I have two different images for the different button states which will allow us to update the UI for user interaction. When I run the app and send the request, here’s what the notification looks like:

Content extension loaded for NotificationTester app. (Large preview)
Everything I’ve mentioned so far in relation to the content extension isn’t new in iOS 12, so let’s dig into the two new features: User Interaction and Dynamic Actions. When the content extension was first added in iOS 10, there was no ability to capture user touch within a notification, but now we can register UIControl events and respond when the user interacts with a UI element.
For this example, we want to show the user that the “Like” button has been selected or unselected. We already set the images for the .normal and .selected states, so now we just need to add a target for the UIButton so we can update the selected state.
override func viewDidLoad() { super.viewDidLoad() // Do any required interface initialization here. likeButton.addTarget(self, action: #selector(likeButtonTapped(sender:)), for: .touchUpInside) }
@objc func likeButtonTapped(sender: UIButton) { likeButton.isSelected = !sender.isSelected }
Now with the above code we get the following behavior:

Selecting like button within notification. (Large preview)
In the selector method likeButtonTapped, we could also add any logic for saving the liked state in User Defaults or the Keychain, so we have access to it in our main application.
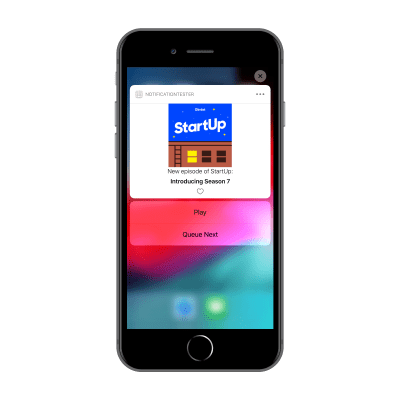
Notification actions have existed since iOS 10, but once you click on them, usually the user will be rerouted to the main application or the content extension is dismissed. Now in iOS 12, we can update the list of notification actions that are shown in response to which action the user selects.
First, let’s go back to our app delegate where we create our notification categories so we can add some actions to our podcast category.
let playAction = UNNotificationAction(identifier: "play-action", title: "Play", options: []) let queueAction = UNNotificationAction(identifier: "queue-action", title: "Queue Next", options: []) let podcastCategory = UNNotificationCategory(identifier: "podcast", actions: [playAction, queueAction], intentIdentifiers: [], hiddenPreviewsBodyPlaceholder: hiddenPreviewsPlaceholder, categorySummaryFormat: summaryFormat, options: [])
Now when we run the app and send a notification, we see the following actions shown below:

Notification quick actions. (Large preview)
When the user selects “Play,” we want the action to be updated to “Pause.” If they select “Queue Next,” we want that action to be updated to “Remove from Queue.” We can do this in our didReceive method in the Notification Content Extension’s view controller.
func didReceive(_ response: UNNotificationResponse, completionHandler completion: (UNNotificationContentExtensionResponseOption) -> Void) { guard let currentActions = extensionContext?.notificationActions else { return } if response.actionIdentifier == "play-action" { let pauseAction = UNNotificationAction(identifier: "pause-action", title: "Pause", options: []) let otherAction = currentActions[1] let newActions = [pauseAction, otherAction] extensionContext?.notificationActions = newActions } else if response.actionIdentifier == "queue-action" { let removeAction = UNNotificationAction(identifier: "remove-action", title: "Remove from Queue", options: []) let otherAction = currentActions[0] let newActions = [otherAction, removeAction] extensionContext?.notificationActions = newActions } else if response.actionIdentifier == "pause-action" { let playAction = UNNotificationAction(identifier: "play-action", title: "Play", options: []) let otherAction = currentActions[1] let newActions = [playAction, otherAction] extensionContext?.notificationActions = newActions } else if response.actionIdentifier == "remove-action" { let queueAction = UNNotificationAction(identifier: "queue-action", title: "Queue Next", options: []) let otherAction = currentActions[0] let newActions = [otherAction, queueAction] extensionContext?.notificationActions = newActions } completion(.doNotDismiss) }
By resetting the extensionContext?.notificationActions list to contain the updated actions, it allows us to change the actions every time the user selects one. The behavior is shown in the gif below.
Dynamic notification quick actions. (Large preview)
Summary
There’s a lot to do before iOS 12 launches to make sure your notifications are ready. The steps vary in complexity and you don’t have to implement them all. Make sure to first download XCode 10 beta so you can try out the features we’ve gone over. If you want to play around with the demo app I’ve referenced throughout the article, check it out on Github.
For Your Notification Permissions Request And Settings, You’ll Need To:
Determine whether or not you want to enable provisional authorization and add it to your authorization options.
If you have already have a customized notification settings view in your app, add providesAppNotificationSettings to your authorization options as well as implement the call back in your app delegate or whichever class conforms to UNUserNotificationCenterDelegate.
For Notification Grouping:
Add a thread identifier to your remote and local notifications so your notifications are correctly grouped in the Notification Center.
When registering your notification categories, add the category summary parameter if you want your grouped notification to be more descriptive than “more notifications.”
If you want to customize the summary text even more, then add a summary identifier to match whichever formatting you added for the category summary.
For Customized Rich Notifications:
Add the Notification Content extension target to your app to create rich notifications.
Design and implement the view controller to contain whichever elements you want in your notification.
Consider which interactive elements would be useful to you, i.e. buttons, table view, switches, etc.
Update the didReceive method in the view controller to respond to selected actions and update the list of actions if necessary.
Further Reading
“Notifications,” Apple’s list of various documentation regarding user notifications
“What’s New in User Notifications,” WWDC 2018 Apple
“Customizing the Appearance of Notifications,” Apple’s documentation on the Notification Content Extension

(ra, yk, il)
0 notes
Video
youtube
All About Local Notification :- Attachment | Action | Category | Tap on ...
#Localnotification in swift 5#Local notification in swift hindi#UNUserNotificationCenter in swift 5#How to create local alert in swift 5#add action in local notification#add attachment in local notification#add image in local notification#UNUserNotificationCenter example in swift 5#local notification#notification#yogeshpatelios#yogeshpatel#xccode#xccode1o#swift 4 local notification#hindi#beginner#beginners tutorials in swift ios hindi
0 notes
Text
SwiftUI Local Notification Tutorial
Notifications can be used in an application to schedule an alert to notify the user about an event. These notifications contains a message and can include a type of media and a sound alert. Notifications initiated by apps running on a device are referred to as local notifications. In this tutorial a local notification is scheduled containing an image. SwiftUI requires Xcode 11 and MacOS Catalina, which can be downloaded at the Apple developer portal.
Open Xcode and either click Create a new Xcode project in Xcode’s startup window, or choose File > New > Project. In the template selector, select iOS as the platform, select the Single View App template, and then click Next. Enter SwiftUILocalNotificationTutorial as the Product Name, select SwiftUI as the User Interface and click Next. Choose a location to save the project on your Mac.
An image will be used as an attachment of the notification. Download the image and drag it inside the project folder. In the canvas, click Resume to display the preview. If the canvas isn’t visible, select Editor > Editor and Canvas to show it.
In the Project navigator, click to select ContentView.swift. Change the code inside the ContentView struct to
struct ContentView: View { var body: some View { Button("Send Notification") { // 1. UNUserNotificationCenter.current().requestAuthorization(options: [.alert, .badge, .sound]) { success, error in if success { print("authorization granted") } else if let error = error } // 2. let content = UNMutableNotificationContent() content.title = "Notification Tutorial" content.subtitle = "from ioscreator.com" content.body = " Notification triggered" content.sound = UNNotificationSound.default // 3. let imageName = "applelogo" guard let imageURL = Bundle.main.url(forResource: imageName, withExtension: "png") else let attachment = try! UNNotificationAttachment(identifier: imageName, url: imageURL, options: .none) content.attachments = [attachment] // 4. let trigger = UNTimeIntervalNotificationTrigger(timeInterval: 5, repeats: false) let request = UNNotificationRequest(identifier: "notification.id.01", content: content, trigger: trigger) // 5. UNUserNotificationCenter.current().add(request) } } }
The UNUserNotificationCenter manages the notification-related activities. To use the notification the user needs to be asked for permission with the requestAuthorization method.
The UNMutableNotificationContent object contains the data of the notification.
The UNNotificationAttachment object contains the media content of the notification.
An UNNotificationRequest is generated which will trigger at the timeinterval of 10 seconds.
The notification is scheduled for delivery.
Build and Run the project. When the “Send Notification” button is clicked. The user will be asked for permission and when granted the notification is scheduled.
Press the home icon to put the app in the background. After 10 seconds the notifcation will be triggered.,
The source code of the SwiftUILocalNotificationTutorial can be downloaded at the ioscreator repository on Github.
0 notes
Text
Preparing Your App For iOS 12 Notifications
Preparing Your App For iOS 12 Notifications
Kaya Thomas
2018-09-05T13:30:35+02:002018-09-05T11:52:50+00:00
In 2016, Apple announced a new extension that will allow developers to better customize their push and local notifications called the UNNotificationContentExtension. The extension gets triggered when a user long presses or 3D touches on a notification whenever it is delivered to the phone or from the lock/home screen. In the content extension, developers can use a view controller to structure the UI of their notification, but there was no user interaction enabled within the view controller — until now. With the release of iOS 12 and XCode 10, the view controller in the content extension now enables user interaction which means notifications will become even more powerful and customizable.
At WWDC 2018, Apple also announced several changes to notification settings and how they appear on the home screen. In an effort to make users more aware of how they are using apps and allowing more user control of their app usage, there is a new notification setting called “Deliver Quietly.” Users can set your app to Delivery Quietly from the Notification Center, which means they will not receive banners or sound notifications from your app, but they will appear in the Notification Center. Apple using an in-house algorithm, which presumably tracks often you interact with notifications, will also ask users if they still want to receive notifications from particular apps and encourage you to turn on Deliver Quietly or turn them off completely.
Notifications are getting a big refresh in iOS 12, and I’ve only scratched the surface. In the rest of this article, we’ll go over the rest of the new notification features coming to iOS 12 and how you can implement them in your own app.
Recommended reading: WWDC 2018 Diary Of An iOS Developer
Remote vs Local Notifications
There are two ways to send push notifications to a device: remotely or locally. To send notifications remotely, you need a server that can send JSON payloads to Apple’s Push Notification Service. Along with a payload, you also need to send the device token and any other authentication certificate or tokens that verify your server is allowed to send the push notification through Apple. For this article, we focus on local notifications which do not need a separate server. Local notifications are requested and sent through the UNUserNotificationCenter. We’ll go over later how specifically to make the request for a local notification.
In order to send a notification, you first need to get permission from the user on whether or not they want you to send them notifications. With the release of iOS 12, there are a lot of changes to notification settings and permissions so let’s break it down. To test out any of the code yourself, make sure you have the Xcode 10 beta installed.
Getting the process just right ain't an easy task. That's why we've set up 'this-is-how-I-work'-sessions — with smart cookies sharing what works really well for them. A part of the Smashing Membership, of course.
Explore features →
Notification Settings And Permissions
Deliver Quietly
Delivery Quietly is Apple’s attempt to allow users more control over the noise they may receive from notifications. Instead of going into the settings app and looking for the app whose notification settings you want to change, you can now change the setting directly from the notification. This means that a lot more users may turn off notifications for your app or just delivery them quietly which means the app will get badged and notifications only show up in the Notification Center. If your app has its own custom notification settings, Apple is allowing you to link directly to that screen from the settings management view pictured below.
Delivery quietly feature. (Large preview)
In order to link to your custom notification setting screen, you must set providesAppNotificationSettings as a UNAuthorizationOption when you are requesting notification permissions in the app delegate.
In didFinishLaunchingWithOptions, add the following code:
UNUserNotificationCenter.current().requestAuthorization(options: [.alert, .badge, .sound, .providesAppNotificationSettings]) { ... }
When you do this, you’ll now see your custom notification settings in two places:
If the user selects Turn Off when they go to manage settings directly from the notification;
In the notification settings within the system’s Settings app.

Deep link to to custom notification settings for NotificationTester from notification in the Notification Center. (Large preview)
Deep link to custom notification settings for NotificationTester from system’s Settings app. (Large preview)
You also have to make sure to handle the callback for when the user selects on either way to get to your notification settings. Your app delegate or an extension of your app delegate has to conform to the protocol UNUserNotificationCenterDelegate so you can then implement the following callback method:
func userNotificationCenter(_ center: UNUserNotificationCenter, openSettingsFor notification: UNNotification?) { let navController = self.window?.rootViewController as! UINavigationController let notificationSettingsVC = NotificationSettingsViewController() navController.pushViewController(notificationSettingsVC, animated: true) }
Another new UNAuthorizationOption is provisional authorization. If you don’t mind your notifications being delivered quietly, you can set add .provisional to your authorization options as shown below. This means that you don’t have to prompt the user to allow notifications — the notifications will still show up in the Notification Center.
UNUserNotificationCenter.current().requestAuthorization(options: [.alert, .badge, .provisional]) { ... }
So now that you’ve determined how to request permission from the user to deliver notifications and how to navigate users to your own customized settings view, let’s go more into more detail about the actual notifications.
Sending Grouped Notifications
Before we get into the customization of the UI of a notification, let’s go over how to make the request for a local notification. First, you have to register any UNNotificationCategory, which are like templates for the notifications you want to send. Any notification set to a particular category will inherit any actions or options that were registered with that category. After you’ve requested permission to send notifications in didFinishLaunchingWithOptions, you can register your categories in the same method.
let hiddenPreviewsPlaceholder = "%u new podcast episodes available" let summaryFormat = "%u more episodes of %@" let podcastCategory = UNNotificationCategory(identifier: "podcast", actions: [], intentIdentifiers: [], hiddenPreviewsBodyPlaceholder: hiddenPreviewsPlaceholder, categorySummaryFormat: summaryFormat, options: []) UNUserNotificationCenter.current().setNotificationCategories([podcastCategory])
In the above code, I start by initiating two variables:
hiddenPreviewsPlaceholder This placeholder is used in case the user has “Show Previews” off for your app; if we don’t have a placeholder there, your notification will show with only “Notification” also the text.
summaryFormat This string is new for iOS 12 and coincides with the new feature called “Group Notifications” that will help the Notification Center look a lot cleaner. All notifications will show up in stacks which will be either representing all notifications from the app or specific groups that the developer has set for there app.
The code below shows how we associate a notification with a group.
@objc func sendPodcastNotification(for podcastName: String) { let content = UNMutableNotificationContent() content.body = "Introducing Season 7" content.title = "New episode of \(podcastName):" content.threadIdentifier = podcastName.lowercased() content.summaryArgument = podcastName content.categoryIdentifier = NotificationCategoryType.podcast.rawValue sendNotification(with: content) }
For now, I’ve hardcoded the text of the notification just for the example. The threadIdentifier is what creates the groups that we show as stacks in the Notification Center. In this example, I want the notifications grouped by podcast so each notification you get is separated by what podcast it’s associated with. The summaryArgument matches back to our categorySummaryFormat we set in the app delegate. In this case, we want the string for the format: "%u more episodes of %@" to be the podcast name. Lastly, we have to set the category identifier to ensure the notification has the template we set in the app delegate.
func sendNotification(for category: String, with content: UNNotificationContent) { let uuid = UUID().uuidString let trigger = UNTimeIntervalNotificationTrigger(timeInterval: 5, repeats: false) let request = UNNotificationRequest(identifier: uuid, content: content, trigger: trigger) UNUserNotificationCenter.current().add(request, withCompletionHandler: nil) }
The above method is how we request the notification to be sent to the device. The identifier for the request is just a random unique string; the content is passed in and we create the content in our sendPodcastNotification method, and lastly, the trigger is when you want the notification to send. If you want the notification to send immediately, you can set that parameter to nil.
Grouped notifications for NotificationTester. (Large preview)
Notification grouped with previews turned off. (Large preview)
Using the methods we’ve described above, here’s the result on the simulator. I have a button that has the sendPodcastNotification method as a target. I tapped the button three times to have the notifications sent to the device. In the first photo, I have “Show Previews” set to “Always” so I see the podcast and the name of the new episodes along with the summary that shows I have two more new episodes to check out. When “Show Previews” is set to “Never,” the result is the second image above. The user won’t see which podcast it is to respect the “No Preview” setting, but they can still see that I have three new episodes to check out.
Notification Content Extension
Now that we understand how to set our notification categories and make the request for them to be sent, we can go over how to customize the look of the notification using the Notification Service and Notification Content extensions. The Notification Service extension allows you to edit the notification content and download any attachments in your notification like images, audio or video files. The Notification Content extension contains a view controller and storyboard that allows you to customize the look of your notification as well as handle any user interaction within the view controller or taps on notification actions.
To add these extensions to your app go File → New → Target.
Adding new target to app for the Notification Content Extension. (Large preview)
You can only add them one at a time, so name your extension and repeat the process to add the other. If a pop-up appears asking you to activate your new scheme, click the “Activate” button to set it up for debugging.
For the purpose of this tutorial, we will be focusing on the Notification Content Extension. For local notifications, we can include the attachments in the request, which we’ll go over later.
First, go to the Info.plist file in the Notification Content Extension target.

Info.plist for the Notification Content Extension. (Large preview)
The following attributes are required:
UNNotificationExtensionCategory A string value equal to the notification category which we created and set in the app delegate. This will let the content extension know which notification you want to have custom UI for.
UNNotificationExtensionInitialContentSizeRatio A number between 0 and 1 which determines the aspect ratio of your UI. The default value is 1 which will allow your interface to have its total height equal to its width.
I’ve also set UNNotificationExtensionDefaultContentHidden to “YES” so that the default notification does not show when the content extension is running.
You can use the storyboard to set up your view or create the UI programmatically in the view controller. For this example I’ve set up my storyboard with an image view which will show the podcast logo, two labels for the title and body of the notification content, and a “Like” button which will show a heart image.
Now, in order to get the image showing for the podcast logo and the button, we need to go back to our notification request:
guard let pathUrlForPodcastImg = Bundle.main.url(forResource: "startup", withExtension: "jpg") else { return } let imgAttachment = try! UNNotificationAttachment(identifier: "image", url: pathUrlForPodcastImg, options: nil) guard let pathUrlForButtonNormal = Bundle.main.url(forResource: "heart-outline", withExtension: "png") else { return } let buttonNormalStateImgAtt = try! UNNotificationAttachment(identifier: "button-normal-image", url: pathUrlForButtonNormal, options: nil) guard let pathUrlForButtonHighlighted = Bundle.main.url(forResource: "heart-filled", withExtension: "png") else { return } let buttonHighlightStateImgAtt = try! UNNotificationAttachment(identifier: "button-highlight-image", url: pathUrlForButtonHighlighted, options: nil) content.attachments = [imgAttachment, buttonNormalStateImgAtt, buttonHighlightStateImgAtt]
I added a folder in my project that contains all the images we need for the notification so we can access them through the main bundle.

Xcode project navigator. (Large preview)
For each image, we get the file path and use that to create a UNNotificationAttachment. Added that to our notification content allows us to access the images in the Notification Content Extension in the didReceive method shown below.
func didReceive(_ notification: UNNotification) { self.newEpisodeLabel.text = notification.request.content.title self.episodeNameLabel.text = notification.request.content.body let imgAttachment = notification.request.content.attachments[0] let buttonNormalStateAtt = notification.request.content.attachments[1] let buttonHighlightStateAtt = notification.request.content.attachments[2] guard let imageData = NSData(contentsOf: imgAttachment.url), let buttonNormalStateImgData = NSData(contentsOf: buttonNormalStateAtt.url), let buttonHighlightStateImgData = NSData(contentsOf: buttonHighlightStateAtt.url) else { return } let image = UIImage(data: imageData as Data) let buttonNormalStateImg = UIImage(data: buttonNormalStateImgData as Data)?.withRenderingMode(.alwaysOriginal) let buttonHighlightStateImg = UIImage(data: buttonHighlightStateImgData as Data)?.withRenderingMode(.alwaysOriginal) imageView.image = image likeButton.setImage(buttonNormalStateImg, for: .normal) likeButton.setImage(buttonHighlightStateImg, for: .selected) }
Now we can use the file path URLs we set in the request to grab the data for the URL and turn them into images. Notice that I have two different images for the different button states which will allow us to update the UI for user interaction. When I run the app and send the request, here’s what the notification looks like:

Content extension loaded for NotificationTester app. (Large preview)
Everything I’ve mentioned so far in relation to the content extension isn’t new in iOS 12, so let’s dig into the two new features: User Interaction and Dynamic Actions. When the content extension was first added in iOS 10, there was no ability to capture user touch within a notification, but now we can register UIControl events and respond when the user interacts with a UI element.
For this example, we want to show the user that the “Like” button has been selected or unselected. We already set the images for the .normal and .selected states, so now we just need to add a target for the UIButton so we can update the selected state.
override func viewDidLoad() { super.viewDidLoad() // Do any required interface initialization here. likeButton.addTarget(self, action: #selector(likeButtonTapped(sender:)), for: .touchUpInside) }
@objc func likeButtonTapped(sender: UIButton) { likeButton.isSelected = !sender.isSelected }
Now with the above code we get the following behavior:
Selecting like button within notification. (Large preview)
In the selector method likeButtonTapped, we could also add any logic for saving the liked state in User Defaults or the Keychain, so we have access to it in our main application.
Notification actions have existed since iOS 10, but once you click on them, usually the user will be rerouted to the main application or the content extension is dismissed. Now in iOS 12, we can update the list of notification actions that are shown in response to which action the user selects.
First, let’s go back to our app delegate where we create our notification categories so we can add some actions to our podcast category.
let playAction = UNNotificationAction(identifier: "play-action", title: "Play", options: []) let queueAction = UNNotificationAction(identifier: "queue-action", title: "Queue Next", options: []) let podcastCategory = UNNotificationCategory(identifier: "podcast", actions: [playAction, queueAction], intentIdentifiers: [], hiddenPreviewsBodyPlaceholder: hiddenPreviewsPlaceholder, categorySummaryFormat: summaryFormat, options: [])
Now when we run the app and send a notification, we see the following actions shown below:
Notification quick actions. (Large preview)
When the user selects “Play,” we want the action to be updated to “Pause.” If they select “Queue Next,” we want that action to be updated to “Remove from Queue.” We can do this in our didReceive method in the Notification Content Extension’s view controller.
func didReceive(_ response: UNNotificationResponse, completionHandler completion: (UNNotificationContentExtensionResponseOption) -> Void) { guard let currentActions = extensionContext?.notificationActions else { return } if response.actionIdentifier == "play-action" { let pauseAction = UNNotificationAction(identifier: "pause-action", title: "Pause", options: []) let otherAction = currentActions[1] let newActions = [pauseAction, otherAction] extensionContext?.notificationActions = newActions } else if response.actionIdentifier == "queue-action" { let removeAction = UNNotificationAction(identifier: "remove-action", title: "Remove from Queue", options: []) let otherAction = currentActions[0] let newActions = [otherAction, removeAction] extensionContext?.notificationActions = newActions } else if response.actionIdentifier == "pause-action" { let playAction = UNNotificationAction(identifier: "play-action", title: "Play", options: []) let otherAction = currentActions[1] let newActions = [playAction, otherAction] extensionContext?.notificationActions = newActions } else if response.actionIdentifier == "remove-action" { let queueAction = UNNotificationAction(identifier: "queue-action", title: "Queue Next", options: []) let otherAction = currentActions[0] let newActions = [otherAction, queueAction] extensionContext?.notificationActions = newActions } completion(.doNotDismiss) }
By resetting the extensionContext?.notificationActions list to contain the updated actions, it allows us to change the actions every time the user selects one. The behavior is shown in the gif below.

Dynamic notification quick actions. (Large preview)
Summary
There’s a lot to do before iOS 12 launches to make sure your notifications are ready. The steps vary in complexity and you don’t have to implement them all. Make sure to first download XCode 10 beta so you can try out the features we’ve gone over. If you want to play around with the demo app I’ve referenced throughout the article, check it out on Github.
For Your Notification Permissions Request And Settings, You’ll Need To:
Determine whether or not you want to enable provisional authorization and add it to your authorization options.
If you have already have a customized notification settings view in your app, add providesAppNotificationSettings to your authorization options as well as implement the call back in your app delegate or whichever class conforms to UNUserNotificationCenterDelegate.
For Notification Grouping:
Add a thread identifier to your remote and local notifications so your notifications are correctly grouped in the Notification Center.
When registering your notification categories, add the category summary parameter if you want your grouped notification to be more descriptive than “more notifications.”
If you want to customize the summary text even more, then add a summary identifier to match whichever formatting you added for the category summary.
For Customized Rich Notifications:
Add the Notification Content extension target to your app to create rich notifications.
Design and implement the view controller to contain whichever elements you want in your notification.
Consider which interactive elements would be useful to you, i.e. buttons, table view, switches, etc.
Update the didReceive method in the view controller to respond to selected actions and update the list of actions if necessary.
Further Reading
“Notifications,” Apple’s list of various documentation regarding user notifications
“What’s New in User Notifications,” WWDC 2018 Apple
“Customizing the Appearance of Notifications,” Apple’s documentation on the Notification Content Extension

(ra, yk, il)
0 notes
Text
iOS 10 Notifications (What is new) - Part 1
I must admit that I have a huge crush on the notifications API regardless of the platform (oh yeah I really like the notifications API in Android too) and I have never shut up about it since iOS 7 now in iOS 10 things get even better. There is a new framework altogether to handle notifications both remote and local, the UserNotifications framework. Previously all the notifications API were bundled within the UIApplication class of UIKit and Apple has realized that notifications play a crucial part in the way users interact with the platforms which is evident in all the WWDC sessions and no wonder they plugged a lot of things out. Not just plugging out has happened but there is a lot of new features too.
If you have been using the UILocalNotification class as you have been doing since ages we need to move on to the new UserNotifications framework. Yes here comes the truth UILocalNotification is deprecate since iOS 10.
If you go see the UILocalNotification class you would find this,
@available(iOS, introduced: 4.0, deprecated: 10.0, message: “Use UserNotifications Framework’s UNNotificationRequest”) public class UILocalNotification : NSObject, NSCopying, NSCoding
Even the way we were receiving notifications are changed, we need to move on to the new framework.
@available(iOS, introduced: 4.0, deprecated: 10.0, message: “Use UserNotifications Framework’s -[UNUserNotificationCenterDelegate willPresentNotification:withCompletionHandler:] or -[UNUserNotificationCenterDelegate didReceiveNotificationResponse:withCompletionHandler:]”)
optional public func application(_ application: UIApplication, didReceive notification: UILocalNotification)
After seeing all this it was pretty much clear that the whole of UILocalNotification is going to be flushed away from iOS 10.
So after going through all the sessions and with my experience with notifications in iOS I am pretty sure that I need to make a lot of changes in the existing code and was pretty surprised of the many changes done here.
So coming to the new features that have been introduced, apps can now send notification with enriched content and users can see the content without even opening the app. The most important types of attachments that were talked about are,
Images
Videos
Audio
Last but not least GIFs!
The other new feature worth mentioning is the custom UI that apps can now show during notification presentation yes you can modify the UI format in which notifications are presented in your app. Hmmmmm I guess that is a pretty big topic and lets just cover that in another post, please!!
Ok then I just started tinkering with local notifications using the UNUserNotificationCenter class in the UserNotifications framework and tried to send some notifications with attachments,
So lets get our hands dirty with some code to send a simple notification with the UserNotification APIs,
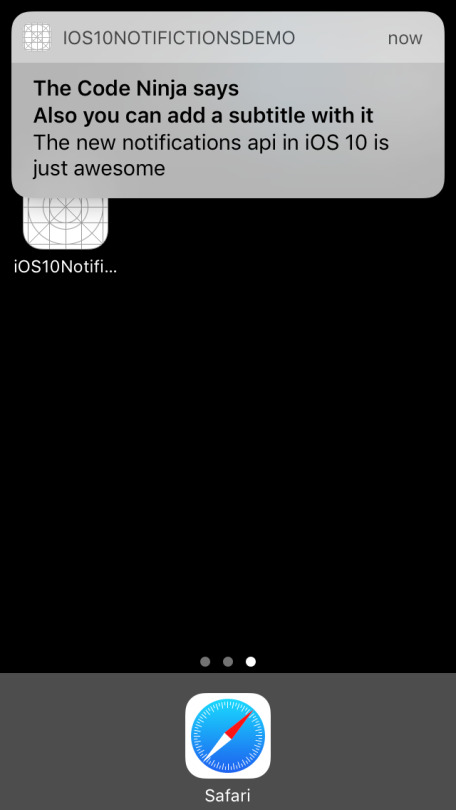
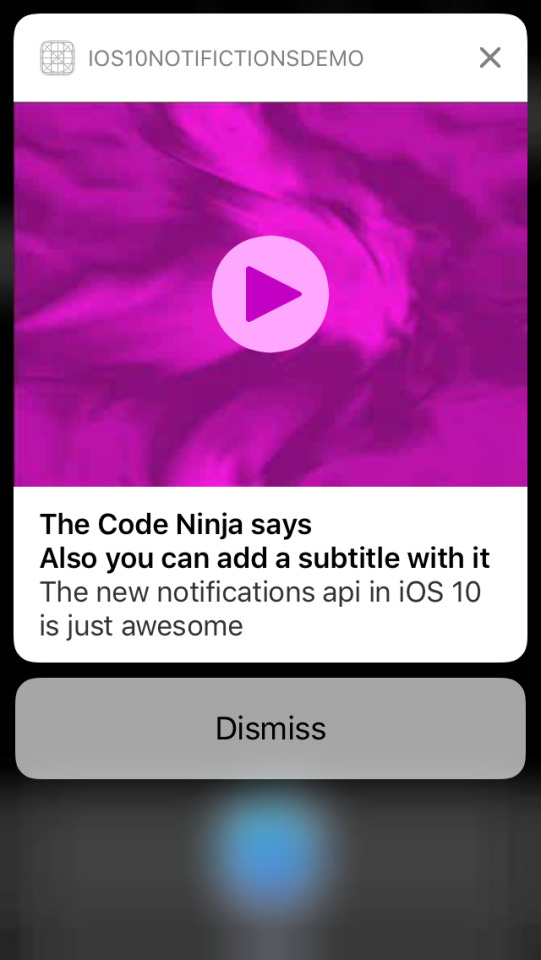
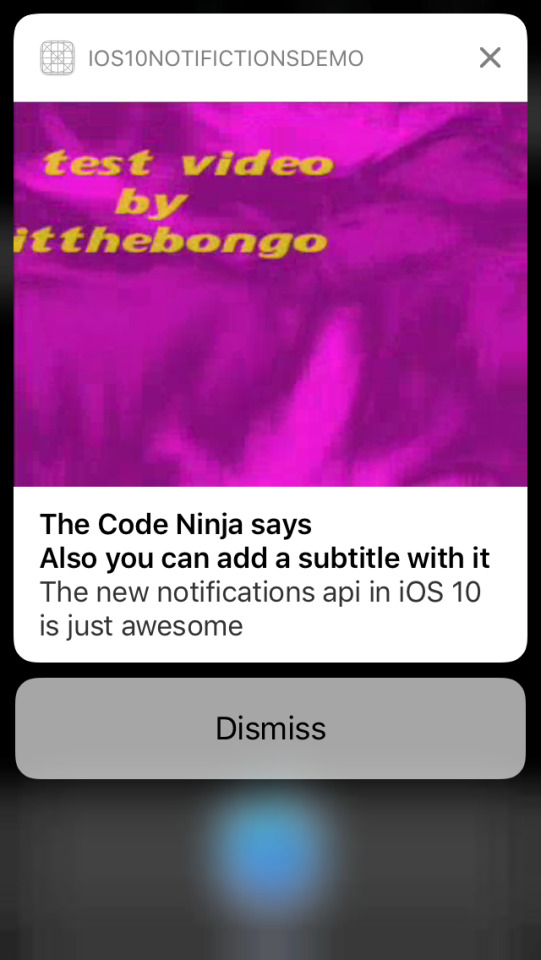
///Creating a UNMutableNotificationContent object that will specify the notification content details let content = UNMutableNotificationContent() ///Setting the title content.title = "The Code Ninja says" ///Setting the body content.body = "The new notifications api in iOS 10 is just awesome" ///Setting the subtitle property, this is new for iOS 10 alone. content.subtitle = "Also you can add a subtitle with it" ///Setting the trigger time let trigger = UNTimeIntervalNotificationTrigger(timeInterval: 5, repeats: false) ///Setting the identifier to identify different types of notifications let requestIdentifier = "TheCodeNinja_Identifier" ///Creating a UNNotificationRequest object with the identifier, content and the trigger object let request = UNNotificationRequest(identifier: requestIdentifier, content: content,trigger: trigger) /// last step, Adding the request to UNUserNotificationCenter.current()'s queue so that it presents the notification when the trigger happens. UNUserNotificationCenter.current().add(request) { (error) in}
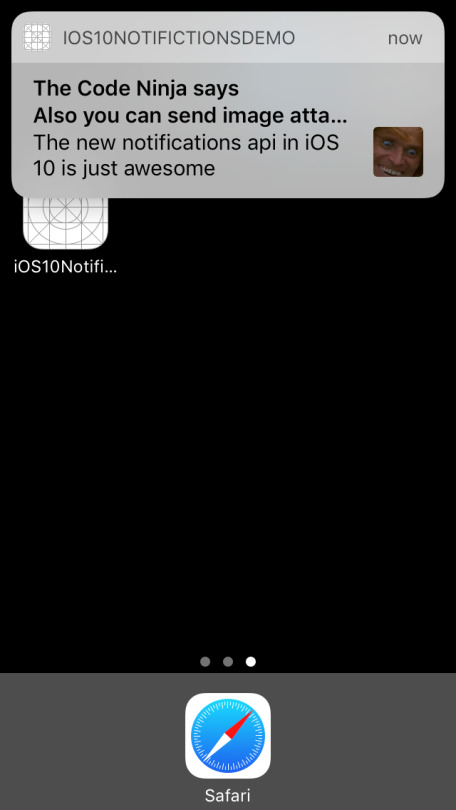
I ran the app, BOOM I got a notification with an image like below,
Now let us try a bit more interesting, we’ll try to add an image attachment to the notification, to do that add the below code before sending the notification
/// Creating a image URL from bundle let imgURL = Bundle.main().urlForResource("notification", withExtension: "jpg") /// Creating an attachment object let notificationImageAttachment = try UNNotificationAttachment(identifier: "jpg_identifier", url:imgURL! , options: nil) content.attachments = [notificationAttachment!]
Hit Run, you will get something like below…
Isn’t that just great, but I was running in the simulator and could not interact much with the attachment but if you have a device with 3D touch you could try out how will you can interact with the notification attachment.
I tried different types attachments like audio, video and GIF’s but could not test all on the simulator and the framework automatically tries to crack the file type for you, if you are trying to do anything apart from common file formats then you can specify the file type like below mentioning the hint key to the API,
let notificationOptions = [UNNotificationAttachmentOptionsTypeHintKey:kUTTypeMP3] /// Creating an attachment object let notificationImageAttachment = try UNNotificationAttachment(identifier: "audio_identifier", url:imgURL! , options: notificationOptions)
All the code I have been doing so far is here. See you all for now, will post more soon on my discoveries on the new notifications API.
UPDATE 1
The code has been upgraded to the changes in Xcode 8 beta 2.
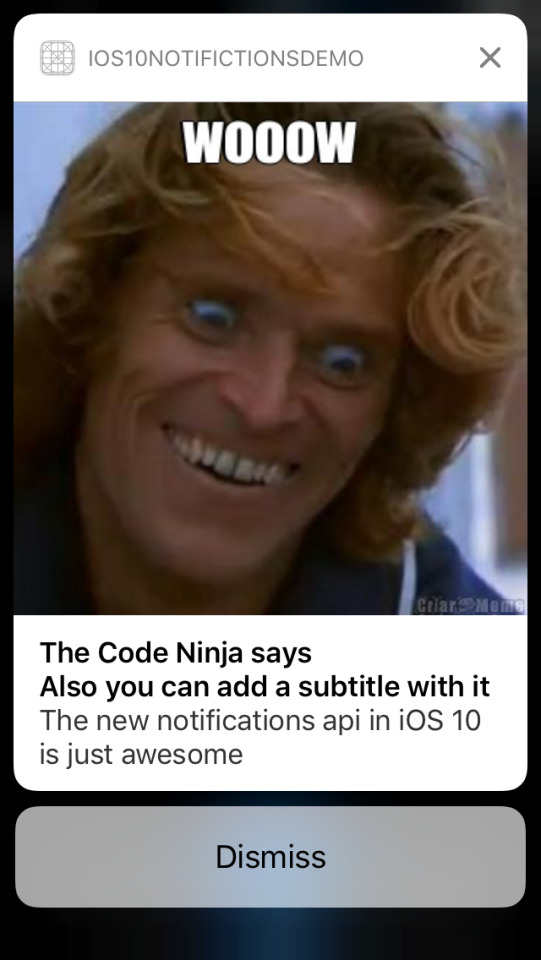
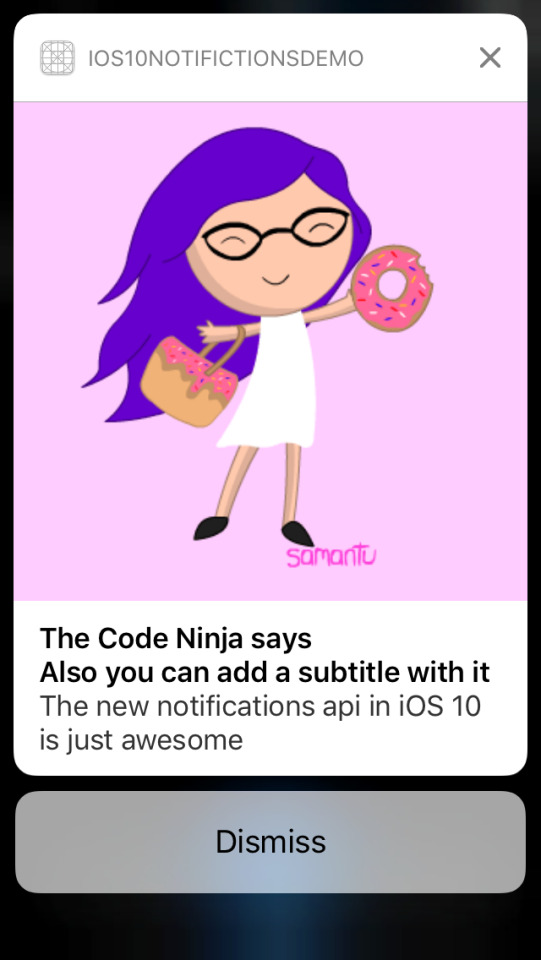
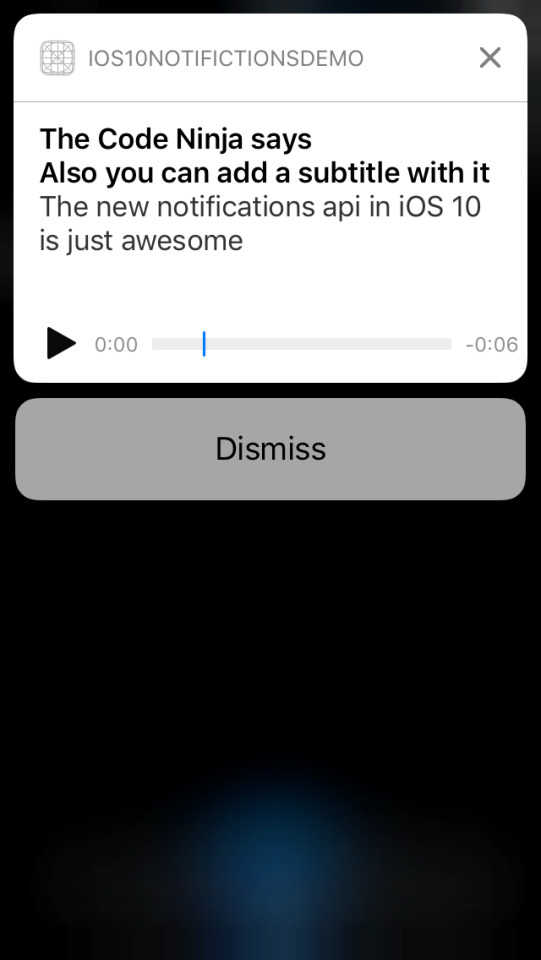
Screenshots of the various attachments I tried, so to view notification attachments the user needs to swipe down the notification banner and he can see the notification attachment.
Image Attachment
GIF (the GIF starts to play when the user swipes down)
Audio Attachment (the user is given a play/pause button and a seek bar to control the audio)
Video attachment (the user is given a play/pause button and a seek bar to control the video)
See you soon guys!!
#unusernotification#ios10#usernotifications framework#unnotificationattachment#unusernotificationcenter#unnotificationrequest#untimeintervalnotificationtrigger#unmutablenotificationcontent#unnotificationattachmentoptionstypehintkey#import usernotifications
6 notes
·
View notes
Text
Local Notification iOS Tutorial
Local notifications are a way for an application that isn’t running in the foreground to let its users know it has information for them. In iOS 10 Apple introduces rich notifications, which can include different type of media . In this tutorial we will create a local notification including an image. This tutorial is made with Xcode 10 and built for iOS 12.
Open Xcode and create a new Single View App.
For product name, use IOSLocalNotificationTutorial and then fill out the Organization Name and Organization Identifier with your customary values. Enter Swift as Language and choose Next.
Go to the Storyboard and drag a Button to the Main View and give it a title of "Send Local Notfication". Select the Resolve Auto Layout Issues button and select Reset to Suggested Constraints.
The Storyboard should look like this.
Open the Assistant Editor and make sure the ViewController.swift file is visible. Ctrl and drag from Button to the ViewController class to create the following Action.
Go to the ViewController.swift file and import the UserNotifications framework
import UserNotifications
Change the viewDidLoad method to
override func viewDidLoad() { super.viewDidLoad() UNUserNotificationCenter.current().requestAuthorization(options: [.alert]) { (granted, error) in if granted { print("yes") } else { print("No") } } }
The UNUserNotificationCenter manages the notification-related activities. To use the notification the user needs to be asked for permission with the requestAuthorization method.
An image will be used as an attachment of the notification. Download the image and drag it inside the project folder. Next, implement the sendNotification action method
@IBAction func sendNotification(_ sender: Any) { // 1 let content = UNMutableNotificationContent() content.title = "Notification Tutorial" content.subtitle = "from ioscreator.com" content.body = " Notification triggered" // 2 let imageName = "applelogo" guard let imageURL = Bundle.main.url(forResource: imageName, withExtension: "png") else { return } let attachment = try! UNNotificationAttachment(identifier: imageName, url: imageURL, options: .none) content.attachments = [attachment] // 3 let trigger = UNTimeIntervalNotificationTrigger(timeInterval: 10, repeats: false) let request = UNNotificationRequest(identifier: "notification.id.01", content: content, trigger: trigger) // 4 UNUserNotificationCenter.current().add(request, withCompletionHandler: nil) }
The UNMutableNotificationContent object contains the data of the notification.
The UNNotificationAttachment object contains the media content of the notification.
An UNNotificationRequest is generated which will trigger at the timeinterval of 10 seconds.
The notification is scheduled for delivery.
Build and Run the Project. The user will be asked for permission.
Select Allow, select the "Send Local Notification" Button to schedule the Notification. Press the Home button in the Simulator(Shift + Command + H). Within 10 seconds the Notfication will be delivered.
You can download the source code of the IOSLocalNotificationTutorial at the ioscreator repository on Github.
0 notes