#Unityevents
Explore tagged Tumblr posts
Visit Tumblr Blog
Explore Tumblr blogs with no restrictions, modern design and the best experience.
Last Seen Tumblr Blogs


Fun Fact
Tumblr was attacked by a cross-site scripting worm deployed by the Internet troll group GNAA on Dec 3, 2012.
Text
United One: Promoting Peace and Unity Across America, Building a More Unified Society #bridgingpoliticalandsocialdivides #buildingamoreunifiedsociety #civilityinpublicdiscourse #comingtogether #concerts #desireforgreaterunity #findingcommonground #inclusivity #localcommunityleaders #marches #messagesofhope #mutualrespect #OneAmerica #positivecounternarrative #prayervigils #promotingpeace #promotingunityandhope #RabbiAbrahamCooper #reducingdivision #ReverendAlSharpton #supportfromorganizations #UnitedOne #unityevents #wellattendedevents
#Politics#bridgingpoliticalandsocialdivides#buildingamoreunifiedsociety#civilityinpublicdiscourse#comingtogether#concerts#desireforgreaterunity#findingcommonground#inclusivity#localcommunityleaders#marches#messagesofhope#mutualrespect#OneAmerica#positivecounternarrative#prayervigils#promotingpeace#promotingunityandhope#RabbiAbrahamCooper#reducingdivision#ReverendAlSharpton#supportfromorganizations#UnitedOne#unityevents#wellattendedevents
0 notes
Text
The Magical Power of your VOICE at Unity October 15, 2023
youtube
Unlock the enchanting potential of your voice! 🎤 Join their at Unity on October 15, 2023, for an extraordinary journey into the magical power of vocal expression. 🌟 In this captivating video, you'll discover the secrets of commanding attention, inspiring others, and creating lasting impact with your voice. From storytelling to public speaking, this event will transform the way you communicate. Don't miss this opportunity to harness the mystical power of your voice! 🔮✨
#VoiceMagic#UnityEvent#UnlockYourVoice#VocalPower#CommunicationMastery#InspireWithYourVoice#MagicalJourney#TransformativeSpeech#VoiceOfInfluence#October15Event#Youtube
0 notes
Text
First Post
12/9/2023
Hi, I'm Finian, and this is my first blogpost! I'm really into like every single artform, and my main passion is gamedev! I learned it in highschool, I'm working on it in college, and I hope to make it a career someday.
I'm very critical on myself, and I am very embarrassed to share any art I make, but I've wanted to make a blog for a little while. I think personal writing is fun. I recently received some advice that making a blog might strengthen my portfolio, so I was like "what the heck" and now here I am.
With that out of the way, this post will be about what I consider my first finished game. I did some stuff in highschool, but that was all in a website called code.org. I worked in Unity in my final year, but I served the role of mentor more than developer.
This game was created for my final project in my ENC1143 class, and shall be called my Multimodal Artifact. The assignment was to share what we'd learned over the year in any form of medium we wished, so I made a game. I've only previously done 2D games and I consider myself acceptable at pixel art, so I made a simple 2D platformer. All of my artwork was done in Aseprite and all code was written in Unity, with Visual Studio.
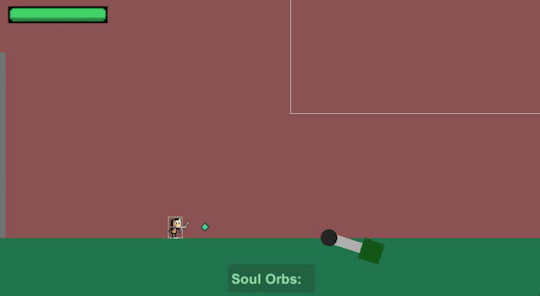
My intentions going into the game were mainly to let the player interact with the sign pictured above, which is something I've never done before. I also wanted the text on the sign to have a scrollbar. I started with an unanimated player sprite, and I made an incredibly simple ground texture, which I stretched to represent a wall. I coded the player's movement and interaction with the terrain. Once I was satisfied with the player's movement, I created some simple animations for idling, running, and jumping.

I then created a tileset of which I am extremely proud, as I've been struggling with grassy and leafy terrain for years. This is the second tileset I've ever made, and the first to perfectly link with itself.

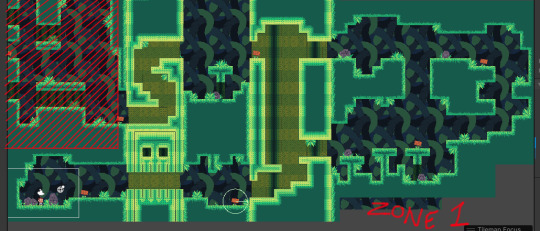
Once I had my tiles in order, I replaced my gaudy primitive, and created the first area of the game as seen in the first image, albeit with significantly less foliage. I created enough level to comfortably house five signs; about half of the game. Finally I began work on the sign itself. The sign was probably the most important part of the game, as its writing is what I was mainly being graded on. There are nine signs in the game, each containing small pieces of the whole final assignment. I created a sprite for the sign in about 20 minutes, and tackled the text with a scroll view. I watched a very helpful video on how it worked, added my TextMeshPro font asset, and made a sign visual behind it all.

My sign was done, from a visual standpoint. I could finally tackle the code, which I did within two scripts. The first script, "Interactable" would be attached to the sign sprite via a child. The script was actually pretty simple, using OnTriggerEnter and OnTriggerExit in tandem with a circle collider 2D to detect if the player was near enough, and an if statement featuring the UnityEvent Invoke in its body. Invoke calls a function from another script, established in the inspector. In this case, I attached a script to the Canvas which disabled and enabled the sign GameObjects.
I also added to the sign sprite a key icon, again of my own making, to make sure the player definitely knows what to press. It has an animation which activates when the player walks near the sign.
Both the coding and the visuals for the sign are finally finished! My final steps for this game were: 1) finish designing the level 2) add some scenery 3) if I had time, a pause screen and maybe even a start screen
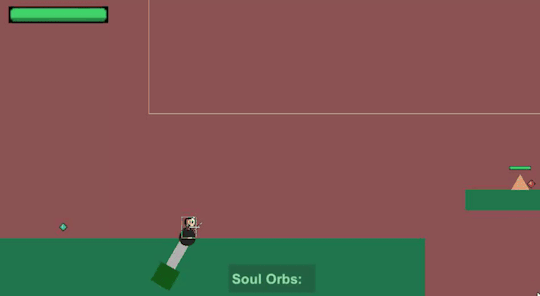
This was a single-level game, and since it was an english assignment that needs to be graded, I figured it ought to be very linear and very non-punishing. There are no enemies and no dying, so the difficulty had to come from platforming. The player can jump exactly three tiles high and seven tiles far. The game features one six tile wide jump and no necessary three tile high jumps. The first area, already completed features very easy one to three tile wide gaps.
The area has the player go from the left of the level to the right, and eventually upwards and back to the left. Within the first zone, it is possible to fall After every new challenge there will be a sign as the player's reward: after the first jump, , two-tile wide jump, series of one-tile wide jumps (pictured above), series of two-tile vertical jumps, and finally after the first four-tile wide jump. There are some punishing jumps in the upper layer of this zone, which cause the player to lose some progress if missed.
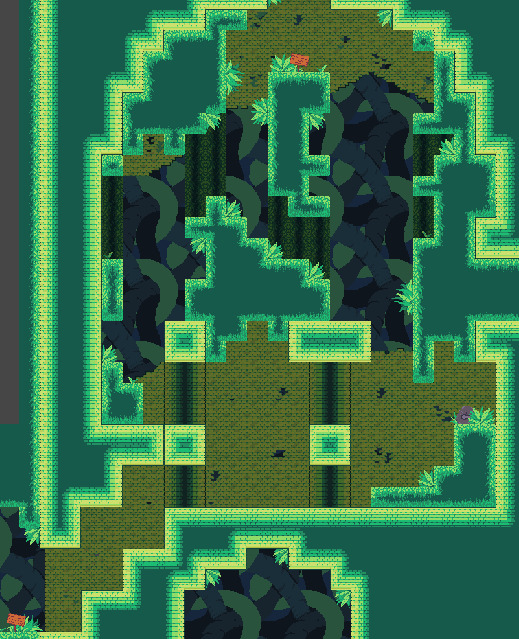
Before making any level past the first sign, I added a second tileset. I took my preciously mentioned first ever tileset, which was a greyish castle brick, and changed it to match my current palette. It's not perfect, but any imperfections are so slight nobody would notice unless they were specifically seeking them out. I added this tileset because I felt continuous jungle would start to get bland, and because I really wanted to get some use out of it. I think it fits in really well.
The second area of my game is a platforming section based off of the loss comic, a suggestion provided to my by my wonderful girlfriend. I think it's a lot of fun to involve others in the gamemaking process, and I think it's fun to work with a specific challenge in mind. I thought of something really fun to do with that idea almost instantly, and got to work.
For those who are unaware, the loss comic is a meme from 2002, which features this character format: I II II I_
I tried loosely to stay within that format, I don't think it tracks very well, but the intention and setup is there.

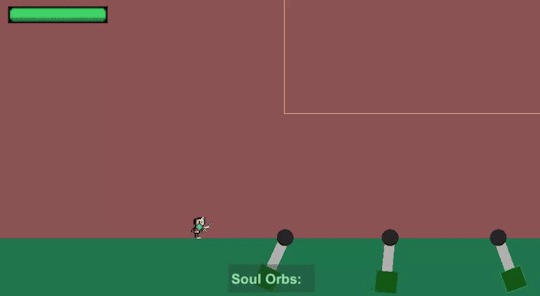
I wanted my third and final segment to be the most challenging, and I wanted it to be inside of the castle/temple setting, in hopes of making the play subconsciously go "oh, this area is different." Each area of the game has its subtle distinctions, but the distinction here is the least subtle.
The final area features a great deal of wide and high jumps, as well as the first and only head-hitter in the game. In the final set of jumps it is possible to fall back down to the start of the section, and the very last jump isn't very difficult. I think it sucks when you think you're almost done with everything in a game, and you mess up at the very end and have to start all over. I didn't want the player to feel that way, hence the easier last jump.
The level was done! My signs (the part I get graded on) were done! I could have some fun with the rest of the game, not that I didn't have fun with the entire previous process, this final bit was just leisure. I love programming.
I started with controls. I put the controls of the game as well as some arrows to point you the right way on rocks, which would not only fit well in the game's environment, but also served well to fill up empty-feeling areas.

After the rocks, I created some bushes. I considered making hanging vines, but I forgot about it somewhere in the creative process. There's obviously not as many of them as the rocks, but trust me when I say these suckers get some crazy mileage. They're everywhere, rotated for the walls and ceiling, flipped, darkened to appear more in the background, placed somewhat behind rocks. These four bushes were super important to the decoration of this game.

After the bushes, I adjusted the hue, saturation, and light of the tilesets to make them appear as background elements. I created the background of the game as a repeating tile. I am not confident in my ability to create a full artpiece, rather than smaller assets, and my wonderful girlfriend added some pixels which I feel made it look significantly better than my rendition. I hue shifted it, and it works excellently as the game's background.

My initial rendition (black was empty) and the final rendition
The final thing to do was to add a pause menu, which is also something I had extremely limited experience with, but found to be super easy. The code is just about the same as making the signs appear and disappear.

The game was not without its bugs, however. There were two that I wanted to fix: 1) sometimes while walking, the player would randomly get snagged and stop. I believed this to be an issue with the ground's collision 2) sometimes upon landing, the player would fly straight through the floor! I also believed this to be an issue with the ground's collision
I had the ground's collider set to a Tilemap Collider 2D, which is a collider designed specifically for tiles. The way a tilemap collider works is that it assigns a square shaped colllider to every individual tile, and would combine all of those collider together in order to save space if it were more efficient on the system. In my game's case it was not more efficient to combine them. However, combining them is exactly what would fix the first issue, the player snagging on the ground. I added a Composite Collider 2D to the tilemap, and viola! No more snagging. The player would still fall through the ground on occasion, but it happened to me so rarely I figured it would be a nonissue. I added a line of code that would set the player's position to the initial spawn if they went too far beneath the map, as well as the reset button in the pause menu which would do the same.
After these fixes I had my incredibly generous roommate playtest for me. He probably played for about thirty minutes, and he relentlessly fell through the map. It was amazing to me how often he just perfectly fell through the ground. Clearly, this was a bigger issue than I anticipated. Thank goodness for playtesters!
After some research, I realized the composite collider actually created an outline of the tiles, rather than completely filling them with collision. The player would fall through the ground because while falling, their velocity would continually increase. Since the collision of the ground was so slim, the player's high velocity would sometimes cause their collider to be on one side of the ground on one frame, and the other side of the ground on the next, not allowing for any collision to happen. The slim outline of the composite collider was not cutting it. There is a setting on the component labeled "Use Delaunay Mesh" which, when clicked, converts the collider from an outline to a full mesh.

The orange lines represent the collider
A Delaunay Mesh is a mesh based on Delaunay Triangulation, which is a complicated math term which can be simplified to mean the mesh has the least amount of big system-taxing triangles possible.
My roommate once again playtested for me, this time with no bugs at all. His thirty minute experience turned into a three minute experience. Magical!
There's more I would have liked to do, but my time ran out and I needed to turn the assignment in. I think I would have liked to make a starting screen, and maybe some hanging vines. If I had as much time as I pleased, I would've added walljumping and maybe some destructible decorations to make the player feel more involved.
I think the game was a success. This is my first game I can say I've actually completed, and I feel proud of how far I've come. If I were to do this again, I'd probably study the games "Getting Over It" and "Jump King," as in hindsight these games were fundamentally very similar.
The end! Thank you for reading my silly blogpost! This took way longer than I thought.
9 notes
·
View notes
Text
How Event-Driven Programming Can Simplify Your Unity Game Development
Introduction
If you've ever worked on a Unity game that started small but grew into a complex project, you’ve likely faced the frustration of tangled code. One script calls another, which calls another, creating a web of dependencies that makes changes risky and time-consuming.
A powerful way to solve this problem is by using event-driven programming. Instead of having scripts directly talk to each other, they communicate through events like sending out notifications that other parts of the game can listen for. This approach keeps your code cleaner, more flexible, and easier to maintain.

The Problem: Tightly Coupled Code
In traditional game scripting, one object often needs to directly reference another to trigger actions. For example:
The player might tell the UI to update the health bar.
The enemy might call a method on the sound manager to play a hit effect.
A quest system might check the inventory directly to see if an item was collected.
While this works at first, it creates a fragile structure. If you later change how the UI, sound, or inventory works, you might have to update multiple scripts—leading to bugs and slowdowns in development.
The Solution: Events as Middlemen
Event-driven programming flips this around. Instead of objects calling each other directly, they broadcast events, and other systems listen for those events.
Imagine it like this:
The player doesn’t tell the UI to update health—instead, it just announces, "I took damage!"
The UI, sound effects, and enemies can choose to react to that announcement if they need to.
This way, the player doesn’t need to know anything about the UI, sound, or enemies—it just sends out a signal, and whoever cares can respond.
Why This Makes Your Game Better
1. Easier to Change and Expand
Since scripts aren’t directly linked, you can modify or add new features without breaking existing ones. For example, if you later add an achievement system, it can listen for the "player took damage" event without requiring changes to the player script.
2. Cleaner, More Organized Code
Events act like a messaging system, making it clearer how different parts of your game interact. Instead of digging through multiple scripts to trace function calls, you can see all event listeners in one place.
3. Fewer Bugs and Conflicts
Because scripts aren’t tightly connected, changes in one place are less likely to accidentally break something elsewhere.
How to Apply This in Unity
Unity provides built-in ways to set up events without needing complex coding:
Option 1: UnityEvents (Great for Designers)
You can use UnityEvents in the Inspector to set up reactions visually.
For example, a "PlayerDamaged" event could trigger:
A health bar animation.
A sound effect.
A screen shake effect.
No code changes needed—just drag and drop in the Editor!
Option 2: C# Events (More Flexible for Programmers)
If you prefer coding, C# events let you define custom notifications that different scripts can subscribe to.
This is useful for more complex interactions, like quest completions or global game state changes.
Best Practices for Using Events
Don’t Overuse Them – Events are great for high-level communication, but simple interactions (like a door opening) might not need them.
Keep Track of Listeners – Always make sure to properly unsubscribe from events when an object is disabled to avoid memory leaks.
Use Debugging Tools – Temporarily log events to the console to make sure they’re firing when expected.
Final Thoughts
Event-driven programming is a game-changer for keeping your Unity projects clean and scalable. By reducing direct dependencies between scripts, you’ll spend less time fixing bugs and more time building fun gameplay.
If you haven’t tried it yet, start small—replace one or two direct function calls with events and see how much cleaner your code feels!
Have you used events in your Unity games? Share your experience in the comments!
#gaming#mobile game development#multiplayer games#metaverse#nft#game#vr games#blockchain#unity game development
0 notes
Text
Trance night at Crazy Atlanta
2 notes
·
View notes
Text

Hi this is brilliant
#c sharp#comp sci#i want my function to yell into the void and see if it gets a reply from someone#i can use two UnityEvent invokes but I feel there's a better way to do it#personal
1 note
·
View note
Text
[my own game] #20 – rotating spikes obstacles
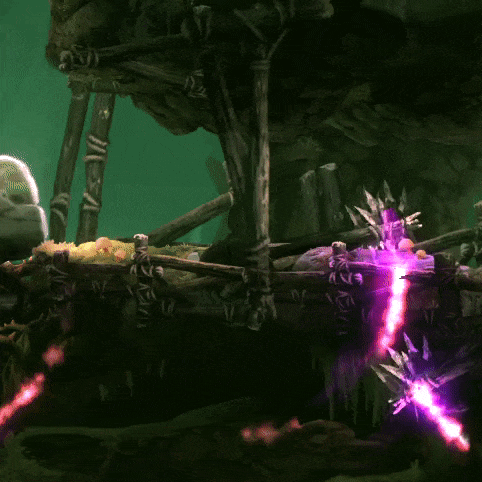
Challenge: How can I create a mace-like obstacle that rotates either clockwise or counter-clockwise, deals damage and knocks back the player on collision for my 2D elemental platformer?
Our 2D elemental platformer will feature different element-based obstacles that deal damage to the player when in contact and hinder their progress while progressing through a level. I decided to create a rotating spikes obstacle which represents the Earth element as the first element-based obstacle because I had a general idea of how I want it to behave and how to implement it.
Methodology
For this challenge I got inspired by the rotating spikes contraptions in Ori and the Blind Forest. In order to get familiar with it, I played the part of the game that features them in order to see how the mechanic feels like. While implementing the mechanic in a Unity prototype, I brainstormed on how to achieve the desired behaviour. Furthermore, I did some playtesting in order to ensure that the mechanic works in a similar way to the one in Ori and the Blind Forest. In the meantime, I looked at some forums for problems that others have encountered in order to incorporate what they have learned. I also checked the Unity documentation to see how certain methods and classes work. I validated the game design and game technology aspects of the challenge results in separate peer review sessions with two teachers.
DOT framework methods used:


Resources
Game concepts:
Dangers (Ori and the Blind Forest) - Ori and the Blind Forest Fandom Wiki
Unity documentation:
Transform.Rotate
Rigidbody.AddForce
UnityEvent<T0>
Unity answers:
What exactly is RelativeVelocity?
[2D] Can't AddForce to x but y works fine.
Using AddForce for horizontal movement doesn't quite work the way I want it to (2D)
Products
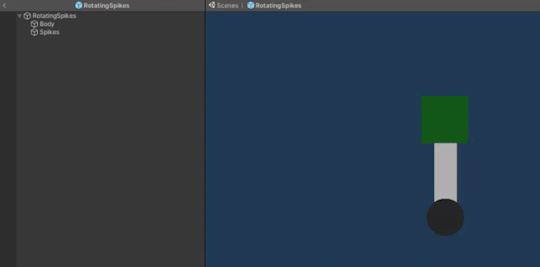
The rotating spikes obstacle prefab is composed of 3 GameObjects: a circular base, a rectangular body and square spikes. The body and the spikes are put under the circle object in order to achieve the desired rotation. The rotation logic is put in a script which is attached to the parent object, whereas the knock back damage script is attached only to the spikes object which also has a 2D box collider component since this is the part of the object that the player can collide with.

The desired way of rotation - make the body and the spikes rotate around the base
If all 3 objects are put under one GameObject, the rotation would look like this which is unwanted behaviour
When in contact, the obstacle deals damage to the player

Configuring the rotation speed to be similar to the speed of the rotating spikes in Ori and the Blind Forest

Desired behaviour of the knockback - push the character away in a direction that depends on the corner that hit the character
As far as I managed to observe in Ori and the Blind Forest, a hit by an outside corner would push the player away from the obstacle, whereas a hit by an inside corner would drag the player inside the rotating obstacle where the player can stay without being hit.
For playtesting purposes, I turned off the damage dealing functionality.
The player can be knocked back by the obstacle
After some playtests, I discovered I had to tweak the knockback power because it pushed the player too far away in the air or on the ground.
Push the player away from the obstacle when hit by an outside corner
Drag the player inside the rotating obstacle when hit by an inside corner
Adding multiple rotating spikes obstacles with clockwise and counter-clockwise rotation directions
Game technology validation:
I did 3 iterations on the implementation of this mechanic and each was committed to our GitLab repository.
Iteration 1: Initial working implementation of the knockback functionality
In order to implement the knockback mechanic, I had to change the velocity of the player GameObject with Rigidbody.AddForce when it collides with the obstacle. I had some troubles doing that because I set the player velocity in the Update() method for the player movement which resets the velocity on every frame and omits the changes that AddForce did as mentioned in [2D] Can't AddForce to x but y works fine. and in Using AddForce for horizontal movement doesn't quite work the way I want it to (2D). In order to fix this, I decided to “pause” the movement for 1-2 seconds, apply the force and reset it back. This workaround solved my issue and also provided a logical explanation for the gameplay - the player gets hammered for 1-2 seconds after being hit by the spikes which totally makes sense.
This version of the code can be found on the following links:
PlayerMovement.cs - attached to the player GameObject; defines the knockback functionality
ElementalObstacle.cs - attached to the obstacle GameObject; triggers the knockback functionality
Iteration 2: Make the knockback functionality be triggered from the player instead from the obstacle
After I achieved the desired results, I showed my progress to Jack. He said that my knockback workaround is a good and not problematic approach since it is okay to do one thing in the Update method and then pause to do something else for a certain period of time. Furthermore, he gave me some nice advice about the current code structure - it is better to trigger the knockback functionality in the player rather than triggering it in the obstacle because if I want to create other obstacles with the same behaviour, it would be easier to handle the knockback in the player since the script will be already attached to the player instead of attaching the script with the knockback functionality to each obstacle GameObject.
This version of the code can be found on the following links:
PlayerMovement.cs - attached to the player GameObject; defines the knockback functionality
PlayerHealth.cs - attached to the player GameObject; triggers the knockback functionality
KnockBackDamage.cs - attached to the obstacle GameObject; empty script, only used to identify whether the obstacle GameObject has it
Iteration 3: Refactor Unity Events
Jack also advised me that it would be cleaner and more flexible to use Unity Events to handle the knockback functionality so I refactored my code like so.
This version of the code can be found on the following links:
Player.cs - attached to the player GameObject; defines the knockback Unity Event
PlayerMovement.cs - attached to the player GameObject; listens for the knockback Unity Event and defines the knockback functionality
PlayerHealth.cs - attached to the player GameObject; invokes the knockback Unity Event which triggers the knockback functionality
Game design validation:
My duo project teammate and I showed our current progress to Mina - our game design semester coach, who was satisfied with our progress so far. She told us to think about ways of informing the player what each thing in the game does so that they know what to expect while playing the game. This also affects the rotating spikes obstacle - how to inform the player that this obstacle would deal them damage?
The current version of the code and other resources can be found on our GitLab Repository.
Next
The next steps are to add spikes on the current square part of the obstacle in order to indicate to the player that this part of the obstacle is harmful and implement more obstacles.
#my own game#devlog#library#benchmark creation#community research#literature study#lab#usability testing#showroom#peer review#workshop#brainstorm#prototyping
1 note
·
View note
Photo

RT @laireon: This weeks #unitytips are method delegates, which are similar to UnityEvents but far faster. It lets you pass methods as a variable reference to be called as needed. This can avoid messy inheritance such as flowers, weapons and players all needing the same methods. #gamedev https://t.co/uhUcyLPc4n
2 notes
·
View notes
Photo

Adding Timeline Signal support to MidiAnimationTrack. Now it can trigger UnityEvents from MIDI notes on a timeline. https://github.com/keijiro/MidiAnimationTrack/tree/dev-signal
4 notes
·
View notes
Text
Weekly Updates #61 - Unity is acting up again
New Post has been published on https://gamedevnexus.000webhostapp.com/2019/09/weekly-updates-61-unity-is-acting-up-again
Weekly Updates #61 - Unity is acting up again
Hello there. Welcome to this week's Weekly Updates. So I was at a standstill for most of the week codewise... I recently discovered that a critical bug has been introduced in the latest version of Unity. No more values are transmitted during UnityEvents. This means that all
Read full article here -> https://gamedevnexus.000webhostapp.com/2019/09/weekly-updates-61-unity-is-acting-up-again
1 note
·
View note
Photo

RT @laireon: This weeks #unitytips are method delegates, which are similar to UnityEvents but far faster. It lets you pass methods as a variable reference to be called as needed. This can avoid messy inheritance such as flowers, weapons and players all needing the same methods. #gamedev https://t.co/uhUcyLPc4n #Unity #GameDev #GameEngine
1 note
·
View note
Photo

I’m still converting my characters to use the new nested prefabs format. It’s taking a while, as I essentially have to recreate them, ensure that the properties on each component is set properly.
I took the time to also switch from UnityEvent to just plain C# event/delegates. I found UnityEvent to be problematic for a time now and have always wanted to stop using it. It is very convenient, but the convenience is also what makes it easy for me to mess it up.
For example, if I accidentally deleted the object assigned to the UnityEvent, or if I renamed the method it was supposed to call (which means it can’t find the method to call anymore), it doesn’t count as a compile error (compared to if I subscribed to an event in C# code), so I won’t notice it easily. I’ve experienced a couple of bugs because of this, and took me a while to pinpoint the cause.
So when I get something like this:

I end up wondering why I have an empty listener there in the Death Event. I’d rack my brain figuring out what the value there used to be. Then I end up cloning my project’s git repository, checkout an old commit to see what it was. It’s quite a hassle, considering the git repo has grown to about 9+ GB in size.
3 notes
·
View notes
Text
Ludum Dare 51
Just so everything's out in public, I've been (very) hard at work at my utils library github.com/browndragon/util .
I highly recommend it; it has:
Topics: scriptable object UnityEvent implementations which let you fully disconnect pub from sub (plus extra tracing & debugging)
CLONES. Trace prefab asset<-->instance through to runtime; easy pooling-by-prefab and returning.
Isometric tile utilities like Billboard (works with tilemaps)
Infrastructure Utilities like a Coroutines (get Update ticks in a scriptable object), StaticAsset (automagically get Camera.main-like behavior for arbitrary scriptable objects), and various Invokers (wire up collision or mouse behavior through the inspector for testing)
QOL Fluent utilities like T OrThrow(T), bool IsEmpty(T), etc; Chain for implementing HashCode and IComparable, tern for implementing behavior trees
Math & additional datatype & inspector support like MinMax and all the collections (serializable map, etc); also PID controller and easing and generic math and generic conversion and...
Maybe even more stuff I've forgotten.
Anyway, please give it a go and LMK what you think.
0 notes
Text
Doawnload all udemy courses For free GLOBALTEACHONLINE.COM What you'll learn Build a stunning turn-based game levelLearn proven game architecture to script logically and cleanlyAre you ready to level up your game dev skills? There's no better way than immersing yourself in a capstone project!In this course, we will: start with a blank Unity project and flesh out a fully working game levellearn fundamental techniques for creating your own turn-based game with 3d assetscreate C# scripts line-by-line and learn how to architect game components cleanly and logicallyLevel up your Unity skills!Design game board components in C# Use the iTween plugin to script animationSetup a player character to respond to keyboard inputScript enemy behavior to challenge your playersDesign user interface components Use UnityEvents to manage complex gameplay behaviorExplore Unity's Lighting system to render a game levelWhen you complete the class, you should have a full set of source code and a prototype for your own turn-based indie game! Learn from 60+ videos broken into small 10-15 minute lessons. Power through 11 hours of lectures and save weeks of coding to jumpstart your own Unity project!Join the ever growing ranks of our class and see what you can build today! Note: the course project files have been updated and you should be able to complete the course using Unity 2019.Though the UI in the recordings is may show a slightly older version of the Editor, the completed game project runs on Unity 2019.We recommend that you use Unity 2019.2 or higher.Who this course is for:Unity developers who want to build a turn-based puzzle gameIntermediate C# developers
0 notes
Text
Footsteps, receiving animation events.
Today I spent most of the day playing Castle Crashers with the girlfriend, she didn’t know the game and I totally love it and it’s a great game to play co-op :D
Anyways, it ended up being another day that I need a really quick task for my task of the day. Thiago (our sound designer) asked me to implement footsteps into the viking game so he can show off some cool FMOD stuff in one of his classes, so I figured it’d be a quick and nice task of the day.

For that I’m using Animation Events. That way I can call a method EXACTLY when the foot hits the ground. I’m also using animation events for controlling things in the attack (When to start dealing damage, when to stop dealing damage and when to play the cool ribbon effect).

Animation Events are slightly annoying as they send the event to the same game object that the animator is in, and usually that’s not where all my code is, I place my mesh with the animator inside a parent game object that has the collider and all the code. So I wrote a nifty little script that receives my events and sends it in a UnityEvent that lets whoever is interested in it subscribe to it.


So basically I just make my animation events be called GetEvent and send a string with it, which is the real name of my event. And when the AnimatorReceiver receives it it passes it along to whoever is interested with the real event name so they can deal with that on their own. ReceivedAnimationEvent above is in my player controller and is registered to receive the calls from AnimatorReceiver, in this case, it will look for LeftStep and RightStep and pass it along to my fmodHelper. (To decouple further, that in itself could be an event, but screw it, I’m just going to talk directly with it)
For finding what type of ground I’m stepping on I used a solution I found on google. In the Unity Forums in an old post. It looks down on the splatmaps of the terrain what’s the dominant texture in that point and uses that to know what type of ground you’re stepping on and pass it along.

On FMODHelper I check if I do have an event for footsteps, and if I do I create an instance of it, set the parameter, start it up and then release it once it’s done playing.
I created an FMODHelper class to keep all of the FMOD calls in one single script, that way If I need to change it later (which in this case I will, it’s going to be WWISE if/when we release it as a commercial game.) I only need to work on on replacing single file instead of hunting calls all over the place.
And that’s about it. A quick little task. Tomorrow is going to be a long day, we’re flying out of spain and to our next destination, I either do my task of the day really early or I’ll end up writing it from an airport... We’ll see what happens :) See you tomorrow!
7 notes
·
View notes
Photo


Take A Dip 077
Pose: Imitation - Viktoria BENTO 6 M [@Marketplace]
Head: Genus Classic [@Mainstore]
Eyeshadow: LUXREBEL DATE WITH LV Eyeshadows [@Inworld]
Body: [ INITHIUM ] KUPRA HD BOM [@Marketplace]
Nails: Rosary Solidity Nails [@Marketplace]
Body Tattoos: Hoodlem - Fruitful Tattoo [@Mainstore]
Face Tattoos: Hoodlem - Face Tattoos FatPack v2 Celeb, Hoodlem - Face Tattoos Fatpack v1 [@Mainstore]
Bikini: BODIED - Tae Kini White [@UnityEvent]
Hair: SHEGO - Lani Flexi [@Maintstore]
0 notes