#Vue.js ESLint
Explore tagged Tumblr posts
Visit Tumblr Blog
Explore Tumblr blogs with no restrictions, modern design and the best experience.
Last Seen Tumblr Blogs


Fun Fact
BuzzFeed published a report claiming that Tumblr was utilized as a distribution channel for Russian agents to influence American voting habits during the 2016 presidential election in Feb 2018.
Text
Essential Full Stack Development Interview Questions to Prepare For Your Next Job Opportunity
The demand for skilled full stack developers continues to grow as more companies seek professionals who can handle both the front-end and back-end development of applications. Preparing for a full stack development interview involves understanding a wide range of concepts that cover various technologies, frameworks, and programming practices.
To set yourself apart and confidently face interviews, consider exploring these essential full stack development interview questions. And for an insightful video overview of full stack interview preparation, check out this Full Stack Developer Interview Preparation Guide.
1. What is Full Stack Development?
Full stack development refers to the practice of working on both the front-end (client-side) and back-end (server-side) of a web application. A full stack developer is proficient in multiple technologies that enable them to build fully functional web applications from start to finish.
Key Points to Discuss:
Differences between front-end, back-end, and full stack development.
Advantages of hiring a full stack developer for a project.
2. What Are the Most Commonly Used Front-End Technologies?
Front-end development involves creating the user interface and ensuring a seamless user experience. The most popular front-end technologies include:
HTML: The standard markup language for creating web pages.
CSS: Used to style and layout web pages.
JavaScript: Essential for interactive features.
Frameworks/Libraries: React, Angular, and Vue.js.
Follow-Up Questions:
How do these technologies differ in terms of use cases?
Can you explain the benefits of using a front-end framework like React over vanilla JavaScript?
3. Explain the Role of Back-End Technologies in Full Stack Development.
The back-end of an application handles the server, database, and business logic. Key technologies include:
Node.js: A JavaScript runtime for server-side programming.
Express.js: A web application framework for Node.js.
Databases: SQL (e.g., MySQL, PostgreSQL) and NoSQL (e.g., MongoDB).
Other Languages: Python (Django, Flask), Ruby (Rails), and Java (Spring Boot).
Important Discussion Points:
RESTful services and APIs.
Authentication and authorization mechanisms (e.g., JWT, OAuth).
4. How Do You Ensure Code Quality and Maintainability?
Interviewers often ask this question to understand your approach to writing clean, maintainable code. Emphasize:
Version Control: Using Git and platforms like GitHub for collaborative coding.
Linting Tools: ESLint for JavaScript and other language-specific tools.
Code Reviews: The importance of peer reviews for improving code quality.
Best Practices: Following design patterns and SOLID principles.
5. Can You Discuss the MVC Architecture?
The Model-View-Controller (MVC) architecture is a common design pattern used in full stack development. Each part of the pattern has a distinct role:
Model: Manages data and business logic.
View: The user interface.
Controller: Connects the Model and View, handling input and output.
Why It’s Important:
Helps organize code, making it more scalable and easier to maintain.
Many frameworks, such as Django and Ruby on Rails, are built on MVC principles.
6. What Is REST and How Is It Used in Full Stack Development?
Representational State Transfer (REST) is an architectural style used to design networked applications:
Key Features: Stateless, cacheable, and uses standard HTTP methods (GET, POST, PUT, DELETE).
Implementation: Building RESTful APIs to enable communication between client and server.
Common Follow-Ups:
How do RESTful APIs differ from GraphQL?
Can you provide an example of designing a RESTful API?
7. Explain the Role of Databases and When to Use SQL vs. NoSQL.
Choosing between SQL and NoSQL depends on the application's needs:
SQL Databases: Structured, table-based databases like MySQL and PostgreSQL. Best for applications requiring complex queries and data integrity.
NoSQL Databases: Flexible, schema-less options like MongoDB and Cassandra. Ideal for handling large volumes of unstructured data.
Typical Questions:
What are the ACID properties in SQL databases?
When would you prefer MongoDB over a relational database?
8. How Do You Implement User Authentication?
User authentication is crucial for any secure application. Discuss:
Methods: Sessions, cookies, JSON Web Tokens (JWT).
Frameworks: Passport.js for Node.js, Auth0 for advanced solutions.
Best Practices: Storing passwords securely using hashing algorithms like bcrypt.
9. What Are Webpack and Babel Used For?
These tools are essential for modern JavaScript development:
Webpack: A module bundler for bundling JavaScript files and assets.
Babel: A JavaScript compiler that allows you to use next-gen JavaScript features by transpiling code to be compatible with older browsers.
Related Questions:
How do you optimize your build for production using Webpack?
What is tree shaking, and how does it improve performance?
10. How Do You Handle Error Handling in JavaScript?
Error handling is vital for ensuring that applications are resilient:
Try-Catch Blocks: For handling synchronous errors.
Promises and .catch(): For managing asynchronous operations.
Error Handling Middleware: Used in Express.js for centralized error management.
Important Concepts:
Logging errors and using tools like Sentry for real-time monitoring.
Creating user-friendly error messages.
Preparing thoroughly for full stack development interviews by understanding these questions will set you on the path to success. For a comprehensive walkthrough and additional insights, make sure to check out this YouTube guide, where these topics are discussed in detail to boost your interview readiness.
0 notes
Text
10 Essential Tools for Web App Development

Web app development is a dynamic field that constantly evolves with new technologies and tools. To stay competitive and build robust web applications, developers need access to a set of essential tools that can streamline their workflow, enhance productivity, and ensure the highest quality results. In this guide, we’ll explore ten must-have tools for web app development.
1. Text Editor or Integrated Development Environment (IDE)
A reliable text editor or IDE is the foundation of web development. Popular choices include Visual Studio Code, Sublime Text, and JetBrains’ WebStorm. These tools provide code highlighting, autocompletion, and debugging features to make your coding experience more efficient.
2. Version Control System (VCS)
Git, coupled with platforms like GitHub or GitLab, is vital for version control. It helps you track changes, collaborate with team members, and roll back to previous versions when necessary.
3. Package Managers
Package managers like npm for Node.js and Yarn help you manage libraries and dependencies efficiently. They make it easy to install, update, and remove packages in your web app project.
4. Web Browsers with Developer Tools
Modern web browsers like Google Chrome, Mozilla Firefox, and Microsoft Edge come equipped with powerful developer tools. These tools allow you to inspect and debug your web app, analyze network traffic, and test various aspects of your application.
5. Frontend Frameworks and Libraries
Choose from popular frontend libraries like React, Angular, or Vue.js to build dynamic and interactive user interfaces. These frameworks provide reusable components and make it easier to manage complex frontend code.
6. Backend Frameworks
Backend frameworks such as Express.js (for Node.js), Ruby on Rails, Django (for Python), or Laravel (for PHP) provide a structured way to build server-side logic, handle data, and create RESTful APIs.
7. Database Management Tools
Tools like phpMyAdmin, Adminer, or GUIs for NoSQL databases like MongoDB are essential for managing and querying databases efficiently.
8. API Testing Tools
Use tools like Postman to test APIs, monitor responses, and ensure your web app’s backend communicates effectively with the frontend.
9. Task Runners
Task runners like Gulp or Webpack automate repetitive development tasks, such as minification, compilation, and file bundling.
10. Code Quality and Testing Tools
Integrate tools like ESLint for JavaScript, Pylint for Python, or PHPUnit for PHP to ensure code quality and run automated tests to catch bugs and issues early.
With these ten essential tools in your toolkit, you’ll be well-equipped to tackle web app development projects with confidence. As technology evolves, staying up-to-date with the latest tools and best practices is crucial for success in this dynamic field.
Remember, the right tools not only enhance your productivity but also improve the quality of your web applications, making them more robust and user-friendly.
Happy coding!
0 notes
Text
How To Setup Your Vue.js Style Guide And Code Like A Pro With Vue 2 and Vue 3!! Vue 3 ESLint Guide
How To Setup Your Vue.js Style Guide And Code Like A Pro With Vue 2 and Vue 3!! Vue 3 ESLint Guide
Vue.js Style Guide is important. How should you create your Vue.js app and what are the best practices? In this tutorial we’ll look at adding ESLint Style’s to your Vue.js app! Using the eslint-plugin-vue. And we’ll look at Vue 3 style guide! #vuejs #vuejs3 Check now if your .TECH is available! Link – https://go.tech/erik Use Code erik.tech at Checkout for a special 80% OFF on 1 & 5 Year .TECH…

View On WordPress
#Erik Hanchett#eslint prettier vscode#eslint setup#eslint vscode#eslint vscode setup#Program With Eric#Program With Erik#VSCode setup eslint#Vue 3 style guide#Vue essentials#vue js 3#vue js tutorial#vue js tutorial for beginners#vue-eslint prettier vscode#Vue.js 3 tutorial#vue.js documentary#Vue.js ESLint#Vue.js eslint tutorial#Vue.js Style Eslint#Vue.js style essentials#Vue.js Style Guide#vuejs
0 notes
Photo

eslint-plugin-vue 7.5.0: Official ESLint Plugin for Vue.js - https://t.co/NvoCnsDxLO
1 note
·
View note
Photo

Official ESLint plugin for Vue.js ☞ http://dev.geekwall.in/070870f07e #vuejs #javascript
1 note
·
View note
Text
10 Excellent Vue Development Tools That Will Make Your Life Easier
Nowadays, developers have a variety of development tools to choose from. For instance, Vue.js developers have many options. With Vue.js, you can build single-paged applications as well as multi-page ones or create apps on the basis of user interfaces.

The introduction of the Vue language began with Vue’s framework. In addition to multiple tools, technologies, editing tools, and styles guides, Vue also offers a number of other services.
In a new blog, we’re exploring the development tools you’ll want to know about and their capabilities to better meet your app development needs. It’s up to you to read. There are many more insightful ideas you can use to improve your developing apps.
vue-cli
Among the best developer tools, Vue CLI takes the top slot. Utilizing Vue without CLI would be similar to having chocolate without peanut butter. For all its flaws, not to mention the fact that you can no longer add new functionalities to it.
That’s in addition to tools that make web development a more user-friendly experience. One can take advantage of Babel, ESLint, TypeScript, PostCSS, PWA, Unit Testing, and End-to-end Testing in the Vue CLI environment. This all is enhanced by the ability to combine any plugin of your choosing with the CLI.
The interest here is that Vue CLI doesn’t require ejecting. In addition, Vue CLI provides more scope for customization than do other frameworks. Regarding Vue CLI, we will find it relatively easy to start a project and manage it smoothly with Vue CLI’s graphical UI.
Bit for Vue
The next Vue.js developer tool is Bit. If you’re looking for the next top-quality library for all sorts of elements, that is all you need to consider. With this change, developers will no longer complain about not having the opportunity to share and collaborate on UI components.
This Bit.dev platform simplifies hosting, managing, and sharing components. Think of the component library as a CD music album. By leveraging Bit’s CLI tool, Bit.dev lets you push the independent components from any local project to the Bit.dev collection.
Each component has its dependencies tracked, and all shared components are reusable. Tests should be conducted frequently and isolated environments should be used.
Nuxt.js
One of the most popular Vue components is Nuxt.js, a component that helps you create performance-optimized user interfaces and single-page apps. It allows server-side rendering (SSR) of Vue.js applications.
With more than 50 modules available, server-rendered applications can be created, as well as single-page apps and Progressive Web Applications (PWA), etc. Basically, it works as a static site creator. It speeds up the application development process.
Vuex
Although there are plenty of Vue developers who are not managing state as well as they should be, we’ve found an awesome hire Vue developers tool, called Vuex, which helps manage state as it needs to be done. Vuex has other cool features like state snapshot export and zero-config time-travel debugging.
Vuetify
Among the Vue.js devtools, Vuetify is one of the most popular ones, offering a large selection of manually crafted UI components based on Material Design. Creating a successful app is also important.
Veutify can be used to develop SSR apps, SPAs, mobile apps, and even progressive web apps. It offers free and premium themes, both of which can be customized.
Vue Apollo
Vue Apollo is a powerful and flexible tool that utilizes your favorite API’s data. You can access whichever data you require to build a project or service. Apollo assists the use of GraphQL through a declarative mode, as well as supporting server-side rendering.
Vue Router
The official router for the Vue framework, Vue routers allow you to have multiple types of pages in one application that each reside on a separate route.
One of the overlooked features of Vue routers is that it has additional features and functions that some users aren’t aware of. Some of the core features include named routes, dynamic matching routes, named views and programmatic navigation.
It has many slewed tools for creating reusable web components; as such, routing is one of the most effective. Using Vue routing, you will be able to go from page to page without having to reload the page in order to see the new destination.
VuePress
When VuePress was created, it was known as a tool for creating technical documentation, and while this still applies today, VuePress has transformed into something even bigger- one of the main components of the Vue ecosystem, alongside other components such as the library, framework, and UI system. More on down the road, after a few years had gone by, it was determined to be an acceptable CMS.
In general, VuePress is divided into two parts: a simple static site generator with Vue theming and a plugin API, and a default theme designed to publish technical documentation.
Documentation was intended for Vue’s own subprojects. Since its first edition, VuePress has been providing exceptional blogging features and has even included a plugin system.
In fact, VuePress allows you to incorporate Vue Components or codes without the requirement to use markdown files. The application even allows you to create custom themes or use one of the many pre-built options available from the community.
Vue.js Guide
Based on its title, this guide looks to be a comprehensive reference on how to work with Vue.js. The Official Vue.js Guide is quite helpful to those just starting out as a Vue.js developer.
Within this lengthy guide format, you will find information about the Vue.js API, examples of official Vue style codes, as well as details about several Vue-related projects. You might make a good deal of progress toward your coding skills simply by joining these online Vue communities, where you might find that approximately 60% of Vue beginners prefer it.
Vue.js DevTools for Browsers
Developer Tools can be considered browser extensions that amplify the development process and speed up the process of finding bugs. There are several critical development tools available for Vuejs that are critical to being able to track your code and ensure that you deliver on time.
When it comes to Vue.js development tools, it has established itself as an industry leader. You will find many faults on the web page as you browse through it, and the tool can help with seamless debugging of Vue code.
Whenever you want to learn about a page’s errors, just enable the indicator in the search bar after installing the Vue dev tools in your web browser.
Conclusion
In this post we talked about some different tools that can be used to differentiate your project. Chrome and Firefox have Vue Devtools Extensions available, but they only work with local servers. It’s all a matter of practice and the more you work with the program, the better you’ll get at it.
If you want your project to be the best, as well as with these developer tools, make sure you also use Vue.js best practices. Feel free to tag us in the comment section below in case you have any questions or queries.
Source: Top Vue Js Development Tools
0 notes
Photo

VuexをTypeScriptで利用するのに悩んだ https://ift.tt/2MOnODr
概要
Vue.jsをTypeScriptで開発する際にVuexを利用するのにしっくりくる実装方法を模索中で、いくつか方法を試してみました。
GitHubに利用したプロジェクトをUPしています。実際に試してみたい方どうぞ^^
https://github.com/kai-kou/vue-js-typescript-vuex
準備
ここではDockerを利用して環境構築していますが、ローカルで構築してもらってもOKです。
> mkdir 任意のディレクトリ > cd 任意のディレクトリ > vi Dockerfile > vi docker-compose.yml
Dockerfile
FROM node:10.8.0-stretch RUN npm install --global @vue/cli WORKDIR /projects
docker-compose.yml
version: '3' services: app: build: . ports: - "8080:8080" volumes: - ".:/projects" tty: true
> docker-compose up -d > docker-compose exec app bash
コンテナ内
> vue create app Vue CLI v3.0.1 ? Please pick a preset: Manually select features ? Check the features needed for your project: Babel, TS, Vuex, Linter, Unit ? Use class-style component syntax? Yes ? Use Babel alongside TypeScript for auto-detected polyfills? Yes ? Pick a linter / formatter config: TSLint ? Pick additional lint features: Lint on save ? Pick a unit testing solution: Mocha ? Where do you prefer placing config for Babel, PostCSS, ESLint, etc.? In dedicated config files ? Save this as a preset for future projects? No ? Pick the package manager to use when installing dependencies: (Use arrow keys) ❯ Use Yarn Use NPM
コンテナ内
> cd app > yarn serve
これで実装の準備が整いました。
Vue-Cli標準
vue create コマンドでプロジェクトを作成するとsrc直下にstore.tsが作成されているので、そこに実装をいれて利用するパターンです。
stateにcounter ってのを持っていて、それをインクリメントするアクションがあるだけです。
src/store.ts
import Vue from 'vue'; import Vuex from 'vuex'; Vue.use(Vuex); interface State { conuter: number; } export default new Vuex.Store({ state: { conuter: 0, } as State, getters: { getCounter: (state, getters) => () => { return state.conuter; }, }, mutations: { increment(state, payload) { state.conuter += 1; }, }, actions: { incrementAction(context) { context.commit('increment'); }, }, });
App.vueで使ってみます。 超適当ですが、画像にclickイベント定義して、HelloWorldコンポーネントでstateに定義しているcounter を表示してます。
src/App.vue
<template> <div id="app"> <img alt="Vue logo" src="./assets/logo.png" @click="increment"> <HelloWorld :msg="`Welcome to Your Vue.js + TypeScript App ${this.counter}`"/> </div> </template> <script lang="ts"> import { Component, Vue } from 'vue-property-decorator'; import HelloWorld from './components/HelloWorld.vue'; @Component({ components: { HelloWorld, }, }) export default class App extends Vue { private get counter(): number { return this.$store.getters.getCounter(); } private increment(): void { this.$store.dispatch('incrementAction'); } } </script> (略)
ブラウザで確認すると、画像をクリックするとcounterがインクリメントするのが、確認できます。

気になる点
実装はシンプルで良いのですが、規模が大きくなってくると、store.tsが肥大化してくるのが目に見えます。辛い。
this.$store を利用するので、メソッド名などを間違えていても実行時にしかエラーにならないので、せっかくTypeScript使っているのになーです。
src/App.vue
export default class App extends Vue { private get counter(): number { return this.$store.getters.getCounter2(); // 実行時にエラー } private increment(): void { this.$store.dispatch('incrementAction2'); // 実行時にエラー } }
vuex-type-helperを利用する
下記記事で紹介されていたvuex-type-helperを利用してみます。
Vue.js + Vuex + TypeScript を試行錯誤してみた https://logs.utahta.com/blog/2017/09/02/110000
ktsn/vuex-type-helper https://github.com/ktsn/vuex-type-helper
vuex-type-helperとvuex-classってのを追加します。
コンテナ内
> yarn add vuex-type-helper vuex-class
storeの実装を追加します。ここではモジュール化してみます。
> mkdir -pv store2/modules > touch store2/index.ts > touch store2/modules/app.ts
store2/index.ts
import Vue from 'vue'; import Vuex from 'vuex'; import { app } from '@/store2/modules/app'; Vue.use(Vuex); export default new Vuex.Store({ modules: { app, }, });
store2/modules/app.ts
import Vuex, { createNamespacedHelpers } from 'vuex'; import { DefineActions, DefineGetters, DefineMutations } from 'vuex-type-helper'; export interface State { counter: number; } export interface Getters { counter: number; } export interface Mutations { increment: {}; } export interface Actions { incrementAction: {}; } export const state: State = { counter: 0, }; export const getters: DefineGetters<Getters, State> = { counter: (state) => state.counter, }; export const mutations: DefineMutations<Mutations, State> = { increment(state, {}) { state.counter += 1; }, }; export const actions: DefineActions<Actions, State, Mutations, Getters> = { incrementAction({ commit }, payload) { commit('increment', payload); }, }; export const { mapState, mapGetters, mapMutations, mapActions, } = createNamespacedHelpers<State, Getters, Mutations, Actions>('app'); export const app = { namespaced: true, state, getters, mutations, actions, };
利用できるようにmain.tsとApp.vueを編集します。
src/main.ts
import Vue from 'vue'; import App from './App.vue'; -import store from './store'; +import store from './store2';
src/App.vue
import { Component, Vue } from 'vue-property-decorator'; import HelloWorld from './components/HelloWorld.vue'; import { Getter } from 'vuex-class'; import * as app from './store2/modules/app'; @Component({ components: { HelloWorld, }, methods: { ...app.mapActions(['incrementAction']), }, }) export default class App extends Vue { @Getter('app/counter') private counter!: number; private incrementAction!: (payload: {}) => void; private increment(): void { this.incrementAction({}); } } (略)
はい。
気になる点
こちらの利点としてはモジュール化しやすい点と、アクション名を間違えてたときにビルドエラー吐いてくれる点でしょうか。
メソッド名間違い
methods: { ...app.mapActions(['incrementAction2']), },
エラー出してくれる
Argument of type '"incrementAction2"[]' is not assignable to parameter of type '"incrementAction"[]'. Type '"incrementAction2"' is not assignable to type '"incrementAction"'.
getterで間違ってる場合は、ブラウザ側でエラーになります。惜しい。
プロパティ名間違い
@Getter('app/counter2') private counter!: number;
ブラウザでエラー

vuex-classを利用するとActionなんかも以下のような定義ができるけれど、getterと同様にメソッド名間違いがブラウザでしか検知できないので、微妙。
vuex-classでAction定義
@Action('app/incrementAction') private incrementAction!: (payload: {}) => void;
うーん。独自実装いれたらもっとブラウザエラーを回避できそうですが、どこまで実装しようか悩ましいところです。
Vue.js+TypeScriptで開発するときの参考記事まとめ https://qiita.com/kai_kou/items/19b494a41023d84bacc7
元記事こちら
「VuexをTypeScriptで利用するのに悩んだ」
September 20, 2018 at 04:00PM
1 note
·
View note
Text
How much does it cost to hire Frontend developer from India?
Are you looking for a frontend developer to work on your next app or website?
When you need to get your business extension plan off to a quick start, the online presence of your firm as a website or a mobile application is the first thing that will attract in your customers.
There are two types of web developers: front-end developers and back-end developers. For the sake of this post, we'll look at the cost of hiring someone to manage your application's client-side, or the component of the website that directly interacts with your customers. Here are the most critical cost considerations you'll have to make when hiring a front-end designer for your project.
From smart site components to small highlights in web and mobile applications, JavaScript is everywhere. JS's unrivalled strong suit resides in web development, despite the fact that it doesn't get overly enthusiastic from this standpoint. However, this does not negate the language's popularity: there are more JavaScript repositories on GitHub than any other language. JavaScript systems such as Angular.js, React.js, Node.js, Vue.js, and JavaScript libraries such as jQuery, Babel, Meteor, ESLint, and others have only raised the bar.
According to a Stack Overflow study, JavaScript is utilised by 55 percent of designers and developers, making it the most popular language.
Before we go into the enlistment process, there are a few things you should know about JavaScript.
A front-end developer's job entails optimising typefaces, sliders, drop-down menus, buttons, and content to make loading time as quick and interactive as possible. The testing component of the front-end functionality, UI, and UX of an app or a website can also be checked with the help of a front-end developer, as they are well-versed in doing manual and automated testing, which further helps in improving the client-side functioning and fixing any errors.
Different resources are required to deal with these two points of view. The front-end engineer, on the other hand, is someone who can cut through the turbulence since he can handle both backend and front-end requirements. This ensures that the project is produced and delivered as quickly as possible, saving you both time and money.
So, how much does it cost to hire Front End Web Developers in India? As a result, you must recognise that this subject is extremely diverse, and there are numerous aspects that might influence the cost. As a result, you must carefully analyse all of these factors.

0 notes
Text
41 Best Vue Component Libraries To Archive For 2021
Quick Summary:
This blog post brings you a comprehensive list of Vue Component Libraries that turn up to be the righteous choice for developing your next successful eye-pleasing mobile application. Vue JS is an elegant choice for creating dynamic frontend applications.
With the expanding Vue community, we have acknowledged varied useful solutions that have enabled us for attaining aimed outputs. This one is a curated list as per my experience and I hope you find it useful.
If you have any other suggestions that I can add up to my list, then please let me know in the comments.
Introduction
VueJS is no more a progressive JavaScript framework, but it is one of the widely used frontend frameworks that enables developers to create UIs elegantly and efficiently. Functionality-driven structure, in-detail documentation, and easy learning curve make it a favorable choice for beginners and for experienced developers.
It is an opportunity to move from other JavaScript frameworks to Vue.js. I have compiled a list of some fundamental tools and libraries, as well as proven tips and tricks to level up your career as a Vue.js Developer.
I have chosen this list based on their effectiveness, usefulness, and uniqueness, also you will find their GitHub repo and stars along with their NPM package manager downloads.

Top 41 Vue Component Libraries
Here is the curated list of 41 best Vue component libraries as per my experience with them. Go through and you may find something useful for your next amazing Vue project. Enlighten us if you have any better libraries that you came across.
#1 Nuxt
Server-Side Rendering is one of the most popular techniques to render SPAs on the server instead of the browser. It allows the website to have a faster page load time, and that is the key to a good user experience.
Nuxt.js is built on SSR features, and with Nuxt, you can create SSR apps, PWAs, and SPAs, or you can use it as a static site generator.
GitHub: 36.1k stars
Weekly downloads on NPM: 397633
Blogs you may also like: 📖 How to Do Server-side Rendering (SSR) With the Help of Vue and Nuxt.js? 📖 Top 10 Essential and Useful NuxtJS Modules for Your Existing as well as Next Vue.js Application
#2 Vuetify
Vuetify is a large set of 80+ crafted component libraries based on Material Design such as banners, badges, form inputs and controls, buttons, progress widgets, and many more such things that are sufficient for any application’s requirements.
Whether you want to start a new application or looking for assistance to add them to the existing app, you can use it to build SSR apps, mobile apps, SPAs, and PWAs. The best thing about Vuetify is it offers free as well as premium themes, and it also lets you build your own theme as well.
GitHub: 30.8k stars
Weekly downloads on NPM: 369800
#3 Vue CLI
Vue CLI is a fully-featured set of tools with installed npm packages that allows you to create project structures and deploy boilerplates rapidly in your terminal. With the use of Vue CLI, you can experiment with new ideas to create instant prototypes to demonstrate new features.
Moreover, Vue CLI offers support for web development tools like Babel, ESLint, PostCSS, TypeScript, Unit Testing, PWA Mocha, Cypress, Nightwatch, and end to end testing.
However, the apple of the eye is Graphical UI – Vue UI that comes along with the CLI that lets you create new projects and manage them accordingly.
GitHub: 27.8k stars
Weekly downloads on NPM: 118513
Read more: Top 41 Vue Component Libraries
#vuejs libraries#vuejs components#vuejs application#front end#vuejs app#vue application#technology news#technology#remote working
0 notes
Photo

eslint-plugin-vue 7.5.0: Official ESLint Plugin for Vue.js - https://t.co/NvoCnsDxLO
0 notes
Photo

eslint-plugin-vue 7.5.0: Official ESLint Plugin for Vue.js - https://t.co/NvoCnsDxLO
0 notes
Link
Inthe past few years, Vue JS has grown in popularity. It’s mostly because of the ease of access it offers both in terms of learning and application development. If you are an accomplished developer who is looking to switch to view or just get started, with the right tools, you must do so. The proper utilisation of these tools would help you to build great apps quickly, without reinventing the wheel.
When selecting tools for this list, we considered the whole Vue JS development cycle. Starting with setting up a boilerplate with all the essentials for your new application, we covered some essential application concepts, debugging and even testing.
Let’s get started.
1. Vue CLI
As in any other JavaScript framework, without a CLI tool, you can not do much on Vue. The CLI allows you to create project structures quickly and to deploy boilerplates. It also lets you create instant prototypes to show new and advanced features/functionalities.
Besides the usual features, the Vue CLI offers much more like support for web development tools such as TypeScript, Babel, PostCSS, ESLint, Unit Testing, PWA, and End-to-End Testing. It is also compatible with Community-created extensible third-party plugins.
Another advantage of the Vue CLI is it does not require ejection. In other words, when compared with other frameworks, more can be done with the Vue CLI in terms of customisation. The Vue CLI’s Graphical UI is one of its most essential features and enables you to create and manage new projects conveniently.
0 notes
Photo

Underscore.js, React without virtual DOM, and why you should use Svelte
#504 — September 4, 2020
Unsubscribe | Read on the Web
JavaScript Weekly
Underscore.js 1.11.0: The Long Standing Functional Helper Library Goes Modular — “Underscore!?” I hear some of our longer serving readings exclaiming. Yes, it’s still around, still under active development, and still a neat project at a mere 11 years old. As of v1.11.0 every function is now in a separate module which brings treeshaking opportunities to all, but there’s also a monolithic bundle in ES module format for those who prefer that. This article goes into a lot more depth about the new modular aspects.
Jeremy Ashkenas
Mastering the Hard Parts of JavaScript — A currently 17-part blog post series written by someone taking Frontend Masters’ JavaScript: The Hard Parts course and reflecting on the exercises that have helped them learn about callbacks, prototypes, closures, and more.
Ryan Ameri
FusionAuth Now Offers Breached Password Detection and LDAP — FusionAuth is a complete identity and access management tool that saves your team time and resources. Implement complex standards like OAuth, OpenID Connect, and SAML and build out additional login features to meet compliance requirements.
FusionAuth sponsor
How Browsers May Throttle requestAnimationFrame — requestAnimationFrame is a browser API that allows code execution to be triggered before the next available frame on the device display, but it’s not a guarantee and it can be throttled. This post looks at when and why.
Matt Perry
Brahmos: Think React, But Without the VDOM — An intriguing user interface library that supports the modern React API and native templates but with no VDOM.
Brahmos
NativeScript 7.0: Create Native iOS and Android Apps with JS — A signficant step forward for the framework by aligning with modern JS standards and bringing broad consistency across the whole stack. Supports Angular, Vue, and you can even use TypeScript if you prefer.
NativeScript
⚡️ Quick bytes:
🎧 The Real Talk JavaScript podcast interviewed Rich Harris of the Svelte project – well worth a listen if you want to get up to speed with why you should be paying attention to Svelte.
ESLint now has a public roadmap of what they're working on next.
You've got nine more days to develop a game for the current JS13kGames competition, if you're up for it.
VueConfTO (VueConf Toronto) are running a free virtual Vue.js conference this November.
The latest on webpack 5's release plans. Expect a final release in October.
💻 Jobs
Senior JavaScript Developer (Warsaw, Relocation Package) — Open source rich text editor used by millions of users around the world. Strong focus on code quality. Join us.
CKEDITOR
JavaScript Developer at X-Team (Remote) — Join the most energizing community for developers and work on projects for Riot Games, FOX, Sony, Coinbase, and more.
X-Team
Find a Job Through Vettery — Create a profile on Vettery to connect with hiring managers at startups and Fortune 500 companies. It's free for job-seekers.
Vettery
📚 Tutorials, Opinions and Stories
Designing a JavaScript Plugin System — jQuery has plugins. Gatsby, Eleventy, and Vue do, too. Plugins are a common way to extend the functionality of other tools and libraries and you can roll your own plugin approach too.
Bryan Braun
▶ Making WAVs: Understanding, Parsing, and Creating Wave Files — If you’ve not watched any of the Low Level JavaScript videos yet, you’re missing a treat. But this is a good place to start, particularly if the topic of working with a data format at a low level appeals to you.
Low Level JavaScript
Breakpoints and console.log Is the Past, Time Travel Is the Future — 15x faster JavaScript debugging than with breakpoints and console.log.
Wallaby.js sponsor
The New Logical Assignment Operators in JavaScript — Logical assignment operators combine logical operators (e.g. ||) and assignment expressions. They're currently at stage 4.
Hemanth HM
Eight Methods to Search Through JavaScript Arrays
Joel Thoms
TypeScript 4.0: What I’m Most Excited About — Fernando seems particularly enthused about the latest version of TypeScript!
Fernando Doglio
Machine Learning for JavaScript Devs in 10 Minutes — Covers the absolute basics but puts you in a position to move on elsewhere.
Allan Chua
How to Refactor a Shopify Site for JavaScript Performance
Shopify Partners sponsor
'TypeScript is Weakening the JavaScript Ecosystem' — Controversial opinion alert, but we need to balance out the TypeScript love sometime.
Tim Daubenschütz
▶ Why I’m Using Next.js in 2020 — Lee makes the bold claim that he thinks “the future of React is actually Next.js”.
Lee Robinson
Building a Component Library with React and Emotion
Ademola Adegbuyi
Tackling TypeScript: Upgrading from JavaScript — You’ll know Dr. Axel from Deep JavaScript and JavaScript for Impatient Programmers.. well now he’s tackling TypeScript and you can read the first 11 chapters online.
Dr. Axel Rauschmayer
Introducing Modular Underscore — Just in case you missed it in the top feature of this issue ;-)
Julian Gonggrijp
🔧 Code & Tools

CindyJS: A Framework to Create Interactive Math Content for the Web — For visualizing and playing with mathematical concepts with things like mass, springs, fields, trees, etc. Lots of live examples here. The optics simulation is quite neat to play with.
CindyJS Team
Print.js: An Improved Way to Print From Your Apps and Pages — Let’s say you have a PDF file that would be better to print than the current Web page.. Print.js makes it easy to add a button to a page so users can print that PDF directly. You can also print specific elements off of the current page.
Crabbly
AppSignal Is All About Automatic Instrumentation and Ease of Use — AppSignal provides you with automatic instrumentation for Apollo, PostgreSQL, Redis, and Next.js. Try us out for free.
AppSignal sponsor
Volt: A Bootstrap 5 Admin Dashboard Using Only Vanilla JS — See a live preview here. Includes 11 example pages, 100+ components, and some plugins with no dependencies.
Themesberg
Stencil 2.0: A Web Component Compiler for Building Reusable UI Components — Stencil is a toolchain for building reusable, scalable design systems. And while this is version 2.0, there are few breaking changes.
Ionic
NgRx 10 Released: Reactive State for Angular
ngrx
🆕 Quick releases:
Ember 3.21
Terser 5.3 — JS parser, mangler and compressor toolkit.
Cypress 5.1 — Fast, reliable testing for anything that runs in a browser.
jqGrid 5.5 — jQuery grid plugin.
np 6.5 — A better npm publish
underscore 1.11.0 — JS functional helpers library.
by via JavaScript Weekly https://ift.tt/3i0cc0z
0 notes
Text
Auth0: Vue & TypeScript Quickstart SDK - The Missing Docs

Authentication is hard. Even if you know the ins and outs of it, handling registration, login, email verification, forgotten password, secret rotation... and what not... is a tedious work.
For this reason, we use auth providers such as AWS Cognito or Auth0. But this comes with its own drawback, namely that you are at the provider's mercy when it comes to examples and tutorials. If a resource you need does not exist, you either need to contact support and wait for them (but nobody got time for that), or figure it out yourself by the good ol' trial and error method.
A couple of days ago, I had to use Auth0 with Vue.js and TypeScript. Now, Auth0 has an excellent tutorial for Vue.js, but I could not find any examples in TypeScript. So seeing no better option, I started annotating the code provided by the tutorial.
I finished it, and in this blogpost, I'll walk you through the details, so you don't have to repeat this chore.
We will follow the original Auth0 Vue tutorial structure which can be found here. To make it easier to compare the two, we'll use the exact same first-level headings as the original.
You can find my complete auth0 vue typescript repo on RisingStack's Github.
Configure Auth0
First, you'll need to set up your Auth0 application. That part is very well written in the original tutorial, and I would like to be neither repetitive nor plagiarize Auth0's content, so please go ahead and read the first section there, then come back.
Create a Sample Application
Now we already start to diverge from the Auth0 tutorial.
If you already have an existing app, make sure that typescript, vue-class-component, and vue-property-decorator are present in your package.json, as we'll use class components.
If you don't have one, let's create a sample app.
$ vue create auth0-ts-vue
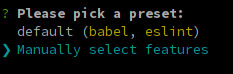
When prompted, select Manually select features.
We'll need Babel, TypeScript, and Router.
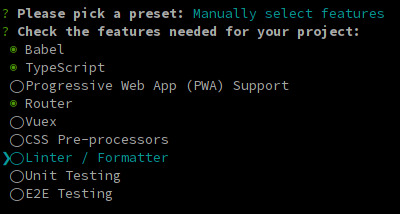
The next 3 questions are about deciding whether you want to use class-style component syntax, Babel, and history mode. Hit enter for all three to answer "Yes". You might opt-out from history mode if you really want to.

It is entirely up to you if you want to use dedicated config files or not, and if you want to save this as a preset.
Grab a beverage of your preference while the dependencies are being installed.
Install the SDK
Once it's done, we need to install our auth0 dependencies.
$ cd auth0-ts-vue-example $ npm install @auth0/auth0-spa-js
The auth0-spa-js package comes with its own type definitions, so we're all set for now.
Modify your Webpack Config
If you followed the original Auth0 tutorials configuration part, you've set up your URLs to listen at port 3000. Time to hard code this into our webpack dev-server.
Create a vue.config.js file in the root directory of your app.
const webpack = require('webpack') module.exports = { devServer: { port: 3000 } }
This way, we don't have to specify the PORT env var when we run our app. We'd need to change it in Auth0 anyway all the time, while we're developing it.
Start the application
$ npm run serve
Leave it running so we can leverage Webpack's incremental build throughout the process.
Create an Authentication Wrapper
Have you ever created a Vue.js plugin? Well, now is the time!
The easiest way to use Auth0 in your app is to make it available on this in each of your components, just as you do with $route after you've installed Vue Router.
It would be nice if this was a separate dependency, but for the sake of simplicity, let it live inside our codebase.
Create a directory called auth inside your src dir then create the following files: index.ts auth.ts, VueAuth.ts, User.ts. The original tutorial has them all in one file. Still, in my opinion, it is easier to understand what's happening if we separate the matters a bit, and it also results in nicer type definitions too.
Our index.ts will be a simple barrel file.
export * from './auth'
auth.ts is where we define the plugin. VueAuth.ts is a wrapper Vue object around auth0-spa-js, so we can leverage the observability provided by Vue, and User.ts is a class to make its type definition nicer.
Defining our User
Let's go from the inside out and take a look at User.ts
import { camelCase } from 'lodash' export class User { sub: string names: string nickname: string picture: string updatedAt: string email: string emailVerified: boolean provider?: string id?: string givenName?: string familyName?: string locale?: string [key: string]: string | boolean | undefined constructor (auth0User: { [key: string]: string | boolean | undefined }) { if (!auth0User) return for (const key in auth0User) { this[key] = auth0User[key] } this.sub = auth0User.sub as string this.provider = this.sub.split('|')[0] this.id = this.sub.split('|')[1] } }
Now, this requires a bit of explanation. The first block of fields are the one that are always present, no matter what login scheme the user used. Sub is the OpenID ID Token's Subject Identifier, which contains the authentication provider (eg. auth0 or google) and the actual user id, separated by a |. The other mandatory fields are probably self-explanatory.
Next are provider and id, which are a result of splitting sub, so they should be there, but we cannot be sure. The last are the ones that were only present when Google OAuth is used as the provider. There might be more, depending on what connections you set up and what other data you request. Or you could even code custom fields in the returned ID Token... but I digress.
Last we tell TypeScript, that we want to be able to use the bracket notation on our object by adding [key: string]: any
Our constructor takes a raw user object with similar fields but snake_cased. That's why we camelCase them and assign each of them to our User object. Once we're done, we extract the provider and the id from the subfield.
Show me the Wrapper
Time to take a look at VueAuth.ts
import { Vue, Component } from 'vue-property-decorator' import createAuth0Client, { PopupLoginOptions, Auth0Client, RedirectLoginOptions, GetIdTokenClaimsOptions, GetTokenSilentlyOptions, GetTokenWithPopupOptions, LogoutOptions } from '@auth0/auth0-spa-js' import { User } from './User' export type Auth0Options = { domain: string clientId: string audience?: string [key: string]: string | undefined } export type RedirectCallback = (appState) => void @Component({}) export class VueAuth extends Vue { loading = true isAuthenticated? = false user?: User auth0Client?: Auth0Client popupOpen = false error?: Error async getUser () { return new User(await this.auth0Client?.getUser()) } /** Authenticates the user using a popup window */ async loginWithPopup (o: PopupLoginOptions) { this.popupOpen = true try { await this.auth0Client?.loginWithPopup(o) } catch (e) { console.error(e) this.error = e } finally { this.popupOpen = false } this.user = await this.getUser() this.isAuthenticated = true } /** Authenticates the user using the redirect method */ loginWithRedirect (o: RedirectLoginOptions) { return this.auth0Client?.loginWithRedirect(o) } /** Returns all the claims present in the ID token */ getIdTokenClaims (o: GetIdTokenClaimsOptions) { return this.auth0Client?.getIdTokenClaims(o) } /** Returns the access token. If the token is invalid or missing, a new one is retrieved */ getTokenSilently (o: GetTokenSilentlyOptions) { return this.auth0Client?.getTokenSilently(o) } /** Gets the access token using a popup window */ getTokenWithPopup (o: GetTokenWithPopupOptions) { return this.auth0Client?.getTokenWithPopup(o) } /** Logs the user out and removes their session on the authorization server */ logout (o: LogoutOptions) { return this.auth0Client?.logout(o) } /** Use this lifecycle method to instantiate the SDK client */ async init (onRedirectCallback: RedirectCallback, redirectUri: string, auth0Options: Auth0Options) { // Create a new instance of the SDK client using members of the given options object this.auth0Client = await createAuth0Client({ domain: auth0Options.domain, client_id: auth0Options.clientId, // eslint-disable-line @typescript-eslint/camelcase audience: auth0Options.audience, redirect_uri: redirectUri // eslint-disable-line @typescript-eslint/camelcase }) try { // If the user is returning to the app after authentication.. if ( window.location.search.includes('error=') || (window.location.search.includes('code=') && window.location.search.includes('state=')) ) { // handle the redirect and retrieve tokens const { appState } = await this.auth0Client?.handleRedirectCallback() ?? { appState: undefined } // Notify subscribers that the redirect callback has happened, passing the appState // (useful for retrieving any pre-authentication state) onRedirectCallback(appState) } } catch (e) { console.error(e) this.error = e } finally { // Initialize our internal authentication state when the page is reloaded this.isAuthenticated = await this.auth0Client?.isAuthenticated() this.user = await this.getUser() this.loading = false } } }
It might make sense to compare this with the original tutorial.
In the original tutorial, a Vue object is created while we're creating a class to make its annotation easier. There you can find it as:
// The 'instance' is simply a Vue object instance = new Vue({ ... })
Now let's unpack it.
First, we need to import a couple of types, including our User class.
Then we create the Auth0Options and RedirectCallback type aliases for convenience.
Instead of creating a simple Vue object, we define a Class Component. The public fields are the same as the data object in the original, whereas the static ones are the parameters passed to the plugin.
We differ in two substantial way from the original tutorial:
We have one less method: handleRedirectCallback is not used anywhere in the original, so we omitted it.
Instead of setting up the Auth0 Client in the Vue object's created hook, we use a separate method called init. Aside from that, the contents of the two are identical.
The reason for using a separate method is simple: The created hook is used in place of a constructor when it comes to Class Components, as the constructor of the class is usually called by Vue.
First, a component object is created just like when using Vue({}), passing it the data, methods, watchers, paramlist, and all the things we usually define for components. When this is done, the created hook is called. Later, when the component is actually used and rendered, the params are passed to it, and mounted, or updated.
The problem with the original one is that we cannot pass parameters to the created method. Neither can we write a proper constructor. So we need to have our own method we will call right after the object is instantiated just as it's done with created by Vue.
Let's dissect init a bit.
First, we create and auth0Client.
Then, in the try-catch block, we check if the user is returning after authentication and handle it. We check if the query params contain any signs of redirection. If they do, we call auth0Client.handleRedirectCallback, which parses the URL and either rejects with an error or resolves with and appState.
Then, we pass on the appState to onRedirectCallback. This is a function we can pass to the plugin when we install it to Vue, so we can handle the app level ramifications of a login.
For the other methods, getUser is a simple wrapper around the authClient's getUser method. We pass on the resolved promise to our User's constructor to create a nicely looking User object.
Next, there is loginWithPopup, which we won't use, as popups can be blocked by browsers. So we'll go with the redirect way, where the user is redirected to Auth0, login, then the callback URL is called by Auth0 passing information to our app in the callback URL's query.
The information in the URL is parsed by auth0Client.handleRedirectCallback which will return a Promise<RedirectCallbackResult>. The Promise will be rejected if there is an error in the authentication flow.
We have a couple of simple wrappers around the auth0Client. loginWithRedirect initiates the flow I described above, logout speaks for itself.
Finally, we set up the user and check if we're authenticated.
Let's turn this into a Plugin
Now, all we need to do is create a proper plugin.
If you take a look at Vue's documentation about plugins, you'll see that we need to create an object that exposes an install method. This method will be called when we pass the object to Vue.use and it will receive the Vue constructor and optionally... options.
type Auth0PluginOptions = { onRedirectCallback: RedirectCallback, redirectUri: string, domain: string, clientId: string, audience?: string, [key: string]: string | RedirectCallback | undefined } export const Auth0Plugin = { install (Vue: VueConstructor, options: Auth0PluginOptions) { Vue.prototype.$auth = useAuth0(options) } }
In our install method, we add an $auth member to any Vue object, so the VueAuth object is available everywhere, just as vue-router is.
Let's implement the useAuth function.
/** Define a default action to perform after authentication */ const DEFAULT_REDIRECT_CALLBACK = () => window.history.replaceState({}, document.title, window.location.pathname) let instance: VueAuth /** Returns the current instance of the SDK */ export const getInstance = () => instance /** Creates an instance of the Auth0 SDK. If one has already been created, it returns that instance */ export const useAuth0 = ({ onRedirectCallback = DEFAULT_REDIRECT_CALLBACK, redirectUri = window.location.origin, ...options }) => { if (instance) return instance // The 'instance' is simply a Vue object instance = new VueAuth() instance.init(onRedirectCallback, redirectUri, options as Auth0Options) return instance }
useAuth returns a singleton VueAtuh instance, and extracts the onRedirectCallback and redirectUri from the options object. What's left is an Auth0Options type which we'll pass on straight to the auth0Client.
You can see the init method in action we created earlier. Then VueAuth is instantiated if it hasn't been already. Above that, we also expose a getInstance function, in case we need to use it outside of a Vue component.
Let's see here the whole auth.ts for your copy-pasting convenience:
import { VueConstructor } from 'vue' import { VueAuth, Auth0Options, RedirectCallback } from './VueAuth' type Auth0PluginOptions = { onRedirectCallback: RedirectCallback, domain: string, clientId: string, audience?: string, [key: string]: string | RedirectCallback | undefined } /** Define a default action to perform after authentication */ const DEFAULT_REDIRECT_CALLBACK = (appState) => window.history.replaceState({}, document.title, window.location.pathname) let instance: VueAuth /** Returns the current instance of the SDK */ export const getInstance = () => instance /** Creates an instance of the Auth0 SDK. If one has already been created, it returns that instance */ export const useAuth0 = ({ onRedirectCallback = DEFAULT_REDIRECT_CALLBACK, redirectUri = window.location.origin, ...options }) => { if (instance) return instance // The 'instance' is simply a Vue object instance = new VueAuth() instance.init(onRedirectCallback, redirectUri, options as Auth0Options) return instance } // Create a simple Vue plugin to expose the wrapper object throughout the application export const Auth0Plugin = { install (Vue: VueConstructor, options: Auth0PluginOptions) { Vue.prototype.$auth = useAuth0(options) } }
As you can see, we're extending the Vue constructor with a new instance member. If we try to access it in a component, the TypeScript compiler will start crying as it has no idea what happened. We'll fix this a bit later down the line.
Now, the Auth0Options are the ones that are needed for the client to identify your tenant. Copy the Client ID and Domain from your Auth0 applications settings and store them in a file called auth.config.json for now. It would be nicer to inject them as environment variables through webpack, but as these are not sensitive data, we'll be just fine like that as well.
With all that said, I will not include my auth.config.json in the reference repo, only an example you'll need to fill in with your data.
{ "domain": "your tenant's domain", "clientId": "your app's clientId" }
Make sure to add "resolveJsonModule": true, to your tsconfig.json.
Finally, we're ready to create our main.ts.
import Vue from 'vue' import App from './App.vue' import router from './router' import { Auth0Plugin } from './auth' import { domain, clientId } from '../auth.config.json' Vue.use(Auth0Plugin, { domain, clientId, onRedirectCallback: (appState) => { router.push( appState && appState.targetUrl ? appState.targetUrl : window.location.pathname ) } }) Vue.config.productionTip = false new Vue({ router, render: h => h(App) }).$mount('#app')
The onRedirectCallback redirects the user to a protected route after they have authenticated. We'll cover this a bit later when we create an actual protected route.
Log in to the App
Time to put the authentication logic to use.
First, we'll add a Login / Logout button to Home.vue
<template> <div class="home"> <img alt="Vue logo" src="../assets/logo.png" /> <HelloWorld msg="Welcome to Your Vue.js App" /> <!-- Check that the SDK client is not currently loading before accessing is methods --> <div v-if="!$auth.loading"> <!-- show login when not authenticated --> <button v-if="!$auth.isAuthenticated" @click="login">Log in</button> <!-- show logout when authenticated --> <button v-if="$auth.isAuthenticated" @click="logout">Log out</button> </div> </div> </template>
We'll also need to update the logic in the script tag of Home
<script lang="ts"> import { Component, Vue } from 'vue-property-decorator' import HelloWorld from '@/components/HelloWorld.vue' @Component({ components: { HelloWorld } }) export default class Home extends Vue { login () { this.$auth.loginWithRedirect({}) } // Log the user out logout () { this.$auth.logout({ returnTo: window.location.origin }) } } </script>
First, we turn the original example component into a Class Component. Second, the methods simply call the methods of VueAuth exposed by our Auth0Plugin.
But what's that? this.$auth is probably underlined in your IDE. Or if you try to compile the code you'll get the following error:
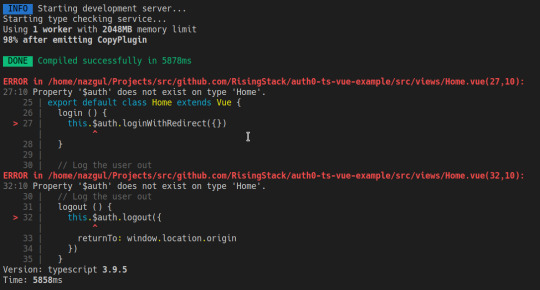
Of course, we still have to tell the compiler that we have augmented the Vue constructor with our $auth member.
Let's create a shims-auth0.d.ts file in our src directory. If you're using VSCode, you might need to reload the window to make the error go away.
import { VueAuth } from './auth/VueAuth' declare module 'vue/types/vue' { interface Vue { $auth: VueAuth } }
Checkpoint
Now, let's try to compile our code. If you have configured your Auth0 credentials correctly, you should be redirected to the Auth0 Universal Login page when you click Login, and back to your app against once you have logged in.
Then, you should be able to click Log out and have the application log you out.
Display the User's Profile
So far so good, but let's try to create a protected route. Displaying the user's profile seems like a prime target for that.
Let's create a file called Profile.vue in src/views.
<template> <div> <div> <img :src="$auth.user.picture"> <h2></h2> <p></p> </div> <div> <pre></pre> </div> </div> </template>
That's it. We read all the information we need from $auth.user we've already set up in VueAuth.ts.
Add a route to the Profile component
Let's update the app's routing configuration, so the users can access their profile.
Open up src/router/index.ts and add the following to the routes array.
//.. other imports // NEW - Import the profile component import Profile from "../views/Profile.vue"; Vue.use(VueRouter) const routes: Array<RouteConfig> = [ routes: [ // .. other routes and pages .. // NEW - add the route to the /profile component { path: "/profile", name: "profile", component: Profile } ] }); export default router
Now we need to update the navigation bar in App.vue
<template> <div id="app"> <div id="nav"> <router-link to="/">Home</router-link> | <router-link to="/about">About</router-link> <span v-if="$auth.isAuthenticated"> | <router-link to="/profile">Profile</router-link> </span> </div> <router-view/> </div> </template>
Checkpoint
The code should compile, so let's check if we can navigate to the Profile page and see the data. For added profit, try logging in with both Google and register a username and password. Take note of the data you get.
Secure the Profile Page
We have the route, time to make it protected. Let's create a new file in src/auth called authGaurd.ts.
import { getInstance } from './auth' import { NavigationGuard } from 'vue-router' export const authGuard: NavigationGuard = (to, from, next) => { const authService = getInstance() const fn = () => { // Unwatch loading unwatch && unwatch() // If the user is authenticated, continue with the route if (authService.isAuthenticated) { return next() } // Otherwise, log in authService.loginWithRedirect({ appState: { targetUrl: to.fullPath } }) } // If loading has already finished, check our auth state using `fn()` if (!authService.loading) { return fn() } // Watch for the loading property to change before we check isAuthenticated const unwatch = authService.$watch('loading', (loading: boolean) => { if (loading === false) { return fn() } }) }
First, we put auth.ts's getInstance to use. Then we create a function that checks if the user is authenticated. If they are, we call next, otherwise redirect them to login.
However, we should only call this function, if the authService is not loading, as otherwise, we still don't have any settled information about the login process.
If it is still loading, we set up a watcher for authService.loading, so when it turns true, we call our guard function. Also, please notice that we use the unwatch function returned by $watch to clean up after ourselves in fn.
I personally prefer giving descriptive names to my functions, but I only wanted to change things for the sake of either type annotation, or stability, so forgive me for keeping fn as it is to maintain parity with the JS tutorial.
Guidance with Auth0, Vue & TypeScript
Auth0 and all other authentication providers relieve us from the tedious job of handling user management ourselves. Auth0 itself excels in having a lot of educational resources for their users. The original Vue tutorial was really helpful, but seeing that TypeScript is becoming the industry standard when it comes to writing anything that should be run by JavaScript runtimes, it would be nice to see more TypeScript tutorials.
I hope this article manages to fill in a bit of this gap. If you liked what you just read, please share it with those who might need guidance with Auth0, Vue & TypeScript!
Happy authenticating!
Auth0: Vue & TypeScript Quickstart SDK - The Missing Docs published first on https://koresolpage.tumblr.com/
0 notes
Photo

Official ESLint plugin for Vue.js ☞ http://dev.geekwall.in/070870f07e #vuejs #javascript
0 notes
Photo

Official ESLint plugin for Vue.js ☞ http://dev.geekwall.in/070870f07e #vuejs #javascript
0 notes