#eslint prettier vscode
Explore tagged Tumblr posts
Visit Tumblr Blog
Explore Tumblr blogs with no restrictions, modern design and the best experience.
Last Seen Tumblr Blogs


Fun Fact
The Tumblr app for Google Glass was released on May 16, 2013.
Video
youtube
Prettier & ESLint in Visual Studio Code: The Ultimate Guide
🚨 NEW VIDEO ALERT! 🚨
In todays video, we'll finish up our series on using Prettier and ESLint with Visual Studio Code. Specifically, we'll learn how to set up Prettier and ESLint so that they play nicely with each other, and how to configure VS Code to fix any ESLint errors that are automatically fixable whenever we save our files. Enjoy! 🎉
#prettier #eslint #vscode #visualstudiocode #webdevelopment #coding #programming #thecommoncoder
https://youtu.be/IRdPRIPd9FM?si=vCYSU4i3_eLbagvg
#youtube#prettier#eslint#vscode#visualstudiocode#webdevelopment#coding#programming#the common coder#thecommoncoder#web development#visual studio code
0 notes
Text
Title: Better Programming: A Comprehensive Guide to Building Better Code and Programming Practices
Introduction
What is Better Programming?
Overview of the publication
Focus on providing quality resources for developers
Audience: beginner to advanced programmers
Why Is It Important?
The need for consistent improvement in programming practices
Emphasis on practical, real-world coding solutions
Purpose of the Article
In-depth exploration of what makes Better Programming a go-to publication for developers
Section 1: The Core Mission of Better Programming
The Goal of the Publication
Focus on helping developers improve their coding practices
Encouraging best practices for software development
Prioritizing clean, maintainable, and efficient code
Content Focus
Programming tips, tutorials, and strategies
Language-specific guidance (e.g., JavaScript, Python, Go)
Best practices in debugging, testing, and optimizing code
Developer tools and methodologies (e.g., Agile, DevOps)
Target Audience
New programmers looking to learn the ropes
Intermediate developers aiming to refine their skills
Advanced developers exploring complex coding challenges
Section 2: Types of Content in Better Programming
Programming Tutorials
Step-by-step guides on various languages and frameworks
Examples of common challenges and solutions
Code Reviews and Best Practices
Insights into writing clean, readable code
Importance of refactoring and maintainability
Code documentation tips
Case Studies and Real-World Projects
Stories of how developers solve real-world problems using best practices
Applying theoretical knowledge in real programming environments
Interviews with Experts
Insights from renowned developers and thought leaders
Understanding the latest trends in the development world
Section 3: Key Themes and Topics in Better Programming
Efficiency and Optimization
Writing code that runs faster and uses fewer resources
Analyzing time and space complexity
Tools for profiling and performance optimization
Testing and Debugging
Importance of testing in the software development life cycle
Types of testing: unit testing, integration testing, and automated testing
Debugging techniques and best practices
Design Patterns and Architecture
Explanation of design patterns (e.g., Singleton, Factory, Observer)
Importance of design principles (e.g., SOLID, DRY, KISS)
Building scalable and maintainable systems
Version Control and Collaboration
Using Git effectively
Best practices for branching, merging, and resolving conflicts
Collaboration tools and strategies in software teams
Continuous Integration and Deployment (CI/CD)
Introduction to CI/CD pipelines
How automating the deployment process improves productivity and reduces errors
Best practices for implementing CI/CD
Section 4: The Role of Technology and Tools in Better Programming
Editor and IDE Choices
Popular IDEs and editors for different languages (e.g., VSCode, JetBrains, Sublime Text)
Customizing development environments to increase productivity
Using Version Control (Git)
Branching strategies for teams
Git hooks and other advanced Git tools
Code Linters and Formatters
The importance of code formatting and linting tools
Common tools for various programming languages (e.g., ESLint, Prettier)
Debugging Tools
Overview of debugging techniques and the tools available for developers
Integrating debuggers into your workflow for efficient problem solving
Section 5: Best Practices Promoted by Better Programming
Clean Code Practices
Why writing clean code matters
Tips for writing code that is easy to read and maintain
Refactoring Code
Why and when to refactor
Common refactoring techniques and patterns
Pair Programming
Benefits of pair programming in improving code quality
How to effectively pair program
in remote teams
The Importance of Code Reviews
How to conduct effective code reviews
The impact of code reviews on improving code quality
Best practices for receiving and giving feedback during code reviews
Section 6: Case Studies and Real-World Applications
Example 1: Building a Web Application from Scratch
Detailed walkthrough of a project where developers used best practices from Better Programming
Challenges faced and how they were overcome
Tools and methodologies applied (e.g., Git, Docker, CI/CD
Example 2: Optimizing an Existing Codebase
A case study showing how developers improved performance and maintainability of an existing project
Refactoring techniques and testing strategies used
Lessons learned and takeaways
Section 7: Interviews with Developers and Experts
Insights from Industry Leaders
Expert opinions on what makes great software development practices
Trends in software development and future directions
How Better Programming Helps Developers
Testimonials and personal experiences of developers who have improved their skills through Better Programming
Conclusion
Recap of Better Programming’s Value
How the publication helps developers at all levels enhance their skills
Encouraging readers to adopt better programming practices
Future Directions for Better Programming
The evolving landscape of software development and programming
How Better Programming will continue to adapt and grow in response to changes in technology and developer needs
Call to Action
Engage with Better Programming
Encourage readers to explore the publication’s articles
Join the community of developers committed to continuous improvement in coding practices
0 notes
Text
Imagine this: You’re deep in your React project, trying to write code that not only works but shines. You want to be efficient, clean, and—let’s be honest—avoid as many headaches as possible. You open up your trusty VS Code editor, but it feels like something’s missing. What if there were a few secret weapons that could transform your workflow?
Well, there are! Here are five essential VS Code extensions that will not only save you time but elevate your entire React development experience.
### 1. **ES7+ React/Redux/React-Native snippets**
We’ve all been there—writing out the same lines of boilerplate code over and over again. It’s tedious and eats up precious time. This is where **ES7+ React/Redux/React-Native snippets** come to the rescue. Imagine typing just a few letters and having your entire component structure, Redux setup, or even imports instantly appear. It’s like having a personal assistant for your code.
Every time you need to create a functional component or import a hook, this extension swoops in, saving you from the repetitive grunt work. And that’s not all—it covers Redux and React Native too. For any React developer, this one’s a game changer.
### 2. **Prettier - Code formatter**
Let’s face it, no matter how great of a coder you are, your code can sometimes look like a hot mess. That's where **Prettier** steps in. This tool ensures your code is consistently formatted across your entire project—no more arguing over tabs vs. spaces or forgetting to add a semi-colon.
Once Prettier is installed, it becomes your silent partner. You save a file, and boom, your code looks neat, clean, and uniform. It’s like having a professional cleaner for your messy codebase, leaving everything polished and tidy. And who doesn’t want that?
### 3. **ESLint**
We all make mistakes, especially when working on complex React apps. Sometimes it's a missing import, other times it’s a forgotten prop. **ESLint** is like your personal code guardian, always watching out for potential issues and best practices.
As you type, ESLint flags errors, warnings, and areas where you might not be following the best standards. Instead of tracking down errors after running your code, you’ll catch them in real time. It’s like having a safety net under your code at all times.
### 4. **Auto Rename Tag**
If you've ever worked with a deeply nested JSX structure, you know the frustration of changing a tag name, only to forget to update its closing pair. Cue the errors! With **Auto Rename Tag**, that’s a thing of the past.
This extension automatically updates both the opening and closing tags in your JSX components. You change one, and the other follows suit. It’s a small feature, but it makes a huge difference when working on large components. Suddenly, editing JSX feels smoother, like a well-oiled machine.
### 5. **GitLens — Git supercharged**
We all know Git is powerful, but sometimes it feels like using a hammer when you really need a fine brush. That’s where **GitLens** comes in—it supercharges your Git experience in VS Code. Ever wondered who wrote a particular line of code or when a change was made? GitLens shows you everything with just a hover.
It doesn’t stop there. GitLens also lets you explore your project’s Git history, navigate through commits, and visualize changes over time. It’s like having X-ray vision for your repository, helping you understand the story behind the code.
### Conclusion
With these five VS Code extensions, your React development process will feel smoother, faster, and more enjoyable. Whether it's auto-generating boilerplate code, keeping your formatting consistent, or helping you stay on top of Git history, each extension brings something valuable to the table.
So, what are you waiting for? Go ahead, install these extensions, and watch as your coding efficiency skyrockets. Happy coding!
#Hashtags:
#ReactJS #JavaScript #WebDevelopment #VScode #Programming #FrontendDevelopment #CodeTips #ProductivityHacks #Tech #SoftwareEngineering
1 note
·
View note
Text
How To Setup Your Vue.js Style Guide And Code Like A Pro With Vue 2 and Vue 3!! Vue 3 ESLint Guide
How To Setup Your Vue.js Style Guide And Code Like A Pro With Vue 2 and Vue 3!! Vue 3 ESLint Guide
Vue.js Style Guide is important. How should you create your Vue.js app and what are the best practices? In this tutorial we’ll look at adding ESLint Style’s to your Vue.js app! Using the eslint-plugin-vue. And we’ll look at Vue 3 style guide! #vuejs #vuejs3 Check now if your .TECH is available! Link – https://go.tech/erik Use Code erik.tech at Checkout for a special 80% OFF on 1 & 5 Year .TECH…

View On WordPress
#Erik Hanchett#eslint prettier vscode#eslint setup#eslint vscode#eslint vscode setup#Program With Eric#Program With Erik#VSCode setup eslint#Vue 3 style guide#Vue essentials#vue js 3#vue js tutorial#vue js tutorial for beginners#vue-eslint prettier vscode#Vue.js 3 tutorial#vue.js documentary#Vue.js ESLint#Vue.js eslint tutorial#Vue.js Style Eslint#Vue.js style essentials#Vue.js Style Guide#vuejs
0 notes
Photo

Write beautiful and consistent JavaScript code using ESLint, Prettier and VSCode http://go.learn4startup.com/c022586481 #javascript #vscode #eslint #prettier
1 note
·
View note
Photo

Write beautiful and consistent JavaScript code using ESLint, Prettier and VSCode ☞ https://morioh.com/p/ec9e5e4b6090 #JavaScript#ESLint # VSCode #Morioh
#javascript#javascript tutorial#javascript tutorial for beginners#learn javascript for beginners#codequs#morioh
3 notes
·
View notes
Photo

Write beautiful and consistent JavaScript code using ESLint, Prettier and VSCode ☞ https://morioh.com/p/ec9e5e4b6090 #JavaScript#ESLint # VSCode #Morioh
#javascript#javascript tutorial#javascript tutorial for beginners#learn javascript for beginners#codequs#morioh
1 note
·
View note
Photo

Write beautiful and consistent JavaScript code using ESLint, Prettier and VSCode ☞ https://morioh.com/p/ec9e5e4b6090 #JavaScript#ESLint # VSCode #Morioh
#javascript#javascript tutorial#javascript tutorial for beginners#learn javascript for beginners#codequs#morioh
1 note
·
View note
Photo

Write beautiful and consistent JavaScript code using ESLint, Prettier and VSCode ☞ https://morioh.com/p/ec9e5e4b6090 #JavaScript#ESLint # VSCode #Morioh
#javascript#javascript tutorial#javascript tutorial for beginners#learn javascript for beginners#codequs#morioh
1 note
·
View note
Photo

Write beautiful and consistent JavaScript code using ESLint, Prettier and VSCode ☞ https://morioh.com/p/ec9e5e4b6090 #JavaScript#ESLint # VSCode #Morioh
#javascript#javascript tutorial#javascript tutorial for beginners#learn javascript for beginners#codequs#morioh
1 note
·
View note
Text
Ultimate Vim Configuration for Developer

Install latest version of nodejs (For ubuntu like distro)
curl -sL https://deb.nodesource.com/setup_14.x -o nodesource_setup.sh sudo bash nodesource_setup.sh sudo apt-get install -y nodejs
Download plug.vim and put it in the "autoload" directory.
usually found in the echo $VIMRUNTIME directory
in my case it was :/usr/local/share/vim/vim82
since I compiled from source in most installations you can do the following:
Vim
Unix
curl -fLo ~/.vim/autoload/plug.vim --create-dirs \ https://raw.githubusercontent.com/junegunn/vim-plug/master/plug.vim
You can automate the process by putting the command in your Vim configuration file as suggested here.
Windows (PowerShell)
iwr -useb https://raw.githubusercontent.com/junegunn/vim-plug/master/plug.vim |` ni $HOME/vimfiles/autoload/plug.vim -Force
Neovim
Unix, Linux
sh -c 'curl -fLo "${XDG_DATA_HOME:-$HOME/.local/share}"/nvim/site/autoload/plug.vim --create-dirs \ https://raw.githubusercontent.com/junegunn/vim-plug/master/plug.vim'
edit and add the following to your .vimrc:
set number set clipboard=unnamedplus colorscheme peaksea set backspace=indent,eol,start call plug#begin('~/.vim/plugged') Plug 'neoclide/coc.nvim', {'branch': 'release'} Plug 'ctrlpvim/ctrlp.vim' Plug 'ctrlpvim/ctrlp.vim' Plug 'preservim/nerdtree' Plug 'chrisbra/vim-commentary' Plug 'jlanzarotta/bufexplorer' Plug 'itchyny/lightline.vim' Plug 'preservim/tagbar' call plug#end() set laststatus=2 let mapleader = "," nmap <leader>w :w!<cr> map <leader>tn :tabnew<cr> map <leader>to :tabonly<cr> map <leader>tc :tabclose<cr> map <leader>tm :tabmove " Opens a new tab with the current buffer's path " Super useful when editing files in the same directory map <leader>te :tabedit <C-r>=expand("%:p:h")<cr>/ " Close current buffer map <leader>bd :Bclose<cr> map <leader>tt :term<cr> " Close all buffers map <leader>ba :1,1000 bd!<cr> vnoremap <silent> <leader>r :call VisualSelection('replace')<CR> map <leader>o :BufExplorer<cr> " Quickly find and open a file in the CWD let g:ctrlp_map = '<C-f>' " Quickly find and open a recently opened file map <leader>f :CtrlPMRU<CR> " Quickly find and open a buffer map <leader>b :CtrlPBuffer<cr> map <leader>nn :NERDTreeToggle<cr> map <leader>nb :NERDTreeFromBookmark map <leader>nf :NERDTreeFind<cr> map <leader>ss :setlocal spell!<cr> map <leader>sn ]s map <leader>sp [s map <leader>sa zg map <leader>s? z= nmap <F8> :TagbarToggle<CR>
restart vim and type
:PlugInstall
Restart vim and enjoy.
In vim install the plugins you need for your development
For example:
:CocInstall coc-json coc-css
That was css
Few of the available plugins are:
You can find available coc extensions by searching coc.nvim on npm, or use coc-marketplace, which can search and install extensions in coc.nvim directly.
coc-angular for angular.
coc-blade-formatter for blade, Integrates the blade-formatter (Laravel Blade formatter).
coc-blade-linter for blade, Integrates the Laravel Blade Linter.
coc-browser for browser words completion
coc-calc expression calculation extension
coc-cfn-lint for CloudFormation Linter, cfn-python-lint
coc-clangd for C/C++/Objective-C, use clangd
coc-clang-format-style-options coc.nvim extension, helps you write .clang-format more easily.
coc-cmake for cmake code completion
coc-css for css, scss and less.
coc-cssmodules css modules intellisense.
coc-deno for deno.
coc-denoland for deno, fork of vscode_deno.
coc-diagnostic for All filetypes, use diagnostic-languageserver.
coc-discord discord rich presence for coc.nvim
coc-discord-rpc fully customizable discord rpc integration with support for over 130+ of the most popular languages
coc-dash-complete Press - to trigger buffer source completion.
coc-dot-complete Press . to trigger buffer source completion.
coc-ecdict ECDICT extension
coc-elixir for elixir, based on elixir-ls.
coc-ember for ember projects.
coc-emmet provides emmet suggestions in completion list.
coc-erlang_ls for erlang, based on erlang_ls
coc-esbonio for rst (reStructuredText), esbonio ([Sphinx] Python Documentation Generator) language server extension.
coc-eslint Eslint extension for coc.nvim
coc-explorer file explorer extension
coc-floaterm for vim-floaterm integration
coc-flow for flow
coc-flutter for flutter
coc-fsharp for fsharp.
coc-fzf-preview provide powerful fzf integration.
coc-gist gist management
coc-git provides git integration.
coc-glslx for glsl, use glslx.
coc-go for go, use gopls.
coc-graphql for graphql.
coc-highlight provides default document symbol highlighting and color support.
coc-html for html, handlebars and razor.
coc-htmldjango for htmldjango, django templates (htmldjango) extension. Provides "formatter", "snippets completion" and more...
coc-htmlhint for html, Integrates the HTMLHint static analysis tool.
coc-html-css-support for HTML id and class attribute completion.
coc-intelephense for php, fork of vscode-intelephense. (scoped packages: @yaegassy/coc-intelephense)
coc-java for java, use eclipse.jdt.ls.
coc-jedi for python, use jedi-language-server.
coc-json for json.
coc-julia for julia.
coc-just-complete Press _ to trigger buffer source completion.
coc-lists provides some basic lists like fzf.vim.
coc-lsp-wl for wolfram mathematica, fork of vscode-lsp-wl.
coc-markdownlint for markdown linting
coc-metals for Scala using Metals
coc-omnisharp for csharp and visualbasic.
coc-perl for perl.
coc-php-cs-fixer for php, Integrates the php-cs-fixer (PHP Coding Standards Fixer).
coc-phpactor for php, using phpactor
coc-phpls for php, use intelephense-docs.
coc-psalm for php, use psalm.
coc-powershell for PowerShellEditorService integration.
coc-prettier a fork of prettier-vscode.
coc-prisma for Prisma schema integration.
coc-pyright Pyright extension
coc-python for python, extension forked from vscode-python. (Not maintained anymore)
coc-pydocstring for python, using doq (python docstring generator) extension.
coc-r-lsp for r, use R languageserver.
coc-reason for reasonml
coc-rls for rust, use Rust Language Server
coc-rome for javascript, typescript, json and more, use Rome
coc-rust-analyzer for rust, use rust-analyzer
coc-sh for bash using bash-language-server.
coc-stylelintplus for linting CSS and CSS preprocessed formats
coc-stylelint for linting CSS and CSS preprocessed formats
coc-snippets provides snippets solution.
coc-solargraph for ruby, use solargraph.
coc-sourcekit for Swift
coc-spell-checker A basic spell checker that works well with camelCase code
coc-sql for sql.
coc-sqlfluff for sql, SQLFluff (A SQL linter and auto-formatter for Humans) extension
coc-svelte for svelte.
coc-svg for svg.
coc-swagger for improved Swagger/OpenAPI spec authoring experience.
coc-tabnine for tabnine.
coc-tailwindcss for tailwindcss.
coc-tasks for asynctasks.vim integration
coc-texlab for LaTeX using TexLab.
coc-toml for toml using taplo.
coc-translator language transaction extension
coc-tsserver for javascript and typescript.
coc-vetur for vue, use vetur.
coc-vimlsp for viml.
coc-xml for xml, use lsp4xml.
coc-yaml for yaml
coc-yank provides yank highlights & history.
coc-thrift-syntax-support for thrift.
in case it the vim version is an issue then you will need to install and compile version:
sudo apt-get install lua50 liblua50-dev liblualib50-dev sudo apt-get install libncurses5-dev libgnome2-dev libgnomeui-dev libgtk2.0-dev libatk1.0-dev libbonoboui2-dev libcairo2-dev libx11-dev libxpm-dev libxt-dev python-dev ruby-dev mercurial sudo make install sudo apt-get install python3-dev sudo apt-get install python-dev
git clone https://github.com/vim/vim.git
cd vim
./configure --with-features=huge --enable-rubyinterp --enable-python3interp --with-python-config-dir=/usr/bin/python3.6-config --enable-perlinterp --enable-gui=gtk2 --enable-cscope --prefix=/usr --enable-luainterp --with-lua-prefix=/usr/local
make
make install
You can get the config here:
https://github.com/macunan/vimconfig/blob/main/.vimrc
0 notes
Text
15 Essential Plugins for Visual Studio Code
Visual Studio Code could be a free, cross-platform text editor developed by Microsoft. It’s quickly changing into a crowd favorite because of its glorious performance and therefore the exuberant quantity of options it offers. Just like most day, VSCode has AN extension marketplace containing thousands of plugins with varied quality. To assist you decide out that value downloading, we have a tendency to create this assortment of the extensions we have a tendency to found most helpful and fun.
Open-In-Browser
VSCode does not supply any inbuilt interface for gap files directly within the browser. This extension adds a Open With Default Browser item to the discourse menu, likewise as command palette choices for gap in an exceedingly consumer of your selection (Firefox, Chrome, IE).
Quokka
Quokka may be a debugging tool that offers live feedback on the code you're writing. It shows you previews of the results of functions and calculated values for variables. The extension is straightforward to tack and works out of the box with JSX or matter comes.
Faker
Quickly insert placeholder knowledge mistreatment the popular cheat JavaScript library. you'll generate random names, addresses, images, phone numbers, or simply paragraphs of classic Lorem Ipsum. every class has numerous subcategories thus you'll create the information suit your wants.
CSS Peek
With this extension you'll trace the definitions of CSS categories and ids in your stylesheets. after you right click on a selector in your hypertext markup language files, selecting the choices move to Definition and Peek definition can send you to the CSS code during which you've got titled them.
HTML Boilerplate
The hypertext markup language boilerplate extension can prevent from having to manually write the head and body tags of a new HTML document. Just type html top and body tags of a document. in empty file, hit the tab, and a clean document structure are going to be generated.
Prettier
Prettier is that the preferred code formatter in internet dev at once. It permits your team's code look a similar, notwithstanding WHO wrote it. This extension makes it doable to mechanically apply Prettier and quickly format whole JS and CSS documents. If you furthermore might need to throw ESLint within the combine, there's is
Prettier - Eslint
.
Color Info
Small plugin that provides you numerous info concerning the colours you've got utilized in your CSS. By hovering on a color you'll see a bigger preview of however it's, further as data concerning its translation to any or all formats (hex, rgb, hsl, and cmyk).
SVG Viewer
This extension adds variety of utilities for operating with SVGs in Visual Studio Code. It makes it doable to render SVG files and see however they appear like while not having to depart the editor. There are choices for changing to PNG and generating information URI schemes.
TODO Highlight
This tool marks all TODO comments in your code, creating it easier to trace down any loose end before pushing to production. By default it's for TODO and FIXME keywords however you'll add your custom expressions likewise.
Icon Fonts
Tiny snippets for together with icon fonts in your project (from a CDN) then adding the icons themselves. The extension supports over twenty in style icon sets, together with Font awe-inspiring, Ionicons, Glyphicons, and Material style Icons.
Minify
Extension for minifying your code. It offers a ton of customization settings and the option to automatically minify on save and export to a .min file. Minify works with JavaScript, CSS, and HTML through
uglify-js
,
clean-css
, and
html-minifier
respectively.
Change Case
VSCode has restricted choices for reworking text. Out of the box it will solely do minuscule and majuscule transforms. This plugin adds a great deal additional commands for modifying strings, together with camelCase, kebab-case, snake_case, CONST_CASE, and others.
Regex Previewer
Useful tool for live testing your regular expressions. It works by applying the regex pattern over any document opened to the facet, highlight all the matches. kind of like RegExr however right within your editor!.
Language and Framework Packs
VSCode ships with support for an outsized range of languages. If for a few reason your programing language of alternative is not enclosed, you'll be able to transfer associate degree extension pack which is able to add autocompletion, correct indentation, and different utilities. Some net dev frameworks like like
react native
and
vue
also offer language packs.
Themes
Of course, the foremost necessary of all extensions area unit the themes. you will be watching your VSCode editor daily, why not build it additional beautiful? There area unit loads of customization plugins that amendment the colour theme and therefore the icons within the sidebar. Here area unit a number of our favorites:
One Monolai
Aglia
One Dark
Material Icon
I hope you understand the article…..
We will be happy to answer your questions on designing, developing, and deploying comprehensive enterprise web, mobile apps and customized software solutions that best fit your organization needs. As a reputed Software Solutions Developer we have expertise in providing dedicated remote and outsourced technical resources for software services at very nominal cost. Besides experts in full stacks We also build web solutions, mobile apps and work on system integration, performance enhancement, cloud migrations and big data analytics. Don’t hesitate to
get in touch with us!
#b2b market research companies
#b2b ecommerce
#b2bsales
#Ecommerce
0 notes
Text
A Gentle Introduction to Using a Docker Container as a Dev Environment
Sarcasm disclaimer: This article is mostly sarcasm. I do not think that I actually speak for Dylan Thomas and I would never encourage you to foist a light theme on people who don’t want it. No matter how wrong they may be.
When Dylan Thomas penned the words, “Do not go gentle into that good night,” he was talking about death. But if he were alive today, he might be talking about Linux containers. There is no way to know for sure because he passed away in 1953, but this is the internet, so I feel extremely confident speaking authoritatively on his behalf.
My confidence comes from a complete overestimation of my skills and intelligence coupled with the fact that I recently tried to configure a Docker container as my development environment. And I found myself raging against the dying of the light as Docker rejected every single attempt I made like I was me and it was King James screaming, “NOT IN MY HOUSE!”

Pain is an excellent teacher. And because I care about you and have no other ulterior motives, I want to use that experience to give you a “gentle” introduction to using a Docker container as a development environment. But first, let’s talk about whyyyyyyyyyyy you would ever want to do that.
kbutwhytho?
Close your eyes and picture this: a grown man dressed up like a fox.
Wait. No. Wrong scenario.
Instead, picture a project that contains not just your source code, but your entire development environment and all the dependencies and runtimes your app needs. You could then give that project to anyone anywhere (like the fox guy) and they could run your project without having to make a lick of configuration changes to their own environment.
This is exactly what Docker containers do. A Dockerfile defines an entire runtime environment with a single file. All you would need is a way to develop inside of that container.
Wait for it…
VS Code and Remote – Containers
VS Code has an extension called Remote – Containers that lets you load a project inside a Docker container and connect to it with VS Code. That’s some Inception-level stuff right there. (Did he make it out?! THE TALISMAN NEVER ACTUALLY STOPS SPINNING.) It’s easier to understand if we (and by “we” I mean you) look at it in action.
Adding a container to a project
Let’s say for a moment that you are on a high-end gaming PC that you built for your kids and then decided to keep if for yourself. I mean, why exactly do they deserve a new computer again? Oh, that’s right. They don’t. They can’t even take out the trash on Sundays even though you TELL THEM EVERY WEEK.
This is a fresh Windows machine with WSL2 and Docker installed, but that’s all. Were you to try and run a Node.js project on this machine, Powershell would tell you that it has absolutely no idea what you are reffering to and maybe you mispelled something. Which, in all fairness, you do suck at spelling. Remember that time in 4ᵗʰ grade when you got knocked out of the first round of the spelling bee because you couldn’t spell “fried.” FRYED? There’s no “Y” in there!

Now this is not a huge problem — you could always skip off and install Node.js. But let’s say for a second that you can’t be bothered to do that and you’re pretty sure that skipping is not something adults do.
Instead, we can configure this project to run in a container that already has Node.js installed. Now, as I’ve already discussed, I have no idea how to use Docker. I can barely use the microwave. Fortunately, VS Code will configure your project for you — to an extent.
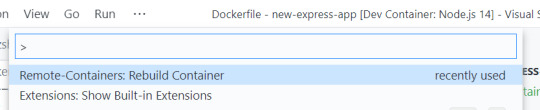
From the Command Palette, there is an “Add Development Container Configuration Files…” command. This command looks at your project and tries to add the proper container definition.

In this case, VS Code knows I’ve got a Node project here, so I’ll just pick Node.js 14. Yes, I am aware that 12 is LTS right now, but it’s gonna be 14 in [checks watch] one month and I’m an early adopter, as is evidenced by my interest in container technology just now in 2020.
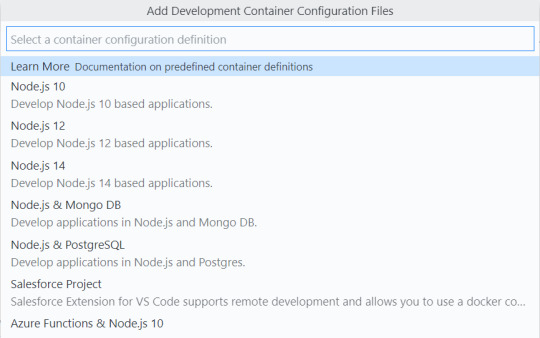
This will add a .devcontainer folder with some assets inside. One is a Dockerfile that contains the Node.js image that we’re going to use, and the other is a devcontainer.json that has some project level configuration going on.
Now, before we touch anything and break it all (we’ll get to that, trust me), we can select “Rebuild and Reopen in Container” from the Command Palette. This will restart VS Code and set about building the container. Once it completes (which can take a while the first time if you’re not on a high-end gaming PC that your kids will never know the joys of), the project will open inside of the container. VS Code is connected to the container, and you know that because it says so in the lower left-hand corner.
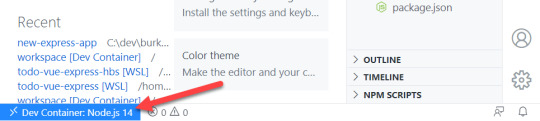
Now if we open the terminal in VS Code, Powershell is conspicously absent because we are not on Windows anymore, Dorthy. We are now in a Linux container. And we can both npm install and npm start in this magical land.
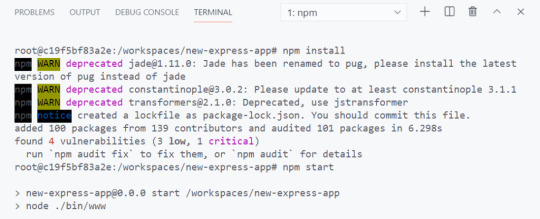
This is an Express App, so it should be running on port 3000. But if you try and visit that port, it won’t load. This is because we need to map a port in the container to 3000 on our localhost. As one does.
Fortunately, there is a UI for this.
The Remote Containers extension puts a “Remote Explorer” icon in the Action Bar. Which is on the left-hand side for you, but the right-hand side for me. Because I moved it and you should too.
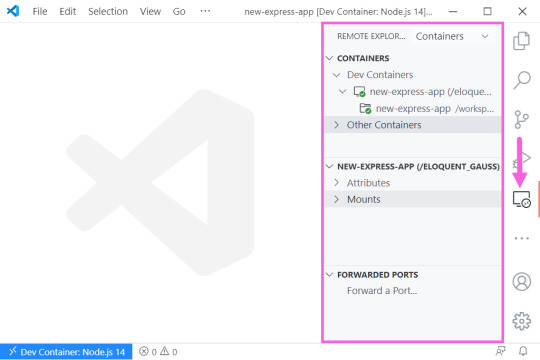
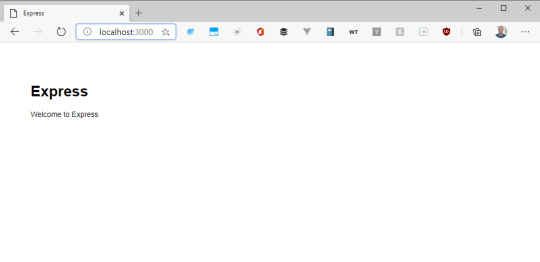
There are three sections here, but look at the bottom one which says “Port Forwarding,” I’m not the sandwich with the most lettuce, but I’m pretty sure that’s what we want here. You can click on the “Forward a Port” and type “3000,” Now if we try and hit the app from the browser…
Mostly things, “just worked.” But the configuration is also quite simple. Let’s look at how we can start to customize this setup by automating some of the aspects of the project itself. Project specific configuration is done in the devcontainer.json file.
Automating project configuration
First off, we can automate the port forwarding by adding a forwardPorts variable and specifying 3000 as the value. We can also automate the npm install command by specifying the postCreateCommand property. And let’s face it, we could all stand to run AT LEAST one less npm install.
{ // ... // Use 'forwardPorts' to make a list of ports inside the container available locally. "forwardPorts": [3000], // Use 'postCreateCommand' to run commands after the container is created. "postCreateCommand": "npm install", // ... }
Additionally, we can include VS Code extensions. The VS Code that runs in the Docker container does not automatically get every extension you have installed. You have to install them in the container, or just include them like we’re doing here.
Extensions like Prettier and ESLint are perfect for this kind of scenario. We can also take this opportunity to foist a light theme on everyone because it turns out that dark themes are worse for reading and comprehension. I feel like a prophet.
// For format details, see https://aka.ms/vscode-remote/devcontainer.json or this file's README at: // https://github.com/microsoft/vscode-dev-containers/tree/v0.128.0/containers/javascript-node-14 { // ... // Add the IDs of extensions you want installed when the container is created. "extensions": [ "dbaeumer.vscode-eslint", "esbenp.prettier-vscode", "GitHub.github-vscode-theme" ] // ... }
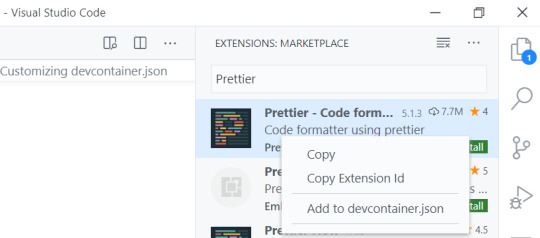
If you’re wondering where to find those extension ID’s, they come up in intellisense (Ctrl/Cmd + Shift) if you have them installed. If not, search the extension marketplace, right-click the extension and say “Copy extension ID.” Or even better, just select “Add to devcontainer.json.”
By default, the Node.js container that VS Code gives you has things like git and cURL already installed. What it doesn’t have, is “cowsay,” And we can’t have a Linux environment without cowsay. That’s in the Linux bi-laws (it’s not). I don’t make the rules. We need to customize this container to add that.
Automating environment configuration
This is where things went off the rails for me. In order to add software to a development container, you have to edit the Dockerfile. And Linux has no tolerance for your shenanigans or mistakes.
The base Docker container that you get with the container configurations in VS Code is Debian Linux. Debian Linux uses the apt-get dependency manager.
apt-get install cowsay
We can add this to the end of the Dockerfile. Whenever you install something from apt-get, run an apt-get update first. This command updates the list of packages and package repos so that you have the most current list cached. If you don’t do this, the container build will fail and tell you that it can’t find “cowsay.”
# To fully customize the contents of this image, use the following Dockerfile instead: # https://github.com/microsoft/vscode-dev-containers/tree/v0.128.0/containers/javascript-node-14/.devcontainer/Dockerfile FROM mcr.microsoft.com/vscode/devcontainers/javascript-node:0-14 # ** Install additional packages ** RUN apt-get update \ && apt-get -y install cowsay
A few things to note here…
That RUN command is a Docker thing and it creates a new “layer.” Layers are how the container knows what has changed and what in the container needs to be updated when you rebuild it. They’re kind of like cake layers except that you don’t want a lot of them because enormous cakes are awesome. Enormous containers are not. You should try and keep related logic together in the same RUN command so that you don’t create unnecessary layers.
That \ denotes a line break at the end of a line. You need it for multi-line commands. Leave it off and you will know the pain of many failed Docker builds.
The && is how you add an additional command to the RUN line. For the love of god, don’t forget that \ on the previous line.
The -y flag is important because by default, apt-get is going to prompt you to ensure you really want to install what you just tried to install. This will cause the container build to fail because there is nobody there to say Y or N. The -y flag is shorthand for “don’t bother me with your silly confirmation prompts”. Apparently everyone is supposed to know this already. I didn’t know it until about four hours ago.
Use the command prompt to select “Rebuild Container”…
And, just like that…
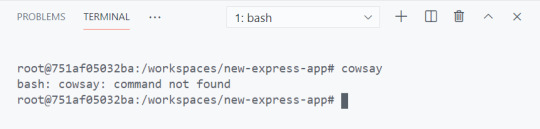
It doesn’t work.
This the first lesson in what I like to call, “Linux Vertigo.” There are so many distributions of Linux and they don’t all handle things the same way. It can be difficult to figure out why things work in one place (Mac, WSL2) and don’t work in others. The reason why “cowsay” isn’t available, is that Debian puts “cowsay” in /usr/games, which is not included in the PATH environment variable.
One solution would be to add it to the PATH in the Dockerfile. Like this…
FROM mcr.microsoft.com/vscode/devcontainers/javascript-node:0-14 RUN apt-get update \ && apt-get -y install cowsay ENV PATH="/usr/games:${PATH}"
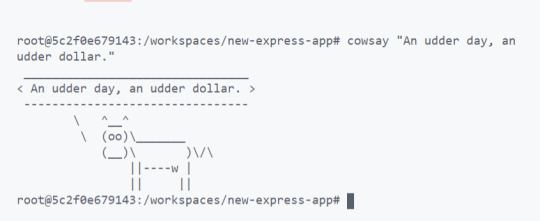
EXCELLENT. We’re solving real problems here, folks. People like cow one-liners. I bullieve I herd that somewhere.
To summarize, project configuration (forwarding ports, installing project depedencies, ect) is done in the “devcontainer.json” and enviornment configuration (installing software) is done in the “Dockerfile.” Now let’s get brave and try something a little more edgy.
Advanced configuration
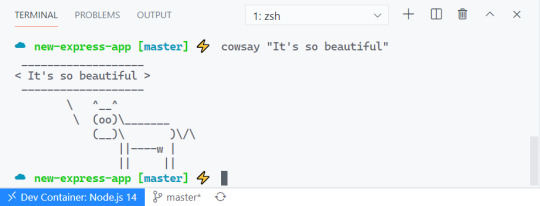
Let’s say for a moment that you have a gorgeous, glammed out terminal setup that you really want to put in the container as well. I mean, just because you are developing in a container doesn’t mean that your terminal has to be boring. But you also wouldn’t want to reconfigure your pretentious zsh setup for every project that you open. Can we automate that too? Let’s find out.
Fortunately, zsh is already installed in the image that you get. The only trouble is that it’s not the default shell when the container opens. There are a lot of ways that you can make zsh the default shell in a normal Docker scenario, but none of them will work here. This is because you have no control over the way the container is built.
Instead, look again to the trusty devcontainer.json file. In it, there is a "settings" block. In fact, there is a line already there showing you that the default terminal is set to "/bin/bash". Change that to "/bin/zsh".
// Set *default* container specific settings.json values on container create. "settings": { "terminal.integrated.shell.linux": "/bin/zsh" }
By the way, you can set ANY VS Code setting there. Like, you know, moving the sidebar to the right-hand side. There – I fixed it for you.
// Set default container specific settings.json values on container create. "settings": { "terminal.integrated.shell.linux": "/bin/zsh", "workbench.sideBar.location": "right" },
And how about those pretentious plugins that make you better than everyone else? For those you are going to need your .zshrc file. The container already has oh-my-zsh in it, and it’s in the “root” folder. You just need to make sure you set the path to ZSH at the top of the .zshrc so that it points to root. Like this…
# Path to your oh-my-zsh installation. export ZSH="/root/.oh-my-zsh"
# Set name of the theme to load --- if set to "random", it will # load a random theme each time oh-my-zsh is loaded, in which case, # to know which specific one was loaded, run: echo $RANDOM_THEME # See https://github.com/ohmyzsh/ohmyzsh/wiki/Themes ZSH_THEME="cloud"
# Which plugins would you like to load? plugins=(zsh-autosuggestions nvm git)
source $ZSH/oh-my-zsh.sh
Then you can copy in that sexy .zshrc file to the root folder in the Dockerfile. I put that .zshrc file in the .devcontainer folder in my project.
COPY .zshrc /root/.zshrc
And if you need to download a plugin before you install it, do that in the Dockerfile with a RUN command. Just remember to group all of these into one command since each RUN is a new layer. You are nearly a container expert now. Next step is to write a blog post about it and instruct people on the ways of Docker like you invented the thing.
RUN git clone https://github.com/zsh-users/zsh-autosuggestions ${ZSH_CUSTOM:-~/.oh-my-zsh/custom}/plugins/zsh-autosuggestions
Look at the beautiful terminal! Behold the colors! The git plugin which tells you the branch and adds a lightning emoji! Nothing says, “I know what I’m doing” like a customized terminal. I like to take mine to Starbucks and just let people see it in action and wonder if I’m a celebrity.
Go gently
Hopefully you made it to this point and thought, “Geez, this guy is seriously overreacting. This is not that hard.” If so, I have successfully saved you. You are welcome. No need to thank me. Yes, I do have an Amazon wish list.
For more information on Remote Containers, including how to do things like add a database or use Docker Compose, check out the official Remote Container docs, which provide much more clarity with 100% less neurotic commentary.
The post A Gentle Introduction to Using a Docker Container as a Dev Environment appeared first on CSS-Tricks.
You can support CSS-Tricks by being an MVP Supporter.
A Gentle Introduction to Using a Docker Container as a Dev Environment published first on https://deskbysnafu.tumblr.com/
0 notes
Photo

React with TypeScript: Best Practices
React and TypeScript are two awesome technologies used by a lot of developers these days. Knowing how to do things can get tricky, and sometimes it’s hard to find the right answer. Not to worry. We’ve put together the best practices along with examples to clarify any doubts you may have.
Let’s dive in!
How React and TypeScript Work Together
Before we begin, let’s revisit how React and TypeScript work together. React is a “JavaScript library for building user interfaces”, while TypeScript is a “typed superset of JavaScript that compiles to plain JavaScript.” By using them together, we essentially build our UIs using a typed version of JavaScript.
The reason you might use them together would be to get the benefits of a statically typed language (TypeScript) for your UI. This means more safety and fewer bugs shipping to the front end.
Does TypeScript Compile My React Code?
A common question that’s always good to review is whether TypeScript compiles your React code. The way TypeScript works is similar to this interaction:
TS: “Hey, is this all your UI code?” React: “Yup!” TS: “Cool! I’m going to compile it and make sure you didn’t miss anything.” React: “Sounds good to me!”
So the answer is yes, it does! But later, when we cover the tsconfig.json settings, most of the time you’ll want to use "noEmit": true. What this means is TypeScript will not emit JavaScript out after compilation. This is because typically, we’re just utilizing TypeScript to do our type-checking.
The output is handled, in a CRA setting, by react-scripts. We run yarn build and react-scripts bundles the output for production.
To recap, TypeScript compiles your React code to type-check your code. It doesn’t emit any JavaScript output (in most scenarios). The output is still similar to a non-TypeScript React project.
Can TypeScript Work with React and webpack?
Yes, TypeScript can work with React and webpack. Lucky for you, the webpack documentation has a guide on that.
Hopefully, that gives you a gentle refresher on how the two work together. Now, on to best practices!
Best Practices
We’ve researched the most common questions and put together this handy list of the most common use cases for React with TypeScript. This way, you can use this article as a reference in your own projects.
Configuration
One of the least fun, yet most important parts of development is configuration. How can we set things up in the shortest amount of time that will provide maximum efficiency and productivity? We’ll discuss project setup including:
tsconfig.json
ESLint
Prettier
VS Code extensions and settings.
Project Setup
The quickest way to start a React/TypeScript app is by using create-react-app with the TypeScript template. You can do this by running:
npx create-react-app my-app --template typescript
This will get you the bare minimum to start writing React with TypeScript. A few noticeable differences are:
the .tsx file extension
the tsconfig.json
the react-app-env.d.ts
The tsx is for “TypeScript JSX”. The tsconfig.json is the TypeScript configuration file, which has some defaults set. The react-app-env.d.ts references the types of react-scripts, and helps with things like allowing for SVG imports.
tsconfig.json
Lucky for us, the latest React/TypeScript template generates tsconfig.json for us. However, they add the bare minimum to get started. We suggest you modify yours to match the one below. We’ve added comments to explain the purpose of each option as well:
{ "compilerOptions": { "target": "es5", // Specify ECMAScript target version "lib": [ "dom", "dom.iterable", "esnext" ], // List of library files to be included in the compilation "allowJs": true, // Allow JavaScript files to be compiled "skipLibCheck": true, // Skip type checking of all declaration files "esModuleInterop": true, // Disables namespace imports (import * as fs from "fs") and enables CJS/AMD/UMD style imports (import fs from "fs") "allowSyntheticDefaultImports": true, // Allow default imports from modules with no default export "strict": true, // Enable all strict type checking options "forceConsistentCasingInFileNames": true, // Disallow inconsistently-cased references to the same file. "module": "esnext", // Specify module code generation "moduleResolution": "node", // Resolve modules using Node.js style "isolatedModules": true, // Unconditionally emit imports for unresolved files "resolveJsonModule": true, // Include modules imported with .json extension "noEmit": true, // Do not emit output (meaning do not compile code, only perform type checking) "jsx": "react" // Support JSX in .tsx files "sourceMap": true, // Generate corrresponding .map file "declaration": true, // Generate corresponding .d.ts file "noUnusedLocals": true, // Report errors on unused locals "noUnusedParameters": true, // Report errors on unused parameters "incremental": true, // Enable incremental compilation by reading/writing information from prior compilations to a file on disk "noFallthroughCasesInSwitch": true // Report errors for fallthrough cases in switch statement }, "include": [ "src/**/*" // *** The files TypeScript should type check *** ], "exclude": ["node_modules", "build"] // *** The files to not type check *** }
The additional recommendations come from the react-typescript-cheatsheet community and the explanations come from the Compiler Options docs in the Official TypeScript Handbook. This is a wonderful resource if you want to learn about other options and what they do.
ESLint/Prettier
In order to ensure that your code follows the rules of the project or your team, and the style is consistent, it’s recommended you set up ESLint and Prettier. To get them to play nicely, follow these steps to set it up.
Install the required dev dependencies:
yarn add eslint @typescript-eslint/parser @typescript-eslint/eslint-plugin eslint-plugin-react --dev
Create a .eslintrc.js file at the root and add the following:
module.exports = { parser: '@typescript-eslint/parser', // Specifies the ESLint parser extends: [ 'plugin:react/recommended', // Uses the recommended rules from @eslint-plugin-react 'plugin:@typescript-eslint/recommended', // Uses the recommended rules from @typescript-eslint/eslint-plugin ], parserOptions: { ecmaVersion: 2018, // Allows for the parsing of modern ECMAScript features sourceType: 'module', // Allows for the use of imports ecmaFeatures: { jsx: true, // Allows for the parsing of JSX }, }, rules: { // Place to specify ESLint rules. Can be used to overwrite rules specified from the extended configs // e.g. "@typescript-eslint/explicit-function-return-type": "off", }, settings: { react: { version: 'detect', // Tells eslint-plugin-react to automatically detect the version of React to use }, }, };
Add Prettier dependencies:
yarn add prettier eslint-config-prettier eslint-plugin-prettier --dev
Create a .prettierrc.js file at the root and add the following:
module.exports = { semi: true, trailingComma: 'all', singleQuote: true, printWidth: 120, tabWidth: 4, };
Update the .eslintrc.js file:
module.exports = { parser: '@typescript-eslint/parser', // Specifies the ESLint parser extends: [ 'plugin:react/recommended', // Uses the recommended rules from @eslint-plugin-react 'plugin:@typescript-eslint/recommended', // Uses the recommended rules from the @typescript-eslint/eslint-plugin + 'prettier/@typescript-eslint', // Uses eslint-config-prettier to disable ESLint rules from @typescript-eslint/eslint-plugin that would conflict with prettier + 'plugin:prettier/recommended', // Enables eslint-plugin-prettier and displays prettier errors as ESLint errors. Make sure this is always the last configuration in the extends array. ], parserOptions: { ecmaVersion: 2018, // Allows for the parsing of modern ECMAScript features sourceType: 'module', // Allows for the use of imports ecmaFeatures: { jsx: true, // Allows for the parsing of JSX }, }, rules: { // Place to specify ESLint rules. Can be used to overwrite rules specified from the extended configs // e.g. "@typescript-eslint/explicit-function-return-type": "off", }, settings: { react: { version: 'detect', // Tells eslint-plugin-react to automatically detect the version of React to use }, }, };
These recommendations come from a community resource written called “Using ESLint and Prettier in a TypeScript Project”, by Robert Cooper. If you visit this resource, you can read more about the “why” behind these rules and configurations.
VSCode Extensions and Settings
We’ve added ESLint and Prettier and the next step to improve our DX is to automatically fix/prettify our code on save.
First, install the ESLint extension and the Prettier extension for VSCode. This will allow ESLint to integrate with your editor seamlessly.
Next, update your Workspace settings by adding the following to your .vscode/settings.json:
{ "editor.formatOnSave": true }
This will allow VS Code to work its magic and fix your code when you save. It’s beautiful!
These suggestions also come from the previously linked article “Using ESLint and Prettier in a TypeScript Project”, by Robert Cooper.
Note: to read more about React.FC, look here, and read here for React.ReactNode.
Continue reading React with TypeScript: Best Practices on SitePoint.
by Joe Previte via SitePoint https://ift.tt/3miQ04t
0 notes
Link
Might be one of the most useful resources I’ve found in a while.
0 notes