#eslint vscode setup
Explore tagged Tumblr posts
Visit Tumblr Blog
Explore Tumblr blogs with no restrictions, modern design and the best experience.
Last Seen Tumblr Blogs


Fun Fact
Average visit duration of Tumblr.com is 10 mins and 25 secs.
Text
Imagine this: You’re deep in your React project, trying to write code that not only works but shines. You want to be efficient, clean, and—let’s be honest—avoid as many headaches as possible. You open up your trusty VS Code editor, but it feels like something’s missing. What if there were a few secret weapons that could transform your workflow?
Well, there are! Here are five essential VS Code extensions that will not only save you time but elevate your entire React development experience.
### 1. **ES7+ React/Redux/React-Native snippets**
We’ve all been there—writing out the same lines of boilerplate code over and over again. It’s tedious and eats up precious time. This is where **ES7+ React/Redux/React-Native snippets** come to the rescue. Imagine typing just a few letters and having your entire component structure, Redux setup, or even imports instantly appear. It’s like having a personal assistant for your code.
Every time you need to create a functional component or import a hook, this extension swoops in, saving you from the repetitive grunt work. And that’s not all—it covers Redux and React Native too. For any React developer, this one’s a game changer.
### 2. **Prettier - Code formatter**
Let’s face it, no matter how great of a coder you are, your code can sometimes look like a hot mess. That's where **Prettier** steps in. This tool ensures your code is consistently formatted across your entire project—no more arguing over tabs vs. spaces or forgetting to add a semi-colon.
Once Prettier is installed, it becomes your silent partner. You save a file, and boom, your code looks neat, clean, and uniform. It’s like having a professional cleaner for your messy codebase, leaving everything polished and tidy. And who doesn’t want that?
### 3. **ESLint**
We all make mistakes, especially when working on complex React apps. Sometimes it's a missing import, other times it’s a forgotten prop. **ESLint** is like your personal code guardian, always watching out for potential issues and best practices.
As you type, ESLint flags errors, warnings, and areas where you might not be following the best standards. Instead of tracking down errors after running your code, you’ll catch them in real time. It’s like having a safety net under your code at all times.
### 4. **Auto Rename Tag**
If you've ever worked with a deeply nested JSX structure, you know the frustration of changing a tag name, only to forget to update its closing pair. Cue the errors! With **Auto Rename Tag**, that’s a thing of the past.
This extension automatically updates both the opening and closing tags in your JSX components. You change one, and the other follows suit. It’s a small feature, but it makes a huge difference when working on large components. Suddenly, editing JSX feels smoother, like a well-oiled machine.
### 5. **GitLens — Git supercharged**
We all know Git is powerful, but sometimes it feels like using a hammer when you really need a fine brush. That’s where **GitLens** comes in—it supercharges your Git experience in VS Code. Ever wondered who wrote a particular line of code or when a change was made? GitLens shows you everything with just a hover.
It doesn’t stop there. GitLens also lets you explore your project’s Git history, navigate through commits, and visualize changes over time. It’s like having X-ray vision for your repository, helping you understand the story behind the code.
### Conclusion
With these five VS Code extensions, your React development process will feel smoother, faster, and more enjoyable. Whether it's auto-generating boilerplate code, keeping your formatting consistent, or helping you stay on top of Git history, each extension brings something valuable to the table.
So, what are you waiting for? Go ahead, install these extensions, and watch as your coding efficiency skyrockets. Happy coding!
#Hashtags:
#ReactJS #JavaScript #WebDevelopment #VScode #Programming #FrontendDevelopment #CodeTips #ProductivityHacks #Tech #SoftwareEngineering
1 note
·
View note
Text
How To Setup Your Vue.js Style Guide And Code Like A Pro With Vue 2 and Vue 3!! Vue 3 ESLint Guide
How To Setup Your Vue.js Style Guide And Code Like A Pro With Vue 2 and Vue 3!! Vue 3 ESLint Guide
Vue.js Style Guide is important. How should you create your Vue.js app and what are the best practices? In this tutorial we’ll look at adding ESLint Style’s to your Vue.js app! Using the eslint-plugin-vue. And we’ll look at Vue 3 style guide! #vuejs #vuejs3 Check now if your .TECH is available! Link – https://go.tech/erik Use Code erik.tech at Checkout for a special 80% OFF on 1 & 5 Year .TECH…

View On WordPress
#Erik Hanchett#eslint prettier vscode#eslint setup#eslint vscode#eslint vscode setup#Program With Eric#Program With Erik#VSCode setup eslint#Vue 3 style guide#Vue essentials#vue js 3#vue js tutorial#vue js tutorial for beginners#vue-eslint prettier vscode#Vue.js 3 tutorial#vue.js documentary#Vue.js ESLint#Vue.js eslint tutorial#Vue.js Style Eslint#Vue.js style essentials#Vue.js Style Guide#vuejs
0 notes
Link
warning A new version (v2.8.0) of the Scanner Plug-in was released on 04-13-2021 Release Information Salesforce CLI Scanner Plug-in# The Salesforce CLI Scanner plug-in is a unified tool for static analysis of source code, in multiple languages (including Apex), with a consistent command-line interface and report output. We currently support the PMD rule engine, ESLint, and RetireJS. We may add support for more rule engines in the future. The Salesforce CLI Scanner Plug-in creates “Rule Violations” when the scanner identifies issues. Developers use this information as feedback to fix their code. You can integrate this plug-in into your CI/CD solution to enforce the rules and expect high-quality code. Additional Resources# Trailhead: Get Started with Salesforce DX Salesforce DX Setup Guide Salesforce DX Developer Guide Open Source Github Repository Bugs and Feedback# To report issues with Salesforce Scanner, open a bug on GitHub. If you want to suggest a feature, create a feature request on GitHub. Feedback or Bugs | Edit this Article
0 notes
Text
A Gentle Introduction to Using a Docker Container as a Dev Environment
Sarcasm disclaimer: This article is mostly sarcasm. I do not think that I actually speak for Dylan Thomas and I would never encourage you to foist a light theme on people who don’t want it. No matter how wrong they may be.
When Dylan Thomas penned the words, “Do not go gentle into that good night,” he was talking about death. But if he were alive today, he might be talking about Linux containers. There is no way to know for sure because he passed away in 1953, but this is the internet, so I feel extremely confident speaking authoritatively on his behalf.
My confidence comes from a complete overestimation of my skills and intelligence coupled with the fact that I recently tried to configure a Docker container as my development environment. And I found myself raging against the dying of the light as Docker rejected every single attempt I made like I was me and it was King James screaming, “NOT IN MY HOUSE!”

Pain is an excellent teacher. And because I care about you and have no other ulterior motives, I want to use that experience to give you a “gentle” introduction to using a Docker container as a development environment. But first, let’s talk about whyyyyyyyyyyy you would ever want to do that.
kbutwhytho?
Close your eyes and picture this: a grown man dressed up like a fox.
Wait. No. Wrong scenario.
Instead, picture a project that contains not just your source code, but your entire development environment and all the dependencies and runtimes your app needs. You could then give that project to anyone anywhere (like the fox guy) and they could run your project without having to make a lick of configuration changes to their own environment.
This is exactly what Docker containers do. A Dockerfile defines an entire runtime environment with a single file. All you would need is a way to develop inside of that container.
Wait for it…
VS Code and Remote – Containers
VS Code has an extension called Remote – Containers that lets you load a project inside a Docker container and connect to it with VS Code. That’s some Inception-level stuff right there. (Did he make it out?! THE TALISMAN NEVER ACTUALLY STOPS SPINNING.) It’s easier to understand if we (and by “we” I mean you) look at it in action.
Adding a container to a project
Let’s say for a moment that you are on a high-end gaming PC that you built for your kids and then decided to keep if for yourself. I mean, why exactly do they deserve a new computer again? Oh, that’s right. They don’t. They can’t even take out the trash on Sundays even though you TELL THEM EVERY WEEK.
This is a fresh Windows machine with WSL2 and Docker installed, but that’s all. Were you to try and run a Node.js project on this machine, Powershell would tell you that it has absolutely no idea what you are reffering to and maybe you mispelled something. Which, in all fairness, you do suck at spelling. Remember that time in 4ᵗʰ grade when you got knocked out of the first round of the spelling bee because you couldn’t spell “fried.” FRYED? There’s no “Y” in there!

Now this is not a huge problem — you could always skip off and install Node.js. But let’s say for a second that you can’t be bothered to do that and you’re pretty sure that skipping is not something adults do.
Instead, we can configure this project to run in a container that already has Node.js installed. Now, as I’ve already discussed, I have no idea how to use Docker. I can barely use the microwave. Fortunately, VS Code will configure your project for you — to an extent.
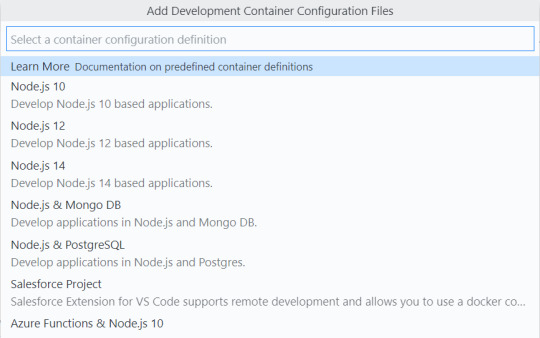
From the Command Palette, there is an “Add Development Container Configuration Files…” command. This command looks at your project and tries to add the proper container definition.

In this case, VS Code knows I’ve got a Node project here, so I’ll just pick Node.js 14. Yes, I am aware that 12 is LTS right now, but it’s gonna be 14 in [checks watch] one month and I’m an early adopter, as is evidenced by my interest in container technology just now in 2020.
This will add a .devcontainer folder with some assets inside. One is a Dockerfile that contains the Node.js image that we’re going to use, and the other is a devcontainer.json that has some project level configuration going on.
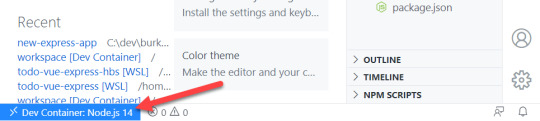
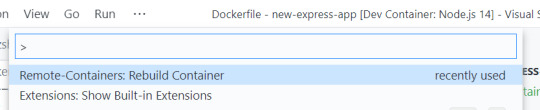
Now, before we touch anything and break it all (we’ll get to that, trust me), we can select “Rebuild and Reopen in Container” from the Command Palette. This will restart VS Code and set about building the container. Once it completes (which can take a while the first time if you’re not on a high-end gaming PC that your kids will never know the joys of), the project will open inside of the container. VS Code is connected to the container, and you know that because it says so in the lower left-hand corner.
Now if we open the terminal in VS Code, Powershell is conspicously absent because we are not on Windows anymore, Dorthy. We are now in a Linux container. And we can both npm install and npm start in this magical land.
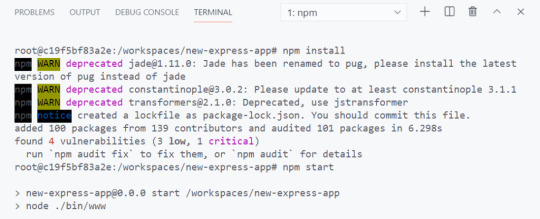
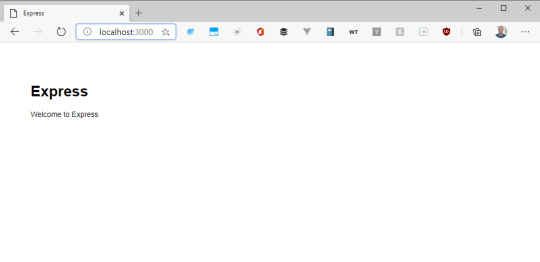
This is an Express App, so it should be running on port 3000. But if you try and visit that port, it won’t load. This is because we need to map a port in the container to 3000 on our localhost. As one does.
Fortunately, there is a UI for this.
The Remote Containers extension puts a “Remote Explorer” icon in the Action Bar. Which is on the left-hand side for you, but the right-hand side for me. Because I moved it and you should too.
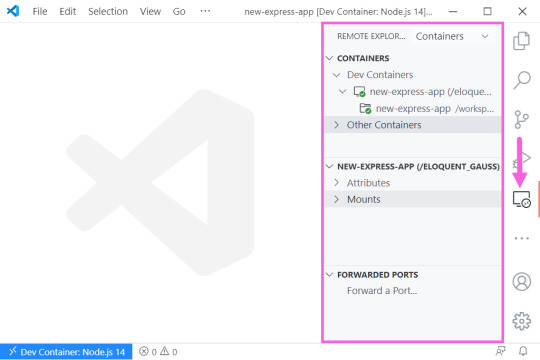
There are three sections here, but look at the bottom one which says “Port Forwarding,” I’m not the sandwich with the most lettuce, but I’m pretty sure that’s what we want here. You can click on the “Forward a Port” and type “3000,” Now if we try and hit the app from the browser…
Mostly things, “just worked.” But the configuration is also quite simple. Let’s look at how we can start to customize this setup by automating some of the aspects of the project itself. Project specific configuration is done in the devcontainer.json file.
Automating project configuration
First off, we can automate the port forwarding by adding a forwardPorts variable and specifying 3000 as the value. We can also automate the npm install command by specifying the postCreateCommand property. And let’s face it, we could all stand to run AT LEAST one less npm install.
{ // ... // Use 'forwardPorts' to make a list of ports inside the container available locally. "forwardPorts": [3000], // Use 'postCreateCommand' to run commands after the container is created. "postCreateCommand": "npm install", // ... }
Additionally, we can include VS Code extensions. The VS Code that runs in the Docker container does not automatically get every extension you have installed. You have to install them in the container, or just include them like we’re doing here.
Extensions like Prettier and ESLint are perfect for this kind of scenario. We can also take this opportunity to foist a light theme on everyone because it turns out that dark themes are worse for reading and comprehension. I feel like a prophet.
// For format details, see https://aka.ms/vscode-remote/devcontainer.json or this file's README at: // https://github.com/microsoft/vscode-dev-containers/tree/v0.128.0/containers/javascript-node-14 { // ... // Add the IDs of extensions you want installed when the container is created. "extensions": [ "dbaeumer.vscode-eslint", "esbenp.prettier-vscode", "GitHub.github-vscode-theme" ] // ... }
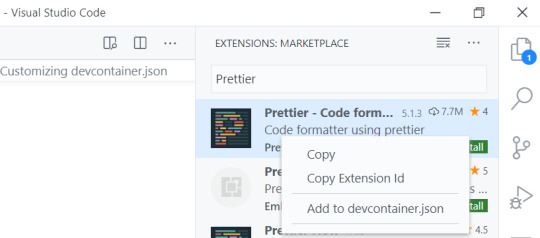
If you’re wondering where to find those extension ID’s, they come up in intellisense (Ctrl/Cmd + Shift) if you have them installed. If not, search the extension marketplace, right-click the extension and say “Copy extension ID.” Or even better, just select “Add to devcontainer.json.”
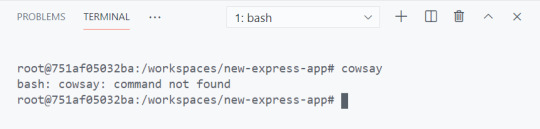
By default, the Node.js container that VS Code gives you has things like git and cURL already installed. What it doesn’t have, is “cowsay,” And we can’t have a Linux environment without cowsay. That’s in the Linux bi-laws (it’s not). I don’t make the rules. We need to customize this container to add that.
Automating environment configuration
This is where things went off the rails for me. In order to add software to a development container, you have to edit the Dockerfile. And Linux has no tolerance for your shenanigans or mistakes.
The base Docker container that you get with the container configurations in VS Code is Debian Linux. Debian Linux uses the apt-get dependency manager.
apt-get install cowsay
We can add this to the end of the Dockerfile. Whenever you install something from apt-get, run an apt-get update first. This command updates the list of packages and package repos so that you have the most current list cached. If you don’t do this, the container build will fail and tell you that it can’t find “cowsay.”
# To fully customize the contents of this image, use the following Dockerfile instead: # https://github.com/microsoft/vscode-dev-containers/tree/v0.128.0/containers/javascript-node-14/.devcontainer/Dockerfile FROM mcr.microsoft.com/vscode/devcontainers/javascript-node:0-14 # ** Install additional packages ** RUN apt-get update \ && apt-get -y install cowsay
A few things to note here…
That RUN command is a Docker thing and it creates a new “layer.” Layers are how the container knows what has changed and what in the container needs to be updated when you rebuild it. They’re kind of like cake layers except that you don’t want a lot of them because enormous cakes are awesome. Enormous containers are not. You should try and keep related logic together in the same RUN command so that you don’t create unnecessary layers.
That \ denotes a line break at the end of a line. You need it for multi-line commands. Leave it off and you will know the pain of many failed Docker builds.
The && is how you add an additional command to the RUN line. For the love of god, don’t forget that \ on the previous line.
The -y flag is important because by default, apt-get is going to prompt you to ensure you really want to install what you just tried to install. This will cause the container build to fail because there is nobody there to say Y or N. The -y flag is shorthand for “don’t bother me with your silly confirmation prompts”. Apparently everyone is supposed to know this already. I didn’t know it until about four hours ago.
Use the command prompt to select “Rebuild Container”…
And, just like that…
It doesn’t work.
This the first lesson in what I like to call, “Linux Vertigo.” There are so many distributions of Linux and they don’t all handle things the same way. It can be difficult to figure out why things work in one place (Mac, WSL2) and don’t work in others. The reason why “cowsay” isn’t available, is that Debian puts “cowsay” in /usr/games, which is not included in the PATH environment variable.
One solution would be to add it to the PATH in the Dockerfile. Like this…
FROM mcr.microsoft.com/vscode/devcontainers/javascript-node:0-14 RUN apt-get update \ && apt-get -y install cowsay ENV PATH="/usr/games:${PATH}"
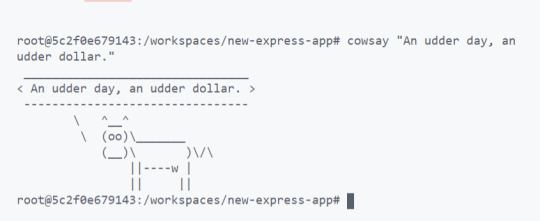
EXCELLENT. We’re solving real problems here, folks. People like cow one-liners. I bullieve I herd that somewhere.
To summarize, project configuration (forwarding ports, installing project depedencies, ect) is done in the “devcontainer.json” and enviornment configuration (installing software) is done in the “Dockerfile.” Now let’s get brave and try something a little more edgy.
Advanced configuration
Let’s say for a moment that you have a gorgeous, glammed out terminal setup that you really want to put in the container as well. I mean, just because you are developing in a container doesn’t mean that your terminal has to be boring. But you also wouldn’t want to reconfigure your pretentious zsh setup for every project that you open. Can we automate that too? Let’s find out.
Fortunately, zsh is already installed in the image that you get. The only trouble is that it’s not the default shell when the container opens. There are a lot of ways that you can make zsh the default shell in a normal Docker scenario, but none of them will work here. This is because you have no control over the way the container is built.
Instead, look again to the trusty devcontainer.json file. In it, there is a "settings" block. In fact, there is a line already there showing you that the default terminal is set to "/bin/bash". Change that to "/bin/zsh".
// Set *default* container specific settings.json values on container create. "settings": { "terminal.integrated.shell.linux": "/bin/zsh" }
By the way, you can set ANY VS Code setting there. Like, you know, moving the sidebar to the right-hand side. There – I fixed it for you.
// Set default container specific settings.json values on container create. "settings": { "terminal.integrated.shell.linux": "/bin/zsh", "workbench.sideBar.location": "right" },
And how about those pretentious plugins that make you better than everyone else? For those you are going to need your .zshrc file. The container already has oh-my-zsh in it, and it’s in the “root” folder. You just need to make sure you set the path to ZSH at the top of the .zshrc so that it points to root. Like this…
# Path to your oh-my-zsh installation. export ZSH="/root/.oh-my-zsh"
# Set name of the theme to load --- if set to "random", it will # load a random theme each time oh-my-zsh is loaded, in which case, # to know which specific one was loaded, run: echo $RANDOM_THEME # See https://github.com/ohmyzsh/ohmyzsh/wiki/Themes ZSH_THEME="cloud"
# Which plugins would you like to load? plugins=(zsh-autosuggestions nvm git)
source $ZSH/oh-my-zsh.sh
Then you can copy in that sexy .zshrc file to the root folder in the Dockerfile. I put that .zshrc file in the .devcontainer folder in my project.
COPY .zshrc /root/.zshrc
And if you need to download a plugin before you install it, do that in the Dockerfile with a RUN command. Just remember to group all of these into one command since each RUN is a new layer. You are nearly a container expert now. Next step is to write a blog post about it and instruct people on the ways of Docker like you invented the thing.
RUN git clone https://github.com/zsh-users/zsh-autosuggestions ${ZSH_CUSTOM:-~/.oh-my-zsh/custom}/plugins/zsh-autosuggestions
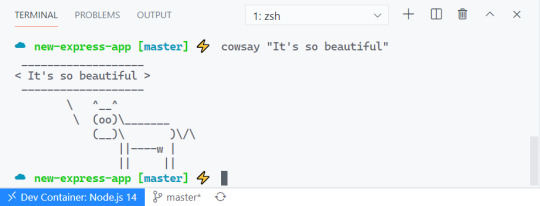
Look at the beautiful terminal! Behold the colors! The git plugin which tells you the branch and adds a lightning emoji! Nothing says, “I know what I’m doing” like a customized terminal. I like to take mine to Starbucks and just let people see it in action and wonder if I’m a celebrity.
Go gently
Hopefully you made it to this point and thought, “Geez, this guy is seriously overreacting. This is not that hard.” If so, I have successfully saved you. You are welcome. No need to thank me. Yes, I do have an Amazon wish list.
For more information on Remote Containers, including how to do things like add a database or use Docker Compose, check out the official Remote Container docs, which provide much more clarity with 100% less neurotic commentary.
The post A Gentle Introduction to Using a Docker Container as a Dev Environment appeared first on CSS-Tricks.
You can support CSS-Tricks by being an MVP Supporter.
A Gentle Introduction to Using a Docker Container as a Dev Environment published first on https://deskbysnafu.tumblr.com/
0 notes
Photo

React with TypeScript: Best Practices
React and TypeScript are two awesome technologies used by a lot of developers these days. Knowing how to do things can get tricky, and sometimes it’s hard to find the right answer. Not to worry. We’ve put together the best practices along with examples to clarify any doubts you may have.
Let’s dive in!
How React and TypeScript Work Together
Before we begin, let’s revisit how React and TypeScript work together. React is a “JavaScript library for building user interfaces”, while TypeScript is a “typed superset of JavaScript that compiles to plain JavaScript.” By using them together, we essentially build our UIs using a typed version of JavaScript.
The reason you might use them together would be to get the benefits of a statically typed language (TypeScript) for your UI. This means more safety and fewer bugs shipping to the front end.
Does TypeScript Compile My React Code?
A common question that’s always good to review is whether TypeScript compiles your React code. The way TypeScript works is similar to this interaction:
TS: “Hey, is this all your UI code?” React: “Yup!” TS: “Cool! I’m going to compile it and make sure you didn’t miss anything.” React: “Sounds good to me!”
So the answer is yes, it does! But later, when we cover the tsconfig.json settings, most of the time you’ll want to use "noEmit": true. What this means is TypeScript will not emit JavaScript out after compilation. This is because typically, we’re just utilizing TypeScript to do our type-checking.
The output is handled, in a CRA setting, by react-scripts. We run yarn build and react-scripts bundles the output for production.
To recap, TypeScript compiles your React code to type-check your code. It doesn’t emit any JavaScript output (in most scenarios). The output is still similar to a non-TypeScript React project.
Can TypeScript Work with React and webpack?
Yes, TypeScript can work with React and webpack. Lucky for you, the webpack documentation has a guide on that.
Hopefully, that gives you a gentle refresher on how the two work together. Now, on to best practices!
Best Practices
We’ve researched the most common questions and put together this handy list of the most common use cases for React with TypeScript. This way, you can use this article as a reference in your own projects.
Configuration
One of the least fun, yet most important parts of development is configuration. How can we set things up in the shortest amount of time that will provide maximum efficiency and productivity? We’ll discuss project setup including:
tsconfig.json
ESLint
Prettier
VS Code extensions and settings.
Project Setup
The quickest way to start a React/TypeScript app is by using create-react-app with the TypeScript template. You can do this by running:
npx create-react-app my-app --template typescript
This will get you the bare minimum to start writing React with TypeScript. A few noticeable differences are:
the .tsx file extension
the tsconfig.json
the react-app-env.d.ts
The tsx is for “TypeScript JSX”. The tsconfig.json is the TypeScript configuration file, which has some defaults set. The react-app-env.d.ts references the types of react-scripts, and helps with things like allowing for SVG imports.
tsconfig.json
Lucky for us, the latest React/TypeScript template generates tsconfig.json for us. However, they add the bare minimum to get started. We suggest you modify yours to match the one below. We’ve added comments to explain the purpose of each option as well:
{ "compilerOptions": { "target": "es5", // Specify ECMAScript target version "lib": [ "dom", "dom.iterable", "esnext" ], // List of library files to be included in the compilation "allowJs": true, // Allow JavaScript files to be compiled "skipLibCheck": true, // Skip type checking of all declaration files "esModuleInterop": true, // Disables namespace imports (import * as fs from "fs") and enables CJS/AMD/UMD style imports (import fs from "fs") "allowSyntheticDefaultImports": true, // Allow default imports from modules with no default export "strict": true, // Enable all strict type checking options "forceConsistentCasingInFileNames": true, // Disallow inconsistently-cased references to the same file. "module": "esnext", // Specify module code generation "moduleResolution": "node", // Resolve modules using Node.js style "isolatedModules": true, // Unconditionally emit imports for unresolved files "resolveJsonModule": true, // Include modules imported with .json extension "noEmit": true, // Do not emit output (meaning do not compile code, only perform type checking) "jsx": "react" // Support JSX in .tsx files "sourceMap": true, // Generate corrresponding .map file "declaration": true, // Generate corresponding .d.ts file "noUnusedLocals": true, // Report errors on unused locals "noUnusedParameters": true, // Report errors on unused parameters "incremental": true, // Enable incremental compilation by reading/writing information from prior compilations to a file on disk "noFallthroughCasesInSwitch": true // Report errors for fallthrough cases in switch statement }, "include": [ "src/**/*" // *** The files TypeScript should type check *** ], "exclude": ["node_modules", "build"] // *** The files to not type check *** }
The additional recommendations come from the react-typescript-cheatsheet community and the explanations come from the Compiler Options docs in the Official TypeScript Handbook. This is a wonderful resource if you want to learn about other options and what they do.
ESLint/Prettier
In order to ensure that your code follows the rules of the project or your team, and the style is consistent, it’s recommended you set up ESLint and Prettier. To get them to play nicely, follow these steps to set it up.
Install the required dev dependencies:
yarn add eslint @typescript-eslint/parser @typescript-eslint/eslint-plugin eslint-plugin-react --dev
Create a .eslintrc.js file at the root and add the following:
module.exports = { parser: '@typescript-eslint/parser', // Specifies the ESLint parser extends: [ 'plugin:react/recommended', // Uses the recommended rules from @eslint-plugin-react 'plugin:@typescript-eslint/recommended', // Uses the recommended rules from @typescript-eslint/eslint-plugin ], parserOptions: { ecmaVersion: 2018, // Allows for the parsing of modern ECMAScript features sourceType: 'module', // Allows for the use of imports ecmaFeatures: { jsx: true, // Allows for the parsing of JSX }, }, rules: { // Place to specify ESLint rules. Can be used to overwrite rules specified from the extended configs // e.g. "@typescript-eslint/explicit-function-return-type": "off", }, settings: { react: { version: 'detect', // Tells eslint-plugin-react to automatically detect the version of React to use }, }, };
Add Prettier dependencies:
yarn add prettier eslint-config-prettier eslint-plugin-prettier --dev
Create a .prettierrc.js file at the root and add the following:
module.exports = { semi: true, trailingComma: 'all', singleQuote: true, printWidth: 120, tabWidth: 4, };
Update the .eslintrc.js file:
module.exports = { parser: '@typescript-eslint/parser', // Specifies the ESLint parser extends: [ 'plugin:react/recommended', // Uses the recommended rules from @eslint-plugin-react 'plugin:@typescript-eslint/recommended', // Uses the recommended rules from the @typescript-eslint/eslint-plugin + 'prettier/@typescript-eslint', // Uses eslint-config-prettier to disable ESLint rules from @typescript-eslint/eslint-plugin that would conflict with prettier + 'plugin:prettier/recommended', // Enables eslint-plugin-prettier and displays prettier errors as ESLint errors. Make sure this is always the last configuration in the extends array. ], parserOptions: { ecmaVersion: 2018, // Allows for the parsing of modern ECMAScript features sourceType: 'module', // Allows for the use of imports ecmaFeatures: { jsx: true, // Allows for the parsing of JSX }, }, rules: { // Place to specify ESLint rules. Can be used to overwrite rules specified from the extended configs // e.g. "@typescript-eslint/explicit-function-return-type": "off", }, settings: { react: { version: 'detect', // Tells eslint-plugin-react to automatically detect the version of React to use }, }, };
These recommendations come from a community resource written called “Using ESLint and Prettier in a TypeScript Project”, by Robert Cooper. If you visit this resource, you can read more about the “why” behind these rules and configurations.
VSCode Extensions and Settings
We’ve added ESLint and Prettier and the next step to improve our DX is to automatically fix/prettify our code on save.
First, install the ESLint extension and the Prettier extension for VSCode. This will allow ESLint to integrate with your editor seamlessly.
Next, update your Workspace settings by adding the following to your .vscode/settings.json:
{ "editor.formatOnSave": true }
This will allow VS Code to work its magic and fix your code when you save. It’s beautiful!
These suggestions also come from the previously linked article “Using ESLint and Prettier in a TypeScript Project”, by Robert Cooper.
Note: to read more about React.FC, look here, and read here for React.ReactNode.
Continue reading React with TypeScript: Best Practices on SitePoint.
by Joe Previte via SitePoint https://ift.tt/3miQ04t
0 notes
Text
Create a Gutenberg Block
In this article you are going to see how to create Gutenberg block.
You are going to learn:
Overview
Requirements
Available Tools
Create Gutenberg Block with create-guten-block
Create Gutenberg Block with @wordpress/block
Create Gutenberg Block with wp scaffold block
Conclusion
Overview #Overview
This article is one of the parts of the series Gutenberg Development: Beginner to Advanced. I am explaining all the details for considering the article for beginner developers. After reading this article you can easily understand the process of creating a Gutenberg block.
In this article we just setup the boilerplate of our first Gutenberg block. So, Let’s see how to create custom Gutenberg block.
Requirements #Requirements
To get started we need a NPM and Node.js to be installed on the system. NPM is a package manager for Node.js. So, After installing the Node.js you’ll get access to use the NPM too.
See the article install the NPM and Node.js
Available Tools #Available Tools
We can create a Gutenberg block from scratch. We custom configure the webpack, Babel, etc but to make the development as simple as possible I’m going to use below tools to create a first Gutenberg block.
We have 3 tools which provides the Gutenberg block development environment. These tools are:
create-guten-block – NPM unofficial but pretty awesome package created by Ahmad Awais.
@wordpress/block – NPM official WordPress package to create a Gutenberg block.
wp scaffold block – WP CLI package to create a Gutenberg block.
All these tools are nice to create a Gutenberg block boilerplate. But, I recommend using the create-guten-block for development. We have a WordPress official tool @wordpress/block for development. The official package @wordpress/block is available from Jan 24, 2020.
I am going to see How to create a Gutenberg block with all the above available tools. Finally, you can choose your favorite tool for creating a Gutenberg block.
Create Gutenberg Block with create-guten-block #Create Gutenberg Block with create-guten-block
The create-guten-block is an awesome tool for developing Gutenberg blocks. create-guten-block is developed by ahmadawais.
create-guten-block provides the ZERO configuration setup. create-guten-block is the same as the create-react-app which is used for creating React applications.
Let’s get started.
Open the Terminal or CMD (command prompt)
Navigate to the \wp-content\plugins\ directory.
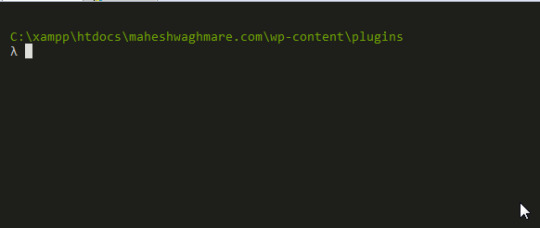
Terminal Window
Type npx create-guten-block {your-gutenberg-block-plugin} command. Note: Above command create a WordPress plugin with your provided plugin name.
I’m using below command:
npx create-guten-block awesome-headings
Here, I am creating a Gutenberg Block plugin with name awesome-headings.
After executing the above command you can see something similar:
λ npx create-guten-block awesome-headings � Creating a WP Gutenberg Block plugin called: awesome-headings In the directory: C:\xampp\htdocs\maheshwaghmare.com\wp-content\plugins\awesome-headings This might take a couple of minutes. √ 1. Creating the plugin directory called → awesome-headings √ 2. Installing npm packages... √ 3. Creating plugin files... ✅ All done! Go build some Gutenberg blocks. CGB (create-guten-block) has created a WordPress plugin called awesome-headings that you can use with zero configurations #0CJS to build Gutenberg blocks with ESNext (i.e. ES6/7/8), React.js, JSX, Webpack, ESLint, etc. Created awesome-headings plugin at: C:\xampp\htdocs\maheshwaghmare.com\wp-content\plugins\awesome-headings Inside that directory, you can run several commands: � Type npm start Use to compile and run the block in development mode. Watches for any changes and reports back any errors in your code. � Type npm run build Use to build production code for your block inside dist folder. Runs once and reports back the gzip file sizes of the produced code. � Type npm run eject Removes this tool and copies build dependencies, configuration files and scripts into the plugin folder. ⚠️ It's a one way street. If you do this, you can’t go back! ✊ Support create-guten-block → Love create-guten-block? You can now support this free and open source project. Supporting CGB means more updates and better maintenance: Support for one hour or more → https://AhmdA.ws/CGB99 More ways to support → https://AhmdA.ws/CGBSupport Check out my best work. VSCode Power User → https://VSCode.pro Get Started → We suggest that you begin by typing: cd awesome-headings npm start
See below screenshot for reference:

Successfully Created a Gutenberg Block Plugin
If we see the plugins directory the we can see that the new directory awesome-headings with all required files and folders.
See below screenshot for reference.
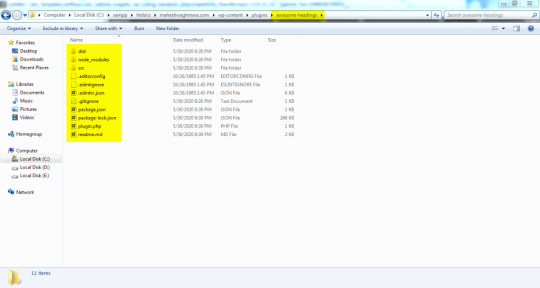
Directory Structure after creating a Gutenberg Block
We have a proper setup for our new block awesome-headings – CGB Block.
We can see the development files and folders into the directory \plugins\awesome-headings\src\
└───block └───block.js └───editor.scss └───style.scss └───blocks.js └───common.scss └───init.php
If you open the file block/block.js then you can see the code something like below:
// Import CSS. import './editor.scss'; import './style.scss'; const { __ } = wp.i18n; // Import __() from wp.i18n const { registerBlockType } = wp.blocks; // Import registerBlockType() from wp.blocks
The above code is written NEW JavaScript format which is ECMAScript 6 is also known as ES6 and ECMAScript 2015 and with JSX.
The new ES6 format is not supported for all browsers also browsers don’t read the JSX expressions. We need to make the browser supported format JS files.
As I describe to you earlier that the create-guten-block tool provides the ZERO configuration setup. So, We don’t need to configure anything.
Simply execute the command npm run build.
What does the npm run build command?
Simply it build the executable files which files browsers can read.
We have a directory \src\ in which we have a .js files (written in ES6 & JSX code) & .scss files. Both files are not readable by browser.
So, The npm run build command create a directory \dist\ and create the .js and .css iles:
└───blocks.build.js └───blocks.editor.build.css └───blocks.style.build.css
Here, We have 3 files which are readable by browser.
Now, Lets create the build files for our awesome-headings – CGB Block Gutenberg block.
Go to \wp-content\plugins\awesome-headings\
Execute the command npm run build e.g.
λ npm run build > [email protected] build C:\xampp\htdocs\maheshwaghmare.com\wp-content\plugins\awesome-headings > cgb-scripts build Let's build and compile the files... ✅ Built successfully! File sizes after gzip: 671 B — ./dist/ blocks.build.js 134 B — ./dist/ blocks.editor.build.css 135 B — ./dist/ blocks.style.build.css � Support Awais via VSCode Power User at https://VSCode.pro →
You can see the screenshot somethine like below:
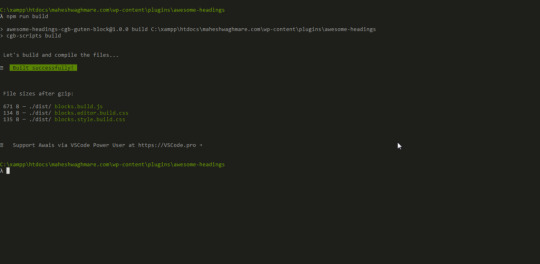
Build the Gutenberg block assets
Now, Our block files are build and ready to see in Gutenberg editor.
Let’s see how our first block looks like in the Gutenberg editor. First we need to activate our plugin.
Go to /wp-admin/plugins.php screen and activate the awesome-headings — CGB Gutenberg Block Plugin.
See below screenshot for reference:
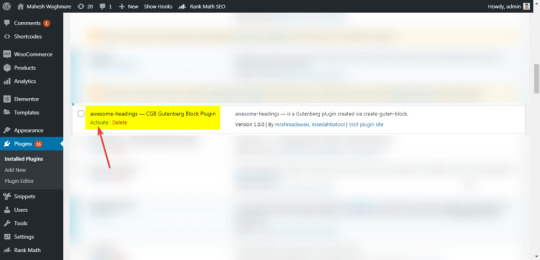
Activate “Gutenberg Block” Plugin
Now, Let’s create a new post from Posts > Add new
Type /awesome in the editor which shows the available bocks.

Inline Gutenberg Block Search
Or
We can search the block in top right corner.
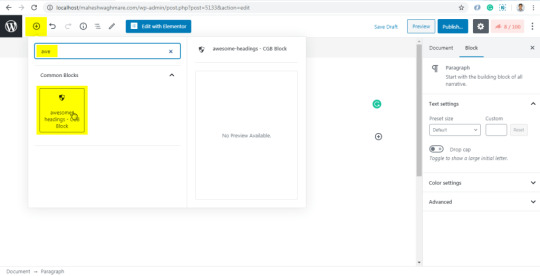
Now, Click on awesome-headings – CGB Block
Click on the Publish button

Publish New Post
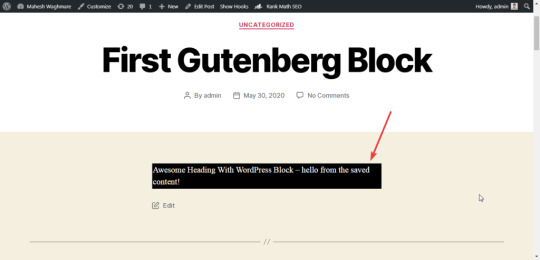
Now, Click on View Post to see your post on frontend.
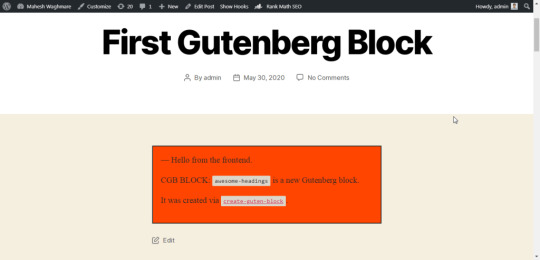
Post Front-End
Here, We can see our first Gutenberg block output in post content.
I have use the default WordPress theme Twenty Twenty to avoid any CSS or JS conflicts. You can use any your favorite theme for development.
I recommend to use the default WordPress themes while development. Also, deactivate all other plugins. Once your development is complete and plugins is ready to test then you can test the plugin with different themes and different plugins.
Create Gutenberg Block with @wordpress/block #Create Gutenberg Block with @wordpress/block
The @wordpress/block is also inspired by create-react-app. The create-react-app is used for creating the react app.
Lets see how to create custom gutenberg block with @wordpress/block.
Goto /wp-content/plugins/ directory and execute below command:
npm init @wordpress/block awesome-heading-with-wordpress-block
Here, the awesome-heading-with-wordpress-block is our plugin name. The package @wordpress/block create a ready to use Gutenberg block for us.
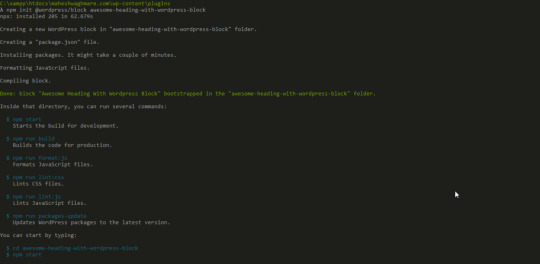
After executing above command you can see something similar:
λ npm init @wordpress/block awesome-heading-with-wordpress-block npx: installed 205 in 62.679s Creating a new WordPress block in "awesome-heading-with-wordpress-block" folder. Creating a "package.json" file. Installing packages. It might take a couple of minutes. Formatting JavaScript files. Compiling block. Done: block "Awesome Heading With WordPress Block" bootstrapped in the "awesome-heading-with-wordpress-block" folder. Inside that directory, you can run several commands: $ npm start Starts the build for development. $ npm run build Builds the code for production. $ npm run format:js Formats JavaScript files. $ npm run lint:css Lints CSS files. $ npm run lint:js Lints JavaScript files. $ npm run packages-update Updates WordPress packages to the latest version. You can start by typing: $ cd awesome-heading-with-wordpress-block $ npm start Code is Poetry
See below screenshot for reference:
Create new Gutenberg Block with @wordpress/block
Same as create-guten-block the NPM package @wordpress/block also create a directory awesome-heading-with-wordpress-block into /wp-content/plugins/ directory. The file structure looks like below:
└───.editorconfig └───.gitignore └───awesome-heading-with-wordpress-block.php └───build └──────index.asset.php └──────index.js └───editor.css └───node_modules └───package-lock.json └───package.json └───readme.txt └───src └──────edit.js └──────index.js └──────save.js └───style.css
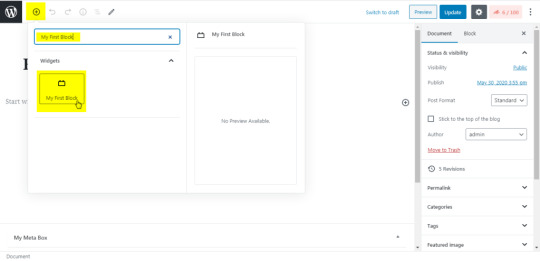
Now, Lets see how our first block looks like in the Gutenberg editor.
Note: Here we have not executed the npm run build command. By default the @wordpresss/block generate the /dist/ directory. If the block is not available from the Gutenberg editor then you can execute the above command.
Create a new post from Posts > Add new
Search from the Awesome Heading With WordPress Block block.
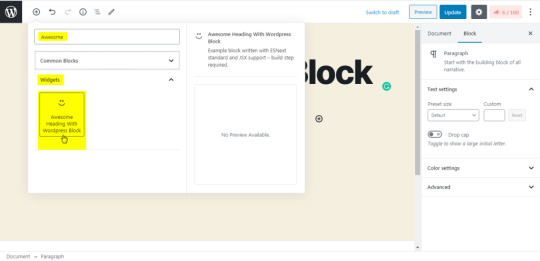
OR

Click on the “Awesome Heading With WordPress Block” which add our block into the editor.
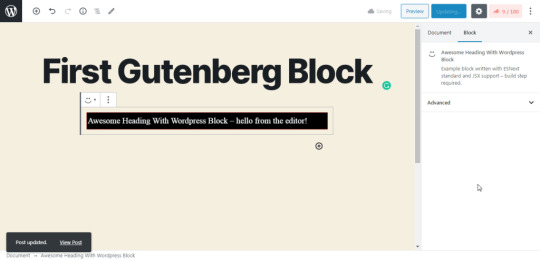
Now, Click on View Post to see the front end.
Create Gutenberg Block with wp scaffold block #Create Gutenberg Block with wp scaffold block
Creating the block with wp scaffold block is two step process if we don’t have any plugin.
We are creating a new plugin and a new block wihtin it.
Let’s see how to do it.
Create a new plugin my-gutenberg-plugin with wp scaffold plugin command.
E.g.
wp scaffold plugin my-gutenberg-plugin
After executing above command you can see something below:
λ wp scaffold plugin my-gutenberg-plugin Success: Created plugin files. Success: Created test files.
Here, The new plugin is created into the /wp-content/plugins/ direcotry with my-gutenberg-plugin
Now, Goto our new plugin directory /wp-content/plugins/my-gutenberg-plugin/ and execute below command:
wp scaffold block my-first-block --title="My First Block" --plugin=my-gutenberg-plugin
You can see something like below:
λ wp scaffold block my-first-block --title="My First Block" --plugin=my-gutenberg-plugin Success: Created block 'My First Block'.
Here, We have created a new block My First Block.
Now, Activate the plugin and Lets see how to use it in Gutenberg Editor.
After activate you’ll not see the Gutenberg block. We need to add a single line of code which actually include the block file path.
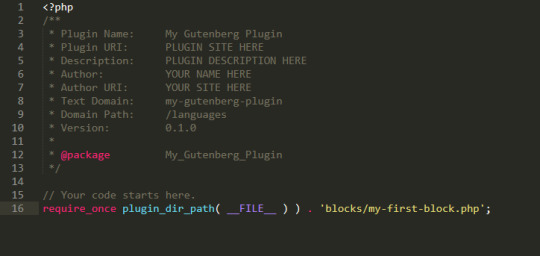
Add below code into the My Gutenberg Plugin plugin’s my-gutenberg-plugin.php file.
// Your code starts here. require_once plugin_dir_path( __FILE__ ) ) . 'blocks/my-first-block.php';
See below screenshot for reference:
Now, Lets create a post and add our new block My First Block.
NOTE: Here we don’t need to build the JS or CSS files because of the Gutenberg block is created with the regular javascript functions. There is NO any JSX syntax. So, We dont need to build the dist directory. We can directly use our block.


Conclusion #Conclusion
In this article we learn how to create Gutenberg block boilerplate with create-guten-block, @wordpress/block, and wp scaffold block. You can setup your custom development environment or use any of the above tools.
In next article you’ll see How to develop a Gutenberg block in details?
from WordPress https://bit.ly/2ZZYZP4 via IFTTT
0 notes
Video
youtube
Hello, code guru’s welcome back.
In this video we will see how to upgrade Quasar application to latest version and also before wrapping up our environment setup module. We will go head and configure our IDE i.e VScode with eslint and vetur plugins. Finally this video concludes all the dev environment setup need for building application using Quasar
If you like more content from us please do consider supporting us on Patreon at https://www.patreon.com/codeguru
Please do not forget to provide your feedback or any topic suggestion in the below comments section.
You can also find us on Twitter : https://twitter.com/codeguru_io facebook : https://www.facebook.com/codeguru.io instagram : https://www.instagram.com/codeguru_io/ Reddit : https://www.reddit.com/r/codeguru_io/ Discord : https://discord.gg/sRsR86 Gitter : https://gitter.im/codeguru_io/community
0 notes
Text
Eslint Prettier Create React App Best Configuration Setup [2019]
youtube
Eslint Prettier Create React App VSCode Best Configuration Setup
Have you ever wanted to configure Eslint to work correctly with Prettier and your Create React App? If so in this video you will learn the best settings to do that.
Steps: 1.Install Eslint Globally npm i -g eslint
2. Open your create-react-app react project or create one by typing npx create-react-app name-of-project (needs npm 5.2+)
3. Initiate Eslint in your project: eslint --init (answer the questions)
4. Confirm installation of eslint-plugin-react
5. Leave this in your ESlint config:
"env": { "browser": true, "es6": true }, "extends": ["eslint:recommended"], "plugins": ["react"], "parserOptions": { "ecmaVersion": 2018 }, "rules": {}
6. Install eslint-config-react-app peer dependencies: npm install-peerdeps --dev eslint-config-react-app
7. Install prettier dependencies: npm i -D eslint-config-prettier eslint-plugin-prettier prettier
8. Configure Prettier through ESlint example:
{ "env": { "browser": true, "es6": true }, "extends": ["react-app", "prettier"], "plugins": ["react", "prettier"], "parserOptions": { "ecmaVersion": 2018 }, "rules": { "prettier/prettier": [ "error", { "printWidth": 80, "trailingComma": "es5", "semi": false, "jsxSingleQuote": true, "singleQuote": true, "useTabs": true } ] } }
9. Change your VScode settings
"eslint.autoFixOnSave": true
10. Check for conflicting rules with the following script in package.json:
{ "scripts": { "eslint-check": "eslint --print-config path/to/main.js | eslint-config-prettier-check" } }
The post Eslint Prettier Create React App Best Configuration Setup [2019] appeared first on CodingSrc.
from WordPress https://codingsrc.com/eslint-prettier-create-react-app-best-configuration-setup-2019/
0 notes
Text
Google App ScriptをTypeScriptとClass構文で書く - 環境導入
GASは本当に手軽で便利。ほんのちょっと自動化したい、でもDB立てて、サーバー立ててまでやるのもなぁ、ってときにその溝を埋めてくれる良いところに収まってる感じがしますね。特にGoogleスプレッドシートとの連携もしやすいからスプシを簡易DBとして見たててやるとけっこういろいろできちゃう。
そんな感じで職場の社内ツール的なものをGASで作ってたりするんですが、昨年後半にClasp経由でTypeScriptがサポートされたのでちゃんと書きなおしてみました(以前はWebpackでやっていました)。それが一段落したのでせっかくなのでその知見をご紹介しようと思います。
書いてたら長くなってしまったので、いくつかに分けます。まずは環境構築から。
TL;DR
GoogleAppScriptはClasp経由でローカルで開発できるぜ
ローカルで開発できるってことはGitが使えたり、静的��析も使えるぜ
TypeScriptにも対応してるのでいろんな恩恵があって最高だぜ
そんなことを実現するための設定を今回は紹介するぜ
なんでやるの?
まずなんでこの路線で開発するか、というポイントは
TypeScriptはES6な書き方ができる
ESLint(TSLint)、Prettierなども使える!
Class構文便利!
ちゃんと継承もできるんだぜ
TypeScriptの型サポートがあると書きやすい
TypeScriptがサポートされたから面倒なWebpackが要らなくなった
ES6による恩恵が一番大きいので、以前からWebpackでやっていた場合は大きな変化ではないですが、Clasp側でサポートされたことによって自前でビルドする手間もなくなったのが大きいですね。 特にWebpackは時に設定がややこしく、そこでつまる人も多いと聞くので脱WebpackしつつもES6の恩恵を受けれる環境ができあがったのが嬉しい限りです。
開発環境
まずなにはともあれClaspを入れます。これは通常Web上のスクリプトエディタでGASのコードを書いていくのではなく、ローカルのファイルとしてスクリプトを書けるようにしてくれるものです。 ローカルで扱えるというだけで様々な利点があります。
Gitが使える
バージョン管理が楽になる
つまりもちろんGitHubによる共同開発環境が持てる
ESLint(TSLint)、Prettierなどの静的解析によるフォーマット、リントが効く
間違いが減ったり、自動修正したり
好きなエディタが使える
捗る!
google/clasp: 🔗 Develop Apps Script projects locally.
ここでは詳細なClaspの導入、GASとの反映方法は割愛します。公式のREADMEやちょっとググればいろいろな導入記事が出てくると思いますのでそちらをご参照いただればすぐできると思います。
あ、ちなみにNode.jsも必須です。その導入もここでは触れません。
今回の開発で特殊な事情を加味して言及するとこんなディレクト構成になります
. ├── __tests__ │ └── 各種テスト用ファイル └── node_modules # ライブラリ格納ディレクトリ └── src │ ├── *.ts # これから作っていくTypeScriptファイル │ └── appscript.json # GASの設定ファイル ├── .clasp.json # claspの設定ファイル ├── .claspignore # clasp用のignoreファイル ├── .eslintrc.js # 後述するESLint用の設定ファイル ├── .gitignore ├── index.d.ts # 型定義ファイル └── package.json # プロジェクトの設定ファイル
とこんな感じですかね。テストは書かないんだったらないですが、せっかくローカルで開発するならテストも書きたいところです。 なので環境を整えた後はsrc/以下にガリガリ実装していく感じです。注意すべき点としてはGASの設定用のappscript.jsonはこのsrcディレクトリ内に置くことになるところです。
Linterとフォーマッターを導入する
いくつか選択肢はあると思いますが、今回は
ESLint経由でTypeScriptのLintをする
理由: TypeScript側が「LintはESLintを使ってくれよな」って言っている
ESLint内でPrettierによるフォーマットをかける
理由: Lint側とバッティングするルールがあるので上手く避ける
という方法で行きたいと思います。
一応TypeScriptでTSLintではなくESLintを推奨している経緯は
TypeScript Roadmap: January - June 2019 · Issue #29288 · Microsoft/TypeScript
のLintの項目、もしくはThe future of TypeScript on ESLint - ESLint - Pluggable JavaScript linterを参照していただければと思います。
ESLintでTypeScriptにLintをかける
yarn add --dev eslint yarn add --dev @typescript-eslint/eslint-plugin yarn add --dev @typescript-eslint/parser
で、ESLintとESLint経由でTypeScript対応するプラグインとパーサーを入れます。 そしたら.eslintrc.jsというルール設定のファイルを作って、
.eslintrc.js
module.exports = { parser: '@typescript-eslint/parser', plugins: ['@typescript-eslint'], }
と入れます。これが最小限の設定ですね。
これで.eslintr.js内にTypeScript用のLint設定も書いて設定ができます。
ESLintにPrettierも組み込む
ESLintの設定のいくつかはJS系の最有力フォーマッタであるPrettierと一部バッティングするルールがあります。 これが整合性が取れてないと、自動でPrettierのフォーマットとesLint --fixを連続してかけたりエディタの設定でFixOnSaveとかやってると矛盾ルールでハマります。
ということで個人的なオススメとして、eslint --fix内でPrettierをかける設定にするのが良いと思っています。またVSCodeなどでESLintのfixOnSave設定だけでキッチリPrettierもかかります。
具体的には
yarn add --dev prettier yarn add --dev eslint-plugin-prettier yarn add --dev eslint-config-prettier
eslint-plugin-prettierは.eslintrc.js内でPrettierの設定もできるようにするもの、eslint-config-prettierはESLint側のPrettierのフォーマットルールとバッティングするルールをオフにするものです。
となると、設定は
.eslintrc.js
module.exports = { root: true, parser: '@typescript-eslint/parser', parserOptions: { sourceType: 'module', }, plugins: [ '@typescript-eslint', 'prettier', ], extends: [ 'prettier', 'prettier/@typescript-eslint', ], rules: { 'prettier/prettier': ['error', { useTabs: false, // example }], 'no-var': 'error', // example '@typescript-eslint/camelcase': 'error' // example }, }
みたいな感じが最小になりますかね(Ruleに関してはサンプルで入れています。適宜カスタムしてください)。
このあたりのことはIntegrating with ESLint · Prettierを参照していただければわかりやすいかと思います。
もっと細かい設定
ここはオプショナルな設定ですが、用意されているルールなどを適用したい場合は、もうちょっと込み入ってきます。僕はStandard(JavaScript Standard Style)派なんですが、例えばそれを適用しようとするなら���standard/eslint-config-standardを使いますので、
yarn add --dev eslint-config-standard eslint-plugin-standard eslint-plugin-promise eslint-plugin-import eslint-plugin-node
として.eslintrc.jsのextendsに'standard'を加えます。Standardにはno-undefルール(定義されていないものに警告するルール)が入ってますので、GAS特有の関数(e.g. SpreadsheetApp)が警告されます。
.eslintrc.jsのglobalsに設定してあげればいいんですが、それなりの数があるのと思うので、selectnull/eslint-plugin-googleappsscriptを使ってガっと回避します。
ちなみにオブジェクト操作のライブラリUnderscore.jsや日付を扱うライブラリMoment.jsがGASでも用意されてますが、使う場合は同じようにグローバルな関数になるので、それは.eslintrc.jsのglobalsで設定していきます。
そうなるとこんな感じになります
.eslintrc.js
module.exports = { root: true, env: { 'googleappsscript/googleappsscript': true, }, globals: { // example Underscore: true, Moment: true }, parser: '@typescript-eslint/parser', parserOptions: { sourceType: 'module', }, plugins: [ 'googleappsscript', '@typescript-eslint', 'prettier', ], extends: [ 'standard', 'prettier', 'prettier/@typescript-eslint', ], rules: { // example 'prettier/prettier': ['error', { useTabs: false, }], 'no-var': 'error', '@typescript-eslint/camelcase': 'error' } }
ちなみに僕の場合、PrettierとESLintともにもっと細かくルール設定しています。 そして、Husky経由でGitのcommit時に自動でeslint --fixがかかるようになっています。 その辺のことは以前書いた記事をご参照ください。
LintとFormatをGitのコミット時に自動でかける方法 - Trial and Spiral
型定義の導入
これでようやく環境が整った! と思いきやまだあるんです。そうです型定義です。 ありがたいことに公式でGAS関数の型定義が用意されているのでサクっと入れます。
yarn add --dev @types/google-apps-script
これでGASの関数に関してはばっちり型サポートが有効になります。
GAS用ライブラリの型定義
GAS用ライブラリを導入した場合、多くはグローバル関数として使えるようになります。しかしローカルで開発するときはそんなことはわからないので、そんな関数の型は定義されてないぜ、っていう警告が出ます。 それを回避するためにindex.d.tsファイルを作って、例えばこんな感じに書きます。
index.d.ts
declare const Moment: { moment(arg?: any): any } declare const Underscore: { load(): any }
これは僕の中でまだ上手くいってない部分で苦肉の策です。MomentもUnderscoreも同名のJSライブラリが元になっていてすでに型定義ファイルが用意されています。使い方がちょっとだけ違うのでそこを上手く吸収しつつ、型定義をうまく流用できたらいいなあと思っています。
どなたか解決方法があったら教えていただけると嬉しいです。
そんな感じで長くなりましたが環境構築ひとまず完了です。 次回は実装編を書けたらいいなぁ。
from Trial and Spiral https://blog.solunita.net/lean-to-develop-google-app-script-with-typescript-class-setup/
0 notes
Text
VS Code productivity extensions with a missing peace of the puzzle
As a developer you've probably already met Visual Studio Code Microsoft's lightweight code editor. If you haven't, you definitely should try it. Today I'm going to share my VS extensions with a missing feature which I recently found - sharing extensions, themes and configuration. What happens if you step on a new machine? You have to customize all your key binding, download all your plugins and setup your theme preferences. And you probably want to sync that across all your devices. Keep reading to find out the sweet solution. Before that I will share all my productive plugins which make my day. They are separated by categories.
C# extensions
C# - Full IntelliSense for C#. A MUST for .NET developers
C# Extensions - Pretty nice addition to the C# extension. Providing quick scaffolding of classes, interfaces etc.
C# XML Documentation Comments - Most of the Visual Studio's users are very familiar with. Type "/// + TAB" and you get nice documentation for your classes and members.
.NET Core Test explorer - Browse, run and debug tests directly in the editor.
Nuget package manager - No need of explanation.
Git extensions
Git History - This extension gives you full feature Git client in the IDE. Search commits, merge and compare branches and more.
gitignore - Remove files from source code tracking from the file context menu.
GitLens - Track authors, dates directly in the file.
JavaScript extensions
TSLint - Analysis tool that checks TypeScript code for readability, maintainability, and functionality errors.
Babel JavaScript - Syntax highlighting for today's JavaScript.
Debugger for Chrome - Debug your JS app directly in the browser.
ESLint - Linting utility for JavaScript and JSX.
Npm IntelliSense - You get npm modules autocomplete in import statements.
IntelliCode for VS — Aset of capabilities that provide AI-assisted development. Still in preview, but worth trying.
Utilities extensions
REST client - Allows you to send HTTP request and review responses.
Path IntelliSense - Plugin that auto completes filenames.
VS Live Share - Real-time collaborative development.
Auto Close Tag - Automatically add HTML/XML close tag, same as Visual Studio IDE or Sublime Text does.
Auto Rename Tag - Auto rename paired HTML/XML tag.
VSCode great icons - File specific icons for improved visual grepping.
SQLTools - Execute queries, auto complete, bookmarks etc.
Docker - Adds syntax highlighting, commands, hover tips, and linting for Dockerfile and docker-compose files.
PHP IntelliSense - Advanced PHP IntelliSense.
More?
Cobalt2 theme
- Using Cobalt2 theme feels so good. In addition it's considered the best theme for your eye balls.

Settings sync
- This is the missing peace of the puzzle. There isn't default support of VS Code for this type of synchronization. This extension will save all your custom settings, themes and extensions. Whatever you switch PCs or just start with new one, setup is as quick as 5 minutes and you have your favorite extensions and settings synced. Reallyyy cool.

I hope you find the list useful. Will try to keep it up to date. If you find any interesting extensions worth mention don't hesitate to drop me a comment.
0 notes
Link
+++ :
https://medium.com/react-native-training/setup-continuous-integration-with-react-native-50ad2f6145f4
https://facebook.github.io/react-native/docs/getting-started.html
https://shift.infinite.red/getting-started-with-react-native-development-on-windows-90d85a72ae65
https://github.com/infinitered/ignite
https://www.decoide.org
https://marketplace.visualstudio.com/items?itemName=vsmobile.vscode-react-native
https://medium.com/react-native-training/vscode-for-react-native-526ec4a368ce
https://medium.com/@franzejr/how-to-use-eslint-in-react-native-ed9c53dde0d0
http://www.reactnativeexpress.com
https://facebook.github.io/react-native/docs/tutorial.html
https://hackr.io/tutorials/learn-react-native
http://www.reactnative.com/courses/
http://blog.creative-tim.com/web-design/best-way-start-learning-react-native/
https://hackernoon.com/learning-react-native-where-to-start-49df64cf14a2
0 notes
Text
My Favorite Front-End Development Extensions for Visual Studio Code
Visual Studio Code is one of the newest kids on the IDE “block” and it’s making a lot of noise. It’s taken a little while to gain traction, perhaps because it’s one of Microsoft’s few open source products, but it’s taken the open source community by storm. Developers who once swore their allegiance to Sublime Text 3 and Atom are slowly being converted by the power and simplicity of VS Code–not to mention its incredible library of extensions.
I began my own coding life on Sublime Text 3, moved to Atom, then PHPStorm, then after my subscription expired with JetBrains I thought I’d give VS Code a try. It continues to make my life easier and by doing so, makes me a better developer.
This introduction will take you from zero to hero, getting you up and running with VS Code, focusing specifically on my favorite front-end development extensions, making sure that every aspect of your workflow is covered.
Assumptions
I’m going to assume a few points for this article:
Your front-end development stack is not opinionated. I’m going to assume that at some point you will have the need for jQuery, ES6, React, Vue, PostCSS, or whatever floats your boat.
You’re using Git for version control.
You already have Node and NPM installed and setup correctly.
Some of the extensions listed below require some configuration outside of VS Code, I’ll let you know what does and doesn’t, but if you need any help, feel free to ask!
Installing
First things first, if you don’t already have VS Code installed, head over to Visual Studio Code’s website. VS Code is cross-platform so our configurations will work on Windows, Mac and Linux.
VS Code is also available as a Homebrew Cask package on Mac: brew cask install visual-studio-code
A step that I find a lot of tutorials often leave out is the ability to execute VS Code from the terminal. There are a few ways of doing this. If you already have a .bash_profile setup you can add this:
export PATH="$PATH:/Applications/Visual Studio Code.app/Contents/Resources/app/bin"
Or, for a more cross platform approach, hit the Command Palette shortcut: Shift + Command + P and type the word shell - this will give you an option called: Install code command in PATH - hit enter and you’re done. Now, you can launch files and folders anywhere from the terminal by typing: code path/to/file/or/dir
Linting
Lint your code–it’s the best way to stop errors before they cause you any undue stress!
ESLint
If you’re running the latest version of ECMA Script, then ESLint is for you. This extension integrates the ESLint pattern recognizer straight into VS Code and aids you with common mistakes that developers make with the new syntax. It does require that you have the NPM ESLint package installed either locally in your project or globally.
SASS Lint
For those of you who enjoy writing more programmatic Sass, Sass Lint provides you with an easy to use set of configurations for writing standards-compliant Sass.
JSHint
JS Hint is another great JavaScript Linter that aids you with logic, syntax and more, depending on your configuration.
TSLint
If you’re a TypeScript fan, then the TSLint extension is your best friend. With TypeScript being a precompiled language, you have full control over what the compiler lints for you as well as auto formatting options.
These extensions all offer Git friendly ways of managing custom / shared configurations between developers on your team namely in .eslintrc and .sass-lint.yml or .jshintrc
I’ve purposely left our HTML Linters here. Whereas I’ll use an extension like Beautify for formatting and tabbing my HTML according to an .editorconfig I find that HTML Linters perform quite poorly. They don’t consider semantics and tend to do a bad job of helping you with accessibility concerns. As the meaning of HTML can be relatively ambiguous, it’s better to use a set of tools that do smaller jobs.
To extend the HTML functionality in VS Code I use the following:
AutoClose Tag
It could use a bit of improvement, but I always liked Sublime Text 3’s auto closing tag functionality. The above mentioned extension will help you out with this in VS Code.
AutoRename Tag
This is another useful HTML extension which allows users to click inside an HTML element and rename it, while simultaneously renaming the closing tag.
Automation
I moved away from Grunt sometime ago, but coincidentally there don’t seem to be any Grunt extensions on the marketplace, at least not with enough traction to make much of an impact. The extensions below are mainly focused on Gulp and Webpack as they seem to be leading the race in the task management world right now.
Gulp Snippets
This extension allows you to use the Command Palette in VS Code for easily injecting useful Gulp configurations into your Gulpfile.js; a must have if you’re still a little shaky about setting up Gulp.
Webpack
Setting up Webpack can be one of the scariest tasks a developer has to commit to. The Webpack extension for VS Code takes the fear out of it by providing you with a minimal webpack.config.js to start your project. If you’re a progress person, and you don’t like being left in the dark while your Terminal thinks about things, then the Webpack Progress extension is for you. It provides a nice progress bar for when Webpack is doing its thing.
Git
One of the most powerful extensions for version control in VS Code is:
Git Lens
For newcomers and advanced users alike, Git Lens is powerhouse. It makes an easy job of making Git and its many intricacies more manageable and visual. I’ve enjoyed using it so much that other than using the Terminal to add, commit, branch and push, I’ve completely scrapped Git GUI’s.
Almost every setting is customizable. Git Lens provides real-time feedback of Git data while you’re coding. Want to know who wrote that function that isn’t working? Want to see how much the code has changed over the last few commits? Not sure how to handle a merge conflict in a file that you never wrote, or have little context of? Git Lens handles this all for you.
Language Support and Intellisense
Where as other IDEs have full on support for the majority of languages, VS Code leaves it up to you for the most part. As and when you require it, you can add Language Support for whatever technology you’re dealing with, out-of-the-box HTML and CSS, as well as JavaScript are provided, but if you have need for Python it’s just a click away. In my workflow I use Python every so often, but Node was a big thing for me.
Intellisense essentially takes care of completions. You can hit tab or hover over a file path, for instance, and VS Code will do the hard work for you.
Babel ES6 / ES7
If you’re one of those people that loves using new technologies in your workflow and you’re crazy about the new edition of JavaScript then the Babel ES6 / ES7 linter is for you.
File System Path
This is a brilliant extension that autocompletes / suggests file paths while you’re typing. If you come from a PHPStorm background, you’ll know the feeling!
NPM
A great extension when using require() or import {} in Node.js, this extension autocompletes file paths to Node Modules.
CSS Class Names
This is a very useful extension for auto completing CSS class names defined in your linked CSS files. If you’re a Bootstrap, Foundation or just a framework fan in general, this will save you a lot of time!
SCSS
For the precompiled CSS fans, this extension makes intellisense possible for imports, mixins, includes and functions in SCSS.
PostCSS
If you’ve yet to come across PostCSS then you’re missing out. It’s an advanced and extremely forward thinking set of plugins for CSS that makes CSS a lot more powerful. I use two PostCSS extensions: Syntax and Sorting; one enables syntax support for new CSS Level 4 modules like nesting and the other allows me to sort CSS properties alphabetically.
Vue
While not really Intellisense alone this is a great extension for Vue.js development. It’s an all-in-one solution for adding linting, intellisense, and formatting to Vue.js development and already includes some of the extensions I've mentioned above.
React / React Native
This is a full solution for developing React Native applications. By default, VSCode has a ton of support built in for React.
Accessibility and Health
You spend a lot of time in front of your IDE, so making sure it’s easy on the eyes and legible is just as important as any other aspect I’ve mentioned.
VS Code Icons
First, get some folder/file icons so that you can easily distinguish the files you’re using.
Cobalt 2 Theme from Wes Bos
Cobalt 2 is not too dark, not too light, and has great contrast for an editor theme. It also has a corresponding colour setup for ZSH Terminals.
Dash
If you haven’t heard of Dash, it should be your new best friend. Dash is an API documentation app for Mac, but this extension plugs right into VS Code. By clicking any method, it will open up Dash to the respective page. The same plugin supports Zeal which is a Windows and Linux alternative.
Formatting
Beautify
As I mentioned earlier, the Beautify extension is a great tool if you’re adamant about code formatting and editor standardization. It also allows you to set a .jsbeautifyrc file which you can commit to Git repos for collaboration. Beautify can also be used as a replacement for .editorconfig if you don’t support it. Beautify formats JS, CSS, Sass, JSON and HTML.
EditorConfig
More and more IDEs are providing support for EditorConfig, which allows you to include an .editorconfig in your project repos. This gives your fellow developers IDEs and linters to read from one file to standardize tabbing and spacing as well as line ending across projects.
Prettier
For a more robust solution, try out Prettier. Prettier follows the same configuration paradigm as ESLint, providing you with a .prettierrc file which an be committed to repositories. It will also read from the .editorconfig file if it exists. In fact you can get rid of ESLint and Sass Lint and use Prettier as your one stop solution. It has its own extensions for EsLint, StyleLint and more.
Terminal
I recently moved over to ZSH which has completely transformed my terminal experience. Whilst not being a direct extension of VS Code, it can be integrated through the Terminal pane. I had to do quite a bit of configuration to get it working on Mac, especially with colors and themes.
ZSH features functionality like tab completion for directories, files, Git branches and more. You can read more about setting up ZSH on the Github repo or leave me a message in the comments below if you’d like to learn more.
Debugging
Visual Studio Code comes with Debugging JavaScript right out of the box. You can take it a step further using the following extensions:
Debugger for Chrome
This extension allows a direct sync between the VS Code Debugger and Chrome Developer Tools allowing you to set breakpoints and jump straight into the code.
Conclusion
That about wraps up my extensions setup for Visual Studio Code–which are your personal favorites? Before I go though, don’t forget that coding should be fun; you may need some tunes to help you along. The Spotify extension adds a tiny inline media player to the VS Code UI.
More Visual Studio Code on Tuts+
Visual Studio
Visual Studio Code: My New Favorite Code Editor
Adi Purdila
Visual Studio Code
Essential Extensions for Visual Studio Code
Craig Campbell
via Envato Tuts+ Code http://ift.tt/2oeCvWZ
0 notes
Link
A lot has changed with Salesforce developer tooling over the past few years. As I mentioned at TrailheaDX a few months back, we have shipped hundreds of releases of our developer tools since they were first released less than three years ago. If you haven’t tried out the Salesforce Extensions for Visual Studio Code in a while, it might be a good time to jump back in. In this post, I’ll share some of the latest updates to the VS Code tools as well as some updates on other Salesforce IDEs. Develop against any org Many of you may not have realized, but you can use VS Code to work against all orgs – not just scratch orgs. You can develop against your sandboxes or DE orgs just as you have always done with other tools. In the past year we have released many features that make this experience great. Org management Several releases back we introduced UI for authorizing, creating, and switching orgs in your project. This makes it easier for you to work with multiple orgs on the same project or quickly create a scratch org to test a new feature. Simply click on the Org Browser button in the menu bar (shown with the red arrow) and you will see the menu for the various org actions. Deploy On Save Many developers prefer to have their work save immediately to their org instead of doing deployments at various stages. This can be helpful when working on UI components where you need to test out various styling changes or behaviors or while you are trying to debug some behavior in an Apex class. Enabling Deploy on Save in your project is straightforward: simply update your .vscode/settings.json file with the config "salesforcedx-vscode-core.push-or-deploy-on-save.enabled": true. Going forward, when you save a file it will be automatically deployed to the org. It will also queue up deployments in case a deployment is currently running and batch the next deployment if multiple saves have occurred before the current deployment. Org Browser When working directly against your org you need a way to retrieve the metadata you are working with. You have always been able to use the CLI or do a retrieve if you have a package.xml file, but there hasn’t been a way to retrieve metadata from the UI in Visual Studio Code. I am happy to share that as of today, you can now use the Org Browser tab to browse and retrieve metadata from your org. Once enabled, you can browse through all the metadata in your org and click on the button next to each metadata item to retrieve the source locally. This is just the first release and we will continue to enhance this feature with more capabilities such as the ability to retrieve all metadata of the same type or create a package.xml file. Let us know what you think by commenting on this Github Issue or creating a new issue if you encounter a bug. NOTE: To enable this feature you need to go to the VS Code settings and enable Org Browser. Also, for now this feature only works against non-scratch orgs – it will automatically hide when you are authenticated against scratch orgs. Diff against org It is often the case in your development process that you need to understand what has changed in an org or with your local code. This could be because you are working against multiple orgs that are at different stages in the release cycle or that you make changes to metadata in the org UI while also doing work on your local machine. In order to better understand where changes have occurred, we are introducing the ability to diff source changes against your org. Initially, this feature will work with Lightning Web Components, Aura, Apex, and Visualforce files, but we will expand to more metadata over time. Additionally, in the first preview release you will only be able to diff single files, but that is something we hope to improve later on as well. This feature will be released in the next week or two, so keep an eye out. Lightning Web Components Visual Studio Code is already the most popular editor amongst web developers today. Developers love it because it offers a rich set of features such as code completion, refactoring, and more that make writing HTML, Javascript, and CSS enjoyable and productive. In addition to the built-in features that make VS Code amazing, there are hundreds of great extensions available from the community that will let you tailor VS Code to meet your exact needs. Finally, Salesforce ships an extension specifically for LWC development that adds many great features specific to developing LWC on the Salesforce Platform. HTML code completions When editing the HTML of a Lightning web component, you will see full code completion for elements, attributes, and values that include inline documentation. Javascript code completions For LWC Javascript files you get code completion for your org’s schema, static resources, custom labels, and other LWC components. ESLint integration LWC provides out of the box support for ESLint to help ensure you write compatible and maintainable code. You will see error messages when you write unsupported code that will cause errors when running in your org and you will see warnings that will help ensure your code is consistent and maintainable. Lightning Explorer The Lightning Explorer allows you to browse through all UI components in your project — LWC and Aura — as well as the build in components. You can browse the properties of the components and for the global components you can click to open the documentation for each item in the Component Library making it easy to find documentation and samples for building your LWC apps. NOTE: This feature is in preview so to enable it you will need to enable the “Lightning Explorer” option in Settings. General productivity Apex refactoring Refactoring is a common task for any developer as you maintain your application. VS Code now supports several ways of refactoring and quick-fixes for your Apex code such as rename variable, extract local variable, extract constant, and declare missing methods. Simply right-click on variables or methods and you will see the menu to perform various refactorings. Code formatting Keeping your code consistent between various developers makes maintaining your application significantly easy and helps new team members more easily read unfamiliar code. At Salesforce we have adopted Prettier in many of our projects and are standardizing on Prettier for Salesforce Platform development. We recently even added Prettier to the Developer Console. Prettier now supports all Salesforce languages and frameworks such as Aura, LWC, and even Apex. Prettier will help you keep your code consistent and avoid all those arguments about code formatting based on personal preferences. See the documentation on how to setup Prettier with your project today or just create a new project using the Salesforce CLI and it will include the default Prettier configuration for Salesforce. Coming soon I have written before about how we keep our roadmap up to date on Github. We strongly believe that developer tools are best built in the open with the end-users involved in providing feedback at every step of the way. If you haven’t commented on a Github issue or created a feature request I would encourage you to do so. We prioritize what gets built by the feedback we get from our customers. There are a few exciting features that we are currently working on that will make your development experience with VS Code even better. Conflict detection on Deploy/Retrieve A common problem when developing in a Sandbox is that multiple developers or admins can be working on the same metadata or code. This inevitably leads to conflicts. While we believe the best way to deal with this is to use source tracking with a version control system like Git, we understand that not every team is ready to adopt that model yet. For this reason, we are currently working on tools that will detect conflicts when you do a deploy or retrieve from your org. Initially this feature will work against Apex, LWC, Aura, and Visualforce but we will expand it to work against all metadata in the future. We aim to ship the first of this feature in the next few months, but please let us know what you would like to see and how you would use this feature at your company by commenting on this Github Issue. SOQL Language features Today, when writing SOQL in VS Code we don’t provide code completion for other advanced language features that developers have come to expect from modern tooling. To remedy this, we are currently working on writing a full-featured SOQL Language Server that will provide code completion for SOQL keywords, objects, and fields to make it much easier to write queries both inside of Apex classes or anonymous files or by itself in a .soql file. You can see the spec and leave feedback on this Github Issue. Additionally, we aim to deliver more advanced SOQL tooling sometime in the future to help you more easily view results and work with data inside of VS Code. More details about those future tools can be found here. Performance updates One of the common complaints about using VS Code and the Salesforce CLI is that it is sometimes slow compared to other tools. One of the reasons for this is that long ago we made the decision to standardize all operations on the Metadata API. There are some benefits to this in terms of consistency, but there are also performance implications. The Metadata API is subject to queues in operations and at times the operations can back up and cause slow deployments. We have several efforts underway to improve this — one of which is working to make the Metadata API faster and more consistent. The other is on the tooling side. We are currently working on changing how single metadata operations for deploy/retrieve and push/pull are handled. Instead of using the Metadata API for these actions, we will use the Tooling API when there is only a single metadata type involved. While this won’t solve every performance issue, this will solve a big one when developers are using Deploy on Save – essentially each save will take less than a few hundred milliseconds so every save when doing Deploy on Save will generally use the Tooling API and feel basically instantaneous. I know this won’t solve every issue, so please continue to let us know how these issues are impacting you by commenting on this Github issue or by creating a new issue. LWC Local Development At TrailheaDX we teased LWC Local Development. This new feature will allow you to render your Lightning Web Components on your local machine without deploying them to the org. This means your time from saving to seeing the results will be almost instant. LWC Local Development will allow you to connect to org data through LDS or by calling Apex classes and will eventually support virtually every aspect of UI development related to LWC entirely on your local machine. You will see rich error messages when you make a mistake so you can quickly make the needed fixes without having to wait for a deployment to fail. The aim here is to dramatically increase the speed at which developers can write, test, and debug the UI applications. We will ship the beta of LWC Local Development sometime in the next few months. MavensMate Finally, I wanted to discuss MavensMate. MavensMate has been a great utility for the Salesforce developer community and we all appreciate the work that Joe Ferraro and others have put into the tool over the years. As you probably know, Joe discontinued working on MavensMate more than two years ago and recommended everyone migrate to the Salesforce Extensions for VS Code. Most people have already made the migration, but we know many of you were still using MavensMate. If you were one of those people still using MavensMate, you noticed last week that it completely stopped working. The reason for this is because a serious security vulnerability was found in the software. Joe and the other project maintainers rightfully decided that rather than leave the users of this software — and the organizations where they work — vulnerable to a security compromise, that the correct course of action would be to disable the software entirely. They reached out to the Salesforce security team and disclosed the vulnerability. Because there was no way to fix the issue remotely or push out an update to MavensMate automatically, they concluded the only way to protect users was to revoke the application’s access to Salesforce APIs. They worked with Salesforce security to disable the Connected App and revoke all security tokens. This had the consequence of completely and permanently disabling MavensMate, but was the only way to ensure that users were secure. I want to thank Joe for creating MavensMate and for the people that have been keeping it going for the past few years. MavensMate was an invaluable tool that pushed the Salesforce Developer platform forward. I also want to thank Joe and Charles Jonas for responsibility disclosing the issue to our security team and working to ensure that our mutual users were kept safe and secure. For those of you that were still using MavensMate, we hope that you will find the Salesforce Extensions for Visual Studio Code to be a productive replacement. I would encourage you to try it out, even if you have before. If there is anything you think is lacking, please let us know by opening a feature request on Github. Force.com IDE As a reminder, if you are still using the Force.com IDE, that product will be complete discontinued in about three months on October 12, 2019. We will no longer provide support or any updates after that date. Additionally, the download links and documentation will be taken offline at that time. I highly recommend starting your transition to the Salesforce Extensions for VS Code as soon as possible. You can find a guide on migrating from the Force.com IDE to VS Code on our docs site. As always, please continue to let us know what we can do to help you be more productive on the Salesforce Platform and thanks for reading!
0 notes
Photo

React with TypeScript: Best Practices
React and TypeScript are two awesome technologies used by a lot of developers these days. Knowing how to do things can get tricky, and sometimes it's hard to find the right answer. Not to worry. We've put together the best practices along with examples to clarify any doubts you may have.
Let's dive in!
How React and TypeScript Work Together
Before we begin, let's revisit how React and TypeScript work together. React is a "JavaScript library for building user interfaces", while TypeScript is a "typed superset of JavaScript that compiles to plain JavaScript." By using them together, we essentially build our UIs using a typed version of JavaScript.
The reason you might use them together would be to get the benefits of a statically typed language (TypeScript) for your UI. This means more safety and fewer bugs shipping to the front end.
Does TypeScript Compile My React Code?
A common question that’s always good to review is whether TypeScript compiles your React code. The way TypeScript works is similar to this interaction:
TS: "Hey, is this all your UI code?" React: "Yup!" TS: "Cool! I'm going to compile it and make sure you didn't miss anything." React: "Sounds good to me!"
So the answer is yes, it does! But later, when we cover the tsconfig.json settings, most of the time you'll want to use "noEmit": true. What this means is TypeScript will not emit JavaScript out after compilation. This is because typically, we're just utilizing TS to do our TypeScript.
The output is handled, in a CRA setting, by react-scripts. We run yarn build and react-scripts bundles the output for production.
To recap, TypeScript compiles your React code to type-check your code. It doesn’t emit any JavaScript output (in most scenarios). The output is still similar to a non-TypeScript React project.
Can TypeScript Work with React and webpack?
Yes, TypeScript can work with React and webpack. Lucky for you, the official TypeScript Handbook has a guide on that.
Hopefully, that gives you a gentle refresher on how the two work together. Now, on to best practices!
Best Practices
We've researched the most common questions and put together this handy list of the most common use cases for React with TypeScript. This way, you can follow best practices in your projects by using this article as a reference.
Configuration
One of the least fun, yet most important parts of development is configuration. How can we set things up in the shortest amount of time that will provide maximum efficiency and productivity? We'll discuss project setup including:
tsconfig.json
ESLint
Prettier
VS Code extensions and settings.
Project Setup
The quickest way to start a React/TypeScript app is by using create-react-app with the TypeScript template. You can do this by running:
npx create-react-app my-app --template typescript
This will get you the bare minimum to start writing React with TypeScript. A few noticeable differences are:
the .tsx file extension
the tsconfig.json
the react-app-env.d.ts
The tsx is for "TypeScript JSX". The tsconfig.json is the TypeScript configuration file, which has some defaults set. The react-app-env.d.ts references the types of react-scripts, and helps with things like allowing for SVG imports.
tsconfig.json
Lucky for us, the latest React/TypeScript template generates tsconfig.json for us. However, they add the bare minimum to get started. We suggest you modify yours to match the one below. We've added comments to explain the purpose of each option as well:
{ "compilerOptions": { "target": "es5", // Specify ECMAScript target version "lib": [ "dom", "dom.iterable", "esnext" ], // List of library files to be included in the compilation "allowJs": true, // Allow JavaScript files to be compiled "skipLibCheck": true, // Skip type checking of all declaration files "esModuleInterop": true, // Disbles namespace imports (import * as fs from "fs") and enables CJS/AMD/UMD style imports (import fs from "fs") "allowSyntheticDefaultImports": true, // Allow default imports from modules with no default export "strict": true, // Enable all strict type checking options "forceConsistentCasingInFileNames": true, // Disallow inconsistently-cased references to the same file. "module": "esnext", // Specify module code generation "moduleResolution": "node", // Resolve modules using Node.js style "resolveJsonModule": true, // Include modules imported with .json extension "isolatedModules": true, // Transpile each file as a separate module "noEmit": true, // Do not emit output (meaning do not compile code, only perform type checking) "jsx": "react" // Support JSX in .tsx files "sourceMap": true, // *** Generate corrresponding .map file *** "declaration": true, // *** Generate corresponding .d.ts file *** "noUnusedLocals": true, // *** Report errors on unused locals *** "noUnusedParameters": true, // *** Report errors on unused parameters *** "experimentalDecorators": true // *** Enables experimental support for ES decorators *** "incremental": true // *** Enable incremental compilation by reading/writing information from prior compilations to a file on disk *** "noFallthroughCasesInSwitch": true // *** Report errors for fallthrough cases in switch statement *** }, "include": [ "src/**/*" // *** The files TypeScript should type check *** ], "exclude": ["node_modules", "build"] // *** The files to not type check *** }
The additional recommendations come from the [react-typescript-cheatsheet community](https://ift.tt/2ZxLWl2) and the explanations come from the Compiler Options docs in the Official TypeScript Handbook. This is a wonderful resource if you want to learn about other options and what they do.
ESLint/Prettier
In order to ensure that your code follows the rules of the project or your team, and the style is consistent, it's recommended you set up ESLint and Prettier. To get them to play nicely, follow these steps to set it up.
Install the required dev dependencies:
yarn add eslint @typescript-eslint/parser @typescript-eslint/eslint-plugin eslint-plugin-react --dev
Create a .eslintrc.js file at the root and add the following:
module.exports = { parser: '@typescript-eslint/parser', // Specifies the ESLint parser extends: [ 'plugin:react/recommended', // Uses the recommended rules from @eslint-plugin-react 'plugin:@typescript-eslint/recommended', // Uses the recommended rules from @typescript-eslint/eslint-plugin ], parserOptions: { ecmaVersion: 2018, // Allows for the parsing of modern ECMAScript features sourceType: 'module', // Allows for the use of imports ecmaFeatures: { jsx: true, // Allows for the parsing of JSX }, }, rules: { // Place to specify ESLint rules. Can be used to overwrite rules specified from the extended configs // e.g. "@typescript-eslint/explicit-function-return-type": "off", }, settings: { react: { version: 'detect', // Tells eslint-plugin-react to automatically detect the version of React to use }, }, };
Add Prettier dependencies:
yarn add prettier eslint-config-prettier eslint-plugin-prettier --dev
Create a .prettierrc.js file at the root and add the following:
module.exports = { semi: true, trailingComma: 'all', singleQuote: true, printWidth: 120, tabWidth: 4, };
Update the .eslintrc.js file:
module.exports = { parser: '@typescript-eslint/parser', // Specifies the ESLint parser extends: [ 'plugin:react/recommended', // Uses the recommended rules from @eslint-plugin-react 'plugin:@typescript-eslint/recommended', // Uses the recommended rules from the @typescript-eslint/eslint-plugin + 'prettier/@typescript-eslint', // Uses eslint-config-prettier to disable ESLint rules from @typescript-eslint/eslint-plugin that would conflict with prettier + 'plugin:prettier/recommended', // Enables eslint-plugin-prettier and displays prettier errors as ESLint errors. Make sure this is always the last configuration in the extends array. ], parserOptions: { ecmaVersion: 2018, // Allows for the parsing of modern ECMAScript features sourceType: 'module', // Allows for the use of imports ecmaFeatures: { jsx: true, // Allows for the parsing of JSX }, }, rules: { // Place to specify ESLint rules. Can be used to overwrite rules specified from the extended configs // e.g. "@typescript-eslint/explicit-function-return-type": "off", }, settings: { react: { version: 'detect', // Tells eslint-plugin-react to automatically detect the version of React to use }, }, };
These recommendations come from a community resource written called "Using ESLint and Prettier in a TypeScript Project" by Robert Cooper. If you visit his blog, you can read more about the "why" behind these rules and configurations.
VSCode Extensions and Settings
We've added ESLint and Prettier and the next step to improve our DX is to automatically fix/prettify our code on save.
First, install the ESLint extension for VSCode. This will allow ESLint to integrate with your editor seamlessly.
Next, update your Workspace settings by adding the following to your .vscode/settings.json:
This will allow VS Code to work its magic and fix your code when you save. It's beautiful!
These suggestions also come from the previously linked article "Using ESLint and Prettier in a TypeScript Project" by Robert Cooper.
The post React with TypeScript: Best Practices appeared first on SitePoint.
by JavaScript Joe via SitePoint https://ift.tt/3aaCBVQ
0 notes
Video
youtube
Eslint Prettier Create React App VSCode Best Configuration Setup Have you ever wanted to configure Eslint to work correctly with Prettier and your Create React App? If so in this video you will learn the best settings to do that. Steps: 1. Install Eslint Globally npm i -g eslint 2. Open your create-react-app react project or create one by typing npx create-react-app name-of-project (needs npm 5.2+) 3. Initiate Eslint in your project: eslint --init (answer the questions) 4. Confirm installation of eslint-plugin-react 5. Leave this in your ESlint config: "env": { "browser": true, "es6": true }, "extends": ["eslint:recommended"], "plugins": ["react"], "parserOptions": { "ecmaVersion": 2018 }, "rules": {} 6. Install eslint-config-react-app peer dependencies: npm install-peerdeps --dev eslint-config-react-app 7. Install prettier dependencies: npm i -D eslint-config-prettier eslint-plugin-prettier prettier 8. Configure Prettier through ESlint example: { "env": { "browser": true, "es6": true }, "extends": ["react-app", "prettier"], "plugins": ["react", "prettier"], "parserOptions": { "ecmaVersion": 2018 }, "rules": { "prettier/prettier": [ "error", { "printWidth": 80, "trailingComma": "es5", "semi": false, "jsxSingleQuote": true, "singleQuote": true, "useTabs": true } ] } } 9. Change your VScode settings "eslint.autoFixOnSave": true 10. Check for conflicting rules with the following: { "scripts": { "eslint-check": "eslint --print-config path/to/main.js | eslint-config-prettier-check" } } by CodingSrc
0 notes
Link
A lot has changed with Salesforce developer tooling over the past few years. As I mentioned at TrailheaDX a few months back, we have shipped hundreds of releases of our developer tools since they were first released less than three years ago. If you haven’t tried out the Salesforce Extensions for Visual Studio Code in a while, it might be a good time to jump back in. In this post, I’ll share some of the latest updates to the VS Code tools as well as some updates on other Salesforce IDEs. Develop against any org Many of you may not have realized, but you can use VS Code to work against all orgs – not just scratch orgs. You can develop against your sandboxes or DE orgs just as you have always done with other tools. In the past year we have released many features that make this experience great. Org management Several releases back we introduced UI for authorizing, creating, and switching orgs in your project. This makes it easier for you to work with multiple orgs on the same project or quickly create a scratch org to test a new feature. Simply click on the Org Browser button in the menu bar (shown with the red arrow) and you will see the menu for the various org actions. Deploy On Save Many developers prefer to have their work save immediately to their org instead of doing deployments at various stages. This can be helpful when working on UI components where you need to test out various styling changes or behaviors or while you are trying to debug some behavior in an Apex class. Enabling Deploy on Save in your project is straightforward: simply update your .vscode/settings.json file with the config "salesforcedx-vscode-core.push-or-deploy-on-save.enabled": true. Going forward, when you save a file it will be automatically deployed to the org. It will also queue up deployments in case a deployment is currently running and batch the next deployment if multiple saves have occurred before the current deployment. Org Browser When working directly against your org you need a way to retrieve the metadata you are working with. You have always been able to use the CLI or do a retrieve if you have a package.xml file, but there hasn’t been a way to retrieve metadata from the UI in Visual Studio Code. I am happy to share that as of today, you can now use the Org Browser tab to browse and retrieve metadata from your org. Once enabled, you can browse through all the metadata in your org and click on the button next to each metadata item to retrieve the source locally. This is just the first release and we will continue to enhance this feature with more capabilities such as the ability to retrieve all metadata of the same type or create a package.xml file. Let us know what you think by commenting on this Github Issue or creating a new issue if you encounter a bug. NOTE: To enable this feature you need to go to the VS Code settings and enable Org Browser. Also, for now this feature only works against non-scratch orgs – it will automatically hide when you are authenticated against scratch orgs. Diff against org It is often the case in your development process that you need to understand what has changed in an org or with your local code. This could be because you are working against multiple orgs that are at different stages in the release cycle or that you make changes to metadata in the org UI while also doing work on your local machine. In order to better understand where changes have occurred, we are introducing the ability to diff source changes against your org. Initially, this feature will work with Lightning Web Components, Aura, Apex, and Visualforce files, but we will expand to more metadata over time. Additionally, in the first preview release you will only be able to diff single files, but that is something we hope to improve later on as well. This feature will be released in the next week or two, so keep an eye out. Lightning Web Components Visual Studio Code is already the most popular editor amongst web developers today. Developers love it because it offers a rich set of features such as code completion, refactoring, and more that make writing HTML, Javascript, and CSS enjoyable and productive. In addition to the built-in features that make VS Code amazing, there are hundreds of great extensions available from the community that will let you tailor VS Code to meet your exact needs. Finally, Salesforce ships an extension specifically for LWC development that adds many great features specific to developing LWC on the Salesforce Platform. HTML code completions When editing the HTML of a Lightning web component, you will see full code completion for elements, attributes, and values that include inline documentation. Javascript code completions For LWC Javascript files you get code completion for your org’s schema, static resources, custom labels, and other LWC components. ESLint integration LWC provides out of the box support for ESLint to help ensure you write compatible and maintainable code. You will see error messages when you write unsupported code that will cause errors when running in your org and you will see warnings that will help ensure your code is consistent and maintainable. Lightning Explorer The Lightning Explorer allows you to browse through all UI components in your project — LWC and Aura — as well as the build in components. You can browse the properties of the components and for the global components you can click to open the documentation for each item in the Component Library making it easy to find documentation and samples for building your LWC apps. NOTE: This feature is in preview so to enable it you will need to enable the “Lightning Explorer” option in Settings. General productivity Apex refactoring Refactoring is a common task for any developer as you maintain your application. VS Code now supports several ways of refactoring and quick-fixes for your Apex code such as rename variable, extract local variable, extract constant, and declare missing methods. Simply right-click on variables or methods and you will see the menu to perform various refactorings. Code formatting Keeping your code consistent between various developers makes maintaining your application significantly easy and helps new team members more easily read unfamiliar code. At Salesforce we have adopted Prettier in many of our projects and are standardizing on Prettier for Salesforce Platform development. We recently even added Prettier to the Developer Console. Prettier now supports all Salesforce languages and frameworks such as Aura, LWC, and even Apex. Prettier will help you keep your code consistent and avoid all those arguments about code formatting based on personal preferences. See the documentation on how to setup Prettier with your project today or just create a new project using the Salesforce CLI and it will include the default Prettier configuration for Salesforce. Coming soon I have written before about how we keep our roadmap up to date on Github. We strongly believe that developer tools are best built in the open with the end-users involved in providing feedback at every step of the way. If you haven’t commented on a Github issue or created a feature request I would encourage you to do so. We prioritize what gets built by the feedback we get from our customers. There are a few exciting features that we are currently working on that will make your development experience with VS Code even better. Conflict detection on Deploy/Retrieve A common problem when developing in a Sandbox is that multiple developers or admins can be working on the same metadata or code. This inevitably leads to conflicts. While we believe the best way to deal with this is to use source tracking with a version control system like Git, we understand that not every team is ready to adopt that model yet. For this reason, we are currently working on tools that will detect conflicts when you do a deploy or retrieve from your org. Initially this feature will work against Apex, LWC, Aura, and Visualforce but we will expand it to work against all metadata in the future. We aim to ship the first of this feature in the next few months, but please let us know what you would like to see and how you would use this feature at your company by commenting on this Github Issue. SOQL Language features Today, when writing SOQL in VS Code we don’t provide code completion for other advanced language features that developers have come to expect from modern tooling. To remedy this, we are currently working on writing a full-featured SOQL Language Server that will provide code completion for SOQL keywords, objects, and fields to make it much easier to write queries both inside of Apex classes or anonymous files or by itself in a .soql file. You can see the spec and leave feedback on this Github Issue. Additionally, we aim to deliver more advanced SOQL tooling sometime in the future to help you more easily view results and work with data inside of VS Code. More details about those future tools can be found here. Performance updates One of the common complaints about using VS Code and the Salesforce CLI is that it is sometimes slow compared to other tools. One of the reasons for this is that long ago we made the decision to standardize all operations on the Metadata API. There are some benefits to this in terms of consistency, but there are also performance implications. The Metadata API is subject to queues in operations and at times the operations can back up and cause slow deployments. We have several efforts underway to improve this — one of which is working to make the Metadata API faster and more consistent. The other is on the tooling side. We are currently working on changing how single metadata operations for deploy/retrieve and push/pull are handled. Instead of using the Metadata API for these actions, we will use the Tooling API when there is only a single metadata type involved. While this won’t solve every performance issue, this will solve a big one when developers are using Deploy on Save – essentially each save will take less than a few hundred milliseconds so every save when doing Deploy on Save will generally use the Tooling API and feel basically instantaneous. I know this won’t solve every issue, so please continue to let us know how these issues are impacting you by commenting on this Github issue or by creating a new issue. LWC Local Development At TrailheaDX we teased LWC Local Development. This new feature will allow you to render your Lightning Web Components on your local machine without deploying them to the org. This means your time from saving to seeing the results will be almost instant. LWC Local Development will allow you to connect to org data through LDS or by calling Apex classes and will eventually support virtually every aspect of UI development related to LWC entirely on your local machine. You will see rich error messages when you make a mistake so you can quickly make the needed fixes without having to wait for a deployment to fail. The aim here is to dramatically increase the speed at which developers can write, test, and debug the UI applications. We will ship the beta of LWC Local Development sometime in the next few months. MavensMate Finally, I wanted to discuss MavensMate. MavensMate has been a great utility for the Salesforce developer community and we all appreciate the work that Joe Ferraro and others have put into the tool over the years. As you probably know, Joe discontinued working on MavensMate more than two years ago and recommended everyone migrate to the Salesforce Extensions for VS Code were released. Most people have already made the migration, but we know many of you were still using MavensMate. If you were one of those people still using MavensMate, you noticed last week that it completely stopped working. The reason for this is because a serious security vulnerability was found in the software. Joe and the other project maintainers rightfully decided that rather than leave the users of this software — and the organizations where they work — vulnerable to a security compromise, that the correct course of action would be to disable the software entirely. They reached out to the Salesforce security team and disclosed the vulnerability. Because there was no way to fix the issue remotely or push out an update to MavensMate automatically, they concluded the only way to protect users was to revoke the application’s access to Salesforce APIs. They worked with Salesforce security to disable the Connected App and revoke all security tokens. This had the consequence of completely and permanently disabling MavensMate, but was the only way to ensure that users were secure. I want to thank Joe for creating MavensMate and for the people that have been keeping it going for the past few years. MavensMate was an invaluable tool that pushed the Salesforce Developer platform forward. I also want to thank Joe and Charles Jonas for responsibility disclosing the issue to our security team and working to ensure that our mutual users were kept safe and secure. For those of you that were still using MavensMate, we hope that you will find the Salesforce Extensions for Visual Studio Code to be a productive replacement. I would encourage you to try it out, even if you have before. If there is anything you think is lacking, please let us know by opening a feature request on Github. Force.com IDE As a reminder, if you are still using the Force.com IDE, that product will be complete discontinued in about three months on October 12, 2019. We will no longer provide support or any updates after that date. Additionally, the download links and documentation will be taken offline at that time. I highly recommend starting your transition to the Salesforce Extensions to VS Code as soon as possible. You can find a the guide on migrating from the Force.com IDE to VS Code on our docs site. As always, please continue to let us know what we can do to help you be more productive on the Salesforce Platform and thanks for reading!
0 notes