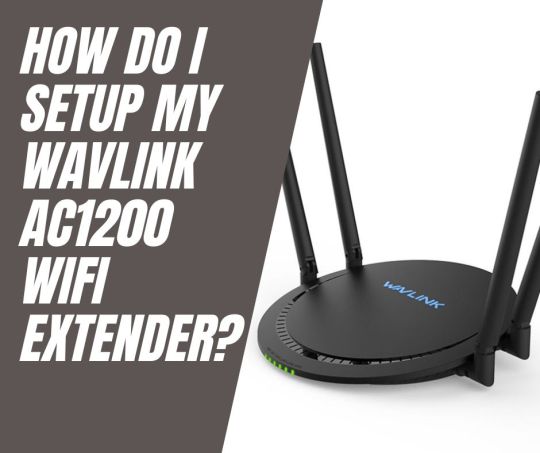
#Wavlink AC1200 WiFi extender setup
Text
Wavlink AV500 Powerline Setup
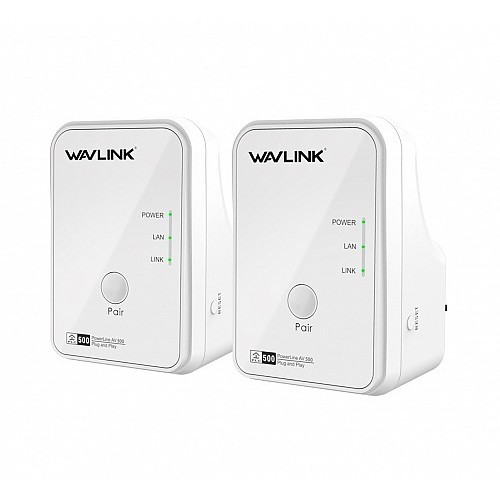
A strong internet connection is offered by the Wavlink AV500 Powerline setup of the wireless range extender, which may be extended using your Wi-Fi router/AP setup. It's ideal for frequent internet usage, including surfing, online gaming, video chats, buffer-free 4K HD video streaming, and more. It enables you to provide your mobile, computer, laptop, and other devices access to a high-quality wireless network. Starting with the Wavlink AV500 Powerline setup
Installation of Wavlink AV500 Powerline
This page contains instructions for setting up a Wavlink AV500 extender as an access point. One by one, the process is explained, and you won't need any further information.
Connect your AV500 repeater's power source to the wall outlet.
Switch on the access point and attach the Ethernet wire from the router to the LAN port of the extender.
Now that the Wi-Fi list is open on your computer, connect the Extender to the default Wi-Fi network.
Open any tab on the connected computer, type "http://wifi.wavlink.com or ap.setup" in the address box, then press Enter.
Request the login and password to open the web tab. Type "admin" as the choice in both locations, then click "Login."
To access the subsequent Wavlink Extender setup menu, select Wizard -> Select Access Point.
Create a new SSID, password, and protection from.
Once the progress meter is filled, wait an additional 60 seconds before requesting more.
After configuration changes and a reboot, the Wavlink AV500 repeater may now work as an access point.
Wavlink AV500 Powerline wps setup
Setting up a Wavlink AV500 extender using WPS:
You must carry out these actions one at a time if your Wavlink setup employs WPS.
Hold your Wavlink AV500 extender close to your router when it is connected to the power source to avoid disruptions.
An LED indication begins flashing after roughly 45 seconds of startup time.
When the router's light blinks to indicate it's ready to attach, press the WPS button to unlock it.
Before a flickering light indicating that it is connected to the router appears, press the WPS button.
Until the blinking light stops, you won't know the Wavlink AV500 extender setup is connected to the router.
Web browser setup for Wavlink Extender
The Wavlink AV500 powerline Extender may be configured via a web browser. You may finish the setup procedure using these steps.
Make sure your Wavlink extender and router are close to the power source when you plug them in.
After connecting the device to the socket, wait around 45 seconds for the LED light to begin blinking.
Go to the default network for Wavlink, Wavlink 2.4 GHz, in your mobile device's or computer's Wi-Fi list, and connect to it.
On the same computer or mobile device that you are connected to, launch the new web browser.
The Wavlink extender setup interface will launch. Please use the default username and password of "admin."
Select a language. Login Press.
On the following tab, you will be prompted to select your nation, time zone, and new password. The most recent password will be used when you log in again.
Open the Wavlink Web UI, choose the Wizard option, then choose Repeater mode. Next, find and choose your Wi-Fi host network.
Wait around 40 to 60 seconds until the progress metre is full before trying again.
When the flashing LED light returns to solid, the setup is sound.
0 notes
Text
1 note
·
View note
Text
How Do I Setup My Wavlink AC1200 Wifi Extender?
Wavlink AC1200 provides fast speeds and reliable connections for multiple devices. With two high-gain antennas, it provides wide coverage and stable connections. A USB port allows users to access shared files easily. The device is easy to set up and use and works with most wireless devices. You can also set up parental controls to keep your children safe online. It takes a few minutes to complete the Wavlink AC1200 setup. You can use the WPS and web browser to start the setup process of the Wavlink AC1200 wifi extender.
WPS Method To Wavlink AC1200 Setup
A step-by-step guide to Wavelink AC1200 Setup WPS is here.
Your extender's power adapter can be connected to a power outlet.
Isolate all wires before connecting them.
When the extender is powered on, a blue light will appear.
The Wavlink extender can be connected to your WiFi router.
You must press the WPS button on both the router and the extender at the same time.
The two buttons need to be pressed together for two minutes for this step.
Ensure that the LED light is solid blue.
When the router and extender are both connected, a solid blue LED will illuminate.
Whenever an extender is connected to a wireless network, it automatically boosts it. Both devices will have the same SSID and password.
It will be possible for you to log in using the same password.
You can use your Wavlink AC1200 device after you complete the setup process.
Using a Web Browser for Wavlink AC1200 Setup
The Wavlink AC1200 setup can also be done via a web browser. It also depends on users' preferences which they want to use. Here are the steps for setting up the system.
Wavlink AC1200 devices must be plugged into power outlets.
You will need to configure your device to repeat the connection.
You can find the network settings on your laptop by going to the settings menu.
By finding the network, you can connect to Wavlink.AC 1200.
To access 192.168.10.1, launch any web browser and type the address in the address bar.
There will be a configuration page for the Wavlink AC1200.
By following the instructions on the screen, you can now connect your home's network to the extender.
The Wavlink AC1200 setup is now ready for use. Once the router is plugged in, the LED lights will indicate when the router is properly connected to the modem. After that, users can access the router's settings page via any web browser to customize their network setup and connect their devices to the internet.
Once the LED lights are lit, users will be able to connect their devices to the router's network and access the internet. They can also access the router's settings page, which will allow them to customize their network setup and adjust settings such as the network name and password.
Wrapping Up
You can use above both methods for the Wavlink AC1200 setup. Users need to read all the instructions so they can follow all steps perfectly.
0 notes
Text
Wavlink AC1200 Setup
Wavlink AC1200 setup is very easy and will be done in different ways. It extend the range of your current wireless connection to the farthest corner of your home or office.
How to Use the Wavlink AC1200
With the Wavlink AC1200 wireless range extender, you can easily extend the range of your current wireless network anywhere. Four antennas are set up in a way that makes them work in all directions. This makes your existing network better and more reliable. With the help of the Wavlink AC1200 dual-band wireless range extender, you can slowly improve your wireless network. Because it is small and easy to use, it lets you set it up without much trouble. Also, its sleek design makes it easy to fit in with the rest of your home or office decor.
You can connect all of your devices from anywhere in your house because the antennas are so good. Also, the Wavlink setup connects to your router wirelessly. So, it automatically finds your router's signals and starts to boost them.
Wavlink AC1200 Setup using WPS
Follow the step-by-step instructions below for Wavlink AC1200 Setup using WPS:
Plug the Wavlink AC1200 into a power source.
Wait until the solid blue light comes on. This shows that the extender is working.
Now, push the WPS button on the extender as well as the wireless router or modem.
Don't unplug the AC1200 while the extender's light is blinking.
The WPS method for setting up the Wavlink AC1200 has now been completed successfully.
On the WIFI repeater, the power, client, device, and WPS lights will all be solid green.
Now, put the Wavlink extender in the spot where the signal is weakest. And make sure your WIFI works well.
Wavlink AC1200 Setup with wifi.wavlink.com web URL?
To finish setting up the AC1200 WiFi extender, you just need to plug the repeater into a power outlet.
Check to see if the button on the extender is set to the repeater mode.
Once the extender's power led light is on, you can move on.
Get all of your wireless devices together, go to the WiFi settings option in the menu, and then connect to the Wavlink network.
After connecting, open any browser and type wifi.wavlink.com into the address bar.
You are now on the screen where you can set up the Wavlink AC1200 extender.
Make sure to follow the on-screen instructions when connecting your Wavlink WIFI AC1200 Dual-band repeater to your home's WiFi router or modem.
How to setup my Wavlink AC1200 WIFI Range Extender?
Follow the steps below in order to connect the Wavlink AC1200 extender using a web browser:
Use the plug that came with your AC1200 Range Extender to connect it to a power source.
At this point, you will need to set your extender to work in the repeater mode.
Get a portable computer, like a laptop or tablet, and go to the WIFI settings.
Also, look for the Wavlink-N network and set up a connection to it.
Once you're connected to the extender network, open a web browser like Google Chrome, Mozilla Firefox, Microsoft Edge, or another one.
Then, type 192.168.10.1 or wifi.wavlink.com where it asks for the address.
You have reached the page for setting up the Wavlink AC1200.
Follow the steps that show up on the screen to add your extender to your home network.
How to reset Wavlink AC1200 Dual-band WIFI extender?
To start resetting the Wavlink AC1200, plug it into a power outlet.
When the extender's power led light is on, move on to the next step.
Use something like a toothpick or a paperclip.
You can let go of the pinhole after you press and hold the reset button for ten to fifteen seconds.
At this point, you have to wait until the power led light turns solid green.
You have now set the extender back to how it was when it came out of the factory.
Follow the steps for setting up the Wavlink AC1200 to put the WiFi extender back in place.
Wavlink AC1200 setup using Wifi.wavlink.com
Plug the Wavlink AC1200 wifi extender into an outlet.
Make sure the repeat button is set on the extension button.
When the power led light on the extender is turned on.
You can connect to the Wavlink network on any wireless device by going to the WIFI settings menu.
Once you're connected, open any web browser and type wifi.wavlink.com into the address bar.
You have reached the screen for setting up the Wavlink AC1200 extender.
Follow the steps on the screen to connect your Wavlink WIFI AC1200 Dual-band repeater to your home WiFi network or modem.
Troubleshooting steps for Wavlink AC1200
By default, the WPS button is turned off on some IP 192.168.10.1 gateways. If you can't connect using the WPS button, you can go to the Wavlink wifi extender setup management website for your extender and set it up there.
Make sure that your wireless router is close to where you put your extender.
If you don't, the way your improved network works will be very different. Keep the extender one metre away from your router.
Make sure that your extension is far away from any electronic equipment that could cause trouble. Things like baby monitors, microwaves, and cordless phones that use Bluetooth should be avoided.
How do I set up Wavlink AC1200 as an access point?
After you've connected the hardware and registered into the WAVLINK AC1200, you can start the installation process.
Follow these simple, straight-forward steps:
You will be taken to the page for setting up the wavlink ac1200.
Use the drop-down menus to choose your country/region and time zone.
Fill in the new login information for your page's web interface.
After choosing the "Access Point" mode of work, follow the instructions on the screen.
Choose the primary router's wireless network that you want to add an extension to.
Enter the same wifi password you used for your home router into your outdoor extender.
Give the setting some time to take effect. This might take some time.
Then, look up the name of your outside ap wireless network and use its wifi password to connect to it.
Your wavlink ac1200 outdoor extender is now set up the way you want it. Now you can put the thing wherever you want.
Wifi Extender Setup is an independent third-party service provider. Wifi Extender Setup is not connected to any of the companies whose trademarks, brands, products, or services are used on this site, unless that connection is made clear. All of these references are just there to give you information.
#Wavlink AC1200 Setup#Wavlink AC1200 Setup with wifi.wavlink.com web URL#Wavlink AC1200 setup using Wifi.wavlink.com
1 note
·
View note
Text
Wavlink AC1200 Setup
Wavlink AC1200 setup can be easily performed in a variety of ways. And improve the range of your current wireless connection all the way to the farthest corner of your home or office.
Wavlink AC1200 Instructions
With the help of the Wavlink AC1200 wireless range extender and the Wavlink AC1200 Setup, you will be able to easily extend the range of your existing wireless network to any location. In order to improve the quality and dependability of your current network, we have incorporated four antennas into our one-of-a-kind and patent-protected wide band design. With the assistance of the Wavlink AC1200 dual-band wireless range extender, you can gradually improve the performance of your wireless network. Because of its extremely compact and user-friendly design, it enables you to enjoy a placement process that is devoid of any complications. In addition, because of its simple layout, it can easily be incorporated into the décor of your existing home or office.
As a result of the high-performance antennas, you are able to connect any and all of your devices from anywhere in the home. In addition, the Wavlink installation process establishes a wireless connection with your router. As a result, it will search for the signals coming from your router and begin to boost them automatically.
Wavlink AC1200 Extender Setup
To install the Wavlink AC1200 using the WPS method, please follow the step-by-step instructions that are provided below:
Establish a connection between the Wavlink AC1200 and the power source.
Wait for the extender to be powered on, which will be indicated by the solid blue light that will illuminate.
At this point, press the WPS button located on the extender.
After that, you need to press the WPS button located on your wireless router or modem.
It is important to remember not to unplug the AC1200 while the light is flashing on the extender.
The WPS method used to set up the Wavlink AC1200 has now been successfully finished.
On the WIFI repeater, you will notice that the power, client, device, and WPS indicators have all turned solid green.
Now position the Wavlink extender in the area where the signal strength is lowest. Make it confirm that your WIFI connection is strong.
How to install Wavlink AC1200 with wifi.wavlink.com web URL
To complete the setup for the AC1200 WIFI extender, simply connect the repeater to an available electrical outlet.
Check to see that the button on the extender is set to the repeater mode.
Once the power led light on the extender is lit up, you can proceed.
Gather all of your wireless devices, navigate to the menu option for the WiFi settings, and then connect to the Wavlink network.
After connecting, open any browser and type in wifi.wavlink.com on the address bar.
You have now arrived at the setup screen for the Wavlink AC1200 extender.
When installing your Wavlink WIFI AC1200 Dual-band repeater to your home WiFi router or modem, make sure to follow the instructions that appear on the screen.
How to setup my Wavlink AC1200 WIFI Range Extender?
To connect the Wavlink AC1200 extender using a web browser, please follow the steps below in order:
Connect your AC1200 Range Extender to the power source using the plug provided.
At this point, you will need to set your extender to operate in the repeater mode.
Obtain a portable computing device, such as a laptop or tablet, and navigate to the WIFI settings options.
Additionally, search for the Wavlink-N network and establish a connection with it.
Open a web browser, such as Google Chrome, Mozilla Firefox, Microsoft Edge, or another one, once you have successfully connected to the extender network.
Then, in the space designated for the address, type 192.168.10.1 or wifi.wavlink.com.
You have arrived at the setup page for the Wavlink AC1200.
How to reset Wavlink AC1200 Dual-band WIFI extender?
To install your extender onto your home network, follow the instructions that appear on the screen.
To begin the process of resetting the Wavlink AC1200, first plug the extender into an available power outlet.
When you have the power led light on the extender, proceed to the next step.
Find a toothpick or a paper clip and use those.
After pressing and holding the reset button for ten to fifteen seconds, you can let go of the pinhole.
The light on the power led changes to an amber colour; at this point, you must wait for the light on the power led to change to a solid green.
You have now successfully returned the extender to its original settings from the factory.
To reinstall the WiFi extender, follow the steps outlined in the setup process for the Wavlink AC1200.
Wifi Extender Setup is a third-party service provider that operates on its own.Wifi Extender Setup is not associated with any of the companies whose trademarks, brands, products, or services are used on this site unless that connection is made explicitly clear. Any and all such references are merely for informational purposes.
#Wavlink AC1200 Setup#how to setup wavlink ac1200 extender?#ap.setup#192.168.10.1#wavlink extender setup
0 notes
Text
NETGEAR Installation — Assistant to Set Up a Netgear Extender
Netgear is one of the most elegant networking brands that offer many similar services. Its routers are quite common with users. This is because of its security and innovations that make it different. Now some cases happen when you face issues while handling them. Although these are simple issues and can be fixed in no time. Now some face problems in configuring area extender setup with Netgear installation assistant. Well, it’s an easy method but seldom gets a bit trickier. Below we have discussed some of the easiest and quick steps to help with this; check out the entire article.
Follow Few Steps to Connect with the Netgear Installation Assistant:
No uncertainty that it’s a confusing process but a doable one; you don’t want to have any special knowledge. You can do this quickly with the help of the given directions and actions. So to make the process of range extender setup with Netgear installation assistant understand the steps:
You initially want to place the extender near a power outlet.
Turn ON the supply and wait for the LED to lighted green.
Later this connects your device using your wifi connection or Ethernet cable. For wifi connection, open the connection manager and find the connection named NETGEAR_EXT.
On this site click the New NETGEAR EXTENDER SETUP button and insert the details in the given field and press the NEXT
In the next step, you need to verify that the Way Point/Extender switch is set to Extender only then proceed to the next step.
Enter the password and head over to the next start.
After this set, the SSID and key of your extender and then move to next.
Now make sure that your extender device is placed midway between your router and other devices. This step will ensure the Netgear installation partner is done successfully.
This is the simple process to configure or complete the Netgear extender setup. You can also take the help of Netgear installation assistant videos. IF you find any problems in the process then try revolving them. The above process will help you in the process of Netgear installation assistant download. At last, you can choose to do a Netgear router reset and then go through these steps.
Queries raised by Netgear Wifi Extender:
How do I set up Netgear WiFi Extender?
Many ways can help you to fix up Netgear wifi extender problems. You can also take the advice of Netgear installation assistant videos. You may want to go through some simple steps like Netgear extender login and then complete the mywifiext setup.
How do I set up my Netgear WiFi Extender without WPS?
If we discuss any specific type of Netgear like Netgear installation assistant ac1200 or Netgear installation assistant ac750 then the best point is that the method is almost related for every extender. You just require to use the common actions and make the setup.
Company: Wifi Extender Hub
Call on 833–666–7003
Email: [email protected]
#netgear installation#netgear extender setup#netgear extender#netgear extender login#netgear installation assistant#netgear#tplink extender setup#wavlink extender setup#range extender#extender#wifi extender#ac1200#ac1900#mywifiext#mywifiext setup#netgear_ext#range extender setup#networking#wifi not working#wifi#wifisetup#wifinetwork#assistant
3 notes
·
View notes
Text
Learn To Do Wavlink WiFi Extender Setup In A Simple Way
Wavlink extenders are always known for their better signal strength. The range that they cover are more than the other extenders. Therefore, in order to use this, you need to complete the wavlink wifi extender setup with wifi.wavlink.com. Though, when the wifi.wavlink.com is used for the setup, then it is the basic web browser method. But, if your WiFi router is WPS supported, then you can complete the wavlink wifi extender setup with WPS method. In this blog, you will get to know about the steps for both the methods. By the end of this blog, you will get your Wavlink WiFi extender working for the extension of this network. So, let’s check out the steps for both the methods in the following sections.
Steps To Complete The Wavlink WiFi Extender Setup
As you know there are two different methods to complete the setup for the Wavlink WiFi extender. Therefore, one by one, you will get to know about the steps for the extender setup using different methods.
Method 1: Using wifi.wavlink.com For Extender Setup
The very first method for the Wavlink WiFi extender setup is the web browser method. It is the very basic method that will help you to complete the Wavlink WiFi extender setup. This method is useful for everyone whether you have the WPS feature or not. So, following are the steps to complete the Wavlink WiFi extender setup with wifi.wavlink.com:
Step 1: Make sure you have connected the Wavlink extender to the power source.
Step 2: Now, press the power button to turn on the Wavlink extender.
Step 3: Then, you need to connect your system to the Wavlink extender’s network using the ethernet or wireless method.
Step 4: Launch Google Chrome or any other web browser of your choice to continue with the setup.
Step 5: Enter the web address as wifi.wavlink.com in the browser.
Step 6: This will open the setup wizard for the Wavlink extender on the screen.
Step 7: First, select the language of your choice from the drop-down menu.
Step 8: Then, enter the default login information for the Wavlink extender, and click on the Login button.
Step 9: The Wavlink extender will automatically detect the nearby WiFi router, and will connect to it.
Step 10: If the connected network is not the one you want to extend, then choose the name from the list.
Step 11: Then, enter the security password for that particular network as well to get connected to it.
Step 12: With this, your network will now be extended.
Step 13: Unplug the Wavlink WiFi extender in order to place it near to the dead zone.
Therefore, with this the Wavlink WiFi extender setup is complete with the web browser method i.e. wifi.wavlink.com. In this way, you will be able to cover up the maximum range for your network. If your main router has the WPS feature, and you want to save some time, move to the next section.
Method 2: Using WPS For Extender Setup
If your main router has the WPS feature, then the Wavlink extender setup can be completed in a few seconds. To do so, just go with the following steps:
Step 1: Make sure both your router and extender are connected to the power source and are powered on.
Step 2: Then, press the WPS button of your main router and keep it pressed till the WiFi light starts blinking.
Step 3: Now, instantly you need to press the WPS button on the Wavlink extender as well.
Step 4: Wait for the LEDs to get stable in solid green color for the devices.
Step 5: When the LEDs for both the devices become stable, it means your main network is extended with the Wavlink extender.
Step 6: Now, place the Wavlink extender at the location near to the dead zone but in the main WiFi’s range.
With this, the Wavlink Wifi extender setup is also complete using the WPS method. Now, you can connect any device to the extender’s network. You just need to search for the available WiFi networks from your device, connect it to the Wavlink’s extender network.
Connect With Extended Network!
Wrapping up! There is no need to worry if you are not in the range of the main WiFi network. Moreover, there is no need to change your location in order to access the network. The only thing you should do is the completion of the Wavlink WiFi extender setup with wifi.wavlink.com. With this, your network will get extended, and you can access the network from anywhere in your home. In case you got stuck somewhere with the setup process, then feel free to talk to our experts. They will identify the cause of the issue, and will help you to complete the Wavlink WiFi extender setup. Therefore, with this blog, get ready to connect with the extended network, and access the network at your desired location.
Visit Us: https://wifiwav.com/
#wavlink ac1200 setup#wavlink wifi extender setup#wifi.wavlink.com#wavlink setup#wavlink ac1200 router setup
0 notes
Link
Faster internet is always a good thing. However, increasing your internet speed may become more of a need than a pleasure. You're probably thinking of getting a Wavlink Wi-Fi extenders Setup to improve your connection.
1 note
·
View note
Text
What are the features of the MSRM US302 Extender Wavlink AC1200 Extender?
MSRM US302 Extender
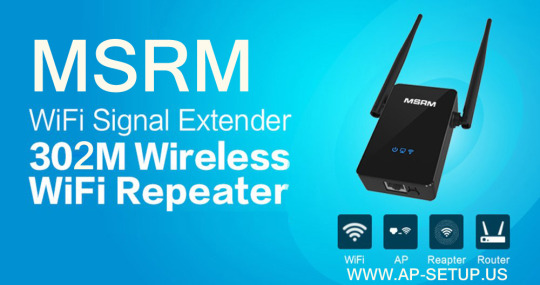
The WiFi 6 (802.11ax) protocol is supported by the MSRM US302 Extender Setup, which is the most recent version of the WiFi standard.
At the same price as before, the high-capacity mesh extender provides higher performance, range, and capacity.
With the potential to link your home at up to 1.8Gbps, you can build a more connected environment and extend faster WiFi to the most remote regions of your home.
4stream WiFi increases the available bandwidth and lowers the latency for all connected devices by adding additional physical streams to the WiFi network. This is the best option for small and medium-sized residences with up to four bedrooms since it gives strong WiFi in every room while using the fastest internet available to get the speeds you pay for.
The MSRM US302 Extender is also appropriate for up to four-bedroom apartments and condominiums. With a WiFi 5 Mesh Extender, you can obtain faster WiFi speeds and extend your network by up to 1.5 times, allowing you to connect numerous devices to your WiFi network today and in the future without worrying about it overheating.
Using your present router, you can rapidly set up a WiFi mesh network throughout your home.
Fast wifi rates are provided by WiFi 6 with 4-stream technology (up to 1.8Gbps)
11ac is 1.5 times faster and has 1.5 times the performance of 11ac.
A 1.5GHz quad-core processor allows for smooth 4K streaming and gaming.
A gigabit WiFi network can be accessed by PCs, laptops, cellphones, and other devices.
Wavlink AC1200 Extender
The Wavlink AC1200 extender setup, you can quickly extend the range of your current wireless network to any region. Four antennas are positioned in a patented omnidirectional configuration to increase the performance and durability of your existing network. With the Wavlink AC1200 dual-band wireless range extender, you can progressively improve your wireless network. It is easy to install due to its extremely small and convenient size. Its simple design also makes it easy to match with the rest of your home or office decor.
You can connect all of your gadgets from anywhere in your house thanks to the high-performance antennas. Wavlink can also connect to your router wirelessly. As a result, it immediately recognises your router's signals and begins boosting them.
With simultaneous 5G 867Mbps and 2.4G 300Mbps connections, the Wavlink AC1200 Dual Band Router for More WiFi Devices delivers a total bandwidth of 1167Mbps.
Simple tasks like composing emails or browsing the internet can be performed on the 2.4GHz frequency, while bandwidth-intensive applications such as online gaming or 4K video streaming can be performed on the 5GHz spectrum — all at the same time.
Expanded Wireless Coverage with High Gain Antennas – 4 x 5dBi omni-directional antennas dramatically increase wireless coverage in all WLAN networks, resulting in even higher wireless performance and transmission rates over longer distances, giving you exceptional wireless coverage and reliability throughout your home.
Router with Through-the-Wall High-Power Capability – A high-power amplifier (PA) increases the magnitude of the signal, whereas a low-noise amplifier (LNA) reduces noise while boosting the signal's intensity. To summarise, PA+LNA can improve performance while also penetrating barriers.
Ethernet Ports (Wired) – WPA2 wireless security protocols are supported on one 10/1000Mbps WAN interface and four 10/100Mbps LAN interfaces.
Router, LAN Bridge(AP), and WISP modes are all supported for a variety of applications.
The WAVLINK WL-WN530H4 comes with a 12-month product replacement warranty and helpful customer service.
PORT FORWARDING IS NOT SUPPORTED BY THIS WARNING.
If you're having trouble with your router, please don't hesitate to contact us for assistance.
0 notes
Link
#Wavlink AC1200 WiFi extender setup#Wavlink AC1200 extender setup#wavlink wifi extender setup#ap.setup#ap setup
0 notes
Text
0556789741 Wifi Extender Repeater Router modem IT Solution IT Services Dubai
0556789741 Vpn Router Modem It Support Installation Wifi Repeater Extender Expert Technicain in Dubai Contact PhoneVPN ROUTER MODEM IT SUPPORT INSTALLATION WIFI REPEATER EXTENDER EXPERT TECHNICAIN Computer mac laptop repair wifi Router Linksys Cisco range extender Installation for Home Villa School Office- 0556789741IT technician Technical support Installation Wifi Technician Router repair guy Wifi IT specialist in Dubai Repair Home Wifi Router setup Expert Network Internet Wireless Services Fixing Dubai Villa house apartment wifi booster wifi range extenders configure installation.5port 8port 16 port 16 port 28 port 48 port Microsoft- Wifi solution repair setup installation in Dubai- Computer Wireless Network IT Support Router ADSL Broadband Modem Etisalat and DU Elife 2G 3G 4G 5G 6G 7G WIFI SIGNAL BOOSTER150mps 300mps 350mps 400mps Ac1750 Ac1950 Ac1200 Tp Link ,D Link ,Linksys , Cisco ,Engenius ,Aztech ,Sitecom ,Buffalo ,Apple ,Asus ,Huawei ,Belkin ,Net gear ,3com ,Mikrotik ,Ubiquity ,Microsoft, Edimax, Zyxel, Mesh router, Tenda, Velop Linksys, Draytek,Netis,Optus,Unifi,Modecom,Yeastar,Ip-com,Kasda,Wavlink,Wepresent,Mocet,Zycoo,Zte,Merlin,Alfa,Xiaomi,Alcatel. Contact Us for Any Computer/ Network Support in Dubai Hotel guest wifi billing system Hotspot wifi voucher system Fiber optic cabling setup in Dubai Wireless setup support in Dubai Laptop Repair in Dubai PC repair in Dubai WIFI Range Extender setup in DUBAI Networking for Home in Dubai Networking for Company in Dubai Wireless Setup change from Etisalat/Du or Alshamil to Elife External Hard drive with network capability for Backup Sharing Printer /Network Printer Setup for Windows 7 Driver for your old printer Scanner which can’t work with MAC or Windows 7 PC /Laptop format /service Repair at your Place /Office with reasonable Price Configure Server /File Sharing via Network “Wired /Wireless” WIFI Hot Spot setup for your Coffee shop /Restaurant if are looking to give internet WIFI voucher Installing Linux for your old PC it works great with old PC for browsing /Chatting emailing Configuring Outlook with POP /Exchange Backup old outlook file and restore in new Laptop Restore all Firefox Setting to new Laptop Backup solution for your small Business home Office Setup /consulting for all IT requirements including cabling installation of hardware /software with best and lowest Price Network Diagram for your home/office for your reference and troubleshooting Cabling solution including Data and Voice for your Office PBX setup /Telephone Setup “if you have 2 different lines we can expand it for you with our qualified technician If you need to program /reprogram /replace upgrade your PBX system we can do it for you Apple computer repair in Dubai/Service Laptop in Dubai Apple airport express set in Dubai/airport express printer setup in Dubai Having issue setup Printer with airport express in Dubai Airport express apple TV in Dubai/airport extreme range in Dubai Wireless range expander in Dubai/ wireless range extender setup in Dubai Range extender setup in Dubai/router range extender in Dubai Wireless router range extender reviews in Dubai/wifi range extender in Dubai Call us for any IT Support For Company in Dubai IT technician Technical support Installation Repair Home Wifi Router Network Internet Wireless Services Fixing Dubai Villa house apartment wifi booster wifi range extenders configure installation Computer Wireless Network IT Support Router. Wireless Apple Router Wifi Booster, Range Extender, long range antenna setup configure configuration Support Solution Maintenances contractor service installer Professional Fixing Installation Repair technician expert Sales supply integrate technology llc In Dubai. UAE DUBAI Wireless Apple Router Wifi Booster, Range Extender, long range antenna setup configure configuration Support Solution Maintenance contractor service installer freelances proffernal Fixing Installation Repair technician expert Sales supply integrate technology llc In Dubai,abu dhabi,sharjah,al ain,ras al khaimah,fujairah,umm al quin ,Ajman • Abu Hail Academic City • Al Barari • Al Barsha • Al Furjan • Al Ghurair City Mall • Al Jaddaf • Al Jafiliya • Al Khawaneej • Al Mamzar • Al Marqadh • Al Mizhar • Al Nahda • Al Quoz • Al Qusais • Al Sufouh • Al Twar • Al Warqaa • Al Wuheida • American Hospital • Aqua Dunya • Arabian Ranches • Arjan • Baniyas Square • Bawadi • Bur Dubai • Burj Al Arab • Burj Khalifa Tower • Burjuman Mall • Business Bay • Business Bay Bridge • Century Mall • Dubai Airport Freezone (DAFZ • Dubai Creek Golf Club • Dubai Festival City (DFC • Dubai Internet City (DIC) • Dubai Investment Park (DIP) • Dubai Lagoon • Dubai Land • Dubai Marina • Dubai Media City (DMC) • Dubai Museum • Dubai Outlet Mall • Dubai Silicon Oasis (DSO) • Dubai Sports City • Dubai Tennis Stadium • Dubai World Central (DWC) • Dubai World Trade Center wireless wifi router price wlan routers
0 notes
Text
#wavlink ac1200 wifi extender setup#wavlink wifi extender setup#wavlink extender setup#ap wifi range extender setup#ap setup
0 notes
Text
#wavlink ac1200 wifi extender setup#wavlink ac1200 extender setup#wavlink extender setup#ap.setup#ap setup#ap extender setup
0 notes
Link
#Wavlink AC1200 wifi extender setup#Wavlink AC1200 extender setup#Wavlink wifi extender setup#Wavlink extender setup#ap.setup#ap setup#ap extender setup
0 notes
Last Seen Blogs

renluchan
Renluchan

najd26-blog1
Untitled

stacksdeep36
36

ssyk00
SyKo! ¿Where Are You?

yourgodlyparent
Who Is Your Godly Parent?