#WordPress export and import tutorial
Explore tagged Tumblr posts
Visit Tumblr Blog
Explore Tumblr blogs with no restrictions, modern design and the best experience.
Last Seen Tumblr Blogs


Fun Fact
Average visit duration of Tumblr.com is 10 mins and 25 secs.
Text
How to Export and Import WordPress Posts and Pages: A Beginner's Guide
Managing a WordPress website comes with its challenges, but exporting and importing posts and pages shouldn’t be one of them. Whether you’re migrating to a new host, creating backups, or sharing content between websites, WordPress makes this process surprisingly simple. In this beginner-friendly guide, we’ll walk you through how to export and import your WordPress posts and pages, step by…
#backup WordPress content#export WordPress posts#how to export WordPress posts#how to import WordPress pages#import posts to WordPress#import WordPress pages#manage WordPress content#migrate WordPress content#transfer WordPress content#WordPress#WordPress admin tools#WordPress beginners guide#WordPress export and import tutorial#WordPress migration#WordPress tools#XML file WordPress
0 notes
Text
Step-by-Step Tutorial: Migrating Translated Posts and Custom Posts in Multilingual Site with Polylang Using CSV Importer

Introduction
Multilingual websites are becoming increasingly common as businesses and individuals aim to reach a global audience. Polylang is a popular WordPress plugin that facilitates the creation of multilingual websites. In this guide, we’ll explore the process of Polylang import translations for various content types, including posts, pages, custom posts, and custom fields.
What is Polylang?
Before diving into the import process, it’s essential to have a basic understanding of how Polylang works. Polylang allows you to create and manage multilingual content by associating different language versions of a post, page, or custom post type. It also supports translations for custom fields.
For efficient content translations install and activate the Polylang plugin in your WordPress website.
How do you set up languages on a WordPress site using Polylang?
Once you install the Polylang plugin, it is time to set up the language to translate your WordPress site content into your preferred languages.
To set up languages in Polylang,
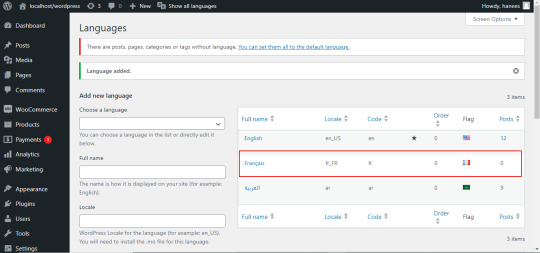
Login to your WordPress website and navigate to the Language tab from the left-side menu

Choose the language from the drop-down menu. Once you select the language, all the other fields like the Full name, locale, and language code have been updated automatically.
Then click on Add Language.

Now your language has been updated in the right side table.
How to Import Polylang translated content in your Multilingual Websites?
Before Importing the Translated content of Polylang, let us understand the basic reasons and benefits of importing translated content in WordPress.
Key reasons to import translated content in WordPress
Importing translated content into WordPress can be essential for several reasons, particularly when managing a multilingual website. Here are some key reasons why importing translated content is crucial:
Global Reach and Audience Engagement: Importing translated content allows you to reach a wider global audience. By offering your website in multiple languages, you increase accessibility and engage users who prefer to consume content in their native language.
Enhanced User Experience: Providing content in the user’s preferred language enhances the overall user experience. Visitors are more likely to stay on your site and explore its offerings when they can easily understand and navigate the content.
SEO Benefits: Translating content helps improve your website’s search engine optimization (SEO). Search engines recognize and index content in different languages, making it more likely for your site to appear in search results for users searching in those languages.
Catering to Diverse Markets: If your business operates in or targets diverse markets, importing translated content is crucial for effectively communicating with customers from different linguistic backgrounds. It demonstrates cultural sensitivity and a commitment to serving a global clientele.
Compliance with Local Regulations: In some regions, there may be legal requirements or industry standards that mandate providing information in specific languages. Importing translated content ensures compliance with such regulations and helps you avoid legal issues.
Multilingual Content Management: WordPress plugins like Polylang make it easier to manage multilingual content. Importing translations allows you to efficiently handle posts, pages, custom posts, and custom fields in multiple languages within a unified content management system.
Consistency Across Languages: Importing translations helps maintain consistency in messaging and branding across different language versions of your website. It ensures that the translated content aligns with the original message and intent.
Efficient Content Localization: Instead of manually translating and inputting content for each language, importing translations streamlines the localization process. It saves time and resources, allowing you to focus on creating high-quality content rather than duplicating efforts for each language.
Adaptation to Regional Preferences: Different regions may have specific language nuances or preferences. Importing translated content enables you to tailor your messaging to resonate better with audiences in various geographic locations.
Facilitates Regular Updates: As your website evolves, regularly importing translated content ensures that the latest updates and changes are reflected across all language versions. This is crucial for keeping the information current and relevant for all users.
CSV Importer for Polylang- WP Ultimate CSV Importer Plugin
The WP Ultimate CSV importer is an all-in-one import tool that helps to import, update, and export your WordPress content in their desired file format.
With WP CSV importer, it is easy to import the Polylang translations with few clicks. The translated content will be imported into your WordPress Website in the languages that we have set up in the Languages section.
In this blog, we will have step-by-step instructions on how to import posts, pages, custom posts, and custom fields in Multiple languages.
How to prepare a CSV to import the content of Polylang translations?
Every content import includes the CSV files with the translated content. Whether it is posts, pages, custom post types, etc it is important to prepare a csv file with the original content and the translated content
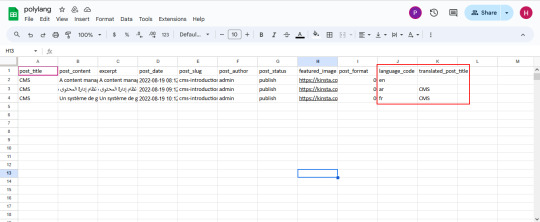
To import the content into the Multilingual website, add two additional columns in the csv file called language_code, and translated_post_title.
Provide the language code with respect to its related content.
Leave the translated_post_title field of the original content as empty.
Enter the post title of the original content in the translated_post_title fields of the translated content
Save and download the CSV file
How to Import Posts, and Pages in Polylang Translation?
The WP CSV importer plugin will make the job easy to import the posts, and pages in the polylang translations.
To import translated posts, and pages in Multilingual Website,
Navigate to the WP CSV importer Plugin from the left side menu.
Click on Import/Update from the top sidebar

Browse the prepared CSV (posts, or pages) from your downloads.

Select the content type that you want to import in the “Import each record as” field
Then click on continue for mapping.

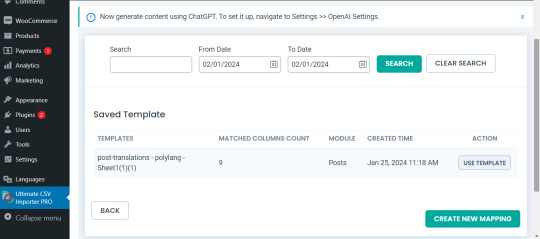
Now click on Create New Mapping. Or If you want to use the existing mapping template, you can click on the saved templates.
In the mapping section, you can map the CSV header field with its related WP fields by means of the drag-and-drop method or advanced method( Mapping the fields by means of selecting the desired field from the drop-down)

Verify the mapping of the polylang settings field. That is language_code and translated_post_title.
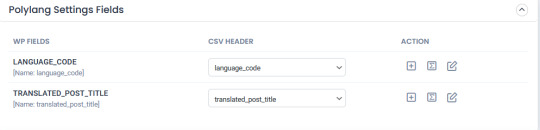
You can also add mapping for the custom fields. Once done with the mapping save the mapping template with the unique name.

Click on Continue for featured media handling.
Here you can enable the desired field for handling media files.
Here you can have all the options to import your featured image based on your business needs.
You can enable the download of external images to media while importing the posts
Also, you can select your desired image handling and image size.
You can map the media SEO and Advanced Options
Click on Continue

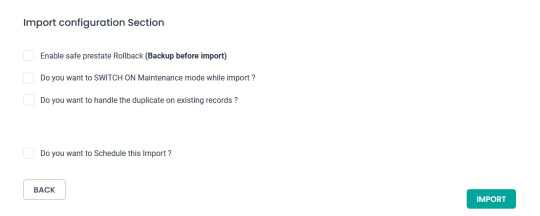
Then configure the Import configuration settings and Click on Import.
Now your post/page has been successfully imported in the desired languages that have been set on polylang.

You can click on the view log to view the successful post/page import on Multiple languages

This is how your translated post content mentioned on your csv has been imported into Multilingual Websites.

How to import Custom Post types and custom fields in Multilingual Websites?
Before diving into the topic of how to import custom post types and custom fields in polylang translation, let us have a basic understanding of What custom post types (CPT) and Custom fields are.
What are Custom Post Types and Custom fields?
WordPress comes with two primary content types: posts and pages. However, in many cases, websites require additional content types that may have distinct characteristics and purposes. This is where custom post types come into play. Whereas custom fields provide a way to store and display specific information related to the content.
For example, if you are building a real estate website, you might create a custom post type for “Properties” with specific custom fields such as price, location, and number of bedrooms. This ensures that the content is structured in a way that suits the website’s needs.
Things to remember before importing custom posts and custom fields
Ensure that you have created your custom post types and have assigned the custom fields to the desired post types.
Ensure you have prepared a csv for the custom post types and all the fields included in that custom post type have been properly assigned to the respective post type.
Ensure you have included the language_code and translated_post_title in the prepared CSV.
Steps to import Custom post types in Polylang translations
Importing translated custom post types is now efficient and effective with WP CSV Importer Pro. You can easily import the translated custom post types of any third-party plugins such as ACF, Jet engine, Metabox, etc.
However, the WP CSV importer Pro will provide support to all the ACF custom fields except that of the layouts sections.
The supported ACF fields for Translated custom field Import are listed below:
Basic: Text, Text area, Number, Range, Email, URL, Password
Content: Image, File, WYSIWYG Editor, oEmbed, Gallery.
Choice: Select, CheckBoxes, Radio Button, Button Group, True/False.
Relational: Link, Post object, Page Link, Relationships, Taxonomy, User.
Advanced: Google Maps, Date Picker, Date Time Picker, Time Picker, Color Picker
The Import steps are the same for all the content types in the WP CSV importer Pro plugin.
Prepare the CSV File:

Importing Translations:
Now that you have a CSV file containing your Polylang translations, it’s time to import them back into your WordPress site. Follow these steps:
Navigate to “WP Ultimate CSV Importer Pro” in the WordPress dashboard and select “Import/Update”
Upload the CSV file you prepared earlier and follow the on-screen instructions.
Choose the content type you want to import translations for. On the ”Import Each record as” field all the custom post types of ACF, Jet engine, Metabox or any plugin and the ACF custom fields are displayed on the drop-down.
All your custom post types and the ACF custom fields have been listed in the drop-down

Select the desired Custom Post types or custom field that you would like to import
Click on Continue. Map the WP fields with respect to their corresponding CSV headers.
Importing translations for custom fields might require additional steps. If your CSV file includes custom field translations, you may need to ensure that the custom field names match those in your WordPress setup.
Map the Custom field Suite and all the desired fields.

You can also add Mapping for the custom fields by simply clicking on the Add Custom Fields.
Ensure that the Polylang settings field is mapped correctly.
Save the mapping template with the unique name and click on continue
Enable the desired field in the Feature Image Media Handling section, and click on Continue.
Configure the Import Section and click on Import.
Now your CPT/ custom fields have been successfully imported into the Multilingual Website.

You can also view the log by clicking on View log-> admin view to verify the imported posts.

How to import taxonomies in Polylang translations?
Importing polylang translations with WP Ultimate CSV importer includes the same steps for all the content types. You can refer to the Importing steps explained above to import your taxonomies into Multilingual Websites.
WP CSV importer has smartly designed to import your translated post/page along with its taxonomies. That is if you import a post, then its related taxonomies like post_categories and post_tag (need to be included in the csv) have been imported with the post itself.
However, you can also provided with an option to import taxonomies alone without a post.
Steps to Import translated Post categories and Post tags
Prepare a csv with the translated content of (post_categories/ post_tags)
Add language_code and translated_post_title.
Navigate to CSV importer -> Import/update-> Browse the CSV
Select the content type as categories or tags
Map all the desired fields like post_categories/ post_tags.

Ensure the polylang settings field is mapped correctly
Save the Mapping template
Configure the Import process and click on Import.
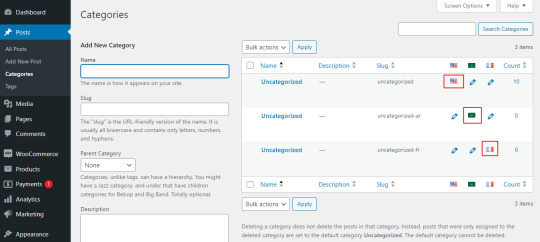
Now the categories has been imported into the Multiple languages
Post Importing Steps
Once you successfully imported your polylang translations, there are few things to consider. That are listed below:
Verification and Troubleshooting
After the import process is complete, it’s crucial to verify that the translations have been applied correctly.
Regular Maintenance
Keep in mind that website content evolves over time. Periodically export and import translations as you update your content. This ensures that your multilingual website remains up-to-date and provides a seamless experience for users across different language preferences.
How to export translated content in WP Ultimate CSV Importer?
Like importing, the export process of Polylang translation is quiet easy with WP ultimate CSV importer plugin. Moreover, this plugin is an all-in-one tool that smartly import and export your translated content from/to the multilingual websites.
The export process is same for all the content types. Let see an example of how to export pages in Multiple languages.
For that, navigate to WP ultimate CSV importer
Select Export from the top side menu and choose the content type that you want to export
Here I select pages. It displays the number of pages including the polylang translation has been displayed. Now click on continue

Provide the File name and File type. Here I select CSV.
You can also Export your translated content with advanced filters.
Now click on Export.

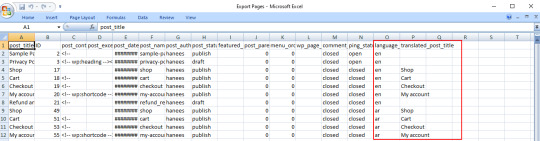
Your WordPress pages with polylang translations has been exported. Now click on download to download the exported file in your local computer.
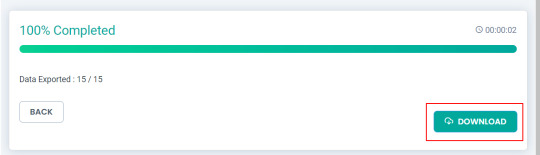
The exported pages with polylang translation will now be downloaded as desired file type.
Conclusion
Importing and Exporting Polylang translations for posts, pages, custom posts, and custom fields is a crucial step in maintaining a dynamic and effective multilingual website. By following the steps outlined in this guide, you can streamline the translation import & export process and provide a seamless experience for your global audience.
Refer to our user guide for step-by-step instruction to migrate Polylang Translations for WooCommerce Products, Variations and Orders
#wordpress#cms#wordpress tutorial#plugins#polylang#csv importer#custom post type#posts#import export data
0 notes
Text
WordPress vs. Webflow vs. Custom Code: What to Choose?

In today’s digital-first world, building a powerful, scalable, and visually stunning website is more important than ever. Whether you're a startup, small business, or enterprise, your website is the digital face of your brand. But with so many development options available—WordPress, Webflow, and Custom Code being the most popular—it can be challenging to choose the right one.
Each of these platforms has its strengths, limitations, and ideal use cases. In this blog, we'll break down WordPress vs. Webflow vs. Custom Code to help you decide which approach best fits your needs. We’ll also discuss why partnering with a Website Development Company in India can ensure you get the best out of whichever path you choose.
1. WordPress: The Popular All-Rounder
Overview:
WordPress is the world’s most widely used Content Management System (CMS), powering over 40% of all websites globally. It's open-source, flexible, and supported by a massive ecosystem of themes, plugins, and developers.
Pros:
Ease of Use: Ideal for beginners and non-developers. The interface is intuitive and user-friendly.
Large Plugin Ecosystem: Thousands of free and premium plugins to add features like SEO, security, eCommerce, and more.
Huge Community Support: Ample documentation, tutorials, and forums.
SEO-Friendly: Plugins like Yoast SEO make optimization accessible to non-tech users.
Cost-Effective: Especially beneficial for small businesses with limited budgets.
Cons:
Security Concerns: Being widely used, it’s a common target for hackers. Regular updates are essential.
Speed & Performance: Can become slow if bloated with plugins or heavy themes.
Limited Design Flexibility: Customizing themes deeply often requires developer expertise.
Best For:
Blogs and content-heavy websites
Small to medium business websites
Basic eCommerce stores using WooCommerce
2. Webflow: The Modern Visual Builder
Overview:
Webflow is a newer no-code/low-code platform that enables designers to build fully responsive and interactive websites visually—without writing extensive code.
Pros:
Design Flexibility: Offers total control over layouts and interactions. Great for pixel-perfect designs.
Built-in Hosting: Comes with fast, secure hosting via AWS CDN.
SEO Capabilities: Clean code output and powerful SEO tools built in.
CMS Capabilities: Suitable for dynamic content like blogs and portfolios.
No Plugins Needed: All essential features like forms, animations, and CMS are built into the platform.
Cons:
Learning Curve: Requires understanding of HTML/CSS layout concepts.
Cost: More expensive than WordPress over time, especially for teams and larger sites.
Limited Scalability: Not ideal for complex logic, custom integrations, or advanced eCommerce features.
Platform Lock-In: Your site is tied to Webflow's infrastructure unless exported and recoded manually.
Best For:
Portfolio and creative websites
Small business and landing pages
Agencies looking for rapid prototyping
3. Custom Code: The Powerhouse of Performance and Flexibility
Overview:
Custom-coded websites are built from the ground up using HTML, CSS, JavaScript, and backend technologies like PHP, Node.js, or Python. This approach is the most flexible and scalable but requires experienced developers.
Pros:
Unlimited Customization: Total control over every pixel, interaction, and backend functionality.
High Performance: Lightweight, clean code leads to faster load times.
Security: Can be built with robust security practices and without third-party vulnerabilities.
Scalability: Perfect for complex platforms with APIs, integrations, and user-based content.
Cons:
Time-Intensive: Development takes longer than WordPress or Webflow.
Higher Cost: Requires expert developers and ongoing support.
Maintenance: Requires regular updates, security patches, and server management.
No Built-in CMS: Everything has to be built from scratch unless integrated with a headless CMS.
Best For:
Large-scale enterprise websites
SaaS platforms and web applications
Complex eCommerce solutions
Portals and marketplaces
When performance, security, and scalability are critical, working with a Website Development Company in India for custom-coded solutions is the best choice. Indian firms often combine global standards with cost-effective services, making them ideal development partners.
Choosing the Right Platform: What to Consider
Before making a decision, ask yourself:
What’s the purpose of your website? Informational, eCommerce, lead generation, SaaS platform?
What is your budget? WordPress is the most budget-friendly. Custom code is best for larger budgets.
How fast do you need it launched? Webflow and WordPress allow faster development. Custom coding takes time.
Will you need to scale in the future? If yes, custom code offers the highest flexibility and future-proofing.
Do you have an in-house team or will you outsource? Partnering with a Website Development Company in India ensures you get expert guidance, whether you choose WordPress, Webflow, or custom solutions.
Why Work With a Website Development Company in India?
India has emerged as a global hub for IT services and digital development. Hiring a Website Development Company in India offers several advantages:
Cost-Effectiveness: Get premium-quality development at affordable rates.
Skilled Talent Pool: Access to experienced developers, designers, and QA experts.
Flexible Engagement Models: Choose between project-based, dedicated, or hourly billing.
Time Zone Compatibility: Many Indian companies provide 24/7 support for international clients.
Diverse Technology Expertise: From WordPress and Webflow to full-stack development.
Conclusion
Choosing between WordPress, Webflow, and Custom Code depends on your business goals, budget, timeline, and desired features.
Choose WordPress if you want flexibility, plugins, and fast deployment on a budget.
Go for Webflow if you need modern design, CMS features, and don’t want to deal with plugins or hosting.
Opt for Custom Code if performance, scalability, and tailor-made features are critical.
No matter which option you choose, partnering with a reputable Website Development Company in India ensures your website is professional, secure, scalable, and optimized for success in 2025 and beyond.
0 notes
Video
youtube
How to Easily Import & Export WordPress Users For Free? 🏗👤 https://www.youtube.com/watch?v=O5kU25vjCe4 🎬 #Import #Export #WordPress #Tutorial #Users
0 notes
Text
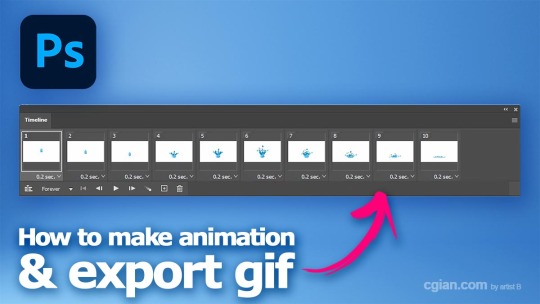
How to create animation in Photoshop and export animated gif
In this tutorial video, we will go through how to create animation in Photoshop and export animated gif. In Photoshop, we can use the timeline panel for importing frames from layers, then we can set the timeline duration for each frame, therefore we can make a simple animation frame by frame. Moreover, we can want to export animated gif. Steps are easy to follow for Adobe Photoshop beginners, I…
View On WordPress
0 notes
Text
From Pixel to Perfection: Mastering the Art of PSD to WordPress | Xchop
Introduction to PSD to WordPress Conversion
In today's digital age, having a strong online presence is essential for businesses and individuals alike. One of the most popular and powerful platforms for creating and managing websites is WordPress. With its user-friendly interface and extensive customization options, WordPress has become the go-to choice for website development. However, if you have a unique design for your website created in Photoshop (PSD) format, you need to convert it into a WordPress theme. This process is known as PSD to WordPress conversion, and it allows you to bring your design to life on the web. In this article, we will guide you through the steps involved in mastering the art of PSD to WordPress conversion.
Understanding the Benefits of Converting PSD to WordPress
Before diving into the technicalities of PSD to WordPress conversion, it's important to understand why it is a beneficial approach. Converting your PSD design to WordPress offers several advantages. Firstly, it provides you with a responsive and mobile-friendly website. With the increasing use of smartphones and tablets, having a website that adapts to different screen sizes is crucial. WordPress themes are designed to be responsive, ensuring that your website looks great on any device.
Secondly, converting PSD to WordPress allows for easy content management. With the intuitive WordPress dashboard, you can easily update and modify your website's content without any coding knowledge. This flexibility empowers you to keep your website up-to-date with fresh content, resulting in better user engagement and search engine rankings.
Step-by-Step Guide to Converting PSD to WordPress
Now that we understand the benefits, let's dive into the step-by-step process of converting PSD to WordPress. The first step is to slice your PSD design into individual image assets. This involves separating different elements like the header, footer, menus, and content sections. Once you have the images ready, you need to convert them into HTML and CSS code. This step involves coding the structure, layout, and styling of your website using web technologies like HTML, CSS, and JavaScript.
Next, you need to integrate the HTML and CSS code into a WordPress theme. This is done by converting the static HTML and CSS files into a dynamic WordPress theme structure. You will need to create PHP template files and add WordPress-specific tags and functions to make your theme compatible with WordPress.
Choosing the Right Tools and Resources for PSD to WordPress Conversion
To ensure a smooth and efficient PSD to WordPress conversion process, it is important to choose the right tools and resources. There are several tools available that can simplify the conversion process. For slicing the PSD design, you can use tools like Adobe Photoshop or Sketch. These tools allow you to export individual image assets from your design.
For coding the HTML and CSS, you can use popular text editors like Sublime Text or Visual Studio Code. These editors provide syntax highlighting, auto-completion, and other features to streamline your coding workflow. Additionally, there are online resources and tutorials available that can help you learn and understand the intricacies of PSD to WordPress conversion.
Customizing the WordPress Theme with Elementor
Once you have converted your PSD design into a WordPress theme, you can further enhance the customization options using popular page builders like Elementor. Elementor is a powerful drag-and-drop page builder that allows you to visually design your website without any coding knowledge. With its extensive library of pre-designed templates and elements, you can easily create stunning and unique layouts for your website. Elementor also offers advanced features like animation effects, responsive editing, and WooCommerce integration, making it a versatile tool for customizing your WordPress theme.
Enhancing Your WordPress Website with Divi Theme
Another popular option for customizing your WordPress theme is the Divi theme. Divi is a multipurpose WordPress theme that comes with a built-in visual page builder. With its intuitive interface and extensive customization options, Divi allows you to create stunning and professional websites. It offers a wide range of pre-designed templates, layout options, and modules that can be easily customized to match your design requirements. Divi also provides advanced features like split testing, global elements, and responsive editing, making it a powerful tool for enhancing your WordPress website.
Creating a Custom WordPress Theme from Scratch
While using pre-designed themes and page builders can be convenient, sometimes you may need a completely custom WordPress theme to meet your unique design requirements. In such cases, you can create a custom WordPress theme from scratch. This involves creating the necessary PHP files, adding the required WordPress tags and functions, and styling the theme using CSS. Although creating a custom WordPress theme requires advanced coding skills, it offers complete control over your website's design and functionality.
Utilizing WordPress with Advanced Custom Fields (ACF)
Another way to enhance your WordPress website is by using the Advanced Custom Fields (ACF) plugin. ACF allows you to add custom fields to your WordPress posts, pages, and custom post types. This gives you the flexibility to create custom content types and add additional data to your website. For example, you can add fields for testimonials, portfolios, or product specifications. ACF also provides an intuitive interface for managing and displaying the custom fields, making it a powerful tool for extending the functionality of your WordPress website.
Converting a Custom Design into a WordPress Website
In addition to converting PSD designs, you can also convert custom designs created in other design tools like Adobe XD or Sketch into a WordPress website. The process is similar to PSD to WordPress conversion, where you need to slice the design into individual assets and convert them into HTML and CSS code. Once you have the code ready, you can integrate it into a WordPress theme following the same steps mentioned earlier. This allows you to bring your custom design to life on the WordPress platform and take advantage of its powerful features and functionality.
Converting a Figma Design to WordPress
Figma is another popular design tool that allows you to create stunning web and mobile designs. If you have a design created in Figma and want to convert it into a WordPress website, the process is similar to converting PSD or custom designs. You need to export the design assets from Figma and convert them into HTML and CSS code. Once you have the code ready, you can integrate it into a WordPress theme and customize it further using WordPress plugins and page builders.
Best Practices for Successful PSD to WordPress Conversion
To ensure a successful PSD to WordPress conversion, it is important to follow best practices. Firstly, optimize your images for web by compressing them without compromising quality. This will ensure faster loading times for your website. Secondly, make your theme lightweight by removing unnecessary code and scripts. This will improve the performance and speed of your website. Thirdly, test your website on different devices and browsers to ensure compatibility and responsiveness. Finally, regularly update your WordPress theme, plugins, and core files to keep your website secure and up-to-date.
Conclusion
Mastering the art of PSD to WordPress conversion opens up a world of possibilities for creating stunning and functional websites. Whether you are a beginner or an experienced developer, the step-by-step guide provided in this article will help you navigate the complex process with ease. By understanding the benefits, choosing the right tools, and following best practices, you can convert your unique designs into fully functional WordPress websites. And if you need professional assistance, Xchop is a leading PSD to WordPress conversion service provider that can deliver high-quality custom WordPress themes tailored to your specifications. Don't miss out on the opportunities that PSD to WordPress conversion offers. Start converting your designs from pixel to perfection today!
More Info: https://www.xhtmlchop.com/
#wordpress#wordpressdesign#psd to wordpress#webdesign#figma to html#divitheme#ACF#wordpress elementor#webdevelopment#bootstrap#wordpress acf#web#website#xchop
0 notes
Text
Customs Brokerage Support: Functions and Responsibilities
Introduction Navigating the complicated labyrinth of global commerce requires a thorough awareness of a vast network of rules, paperwork, and legal norms. The function of the customs brokerage service, which acts as a vital mediator between importers, exporters, and customs officials, is crucial to this difficult process. This in-depth tutorial digs into customs brokerage services’ key roles and…

View On WordPress
0 notes
Text
A Great Tool to Get Reviews from AliExpress
AliExpress is an online retail service based in China and owned by the Alibaba Group. Launched in 2010, it is made up of small businesses in China and other locations, such as Singapore, that offer products to international online buyers.
Introduction to the scraping tool
ScrapeStorm is a new generation of Web Scraping Tool based on artificial intelligence technology. It is the first scraper to support both Windows, Mac and Linux operating systems.
Preview of the scraped result
Export to Excel:

1. Create a task
(1) Copy the URL

(2) Create a new smart mode task
You can create a new scraping task directly on the software, or you can create a task by importing rules.
How to create a smart mode task
How to import and export scraping task

Configure the scraping rules
(1)Pre-executed Operation
Click to switch tab to reviews.

(2) Smart mode automatically detects the fields on the page. You can right-click the field to rename the name, add or delete fields, modify data, and so on.
How to set the fields

(3)Set up Paging
ScrapeStorm can automatically detect pagination. Please refer to the following tutorial to learn how to manually set up paging.
How to set up Paging

3. Set up and start the scraping task
(1) Run settings
Choose your own needs, you can set Schedule, IP Rotation&Delay, Automatic Export, Download Images, Speed Boost, Data Deduplication and Developer.
How to configure the scraping task

(2)Wait a moment, you will see the data being scraped.

4. Export and view data
(1) Click "Export" to download your data.

(2) Choose the format to export according to your needs.
ScrapeStorm provides a variety of export methods to export locally, such as excel, csv, html, txt or database. Professional Plan and above users can also post directly to wordpress.
How to view data and clear data
How to export data

0 notes
Video
youtube
Exporting and importing posts in wordpress
#wordpress#wordpress tricks#wordpress tips#web design#export posts#import posts#new posts#tutorial#follow for follow#more followers#follow back#new blogs#news#trending
2 notes
·
View notes
Text
How to Import and Export WordPress Users to CSV with Ultimate CSV Importer
When migrating your website content, it’s important to know that users data is just as significant as Posts, Pages, and Custom Posts data. Migrating all data is simply done using an Import/Export plugin such as WP Ultimate CSV Importer. This plugin can import and export your users/WooCommerce customers data along with their billing and shipping information. It can also let you update existing users’ data.
Using WP Ultimate CSV Importer, you can easily manage the users information without manual entries. It offers a wide range of filters to export only the data you require. Adding to that, you can export and import users with metadata. To create meta fields in the users, you can use third-party add-ons like WP-Members, Members, Ultimate Member and ACF, Toolset, JetEngine, and more.

Is it significant to take a backup of your WordPress site?
Any reasons like hardware or software failure, human error, or server crashes may result in the loss of necessary site data. Taking a backup can protect you from such data loss and help you restore the site data quickly. So you wouldn’t lose your data. Using Ultimate CSV Importer you can take a safe backup of all your content including Posts, Pages, Comments, Categories, WooCommerce data, and more. Here in this blog, we’ll see the complete features of User export using the Ultimate CSV Importer plugin.
How to Export WordPress Users?
Exporting users data is indispensable if you’re about to migrate your site or need to take a backup of all your necessary data. You can export user information, their passwords, WooCommerce plugin-generated fields like billing/shipping information, and other data. Here we will see how to export users with the metadata using Ultimate CSV Importer.
Navigate to the Ultimate CSV Importer (Pro) plugin in your WordPress instance and click the Exporter tab.

Select users and click continue.
The next step is “To export data based on the filters”.
1. Export File Name - Give a name to the export file.
2. Export Type - Here are the four different types of file formats you can export: CSV, XML, XLS, and JSON. Choose anyone.
3. Split the Record - Allows splitting and exporting records. If you have many records to export you can use this option. For example, you give the value 100 after enabling the checkbox and have chosen the CSV file type to export. It will download the files as a zip. Inside the zip file, you can see CSV files. The first exported CSV will contain the first 100 records and the second CSV contains the next hundred records and so on.
4. Using advanced filters, you can export any specific data from WordPress you need. Export data with auto delimiters, specific periods, and specific Inclusions(specific fields selection to export).
5. To schedule your export, just enable the "Do you want to schedule this export" and fill out the details: schedule date, time, frequency, and time zone then click Schedule Export.

If you haven’t used the scheduling option. Click the Export button to export your data and then Download. Now the files will be downloaded locally that contain all the User details and meta fields in your CSV.

Exported CSV

How to Export Users with Metadata?
To begin with, let’s see why users should have custom fields. Custom fields are helpful to collect more information about website users. You can use third-party add-ons to create these additional fields.
If you have created metadata(custom fields) using plugins like ACF, JetEngine, Toolset, Metabox, etc., You can export users data along with its metadata using the Ultimate CSV Importer plugin.
We have the aforementioned export steps. To export specific users fields with metadata follow the below steps
1. If you only want to export metadata and some specific user fields, navigate to the Ultimate CSV Importer Pro plugin. Click Export and select the module “Users” and then click Continue.
2. On the next page click “Export Based on Specific Inclusion”. Here you can select the meta fields and default user fields you want to export.
3. At last, click export and download.
The below picture shows the custom fields assigned for users that were created using ACF, Toolset Types, and MetaBox plugins.

How to Export WooCommerce Customers along with Membership plugin information
In WordPress, the customer who visits and makes a purchase on your WooCommerce store will automatically become a User. This will include some additional fields in the users like Billing and Shipping Information. Ultimate CSV Importer will export all the User details along with Billing and Shipping information.
It also supports membership plugins like WP Member, Ultimate Member, and Members. For example, I have created meta fields using Ultimate Member, and WP Member plugins and assigned them to users. You can see that in the below screenshot.

To export WooCommerce customers with metadata follow the above steps explained to export the User with all the details. And if you want to export only some fields with WooCommerce User information, navigate to the Ultimate CSV Importer plugin >> click Exporter Tab. Select Users >> then click Continue.
Choose “Export Based on Specific Inclusion”. There you can see Billing and Shipping Information and Custom Fields of Membership plugins widgets. Click and select the fields you want to export.

Import WordPress Users using WP Ultimate CSV Importer
Creating large numbers of users or updating existing users or adding new roles, etc manually sucks your time. Ultimate CSV Importer makes the process simple and easy with just a few clicks. You can import Customer Billing Shipping information and metadata using the plugin. Let’s see how to do it.
Click on the Ultimate CSV Importer(Pro) plugin in your WordPress dashboard. It will open up the Import tab. Upload your CSV/XML file. If you don’t have any, download a sample CSV/XML file for reference. Then prepare your own and upload it.

After uploading, select users from Import each record dropdown. Continue with New Item to import the new users or choose Existing Items to update the old users data. All the file header fields must be mapped to WordPress field headers. User Login, User Email, and Language are mandatory fields. Skip the media handling section. In the Import configuration section, there are 4 different options available to configure your import. Enable safe prestate Rollback (Backup before import) - Import can be reverted to the previous state if any issues arise. Do you want to SWITCH ON Maintenance mode while import? - To notify the visitors that the site is under maintenance mode. Do you want to handle the duplicate on existing records? - Enable this to truncate the duplicate records.
Do you want to Schedule this Import? - Fill out all the details necessary to run the data import at a particular time.
Click Import to finish the process.
You can verify the status in Admin View/Web View by clicking the “View Log” button.
How to Import Users with Metadata?
Follow the above steps to import the User. If you have to add additional columns in your CSV that are the meta fields. At the time of configuring import, in the mapping section, a new widget will appear for mapping custom fields so you have to map the CSV headers with WordPress fields.
As mentioned above, the Ultimate CSV Importer plugin supports meta fields created with plugins like JetEngine, ACF, toolset, Meta Box, etc., Know the compatible plugins listed here.
For instance, I created an ACF and Types fields and assigned them to the User. In the mapping section, new widgets with naming ACF Pro Fields and Types Custom Fields will appear. You can see that in the below screenshot.

How to Import WooCommerce Users and Membership plugin information
Not only exporting, but Ultimate CSV Importer also supports importing data into Membership plugins like WP Member, Ultimate Member, and Members plugins. Furthermore, you can import the WooCommerce Billing and Shipping Information of the User.
1. After you upload your file inside the plugin, choose "Users" from the drop-down menu.
2. Then in the Mapping section, along with the default user field, the WooCommerce Billing Shipping Information widget and Membership custom field widget will appear.
3. Map all the fields and next continue to Import.
How does it work with Passwords?
In the plugin page, go to Settings >> General Settings >> Send password to user. Enable the “Send password to user” toggle to send passwords via email.

To provide customized passwords to the users, prepare your CSV with the password assigned to users and import it. Otherwise, the plugin will automatically generate the password and share it with the users via email.
Note: To send passwords via email, make sure you have enabled and configured Easy WP SMTP in your WordPress.
How to update WordPress Users?
When you decide to update existing User data, begin to export the users data from your WordPress and make all necessary changes to the exported CSV file, and save it. Then import the file with our plugin.
Let’s explore how we can accomplish this using the Ultimate CSV Importer plugin.
Updating is just as same as importing, only a few steps will differ.
Likewise, import, and upload the CSV file. Next to that, you have to select Existing Items and map all the fields required to update data.
Select a field from the ‘Update records based on’ dropdown in the Import section, to update existing records based on the selected User Email/ID/Login field. That’s all you need to do.

Tips for successful User Import and Export
File Format: When you are ready to import, make sure your CSV/XML is in a valid format. Use a file validator to check the files before uploading.
Duplicate Checking: Check if there are any duplicate records in your CSV or else enable “Do you want to handle the duplicate on existing records?” in the Import configuration section to restrict the duplicates entering your website.
Trial Import: Try a test import with the User CSV to ensure it is error-free and successfully import. Download CSV & XML file samples here to know how to give or include values to the files.
Backup your WordPress site: Before importing any data it is necessary to keep a safe backup to revert the website data in case of any error occurs in the import process. Use the “Enable safe prestate Rollback (Backup before import)” in the Ultimate CSV Importer plugin to keep a backup before import.
Frequently Asked Questions for WordPress Users Import & Export
1. How do I export my WordPress users to another site?
To get started, install and activate the Ultimate CSV Importer plugin on your WordPress site. Go to the plugin’s Export tab and click on users. Provide a filename and choose a file type. Then click the Export button. After the file is exported, make changes to that file as needed and prepare it for re-import into your new website.
2. Can I export/import WordPress users with their passwords?
Yes, you can. Ultimate CSV Importer plugin exports users data along with their password. You can import users and their passwords, if the password fields are empty the plugin will send auto-generated passwords to the appropriate user email id.
3. I have a specific scenario where I have two user profiles with the same name. How can I change/update the record in this situation?
Yes. Even though the users have the same name they differ in their Email IDs. So you can easily update the users record based on Email ID.
4. Can I import Zip Code with user data?
Yes, it is possible to import Billing and Shipping Information(including Zip Codes) to the users module. Prepare the CSV, with all the details and import the data.
5. Is there a plugin for automated User Import and Export?
There are many plugins available to Import & Export users. Here are a few suggestions:
WP Ultimate CSV Importer
WP All Import
User Meta Pro
Export User Data
When choosing a plugin do detailed research and select the best plugin that fits your needs.
We hope that this article is helpful to you. Please don’t hesitate to reach out to us at [email protected] if you have any inquiries.
#wordpress#wordpress plugins#wordpress tutorial#cms#website development#plugins#blog post#import#wordpresswebsite#csvimporter#users#import export data#wordpress users
0 notes
Text
GSA software verified lists set up guide
Table of ContentsAmazing GSA SER training Rank YouTube Videos Using GSA Search Engine Ranker Easy Tutorial: Use GSA SER for Tier 1 Link Building How to Export Content for GSA SER How to use GSA Search Engine Ranker correctely
The setting options you have are thread count, proxies, and various other things The thread count defaults at 50 which is fine unless you have a more powerful computer system. Mine is quad core with 16 gigs of rams so I can set it up to 250 threads. If you do not, 50 will work just great.
Set it to look for new ones every 60 minutes if there are less than one hundred active. Evaluate all of them and take out the failed proxies if they're older than a couple of hours. The issue with public proxies is that they aren't 100% trusted and you normally receive a high failure rate which winds up wasting your time.
youtube
To input your own proxy list, click Include proxy, import them from clipboard and set them to private. Home. After you include them, return to settings and choose which proxies to use, personal or public and when. Although GSA can support a large series of captcha resolving services, there are two types that you truly need to understand.
It will try to automatically solve them for you which saves money on human based captcha services. The second one is a human based solver like Death By Captcha and these are really inexpensive, around $1. 39 for a thousand resolves. The finest method to set it up is to pick a software based service as your main and then a human based as your secondary.
GSA Search Engine Ranker: Learn To Rank Sites
To set it up click Include and select the services of your choice. Test to check your balance, established your retry limit and the rest of the options. If you don't desire GSA to ask you when fixes aren't effective, untick package that states to ask the user if everything else fails.
Although some people like utilizing the indexer services, I don't think they're actually all that required. Instead you can develop more links to them with GSA SER but if you have actually got them and wish to use them, then do not hesitate to integrate them. A few of the indexers are GSA SEO indexer, Linklicious, Nuclear Link Indexer, Link Pipeline, Lindexed and Back Hyperlinks Indexer.
Another option is the filter which allows you to avoid submissions if the URL if appearing in your blacklist. You can leave all these at defaults. Sites lists allow you to keep a log of various kinds of links GSA Search Engine Ranker finds and sends to. You can then recycle these lists in other projects to speed up the general submission procedure.

Among the alternatives for a brand-new project is to import target URLS and you can do that from a previous website list. After a few months of using GSA Online search engine Ranker, you'll end up having a huge site list of validated and successful links that you can conserve and import quickly in different jobs - GSA SER Video tutorials.
How to Use GSA Search Engine Ranker Tutorial
When you're done setting everything up and all the choices are how you desire them, click Start to get your project going. As quickly as you do that, GSA Search Engine Ranker will begin going out and discovering targets and sending and validating links. During the procedure, you might get turn up from GSA that requires you to answer random concerns.
Select Options tab and you'll see a line that says if a type can't be filled to Ask User or Pick Random. GSA Search Engine Ranker reviews. To stop appear, alter it to Random. You'll have to alter this for every project so keep in mind to do that prior to you start a new one! So that is an overview of the GSA interface and the particular functions and alternatives it has.
Then we are going to develop a project together The left side column is a list of links to where you want to submit to such as: Blog site remark Directory site Forum Image Comment Pingback Social Bookmark Social Network Video Web 2. 0 Wiki Compared to SENuke XCR, this list might not look like a lot.
This is because all of these are platforms utilized by thousands of various websites. WordPress for example is a widely used platform so if you select WordPress article, GSA Online search engine Ranker will publish to all websites using that platform which remains in thousands. Don't be fooled by your first impression, there's limitless materials of sites to post to behind the scenes! In the main window you need to input all the information for your project.
GSA search engine ranker manual by Asia Virtual Solutions
So now you know what you are looking for let me take you through developing your first task. To begin a brand-new job, click New and a new task will pop up. First you need to choose which link types to utilize which will depend on the type of project your running.
We can tick some of these choices here such as Article, Wikis, Web 2. 0's, and Social media. I'm going to leave it relatively easy for this example - GSA SER tutorials. After you have actually picked your link types, you can begin on the remainder of the settings. Enter URL Go into keywords Complete anchor text You can get in multiple URLs which GSA Search Engine Ranker will just turn through at random and make variations of capital and lower case letters.

RANK YOUTUBE VIDEOS WITH GSA SER
The anchor text must be based on your primary keywords and need to remain in spintax format. Your keywords (used to find websites to submit links to) can be the very same as your anchor text if you want, just tick the box that states usage keywords as anchor text. Now the next few alternatives are essential for developing a natural looking profile in GSA Online search engine Ranker so you lower the threat of being penalized by Google Penguin.
Get Kick-ass GSA Search Engine Ranker Help at - Asia Virtual Solutions
A partial match is one that consists of the primary keyword with something else. I really suggest keeping a list of partial anchor text. Some examples of top quality anchor text for my blog site, matthewwoodward. co.uk would be Asia Virtual Solutions, Matthewwoodward and Matthewwoodward. co.uk. Usage scrapebox or Google wonderwheel to get some brand-new words and paste that into here.
How To Build Your Own Auto Accept List With GSA SER
Develops a naked URL of your site that makes your profile appearance much more natural. varies the uppercase and lowercase letters of anchor text Combined, these settings will assist you develop an extremely natural looking profile. Do not believe we're done yet! Under the options tab, we have much more stuff to complete.

GSA Search Engine Ranker Tutorial
Do not tick package to use character spinning! Choose to randomly have spelling mistakes or typos To avoid turn up like previously, remember we have to select package to arbitrarily choose a choice. Have all services fill captchas if you set up captcha resolving services. To utilize tags, you have an option in between keywords or anchor text.
First, select the online search engine. Right click to search by nation which I usually do and this will depend on your target audience and language so I'm going to select UK and United states. I also like to utilize keywords to find target sites. Even though it returns with less, the outcomes are generally more precise and appropriate which is what you want when developing links.
1 note
·
View note
Video
youtube
How To Export & Import WordPress Widgets? Migration Guide https://www.youtube.com/watch?v=e0dCBkd8XZU 🎬🚀🔌 #WordPress #Guide #Tutorial #Migration #Export #Import #Widgets
0 notes
Text
100 Creative Tasks for Designers, Video creators & creatives in general
PS: If you want a tutorial on any of those, let me know and I’ll show you! (There are some things on this list I have to learn as well tho)
Create digital Stickers
Set-up your Bullet Journal
Create a monthly spread
Create a colour palette library
Create Text presets in After Effects or Motion
Create an after effects animation featuring gradient
Create a character
Create a paper-like digital artwork
Create a Youtube intro & Outro if you have a channel
Create poster designs and sell them on Society6
Learn how to use After Effects
Learn Houdini
Create a 3D simulation
Learn how to model a character
Learn Maya
Learn how to render a scene
Inform yourself about lighting
Learn how to use a camera’s manual mode
Learn Adobe Premiere
Create a video of your life so far
Create a video featuring old home videos
Design a logo for yourself or a friend
Learn how to draw a human face
Draw your favourite food
Create a 3D model of your something in your room
Model something from a city you love
Edit photos of your favourite trip
Write a blog post about your favourite trips
Draw yourself in your style
Try a new style
Try an After Effects tutorial by Ben Marriot
Do a Houdini Tutorial
Do a Maya Tutorial
Film the preparation of your favourite meal
Create LUTs for future videos
Learn how to properly export a Youtube video
Learn how to use Adobe Illustrator
Draw something in your room in Illustrator
Create Stock photos and sell them online
Create a mini-game in Unity
Import a Maya Character into Unity
Create your first mobile game in Unity
Think of a story for a book or game
Draw more characters and describe them
Learn basic CSS
Create a blog on Wordpress
Share your progress
Learn the 12 principles of animation
Animate the 12 principles of animation
Create a vision board
Create a list of Software you want to learn
Make an isometric artwork
Create a youtube header
Take product shots of your favourite things
Prepare a meal and practice food photography
Declutter your computer
Declutter your phone
Create some wallpapers and share them with others
Create a digital collage
Create anything inspired by your favourite song
Create something inspired by a movie
Redo your room
Declutter your desk
Create a rigid body simulation
Simulate or animate water
Create sticker designs for yourself
Design your business cards
Design something for 99Designs
Participate in Creative challenges
Draw something for someone you love
Rig a character in Maya
Create a fire simulation
TO BE CONTINUED
#thingstodo#creative#createeveryday#art prompt#aftereffects#adobecreativecloud#videography#photography#prompts#create
5 notes
·
View notes
Text
Psd to wordpress theme software
Psd to responsive wordpress themes. However, transforming a psd file to wordpress template conversion is really tough task, but can be made easy if you find some time to learn about the steps involved in psd to wordpress theme or hire psd to wordpress conversion experts from reputed web development companies. Once you have done that, you would have a well-functioning responsive wordpress theme using bootstrap that you can activate via the wp dashboard.
The only difference in both of them is that mobile themes are just for the look and feel, while wordpress theme defines the visual identity of your website. However, if you are creating a wordpress theme from scratch, you might need to find and add important wordpress tags and functionalities to your theme. A unique, responsive wordpress theme can make or break you site.
Manual conversion can how to convert psd to wordpress any design, no matter how detailed or asymmetrical, and make it show up perfectly on your wordpress site. This conversion tutorial teaches you the basic steps of a theme development process. Also, it is not recommended to create a wordpress theme from scratch if you are not quite familiar with php language.
Before converting a psd to wordpress theme, read our theme development crash course to better understand export kit and wordpress theme support. By default export kit will take a screen shot of your psd document and use this as your wordpress file. If you've designed your wordpress site in photoshop, than there are plenty of ways to get it turned into a real life theme.
This folder will render the wordpress file based on your psd design. The file has a minimal structure as wordpress only recommends some properties that you should include in your psd theme design. Now that you have the html and css files ready, you can start integrating them into the wordpress environment. You can open psd files in photoshop and make more changes in design as you wish.
According to a recent survey conducted by the google webmaster team on google+, over 81% people prefer to use a responsive design approach to make their websites render properly on all kind of devices. Psd is short for photoshop design, therefore psd to wordpress is the process of converting a photoshop design file to a working wp template using bootstrap or other methodologies and frameworks.
1 note
·
View note
Text
35 Tutorials to Learn & Master Adobe Lightroom
Adobe Lightroom is a powerful tool for managing and editing your photos. It’s an application with many apps inside one convenient package. Photographers use it as a hub to take their images from import to export. But like most Adobe apps, it does have a learning curve. While it’s easy to get started with the application, you may soon feel overwhelmed by the many sliders and panels. And you might…

View On WordPress
0 notes
Video
youtube
How to Create a Blog Website - WordPress Extra Theme Tutorial.
How to Create a Blog Website - WordPress Extra Theme Tutorial. How to Create a Blog, Magazine or News Paper Website - WordPress Extra Theme Tutorial 2017 ★ ----- Important Links ----- ★ * Tmd Hosting -- https://bloggdude.com/tmd (Use NAYYAR7 for 7% Discount) * Extra Theme 10% Discount -- http://bloggdude.com/divi * Complete Divi eCommerce Tutorial -- http://bit.ly/2udSuEV * What After Creating this Website --- https://lnkd.in/dwz8hGEf... * Join the Gang --- http://bit.ly/2ch451i * Images &CSS Codes Download -- https://lnkd.in/dw-GacmT... * SiteGround --- https://bloggdude.com/sg (Get 60% OFF Link) * A2 Hosting --- https://bloggdude.com/a2 (Get 51% OFF Link) -------------------------------------- ☑ Watched the video! ☐ Liked? ☐ Subscribed? -------------------------------------- ☑ Facebook -- https://lnkd.in/ds2Y54HE ☑ Twitter -- https://lnkd.in/du7aWCpZ -------------------------------------- 00:00:00 Tour of Demo Blog Website 00:10:48 Purchasing Hosting & Domain Name 00:17:56 Installing WordPress 00:21:33 Installing Extra Blog Theme 00:26:09 Basics of Creating Blog 00:35:50 Creating and Adding Authors 00:40:17 Creating Advance Post No.1 01:18:08 Creating Advance Post No.2 01:37:40 Import & Export Layouts 01:42:09 Changing Home Page Design & Layout 01:47:39 Changing Categories Colors 01:48:49 Creating Menu & Mega Menu 01:50:56 Changing the Size of the Menu & Logo 01:54:22 Creating the Sidebar For more tutorials like this, or to learn how to make a wordpress website feel free to visit my website. Also make sure to subscribe to my newsletter where i give away divi layouts! Note: Some of the above links are Affiliate Links, Which Means I earn Some Commission through that Which helps me Keep Making these Free Videos for You. #wordpress #divi # ExtraTheme #divi-theme #slider #elegantthemes #blog #blogging #website #magazine #newspaper how to create a blog,how to create a blog for beginners,how to create a blog website,Wordpress Tutorial for beginners,Create a News website,How to Create A Blog Website,how to make a blog,how to create a wordpress blog,blog,blogging,how to start a blog,wordpress blog,starting a blog,build a website,make a blog,how to make a wordpress website,start a blog,start a wordpress blog,create a wordpress blog,create a blog,wordpress,extra theme,nayyar shaikh #ecommerce #design #css
0 notes