#amazon aurora tutorial
Explore tagged Tumblr posts
Visit Tumblr Blog
Explore Tumblr blogs with no restrictions, modern design and the best experience.
Last Seen Tumblr Blogs


Fun Fact
Tumblr was attacked by a cross-site scripting worm deployed by the Internet troll group GNAA on Dec 3, 2012.
Text
Amazon Aurora Database Explained for AWS Cloud Developers
Full Video Link - https://youtube.com/shorts/4UD9t7-BzVM Hi, a new #video #tutorial on #amazonrds #aws #aurora #database #rds is published on #codeonedigest #youtube channel. @java @awscloud @AWSCloudIndia @YouTube #youtube @codeonedigest #cod
Amazon Aurora is a relational database management system (RDBMS) built for the cloud & gives you the performance, availability of commercial-grade databases at one-tenth the cost. Aurora database comes with MySQL & PostgreSQL compatibility. Amazon Aurora provides built-in security, continuous backups, serverless compute, up to 15 read replicas, automated multi-Region replication, and…
View On WordPress
#amazon aurora#amazon aurora mysql#amazon aurora postgresql#amazon aurora serverless#amazon aurora tutorial#amazon web services#amazon web services tutorial#aurora database aws#aurora database tutorial#aurora database vs rds#aurora db#aurora db aws#aurora db aws tutorial#aurora db cluster#aurora db with spring boot#aws#aws aurora#aws aurora mysql#aws aurora postgresql#aws aurora tutorial#aws aurora vs rds#aws cloud#what is amazon web services
0 notes
Text
Houseki no Kuni/Land of the Lustrous Wig Tutorial: How to Create a Beautiful Gem-like Finish!


(Left photo taken by @/mystes_photo on Instagram)

When I first saw the characters in Houseki no Kuni, I knew right away that I wanted to cosplay Diamond, but to be honest, I did not like any of the commonly used methods to achieve the iridescent effect at the time (cellophane can easily be damaged, glitter doesn’t have the finish I want, resin is difficult to work with, etc.), so I did some research on ways to achieve a more convincing finish.

My main inspiration came from nail artists achieving a smooth iridescent finish similar to what I wanted for my wig (Fun fact, I became a SimplyNailogical fan during this whole process XD). Once I discovered that iridescent nail powder was the key material I needed, from there, I did some trial and error experiments to figure out the best method to apply it onto a wig and came up with this method!
This is not a styling tutorial on how to create a Diamond wig specifically, but rather how to create the unique gem-like finish on any wig! This tutorial can apply to any Houseki no Kuni/Land of the Lustrous character you’d like! :D
(Disclaimer, this method and the Diamond wig pictured above were created in 2021, but the wig featured in this tutorial was styled in 2024)
Skill level: Intermediate
Prerequisite: At least basic wig styling skills, dependent on character
Materials needed:


Wig (style varies based on character, but I recommend using a thick base wig if you can! )
Wig head that’s close to the size of your head to ensure that style conforms properly to your head size
Wig stand
Got2b spray and glue
Flexbond primer (amount needed varies, but for reference, I was able to cover my Diamond wig with about ¾ of a 16 oz bottle)
Mod Podge Gloss waterbase sealer (optional if Flexbond is tacky enough on its own)
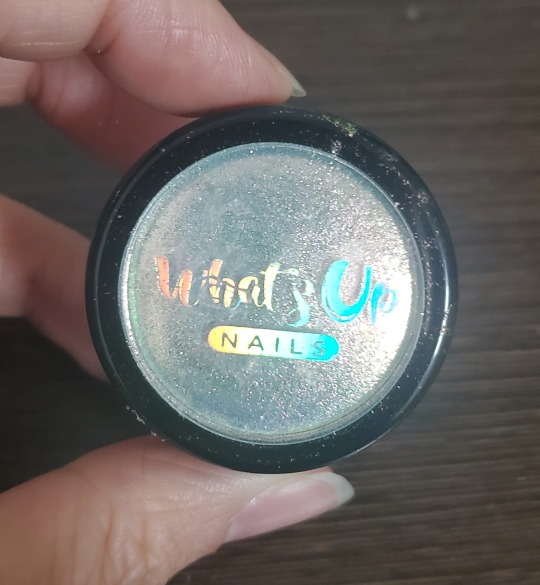
Iridescent/holographic nail powder (any can work depending on the finish you want, but I used the Aurora pigment powder from the brand What’s Up Nails. One little 1 gram jar was enough to cover two Diamond wigs with quite a bit left over, a little goes a long way!)
Clear gloss varnish
Spray bottle
Wide decoupage brush and/or any wide paintbrush
Silicone face mask brush (optional, but I find it great for smoothing out thick coats of Flexbond)
Mini scissors to trim stray hairs and/or excess Flexbond
Latex or vinyl gloves to rub on nail powder
Safety requirements:


Wear gloves to protect your hands. The nail powder is safe to touch barehanded, but the rubbing needed to buff the powder onto the wig may cause skin irritation or chafing if done excessively.
The nail powder is very fine, so I suggest wearing a face mask to avoid breathing it in/blowing it away. There are no toxic fumes or substances used in this tutorial, so a basic face mask should suffice.
Keep the floor covered to protect the Flexbond from getting on it and causing a slipping hazard (also great for easy cleanup!) I initially laid out a bunch of old Amazon bags around the wig stand, but I recently picked up a handy device from Assist Wigs in Japan that was originally designed to catch cut wig hair, but it does a pretty good job catching dripping glue and loose nail powder as well!
Step 1:


Style your wig as you would a normal wig. This is highly dependent on the character you choose, but from experience, I have two tips I would highly recommend:
Make your wig about 10-20% fuller than you want the final wig to be. Like how actual hair flattens when it’s wet, depending on how the wig is styled, the same thing may happen once the Flexbond is added.
Try to keep at least the outer layer of hair on your wig as smooth and free of tangles as possible. When you coat the wig with Flexbond, any knots or irregularities in the wig will be emphasized. To avoid this, thoroughly comb through your wig to get rid of tangles and straighten any kinks or irregularities. Teasing your wig can leave the outside looking messy, so try to stick to the crimping method to add volume to wigs if needed, or at least limit teasing to areas that will be hidden with smoother hair later on.
youtube
I was quite fortunate that there’s an official 3D model video with the perfect references for Diamond’s hair that I was able to use as reference for my wig!
Step 2:
If you haven't already, protect the floor underneath your wig with any sort of protective covering to catch the Flexbond that will drip down from your wig.
Step 3:
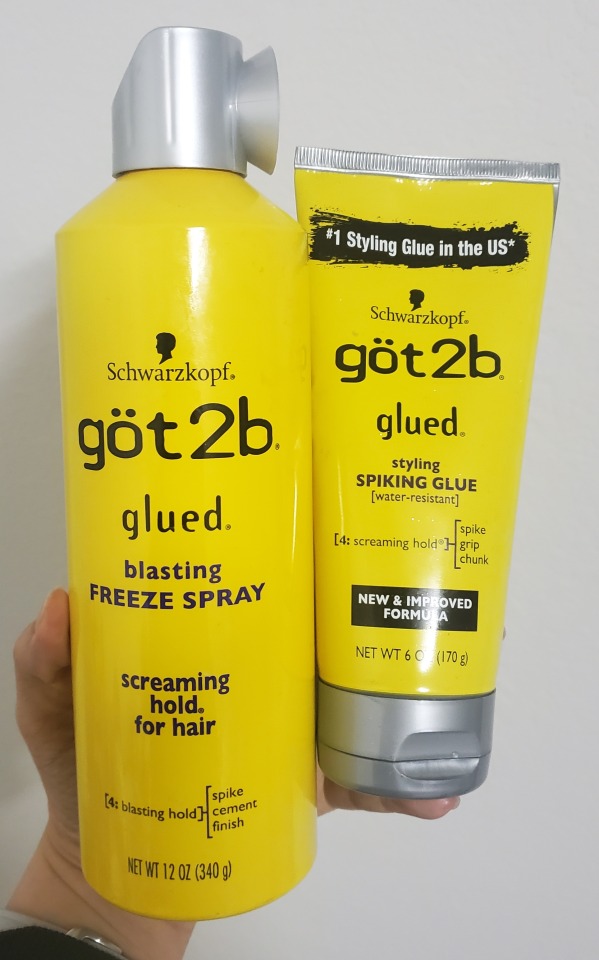
Use Got2B spray and spiking glue to hold the style in place to prepare for the next steps. Apply enough to make the wig relatively stiff, but avoid getting the hair saturated up to the point where the hair looks wet and stringy.
You'll know your wig is ready for Flexbond when your wig is quite stiff on the outside, as shown in the video above.
Step 4:

Take your Flexbond and dilute it with water to make a thin sprayable glue. I recommend about a 1 to 3 ratio of Flexbond to water to create a solution that is thin enough to easily spray yet still strong enough to be an effective glue. I would say the viscosity is similar to milk.
Step 5:
Apply the diluted Flexbond to the wig in a fine mist. If you see any significantly large droplets, use your fingers to carefully smooth them out. Do your best not to press down too hard or oversaturate the wig, as the goal is to create a hard outer shell on your wig rather than to saturate the entire wig in glue.
Repeat Step 5 a few times until your wig feels solid up to the point where the wig hair stays in place even when shaken around (or even turned upside down!) This step is very important because this creates the solid foundation for your wig that will support all the thick Flexbond layers you will be applying later.
Step 6:
Once your wig is solid, coat the outer surface of the wig (you can cover all visible hair if desired, but I like having the hair inside soft against my skin) with a generous coat of Flexbond. You want this first coat to be thick enough to completely cover the outside of the wig’s surface, but not so much that the Flexbond is dripping.
However, if noticeable drips do occur, you can smooth them out with your brush while they’re still wet or trimmed off with scissors if already dried.
Repeat Step 6 for about 2-3 layers or until your wig has a smooth, almost glossy looking appearance, as pictured below.
Below are a few helpful tips to help you with this step!

Remember how if you did Step 5 correctly, you should be able to turn the wig upside down? You can use this to your advantage to help you coat the bottom half of the wig! Just be sure that the top half is completely dry before you place it on a surface. I would also alternate between coating the top half and the bottom half to keep the coats even.
2. You can use the Flexbond to gradually fill gaps between the fibers for a smoother appearance. Also, the more layers, the less emphasized the hair strands will be on the final product.
Step 7:


If you have stray hairs or glue strands that you find distracting, you can trim them off using a sharp pair of scissors. In the example above, you can see how I trimmed the frayed-looking ends of the hair to create nice clean points
Make sure to do this step prior to applying any nail powder to avoid wasting powder that be covering an area that will be cut off.
Step 8 (Possible extra step):
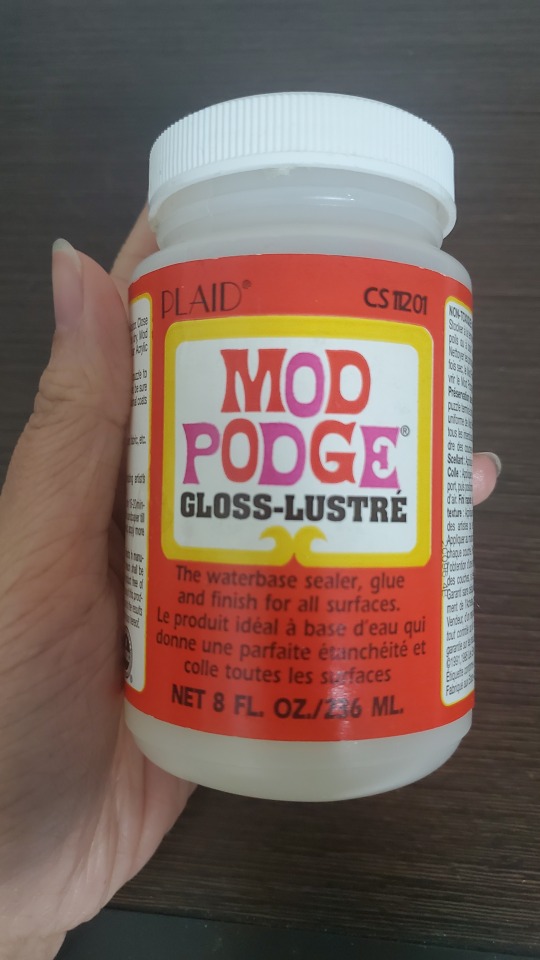
The first time I made my Diamond wig, I was able to rub the nail powder directly onto the Flexbond, which was just tacky enough for the powder to adhere itself to the wig. However, this time around, the Flexbond was not tacky enough and the powder would not adhere properly. I am unsure why this occurred, whether it was the weather/humidity (I created the first wig around Summer 2021 vs. this wig in late winter/early spring 2024) or Rosco tweaking the Flexbond formula sometime in the past few years. Thankfully, I was able to remedy this issue by applying a thin coat of Mod Podge Gloss, which I found stayed temporarily tacky for about 20 minutes after drying.
If you also encounter the same issue, apply a layer of Mod Podge Gloss over your wig. Check it frequently to able to apply the powder as soon as possible once it is dry before the Mod Podge loses its tackiness. Don't be too impatient though, as the Mod Podge will smear if you try to apply the powder before it is dried.
(I’m not sure if using only Mod Podge to create this outer shell would work as opposed to using the Flexbond due to its lower viscosity and lack of flexibility in thicker coats, but I do think it’d be an interesting experiment to try! If it’s successful, it’d be a much more accessible and budget-friendly option!)
*If the Flexbond you applied is tacky enough to apply powder onto directly, you can skip this step and jump ahead to Step 9.
Step 9:
Once your wig is dry, put on your gloves and dip your finger into the nail powder to coat it with a thin layer of powder. Take this powder and buff it onto the surface of your wig, similar to how you would buff nail powder onto your nails. Buff thoroughly until the surface is smooth and looks reflective. It should look almost like metallic/iridescent paint was applied rather than a powdery glitter. Continue this process on the entire wig.
Step 10
If you feel like you need more coverage with the nail powder after applying the first layer, coat the wig with another coat of Flexbond/Mod Podge (depending on what you use to adhere the nail powder), let it dry, then apply another layer of nail powder. You can repeat this process until you satisfied with the coverage. Depending on the powder used, I find that at least 3-4 coats are needed to obtain full coverage and a smooth finish!
Step 11:

Once you are satisfied with the finish, coat the wig in one last layer of Flexbond to protect the finish and add a bit of depth to the glassy finish as opposed to varnish alone.
Step 12:
Add a final coat of gloss varnish to give your wig a beautiful glassy finish! You may notice the Flexbond turning white again underneath the varnish. Do not panic, Flexbond is known to do that when it gets wet! Once everything is dry again, it will return to being clear. :)
You Did it!
Now you have your finished Houseki no Kuni wig with a lovely iridescent finish that is not only beautiful, but also indestructible (seriously, I’ve thrown this thing at a wall and it stayed in perfect condition XD) and super easy to put on (very flexible and goes on like Lego hair XD)!


For my second Diamond wig, I wanted to be experimental and try remaking the wig with a shape more accurate to the show (less visible hair strands and more like solid shapes) and adding subtle stripes of color underneath the Flexbond. I will be honest, I actually ended up liking the first one a tad more ^^; It’s okay though, I still learned a lot, and I feel the mistakes I went through the second time around really helped me perfect the technique for this tutorial :)
Another key thing that I messed up on for the second wig is that due to lack of time, I was unable to apply as many layers of the nail powder as I would've liked. As mentioned in Step 10 above, adding at least 3-4 coats will result in a smooth lovely iridescent finish, as seen here on my first Diamond wig!
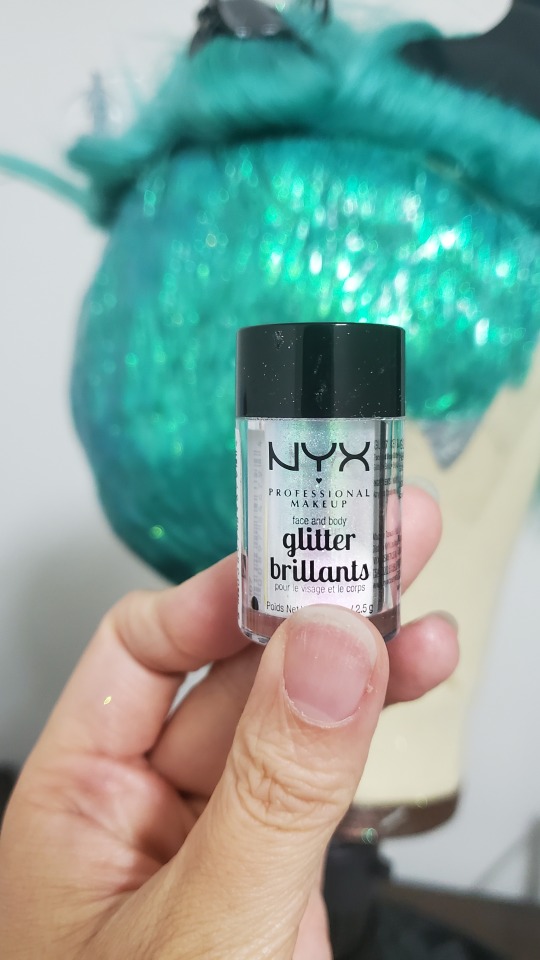
As mentioned before, this tutorial can apply to any Houseki no Kuni character! Here’s a little work-in-progress of my Phos wig! :) I actually used body glitter by Nyx Cosmetics instead of nail powder because it gave a similar smooth finish to the nail powder and gave the wig more of a blue-green-gold shift rather than a full iridescent rainbow spectrum.
Bonus tip: for characters who have multiple distinct layers/sections in their hair, like Phos in this example (undercut and top half), I suggest applying the Flexbond and nail powder in sections as opposed to all at once.
Final words
Thank you so much for taking a look at my tutorial! I can’t wait to see all the lovely wigs that can be made using it~ ^_^
I'm not very active on Tumblr these days, so if you have any questions or need any clarifications for this tutorial, feel free to reach out to me on my Instagram account @/ashtheketchup!
(This tutorial is my entry for @/cosplaytutorialchallenge on IG's Online Cosplay Tutorial Challenge 2024)
31 notes
·
View notes
Text
AWS Certified Solutions Architect (SAA-C03): The Roadmap to Success
Introduction
The AWS Certified Solutions Architect – Associate (SAA-C03) certification is a valuable credential for IT professionals looking to validate their cloud computing expertise. This certification focuses on designing cost-effective, scalable, and secure solutions on the AWS platform. It is widely recognized in the industry and is ideal for those aiming to advance their careers in cloud architecture.

Who Should Take the SAA-C03 Exam?
This certification is designed for individuals who have experience working with AWS and want to enhance their cloud solution architecture skills. It is best suited for solutions architects, developers, DevOps engineers, IT consultants, and professionals who design and implement distributed systems on AWS.
Prerequisites for the Exam
Although there are no official prerequisites, AWS recommends at least one year of hands-on experience designing cloud solutions. Familiarity with AWS core services, networking, security, and best practices is beneficial. Candidates should also have a basic understanding of high-availability architectures and cost optimization strategies.
Exam Structure and Format
The SAA-C03 exam consists of multiple-choice and multiple-response questions. Candidates have 130 minutes to complete the exam, which costs $150. The exam can be taken online or at Pearson VUE testing centers. AWS does not disclose the exact passing score, but candidates should aim for at least 70%–75%.
Exam Domains and Topics
The exam is divided into four key domains:
1. Design Secure Architectures (30%)
This domain focuses on implementing AWS security best practices. Candidates should understand identity and access management (IAM), data encryption, and compliance frameworks.
2. Design Resilient Architectures (26%)
Candidates must demonstrate knowledge of high-availability and fault-tolerant systems. This includes using Auto Scaling, Load Balancers, and AWS services to ensure system reliability.
3. Design High-Performing Architectures (24%)
This section covers performance optimization, database selection, and choosing the right storage and networking solutions. It also includes caching strategies and content delivery networks (CDNs).
4. Design Cost-Optimized Architectures (20%)
This domain tests candidates on AWS cost management tools, pricing models, and methods for optimizing resource utilization to reduce costs.
Key AWS Services to Focus On
Understanding core AWS services is essential for passing the exam. Some important services include:
Compute: Amazon EC2, AWS Lambda, and Elastic Load Balancing.
Storage: Amazon S3, Amazon EBS, and Amazon Glacier.
Databases: Amazon RDS, Amazon DynamoDB, and Amazon Aurora.
Networking: VPC, Route 53, AWS CloudFront, and AWS Direct Connect.
Security: IAM, AWS KMS, AWS Shield, and AWS WAF.
Monitoring: Amazon CloudWatch, AWS Trusted Advisor, and AWS Cost Explorer.
Study Tips for the SAA-C03 Exam
1. Take AWS Official Training
AWS offers a variety of free and paid training courses to help candidates prepare. The AWS Skill Builder platform provides structured learning paths for certification preparation.
2. Gain Hands-On Experience
Practical knowledge is essential for understanding AWS services. Set up a free-tier AWS account and practice deploying and managing cloud resources.
3. Use Practice Exams
Taking mock tests helps candidates identify weak areas. Platforms like Udemy, Whizlabs, and Tutorials Dojo offer high-quality practice exams.
4. Join Study Groups and Online Communities
Engaging with AWS communities on LinkedIn, Reddit, and Discord can provide valuable insights and study resources.
5. Read AWS Whitepapers and Documentation
AWS provides whitepapers on best practices, security, and cost optimization. Reviewing these documents can improve understanding of key exam topics.
Career Benefits of the AWS SAA-C03 Certification
1. Higher Salary Potential
AWS-certified professionals earn competitive salaries, with average earnings exceeding $130,000 per year.
2. Industry Recognition
The certification is globally recognized and demonstrates expertise in cloud computing, making professionals more attractive to employers.
3. Expanded Job Opportunities
Holding this certification can open doors to roles such as AWS Solutions Architect, Cloud Engineer, and DevOps Engineer.
4. Enhanced Cloud Knowledge
The certification process helps candidates develop a deeper understanding of cloud architecture and AWS services.Learn More: AWS Certified Solutions Architect (SAA-C03)
0 notes
Video
youtube
Amazon RDS Performance Insights | Monitor and Optimize Database Performance
Amazon RDS Performance Insights is an advanced monitoring tool that helps you analyze and optimize your database workload in Amazon RDS and Amazon Aurora. It provides real-time insights into database performance, making it easier to identify bottlenecks and improve efficiency without deep database expertise.
Key Features of Amazon RDS Performance Insights:
✅ Automated Performance Monitoring – Continuously collects and visualizes performance data to help you monitor database load. ✅ SQL Query Analysis – Identifies slow-running queries, so you can optimize them for better database efficiency. ✅ Database Load Metrics – Displays a simple Database Load (DB Load) graph, showing the active sessions consuming resources. ✅ Multi-Engine Support – Compatible with MySQL, PostgreSQL, SQL Server, MariaDB, and Amazon Aurora. ✅ Retention & Historical Analysis – Stores performance data for up to two years, allowing trend analysis and long-term optimization. ✅ Integration with AWS Services – Works seamlessly with Amazon CloudWatch, AWS Lambda, and other AWS monitoring tools.
How Amazon RDS Performance Insights Helps You:
🔹 Troubleshoot Performance Issues – Quickly diagnose and fix slow queries, high CPU usage, or locked transactions. 🔹 Optimize Database Scaling – Understand workload trends to scale your database efficiently. 🔹 Enhance Application Performance – Ensure your applications run smoothly by reducing database slowdowns. 🔹 Improve Cost Efficiency – Optimize resource utilization to prevent over-provisioning and reduce costs.
How to Enable Amazon RDS Performance Insights: 1️⃣ Navigate to AWS Management Console. 2️⃣ Select Amazon RDS and choose your database instance. 3️⃣ Click on Modify, then enable Performance Insights under Monitoring. 4️⃣ Choose the retention period (default 7 days, up to 2 years with paid plans). 5️⃣ Save changes and start analyzing real-time database performance!
Who Should Use Amazon RDS Performance Insights? 🔹 Database Administrators (DBAs) – To manage workload distribution and optimize database queries. 🔹 DevOps Engineers – To ensure smooth database operations for applications running on AWS. 🔹 Developers – To analyze slow queries and improve app performance. 🔹 Cloud Architects – To monitor resource utilization and plan database scaling effectively.
Amazon RDS Performance Insights simplifies database monitoring, making it easy to detect issues and optimize workloads for peak efficiency. Start leveraging it today to improve the performance and scalability of your AWS database infrastructure! 🚀
**************************** *Follow Me* https://www.facebook.com/cloudolus/ | https://www.facebook.com/groups/cloudolus | https://www.linkedin.com/groups/14347089/ | https://www.instagram.com/cloudolus/ | https://twitter.com/cloudolus | https://www.pinterest.com/cloudolus/ | https://www.youtube.com/@cloudolus | https://www.youtube.com/@ClouDolusPro | https://discord.gg/GBMt4PDK | https://www.tumblr.com/cloudolus | https://cloudolus.blogspot.com/ | https://t.me/cloudolus | https://www.whatsapp.com/channel/0029VadSJdv9hXFAu3acAu0r | https://chat.whatsapp.com/BI03Rp0WFhqBrzLZrrPOYy *****************************
*🔔Subscribe & Stay Updated:* Don't forget to subscribe and hit the bell icon to receive notifications and stay updated on our latest videos, tutorials & playlists! *ClouDolus:* https://www.youtube.com/@cloudolus *ClouDolus AWS DevOps:* https://www.youtube.com/@ClouDolusPro *THANKS FOR BEING A PART OF ClouDolus! 🙌✨*
#youtube#AmazonRDS RDSPerformanceInsights DatabaseOptimization AWSDevOps ClouDolus CloudComputing PerformanceMonitoring SQLPerformance CloudDatabase#amazon rds database S3 aws devops amazonwebservices free awscourse awstutorial devops awstraining cloudolus naimhossenpro ssl storage cloudc
0 notes
Text
A Step-by-Step Guide to Creating a Highly Available AWS Database with Amazon Aurora and RDS
Introduction Creating a highly available AWS database with Amazon Aurora and RDS is a crucial task for any organization that relies on a scalable and reliable database solution. In this tutorial, we will guide you through the process of setting up a highly available AWS database using Amazon Aurora and RDS. This tutorial is designed for developers and system administrators who have some…
0 notes
Text

☆゚*・゚WOAH is that CULLEN ZEPHYRUS ? i’ve heard they’re a FAE working here as a CRYPTOLOGY TUTORIAL PROFESSOR. they came here because THEY WERE OFFERED A JOB and they’ve been working here for 0 years. as a 667 / 28 year-old, i’m sure they’re skilled. someone told me they’re COCKY & IMPULSIVE but i think they’re INTUITIVE & WILLFUL. i can’t help but think of LEATHER WRIST BANDS TIED TO HIS WRIST, INSTAGRAM FILLED WITH EXOTIC LOCAL PICTURES, A MESSY MOP OF CURLY HAIR, WITH A PHD HANGING BEHIND HIM ON THE WALL when i look at them. ( tommy martinez, cismale, he/him ) — boo (filling astoria’s ex wanted connection)
Born to an angelic mother and a devil for a father. Cullen became fascinated in knowing more of the world he had no ties too. He became bored with the world of Avalon, viewing it as a plan of empty promises and just a spot their parents dumped their regrets. When he turned a 100, he left and only goes back when the pain becomes unbearable to remain out of it.
Cullen became fascinated with the realm of mortals. He enrolled in a normal university in London, and pursued his first bachelors in archaeology. Using this degree, he began exploring the depths of the mortal world that others wouldn’t out of fear of death.
He wanted to chase adventures, and when he returned back to Avalon just shy of fifteen years of leaving it. He met Astoria, fresh from Avalon and he wouldn’t lie. He was taken a back by her. Everything he never thought he would want, but he found himself drawn to her.
He changed his plans, canceled a trip to the Amazon to offer his experiences with Astoria.. The two began dating not long after, and for a short while Cullen thought perhaps he had found the one person he could chase every wish he had with. He wasn’t as well off as her, he’d have to wait several thousand years before he could touch that but he still wanted to give her the world and everything in it.
Which is what he strives to do, he took Astoria to some of the wildest places on earth. He took her to see some of the greatest wonders of the world. Enjoying just getting lost in the world with her.
He had even prepared to propose to her during an aurora borealis, when he was blind sided by her breaking up with him. He took the breakup a bit harder then he’d admit. He put himself back into school, got another degree and began traveling more in depth again. He sought the mysteries of egypt, followed a wild goose chase through south america, climbed several mountains and finally. As the modern age began to become more prevelant.
He put himself back into school, this type for computer information specialist training and cryptology. He fell in love with codes and numbers and took great joy and finding new challenges to keep him engaged.
He hoped that if he never found the world boring, perhaps he’d never end up like the older fae in Avalon.
4 notes
·
View notes
Text
Amazon Relation Database Service RDS Explained for Cloud Developers
Full Video Link - https://youtube.com/shorts/zBv6Tcw6zrU Hi, a new #video #tutorial on #amazonrds #aws #rds #relationaldatabaseservice is published on #codeonedigest #youtube channel. @java @awscloud @AWSCloudIndia @YouTube #youtube @codeonedig
Amazon Relational Database Service (Amazon RDS) is a collection of managed services that makes it simple to set up, operate, and scale relational databases in the cloud. You can choose from seven popular engines i.e., Amazon Aurora with MySQL & PostgreSQL compatibility, MySQL, MariaDB, PostgreSQL, Oracle, and SQL Server. It provides cost-efficient, resizable capacity for an industry-standard…
View On WordPress
#amazon rds access from outside#amazon rds aurora#amazon rds automated backup#amazon rds backup#amazon rds backup and restore#amazon rds guide#amazon rds snapshot export to s3#amazon rds vs aurora#amazon web services#aws#aws cloud#aws rds aurora tutorial#aws rds engine#aws rds explained#aws rds performance insights#aws rds tutorial#aws rds vs aurora#cloud computing#relational database#relational database management system#relational database service
1 note
·
View note
Text
Preparing on-premises and AWS environments for external Kerberos authentication for Amazon RDS
As database security becomes more and more essential to the success of a business, managing user access to databases effectively has always been a challenge to database administrators (DBAs) and security officers. Traditional database authentication is based on a username-password mechanism. This method unfortunately requires effort from both DBAs and users to maintain the credentials; it also incurs extra work for security officers from an auditing perspective. Integrating relational database authentication with a centralized authentication service such as Microsoft Active Directory (AD) is a common and proven practice to address this challenge. Kerberos is a network authentication protocol developed by the Massachusetts Institute of Technology (MIT). It uses tickets and symmetric-key cryptography to eliminate the need to transmit passwords over the network. The Kerberos ticket is a certificate issued by an authentication server, encrypted using the server key. Kerberos has been built into Microsoft AD and is designed to authenticate users to network resources, such as Amazon RDS for PostgreSQL, Amazon RDS for Oracle, Amazon Aurora PostgreSQL and Amazon RDS for SQL Server. Amazon RDS for PostgreSQL, Amazon RDS for Oracle, Aurora PostgreSQL and Amazon RDS for SQL Server support external authentication of database users using Kerberos and Microsoft AD, including those running on premises. This feature provides the benefits of single sign-on (SSO) and centralized authentication of database users. Keeping all your user credentials in the same AD saves you time and effort because you can have a centralized place for storing and managing them for multiple database instances. In this series of posts, we demonstrate how to authenticate database users for Amazon RDS for PostgreSQL, Amazon RDS for Oracle, and Aurora PostgreSQL with Kerberos, your on-premises Microsoft AD, and AWS Managed Microsoft Active Directory provided by AWS Directory Service. For external Kerberos authentication for Amazon RDS for SQL Server, please refer to this Blog. Trust between the on-premises AD domain and AWS Managed Microsoft AD domain For the users in your on-premises AD domain to access the Amazon RDS resources in the AWS managed domain, we need to establish a trust relationship between the two domains. Trust relationships provide a mechanism for one domain to allow access to the resources based on the login authentications of another domain. The flow of communication over trusts is determined by the direction of the trust: One-way trust – A unidirectional authentication path created between two domains. In a one-way trust between Domain A and Domain B, when Domain B has configured to trust Domain A, users in Domain A can access resources in Domain B; however, users in Domain B can’t access resources in Domain A. Two-way trust –Domain A trusts Domain B, and Domain B trusts Domain A. This configuration means that authentication requests can be passed between the two domains in both directions. AWS Directory Service supports both one-way and two-way trust. Unless you have specific business requirements, one-way trust is recommended for better security. With one-way trust between your on-premises domain and AWS managed domain, you configure the trust in your on-premises domain as one-way: incoming, and configure the trust in your AWS managed domain as one-way: outgoing. With this configuration, the on-premises domain takes the role of the trusted domain, and the Directory Service managed domain takes the role of the trusting domain. Validated authentication requests travel between the domains in only one direction—allowing accounts in your on-premises domain to authenticate against resources in the AWS managed domain. In this case, users are authenticated by the on-premises domain, whereas Amazon RDS interact only with the AWS managed domain. Directory Service supports two types of trusts: Forest trusts – When you configure a forest trust, you can allow any contiguous namespaced domain in the trusting forest to be accessible to any security principal in the trusted forest. You most likely configure forest trusts if your organization has two or more AD forests. Forest trust provides name suffix routing, which routes the Kerberos authentication requests to the correct domain. External trusts – External trusts enable you to configure one domain in one forest to trust a domain in another forest without enabling a transitive trust. With external trust, name suffix routing is not provided. Microsoft recommends forest trusts where possible. Forest trusts ensure that Kerberos is used whenever possible. Different database management applications running on different platforms (Windows or Linux) for different Amazon RDS engines require different trust types. Amazon RDS for PostgreSQL and Aurora PostgreSQL have the following requirements: Forest trust is required by psql and pgAdmin running on a Windows client. These tools rely on name suffix routing, which is only provided by forest trusts to forward Kerberos authentication requests from an on-premises AD domain to an AWS Managed Microsoft AD domain. Both forest trusts and external trusts work for Java-based software on Windows (such as DBeaver) and for applications running on a Linux client (such as psql). For Linux and Java-based software, Kerberos can forward the authentication requests to the AWS Managed Microsoft AD domain based on the [domain_realm] section in the Kerberos configuration file (commonly known as krb5.conf). For Amazon RDS for Oracle, the trust type can be either forest trust or external trust, because the Kerberos configuration file (commonly known as krb5.conf) is required by SQL Developer and SQL*Plus (on both Windows and Linux) for cross-domain Kerberos authentication. In this post, we use one-way (on-premises domain: incoming and AWS managed domain: outgoing) forest trust between the on-premises domain and AWS managed domain, as shown in following architectural diagram. Initial infrastructure configurations For demonstration purposes, we created three AWS accounts. The account on-prem-account simulates your on-premises environment. Accounts aws-acc-1 and aws-acc-2 simulate your AWS environment: AWS Managed Microsoft AD is created in aws-acc-1 and is shared with aws-acc-2; Amazon RDS resources are created in both aws-acc-1 and aws-acc-2. AD users in on-prem-account log in to the Amazon RDS resources in aws-acc-1 and aws-acc-2 via Kerberos and Microsoft AD authentication from the Windows and Linux client joined the on-premises domain. Important Note: To follow this tutorial you’ll need 3 AWS Accounts. This tutorial will also incur costs of services involved in this demo including following services: Amazon Amazon Elastic Compute Cloud (EC2) AWS Transit Gateway AWS Managed Active Directory Amazon RDS You are responsible for the costs related to your use of any AWS services used while running this Quick Start reference deployment. Prices are subject to change. For more information, see the Cost and Licenses section. The following are the details about the three accounts: on-prem-account – This account has two VPCs: one for the on-premises AD domain onprem.local and one for the on-premises Windows and Linux clients where the on-premises users log in to. The following table summarizes these details. VPC/Subnet CIDR on-prem-ad-vpc 10.10.0.0/16 on-prem-ad-vpc-sn 10.10.0.0/24 on-prem-client-vpc 10.11.0.0/16 on-prem-client-vpc-windows-sn 10.11.0.0/24 on-prem-client-vpc-linux-sn 10.11.1.0/24 aws-acc-1: We create Directory Service in this account. It has two VPCs. The first is for AWS Managed Microsoft AD ad.myaws.com; this directory service is shared with aws-acc-2. The other VPC is for Amazon RDS resources. The following table summarizes these details. VPC/Subnet CIDR aws-acc-1-mad-vpc 10.20.0.0/16 aws-acc-1-mad-sn-1 10.20.0.0/24 aws-acc-1-mad-sn-2 10.20.1.0/24 aws-acc-1-rds-vpc 10.21.0.0/16 aws-acc-1-rds-sn-1 10.21.0.0/24 aws-acc-1-rds-sn-2 10.21.1.0/24 aws-acc-1-rds-sn-3 10.21.2.0/24 aws-acc-2: This account has one VPC for Amazon RDS resources; details shown in following table. VPC/Subnet CIDR aws-acc-2-rds-vpc 10.31.0.0/16 aws-acc-2-rds-sn-1 10.31.0.0/24 aws-acc-2-rds-sn-2 10.31.1.0/24 aws-acc-2-rds-sn-3 10.31.2.0/24 We build our environment for external Kerberos and Microsoft AD authentication for Amazon RDS resources based on the preceding environments. Creating network connections between VPCs To allow on-premises users to access the Amazon RDS resources, network connections need to be in place among on-prem-account, aws-acc-1, and aws-acc-2. There are different options to build network connections between your on-premises infrastructure and the VPC, and network connections between VPCs. AWS Transit Gateway is one of the options and is recommended. AWS Transit Gateway connects on-premises networks and VPCs through a central hub. This simplifies your network and puts an end to complex peering relationships. It acts as a cloud router—each new connection is only made one time. We use AWS Transit Gateway to link VPCs when the VPC connection is required. The solid blue lines in the following diagram indicate the required network connections between VPCs. On-premises AD and AWS Managed Microsoft AD After you create the network connections between VPCs, complete the following steps: In the on-prem-account, we create a Windows EC2 server and promote it to be our on-premises AD and domain controller server with following details: VPC – on-prem-ad-vpc Subnet – on-prem-ad-vpc-sn IP – 10.10.0.192 Domain – onprem.local For instructions, see Set Up Your Environment for Trusts. In the aws-acc-1 account, we create an AWS Managed Microsoft AD with the following details: Edition – Standard Directory DNS name – ad.myaws.com Directory NetBIOS name – ad VPC – aws-acc-1-mad-vpc Subnet – aws-acc-1-mad-sn-1, aws-acc-1-mad-sn-2 IP – 10.20.0.59, 10.20.1.188 Directory ID – d-97671c6bae After creating the AWS Managed Microsoft AD, share it with aws-acc-2. The Amazon RDS resources in aws-acc-2 join this shared AWS Managed Microsoft AD. From aws-acc-1, sign in to the Directory Service console. On the Directories page, select myaws.com. On the Actions drop-down menu, choose Share directory. Select Share this directory with other AWS accounts. For AWS account IDs, enter the ID for aws-acc-2. Choose Add. The share status shows as Pending acceptance. From aws-acc-2, sign in to the Directory Service console. Under Active Directory, choose Directories shared with me. Select the directory ad.myaws.com shared by aws-acc-1 and choose Review. Review the directory sharing invitation, acknowledge the cost, and choose Accept. The directory share status in aws-acc-1 changes from Pending acceptance to Shared. Establishing a one-way forest trust Amazon RDS for PostgreSQL and Aurora PostgreSQL require a forest trust to enable name suffix routing. Name suffix routing allows us to configure how Kerberos authentication requests are routed when we configure a forest trust between two AD forests. Kerberos authentication for Amazon RDS for Oracle works with forest trusts and external trusts because the domain-to-realm mapping is provided by the Kerberos configuration file (krb5.conf). We use a one-way (on-premises domain: incoming, AWS managed domain: outgoing) forest trust in this series of posts because a forest trust is recommended and works for Amazon RDS for PostgreSQL, Amazon RDS for Oracle, and Aurora PostgreSQL. In on-prem-account, create a security group to have the following ports open between the onprem.local server and the VPC and subnets of the AWS Managed Microsoft AD: TCP/UDP 53 – DNS TCP/UDP 88 – Kerberos authentication TCP/UDP 389 – LDAP TCP 445 – SMB The following screenshot is an example of the inbound rules of a security group associated with the onprem.local server. For an on-premises corporate network, the firewall must have the following ports open between your on-premises clients and the VPC and subnets of the AWS Managed Microsoft AD: TCP/UDP 53 – DNS TCP/UDP 88 – Kerberos authentication TCP/UDP 389 – LDAP TCP/UDP 445 – SMB TCP/UDP 464 – Kerberos authentication UDP 123 – NTP UDP 137-138 – Netlogon TCP 135 – RPC TCP 139 – Netlogon TCP 636 – LDAPS (LDAP over TLS/SSL) TCP 3268-3269 – Global Catalog TCP 1024-65535 – Ephemeral ports for RPC ICMP – All In aws-acc-1, open the Amazon VPC console. Choose Security groups. Search for your AWS Managed AD directory ID. In the search results, select the item with the description “AWS created security group for directory ID directory controllers.” On the Outbound rules tab of that security group, choose Edit. Choose Add another rule. For the new rule, enter the following values: Type – All traffic Protocol – All Destination – The traffic that can leave your AWS managed domain controllers and where it can go in your on-premises network. Specify a single IP address or an IP address range in CIDR. Log in to the onprem.local domain controller server. In DNS, choose New Conditional Forwarder. For DNS Domain, enter the domain name of the AWS Managed Microsoft AD. For IP addresses of the master servers, provide the two IPs of the AD. You can ignore the red icon that appears next to the IPs. Choose OK. Creating an incoming forest trust You now create a one-way: incoming forest trust with AWS Managed Microsoft AD ad.myaws.com. On the loprem.local domain controller server, in Active Directory Domains and Trusts, choose Properties. On the Trusts tab, choose New Trust. Choose Next. For Name, enter the name of AWS Managed Microsoft AD (ad.myaws.com). Choose Next. For Trust Type, select Forest trust. Choose Next. For Direction of Trust, select One-way: incoming. Choose Next. For Sides of Trust, select This domain only. Choose Next. For Trust password, enter a password to use when we create the trust relationship in AWS Managed Microsoft AD in aws-acc-1. Choose Next. In the Trust Selections Complete section, review your settings and choose Next. In the Trust Creation Complete section, review your settings and choose Next. For Confirm Incoming Trust, select No, do not confirm the incoming trust. Choose Next. In the final section, choose Finish. Creating an outgoing forest trust Now you can create a one-way: outgoing forest trust in AWS Managed Microsoft AD ad.myaws.com on the Directory Service console in account aws-acc-1. On the Networking & security tab, choose Add trust relationship. For Trust type, select Forest trust. For Existing or new remote domain, enter onprem.local. For Trust password, enter your password. For Trust direction, select One-way: outgoing. For Conditional forwarder, enter 10.10.0.192. Choose Add. The one-way forest trust is established and verified successfully. After the trust is created, log in to the onprem.local domain controller server. On the Trusts tab, choose your domain (ad.myaws.com) and choose Properties. Make sure that the on-premises Microsoft AD domain name includes a name suffix routing that corresponds to the newly created trust relationship. Joining Windows and Linux clients to an on-premises domain Now we create an AD user joedoe@onprem in on-premises AD, and join one Windows client and one Linux client to the on-premises domain onprem.local. Later on, we log in to the Windows and Linux client as joedoe@onprem and connect to Amazon RDS resources with Kerberos and Microsoft AD authentication. Create an AD user joedoe in onprem.local, and make sure that Do not require Kerberos preauthentication is deselected. Create one Windows EC2 server and one Linux EC2 server in on-prem-client-vpc, and join the Windows and Linux server to the on-premises local domain. For the Linux client, configure the /etc/krb5.conf file as the following: [joedoe@ip-10-11-1-23 ~]$ cat /etc/krb5.conf # Configuration snippets may be placed in this directory as well includedir /etc/krb5.conf.d/ includedir /var/lib/sss/pubconf/krb5.include.d/ [logging] default = FILE:/var/log/krb5libs.log kdc = FILE:/var/log/krb5kdc.log admin_server = FILE:/var/log/kadmind.log [libdefaults] dns_lookup_realm = false ticket_lifetime = 24h renew_lifetime = 7d forwardable = true rdns = false default_realm = ONPREM.LOCAL default_ccache_name = /tmp/kerbcache [realms] AD.MYAWS.COM = { kdc = ad.myaws.com admin_server = ad.myaws.com } ONPREM.LOCAL = { kdc = onprem.local admin_server = onprem.local } [domain_realm] .ad.myaws.com = AD.MYAWS.COM ad.myaws.com = AD.MYAWS.COM .onprem.local = ONPREM.LOCAL onprem.local = ONPREM.LOCAL .rds.amazonaws.com = AD.MYAWS.COM .amazonaws.com.cn = AD.MYAWS.COM .amazon.com = AD.MYAWS.COM Summary In this post, we talked about the difference between two domain-trust directions, one-way and two-way trust, and the difference between two trust types: forest trust and external trust. To enable external Kerberos authentication for Amazon RDS, a one-way (on-premises domain: incoming, AWS managed domain: outgoing) forest trust is recommended between the on-premises domain and AWS managed domain. We then created the infrastructure and resources for the external Kerberos authentication for Amazon RDS based on three AWS accounts. Now we have achieved the following: Network connections on the on-premises account, aws-acc-1, and aws-acc-2 via AWS Transit Gateway. An AWS Managed Microsoft AD ad.myaws.com in aws-acc-1 and shared with aws-acc-2. A one-way (on-premises domain: incoming, AWS managed domain: outgoing) forest trust between the on-premises AD domain onprem.local and AWS Managed Microsoft AD domain ad.myaws.com. A Windows client and Linux client joined to the on-premises AD domain. An on-premises AD user joedoe@onprem, who can log in to the Windows and Linux client with AD authentication. With this infrastructure in place, we’re now ready for the forthcoming series of posts: Using external Kerberos authentication with Amazon RDS for PostgreSQL, in which you create Amazon RDS for PostgreSQL instances in aws-acc-1 and aws-acc-2 and enable Kerberos and Microsoft AD authentication for database users; Using external Kerberos authentication with Amazon RDS for Oracle; and Using external Kerberos authentication with Amazon Aurora PostgreSQL. About the Authors Zhen Wang is an RDS Cloud Support Engineer at Amazon Web Services. Sundar Raghavan is a Senior Specialist Solutions Architect at Amazon Web Services. https://aws.amazon.com/blogs/database/preparing-on-premises-and-aws-environments-for-external-kerberos-authentication-for-amazon-rds/
0 notes
Video
youtube
Amazon RDS Proxy | Enhance Database Performance and Security
Amazon RDS Proxy is a fully managed database proxy service that improves the performance, scalability, and availability of your relational databases. It acts as an intermediary between your application and the database, ensuring optimized connections and enhanced security without requiring changes to your application code.
Key Features Covered in This Video: 1. Connection Pooling: - Efficiently manages thousands of database connections to handle high-concurrency workloads. - Reduces overhead by reusing existing database connections.
2. Improved Database Performance: - Minimizes connection establishment overhead for high-traffic applications. - Optimizes resource usage, especially during traffic spikes.
3. Enhanced Security: - Protects database credentials with AWS Secrets Manager integration. - Ensures secure connections to your database by handling authentication and encryption.
4. Automatic Failover: - Seamlessly switches to a standby instance during database failovers, ensuring high availability.
5. Compatibility with Major Engines: - Supports Amazon Aurora, MySQL, and PostgreSQL databases.
Hands-On Demonstration: - Setting Up RDS Proxy: Step-by-step guide to creating and configuring an RDS Proxy for your database. - Integrating with Applications: How to update your application to connect through the RDS Proxy. - Testing Performance and Security: Evaluate the benefits of connection pooling and automated failovers in real-time scenarios.
Who Should Watch This Video? - Developers and architects looking to optimize database performance for high-concurrency applications. - DevOps engineers focused on improving database availability and scalability. - AWS users aiming to enhance security for database connections.
Benefits of Using Amazon RDS Proxy: - Reduced Latency: Ideal for serverless applications and microservices requiring fast and consistent database access. - Cost Optimization: Efficient connection management reduces database resource consumption. - Simplified Authentication: Securely connect applications to databases without storing credentials.
Tools and AWS Services Covered: - Amazon RDS Proxy - AWS Secrets Manager - Amazon Aurora (MySQL and PostgreSQL compatible) - AWS Management Console - AWS SDKs
By the end of this tutorial, you’ll understand how to configure and utilize Amazon RDS Proxy to improve your database’s performance, scalability, and security.
#amazon #rds #database #S3 #aws #devops #amazonwebservices #free #awscourse #awstutorial #devops #awstraining #cloudolus #naimhossenpro #ssl #storage #cloudcomputing #dbs #free
***************************** *Follow Me* https://www.facebook.com/cloudolus/ | https://www.facebook.com/groups/cloudolus | https://www.linkedin.com/groups/14347089/ | https://www.instagram.com/cloudolus/ | https://twitter.com/cloudolus | https://www.pinterest.com/cloudolus/ | https://www.youtube.com/@cloudolus | https://discord.gg/GBMt4PDK | https://www.tumblr.com/cloudolus | https://cloudolus.blogspot.com/ | https://t.me/cloudolus | https://www.whatsapp.com/channel/0029VadSJdv9hXFAu3acAu0r | https://wa.me/message/5CU3EUNG7KMJA1 *****************************
*🔔Subscribe & Stay Updated:* Don't forget to subscribe and hit the bell icon to receive notifications and stay updated on our latest videos, tutorials & playlists! *ClouDolus:* https://www.youtube.com/@cloudolus *THANKS FOR BEING A PART OF ClouDolus! 🙌✨*
#youtube#amazon rds proxyaws rds proxyaws database proxycloudamazon proxycloud computingamazonaws tutoriallalicat proxyrds proxyamazon web servicesaw#cloudolus#aws#free#AWS Bangla#ClouDolusPro
1 note
·
View note
Text
A Step-by-Step Guide to Creating a Secure and Scalable AWS Database
Introduction Creating a secure and scalable AWS database is a crucial aspect of any modern application. In this comprehensive tutorial, we will guide you through the process of setting up a secure and scalable AWS database using Amazon Aurora and RDS. This tutorial is designed for developers and system administrators who want to learn how to create a robust and reliable database solution for…
0 notes
Text
Seven Clarifications On Simple Canvas Painting Ideas For Beginners | simple canvas painting ideas for beginners
It’s Wednesday afternoon and our home is abnormally quiet. The accepted self-isolation soundtrack of my two adolescent daughters shouting, singing, arguing and bedlam as they hula hoop, skip, jump, ball and hop from aurora to black has been muted.

10+ Easy Canvas Painting Ideas for Christmas 10 – simple canvas painting ideas for beginners | simple canvas painting ideas for beginners
Instead, the girls, ages 5 and 7, are sitting in blackout at a table, creating their actual own Joan Miro-inspired paintings during a alive online art chic — one of a cord of basic activities currently accessible to accouchement ashore at home due to the coronavirus pandemic.
Such a moment of calm is as adored as it is abnormal in the accepted “#stayhome” altitude of Tokyo — in our domiciliary at least. As in endless countries beyond the globe, it’s a behemothic claiming for abounding families in Japan to acclimatize to the cease of schools and nurseries, after the accouchement accepting bored, activity crazy or axis beastly (not to acknowledgment the acumen of the developed ups).

Easy Drawing Ideas On Canvas – simple canvas painting ideas for beginners | simple canvas painting ideas for beginners
Our moment of cursory calm came address of Kodomo Edu International School, one decidedly aesthetic academy specializing in Reggio Emilia-style English and art acquaint in Tokyo’s Nakameguro district. While my girls commonly appear in person, classes accept now switched online and are accessible to accouchement beyond the country.
Offering admonition to parents with active adolescent ones at home, Yoshimi Ueda, architect and ambassador of Kodomo Edu, says: “Don’t anguish about accepting them belief the bookish ancillary too much. Now is the best time for accouchement to accompany their own interests. So accept to their absolute articulation and accommodate an ambiance they can explore.

10 Easy Canvas Painting Ideas To Take On | Homesthetics .. | simple canvas painting ideas for beginners
“Through exploring art abstracts and creating assignment in accord with peers, accouchement will be able to breeding their own creativity, beforehand the aplomb to accurate their account and acquisition their own voices.”
And there are affluence of means to do this. From painting to dancing to science, a bulk of avant-garde online classes accept circumscribed up in contempo weeks. Not apathy the endless chargeless DIY activities and account begin online (tip: don’t bandy abroad old Amazon packaging or toilet rolls). Here’s my aces of some of the best.

40 Easy Acrylic Canvas Painting Ideas for Beginners – simple canvas painting ideas for beginners | simple canvas painting ideas for beginners
Acceptable morning, teacher: Fernando Saiki active up art chic at Kodomo Edu International School.
Fun, beginning and creative, Kodomo Edu International Academy has briefly switched to an online program, with Zoom classes in English and art for accouchement amid the ages of 5 and 9. English is accomplished by friendly, acute built-in speakers (levels ambit from abecedarian to bilingual) with an interactive, antic bend (my youngest babe admired active about the abode counting all the ablaze bulbs in one exercise). Art is a big highlight: the school’s beforehand art teacher, Fernando Saiki (whose assignment was afresh apparent at Maison Hermes in Tokyo), acclaim guides accouchement to actualize their actual own masterpieces

10 Beautiful DIY Canvas Painting Ideas for Your Home | Shutterfly – simple canvas painting ideas for beginners | simple canvas painting ideas for beginners
Seven Clarifications On Simple Canvas Painting Ideas For Beginners | simple canvas painting ideas for beginners – simple canvas painting ideas for beginners | Pleasant in order to my website, in this period I’m going to teach you in relation to keyword. And today, this is the 1st graphic:

Simple canvas painting for beginners | DIY video tutorial – simple canvas painting ideas for beginners | simple canvas painting ideas for beginners
Why not consider impression over? will be of which remarkable???. if you think so, I’l d explain to you many impression all over again below:
So, if you’d like to receive these great shots related to (Seven Clarifications On Simple Canvas Painting Ideas For Beginners | simple canvas painting ideas for beginners), click on save button to store these photos to your pc. They are ready for obtain, if you love and want to grab it, simply click save symbol on the article, and it will be immediately down loaded in your pc.} Finally if you wish to have unique and recent photo related to (Seven Clarifications On Simple Canvas Painting Ideas For Beginners | simple canvas painting ideas for beginners), please follow us on google plus or save this page, we attempt our best to present you regular up-date with fresh and new shots. We do hope you enjoy staying right here. For many updates and recent news about (Seven Clarifications On Simple Canvas Painting Ideas For Beginners | simple canvas painting ideas for beginners) pics, please kindly follow us on tweets, path, Instagram and google plus, or you mark this page on book mark section, We try to provide you with up grade periodically with fresh and new graphics, love your surfing, and find the perfect for you.
Thanks for visiting our website, articleabove (Seven Clarifications On Simple Canvas Painting Ideas For Beginners | simple canvas painting ideas for beginners) published . Today we are pleased to declare that we have found an extremelyinteresting nicheto be reviewed, namely (Seven Clarifications On Simple Canvas Painting Ideas For Beginners | simple canvas painting ideas for beginners) Some people trying to find specifics of(Seven Clarifications On Simple Canvas Painting Ideas For Beginners | simple canvas painting ideas for beginners) and definitely one of them is you, is not it?

Tulips BEGINNER EASY Acrylic Painting Tutorial – YouTube – simple canvas painting ideas for beginners | simple canvas painting ideas for beginners

40 Acrylic Painting Tutorials & Ideas For Beginners .. | simple canvas painting ideas for beginners

40 Easy Canvas Painting Ideas For Art Lovers | Easy canvas .. | simple canvas painting ideas for beginners

cool painting ideas – simple canvas painting ideas for beginners | simple canvas painting ideas for beginners
The post Seven Clarifications On Simple Canvas Painting Ideas For Beginners | simple canvas painting ideas for beginners appeared first on Wallpaper Painting.
from Wallpaper Painting https://www.bleumultimedia.com/seven-clarifications-on-simple-canvas-painting-ideas-for-beginners-simple-canvas-painting-ideas-for-beginners/
0 notes
Photo

AWS Certification Training Free AWS Amazon Tutorials: How to create an Amazon Aurora Global Database http://ehelpdesk.tk/wp-content/uploads/2020/02/logo-header.png [ad_1] Watch this FREE AWS Hands-On Lab... #amazonaws #amazonwebservices #aws #awsamazon #awsaurora #awsauroradatabase #awscertification #awscertificationtraining #awscertified #awscertifiedcloudpractitioner #awscertifieddeveloper #awscertifiedsolutionsarchitect #awscertifiedsysopsadministrator #awscloud #awscloudtraining #awsexam #awsfree #awsfreetutorialsforbeginners #awsfreetutorialsseries #awshandson #awshowto #awssolutionsarchitect #awstraining #awstutorialonline #ciscoccna #cloudcomputing #comptiaa #comptianetwork #comptiasecurity #cybersecurity #ethicalhacking #freeaws #it #kubernetes #linux #microsoftaz-900 #microsoftazure #networksecurity #software #webamazonservices #windowsserver
0 notes
Photo

Got 10 minutes? Learn how to build continuous read & write availability applications with Amazon Aurora Multi-Master using our getting started tutorial! https://t.co/I7GupgIxGe https://t.co/irBe9RNmcK (via Twitter http://twitter.com/awscloud/status/1176874758820044800)
0 notes
Text
How to Make Your Amazon Alexa More Vision Accessible
You have to use VoiceView screen reader feature to make your Amazon Alexa more vision accessible. Once you open a screen, VoiceView feature will read out the screen name and you can press on any object on the screen to hear the object name and text. Here’s how you can use this feature:
Here’s how to make your Amazon Alexa More Vision Accessible

Steps for Using the VoiceView Screen Reader Feature
• Slide down by going to the upper side of the display.
• After that, press on the Settings tab.
• Select the Accessibility option.
• Choose the VoiceView Screen Reader option.
• Press on the VoiceView to enable it.
The Amazon Alexa changes into VoiceView mode, and its voice indicates “VoiceView ready.” Now, you will get the tutorial for the VoiceView Screen Reader Feature. You have to go through the tutorial for the basic understanding. After going through the tutorial, you can move forward to the remaining steps. When the VoiceView screen reader feature is turned on, the interacting settings get changed automatically. You should know about the three VoiceView screen reader gestures listed below:
1. To listen to the title or text linked with a display, you need to press that object.
2. For opening the display object, press the object for choosing it and after that, click twice on the space provided on display.
• Press on the VoiceView Preferences option.
• After that, click twice on the space given on the desktop. Now, you will get a menu list of the settings to modify the VoiceView screen reader feature to change the style. Go through the summary mentioned below:
1. VoiceView Tutorial.
You need to open the tutorial which provides you a basic chapter concerning how to use the VoiceView screen reader feature.
2. Identify Capital Letters.
Identifies how VoiceView screen reader feature specifies uppercase letters.
3. Key Echo.
Identifies how VoiceView screen reader feature checks what input you have used while typing text through the system keyboard.
4. Verbosity.
It helps you identify those display elements which VoiceView has mentioned on the desktop.
5. Reading Speed.
It changes the speed by which VoiceView starts reading the text on the screen.
6. Sounds Volume.
It changes the volume or effects of the sound of the VoiceView.
How to Zoom In on Amazon Alexa Device Using Screen Magnifier?
• Slide down by going to the upper side of the display.
• After that, press on the Settings tab.
• Click on the Accessibility option.
• Press on the Screen Magnifier to enable it.
Aurora is an engineer by day and writer by night. Previously, Aurora worked as a certified technicians for a tech hardware startup. In her free time, she likes to write about printers, routers, web browsers, and other technical stuff. She majorly writes for canon, brother, lexmark printer support etc.
Source: Make Your Amazon Alexa More Vision Accessible
0 notes
Link
AWS MasterClass: Go Serverless with AWS Lambda & AWS Aurora ##Edx ##UdemyFreeDiscountCoupons #Aurora #AWS #Lambda #Masterclass #Serverless AWS MasterClass: Go Serverless with AWS Lambda & AWS Aurora The next big thing in Cloud computing is Serverless architecture. So what is this Serverless computing architecture? Traditionally the applications are developed and deployed in servers. Apart from coding, the developer should also look into pre-deployment checks such as storage allocation, and server maintenance. With Serverless computing, the code execution is entirely managed by the cloud provider. Developers can concentrate on the coding part, and the cloud provider takes care of managing, provisioning and maintaining servers for the code deployment. Serverless architecture has an automatic scaling feature which helps to reduce the computing and operational costs. Serverless doesn’t require containerization, developers or programmers will write code in the vendor console. AWS Lambda is a front runner in serverless computing services. Even companies like Netflix, Codepen, Zalora, Coca-Cola, and Nordstrom have embraced AWS serverless. There is no wonder why there is an increased demand for developers with AWS Lambda skills. According to Indeed jobs listings, Average salary of developers with AWS Lambda skills is $121,481. That's why today, we are thrilled to be able to share with you our new training program "AWS MasterClass: Go Serverless with AWS Lambda and Amazon Aurora.” What does the AWS Serverless course offer to you? 1. You will learn AWS Simple Storage Service, its features. How to host a static website (in HTML) using S3. 2. Learn about the basics of API Gateway. How to map URL query strings to variables in backend programs in Lambda and how to use mapping templates in API Gateway. 3. You will learn how to provision and use AWS RDS (MySQL). How to connect to RDS MySQL using a database client from EC2 and your own laptop. 4. You will learn how to provision and use AWS Aurora Serverless Database and connect to it from EC2 instance. 5. You will learn what is a Lambda function. How to host backend in Lambda using Python programming language. You will also learn various features of Lambda and connect to Aurora Serverless database from Lambda Function. 6. For better understanding, you will go through an actual demo of a 3-tier application. Front end tier would be hosted on S3 using HTML. Backend application will be executed using Lambda function, front-end requests would be directed to backend application using AWS API Gateway. DB tier would be hosted on Aurora Serverless. Finally, how to stitch all these components together. What Sets Us Apart? Complete beginner to expert skills – This course does not assume any expertise in the Serverless architecture. We give you step by step instructions, and in fact, we hand hold you through all the exercises together with you. Practical demo tutorials – Where most courses bombard you with dense theory and set you on your way, we believe in developing a deep understanding of not only what you’re doing, but why you’re doing it. That’s why we focus on building up your understanding for infinitely better results down the line. I am not an engineer; will this course still benefit me? Whether you are a start-up founder, a product manager or a project manager - it is quite likely that your organization is already using or will be using these technologies. You might not be interested in learning about new technologies. Well, we don’t blame you for that. But whether you like it or not, any business relies on updating the new technology to survive. Is your IT career on the right track? Well, if you invest your time and bring an eagerness to learn, we guarantee you real, actionable education at a fraction of the cost you can demand as an IT engineer or consultant. We are confident your investment will come back to you in no time. So, if you're ready to make a change and learn how to go serverless, click the "Add to Cart" button below. What are you waiting for? Click the “Add to Cart” button below and get started today with our course “AWS MasterClass: Go Serverless with AWS Lambda and Amazon Aurora.” Let’s do this together! 👉 Activate Udemy Coupon 👈 Free Tutorials Udemy Review Real Discount Udemy Free Courses Udemy Coupon Udemy Francais Coupon Udemy gratuit Coursera and Edx ELearningFree Course Free Online Training Udemy Udemy Free Coupons Udemy Free Discount Coupons Udemy Online Course Udemy Online Training 100% FREE Udemy Discount Coupons https://www.couponudemy.com/blog/aws-masterclass-go-serverless-with-aws-lambda-aws-aurora/
0 notes
Text
RT @awscloud: Want to learn how to build a Serverless application? Use this step-by-step tutorial to create a message processing application with Aurora Serverless. https://t.co/Qv8jA9JzTn? https://t.co/LWyYwwuOqU
Want to learn how to build a Serverless application? Use this step-by-step tutorial to create a message processing application with Aurora Serverless.https://t.co/Qv8jA9JzTn? pic.twitter.com/LWyYwwuOqU
— Amazon Web Services (@awscloud) April 30, 2020
via Twitter https://twitter.com/swfideas May 02, 2020 at 02:36PM
0 notes