#aws rds aurora tutorial
Explore tagged Tumblr posts
Visit Tumblr Blog
Explore Tumblr blogs with no restrictions, modern design and the best experience.
Last Seen Tumblr Blogs


Fun Fact
There are dozens of funny blogs to kill time on Tumblr.
Text
Amazon Relation Database Service RDS Explained for Cloud Developers
Full Video Link - https://youtube.com/shorts/zBv6Tcw6zrU Hi, a new #video #tutorial on #amazonrds #aws #rds #relationaldatabaseservice is published on #codeonedigest #youtube channel. @java @awscloud @AWSCloudIndia @YouTube #youtube @codeonedig
Amazon Relational Database Service (Amazon RDS) is a collection of managed services that makes it simple to set up, operate, and scale relational databases in the cloud. You can choose from seven popular engines i.e., Amazon Aurora with MySQL & PostgreSQL compatibility, MySQL, MariaDB, PostgreSQL, Oracle, and SQL Server. It provides cost-efficient, resizable capacity for an industry-standard…
View On WordPress
#amazon rds access from outside#amazon rds aurora#amazon rds automated backup#amazon rds backup#amazon rds backup and restore#amazon rds guide#amazon rds snapshot export to s3#amazon rds vs aurora#amazon web services#aws#aws cloud#aws rds aurora tutorial#aws rds engine#aws rds explained#aws rds performance insights#aws rds tutorial#aws rds vs aurora#cloud computing#relational database#relational database management system#relational database service
1 note
·
View note
Text
AWS Certified Solutions Architect (SAA-C03): The Roadmap to Success
Introduction
The AWS Certified Solutions Architect – Associate (SAA-C03) certification is a valuable credential for IT professionals looking to validate their cloud computing expertise. This certification focuses on designing cost-effective, scalable, and secure solutions on the AWS platform. It is widely recognized in the industry and is ideal for those aiming to advance their careers in cloud architecture.

Who Should Take the SAA-C03 Exam?
This certification is designed for individuals who have experience working with AWS and want to enhance their cloud solution architecture skills. It is best suited for solutions architects, developers, DevOps engineers, IT consultants, and professionals who design and implement distributed systems on AWS.
Prerequisites for the Exam
Although there are no official prerequisites, AWS recommends at least one year of hands-on experience designing cloud solutions. Familiarity with AWS core services, networking, security, and best practices is beneficial. Candidates should also have a basic understanding of high-availability architectures and cost optimization strategies.
Exam Structure and Format
The SAA-C03 exam consists of multiple-choice and multiple-response questions. Candidates have 130 minutes to complete the exam, which costs $150. The exam can be taken online or at Pearson VUE testing centers. AWS does not disclose the exact passing score, but candidates should aim for at least 70%–75%.
Exam Domains and Topics
The exam is divided into four key domains:
1. Design Secure Architectures (30%)
This domain focuses on implementing AWS security best practices. Candidates should understand identity and access management (IAM), data encryption, and compliance frameworks.
2. Design Resilient Architectures (26%)
Candidates must demonstrate knowledge of high-availability and fault-tolerant systems. This includes using Auto Scaling, Load Balancers, and AWS services to ensure system reliability.
3. Design High-Performing Architectures (24%)
This section covers performance optimization, database selection, and choosing the right storage and networking solutions. It also includes caching strategies and content delivery networks (CDNs).
4. Design Cost-Optimized Architectures (20%)
This domain tests candidates on AWS cost management tools, pricing models, and methods for optimizing resource utilization to reduce costs.
Key AWS Services to Focus On
Understanding core AWS services is essential for passing the exam. Some important services include:
Compute: Amazon EC2, AWS Lambda, and Elastic Load Balancing.
Storage: Amazon S3, Amazon EBS, and Amazon Glacier.
Databases: Amazon RDS, Amazon DynamoDB, and Amazon Aurora.
Networking: VPC, Route 53, AWS CloudFront, and AWS Direct Connect.
Security: IAM, AWS KMS, AWS Shield, and AWS WAF.
Monitoring: Amazon CloudWatch, AWS Trusted Advisor, and AWS Cost Explorer.
Study Tips for the SAA-C03 Exam
1. Take AWS Official Training
AWS offers a variety of free and paid training courses to help candidates prepare. The AWS Skill Builder platform provides structured learning paths for certification preparation.
2. Gain Hands-On Experience
Practical knowledge is essential for understanding AWS services. Set up a free-tier AWS account and practice deploying and managing cloud resources.
3. Use Practice Exams
Taking mock tests helps candidates identify weak areas. Platforms like Udemy, Whizlabs, and Tutorials Dojo offer high-quality practice exams.
4. Join Study Groups and Online Communities
Engaging with AWS communities on LinkedIn, Reddit, and Discord can provide valuable insights and study resources.
5. Read AWS Whitepapers and Documentation
AWS provides whitepapers on best practices, security, and cost optimization. Reviewing these documents can improve understanding of key exam topics.
Career Benefits of the AWS SAA-C03 Certification
1. Higher Salary Potential
AWS-certified professionals earn competitive salaries, with average earnings exceeding $130,000 per year.
2. Industry Recognition
The certification is globally recognized and demonstrates expertise in cloud computing, making professionals more attractive to employers.
3. Expanded Job Opportunities
Holding this certification can open doors to roles such as AWS Solutions Architect, Cloud Engineer, and DevOps Engineer.
4. Enhanced Cloud Knowledge
The certification process helps candidates develop a deeper understanding of cloud architecture and AWS services.Learn More: AWS Certified Solutions Architect (SAA-C03)
0 notes
Video
youtube
Amazon RDS Performance Insights | Monitor and Optimize Database Performance
Amazon RDS Performance Insights is an advanced monitoring tool that helps you analyze and optimize your database workload in Amazon RDS and Amazon Aurora. It provides real-time insights into database performance, making it easier to identify bottlenecks and improve efficiency without deep database expertise.
Key Features of Amazon RDS Performance Insights:
✅ Automated Performance Monitoring – Continuously collects and visualizes performance data to help you monitor database load. ✅ SQL Query Analysis – Identifies slow-running queries, so you can optimize them for better database efficiency. ✅ Database Load Metrics – Displays a simple Database Load (DB Load) graph, showing the active sessions consuming resources. ✅ Multi-Engine Support – Compatible with MySQL, PostgreSQL, SQL Server, MariaDB, and Amazon Aurora. ✅ Retention & Historical Analysis – Stores performance data for up to two years, allowing trend analysis and long-term optimization. ✅ Integration with AWS Services – Works seamlessly with Amazon CloudWatch, AWS Lambda, and other AWS monitoring tools.
How Amazon RDS Performance Insights Helps You:
🔹 Troubleshoot Performance Issues – Quickly diagnose and fix slow queries, high CPU usage, or locked transactions. 🔹 Optimize Database Scaling – Understand workload trends to scale your database efficiently. 🔹 Enhance Application Performance – Ensure your applications run smoothly by reducing database slowdowns. 🔹 Improve Cost Efficiency – Optimize resource utilization to prevent over-provisioning and reduce costs.
How to Enable Amazon RDS Performance Insights: 1️⃣ Navigate to AWS Management Console. 2️⃣ Select Amazon RDS and choose your database instance. 3️⃣ Click on Modify, then enable Performance Insights under Monitoring. 4️⃣ Choose the retention period (default 7 days, up to 2 years with paid plans). 5️⃣ Save changes and start analyzing real-time database performance!
Who Should Use Amazon RDS Performance Insights? 🔹 Database Administrators (DBAs) – To manage workload distribution and optimize database queries. 🔹 DevOps Engineers – To ensure smooth database operations for applications running on AWS. 🔹 Developers – To analyze slow queries and improve app performance. 🔹 Cloud Architects – To monitor resource utilization and plan database scaling effectively.
Amazon RDS Performance Insights simplifies database monitoring, making it easy to detect issues and optimize workloads for peak efficiency. Start leveraging it today to improve the performance and scalability of your AWS database infrastructure! 🚀
**************************** *Follow Me* https://www.facebook.com/cloudolus/ | https://www.facebook.com/groups/cloudolus | https://www.linkedin.com/groups/14347089/ | https://www.instagram.com/cloudolus/ | https://twitter.com/cloudolus | https://www.pinterest.com/cloudolus/ | https://www.youtube.com/@cloudolus | https://www.youtube.com/@ClouDolusPro | https://discord.gg/GBMt4PDK | https://www.tumblr.com/cloudolus | https://cloudolus.blogspot.com/ | https://t.me/cloudolus | https://www.whatsapp.com/channel/0029VadSJdv9hXFAu3acAu0r | https://chat.whatsapp.com/BI03Rp0WFhqBrzLZrrPOYy *****************************
*🔔Subscribe & Stay Updated:* Don't forget to subscribe and hit the bell icon to receive notifications and stay updated on our latest videos, tutorials & playlists! *ClouDolus:* https://www.youtube.com/@cloudolus *ClouDolus AWS DevOps:* https://www.youtube.com/@ClouDolusPro *THANKS FOR BEING A PART OF ClouDolus! 🙌✨*
#youtube#AmazonRDS RDSPerformanceInsights DatabaseOptimization AWSDevOps ClouDolus CloudComputing PerformanceMonitoring SQLPerformance CloudDatabase#amazon rds database S3 aws devops amazonwebservices free awscourse awstutorial devops awstraining cloudolus naimhossenpro ssl storage cloudc
0 notes
Text
A Step-by-Step Guide to Creating a Highly Available AWS Database with Amazon Aurora and RDS
Introduction Creating a highly available AWS database with Amazon Aurora and RDS is a crucial task for any organization that relies on a scalable and reliable database solution. In this tutorial, we will guide you through the process of setting up a highly available AWS database using Amazon Aurora and RDS. This tutorial is designed for developers and system administrators who have some…
0 notes
Text
Preparing on-premises and AWS environments for external Kerberos authentication for Amazon RDS
As database security becomes more and more essential to the success of a business, managing user access to databases effectively has always been a challenge to database administrators (DBAs) and security officers. Traditional database authentication is based on a username-password mechanism. This method unfortunately requires effort from both DBAs and users to maintain the credentials; it also incurs extra work for security officers from an auditing perspective. Integrating relational database authentication with a centralized authentication service such as Microsoft Active Directory (AD) is a common and proven practice to address this challenge. Kerberos is a network authentication protocol developed by the Massachusetts Institute of Technology (MIT). It uses tickets and symmetric-key cryptography to eliminate the need to transmit passwords over the network. The Kerberos ticket is a certificate issued by an authentication server, encrypted using the server key. Kerberos has been built into Microsoft AD and is designed to authenticate users to network resources, such as Amazon RDS for PostgreSQL, Amazon RDS for Oracle, Amazon Aurora PostgreSQL and Amazon RDS for SQL Server. Amazon RDS for PostgreSQL, Amazon RDS for Oracle, Aurora PostgreSQL and Amazon RDS for SQL Server support external authentication of database users using Kerberos and Microsoft AD, including those running on premises. This feature provides the benefits of single sign-on (SSO) and centralized authentication of database users. Keeping all your user credentials in the same AD saves you time and effort because you can have a centralized place for storing and managing them for multiple database instances. In this series of posts, we demonstrate how to authenticate database users for Amazon RDS for PostgreSQL, Amazon RDS for Oracle, and Aurora PostgreSQL with Kerberos, your on-premises Microsoft AD, and AWS Managed Microsoft Active Directory provided by AWS Directory Service. For external Kerberos authentication for Amazon RDS for SQL Server, please refer to this Blog. Trust between the on-premises AD domain and AWS Managed Microsoft AD domain For the users in your on-premises AD domain to access the Amazon RDS resources in the AWS managed domain, we need to establish a trust relationship between the two domains. Trust relationships provide a mechanism for one domain to allow access to the resources based on the login authentications of another domain. The flow of communication over trusts is determined by the direction of the trust: One-way trust – A unidirectional authentication path created between two domains. In a one-way trust between Domain A and Domain B, when Domain B has configured to trust Domain A, users in Domain A can access resources in Domain B; however, users in Domain B can’t access resources in Domain A. Two-way trust –Domain A trusts Domain B, and Domain B trusts Domain A. This configuration means that authentication requests can be passed between the two domains in both directions. AWS Directory Service supports both one-way and two-way trust. Unless you have specific business requirements, one-way trust is recommended for better security. With one-way trust between your on-premises domain and AWS managed domain, you configure the trust in your on-premises domain as one-way: incoming, and configure the trust in your AWS managed domain as one-way: outgoing. With this configuration, the on-premises domain takes the role of the trusted domain, and the Directory Service managed domain takes the role of the trusting domain. Validated authentication requests travel between the domains in only one direction—allowing accounts in your on-premises domain to authenticate against resources in the AWS managed domain. In this case, users are authenticated by the on-premises domain, whereas Amazon RDS interact only with the AWS managed domain. Directory Service supports two types of trusts: Forest trusts – When you configure a forest trust, you can allow any contiguous namespaced domain in the trusting forest to be accessible to any security principal in the trusted forest. You most likely configure forest trusts if your organization has two or more AD forests. Forest trust provides name suffix routing, which routes the Kerberos authentication requests to the correct domain. External trusts – External trusts enable you to configure one domain in one forest to trust a domain in another forest without enabling a transitive trust. With external trust, name suffix routing is not provided. Microsoft recommends forest trusts where possible. Forest trusts ensure that Kerberos is used whenever possible. Different database management applications running on different platforms (Windows or Linux) for different Amazon RDS engines require different trust types. Amazon RDS for PostgreSQL and Aurora PostgreSQL have the following requirements: Forest trust is required by psql and pgAdmin running on a Windows client. These tools rely on name suffix routing, which is only provided by forest trusts to forward Kerberos authentication requests from an on-premises AD domain to an AWS Managed Microsoft AD domain. Both forest trusts and external trusts work for Java-based software on Windows (such as DBeaver) and for applications running on a Linux client (such as psql). For Linux and Java-based software, Kerberos can forward the authentication requests to the AWS Managed Microsoft AD domain based on the [domain_realm] section in the Kerberos configuration file (commonly known as krb5.conf). For Amazon RDS for Oracle, the trust type can be either forest trust or external trust, because the Kerberos configuration file (commonly known as krb5.conf) is required by SQL Developer and SQL*Plus (on both Windows and Linux) for cross-domain Kerberos authentication. In this post, we use one-way (on-premises domain: incoming and AWS managed domain: outgoing) forest trust between the on-premises domain and AWS managed domain, as shown in following architectural diagram. Initial infrastructure configurations For demonstration purposes, we created three AWS accounts. The account on-prem-account simulates your on-premises environment. Accounts aws-acc-1 and aws-acc-2 simulate your AWS environment: AWS Managed Microsoft AD is created in aws-acc-1 and is shared with aws-acc-2; Amazon RDS resources are created in both aws-acc-1 and aws-acc-2. AD users in on-prem-account log in to the Amazon RDS resources in aws-acc-1 and aws-acc-2 via Kerberos and Microsoft AD authentication from the Windows and Linux client joined the on-premises domain. Important Note: To follow this tutorial you’ll need 3 AWS Accounts. This tutorial will also incur costs of services involved in this demo including following services: Amazon Amazon Elastic Compute Cloud (EC2) AWS Transit Gateway AWS Managed Active Directory Amazon RDS You are responsible for the costs related to your use of any AWS services used while running this Quick Start reference deployment. Prices are subject to change. For more information, see the Cost and Licenses section. The following are the details about the three accounts: on-prem-account – This account has two VPCs: one for the on-premises AD domain onprem.local and one for the on-premises Windows and Linux clients where the on-premises users log in to. The following table summarizes these details. VPC/Subnet CIDR on-prem-ad-vpc 10.10.0.0/16 on-prem-ad-vpc-sn 10.10.0.0/24 on-prem-client-vpc 10.11.0.0/16 on-prem-client-vpc-windows-sn 10.11.0.0/24 on-prem-client-vpc-linux-sn 10.11.1.0/24 aws-acc-1: We create Directory Service in this account. It has two VPCs. The first is for AWS Managed Microsoft AD ad.myaws.com; this directory service is shared with aws-acc-2. The other VPC is for Amazon RDS resources. The following table summarizes these details. VPC/Subnet CIDR aws-acc-1-mad-vpc 10.20.0.0/16 aws-acc-1-mad-sn-1 10.20.0.0/24 aws-acc-1-mad-sn-2 10.20.1.0/24 aws-acc-1-rds-vpc 10.21.0.0/16 aws-acc-1-rds-sn-1 10.21.0.0/24 aws-acc-1-rds-sn-2 10.21.1.0/24 aws-acc-1-rds-sn-3 10.21.2.0/24 aws-acc-2: This account has one VPC for Amazon RDS resources; details shown in following table. VPC/Subnet CIDR aws-acc-2-rds-vpc 10.31.0.0/16 aws-acc-2-rds-sn-1 10.31.0.0/24 aws-acc-2-rds-sn-2 10.31.1.0/24 aws-acc-2-rds-sn-3 10.31.2.0/24 We build our environment for external Kerberos and Microsoft AD authentication for Amazon RDS resources based on the preceding environments. Creating network connections between VPCs To allow on-premises users to access the Amazon RDS resources, network connections need to be in place among on-prem-account, aws-acc-1, and aws-acc-2. There are different options to build network connections between your on-premises infrastructure and the VPC, and network connections between VPCs. AWS Transit Gateway is one of the options and is recommended. AWS Transit Gateway connects on-premises networks and VPCs through a central hub. This simplifies your network and puts an end to complex peering relationships. It acts as a cloud router—each new connection is only made one time. We use AWS Transit Gateway to link VPCs when the VPC connection is required. The solid blue lines in the following diagram indicate the required network connections between VPCs. On-premises AD and AWS Managed Microsoft AD After you create the network connections between VPCs, complete the following steps: In the on-prem-account, we create a Windows EC2 server and promote it to be our on-premises AD and domain controller server with following details: VPC – on-prem-ad-vpc Subnet – on-prem-ad-vpc-sn IP – 10.10.0.192 Domain – onprem.local For instructions, see Set Up Your Environment for Trusts. In the aws-acc-1 account, we create an AWS Managed Microsoft AD with the following details: Edition – Standard Directory DNS name – ad.myaws.com Directory NetBIOS name – ad VPC – aws-acc-1-mad-vpc Subnet – aws-acc-1-mad-sn-1, aws-acc-1-mad-sn-2 IP – 10.20.0.59, 10.20.1.188 Directory ID – d-97671c6bae After creating the AWS Managed Microsoft AD, share it with aws-acc-2. The Amazon RDS resources in aws-acc-2 join this shared AWS Managed Microsoft AD. From aws-acc-1, sign in to the Directory Service console. On the Directories page, select myaws.com. On the Actions drop-down menu, choose Share directory. Select Share this directory with other AWS accounts. For AWS account IDs, enter the ID for aws-acc-2. Choose Add. The share status shows as Pending acceptance. From aws-acc-2, sign in to the Directory Service console. Under Active Directory, choose Directories shared with me. Select the directory ad.myaws.com shared by aws-acc-1 and choose Review. Review the directory sharing invitation, acknowledge the cost, and choose Accept. The directory share status in aws-acc-1 changes from Pending acceptance to Shared. Establishing a one-way forest trust Amazon RDS for PostgreSQL and Aurora PostgreSQL require a forest trust to enable name suffix routing. Name suffix routing allows us to configure how Kerberos authentication requests are routed when we configure a forest trust between two AD forests. Kerberos authentication for Amazon RDS for Oracle works with forest trusts and external trusts because the domain-to-realm mapping is provided by the Kerberos configuration file (krb5.conf). We use a one-way (on-premises domain: incoming, AWS managed domain: outgoing) forest trust in this series of posts because a forest trust is recommended and works for Amazon RDS for PostgreSQL, Amazon RDS for Oracle, and Aurora PostgreSQL. In on-prem-account, create a security group to have the following ports open between the onprem.local server and the VPC and subnets of the AWS Managed Microsoft AD: TCP/UDP 53 – DNS TCP/UDP 88 – Kerberos authentication TCP/UDP 389 – LDAP TCP 445 – SMB The following screenshot is an example of the inbound rules of a security group associated with the onprem.local server. For an on-premises corporate network, the firewall must have the following ports open between your on-premises clients and the VPC and subnets of the AWS Managed Microsoft AD: TCP/UDP 53 – DNS TCP/UDP 88 – Kerberos authentication TCP/UDP 389 – LDAP TCP/UDP 445 – SMB TCP/UDP 464 – Kerberos authentication UDP 123 – NTP UDP 137-138 – Netlogon TCP 135 – RPC TCP 139 – Netlogon TCP 636 – LDAPS (LDAP over TLS/SSL) TCP 3268-3269 – Global Catalog TCP 1024-65535 – Ephemeral ports for RPC ICMP – All In aws-acc-1, open the Amazon VPC console. Choose Security groups. Search for your AWS Managed AD directory ID. In the search results, select the item with the description “AWS created security group for directory ID directory controllers.” On the Outbound rules tab of that security group, choose Edit. Choose Add another rule. For the new rule, enter the following values: Type – All traffic Protocol – All Destination – The traffic that can leave your AWS managed domain controllers and where it can go in your on-premises network. Specify a single IP address or an IP address range in CIDR. Log in to the onprem.local domain controller server. In DNS, choose New Conditional Forwarder. For DNS Domain, enter the domain name of the AWS Managed Microsoft AD. For IP addresses of the master servers, provide the two IPs of the AD. You can ignore the red icon that appears next to the IPs. Choose OK. Creating an incoming forest trust You now create a one-way: incoming forest trust with AWS Managed Microsoft AD ad.myaws.com. On the loprem.local domain controller server, in Active Directory Domains and Trusts, choose Properties. On the Trusts tab, choose New Trust. Choose Next. For Name, enter the name of AWS Managed Microsoft AD (ad.myaws.com). Choose Next. For Trust Type, select Forest trust. Choose Next. For Direction of Trust, select One-way: incoming. Choose Next. For Sides of Trust, select This domain only. Choose Next. For Trust password, enter a password to use when we create the trust relationship in AWS Managed Microsoft AD in aws-acc-1. Choose Next. In the Trust Selections Complete section, review your settings and choose Next. In the Trust Creation Complete section, review your settings and choose Next. For Confirm Incoming Trust, select No, do not confirm the incoming trust. Choose Next. In the final section, choose Finish. Creating an outgoing forest trust Now you can create a one-way: outgoing forest trust in AWS Managed Microsoft AD ad.myaws.com on the Directory Service console in account aws-acc-1. On the Networking & security tab, choose Add trust relationship. For Trust type, select Forest trust. For Existing or new remote domain, enter onprem.local. For Trust password, enter your password. For Trust direction, select One-way: outgoing. For Conditional forwarder, enter 10.10.0.192. Choose Add. The one-way forest trust is established and verified successfully. After the trust is created, log in to the onprem.local domain controller server. On the Trusts tab, choose your domain (ad.myaws.com) and choose Properties. Make sure that the on-premises Microsoft AD domain name includes a name suffix routing that corresponds to the newly created trust relationship. Joining Windows and Linux clients to an on-premises domain Now we create an AD user joedoe@onprem in on-premises AD, and join one Windows client and one Linux client to the on-premises domain onprem.local. Later on, we log in to the Windows and Linux client as joedoe@onprem and connect to Amazon RDS resources with Kerberos and Microsoft AD authentication. Create an AD user joedoe in onprem.local, and make sure that Do not require Kerberos preauthentication is deselected. Create one Windows EC2 server and one Linux EC2 server in on-prem-client-vpc, and join the Windows and Linux server to the on-premises local domain. For the Linux client, configure the /etc/krb5.conf file as the following: [joedoe@ip-10-11-1-23 ~]$ cat /etc/krb5.conf # Configuration snippets may be placed in this directory as well includedir /etc/krb5.conf.d/ includedir /var/lib/sss/pubconf/krb5.include.d/ [logging] default = FILE:/var/log/krb5libs.log kdc = FILE:/var/log/krb5kdc.log admin_server = FILE:/var/log/kadmind.log [libdefaults] dns_lookup_realm = false ticket_lifetime = 24h renew_lifetime = 7d forwardable = true rdns = false default_realm = ONPREM.LOCAL default_ccache_name = /tmp/kerbcache [realms] AD.MYAWS.COM = { kdc = ad.myaws.com admin_server = ad.myaws.com } ONPREM.LOCAL = { kdc = onprem.local admin_server = onprem.local } [domain_realm] .ad.myaws.com = AD.MYAWS.COM ad.myaws.com = AD.MYAWS.COM .onprem.local = ONPREM.LOCAL onprem.local = ONPREM.LOCAL .rds.amazonaws.com = AD.MYAWS.COM .amazonaws.com.cn = AD.MYAWS.COM .amazon.com = AD.MYAWS.COM Summary In this post, we talked about the difference between two domain-trust directions, one-way and two-way trust, and the difference between two trust types: forest trust and external trust. To enable external Kerberos authentication for Amazon RDS, a one-way (on-premises domain: incoming, AWS managed domain: outgoing) forest trust is recommended between the on-premises domain and AWS managed domain. We then created the infrastructure and resources for the external Kerberos authentication for Amazon RDS based on three AWS accounts. Now we have achieved the following: Network connections on the on-premises account, aws-acc-1, and aws-acc-2 via AWS Transit Gateway. An AWS Managed Microsoft AD ad.myaws.com in aws-acc-1 and shared with aws-acc-2. A one-way (on-premises domain: incoming, AWS managed domain: outgoing) forest trust between the on-premises AD domain onprem.local and AWS Managed Microsoft AD domain ad.myaws.com. A Windows client and Linux client joined to the on-premises AD domain. An on-premises AD user joedoe@onprem, who can log in to the Windows and Linux client with AD authentication. With this infrastructure in place, we’re now ready for the forthcoming series of posts: Using external Kerberos authentication with Amazon RDS for PostgreSQL, in which you create Amazon RDS for PostgreSQL instances in aws-acc-1 and aws-acc-2 and enable Kerberos and Microsoft AD authentication for database users; Using external Kerberos authentication with Amazon RDS for Oracle; and Using external Kerberos authentication with Amazon Aurora PostgreSQL. About the Authors Zhen Wang is an RDS Cloud Support Engineer at Amazon Web Services. Sundar Raghavan is a Senior Specialist Solutions Architect at Amazon Web Services. https://aws.amazon.com/blogs/database/preparing-on-premises-and-aws-environments-for-external-kerberos-authentication-for-amazon-rds/
0 notes
Text
How the Coinbase Security team deployed CTFd to Power our First Capture the Flag contest at Defcon…
How the Coinbase Security team deployed CTFd to Power our First Capture the Flag contest at Defcon 27
By Nishil Shah and Peter Kacherginsky

We recently ran Coinbase’s first Capture the Flag (CTF) competition called Capture the Coin. As part of running the CTF, we needed to setup the underlying infrastructure. In this guide we’ll describe our process from choosing a CTF platform to getting it production ready. This CTF definitely would not have been possible without all the open source contributors, projects, tutorials, and free services we leveraged, so we’re making this guide as a small contribution back to the community. Overall, the process took us a few weeks to setup, but with this guide, you’ll only spend a few days.
Choosing a CTF Platform
We chose CTFd as our CTF platform based on the following criteria:
Challenge Input Interface
Support for Types of Challenges
Free Response (Static and Pattern-Based)
Dynamic Value
Multiple Choice
Custom Plugins
Public Scoreboard
User and Team Registration
Admin Panel
Player Communications
Hints
Active Maintainers
CTFd had support for most of our requirements except for multiple choice questions. However, requirements like having active maintainers was useful when the maintainers quickly patched a bug in a few hours. We also wanted to write challenges that forced users to interact with a real blockchain. This would require some custom development, so we also wanted the ability to build our own custom modules. Anecdotally, a few other CTFs had run successfully on CTFd. Given these requirements, CTFd matched our needs the closest.
CTFd mostly worked out of the box by following the README instructions; however, we did run into one issue. Out of the box, CTFd started running really slow. We did some basic debugging like looking at memory and CPU utilization to see if we needed to upgrade our EC2 instance. In general, resource consumption was generally less than 1%. We eventually found out that using Sync workers was inefficient. We changed the settings to use async gevent workers and correctly setting worker_connections and workers using the advice from this post. This solved our issue and CTFd worked great with very little latency.
Capture the Coin Infrastructure
Setting up and running this CTF was a great learning experience in getting hands-on with AWS and debugging real issues. As appsec engineers reviewing code or infrastructure, we often times can become unsympathetic to how hard an engineers’ job can be when defining security requirements even in a #SecurityFirst engineering culture. Just for something as simple as a CTF, the bill of materials starts to pile up as you can see below.
Cloudflare Free Tier
CTFd
Google Recaptcha v2
Infura
Let’s Encrypt/CertBot
Redis (AWS-managed or locally running)
SES Email Forwarder Lambda (Here’s a guide we found very helpful to setup this lambda)
AWS (Paid Tier)
EC2
IAM
Lambda
RDS Aurora
S3
SES
Here’s a network diagram of what our AWS infrastructure looked like at a high level.
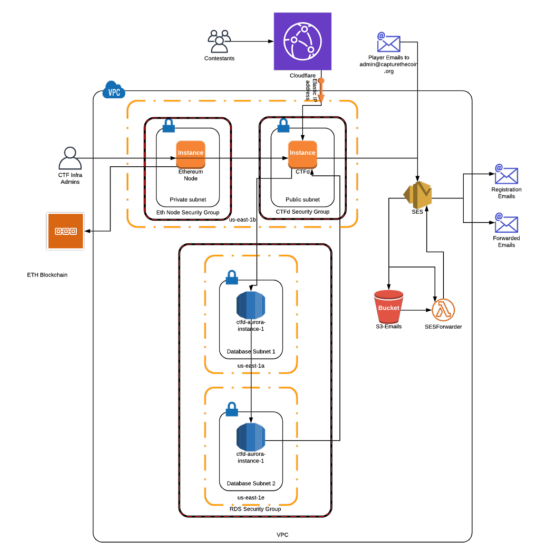
Our vendor choices were typically determined by our own familiarity. We used AWS as our infrastructure provider, and we used Cloudflare as our DoS protection for similar reasons. For email and email verification, we used SES to trigger an email forwarder lambda and save a copy of the email to an S3 bucket. The lambda then pulled the email from the S3 bucket and forwarded the contents to the recipients defined in the lambda. Eventually, we swapped out our EC2 instance hosting an Ethereum node with Infura as this gave us reliable connectivity to the ETH blockchain for the smart contract challenges. Our infrastructure is rather simple compared to the complicated microservice environments today, but there was still some complexity involved.
Our Setup Notes
Signup for AWS Account.
Buy a domain with your favorite provider.
Set up Route53 NS DNS records in AWS.
Set up Route53 MX DNS records in AWS.
Set up Route53 SOA DNS records in AWS.
Set up Route53 SPF DNS records in AWS.
Set up Route53 DKIM DNS records in AWS.
Note: The AWS SES Domain Verification step will require an additional TXT record.
Spin up an EC2 micro instance. You can always resize later.
Attach the right security groups. Initially, we limited external access to private IP ranges so that we didn’t accidentally leak challenges until we started the competition.
Spin up RDS instance. We went with the AWS managed solution because this was the simplest and we wouldn’t have to worry about load balancing or patching.
Follow this guide to get inbound and outbound emails working under your CTF domain.
Install CTFd by cloning the repo and installing dependencies. (We used v2.1.3)
Setup Google Recaptcha v2 for spam and DoS protection.
Setup Infura or your own node if you want Ethereum smart contract challenges.
Setup Let’s Encrypt/Certbot for HTTPS during testing and eventually for connections from Cloudflare to CTFd.
Setup AWS-managed Redis or use a Redis instance locally.
Setup port forwarding 80 to 443 and 443 to 8443 so CTFd doesn’t have to run with sudo and http:// is auto-redirected to https://.
Run CTFd! Note that Unix security best practices still apply like running the application under a limited user.
Run the following commands to set all the environment variables.
# CTFd Database
export DATABASE_URL=
# Web3
export WEB3_PROVIDER_URI=
export GETH_ACCT_PASSWD=
# Redis Caching
export REDIS_URL=
# Infura
export WEB3_INFURA_API_KEY=
export WEB3_INFURA_API_SECRET=
# reCAPTCHA
export RECAPTCHA_SECRET=
export RECAPTCHA_SITE_KEY=
cd CTFd
gunicorn3 -name CTFd —bind 0.0.0.0:8443 —statsd-host localhost:8125 —keyfile /etc/letsencrypt/live/capturethecoin.org/privkey.pem —certfile /etc/letsencrypt/live/capturethecoin.org/fullchain.pem —workers=5 —worker-class=gevent —worker-connections=5000 —access-logfile /home/ubuntu/access.log —log-file /home/ubuntu/error.log “CTFd:create_app()”
We found this guidance for optimizing workers and worker-connections helpful.
When finished testing with your running CTFd instance, setup the competition dates in the CTFd admin interface.
Install the Ethereum Oracle CTFd extension and generate contracts.
Add SES SMTP credentials to CTFd admin interface for user registration if you want email verification.
At this point, the CTF should be entirely setup. Only keep going if you’d like to setup Cloudflare for DoS protection.
Setup Cloudflare DNS and modify the AWS security group for the CTFd box to allow ingress from Cloudflare IPs.
Setup Cloudflare SSL/TLS. SSL — Full (strict) if you still have a valid cert from Let’s Encrypt
Setup Edge Certificates — Cloudflare Universal SSL certificate unless you have the budget and security requirements for a dedicated cert or uploading your own cert.
Setup Cloudflare by enabling Always Use HTTPS, HSTS, TLS 1.3, Automatic HTTP Rewrites, and Certificate Transparency Monitoring
Setup Cloudflare by using minimum TLS version 1.2
You can also setup whitelisting for known good IP addresses in Firewall Tools so that Cloudflare doesn’t challenge requests from these ranges.
Dynamic Oracle
One requirement for the competition was to support Ethereum smart contract challenges, after all, this was called Capture the Coin. If no (testnet) coins could be captured, we would not have lived up to the name.
The contest included the excellent CTFd Oracle plugin by nbanmp which allowed us to process on-chain events such as determining whether or not the deployed smart contract was successfully destroyed by the player. We have modified the original oracle to allow for contract pre-deployment since Ethereum Ropsten network may sometimes be unreliable.
You can find the source code for the oracle and contract deployer here: https://github.com/iphelix/ctc-eth-challenge
Future Steps
In the future, we plan to use the dockerized setup so that it is easy to spin up and down the entire CTFd platform. CTFd already allows for codification of the settings which is helpful in being able to get predictable application deploys. We also would like to codify our infrastructure so that we can get predictable and simple deploys.
Thank you to all the open source contributors without their contributions hosting this CTF would not have been possible.
If you’re interested in working on solving tough security challenges while also creating an open financial system, please join us!
This website contains links to third-party websites or other content for information purposes only (“Third-Party Sites”). The Third-Party Sites are not under the control of Coinbase, Inc., and its affiliates (“Coinbase”), and Coinbase is not responsible for the content of any Third-Party Site, including without limitation any link contained in a Third-Party Site, or any changes or updates to a Third-Party Site. Coinbase is not responsible for webcasting or any other form of transmission received from any Third-Party Site. Coinbase is providing these links to you only as a convenience, and the inclusion of any link does not imply endorsement, approval or recommendation by Coinbase of the site or any association with its operators.
All images provided herein are by Coinbase.
How the Coinbase Security team deployed CTFd to Power our First Capture the Flag contest at Defcon… was originally published in The Coinbase Blog on Medium, where people are continuing the conversation by highlighting and responding to this story.
from Money 101 https://blog.coinbase.com/how-the-coinbase-security-team-deployed-ctfd-to-power-our-first-capture-the-flag-contest-at-defcon-eeb8da3bf2b0?source=rss----c114225aeaf7---4 via http://www.rssmix.com/
0 notes
Link
AWS MasterClass: Go Serverless with AWS Lambda & AWS Aurora ##Edx ##UdemyFreeDiscountCoupons #Aurora #AWS #Lambda #Masterclass #Serverless AWS MasterClass: Go Serverless with AWS Lambda & AWS Aurora The next big thing in Cloud computing is Serverless architecture. So what is this Serverless computing architecture? Traditionally the applications are developed and deployed in servers. Apart from coding, the developer should also look into pre-deployment checks such as storage allocation, and server maintenance. With Serverless computing, the code execution is entirely managed by the cloud provider. Developers can concentrate on the coding part, and the cloud provider takes care of managing, provisioning and maintaining servers for the code deployment. Serverless architecture has an automatic scaling feature which helps to reduce the computing and operational costs. Serverless doesn’t require containerization, developers or programmers will write code in the vendor console. AWS Lambda is a front runner in serverless computing services. Even companies like Netflix, Codepen, Zalora, Coca-Cola, and Nordstrom have embraced AWS serverless. There is no wonder why there is an increased demand for developers with AWS Lambda skills. According to Indeed jobs listings, Average salary of developers with AWS Lambda skills is $121,481. That's why today, we are thrilled to be able to share with you our new training program "AWS MasterClass: Go Serverless with AWS Lambda and Amazon Aurora.” What does the AWS Serverless course offer to you? 1. You will learn AWS Simple Storage Service, its features. How to host a static website (in HTML) using S3. 2. Learn about the basics of API Gateway. How to map URL query strings to variables in backend programs in Lambda and how to use mapping templates in API Gateway. 3. You will learn how to provision and use AWS RDS (MySQL). How to connect to RDS MySQL using a database client from EC2 and your own laptop. 4. You will learn how to provision and use AWS Aurora Serverless Database and connect to it from EC2 instance. 5. You will learn what is a Lambda function. How to host backend in Lambda using Python programming language. You will also learn various features of Lambda and connect to Aurora Serverless database from Lambda Function. 6. For better understanding, you will go through an actual demo of a 3-tier application. Front end tier would be hosted on S3 using HTML. Backend application will be executed using Lambda function, front-end requests would be directed to backend application using AWS API Gateway. DB tier would be hosted on Aurora Serverless. Finally, how to stitch all these components together. What Sets Us Apart? Complete beginner to expert skills – This course does not assume any expertise in the Serverless architecture. We give you step by step instructions, and in fact, we hand hold you through all the exercises together with you. Practical demo tutorials – Where most courses bombard you with dense theory and set you on your way, we believe in developing a deep understanding of not only what you’re doing, but why you’re doing it. That’s why we focus on building up your understanding for infinitely better results down the line. I am not an engineer; will this course still benefit me? Whether you are a start-up founder, a product manager or a project manager - it is quite likely that your organization is already using or will be using these technologies. You might not be interested in learning about new technologies. Well, we don’t blame you for that. But whether you like it or not, any business relies on updating the new technology to survive. Is your IT career on the right track? Well, if you invest your time and bring an eagerness to learn, we guarantee you real, actionable education at a fraction of the cost you can demand as an IT engineer or consultant. We are confident your investment will come back to you in no time. So, if you're ready to make a change and learn how to go serverless, click the "Add to Cart" button below. What are you waiting for? Click the “Add to Cart” button below and get started today with our course “AWS MasterClass: Go Serverless with AWS Lambda and Amazon Aurora.” Let’s do this together! 👉 Activate Udemy Coupon 👈 Free Tutorials Udemy Review Real Discount Udemy Free Courses Udemy Coupon Udemy Francais Coupon Udemy gratuit Coursera and Edx ELearningFree Course Free Online Training Udemy Udemy Free Coupons Udemy Free Discount Coupons Udemy Online Course Udemy Online Training 100% FREE Udemy Discount Coupons https://www.couponudemy.com/blog/aws-masterclass-go-serverless-with-aws-lambda-aws-aurora/
0 notes
Text
Archive & Delete Old Data from an Amazon RDS Aurora MySQL Database
Archive & Delete Old Data from an Amazon RDS Aurora MySQL Database
Over time, as the data in your production database grows, it will inevitably degrade the DB’s performance. When that happens, you know it’s time to get rid of some of that years old data. But of course, you can’t just delete it. You have to archive it first.
The traditional way to do this would be to export the old data using maybe mysqldumpor some other format available in MySQL Workbench.…
View On WordPress
#Archive#Athena#Aurora#AWS#Backup#Console#DevOps#Featured#Guide#How To#MySQL#mysqldump#Parquet#RDS#S3#Tips & Tricks#Tutorial#Workbench
0 notes
Text
Actcastのアーキテクチャ紹介
まえがき
2020年になり、弊社の提供するIoTプラットフォームサービスであるActcastも正式版をリリースしました。まだまだ改善余地はありますが、現状のActcastを支えているAWS上のアーキテクチャを紹介します。
参考
エッジコンピューティングプラットフォームActcastの正式版をリリース - PR TIMES
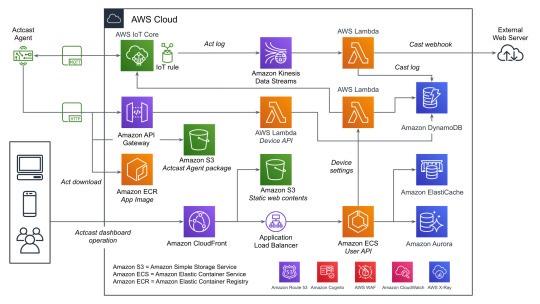
全体の概要
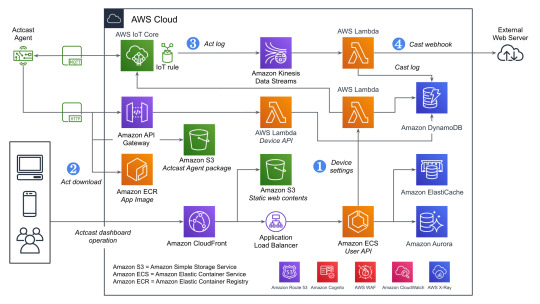
データをやり取りする主要なコンポーネントとしては、以下の3つがあげられます。下記の図を参照する際にこれを念頭においてください。
User API: ウェブのダッシュボードから使用され、グループやデバイスの管理などに使われます。
Device API: エッジデバイスから使用され、デバイスの設定や認証情報などを取得するのに使われます。
AWS IoT Core: MQTTを用いてデバイス側へ通知を送ったり、デバイス側からデータを送信するのに使われます。
すべてを記載しているわけではないですが典型的なデータのながれに着目して図にしたものがこちらになります。(WAFやCognitoなどはスペースの都合でアイコンだけになっています)
Actcast特有の概念であるActやCastという用語についてドキュメントから引用し、そのあと全体の説明をします。
Actとは
デバイス上で実行され、デバイスに様々な振舞いをさせるソフトウェアを Act と呼んでいます。 Actcast に用意されているアプリケーションに、お好みの設定を与えたものが Act になります。
注: 上記の図ではアプリケーションはAppと記載されています。
Castとは
Cast とは Act から届いたデータをインターネットにつなげるものです。 Cast は「どのような場合にインターネットにつなげるか」を指定するトリガー部分と「どのようにインターネットにつなげるか」を指定するアクション部分からなります。
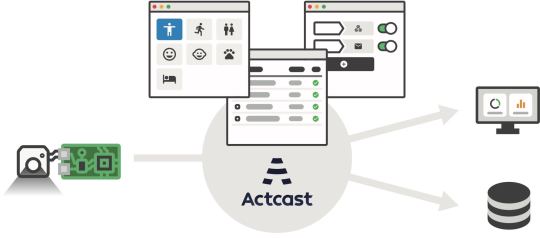
Actcastでのデータの流れ
ユーザーの操作とエッジデバイス上でのデータの流れに着目すると以下のようになります。
Actcastのユーザーはダッシュボードを通じてActのインストールやCastの設定をおこなう
エッジデバイス上で実行されているActcast Agentが設定に基づいたアプリケーションを起動する(Act)
Actが必要に応じてデータを生成する
Castの設定に基づいて生成されたデータを外部システムへ送信する(webhook)
先程の図に上記の番号を記載したのがこちらの図です。
それぞれについて実際のAWSのリソースと絡めながら説明していきます。
1. Device Settings
良くあるウェブアプリケーションと同じ部分は箇条書きで簡単に説明します。
負荷分散はCloudFrontやAWS WAFなどをはさみつつALBを使用
アプリケーションの実行環境としてはECSをFargateで実行(User API)
データの永続化は基本的にAmazon Aurora(PostgreSQL)
キャッシュはElastiCache(Redis)
一部のデータはエッジデバイスから参照されるためワークロードの変化が読めなかったり、スケーラビリティが重要になったりするためDynamoDBを使用する形になっています。ECSのタスクから直接DynamoDBを触っていないのはDynamoDBに関するアクセス権をLambda側に分離するためです。もともとはすべてのDynamoDBへのアクセスパターンごとにLambdaを分けていましたが、さまざまな理由から最近は統合されました。
また、ダッシュボードでユーザー操作があった際にその設定をDynamoDBに保存すると同時にAWS IoTのMQTT経由でActcast Agentに通知を送り、それを契機にAgent自身でDevice APIを使って設定を取得します。Device API自体はAWS IoTのデバイス証明書を用いて認証を行っています。
2. Act download
DynamoDBから設定を取得したActcast Agentは、実行対象のアプリケーションイメージをECRから取得します。(ECRの認証情報はDevice APIから取得しています)
その後、設定に基づきイメージをActとして実行します。設定はアプリケーションによってことなり、典型的には後述のAct logを生成する条件が指定できます(推論結果の確度などを用いて)。
3. Act log
Actは条件によってデータ(Act log)を生成することがあります。 例えば、年齢性別推定を行うActはカメラに写った画像から以下のようなデータを生成します。
{ "age": 29.397336210511124, "style": "Male", "timestamp": 1579154844.8495722 }
生成したデータはAWS IoTを経由して一旦Kinesisのシャードに追加されていきます。Kinesisを挟むことでDynamoDBに対する負荷が急激に上昇した場合でもデータの欠損が発生しにくいようにしています。
4. Cast webhook
Kinesisのシャードに追加されたデータをLambdaのコンシューマーが処理していきます。 この際に、Castの設定(TriggerとAction)をもとにwebhookをするかや送信先を決定します。
Triggerではいくつかの条件が満たされているときに限りActionを実行するように設定することができます。
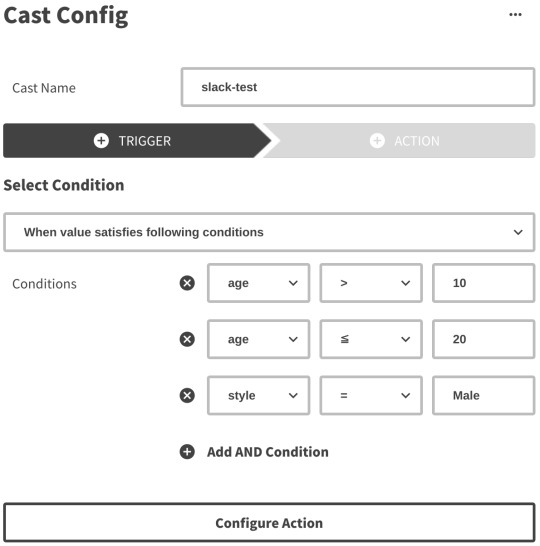
Actionではwebhook先のURLや送信するHTTPリクエストのボディなどを設定できますが詳細はドキュメントを確認してください。
ユーザー設定に基づきリクエスト先が変わるためSSRFなどが起きないような対策もしています。
苦労話
AWS IoT
Device Shadow
AWS IoTのDeviceとして登録するとそれに対応したShadowというものがAWS IoT上から操作できます。 これはShadowに設定した状態をDevice側に同期させるような場合に使えますが、このShadowで保持できるデータのサイズがなかなか厳しく最終的にはDynamoDB側に自前で同じようなデータをもたせる方針に切り替えました。
Job
AWS IoTにはJobというものがありますが、同時実行数の制限などが厳しく(Active continuous jobs: max 100)Actcastのようにデバイス数がどんどん増えていくような場合には使えませんでした。こちらもDevice Shadowと同じようにDynamoDB上に自前で似たような仕組みを作っています。
Amazon Aurora
Amazon Aurora with PostgreSQL Compatibility
MySQLではなくPostgreSQLのAuroraを使っていると直面する課題ですが、Auroraの機能としてメジャーバージョンを更新する方法が提供されていないということが挙げられます。
Upgrading an Aurora PostgreSQL DB Cluster Engine Version - Amazon Aurora
ダウンタイムを抑えつつバージョンを更新するためには新旧のAuroraクラスタを用意し、データを同期しつつどこかのタイミングでアプリケーションから接続する先を変更するということが必要です(本当はもう少し複雑です)。
更新元のバージョンが9.xか10.xかでPostgreSQLのロジカルレプリケーションが使えるかが変わってくるのも難しいポイントです。もし9.x系であれば外部のツール(bucardoなど)を使う必要があります。
pg_upgrade相当の機能を実現してもらえればダウンタイムがあるとはいえ運用負荷は相当下がるのですがなかなか実現されていないようです。
今後の改善
ログの追跡
現状でもX-Rayを導入したり、CloudWatch Logsからログを確認したりなどは行っていますが今回紹介していないものも含め全体を構成する要素が非常に多いため問題が起きたさいに関連箇所を調べるのはなかなか大変な状態です。この部分を改善していくための手法を検討している段階です。
まとめ
AWS上には様々なサービスがあり、IoT関係も含めてすべてAWSのサービスだけで構築することができました。 今後は安定性やスケーラビリティの観点で改善を続けていきます。
ここでは言及していませんが、ECSやLambdaの上でRustを使う話も別途記事として公開する予定なのでお楽しみに。
この記事はwatikoがお送りしました。
0 notes
Text
Running queries on RDS Aurora from AWS Lambda
Running queries on RDS Aurora from AWS Lambda
You can find the relevant set of steps for accessing your Amazon Aurora instance using Lambda in the following documentation:
[+] Tutorial: Configuring a Lambda Function to Access Amazon RDS in an Amazon VPC – https://docs.aws.amazon.com/lambda/latest/dg/vpc-rds.html
I also carried out a test for connecting to my Aurora instance from Lambda. Following are the steps taken by me in order to…
View On WordPress
0 notes
Text
Amazon Aurora Database Explained for AWS Cloud Developers
Full Video Link - https://youtube.com/shorts/4UD9t7-BzVM Hi, a new #video #tutorial on #amazonrds #aws #aurora #database #rds is published on #codeonedigest #youtube channel. @java @awscloud @AWSCloudIndia @YouTube #youtube @codeonedigest #cod
Amazon Aurora is a relational database management system (RDBMS) built for the cloud & gives you the performance, availability of commercial-grade databases at one-tenth the cost. Aurora database comes with MySQL & PostgreSQL compatibility. Amazon Aurora provides built-in security, continuous backups, serverless compute, up to 15 read replicas, automated multi-Region replication, and…
View On WordPress
#amazon aurora#amazon aurora mysql#amazon aurora postgresql#amazon aurora serverless#amazon aurora tutorial#amazon web services#amazon web services tutorial#aurora database aws#aurora database tutorial#aurora database vs rds#aurora db#aurora db aws#aurora db aws tutorial#aurora db cluster#aurora db with spring boot#aws#aws aurora#aws aurora mysql#aws aurora postgresql#aws aurora tutorial#aws aurora vs rds#aws cloud#what is amazon web services
0 notes
Text
A Step-by-Step Guide to Creating a Secure and Scalable AWS Database
Introduction Creating a secure and scalable AWS database is a crucial aspect of any modern application. In this comprehensive tutorial, we will guide you through the process of setting up a secure and scalable AWS database using Amazon Aurora and RDS. This tutorial is designed for developers and system administrators who want to learn how to create a robust and reliable database solution for…
0 notes
Video
youtube
Amazon RDS Proxy | Enhance Database Performance and Security
Amazon RDS Proxy is a fully managed database proxy service that improves the performance, scalability, and availability of your relational databases. It acts as an intermediary between your application and the database, ensuring optimized connections and enhanced security without requiring changes to your application code.
Key Features Covered in This Video: 1. Connection Pooling: - Efficiently manages thousands of database connections to handle high-concurrency workloads. - Reduces overhead by reusing existing database connections.
2. Improved Database Performance: - Minimizes connection establishment overhead for high-traffic applications. - Optimizes resource usage, especially during traffic spikes.
3. Enhanced Security: - Protects database credentials with AWS Secrets Manager integration. - Ensures secure connections to your database by handling authentication and encryption.
4. Automatic Failover: - Seamlessly switches to a standby instance during database failovers, ensuring high availability.
5. Compatibility with Major Engines: - Supports Amazon Aurora, MySQL, and PostgreSQL databases.
Hands-On Demonstration: - Setting Up RDS Proxy: Step-by-step guide to creating and configuring an RDS Proxy for your database. - Integrating with Applications: How to update your application to connect through the RDS Proxy. - Testing Performance and Security: Evaluate the benefits of connection pooling and automated failovers in real-time scenarios.
Who Should Watch This Video? - Developers and architects looking to optimize database performance for high-concurrency applications. - DevOps engineers focused on improving database availability and scalability. - AWS users aiming to enhance security for database connections.
Benefits of Using Amazon RDS Proxy: - Reduced Latency: Ideal for serverless applications and microservices requiring fast and consistent database access. - Cost Optimization: Efficient connection management reduces database resource consumption. - Simplified Authentication: Securely connect applications to databases without storing credentials.
Tools and AWS Services Covered: - Amazon RDS Proxy - AWS Secrets Manager - Amazon Aurora (MySQL and PostgreSQL compatible) - AWS Management Console - AWS SDKs
By the end of this tutorial, you’ll understand how to configure and utilize Amazon RDS Proxy to improve your database’s performance, scalability, and security.
#amazon #rds #database #S3 #aws #devops #amazonwebservices #free #awscourse #awstutorial #devops #awstraining #cloudolus #naimhossenpro #ssl #storage #cloudcomputing #dbs #free
***************************** *Follow Me* https://www.facebook.com/cloudolus/ | https://www.facebook.com/groups/cloudolus | https://www.linkedin.com/groups/14347089/ | https://www.instagram.com/cloudolus/ | https://twitter.com/cloudolus | https://www.pinterest.com/cloudolus/ | https://www.youtube.com/@cloudolus | https://discord.gg/GBMt4PDK | https://www.tumblr.com/cloudolus | https://cloudolus.blogspot.com/ | https://t.me/cloudolus | https://www.whatsapp.com/channel/0029VadSJdv9hXFAu3acAu0r | https://wa.me/message/5CU3EUNG7KMJA1 *****************************
*🔔Subscribe & Stay Updated:* Don't forget to subscribe and hit the bell icon to receive notifications and stay updated on our latest videos, tutorials & playlists! *ClouDolus:* https://www.youtube.com/@cloudolus *THANKS FOR BEING A PART OF ClouDolus! 🙌✨*
#youtube#amazon rds proxyaws rds proxyaws database proxycloudamazon proxycloud computingamazonaws tutoriallalicat proxyrds proxyamazon web servicesaw#cloudolus#aws#free#AWS Bangla#ClouDolusPro
1 note
·
View note
Text
Optimizing Database Performance with AWS RDS and Amazon Aurora
Introduction Optimizing Database Performance with AWS RDS and Amazon Aurora is a crucial aspect of maintaining a scalable and efficient database infrastructure. In this comprehensive tutorial, we will delve into the technical aspects of optimizing database performance using AWS RDS and Amazon Aurora. By the end of this tutorial, you will have gained hands-on experience with implementing and…
0 notes
Text
"Optimizing Database Performance with AWS Aurora and Amazon RDS"
Introduction Optimizing Database Performance with AWS Aurora and Amazon RDS is a crucial aspect of maintaining a scalable and efficient database infrastructure. In this tutorial, we will explore the technical aspects of optimizing database performance using AWS Aurora and Amazon RDS. We will cover the core concepts, best practices, and common pitfalls, as well as provide hands-on code examples…
0 notes
Text
Best practices for working with Amazon Aurora Serverless
Amazon Aurora Serverless is an on-demand, autoscaling configuration for Amazon Aurora, where the database automatically starts up, shuts down, and scales capacity up or down based on your application’s needs. It enables you to run your database in the cloud without provisioning or managing any database instances, so you can focus on building and innovating. Aurora Serverless is suitable for workloads that have intermittent, infrequent, or unpredictable bursts of requests. Some examples are development and test databases that are infrequently used, ecommerce applications occasionally running flash sales, or new applications you can’t predict capacity for. Arranging to have just the right amount of capacity for these workloads can be a lot of work; paying for it on a steady-state basis might not be sensible. With Aurora Serverless, you should be mindful of a few things, such as connection management and cold starts. In this post, we describe some of the important best practices for Aurora Serverless such as operational debugging tools, security, and monitoring. Connection management One key challenge for modern serverless applications is connection management. An application communicates with a database by establishing connections. Establishing such a connection consumes valuable compute and memory resources on the database server. Serverless applications can open a large number of database connections or frequently open and close connections. This can have a negative impact on the database and lead to slower performance. The capacity allocated to your Aurora Serverless DB cluster seamlessly scales up and down based on the load (the CPU utilization and the number of connections) generated by your application. By following the best practices for connection management, you can appropriately scale the database cluster, lower costs, and improve performance. You have two choices with Aurora Serverless: manage your own application connection pooling or use the Amazon RDS Data API. Application connection pooling Connection pooling is a good solution for some applications, such as long-running programs, applications that don’t need scale the application layer, and applications with steady traffic. Connection pooling reduces the number of times new connections are opened with the database. When you need a new connection, you get an already established connection from the pool. When the application closes the connection, the connection is returned to the pool instead of being closed. Connection pooling can enhance your application’s performance and scalability because it reduces the number of times new connections are created and it quickens the process of getting a connection. It also avoids unnecessarily keeping the database cluster at a higher capacity because you maintain only as many connections as you need. Lastly, connections in the pool are automatically closed if they aren’t used for a certain time. If connection pooling suits your use case, make sure you follow general best practices: Ensure appropriate timeouts and health checks Retrieve a connection from the pool as late as possible and return it as soon as possible Always close a connection, including in the event of an exception Connecting to an Amazon Serverless DB cluster A DNS scan is necessary for the custom implementation of a connection failover. However, the mariadb:aurora parameter avoids the automatic DNS scan for failover targets, thereby eliminating the scanning, which causes a delay in establishing the connection. If you use the MariaDB Connector/J utility with an Aurora Serverless cluster, use the prefix jdbc:mariadb:aurora// in your connection string. Aurora Serverless closes connections that are older than 24 hours. Make sure that your connection pool refreshes connections frequently. Data API Due to the transient nature of serverless applications, you often have more connections than in traditional applications. Because there’s no persistent server, there’s no place to store a connection identifier for reuse. Managing connections for serverless applications can be cumbersome. The Data API reduces the effort of managing database connections or connection pools. The Data API doesn’t require a persistent connection to the DB cluster. Instead, it provides a secure HTTP endpoint, backed by a connection pool. The Data API uses database credentials stored in AWS Secrets Manager so you don’t need to pass credentials in the API calls. With the Data API, you can avoid the complexity and overhead that comes with connection management. The following diagram illustrates a representative Aurora Serverless architecture using the Data API. To learn more about the Data API, see Using the Data API for Aurora Serverless. Minimum capacity Capacity in Aurora Serverless is measured in Aurora Capacity Units (ACUs). Each ACU comes with approximately 2 GB of memory, corresponding CPU, and networking. As a best practice, set the appropriate minimum capacity instead of using the default value. Aurora Serverless scales up when capacity constraints are seen in CPU or connections. However, finding a scaling point can take time (see the Scale-blocking operations section). Test your application to determine the proper minimum capacity. If you observe that your application needs more resources, set a higher minimum capacity. If you find your cluster is struggling to find a scaling point, it could be your minimum capacity is too low, and your database is too busy to pause transactions and scale. In that case, set your minimum capacity higher and re-run the test again. If there is a sudden spike in requests, you can overwhelm the database. Aurora Serverless might not be able to find a scaling point and scale quickly enough due to a shortage of resources. This is especially true when your cluster is at 1 ACU capacity, which corresponds to approximately 2 GB of memory. Typically 1 ACU is not adequate for production workloads. Minimizing pause and resume time You can choose to pause your Aurora Serverless DB cluster after a given amount of time with no activity. When the DB cluster is paused, no compute or memory activity occurs, and you’re charged only for storage. If database connections are requested when an Aurora Serverless DB cluster is paused, the DB cluster automatically resumes and services the connection requests. Some applications may require a fast resume. Resuming the cluster takes a few seconds and in some cases can be longer based on variables such as your ACU, storage size, and more. To avoid a cold start, consider disabling auto pause and, as discussed in the previous section, set the proper minimum capacity. Pre-warming You may have use cases when you know exactly when to scale up or resume the cluster, or use cases when you expect a sharp increase in load in a short period. In those cases, scaling up or waking up might not be quick enough. Instead, you can pre-warm your cluster. You can either resume your cluster by establishing a new connection through the Data API, or you can call the Amazon RDS API to modify the cluster to your needs. To run a periodic job, you can create a scheduled Amazon CloudWatch rule or use Amazon EventBridge to call AWS Lambda to do the job. For instructions, see Tutorial: Schedule AWS Lambda Functions Using CloudWatch Events and Tutorial: Schedule AWS Lambda Functions Using EventBridge, respectively. When resuming a cluster, make sure you run your load within the SecondsUntilAutoPause time frame. The following diagram illustrates this architecture. One cluster = one database In the traditional database world, it’s common to have a cluster containing multiple databases. It helps reduce maintenance and cost. That’s not true for Aurora Serverless. AWS performs maintenance and updates automatically. There’s no limit to the number of databases you can have in an Aurora Serverless cluster, but it’s a best practice to only group schemas or databases that serve similar application use cases. Splitting up unrelated databases across separate clusters reduces the blast radius of potential failures or performance issues, and scaling operations can run independently based on the unique database traffic patterns. Unlike other database engines, there is no cost benefit by consolidating multiple databases into a single cluster as long as you set the right capacity settings. Because the main cost for Aurora Serverless is per ACU (not per cluster or any license), you can also achieve cost savings in the long term. Scale-blocking operations The capacity allocated to your Aurora Serverless DB cluster seamlessly scales. But using long-running queries or transactions and temporary tables or table locks can delay finding a scaling point. Long-running queries or transactions For transactions, you should follow standard best practices. For example, keep your transactions simple, short and use a suitable isolation level. For more information, see Transactional and Locking Statements and Optimizing InnoDB Transaction Management. The most important practice is to avoid long-running transactions. In general, for any relational database, long-running transactions can cause performance degradation. Specifically for Aurora Serverless, long-running transactions are blocking operations for scaling unless you use the force scaling parameter. Even in this scenario, you must complete a proper rollback first, which can take significant time. This can have a very negative impact on your application. In any case, you should remember to properly handle rollback exceptions on your application level. For Aurora Serverless MySQL 5.6, the exception will look as follows: mysql> SELECT * FROM Customer; ERROR 1105 (HY000): The last transaction was aborted due to an unknown error. Please retry. For Aurora Serverless MySQL 5.7, the exception will look as follows: mysql> SELECT * FROM Customer; ERROR 1105 (HY000): The last transaction was aborted due to Seamless Scaling. Please retry. If your system requires long-running transactions, first narrow the scope of the transaction to a minimum by accessing the least amount of data inside the transaction body. Try breaking down the transaction into smaller sub-transactions and run them independently. For example, retrieve the data from the tables separately, if possible. A single long-running query can block scaling. A single query is implicitly a single-statement transaction, therefore they follow similar principles and best practices as mentioned previously for long-running transactions. Lastly, set proper timeouts for statements and transactions. For PostgreSQL 10, you can use statement_timeout and idle_in_transaction_session_timeout. For MySQL 5.7, use max_execution_time. Temporary tables or table locks During your application and database design, remember that temporary tables and table locks are also blocking operations for scaling unless you enable the force scaling parameter. Potential timeout and force scaling results again in a proper transaction rollback. If you use either of those, consider the potential impact on your application side. A temporary table is a special type of table that allows you to store a temporary result set that you can reuse several times. Aurora Serverless removes the temporary table automatically when the session ends or the connection ends. You can also drop the table manually to remove a temporary table explicitly when you no longer need it. If you have to use temporary tables, try to limit their overall lifetime. Create a temporary table when you need it and drop it as soon as you can rather than wait for automatic cleanup. In some use cases, a temporary table is created internally as part of the statement. Users have no control over when this occurs. The lifetime of these temporary tables is the span of the query itself. Such examples might be UNION statements, views, derived tables, or CTE (common table expressions). For more information, see Internal Temporary Table Use in MySQL. A similar rule also applies to table locks. Table locks are typically used to emulate transactions or to get more speed when updating tables. If the session ends, either normally or abnormally, Aurora Serverless releases all the locks implicitly. The best option is to avoid table locks. If you must use it, hold the lock for the minimum necessary time. Retry logic Numerous components on a network, such as DNS servers, switches, load balancers, and others, can generate errors anywhere in the life of a given request. Other errors include the temporary unavailability of a service or timeouts that occur when a service is busy. These errors are typically self-correcting. The usual technique for dealing with these error responses is to implement retries in the client application. This technique increases the reliability of the application and reduces operational costs for the developer. When you design your application, make sure that you implement retry logic in your data access layer. For more information, see Exponential Backoff And Jitter and Timeouts, retries, and backoff with jitter. When forced scaling is enabled, the scaling happens as soon as the timeout is reached, which is 300 seconds by default. This behavior may cause a database interruption from your application. If you implement the retry logic, this is handled and retried on your database layer and doesn’t affect the rest of the application. In fact, this can potentially speed up the scaling process and your application can be more resilient. Difference between Aurora Serverless PostgreSQL and Aurora Serverless MySQL Aurora PostgreSQL and Aurora MySQL are two different database engines, but in terms of Aurora Serverless, both Aurora Serverless PostgreSQL and Aurora Serverless MySQL have no major differences. There are slight differences in the availability of ACU configurations and, consequently, specific server compute and memory configuration. The most important difference is that Aurora Serverless MySQL supports a minimum ACU configuration of 1 and Aurora Serverless PostgreSQL supports a minimum of 2. Accessing Aurora Serverless Aurora Serverless resides in the private subnet of Amazon Virtual Private Cloud (Amazon VPC). You can’t give an Aurora Serverless DB cluster a public IP address; you can only access it from within a VPC based on the Amazon VPC service. You can use any service, such as Amazon Elastic Compute Cloud (Amazon EC2), Lambda, Amazon Elastic Container Service (Amazon ECS), and more, if they reside within the same VPC. For developer access to the Aurora Serverless cluster, you have two kinds of access: the Data API or an SSH tunnel through a jump box. Data API access For the following options, you must enable the Data API for your Aurora Serverless DB cluster. For easy and basic access, you can use the Query Editor for Aurora Serverless on the Amazon Relational Database Service (Amazon RDS) console. Query results are instantly visible on the console. The Query Editor is suitable for verifying the contents of the table or performing some quick SQL statements. You may prefer to use the AWS Command Line Interface (AWS CLI) directly, which Aurora Serverless supports. The following code is an example for Linux, macOS, or Unix: aws rds-data execute-statement --resource-arn "arn:aws:rds:us-east-1:123456789012:cluster:my_db_cluster" --database "mydb" --secret-arn "arn:aws:secretsmanager:us-east-1:123456789012:secret:my_secret" --sql "SELECT * FROM Customer" The following code is an example for Windows: aws rds-data execute-statement ^ --resource-arn "arn:aws:rds:us-east-1:123456789012:cluster:my_db_cluster" ^ --database "mydb" ^ --secret-arn "arn:aws:secretsmanager:us-east-1:123456789012:secret:my_secret" ^ --sql "SELECT * FROM Customer" Similarly, you can use the Data API to easily connect and run any SQL statement against the database with a simple Lambda function. The function doesn’t need to be inside a custom Amazon VPC or have any MySQL or PostgreSQL drivers. You just make SQL statements as an HTTP request.i SSH tunnel access The other option is using AWS Cloud9. AWS Cloud9 is a cloud-based integrated development environment (IDE), which provides terminal access with just a browser. The main advantage is you don’t need to install or maintain a local IDE. For instructions, see Configure and Connect to Serverless MySQL Database. You might already be familiar with some IDEs, such as MySQL Workbench, HeidiSQL, pgAdmin, or DBeaver. You can still use them with a setup similar to that for AWS Cloud9. Because you can’t connect directly to your server over SSH, you must set up a jump box. This is the same as in the AWS Cloud9 configuration, which is done for you automatically. To set up a jump box, complete the following steps: Create a Linux-based EC2 instance in the same Region and the same VPC as the Aurora Serverless cluster. Make sure you can SSH to the instance using the user name and private key. Enable client network access to your cluster: Find the VPC security groups for your cluster. Choose Inbound Rules. Add a new rule with Source as the security group ID of your EC2 instance and Type as one of the following: MySQL/Aurora (3306) for MySQL PostgreSQL (5432) for PostgreSQL Update your IDE: For cluster hostname or IP address, use the Aurora Serverless cluster database endpoint. For cluster credentials, enter the cluster user name and password. For cluster port, enter the following: 3306 for MySQL 5432 for PostgreSQL For SSH host and port, set your public DNS name for your EC2 instance. For SSH user name, enter the user name you use to access your EC2 instance. For SSH, set your private key (.pem). Resilience Resilience is an important part of the design. Aurora Serverless offers features to help support your data resiliency. Failover Aurora separates computation capacity from storage. The storage volume for the cluster is spread across multiple Availability Zones. The durability of the data remains unaffected even if outages affect the DB instance or the associated Availability Zone. Aurora Serverless clusters are monitored for availability and automatically replaced when problems are detected; you don’t need to intervene on your end. Aurora Serverless manages the warmpool of pre-created DB clusters. The replacement process then fetches a new DB instance from the warmpooling service and replaces the unhealthy host. The DB instance for an Aurora Serverless DB cluster is created in a single Availability Zone. In the unlikely event that an entire Availability Zone becomes unavailable, Aurora Serverless launches a new instance for your cluster in one of the other Availability Zones. We refer to this capability as automatic Multi-AZ failover. This failover mechanism takes longer for Aurora Serverless than for an Aurora provisioned cluster. The Aurora Serverless Availability Zone failover is done on a best effort basis because it depends on demand and capacity availability in other Availability Zones within the given AWS Region. Because of that Aurora Serverless is not supported by the Aurora Multi-AZ SLA. Replication Binlog-based replication and the Aurora Replicas feature are limited for Aurora Serverless DB clusters. If you need these features, consider using the provisioned version of Aurora. For more information, see Limitations of Aurora Serverless. You can use Aurora Serverless as a target for AWS Database Migration Service (AWS DMS) data replications. For more information, see Getting started with AWS Database Migration Service. Security Cloud security at AWS is the highest priority. The following sections show you the recommended configuration of Aurora Serverless to meet your security and compliance objectives. You also learn how to use other AWS services that help you monitor and secure your Aurora Serverless resources. Patching and maintenance Aurora Serverless performs regular maintenance so your DB cluster has the latest features, fixes, and security updates. Aurora Serverless performs maintenance in a non-disruptive manner whenever possible. However, it may interrupt your workload in some use cases. For more information, see How Aurora Serverless Works. To avoid any interruptions, we recommend you follow the same best practices as already mentioned in the Scale-blocking operations section. TLS/SSL To improve security, you can connect to Aurora Serverless clusters using the Transport Layer Security/Secure Sockets Layer (TLS/SSL) protocol. The use of SSL is recommended and it’s the first choice for establishing a new connection, but it’s not required. To make sure that your session uses TLS, specify the requirement on the client side with the --ssl-mode parameter equal to VERIFY_CA or VERIFY_IDENTITY. Aurora Serverless supports TLS protocol version 1.0, 1.1, and 1.2. Snapshots The cluster volume for an Aurora Serverless cluster is always encrypted. You can choose the encryption key, but can’t turn off encryption. To copy or share a snapshot of an Aurora Serverless cluster, you encrypt the snapshot using your own AWS Key Management Service (AWS KMS) key. Monitoring Aurora Serverless provides a variety of CloudWatch metrics that you can monitor to determine the health and performance of your Aurora Serverless DB cluster. To access CloudWatch metrics, you can use tools such as the Amazon RDS console, AWS CLI, or CloudWatch API. In a traditional database scenario, you need to monitor several infrastructure metrics. Because Aurora Serverless is a fully managed service, you don’t need to monitor the health of the underlying infrastructure. Platform and application management and any operating system and network configuration is the responsibility of AWS, but it’s important to remember that customers are responsible for access management, their application, and performance. The shared responsibility model describes responsibilities between AWS and the customer. Creating a proper monitoring plan is a difficult topic with many variables. For more information about setting up the right monitoring goals, see Monitoring an Amazon Aurora DB Cluster. Amazon RDS Performance Insights is currently available for use with only some DB engines. For more information, see Using Amazon RDS Performance Insights. Logs and auditing You can have Aurora publish some or all database logs to CloudWatch. You can perform real-time analysis of the log data, audit database activity, and use CloudWatch to create alarms and view metrics. You can also store your log records in highly durable storage. You select which logs to publish by enabling the configuration parameters in the DB cluster parameter group associated with the Serverless cluster. Serverless clusters don’t require you to specify which log types to upload to CloudWatch like provisioned clusters. Serverless clusters automatically upload all available logs. When you disable a log configuration parameter, the publishing of the log to CloudWatch stops. You can also delete the logs in CloudWatch if you no longer need them. After enabling Aurora Serverless log events, you can monitor the events in CloudWatch Logs. A new log group is automatically created for the Aurora DB cluster under the following prefix, in which my_db_cluster represents the DB cluster name, and log_type represents the log type: /aws/rds/cluster/my_db_cluster/log_type Aurora Serverless PostgreSQL uses a single log type called error. For Aurora Serverless MySQL, you control logging with the following parameters: slow_query_log – Creates a slow query log long_query_time – Prevents fast-running queries from being logged in the slow query log general_log – Creates the general log log_queries_not_using_indexes – Logs all queries that don’t use an index to the slow query log server_audit_logging – Enables or disables Advanced Auditing, and the server_audit_events specifies which audit events to log For more information, see Publishing Amazon Aurora MySQL Logs to Amazon CloudWatch Logs and Using Advanced Auditing with an Amazon Aurora MySQL DB Cluster. For Aurora Serverless PostgreSQL, you control logging with the following parameters: log_statement – Controls which SQL statements are logged log_min_duration_statement – Sets the limit in milliseconds of a statement to be logged log_connections – Logs all new client connection details; enabled by default and can’t be modified log_disconnections – Logs all client disconnections; enabled by default and can’t be modified log_temp_files – Controls logging of temporary file names and sizes log_lock_waits – Logs sessions that are stuck in a locked state log_autovacuum_min_duration – Logs information of autovacuum and autoanalyzer runs (you must enable rds.force_autovacuum_logging_level) force_admin_logging_level – Captures the activities from rdsadmin user For more information, see Working with RDS and Aurora PostgreSQL logs: Part 1 and Working with RDS and Aurora PostgreSQL logs: Part 2. Conclusion This post discussed best practices for Aurora Serverless, which should help you design your architecture and make more robust, secure, and scalable applications. To get started on Aurora Serverless today, see Building serverless applications with Amazon Aurora Serverless. For more information about Aurora Serverless, see the following: How Aurora Serverless Works Using Amazon Aurora Serverless Using the Data API for Aurora Serverless If you have questions or suggestions, please leave a comment. About the Author Milan Matejka joined Amazon in 2017. He is a Software Development Engineer at Amazon Web Services. Milan holds a master’s degree in Mathematical Analysis. https://aws.amazon.com/blogs/database/best-practices-for-working-with-amazon-aurora-serverless/
0 notes