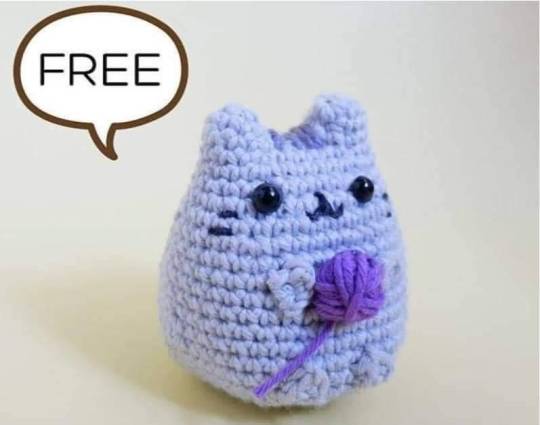
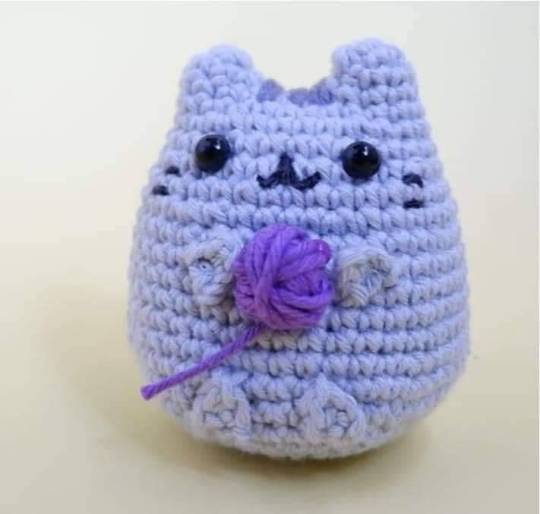
#amigurumi free patterns
Text


Kuriboh Amigurumi Pattern
The pattern is available above and as a free PDF download on Ravelry.
Check out my other patterns on Ravelry and Etsy.
First time trying the loop stitch. I had to search for a bit to find a method I liked, so a tutorial is included. This way puts the loops on the right side of the stitches and it works up fast, which is a win-win for me.
I had a small Yu-Gi-Oh phase as a kid. Is it still a thing? I remember the abridged series was pretty good in its day.
This is an icrochetthings original pattern © 2024. For personal use only. Do not copy, sell, alter, or distribute this pattern or parts of it. You may sell a limited number of your handmade finished items provided you credit icrochetthings as the designer.
#crochet#amigurumi#handmade#amigurumi pattern#plush#crochet pattern#free amigurumi pattern#free crochet pattern#kuriboh#yugioh
434 notes
·
View notes
Text

Did you know that both my Tiny Tom and Pigeon patterns are free? Pigeon is a free gift to those who subscribe to my newsletter, and you can find Tiny Tom as a freebie on my website! Both would love to hang out with you.
#crochet#craft#handmade#yarn#amigurumi#plush#plushie#cute#kawaii#crochet pattern#free crochet pattern#pigeon#turkey
168 notes
·
View notes
Text

Snoopy Fans! Crochet a Woodstock Amigurumi, Free Pattern! 👉 https://buff.ly/38EVGRJ 💛
744 notes
·
View notes
Photo

Crochet Lavender by Yui Sun
Free Crochet Pattern Here (May need to make an account)
334 notes
·
View notes
Photo

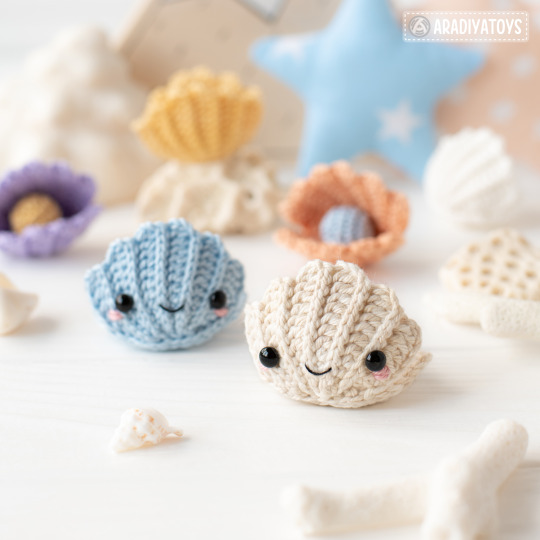
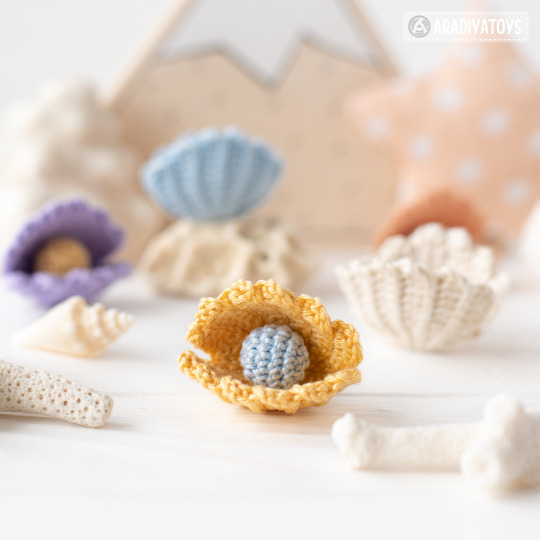
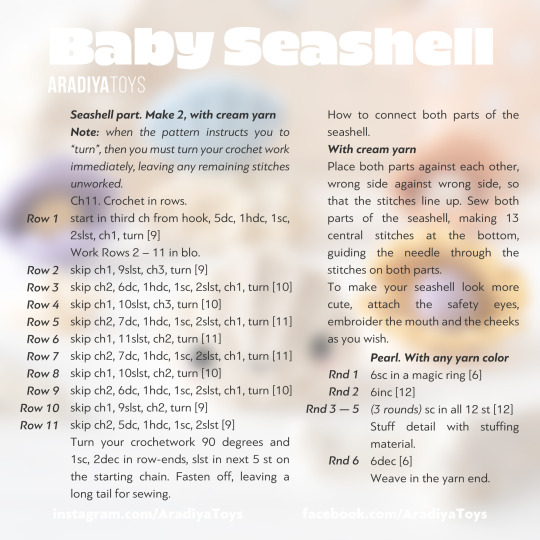
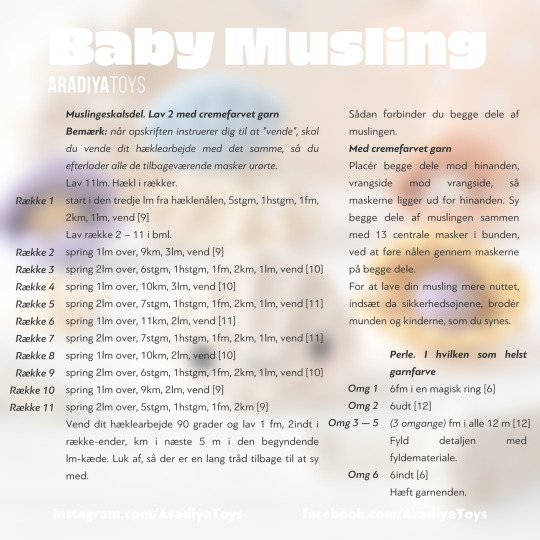

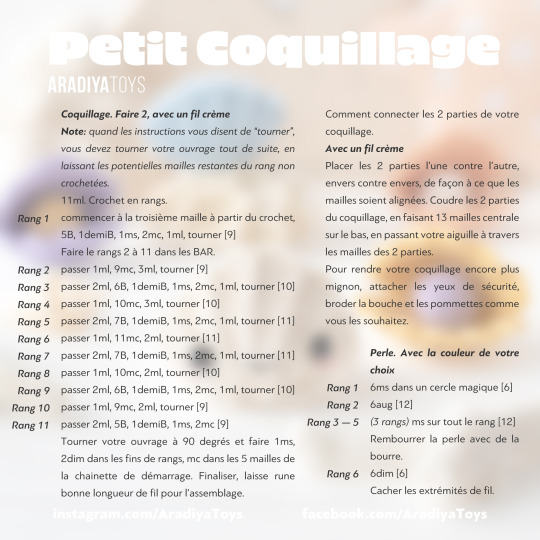


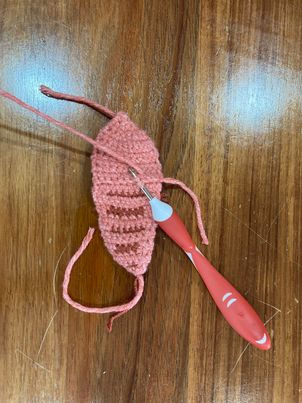
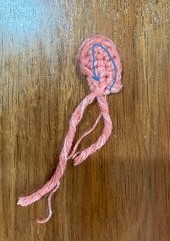
🚨[FREE BABY SEASHELL PATTERN!]🚨
Once upon a time, in the deep blue ocean, there was a tiny Baby Seashell. She lived among the mermaids 🧜🏻♀️ crabs 🦀 and octopuses 🐙 in a beautiful underwater world 🌊 The Baby Seashell loved to play hide-and-seek with her octopus friends and listen to the beautiful songs 🎶 of the mermaids. She would also often explore the nearby coral reefs 🪸 marveling at the vibrant colors and the exotic sea creatures that called it home. Despite being small, the Baby Seashell had a big heart ❤️ and always looked out for her friends, whether it was helping a crab mend a broken shell or sharing a tasty seaweed snack with the mermaids. Life was full of adventure and wonder in the deep ocean, and the Baby Seashell couldn't wait to see what each new day would bring! 🥰
Baby Seashell is a FREE addition to my Kawaii Ocean Minis crochet pattern that includes Mermaid, Triton, Octopus, Hermit Crab and Seahorse and is available here -> https://etsy.me/41Oz4GU 😊
FREE Crochet pattern for amigurumi Baby Seashell is available in English, Spanish, French, Italian, Dutch, Portuguese and Danish, browse through the gallery to see all of these languages! 🤗
Happy crocheting and have a wonderful weekend, dear friends! 💛💙
#AradiyaToys#olka novytska#amigurumi#crochet#handmade#crochet pattern#free crochet pattern#free crochet tutorial#free#free amigurumi pattern#kawaii#seashell#ocean world#kawaii ocean minis#DIY#cute#adorable
1K notes
·
View notes
Text
Links to my crochet patterns!
I'll update this list when I make new ones, so if you're seeing this as a reblog it might be worth clicking through to the original post to see if any have been added
- round bee pattern
- spider buddy
- little axolotl (for sale on Ravelry or free on tumblr)
- fluffy mini bunnies
- little t-rex
- little llama
- lemon earrings (free on Ravelry and tumblr)
- moth (but no wing pattern, so it's more of a creature base??)
- Marie Kondo (aka a doll pattern base)
- a tooth
- squirrel
- tiny scythe
- tiny punk
- spinnable dreidel
- mini blorbo
- peas in a pod
- happy pill
- void cat
- mothman and the skeleton
- Pride Moth (different full moth pattern, including wings)
- mini cauldron (with or without potion inside)
The rest of these patterns are for sale for $2 in my Ravelry store:
- mini manatee
- fluffy baby seal
- little crow, phoenix, and peacock
- mini cthulhu
- Velociraptors (based on Jurassic Park not on real science)
- basket the fish (idk why I put this one behind a paywall, someone remind me and I'll make it free when I have more time)
I wrote these over many years and at many different points in my pattern making journey, so if you are trying to make one and it doesn't make sense, please let me know. I've learned a lot about making patterns since I wrote some of these and I don't always remember to go back and update them (the ones that are for sale should be fine it's some of the earlier free ones I'm not sure about lol)
#crochet#amigurumi#free crochet patterns#handmade#long post#I know it's kinda odd that Marie Kondo is the version of that pattern I've shared#but I used the same base pattern for Mulan and Alanna and I think Winnifred Sanderson#I do not remember my reasoning for sharing the Marie Kondo version instead of the other versions#I'm also not sure why I have basket the fish in the two dollar category instead of the free category#like the free patterns are generally my simpler ones#and the ones for sale are generally the ones I had to actually revise the pattern for#instead of making one version and it being right the first time#but Basket the Fish is pretty simple#and literally based on a dream I had#that's why he's named Basket. Because he was named that in the dream#but no one else is going to be like yeah Basket the Fish that's the pattern I want to make lol
163 notes
·
View notes
Text
Crochet Prawn
For Christmas my (marine biologist) dad wanted some prawns and I could not find any free patterns anywhere so I ended up drafting my own pattern. It has since been approved by my dad despite having no rostrum or antennae (I found these too hard to look good - if anyone has any tips please let me know!).

Also this pattern is NOT made in the round and so does require sewing and has a few fiddly bits. In order to make the legs smaller than the rest of the body without changing the colour, I separated out smaller sections of the ply, much like when using embroidery floss. I'm not sure if proper crochet-ers do this but I've found it works for me as long as it is 2-ply or greater.
Full Pattern under the cut:
INGREDIENTS:
3.5mm and 2mm Crochet Hooks
6mm Safety Eyes
Pinky Yarn (Colour A)
Darker Yarn (Colour B)
METHOD:
Note: ch1 and turn between each row. inc= 2 sc in same stitch. sc2tog= sc 2 together. blo= back loops only
Changes in colour will be denoted using A! (change to colour A) and B! (change to colour B)
MAIN BODY
Using colour A and a 3.5mm hook:
Ch4
sc 3
sc 1, inc 1, sc 1
sc 1, inc 2, sc 1
sc 2, inc 2, sc 2
sc 2, inc 4, sc 2 (eyes will be inserted between row 6 & 7)
sc 12
sc 5, sc2tog, sc 5
sc 11
sc 11
sc 11
sc 11
sc 11
sc 11 in blo (this ridge separates the head from the body)
sc 11
sc 2, B! sc 7, A! sc 2
sc 5, inc, sc 5
sc2tog, sc 8, sc2tog
sc 2, B! sc 6, A! sc 2
sc2tog, sc 2, inc 2, sc 2, sc2tog
sc 10
sc 2, B! sc 6, A! sc 2
sc2tog, sc 6, sc2tog
sc 8
sc 2, B! sc 4, A! sc2
sc 8
sc2tog, sc 4, sc2tog
sc 2, B! sc 2, A! sc 2
sc2tog 3 and finish off
Now using the ridge created by the blo row (shown in picture above), slip stitch across the surface of the prawn to enhance the ridge and accentuate the difference between the head and the body. Your prawn should now look like this (folded):

TAIL x2
Note: all stitches within [] belong in same stitch
The tail might be a bit tricky as it goes up and around the foundation chain like this:
Using colour A and 3.5 mm hook:
ch 6
from 2nd chain - slst, sc, hdc, hdc, [dc, hdc, dc], hdc, hdc, sc, slst then finish off
PLEOPODS (Back Legs) x10
Separating colour A to create a 3-ply yarn and using a 2mm hook:
ch 11
from 2nd chain - sl st 10 then finish off
PEREOPODS (Front Legs) x10
Separating colour A to create a 2-ply yarn and using a 2mm hook:
ch 15 then finish off
ASSEMBLY
Secure eyes between rows 6 & 7 and weave in ends to the inside of the prawn (don't bother clipping the yarn as this can be used as extra stuffing!).
Attach tail at a slight angle at the end of prawn to get the positioning to look more realistic.
Start attaching the pleopods approx. one row back from the head ridge and one stitch in from the side, continuing attaching them ~1 row each until five are attached per side.
Attach the pereopods approx. one row forward from the head ridge and one stitch from the side, continuing to attach them every 1/2 row until five are attached per side.
Whip stitch the prawn together using colour A until you reach the end, stuffing as you go.
Congratulations, you now have your very own prawn!!
Please reblog with pictures if you make your own! And any tips and tricks to make them look even better :))))
328 notes
·
View notes
Text
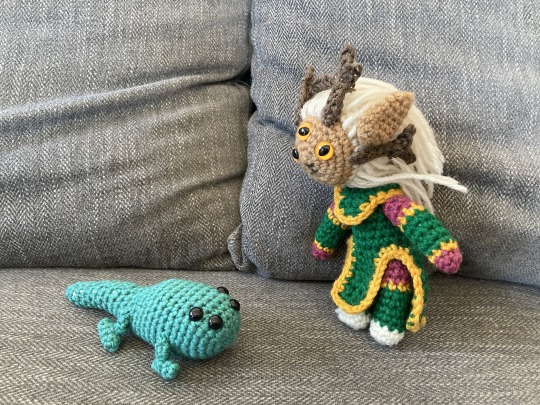
Ancient Hearthian (Outer Wilds) Pattern
I got so many requests for the ancient Hearthian from Outer Wilds, and they really are so much simpler than the Nomai - but also, my notes and pics are a bit less detailed, and I've been so bad at even getting on my computer lately - so lemme try and cobble this together so anyone interested at least has something to work with!
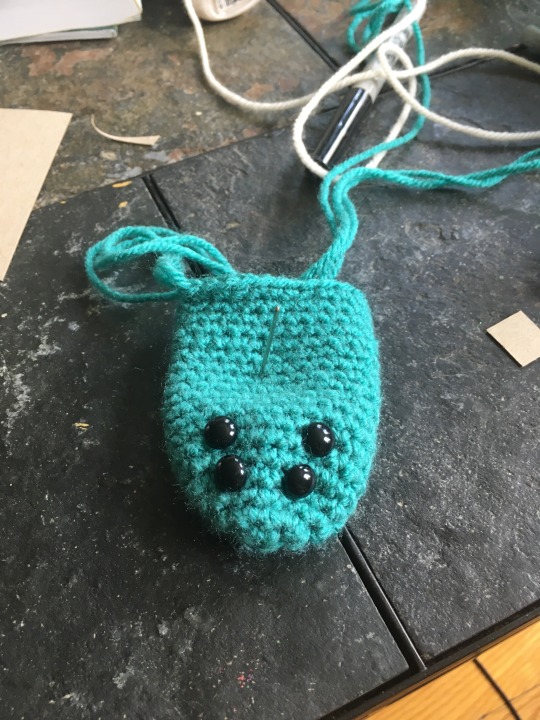
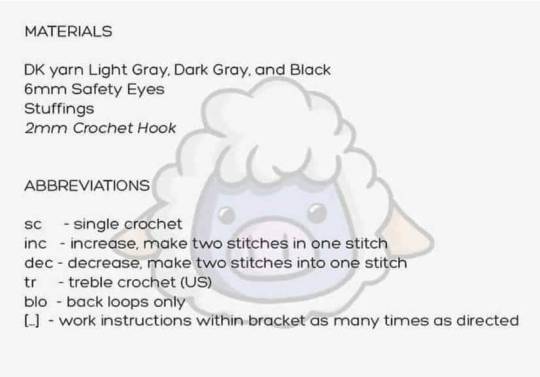
Technical stuff: 3mm crochet hook, 9mm safety eyes, Red Heart Super Saver yarn in Jade, probably... but any nice shade would do!
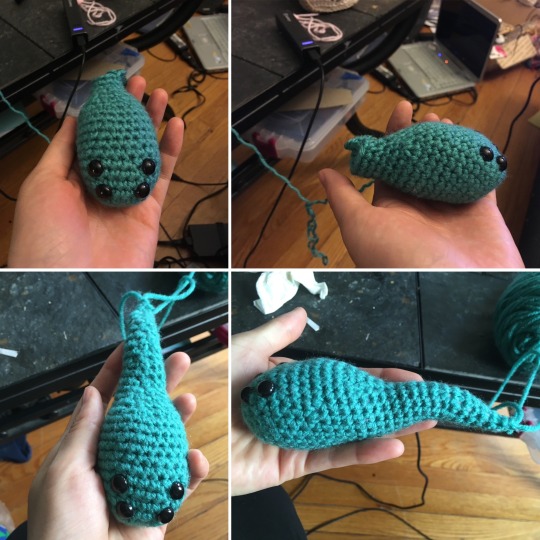
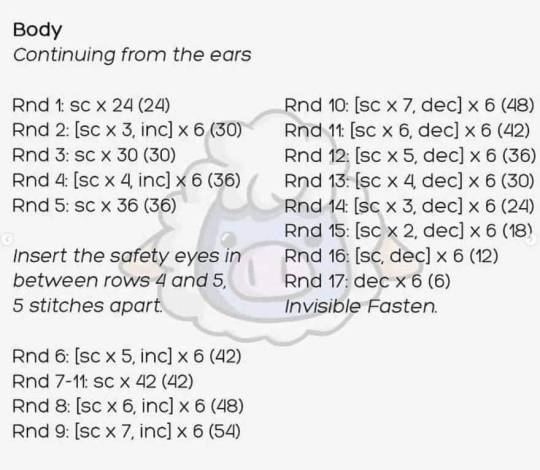
Body:
They start as one long piece that kinda looks like a tadpole! A lot of the shaping is just by gentle smooshing it, but there are a few rows where you increase or decrease unevenly to contribute to it... I'm not even sure how much it really makes a difference tho!
6 sc in a magic circle
inc 6x to make 12 stitches
(3 inc, 3 sc) 2x to make 18 stiches (and a slightly elongated oval rather than circular cross section when looking face on)
(2 sc, inc) 6x to make 24 stitches
9 rows of 24
Add eyes and begin to stuff
Across the "top" of the body (wherever you choose that to be) do (1 sc, 1 dec) 3x, then 15 more sc to make a row of 21 stitches
Again across the "top" of the body do (1 sc, 1 dec) 3x, then 12 more sc to make a row of 18 stitches
From here, it's slow decreases (still at the top) and stuffing as you go:
(1 sc, 1 dec) 2x then sc around to make a row of 16
1 dec then sc around to make a row of 15
1 dec then sc around to make a row of 14
1 dec then sc around to make a row of 13
1 dec then sc around to make a row of 12
2 dec then sc around to make a row of 10
1 dec then sc around to make a row of 9
1 row of 9
1 dec then sc around to make a row of 8
3 rows of 8
2 dec then around to make a row of 6, fasten off and hide tail

Feet and Legs:
It looks like I really winged it a bit here, so let me try and figure out approximately what I did - the main idea is I think I made a very small tube for the feet, then pulled the tails through to the center, chained into a random stitch, and and did a few chains up and down to give it a short leg, then used those tails as well to sew them on to the body... I'm afraid I can hardly tell what I did for those legs, even looking at it in person, like it might just be a few knots... I am hoping that for here it isn't too much trouble for you to improvise something that works well for you!:
4 sc in a magic circle
3 rows of 4, then close off and pull the tails through the small cylinder, out the center
chain into a random stitch, then into an adjacent stitch,
sc "around" these two for 2-3 rows, to make a short leg
use the rest of the tail to sew onto the body.
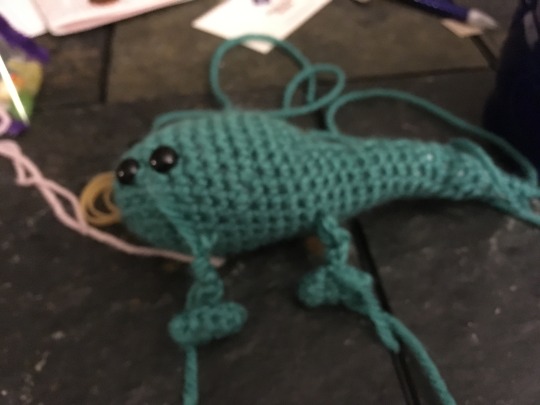
Very messy, possibly blurry.... but hopefully this at least gives a bit more inspiration.
Ok, again, I apologize, it's not my best pattern, but I hope it will give people a starting point! Don't hesitate to ask questions if you need them, although as I mentioned, I'm not on tumblr much now a days. Don't forget to check out my Nomai pattern here! And as always, give me a tag here or @ erin.gurumi on instagram if you make one! I love to see them!
#crochet#crochetpattern#freecrochetpattern#free crochet pattern#freepattern#free pattern#amigurumi#amigurumipattern#amigurumi pattern#hearthian#outerwilds#outer wilds#outer wilds nomai#nomai#diy#yarn#stuffie#longpost#long post#solanum
76 notes
·
View notes
Text
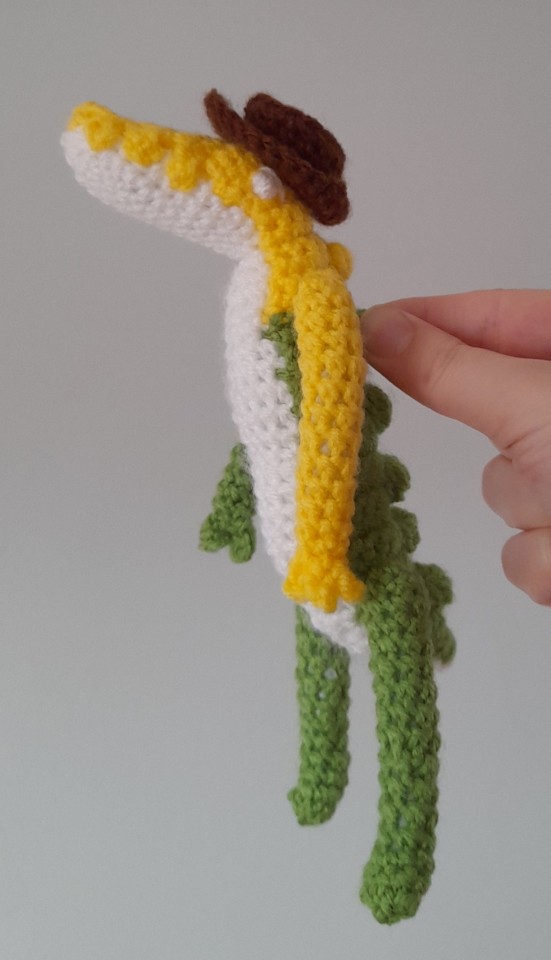
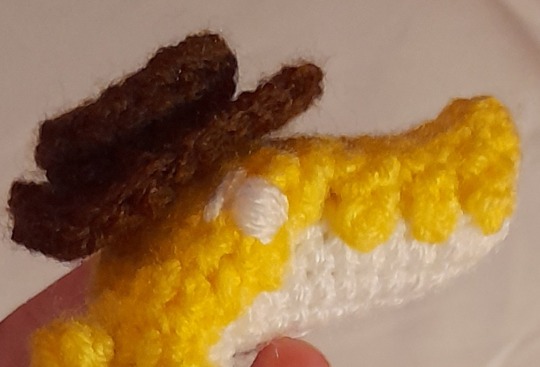
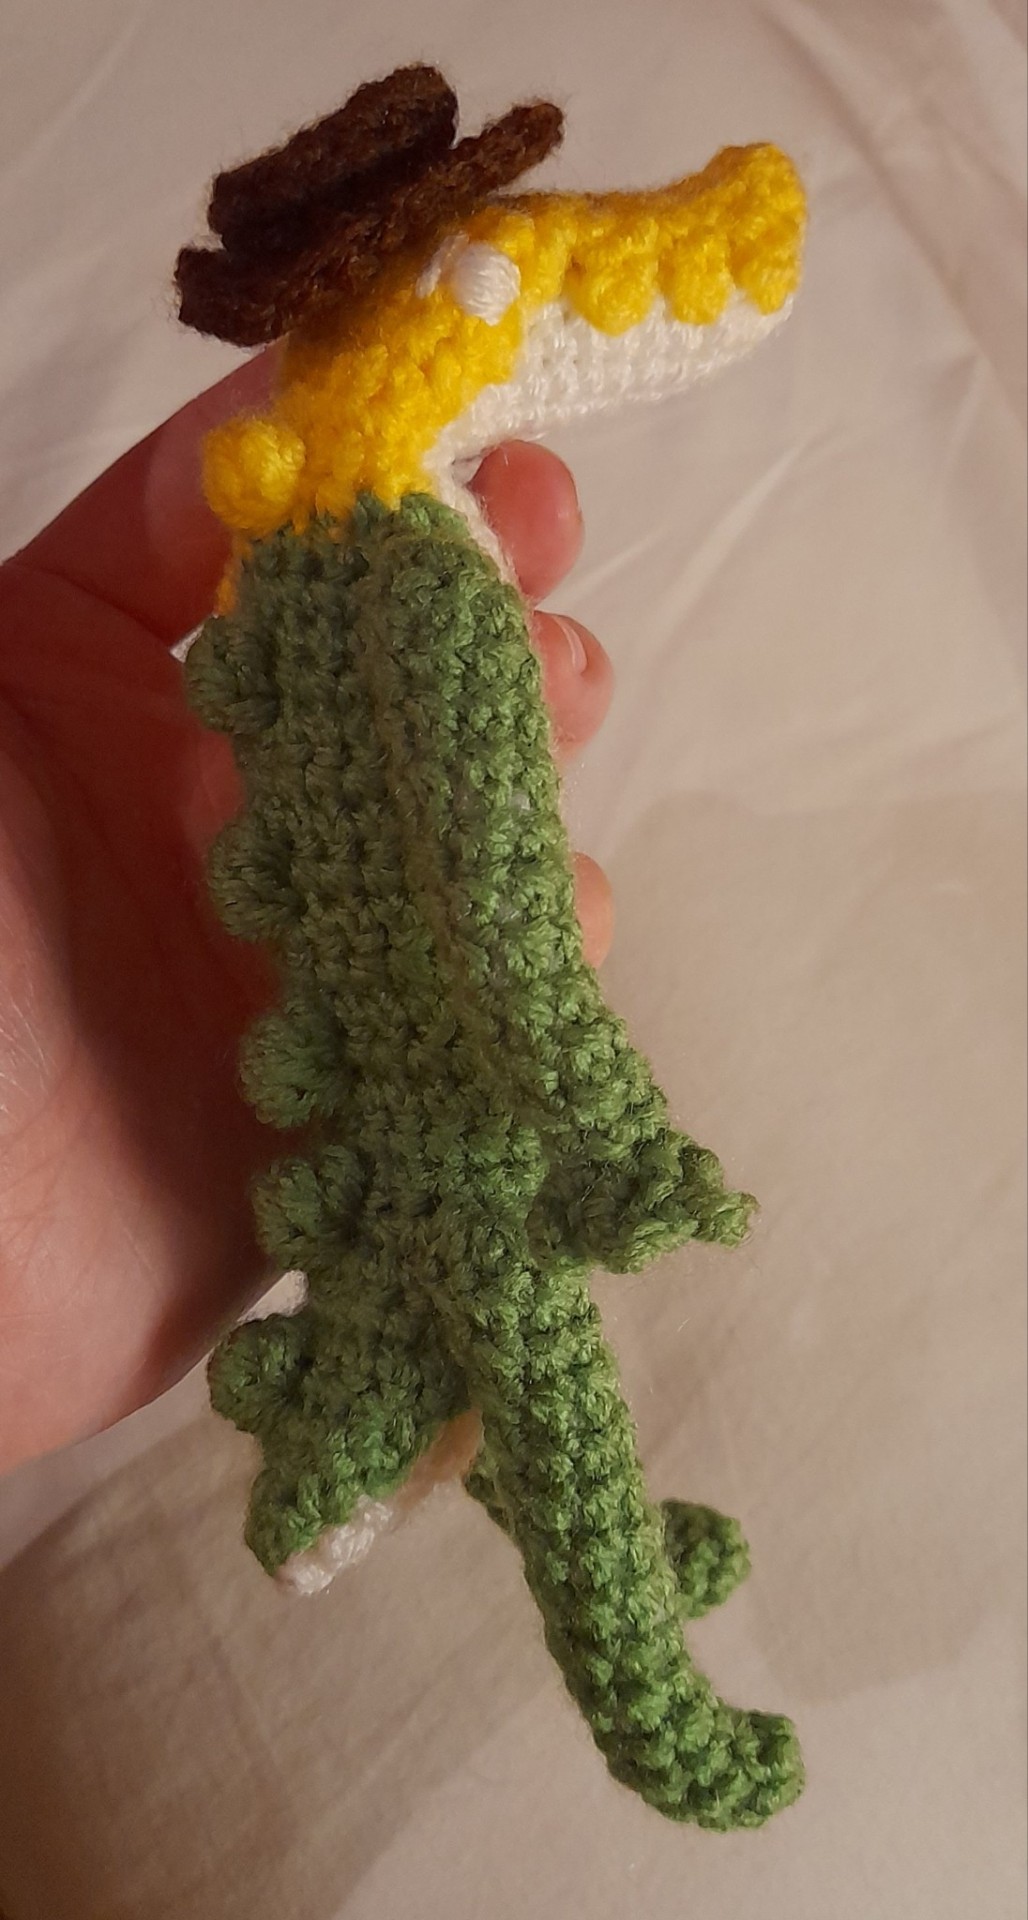
Gummigoo free crochet pattern
FREE pattern at my Ravelry link and under the cut! Pattern includes photo references.
My boy is done! I started making myself a Gummigoo right after seeing episode 2 of The Amazing Digital Circus. While I was making it I realised that you guys might want one too. This doll and this pattern weren't nearly as tough to make as I thought they would be, and I really enjoyed making them.
PDF now edited to remove typo and add another couple of photos.
Pattern and photos under cut!
You need:
(less than) 50g/150m of the following colours of yarn: white, yellow, green, brown
3.5mm hook
Stuffing
Pins
Scissors
Special stitches used:
Picot: chain 3, then slip stitch into the back loop of the first chain.
Bobble: Yarn over. Pull up a loop, yarn over and pull through two, do 4 more times until you have 6 loops on the hook. Yarn over and pull through all six. Pull stitch a little tight.
Triple bobble (regular bobble stitch but twice as tall): Yarn over twice. Pull up a loop, yarn over and pull through two, yarn over and pull through two again, do 4 more times until you have 6 loops on the hook. Yarn over and pull through all six. Pull stitch a little tight.
Double decrease (a decrease over 3 stitches): Pull up a loop through each of 3 stitches, yarn over and pull through all three.
HEAD (white)
1. 6sc into a magic ring [6]
2. 6 inc [12]
3. sc around [12]
4. 2sc, 2 dec, 6sc [10]
5. 2sc, 2inc, 6sc [12]
6-8. sc around (3 rounds) [12]
9. (2sc, inc) x2, 6sc [14]
See special stitches for how to do a bobble stitch -- it's five double crochets to create one stitch.
10. 4sc, bobble stitch, 2sc, bobble stitch, 6sc [14]
11. 4sc, bobble stitch, 2sc, bobble stitch, 6sc [14]
12. 1sc, dec, 6sc, dec, 3sc [12]
13. (2sc, dec) x3 [9]
Stuff.
14. 1sc, dec) x3 [6]
Cut a tail long enough to sew with. Thread the yarn through the front loops of each remaining stitch and pull to cinch the hole shut. Leave the tail out until needed for sewing.
BODY (white)
1. 6sc into a magic ring
2. 6 inc [12]
3. (5sc, inc) x2 [14]
4-5. sc around (2 rounds) [14]
6. (6sc, inc) x2 [16]
7. (7sc, inc) x2 [18]
8-10. sc around (3 rounds) [18]
Stuff as you go. It's hard to stuff long pieces at last minute.
11. (7sc, dec) x2 [16]
12. sc around [16]
13. (6sc, dec) x2 [14]
14. sc around [14]
15. (5sc, dec) x2 [12]
16. sc around [16]
17. (5sc, inc) x2 [14]
18. sc around [14]
19. 1sc, 4dec, 1sc, 4inc [14]
20. 1sc, 4hdc, 9sc [14]
21. 1sc, 4hdc, 9sc [14]
22. 1sc, 2dec, 9sc [12]
23. 4hdc, 8sc [12]
24. 2dec, 8sc [10]
25. Dec, 8sc [9]
Finish stuffing.
26. (1sc, dec) x3 [6]
Cut the yarn, cinch the hole shit and hide the end.
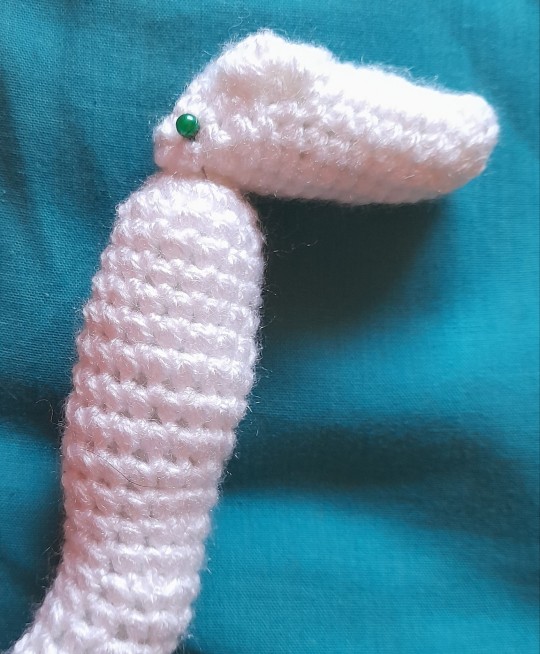
Connect the head to the body at the very back of the bottom of the head. It should face forwards levelly with the torso erect (90°). The head and neck should connect smoothly at the back to the body.
OVERLAY (yellow and green)
Start in yellow.
1. 6sc into a magic ring [6]
2. 2sc, inc, 2sc. Leave last stitch unworked. Picot (chain 3 and slip stitch into the back loop of the first chain) and turn. [6]
3. 6sc. Picot and turn. [6]
4. 4sc, inc. Leave last stitch unworked. Picot and turn. [6]
5. 4sc, inc. Leave last stitch unworked. Picot and turn. [6]
6. 2sc, inc, 1sc, inc. Leave last stitch unworked. Picot and turn. [7]
7. 3sc, inc, 1sc, inc. Leave last stitch unworked. Picot and turn. [8]
8. 3sc, inc, 2sc, inc. Leave last stitch unworked. Chain (not picot!) and turn. [9]
9. 4sc, inc, 2sc, inc. Leave last stitch unworked. Chain and turn. [10]
10. 4sc, inc, 4sc, inc. Chain and turn. [12]
11. 10sc, dec. Chain and turn. [11]
12. 9sc, dec. Chain and turn. [10]
13. 4sc, dec, 4sc. Chain and turn. [9]
14. 9sc. Chain and turn. [9]
15. 9sc. Chain and turn. [9]
The next row will start colour changing to green. Always hide yarn on the wrong side of the work. There will also be a triple bobble (same as a bobble stitch but with triples -- see special stitches).
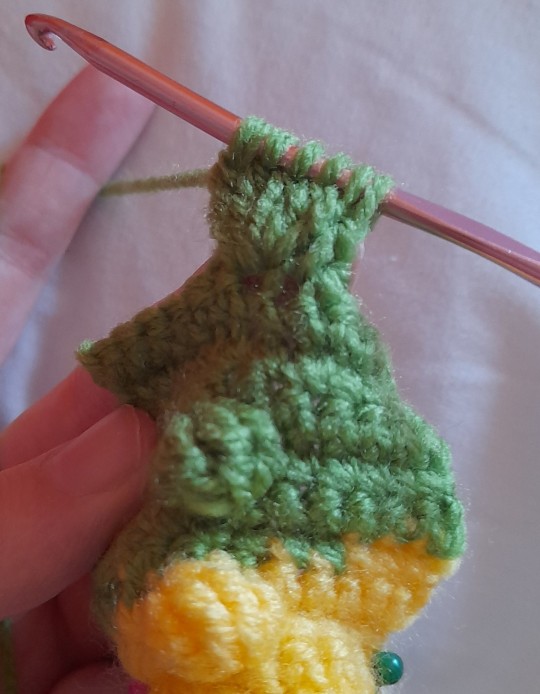
Bobbles aren't exactly sharp, but neither are gummy spikes tbh.
16. (Right side is facing you, hide yarn at back:) Inc, 3sc, triple bobble stitch, 2sc, change to green, sc, inc. Chain and turn. [11]
Careful not to skip stitches. Bobbles like to squish the stitches at the side of them and this makes them easy to skip while you're crocheting.
17. (Wrong side is facing you, hide yarn at front:) Inc, 5sc, change to yellow, 4sc, inc. Chain and turn. [13]
18. 3sc, change to green, 10sc. Chain and turn. [13]
13sc in green. Chain and turn. [13]
There will be no more yellow stitches. Leave enough yellow tail to stitch the yellow part on and cut the yarn.
19. 6sc, triple bobble, 6sc. Chain and turn. [13]
Again, careful not to skip stitches around bobbles. Count the stitches at the end of the row following a bobble.
20-22. 13sc (3 rows) [13]
23. 6sc, triple bobble, 6sc. Chain and turn. [13]
24-26. 13sc (3 rows) [13]
27. 6sc, triple bobble, 6sc. Chain and turn. [13]
28-30. 13sc (3 rows) [13]
31. Dec, 4sc, triple bobble, 4sc, dec. Chain and turn. [11]
32-34. 11sc (3 rows) [11]
35. Dec, 3sc, triple bobble, 3sc, dec. Chain and turn. [9]
36. Dec, 5sc, dec. Chain and turn. [7]
37. Dec, 3sc, dec. Chain and turn. [5]
38. Dec, 1sc, dec. Chain and turn. [3]
39. Double decrease (decrease over 3 stitches). Chain 1.
Pull enough yarn through the chain to stitch the green parts down and cut the yarn.
Pin the overlay in place. It should go from just over the tip of the snout to the very tip of the tail, and should fit snuggly and symmetrically. Remember to shape the angles -- the snout should face forwards, the tail should face backwards, the torso should be upright.
Pin the teeth individually if you have enough pins. This ensures the spaces between are visible when connected. The teeth may be uneven/asymmetrical on opposite sides of the mouth due to the way the picots stagger, but just make sure they're pinned and sewn okay and they'll look even.
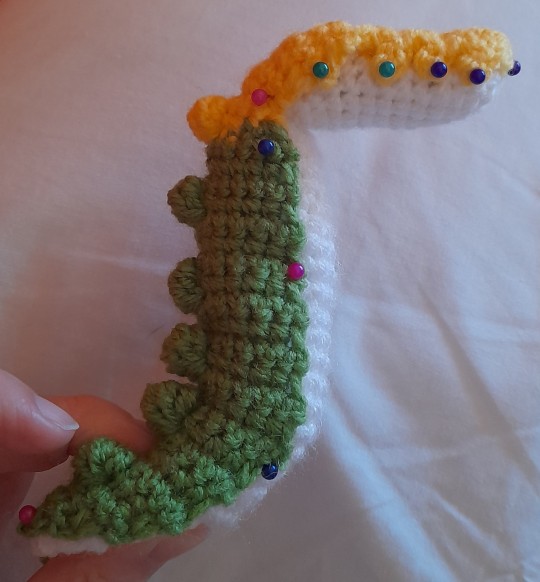
Note the shape -- it'll need to be bent like this when you fit the overlay on or it'll scrunch when bent later.
Sew! You don't have to go into every row, sewing every other stitch of the body should connect it okay with no glaring gaps. Make sure to sew with the correct colour of yarn tail.
Embroider on a couple of white eyes underneath the eyebrow ridges, with small eyebrows in white.
The eyes are embroidered on with an eyebrow each.
ARMS (one yellow, one green)
Start with a magic ring and leave enough of a tail to attach the end. Leave this end hanging outside the arm.
1. 7sc into a magic ring [7]
2-6. sc around (5 rounds) [7]
7. 2sc, dec, 3sc [6]
8-14. sc around (7 rounds) [6]
Stuff.
15. sc, (picot, sc in the next stitch) x4, slip stitch into the last stitch. Cut the yarn and cinch the palm shut, not too tightly. Hide the end inside.
The green arm is sewn on the higher-green shoulder and the yellow arm on the yellower side. Make sure the biggest finger gap is facing inwards to the body, this is like the wrist.
Leave a gap for the neck and match the arms to the shoulders. You'll find that the arms and fingers are a little bit posable.
LEGS (x2 in green)
Start with a magic ring and leave enough of a tail to attach the end. Leave this end hanging outside the leg.
1. 7sc into a magic ring [7]
2-9. sc around (8 rounds) [7]
10. 2sc, dec, 3sc [6]
11-13. sc around (3 rounds) [6]
14. 4inc, 2sc [10]
15. dec, 4sc, 2dec [7]
Stuff.
Cut yarn and cinch hole shut.
The legs should be connected at the hips with the legs pointing straight down and should connect closely at the top of the leg to make the hips look smoothly attached.
The hips are not at the lowest point of the body, they're where the lower curve begins to happen when the torso is straight upright and the tail points backwards.
HAT (brown)
1. 8sc into a magic ring [8]
2. (2sc, 2inc) x2 [12]
3. 3sc, 2inc, 4sc, 2inc, 1sc [16]
4. In the back loops only, 4sc, dec, 6sc, dec, 2sc [14]
5-6. In both loops, 14sc (2 rounds) [14]
7. In the front loops only, (1sc, inc) x7 [21]
8. In both loops, 5sc, hdc, 2dc in 1, 2dc in 1, hdc, 7sc, hdc, 2hdc in 1, hdc, 2sc [24]
Slip stitch and finish off.
The wider part of the brim with the dcs is the front of the hat. Attach the hat by either tying a string under the chin, or by sewing a couple of inner rim stitches to the head to keep it in place.
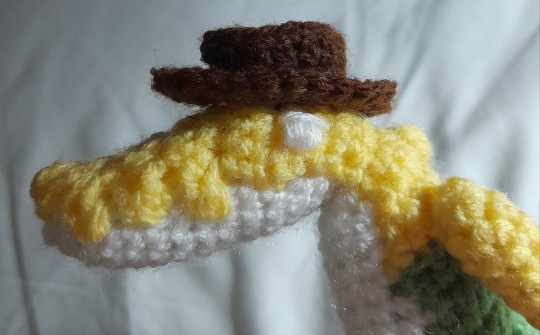
Sewn in place by two stitches at opposite sides of the inner edge. Yeehaw.
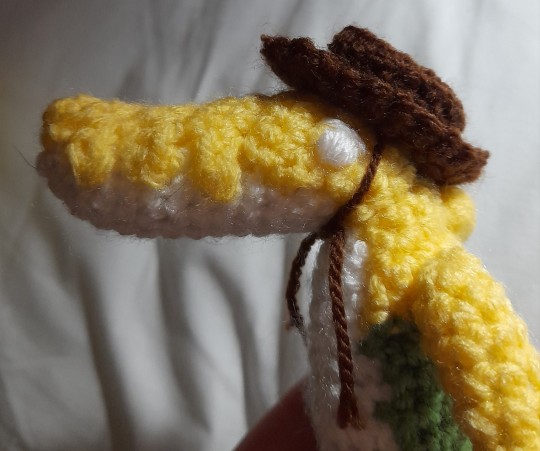
Hat connected by its straps: non-canonical but cute.
And that's it! Gummigoo is done.
I love my lil guy. Hope nothing bad happens to him when I show my friend Caine
#crochet#free crochet pattern#amigurumi#gummigoo#tadc#the amazing digital circus#gumigoo#gummygoo#tadc episode 2#tadc ep 2#tadc gummigoo
106 notes
·
View notes
Text

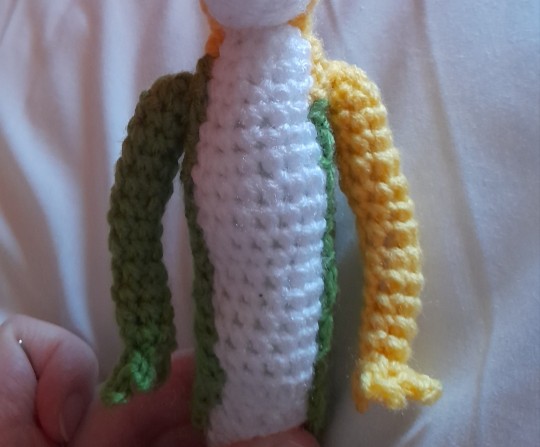
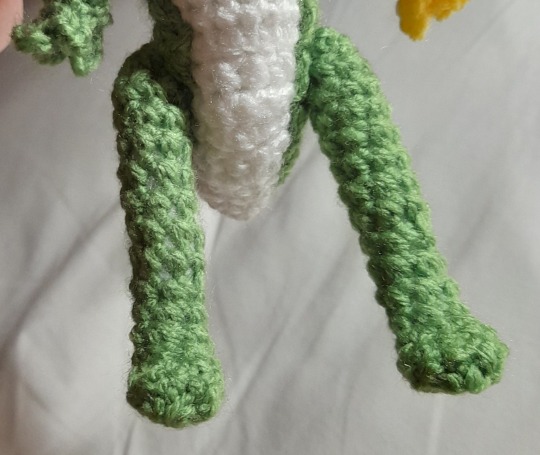
Erissa's Doll
It's finally done! Here is my take of Erissa's dolls..or puppets? Do we know what SSO is calling them yet? I admit, I messed up the proportions a bit and it isn't exact to the game model, but I'm still so proud and think it came out really cute! This was the first time I made my own pattern, and while there are things I think I would do differently next time, I'm still pretty happy with her!
Free Amigurumi Pattern below!
DISCLAIMER! This is my first pattern, so it may read rough. These are the exact steps I used to make the doll in the picture, but feel free to modify to look closer to the original.
MATERIALS
Weight 4 in 3 colors. I don't have exact amounts because this yarn came from my stash of rug yarn. Definitely less than a full ball, probably about 1/3 to 1/2. I believe it was Loops and Threads brand. The bows used a very small amount, less than a fist's size each.
4mm crochet hook
tapestry needle
safety eyes or buttons
stuffing material
LEGEND
r# - round/row
mc - magic circle
inc - increase
sc - single crochet
fo - fasten off (pull the tail through to knot)
ch - chain
dec - decrease (I used the invisible decrease, where you pull up the inside loops only of the 2 stitches you're decreasing)
slst - slip stitch
LEGS (make 2)
r1 - mc 4sc [4]
r2 - inc x4 [8]
r3 - (inc, 3sc) x2 [10]
r4 - (inc, 4sc) x2 [12]
r5 - (inc, 5sc) x2 [14]
r6 - (inc, 6sc) x2 [16]
r7 - 16sc [16]
r8 - (inc, 7sc) x2 [18]
r9 - 18sc [18]
r10 - (inc, 8sc) x2 [20]
r11 - 20sc [20]
r12 - (inc, 9sc) x2 [22]
r13 - 22sc [22]
r14 - (inc, 10sc) x2 [24]
Don’t FO the first leg, leave a hands length tail.
After you finish the second leg, chain 2 and join with the unfinished loop of the first leg.
sc once into the next stitch on the first leg, and then sc 2x into the side of the chain 2.
Rejoin leg 2 with a sc and continue to sc around leg 2.
Continue to sc down the chain and around the next leg. You should have about 52-54 stitches in this round, give or take. Consider the point where you rejoined the second leg after coming back on the side of the chain 2 the start of your round.
NOTE: About here on, your stitch counts might not match mine, and that's okay. The rest isn’t so precise, so if it looks good to
you, you’re good!
BODY (continuing from last step)
r1 - r3 - sc around (54)
Stuff the legs.
This is where we start decreasing. On each “decrease round”, you’re going to DEC at the front and back of (for lack of a better term) the crotch.
r4 - (25sc, dec) x2 [52]
r5 - 52sc [52]
r6 - (24sc, dec) x2 [50]
r7 - 50sc [50]
r8 - (23sc, dec) x2 [48]
r9 - 48sc [48]
r10 - (22sc, dec) x2 [46]
r11 - 46sc [46]
r12 - (21sc, dec) x2 [44]
r13 - 44sc [44]
r14 - (9sc. dec) x4 [40]
r15 - (8sc, dec) x4 [36]
Another reminder to stuff here.
r16 - (7sc, dec) x4 [32]
r17 - (6sc, dec) x4 [28]
r18 - (5sc, dec) x4 [24]
r19 - (4sc, dec) x4 [20]
FO and leave a long tail for sewing (2 hands length)
HEAD
r1 - mc 6sc [6]
r2 - 6inc [12]
r3 - (1sc, inc) x6 [18]
r4 - (2sc, inc) x6 [24]
r5 - (3sc, inc) x6 [30]
r6 - (4sc, inc) x6 [36]
r7 - (5sc, inc) x6 [42]
r8 - (6sc, inc) x6 [48]
r9 - (7sc, inc) x6 [54]
r10 - (8sc, inc) x6 [60]
r11-18 60sc [60]
r19 - (8sc, dec) x6 [54]
If you are adding safety eyes, add them between rows 17 and 18, about 12 stitches apart
r20 - (7sc, dec) x6 [48]
r21 - (6sc, dec) x6 [42]
r22 - (5sc, dec) x6 [36]
r23 - (4sc, dec) x6 [30]
r24 - (3sc, dec) x6 [24]
r25 - (2sc, dec) x6 [18]
r26 - (1sc, dec) x6 [12]
FO and leave a few inches to weave in
Stuff firmly and sew to body, stuffing the joint as you close it. Be careful to line your stitches up so the eyes face forward, and don't list to the left like mine did.
ARMS (make 2)
r1 - mc 4sc [4]
r2 - inc x4 [8]
r3 - (inc, 3sc) x2 [10]
r4 - (inc, 4sc) x2 [12]
r5 - (inc, 5sc) x2 [14]
r6 - (inc, 6sc) x2 [16]
r7 - 16sc [16]
r8 - (inc, 7sc) x2 [18]
r9-13 - 18sc [18]
So at this point, I know it would be more accurate to attach the arms fluffed and sewn a bit open to the body…but I decided to lightly stuff and slst the opening closed, leaving a tail for sewing.
BOWS (make 2 in different colors)
r1 - ch36, slst into first chain to close the loop, making sure the chain doesn’t twist [36]
r2 - (into the sides of the chain) ch1, sc35 [36]
r3-10 sc36 [36]
slst and weave the ends.
With the same color, we’re going to make the bow’s knot.
r1 - ch 11 [11]
r2 - sc in the second stitch from the hook and down the remaining 9 stitches, ch1 and turn [10]
r3-4 - 10sc, ch1, turn [10]
r5 - fold your work so the short ends touch and slst to join down the short side [4]
Leave a long tail for sewing.
To assemble, scrunch/gather the first part of the bow you made and slide it through the “knot” with the openings at the top and bottom. Rolling it up and twisting helps. Then fluff out the sides so it looks
how you like.
Then assemble! Your head should already be attached. Go ahead and add the arms about 6 rows down from the head connection, or place them visually. Attach the bows to the top using the tail from the knot. Fluff the bows and you're done!
#sso#ssoblr#star stable online#star stable#sso erissa#sso erissa doll#crochet#crochet pattern#amigurumi#free crochet pattern#free amigurumi pattern#star stable crochet
115 notes
·
View notes
Photo
Sea Bunny Amigurumi Pattern
The pattern is available as a PDF on Ravelry.
Check out my other patterns on Ravelry and Etsy.
This is an icrochetthings original pattern © 2023. For personal use only. Do not copy, sell, alter, or distribute this pattern or parts of it. You may sell a limited number of your handmade finished items provided you credit icrochetthings as the designer.
Size: 3” tall, 3.5″ long
Materials:
• DK weight yarn in white, brown, pink
• C (2.75mm) crochet hook
• Stuffing
• Scissors
• Yarn needle
Some knowledge of embroidery is needed to complete the pattern as shown. You should be familiar with the following technique(s):
• French knot
#crochet#crochet pattern#free crochet pattern#amigurumi#amigurumi pattern#free amigurumi pattern#handmade#plush#sea bunny
1K notes
·
View notes
Text
Free pattern ❤️❤️❤️
#free cross stitch pattern#free crochet pattern#free pattern#free amigurumi pattern#free crochet patterns#free#crochet amigurumi#crochet pattern#crochet#amigurumi bear#amigurumi pattern#amigurumi
120 notes
·
View notes
Text


Sure, You've Seen Patterns For Crochet Aquariums Before ... But Not Like These Ones! Ton O' Patterns! 👉 https://buff.ly/3yk7xOJ 🐡🐠🐟
482 notes
·
View notes
Photo

Rat by Kylie Slee
Free Crochet Pattern Here *** Video Pattern Only ***
1K notes
·
View notes
Text
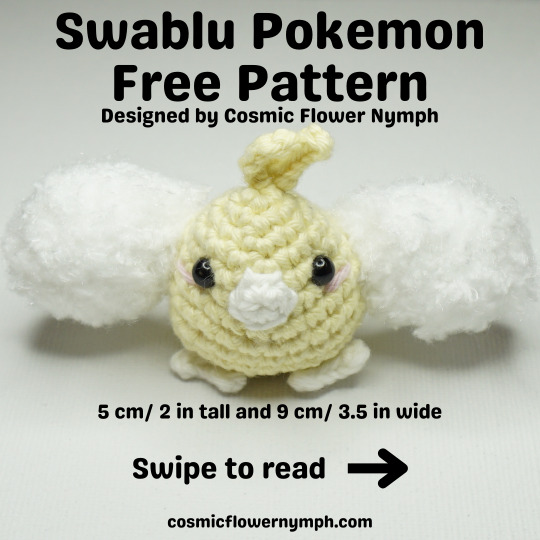
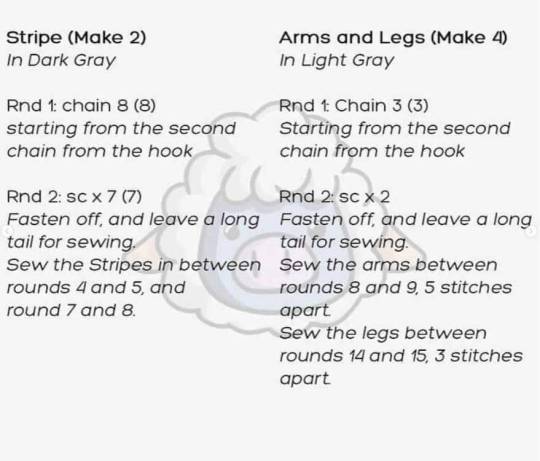
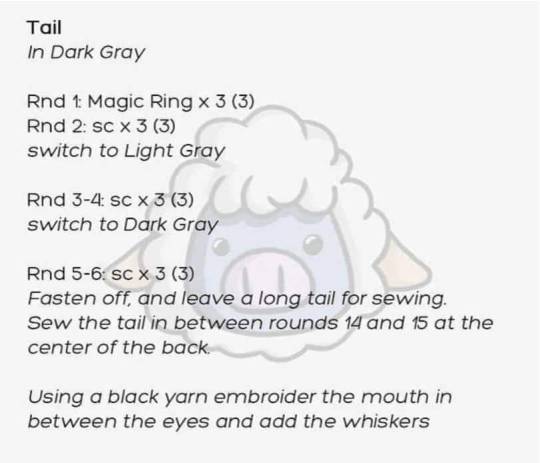
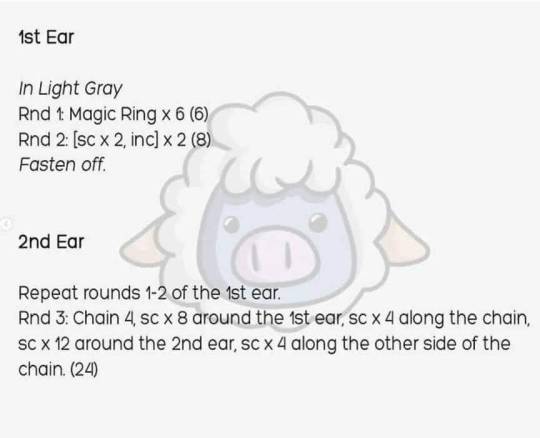
I hope you enjoy making this cute small shiny Swablu Pokemon! I will make more free fanart patterns regularly over time to share with you! I would appreciate it if you repost this post, maybe more crocheters might want to try this pattern! Thank you!!
#amigurumi#amigurumi doll#amigurumi pattern#crochet#crochet ideas#crochet inspiration#crochet pattern#crocheters of tumblr#artists on tumblr#crocheting#pokemon crochet#crochet pokemon#amigurumay#amigurimi#free crochet pattern#free amigurumi pattern
88 notes
·
View notes
Text
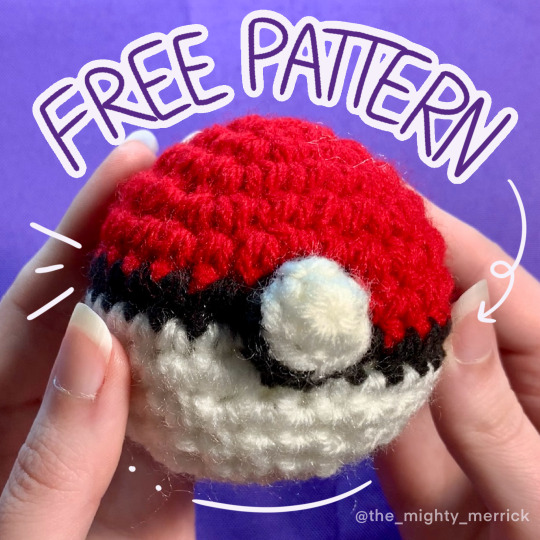
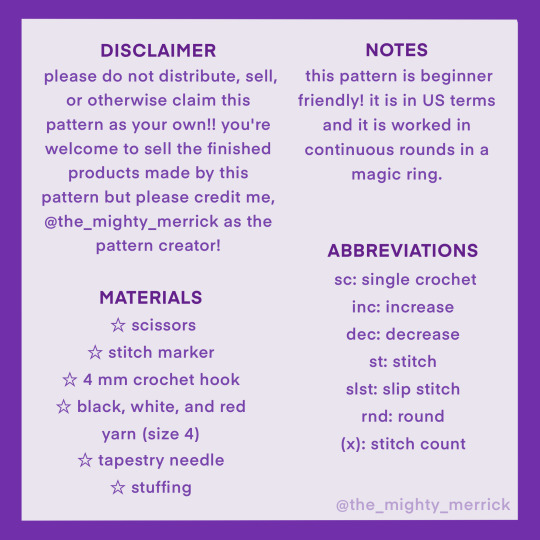

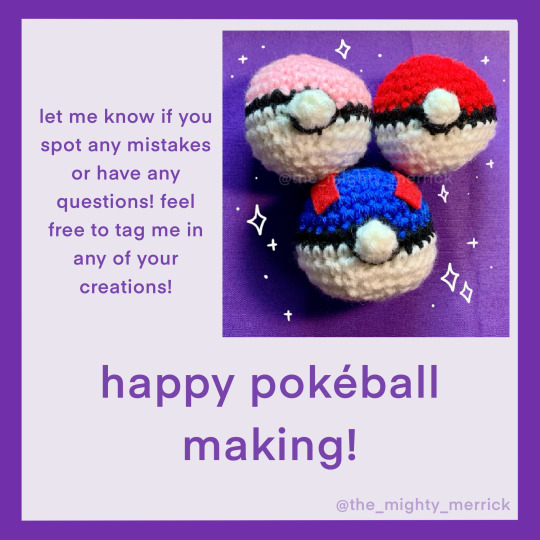
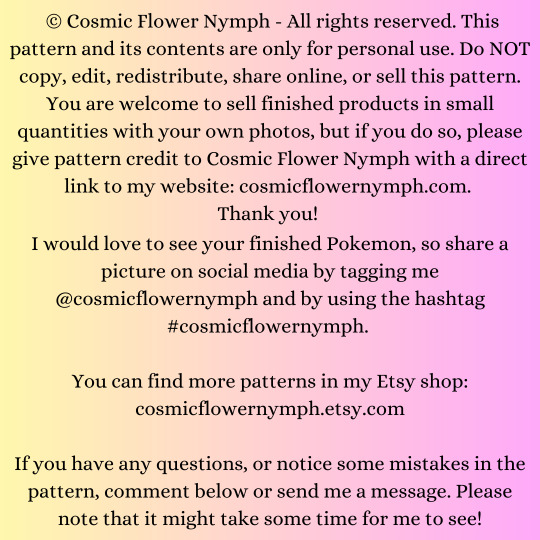
say hello to my very first pattern release!! i make these all the time and they're super quick and easy! hope you all enjoy the free pattern :) happy pokéball making!!
you can find the video tutorial here!
#crochet#crochet pattern#free crochet pattern#amigurumi#cute crochet#easy crochet#beginner friendly#crocheters of tumblr#pokémon#pokéball#pokémon crochet#fiber art#fiber crafts#crochet plush
54 notes
·
View notes
Last Seen Blogs
med-studies
doctor to be

kevinkinky
follow me on twitter @jimdavishouse
anxious-asexual-the-second-art
Random Art by anxious-asexual-the-second

rotodbtumblog-nhl
🏒 NHL Fantasy Hockey News

wildkissed-a
𝒘𝒐𝒍𝒇 𝒘𝒊𝒍𝒅 𝒉𝒆𝒂𝒓𝒕.