#and I measured it and it was 50 cm on the fabric
Text
nothing quite like sewing to make you realize how small you really are
like I did not expect my hip-to-ankle-length to be less than a meter even though my whole body is only 164. but still!! less than a meter!!! I'm so short!!!!!
#adventures in sewing#I was putting a pattern on some fabric and looked at the crotch-to-ankle bit and was like. hm. this looks VERY short#and I measured it and it was 50 cm on the fabric#which still seemed VERY short#and then I measured it on myself and it was just above my ankle and like. oh. I'm SHORT-short#got it#still doesn't seem right but well here I am#we'll find out later when I actually cut the fabric out lmao#though I moved the crotch bit up a bit because on the pattern I found it was really low#also this is gonna be highkey terrifying because I've been using my self-made pyjama pants#and they fit horribly lmao#though to be fair I messed with those a lot#stiiilllll#prayer circle for these trousers to come out wearable
0 notes
Text

"could I have a fashion kit based on Pete from Power Stone 2?" -anon requested

#pete kin#pete#power stone 2#fashion kit#anti harassment#proship#proship safe#request fill#proship edit blog#[assignment passed back... /requested finished]#antis dni#proshippers please interact#hate will be blocked
5 notes
·
View notes
Text
🎀 lolita sales post 🎀
A little mix of styles, I'll post below the cut. I'm open to offers and whatever doesn't sell I'll probably list to lacemarket? Prices in usd, I will provide photos to anyone interested! I just didn't want to go through the hassle of photographing everything. I'll state the condition and notes I have on each piece~ everything has been purchased secondhand.
I've linked lolibrary entries for sizing and release info. Feel free to make offers!!! I based my prices from quick searches on other sites, but I'm flexible. Depending on the item and country I would estimate 20-40$ shipping (im in canada)
I dont really have formal feedback for selling clothes anymore since I haven't in forever, but I do have an online shop where I sell art prints, so I have experience selling things online and whatnot.
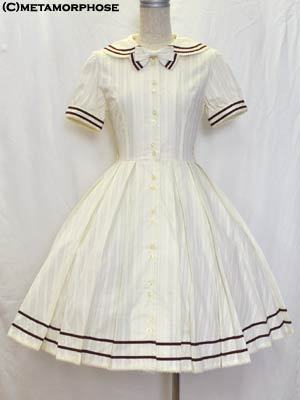
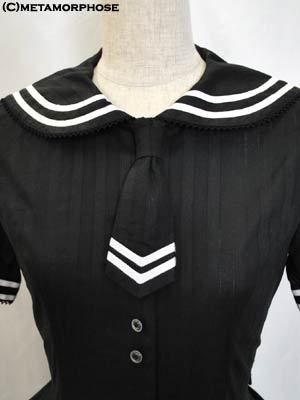
Metamorphose Sailor Short Sleeve OP in ivory (2011) - $100
Missing bow (left photo), but still has the tie (like right photo) this dress is so lightweight and perfect for summer, I just don't like how the sleeves fit on my arms. No noticeable damage. I washed it but i havent worn it out!
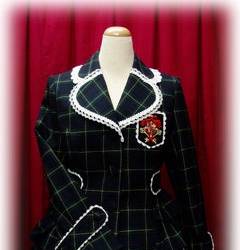
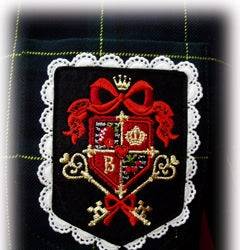
Btssb Tartan Check Jacket in green (2005) - $180
No damage, only tried on by me. Another wonderful piece but too tight in the arms for me. It's soft, but polyester. I'm honestly so sad about letting this piece go I adore it, but I need to stop holding onto things I won't wear!
Btssb Ribbon Sherbet Skirt in pink (2010) - $40
Really adorable skirt, it's shorter and perfect for casual wear. You can't tell in the stock photos, but the fabric is woven with glitter! Again, washed but I haven't worn it besides trying on.
Aatp Sylvester vest (2011 or 2013) - $80
I think its the women's size, as there is so spider tag. I had forgotten and then realized upon inspecting while writing this that one of the back panel buttons had come off and I must have stored it somewhere to keep safe. I'll look for it (I know I have it somewhere lol) on the offchance I can't find it though I will discount accordingly. Worn by me and washed, there is no other noticeable damage.

Aatp Justin pants in red (2018) - $100
Only tried on by me- I'm going to keep it real with you I'm just too bottom heavy. The waist is full of room but the leg measurement (in average clothing sizing proportion) is really small. I don't understand why they would add so much extra room in the waist and not make the thighs adjustable at all. The sizing doesn't match up with the lolibrary entry, the waist can stretch up to 90cm, and is about 76cm not stretched... the inside measurement of the leg cuff is maybe 46 cm (the fabric is thick so measures 50 on the outside if that makes sense) when wearing this, the top of the waistband was floating around but made a sharp ^ down the back, these shorts will not be flattering if you have wider hips. All of that said they are really beautiful, I adore the fabric, but the lolibrary entry is very misleading!
---
I've run out room for photos in this post and need to locate the second blouse, but I have 2 white bodyline blouses and the strawberry gingham skirt I might bundle all together for idk 50$? I'll have to find them all first, but in case anyone is interested.
---
Other pieces I've been going back and forth on selling are:
victorian maiden velveteen frill bustier in wine (2002)
Metamorphose velveteen high waist ribbon jsk in red (2004) (missing detachable bust panel)
But tbh I can't come up with a reasonable price I'd be willing to sell them at. On the off chance they are someone's #1 dream items and you'd like to make an offer I am open for it but I might turn it down. I would be open to trades for similar items too though! Such as another vm bustier or old meta velveteen op/jsk of the era.
22 notes
·
View notes
Text
Tumblr sweatpants review
8/10 overall rating
Price: $55

Image ID: black Tumblr sweatpants laid flat on a beige carpet.
Measurements
First things first: the measurements on the size chart are confusing and not super helpful. I got the 3XL (the largest size) to be safe and I'm very glad I did. This ended up being my size, though I usually can wear a 2XL in other brands. Here is a full breakdown of the pant measurements, so you can judge them for yourself. All are measured flat then doubled where applicable.
Waistband relaxed = 42 1/2in (108cm)
Waistband stretched = 52in (132 cm)
Hip = 53in (134.5cm)
Upper thigh (at crotch level) = 31 1/2in (80cm)
Calf (10 inches above bottom hem) = 17in (43cm)
Ankle = 14in (35.5cm)
Length along outseam = 46 1/2in (118cm)
Inseam = 31 1/1in (80cm)
Pocket depth = 11 3/4in (30cm) from waistband, roughly 3 1/4in (8cm) from bottom of the opening. Curved, so hard to measure.
The waistband has a bit of stretch thanks to the elastic in it, but not much. There is a functional drawstring to tighten. The material itself has minor stretch, maybe about as much as a cotton t-shirt. The ankle cuff seam has *zero* stretch. The legs are tapered in a fairly slim cut.
The legs ended up being too long for me, so I'll have to roll up the cuffs or recuff them entirely.
The sizing chart at the time of my ordering listed the waist measurement of the 3XL at 21 1/4 and the inseam at 30 3/4. There was no indication if that waist measurement was flat, doubled, anything.
Material, Construction, and Comfort
There are no material content, washing instructions, or manufacturer origin tags inside the pants. The site lists the material as "7.8-ounce, 50/50 cotton/poly fleece, Elastic, self-fabric waistband and self-fabric cuffs." This matches what I see without doing a burn test. The outer material has a smooth, slightly ribbed finish that does look and feel like a heavier t-shirt material. The inside is a fluffy poly fleece.
All seams are fully sealed in surge stitching, with a few trailing tails at joins. The drawstring is a woven flat cord. The elastic is 1 1/2in flat elastic, stitched down on top and bottom. The elastic and drawstring are both anchored at the center back, so the drawstring is not continuous and cannot be pulled out. Both are contained within the channel of the waistband, so no elastic pressing directly to the skin.
The tumblr logo is screenprinted on the left leg. It is warm and flexible, so I believe it will serve my sweatpantsy needs. I have not yet washed them, so I cannot say how they'll hold up over time.
As long as you get the right size, there should be plenty of ease for movement. If you want a more relaxed fit, maybe go a size up so long as the size range allows you to.
Overall, I'm pleased with these and do no regret buying them. The pockets are nice and deep, the pants are comfy, and they'll keep my legs warm. The quality and construction are pretty good; if you told me these were from a mid-tier department store like JcPenney or Kohls, or that they were from an athletics brand, I would believe you. I think this is reflected in the price. I'm not a huge fan of tapered legs and the pants only just fit comfortably where I prefer a much more relaxed fit.
I would love if Tumblr offered other styles and they should definitely talk to their manufacturer about increasing the size range into truly plus sized options, as I consider myself on the lower end of plus size and only fit their largest size.
@staff Please put the option for reviews on your shop page!
#Tumblr#Tumblr merch#Review#Tumblr sweatpants review#Tumblr merch review#This is my hellsite and I'll support it with my real money#As Seen On Tumblr
16 notes
·
View notes
Text
installing patches in my trousers because of these fucking thighs that i never asked for have done their very best job and worn through the linen from the constant chafing. i picked off some of the pilling because this really is a loose weave (though i would say ALL modern linen is loose weave compared to today's, see the following tangent:
very sheer linen cloth, ca. 1492 - 1473bce - 46 warp/30 weft per cm
- metropolitan museum of art
18th dynasty loosely woven royal textile - 32 warp/32 weft per cm; 80/80 per inch
18th dynasty royal plain weave - 15 warp/15 weft per mm
18th dynasty royal plain weave - 25 warp /13 weft per mm
- tatiana sol verdon thesis (yeah, you read that right. i read that right. it's actually by millimetre)
undecorated linen cloth, ca. 6 - 800ce - 27 - 29 warp/19 weft per cm
- metropolitan museum of art
vs. fabrics-store.com’s linen (what i would consider to be the most widely available and ‘generic’ of linen fabrics, which are grown and processed throughout eastern europe with some fabrics dyed in the us) which actually lists the warp/weft thread counts for its different cloths.
rustic linen, 15/12.6 per cm, 241g/m2
all-purpose, 18/14.5 per cm 180g/m2
handkerchief - 22/17 per cm, 125.5g/m2
luxury - 19/19 per cm, 180g/m2
gauze - 15/16 per cm, 95g/m2
spoonflower's belgian linen, 335g/m2, just has its thread count listed as '50', without any indication if this is the entirety of the threads, just the warp or the weft, or even what unit of measurement is being used.
onlinefabricstore's belgian linen equals out to 20.5 warp and 10 weft for a 341g/m2.
...
completely unscientifically: yes. even allowing that the preserved textiles were from royal burials, indicating that the quality would be quite high, but even disregarding that, the 32/32 warp/weft one is considered 'loosely woven' and that thread count is higher than the ones that i could find online because for some reason no one wants to list their linen thread counts. even if you look at sheets, those numbers are 80 - 150 per inch, so 31.5 - 59 threads per cm, and even then when you half them to make an even warp and weft, you end up with 15/16 - 29/30 warp and weft threads per cm, where that undecorated 6 - 800ce cloth ends up with 48 threads per cm, so.
3 notes
·
View notes
Text
High Profit Business (Make Money by Selling 50 Pieces in a Day) | Tuğba İşler

Hi everyone. I show you how to make summery round dress in this video.
I used 220 cm length woven crinkle fabric. Measurements are given for size 38.
In this video, I'm going to show you how to make high profit business by selling 50 pieces of clothing in a day. This is a simple and easy to follow plan that you can start using today!
If you're looking for a way to make money this summer, then this is the video for you! In this video, I'll show you how to make high profit business by selling 50 pieces of clothing in a day. This is a simple and easy to follow plan that you can start using today!
So what are you waiting for? Click the play button and let's start making money by selling clothes! Hi everyone.
High Profit Business (Make Money by Selling 50 Pieces in a Day) | Tuğba İşler ► https://youtu.be/5Q3MdJBCI-0
0 notes
Text
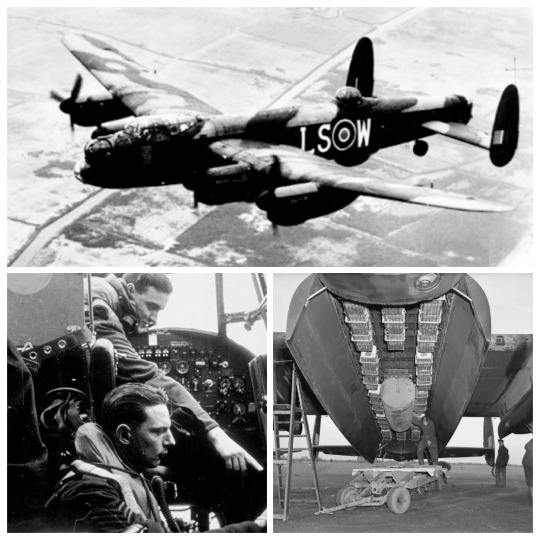
• Avro Lancaster Bomber
The Avro Lancaster is a British Second World War heavy bomber. It was designed and manufactured by Avro as a contemporary of the Handley Page Halifax. The Lancaster would become one of the most capable strategic bombers of the Second World War.
The Lancaster has its origins in the twin-engine Avro Manchester which had been developed during the late 1930s in response to the Air Ministry Specification P.13/36 for a capable medium bomber for "world-wide use". Originally developed as an evolution of the Manchester (which had proved troublesome in service and was retired in 1942), the Lancaster was designed by Roy Chadwick and powered by four Rolls-Royce Merlins engines. During the late 1930s, none of these were ready for production. Both the United States and the Soviet Union were pursuing the development of bombers powered by arrangements of four smaller engines; the results of these projects proved to possess favourable characteristics such as excellent range and fair lifting capacity. Accordingly, in 1936, the RAF also decided to investigate the feasibility of the four-engined bomber. Various candidates were submitted for the specification by such manufacturers as Fairey, Boulton Paul, Handley Page and Shorts; all submissions were designed around two-engine configurations, using the Rolls-Royce Vulture, Napier Sabre, Fairey P.24 or Bristol Hercules engines. The majority of these engines were under development at this point; while four-engined bomber designs were considered for specification of a heavy bomber. In response, British aviation company Avro decided to submit its own design, designated the Avro 679, to meet Specification P.13/36. In February 1937, following consideration of the designs by the Air Ministry, Avro's design submission was selected along with Handley Page's bid being chosen as "second string". Accordingly, during April 1937, a pair of prototypes of both designs were ordered.
As early as mid-1940, Avro's chief design engineer, Roy Chadwick, had been working on an improved Manchester design. This redesign was powered by four of the more reliable but less powerful Rolls-Royce Merlin engines, specifically adopting the form of the Merlin "Power Plant" installations which had been developed by Rolls-Royce for the earlier Beaufighter II, installed on a larger wing. Initially, the improved aircraft was designated as the Type 683 Manchester III; it was subsequently renamed as the Lancaster. The prototype aircraft, serial number BT308, was assembled by the Avro experimental flight department at Ringway Airport, Manchester; the prototype was constructed from a production Manchester airframe, which was combined with a new wing centre section designed to accommodate the additional engines. On January 9th, 1941, test pilot H. A. "Sam" Brown performed the prototype's maiden flight at RAF Ringway, Cheshire. Flight testing of the new aircraft quickly proved it to be a substantial improvement on its predecessor. The first prototype was initially outfitted with a three-finned tail layout, a result of the design having been adapted from the Manchester I; this was quickly revised on the second prototype. Some of the later orders for Manchesters were converted in favour of the Lancaster; both bombers shared various similarities and featured identical design features, such as the same distinctive greenhouse cockpit, turret nose and twin tail. The designs were so similar that an entire batch of partially constructed Manchesters were completed as Lancaster B I aircraft instead. Based upon its performance, a decision was taken early on to reequip twin-engine bomber squadrons with the Lancaster as quickly as possible. In October 1941, the first production Lancaster, L7527, powered by Merlin XX engines, conducted its first flight.
Avro received an initial contract for 1,070 Lancasters. The majority of Lancasters manufactured during the war years were constructed by Avro at its factory at Chadderton near Oldham, Greater Manchester and were test-flown from Woodford Aerodrome in Cheshire. As it was quickly recognised that Avro's capacity was exceeded by the wartime demand for the type, it was decided to form the Lancaster Aircraft Group, which comprised a number of companies that undertook the type's manufacture, either performing primary assembly themselves or producing various subsections and components for the other participating manufacturers. In addition to Avro, further Lancasters were constructed by Metropolitan-Vickers (1,080, also tested at Woodford) and Armstrong Whitworth. They were also produced at the Austin Motor Company works in Longbridge, Birmingham, later in the Second World War and post-war by Vickers-Armstrongs at Chester as well as at the Vickers Armstrong factory, Castle Bromwich, Birmingham. Belfast-based aircraft firm Short Brothers had also received an order for 200 Lancaster B Is, but this was cancelled before any aircraft had been completed. The Lancaster was also produced overseas. During early 1942, it was decided that the bomber should be produced in Canada, where it was manufactured by Victory Aircraft in Malton, Ontario. Of later variants, only the Canadian-built Lancaster B X was produced in significant numbers. A total of 430 of this type were built, earlier examples differing little from their British-built predecessors, except for using Packard-built Merlin engines and American-style instruments and electrics. By the time of the Lancaster's production by the end of the war and later into 1946, 7,377 aircraft were produced.
The Avro Lancaster was a British four-engined strategic bomber that was used as the RAF's principal heavy bomber during the latter half of the Second World War. The typical aircraft was powered by an arrangement of four wing-mounted Rolls-Royce Merlin piston engines, each of which drove a 13 ft (4.0 m) diameter de Havilland Hydromatic three-bladed propeller. While not optimal, the Lancaster was capable of flying the return journey home on only two operational engines, along with very limited distances on a single running engine. It possessed largely favourable flying characteristics, having been described by Goulding and Garbett as being: "a near-perfect flying machine, fast for its size and very smooth...such a delightfully easy aeroplane to fly...there are instances of Lancasters having been looped and barrel-rolled, both intentionally and otherwise". The Lancaster benefited from a structure that possessed considerable strength and durability, which had been intentionally designed to maximise structural strength-per-weight; this resulted in the Lancaster being capable of withstanding some levels of damage resulting from attacks by hostile interceptor aircraft and ground-based anti-aircraft batteries. However, during the first year of the type's career, some instances of structural failures were encountered on Lancaster B Is and a number of aircraft were lost in accidents as a result of the design limitations having been greatly exceeded. Compared with other contemporary aircraft, the Lancaster was not an easy aircraft to escape from as its escape hatch was only 22 in × 26.5 in (56 cm × 67 cm) in size; in a Halifax or Stirling (which both had an escape hatch 2 in (5.1 cm) wider), 25 per cent of downed aircrew bailed out successfully, and in American bombers (albeit in daylight raids) it was as high as a 50 per cent success rate while only 15 per cent of the Lancaster crew were able to bail out. The Lancaster uses a mid-wing cantilever monoplane configuration. The wing is constructed from five separate main sections while the fuselage is likewise composed of five sections. Aside from a few elements, such as the fabric-covered ailerons, the Lancaster's oval-shaped fuselage had an all-metal covering. All of the wing and fuselage sections were manufactured separately, during which they were outfitted with all of the required equipment in advance of final assembly being performed, as a measure intended to accelerate the rate of production. The Lancaster was equipped with a retractable main undercarriage and fixed tailwheel; the hydraulically-actuated main landing gear raised rearwards into recesses within the inner engine nacelles. The distinctive tail unit of the aircraft was outfitted with a large twin elliptical fins and rudder arrangement.
The standard crew for a Lancaster consisted of seven men, stationed in various positions in the fuselage. Starting at the nose, the bomb aimer had two positions to man. His primary location was lying prone on the floor of the nose of the aircraft, with access to the bombsight controls facing forward, with the bomb sights on his left and bomb release selectors on the right. He also used his view out of the large transparent perspex nose cupola to assist the navigator with map reading. To man the Frazer Nash FN5 nose turret, he stood up placing himself in position behind the triggers of the twin .303 in (7.7 mm) guns. Ammunition for the turret was 1,000 rounds per gun (rpg). The bomb aimer's position contained the nose emergency hatch in the floor; at 22 by 26.5 inches (560 by 670 mm) (two inches narrower than the Halifax escape hatch) it was difficult to exit through while wearing a parachute. On the roof of the bomb bay the pilot and flight engineer sat side by side under the expansive canopy, with the pilot sitting on the left on a raised portion of the floor (almost all British bombers, and most German bombers, had only a single pilot seat as opposed to American practice of carrying two pilots, or at least having controls for two pilots installed). The flight engineer sat on a collapsible seat (known as a "second dicky seat") to the pilot's right, with the fuel selectors and gauges on a panel behind him and to his right. The tail gunner escaped by rotating his turret to the rear, opening the door in the back of the turret, passing into the fuselage, and clipping on a parachute that was hung on the side wall. He could then exit through the rear entrance door. Behind the pilot and flight engineer, and behind a curtain fitted to allow him to use light to work, sat the navigator. His position faced to port with a chart table in front of him. An instrument panel showing the airspeed, altitude, and other information required for navigation was mounted on the side of the fuselage above the chart table. The wireless operator's radios were mounted on the left-hand end of the chart table, facing the rear of the aircraft. On his left was a window, and above him was the astrodome, used for visual signalling and by the navigator for celestial navigation. Behind the wireless operator were the two spars for the wing, which created a major obstacle for crew members moving down the fuselage even on the ground. On reaching the end of the bomb bay the floor dropped down to the bottom of the fuselage, and the mid-upper gunner's turret was reached. His position allowed a 360° view over the top of the aircraft, with two Browning .303 Mark IIs to protect the aircraft from above and to the side. The mid-upper gunner sat on a rectangle of canvas that was slung beneath the turret and would stay in position throughout the flight. Ammunition for the turret was 1,000 rounds per gun.
The Avro Lancaster was initially equipped with four Nash & Thompson Frazer Nash hydraulically operated turrets mounted in the nose, tail, mid-upper and underside. The original tail turret was equipped with four Browning .303 Mark II machine guns and all other turrets with two such machine guns. Late on in the war, as a result of statistical analysis, Freeman Dyson put forward a case for the removal of the majority of the Lancaster's defensive armament. He argued that this would reduce the overall loss rate as it would have the benefit of increasing the Lancaster's cruise speed by up to 50 mph (80 km/h) (assuming the bomb load was not increased at the same time), and thus make the bomber harder to shoot down. However this theory neglects the fact that the two main Luftwaffe night fighters of the time, the Me 110 and the Ju 88 in their night fighter versions were all capable of 300 mph (480 km/h), thus any 50 mph (80 km/h) increase over the Lancaster's normal cruising speed of around 180 mph (290 km/h), (giving a speed of 230 mph (370 km/h)) still left the Lancaster well within the interception speeds of these two aircraft. Only the FN-5A nose turret which was similar to the FN-5 used on the preceding Avro Manchester, the Vickers Wellington and the Short Stirling remained unchanged during the life of the design, except in instances where it was removed entirely. The ventral (underside) FN-64 turret quickly proved to be dead weight, being both difficult to sight because it relied on a periscope which limited the gunner's view to a 20-degree arc, and too slow to keep a target within its sights. Aside from early B Is and the prototype B IIs, the FN-64 was almost never used. The mid-upper (dorsal or top) turret was an FN-50 on early examples and the very similar FN-150 with improved sights and controls on later examples. On all but the earliest examples this turret was surrounded by a coaming which provided a track for a cam operated interruptor device which prevented the gunner from shooting the tail of his own aircraft. The tail turret was the most important defensive position and carried the heaviest armament. Despite this, the turrets used, starting with the FN-20, were never entirely satisfactory and numerous designs were tried. The FN-20 was replaced by the very similar FN-120 which used an improved gyroscopic gun sight (GGS). Many rear gunners insisted on having the centre section of perspex removed from the turret to improve visibility. The transparencies were difficult to see through at night, particularly when trying to keep watch for enemy night fighters that appeared without notice astern and below the aircraft when getting into position to open fire. Ultimately radar, rather than improved visibility, made the turret more effective. An important feature of the Lancaster was its unobstructed 33 ft (10 m) long bomb bay. At first, the heaviest bomb carried was the 4,000 lb (1,800 kg) high capacity HC "Cookie".[38] Bulged doors were added to 30 per cent of B Is to allow the aircraft to carry 8,000 lb (3,600 kg) and later 12,000 lb (5,400 kg) "Cookies". The Lancaster also carried a variety of smaller weapons, including the Small Bomb Container (SBC) which held 236 4 lb (1.8 kg) or 24 30 lb (14 kg) incendiary and explosive incendiary bomblets; 500 lb (230 kg) and 1,000 lb (450 kg) General Purpose High Explosive (GP/HE) bombs (these came in a variety of designs); 1,850 lb (840 kg) parachute deployed magnetic or acoustic mines, or 2,000 lb (910 kg) armour-piercing (AP) bombs; 250 lb (110 kg) Semi-Armour-Piercing (SAP) bombs, used up to 1942 against submarines; post 1942: 250 lb (110 kg) or 500 lb (230 kg) anti-submarine depth charges.
During early 1942, No. 44 Squadron, based at RAF Waddington, Lincolnshire, became the first RAF squadron to convert to the Lancaster; it was quickly followed by No. 97 Squadron, which was also based at Waddington. On March 2nd, 1942, the first operational mission of the Lancaster, deploying naval mines in the vicinity of Heligoland Bight, was performed by aircraft of No. 44 Sqn. On March 10th, 1942, the first bombing mission was conducted over the German city of Essen, North Rhine-Westphalia. While the Lancaster had been designed to conduct night-time operations, daylight raids were occasionally performed by the type as well. The existence of the Lancaster was revealed after a daytime raid upon an engine factory located in Augsburg, Swabia, Bavaria conducted by Nos. 44 and 97 Sqns on April 17th, 1942. Due to the high loss rates typically involved in such operations, daytime bombing missions were performed sparingly until the Allies had achieved a level of aerial supremacy over the Axis powers. During 1942, the Lancaster remained in relatively short supply, which meant that training and crew conversion courses typically had to be performed by the squadrons themselves; there were no aircraft furnished with dual controls at this time, and pilots would therefore have to perform their first flight without the instructor being capable of directly acting on the controls themselves. Throughout July 1943, large numbers of Lancasters participated in the devastating round-the-clock raids on the city of Hamburg during Air Chief Marshal Harris's "Operation Gomorrah". A particularly famous mission performed by the Lancaster was the mission flown May 16-17th, 1943, codenamed Operation Chastise, to destroy the dams of the Ruhr Valley. The operation was carried out by 617 Squadron in modified Mk IIIs carrying special drum-shaped bouncing bombs, which had been designed by British engineer Barnes Wallis. The story of the operation was later made into a film, The Dam Busters.
During the latter half of 1944, a series of high-profile bombing missions were performed by the Lancaster against the German battleship Tirpitz. Executed by Nos. 617 and 9 Sqns, a combination of Lancaster B I and B III bombers were armed with 12,000 lb 'Tallboy' bombs and were adapted with enlarged bomb bay doors in order to accommodate their special payloads and additional fuel tanks to provide the necessary endurance. A total of three attacks, individually codenamed Operation Paravane, Operation Obviate and Operation Catechism, were conducted against Tirpitz, which was anchored in a fjord in Occupied Norway. The first of these attacks disabled the vessel while the third mission was responsible for sinking the ship. As a result of actions such as Operation Chastise and the sinking of Tirpitz, No. 617 Sq was perhaps the most famous of all Lancaster squadrons. During early 1945, a total of 33 Lancaster B Is were modified so that they could deploy the 22,000 lb Grand Slam bomb, the heaviest conventional bomb to be used during the conflict. On March 13th, 1945, the first operational use of the Grand Slam was performed by a Lancaster of No. 617 Sqn against the Bielefeld viaduct in North Rhine-Westphalia. Amongst the final wartime operations performed by the Lancaster was the destruction of Eagle's Nest, the extensive holiday home complex used by German leader Adolf Hitler. RAF Lancasters dropped food into the Holland region of the occupied Netherlands, with the acquiescence of the occupying German forces, to feed people who were in danger of starvation. The Lancaster conducted a total of 156,000 sorties and dropped 608,612 long tons (618,378 tonnes) of bombs between 1942 and 1945. Only 35 Lancasters completed more than 100 successful operations each, and 3,249 were lost in action. The most successful survivor completed 139 operations, and was ultimately retired from service and scrapped in 1947. From 1942 onwards, the Lancaster became the mainstay of the British heavy bomber fleet; by the end of the war in Europe, there were roughly 50 squadrons equipped with the Lancaster, the majority of these being the Lancaster B I model. Adolf Galland (commander of the Luftwaffe fighters) considered the Lancaster to be "the best night bomber of the war", as did his adversary, Arthur "Bomber" Harris, who referred to it as the RAF Bomber Command's "shining sword".
Lancasters from Bomber Command were to have formed the main strength of Tiger Force, the Commonwealth bomber contingent scheduled to take part in Operation Downfall, the codename for the planned invasion of Japan in late 1945. Aircraft allocated to the Tiger Force were painted in white with black undersides and outfitted with additional radio units and navigational aids to facilitate their use in the Pacific theatre. The addition of large saddle-type external fuel tanks was considered and trialled in Australia and India, but this was discontinued due to their perceived vulnerability to attack. Prior to the decision to carry out extensive modifications under Silverplate to the Boeing B-29 Superfortress to allow it deliver atomic bombs over Japan, serious consideration was given to using the Lancaster with its cavernous bomb bay instead. Using the Lancaster would have required much less modification to the aircraft itself, but would have necessitated additional crew training for the USAAF crews. As a byproduct of its sound design and operational success, various developments and derivatives of the Lancaster were produced for both military and civilian purposes. One of these was the Avro Lincoln bomber, initially known as the Lancaster IV and Lancaster V. These two marks became the Lincoln B1 and B2 respectively. A civilian airliner was based on the Lancaster, known as the Lancastrian. In the post-war climate, the Lancaster continued to see use for several more years, during which a number of high-profile operations were conducted. Immediately following the end of hostilities, the Lancaster was used as a crude transport aircraft, being used to ferry thousands of prisoners of war (POWs) back to the British Isles from across the continent. In RAF service, the Lancaster remained at the forefront of Bomber Command; the Lancaster B I was gradually replaced by the improved Lancaster B I (F/E) models.
Of the 17 surviving and largely intact Lancasters known to exist, two are airworthy; one, PA474, based in Coningsby, the UK, is operated by The Battle of Britain Memorial Flight, and the other, called Vera (coded VR-A, FM213), is in Canada, operated by the Canadian Warplane Heritage Museum in Mount Hope, a suburb of Hamilton, Ontario. Another Lancaster, Just Jane, NX611, a B MkVII, based in East Kirkby Lincolnshire Aviation Heritage Centre is able to taxi but is not currently airworthy, though there are plans to return her to flight in the future. The fourth Lancaster with working engines and able to taxi is Bazalgette FM159 based at the Bomber Command Museum of Canada in Nanton, Alberta. It has been carefully restored from a vandalised state and is now a main tourist attraction. For the 2018 flying season, to commemorate the 75th anniversary of Operation Chastise, the Canadian Warplane Heritage Lancaster is painted in the markings of Guy Gibson's 617 Squadron aircraft (Code AJ-G, ED932) when he commanded the "Dambusters" raids.
#second world war#world war 2#world war ii#wwii#military history#history#british history#aviation#military aircraft#aircraft#bombers#royal air force#british commonwealth#avro lancaster#long post
66 notes
·
View notes
Text
Disabled sewing - YMMV
I watch a lot of what seems to be affectionately known as "costube" and I make a lot of my own clothes at this point, which is !!!!! to me, since it was always a dream of mine when I was a kid. I found costube invaluable to me to explain how garments piece together - which is the first thing I have realized about my "disabled sewing".
I have read SO many books and purchased SO many patterns, only to give up in frustration, but actually watching someone piece together a garment from start to finish (and not in the Project Runway sense) made my ADHD, visual learning brain go: Ohhhhhhhhhhhhhhh.
(Not sure why that surprised me, since "watch one, do one, teach one" is how I learn the best and always has been.)
Modern sewing is pretty focused on sewing machines, and I have had many in my life (starting with one from the 1950s set into a wooden table that folded up to have a glass top !) but I find it difficult and confusing to keep track of what I am doign with a sewing machine. Hand stitching, just because of what it is, forces me to slow down and focus on one seam at a time.
But my hands cramp and have tremors and that does not seem to be the case for the folks who film their sewing adventures.
I have learned to use a long needle. This goes against most hand sewing advice for clothes, because a short, small needle gives you lss of a "puncture" through the fabric and more "cntrol", but a longer needle, as long as it is slim, can still fit throug the weave of the fabric instead of puncturing it - especially with how loosely woven modern fabric is - and since there's more room to hold it, I can switch ff which fingers hold it, change the shape of my hand as it is holding it, and also don't drop it when my fingers tremor.
In hand stitching garments, if you read manuals - especially historical ones from the Victorian era - and sometimes in the "costube" videos - there's focus on making tiny, neat stitches. Well. First of all, the interior of your garment is your own, so if you are doing a back stitch, your garment will pretty much stick together, and no one will see. But also, I learned (I think from something Matthew Gnagy said in one of his videos) that modern fabric is so much more loosely woven than historical fabrics that tiny stitches can actually make your garment LESS structurally sound, rather than more. Since I learned that, I stopped feeling bad about not being able to make my stitches one mm long, and started focusing on getting the stitching done in a way that does not hurt/exacerbate my hand, finger, and wrist problems. I usually end up with 2 stitches per cm, or 4-5 stitches to an inch.
Yes, this is drastically fewer stitches per inch than you'd get with a sewing machine, and it might not work for something like a kirtle, where the stitches are taking the full weight stress of the garment, but you know what? If I were making a kirtle, I could just do TWO LINES OF STITCHING and then I would have 10 stitches per inch, and that measure can take about 50 lbs of stress (per sewing machine guidelines), which would be fine. (Although there is a 0% chance I will ever make a kirtle, since I can't wear tight things and couldn't button the sleeves up anyway!)
I mark out my stitch lines with pencil or pen (I don't use fancy fabrics, so what do I care if there's a pen mark on my cotton until it's washed?), and am very careless with seam allowance. As long as the seam allowance exists, the vagarities don't really matter - and cutting in a straight line is a no-go because of my hands and wrists, so not having to worry about cutting along a seam allowance line is great.
And then I often take a bright cheap polyester thread and baste. I can't sew in a straight line. I literally cannot draw a straight line with a ruler. But that actually rarely matters! If there's a running stitch every inch or so, I can eyeball it enough to get a decent enough seam. If someone is looking so closely at my clothing that they can see the side seam or the hem is a cm crooked, they are frankly standing way too close to me and should step the fuck away.
One thing some costubers do that I thought would be helpful but turned out to not work for me personally is pin the end of the fabric to a tailor's ham, or pillow, to help keep the tension. But it may work for some folks.
Finally, the last thing on my list is that due to my migraines, I have a hard time stitching in natural sunlight. However, I've found that my seasonal affective disorder sunlamp, which has brightness levels and can be situated into the exact position I want, make stitching a lot easier! And also can be used at any time of day, so if I want to sew at 7 pm, I don't have to worry that I am losing the sunlight, I can just adjust my lamp that does NOT trigger migraines, and sew for a half hour that way.
Lots of breaks are also crucial! Every 15 minutes or so, I give my hands and eyes a rest, and move around as much as I can to stretch out, just like when I'm working on the computer. Or, like, how I try to do when working on the computer and fail because I'm too hyperfocused on what I'm doing.
\o/
What are your disabled sewing tricks and tips?
16 notes
·
View notes
Link
Check out this listing I just added to my Poshmark closet: Crushed Velvet Long Sleeve Stretch Blouse Top Womens Plus Size 26 Pink Purple.
0 notes
Text
How to make a dress
The starting point of your outfit.
There is no structural difference between a shirt and a dress, except for length.
Would you like to make a shirt instead?
Just replace every ankle with knee.

http://www.forest.gen.nz/Medieval/articles/garments/bocksten/bocksten.html
This style of shirt could be from pretty much any point in history, and from anywhere. The shape is conceived from straight pieces of fabric, cut from a cloth that is woven on a narrow loom, around 50-60cm.
The length of a dress is usually a bit shorter than floor length, and wide enough at the hem to easily walk in.
For your first Viking dress, I would recommend linen, but it is very nice to have a wool dress, or two, as well.
Here's a video!
This is your very basic dress:

I’ve made some alterations to a pattern I’ve found here. The original has got only two gores. Two gores are easier to sew, and uses less fabric, but has less room of movement for walking.
How to measure
This pattern is made for 150cm fabric width, the length is your measurement from the top of your shoulder, to your ankle, x 2 .
The body
Length: Same as the entire fabric length (, the top of your shoulder, to you ankle, times two ).
Width : Measure the widest place of your torso, above your waist. If you usually wear a bra, keep that on while measuring, as that changes the shape of the chest. Remember that too big is easier to fix than too small.
The sleeves:
Length: If you want a long sleeved dress, measure on the outside of your arm, from your shoulder to your wrist, with your elbow bent.
Width : Measure your arm at the widest place, usually near the shoulder, add a few centimeters. Don’t make them too narrow, or they will rip! If you want to, the sleeve can be narrowed by the wrist, but that is optional.
The gores:
Length: Find your natural waist (the narrowest part of your torso), the gores should never start lower than that. Measure from your natural waist or higher, to your ankle.
Width: Same as the body, not wider. A gore that is too wide does not move very nicely. If you want a more glamorous looking dress I would instead recommend adding more gores.
Gussets:
Lenght / Width: Not that important, I would suggest 15cm x 15cm .
How to cut the fabric
Must-do-list:
Add 2 cm to everything ! This is called seam allowance, it is important to remember, or you will really angry when you try it on for the first time!
When you cut out the neck, try to make it as small as you can, it is really easy to make your neckline too big, and very difficult to fix.
Take a piece of paper, draw a plan of how you are going to cut out the pieces on the amount of fabric you have. Try to waste as little as possible.
Any fabric that is left over, keep it ! You can either make some kind of accessory, or if your dress brakes when your dress brakes, use it for patching.
If you do not have enough material, don’t worry! This is a puzzle for you to solve, and any way you can solve it, is the correct one. I honestly believe making fabric into a dress is great neurobics !
If you feel very nervous, go here, scroll down to Don’t be perfect ....
How to sew it
Sew everything inside out. If at anytime you are unsure, look. Looking three times too many, is better than having to undo your seams.
Attach sleeves to the body first. Then gussets.
Sew together the divided gore.
Attach the right and left gore to the sides of the body.
(If you are doing a dress with two gores,skip to Finishing the dress.)
Find the center of the fabric of the body, cut a very straight slit, from the hem, up to the point where the two side gores begin, on both the front and back.
Attach the front and back gore, make sure you line up the seam of the back gore, so that it is completely centered.
If you feel like this is beyond your sewing level, you can cut all the way through the center of the garment, through the neckline. It will make it easier to sew the gores in place.
Finishing the dress
Now you can turn the dress outside out, and try it on! Did it fit you?
(If not, back at it again, buddy!)
Now turn it back inside out, for the final step.
Finishing the edges
If you have made the entire dress using a sewing machine, this is the part I would truly recommend you put the machine away.
Every single raw edge of the dress must be folded in and sewn in place, at the neckline, the sleeve holes and the hem. This is my favourite technique:

( This it what the seam looks like on the inside. )
Make sure there are no long threads hanging from the dress, and if there are, cut don’t rip!

Need help? Ask me!
Do you want to look at a some dresses or shirts for inspiration?
3 notes
·
View notes
Text
Happy Valentine's Day Sewing Project | Tuğba İşler
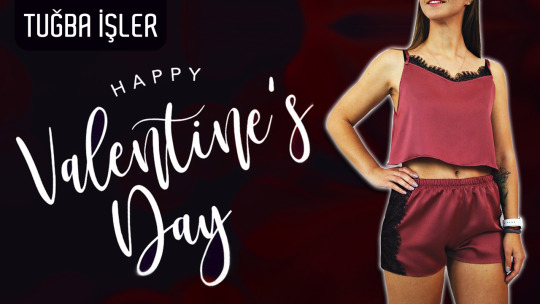
I made a special sewing project for Valentine's Day.
I used 35 cm satin fabric and 50 cm lace. Measurements which are given in the video suitable for 38 size. (European) It will be enough to expand 3 cm in total from sides for a bigger size.
Thanks to my friend Lena, who contributed to this video by modeling.
Happy Valentine's Day Sewing Project | Tuğba İşler ► https://youtu.be/YBVZpDKE7Sk
0 notes
Text
Sewing a Babydoll Dress Attempt 1
Part 1
Okay I don't think it's exactly a babydoll dress but more something like this puffy-sleeved selkie dress that was all over everywhere sometime ago.

My Plan:
A tube bodice with darts to fit (as compared to the princess seams in the selkie dress, because it's simply just easier for me to measure out the exact dart positioning and dimensions and then put the bodice on and fix them.)
A rectangle skirt, but I'm just making a mockup out of a linen bedsheet for now, so just one layer is fine for now.
I remembered this later, but the bodice needs to have a lining
Poofy sleeves owo
The fabric I'm using is an old bedsheet lol but but but it's print is actually very fun and colourful and childlike so I think it actually goes pretty well with this babydoll-ish silhouette.
Quick disclaimer: My country does use SI units but its kinda not that hard and fast so I use inches more because that's what my parents use more often and also because I'm a wannabe American. Most people here can convert between inches and cms pretty easily so it's easy to talk in whatever units I want even tho I can't convert them. What I'm trying to say is let's slander Americans in the notes.
Cutting:
Top: I measured out a rectangle that would go around by chest plus a bit extra for attaching some kind of closure at the back, with the breadth that I wanted. Then I marked the tips/centre lines of darts where I measured my nips would end up and divided the amount that my underbust is less than my bust evenly among the two.
Skirt: I actually has no idea as to how long (parallel to my waist, not the length of the skirt) the rectangle needs to be for a good frill, so I started out by cutting out my underbust circumference plus 20 inches or so. This turned out to be about 50 inches. I did a very loose basting stitch along the top and pulled on it to see if the length is enough for the floof that I'm going for and it wasn't, so I cut out an additional piece of 30 inches, making the total 80 inches. That's 2 metres, like wow thats A lot and this is just a mockup. I'm gonna have to spend so much money on buying 5-6 metres of tulle if/when I make the actual dress.
Something that I should've paid attention to is that if I did piece the fabric for the skirt, I could've easily hidden the joint under a gather. But oh well, I'm just gonna press it and hope for the best now.
Sleeves: I have never ever made sleeves before and I don't like using patterns (neither am I good at using them) so I was kinda scared, but I finally figured out the basic shape that I need and made a couple... mockup mockups? The first one turned out pretty decent too, and after that I just had to trim the shoulders, decrease the length and increase the width. The second one turned out pretty good by my standards, so I'm gonna be using the pattern I made for that.
0 notes
Photo


Box Folder Bindery Tutorial
Today, I took the day to go into the Bindery Studio, undertaking a tutorial with Fleur in how to create a box holder. I decided to sign up to the studio, paying for the remainder of the semester to have unlimited access to materials.
This tutorial took the entire day but allowed me to have a step by step walk through in the process of creation for this outcome according to my specific brand book. I took notes throughout and also documented in the form of images.
Process Steps
Buy folder with ringmech height needed (measure the stacked height of material samples and card for pockets)
Drill out ringmech (3D lab or at home with hand drill). Keep folder and ringmech for calculating dimensions of spine
Undertake the calculations for the box folder card measurements
*everything that cloth touches, add 0.5 mm
Clearance/height of folder = 58 mm (ringmech (50 mm height (35 mm stack of paper could fit within (useable space))) + 3 mm (base lid) + 3 mm (lid bed) + 2 mm (clearance))
Drop board = 338 mm x 230 mm
Length = 338 mm (1mm (left of ringmech) + 40 mm (width of ringmech) + 28.7 mm (A4 page - 10 mm (due to drill holes) + 10 mm (border))
Width = 230 mm (10 mm (border - decided upon this amount as it provides a nice amount of breathing room around the page) + 210 mm (A4 page) + 10 mm (border))
Tray lid/base = 339 mm x 232 mm
Length = 339 mm (length + 1 mm (2 edges covered in cloth))
Width = 232 mm (width + 2 mm (4 edges covered in cloth))
Short wall = 232 mm x 58 mm
Length = 232 mm (base width (232 mm)
Width = 58 mm (height/clearance of folder)
Long walls = 341 mm x 58 mm
Length = 341 mm (base length + 2 mm (thickness of card (the long walls overlap either side of the short wall))
Width = 58 mm (height/clearance of folder)
Cover (Top and Bottom) = 341 mm x 236 mm
Length = 341 mm (base length + 2 mm)
Width = 236 mm (base width + 4 mm)
Cover (Spine) = 236 mm x 58 mm
Length = 236 mm (base width + 4 mm)
Width = 58 mm (height/clearance of folder)
Cut card (according to above measurements)
*When cutting the boards the length (longer measurement) should, ideally, run with the grain.


Undertake the calculations for the box folder cloth measurements
Drop board = 358 mm x 250 mm (add 10 mm border all around (20 mm to each of the measurements for the drop board itself)
Tray cover = 938 mm x 136 mm
Length = 938 mm (10 mm + 341mm (long wall) + 232 mm (short wall) + 341 (long wall) + 10 mm)
Width = 136 mm (10 mm + 58 mm (height/clearance of folder) + 58 mm (height/clearance of folder) + 10 mm)
Tray lining = 349 mm x 228 mm
Length = 349 mm (339 mm (tray lid/base length) + 10 mm)
Width = 228 mm (232 mm (tray lid/base width) - 4 mm (2mm card thickness from each side))
Cover = 789 mm x 276 mm
Length = 789 mm (20 mm (border) + 341 mm (cover top width) + 4.5 mm (gap (hinges - width of 2 x card thickness (2 x 2 mm) + 0.5 mm (cloth in the gaps)) + 58 mm (spine width) + 4.5 mm (gap) + 341 mm (cover bottom width) + 20 mm (border)
Width = 276 mm (20 mm (border) + 236 mm (cover width) + 20 mm (border)
Cover lining (spine and gaps) = 228 mm x 97 mm
Length = 228 mm (tray lining width)
Width = 97 mm (can round to 100) (15 mm (extended onto top cover) + 4.5 mm (gap) + 58 mm (spine width) + 4.5 mm (gap) + 15 mm (extended onto bottom cover))
Select cover fabric
During this process, there was also a decision to be made with regards to cover fabric colour selection. Two greens were pulled out as, possibly, being the most appropriate. However, following discussion with both Fleur and my lecturer, I came to the decision that I would use the darker of the two (see top fabric in image below) The, lighter green could appear too dramatic, ultimately much more a forest green. The darker, not only being slightly more subdued/muted in nature, but matte in texture and sheen, could have the capacity to appear more sophisticated and professional. This presents a more appropriate selection for the covering of this box folder for the means of a brand book.

Cut cloth (according to above measurements)
*trim the factory edges first (these prevent fraying)

Glue the box components
Apply the glue to the walls of the box using the gluing booth and face mask. Apply this glue to all surfaces, which touch/intersect (the glue bonds to itself).
Construct the box
Once the glue becomes tacky (after approx. 15 minutes), begin assembling the box, away from the gluing booth (more space)
Use bone fold, 90 degree set square ruler, and weight to help

Check for gaps/cracks in the glue, holding the box up to the light (use the bone fold to push these out)
Glue the card and fabric (COVER)
Lay out the cards for the cover a top of the appropriate fabric
Use a pencil and ruler to mark out the measurements, including the gaps and border (see image below)
Use wooden 4/4.5 tool to mark off corners on an angle
Cut corners on an angle


Use the glue roller to roll a decent amount of glue onto the top cover
Place this onto the fabric by eye, utilising the marked measurements
Fold fabric up around the card (1. Use the bone fold at a 40 degree angle to make a sharp edge at the base, 2. Use the bone fold at a 90 degree angle to push the fabric up against the sides, 3. Fold the fabric around, using fingers, with palm pressed against board, and the bone fold in another hand to flatten the fabric in and against the board)
Flip and push outwards from the centre to get rid of any air bubbles (hold up to the light flat to check this)
Push down/run palm around the edges
Glue the spine and bottom cover down, using the ruler to ensure the 4.5 mm gaps for hinges
Use two long and two medium weight boards, placing the cover between them with a gap/hinge in between the two sets of boards)
Place two weights atop of these boards and leave to weight down
Glue the card and fabric (around the BOX)
Mark 10 mm border all around the fabric
Glue the first long wall in the bottom right corner (when placed here the base of the box should be facing outwards at the bottom and the open side of the box should also be facing outwards at the right side of the fabric) (see image below)

Glue the short wall (using the brush to paint the last 1 cm or so close to where it meets the fabric (avoid getting it on the fabric)
Pull the fabric out flat and tight and roll the box so that it meets the short wall
Glue the second long wall and roll again
Slightly cut the overhanging fabric at the edges/meeting points between the long and short walls on the underside of the box (once and then a little bit more) (see image below)

Cut line using ruler at meeting the points between short and long walls (see image below)

Cut out shape as seen below, leaving 1 mm inwards of each board, at the end of the long walls


Cut small line, straight in line/in continuation with the long wall and when folding in the fabric, fold this tightly into the box (see image below)

Apply glue to all small overhanging sections of fabric
Fold this into the box using bone fold
Fold over the larger overhanging sections of fabric and use bone fold to mark where it meets the tray base (see image below)

Cut across the edges at the corners of these sections, just above the bone fold markings (see image below)

This is the point, which I got up to in this session (see image below). I intend to come back into the Bindery Studio and continue early next week.

Continuing on (Part 2 of Binding Tutorial)
Today (11 May), I continued on with the binding of this outcome.
Glue the card and fabric (around the BOX) - CONTINUED
Glue the short wall and fold over into the box
Glue the long walls and fold over into the box

Cut and glue down the TRAY LINING
Cut the tray lining to size (4mm less in width, 10mm more in length)
Apply glue lightly to the fabric
Fold fabric gently back onto itself and stick down up to the short wall
Unfold the fabric from itself and lay it down on the tray base
Use palm to push out the fabric from centre, removing any air bubbles

Fold the lip around the open end of the tray base

Cut and glue the card and fabric (DROP BOARD)
Add an extra 20 mm and mark on the fabric
Cut the drop board fabric to size
Use approx. 2mm piece of card (similar concept to the wooden 4/4.5 tool) to mark off corners on an angle
Cut corners on an angle
Glue the drop board
Place down onto the fabric by eye
Weight down between two medium boards

Cut and glue down the COVER LINING
Cut the cover lining to size
Apply glue lightly
Place down over the spine and two gaps by eye
Weight down between two boards on the bottom and one board on top

Glue down DROP BOARD
Tape down card onto a board in preparation for using the press after gluing (see image below)

Use masking tape around 3mm inwards right around the drop board
Use double sided tape on two of the corners of the drop board
Glue the drop board
Place down flush with the gaps at the centre and 3mm inwards approx. from all other sides (see below). Use the case as a guide, placing it down over this.

Use the press with boards either side of the cover

Measure and drill the ringmech
Stick down masking tape underneath approximately where the ringmech will sit

Measure out where the ringmech will sit when centred top and bottom as well as 1mm inwards from the gap, marking these measurements on the masking tape
Trace inside the holes of the ringmech when placed in accordance with these measurements


Use the electric drill to drill out the holes for the ringmech to sit


Select the appropriately sized rivets (in this case 6mm x 6mm)
Hammer partially into the holes with a hollow punch and hammer
Push in the rivet
Flip over the surface
Place the ringmech over the open rivets
Use another punch and hammer to bend the rivet back, closing it against the surface, sealing in the ringmech
*before undertaking this for real, I practiced extensively (see images below)


*I then undertook the following for my actual box folder (see images below)


Glue down CASE
Use masking tape around 3mm inwards right around the drop board
Use double sided tape on the two of the corners of the case at the open end
Glue the case
Place the case down appropriately and then fold the cover up over it, sticking it down against it
Place a number of smaller boards inside the case, stacking them up to be taller than the walls
Use the press with another larger board beneath the case
Weight down the entire box folder with one smaller board in the case and one larger board on the cover, with a weight upon each (see image below)

0 notes
Text
advent calendar bags and backpack collection
If you love adventures and enjoy going out for travelling then backpacks are inevitable needs for you. For the best deals on travel luggage and bags to go back to school, you can explore the online stores with an incredible reputation and a guarantee of quality and material of bags. Whatever bag you may choose, it should reflect your personality without compromising with quality for it.
Sometimes a bag with a quality and attractive design might be expensive. But you don’t need to get worried. You can get such great bags and backpack collections at affordable prices from Hype. It has a versatile range of bags with unisex designs and quality material. Let’s have a look at its latest collection to choose from this festive season.
Types of Bags and Backpacks by Hype.
HYPE. LUNCH BAGS:
To keep your lunch fresh and safely, explore Hype. lunch bags collection with different prints, themes, and colours to carry your food in style.
DISNEY POOH HUNNY LUNCH BAG: £17.99
Meet this adorable lunch bag, creating a little lunchtime nostalgia. Designed in 100% Polyester, the Disney lunch box features an all-over deep yellow Winnie The Pooh colour, with a honey drip effect, and finished with an embroidered Pooh bear eating his pot of honey. Featuring an elasticated mesh pocket, perfect for storing your water bottle, and an inside thermal lining to keep your packed lunch fresh.

HYPE BLACK SPECKLE LUNCH BOX: £14.99
This lunch bag is the best transporter for your precious dairy lea Lunchables and pickled onion space raiders. With famous speckle print in monochrome, this lunch bag is perfect for boys, girls, and gender-neutral. Designed in 50% PVC and 50% polyester with embossed inside lining to keep your lunch at its maximum freshness. Boasting an embossed zip puller and a side mesh pocket compartment, perfect to store your HYPE. black water bottle. The size is 22cms x 20cms x 10 cms - just the right amount of room for your packed lunch.

BACK TO SCHOOL BAGS:
If you're looking for a new school essential item such as kids' school bags, boys' school bags, girls' school bags, or bags for school, then you can get all from Hype. Its bags are designed with adorable prints of kids’ favourite characters that will inspire them to go back to school in style. Here are some of the best bag trends for kids in xmas sale by Hype.
DISNEY THUMPER FUR BACKPACK: £34.99
This Disney Thumper Fur Backpack features grey faux fur all over the fabric, with a contrasting baby pink faux fur front pocket. Finished with the HYPE. crest badge backpack and an embroidered thumber on the front pocket, inside embossed lining and adjustable straps, measuring at 42cms x 30cms x 12cm. Its features make it a perfect bag you need to carry the kids’ everyday essentials.

HYPE STATIONERY ITEMS X5 BUNDLE: £29.99
The essentials you need to get you back to school ready, featuring the HYPE. blue speckle A5 notebook, HYPE. blue camo reusable travel mug, HYPE. blue camo pencil case, HYPE. blue camo 3 pens tin set and the HYPE. blue camo set of 6 pencils. Designed in our signature camo and speckle fade prints with a blue and monochrome colour palette. Grab the matching backpack to complete the set.

HYPE. PENCIL CASES:
A pencil case is the best home to keep your kid’s stationary or little snacks safely. Here are some cute collections of Hype. pencil cases in every colourway you can dream of.
HYPE UNICORN SKIES PENCIL CASE: £9.99
Have a look at this cute unicorn skies pencil case. Designed in cloud print entwined with rainbows and unicorns. Keep safe your pencils, pens, highlighters, paper clips, mini sticky notes in your new pencil case.

HYPE DISNEY CHESHIRE WAVES PENCIL CASE: £12.99
This pencil case features a snazzy pink wavy holographic fabric, replicating the Cheshire Cat. Highlighting a Cheshire Cat embroidery on the front pocket and inside embossed lining. A perfect back to school pencil case to store all your stationery goods. Complete the set and buy the matching lunch bag and backpack to get your kids back to school ready.
HYPE. MEN’S BAGS:
Walk-in style with the latest men's bags by Hype. You can choose the best bag from it to give him as a gift this Christmas. Let’s check out some of the best items of this collection.
HYPE BLACK DISCOVERY MEN'S BAG: £34.99
The HYPE. black discovery backpack that's military-inspired. Featuring pockets on pockets, you'll never run out of storage space. Highlighting a buckle strap, embossed zip pullers, and the HYPE. tab logo. The ultimate bag to transport your goods. Wipe clean only.

HYPE. SIDE BAGS:
To match with your outfits, Hype. has an amazing range of side bags for women and men with different designs. Have a look at the following items to choose as per your need.
WOMEN'S IOWA SIDE BAG: £19.99
Let us introduce you to your new go-to bag. The HYPE. neon leopard Iowa side bag, in a brown, turquoise, and burnt orange colour palette. With adjustable straps to create a perfectly versatile bag for women whatever their mood.

BLACK TAPED STRAP SIDE BAG: £17.99
Hype. has Introduced an ultimate 'I want it now' bag. Featuring a buckle clip close and a monochrome hype. logo repeat woven strap. For a casual look, wear it with a loungewear tracksuit or match it with your best clobber. Ideal for men and women.

The above-enlisted items are just a little glance over the wide selection of Hype. bags and backpacks. You can explore much from its official online store and grab the ultimate advent calendar bags at the best discount packages. It will be a perfect gift to give your family and friends to give this Christmas. Moreover, you can browse stylish Christmas clothes, accessories, treat boxes, and much more from Hype. at the sale prices to make this holiday season more exciting.
#advent calendar bags#backpacks#backpack#back to school bags#xmas sale#black friday bags#cyber monday bags#pencil cases#men's advent calendar
0 notes
Text
7 Reasons to Choose Quartz
A large selection of Quartz slabs always in our inventory is simply one reason to shop for Quartz from Astrum Granite, Ilford.

If you’re shopping around for surfacing material, you almost certainly already know that quartz surfaces are durable and straightforward to take care of. They’re stain, scratch, and warmth resistant. They’re easy to fabricate and hygienic. Here at Astrum Granite, we feature several brands of quartz surfacing. What you'll not know is there are even more reasons to think about Quartz from Astrum Granite.
· Sure Slab Size - Our quartz slabs are manufactured to maximise usage and minimize waste to stay your project as economical as possible. another brands will charge you additional for “jumbo” slabs, which in some cases just adds waste, or only have quartz slabs that measure 120-in. x 56-in, which frequently leads to wanting to purchase extra material to finish the project.
· Free Delivery – Astrum Granite. Offers free delivery anywhere in New England and Upstate NY (Albany to Buffalo) within 48-hours of order placement.
· It’s available - In our indoor, showrooms with proper lighting, located in Westwood, MA, Milford, CT and Albany, NY we stock over 50 unique colors of 2cm and three cm thick quartz slabs.
· Liberal Return Policy - We understand that buying countertops, flooring, and surfacing may be a big decision, and investment. Sometimes you order an additional slab to form sure you'll get the whole job done, then you’re cursed with extra material. Also, we all know that customers can change their minds, and that we believe they ought to have the proper to try to to so without being penalized. We allow returns of any uncut quartz up to 30 days after the initial purchase—and without a restocking fee!
· Supports an area Business - Astrum granite. Began in 1990 by two local men from England. We’re not an outsized corporation that’s only concerned with revenues. We don’t have a multi-million-dollar a year marketing budget like other quartz brands. Rather, we truly care about our reputation and calculate our service to earn repeat business.
· Lifetime Warranty - Our quartz products have a lifetime warranty, a bit like all the opposite brands. But our warranty is different therein it's actually supported by both the manufacturer and Astrum Granite. there's no bureaucratic procedure or prolonged corporate process. We’ll handle all warranty claims within 24-48 hours and confirm you're satisfied.
And lastly and most significantly, the number-one reason to think about Quartz is…
· It’s the perfect Brand for the Professional Entrepreneur - Unlike other major brands, we cater to YOU, not the massive box stores who compete against us small businesses. Silestone, for instance, is sold at Lowes and residential Depot, Caesarstone is sold at IKEA, and Cambria has tiered pricing which protects certain dealers and charges others a premium due to their volume. Marble and Granite quartz pricing, on the opposite hand, is about an equivalent for everybody, allowing fair market competition. We also are the sole distributor that has retail pricing for material on our public website, adding another layer of transparency. By choosing the opposite brands, you're contributing to the large box store’s success by validating it as a viable option. the buyer will think, “If it's a trusted product at the local boutique kitchen center or fabrication shop, then it must be good, but I can catch on cheaper at the large box store, and that they also offer financing”

If you’d wish to see which quartz slabs we feature, inspect our online Inventory, visit our showrooms in London east, ilford or give us at +44-7748-556552. We glance forward to working with you.
#quartz countertops#quartz worktops#quartz at best price#reasons to choose quartz material#benefits of quartz material
0 notes
Text
Double Side Peter Pan Collar Kids Poncho Cutting and Sewing | Tuğba İşler

Hi everyone. I show you how to make a poncho with peter pan collar and double sided usable in this video.
I used 2 different 50 cm length fabric. (velvet and cachet) I show you how to make a pattern and sewing of peter pan collar. Measurements are given for kids size 2 - 3 years of age.
Double Side Peter Pan Collar Kids Poncho Cutting and Sewing | Tuğba İşler ► https://youtu.be/Swjz31etxcU
0 notes
Last Seen Blogs