#animation blockout
Explore tagged Tumblr posts
Visit Tumblr Blog
Explore Tumblr blogs with no restrictions, modern design and the best experience.
Last Seen Tumblr Blogs


Fun Fact
Tumblr is available in 18 languages.
Text
5:00 a.m. adrenaline kicked in, and I thought I could make a rubber hose animation of my 1920 Frankie.
Then the adrenaline disappeared, and I started watching Minecraft hardcore. Now I'm stuck with the breakdown or blockout. I don't know my terms properly
It's just a little chuckling animation

#art#drawing#animation breakdown#animation blockout#tahoma2d#opentoonz#finding frankie#finding frankie fanart#frankie#19s rubber hose
48 notes
·
View notes
Text
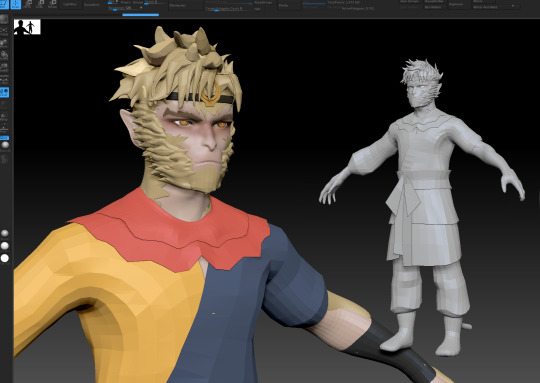
AAAAND HE'S DONE. Tixton's current appearance model is complete ! This turned into a 2 man team thing cus my PC couldn't handle sculpting unfortunately, so shoutout to my friend Buddy for the sculpt, retopo, and texturing, they did a fantastic job I'M STILL GEEKING OUT OVER IT, CRAZY WORK... As for me, I did the blockout, all the accessories, and rigged him !
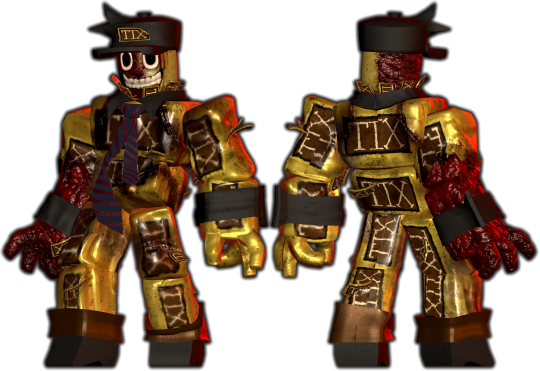


also extra screenshots + a wip anim lalala
204 notes
·
View notes
Text
I AM HAVING SO MUCH FUN WITH THIS !!!!!!
Got a super rough blockout started, this is a super different style to what I'm used to, i've been meaning to get into more toony modelling and animation methods and am loving the expressions I can get out of this thing. hes so cool omg turbo 🥺

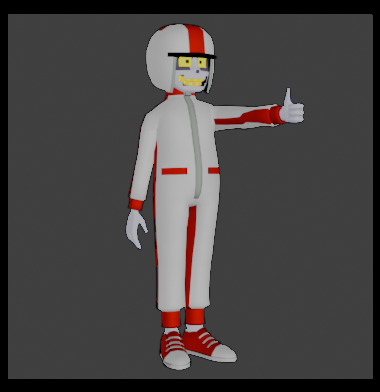

bonus mixamo test animation because funny:

#how have i never done cartoony animation before#SOBBING#body was a pain in the ass like im still not happy with it tbh#hes just a little guy#pleading emoji#wir#turbotastic#turbotime#wreck it ralph turbo#wreck it ralph#WIP#i gotta find a ref of the top of his helmet too#i think its inaccurate#tho most of this model is tbf i gotta like lock in some time and search every corner of the web#also used a different sprite sheet for additional reference#@riggedbones one is very epic awesome#turbo twins next#painting is also nearly finished just taking a break because i still dont know how i did that#tagetto rambling again oh lord
781 notes
·
View notes
Text
We Don't Gatekeep Art Resources | A Comprehensive List
Here's a list of some of the tools/sites I currently use or have used previously for works/studies. I'll separate it into Software/Utility, Reference, and 'Other' which will be just general things that could help you map out things for your experience with art. **[Free highlighted in pink, paid highlighted in green. Blue is variable/both. Prices Listed in USD]**
Software/Utility:
2D
Krita Painting app (PC) (my main digital art software on PC for 5+ yrs)
Clip Studio Paint [PC] [CSP 2.0+ allows for 3d modelling within the painting app and a lot of other cool features] [apparently allows up to 6 months free trial]
Procreate (12.99) [iPad/iPad Pro] (the GOAT)
Artstudio Pro [iPad/iPad Pro] (An alternative to Procreate if you enjoy the more traditional art app layout) -- I find this app handy when Procreate is lacking a feature I need, or vice versa. (you can easily transfer files between the two, but keep in mind Procreate's layer limit)
2D "Collaborative Painting/Drawing apps"
Magma Studio
Drawpile
Discord Whiteboard
Gartic Phone (Pretty decent for 2d animation practice, but has a hard limit on frames)
3D
Blender [3D Modelling, Sculpting + Layout] (PC)
Sculptris [PC] (it's an old unsupported version of Zbrush, but can help to get ideas out, and functions better than browser sculpting apps
Nomad Sculpt [iPad/iPad Pro] ($20) Works pretty well if you prefer a mobile setup, but it is a bit intense on the battery life and takes some getting used to
References + Study
Magic Poser [ PC and Mobile ] Has both free and paid versions, I've made do with just the lite version before
Artpose ($9.99) [Iphone + Steam]
Head Model Studio [IPhone] A 3D head, with both a basic blockout version for angles, and a paid version with more detail
Cubebrush [simply search "[keyword] pose reference pack"], they usually have good results + they frequently have sales!
Line of Action [Good for Gesture practice + daily sketching], also has other resources built in.
Quickposes Similar to Line of action, more geared toward anatomy
Drawabox | Perspective Fundamentals Improvement modules (Suggested by @taffingspy )
Sketchfab, this skull in particular is useful, but there is other models that can help you study anatomy as well.
Pinterest can be good, you just have to be careful, usually you're better off just finding reference pack if you have the money, sometimes certain creators have freebies as well
Artstation Marketplace can be decent [make sure to turn on the Aye-Eye filter so it doesn't feed you trash], a colleague of mine recommended this head model for practicing facial blocking, there is also this free version without lighting.
Local Art Museums [Unironically good for studying old "master work" if you're into that, or even just getting some inspiration]
Brushes + Other Useful software:
I personally have used both of these brush packs before making my own
(I actually don't know how to share my daily brush set because I frequently switch between Krita, Procreate, and ASP, but once I figure that out I'll be sure to do that lol)
Marc Brunet's Starter brush pack [Technically free but supporting him for this if you like it is ideal, there's some good brushes]
Dave Greco Brush Pack [$3]
Gumroad in general is a good place to find brushes and art resources. *Note; for Krita specifically, brush packs are a bit weird, so it may require you to find different packs, or import them in a particular way
PureRef [PC] - Reference Compiler/Moodboarding
VizRef ($3.99) [iPad] - Moodboarding/Reference Compiler
Artist Youtubers/Creators that helped me improve/guide me along as a self-taught artist from when I first started digital art to where I am today:
Proko
Marco Bucci
Sinix Design
Sycra
Hardy Fowler
Lighting Mentor
Winged Canvas
Moderndayjames
Swatches
Chommang_drawing
Marc Brunet (YTartschool)
+ Observing a lot of speedpaint art by people whose work I enjoy on social media/youtube, trying to dissect their processes
If you've gotten this far, first of all, congrats, you can read a lot, and second of all, thank you for reading and I hope this helps! I'll continue to come back and update this if I find any new resources in the future, or if my processes change :)
Much Love,
-Remidiy
#art#artwork#digital painting#painting#artists on tumblr#drawing#anime art#sketch#digital illustration#transfem#art tools#art resources#useful websites#small artist#illustration#digital art#artist on tumblr#procreate#my process#my art#krita#art tag#sharing is caring#learning#knowledge#useful stuff#links#reference
260 notes
·
View notes
Text
i have this old 3D model of Blondie that is just sitting around..I really wanna make him a proper 3D model but I will remake this into an anime style model bc that's what im going for stylistic wise not really the whole realistic game model style lol..and yes his face is referenced from BM!Wukong bc well I like his face lol...this is very rough blockout of his model...probably will zremesh everything and import them into Blender so i can start the anime-fication lmfao..when?..idk lmao im kinda lazy and 3D takes such a long time to finish and I'm also a noob 0)--(
45 notes
·
View notes
Text
lil blockout for a bored soap animation, also surprise I animate too lol they say as they haven’t touched any animation since uni which was 2yrs ago
170 notes
·
View notes
Text
haikyuu rewatch s01e01
i've been itching to rewatch the series lately and a few years ago i did something similar for miraculous ladybug where i wrote up like a stream of consciousness/commentary post and made a gifset for each episode and i wanna try to do it again for haikyuu?? we'll see if i stay committed or not lol—gifsets per ep probably a lot more likely to continue than commentaries tbh, these things are long and not thought out so,
anyway let's start with episode 1, who wants to take bets on how many times i get teary-eyed?
ughhhhh how did i not know IMMEDIATELY my first time watching what a fucking banger of a show this would be. this opening scene is sooo aah. the voice over with the sounds of the balls and shoes, the actual content of the 'a tall tall wall' monologue, and then the visuals of just hinatas shoes stepping up to the line and then 'it was a view i could never see on my own' and the rest of the teams shoes step in??? FUCK
holyyyyy and bc im obsessed i know who is who based on their shoes in that lineup and after thir 'onigaishimasu' and they run onto the court they all run in at different speeds?? and like tanaka goes quick and kageyama bounces on his toes and tsukki is all like unenthusiastic?? what the fuCK bro
its been literally 40 seconds and im in awe aaah
oh.. oh no it's the intro. i was joking before about getting teary-eyed but uhhh
how long has it been since i watched season 1 omgg 😭😭😭
gOD the opening is so good, not just imagination but the visuals rrr the practicing shots and the animation on all the volleyball looks so great wowow
one of the less talked about of the many crimes of getting movies instead of a 5th season is definitely the loss of another amazing opening and ending
damn did i really never realize that karasuno of the little giant's time didnt JUST go to nationals but theyre playing on center court when hinata catches them on tv? meaning its either the semi finals or finals, damn lol
hmmmm i am already conflicted about whether or not i wanna talk about manga spoilers in these writeups lmao. tumblr blockout spoiler text WHEN
anywayyyy manga readers hinata on his bike watching little giant on tv iykyk (and if you know me lol) right
rrrr the imagery of the crow flying into hinata from the screen with still the sounds of the balls and whistles aaah what a cool way to show inspiriation
huh, the libero is no.2 not no.4 is that manga accurate from just before furudate decided that it was a Thing for karasuno or did the animation not check?
okay i checked and you literally can only see the little giant in the manga and none of the rest of the team so im calling it an oversight on the animation side lol (understandable, tbh when youre just making people up to fill in the shot, you arent thinking about jersey lore)
no one cares but my japanese is surprisingly better than when i first watched (at which time i knew nothing) and i can actually understand a few bits here and there without the subs
reading the occasional katakana in the background is fun too. mmmm i should try looking at og scans of the manga to see how the sound effects are intended to be read, ive heard the way furudate incorporates the characters into the action as the sound itself is really well done
air salonpas!
oooo one of the teams practicing spikes had one guy hit left handed, thats a fun detail!
dude hinatas friends are such homies i swearrrr
'whats our opponent kitagawa daiichi even like' 'idk! but we're gonna win!' lmaooo hinata you coulda done SOME research
ooo the shot of kitagawa walking in and looming above hinata is so well done, they look huuuge. i know factually that kindaichi and kunimi are tall but i tend to forget, kunimi especially, hes got short energy to me 😅
yessss and the shot of kagyama walking by and just like his Aura is enough for hinata to pick up on the king vibes yooo its so goood
kitagawa daiichi banner is just 'victory' lol okay
i could use some of hinatas blind confidence in my life lmao
oh jk its bathroom tummy ache time
man the set up for kageyama as like powerful early on is SO good, weve only seen him twice so far and both times it all above the king cape, which im pretty sure is also supposed to represent how hinata sees him which rrrr what a great way to set up their dynamic knowing everything that's to come. greatest opponent to greatest ally etc etc
also thinking about how this IS basically all hinatas POV (including the quote i just referenced) and what kageyamas POV of hinata is when he looks back on it all 👀
kageyama telling hinata he shouldnt talk big bc he isnt even physically ready (referencing tummy ache), and hinata right off the bat telling kageyama 'the six of us go all the way' and kageyama responds 'i will win every game' oooo yep they both got some things to learn from each otherr
seriously how is hinata like the friendliest person on the planet. his team is SO bad and all he cares about is that he's finally on the court, he's so positive and determined even when they're doing terribly and his friends dont know wtf is going on
🥺🥺🥺 he's so happy seeing his palm all red after spiking the ball successfully the first time waaah
sjkhdk i always laugh at 'well there IS a foxy senpai on the girls team' lmaoo like he could have just ignored that part of the question, and who translated it to 'foxy' anyway lmaoo
koji, soccer friend, coming in for a foot receive! he missed lol but for real hinatas friends are so cool showing up for him like this
i mean, they are also avoiding him when he tries to practice throughout middle school, but they showed up here when it counts
love that you can see the 'mild internal bleeding,' as kuroo would call it, on izumi's arms when he tells hinata that his arms hurt lol
akjhsakjsasj they hype hinatas jumping skills, the music swells, you think hes got it, aaaand then immediately triple blocked and the music cuts back out lmaoo. honestly, love how haikyu always plays with expectations like that
half time serve routines my beloved.... i miss you..
'we keep trying.. because we havent lost yet' <333
but also kunimi, what a mood lmao
the animation on hinatas slide hit after the toss missss aaaah, and kageyamas bangs like whipping in the wind before he reaches as far as he can aah god this whole sequence is so beautiful
kageyama after knowing hinata for roughly 30 minutes: "this guy overwhelms me" skagsajsa
he has every quality to be someone even better but—WHAT HAVE YOU BEEN DOING THESE PAST 3 YEARS?? 😭😭😭😭
karasuno senpai in the crowd!! related dumb question time, why isnt tanakas hair blond here? he should be a first year atm, and the beginning of the ep said this match is about 3 years and 3 months after little giants nationals (which is in january, although iirc the month changed sometime around those years so possibly it was in march during his time—hence why call 'spring tournament') but either way if hinata and kageyama are still middle school third years then tanaka should be a first year and thats when his hair was blonde. likely in universe answer i guess is just that this tournament is after the practice match where karasuno loses badly and gets made fun of which makes tanaka respect his senpai more and shave his head lol. which also, if hes here with them at this middle school tournament also makes sense with that so. question answered i guess
'if you want to be the last one standing then become strong' waaah
awwww the first years that he recruited to fill out his team stayed with him to practice with the middle school girls team!! they caught the volleyball bug <3
not me pausing to try and see which one of them is the foxy senpai..
lmaoooo the "old ladies team" that hinata practices with are called the yukigoaka beauties lol nice
yoooo hinatas running toward the gym for the first time and a crow flys away and a feather crossed in front of hinata niiiiice
let me tell you i had relatively low expectations for haikyu my very first time. i just wanted something easy to watch while i ate my lunch during the day, and i thought it would just be a predictable underdog story where hinata gets revenge for middle school. and i wasnt against that, i was relatively entertained this whole episode, then it gets to the end and reveals that kageyama has to be his teammate and i was like OH this is gonna be GOOD good. immediately have me hope and reassurance that the show knew what it was doing and wasnt gonna just be typical cliches etc
fuck i wish i could watch again for the first time
i warned you this would be long lol, honestly these writeups are more for me in the future to like remember my thoughts etc and like i said we'll see if i keep it up lol
8 notes
·
View notes
Text
castiean replied to your post:
love you too! beaming good luck and stay safe vibes your way
thank you boo! 😘
kselavie replied to your post:
pls check out all the lifehacks possible and stay safe!!! praying buddy alfred will pass by without causing much damage or danger!
crossing everything! i've done pretty much everything i can do for my place and prepped everything for multiple days without power. here's hoping we don't have to use it all!
ceeturnalia replied to your post:
if you want any advice from someone who’s lived through some not insignificant hurricanes, lmk. i love you and be safe
always! i've removed everything from the yard and porch, got enough stable food and water for the three of us + the animals for 3-5 days without power, and have an evacuation bag packed with the essentials. we're testing the generator today, hopefully it will work, but we have backup oil and petrol for it stored too. i have power banks, torches, lanterns, tools, duct tape and a first aid kit all set out
all the windows are shut, and my heavy blockout curtains are all clipped closed to catch any glass if a window breaks. i have two buckets of spare water in the bathroom to flush the toilet if the water cuts off, and thankfully we don't need sandbags for the flood as we're on a hill and my house is elevated off the ground on wide concrete pillars. the only thing i haven't been able to do is board up the windows, which is worrying me a bit. anything else i should do?
6 notes
·
View notes
Text
hgjfjdjdjccncbcncncncjdjcndncnc i need to get this 3D animation blockout done by the end of the weekend but I have not been able to get myself to do it all day…
9 notes
·
View notes
Text
if you're coming from the grenade launch post i also have it on youtube, with animator journals during my month i spent working on it, if you're interested!
also yes I know CE doesn't have a battle rifle 😭 I needed a medium-long range shooter and the AR wasn't going to cut it... point out Halo 5 pistol while you're at it
[blockout 1] - [blockout 2] - [final blockout, effects 1] - [effects 2, self crit]
14 notes
·
View notes
Note
Name: Sage
Age: young? idk
Hobbies: drawing, playing string instruments, I do choir if that counts, playing games, sleeping (not often achievable)
Likes and dislikes: I like sweets as long as they aren’t too sweet. I also like animals. Animals are cute sometimes. Sometimes. I also like Ghibli movies and I have a collection of stuffed animals. Vocaloid supremacy(including virtual singers). I dislike loud noises, and things that feel weird.
Fandom(s): Genshin Impact and Project Sekai
I have been told that I act like Furina, Hu Tao, and Mizuki from Genshin and Project Sekai if that helps with anything :) I may or may not have slight anger issues, or I just like kicking and throwing things at people-
Happy 500 followers ! sorry if I wrote too much :(
Hi! Tysm! Somehow I've got 700 rn heh
And I match you with....
..
.
.
.
.
.
.
.
.
.
☆
Project Sekai:
Rui!!
Rui:
He adores you
And cannot make you sleep, due to his bad sleeping habits.
You probably put him to sleep, during the nights when he creates robots instead of sleeping. He knows you worry about his health, but he also loves his hobby (relatable ngl), so he just says 5 more minutes and will say so, until you would physically try to drag him.
When you would start tugging, he would immediately take action of standing up and going to do the teeth brushing and stuff to sleep.
I, for some reason, think that he sleeps in one pose throughout the night. He also probably has insomnia. If you sleep with stuffed animals, he probably either cuddles them along with you, either throws them off the bed to cuddle only you. There's no in-between. He also would say that they fell by themselves.
Would always come and support you when do choir and play instruments!
He would create a lot of small glowing bots, that would create your face and name to support you. Just imagine that megamind scene. Thats what he would do.
You and Nene would be besties fr. He would just stand there, nearby, and look pretty (support it too)
Maybe would make your device less glitchy, or sth, to make your wins in games easier (or if it's a calm game, play with you).
He may try cooking with you. Wether it turns out good or bad, he will eat it anyways.
HE WILL
He would also ask what's your favorite animal is! Why, you may ask?
he will make a r o b o t of it for you. H e w i l l.
He will watch Ghibli films with you, and may try cosplaying! (He will ask Mizuki for that)
His favorite Ghibli movie would probably be "Howl's moving castle".
Oh, you like vocaloid? WELL GUESS WHO HE-- [disconnected]
*drops small Mikudayo/[your fave vocaloid] little bots on your bed*
Purple head WILL make you/give you headphones, to make it easier to go throughout the day. You need to blockout those loud noises, y'know?
If you like being dramatic, he will definitely join in. You two will create random story and be in character. "Off with your heads!", Rui: "Yes, on it fufufu!"
You will join wxs in creating "lore/scene" for their songs.
Genshin Impact:
Albedo!!
He tries to visit you as much as he can.
The alchemist tries making you some nice animal, that is a COMBINATION OF YOUR FABORITE ANIMALS????
He may do some with food, try to make you something p e r f e c t
Does it fail? Does he succeed? I will leave it to your imagination!
"What's vocaloid? What's Ghibli? Can you explain?"
I think he would love "Spirited Away" and is another enjoyer of "Howl's moving castle".
Will draw you a lot, and I mean A LOT
He wants you to be remembered forever. You, everything about you. The way you look like, the way you carry yourself, your personality. All of this, captured in paintings and doodles.
Since you don't like loud noises, will create you some sort of headphones-thingy (like the things on Alhaitham).
Will join in your hobbies, choir or instruments, he will try to do it aswell and enjoy it with you.
Since you don't like most weird textures, he would try to leave you outside of his lab during experiments heh
"Hey Sage, is this what you call a vocaloid?" *crawling WopperFlower that slightly looks like VFlower from your description*"
#genshin x you#genshin x reader#pjsekai x reader#pjsk#pjsk x reader#match ups#genshin impact x reader#sagau x reader#project sekai x reader
19 notes
·
View notes
Text
Blockout Animations
Tumblr won't let me post the videos again so attaching drive links.
Storyboard for reference.

Outer world -
Inner World -
I'm planning to use textures on the elements of my outer world. For my elements in the inner world I mostly just want them to glow.
Inside a sphere


Without sphere


Most time spent -> Modeling jellyfish tentacles
I think the first one with the sphere looks pretty cool. And for reasons unknown the artifact glows. But I applied some textures so it might not look the same again.
Elements in the outer world (untextured):


Most time spent -> Modeling the leaves


Added the sky with a Maria's help ^^
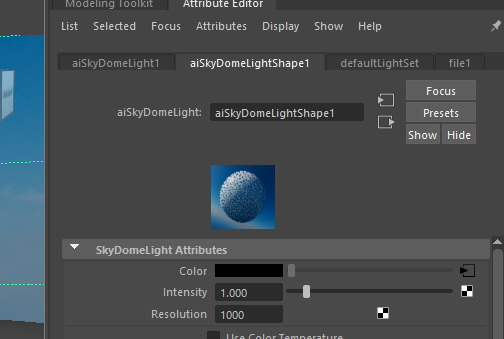
Download the background you want from here, then add a skydome light to your model, and add the file to the box next to "color".
3 notes
·
View notes
Text
Digital Media : Sources & Significance
Critical Analysis
H.. Desamsetti & K. Lal(2019) , “Being a Realistic Master: Creating Props & Environments Design for AAA Games”, Asian Journal of Applied Linguistics, Vol. 6 No.2
Introduction
The data I've chosen to analyze is an article on Being a Realistic Master: Creating Props & Environments Design for AAA Games, which is written by Harshith Desamsetti & Karu Lal from Asian Journal of Applied Linguistics (volume 6, No 2). H. Desamsetti is the Senior Software Engineer at Charter Communications in USA and K. Lal is the Integration Engineer at Ohio National Services in USA. Both authors have unique perspectives about this topic and have solid authorities in their fields.
The overall article talks about the process of creation and realistic environments for AAA video focusing on the techniques, limits and strategies involved in creating visually stunning and authentic environments. The authors states that “the games come to life because of a well-designed environment, which provides additional layers of depth, context and emotional effect to the narrative. And here, I’ve chosen pages 195-196. In these pages the authors have been discussed as two main topics, ‘Role of An Environment Artist’ & ‘Environment Design from Scratch’.
Role of An Environment Artist
The duties and responsibilities of an environment artist can be discussed as two, ‘making the world & Teamwork’.
In the creation of game world the main duty of an environment artist is to create a realistic world which includes a variety of tasks such as designing the layout, creation of layout elements and props, and handling overall elegance. The size of the project (small independent game or AAA development) has a big impact on the artist’s performance. In small-scale manufacturing, the environmental designer may own a large portion of the pipeline, handling various activities from dressing & these impacts in scale effect. In the independent game development design to final product. AAA games can have a focus on specific elements like set decorating , the artist can be involved in the process of designing, blocking and creating the last form of props and structural parts. The process can vary greatly in AAA productions, with concept art providing the settings and level artists handling the blocking. Decorating the set, the addition of various elements to the environment for the quality of being real is the key point in both cases.
Working as an environmental artist play an important role in collaborations with other departments which includes working with level designers, art directors, concept artists, prop artists and animation directors to turn blackout designs into suitable form of levels, it is the result of Teamwork. These highlight’s the varied and dynamic roles of environmental designers, emphasizing flexibility depending on the scope of the project. Designer responsibilities range from world building to highly collaborative teams, reflecting their role on tangible aspects of the video game environment.
There are some departments that environmental designers often collaborate with to create a cohesive and immersive gaming experience.
Level Design: Responsible for playing the initial block at game level. Blockout collaborates with environmental designers to transform a beautiful and playful environment.
Prop Art: Creates props and additional content, including textures. He coordinates the export of props, which contribute to the overall aesthetic and functionality of the theater.
Animation: They keeps the spirit or order in the environment alive. The animation seamlessly integrates with the game world and collaborates with environmental designers.
Game Design: They focus on the overall design of the game. He works with environmental artists to showcase game elements such as weapon availability, player abilities, and other interactive elements.
Concept Art: Through conceptual art, he generates ideas and plans for the environment. Concept designers provide visual feedback and inspiration in the development of game worlds.
Art Guidelines: Collaborates closely with concept designers and other department members to ensure visual cohesion throughout the game. Art directors play an important role in shaping the overall artistic vision.
Technical Art: It ensures that the game works properly on different hardware platforms. Creates tools and products for environmental designers and other departments to increase operational efficiency and solve technical challenges.
Marketing: The one who is responsible for promoting the game. Although not directly involved in the making of sporting assets, the marketing department plays an important role in exposing the work of environmental designers to a wider audience.
Environmental Design from Scratch
The process of designing environment begins with brainstorming. ‘Google’ and ‘Pinterest’ can be used to collect a variety of visual references. That might be photographs, film, and conceptual art of people and ideas. The artist intentionally looks only for references that may be loosely related to the main concept. This’ll helps in creating unique and innovative ideas by drawing inspiration from a wide range of sources. A selection of screenshots and references have been compiled into a mood board. It acts as a visual collage encapsulating the aesthetic, style and desired perspective of the project. Artists then proceed to rapidly create images based on the collected references. These diagrams are a preliminary analysis of ideas and help visualize the overall layout. Depending on the needs of a project, artists can create a set of drawings or detailed utility drawings. This phase involves refining the baseline image to produce a more realistic representation of the suspected objects.
Artists use sketching as a problem-solving tool if there are already elements in the layer that need to be fixed due to artistic connection or technical limitations. These images were created with the specific purpose of finding answers to design challenges. The methodology described goes beyond the traditional steps of brainstorming, gathering reference data, gathering reference data, and creating a sensitivity score. Instead, the team immediately starts simulating the environment in the game engine. The team may work with little or no feedback, or they may only work in group sections selected by art direction. This simplified process shows a spontaneous and immediate way of translating concepts into the game environment. Sketching is sometimes used as a tool to find solutions for existing features in a layer. This includes addressing artistic confidence in a particular game universe, such as “for the sake of honor” or overcoming technical limitations imposed by level design. After creating a design on the engine, the team seeks approval, obtains it and proceeds to remove the asset. This includes ensuring appropriate calculations and making enough adjustments based on feedback from the art director. The modeling is then outlined, and high-quality renderings of the elements are created using tools such as ‘ZBrush or 3ds Max’. Then Unwrapping (UV mapping) occurs during or after the modeling process. The group continues to go first with materials, textures and lighting.
The team’s responsibility at Ubisoft focuses on modeling and level art. The team works independently across projects, and the workflow is more organic. Once the team is satisfied with the results, they move on to polishing the lighting, followed by polishing materials and designs to achieve the desired effect.
Conclusion
In overall, the authors discuss about the artist’s duties range from world creation to extensive collaboration across departments, demonstrating the significant roles they play in shaping the visual aspects of video game environments. While the environment artists work collaborates with several elements, such as level designing, animations and the overall artistic direction in the process of game creation. A graphic approach to problem solving and integrating different roles within the team implies a dynamic and iterative process in environment design.
2 notes
·
View notes
Text
Blinds or Curtains? How to Choose the Right Fit for Your Home
When choosing window coverings, homeowners often consider two main options: blinds and curtains. Both offer light control, privacy, and temperature regulation, but they differ in design, upkeep, cost, and overall functionality. Making the right choice can improve your space, save energy, and boost comfort.
Blinds are appreciated for their sleek look and are popular in modern homes for their minimalism and easy maintenance. Curtains, by contrast, bring softness and a range of textures and colours to a room. The ideal option can vary depending on the space.
This guide looks at the pros and cons of both blinds and curtains, covering insulation, durability, safety, and design. Understanding these aspects will help you make a decision that suits your needs and home.
Blinds: Pros and Cons
Blinds are a practical choice in many Australian homes. They allow precise control over light. Styles like Venetian blinds or vertical blinds let you adjust slats to manage how much and what angle light enters. Their compact, minimalist design suits smaller spaces and modern interiors.
Blinds are made from durable materials like aluminium or PVC, which are easy to clean and resistant to wear, even in sunny rooms. Their long lifespan adds to their value.
However, blinds offer less insulation than curtains, so they may not be ideal for blocking out heat or sound. Some types use cords, which can pose safety risks for children and pets. Also, blinds don’t provide the same warm, textured feel as curtains.
Curtains: Benefits and Drawbacks
Curtains insulate well, especially if they’re lined or thermal-backed. They help maintain indoor temperatures and also absorb sound, beneficial in bedrooms and living areas.
In terms of design, curtains offer great flexibility. With so many fabrics and styles, they can be matched to any decor. Curtains also create a soft, welcoming look and don’t use cords, making them safer in homes with children or animals.
But curtains need more maintenance. Depending on the fabric, they might require regular washing or dry cleaning. They also take up more space and can collect dust, which might be an issue for allergy sufferers.
Blinds vs. Curtains: Choosing for Each Room
Think about the purpose of each room when deciding. For bedrooms, curtains are great for blocking light and adding insulation. In kitchens or bathrooms, blinds work better because they’re moisture-resistant and easier to clean.
Design preference also plays a role. Curtains bring elegance and a layered look, fitting traditional or transitional styles. Blinds offer clean lines and are perfect for minimalist or modern designs. They’re also better suited for tight spaces.
When it comes to cleaning, blinds are simpler to maintain. A quick dust or wipe is often enough. Curtains, especially heavier or delicate ones, may need more attention.
Cost is another factor. Blinds are often more affordable, but custom curtains can become a central design feature despite the higher price.
Using Both Curtains and Blinds
You don’t have to pick one over the other. Layering both can offer the best of each. For instance, pairing roller or Venetian blinds with sheer curtains allows light filtering during the day and full privacy at night.
Another popular option is layering blockout curtains over light-filtering blinds. This setup helps with temperature control and noise reduction while still offering visual appeal.
Blinds and curtains used together work especially well in bedrooms, living rooms, or home theatres. They also create depth in a space, making window areas feel more finished.
With many styles and combinations available, mixing both types lets you customise each room according to your specific needs.
Deciding What Works for You
Ultimately, your decision depends on how you use each space and the overall atmosphere you want to create. Think about your daily routine and how much time you spend in the room, as well as the type of activities that take place there.
For example, if you work from home and need a quiet, well-insulated office, curtains might help absorb sound and maintain a comfortable temperature. If you're looking for a quick-clean, no-fuss solution in a high-traffic hallway, blinds could be more practical.
It's also worth considering your preferences when it comes to natural light. If you enjoy bright, open spaces, blinds may allow better light control throughout the day. But if you value cosy, dimmed lighting, especially in the evenings, curtains can provide a more calming environment.
Children and pets are another consideration. Cordless curtains are often the safer option, though many blinds now come with child-safe designs or can be installed with safety features.
Your design style plays a part too. Do you want a streamlined, modern look? Blinds might be the better match. Prefer a softer, classic feel? Curtains will likely suit that aesthetic more. You can also look at your existing furniture and finishes. Some materials or colours may pair better visually with one option over the other.
In many cases, you don’t need to limit yourself to just one type. Combining both allows for flexibility, which is especially helpful in rooms where you want to adjust lighting and privacy throughout the day.
Ultimately, the decision should align with your lifestyle, the needs of each room, and your long-term goals for comfort and maintenance. Try not to rush the process—observe your space, get inspiration, and consider testing a style in one room before committing to an entire home solution.
Support from Decor Blinds
If you’re not sure which option fits best, Decor Blinds offers expert guidance. An Australian brand with years of experience, they provide a wide range of custom-made blinds and shutters for all home styles.
From basic roller blinds to traditional plantation shutters, their products combine function and design. Decor Blinds also offers personal consultations to help you pick what works for your space, lifestyle, and budget.
Whether you’re updating one room or your whole house, they’ll help you choose window coverings that match your needs. Visit their website or contact their team to explore your options. With their help, choosing between blinds and curtains can be straightforward and stress-free.
0 notes
Text
Creating Modular Props for Dynamic 3D Game Environments

In the fast-paced world of 3D modeling games, developers and artists are always looking for ways to streamline production while boosting creativity. One such powerful technique is creating modular props—versatile, reusable assets that form the foundation of immersive and dynamic 3D game environments.
Modular design is more than just a buzzword. It is a production strategy that fuels game development efficiency, reduces costs, and enhances visual consistency. Whether you’re designing a car 3D model, a sci-fi corridor, or environmental assets for an open-world map, modular props are indispensable.
In this blog, we’ll explore the importance, workflow, and best practices for creating a modular props 3D model that elevates gameplay and storytelling.
Why Modular Props Matter in 3D Modeling Games
At the heart of any interactive 3D game environment is a collection of detailed and reusable 3D game assets. Instead of designing every structure or object from scratch, modular props allow developers to use predefined pieces to build complex scenes, just like building blocks.
Here’s why this approach works so well:
Efficiency: Designers can create large scenes quickly using smaller pre-made components.
Consistency: Modular props maintain visual cohesion throughout levels.
Optimization: Reused assets reduce memory load and improve game performance.
Flexibility: Artists can easily update, reconfigure, or animate props to suit evolving gameplay.
Understanding the Role of Props in 3D Game Environments
In gaming, props are objects that decorate the scene or serve gameplay functions—barrels, crates, streetlamps, vehicles, benches, or even modular wall sections. These props 3D model may not always be interactive, but they’re crucial for storytelling and immersion.
In open-world or sandbox-style 3D modeling games, dynamic environments rely on a massive volume of props, from urban clutter to wild forest elements.
Pillars, fences, and wall panels
Road and terrain tiles
Pipes and mechanical parts
These elements bring richness to the scene without overwhelming artists with too many unique asset requirements.
Designing Modular Props: The Workflow
Creating modular 3D game assets isn’t as simple as cutting objects into chunks. It requires careful planning and technical discipline. Here’s a typical workflow:
1. Planning and Blockout
Start by planning the environment type—sci-fi, medieval, urban, etc. What story or gameplay will unfold in that space? Then, block out the level using basic geometry to understand scale and proportions.
Define modular sizes using grid snapping and units. For example, if walls are 2 meters tall and 1 meter wide, all modular pieces should follow this metric.
2. Modeling the Props
Model your props using best practices from 3D hard surface modeling or Hard Surface Modeling, especially for mechanical or architectural objects. Modular modeling thrives on clean geometry, straight edges, and seamless alignments.
Use edge loops, bevels, and consistent topology for smooth baking and texturing later.
3. UV Unwrapping and Texturing
Keep UVs clean and consistent. Modular props often share the same UV tile or texture atlas to optimize rendering. Use trim sheets for repetitive surfaces like metal beams or pipes.
For texturing, tools like Substance Painter or Quixel Mixer help create realistic materials and surface detail, even for low-poly assets.
4. Optimization and LODs
Modular props need to be optimized for performance. Use polygon-efficient modeling, bake normal maps for high detail, and create Level of Detail (LOD) meshes to support different view distances.
A detailed 3D vehicle modeling asset, for example, should have high-res and low-res versions, depending on the camera proximity.
5. Exporting and Engine Integration
Once your props are ready, export them into your game engine—Unreal Engine, Unity, or others. Use naming conventions, pivot points, and snapping coordinates to ensure smooth assembly.
Import the props into prefabs or blueprints for modular scene creation and in-game logic connections.
Hard Surface Modeling for Modular Props
3D hard surface modeling techniques are essential when crafting modular props. Think of industrial corridors, pipes, or vehicles—these require precise, mechanical geometry with clean lines.
Hard surface props benefit from:
Boolean modeling for cutouts and panel details
Decal workflows for adding dirt, labels, or damage
A modular car 3D model might include detachable wheels, doors, and interiors that you can reuse across game levels or repurpose for different missions.
Dynamic Use of Modular Props in Game Environments
The same prop can serve multiple roles in a game depending on placement and transformation.
1. Environmental Storytelling
A broken lamp post can suggest a recent battle. A rearranged set of crates might form a barricade. With a library of modular 3D game assets, level designers can create narrative depth through environmental storytelling.
2. Procedural Generation
Many modern games use procedural systems to generate levels. Modular props feed directly into this workflow, allowing infinite combinations without manual design. Dungeons, cities, or terrain can be created using algorithms powered by modular components.
3. Real-time Gameplay Adjustments
In dynamic games where environments shift—say, an earthquake collapses a structure—modular props make it easier to trigger environmental changes without reloading scenes.
Best Practices for Creating Props 3D Model Libraries
To maximize the power of modular props in 3D game environments, follow these best practices:
Use consistent naming conventions: Makes large libraries manageable.
Test frequently in-engine: Always verify snapping, alignment, and performance in your target game engine.
Future Trends in Modular 3D Game Assets
As 3D modeling games evolve, so do the demands on asset creation. Here are some upcoming trends:
AI-assisted prop generation: Tools that generate modular pieces based on concept sketches or prompt-based inputs.
Photogrammetry-based modular kits: Real-world scanning converted into modular prop kits for realistic environments.
Cross-platform asset reuse: Modular props optimized to work in both mobile and console versions of games.
Additionally, industries like automotive simulation and metaverse development are adapting modular 3D vehicle modeling techniques to reduce build time and enhance flexibility.
Conclusion
Modular props 3D model creation is the backbone of efficient and engaging 3D game environments. It empowers artists to build rich, dynamic worlds from a relatively small set of reusable pieces. By mastering 3D environment modeling, following hard surface modeling principles, and maintaining a structured workflow, game developers can reduce asset production time and deliver high-quality content.
Whether you're crafting a futuristic spaceship interior or a bustling city street filled with car 3D models, modular props offer a creative and technical advantage that no game development pipeline should ignore.
#3d game environments#game assets#3d game assets#3d modeling services#hard surface modeling#props 3d model#3d vehicle modeling
0 notes
Text
Digital Character Design Workbook - Pt.1
In class today we explored using line stability on our paint tool to create smooth and seamless linework. We traced over an existing draft character design employing a few different tools and techniques.
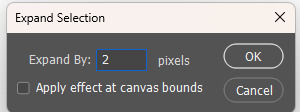
Some of the other techniques we used included, using both the selection tool and paint bucket tools to quickly fill in sections of our linework; with a proper organised layer setup, this setup allows for an easy to navigate, non-destructive workflow to allows for quick and easy adjustments to values and colors. We used the "Some of the other techniques we used included, using both the selection tool and paint bucket tools to quickly fill in sections of our linework; with a proper organised layer setup, this setup allows for an easy to navigate, non-destructive workflow to allows for quick and easy adjustments to values and colors. We used the "Expand" tool to remove any anti-aliasing that occurs using the paint bucket tool.

Once you have your selection expanded and ideally on a layer of it's own, you can quickly change values like hue, lightness and saturation by using the shortcut "Ctrl - U"

We practiced these tools and techniques on a quick donut sketch we did in class. To quickly create different colour variations of the donut, I made sure to group all layers and then I could quick duplicate these groups and adjust the new donuts colour groups as I went.


Below are some of the shortcuts we learned -
Ctrl - U - Colour Change Settings
Ctrl - A - Select All
Ctrl - D - Deselect All
Shift - Command - I - Invert Selection
Alt - Delete - Fill Selection (Used After expanding Pixels
[ - ] - Changes Current Toolsize/Brushsize
Change Opacity Levels - Numpad keys
Value Study -

Today in class we moved away from lines all together and moved on to practicing values.
The first stage of this process involved a flat greyscale blockout that most represented a middle value shown in the reference picture.
The next step was a basic blockout of the shapes, their general location and scale. A tried and true technique while doing this is to place your image close to the study you’re attempting. Also, blurring of the eyes can help remove unimportant information and allows you to focus on the larger scale tasks.
After this study we moved onto creating an original character of our own. I decided to keep it simple and try creating an anthropomorphized animal. I went with a Western theme and chose to use Owls as my animal. I find their strange head and neck flexibility rather menacing and predatory so I took these features and attempted to create a wild west bounty hunter/deadeye type character.
The first thing I did was gather a bunch of references from google images and Artstation. General pictures of different types of owls and Wild West Cowboys and other figures.

Once I had a loose Idea of the types of imagery and subject matter I wanted to roll with, I began doing some very loose shape and linework. At this stage of the design, I was really just trying to gauge what type of stylisation I wanted to use for this character. I'm generally used to creating more realistic character designs, so I wanted to take this as an opportunity to challenge my normal workflow.


After doing some designs ranging from heavily stylised to slightly more dialed back, I decided to go with the design on the right.

I worked on refining this design a little further by adding some more costume elements, and doing a cleaner line pass over the rough sketch.

I then went through with a range of different greyscale values and blocked out each piece of the character, with an aim to keep readability through contrast of values and shapes.
Below are the various value studies I ended up with, I haven't got an overall favorite, but I lean more towards the left most designs value setup.


In class, we were assigned into groups of three, and tasked with both writing a brief relating to a character we worked on developing as a group, and then passing that brief onto another group and receiving our new brief. While waiting for the groups to be set up I jumped into another value study, I wanted to explore the planes of the face this time so I found this sculpture reference through Pinterest and spent about 1 hour total studying (some of the study was done at home after class too).

The brief we received involved a goofy magical minion who was involved in a summon accident, it was left pretty ambiguous in regards to its visual design, so the first thing our group did was put together a reference board with a rough idea of the type of creature we were thinking of. Something goofy but also cute, we also wanted it to be apparent that something was a little off on account of being involved in the summoning accident, so most of our references have a slightly uncanny goofiness.

we all went off and began just brainstorm sketching, we would regroup after a little sketch session. Below is the second stage of the brainstorming where we’ve all done some designs and considered a colour palette, and I’m working on loosely matching my first sketches with elements of the other group members sketches.

This is the third stage where the line art is being cleaned up, the smaller shape language is being refined, and all the colours are now on the design and matching the other group members designs.

the final sketch has shadowing applied, line art cleaned up and a background, that was built on ideas of retro tv studio contexts (This was also part of the brief character story). The style of this character is meant to loosely represent a mobile game character, but I took a higher fidelity stylised approach to the design.
Here’s the A4 lineup of all our groups characters, I love that their all so stylistically different, yet they are cohesive in their design choices and colour palette.
In class, we compiled these designs as a group page and passed it off to the original brief writing group to see what they think, whether it matches what they envisioned, and what couple be improved.
Each group member went away with the feedback we had recieved from the other team, to create revised versions. Below is the list of things needing adjustment or changing for my character in particular.
The next step for me was to compile all the feedback points that were specific to my character, as well as general design changes across the board for all of our characters.
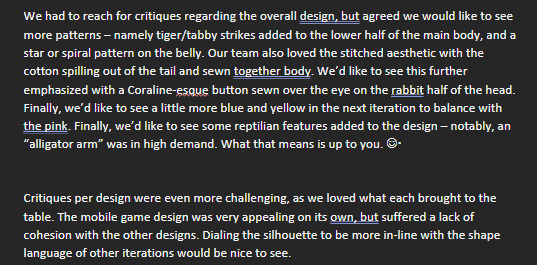
I quickly jotted down the points of revision in my procreate character project file, as well as gathered some new reference images for the additional design changes ("Add tiger stripes to lower torso, and an Alligator arm)

One key piece of feedback specific to my character was the lack of design cohesion with the other group designs, so i started by grabbing a reference of the new design Abby had sketched up, and I did a sketch over my original character to figure out which areas needed dialling back or complete redo's. This was also a chance to slot in the new design elements we had received in our feedback.
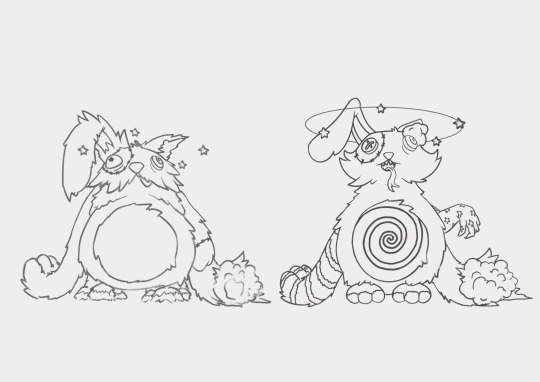
From here I did a simple colour blockout, aiming to match Abby’s reference as accurately as possible this time.
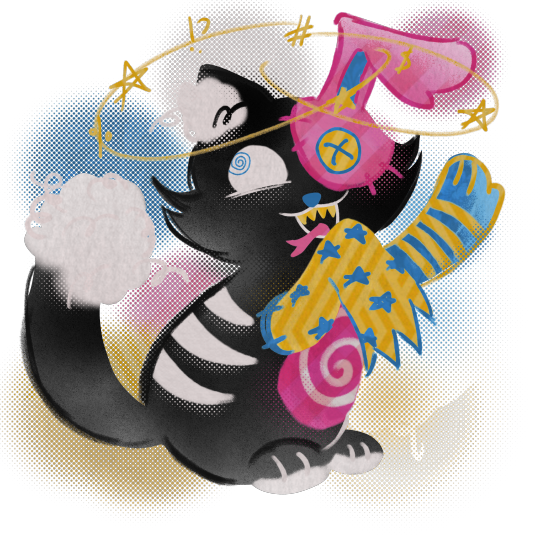
The final and longest spent section was line clean up. I could've probably done a completed fresh sketch, but I instead opted to work my way around the existing sketch and incorporate linework from the old design. I enjoyed dialing between the two designs, and really thinking about which elements to keep, which to bin and which to modify.
To tie the design in even closer to Abby’s I added some stipple-like effects to the shading It also adds a nice subtle texture, and comic-print feel.
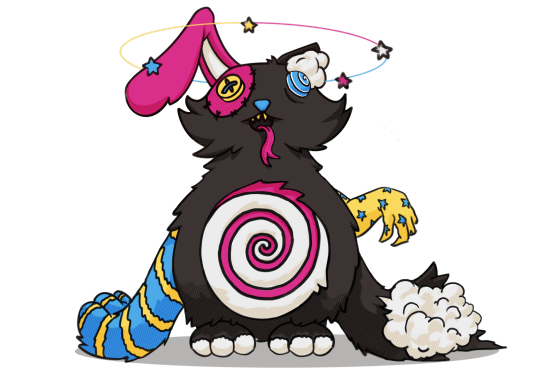
Here is the final revision A4 layout of all our new characters.

0 notes