#baking tutorial
Explore tagged Tumblr posts
Visit Tumblr Blog
Explore Tumblr blogs with no restrictions, modern design and the best experience.
Last Seen Tumblr Blogs


Fun Fact
70% of Tumblr users say the Dashboard is their favorite place to spend time online.
Text
Let's bake some sugar cookies!
Okay so I technically did this way back in December but I'm finally getting around to posting everything now. Better late than never, right? The recipe I used to make the cookies is How To Make The Best Sugar Cookies from Tasty!
I did this mostly for fun, but also sort of to act like a tutorial, I guess, for anyone who might be new to baking. Honestly, the recipe video on Tasty is pretty comprehensive, most folks would probably get all the info they need just from watching it, but here's my take on it with a few tips of my own to hopefully make it even easier for people!
First off, ingredients! (List taken directly from the Tasty recipe):
24 tablespoons unsalted butter, softened
1 ½ cups granulated sugar(300 g)
3 tablespoons cream cheese, softened
1 large egg
2 large egg yolks
1 teaspoon Club House® vanilla extract
½ teaspoon Club House® almond extract
1 teaspoon kosher salt
3 ½ cups all purpose flour(440 g), plus more for dusting
½ teaspoon baking powder
2 teaspoons cream of tartar
And now, onto the process steps! This is going to be long and very image-heavy (edit: especially now that the images should be actually attached lol), so I'm hiding the rest of it under a Read More:
Here we go, making cookies!!
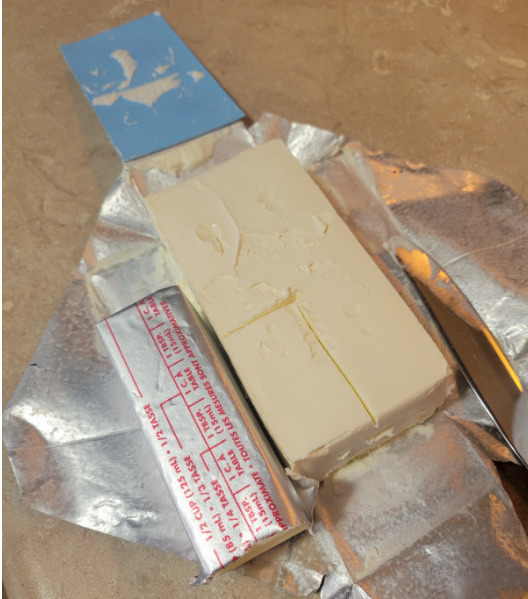
Got all of my ingredients together! Recipe calls for 24 tbsp of butter for some reason, that’s just 3 sticks (Each stick is 8 tbsp). I usually buy butter specifically sold as butter sticks to make it easier to measure, but they are typically a little bit more expensive. If you get one of those big blocks of butter, just remember that each block is 4 sticks (Cut in quarters down the length of it) and then each stick is 8 tbsp.

Tip for separating out egg yolks - literally just scoop it up with your hands. Yes it’s messy, but it’s also hella easy, and that way you don’t break the yolk (I may have even gotten that tip from the recipe video itself, I don’t remember, but I definitely didn’t figure that one out myself lol)


To measure the cream cheese, I just used a spare stick of butter. They’re about the same height, so I cut a groove the same width as the stick, and then used the handy-dandy tbsp markings on the butter stick to figure out how wide to cut to get 3 tbsp
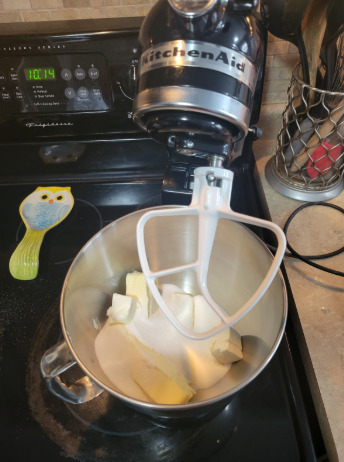
Very important step, make sure your mixer is actually plugged in

The Tasty recipe uses a hand mixer, but I’m a lucky bitch who got a stand mixer as a wedding present so I’m using that instead. You could theoretically do this all by hand, but, like, your arm would probably fall off before you could cream the butter and sugar together, and there’s so much more mixing coming up. Why would you do that to yourself? I definitely wouldn’t recommend trying to do this recipe by hand, make sure you have some sort of electric mixer, or make someone else do the mixing for you :P
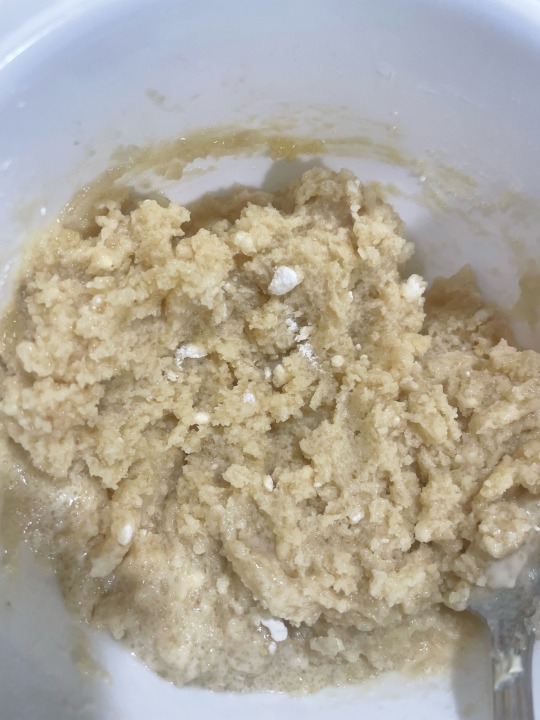
Time to throw a bunch of stuff in there and start mixing! In goes the butter, cream cheese, and sugar! I set the mixer to med speed and mixed for 3 min, then scraped down the sides, then did 2 more, 1 more scrape, and 1 more min to make sure the sugar’s all dissolved in the butter and cream cheese. That's technically a little bit longer than what the Tasty recipe calls for, but this is one of those "your timing might vary moments", based on your mixing technique and equipment
Scrape!
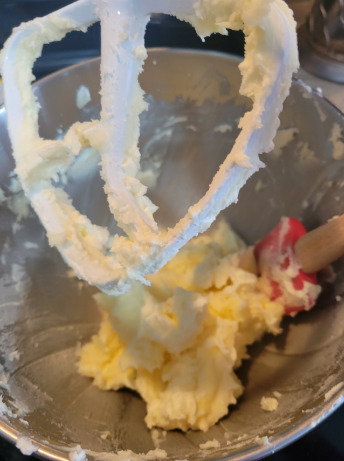
I think it mentions it in the recipe video, but the way you can tell if the sugar is mixed in well is if you pick up a bit of the butter and rub it between your fingers and it doesn’t feel as gritty. If you can feel a lot of grit, it’s not mixed in enough. Like, I can still feel something at this point, but it’s definitely not pure sugar crystals left.
She lookin FLUFF

Next we're adding the egg, egg yolks, vanilla, and almond extract. I highly recommend cracking your egg into a separate dish before adding it to the mix, just to avoid having to pick out egg shells if you’re bad at cracking them like I am. You can even use the same dish you were holding your egg yolks in if you want to make less dishes.
Add the eggos and extracts in! They’re going to be friends!
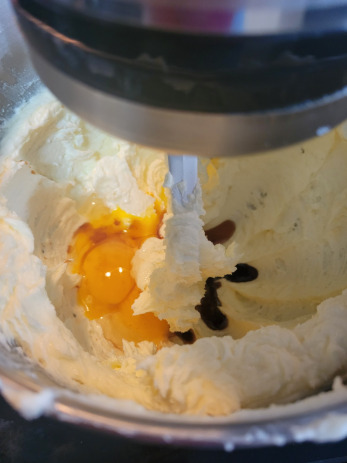
SPIN CYCLE. Basically mix until everything looks combined and you can't see the individual ingredients anymore. When you're done, scrape it down!
Time for the dry stuff! The recipe recommends sifting the flour, salt, baking powder, and cream of tartar directly into your mixing bowl. I forgot to take a picture of when I actually had the ingredients in the sifter, but here’s the set up, and the after. Basically you put your sifter over your mixing bowl, dump the dry stuff into the sifter, and then lightly tap the sides to knock the dry stuff down into the mixing bowl. Watch out, as you tap, the powders will actually start to travel UP the sides of the sifter, so you'll have to make sure to settle them back down towards the middle occasionally.


Side note: I don’t know if it’s 100% necessary to sift the dry ingredients, so like, don’t stress out too much if you don’t have a sifter, I think it just ensures that there’s no flour lumps in your dough and makes mixing easier/ your cookies look nicer at the end. They should still taste the same, regardless lol
Folding time! For anyone who’s new to baking, folding in your dry stuff just means mix it gently with a spoon or spatula first. Because if you try to take a mixer to this right away, all you’re going to get is a cloud of flour in your face. Even when I started mixing by hand, I still sent up a big puff of it everywhere.

Back to mixing with the mixer! You want to mix the dough just until it starts taking on the consistency of play-doh. You'll kind of know it's ready because suddenly it'll feel like the whole thing is clinging to your mixing paddle/mixing beaters at once.
Kronk Voice: Oh yeah, it’s all coming together

Take the dough out of the bowl and throw it onto A Surface. I happen to have a pastry mat because my mom got one once and loved it so much she bought one for everyone she knows, but a clean counter or really big cutting board works just as well. The dough is gonna be pretty sticky, so I’d recommend coating your hands and your Surface in flour to help prevent it sticking to everything. Just sprinkle a handful of flour onto your Surface and spread it around with your palm and you should be good.

Mush your dough together like it’s play-doh, and then wrap it up in plastic wrap. Try to make the disk as flat as you can without it spilling out of the plastic wrap because that’ll make it easier to roll out later. Then throw that bad boy in the fridge, and take advantage of your waiting time to wash some dishes. Future you will thank you for getting ahead of the dish pile-up

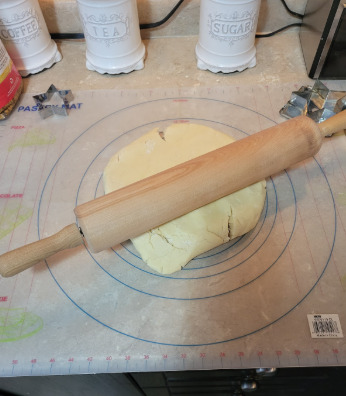
So! 2 hours later it’s time to transform and roll out! (the dough, that is). Preheat your oven to 350 degrees, and let's get to the fun part!
Unwrap your dough, put it down on your Surface, and start to squish it down to about a half cm thick (1/4inch) or so. If you have a rolling pin, great, but any hard cylinder will do (yes I know how that sounds). You could even squish it by hand, but it might be a bit tricky to get it flat enough to bake evenly. I also broke the dough into chunks and worked with small pieces one by one so that it was easier to work with and didn’t take up too much space
Time to break out the cookie cutters! Yes I know some of mine look kinda stained, but those are my grandmother’s cookie cutters (maybe my great grandma? IDEK) so you KNOW they’re the good ones

Dough is still sticky, use a spatula as needed to free cookies from your Surface. I’d also recommend using flour again to keep the dough from sticking. I definitely forgot lol

Start putting those cookies on your cookie sheet! The cookies do spread a little, so don’t let the cookies touch each other, but like, a cm of space is MORE than enough between the cookies. And trust me, you will need the space.

COOKIES
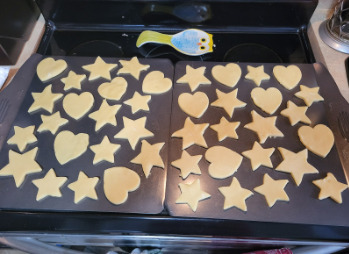
The tasty recipe says it’s supposed to make 12 cookies. Like, maybe if it’s Godzilla baking them? Or if you intend the cookies to be the size of a dinner plate? This isn’t even all of the cookies, this was just all I could fit on two cookie sheets
Into the oven they go!
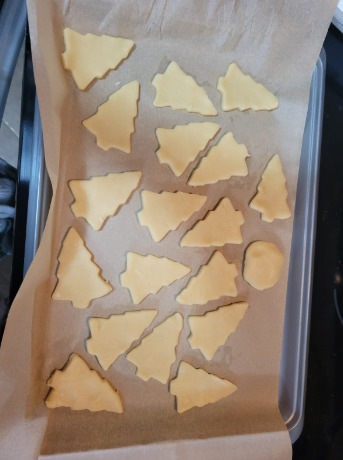
While the first batch is baking, I remembered I DID have a christmas tree shaped cutter, and these WERE supposed to be christmas cookies. I dug it out, and used it for the rest of the dough. I was getting a bit tired at this point, so these ones are a bit more lumpy and rushed. Oh well, I’m sure they’ll still be delicious
Batch 1 baked! I put them in for 11 min (recipe calls for 10-12) but I didn’t think they looked done at that point. Put them in for another 2, and that seems to have been perfect. Again, this is another one of those "your timings may vary" moments. What you're looking for is the very bottom edges of the cookies to have just a hint of brown on them. The tops should still be pretty pale. A couple of the ones on the edges here are a little bit extra brown (hard to tell in the photos), but overall these guys are looking good!

Quality assurance check!
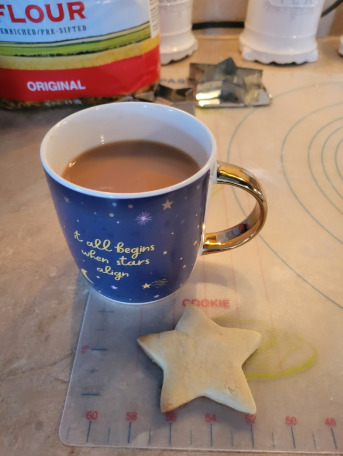
So gooood

And batch 2! Did 12 min for these ones, because they were smaller and on a different kind of baking sheet, and they turned out perfect.

I ended up icing my cookies, but honestly you could genuinely leave them as-is, and they’re still a damn good cookie.
And there you have it! A step-by-step cookie tutorial/rant on how to make super tasty sugar cookies! Great for christmas, or any occasion, really!
I do a lot of baking and cooking, so I do have some baking equipment that not everyone may own, but hopefully I've offered suggestions for alternatives that folks can use for each step. I'm also no expert or professional, I do this for fun, but if anyone has any questions or needs clarification on any of the steps, I'm always happy to try to explain things in more detail! And if people like this, I might try to make another tutorial rant someday!
I hope y'all had fun making cookies with me!
#Baking#sugar cookies#Recipe#cookie recipe#Baking Tutorial#I'm just trying my best#I hope this helps someone somewhere!#long post
14 notes
·
View notes
Text
Credit: concha.emoji
5 notes
·
View notes
Text
It’s here! The full YouTube howto cake recipe tutorial to make the scrumtiously soft and velvety lemon loaf /lemon cake you have ever had! https://youtu.be/ac1e0B3-pAo
youtube
#cakes#cake design#cupcakes#cakemeistro#cake#cake decorating#london cakes#lemon cake#lemon loaf#lemon loaf cake#how to video#youtube tutorial#recipe video#recipe#cake recipe#baking recipes#cake recipes#baking tutorial#Youtube
9 notes
·
View notes
Text
youtube
btw i made a cake and had a fun time while doing it
#remembering to post the things i do here#or working on it lol#Youtube#my video#my.video#youtube video#cooking video#baking video#baking tutorial#cooking tutorial
0 notes
Text

6 months old meme 👍
#I could not resist drawing it with my own hoodie#I used a tutorial to draw this hoodie in specific. I think the result is very good#He’s a loser since he will bark at how much he hates this but at home he’ll wear your clothes if he can#He loves his autonomy#I think it does not often but is present. Fortunately I can quench he's thirst#I thought and took advantage that I had drawn my sona before and could use it in this place#This is pretty silly but love is like that#selfship art#selfship#katsuki bakugou#bakugou katsuki#art#baking my long distance bf into a cookie because i miss him#katsunney 🌶️🍒
93 notes
·
View notes
Text
Don't quite understand the obsession with bringing back characters' old interests/hobbies. Like yeah it could be fun but also, people pick up and abandon hobbies all the time? People do them a little every once in a while and then forget about them for like 3 years? It's not some horrible character-assassinating thing to not mention someone's interest in poetry or whatever they quite literally might have just stopped doing it.
#and dare I say this can even go for Jay's inventing#like. the guy was never “the inventor” he was just the dreamer. he liked MAKING things sure but of his own admittance he liked making#ALL SORTS of things#nya was always the mechanic#jay could get into baking or sculpting or needlework or woodcarving or programming or fuckin makeup tutorials and it would feel in-character#okay fine so maybe the post is just about jay#ninjago#ninjago jay
53 notes
·
View notes
Text
Updating... The Tattooer (ver. 3.4)!

Finally! Took me a while, huh. This is the updated version of the Tattooer project. It skips some steps, making the workflow much, much faster! Huge thanks to @applewatersugar for his suggestion on how to bake textures while preserving the transparency. This is kind of a repost of the original Tattooer post, but it actually has some new stuff and a few changes here and there, so please take a look if you want to learn how to use this new version.
This is a series of Blender template files already set up to quickly bake textures from The Sims 4 to The Sims 2. The different Blender files will allow you to: -Bake body textures from TS4 to TS2 (Female) -Bake body textures from TS4 to TS2 (Male) -Bake body textures from TS4 (Female) to TS2 (Male) -Bake body textures from TS2 (Female) to TS2 (Male) [Bonus!] -New! Bake face textures from TS4 to TS2 (Unisex) [Bonus!] -Bake head textures from TS4 to TS2 (Face + Scalp) (Unisex) [Still experimental] Check the file names to see which one is which, and the resolution of the baked texture it will give. Everything you see in the render above was 100% converted using those Blender files.
Download here! SFS / GD
Update: Version 3.4.1 (27/08/2023) Fixed some issues on the shoulders for the AF-body-4t2-1024 and AF-body-4t2-2048 templates. Now the top straps on most converted underwear/swimwear should look right.
Update: Same version (13/12/2023) As requested, added a new spanish version of the included pdf guide!
These templates were made mainly to bake and convert tattoos, but there’s more you can do with them if you get creative. I have to say, these are NOT perfect. Results may vary depending on what you are trying to convert, so! With that in mind, this is all the stuff you will be able to convert almost seamlessly from TS4 to TS2: -Tattoos. -Other body details such as body hair, scars, freckles, supernatural/occult details… -Body painted underwear and swimwear, as well as some other clothing that’s mostly painted on the body. -Socks, stockings and maybe leggings. -Even skintones! In some areas they will look weird, so I recommend editing and blending them with other existing TS2 skins. -Makeup, eyebrows and beards. In the old version this was just a proof of concept, but now I’ve added a new Face file template which gives some pretty decent results! -Hair scalps. Very useful when converting some hairs! Although keep in mind part of that texture might also need to be baked on the face mesh, you know, that hairline makeup stuff.
Got your attention? Nice! Editing some of the textures from TS4 to match the UV mapping in TS2 using a 2D editing program can be incredibly hard. That’s where texture baking in Blender comes to the rescue!
You will need to download Blender, at least version 3.4, but you could always use a newer version. It is only incompatible with versions older than 3.4. -You can download Blender for free here. -You will also need Sims 4 Studio to extract the original Sims 4 CC textures you want. In the first version of these Blender files, there was a necessary step using Photoshop, but that’s no longer needed. However, there’s still a tiny extra step which requires resizing the newly baked texture on some of the high resolution templates, so you might need a 2D editing program like Photoshop. More on that later.
So, before we begin, let’s clear out some questions you might have. What the heck is this texture baking thing and what does it do? Well, let’s imagine you have a video projector and point an image into a blank wall. Then you pick up some brushes and start painting and copying that projected image in that wall. Texture baking is kinda like that when it comes to 3D models. You align two models and match them as closely as you can in shape and form, and once you adjust some parameters and values, Blender does the rest for you: it will give you a new texture for a new model with a different UV map. These files I’m sharing have everything already set up, so it’s a matter of plopping in that Sims 4 texture and you will get that new texture for TS2 in just a few clicks.
This tutorial assumes you know literally nothing about how to use Blender, so if you feel uncomfortable with it, worry no more! This will guide you with pictures showing where you need to click and explaining what is happening. For Sims 4 Studio and Photoshop the process might be a bit less detailed, but still this should be pretty beginner friendly. For this tutorial, I will use some tattoos as an example (properly credited at the end of the post). Alright, enough with the rambling. Let’s get started!
·EXTRACTING TEXTURES IN SIMS 4 STUDIO: First things first, you will need to extract as pngs all the textures you want to convert from TS4 using Sims 4 Studio. It should be pretty straightforward. Just open the packages and export the Diffuse textures. Keep them organized in a folder for easy access.
·BAKING THE TEXTURES IN BLENDER: PRELIMINARY STEP 1: CONFIGURING BLENDER’S GRAPHICS SETTINGS: Open your preferred Blender file depending on what you’re going to bake and the desired resolution (in this example I’m going to use the AF-body-4t2-1024 file). Before we start messing around in Blender, there’s one thing you should set up. It is a onetime step, and once it’s done, you won’t need to do it again. So, does your computer have a dedicated graphics card? If you don’t know or you’re not sure, just skip to the next step. Configuring Blender so it uses your graphics card instead of your CPU will make the baking render much faster, so it is recommended you set it up correctly. If your computer has a dedicated graphics card, click File (1) > Preferences (2) > and on the window that pops up click System (3) > and select CUDA and make sure your graphics card is there and tick it (4). I have an Nvidia Graphics card but your case may vary. Once you’re done, click on the tiny button on the bottom left corner and Save Preferences (5).

PRELIMINARY STEP 2: CHOOSING THE RENDERING DEVICE: Click on the tiny camera button on the right, called Render Properties (1), and on Device (2) select GPU Compute if it’s not already selected. If you’re not sure if you have a graphics card or not, just select CPU. Then select the Material Properties tab (3) and Save your changes, either by pressing Ctrl + S, or clicking File (4) > Save (5). You might need to do this second step with the other Blender files, but once you have it done and saved, you won’t need to do this again. Okay, time to get into the good stuff!

·STEP 1: LOADING YOUR TS4 BASE TEXTURE: In the Material Properties tab, click the folder icon that says Open (1) and on the window that pops up, navigate through your folders and select your first texture. To navigate easily, the 3 buttons on the top right (2) are for the display mode. They will show your files in list mode, vertical and horizontal, and the one on the right will display the file thumbnails, pretty useful if you want to easily preview your textures here. The icons on the left side (3) will let you go one folder back and forward, go to the parent directory, and refresh the folder in case you just dropped something new in there. Double click on the image you need and that will load the texture into the Sims 4 body model, named “ts4 body”.

·STEP 2: SETTING UP YOUR SELECTION AND BAKING THE TEXTURE: On the top right of the screen, you will see the names of the 2 models in the scene. Hold the Ctrl key in your keyboard and left click on the “ts2 body” model (1). If you did it correctly, you should see “ts2 body” in a yellowish orange color, and right down below, “ts4 body” should look more like a red orange. If not, try again by clicking first on ts4 body, and then while holding Ctrl click again on ts2 body. Then switch to the Render Properties tab by clicking the tiny camera icon (2) and click Bake (3). Depending on your screen resolution, you might need to scroll down a bit with your mouse to see the Bake button. Wait a few seconds for it to finish. You will see the progress percentage down on the bottom of your screen. Don’t panic if you notice your computer fans start ramping up, that’s completely normal! As I said in the beginning, using your GPU will bake the textures much faster than the CPU.

·STEP 3: SAVING YOUR NEW TS2 TEXTURE: Once it’s finished, switch to the UV Editing Mode by clicking “UV Editing” on the top of your screen. And there it is: your new texture! You might have to scroll up your mouse wheel a bit to zoom in and see it in all its glory on the left side of the screen. We’re still not done yet though. You need to save it to yet another new folder (always try to keep your stuff organized!).

You can save it by pressing Shift + Alt + S, or clicking on Image* (1) and then Save As… (2). That will pop a window where you’ll need to navigate again and save it somewhere. Give it a proper name (3) and hit Enter to save it… well, Enter doesn’t always work for me for some reason, so if that happens just click Save As Image (4). And that’s it! You’ve successfully converted your baked texture. Congrats!

·STEP 4: GOING BACK TO STEP 1: Alright! If you’re done with your textures, you can close Blender without saving and call it a day. But let’s say you want to keep baking other swatches. In order to go back to step 1 and start the process once again, click Layout (1), go back to the Material Properties tab (2), select “ts4 body” (3) and click on the folder icon (4) to open and load your next swatch.

Then it’s just a matter of repeating the process from step 2. When you’re ready to move on, close Blender without saving. If you see a small check telling you it will save some images, make sure you uncheck it, so you will be able to use it again in the future from the starting point with no issues. I don’t think it really matters if you accidentally save your progress in these files, but I like to keep it clean and fresh so I can do the process where I left it from the beginning next time I open it. And in case you mess up and save somewhere, you can always just delete the .blend file and download the template files again.
In case you’d like a video tutorial on how to use these files, the amazing @platinumaspiration recorded this fantastic video showcasing the process! You can watch it here.
One final note: some of the baking .blend files save the textures with a resolution of 2048x2048 pixels, as clearly stated at the end of their file name. That’s way too overkill, because TS2 only properly supports up to 1024x1024 for most of its textures and you should always resize your final product to that max resolution (or lower if needed). I just made those 2048 versions because there might be some really tiny and slim details on some tattoos that might look a little too blurry when baked into a 1024 resolution texture, so for those cases use that if you want and then resize them using your 2D editing software of choice. In Photoshop, in the Resample mode of the Image Size menu, there are a few options to choose. For the fine details, I like the Nearest Neighbor (hard edges) option, which, even if it looks a bit pixelated, it still preserves most of the texture and quality.

For anything else, I would just directly bake them using the 1024 versions in Blender (512 for the face and scalp).
And for the folks who feel comfortable playing around in Blender, this is just the beginning! Texture baking opens a LOT of possibilities, so feel free to move stuff around and edit the models to your liking! If you notice the baked textures look warped or stretched somewhere, or don’t like where some textures are placed in the S2 body, poke around that area moving stuff and then give it another try. The main objective of the baking process is keeping both overlapping models as close in shape as possible. You may also edit and save new copies of the templates, or make new ones from scratch using mine as a reference (keep a close look on those Baking settings and values, I think they work pretty well) and share them if you want to. Go ham, do whatever you want with them! I still have plans on making templates to convert body textures from Sims 3 to Sims 2, but for now it’s not on my priorities, so we’ll see when that happens.
Whew! Hope none of this was too confusing. Need help or have any issues with these? Please ask/message me here and I’ll be glad to help when I’m able to!
Credits for the CC used in the render demonstration: -Skin by Sims3Melancholic. -Eyes by Northern Siberia Winds. -Eyebrows by PeachyFaerie. -Tattoos by xtc. -Top by SerenityCC. And the Tattoo I used for the tutorial can be found here, by ValhallanSim.
Last but not least, a huge thanks to all the people who somehow contributed to make this project and update possible, either by doing initial testing, finding issues to fix, or teaching me new Blender tricks to make the workflow way faster and easier. So thanks again to @elvisgrace @moyokeansimblr and @applewatersugar on Tumblr! <3
And thank you for reading! Hope you have fun playing with this (not so) new toy hehe.
#tattooer project#tattooer update#ts2 tutorial#ts2 resources#ts2 blender#ts2 overlays#ts2 texture baking#4t2 conversion tutorial#this took me so LONG to update#im really sorry for the delay :(
408 notes
·
View notes
Text
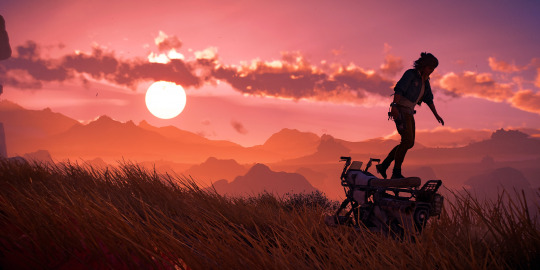
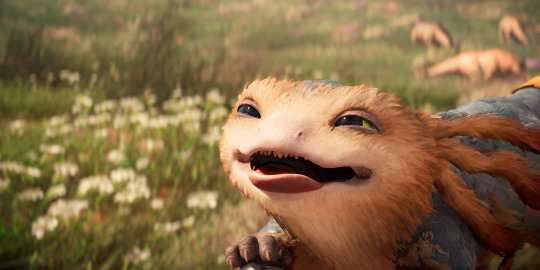


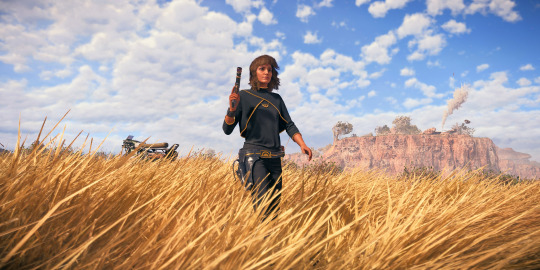

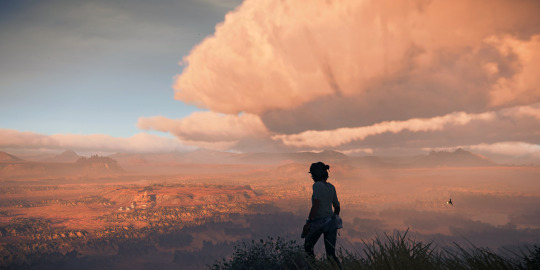
star wars outlaws
#star wars outlaws#kay vess#nix#did a brief detour into this game it isn't bad! but certainly lacks in polish for core loops. tutorialization pipelines are ass also#performance - also ass. had to play quality on ps5 for it to have any clarity at all. but the open world is gorgeous#and it certainly nails the very narrow target of horse girl star wars fantasy (ripping across tatooine on a speeder with a little Guy)#nix is everything I love him. modern star wars rarely captivates me but they do know how to do lil guys real well#my photos#star wars#also-also. would be remiss not to mention. never played a game with unregulated scope creep this noticeable before. it's baffling#I KNOW people crunched on this it's in the walls in the floorboards it's everywhere. unmitigated hodge podge of mechanics and pillars#and those pillars are often unbalanced between each other. storytelling payloads are an issue too. there's pre-rendered in-engine cutscenes#real-time in-engine cutscenes. and digic-produced full CG cutscenes. and their placement and prioritization feels insane and inscrutable#like three different teams were working on the game at the same time and never in congress or coordination#it also suffers from the open world 4th and 5th priority narrative payload issues - many secondary and sometimes even primary questgiving#and expository dialogues are in-game zoomed camera lipsync exchanges. or flavor text#on the other hand - surprisingly deft mission design itself? side quests reward either cosmetics or actual unlockable deployable skills#it has fleeting genes of a metroidvania spread across a wide open world in that sense. but only fleeting. the rep system is a smokescreen#and progression in general has a very open and unsatisfying end to it. this game needed less scope and maybe no space stuff at all#the resulting resource allocation adjustment would truly make for a captivating open world adventure. as it stands it feels like#a product of overworked people misusing mismanaged budgets and managing to sprinkle some love into it regardless#games should never be good on the merit of their perceivable seasoning of overwork and passion. that really only bakes a sadness cake
41 notes
·
View notes
Text
this might be a hard pill to swallow. but coming from someone who just went on a really long hiatus from drawing and had a several years-long journey of rediscovering my love for art… I think some of u online artists need to just take a break.
like— the amount of times I see people stressing about everything they post and beating themselves up for not being creative as they wish they were is insane. mama! you are burnt out! your mind and body are begging for a break. that’s why it feels taxing to create. that’s why validation isn’t cutting it anymore. that’s why you’re feeling doomed. the more you avoid taking a break and keep pushing yourself, the tougher the recovery process will be.
take. a. break!!!!!!!!!
#it doesn’t mean you need to stop being creative as a whole#but whatever is bringing you stress needs to be put away for a while#for me it was drawing that did it. I would pick up a pencil and feel panicked#I felt no joy or peace from it because I was critical of everything I made#so I started baking. I started crocheting. I started learning how to write creatively#I found myself being invested in nature and noticing the world around me#and became more inspired#without ever having the intention of drawing#and when I felt like it was time to come back to my sketch pad.. that’s when I came back.#I didn’t rush it. I didn’t force myself. and it took a long time. but it’s better than hating everything you make#avoiding taking a break and telling yourself you’re fine does you a disservice#atp you are punishing yourself for not being mentally well. That’s not right#and it also shows in your art when you’re not feeling good about what you make tbh#confidence is attractive. with humans and with art#art rambles#art tips#art tutorial#art how to#art hot take#text post#mine
11 notes
·
View notes
Text

#cat#giphy#gif#gordon ramsey#dough#kneeding#making biscuits#gato#chat#feline#animal#tv#television#baking#tutorial#baking with gordon#caturday#cooking
12 notes
·
View notes
Text

I’ve taken up baking! So far I’m not using the stove since I lit that fire and I’m also avoiding the microwave since I lit that other fire last week and times before that. Tasty in a gelatinous way with dry chunks in it and a pool of liquid at the bottom but the rest of it was dry also crunchy and very nice. Let me know if I should drop the recipe.
#baking#cooking#deserts#foodie#food photography#aesthetic food#foodblr#tw food#shit post#memes#tutorials#lifestyle#failure#crack post
12 notes
·
View notes
Text

his skinnnnnn
#okay one more progress picture#life size wilt saga#the washable markers keep coming back when it dries so I guess I wouldn't have been able to finish him today anyway#internet says mix in some baking soda into the water to get them to go away for good#and if that doesn't work I'll have to properly soak him in soap and water#soooo many tutorials just say 'add a bit of water and the lines go away :)'#which is true until it dries and the ink has just spread over the entire wet area#it gets lighter every time I spray it down so they'll eventually get spread so thin you can't see them from the front#so it's not a project ruining issue#but it is a project delaying issue#I was kinda so-so on if I wanted to stuff him today anyway though bc I kinda want to have his two eyes done first#so I can just finish him all at once#I should at least do his finger tips today though. get those made and ready to sew on
7 notes
·
View notes
Text
youtube
Everybody please go check out / subscribe to my friends YouTube channel! She's in the process of expanding her business
✨ her instagram ✨
10 notes
·
View notes
Note
Hiii
I really wanna use the pfp frames and I don’t understand how ? Would you be willing to walk me through that? I don’t get it 😭

Hii hii!! ૮꒰ ˶• ᵕ •˶꒱ა ♡ So to use the frames, you can just download picsart and add an image behind the photo! Once you get the app you just choose my frame, add the photo that you want (make sure it’s behind the frame layer!) and erase the parts that stick out of the frame :> i hope this helps!! let me know if anything is confusing!! :)


23 notes
·
View notes
Text
must say again that mgs3 ocelot is so so compelling to me. in my head he's the perfect little prodigy boy who has his position as a major at just 20 yrs old thru a combination of nepotism and real skill, real gifted kid who's excelled at everything he's ever tried, triple agent fooling absolutely everyone, trying out combat techniques he's only read or heard about in the field bc he knows he'll just Get it right away, and it's like partially true that he's very good but he's not That good, there's people pulling strings behind the scenes to get him there, but he doesn't see them and thinks he got this all by himself. and i need to put this smarmy little man in my mouth and shake him like a dog with a toy.
#i like him sooooooo bad i like him so much#kitten ocelot inspires this cuteness aggression in me to such an intense degree#literally said i need to bake him into a pie the other day. And i do.#my fucking googyyyyy....#like and then he runs into big boss and that's his first ever real challenge and he Loses. and i foam at the mouth#the way he repeats 'pretty good' and then like genuinely swoons. fuck offfffff#ooo did you get a compliment you little teacher's pet are you hooked on the serotonin of getting a pat on the heas#*head#do you respect this man bc he defeated you but you're also blindingly furious at him for it and also a lil bit got a little puppydog crush#i'm gonna explode. i haven't even finished the tutorial on mgs2 yet and i can't wait to start 3.#for Him.#witness me
81 notes
·
View notes