#c sharp programming tutorial
Explore tagged Tumblr posts
Visit Tumblr Blog
Explore Tumblr blogs with no restrictions, modern design and the best experience.
Last Seen Tumblr Blogs


Fun Fact
Tumblr was acquired by Yahoo for $1.1B in 2013.
Text
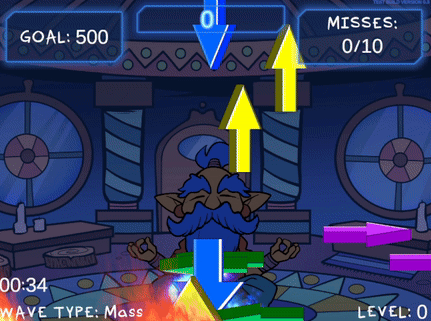
I dislike using rigidbodies to move my objects because physics interactions can sometimes go ham and while that can be very amusing, I prefer things to be predictable. So for moving arrows in this game I handled the movement math myself via coroutine. Let's take a look-see, shall we? :3

The goal of this coroutine is to move its symbol object in an arcing motion from its initial position, moving it upward and to either the right or left. Then it will fall downward. Rather than having each symbol object run this coroutine from an attached script, I am using a central script (my GameManager) to apply this movement to a given object, so the first thing I do is make sure the symbol still exists before proceeding with the coroutine:
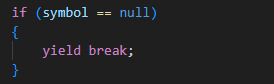
If we find that our symbol has been destroyed, we exit the coroutine with "yield break". You wouldn't need this check if the script is running this movement on its own object, as coroutines are ended upon an object's destruction.
There are a bunch of variables we'll define within our coroutine to calculate our desired motion; we'll start by defining an arcDuration:

This determines how long the object will take to move in the arc shape. A shorter duration results in faster movement. Using a random amount between a min and max duration creates some variance in how fast different symbol objects will move. I have my minArcDuration set to 1 and maxArcDuration set to 2.5 for quick bouncy movements.

These variables referencing the outermost bounds of the camera's view will be used to ensure that symbols remain within the visible area of the camera at all times. I'm not using a topBound because I'm fine with symbols possibly going off the top of the screen, but I use a maxArcHeight variable that is set low enough that they never do.

For even more spawn variability, we add a little randomness to our starting point. My spawnPointVariance is set very low at 0.3; my initial symbol spawn position is low on the screen, and due to how the rest of this coroutine works, it's important that the symbols are never allowed to spawn below the bottomBound or else they will be instantly deleted (and result in a miss!)

The height here is, of course, how far up the symbol will travel, and the distance refers to how far it will move to the left or right. We calculate the peak of the arc by adding our distance and height to the x and y values of our starting position. Randomizing between negative and positive distance values for our x position adds another layer of variability which includes the possibility of moving either left or right, even though our minArcDistance and maxArcDistance are both set to positive values for clarity (mine are set to 1 and 6).

This is the part of the code that decides upon our symbol's speed by calculating the distance it has to cover from its start to its peak. By dividing our horizontalDistance by our arcDuration (distance divided by time), we calculate how fast the symbol needs to move to cover the entire distance in the given duration. Mathf.Abs is used to ensure that horizontalDistance is always positive, lest we get a negative value that causes us to move in the opposite of the intended direction.

We'll also want a speed variable for when the arcing motion ends and the symbol starts falling, that's where downwardSpeed comes in. In earlier versions of this function, I used downwardSpeed alone to transform the object's position, but I've since refined the logic to take the current horizontalSpeed into account for more consistent motion; we'll see that later. (Also you can see I've been tweaking that arbitrary range a bit... the fall speed was brutal during those mass waves ;o;)

Here we create an elapsedTime variable starting at 0. In our while loop, we will use this variable to count how much time has passed, and if it becomes greater than or equal to arcDuration, we'll change isFalling to true and begin moving down.
We create a Vector3 moveDirection which gives the vector pointing from the startPosition to the peakPosition, and then turn it into Vector3 horizontalDirection, which retains only the X-axis direction. Both values are normalized to ensure consistency. Without normalization, the magnitude (or distance) of the vector would vary depending on the distance between the start and peak positions, which could result in inconsistent speed. Normalization caps the magnitude at 1, meaning the vector represents just the direction, not the distance, allowing for consistent speed calculation later.
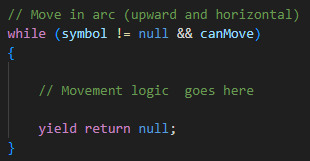
Here's how we start our while loop: as long as our symbol object is not null and the game says we canMove, we say yield return null, which will instruct our loop to occur every frame. If either the symbol becomes null or canMove becomes false, the while loop will end and so will the coroutine - for this reason, I only set canMove false when the game ends and the symbols will never have to resume movement, rather than in cases where I want them to pause movement and resume later, such as when a player pauses the game or during level-up periods. For the latter I use an isLevelingUp bool in my while loop that waits until that bool is false before proceeding (yield return new WaitUntil(() => !isLevelingUp)), and for the former I actually change the game Time.timeScale to 0, which is not typically recommend but fuck it we doin it live, because I don't have a mechanism for resuming this function with appropriate variables if it is stopped. It could surely be done if you just store the local variables somehow.

This is the first part of our movement logic that we put in the while loop; remember we already set isFalling false, so this part will proceed with the rising motion.

We count our elapsedTime here by adding Time.deltaTime, a variable which represents the time in seconds that has passed since the last frame, ensuring that time calculation is frame-rate independent. Do NOT use Time.time in cases like this unless you want your users with varying computer specs to all have different experiences with your game for some insane, villainous reason
The variable 't' is looking at the elapsedTime divided by arcDuration, a ratio that tells us how far along we are in the arc movement. If elapsedTime equals arcDuration, this ratio would be 1, meaning the arc is complete. We use Mathf.Clamp01 to clamp this value between 0 and 1, ensuring that it won't ever go higher than 1, so that we can use it to calculate our desired arcPosition and be sure it never exceeds a certain point due to frame lag or some such. If 't' is allowed to exceed 1, the arcPos calculation could possibly go beyond the intended peakPos. We are going for predictable motion, so this is no good

We define our Vector3 arcPos with Vector3.Lerp, short for "Linear Interpolation", a function for calculating smooth transition between two points overtime. Ours takes our startPos and peakPos and moves our symbol between the two values according to the value of 't' which is incrementing every frame with Time.deltaTime. As 't' progresses from 0 to 1, Vector3.Lerp interpolates linearly between startPos and peakPos, so when 't' is 0, arcPos is exactly at startPos. When 't' is 1, arcPos reaches peakPos. For values of 't' between 0 and 1, arcPos is smoothly positioned between these two points. Very useful function, I be lerping for days
Then we alter the y coordinate of our arcPos by adding a calculation meant to create smooth, curved arc shape on the y axis, giving our object its rounded, bouncy trajectory. Without this calculation, you'll see your symbols rising and falling sharply without any of that rounded motion. This uses some functions I am not as familiar with and an explanation of the math involved is beyond my potato brain, but here's a chatgpt explanation of how it works:
Mathf.Sin(t * Mathf.PI): This calculates a sinusoidal wave based on the value of t. Mathf.PI represents half of a full circle in radians (180 degrees), creating a smooth curve. At t = 0, Mathf.Sin(0 * Mathf.PI) is 0, so there’s no vertical displacement. At t = 0.5, Mathf.Sin(0.5 * Mathf.PI) is 1, reaching the maximum vertical displacement (the peak height of the arc). At t = 1, Mathf.Sin(1 * Mathf.PI) returns to 0, completing the arc with no vertical displacement. This scales the vertical displacement to ensure the arc reaches the desired height. If height is 10, then at the peak, the symbol moves 10 units up.

With those positions calculated, we can calculate the "newX" variable which represents where we want our symbol to appear along the x axis. It adds the horizontal movement to the current x coordinate, adjusted for the time passed since the last frame.
We use Mathf.Clamp to ensure our newX value doesn't exceed either the left or right bounds of the screen. This function limits the given value to be between min and max value.

Finally we tell our loop to actually reposition the symbol object by creating a new Vector3 out of newX, arcPos.y, and using our symbol's own z coordinate. That last bit is important to ensure your sprite visibility/hierarchy doesn't go out of whack! If I used arcPos.z there instead, for example, it's likely my sprites would no longer be visible to my camera. The z position the symbol spawned at is the z position I want it to retain. Your needs may vary.
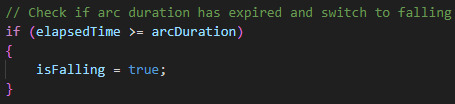
This part tells us our arcDuration should end, so we set isFalling to true, which will cause the secondary logic in our while loop to trigger:
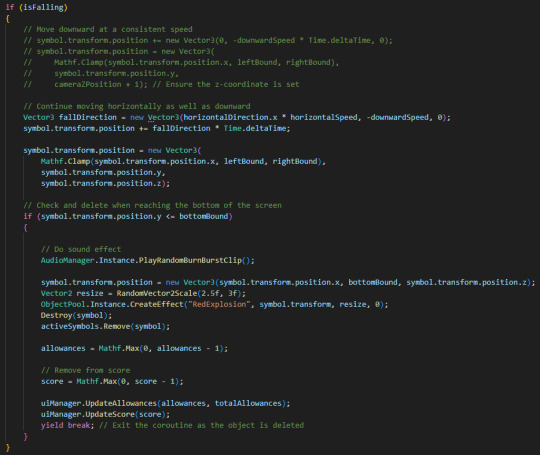
Previously, objects retained their x position and only had negative downwardSpeed applied to their y position, but I didn't like that behaviour as it looked a little wonky (symbols would reach their arc peak and then suddenly stop and drop in a straight line downward).

By creating a new Vector3 fallDirection that retains the horizontalDirection and horizontalSpeed from the arc phase, we're able to apply smooth downward motion to the symbol that continues to the left or right.
Just below that, we once again clamp the symbol's x position to the left and right screen bounds so the symbols can't travel offscreen:

The loop would continue causing the symbols to fall forever if we didn't have this check:

which triggers some project specific logic and destroys the symbol, then exits the coroutine with "yield break". Although the coroutine already exits when the symbol becomes null, which it will see is the case in the next frame as we destroyed the symbol here, adding an explicit yield break is an added layer of security to ensure predictability. Once again, not super necessary if you decide to run this code from the moving object itself, but just be sure you move your Destroy() request to the bottom of any logic in that case, as nothing after that point would be able to trigger if you destroy the object which is running the coroutine!
and that's all folks. If this helps you make something, show me!
HEY, did you really make it all the way to the end of this post?! ilu :3 Do let me know if this kind of gratuitous code breakdown interests you and I will summon motivation to make more such posts. I personally like to see how the sausage is made so I hoped someone might find it neat. If ya got any questions I am happy to try and answer, the ol' inbox is always open.
#gamedev#solodev#made with unity#c sharp#tutorial#coding#programming#clonin game#code explanation#code explained
3 notes
·
View notes
Text
We banished the sillies to the backrooms.

ALSO REALLY REALLY OFF TOPIC- But do you guys have any advice or know any tutorials or anything involving making a game? I've been trying for a while, and I've attempted to test a little and try and make test sprites to help do these tests, but neither of my art programs on my laptop work. It's Krita and MediBang Paint Pro that I use. I've been using Unity for this. Are there any free art programs that work with Unity? Also I would like to know something involving the programming. I've been attempting to figure out how to code in C Sharp if I remember the name right, but when I go to code, it brings me to notes. Is this suppose to happen, or do I need to install something for this?
#bendy and the ink machine#alice angel#sammy lawrence#susie campbell#bendy and the dark revival#i need advice#video games
6 notes
·
View notes
Text

MASTERING C#: FROM BASICS TO ADVANCED
This infographic offers a clear roadmap to Mastering C# tutorial, covering everything from basic syntax and object-oriented programming to advanced topics like LINQ, async/await, and .NET frameworks. Ideal for beginners and intermediate developers, it visually breaks down key concepts, practical tips, and learning milestones to accelerate your C# journey.
CONTACT INFORMATION
Email: [email protected]
Phone No. : +91-9599086977
Location: G-13, 2nd Floor, Sec-3, Noida, UP, 201301, India
Website: https://www.tpointtech.com/c-sharp-tutorial
0 notes
Text
C Sharp Tutorial for Beginners: A Step-by-Step Guide to Learn C# Fast

Are you new to programming and want to learn C#? This C Sharp Tutorial for Beginners will help you understand the basics of C# in a simple way.
What is C#?
C# (pronounced "C Sharp") is a popular programming language developed by Microsoft. It is widely used for building software, web applications, and even games using the Unity engine. C# is easy to learn, making it a great choice for beginners.
Why Learn C#?
Beginner-Friendly – C# has simple and clear syntax.
Versatile – It is used for web apps, desktop software, and games.
Strong Community Support – Many learning resources and forums are available.
Job Opportunities – Many companies use C# for software development.
Key Concepts in C#
Variables – Store different types of data, like numbers and text.
Data Types – Define the kind of data a variable can hold.
Conditional Statements – Help the program make decisions.
Loops – Repeat tasks automatically.
Functions – Organize code into reusable blocks.
By learning these basics, you will build a strong foundation in C#. With practice, you can create powerful applications.
To start your C Sharp Tutorial for Beginners, visit CodePractice.io for more in-depth learning. Happy coding!
0 notes
Text
C Sharp Tutorial for Beginners

Learn C# programming step-by-step with this beginner-friendly tutorial. Understand syntax, variables, loops, and more with easy examples. Perfect for new coders looking to start their C# journey.
0 notes
Text
Discovering the Power of Programming Languages: Your Guide to Coding Success
In today’s tech-driven world, mastering programming languages can open doors to countless opportunities. Whether you're aiming to build web applications, develop software, or dive into data science, understanding the power of programming languages is essential for your success. Here’s a comprehensive guide to help you navigate this journey.

1. Choosing the Right Language
Each programming language has its unique strengths. Here’s a quick overview:
Python: Ideal for beginners and data science. Its simple syntax allows for quick learning and extensive libraries for machine learning and data analysis.
JavaScript: The backbone of web development. With frameworks like React and Angular, JavaScript helps you create dynamic and interactive websites.
Java: A versatile choice for enterprise applications and Android development. It’s robust, portable, and widely used in large organizations.
C++: Perfect for systems programming and game development. Its performance and control over system resources make it a popular choice for high-performance applications.
2. Building a Solid Foundation
Once you’ve chosen a language, focus on the fundamentals. Understanding concepts like data structures, algorithms, and object-oriented programming will enhance your coding skills and problem-solving abilities.
3. Hands-On Practice
The best way to learn programming is through practice. Engage in projects, contribute to open-source, or tackle coding challenges on platforms like LeetCode or HackerRank. Real-world application of your skills solidifies your understanding and boosts confidence.
4. Utilizing Online Resources
Leverage the wealth of online resources available:
Courses: Websites like Coursera, Udemy, and edX offer structured courses for various programming languages.
Tutorials and Blogs: Follow programming blogs and YouTube channels for tips, tricks, and tutorials.
Forums: Join communities on platforms like Stack Overflow and Reddit to ask questions and share knowledge.
5. Networking and Collaboration
Connect with other programmers. Participate in coding meetups, hackathons, or online communities. Networking can lead to mentorship opportunities and collaborations that enhance your learning experience.
6. Staying Updated
The tech industry evolves rapidly. Stay updated on the latest trends and tools in programming. Follow industry news, join newsletters, and subscribe to relevant YouTube channels to keep your skills sharp.
Conclusion
Embarking on your programming journey can be incredibly rewarding. By choosing the right language, mastering the basics, practicing regularly, utilizing online resources, and networking, you’ll be well on your way to coding success.
#ProgrammingLanguages #CodingSuccess #LearnToCode #TechSkills #WebDevelopment #DataScience #Python #JavaScript #Java #Cplusplus
0 notes
Text
Week 10 - More unity work and video creation
Current Status: Deliver
For this week I focused on working on some 3D animations for my video and working on the C sharp scripts for unity for the interactive parts of my unity project. The environment is finished I just need to get the actual drawing program I want to create unity to actually function.
I once again took a break from unity after trying two different tutorials and rage quitting at writing scripts and decided to work on creating a 3D animation for my video. First I 3D modelled the figure, then rigged and posed them in a knelling position. I then added a ground that mimicked wet concrete to give some contrast to the smooth figure and to reflect the videos lighting in the background. I then added stand in videos for where I intend to have my stock footage and set up the camera to zoom out as part of a transition for my video.

Please note that the videos used in the above render for the animation will not be actually used but instead are place holders for the stock footage I plan to include in my video.
Above is the quickly put together video of my storyboard into an actual video to test how well it works. This was put together in iMovie using a combination of screenshots my storyboard and phone recordings of my 3D blender animation.
Current mood for week 10 and working on unity:

0 notes
Link
Download RPG Core Combat Creator: Learning Unity C# Coding
BestSelling Course.
#rpg#unitygames#unity programming#unity3d#unity development#unity tutorial#free udemy courses#free udemy course#c sharp#c sharp tutorial#programming#coding#c#c++#game development#games development
1 note
·
View note
Photo

Top 50 C# Interview Questions and Answers ☞ https://morioh.com/p/133f04558639 #csharp #Interview #Interview #Answers #Morioh
#c#c programming#learn c#c tutorial#c sharp tutorial#c fundamentals for absolute beginners#c course#c for beginners#c tutorial for beginners#codequs#morioh
1 note
·
View note
Photo

C Programming Tutorial For Beginners - Built Game Using C Language ☞ https://morioh.com/p/09369594b317 #CProgramming #CLanguage #Morioh
#c#c programming#learn c#c tutorial#c sharp tutorial#c fundamentals for absolute beginners#c course#c for beginners#c tutorial for beginners#codequs#morioh
5 notes
·
View notes
Photo

Ancient Math and Modern C++ ☞ https://morioh.com/p/85630cdb10a8 #cplusplus #Morioh
#c#c programming#learn c#c tutorial#c sharp tutorial#c fundamentals for absolute beginners#c course#c for beginners#c tutorial for beginners#codequs#morioh
1 note
·
View note
Text
Mastering C Sharp with an In-Depth Tutorial: Unleash Your Programming Potential

Are you ready to embark on a journey into the world of C# programming? Look no further! This comprehensive C# tutorial is designed to equip you with the knowledge and skills needed to master the language. Whether you're a beginner taking your first steps or an experienced developer looking to enhance your skills, this tutorial has something for everyone.
Why C#?
C# (C Sharp) is a versatile and powerful programming language widely used for developing desktop, web, and mobile applications. Known for its simplicity, readability, and robustness, C# is a popular choice among programmers. By learning C#, you open up doors to a vast array of career opportunities in the software development industry.
What Does the Tutorial Cover?
This tutorial covers the essentials of C# programming, starting from the basics and gradually progressing to more advanced topics. You'll learn about variables, data types, control structures, object-oriented programming (OOP) concepts, and more. The tutorial provides clear explanations, code examples, and practical exercises to reinforce your understanding.
Real-World Applications:
One of the highlights of this tutorial is its focus on real-world applications. As you progress, you'll encounter examples that demonstrate how to apply C# in practical scenarios, such as building a web application or creating a desktop software solution. This hands-on approach will enhance your problem-solving skills and give you the confidence to tackle real-world projects.
Why Choose this Tutorial?
This tutorial stands out for its comprehensive coverage, step-by-step explanations, and practical examples. It is suitable for beginners as well as those with some programming experience. The tutorial offers a structured learning path that ensures a solid foundation in C# programming.
If you're ready to dive into the world of C# programming and unlock your full programming potential, this C Sharp Tutorial is the perfect resource for you. Start your journey today and become a proficient C# developer!
0 notes
Text
TutorialandExample offers an extensive C# tutorial, guiding readers through fundamental concepts, advanced topics, and practical examples to help them gain expertise in C# programming.
0 notes
Text
girl help i want to understand how to use unity game engine but i despise learning new ui
#if i dont get it immediately or if it isn't reminiscent of other programs i cant be bothered#still rlly want tp learn though#will power through it eventually#I also never have patience for tutorials but i'll power through one eventually as well#ALSO also i simply Do No understand c sharp or c ++#my coding abilities reach their limit with the python console#oh well#i'll learn it at some point
1 note
·
View note