#child component in vue
Explore tagged Tumblr posts
Visit Tumblr Blog
Explore Tumblr blogs with no restrictions, modern design and the best experience.
Last Seen Tumblr Blogs


Fun Fact
130K people were victims of a chain letter scam that affected Tumblr in May 2011.
Text
Frontend Development Using Vue.js

Vue.js is one of the most popular JavaScript frameworks for building interactive user interfaces and single-page applications. It’s lightweight, flexible, and beginner-friendly — making it an excellent choice for frontend developers of all skill levels.
What is Vue.js?
Vue.js is an open-source JavaScript framework for building UIs. It was created by Evan You and is designed to be incrementally adoptable. That means you can use it to enhance parts of your webpage or build full-featured SPAs (Single Page Applications).
Why Choose Vue.js?
Easy to Learn: Simple syntax and comprehensive documentation.
Component-Based: Encourages reusable and maintainable code.
Lightweight: Fast to load and quick to execute.
Reactive Data Binding: Automatically updates the DOM when data changes.
Great Tooling: Vue CLI, Devtools, and a strong ecosystem.
Getting Started with Vue.js
You can include Vue.js via CDN or use Vue CLI for a full project setup.
Using CDN (Quick Start)
<script src="https://cdn.jsdelivr.net/npm/vue@2/dist/vue.js"></script> <div id="app"> <p>{{ message }}</p> </div> <script> var app = new Vue({ el: '#app', data: { message: 'Hello Vue!' } }); </script>
Using Vue CLI (Recommended for Projects)
npm install -g @vue/cli vue create my-vue-app cd my-vue-app npm run serve
Key Vue.js Concepts
Templates: HTML-like syntax with embedded expressions.
Directives: Special attributes like v-if, v-for, v-model.
Components: Reusable, encapsulated UI blocks.
Props & Events: Communication between parent and child components.
Reactivity System: Automatically updates DOM when data changes.
Vue Router: For building SPAs with routing.
Vuex: State management for complex applications.
Example: Creating a Component
Vue.component('todo-item', { props: ['item'], template: '<li>{{ item.text }}</li>' });
Popular Vue.js Libraries & Tools
Vue Router: Adds navigation and routing features.
Vuex: Centralized state management.
Vuetify / BootstrapVue: UI frameworks for Vue.js.
Vite: Lightning-fast development server and build tool for Vue 3.
Best Practices
Break your UI into small, reusable components.
Use Vue CLI or Vite for project scaffolding.
Keep components clean and focused.
Use Vue DevTools for debugging.
Organize files using standard folder structures (components, views, assets, store).
Conclusion
Vue.js is a powerful and approachable framework for frontend development. Whether you're enhancing a small section of your site or building a full-scale web app, Vue offers the tools and flexibility you need. Dive into Vue and take your frontend skills to the next level!
0 notes
Text
Understanding Slots in Vue

Slots serve as placeholders within a child component's template where parent components can insert their own content. This mechanism promotes component reusability and adaptability. There are different types of slots in Vue:
Default Slots: Allow the parent to pass content without a specific name.
Named Slots: Enable the parent to pass content to designated slots identified by names.
Scoped Slots: Provide a way for child components to pass data back to the parent through the slot, allowing the parent to render content based on that data.
Using Slots in <script setup>
With the introduction of the <script setup> syntax in Vue 3, handling slots has become more streamlined. The <script setup> is a compiler macro that allows you to write less boilerplate code when using the Composition API. To work with slots inside <script setup>, Vue provides the useSlots() and useAttrs() helper functions.
The useSlots() function returns an object containing all the slots passed to the component, which can be utilized within the <script setup> block. This is particularly useful when you need to programmatically interact with the slots.
vue
CopyEdit
<script setup> import { useSlots } from 'vue'; const slots = useSlots(); // You can now use `slots` to access the slots passed to this component </script>
In scenarios where you need to provide type hints for slots, especially when using TypeScript, Vue 3.3 introduced the defineSlots() macro. This macro allows you to define the expected slots and their props, enabling better type checking and editor support.
vue
CopyEdit
<script setup lang="ts"> const slots = defineSlots<{ default: (props: { msg: string }) => any; header: (props: { title: string }) => any; }>(); </script>
By defining slots in this manner, you enhance the maintainability and readability of your components, making it clear what slots are expected and what props they provide.
Practical Example
Let's consider a practical example where we have a BaseLayout component that utilizes named slots to structure a page layout:
vue
CopyEdit
<template> <div class="container"> <header> <slot name="header"></slot> </header> <main> <slot></slot> <!-- default slot --> </main> <footer> <slot name="footer"></slot> </footer> </div> </template>
In the parent component, we can use the BaseLayout and provide content for each slot:
vue
CopyEdit
<template> <BaseLayout> <template #header> <h1>Page Title</h1> </template> <template #default> <p>This is the main content of the page.</p> </template> <template #footer> <p>© 2025 My Website</p> </template> </BaseLayout> </template>
In this example, the BaseLayout component defines three slots: header, default, and footer. The parent component then provides the content for each slot using the v-slot directive (shorthand #). This approach allows for a clean and organized way to compose layouts with reusable components.
Conclusion
Mastering the use of slots in Vue, particularly within the <script setup> syntax, empowers developers to create flexible and maintainable components. By effectively leveraging default, named, and scoped slots, you can build complex user interfaces that are both reusable and easy to manage. Understanding how to use slots in scripts is essential for any Vue developer aiming to write clean and efficient code.
more details : vue how to use slots in script
0 notes
Text
Mastering Scoped Slots in Vue 2: A Complete Guide

Vue.js is a progressive framework that offers developers numerous features to build dynamic and interactive web applications. One of its most powerful features is scoped slots, which enable flexible and reusable component patterns. This article will explain how to access scoped slots in Vue 2, empowering you to create highly customizable components.
What Are Scoped Slots?
Scoped slots in Vue 2 are an advanced slot mechanism that allows a parent component to pass data to a child’s slot content. Unlike regular slots, scoped slots provide a way to dynamically inject content into components based on specific data from the child component.
For instance, imagine a table component where you want to customize the content of each cell dynamically. Scoped slots make this possible.
How to Access Scoped Slots in Vue 2?
To understand how to access scoped slots in Vue 2, follow these steps:
Define the Scoped Slot in the Child ComponentThe first step is to define a scoped slot in your child component. For example:vueCopy code<template>
<div>
<slot :info="dataFromChild"></slot>
</div>
</template>
<script>
export default {
data() {
return {
dataFromChild: "Hello from child component!"
};
}
};
</script>
Here, the slot element passes the dataFromChild property to the parent via the info attribute.
Access the Scoped Slot in the Parent ComponentIn the parent component, use the v-slot directive to bind the slot scope:vueCopy code<template>
<ChildComponent v-slot="{ info }">
<p>{{ info }}</p>
</ChildComponent>
</template>
The { info } syntax extracts the scoped data, which you can then use within the slot’s content.
Dynamic Content RenderingScoped slots are incredibly useful for rendering dynamic content. For example, you can loop through an array of data and use scoped slots to display each item:vueCopy code<template>
<ChildComponent v-slot="{ info }">
<ul>
<li v-for="(item, index) in info" :key="index">{{ item }}</li>
</ul>
</ChildComponent>
</template>
Here, the info object can contain a list of items that the parent renders dynamically.
Practical Use Cases
Understanding how to access scoped slots in Vue 2 unlocks several possibilities:
Customizable TablesBuild dynamic table components where each column’s content can be customized based on the data.
Reusable UI ComponentsCreate components like modals or dropdowns where the content is determined by the parent component.
Flexible LayoutsUse scoped slots to define layouts where the structure is consistent, but the content varies.
Tips for Using Scoped Slots Effectively
Keep It SimpleWhile scoped slots are powerful, overusing them can lead to complex and hard-to-maintain code.
Document Your ComponentsWhen building reusable components, document the data provided through scoped slots so other developers can use them effectively.
Use Descriptive NamesName your scoped slot properties descriptively to avoid confusion.
By understanding how to access scoped slots in Vue 2, you can leverage this feature to create dynamic, reusable, and maintainable components. Scoped slots not only enhance the flexibility of your applications but also improve the overall development experience in Vue.js.
Explore scoped slots in your next Vue 2 project and discover how they can simplify your component structure while making your application more powerful.
0 notes
Text
Vue: How to Use Slots in Script
When working with Vue.js, slots are an incredibly powerful feature for creating dynamic and reusable components. Slots allow you to pass content from a parent component to a child component, enabling greater flexibility and customization. In this article, we’ll explore how to use slots in script, ensuring that you can leverage their full potential in your Vue applications.
What Are Slots in Vue?
Slots are placeholders in a Vue component that allow you to inject custom content. They are often used in templates but can also be utilized in scripts to add more advanced logic. Understanding how to use slots in script will give you more control over how your components behave and interact with each other.
How to Define Slots in Vue
Slots can be defined in a Vue component by using the <slot> tag in the template. Here’s a basic example:
<template>
<div>
<slot></slot>
</div>
</template>
The <slot> tag acts as a placeholder that will be replaced by content passed from the parent component.
Using Slots in Script
To understand "vue how to use slots in script," let’s break it down into practical steps. The following examples illustrate how you can work with slots programmatically.
Step 1: Accessing Slots Programmatically
In Vue 3, the setup function provides direct access to slots through the slots parameter. Here’s how you can access and manipulate slots:
<script>
export default {
setup(props, { slots }) {
console.log(slots);
return {};
},
};
</script>
The slots parameter gives you access to all the slots passed into the component. You can check if specific slots exist or render their content dynamically.
Step 2: Rendering Slots Dynamically
You can use the slots object to render slot content conditionally or programmatically in your script:
<template>
<div>
<div v-if="slots.default">
<h3>Default Slot Content:</h3>
<div>{{ slots.default()[0].children }}</div>
</div>
</div>
</template>
<script>
export default {
setup(props, { slots }) {
return { slots };
},
};
</script>
This approach is useful when you need to process or modify the content of slots before rendering.
Step 3: Named Slots in Script
When using named slots, the slots object will include keys corresponding to the slot names:
<template>
<div>
<slot name="header"></slot>
<slot name="footer"></slot>
</div>
</template>
<script>
export default {
setup(props, { slots }) {
if (slots.header) {
console.log("Header slot exists");
}
if (slots.footer) {
console.log("Footer slot exists");
}
return {};
},
};
</script>
This makes it easy to determine which slots are available and render them accordingly.
Benefits of Using Slots in Script
Dynamic Rendering: You can control how and when slot content is displayed.
Flexibility: Slots allow you to create highly customizable components without hardcoding content.
Code Reusability: By leveraging slots, you can create components that adapt to various use cases, reducing duplication.
Common Use Cases
Building dynamic UI components like modals or tabs.
Creating customizable layouts.
Implementing component-based libraries where users can inject their content.
Conclusion
Understanding "vue how to use slots in script" can significantly enhance your ability to build flexible and reusable Vue components. By programmatically accessing and rendering slots, you gain deeper control over your component’s behavior. Start incorporating these techniques into your Vue projects to unlock their full potential!
0 notes
Text
How to Access Scoped Slots in Vue 2
Vue.js is a versatile framework for building user interfaces. One of its powerful features is scoped slots, which offer advanced customization options for reusable components. If you’re new to Vue 2, understanding how to access scoped slots in Vue 2 can greatly enhance your development skills. This article explains what scoped slots are, how they work, and provides a step-by-step guide to accessing them in Vue 2.
What Are Scoped Slots?
Scoped slots in Vue 2 allow a parent component to render content within a child component while having access to the child’s data. Unlike regular slots, scoped slots provide greater flexibility by exposing specific properties or data from the child component to the parent.
For example, if a child component provides a list of items, a scoped slot allows the parent to customize how each item is displayed, leveraging the data provided by the child.
Why Use Scoped Slots?
Scoped slots are ideal when you need:
Dynamic content customization: Render unique content based on data from the child component.
Improved reusability: Create versatile components that adapt to various use cases.
Data sharing: Easily share specific properties between components without additional props.
How to Access Scoped Slots in Vue 2
Here’s a step-by-step guide to access scoped slots in Vue 2:
Step 1: Define a Scoped Slot in the Child Component
In the child component, define a slot and specify the data to be exposed:
<template>
<div>
<slot :item="item"></slot>
</div>
</template>
<script>
export default {
data() {
return {
item: { name: 'Example Item', value: 42 }
};
}
};
</script>
In this example, the child component exposes an item object via the slot element.
Step 2: Consume the Scoped Slot in the Parent Component
In the parent component, use the slot-scope attribute to access the data:
<template>
<ChildComponent>
<template slot-scope="slotProps">
<div>
<p>Name: {{ slotProps.item.name }}</p>
<p>Value: {{ slotProps.item.value }}</p>
</div>
</template>
</ChildComponent>
</template>
<script>
import ChildComponent from './ChildComponent.vue';
export default {
components: {
ChildComponent
}
};
</script>
Here, the slot-scope directive binds the data exposed by the child component to the slotProps variable.
Step 3: Use Scoped Slots Dynamically
You can also access scoped slots dynamically for more complex scenarios. This is particularly useful when building highly customizable components or libraries.
Example: Looping Through Data
<template>
<ChildComponent>
<template slot-scope="{ item }">
<div>
<h4>{{ item.name }}</h4>
<p>Value is: {{ item.value }}</p>
</div>
</template>
</ChildComponent>
</template>
This example demonstrates how scoped slots can dynamically generate content based on child component data.
Benefits of Mastering Scoped Slots
Knowing how to access scoped slots in Vue 2 helps you:
Build more flexible and reusable components.
Simplify data flow between components.
Enhance your ability to customize UI elements effectively.
Scoped slots are a cornerstone of Vue’s powerful component system. With practice, you’ll find them invaluable for creating sophisticated, dynamic user interfaces.
Conclusion
Mastering how to access scoped slots in Vue 2 is essential for any Vue.js developer. By understanding their structure and usage, you can leverage them to create highly customizable and efficient components. Experiment with the examples provided, and start integrating scoped slots into your Vue 2 projects today.
0 notes
Photo

Transfer Data Between Components In Vue JS How you can transfer data between components in vue js? I'll explain to you the communication between a parent component and a child component. source
#child component#child component in vue#components#components communication#components communication in vue#data#data between vue components#learn vue step by step#mario laurich#parent component#parent component in vue#passing data between components#passing data between components in vue#passing data between components in vue js#Transfer#transfer data between components#transfer data between components in vue#transfer data between components in vue js#vue#vue js#vue js tutorial#vuejs#webnoob
0 notes
Text
VueJs - How to call a method from non-parent-child component in vue-js
VueJs – How to call a method from non-parent-child component in vue-js
If you have an idea about the vue js then you know that how we can pass variables or methods in vue js , basically we use the props to do such activity, but what if there is no parent-child relation in the component, and you can want to call those methods. You can also read: How to pass value to child component in Vue.js Let’s suppose I have two components, one name is ComponentOne.vue and…

View On WordPress
#call child component method from parent vue js#call method in parent component vue#call parent component method from child component vuejs#call parent method from child vue js
1 note
·
View note
Text
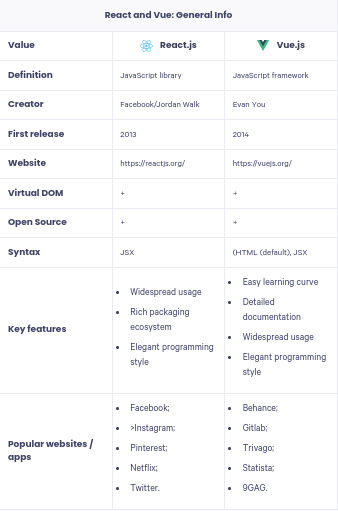
The Ultimate Battle: Vue.js vs React
Vue.js and React are two of the most popular JavaScript frameworks that have taken the web development community by storm in recent years. These JavaScript frameworks help developers build complex apps with ease and flexibility, resulting in some of the best user experiences on the web.
However, there are also quite a few differences between them, which makes it difficult to choose one over another. In this comparison, we’ll look at these two frameworks’ features, including their pros and cons, to see which one you should use when building your next app or website.
Why React and Vue? Tools overview
React and Vue are popular JavaScript frameworks for creating user interfaces, however, they have differing design philosophies.
Though less popular than React, this difference makes it easier for designers who may not be as experienced with JS or HTML/CSS to create UIs without having to worry about updating an entire page on each change — making it faster to create reusable components and move around UI elements in a complex app environment.
Similarities Between React js And Vue
Although both frameworks are very different, there are some similarities between them.
Both React and Vue have Virtual DOM that updates the user interface in response to changes in the application data. However, React uses a diffing algorithm to update only the necessary elements, while Vue’s reactivity system re-renders all of its components when an observed value changes.
This means that React is typically faster than Vue when it comes to updating the UI with new data, but it requires more work on the developer’s part to keep track of dependencies between components so as not to accidentally cause unnecessary renders.
Differences Between Reactjs and VueJs
ReactJS and VueJs are two very popular JavaScript frameworks for front-end development. But what’s the difference? Let’s compare them: 1) React is simpler and more popular, but it requires you to use a build system like Webpack or Jest to make full use of it
2) React uses JSX, which allows you to write HTML in your JavaScript code
3) VueJs is more powerful out-of-the-box because it doesn’t require a build system and it has a lot of features that come prebuilt in its core library, such as routing and internationalization (I18N) support. The downside to VueJs is that if you want to customize anything then you’ll need some experience with TypeScript
4) React focuses on being a view layer while Vue concentrates on providing an entire platform that helps developers create interactive UIs
5) One of the biggest differences between React and Vue is how they deal with data binding — when we say data binding, we mean how well they allow developers to tie together their code so different components can interact with each other seamlessly
6) In React, data flows from parent component to child component; whereas in Vue, this process can happen either way
The most popular applications created with React and Vue
There are a lot of different factors that go into choosing a framework, which is why it’s important to compare the two frameworks based on your specific needs and requirements.
VueJS (pronounced view) is often called the progressive framework because it scales from small simple components to large complex single page applications with ease and simplicity.
Built with component-based architecture, interactive features without jQuery, data binding, routing and transitions built in by default, Vue offers flexibility and power for building any application you can imagine.
React is a library for creating user interfaces for web apps or websites using JavaScript and has become popular with developers because of its many benefits when compared to other frameworks like Angular or Ember.
The way it renders the DOM is faster than Angular and uses less memory than both React’s JSSEL engine and Web Components, which means there will be less time spent waiting for things to load.
React also provides a simpler API where changes happen only at one level deep, so updates will be easier as well as allowing you to think about every change as smaller, manageable steps rather than trying to keep track of everything at once.
Vue supports both JSX and virtual DOM rendering while React relies solely on JSX rendering, but both have their pros and cons. The decision ultimately comes down to what works best for you!
Advantages and Disadvantage of ReactJS
ReactJS has a lot of advantages, especially in the field of user interfaces. It’s easy to use and well documented on sites like Stack Overflow, which will help you find answers to your questions quickly and easily. If you know HTML5 and CSS3, then you’ll have an easier time learning React.
You can use JSX syntax with it, which makes it very easy to create complex layouts without having to write a lot of code. It also works well with other libraries like jQuery and Bootstrap because they are both compatible with ES6 (and many are ported to ES6).
While there are many benefits from using ReactJS, there are some disadvantages as well. One thing that is not so great about it is that all the state for your components must be stored in this one object.
There are times when two components need to share data, but unfortunately you cannot pass data from one component to another with ReactJS unless you put that data inside of this object. There are also limitations when it comes to server-side rendering.
One last disadvantage is how difficult it is sometimes to add 3rd party libraries into a project because of how complicated dependencies can get, which might make development slower than what you want it to be if adding more third party packages.
Advantages and Disadvantage of Vue Js
Vue is a user-friendly, easy to learn and fast in performance which makes it perfect for projects of any size and scope. One of the best things about Vue is how well it integrates with other libraries or frameworks, such as jQuery, Angular and Bootstrap.
It is also lightweight, which means that you can use it in a mobile application or on a single page without the need to load large amounts of data into the browser at once.
Finally, one of the biggest advantages is that if you ever decide to switch from Vue to another framework such as React, all your code will still be valid and usable without having to rewrite everything from scratch! Flaws (3+ sentences): Despite being fast and lightweight, Vue does not provide an out-of-the box solution for routing.
In order to take advantage of this functionality, developers must implement their own solution using JavaScript or one of the many plugins available online.
Some might argue that it’s better to wait until we have something more stable than rewriting something every few months when new versions come out because there are few bugs left after all these updates.
However, even though they are there occasionally, bug fixes are usually delivered quickly by the team at Vue so they don’t usually cause too much trouble!
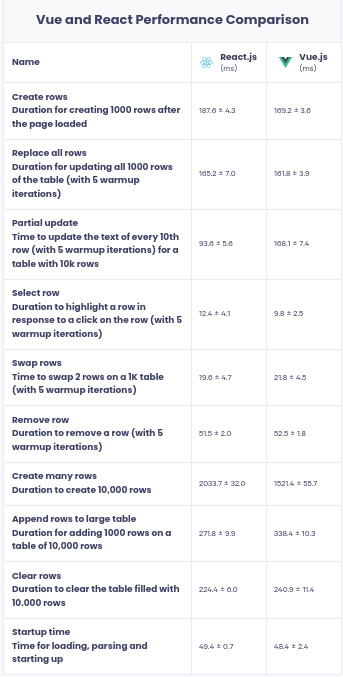
Vue vs React performance
A common misconception is that Vue performs better than React because it doesn’t require a virtual DOM, but this isn’t true. In tests with one thousand items, the difference in performance was a mere 3%.
That said, if you’re using a framework like Angular then you’ll want to go with React since it’s more compatible. If you’re using jQuery or another lightweight library on the other hand, then your decision will depend on your personal preferences.
The two frameworks have different philosophies when it comes to modularity and code reusability, so choose based on what would be most beneficial for your project.
When to choose React or Vue?
React is best for complex data and large projects, while Vue is a better choice for smaller projects that require more flexibility with data binding and templating.
We recommend using React if you have a lot of data to display, but are not sure what the end result will be like; it’s easier to make adjustments in React than in Vue because of the way that templates work.
We recommend using Vue if you want an easy-to-learn framework with less configuration needed to get started, or if you are doing something simple where a single file can contain the whole app.
You should also use Vue if you’re creating a lightweight product within your company, as it doesn’t come with all the overhead of other frameworks.

React uses one-way data flow and views are created by composing elements together with JSX (a JavaScript syntax extension), which makes it seem more complicated at first glance — especially when working on bigger projects.
However, this complexity pays off once developers start working on larger applications; since everything happens in one place, they don’t have to spend time searching through components elsewhere when they need to edit them.
Conclusion
Ultimately, there is no best framework for everyone. You need to weigh the pros and cons of each to decide which is best for you and your project’s needs.
The choice between Vue and React largely depends on what your app does, how much complexity it has, who the audience is, etc. It’s a tough decision that can’t be made in isolation from other factors so take time to research both sides before making a final decision.
Frequently Asked Questions
Is React a framework or library? React is a JavaScript library for building user interfaces, developed by Facebook and open sourced in 2013.
React handles the view layer of your application, leaving you free to concentrate on the rest of your app without worrying about browser compatibility or DOM manipulation.
Why is React better than Vue? React is a more mature library and has a larger community of developers than Vue, which means you’ll find more tutorials, example code and answers to your questions on the internet.
As a result, there are more high-quality components available for React with good documentation.
Why is React better than Vue for bigger web apps? React is the better framework for creating bigger web apps than Vue, because it’s a more mature and well-established framework.
In addition to its age, React has a much steeper learning curve than Vue, which can be daunting for beginners who are just starting out with JavaScript frameworks.
This is in part because React does not use HTML templates like many other JS frameworks do, so developers need to understand more about how the DOM works.
How is Vue different than React? Vue.js takes a more approachable and easy-to-learn approach to building user interfaces. It has a simple two-way binding system, which automatically updates the view whenever the underlying data changes, and vice versa.
With one-way data flow (unidirectional), you can easily understand how data is flowing through your application without having to trace it manually; this makes debugging easier as well!
Which has more industry support React vs Vue? One of the important factors to consider when selecting a framework is the level of industry support it has. It is important to be aware of the community and what they have to say about a framework that you are considering using in your project.
In the case of React and Vue, both frameworks have an established following within their respective communities and are used by millions of people around the world with success.
Originally Source: Vue.js vs React
1 note
·
View note
Text
Apple IPhone 6s Plus 32 Go Gris Sidéral
Apple IPhone 6s Plus 32 Go Gris Sidéral
Vous avez choisi avec d’autres aspects, des usages particuliers ? ] Galaxy Notice 9 partagerait ainsi boy exclusivité avec le Galaxy S9 et d’autres appareils du fabricant. IPhone 6 Plus 64Go Or Reconditionné , votre iPhone vit en harmonie totale avec votre Mac pc et vos autres appareils iOS. Streamer votre musique sans fil depuis vos appareils mobiles smart. Les programs mobiles que l’on vient d’évoquer permettent aussi de transférer votre musique de votre ancien smartphone vers le nouveau. Dans l’e-mail, vous trouverez un lien vers le tableau de bord d’Installation, qui vous guidera dans le processus d’installation. Ce jour-là, veille de vacances scolaires, à 13h10, les gendarmes entrent dans l’école de Zittersheim pour interpeller Paul Jacquin, l’instituteur, devant la classe et alors qu’aucune plainte n’a encore été déposéelectronic contre lui. 5 Points à Vérifier Avant D’acheter Un IPhone D’occasion Ou Reconditionné l’iPhone n’a pas de bouton d’accueil physique, ce signifie qu’il supportera l’identification du visage qui. Pour ma component samsung ne doit pas éternellement se cacher derrière les dalles qu’il produit. Il est vendu dans une boite avec des accessoires neufs, un guidebook de démarrage et bénéficie d'une garantie d'un an valable chez ELECTRO DEPOT (et pas en Apple Shop).
Au procès au tribunal de Champ-fleuri, le 9 octobre 2017, soit 4 tard in addition ans, son avocat démontre sobre décortiquant ses déclarations que, si celle-ci a peut-être été témoin d’un acte sexuel, elle a pas été una victime n’en. Il permet notamment d’afficher simultanément plus d’icônes sur la web page d’accueil (jusqu’à 24 au lieu de 20 précédemment). C’est l’un des problèmes les plus recensés sur l’iPhone 7. Il existe plusieurs fils de dialogue sur le discussion board d’Apple. Manu, rugbyman dans le sud-ouest de la France, divorcé d’une femme dont il a eu deux fils. A moins que vous ayez désactivé les providers de localisation ou les localisations fréquentes, votre télételephone est probablement en teach d'enregistrer votre localisation dans l'appareil lui-même. L’application Cellular d’espionnage highster permettra d’enregistrer toutes les activités du télételephone cellulaire, vous analysez et transférez-le sur un compte sécurisé sur le internet pour vous permet de visualiser à tout time.
Cell phone. Spécialiste dans l’achat et la vente de mobil residences neufs et de mobil house s d’occasion. À l’aide de logiciels semi-automatisés, ils procèdent à des testing approfondis sur les iPhone 7 reconditionnés, avant leur mise en vente. IPhone Garage Entrance Opener (Kept up to date!): UPDATED! Vous êtes à la recherche d'un iPhone d'occasion ou remis à neuf ? Un Iphone X , Xr , Xs Max reconditionné un autre Iphone reconditionné ou? Retrouvés notamment dans les milliers de « cell phone merchants » qui pullulent dans les grandes villes, ces mobiles présentent le meilleur rapport qualité-prix et permettent de s'acheter un nouveau télécell phone en bon état à peu de frais. 2016 Sobre effet, un télémobile indiqué “neuf” mais à un prix frôlant l'occasion, c'est alléchant. Lui, c'est un style en verre et en acier qui sublime un écran Super Retina HD 5.8 pouces avec HDR et affichage True Tone pour une immersion incroyable à chaque prise en key.
Pour certains, le 5,5 pouces est décidément trop grand, le choix est évident, ce sera le 4,7 pouces, ou même un petit plus modèle. Une garantie plus ou moins longue est alors établie par le revendeur. Cet utilizeé de l’école Certificate of Key Schooling est accusé par une jeune fille de l’avoir attiréelectronic dans un bungalow et de l’y avoir violéelectronic. Agés de 37 et 41 ans, ils sont accusés de viol dans la nuit du 16 au 17 par une étudiante contrôléelectronic sur la voie publique. Paiement plusieurs fois par Carte Bancaire en ! A Carvin , une femme de 36 ans dépose plainte contre boy ex, l’accusant de l’avoir violéelectronic pendant qu’un complice faisait le guet. Avec child épouse Michelle, il est placé en garde vue suite à une plainte pour viol de sa belle-soeur à. Le remboursement est ensuite effectué sous 16 semaines, sur vos factures suivantes.
Les Smartphones sont fournis sous emballage avec tous les accessoires d'origine comme le chargeur, le package piètons, le câble USB, la see utilisateur. Utiliser son compact à l'étranger peut coûter cher. Mais la diffamation continue on : il demande au rectorat d’affirmer officiellement boy innocence, ce que celui-ci refuse. En 1999, au fond de la dépression, il accepte une mutation dans le Tarn. Sobre 2013, elle obtient une petite notoriété médiatique en participant à l’éobjective L’amour est dans le pré. Le reconditionnement est une answer astucieuse pour profiter des dernières technology de l'iPhone 6 sans dilapider toutes ses économies. Renewd est la marque de qualité des produits reconditionnés. Una fonctionnalité de chronomètre est un moyen commode pour enregistrer la duréelectronic des événements et précise à un dixième de seconde. Le suivi de mouvement est ici plutôt loupé, particulièrement experience à Snapchat ou Instagram qui font bien mieux que cela. C’est usual : ça l’est. C’est historiquement sur la plate-forme d’enchères que les ventes d’iPhone entre particuliers ont décollé. IPhone 6s Plus Reconditionné n’ai aucune garantie quant à la disponibilité d’iPhone 7 ! Offre limitéelectronic et soumise à des situations de disponibilité. Release Jailbreak : iOS 6 - 8,4. L’appareil iOS cible doit être jailbreaké.
1 note
·
View note
Text
vue 3.x components for bootstrap 5.x pagination and modals
The software ecosystem for vue 3.x is still evolving. I could not find any off-the-shelf components for pagination and modals, so I scratched up my own.
For the quick learners, you can visit the logic on github; code is distributed under the MIT license. In the coming days/weeks, I will try to set up parent views that exploit these components and illustrate their use, so please revisit the repo as needs be. For now, you're sledding downhill on your on.
Evan You from MIT is generally credited with authoring vueJS, a javascript framework for frontend development, while bootstrap -- a styling library -- grew out of efforts at Twitter, I believe. Both are fairly well-documented. Bootstrap probably enjoys wider adoption, but vueJS is holding its own in the modern frontend dev efforts.
Pagination
It's truly remarkable what vueJS in combination with bootstrap can accomplish on the web page. Here is what my component looks like for pagination:
<template>
<nav v-if="pagenav.numPages > 0" aria-label="Navigate through unvetted results">
<ul class="pagination justify-content-start">
<li class="page-item">
<a class="page-link" @click="previousPage" href="#">Previous</a>
</li>
<li v-for="pp in pagenav.numPages" :key="pp" class="page-item">
<a class="page-link" @click="navigateToPage(pp)" href="#"
:ref="setAnchor" v-bind:class="{ 'isSelected': isSelected(pp) }">{{ pp }}</a>
</li>
<li class="page-item">
<a class="page-link" @click="nextPage" href="#">Next</a>
</li>
</ul>
</nav>
</template>
<script>
import { computed, onBeforeUpdate, onUpdated } from 'vue';
export default {
name: "Pagination",
props: {
modelValue: {
type: Object,
default: () => {}
}
},
emits: ['update:modelValue'],
setup(props, { emit }) {
const pagenav = computed({
get: () => props.modelValue,
set: (value) => emit('update:modelValue', value),
});
let anchors = []
const setAnchor = el => {
if (el) {
anchors.push(el)
}
}
onBeforeUpdate(() => {
anchors = []
})
onUpdated(() => {
// Empty for now
})
const focusPageAnchor = () => {
anchors[pagenav.value.page].focus();
}
const isSelected = (pp) => {
return pagenav.value.page == (pp - 1);
};
return { pagenav, setAnchor, focusPageAnchor, isSelected };
},
methods: {
previousPage() {
this.pagenav.page = Math.max(0, this.pagenav.page - 1);
this.focusPageAnchor();
},
navigateToPage(pp) {
this.pagenav.page = pp - 1;
this.focusPageAnchor();
},
nextPage() {
this.pagenav.page = Math.min(this.pagenav.numPages - 1, this.pagenav.page + 1);
this.focusPageAnchor();
}
},
};
</script>
<style>
/* XXX color here is same as background color used by bootstrap for focused page-links */
a.isSelected {
background-color: rgb(234, 236, 239);
}
</style>
For 85 lines of markup and logic, this component does wonders. I will just highlight some of the hidden magic here:
* pagenav is a reactive variable injected into the Pagination component but declared, read, and written within the parent component. What that means is that the parent can function as a content manager, while the mechanics of pagination is deferred to the child component. The Pagination component can adjust the current page -- which in turn is picked up by the parent, which adjusts displayed content accordingly. In this light, pagination is a nice, compact example of modern, reactive programming.
* Use v-bind:class for conditional classes. The function isSelected highlights the currently selected page number, and it does so through selectively turning off/on the isSelected class. Got that? Conditional classes have been out there a long time, but here it's done in a fairly terse, reactive way.
PageModal
For purposes of rendering modal dialogs, I leverage bootstrap 5.x modals. My thinking was that I should not have to create new divs every time the UX/UI require a new popup dialog. So instead, I scratched up a component which abstracts away the mechanics of the modal, while leaving the parent view to dictate the profile of each modal. Some of the programming for PageModal is quite similar to the Pagination component.
Here's the logic:
<template>
<div>
<svg xmlns="http://www.w3.org/2000/svg" style="display: none;">
<symbol id="check-circle-fill" fill="currentColor" viewBox="0 0 16 16">
<path d="M16 8A8 8 0 1 1 0 8a8 8 0 0 1 16 0zm-3.97-3.03a.75.75 0 0 0-1.08.022L7.477 9.417 5.384 7.323a.75.75 0 0 0-1.06 1.06L6.97 11.03a.75.75 0 0 0 1.079-.02l3.992-4.99a.75.75 0 0 0-.01-1.05z"/>
</symbol>
<symbol id="info-fill" fill="currentColor" viewBox="0 0 16 16">
<path d="M8 16A8 8 0 1 0 8 0a8 8 0 0 0 0 16zm.93-9.412-1 4.705c-.07.34.029.533.304.533.194 0 .487-.07.686-.246l-.088.416c-.287.346-.92.598-1.465.598-.703 0-1.002-.422-.808-1.319l.738-3.468c.064-.293.006-.399-.287-.47l-.451-.081.082-.381 2.29-.287zM8 5.5a1 1 0 1 1 0-2 1 1 0 0 1 0 2z"/>
</symbol>
<symbol id="exclamation-triangle-fill" fill="currentColor" viewBox="0 0 16 16">
<path d="M8.982 1.566a1.13 1.13 0 0 0-1.96 0L.165 13.233c-.457.778.091 1.767.98 1.767h13.713c.889 0 1.438-.99.98-1.767L8.982 1.566zM8 5c.535 0 .954.462.9.995l-.35 3.507a.552.552 0 0 1-1.1 0L7.1 5.995A.905.905 0 0 1 8 5zm.002 6a1 1 0 1 1 0 2 1 1 0 0 1 0-2z"/>
</symbol>
</svg>
<div ref="activeModalRef" class="modal" tabindex="-1">
<div class="modal-dialog modal-dialog-centered">
<div class="modal-content">
<div class="modal-header alert d-flex align-items-center"
v-bind:class="{ 'alert-primary': isPrimary(), 'alert-warning': isWarning(), 'alert-info': isInfo() }" role="alert">
<svg v-if="activeModal.iconName == 'check-circle-fill'" class="bi flex-shrink-0 me-2" width="24" height="24" role="img" aria-label="Success:"><use xlink:href="#check-circle-fill"/></svg>
<svg v-if="activeModal.iconName == 'info-fill'" class="bi flex-shrink-0 me-2" width="24" height="24" role="img" aria-label="Information:"><use xlink:href="#info-fill"/></svg>
<svg v-if="activeModal.iconName == 'exclamation-triangle-fill'" class="bi flex-shrink-0 me-2" width="24" height="24" role="img" aria-label="Warning:"><use xlink:href="#exclamation-triangle-fill"/></svg>
<h5 class="modal-title">{{ activeModal.title }}</h5>
<button type="button" class="btn-close" data-bs-dismiss="modal" aria-label="Close"></button>
</div>
<div class="modal-body">
<p class="text-start">{{ activeModal.bodyMsg }}</p>
</div>
<div class="modal-footer">
<button v-if="activeModal.hasCancelBtn" type="button" class="btn btn-secondary" data-bs-dismiss="modal">Cancel</button>
<button @click="activeModal.okBtnCallback" type="button" class="btn btn-primary" data-bs-dismiss="modal">OK</button>
</div>
</div>
</div>
</div>
</div>
</template>
<script>
import { computed, onMounted, ref } from 'vue';
export default {
name: 'PageModal',
props: {
modelValue: {
type: Object,
default: () => {}
}
},
emits: ['update:modelValue'],
setup(props, { emit }) {
const activeModalRef = ref(null);
const activeModal = computed({
get: () => props.modelValue,
set: (value) => emit('update:modelValue', value)
});
onMounted(() => {
activeModal.value.ref = activeModalRef.value;
});
const isPrimary = () => {
return activeModal.value.iconName == 'check-circle-fill';
};
const isWarning = () => {
return activeModal.value.iconName == 'exclamation-triangle-fill';
};
const isInfo = () => {
return activeModal.value.iconName == 'info-fill';
};
return { activeModal, activeModalRef, isPrimary, isWarning, isInfo };
},
};
</script>
There likely are better approaches to this logic than what you see here. Here are some highlights:
* activeModal is a reactive variable similar to pagenav in the Pagination component. You can think of activeModal as determining the profile of some modal dialog -- the wording, any header icons, etc. The parent view sets activeModal, and when it raises the modal dialog, the latter is configured properly.
* activeModalRef is a reference to the HTML element -- a div here -- that encompasses the modal dialog. We need to convey that reference to the parent view so it can raise the modal as needs be.
* The svg element is an image sprite that, along with much of the vanilla modal mark-up, I simply copied from bootstrap's online documentation. By setting up an inline sprite, we can then specify self-referential icons in the modal headers.
Summary
That's all for now! When I have the time, I will scratch up examples of how parent views use these components.
Novemeber 17, 2021
0 notes
Text
Vue Slot Props
Learn how to master slots and scoped slots, to build flexible and reusable vue.js components.
Here we are using slot-key instead of slot, because in Vue, slot is a reserved prop name. # Default Slot Content By default, the slot-free part of a Markdown file becomes the default content of a Markdown slot. I found a way to get access tot the scoped slot props outside of the slot but it’s a hack. Make a component to just receive a prop( the scoped slot provided prop). And do with it whatever you want. But there has to be a better way. V-slot 指令自 Vue 2.6.0 起被引入,提供更好的支持 slot 和 slot-scope attribute 的 API 替代方案。v-slot 完整的由来参见这份 RFC。在接下来所有的 2.x 版本中 slot 和 slot-scope attribute 仍会被支持,但已经被官方废弃且不会出现在 Vue 3 中。 带有 slot attribute 的具名插槽. 在Vue中,slot是很实用的api,父组件可以很容易通过插槽向子组件插入内容,插槽还分为单个插槽,多个插槽和作用域插槽。 在React中,能不能实现和插槽一样的功能呢?当然有了,我们分别来看. Slot Content Vue Native just like Vue implements a content distribution API that’s modeled after the current Web Components spec draft, using the element to serve as distribution outlets for content. In order to allow a parent component to pass elements into a child component, provide a element inside the child component.
Follow the course to get an email notification when a new lesson is published.
7 of 10 lessons
30 min
Advanced
About the course
In this course, you'll learn how to use slots and scoped slots to create flexible and reusable Vue.js components.
Slots allow us to pass components and HTML to components, giving us greater control of the appearance than what we get with props.
Slots do not replace props. The two features have different purposes.
During the course, you'll learn:
Vue Component Slot
When and how to use slots
What scoped slots are
How to work with dynamic named components
How to compose components with reusable component patterns
Slots
3:48
3:55

3:46
Scoped Slots
4:19
5:41
5:38
3:38
Using Scoped Slots with Functions
Coming Soon
Composing Components
Coming Soon
Vue Slot Event
Dynamic Named Slots
Coming Soon
What you will learn
Vue Slot Props Computed
What are slots and scoped Slots
What are the benefits of using slots
How to compose components with slots
Share this course
Who's behind the course
Aleksej Dix - Teacher
Aleksej is an eager front-end developer who loves to share his knowledge through teaching, public speaking, and organizing meetups and conferences in Switzerland.
Rolf Haug
Vue Scope Slot

Vue Named Slot
- Contributor / Reviewer
Rolf has been in development industry for 16 years. Long-time entrepreneur and consultant currently working on educational content and workshops.
Alex Kyriakidis
Vue Slot-scope Props Not Defined
- Contributor / Reviewer
Alex is an educator and consultant, core member of the Vue.js team and author of the first best-selling books on Vue.js.
0 notes
Text
Props in Vuejs Components - Use props for parent child communication - Vuejs tutorials - Tutorial 25 - VueJs
Props in Vuejs Components – Use props for parent child communication – Vuejs tutorials – Tutorial 25 – VueJs
Props in Vuejs Components – Use props for parent child communication – Vuejs tutorials – Tutorial 25 – VueJs
[ad_1]
[DISCOUNTED] Master CSS Grid Course: https://bit.ly/2NONxxE
Props in Vuejs Components – Props are really useful when we want to communicate with vuejs child component. We can pass data from parent to child component as prop. Because we may want to pass multiple data rather than…
View On WordPress
#child component#component props#parent child communication#parent component#passing props#passing props vuejs#props#props component#props in nested components#props in vue js#props in vuejs#props vue js#props vuejs#Use props for parent child communication#using props#using props in component#using props in components#using props in vuejs#vue js props#vuejs props
1 note
·
View note
Text
How to pass value to child component in Vue.js
How to pass value to child component in Vue.js
Hello buddy, in this blog we will see how we can pass value to the child component in vue.js and we will also learn the use of props. Sharing data across components is one of the core functionalities of VueJS. It allows you to design a more modular project, control data scopes, and create a natural flow of data across your app. Think you are using the Vue tab component where you have put 5oo…

View On WordPress
#pass data to component vue#vue dynamic component#vue emit#vue get data from child component#vue pass data between sibling components#vue pass data from one component to another#vue pass data from parent to child#vue pass data to component onclick
0 notes
Text
Teleport In Vue 3 With Example
Creating the web pages using components is a good idea. So that we can re-use the logic and structure of the design. We have to make a component hierarchy or tree to make the UI better. In Vue.js we are using template string or render function to build the HTML DOM in the components. The Vue compiler will compile it and make the div elements for us
However, sometimes logically, we need one component which could be a child to its parent component, But the component HTML div should not be nest to its parent. Meanwhile we need to place it somewhere else in the DOM Read More
0 notes
Text
Getting started with C# and Blazor
In this new post, I want to summarize what I understood for getting started with C# and Blazor, the new technology from Microsoft. I briefly spoke about Blazor in some other posts but here I want to introduce it properly.
We live in exciting times, as .NET developer’s life has never been better. We can create apps for any operating system be it Windows, Linux, iOS, Android or macOS. Of course, we can also build amazing web-based applications with ASP.NET. MVC, Razor Pages, and WebAPI have allowed us to create robust scalable and reliable systems for years, but there has long been a missing piece to the puzzle.
One thing all of ASP.NETs web solutions have in common is that they are server based. We’ve never been able to leverage the power of C# and .NET to write client-side applications, this has always been the domain of JavaScript.
So, I’m going to introduce you to a revolutionary client-side framework: Blazor. Built on web standards, Blazor allows us to write rich, engaging user interfaces using C# and .NET. We’ll explore how Blazor can make your development process more efficient and raise your productivity levels, especially if you’re using .NET on the server as well. We’ll cover hosting models, an important concept to understand when starting out with Blazor. We’ll look at both production supported models and the benefits and tradeoffs of each. Next, we’ll introduction components and the benefits of using them to build UIs. Finally, we’ll discuss the reasons why you should consider Blazor for your next project.
Table of contents
Why choose Blazor for new applications?
Pros
Components, a better way to build UI.
What is a component?
The benefits of a component-based UI
Components
Anatomy of a Blazor component
Understanding the code
Blazor, a platform for building modern UI with C#
No installation required
Mobile applications
Understanding hosting models
Blazor Electron
Code example
Mobile Blazor Bindings
Blazor WebAssembly
Process begin
DOM manipulation
blazor.boot.json
dotnet.wasm
Calculating UI Updates
Process explained
Benefits
Tradeoffs
Blazor WebAssembly summarize
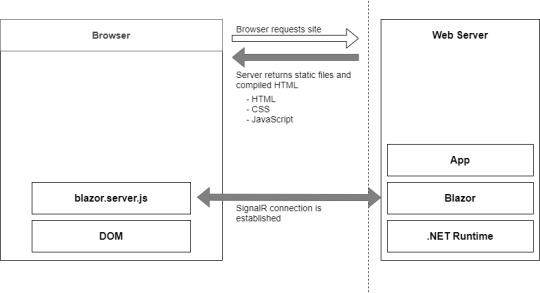
Blazor Server
Process begins
Process static files
Calculating UI updates
Process explained
SignalR
DOM
Performance
The test
Testing
Benefits
Tradeoffs
Blazor Server summarize
Why choose Blazor for new applications?
Arguably, the hardest part of starting a new project in recent times has been choosing the tech stack, there is just so much choice available. This is especially true in the front-end world. Pick a framework (Angular, React, Vue), pick a language (TypeScript, CoffeeScript, Dart), pick a build tool (Webpack, Parcel, Browserify). If a team is new to this eco-system, it can seem an almost impossible task to try and work out which combination of technologies will help make the project a success; it’s even hard for teams with experience!
So, first in this getting started with C# and Blazor, let’s cover some of the top reasons for choosing Blazor for your next project and how it can help avoid some of the issues I’ve just mentioned.
Pros
C#, a modern and feature rich language – It’s powerful, easy to learn, and versatile
Great tooling – The .NET community has been fortunate to have some amazing tooling. Visual Studio is an extremely powerful, feature rich and extensible IDE. It’s also 100% free for individuals or non-enterprise teams of 5 or less. If you prefer something more lightweight, then there is Visual Studio Code – one of the most popular code editors today. Both Visual Studio and VS Code are both cross platform:
Visual Studio for Windows and Mac
Visual Studio Code for Windows, Mac and Linux.
.NET Ecosystem – While many new frameworks need to wait for an ecosystem to build up around them, Blazor can tap into the existing .NET ecosystem. Blazor applications target .NET Standard 2.1 and can in theory use any .NET Standard NuGet package.
Unopinionated – There are no preferred patterns or practices for Blazor development, you can write applications using the ones you’re familiar and comfortable with.
Shallow learning curve – If you’re an existing .NET developer then the learning curve for Blazor is quite shallow. Razor, C#, dependency injection, project structure will all look familiar to you. This means you can focus on writing features quicker, rather than learning the framework.
Code sharing – If you’re using C# on the server then Blazor makes an excellent paring. One of the most frustrating problems with different client and server languages is the inability to reuse code. With Blazor, everything is C#. Any shared code can be placed in a common .NET Standard class library and shared easily between server and client.
Open source – As with many projects at Microsoft, Blazor is fully open source and the code is freely available on GitHub for you to browse, download, or fork your own copy.
Components, a better way to build UI.
Blazor, as with many modern front-end frameworks, uses the concept of components to build the UI. Everything is a component, pages, parts of a page, layouts, they’re all components. There are various types of component in Blazor as well as multiple ways to write them all of which will be explored in future chapters. But learning to think in terms of components is essential for writing Blazor applications.
What is a component?
You can think of a component as a building block. You put these building blocks together to form your application. These building blocks can be as big or as small as you decide, however, building an entire UI as a single component wouldn’t be a good idea. Components really show their benefit when you think of them as a way to divide up logical areas of a UI. Let’s look at an example of a user interface structured as components.

Example of a layout divided into components
Each area of the interface is a component and each one has a certain responsibility. You may also notice that there is a hierarchy forming. The layout component sits at the top of the tree, the menu, header, home page and footer are all child components of the layout component. These child components could, and probably would have child components of their own. For example, the header component could contain a logo component and a search component.

Example of nesting components to form a component tree
The benefits of a component-based UI
Many UIs have repeating elements in them, a great advantage to using components is that you can define an element in a component and then reuse the component wherever the element repeats. This can drastically cut down on the amount of repeated code in an application. It also makes the maintainability of the application much better as if the design of that element changes you only need to update it in a single place.
To cater for more advanced scenarios, components can define their own APIs allowing data and events to be passed in and out. Imagine a line of business application, it’s probably safe to assume that within that app there would be lots of places data would be displayed in table format. One approach would be to create each table as its own component, however, this would mean we would end up with a lot of components which displayed data in a table.
A better approach would be to define a single component which took in a dataset as a parameter and then displayed it in a table. Now we have a single component for displaying data in a table that we can reuse all over the application. We could also add features to this component, things such as sorting or paging. As we do, this functionality is automatically available to all the tables in the application as they are all reusing the same component.
Components
Components help speed up the development process. Due to the reusable nature of components, using them often leads to shorter development times. They can be composed together.
While usually self-contained, it’s also possible to have components work together to create more complex UI. For example, let’s take the data table scenario we just talked about, that could be a single component but that could potentially be quite large.
Another approach would be to divide it up into several smaller components, each performing a certain job. We could have a table header component, a table body component even a table cell component. Each of these components are performing a specific job but they are still part of the overall table component.
Anatomy of a Blazor component
Now, in this post getting started with C# and Blazor, we have a better idea of what components are in a general sense, let’s look at an example of a component in Blazor. For this we’re going to grab a component from the Blazor project template.
In figure 1.3 we can see an example of a component from Blazors standard project template, Counter.razor.

The sections of a component in Blazor
This particular component is known as a routable component, as it has a page directive declared at the top. Routable components are essentially a page in the application. When the user navigates to the /counter route in the application, this component will be loaded by Blazor router. It displays a simple counter with a button and when the user clicks on the button the count is incremented by one and the new value displayed to the user.
Understanding the code
While understanding the code isn’t important at this point, we can understand the structure of the component. Figure 1.3 is divided up into three sections each has a certain responsibility.
Section 1 is used to define directives, add using statements, inject dependencies, or other general configuration which applies to the whole component.
Section 2 defines the markup of the component; this is written using the Razor language, a mix of C# and HTML. Here we define the visual elements which make up the component.
Section 3 is the code block. This is used to define the logic of the component. It is possible to write any valid C# code into this section. You can define fields, properties, even entire classes if you wish.
Blazor, a platform for building modern UI with C#
Blazor is a fully featured framework for building modern client-side applications using the power of C# and .NET. Allowing developers to build engaging applications which work across nearly any platform – including web, mobile and desktop.
Blazor is an alternative to JavaScript frameworks and libraries such as Angular, Vue and React. If you’ve had experience working with any of these then you’ll probably start spotting familiar concepts. The most notable influence is the idea of building UIs with components, a concept all these technologies share and something we’ll explore in more detail later in this chapter.
No installation required
Because Blazor is built on top of web standards; it doesn’t require the end user to have .NET installed on their machines or any kind of browser plugin or extension. In fact, with Blazor WebAssembly applications we don’t even need .NET running on the server, this flavor of Blazor can be hosted as simple static files.
Being built on .NET means we have access to the vibrant ecosystem of packages available on NuGet. We also have best in class tooling with Visual Studio and Visual Studio Code, and of course, with .NET being cross platform, we can develop our Blazor applications on whatever our preferred platform is, be that Windows, Mac or Linux.
Mobile applications
Therefore, I want to highlight that Blazors programming model can also be used to build cross-platform native mobile applications via an experimental project called Mobile Blazor Bindings. This is a collaboration between the ASP.NET Core team and the Xamarin team to investigate the potential and demand for using Blazor to build non-web UIs. Microsoft has also announced the future evolution of Xamarin Forms, the Multi-platform App UI framework known as .NET MAUI. This framework will allow developers to build native apps which run on Windows, macOS, iOS and Android. According to the roadmap, Blazors programming model will be offered as an option for building these new .NET MAUI apps. This really makes Blazor a compelling technology to learn as once understood, could allow developers to build UIs for almost any platform or device.
Hopefully, you can already see Blazor is an exciting technology with a lot of potential. But there is a key concept which is important to understand before we go any further, that of hosting models. Let’s tackle that next.
Understanding hosting models
When first getting started with Blazor you will immediately come across the concept of hosting models. Essentially, hosting models are where a Blazor application is run. Currently, Blazor has two production supported hosting models called Blazor WebAssembly and Blazor Server. Regardless of which of these models you choose for your application, the component model is the same meaning components are written the same way and can be interchanged between either hosting model.

Blazor has a separation between hosting models and its app/component model. Meaning components written for one hosting model can be used with another.
The above image shows an abstract representation of Blazors architecture, with the separation between the app and component model and the various hosting models. One of the interesting aspects of Blazor is the potential of other hosting models being made available over time to allow Blazor to run in more places and be used to create more types of UI.
Outside of the two production hosting models we will cover below, there are also two other experimental models Microsoft have been testing, Blazor Electron and Mobile Blazor Bindings.
Blazor Electron
Blazor Electron is the oldest of the two experiments and allows Blazor components to be hosted in an Electron application (https://www.electronjs.org/). Developers write components for this model using HTML and C# in the exact same way as they would for Blazor WebAssembly or Blazor Server.
Code example
An example of a component which can be used by all three of hosting models is shown in the following code.
<div> <p>Current count: @currentCount</p> <button @onclick="IncrementCount">Click me</button> </div> @code { private int currentCount = 0; private void IncrementCount() { currentCount++; } }
Mobile Blazor Bindings
The newer experiment is Mobile Blazor Bindings. This model allows developers to write native mobile applications using Blazors programming model. However, this hosting model can’t use components written using web technologies, components for this hosting model must be written using native controls. The following code contains the same component as the code abode but rewritten for the Mobile Blazor Bindings hosting model.
<StackLayout> <Label> Current count: @currentCount </Label> <Button OnClick="@IncrementCount">Click me</Button> </StackLayout> @code { private int currentCount = 0; private void IncrementCount() { currentCount++; } }
As you can see the programming model is the same between the two code samples. The logic in the code block is unchanged, it’s just C# after all. The only difference is in the markup where web technologies have been swapped for native mobile controls. This does mean that we can’t swap component around between web-based hosting models and native hosting models. However, once we’ve mastered Blazors programming model we can easily use that knowledge to create other types of UI.
Now we’ve talked a little about hosting models in general we’re going to focus in on the two production supported options available in Blazor today, Blazor WebAssembly and Blazor Server.
Blazor WebAssembly
Blazor WebAssembly is the principal hosting model for Blazor applications. Choosing this option will mean your application will run entirely inside the client’s browser making it a direct alternative to JavaScript SPA (Single Page Application) frameworks. To understand how this hosting model works we’re going to walk through the process of initializing a Blazor WebAssembly application shown in following image.
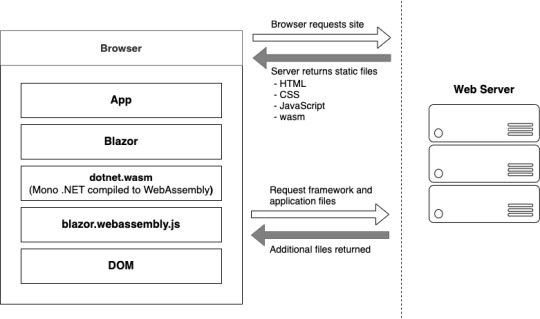
Bootup of a Blazor WebAssembly application showing the interactions between the client’s browser and the web server
Process begin
The process begins when a browser makes a request to the webserver. The web server will return a set of files needed to load the application, these include the host page for the application, usually called index.html, any static assets required by the application such as images, CSS and JavaScript. As well as a special JavaScript file called blazor.webassembly.js.
At this point, you may be wondering why we have a JavaScript file, one of the big selling points of Blazor is the ability to write UI logic using C# instead of JavaScript, right? Yes, that’s true.
But as of right now WebAssembly has a fairly large limitation, it can’t alter the DOM or call Web APIs directly.
DOM manipulation
In order to manage this current limitation, part of the Blazor framework resides in JavaScript called blazor.webassembly.js file. This part of the framework does three main things:
Loads and initializes the Blazor application in the browser.
Provides direct DOM manipulation so Blazor can perform UI updates.
Provides APIs for JavaScript interop scenarios, which we’ll discuss in detail in later chapters.
It’s possible that in the future this file will no longer be required, this will depend on how fast features are added to WebAssembly and adopted by browsers. But for now, it’s an essential part of the framework.
Now, we’ve cleared that up let’s get back to our booting Blazor app. I want to point out that the server returns all static files. They haven’t required any server-side compilation or manipulation. This means that they can be hosted on any service which offers static hosting, there is no requirement for a .NET runtime to be present on the server. For the first time this opens up free hosting options such as GitHub pages to .NET developers (applies to standalone Blazor WebAssembly applications only).
blazor.boot.json
Once the browser has received all the initial files from the web server it can process them and construct the Document Object Model (DOM). Next, blazor.webassembly.js is executed. This performs many actions but in the context of starting a Blazor WebAssembly app it downloads the blazor.boot.json file. This file essentially contains an inventory of all of the framework and application files which are required to run the app.
Most of these files are normal .NET assemblies, there is nothing special about them and they could be run on any compatible .NET runtime. But there’s also another type of file which is downloaded called dotnet.wasm.
dotnet.wasm
The dotnet.wasm file is in fact a complete .NET runtime, the mono .NET runtime to be exact, which has been compiled to WebAssembly.
At this point in time, only the .NET runtime is compiled to WebAssembly, the framework and application are standard .NET assemblies. In the future a feature called AOT (Ahead Of Time) compiling will be introduced which will allow developers to compile parts of their applications into WebAssembly.
The benefit of this will be performance, any code compiled to WebAssembly will be many times more performant than the interpreted approach used today. However, there’s a tradeoff, and that’s size. AOT compiled code will be bigger than the standard assemblies meaning a larger overall download size for the application.
Once the blazor.boot.json file has been downloaded and the files listed in it have been downloaded, it’s time for the application to be run. The WebAssembly .NET runtime is initialized which in turn loads the Blazor framework and finally the application itself. At this point we have a running Blazor application which exists entirely inside the client’s browser. Aside from requesting additional data (if applicable), there’s no further reliance on the server.
Calculating UI Updates
We now understand how a Blazor WebAssembly application boots up. But how do UI updates get calculated? Just as we did for the initialization process, we’re going to follow a scenario to understand how this happens and what Blazor does.
The process of client-side navigation in Blazor WebAssembly from clicking a link to the application of UI updates
For our scenario we have a Blazor WebAssembly application with two pages, home and counter. Neither of these pages have anything on them except a heading saying either “Home” or “Counter”, respectively. The user is on the home page of the application and is going to click on a link to the go to the counter page. We’ll follow the process Blazor goes through to update the UI from that of the home page to the counter page.
Process explained
When the user clicks on the counter link, the navigation event is intercepted by Blazor on the JavaScript side. This event is then passed over to Blazor on the WebAssembly side and is processed by Blazors router component.
The router checks its routing table for any routable components which match the link the user has attempted to navigate to. In our case, it will find a match with the Counter component and a new instance of that component will be created and the relevant lifecycle methods will be executed.
Once complete Blazor will work out the minimum amount of changes that are required to update the DOM to match that of the Counter component. When this is complete, those changes will be passed back down to the Blazor JavaScript runtime and that will in-turn, apply those changes to the physical DOM. At this point the UI will update the user will be on the Counter page.
All of this has happened client-side in the user browser. There was no need for a server during any point in this process. It’s fair to say that in a real world application, you would probably make a call out to a server to some point in this process. This usually happens during the execution of the lifecycle methods of the component being navigated to in order to load some initial data for the component. But this would depend on the individual application.
Benefits
Now we know a bit more about how the Blazor WebAssembly hosting model works, let talk about the benefits and tradeoffs of choosing this model. Let’s start with the benefits.
Applications run on the client. This means that there is much less load on the server, you can offload much of the work to the client. This could lead to significant cost saving on server infrastructure and improve the scalability of an application.
Can work in offline scenarios. As the app runs entirely inside the browser there’s no need for a persistent connection to the server, making applications more tolerant to unstable network connections. It’s also trivial is enable Progressive Web Application (PWA) functionality. In fact, Blazor WebAssembly has this as an option you can select when creating your application.
Deployed as static files. As Blazor WebAssembly apps are just static files, they can be deployed anywhere static hosting is available. This opens up some options which have never been available to .NET developers historically. Services such as GitHub pages, Netlify, Azure Blob Storage, AWS S3 Buckets, Azure Static Web Sites, are all options for hosting standalone Blazor WebAssembly applications.
Code Sharing. Potentially one of the greatest benefits with Blazor WebAssembly is if you’re using C# on the server. You can now use the same C# objects on your client as you use on the server. The days of keeping TypeScript models in sync with their C# equivalent and vice versa, are over.
Tradeoffs
Of course, nothing is a silver bullet so let’s understand some tradeoffs of this model.
Payload. The initial download size for a Blazor WebAssembly app can be considered quite large. The project template weighs in at around 1.8mb when published. This is largely down to the fact Blazor needs to ship an entire .NET runtime to the client which comes in at around 600kb. However, this is a one-time cost as the runtime and many of the framework assemblies are cached on the first load. Meaning subsequent loads can be a small as a few kb.
Load time. A knock-on effect of the payload size can be load time. If the user’s on a poor internet connection the amount of time required to download the initial files will be higher, which will delay the start of the application, leaving the user with a loading message of some kind. This can be offset slightly by using server-side prerendering, however, while this will give the user something more interesting to look at initially, the app still won’t be interactive until all files have been downloaded and initialized. Server-side prerendering for Blazor WebAssembly apps also requires a ASP.NET Core element on the server, which negates any free hosting options.
Restricted runtime. This is arguably not a tradeoff as such, but for existing .NET developers who are used to having a relatively free rein over the machine their apps run on, it’s something to be aware of. WebAssembly applications run in the same browser sandbox as JavaScript applications. This means, for example, that you will not be allowed to reach out to the users’ machine and do things such access the local file system.
Blazor WebAssembly summarize
To summarize, Blazor WebAssembly is the hosting model to choose if you’re looking for a direct replacement for a JavaScript SPA framework such as Angular, React or Vue. While there are a few tradeoffs to consider, there are some substantial benefits to choosing this model.
Blazor Server
Now we’ve seen how Blazor WebAssembly works, let’s turn our attention to the Server hosting model and see how it differs. Blazor Server was the first production supported hosting model for Blazor, being released around 8 months before the WebAssembly version. As we did with the previous model, we’ll walk through initializing a Blazor Server application to help us understand how things work.
Bootup process of a Blazor Server application
Process begins
The process begins with a request to load the site from the browser. When this request hits the webserver two things could happen, the app is started up, or if the app is already running, a new session is established. Why would the app already be running? Blazor WebAssembly follows the traditional SPA model and runs entirely in the browser, essentially making it like a desktop application. Each user has their own instance of the app which runs locally on their machine. Blazor Server is different, only one instance of the application runs on the server, but it can support many clients. Therefore, the app could already be running, and the new request would just establish a new session.
Process static files
The request is then processed by the application and the initial payload is sent back to the browser. This includes static assets such as CSS and JavaScript files, and images. There is also the initial HTML, but this is compiled rather than static HTML we saw in Blazor WebAssembly. The reason for this is that the hosting page for a Blazor Server application is a Razor Page rather than a static HTML page in the WebAssembly model. The advantage of this is it allows Blazor Server applications to use server-side prerendering out of the box. In fact, this feature is enabled by default when you create this type of Blazor application.
Once the initial payload is returned to the browser the files are processed and the DOM is created – then a file called blazor.server.js is executed. The job of this runtime is to establish a SignalR connection back to the Blazor application running on the server. At this point the application is ready for user interaction.
Calculating UI updates
What happens when a user interacts with the application? We saw earlier that in Blazor WebAssembly the events are processed right there in the browser along with calculating any UI updates and applying them to the DOM. But that can’t happen here as the application is running on the server.
We’ll follow the same scenario as we did with Blazor WebAssembly, we have a Blazor Server application with two pages, home and counter. Neither of these pages have anything on them except a heading saying either “Home” or “Counter”, respectively. The user is on the home page of the application and is going to click on a link to the go to the counter page. We’ll follow the process Blazor goes through to update the UI from that of the home page to the counter page.

Process of updating the UI in Blazor Server
Process explained
The user clicks on the link in the menu and the click event is intercepted by Blazor’s runtime on the client. The runtime then processes the event to understand what has happened. In this case there are two things, a mouse click event and a navigation event, due to it being a hyperlink that was clicked. These two events are then bundled up and sent back to the server over the SignalR connection that was established when the application started.
So, the client sent a the message to the server and the server unpacks and process the message. The Blazor framework then calls any application code necessary. In this case it would instantiate an instance of the counter page component and execute the relevant lifecycle methods.
SignalR
Once complete, Blazor will work out what the minimum amount of changes needed to make the current page transform to the counter page and then send these back to the client via the SignalR connection. Just to be clear, Blazor will not send back an entirely new page to the client. It will only send back the minimum number of instructions needed to update the current DOM to match the Counter page. In our case, the only difference is the heading. Blazor will send back a single instruction to change the text in the heading from “Home” to “Counter”.
DOM
Once back on the client, the client unpacks the changes, and the required changes are applied to the physical DOM. From the user’s perspective, they appear to have navigated to a new page in the application, the counter page. But they are still on the same physical page, it just has a different header.
You may have spotted this already, but the overall process isn’t any different to how Blazor WebAssembly worked, it’s just been stretched out a bit over that SignalR connection. Blazor Server is just as much a SPA as Angular, Vue or Blazor WebAssembly. It just happens to run its logic and calculate UI updates on the server instead of the client. In fact, I would go as far as saying if you were presented with two identical applications, one written in Blazor Server and one in Blazor WebAssembly, you wouldn’t be able to tell the difference between them, as a user.
Performance
Before we talk about benefits and tradeoffs for this model, I want quickly mention performance. With all the network chatter which goes on in this hosting model I’m sure it may have crossed your mind that this might not scale particularly well.
The test
In 2019, the ASP.NET Core team did some testing to establish the performance levels of Blazor Server apps. They setup an application in Azure and tested it on different powered virtual machines, checking the number of active users the application could support. Here are the results.
Standard D1 v2 Instance (1vCPU & 3.5GB Memory). Over 5000 concurrent users
Standard D3 v2 Instance (4vCPU & 14GB Memory). Over 20,000 concurrent users
As you can see, Blazor Server is no slouch when it comes to performance. The main factor they found which effects the number of clients that can be supported is memory. This makes sense as the server needs to keep track of all the clients which are connected to it, the more there are the more information needs to be stored in memory.
Testing
The other major finding from testing was how network latency effected the application. As all interaction are sent back to the server for processing, latency can have a large impact on usability.
If the server is located 250ms away from the client, then each interaction is going to take at least 500ms to be processed as it has to travel to the server (250ms), then be processed, then travel back again (250ms).
Testing found that when the latency went above 200ms then the UI began to feel sluggish and less responsive. As a rough rule you would always want your users to be on the same continent as the server. If you want to have a globally available Blazor Server application, then you need to have your app evenly distributed across the world aiming to keep all clients within 200ms of a server.
Benefits
As we did before, let’s look at the benefits and tradeoffs of choosing a Blazor Server application.
Small payload. As the application is running on the server as opposed to the client, the initial download is significantly smaller. Depending on static assets such as CSS and images a Blazor Server application can be as small as a 100-200kb.
Fast load time. With a much smaller payload the application loads much faster. The server-side prerendering also helps as the user never sees a loading message.
Access to the full runtime. The application code is executing on the server on top of the full .NET runtime. This means that you can do things such as access the servers file system if you require without hitting any security restrictions.
Code security. If you have code which is proprietary, and you don’t want people being able to download and interrogate it then Blazor Server is a good choice. The application code is all executed on the server and only the UI updates are sent to the client. This means your code is never exposed to the client in anyway.
Tradeoffs
Heavy server load. Where Blazor WebAssembly allows us to utilize the power of the client Blazor Server does the complete opposite. Almost all of the work is now being performed by the server. Meaning you might need a larger investment in your infrastructure to support Blazor Server apps.
Doesn’t work offline. Where Blazor WebAssembly takes offline working in its stride Blazor Server does not. The SignalR connection is the lifeline of the application and without it the client can’t function at all. By default, this results in an overlay with a message saying the client is attempting to reestablish the connection. If this fails, the user has to refresh the browser to restart the application.
Latency. Due to its design Blazor Server apps are sensitive to latency issues. Every interaction the user has with the application must be sent back to the server for processing and await any updates that need to be applied. If there is a high latency in the connection between client and server a noticeable lag manifests in the UI and actions quickly feel sluggish. In real numbers a latency above 200ms is going to start causing these issues.
Requires a stable connection. Following on from the need for low latency and tying in with the inability to work offline. Blazor Server apps need to have a stable internet connection. If the connection is intermittent in any way, the user will continually see the reconnecting overlay in their application which quickly becomes very disruptive. An obvious scenario where this could occur is when a user is on a mobile device which has intermittent connection.
Blazor Server summarize
In summary, if you’re looking for a fast loading application and you have users with a fast and stable network connection, then Blazor Server is a great choice.
The post Getting started with C# and Blazor appeared first on PureSourceCode.
from WordPress https://www.puresourcecode.com/dotnet/net-core/getting-started-with-c-and-blazor/
0 notes
Text
Simplify Static Asset Management With Vue.js Single-File Component

Static asset management is one of the more painful and mysterious challenges front-end developers face. We want our source code to be simple to develop and maintain, but we rely on browsers to be lean and mean. Browsers can’t be expected to understand our fancy source files with conveniences like Sass or the newest bleeding edge JavaScript features. We configure transpilers, linters, and compressors that watch for source code changes or get triggered by build processes. And finally, these tools emit static assets that a browser can interpret

Even when we don’t use fancy preprocessors, we still copy the source files to a dist directory to deploy them…because…well…it’s just what we do!

On top of this complexity, we have traditionally maintained a separation of concerns between markup, scripting, and styling. This separation can lead to extreme bloat that makes our applications difficult to maintain.
Imagine a request to remove a component from a view. You remove the markup…but can you track down CSS selectors that are specific to this component? All the media queries? Do you feel safe removing code that may affect other parts of the view? What about a request to modify a component’s appearance? Do you add a new class to your updated component and leave the old styling behind, just in case there are other parts of the view that are styled by it? Technical debt accumulates. Eventually, you have a pile of dead code mixed in with the good stuff. It’s very difficult to clean up, and nobody wants to pay for the effort.

Not to imply that your code is inherently bad. It’s a consequence of the separation of concerns that has made the internet look sharp since the W3C adopted CSS in 1996.
So, what are our alternatives? Inline CSS? An occasional inline style attribute is acceptable in the 21st century. But even with CSS-in-JS libraries, this solution can be challenging to scale. We need the cascade. We need media queries.
Many modern frameworks combine JavaScript with markup; it’s the core of the React, Angular, and Vue.js revolution. The concept of “styled components” is also trending. But unification usually comes at a cost. The learning curve, awkward code structure, and dependency on 3rd party libraries may outweigh the advantages. However, Vue’s out-of-the-box support for the concept makes it simple to grasp and implement.

The Vue.js framework Single-File Component (SFC) allows you to combine templating, scripting, and styling in a single source file that can accept props and manage state. Vue CLI — the “beginner” installation of Vue.js — will pre-configure the bridge between your .vue source files and webpack that requires absolutely no configuration or webpack knowledge. Let’s open a terminal and quickly build a working example using npm.
1.Install Vue CLI: npm install -g @vue/cli
2.Create a new project (accept the default settings): vue create vue-sfc-example
3.Start the project: npm run serve
4. Render HelloWorld.vue in a browser: http://localhost:8080

SO easy. Let’s open the source to see what we built.
<template>
<div class="hello">
...some markup...
</div>
</template>
<script>
export default {
name: 'HelloWorld',
props: {
msg: String
}
}
</script>
<!-- Add "scoped" attribute to limit CSS to this component only -->
<style scoped>
h3 {
margin: 40px 0 0;
}
ul {
list-style-type: none;
padding: 0;
}
li {
display: inline-block;
margin: 0 10px;
}
a {
color: #42b983;
}
</style>
The <template> tag wraps Vue template syntax enhanced markup.
The <script> tag wraps JavaScript.
The <style> tag wraps CSS.
Aside from placing the styling at the end of the file, this source file looks an awful lot like an html file that a browser could interpret. There is a lot going on under the hood, but Vue doesn’t clutter the source with tooling bloat.
Let’s concentrate on the <style> tag. The boilerplate contains some basic CSS, and an attribute named “scoped”. As the code comment implies, this attribute allows you to “scope” this block to only apply to this particular component, by automatically namespacing the CSS. Compare this to a more traditional approach, which might involve creating a selector like: “#hello-world-component-namespace.this-component {...}” in some faraway css file. The scoped attribute is optional. If you want to modify child components, one approach is to exclude the scoped attribute. You may also use multiple blocks of CSS, in case you wish to scope part of the code, but style children with a separate CSS block.
<style scoped>
h3 {
margin: 40px 0 0;
}
...
</style>
<style>
#child-component > h3 {
margin: 10px;
}
...
</style>
If you inspect the source code in your browser, you can see this style block rendered in the head of the document:
<style type="text/css">h3[data-v-469af010] {
margin: 40px 0 0;
}
ul[data-v-469af010] {
list-style-type: none;
padding: 0;
}
li[data-v-469af010] {
display: inline-block;
margin: 0 10px;
}
a[data-v-469af010] {
color: #42b983;
}
</style>
There is no need to version or deploy a CSS file, in this example. The data attribute in the first block is no accident. It uniquely identifies the component this styling is scoped to.
<div data-v-469af010="" class="hello">...</div>
Predictably, namespacing is suppressed for code blocks that are not scoped.
<style type="text/css">
#child-component > h3 {
margin: 10px;
}
</style>
An alternative to this approach is the ::v-deep combinator, which allows you to style children from a scoped block. Details can be found here.
But what about my Sass? Good news: SFCs tap into all of your favorite webpack preprocessors. Install sass-loader with npm:
<style scoped lang="scss">
h3 {
margin: 40px 0 0;
}
ul {
list-style-type: none;
padding: 0;
> li {
display: inline-block;
margin: 0 10px;
a {
color: #42b983;
&.very-green {
#00ff00;
}
}
}
}
</style>
But what about my Sass globals, includes, mixins, etc.? Never fear — the Sass block you include in your SFCs works just like your typical Sass source file. You can pass includes, set variables, nest media queries, and any other Sass convenience.
<style scoped lang="scss">
@import "mixins";
@import "global/global";
#main {
padding-top: em(54);
@media (min-width: $screen-md) {
padding-top: 0;
}
}
</style>
The vue-loader, which is included and pre-configured by Vue CLI, makes all of this work. Sass/Scss, Less, Babel, TypeScript, and other popular preprocessors and linters are supported. These features can be discretely configured, to the delight of advanced users.
The Vue.js SFC offers the convenience our source code deserves, without the file management and webpack tooling headaches. You can also use the component state to set class and style inside your templates, using built-in lifecycle hooks. It is also important to note that you can still include CSS the typical way, or in a mixed mode. This is especially handy when using rapid prototyping libraries like Bootstrap.
What’s the catch? Vue.js is a relatively new player. It’s picking up steam, but there aren’t as many applications using the framework as the competing products — Angular and React. That means the user community is comparably small. Examples are slim and basic. You are cutting your own trail. Also, we have detected some “spookiness” in the way preprocessors react to code structure. The preprocessors may need some configuration and babysitting, once you scale into a larger project.
_________________________________________
0 notes