#passing data between components in vue js
Explore tagged Tumblr posts
Visit Tumblr Blog
Explore Tumblr blogs with no restrictions, modern design and the best experience.
Last Seen Tumblr Blogs


Fun Fact
The total number of visits Tumblr.com received during January 2021 is 327 million.
Photo

Transfer Data Between Components In Vue JS How you can transfer data between components in vue js? I'll explain to you the communication between a parent component and a child component. source
#child component#child component in vue#components#components communication#components communication in vue#data#data between vue components#learn vue step by step#mario laurich#parent component#parent component in vue#passing data between components#passing data between components in vue#passing data between components in vue js#Transfer#transfer data between components#transfer data between components in vue#transfer data between components in vue js#vue#vue js#vue js tutorial#vuejs#webnoob
0 notes
Link
A form will pop-up what feels for you to fill out and when you hit enter the app creates that timer for you. When you decide to delete a timer if you click the delete button, the timer will remove itself from the page that is pretty much what you would call a dynamic user interface.
React was created because the facebook develop team wanted a better way to structure JavaScript applications.
So, why use React.Js ?
Number one is for reusable components
Components are a huge part of what makes react so understanding them is crucial when programming with react components let you split your code into separate independent reusable pieces.
You can think of components as functions that can take inputs to call props and return elements describing what should appear on the screen. You also take those already created functions and reuse than in other parts of your app without any problems.
So, react components are like individual Legos that can build something great and then connect it together and they’re also reusable.
Also Read:
React Is The New jQuery! (Or Is It Vue)
Number two is for the virtual Dom
Even though, javascript is fast enough to handle complex web applications. Dom manipulations are still not too fast.
Updating the Dom is usually the problem when it comes to achieving optimal web performance that’s where the virtual Dom comes in how the virtual Dom works are.
It keeps a copy of the real Dom in storage and whenever a change is made the update first goes to the virtual Dom.
The virtual Dom then compares its Dom with the real Dom and applies the changes to the real Dom in the most efficient way possible.
The number three is for props and skates
So let’s start off with props short for properties by the wedding preps are used to let components talk with each other.
That’s pretty much it, props let you pass data to other components for them to use it and another thing to know about props is that you cannot change props.
And you may be thinking then what can I use for values that change over time what do I need for values that do that change frequently. That’s where the state comes in.
So props shouldn’t change but we need inputs that can change its value. The purpose of states is so that components can keep track of information between any renders.
It does when you change a part of the state it updates the objects and then every renders the component. It’s also important to note that you should have this little state as possible reason being is.
Let’s say that you have a car, a car has many moving parts and eventually things break.
And the same thing could happen if you have too much state in your react, that location and for components that don’t need any state.
We have two types of components stateful and stateless components
Also Read:
Learn Reactjs: Become The Highest Paid Front-End Software Developer Today
stateful components | stateless components
stateful components are components using state which means they have values that can change stateless components, on the other hand, are components that don’t use state, which means they don’t have values that change.
1 note
·
View note
Text
Significant React Native Libraries for Mobile App Development in 2021

React Native happens to be one of the most sought-after app development frameworks across the globe as it comes with a host of advantages like a cost-effective developmental cycle, faster time-to-market, high performance, modular and intuitive architecture, and many more.
One of the unique benefits of this framework is the availability of countless third-party libraries that expedite the development and prove highly convenient for every React Native App Development Company. However, owing to the presence of thousands of React Native libraries, selecting the apt ones becomes a herculean task. As a consequence, development teams often have to spare a great deal of time and effort for picking the right tool or library that would prove fruitful.
For easing out this task, I have penned down the most significant tools and libraries that complement the React Native framework. A quick read will help you to find the perfect match that suits your requirement.
Tools and Libraries for Various React Native App Development Categories

Category: User Interface
React Native Elements
This UI library, built using JavaScript, has earned 20.5k stars and 4.2k forks on GitHub.
This library comes with cross-platform compatibility and supports Expo.
It is easy to use, customizable, and community-driven.
Lottie-react-native
This library created by Airbnb enables adding attractive animations to React Native applications.
React Native developers can either select from the free animations available or design and add their animations employing “Adobe After Effects.”
Functioning: The animation data is exported in JSON format with Bodymovin and rendered natively on mobile.
Styled Components
This library enables developers to write CSS code for styling components
It removes the mapping between styles and components, thereby easing out the usage of components as a low-level styling construct.
The styles can be reused several times resulting in lesser coding
React Native Vector icons
React Native Vector icons is a library that offers numerous icons of various types, designed for the React Native Apps.
Each element can be fully customized
Category: Forms
Formik
It’s a small library that helps to build forms in React
Formik enables to validate the form values, display error messages and helps to submit the form.
Redux-form
Redux-form enables proper state management in Redux
It helps in tracking the commonest form states like fields contained in the form, focussed field, field values, fields which the users have interacted with, etc.
Category: Testing
Jest
This is a popular testing framework, designed and maintained by Facebook, and is used for testing JavaScript code. This versatile testing tool is compatible with any JavaScript framework or library, including React, Angular, VueJS, etc. Uber, Airbnb, and Intuit are some of the top brands that have leveraged this tool. Its offerings are:
High-speed performance
Standard syntax with report guide
Mocks functions, with the inclusion of third-party node_module libraries
Conducts parallelization, snapshot, and async method tests
Enables managing tests with bigger objects, by using live snapshots
Mocha
Mocha is a JavaScript test framework, used for testing React and React Native apps. It provides the Developers full control over what plugins and tools they choose to use while testing applications. Its major highlights are:
Runs on Node.js
Provides support for asynchronous front-end and backend testing, test coverage reports, and the usage of any claims library
Helps to track errors
Excels in mocking tests
Enzyme
Enzyme is another testing tool developed by Airbnb.
It comes with API wrappers, to ease out developers’ tasks like manipulating, asserting, and traversing the React DOM.
It supports full and shallow DOM and also supports static rendering
Besides, it is compatible with several other testing frameworks and libraries like Mocha and Jest.
Chai
It’s an assertion testing library meant for browser and node
Chai employs behavior-driven and test-driven development principles
Compatible with various testing tools and can be paired with any JS testing framework
Its functionality can be extended by using several custom plugins
Moreover, it enables the developers to create their plugins and share them in the community
Category: Navigation
React Navigation
This component supports navigational patterns like tabs, stacks, and drawers
It is based on JavaScript and is simple to use
It enables developers to effortlessly set up app screens
Can be completely customized as well as extended
React Router
This is a library of navigational components which composes declaratively with the app.
It allows one to specify named components, create various types of layouts, and pass layout components.
Category: App’s State Management
Redux
Redux, a free-standing library, and a predictable state container is predominantly used along with the UI library components of React. Besides the React ecosystem, one can also use Redux with other frameworks like Vue, Angular, Vanilla JS, Ember, etc. Its principal offerings are:
Can be used with back-end as well as front-end libraries
Enables the developers to write consistent codes
Allows editing the live code
Functions well in various environments – Server-side, client-side, and native
Connects the pieces of state to the React components by minimizing the need for props or callbacks.
Category: Linting and checking Types
ESLint
It’s a JavaScript-based, open-source linter tool
ESLint is configurable and pluggable
It improves the code consistency and makes it bug-free
It helps in evaluating patterns in the code and eliminates errors by automatically fixing the code, to enhance the overall code quality.
It helps detect creases in the JavaScript code that don’t comply with the standard guidelines
It helps react native developers to create their own linting rules
Flow
Developed by Facebook, Flow is a static type checker JavaScript library
It easily identifies problems during coding
It proves beneficial in crafting large applications, as it prevents bad rebases when several persons are working on a single program.
The main objective of Flow is to make the code more precise and enhance the speed of the coding process
Category: Networking
Networking tools are used to establish a networking flow in React Native projects. Let us have a look at a few of them.
react-native –firebase is a lightweight layer on the top of Firebase libraries. It creates a JavaScript bridge connecting to the native JavaScript SDKs to ease out using Firebase in React Native Application Development projects.
Apollo Client is quite compatible and adaptable. It is required when the developers need to use GraphQL. It assists in creating a User Interface that pulls data with GraphQL.
Axios, a lightweight HTTP JavaScript client was built to send asynchronous HTTP requests to REST endpoints. Besides, it performs CRUD operations.
react-native-ble-manager is a plugin that helps in connecting and transmitting data between a mobile handset and BLE peripherals.
Category: Utils
The below-mentioned ready-made tools simplify and speed up working with Utils while developing React Native apps.
Ramda is a library that eases out creating functional pipelines without user-data mutation.
The JavaScript functions’ toolkit Lodash offers clean and effective methodologies to your development team for working with collections and objects.
Reselect builds memorized selectors that are needed for avoiding unnecessary recalculation and redrawing of data. This library also quickens the speed of your app.
Moment works with various data formats and is capable of parsing, manipulating as well as validating times and dates in JavaScript.
Validate.js, designed by Wrap, offers the app developers a declarative way to validate JS objects
Category: Analytics
The following libraries act as mediators enabling one to implement the trending analytical tools into their React Native Mobile App Development projects.
react-native-mixpanel is a kind of wrapper for the library named Mixpanel and helps the developers to reap all the benefits of the Mixpanel library.
react-native-google-analytics-bridge acts as a bridge for establishing compatibility between Google Analytics tools and React Native projects.
Category: Localization
react-native-i18n helps in localizing or internationalizing applications. It integrates the i18n-js library in JavaScript for React Native applications.
Category: In-app Purchases
react-native-in-app-utils is a small library used to implement the in-app billing procedure for iOS apps. It can be effortlessly installed and is simple to work with.
react-native-billing is used for adding in-app billing to applications meant for the Android platform. It possesses a simple UI and wraps anjlab’s InApp Billing library to function as a bridge.
Category: AR and VR
ViroReact is used to speedily develop native cross-platform VR/AR apps in React Native. Its key functionalities are:
It has an easy learning curve
It comes with a high-performing native 3D rendering engine as well as a custom extension of React for creating VR and AR solutions.
It provides support for all kinds of platforms in VR including Samsung Gear VR, Google Cardboard, Google Daydream, etc. for Android and iOS; and AR including Android ARCore and iOS ARKit platforms.
Needs React-Viro-CLI and React-Native-CLI for writing cross-platform native codes
Final Verdict:
I hope the aforesaid information was helpful and has given you a clear idea of which library/libraries would be most suitable for your next project.
To know more about our other core technologies, refer to links below:
Angular App Development Company
Ionic App Development Company
Blockchain app developers
0 notes
Text
Simplify Static Asset Management With Vue.js Single-File Component

Static asset management is one of the more painful and mysterious challenges front-end developers face. We want our source code to be simple to develop and maintain, but we rely on browsers to be lean and mean. Browsers can’t be expected to understand our fancy source files with conveniences like Sass or the newest bleeding edge JavaScript features. We configure transpilers, linters, and compressors that watch for source code changes or get triggered by build processes. And finally, these tools emit static assets that a browser can interpret

Even when we don’t use fancy preprocessors, we still copy the source files to a dist directory to deploy them…because…well…it’s just what we do!

On top of this complexity, we have traditionally maintained a separation of concerns between markup, scripting, and styling. This separation can lead to extreme bloat that makes our applications difficult to maintain.
Imagine a request to remove a component from a view. You remove the markup…but can you track down CSS selectors that are specific to this component? All the media queries? Do you feel safe removing code that may affect other parts of the view? What about a request to modify a component’s appearance? Do you add a new class to your updated component and leave the old styling behind, just in case there are other parts of the view that are styled by it? Technical debt accumulates. Eventually, you have a pile of dead code mixed in with the good stuff. It’s very difficult to clean up, and nobody wants to pay for the effort.

Not to imply that your code is inherently bad. It’s a consequence of the separation of concerns that has made the internet look sharp since the W3C adopted CSS in 1996.
So, what are our alternatives? Inline CSS? An occasional inline style attribute is acceptable in the 21st century. But even with CSS-in-JS libraries, this solution can be challenging to scale. We need the cascade. We need media queries.
Many modern frameworks combine JavaScript with markup; it’s the core of the React, Angular, and Vue.js revolution. The concept of “styled components” is also trending. But unification usually comes at a cost. The learning curve, awkward code structure, and dependency on 3rd party libraries may outweigh the advantages. However, Vue’s out-of-the-box support for the concept makes it simple to grasp and implement.

The Vue.js framework Single-File Component (SFC) allows you to combine templating, scripting, and styling in a single source file that can accept props and manage state. Vue CLI — the “beginner” installation of Vue.js — will pre-configure the bridge between your .vue source files and webpack that requires absolutely no configuration or webpack knowledge. Let’s open a terminal and quickly build a working example using npm.
1.Install Vue CLI: npm install -g @vue/cli
2.Create a new project (accept the default settings): vue create vue-sfc-example
3.Start the project: npm run serve
4. Render HelloWorld.vue in a browser: http://localhost:8080

SO easy. Let’s open the source to see what we built.
<template>
<div class="hello">
...some markup...
</div>
</template>
<script>
export default {
name: 'HelloWorld',
props: {
msg: String
}
}
</script>
<!-- Add "scoped" attribute to limit CSS to this component only -->
<style scoped>
h3 {
margin: 40px 0 0;
}
ul {
list-style-type: none;
padding: 0;
}
li {
display: inline-block;
margin: 0 10px;
}
a {
color: #42b983;
}
</style>
The <template> tag wraps Vue template syntax enhanced markup.
The <script> tag wraps JavaScript.
The <style> tag wraps CSS.
Aside from placing the styling at the end of the file, this source file looks an awful lot like an html file that a browser could interpret. There is a lot going on under the hood, but Vue doesn’t clutter the source with tooling bloat.
Let’s concentrate on the <style> tag. The boilerplate contains some basic CSS, and an attribute named “scoped”. As the code comment implies, this attribute allows you to “scope” this block to only apply to this particular component, by automatically namespacing the CSS. Compare this to a more traditional approach, which might involve creating a selector like: “#hello-world-component-namespace.this-component {...}” in some faraway css file. The scoped attribute is optional. If you want to modify child components, one approach is to exclude the scoped attribute. You may also use multiple blocks of CSS, in case you wish to scope part of the code, but style children with a separate CSS block.
<style scoped>
h3 {
margin: 40px 0 0;
}
...
</style>
<style>
#child-component > h3 {
margin: 10px;
}
...
</style>
If you inspect the source code in your browser, you can see this style block rendered in the head of the document:
<style type="text/css">h3[data-v-469af010] {
margin: 40px 0 0;
}
ul[data-v-469af010] {
list-style-type: none;
padding: 0;
}
li[data-v-469af010] {
display: inline-block;
margin: 0 10px;
}
a[data-v-469af010] {
color: #42b983;
}
</style>
There is no need to version or deploy a CSS file, in this example. The data attribute in the first block is no accident. It uniquely identifies the component this styling is scoped to.
<div data-v-469af010="" class="hello">...</div>
Predictably, namespacing is suppressed for code blocks that are not scoped.
<style type="text/css">
#child-component > h3 {
margin: 10px;
}
</style>
An alternative to this approach is the ::v-deep combinator, which allows you to style children from a scoped block. Details can be found here.
But what about my Sass? Good news: SFCs tap into all of your favorite webpack preprocessors. Install sass-loader with npm:
<style scoped lang="scss">
h3 {
margin: 40px 0 0;
}
ul {
list-style-type: none;
padding: 0;
> li {
display: inline-block;
margin: 0 10px;
a {
color: #42b983;
&.very-green {
#00ff00;
}
}
}
}
</style>
But what about my Sass globals, includes, mixins, etc.? Never fear — the Sass block you include in your SFCs works just like your typical Sass source file. You can pass includes, set variables, nest media queries, and any other Sass convenience.
<style scoped lang="scss">
@import "mixins";
@import "global/global";
#main {
padding-top: em(54);
@media (min-width: $screen-md) {
padding-top: 0;
}
}
</style>
The vue-loader, which is included and pre-configured by Vue CLI, makes all of this work. Sass/Scss, Less, Babel, TypeScript, and other popular preprocessors and linters are supported. These features can be discretely configured, to the delight of advanced users.
The Vue.js SFC offers the convenience our source code deserves, without the file management and webpack tooling headaches. You can also use the component state to set class and style inside your templates, using built-in lifecycle hooks. It is also important to note that you can still include CSS the typical way, or in a mixed mode. This is especially handy when using rapid prototyping libraries like Bootstrap.
What’s the catch? Vue.js is a relatively new player. It’s picking up steam, but there aren’t as many applications using the framework as the competing products — Angular and React. That means the user community is comparably small. Examples are slim and basic. You are cutting your own trail. Also, we have detected some “spookiness” in the way preprocessors react to code structure. The preprocessors may need some configuration and babysitting, once you scale into a larger project.
_________________________________________
0 notes
Photo

D3 6.0, easy 3D text, Electron 10, and reimplementing promises
#503 — August 28, 2020
Unsubscribe | Read on the Web
JavaScript Weekly
ztext.js: A 3D Typography Effect for the Web — While it initially has a bit of a “WordArt” feel to it, this library actually adds a pretty neat effect to any text you can provide. This is also a good example of a project homepage, complete with demos and example code.
Bennett Feely
D3 6.0: The Data-Driven Document Library — The popular data visualization library (homepage) takes a step forward by switching out a few internal dependencies for better alternatives, adopts ES2015 (a.k.a. ES6) internally, and now passes events directly to listeners. Full list of changes. There’s also a 5.x to 6.0 migration guide for existing users.
Mike Bostock
Scout APM - A Developer’s Best Friend — Scout’s intuitive UI helps you quickly track down issues so you can get back to building your product. Rest easy knowing that Scout is tracking your app’s performance and hunting down small issues before they become large issues. Get started for free.
Scout APM sponsor
Danfo.js: A Pandas-like Library for JavaScript — An introduction to a new library (homepage) that provides high-performance, intuitive, and easy-to-use data structures for manipulating and processing structured data following a similar approach to Python’s Pandas library. GitHub repo.
Rising Odegua (Tensorflow)
Electron 10.0.0 Released — The popular cross-platform desktop app development framework reaches a big milestone, though despite hitting double digits, this isn’t really a feature packed released but more an evolution of an already winning formula. v10 steps up to Chromium 85, Node 12.1.3, and V8 8.5.
Electron Team
Debug Visualizer 2.0: Visualize Data Structures Live in VS Code — We first mentioned this a few months ago but it’s seen a lot of work and a v2.0 release since then. It provides rich visualizations of watched values and can be used to visualize ASTs, results tables, graphs, and more. VS Marketplace link.
Henning Dieterichs
💻 Jobs
Sr. Engineer @ Dutchie, Remote — Dutchie is the world's largest and fastest growing cannabis marketplace. Backed by Howard Schultz, Thrive, Gron & Casa Verde Capital.
DUTCHIE
Find a Job Through Vettery — Create a profile on Vettery to connect with hiring managers at startups and Fortune 500 companies. It's free for job-seekers.
Vettery
📚 Tutorials, Opinions and Stories
Minimal React: Getting Started with the Frontend Library — Dr. Axel explains how to get started with React while using as few libraries as possible, including his state management approach.
Dr. Axel Rauschmayer
A Leap of Faith: Committing to Open Source — Babel maintainer Henry Zhu talks about how he left his role at Adobe to become a full-time open source maintainer, touching upon his faith, the humanity of such a role, and the finances of making it a reality.
The ReadME Project (GitHub)
Faster CI/CD for All Your Software Projects - Try Buildkite ✅ — See how Shopify scaled from 300 to 1800 engineers while keeping their build times under 5 minutes.
Buildkite sponsor
The Headless: Guides to Learning Puppeteer and Playwright — Puppeteer and Playwright are both fantastic high level browser control APIs you can use from Node, whether for testing, automating actions on the Web, scraping, or more. Code examples are always useful when working with such tools and these guides help a lot in this regard.
Checkly
How To Build Your Own Comment System Using Firebase — Runs through how to add a comments section to your blog with Firebase, while learning the basics of Firebase along the way.
Aman Thakur
A Guide to Six Commonly Used React Component Libraries
Max Rozen
Don't Trust Default Timeouts — “Modern applications don’t crash; they hang. One of the main reasons for it is the assumption that the network is reliable. It isn’t.”
Roberto Vitillo
Guide: Get Started with OpenTelemetry in Node.js
Lightstep sponsor
Deno Built-in Tools: An Overview and Usage Guide
Craig Buckler
How I Contributed to Angular Components — A developer shares his experience as an Angular Component contributor.
Milko Venkov
🔧 Code & Tools
fastest-levenshtein: Performance Oriented Levenshtein Distance Implementation — Levenshtein distance is a metric for measuring the differences between two strings (usually). This claims to be the fastest JS implementation, but we’ll let benchmarks be the judge of that :-)
ka-weihe
Yarn 2.2 (The Package Manager and npm Alternative) Released — As well as being smaller and faster, a dedupe command has been added to deduplicate dependencies with overlapping ranges.
Maël Nison
Light Date ⏰: Fast and Lightweight Date Formatting for Node and Browser — Comes in at 157 bytes, is well-tested, compliant with Unicode standards on dates, and written in TypeScript.
Antoni Kepinski
Barebackups: Super-Simple Database Backups — We automatically backup your databases on a schedule. You can use our storage or bring your own S3 account for unlimited backup storage.
Barebackups sponsor
Carbonium: A 1KB Library for Easy DOM Manipulation — Edwin submitted this himself, so I’ll let him explain it in his own words: “It’s for people who don’t want to use a JavaScript framework, but want more than native DOM. It might remind you of jQuery, but this library is only around one kilobyte and only supports native DOM functionality.”
Edwin Martin
DNJS: A JavaScript Subset for Configuration Languages — You might think that JSON can already work as a configuration language but this goes a step further by allowing various other JavaScript features in order to be more dynamic. CUE and Dhall are other compelling options in this space.
Oliver Russell
FullCalendar: A Full Sized JavaScript Calendar Control — An interesting option if you want a Google Calendar style control for your own apps. Has connectors for React, Vue and Angular. The base version is MIT licensed, but there’s a ‘premium’ version too. v5.3.0 just came out.
Adam Shaw
file-type: Detect The File Type of a Buffer, Uint8Array, or ArrayBuffer — For example, give it the raw data from a PNG file, and it’ll tell you it’s a PNG file. Usable from both Node and browser.
Sindre Sorhus
React-PDF: Display PDFs in a React App As Easily As If They Were Images
Wojciech Maj
Meteor 1.11 Released
Filipe Névola
🕰 ICYMI (Some older stuff that's worth checking out...)
Need to get a better understanding of arrow functions? This article from Tania Rascia will help.
Sure, strictly speaking a string in JavaScript is a sequence of UTF-16 code units... but there's more to it.
Zara Cooper explains how to take advantage of schematics in Angular Material and ng2-charts to substantially reduce the time and work that goes into building a dashboard
In this intro to memoizaition Hicham Benjelloun shares how you can optimize a function (by avoiding computing the same things several times).
by via JavaScript Weekly https://ift.tt/3jmo1hQ
0 notes
Text
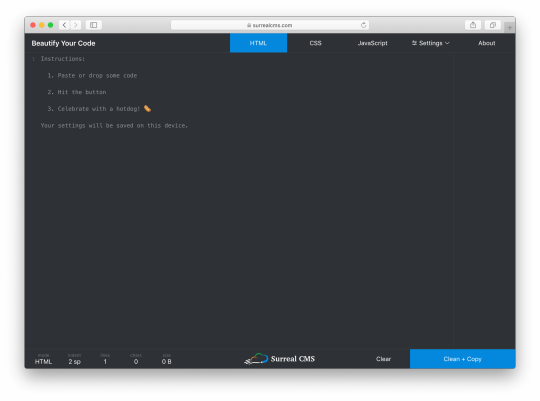
How I Created a Code Beautifier in Two Days
I recently drew up a wireframe for a code beautifier. The next day, I decided to turn it into a real tool. The whole project took less than two days to complete.
I'd been thinking about building a new code beautifier for a while. The idea isn't unique, but every time I use someone else's tool, I find myself reapplying the same settings and dodging advertisements every single time. 🤦🏻
I wanted a simple tool that worked well without the hassle, so last week I grabbed some paper and started sketching one out. I'm a huge fan of wireframing by hand. There's just something about pencil and paper that makes the design part of my brain work better than staring at a screen.
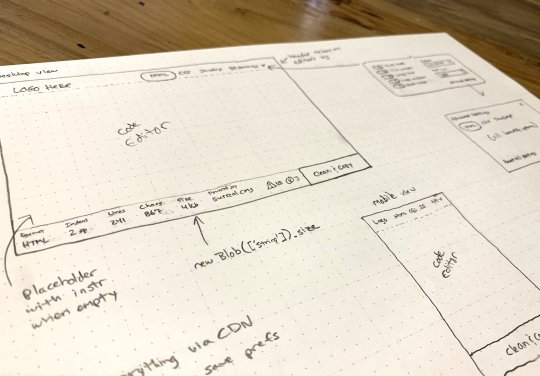
I kicked off the design process by hand-drawing wireframes for the app.
I was immediately inspired after drawing the wireframe. The next day, I took a break from my usual routine to turn it into a something real. 👨🏻💻
Check it Out
The design
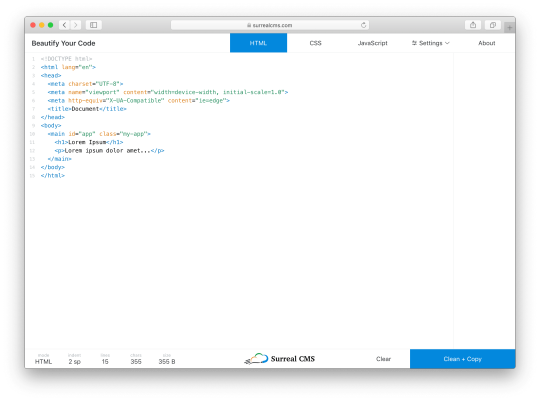
I knew I wanted the code editor to be the main focus of the tool, so I created a thin menu bar at the top that controls the mode (i.e. HTML, CSS, JavaScript) and settings. I eventually added an About button too.
The editor itself takes up most of the screen, but it blends in so you don't really notice it. Instead of wasting space with instructions, I used a placeholder that disappears when you start typing.
The Dark Mode UI is based on a toggle that updates the styles.
At the bottom, I created a status bar that shows live stats about the code including the current mode, indentation settings, number of lines, number of characters, and document size in bytes. The right side of the status bar has a "Clear" and "Clean + Copy" button. The center has a logo shamelessly plugging my own service.
I don't think many developers really code on phones, but I wanted this to work on mobile devices anyway. Aside from the usual responsive techniques, I had to watch the window size and adjust the tab position when the screen becomes too narrow.
I'm using flexbox and viewport units for vertical sizing. This was actually pretty easy to do with the exception of a little iOS quirk. Here’s a pen showing the basic wireframe. Notice how the textarea stretches to fill the unused space between the header and footer.
See the Pen Full-page text editor with header + footer by Cory LaViska (@claviska) on CodePen.
If you look at the JavaScript tab, you’ll see the iOS quirk and the workaround. I’m not sure how to feature detect something like this, so for now it’s just a simple device check.
Handling settings
I wanted to keep the most commonly used settings easy to access, but also expose advanced settings for each mode. To do this, I made the settings button a popover with a link to more advanced settings inside. When a setting is changed, the UI updates immediately and the settings are persisted to localStorage.
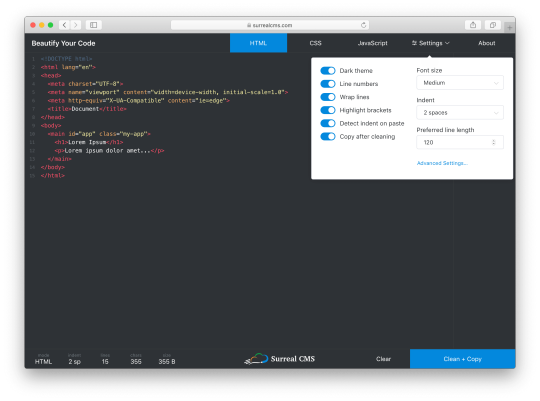
The most common settings are contained in a small panel that provides quick access to them, while advanced settings are still accessible via a link in the panel.
I took advantage of Vue.js here. Each setting gets mapped to a data property, and when one of them changes, the UI updates (if required) and I call saveSettings(). It works something like this.
function saveSettings() { const settings = {}; // settingsToStore is an array of property names that will be persisted // and "this" is referencing the current Vue model settingsToStore.map(key => settings[key] = this[key]); localStorage.setItem('settings', JSON.stringify(settings); }
Every setting is a data property that gets synced to localStorage. This is a rather primitive way to store state, so I might update the app to use a state management library such as Vuex later on.
To restore settings, I have a restoreSettings() function that runs when the app starts up.
function restoreSettings() { const json = localStorage.getItem('settings'); if (json) { try { const settings = JSON.parse(json); Object.keys(settings).forEach(key => { if (settingsToStore.includes(key)) { this[key] = settings[key]; } }); } catch (err) { window.alert('There was an error loading your previous settings'); } } }
The function fetches settings from localStorage, then applies them one by one ensuring only valid settings in settingsToStore get imported.
The Advanced Settings link opens a dialog with tabs for each mode. Despite having over 30 settings total, everything is organized and easy to access so users won't feel overwhelmed.
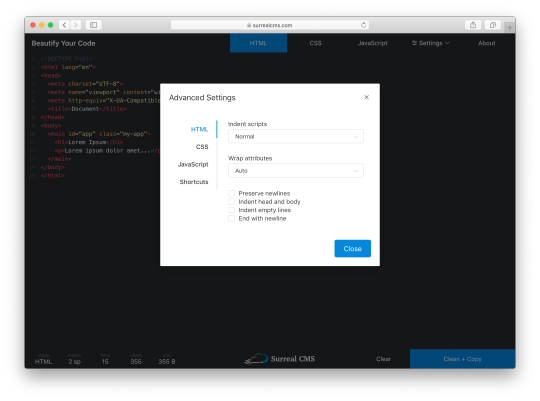
Clicking the "Advanced Settings" link opens up language-specific preferences and shortcuts.
Applying themes
Dark mode is all the rage these days, so it's enabled by default. There's also a light theme for those who prefer it. The entire UI changes, except for popovers and dialogs.
I considered using prefers-color-scheme, which coincidentally landed in Firefox 67 recently, but I decided a toggle would probably be better. Browser support for the color theme preference query isn't that great yet, plus developers are weird. (For example, I use macOS with the light theme, but my text editor is dark.)
The app with Light Mode UI enabled.
Defining features
Coming up with feature ideas is fairly easy. It’s limiting features for an initial release that’s hard. Here are the most relevant features I shipped right away:
Beautifies HTML, CSS, and JavaScript code
Syntax highlighting with tag/bracket matching
Paste or drop files to load code
Auto-detects indentation preference based on pasted code or dropped file
Light and dark themes
Clean and copy in one click
Keyboard shortcuts
Most JS Beautify options are configurable
Settings get stored indefinitely in localStorage
Minimal UI without ads (just an unobtrusive plug to my own service) 🙈
I also threw in a few easter eggs for fun. Try refreshing the page, exploring shortcuts, and sharing it on Facebook or Twitter to find them. 😉
The tools and libraries I used
I'm a big fan of Vue.js. It's probably overkill for this project, but the Vue CLI let me start building with all the latest tooling via one simple command.
vue create beautify-code
I didn't have to waste any time scaffolding, which helped me build this out quickly. Plus, Vue came in handy for things like live stats, changing themes, toggling settings, etc. I used various Element UI components for things like buttons, form elements, popovers, and dialogs.
The editor is powered by CodeMirror using custom styles. It’s a well-supported and fantastic project that I can’t recommend enough for in-browser code editing.
The library that does all the beautifying is called JS Beautify, which handles JavaScript, HTML, and CSS. JS Beautify runs on the client-side, so there’s really no backend to this app — your browser does all the work!
JS Beautify is incredibly easy to use. Install it with npm install js-beautify and run your code through the appropriate function.
import beautify from 'js-beautify'; const code = 'Your code here'; const settings = { // Your settings here }; // HTML const html = beautify.html(code, settings) // CSS const css = beautify.css(code, settings) // JavaScript const js = beautify.js(code, settings)
Each function returns a string containing the beautified code. You can change how each language is output by passing in your own settings.
I’ve been asked a few times about Prettier, which is a comparable tool, so it’s worth mentioning that I chose JS Beautify because it’s less opinionated and more configurable. If there’s enough demand, I’ll consider adding an option to toggle between JS Beautify and Prettier.
I've used all of these libraries before, so integration was actually pretty easy. 😅
This project was made possible by my app, Surreal CMS. If you’re looking for a great CMS for static websites, check it out — it’s free for personal, educational, and non-profit websites!
Oh, and if you’re wondering what editor I used... it’s Visual Studio Code. 👨🏻💻
The post How I Created a Code Beautifier in Two Days appeared first on CSS-Tricks.
How I Created a Code Beautifier in Two Days published first on https://deskbysnafu.tumblr.com/
0 notes
Link
How To Pass Data Between Components In Vue.js - https://oncallsolutions.ca/how-to-pass-data-between-components-in-vue-js/
0 notes
Text
Top Essential Skills for React Web Developer | ExcelPTP
React is the ultimate library for front-end developers today. Simply put, you get better at development when you learn React, and many organizations view these skills as essential. JavaScript is the major driver of modern web applications since it’s the only programming language which runs in the browser and hence allows you to provide highly reactive apps. React is all about components- basically custom HTML elements-with which you can quickly build amazing and powerful web apps. Just build a component once, configure it to your needs, dynamically pass data into it and re-use it as often as needed.
1. HTML + CSS
No front-end dev is a stranger to HTML and CSS. The ability to work with and craft user interface is necessary to every organization. At high level, React developers should be able to:
1. Work with and write semantic HTML tags
2. Work with and Write CSS selectors
3. Implement a CSS reset
4. Understand the box model and how to reset to border-box
5. Understand flexbox
6. Work with and implement responsive web principles including the proper user of media queries
2. React JS and Redux —- Mastering Web Apps
This project- based course will have you coding right away. Building four carefully Thought-out example applications in this course will sharpen your skills in modern web development. As one of the most highly-paid skills for web developers, learning react will Open doors and jobs for you. Create the React JS & Redux apps you always wanted.
First, learn the principles of React JS by building two applications. One introduce ES6/Babel, and the other how to handle HTTP Web Requests in React using an API. with the third application, learn how to manipulate browser cookies. Finally, you’ll create an entire app with full authentication and a real-time database to finish it off.
3. Git:
Git is essential to every developer toolkit for storing projects on Solutions like GitHub, Bit bucket and GitLab. Git is magic sauce that allows you to track and host versions of files on Github. In the words, you use commands of Git to track version of your files. And Github is Just a remote platform where these files are hosted. Skills that should just be part of your day to day include:
1. Tracking changes with add, commit, push and pull
2. Branching and merging strategies
3. Handling merge conflicts
4. Node + npm
NPM(Node Package Manager) is the default package manager for Node.js and is written entirely in JavaScript. NPM Manage all the packages and modules for Node,js and consists of command line client npm. It gets installed into the system with installation of Node.js. A package contains all the files needed for a module and module are the JavaScript libraries that can be included in Node Project according to the requirement of the project. React developers need to have a solid understanding of the npm registry. This is the place where software developers can go to get software to help them build software. Node package Manager(NPM) provides two main functionalities –
1. Online repositories for node.js packages/modules which are searchable on search.nodejs.org
2. Command line utility to install Node.js Packages, do version management and dependency management of Node.js packages.
5. Complete React JS web developer with ES6-Build 10 Projects
React is having very high demand in market. One of the top most searched subject on stack overflow. Most of high performance apps are created using react. If you want to stand apart from react, for sure you need to get familiar with react.
Also, if you are looking to move in react-native app development, that path goes with react js. Once you are familiar with concepts like JSX, props and states, same concepts are applied in react native too. And moving into react-native would be just a piece of cake.
This course will first cover local installation and react basics. After that we will create 10 projects
1. Project 1 – Create react app manually
2. Project 2 – Converting a simple Blog into react components
3. Project 3 – Timer App
4. Project 4 – sales cart in Single Page Application
5. Project 5 – Usurvery with Firebase database
6. Project 6 – Firebase Login Setup
7. Project 7 – Google Sign in with Firebase
8. Project 8 – Reddit API with axios
9. Project 9 – Auth0 login System
10. Project 10 – Github API with Fetch and Auth0 login System
6. React JS — Build real world JS apps & deploy on cloud
React JS is an awesome JS Framework for building front end Applications. React JS is leading Over Angular JS or vue JS. This is a truly complete React Js course, that goes way beyond what other React Courses out there teach you.
You will learn “why” something works in React, not Just “how”. Because in the modern JavaScript world of today, you need more than just knowing how something works. You need to debug code, you need to understand code, you need to be able to think about code.
So, by the end of the course, you will be a capable react developer, able to write, understand and debug JavaScript code using all the powerful features the language offers to code your application using React js.
This Course will take you from a complete React Js beginner to an advance developer. You will not just learn the React itself, you will also learn how to program. How to solve problems. How to Organized code using common standard/patterns.
7. React From The Ground UP
React is a hugely in demand framework and having the knowledge of react that this course will teach you will set you apart from other candidates. This tutorial will take you through everything you need to master web development using ReactJS.
If you’ve got a great idea that you want to turn into a business react is a great choice to build your application with and React from the Ground Up will teach you everything you need to make amazing application with React.
Getting a great understanding of React JS will get you into position to build fantastic, well built personal and professional projects.throughout the course you will build mini projects with React then move onto build a Pokemon dashboard application that will pit your new found React skills into practice. We will then build an application that teaches you all the principles behind Redux and how you can confidently and easily use React with Redux to build applications.
8. React for Absolute Beginners
React has simplified not only the process of designing UIs but also make it easier to build complete projects that are real-time and dynamic.JavaScript plays an important role when it comes to designing and deploying apps and websites.
This epic react course not only helps break down the Fundamentals of React, but also dives deep into how React works and the actual coding process that is required. At the end of this course, you will have a through working idea of react and you’ll even be able to build your own small projects.
This course strips the complicated bits and pieces of React that are scary and simplifies it to make it easier to understand. Starting at the very beginning with the basic definitions of React and it’s core components. From there you’ll breakdown the important aspects of React such as JSX, looping, ES, Bug Fixing, States, Props, libraries, Actions, Redux, and so much more.
At the end of this course, you will have a more sound knowledge of React and it’s components such as JSX, Redux, etc. and you’ll also be able to actually integrate React with your own working project.
What you’ll learn in this course:
1. A complete introduction to React and it’s core components.
2. Introduction to JSX
3. Learning to build your very first component
4. Event looping & bug fixing
5. Going over State & Props including how to pass data around inside or between components
6. Introduction to data, libraries and APIs
7. Other Important concepts such as Redux, Actions, Reducers, etc.
8. Build your own app with everything you’ve learnt through the course.
0 notes
Text
Vue.js Tutorial From Scratch - e08 - Custom Events Passing Data from Child to Parent Component - VueJs
Vue.js Tutorial From Scratch – e08 – Custom Events Passing Data from Child to Parent Component – VueJs
Vue.js Tutorial From Scratch – e08 – Custom Events Passing Data from Child to Parent Component – VueJs
[ad_1]
Now that we have a nice modern npm and webpack build, let’s tackle getting our components to communicate. In Vue, this is done using custom events. We can emit an event on our child component and then listen for that event on our parent event. Follow along as we code a simple example from…
View On WordPress
#laravel computed property#laravel mix#laravel vue tutorial#Learn Vue#Learn Vuejs#passing data to parent component vue#vue#Vue 2019#vue course#vue emit to parent component#vue for beginners#vue framework#vue js frontend laravel backend#vue methods#vue npm#vue passing data between components#vue tutorial#vue webpack#Vue.js#vue.js tutorial 2019#Vuejs#vuejs course#vuejs tutorial#web development#web development framework#webpack crash course
0 notes
Text
Essential JavaScript Libraries and Frameworks You Should Know About
JavaScript has been around for 20+ years, and it's one of those languages that never stop evolving. The language has been experiencing a fast-paced growth recently that makes me wonder whether the modern front-end JavaScript technologies that are well known today will be relevant a couple of years later.
Nevertheless, it's important to be ahead of the game by working with the latest tools and frameworks for a better development workflow. This article explores various JavaScript libraries, frameworks, and tools that you should consider learning right now.
Introduction
The JavaScript environment has grown huge. It has its own ecosystem of libraries, frameworks, tools, package managers and new languages that compile down to JavaScript. Interestingly, npm, which is the de facto package manager for JavaScript, is also the largest software registry in the world. Here is an excerpt from a post published on Linux.com back in January 2017.
At over 350,000 packages, the npm registry contains more than double the next most populated package registry (which is the Apache Maven repository). In fact, it is currently the largest package registry in the world.
Fast forward eight months, and there are currently about 500,000 packages in the npm registry. That's a massive growth compared to other package repositories.
Source: ModuleCounts.com
As a front-end JavaScript developer, it's important to keep up with the modern JavaScript tools and libraries. When a technology becomes popular, demand for it is high, which in turn means more coding jobs that pay the highest salary in the industry. So I've assembled a list of the popular JavaScript technologies that I think you should be aware of.
Libraries
A library is a reusable piece of code that offers certain functionality. It is a collection of functions, objects, and classes that you can use in your application. A library abstracts different layers so that you don't have to be concerned about their implementation details.
You can call a library function and pass it some parameters, and the library executes it and returns the control back to you. However, it doesn't place any structural constraints that restrict how you use the library. Popular JavaScript libraries include:
React
React is a JavaScript library built by the developers of Facebook and Instagram. React was voted as the most-loved technology among developers, according to the Stack Overflow Survey 2017. React also holds the credit for being the most popular JavaScript project based on GitHub star count.
So why is React getting all the attention? With React, it is possible to create an interactive UI using a declarative approach where you can control the state of the application by saying "the view should look like this". It uses a component-based model where the components are reusable UI elements and each component has its own state.
React uses a Virtual DOM so that you don't have to be concerned about directly manipulating the DOM. Other notable features of React include one-way data flow, optional JSX syntax, and a command-line tool for creating a React project with zero build configuration.
If you believe that React is the next best thing and would like to learn React, check out our React Crash Course for Beginners tutorial series.
jQuery
jQuery is a library that made JavaScript more approachable and DOM manipulation easier than before. jQuery's gentle learning curve and easy syntax gave rise to a generation of new client-side developers. A few years back, jQuery was considered a solid solution for building robust websites with cross-browser support. jQuery's core features such as DOM manipulation based on CSS selectors, event handling, and making AJAX calls fueled its popularity.
However, things have changed, and the JavaScript environment has steadily evolved. Some of jQuery's features have been incorporated into the newer ECMAScript specification. Moreover, the new libraries and frameworks in use today have a native way of binding the DOM, and hence plain DOM manipulation techniques are not required anymore. jQuery's popularity is on the decline, but I don't see it disappearing anytime soon.
D3: Data-Driven Documents
D3 (or D3.js) is a powerful JavaScript library for producing interactive visualizations using web standards such as SVG, HTML, and CSS. Unlike other visualization libraries, D3 offers better control over the final visual result.
D3 works by binding the data to the DOM and then making the transformation to the document. It also has an ecosystem of its own, which consists of plugins and libraries that extend its basic functionality. The library has been around since 2011, and it has tons of documentation and tutorials that can help you get started.
If you are looking to create simple visualizations without investing too much time in it, you should check out Chart.js. We have an introductory series on Chart.js that covers most of the visualizations that you can create with Chart.js
Frameworks
A framework has an architecture that dictates the flow of control in your application. The framework describes the skeleton and tells you how everything should be organized. The basic functionality required to get the application up and running is also provided to you. Moreover, you are bound to follow the framework's design principles and patterns. The difference between a framework and library is that you call a library, whereas the framework calls you.
A framework often comprises of many libraries and has a higher level of abstraction. Functionality such as event handling, making AJAX calls, template and data binding, and testing are built into the framework.
Angular
AngularJS was once the most popular JavaScript technology among front-end developers. It was backed by Google and a community of individuals and corporations. Despite the popularity, AngularJS had its own share of flaws. The Angular team spent two years working on a newer version of Angular, which was finally released in September 2016.
The Angular 2 release was a ground-up rewrite of AngularJS. Some of the features of Angular 2 include:
TypeScript over JavaScript as the default language
component-based architecture
improved performance on both mobile and web platforms.
better tooling and scaffolding options
However, upgrading from Angular 1.x to Angular 2 is expensive because Angular 2 is an entirely different beast. That's one of the reasons why Angular 2 hasn't experienced the same adoption rate as that of its predecessor. But Angular and AngularJS continue to be among the most commonly used technologies according to Stack Overflow (2017). The Angular project has about 28,000 stars on GitHub.
Vue.js
Vue.js is a lightweight JavaScript framework that has been trending this year. It is the most popular JavaScript framework on GitHub in terms of the GitHub star count. Vue claims to be a less opinionated framework and thus easy for developers to catch up with. Vue's HTML-based template syntax binds the rendered DOM to the instance data.
The framework offers a React-like experience with its Virtual DOM and reusable components that you can use to create both widgets and entire web applications. Moreover, you can also use the JSX syntax to write the render functions directly. When the state changes, Vue.js uses a reactivity system to determine what has changed and rerenders the minimal number of components. Vue.js also supports the integration of other libraries into the framework without much hassle.
Ember.js
Ember.js is a front-end framework based on the Model-View-ViewModel (MVVM) pattern. It follows the convention over configuration approach which is popular among server-side side frameworks like Ruby on Rails and Laravel. Ember.js incorporates common idioms and best practices into the framework so that you can get an application up and running without much effort.
The Ember stack usually comprises:
Ember CLI: Provides basic scaffolding options and supports hundreds of add-ons.
Ember Data: A data persistence library that can be configured to work with any server back end.
Ember Inspector: An extension available for Chrome and Firefox.
Liquid Fire: An add-on for transitions and animations.
Tools
A tool is a collection of routines that help you in the development process. Unlike a library, a tool usually executes a task on the client code. It takes your code as input, performs a task on it, and then returns an output. The commonly used tools include transpilers and build tools, asset minifiers, module bundlers, and scaffolding tools.
Tools: General-Purpose Task Runners
General-purpose task runners are the tools used to automate certain repetitive tasks. The popular general-purpose task runners include:
Gulp
Gulp is a JavaScript toolkit used as a task runner and as a build system in web development. Compilation, code minification, image optimization, unit testing, linting etc. are repetitive tasks that should be automated. Gulp makes the process of writing tasks easier, even for people who are less familiar with JavaScript.
Gulp uses pipelines to stream the data from one plugin to another, and the final result is outputted to a destination folder. Gulp performs better compared to Grunt because it doesn't create temporary files for storing intermediate results, which results in fewer I/O calls.
Grunt
Grunt is a task runner and an automation tool for JavaScript. Grunt has a command-line interface that lets you run custom tasks defined in a file called a Gruntfile. Grunt has thousands of plugins to choose from, which should cover most of the common repetitive tasks that you'd encounter. With Grunt, you can run all the tasks under a single command, making your life easier.
npm
Gulp and Grunt require you to spend time learning and mastering a new tool, which takes time. Introducing additional dependencies into your project can be avoided by choosing an alternative that is already bundled with Node.js. Although npm is better known as a package manager, npm scripts can be used to perform the bulk of the abovementioned tasks.
Tools: Testing
Testing is the process of validating and verifying that the application meets the expected business and technical requirements. The Test-Driven Development approach also aids in discovering bugs and therefore should be treated as an integral part of the modern front-end development stack.
Jest
Jest is a relatively new testing framework authored by Facebook and is well-received by the React community. There is a common misconception that Jest is specifically designed to work with React; however, according to the Jest Documentation:
Although Jest may be considered React-specific test runner, in fact it is a universal testing platform, with the ability to adapt to any JavaScript library or framework. You can use Jest to test any JavaScript code.
The biggest advantage of using Jest over other test suites is that you require zero or minimal configuration to start writing tests. The framework has a built-in assertion library and supports the use of mock functions or spies.
Jest has a feature called snapshot testing that lets you ensure that the UI of the application doesn't change unexpectedly. The developers at Facebook and other contributors have been pouring a lot of work into this project recently, so it wouldn't be a surprise if Jest turns out to be the most popular testing framework for JavaScript in the years to come.
Mocha
Mocha is a JavaScript testing framework that features browser support, async support including promises, test coverage reports, and a JavaScript API for running tests. Mocha is often paired with an assertion library such as Chai, should.js, expect.js, or better-assert because it lacks an assertion library of its own.
Jasmine
Jasmine is a behavior-driven testing framework for JavaScript. Jasmine aims to be a browser, platform, and framework-independent test suite. Jasmine has its own assertion library called matchers that gives it a clean and easy-to-read syntax. Jasmine doesn't have a built-in test runner, and you might have to use a generic test runner like Karma instead.
Summary
JavaScript, the language of the web, has stayed relevant since the days of its inception back in 1995. It will probably stay that way as long as browsers don't decide to ditch it for another language. Although there are a lot of other languages that compile down to JavaScript, there is no other scripting language that will replace JavaScript in the foreseeable future. Why? Because JavaScript has grown too popular to be replaced.
The language is not without its learning curves, and there are plenty of frameworks and libraries to keep you busy, as well. If you’re looking for additional resources to study or to use in your work, check out what we have available in the Envato Market.
The JavaScript environment is definitely evolving, which is evident from the current trends in web development. Older libraries and frameworks have been replaced with new technologies. jQuery, which was once the most favored JavaScript library, is experiencing a decline in terms of appeal, usage, and popularity. The new generation of front-end libraries, frameworks, and tools are gaining ground and getting universal acceptance.
Adapting to the new trends in technology has benefits too. Coding jobs that require React have some of the highest salaries in the industry, with an average salary of $105,000 in the U.S. according to Stack Overflow (2016). So you need to continue learning and experimenting with the latest tools and frameworks to get the best out of JavaScript.
If you think I've missed a JavaScript framework, library or tool that is worth mentioning, let me know through the comments.
Further Reading
Modules, a Future Approach to JavaScript Libraries
Quiz: Choose the Right Front-End JavaScript Framework for Your Project
Learn Computer Science with JavaScript
6 Things That Make Yarn the Best JavaScript Package Manager
via Envato Tuts+ Code http://ift.tt/2go1Byc
0 notes
Photo

Angular 10, data grids, randomness, and checking some boxes
#494 — June 26, 2020
Unsubscribe | Read on the Web
JavaScript Weekly
Lessons Learned Refactoring Optional Chaining Into a Large Codebase — Lea Verou, creator of Mavo, decided to refactor Mavo to use optional chaining (?.) and here’s some of what she discovered along the way. (As an aside, Lea was the subject of a neat 10 minute programming documentary recently – worth a watch!)
Lea Verou
A Little Bit of Plain JavaScript Can Do A Lot — For anyone more than happy to dive in and write JavaScript without dragging in an entire framework and tooling to manage it, there will be no surprises here, but this is a nice reminder otherwise. Do you always need a 'framework'? No.
Julia Evans
Creating a Voting App with Firestore and Wijmo — Learn how to build a realtime voting app quickly and easily with the Firestore database and Wijmo components. The app uses OAuth for authentication and allows users to submit and vote for ideas.
Wijmo by GrapeCity sponsor
Angular 10 Released — A major release for the popular Google-led framework, though smaller in scope than usual as Angular 9 only came out in February ;-) 10 gains a new date range picker, optional stricter settings, and an upgrade to TypeScript 3.9.
Stephen Fluin (Google)
What's Coming in TypeScript 4? — The first beta of TypeScript 4 is due any moment with a final release due in August. New bits and pieces include variadic tuple types, labelled tuples, short-cut assignment operators (e.g. ||=) and more.
Tim Perry
⚡️ Quick bytes:
Chrome 85's DevTools have gained better support for working with styles created by CSSOM APIs (such as by CSS-in-JS frameworks). There's also syntax autocompletion for optional chaining and highlighting for private fields.
There's nothing to see just yet, but NativeScript is coming to Ionic.
The creator of AlpineJS has written about how he's passed $100K/yr in income using GitHub Sponsors.
Did you know there's a Slack theme for VS Code? 😆
▶️ The JS Party podcast crew discusses how their use of JavaScript syntax evolves (or not) over time.
engineeringblogs.xyz is a new aggregator site (by us!) that brings together what 507 (so far) product and software engineering blogs are talking about. Worth a skim.
💻 Jobs
JavaScript Developer at X-Team (Remote) — Join X-Team and work on projects for companies like Riot Games, FOX, Coinbase, and more. Work from anywhere.
X-Team
Find a Job Through Vettery — Vettery specializes in tech roles and is completely free for job seekers. Create a profile to get started.
Vettery
📚 Tutorials, Opinions and Stories
ECMAScript Proposal: Private Static Methods and Accessors in Classes — Dr. Axel takes a look at another forthcoming language feature (in this case being at stage 3 and already supported by Babel and elsewhere).
Dr. Axel Rauschmayer
npm v7 Series: Why Keep package-lock.json? — If npm v7 is going to support yarn.lock files, then why keep package-lock.json around as well? Isaac goes into some depth as to how yarn.lock works and why it doesn’t quite suit every npm use case.
Isaac Z. Schlueter
How to Dynamically Get All CSS Custom Properties on a Page — Some fun DOM and stylesheet wrangling on display here.
Tyler Gaw
Stream Chat API & JavaScript SDK for Custom Chat Apps — Build real-time chat in less time. Rapidly ship in-app messaging with our highly reliable chat infrastructure.
Stream sponsor
Getting Started with Oak for Building HTTP Services in Deno — A comprehensive Oak with Deno tutorial for beginners (which, I guess, we all are when it comes to Deno). Oak is essentially the most popular option for building HTTP-based apps in Deno right now.
Robin Wieruch
Understanding Generators in JavaScript — Generator functions can be paused and resumed and yield multiple values over time and were introduced in ES6/ES2015.
Tania Rascia
Build a CRUD App with Vue.js, Spring Boot, and Kotlin — It’s a fact of life that not everyone is building apps with JavaScript at every level of the stack. Sometimes.. people use Java too 🤫
Andrew Hughes
▶ Creating a Basic Implemention of 'Subway Surfers' — No modules, webpack or such-like here.. just exploring the joy of throwing a game mechanic together quickly using rough and ready JavaScript. Love it.
Shawn Beaton
Rubber Duck Debugging for JavaScript Developers — When you’re stuck with something, why not talk to a rubber duck?
Valeri Karpov
🔧 Code & Tools

Tabulator 4.7: An Interactive Table and Data Grid Library — Supports all major browsers and can be used with Angular, Vue, and React if you wish. 4.7 is a substantial release. Among other things is a new layout mode that resizes the table container to fit the data (example).
Oli Folkerd
Tragopan: A Minimal Dependency-Free Pan/Zoom Library — Try it out here. Claims to work faster due to use of native browser scrolling for panning (left/right/up/down) and transform/scale for zooming.
team.video
Builds Run Faster on Buildkite 🏃♀️ — Build times <5 mins at any scale. Self-hosted agents work with all languages, source control tools & platforms.
Buildkite sponsor
React Query 2: Hooks for Fetching, Caching and Updating Async Data — React Query is well worth checking out and has extensive documentation and even its own devtools. Main repo.
Tanner Linsley
Rando.js: A Helper for Making Randomness Easier — The rando function lets you get random integers in a range, floats in a range, pick between multiple items, return a random element from an array, and more. There’s also randosequence for a more shuffle-like experience.
nastyox
jinabox.js: A Customizable Omnibox for AI Powered Searching — Designed to be used with a Jina back-end. It’s all open source, but will take some digging around to understand fully.
Jina AI
MongoDB Is Easy. Now Make It Powerful. Free Download for 30 Days.
Studio 3T sponsor
IntersectionObserver Visualizer — If you’re new to using the IntersectionObserver API, this useful interactive demo might help you comprehend it a little better.
michelle barker
Polly.js 5.0: Record, Replay, and Stub HTTP Interactions
Netflix
Vest: Effortless Validations Inspired by Testing Frameworks — If you’re used to unit testing, the syntax used here will be familiar.
Evyatar
👻 Scary Item of the Week
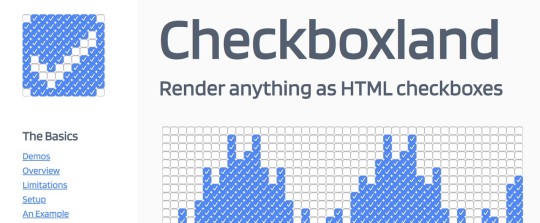
Checkboxland: Render 'Anything' as HTML Checkboxes — This frivolous experiment is equal parts terrifying and impressive. It’s a JS library that displays animations, text, and arbitrary data using nothing but HTML checkboxes and, to be fair, they’ve presented it really well!
Bryan Braun
by via JavaScript Weekly https://ift.tt/3g53MDU
0 notes
Photo

Is Deno the next big thing?
#472 — January 24, 2020
Read on the Web
JavaScript Weekly
▶ A Look at Deno: Could It Supplant Node (One Day)? — Over the past couple of years, we’ve mentioned Deno a few times. It’s a 'new' JavaScript and TypeScript runtime initially created by Ryan Dahl, the creator of Node, so it’s interesting to see how he thinks things should be done nowadays. Version 1.0 is due soon and we'll feature it in more detail then.
Bert Belder
A Guide to ESLint Configuration and Best Practices — A start-to-finish walkthrough aimed at beginners or anyone who usually just copy/pastes settings until things work. This will help you really understand what’s going on.
Lucas Santoni
React Hooks Guide: See the In-Depth Tutorials with Examples — This guide serves as an exhaustive resource for learning the built-in Hooks that are now part of React. Learn all about them as we comprehensively cover: State and Effects, Context, Reducers, and Custom React Hooks. Start learning today.
Progress KendoReact sponsor
TypeOfNaN JavaScript Quiz Questions — A set of 72 (so far) multiple choice questions to test out your JavaScript knowledge. Give it a try over the weekend :-)
Nick Scialli
Playwright: A Node Library to Automate Chromium, Firefox and WebKit — If you’re familiar with Puppeteer for automating Chrome/Chromium, this is in a similar vein for multiple browsers and is being worked on by some of the same contributors. The goal? To be vendor-neutral and to make the APIs more testing-friendly than Puppeteer.
Microsoft
⚡️ Quick Releases
Node 13.7.0
Jest 25.1 — Popular testing solution.
CodeMirror 5.51 — Powerful code editor control.
Vue 3.0.0 alpha 3
💻 Jobs
Full Stack Engineer — Expensify seeks a self-driven individual passionate about making code effective, with an understanding of algorithms and design patterns.
Expensify
Programmer — Basecamp (Remote) — Join our Research & Fidelity team and help shape the front end of our Rails apps and expand our suite of open-source JavaScript frameworks.
Basecamp
Find a Job Through Vettery — Vettery is completely free for job seekers. Make a profile, name your salary, and connect with hiring managers from top employers.
Vettery
📘 Articles & Tutorials

JavaScript Visualized: Generators and Iterators — An easily accessible introduction to generator functions with code and animated examples.
Lydia Hallie
How to Pass Data Between Components in Vue.js — With several ways to share data across components, it’s worth spending some time to reflect on what best suits your situation.
Matt Maribojoc
Writing Dependency-Free JavaScript — If you really need to have no dependencies at all, these tips may help.
Magnus Hovland Hoff
▶ Scaling Telecommunications Data with a Service Mesh — Luca Maraschi, a TELUS Digital chief architect, shares how they serve massive volumes of data to millions of customers.
Heroku sponsorpodcast
JavaScript Tree Shaking, Like A Pro — Eliminating dead code is becoming an essential practice, to avoid large bundle sizes and improve performance. But “as a general rule of thumb: predicting how Webpack will behave for a given module, is not easy to do by eye.”
Daniel Brain
The Best Way to Build Reactive Sub-Forms with Angular — Learn how to extract repetitive sub-form implementations into standalone, robust and type safe components.
Tomas Trajan
How We Do Efficient TDD with Karma and Webpack — How Bamboo has made the act of writing a unit test, running the test and seeing feedback into a fast, iterative process for their developers.
Josh Hale
TypeScript's Secret Parallel Universe — How TypeScript handles name clashes between types and variables.
Florian Reuschel
A Basic Introduction to 'Big O' Notation via JS — This article won’t get you through a CS degree(!) but if you’ve heard people talking about things like “O(n) complexity”, it’ll help.
Joshua Hall
The 10 Most Important JavaScript Frameworks of The Past Decade? — It’s a bit of a listicle by definition, but covers frontend, backend, and native and broadly matches up with our experiences. Where’s Ember though?
Ovie Okeh
How We Replaced Mocha with Jest
Ákos K
🔧 Code & Tools

React Nice Dates: Responsive, Touch-Friendly Modular Date Picker — Another month, another date picker, but this seems to be a pretty good one. Lots of demos and code examples and the control itself feels good.
Hernán Sartorio
Time-Travel Debugger for JavaScript and TypeScript — Move forward and backwards through your code to understand the conditions that led to a specific bug, view runtime values, edit-and-continue, and more.
Wallaby.js sponsor
Panzoom: A Universal Panning and Zooming Library — Here’s a live demo.
Andrei Kashcha
Ava 3.0 Released: The Popular Test Runner — A popular test runner for Node with a concise API, detailed error output, etc. 3.0 drops built-in Babel support due to advancements in Node’s native modern JavaScript support and this has some implications for how you’ll write your tests so take care with this upgrade and read this post first.
AVA
Proton Native V2: React, but for Desktop Apps — Make cross-platform desktop apps with React without using Electron or a browser by using Qt (or, as of v2, wxWidgets) for rendering native interfaces.
Gustav Hansen
BLAKE3 Hashing for JavaScript: Native Node Binding and WebAssembly — BLAKE3 is a Merkle-tree based cryptographic hash function (originally implemented in Rust) that’s fast, secure, and highly parallelizable.
Connor Peet
Axe Pro: Free Accessibility Testing Tool Created for Development Teams
Deque sponsor
EPANET-JS: Model A Water Distribution Network in JavaScript — This certainly seems like the real deal, but the creator is quick to note that it’s “extremely niche as I don’t suspect there will be many engineers simulating water networks”. Hmm.
Luke Butler
A Big List of HTTP Static Server One-liners — Want to spin up a quick HTTP server locally? There’s a lot of ways to do it.
William Bowers
by via JavaScript Weekly https://ift.tt/38GCrnL
0 notes
Photo

Getting up and Running with the Vue.js 2.0 Framework
This article was updated in November 2018, primarily to bring the tooling section up to date.
As soon as the popular JavaScript framework Vue.js released v2, I was eager to give it a spin and see what it’s like to work with. As someone who’s pretty familiar with Angular and React, I was looking forward to seeing the similarities and differences between them and Vue.
Vue 2 sports excellent performance stats, a relatively small payload (the bundled runtime version of Vue weighs in at 30KB once minified and gzipped), along with updates to companion libraries like vue-router and Vuex, the state management library for Vue. There’s far too much to cover in just one article, but keep an eye out for some later articles where we’ll look more closely at various libraries that couple nicely with the core framework.
Inspiration from Other Libraries
As we go through this tutorial, you’ll see many features that Vue has that are clearly inspired by other frameworks. This is a good thing; it’s great to see new frameworks take some ideas from other libraries and improve on them. In particular, you’ll see Vue’s templating is very close to Angular’s, but its components and component lifecycle methods are closer to React’s (and Angular’s, as well).
One such example of this is that, much like React and nearly every framework in JavaScript land today, Vue uses the idea of a virtual DOM to keep rendering efficient. Vue uses a fork of snabbdom, one of the more popular virtual DOM libraries. The Vue site includes documentation on its Virtual DOM rendering, but as a user all you need to know is that Vue is very good at keeping your rendering fast (in fact, it performs better than React in many cases), meaning you can rest assured you’re building on a solid platform.
Components, Components, Components
Much like other frameworks these days, Vue’s core building block is the component. Your application should be a series of components that build on top of each other to produce the final application. Vue.js goes one step further by suggesting (although not enforcing) that you define your components in a single .vue file, which can then be parsed by build tools (we’ll come onto those shortly). Given that the aim of this article is to fully explore Vue and what it feels like to work with, I’m going to use this convention for my application.
A Vue file looks like so:
<template> <p>This is my HTML for my component</p> </template> <script> export default { // all code for my component goes here } </script> <style scoped> /* CSS here * by including `scoped`, we ensure that all CSS * is scoped to this component! */ </style>
Alternatively, you can give each element a src attribute and point to a separate HTML, JS or CSS file respectively if you don’t like having all parts of the component in one file.
Setting Up a Project
Whilst the excellent Vue CLI exists to make setting up a full project easy, when starting out with a new library I like to do it all from scratch so I get more of an understanding of the tools.
These days, webpack is my preferred build tool of choice, and we can couple that with the vue-loader plugin to support the Vue.js component format that I mentioned previously. We’ll also need Babel and the env preset, so we can write all our code using modern JavaScript syntax, as well as the webpack-dev-server, which will update the browser when it detects a file change.
Let’s initialize a project and install the dependencies:
mkdir vue2-demo-project cd vue2-demo-project npm init -y npm i vue npm i webpack webpack-cli @babel/core @babel/preset-env babel-loader vue-loader vue-template-compiler webpack-dev-server html-webpack-plugin --save-dev
Then create the initial folders and files:
mkdir src touch webpack.config.js src/index.html src/index.js
The project structure should look like this:
. ├── package.json ├── package-lock.json ├── src │ ├── index.html │ └── index.js └── webpack.config.js
Now let’s set up the webpack configuration. This boils down to the following:
Tell webpack to use the vue-loader for any .vue files
Tell webpack to use Babel and the env preset for any .js files
Tell webpack to generate an HTML file for the dev-server to serve, using src/index.html as a template:
//webpack.config.js const VueLoaderPlugin = require('vue-loader/lib/plugin') const HtmlWebPackPlugin = require("html-webpack-plugin") module.exports = { module: { rules: [ { test: /\.vue$/, loader: 'vue-loader', }, { test: /\.js$/, exclude: /node_modules/, use: { loader: 'babel-loader', options: { presets: ['@babel/preset-env'] } } } ] }, plugins: [ new VueLoaderPlugin(), new HtmlWebPackPlugin({ template: "./src/index.html" }) ] }
Finally, we’ll add some content to the HTML file and we’re ready to go!
<!-- src/index.html --> <!DOCTYPE html> <html> <head> <title>My Vue App</title> </head> <body> <div id="app"></div> </body> </html>
We create an empty div with the ID of app, as this is the element that we’re going to place our Vue application in. I always prefer to use a div, rather than just the body element, as that lets me have control over the rest of the page.
Writing Our First Vue.js App
We’re going to stay true to every programming tutorial ever and write a Vue application that puts “Hello, World!” onto the screen before we dive into something a bit more complicated.
Each Vue app is created by importing the library and then instantiating a new Vue instance:
import Vue from 'vue' const vm = new Vue({ el: '#app', })
We give Vue an element to render onto the page, and with that, we’ve created a Vue application! We pass a selector for the element that we want Vue to replace with our application. This means when Vue runs it will take the div#app that we created and replace it with our application.
The reason we use the variable name vm is because it stands for “View Model”. Although not strictly associated with the “Model View View-Model” (MVVM) pattern, Vue was inspired in part by it, and the convention of using the variable name vm for Vue applications has stuck. Of course, you can call the variable whatever you’d like!
So far, our application isn’t doing anything, though, so let’s create our first component, App.vue, that will actually render something onto the page.
Vue doesn’t dictate how your application is structured, so this one is up to you. I ended up creating one folder per component, in this case App (I like the capital letter, signifying a component), with three files in it:
index.vue
script.js
style.css
mkdir src/App touch src/App/{index.vue,script.js,style.css}
The file structure should now be:
. ├── package.json ├── package-lock.json ├── src │ ├── App │ │ ├── index.vue │ │ ├── srcipt.js │ │ └── style.css │ ├── index.html │ └── index.js └── webpack.config.js
App/index.vue defines the template, then imports the other files. This is in keeping with the structure recommended in the What About Separation of Concerns? section of Vue’s docs.
<!-- src/App/index.vue --> <template> <p>Hello, World!</p> </template> <script src="./script.js"></script> <style scoped src="./style.css"></style>
I like calling it index.vue, but you might want to call it app.vue too so it’s easier to search for. I prefer importing App/index.vue in my code versus App/app.vue, but again you might disagree, so feel free to pick whatever you and your team like best.
For now, our template is just <p>Hello, World!</p>, and I’ll leave the CSS file blank. The main work goes into script.js, which looks like so:
export default { name: 'App', data() { return {} }, }
Doing this creates a component which we’ll give the name App, primarily for debugging purposes, which I’ll come to later, and then defines the data that this component has and is responsible for. For now, we don’t have any data, so we can just tell Vue that by returning an empty object. Later on, we’ll see an example of a component using data.
Now we can head back into src/index.js and tell the Vue instance to render our App component:
import Vue from 'vue' import AppComponent from './App/index.vue' const vm = new Vue({ el: '#app', components: { app: AppComponent, }, render: h => h('app'), })
Firstly, we import the component, trusting webpack and the vue-loader to take care of parsing it. We then declare the component. This is an important step: by default, Vue components are not globally available. Each component must have a list of all the components they’re going to use, and the tag that it will be mapped to. In this case, because we register our component like so:
components: { app: AppComponent, }
This means that in our templates we’ll be able to use the app element to refer to our component.
Finally, we define the render function. This function is called with a helper — commonly referred to as h — that’s able to create elements. It’s not too dissimilar to the React.createElement function that React uses. In this case, we give it the string 'app', because the component we want to render is registered as having the tag app.
More often than not (and for the rest of this tutorial) we won’t use the render function on other components, because we’ll define HTML templates. But the Vue.js guide to the render function is worth a read if you’d like more information.
Once we’ve done that, the final step is to create an npm script in package.json:
"scripts": { "start": "webpack-dev-server --mode development --open" },
Now, run npm run start. Your default browser should open at http://localhost:8080/ and you should see “Hello, World!” on the screen.
Try editing src/index.vue to change the message to something else. If all has gone correctly, webpack-dev-server should refresh the page to reflect your changes.
Yay! We’re up and running with Vue.js.
The post Getting up and Running with the Vue.js 2.0 Framework appeared first on SitePoint.
by Jack Franklin via SitePoint http://bit.ly/2UhqBca
0 notes
Text
How to Build Vue Components in a WordPress Theme
Intrigued by the title and just wanna see some code? Skip ahead.
A few months ago, I was building a WordPress website that required a form with a bunch of fancy conditional fields. Different options and info were required for different choices you could make on the form, and our client needed complete control over all fields 1. In addition, the form needed to appear in multiple places in each page, with slightly different configs.
And the header instance of the form needed to be mutually exclusive with the hamburger menu, so that opening one closes the other.
And the form had text content that was relevant to SEO.
And we wanted the server response to present some cute animated feedback.
(Phew.)
The whole thing felt complex enough that I didn't want to handle all that state manually. I remembered reading Sarah Drasner’s article "Replacing jQuery With Vue.js: No Build Step Necessary” which shows how to replace classic jQuery patterns with simple Vue micro-apps. That seemed like a good place to start, but I quickly realized that things would get messy on the PHP side of WordPress.
What I really needed were reusable components.
PHP → JavaScript
I love the static-first approach of Jamstack tools, like Nuxt, and was looking to do something similar here — send the full content from the server, and progressively enhance on the client side.
But PHP doesn’t have a built-in way to work with components. It does, however, support require-ing files inside other files 2. WordPress has an abstraction of require called get_template_part, that runs relative to the theme folder and is easier to work with. Dividing code into template parts is about the closest thing to components that WordPress provides 3.
Vue, on the other hand, is all about components — but it can only do its thing after the page has loaded and JavaScript is running.
The secret to this marriage of paradigms turns out to be the lesser-known Vue directive inline-template. Its great and wonderful powers allow us to define a Vue component using the markup we already have. It’s the perfect middle ground between getting static HTML from the server, and mounting dynamic DOM elements in the client.
First, the browser gets the HTML, then Vue makes it do stuff. Since the markup is built by WordPress, rather than by Vue in the browser, components can easily use any information that site administrators can edit. And, as opposed to .vue files (which are great for building more app-y things), we can keep the same separation of concerns we use for the whole site — structure and content in PHP, style in CSS, and functionality in JavaScript.
To show how this all fits together, we’re going to build a few features for a recipe blog. First, we’ll add a way for users to rate recipes. Then we’ll build a feedback form based on that rating. Finally, we’ll allow users to filter recipes, based on tags and rating.
We’ll build a few components that share state and live on the same page. To get them to play nicely together — and to make it easy to add additional components in the future — we’ll make the whole page our Vue app, and register components inside it.
Each component will live in its own PHP file and be included in the theme using get_template_part.
Laying the groundwork
There are a few special considerations to take into account when applying Vue to existing pages. The first is that Vue doesn't want you loading scripts inside it — it will send ominous errors to the console if you do. The easiest way to avoid this is to add a wrapper element around the content for every page, then load scripts outside of it (which is already a common pattern for all kinds of reasons). Something like this:
<?php /* header.php */ ?> <body <?php body_class(); ?>> <div id="site-wrapper">
<?php /* footer.php */ ?> </div> <!-- #site-wrapper --> <?php wp_footer(); ?>
The second consideration is that Vue has to be called at the end of body element so that it will load after the rest of the DOM is available to parse. We’ll pass true as the fifth argument (in_footer) for the wp_enqueue_script function. Also, to make sure Vue is loaded first, we’ll register it as a dependency of the main script.
<?php // functions.php add_action( 'wp_enqueue_scripts', function() { wp_enqueue_script('vue', get_template_directory_uri() . '/assets/js/lib/vue.js', null, null, true); // change to vue.min.js for production wp_enqueue_script('main', get_template_directory_uri() . '/assets/js/main.js', 'vue', null, true);
Finally, in the main script, we’ll initialize Vue on the site-wrapper element.
// main.js new Vue({ el: document.getElementById('site-wrapper') })
The star rating component
Our single post template currently looks like this:
<?php /* single-post.php */ ?> <article class="recipe"> <?php /* ... post content */ ?> <!-- star rating component goes here --> </article>
We’ll register the star rating component and add some logic to manage it:
// main.js Vue.component('star-rating', { data () { return { rating: 0 } }, methods: { rate (i) { this.rating = i } }, watch: { rating (val) { // prevent rating from going out of bounds by checking it to on every change if (val < 0) this.rating = 0 else if (val > 5) this.rating = 5 // ... some logic to save to localStorage or somewhere else } } }) // make sure to initialize Vue after registering all components new Vue({ el: document.getElementById('site-wrapper') })
We’ll write the component template in a separate PHP file. The component will comprise six buttons (one for unrated, 5 with stars). Each button will contain an SVG with either a black or transparent fill.
<?php /* components/star-rating.php */ ?> <star-rating inline-template> <div class="star-rating"> <p>Rate recipe:</p> <button @click="rate(0)"> <svg><path d="..." :fill="rating === 0 ? 'black' : 'transparent'"></svg> </button> <button v-for="(i in 5) @click="rate(i)"> <svg><path d="..." :fill="rating >= i ? 'black' : 'transparent'"></svg> </button> </div> </star-rating>
As a rule of thumb, I like to give a component’s top element a class name that is identical to that of the component itself. This makes it easy to reason between markup and CSS (e.g. <star-rating> can be thought of as .star-rating).
And now we’ll include it in our page template.
<?php /* single-post.php */ ?> <article class="recipe"> <?php /* post content */ ?> <?php get_template_part('components/star-rating'); ?> </article>
All the HTML inside the template is valid and understood by the browser, except for <star-rating>. We can go the extra mile to fix that by using Vue’s is directive:
<div is="star-rating" inline-template>...</div>
Now let’s say that the maximum rating isn’t necessarily 5, but is controllable by the website’s editor using Advanced Custom Fields, a popular WordPress plugin that adds custom fields for pages, posts and other WordPress content. All we need to do is inject that value as a prop of the component that we’ll call maxRating:
<?php // components/star-rating.php // max_rating is the name of the ACF field $max_rating = get_field('max_rating'); ?> <div is="star-rating" inline-template :max-rating="<?= $max_rating ?>"> <div class="star-rating"> <p>Rate recipe:</p> <button @click="rate(0)"> <svg><path d="..." :fill="rating === 0 ? 'black' : 'transparent'"></svg> </button> <button v-for="(i in maxRating) @click="rate(i)"> <svg><path d="..." :fill="rating >= i ? 'black' : 'transparent'"></svg> </button> </div> </div>
And in our script, let’s register the prop and replace the magic number 5:
// main.js Vue.component('star-rating', { props: { maxRating: { type: Number, default: 5 // highlight } }, data () { return { rating: 0 } }, methods: { rate (i) { this.rating = i } }, watch: { rating (val) { // prevent rating from going out of bounds by checking it to on every change if (val < 0) this.rating = 0 else if (val > maxRating) this.rating = maxRating // ... some logic to save to localStorage or somewhere else } } })
In order to save the rating of the specific recipe, we’ll need to pass in the ID of the post. Again, same idea:
<?php // components/star-rating.php $max_rating = get_field('max_rating'); $recipe_id = get_the_ID(); ?> <div is="star-rating" inline-template :max-rating="<?= $max_rating ?>" recipe-id="<?= $recipe_id ?>"> <div class="star-rating"> <p>Rate recipe:</p> <button @click="rate(0)"> <svg><path d="..." :fill="rating === 0 ? 'black' : 'transparent'"></svg> </button> <button v-for="(i in maxRating) @click="rate(i)"> <svg><path d="..." :fill="rating >= i ? 'black' : 'transparent'"></svg> </button> </div> </div>
// main.js Vue.component('star-rating', { props: { maxRating: { // Same as before }, recipeId: { type: String, required: true } }, // ... watch: { rating (val) { // Same as before // on every change, save to some storage // e.g. localStorage or posting to a WP comments endpoint someKindOfStorageDefinedElsewhere.save(this.recipeId, this.rating) } }, mounted () { this.rating = someKindOfStorageDefinedElsewhere.load(this.recipeId) } })
Now we can include the same component file in the archive page (a loop of posts), without any additional setup:
<?php // archive.php if (have_posts()): while ( have_posts()): the_post(); ?> <article class="recipe"> <?php // Excerpt, featured image, etc. then: get_template_part('components/star-rating'); ?> </article> <?php endwhile; endif; ?>
The feedback form
The moment a user rates a recipe is a great opportunity to ask for more feedback, so let’s add a little form that appears right after the rating is set.
// main.js Vue.component('feedback-form', { props: { recipeId: { type: String, required: true }, show: { type: Boolean, default: false } }, data () { return { name: '', subject: '' // ... other form fields } } })
<?php // components/feedback-form.php $recipe_id = get_the_ID(); ?> <div is="feedback-form" inline-template recipe-id="<?= $recipe_id ?>" v-if="showForm(recipe-id)"> <form class="recipe-feedback-form" id="feedback-form-<?= $recipe_id ?>"> <input type="text" :id="first-name-<?= $recipe_id ?>" v-model="name"> <label for="first-name-<?= $recipe_id ?>">Your name</label> <?php /* ... */ ?> </form> </div>
Notice that we’re appending a unique string (in this case, recipe-id) to each form element’s ID. This is to make sure they all have unique IDs, even if there are multiple copies of the form on the page.
So, where do we want this form to live? It needs to know the recipe’s rating so it knows it needs to open. We’re just building good ol’ components, so let’s use composition to place the form inside the <star-rating>:
<?php // components/star-rating.php $max_rating = get_field('max_rating'); $recipe_id = get_the_ID(); ?> <div is="star-rating" inline-template :max-rating="<?= $max_rating ?>" recipe-id="<?= $recipe_id ?>"> <div class="star-rating"> <p>Rate recipe:</p> <button @click="rate(0)"> <svg><path d="..." :fill="rating === 0 ? 'black' : 'transparent'"></svg> </button> <button v-for="(i in maxRating) @click="rate(i)"> <svg><path d="..." :fill="rating >= i ? 'black' : 'transparent'"></svg> </button> <?php get_template_part('components/feedback-form'); ?> </div> </div>
If at this point you’re thinking, “We really should be composing both components into a single parent component that handles the rating state,” then please give yourself 10 points and wait patiently.
A small progressive enhancement we can add to make the form usable without JavaScript, is to give it the traditional PHP action and then override it in Vue. We’ll use @submit.prevent to prevent the original action, then run a submit method to send the form data in JavaScript.
<?php // components/feedback-form.php $recipe_id = get_the_ID(); ?> <div is="feedback-form" inline-template recipe-id="<?= $recipe_id ?>"> <form action="path/to/feedback-form-handler.php" @submit.prevent="submit" class="recipe-feedback-form" id="feedback-form-<?= $recipe_id ?>"> <input type="text" :id="first-name-<?= $recipe_id ?>" v-model="name"> <label for="first-name-<?= $recipe_id ?>">Your name</label> <!-- ... --> </form> </div>
Then, assuming we want to use fetch, our submit method can be something like this:
// main.js Vue.component('feedback-form', { // Same as before methods: { submit () { const form = this.$el.querySelector('form') const URL = form.action const formData = new FormData(form) fetch(URL, {method: 'POST', body: formData}) .then(result => { ... }) .catch(error => { ... }) } } })
OK, so what do we want to do in .then and .catch? Let’s add a component that will show real-time feedback for the form’s submit status. First let’s add the state to track sending, success, and failure, and a computed property telling us if we’re pending results.
// main.js Vue.component('feedback-form', { // Same as before data () { return { name: '', subject: '' // ... other form fields sent: false, success: false, error: null } }, methods: { submit () { const form = this.$el.querySelector('form') const URL = form.action const formData = new FormData(form) fetch(URL, {method: 'POST', body: formData}) .then(result => { this.success = true }) .catch(error => { this.error = error }) this.sent = true } } })
To add the markup for each message type (success, failure, pending), we could make another component like the others we’ve built so far. But since these messages are meaningless when the server renders the page, we’re better off rendering them only when necessary. To do this we’re going to place our markup in a native HTML <template> tag, which doesn't render anything in the browser. Then we’ll reference it by id as our component’s template.
<?php /* components/form-status.php */ ?> <template id="form-status-component" v-if="false"> <div class="form-message-wrapper"> <div class="pending-message" v-if="pending"> <img src="<?= get_template_directory_uri() ?>/spinner.gif"> <p>Patience, young one.</p> </div> <div class="success-message" v-else-if="success"> <img src="<?= get_template_directory_uri() ?>/beer.gif"> <p>Huzzah!</p> </div> <div class="success-message" v-else-if="error"> <img src="<?= get_template_directory_uri() ?>/broken.gif"> <p>Ooh, boy. It would appear that: </p> </div> </div </template>
Why add v-if="false" at the top, you ask? It’s a tricky little thing. Once Vue picks up the HTML <template>, it will immediately think of it as a Vue <template> and render it. Unless, you guessed it, we tell Vue not to render it. A bit of a hack, but there you have it.
Since we only need this markup once on the page, we’ll include the PHP component in the footer.
<?php /* footer.php */ ?> </div> <!-- #site-wrapper --> <?php get_template_part('components/form-status'); ?> <?php wp_footer(); ?>
Now we’ll register the component with Vue…
// main.js Vue.component('form-status', { template: '#form-status-component' props: { pending: { type: Boolean, required: true }, success: { type: Boolean, required: true }, error: { type: [Object, null], required: true }, } })
…and call it inside our form component:
<?php // components/feedback-form.php $recipe_id = get_the_ID(); ?> <div is="feedback-form" inline-template recipe-id="<?= $recipe_id ?>"> <form action="path/to/feedback-form-handler.php" @submit.prevent="submit" class="recipe-feedback-form" id="feedback-form-<?= $recipe_id ?>"> <input type="text" :id="first-name-<?= $recipe_id ?>" v-model="name"> <label for="first-name-<?= $recipe_id ?>">Your name</label> <?php // ... ?> </form> <form-status v-if="sent" :pending="pending" :success="success" :error="error" /> </div>
Since we registered <form-status> using Vue.component, it's available globally, without specifically including it in the parent’s components: { }.
Filtering recipes
Now that users can personalize some bits of their experience on our blog, we can add all kinds of useful functionality. Specifically, let's allow users to set a minimum rating they want to see, using an input at the top of the page. The first thing we need is some global state to track the minimum rating set by the user. Since we started off by initializing a Vue app on the whole page, global state will just be data on the Vue instance:
// main.js // Same as before new Vue({ el: document.getElementById('site-wrapper'), data: { minimumRating: 0 } })
And where can we put the controls to change this? Since the whole page is the app, the answer is almost anywhere. For instance, at the top of the archive page:
<?php /* archive.php */ ?> <label for="minimum-rating-input">Only show me recipes I've rated at or above:</label> <input type="number" id="minimum-rating-input" v-model="minimumRating"> <?php if (have_posts()): while ( have_posts()): the_post(); ?> <article class="recipe"> <?php /* Post excerpt, featured image, etc. */ ?> <?php get_template_part('components/star-rating'); ?> </article> <?php endwhile; endif; ?>
As long as it’s inside our site-wrapper and not inside another component, it’ll just work. If we want, we could also build a filtering component that would change the global state. And if we wanted to get all fancy, we could even add Vuex to the mix (since Vuex can’t persist state between pages by default, we could add something like vuex-persist to use localStorage).
So, now we need to hide or show a recipe based on the filter. To do this, we’ll need to wrap the recipe content in its own component, with a v-show directive. It’s probably best to use the same component for both the single page and the archive page. Unfortunately, neither require nor get_template_part can pass parameters into the called file — but we can use global variables:
<?php /* archive.php */ ?> <label for="minimum-rating-input">Only show me recipes I've rated at or above:</label> <input type="number" id="minimum-rating-input" v-model="minimumRating"> <?php $is_archive_item = true; if (have_posts()): while ( have_posts()): the_post(); get_template_part('components/recipe-content'); endwhile; endif; ?>
We can then use $is_archive_item as a global variable inside the PHP component file to check if it is set and true. Since we won’t need to hide the content on the single post page, we’ll conditionally add the v-show directive.
<?php // components/recipe-content.php global $is_archive_item; ?> <div is="recipe-content"> <article class="recipe" <?php if ($is_archive_item): ?> v-show="show" <?php endif; ?> > <?php if ($is_archive_item): the_excerpt(); else the_content(); endif; get_template_part('components/star-rating'); ?> </article> </div>
In this specific example, we could have also tested with is_archive() inside the component, but in most cases we’ll need to set explicit props.
We’ll need to move the rating state and logic up into the <recipe-content> component so it can know if it needs to hide itself. Inside <star-rating>, we’ll make a custom v-model by replacing rating with value, and this.rating = i with $emit('input', i) as well . So our component registration will now look like this:
// main.js Vue.component('recipe-content', { data () { rating: 0 }, watch: { rating (val) { // ... } }, mounted () { this.rating = someKindOfStorageDefinedElsewhere.load(this.recipeId) } }) Vue.component('star-rating', { props: { maxRating: { /* ... */ }, recipeId: { /* ... */ }, value: { type: Number, required: true } }, methods: { rate (i) { this.$emit('input', i) } }, })
We’ll add v-model in star-rating.php and change rating to value. In addition, we can now move the <feedback-form> up into <recipe-content>:
<?php // components/star-rating.php $max_rating = get_field('max_rating'); $recipe_id = get_the_ID(); ?> <div is="star-rating" inline-template :max-rating="<?= $ max_rating ?>" recipe-id="<?= $recipe_id ?>" v-model="value" > <div class="star-rating"> <p>Rate recipe:</p> <button @click="rate(0)"> <svg><path d="..." :fill="value === 0 ? 'black' : 'transparent'"></svg> </button> <button v-for="(i in maxRating) @click="rate(i)"> <svg><path d="..." :fill="value >= i ? 'black' : 'transparent'"></svg> </button> </div> </div>
<?php // components/recipe-content.php global $is_archive_item; ?> <div is="recipe-content"> <article class="recipe" <?php if ($is_archive_item): ?> v-show="show" <?php endif; ?> > <?php if ($is_archive_item): the_excerpt(); else the_content(); endif; get_template_part('components/star-rating'); get_template_part('components/feedback-form'); ?> </article> </div>
Now everything is set up so the initial render shows all recipes, and then the user can filter them based on their rating. Moving forward, we could add all kinds of parameters to filter content. And it doesn’t have to be based on user input — we can allow filtering based on the content itself (e.g. number of ingredients or cooking time) by passing the data from PHP to Vue.
Conclusion
Well, that was a bit of a long ride, but look at what we’ve built: independent, composable, maintainable, interactive, progressively enhanced components in our WordPress theme. We brought together the best of all worlds!
I’ve been using this approach in production for a while now, and I love the way it allows me to reason about the different parts of my themes. I hope I’ve inspired you to try it out too.
Of course, two days before launch, the client’s legal department decided they don't want to collect all that info. Currently the live form is but a shadow of its development self.
Fun fact: Rasmus Lerdorf said that his original intent was for PHP to be templating only, with all business logic handled in C. Let that sink in for a moment. Then clear an hour from your schedule and watch the whole talk.
There are third-party WordPress templating engines that can compile down to optimized PHP. Twig, for example, comes to mind. We’re trying to go the reverse route and send vanilla PHP to be handled by JavaScript.
The post How to Build Vue Components in a WordPress Theme appeared first on CSS-Tricks.
How to Build Vue Components in a WordPress Theme published first on https://deskbysnafu.tumblr.com/
0 notes
Text
An Introduction To Storybook: Organize How You Build JS Components
What is Storybook?
Storybook is an open source tool for developing UI components in isolation and it integrates pretty well with most front end frameworks including React, Vue, and Angular and a host of other frameworks. It makes building stunning UIs organized and efficient that means developers don’t get distracted with flaky data, unfinished API or business logic.
Storybook runs outside of the main app so users can create UI components in a different environment without worrying about app-specific dependencies and requirements and this makes it easy to keep track of edge cases and as a result, you ship components with confidence.
Use Cases for Storybook
Storybook is currently being used by a lot of teams and engineers as a UI component library because of the way it helps you build components in isolation. Several teams rely on storybook to do the heavy lifting of composing a component library and also as a building block for their design systems. Companies like Algolia, Salesforce, Artsy ,Gov.uk, and GitHub use Storybook to build and distribute UI components that impact millions of people.
Here's a couple of use cases for Storybook.
Component Library: With the way Storybook works, we can maintain a component library by utilizing this process of having all components in our application in one location with the ability to test each state of the component.
Design Systems:A design system is a series of components that can be reused in different combinations. Design systems allow you to manage design at scale. With storybook, this becomes easy to achieve you get a design system out of the box.
Visual Testing: With Storybook addons, we can integrate visual regression testing in order to test and keep your component library consistent no matter how big it is.
Share across teams:Storybook can be shared across teams because of the way it can be deployed as a static site functioning solely on its own. It can be shared amongst designers, project managers in a team to give feedback or comments on the current design of the components which improves collaboration within teams.
Writing Stories with Storybook
From the name Storybook what comes to mind when you hear stories is that a combination of stories forms a Storybook right? My thoughts exactly! A Storybook is a combination of different stories for different components. Stories are functions that return something that can be rendered to screen. A story can contain a single state of one component or can be seen as a visual representation of a component.
Building UI components with Storybook is a good choice what this means is you have all components in your application isolated whereby they function regardless of the connection between them and it becomes easy to test out UI components.
When building with Storybook there are several ways to structure and organize stories within your application.
Stories inside a component directory
. └── src/ └── components/ └── button └── button.js └── button.stories.js
Stories outside the src directory
. └── src └── components └── button.js └── stories └── button.stories.js
Stories sub-folder in a component directory
. └── src/ └── components/ └── button └── button.js └── stories └── button.stories.js
Following any of these methods is a matter of choice. It’s up to you to pick what works best for you or/and your team.
Integrating Addons
Addons are extra features that can be added to a storybook to make them more interactive and useful. With addons we have two ways of implementing them, One way is by using Decorators and another is by using Native Addons. A list of all addons curated by Storybook team can be found on this page.
Decorators: Decorators are wrapper components that wrap a story. An instance where decorators can be handy is when you need to center a story on the displayed screen. We can create a wrapper component and then use it within the story.
const styles = { textAlign: 'center', }; const Center = ({ children }) => <div style={styles}>{children}</div>;
import { storiesOf } from '@storybook/react'; import { action } from '@storybook/addon-actions'; import Center from './center'; import Button from './button'; storiesOf('Button', module).add('with text', () => ( <Center> <Button onClick={action('clicked')}>Hello Button</Button> </Center> ));
Native Addons: Native addons use Storybook as a platform and interact with it. Native addons can add extra features beyond wrapping stories. An example is the storybook-action addon, this helps with logging the data received by event handlers in Storybook.
Deploying Storybook as a Static App
Storybook can be used alongside with the project we are developing because it gives a great developer experience with features, like hot reloading via Webpack HMR. But also we can extend this further by deploying the Storybook as a static site on its own. This will enable us to showcase our components to everyone and can even pass as a style guide for our application. To do this all you need to do is to configure your storybook using this script.
{ "scripts": { "build-storybook": "build-storybook -c .storybook -o .out" } }
When you run yarn build-storybook this will build the storybook configured in the Storybook directory into a static web app and place it inside the directory called out and then you can proceed to deploy that directory using one of any of these services GitHub Pages, Netlify or Now, etc.
Integrating with Other Frameworks
Storybook supports almost all the frontend frameworks available and in order for you to integrate with either of these frameworks a guide has been written by the storybook team that you can follow to setup storybook for individual frameworks and they include:
React
React Native
Vue
Angular
Mithril
Marko
HTML
Svelte
Ember
Riot
Preact
Wrapping Up
Storybook works for a lot of use cases as we have seen and integrating it into our workflow will enable us to build comprehensive UI components for our applications in isolation. In this article, I’ve covered what Storybook is all about and when it is useful to take advantage of when building web applications. The next part of this article will entail how we can start building interactive UI components using React and Storybook.
An Introduction To Storybook: Organize How You Build JS Components published first on https://deskbysnafu.tumblr.com/
0 notes