#cloth dolls
Text
Raggedy Andy
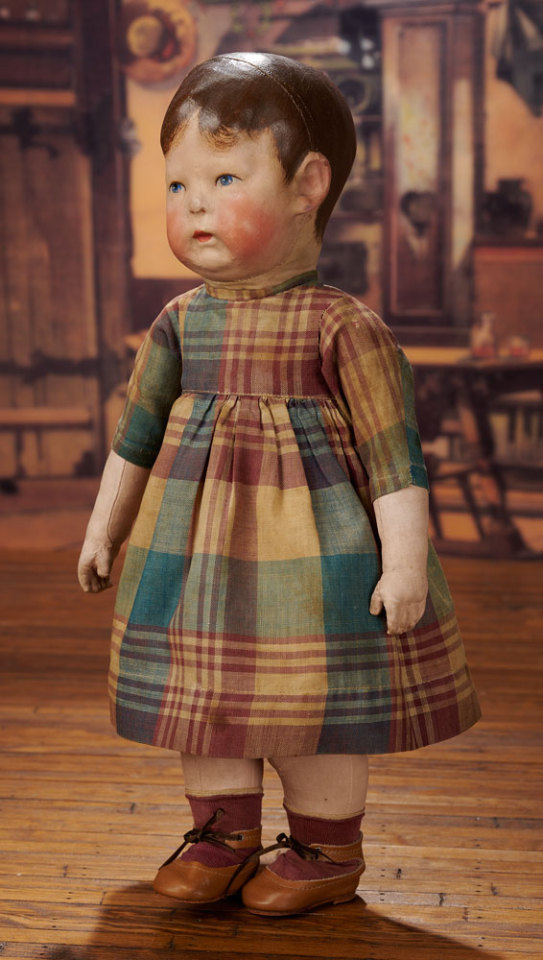
As some of you who've been reading for some time know, in addition to stuffed animals, I also repair (and actually make) cloth dolls. This part of the hospital is rather specialized, mostly all cloth dolls, not ones with plastic parts or mobile eyes or hand knitted ones. My specialty is fabric (including faux fur, obviously), and that's the equipment I have. But that does mean I get a lot of Raggedies. Raggedy Anns, Raggedy Annes (the name spelling really matters!) and Raggedy Andys. Today, I thought I'd share a story of a small handmade Raggedy Andy.
Andy had been loved for over twenty years when his person asked her mom to please get him fixed up. He had had a lot of adventures, and clearly some serious accidents! Here are his diagnosis photos:

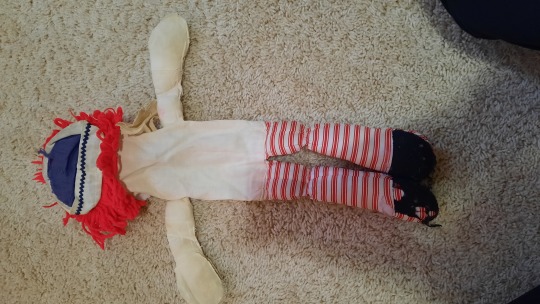
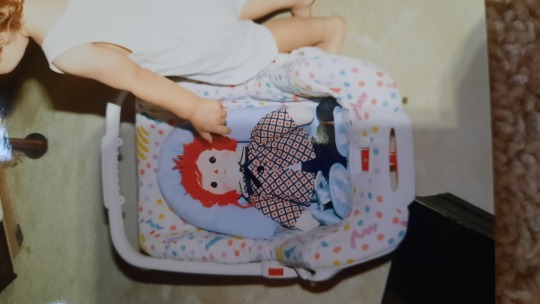
And this is what he looked like as a young doll:
You can see that he's lost his face, and his clothes. Even his sewn on shoes were wearing off. And he had more injuries to his limbs and torso. You can also see that Andy was custom made... his face and clothing were both different from commercial raggedies, as was his foot shape.
I couldn't match his original jacket fabric, so I recommended his family choose a fabric they'd like and send that to the hospital with him. In addition to new clothes, and a new face, and other wound repair, he was going to get his shoes recovered and supplemental stuffing. Once he was in the hospital, we also agreed to recover the blue part of his hat (as it was quite worn, which is hard to see in the photos.
It took a bit of time, but soon, Andy was feeling more like himself. Here he is with his wounds repaired, new face, new pants, and new shoes:
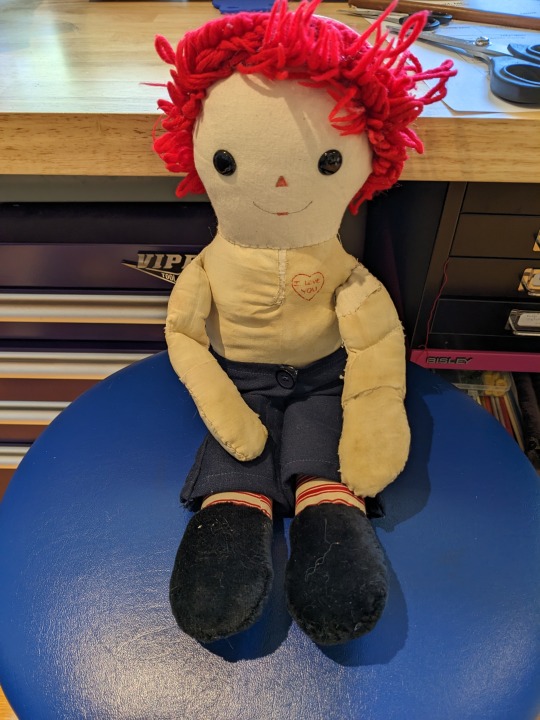
You can see the torso and arm wounds were repaired, but the face is new. His pants button on, but his shoes (now velour) are sewn in place.
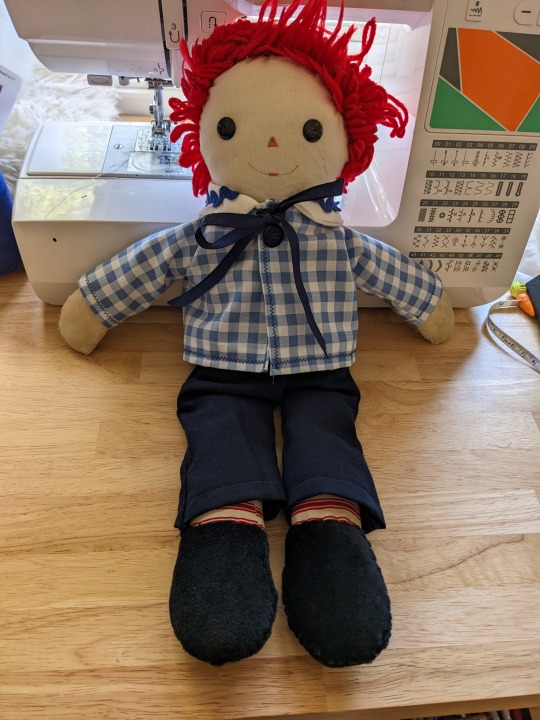
And here's Andy all spiffy in his full new outfit, ready to fly home:

His family wrote when they saw the photos:
Oh my goodness this is fantastic!! He looks amazing. I cannot thank you enough!! I love his new face and his heart is still there. Thank you for salvaging all you could. His outfit is wonderful. Thank you Thank you!!
And when Andy made it home they said:
Andy arrived!! He looks amazing and just so incredible how he came back to life. I am so happy and cannot wait to surprise my daughter.
Amazing and just could cry. This is her most valued memory from childhood. Her Andy.
Thank you, thank you.
:-)
#cloth doll repair#raggedy ann#raggedy anne#raggedy andy#cloth dolls#raggedies#dolls#doll repair#doll#cloth doll#doll clothes
2K notes
·
View notes
Text


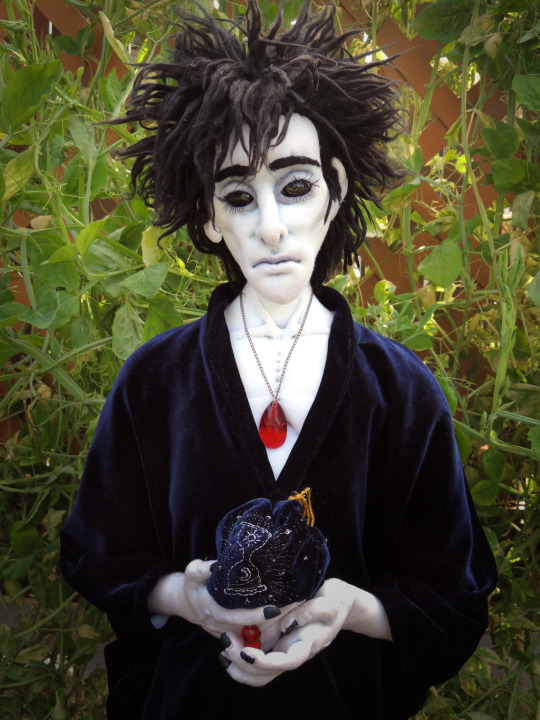
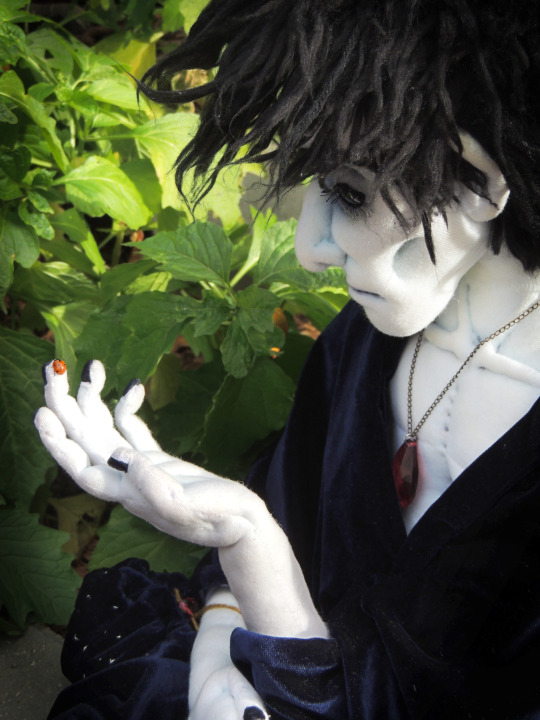

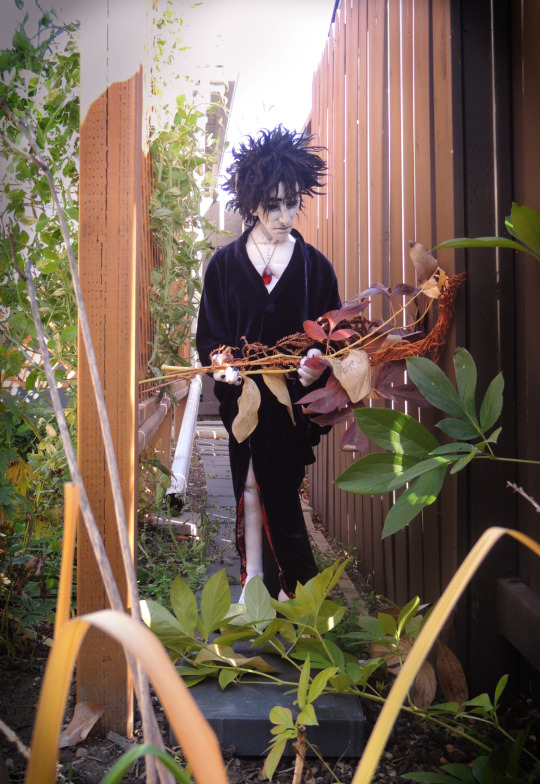
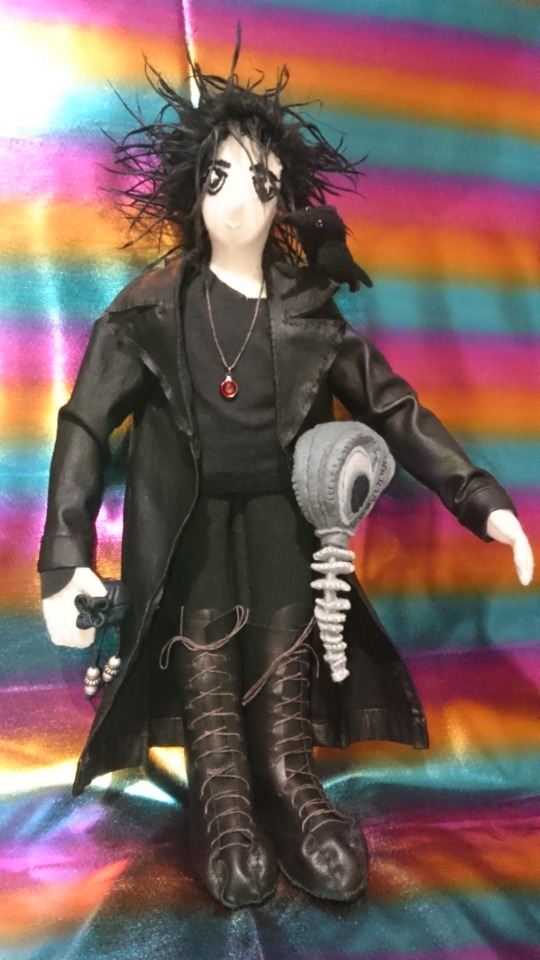
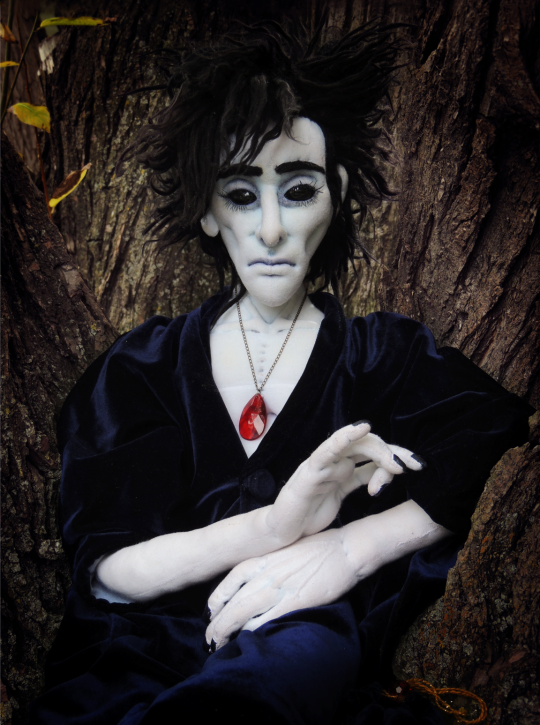
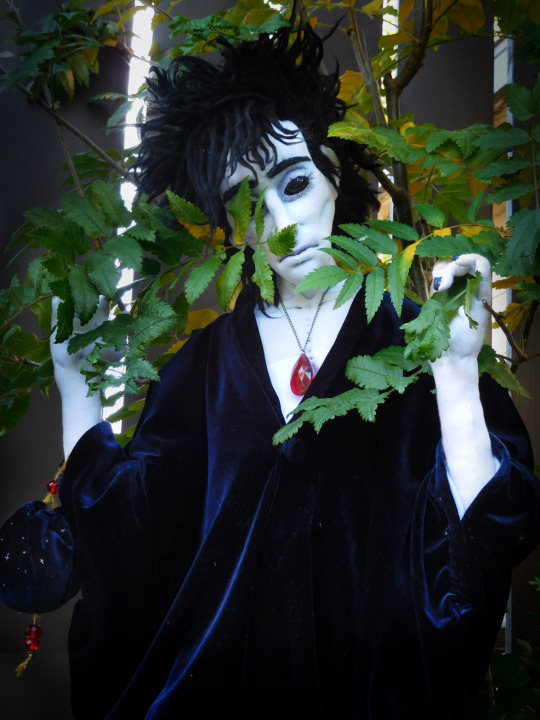
Part 2: A Dream of an Autumn Garden
A few more photos of Mr. Morpheus, continuing from my post here!
As I said on the other photoset, I'm very happy & proud of him! I'm happy I decided to take my time to get him just how I wanted & edit the photos I took nicely. I hope you all love him too. Sweet dreams~
I have included a bunch of Cool Facts about how I made him under the cut if you are so inclined!
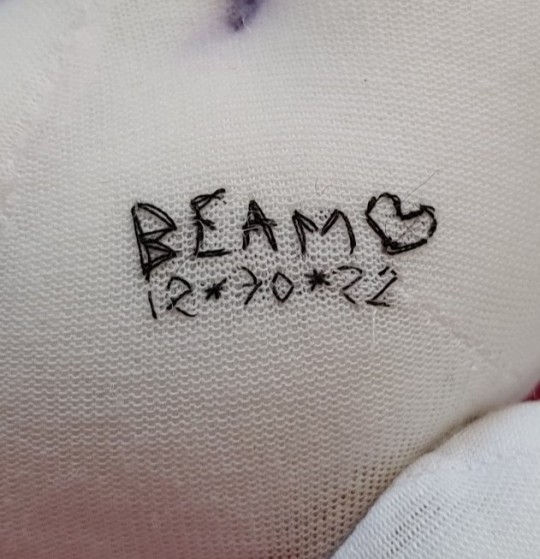
Started: Late Jan 2022 / Finished: Dec 30 2022
Approx work hours- 273 hours (worked on average every 3rd day out of 274 days; averaged 3h/session)
Times I remade something because I messed it up/wasn't happy with it: Hands- 2; Feet- 2; Head- 2.5; Body- 1; Clothes: 3
Pattern: trial, error & determination
Height: 3ft tall
Materials:
stretch jersey knit (body)
polyfill (stuffing)
brushed out acrylic yarn (hair)
star sapphire x2 (eyes)
pipe cleaner (hand armature)
wooden dowels/18 gauge wire (elbow/arm skeleton that keeps snapping I may add)
acrylic paint/pastels (shading & details)
acrylic thread (body sculpting & upper eyelashes)
stretch velvet/velvet burnout, cotton (clothes)
Fun facts:
his look was inspired by his overall appearance in the comics; I particularily like the depictions done by Jill Thompson, Mike Dringenberg & Marc Hempel!
his arms and legs are jointed in the same way as many teddy bears are: you use a washer, nut & bolt to butt-up the limb against the body internally and it gives the limbs full rotation. First time I have tried the method and it's definitely something I'll try again!
I had no idea how I was going to do the inset eyes, but I was determined to have them as some sort of stone. I had to redo his first head completely because I cut too far in! Eventually I got it to work by creating a "backcushion" with clay for the stones, and then closed and sculpted the eyelids overtop to secure them in.
You can't see in most of my photos but his eyes are star sapphire: when light hits them correctly, it causes a ✨to appear just like his eyes in the comics~!
making his hand & feet were a challenge, especially thinking about where to put the needle through to sculpt tendons, nails, etc (and also deciding how detailed to get without looking strange). I think I learned a lot tho and I'm very proud of the hands
my favorite sculpted parts are the collar bone/chest, the right hand & the nose~
because the skin is white, he gets very dirty with his black clothes, so I had to line all of them in white. He also has to soak in bleach once in a while to maintain his complexion (LOL)
A signature somehwere on his person xD
Thank you all again for your nice tags & comments so far on my work. If you guys would like for me to share some behind the scenes photos of this photoshoot, or WIP photos of me making him, let me know and if there's enough interest maybe I'll make a post down the road!
#the sandman#dream of the endless#dolls#beamies buddies#thank you all so much again for viewing him with your eyeballs! i can now rest#cloth dolls#custom dolls#crafts#also if you happen to have any questions about how i made anything feel free to send an ask!
166 notes
·
View notes
Text
instagram
They’re the cutest!! Also cornerofwoe customized the plaid their top is made of, which is deeply rad
#doll customization#dollblr#custom doll#custom doll inspo#ooak doll#monster high#frankie stein#cloth dolls#from instagram#Instagram
77 notes
·
View notes
Text


Theriault’s September 23-24th Marquis Auction Weekend is Now Online! Featuring the Jonathan Green Collection on Saturday, September 23rd and the Chris Klemm Collection on Sunday, September 24th. In-person, online, telephone, and absentee bidding available. http://theriaults.com/events/
#doll#dolls#auction#september 23#september 24#plastic dolls#composition dolls#composition doll#effanbee#ideal#kathekruse#cloth doll#cloth dolls#collectibles#rare#vintage#retro
8 notes
·
View notes
Text


#neil gaiman#the sandman#dream of the endless#morpheus#sandman fanart#cloth dolls#handsewn#handmade#matthew the raven
11 notes
·
View notes
Text
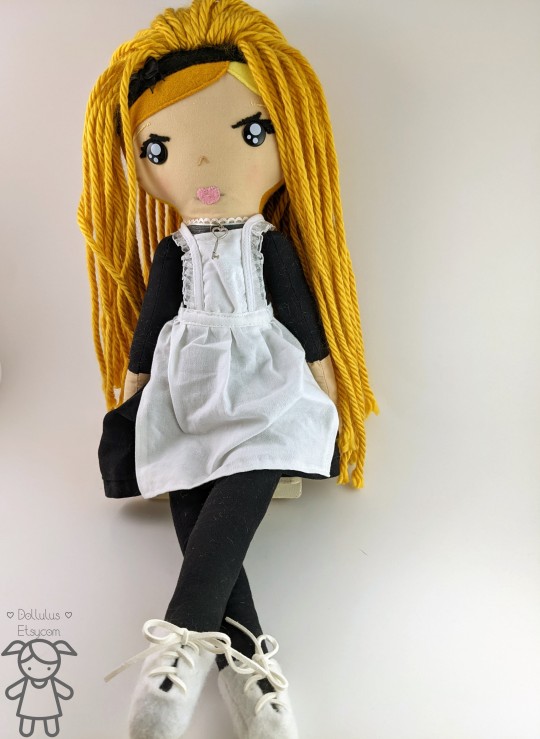
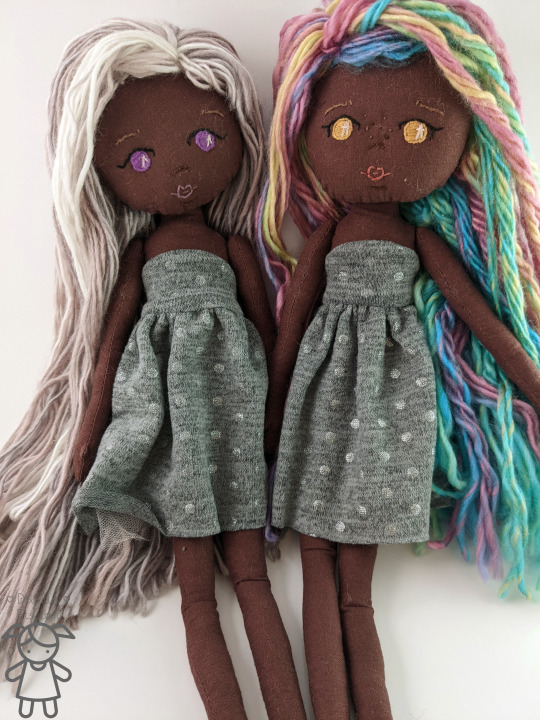

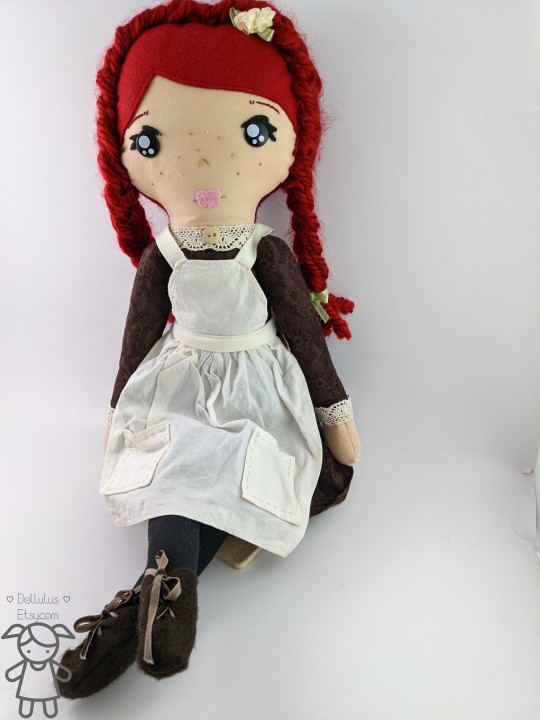
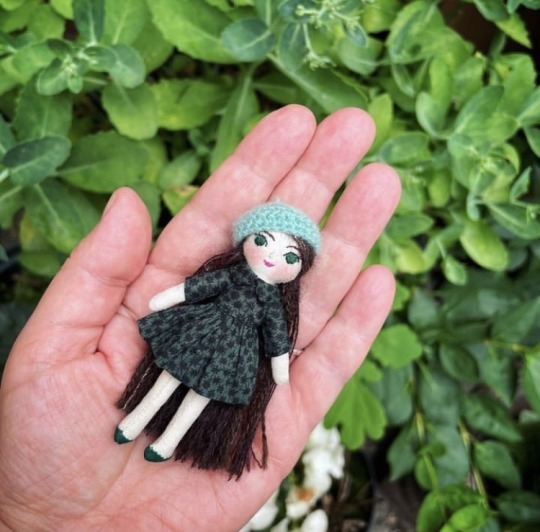
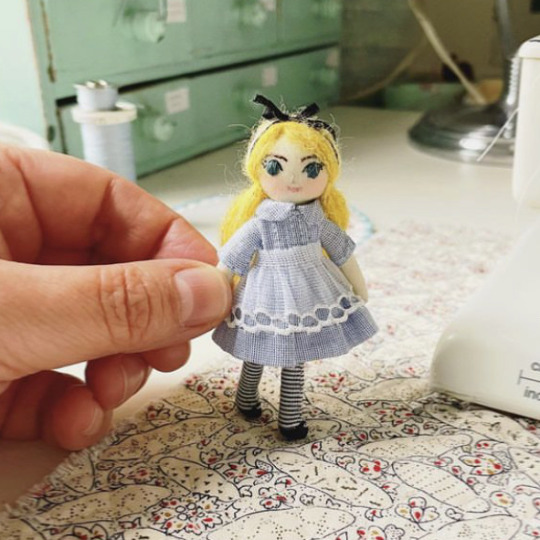
Give the gift of a handmade doll this holiday season! All dolls made with love by me! Check out my Etsy or Mercari.
Dollulus.etsy.com
MERCARI
#holidays#gifts#christmas#hannukah#dolls#handmade#etsy#mercari#doll#dolly#dollies#home made#cloth dolls#rag dolls#anne of green gables#anne with an e#alice#alice in wonderland#gingermelon#ginger melon#x-mas#presents
5 notes
·
View notes
Text


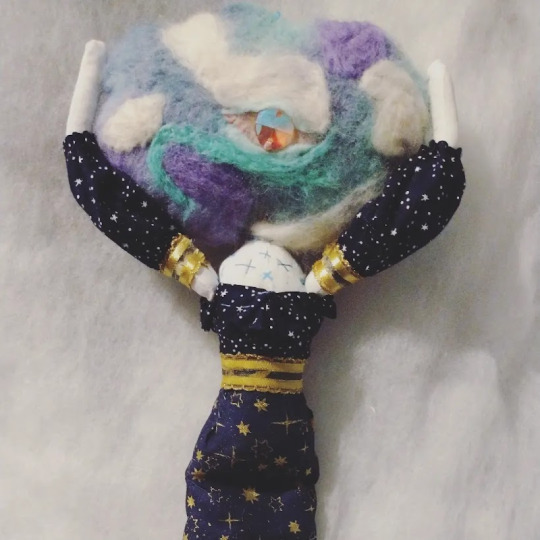
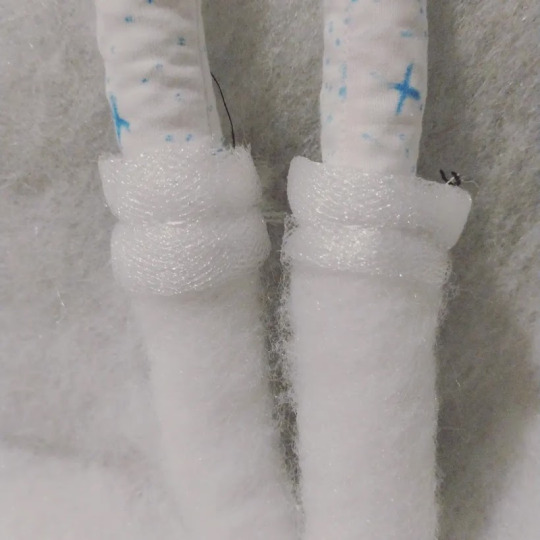

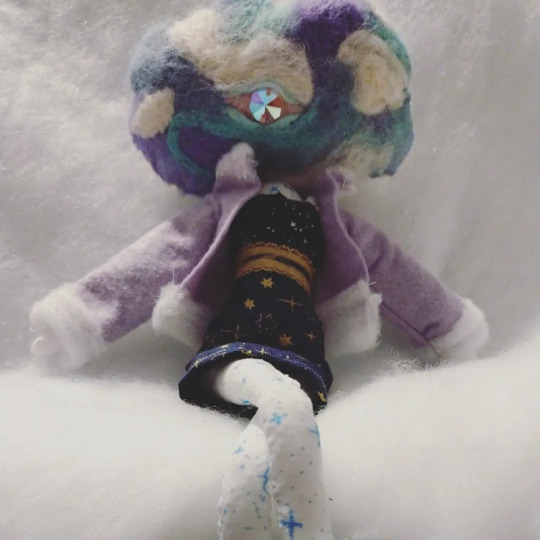
An Eldritch Cloud Lady 💜
Her name is Idris! I've been meaning to post about my doll making more but I've been super busy with college and whatnot until now! I can't wait to share more of my creations with you all!
I am currently taking doll commissions and am planning on making some more cloud people to sell among other things :)
DM me if you're interested!
#sewing#art#artists on tumblr#my dolls#doll making#cute aesthetic#eldrichcore#eldrich horror#witchcore#magiccore#cloth dolls#dreamcore#surrealism#aesthetic
15 notes
·
View notes
Text
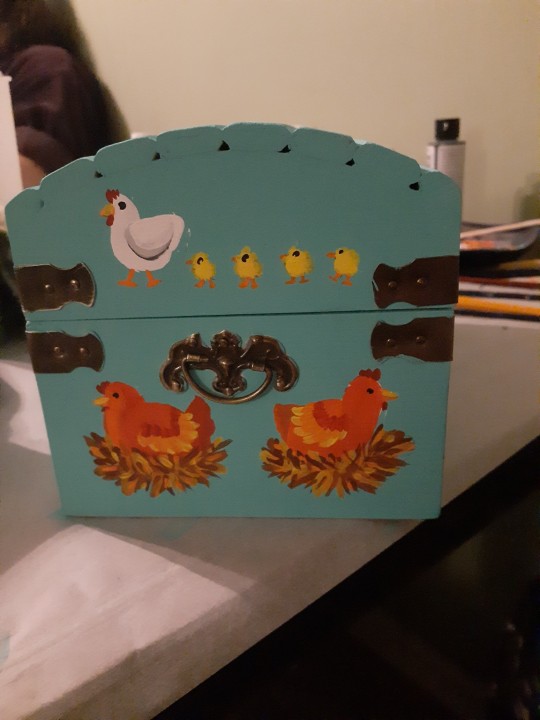
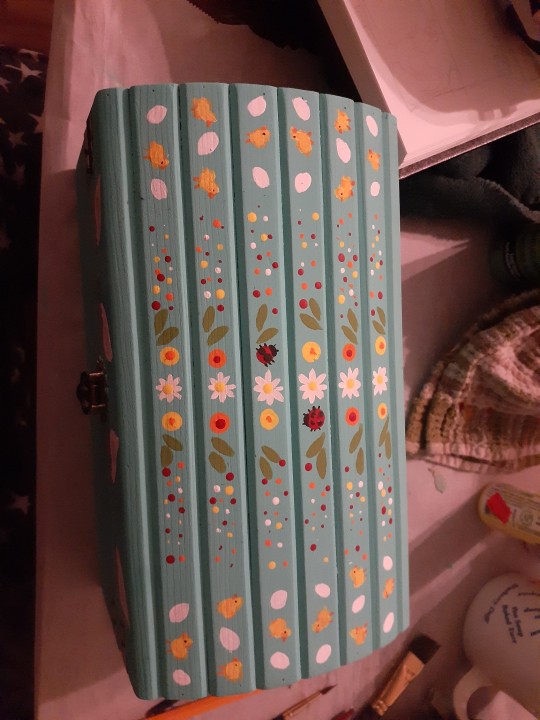


So each of these dolls I painted a chest for their clothes to go into. This little girl loves chickens and really really wants chickens that are home and so of course I had to put chickens on her chest. There's even a fox hiding under the coop and on the back is a is a chopping block with an ax. I'm really happy with how this turned out and it fit everything that I made for her doll, plus a little bit of extra room this way in future. Christmases I can send her some more clothes and accessories as Christmas presents
12 notes
·
View notes
Text
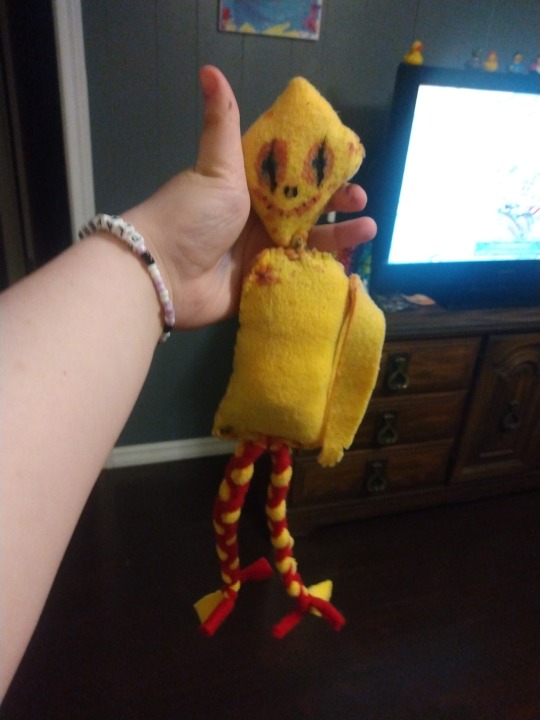

His name is Jerry
#tw creepy#Creepy doll#hand made#Second doll I've ever made#Doll#hand made doll#Cloth doll#cloth dolls#fabric doll#Fabric dolls#Love making creepy gorey stuff#Oh#Tw gore#Kinda#tw fake gore#Doll gore
6 notes
·
View notes
Text


5 notes
·
View notes
Text

Little man I made in uni, his name is Innard
4 notes
·
View notes
Text
Fairy Godmother
One of you kind people asked to see the Fairy Godmother dolls I make.... they vary quite a bit, but here are a few of the original ones. The first photo is a bit blurry, but she has wire glasses and earrings, and bells on her skirt with a velvet overdress.
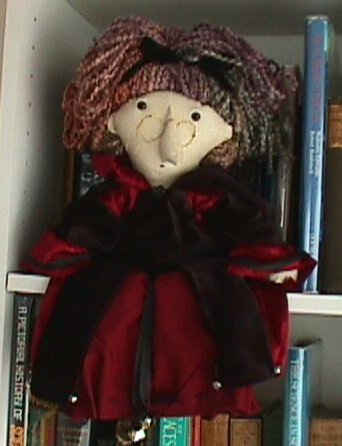
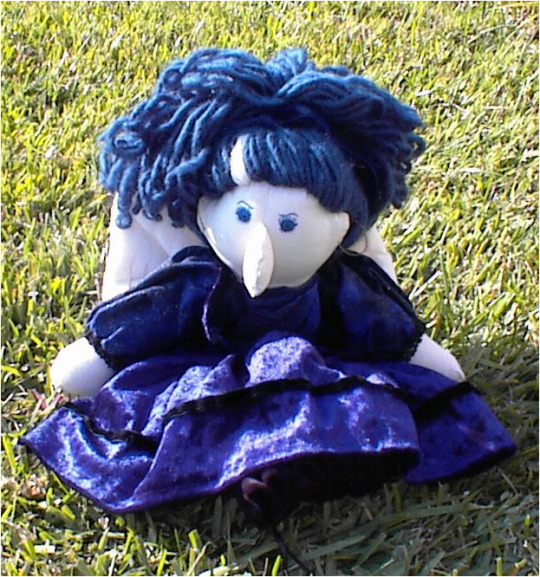
This one doesn't have glasses, but has a velvet dress with lace, and has wire hoop earrings.
They all tend to have wings, and multicolored hair. These two are based on the original design where they all had pouches hidden under their skirts, so they could hide secrets (or secret stashes).
This one had the pouch hidden in her legs:

The fairy godmother is also the logo for the dolls I create. Here's that:

Then as an added bonus, here's my steampunk Cinderella I made. She's a reversible doll... rags on one side, gown on the other. I loved her ball gown, and it feels almost fairy godmother with her removable wings.

I hope you enjoy this side forray into some of the dolls I make.... more stories from the hospital in coming weeks, including some Christmas tales.
#cloth dolls#fairy godmother#fairy godmother doll#cinderella doll#reversible doll#topsy turvy doll#steampunk doll#dolls
994 notes
·
View notes
Text


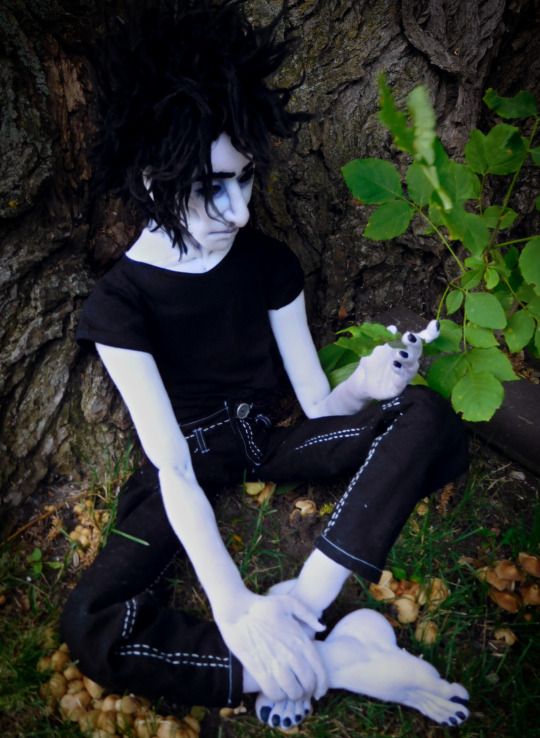

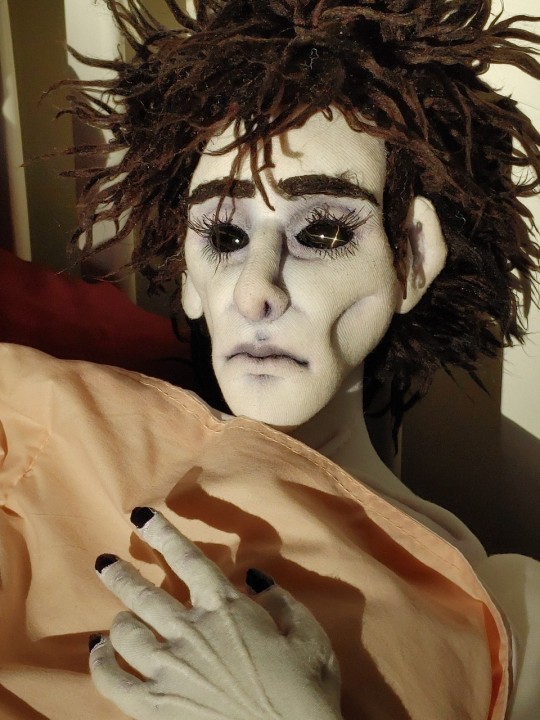
Part 1: A Dream of the Trees
He is known by many names- Prince of Stories, Shaper, Lord Morpheus, Dream of the Endless - but many a child 'round the world hearing stories at bedtime know him simply as The Sandman.
It's my pleasure to share this project with you after sitting on it for so long! The Sandman (Neil Gaiman) is a profoundly important & personal piece of literature to me, & Mr. Dream such an important figure, I absolutely needed to bring him into the waking world. I worked, reworked & re-reworked on my interpretation of him until finally saying "done!" in December of 2022.
I learned so much about what I could accomplish sculpting with fabric, I'm very proud of him & love him terribly. I really hope you will enjoy him too!
(more photos to come!)
#the sandman#dream of the endless#dolls#beamies buddies#it feels weird to share him after keeping him secret so long#like ive been hiding a secret lovechild in my attic and now im confessing him to you#im nervous! but also very happy#i have so much to say and share about the making of this doll that perhaps i can make a 'behind the scenes/making of' post#but that is for another day! i hope you like him and i want you to know i tuck him in and give him a smoochie every day#cloth dolls#crafts#handmade dolls#also fyi he is approx 3 feet tall :)
105 notes
·
View notes
Text


"CREEPY DOLL w/ Photo $50" **Not my pics**
#marketplace#dolls#creepy#i like it#random shit#people sell the weirdest shit on marketplace#people are strange#cant tell if she made it or found it in a goodwill bin#50 bucks#its yours#photo included#ill stop now#handmade#cloth dolls#vintage#vintage photography
3 notes
·
View notes
Photo

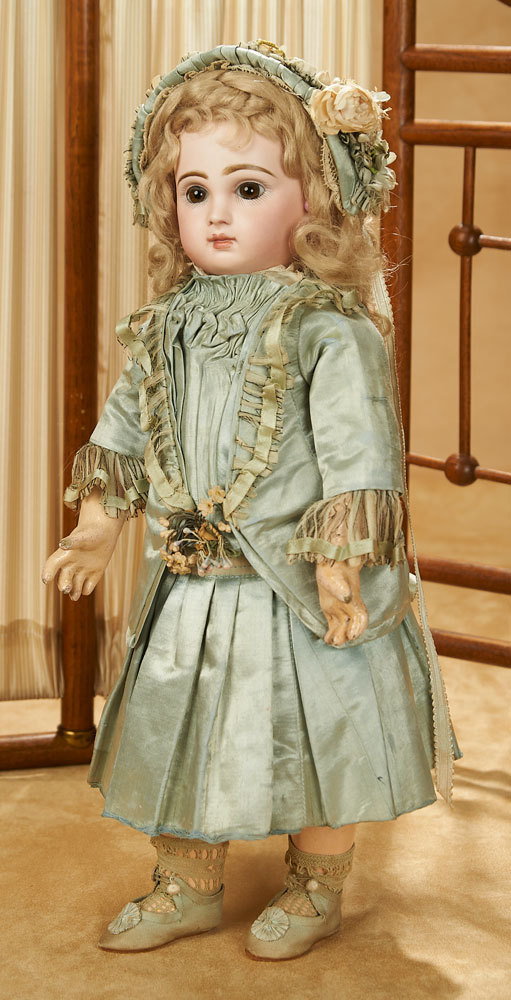


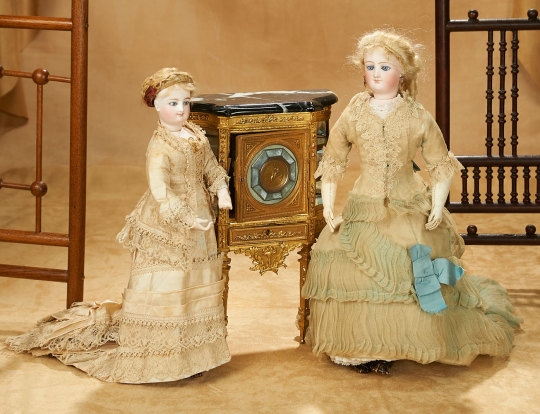

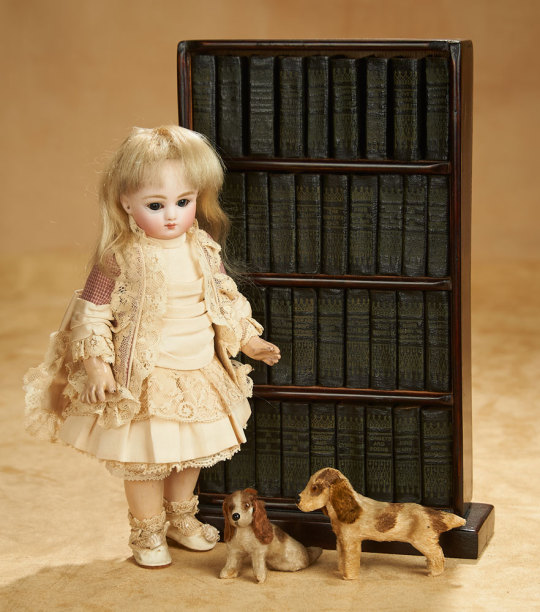

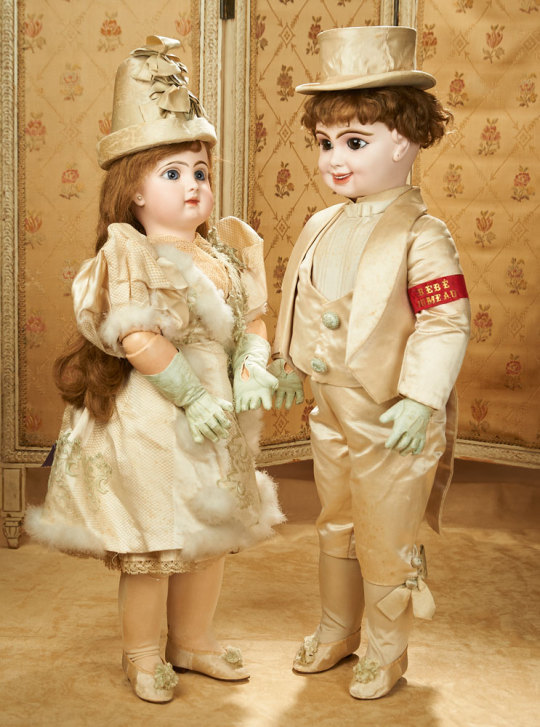
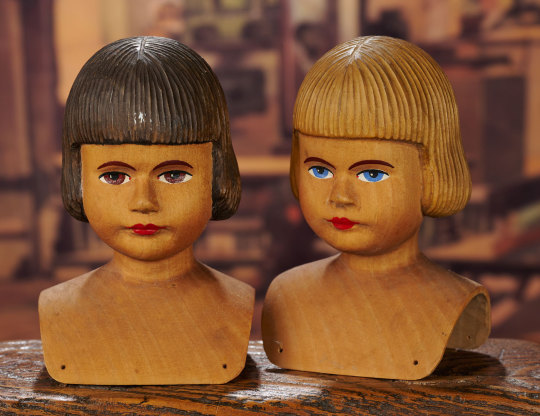
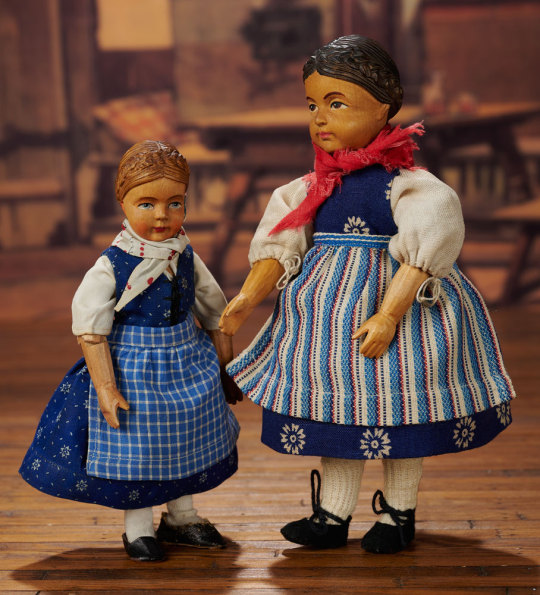
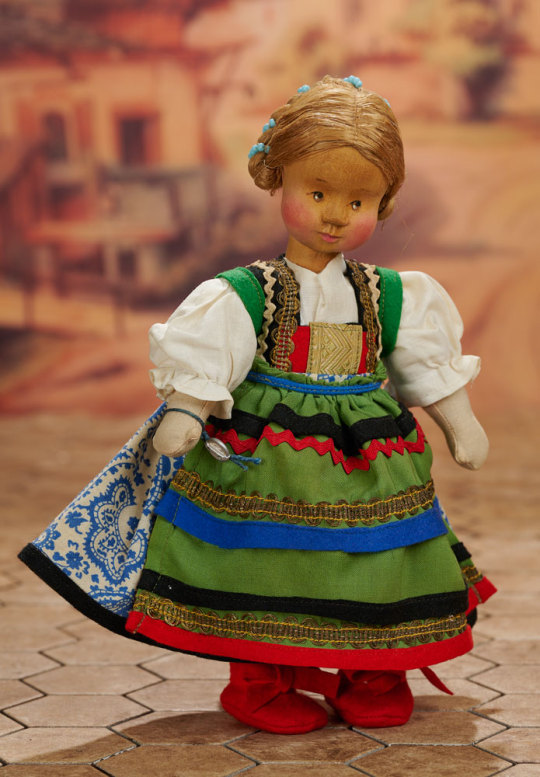
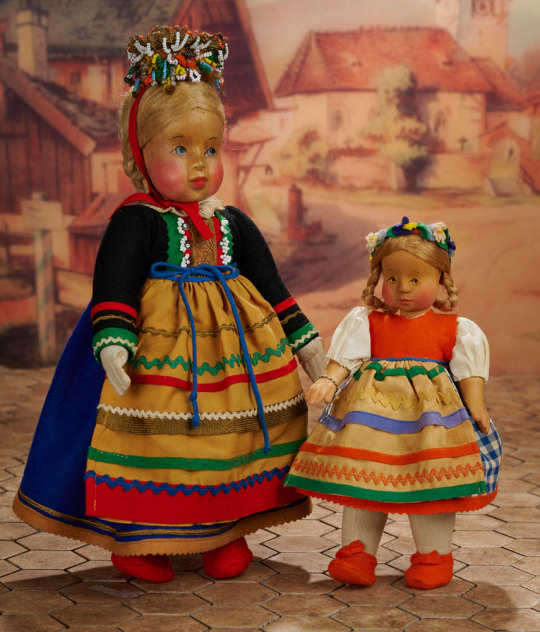
"Dreams" January 7-8, 2023 Marquis Auction Weekend Featuring the Kralovetz Collection. More than 500 wonderfully-preserved dolls are presented ranging from French poupées and bébés, to German Art Characters, to Mignonettes. Live internet, absentee and telephone bidding available. For more information email [email protected] or call 410-224-3655. A collectible book is available for the auction at Theriaults.com.
http://theriaults.proxibid.com
http://www.theriaults.com
#theriaults#antique dolls#doll#dolls#auction#january 7#january 8#bisque dolls#cloth dolls#mignonettes#rare dolls#collectible#antique#rare#vintage#retro#bebe#jumeau#poupee#bru#automata#fashion#doll fashion#fashion dolls#vintage dolls
28 notes
·
View notes
Text
Delirium of the Endless.


The finished doll.


#art#sandman fanart#the sandman#delirium of the endless#doll maker#cloth dolls#cute#neil gaiman#delight
5 notes
·
View notes
Last Seen Blogs

the-best-thing-about-october
The Best Thing About October...
dedicated-not-obsessed
dream big

vipclifford
if you could love me again

rolandart
rb.photo.art

sambart93
akai sono kuchibiru