#convert mp4 to avi
Text

I added noise to mask some of the artifacts I was getting, but thanks to @warmsol, I tried ezgif and then brought the gif into photoshop to edit it further. It's a bit tedious, but definitely works!!
#uses fraps to record video then has to convert the AVI to mp4 to import it into ezgif and then download the gif and bring it into photoshop#the things i do just to make cute little gifs#maybe one day i'll try to fix photoshop and see if i can get it to import video again but until then this works#sdv#samhain farm
2 notes
·
View notes
Text
snow in the del sol valley
#* mine.#hallasimss#ts4#the sims 4#sims4#ts4 gameplay#ts4 screencaps#ts4 screenshots#ts4 video#simmer#simblr#ts4 simblr#black simblr#black simmer#( * the hell i went through to get this recorded. my God#| this is from Ishita's back porch and despite what they like to say sometimes tab mode is not your best friend. it kept sending me#| off the f*cking cliff. had to keep adjusting. all my camera setting slots are filled for sim photoshoots so i couldn't f*ck with that#| and once we got that done the sorrows continue. had to convert the file from AVI to MP4 bc the computer's default player#| would not read it. Windows hates me. i had to download the legacy photo app to color this properly bc i don't use re/gshade and even with#| the sunblind mod everything is so damn blue at this hour [read: half past 9 in the morning]#| AND SRWE didn't do sh*t. the video is still blurry af and i am ready to bite and maim so do not zoom in. pls. spare me the embarrassment#| anyway i'm dropping this and shutting tf up. maybe i'll have better luck with this kind of sh*t in Sulani or Tartosa or something rip#| local gay attempts filmmaking and fails miserably.txt )
12 notes
·
View notes
Text
Convert avi to mp4 mac software

Convert avi to mp4 mac software movie#
Convert avi to mp4 mac software mp4#
Convert avi to mp4 mac software software#
Convert avi to mp4 mac software movie#
By default, iPad, iPhone & iPod can only play specific movie types, like MOV.īut WALTR converts AVI to MOV on-the-fly simply by swapping its container. Send files to your iPhone wirelessly, using Wi-Fi network.Ĭonverting AVI to MOV on a Mac and Windows is made possible with the use of automatic AVI converter software. Put any movie, music or ringtone onto your iPhone blazingly fast Support of any iPhone, iPad or iPod ever created! WALTR 2 is a universal tool to put any media into your Apple device!Ĭonvert AVI to MOV video format without using any third-party converters First, click on the gear in the bottom left corner of the app, then select “Enable Wi-Fi Connectivity”.Īnd also: don’t know if you have anything to compare this with any other apps but the procedure was shockingly fast, right? You can also use Wi-Fi network to import movies onto your iPhone without even plugging it in. The average speed is up to 2GB per minute! Drag the AVI file and drop into WALTR’s drop-zone. In this case, we’ll use an AVI format movie that we will convert into MOV on-the-fly. Immediately, WALTR 2 will correctly identify your device and show how much free storage space it has.Ī window will pop up asking you for the AVI, MKV, MP4, MP3 files. Plug-in your device & open the folder with AVI files.Ĭonfirm that you “Trust the computer” if needed. exe file.Īfter you have done so, WALTR will automatically be installed on your Mac and you’ll be able to launch it using from the ‘Applications’ folder or simply type in WALTR in the ‘Spotlight’. If you’re on a PC, simply proceed with the steps for installation of WALTR after launching the. Then drag the WALTR icon to the ‘Applications’ folder as requested in the appeared window.
Convert avi to mp4 mac software mp4#
To this date, with confidence I can say that this IS the only EASIEST and FASTEST way to import AVI, MKV, MP4 & MOV files into your iOS device (iPad, iPhone, iPod Touch) using computer with Mac & Windows OS.Ĭlick on the button down below for the freeload and then mount the downloaded Waltr.dmg *HEADS UP* Before we continue, I assume you’re reading this because you have an iPad or iPhone right next to you that will be used to put AVI files on it right away.īy right away I mean without even launching iTunes and doing any sync steps. Here’s an Easy Way to Convert AVI to MOV on a Mac (and Windows): Besides lighting fast conversion, it’s also easy to use and very user-friendly for those who simply want to put AVI files into their iPad or iPhone. The app I’m going to recommend in this article is a “foot”that breaks Apple’s format barrier.
Convert avi to mp4 mac software software#
This develops a need for a media transformation software that is third-party. To watch your favourite AVI files on any of your iDevices, Apple makes you convert AVI to MOV or MP4 compatible formats. This is a direct AVI to MOV converter for Apple devices. Converting AVI to MOV on a Mac and Windows is pretty easy to do with WALTR 2.
0 notes
Text
Handbrake wont convert mp4 into avi

#HANDBRAKE WONT CONVERT MP4 INTO AVI HOW TO#
#HANDBRAKE WONT CONVERT MP4 INTO AVI MP4#
But the video quality therefore may be lower than that encoded with Xvid. You can set the video encoder as MPEG-4 codec.
#HANDBRAKE WONT CONVERT MP4 INTO AVI MP4#
Here, you will find advanced converters that can be installed on desktop computers and great online converters that can be used for saving AVI files in MP4 format. For Handbrake 0.9.3 or above like the latest Handbrake, it shall be a little tricky to convert MP4 file to AVI format as AVI container and codec are dropped. You won’t face any difficulties when using these options. I have compiled the list of the best free video converters that will help you quickly convert AVI into MP4. All of them are quite easy and can help you solve this task without any hassle. There are several ways to convert AVI into MP4 online.
Convertfiles - Convert clips from YouTube to MP3.
Online Converter - An impressive choice of conversion options.
HD Video Converter Factory - Allows cropping and cutting clips.
DVDFab Video Converter - Converts 2D to 3D video.
Wondershare UniConverter - For burning files to discs.
Freemake Video Converter - Many preset profiles available.
Any Video Converter - Supports 4K resolution.
The time it takes depends on the file size of the video file, the output quality settings you choose, your computer’s hardware, and the software (e.g., video converter). Handbrake is open source and completely free of any attached. Moreover, they often come packaged with toolbars or malware so what started off as an innocent attempt to simply convert a video turns into a trip to the computer store to get your laptop fixed.
#HANDBRAKE WONT CONVERT MP4 INTO AVI HOW TO#
HandBrake will now convert the MP4 video to another MP4 video with hardcoded subtitles. Handbrake Convert To Mpeg2 Software On Your Handbrake Convert To Mpeg2 How To Use It. VideoProc - Decreases the video frame rate Handbrake convert mkv to mp4 with subtitles.
0 notes
Text
Simple free avi to mp4 converter

Simple free avi to mp4 converter how to#
Simple free avi to mp4 converter mp4#
Step 3: Then, go to the Convert all files to part. In the Video Convert section, click Add Files to upload the AVI file you want to convert. Step 1: Download and install MiniTool Video Converter on your Windows PC.
Simple free avi to mp4 converter how to#
Here is how to use MiniTool Video Converter to convert AVI to MP4. It is a comprehensive file converter, which not only allows you to accomplish your various video/audio conversion tasks but also enables you to download videos, audio tracks, playlists as well as subtitles from YouTube.
Simple free avi to mp4 converter mp4#
Whether you want to convert AVI to MP4 or convert MP4 to AVI, MiniTool Video Converter is a great choice for you. If you are a Windows user, you can try the following converters to convert AVI to MP4. If you want to get the detailed information about MP4, this post - What Is MP4 and What Are the Differences Between It and MP3. Almost all original quality is preserved. Reducing the file size does not affect the file’s quality. With the high compression used in MP4 videos, this makes the file size much smaller than other video formats. As the most popular formats, it can be played on multiple platforms, so there is no need to worry about the compatibility problem. This file format can store audio and text. What is MP4? MPEG-4 Part 14, so-called as MP4, is a digital multimedia container format. To get more information about AVI, you can refer to this post - What Is AVI Format and What Are the Cons and Pros of It. Similarly, most media players (such as VLC players) can also recognize it. It is mainly used as a container for TVs, movies, and other videos.ĭue to its high compatibility, AVI files are supported not only on Windows systems but also on many other major platforms such as Mac, Linux, and Unix. It is a file format that combines audio and video data into a file for simultaneous playback. What is AVI format? AVI, also known as Audio Video Interleaved, which was developed by Microsoft in November 1992.
0 notes
Text
Free convert mp4 into avi

#Free convert mp4 into avi how to
#Free convert mp4 into avi movie
#Free convert mp4 into avi mp4
#Free convert mp4 into avi install
If you are a Mac user, you can read this part. There are 2 converters for the Mac users to convert AVI to MP4. During the conversion process, damaged files can be repaired, so that the conversion quality is not damaged.Support almost all types of multimedia formats.Step 4: Then, click the Start button to convert AVI to MP4. After that, click the OK button to get started. You can click the Output Setting button to change the audio quality. Step 3: Choose Add File to add your AVI video file.
#Free convert mp4 into avi mp4
Step 2: Click Video and find the MP4 part. Then, launch it to get its main interface.
#Free convert mp4 into avi install
Step 1: Download and install Format Factory on your computer.
#Free convert mp4 into avi how to
Now, let’s see how to use it to convert AVI to MP4. Format Factory provides audio and video file editing, merging, splitting, video file mixing, cropping and watermarking. Besides, it supports you converting any video format to OGG/MP3/WMA/AAC/WAV/AMR. You can also try Format Factory to convert AVI to MP4 free.
#Free convert mp4 into avi movie
Make video and audio files compatible with mobile devices.Īlso see: 2020 Top 4 Free Movie Video Converters for Windows 10 2.Optional output format and fast conversion speed.Support 1000+ conversions between videos and audio formats.100% free, no bundles, no ads, and no watermarks.Step 4: Then click the Convert button to convert AVI to MP4. Besides, you can choose the video quality and resolution. Navigate to the Video tab and scroll down to choose the MP4 file format. Step 3: Then, go to the Convert all files to part. In the Video Convert section, click Add Files to upload the AVI file you want to convert. Step 1: Download and install MiniTool Video Converter on your Windows PC. Here is how to use MiniTool Video Converter to convert AVI to MP4. It is a comprehensive file converter, which not only allows you to accomplish your various video/audio conversion tasks but also enables you to download videos, audio tracks, playlists as well as subtitles from YouTube. Whether you want to convert AVI to MP4 or convert MP4 to AVI, MiniTool Video Converter is a great choice for you. If you are a Windows user, you can try the following converters to convert AVI to MP4. If you want to get the detailed information about MP4, this post - What Is MP4 and What Are the Differences Between It and MP3. Almost all original quality is preserved. Reducing the file size does not affect the file’s quality. With the high compression used in MP4 videos, this makes the file size much smaller than other video formats. As the most popular formats, it can be played on multiple platforms, so there is no need to worry about the compatibility problem. This file format can store audio and text. What is MP4? MPEG-4 Part 14, so-called as MP4, is a digital multimedia container format. To get more information about AVI, you can refer to this post - What Is AVI Format and What Are the Cons and Pros of It. Similarly, most media players (such as VLC players) can also recognize it. It is mainly used as a container for TVs, movies, and other videos.ĭue to its high compatibility, AVI files are supported not only on Windows systems but also on many other major platforms such as Mac, Linux, and Unix. It is a file format that combines audio and video data into a file for simultaneous playback. What is AVI format? AVI, also known as Audio Video Interleaved, which was developed by Microsoft in November 1992.
0 notes
Text
Bulk convert avi to mp4 mac

#BULK CONVERT AVI TO MP4 MAC FOR MAC#
#BULK CONVERT AVI TO MP4 MAC MP4#
Conversion to predefined formats for specific devices like Apple, Android, Gaming Consoles, and others are also supported. To enhance the overall visual effect of your videos and personalize it, there is a complete video editor available with features like trim, crop, watermark, and others.
#BULK CONVERT AVI TO MP4 MAC MP4#
Convert your AVI files to MP4 and other formats without any hassles with the program. The Mac version of this complete video toolbox allows converting all types of files to iOS-compatible formats. Still, if you are looking for professional software that is fast, accurate, feature-packed, and offers lossless quality files, then Wondershare UniConverter (originally Wondershare Video Converter Ultimate)is the best choice. There are many tools available for converting AVI videos to MP4. Best Video Converter for Lossless AVI to MP4 Mac Conversion
#BULK CONVERT AVI TO MP4 MAC FOR MAC#
Free Online AVI Video Files to MP4 Converter for Mac How to Convert AVI to MP4 Mac Using QuickTime Wondershare UniConverter for Macįind more video ideas from Wondershare Video Community.The following part discusses in detail the best ways to convert AVI to MP4 Mac in original quality. Hence, converting AVI videos to a compatible format like MP4 is needed. For example, you would play your AVI files on iPhone, iPad, and other devices, however, many times AVI is not compatible with Mac devices or mac editing and other programs, even though AVI is a widely used format as it keeps the files compressed while maintaining the quality. There are some situations when you would need to convert AVI files to MP4 on your Mac system. 4.15 10 Easy Way Do Split-Screen on Mac.4.11 Best 12 Alternatives to CleanMyMac.2.7 Use QuickTime to Record Screen on Mac.1.26 Toast Titanium Alternative for Mac.
0 notes
Text
Convert avi to mp4 for mac free

#CONVERT AVI TO MP4 FOR MAC FREE MOVIE#
#CONVERT AVI TO MP4 FOR MAC FREE MP4#
#CONVERT AVI TO MP4 FOR MAC FREE MOVIE#
Locate any movie or video in any format and drop it into the window. You will now see a window that will ask you to drop the desired AVI files you want on your iPad.
#CONVERT AVI TO MP4 FOR MAC FREE MP4#
Drag your AVI files into the AVI to MP4 converter. At first, install it & connect your device. The best thing is, they appear in your native Videos app without syncing via iTunes. The app allows you to transfer AVI files directly to your iPad without having to worry about which format to choose for converting such as MP4. Be sure to watch this video showcasing this AVI to MP4 Converter in action: This is the same utility that transfers any file type to Apple devices bypassing iTunes. The app, which is introduced in this article will convert AVI to MP4 on Mac and Windows in 3 Steps. How to Convert AVI to MP4 on a Mac & Windows: Yes, because we know that playing non-Apple-approved media formats is a continuous source of aggravation for iPad owners. Will there be a definitive solution to easily convert AVI to Mp4 and even transfer movies that are in AVI format (or MKV) right away, straight into iPhone or iPad native Video app? Some web sources say there’s no way to achieve this others reckon by converting the files, it’s possible but only, whilst others suggest that there’s a need for a specific app that costs tons of money. You might have come up against a brick wall trying to discover if it is possible to convert AVI to MP4 to play on the iPad. Convert AVI to MP4 for playback on your iPad in a quick way! There’s a simple solution that allows you to convert AVI to MP4 on Mac or Windows in a few steps.
0 notes
Text
Free avi to mp4 converter download

#FREE AVI TO MP4 CONVERTER DOWNLOAD MP4#
#FREE AVI TO MP4 CONVERTER DOWNLOAD INSTALL#
#FREE AVI TO MP4 CONVERTER DOWNLOAD SOFTWARE#
#FREE AVI TO MP4 CONVERTER DOWNLOAD FREE#
#FREE AVI TO MP4 CONVERTER DOWNLOAD MP4#
FFmpegįFmpeg is another open source command line AVI to MP4 converter. Step 2: Choose a target device or MP4 from "Format" area and hit "Convert to WebM SD" to start converting. Step 1: Connect your phone to the Mac computer and launch the program. It is easy to transfer files to MP4, WebM, OGG, MP3, etc. If you want to convert AVI to device, it also leaves you the option to convert video to various devices directly. It supports drag-and-drop command to convert AVI to MP4 for free.
#FREE AVI TO MP4 CONVERTER DOWNLOAD FREE#
Let's check what is also supported apart from free converting AVI to MP4. Miro Video Converter is a free AVI to MP4 converter for Mac, Windows and Linux. Step 2: Choose MP4 on the "Container" list and click "Start" button. Drop a folder to save the output in "Destination" area. Step 1: Go to "Source-> Open File" to import the AVI video into the program. How to use Handbrake to convert AVI to MP4 What's more, it offers extensive custom options. When converting MP4 files, it supports 4K resolution AVI to MP4 conversion. Besides, it extracts MP4, MOV, FLV, WMV, MP4, etc. It converts AVI videos to MKV, M4V, MP4, AAC, FLAC, MP3, etc. Handbrake is an open source AVI to MP4 converter. After importing one or several AVI videos and choose MP4 from the dropdown list of "Output format" as the output format, and one-click on the Convert button will complete the job. This free AVI to MP4 converter is easy to use. Last but not lease, it lets you batch convert AVI to MP4 on computer. As for the editing features, it can edits opening theme and ending theme. It customizes the output settings like codec, bitrate, resolution (up to HD). Apart from encoding AVI to MP4, it also lets you encode AVI format to more than 300 formats, and convert MP4 to AVI and other formats for free. Aiseesoft Free Video ConverterĪiseesoft Free Video Converter is another popular video converter.
#FREE AVI TO MP4 CONVERTER DOWNLOAD SOFTWARE#
Best 10 Free AVI to MP4 Converter Software for Windows and Mac 1. Once you have finished all the steps above, you can click the "Convert All" choice at the bottom of the interface. Then, hit the inverted triangle in the box next to the "Convert All to" text to choose the MP4 format. Regarding this step, you can just skip it directly if you don't need to modify or polish this video, you can skip it directly. After that you can adjust video rotate, crop, watermark, filter and effect according to your requirement. This option is the second one at the top of the interface. Afterwards, click "Add Files" icon to choose the video that you intend to convert it to MP4 online.
#FREE AVI TO MP4 CONVERTER DOWNLOAD INSTALL#
Step 1: Download and install software on your PCĪbove all, just download the AnyMP4 Video Converter Ultimate from AnyMP4 website, and then you should install it on your computer.Īfter you finish installation, open this application. How to use AnyMP4 Video Converter Ultimate Add or delete subtitle, extra-audio track, etc. It also has the capacity to extract video and audio from DVDs. The built-in video editor offers basic editing tools, like clip, merge, rotate, mirror, watermark, effects, 3D, etc. This video converter supports almost all video and audio formats. It is able to convert video formats without damaging quality, including the resolution from SD to HD, even 4K UHD. Here, we recommend the best way to convert AVI to MP4 on computer with AnyMP4 Video Converter Ultimate. However, another way of exporting AVI to MP4 free has some limites to convert AVI to MP4 like file size, file number, etc. The above free AVI to MP4 converter can easily help you to free transfer AVI to MP4 for free. How to Convert AVI to MP4 (Recommende Way) Top 5 AVI to MP4 Converter Online and Free Best 10 Free AVI to MP4 Converter Software for Windows and Mac
0 notes
Text
How convert avi to mp4 mac

How convert avi to mp4 mac how to#
How convert avi to mp4 mac mp4#
How convert avi to mp4 mac mp4#
VLC provides one kind of simple way to make the AVI to MP4 conversion. After that, you can click the Start button to start the video conversion from AVI to MP4. Then set MP4 as the target format from the Profile option. When you get to the Convert window, you can select a destination folder for the converted MP4 video. In the drop-down list of Convert/Save, choose the Convert feature. That means you can also use VLC to convert them to MP4 with ease. VLC highly supports any frequently-used video formats like AVI, MKV, FLV, ASF, SWF, 3GP, RMVB, DAT, VOB, and more. Click Add button to import the AVI video(s) you want to convert to MP4. Select the Convert/Save option from the drop-down menu. When you enter its home window, click the Media menu on the top-left corner. You can easily freeload the latest version of VLC media player from its official site. First, you need to install and open VLC on your computer.
How convert avi to mp4 mac how to#
The following guide will show you how to make the conversion in details. It has the capability to convert AVI to MP4 or convert WMV/MOV/MP4 to AVI. More than just a powerful media player, VLC can also work as a video transcoder or converter to help you convert many formats. It is compatible with almost all systems like Windows, macOS, Linux, Android and iOS. VLC Media Player is a free and open-source media player that enables you to play various video and audio files. Professional Way to Convert AVI to MP4 without Quality Loss
0 notes
Text


Two frames from my silly LMK video. heheh
145 notes
·
View notes
Text


No point, just cut up some gifs.
I would be grateful if you can advise me a good converter from mp4 or avi to gif.
41 notes
·
View notes
Note
If I wanted to get into making gifs, how does one start? WHERE does one start?
Sorry for the late response! I feel like I might not be the best person to ask, just because I don't make my gifs in the most typical way. There are a bunch of ways to make gifs, and none of them are wrong per se, but most other gifmakers go frame by frame, whereas I like to import the video files directly onto the Photoshop timeline. My way was easier to learn, but can be a little limiting in what I can do with them.
I'll include an updated tutorial on how I make mine under the cut below, but if you'd like to go the more typical route, then I recommend checking out one of the popular gif making tutorials, such as this one, as a base tutorial and then playing around with it.
How I Make My Gifs
Needed:
- Adobe Photoshop (I currently use 2023)
- Any video editing program (I currently use Adobe Premiere Pro 2020)
- A screen recording program (I use OBS)
How to:
1 - Record your game footage using OBS (or any screen recording program). Always make sure your game is running the highest settings.
2 - In Premiere Pro (or any video editing program), import your captured footage and create short, identical length clips that are under 2 seconds each. I recommend exporting in 1080p, no less than 30fps, using the best quality. Export as .avi or .mp4, something Photoshop accepts.
3 - In Photoshop, create a new 1920×1080 file.
4 - Click the Windows tab and make sure you have Timeline ticked.
5 - On the Timeline, click Create Video Timeline.
6 - Click the down arrow to the left of the video layer, and add as many New Video Groups as you have clips.
7 - Click the down arrow on each of those video layers and Add Media (your clips). One video per layer.
8 - Right click on one of the videos in the timeline and change the speed (I usually go 70% but if you like slower gifs, go with 60% or 65%). Then bump the Duration slider all the way up. Do this for all the video clips.
9 - In the layers tab to the bottom right, convert each video clip to a Smart Object.
10 - Resize and crop depending on which size is needed for the set. Here are the dimensions to use for Tumblr. The height can be whatever you want, but the width is very important.
11 - Now for colouring. If you're unfamiliar with editing in Photoshop, it might be helpful to look through the #psd coloring tag and finding something you like. I personally make mine from scratch because game lighting is so unpredictable and varied. It's up to you!
12 - I really recommend some Smart Blur and Smart Sharpen on each of the video layers. How much or little you use will personal preference. At the moment I'm typically doing 0.3-0.5 Smart Blur radius and 0.4-0.5 Smart Sharpen radius.
13 - If you're looking to use subtitles, check this tutorial out.
14 - Click on File > Save for Web, and save each clip this way. Play around with the settings. Just make sure each gif comes out under 10mb, because that's what Tumblr's current limit is.
That's it! Hope that was easy enough to follow. If you do make/post some, please feel free to tag me in them. I'd love to see! :)
12 notes
·
View notes
Note
hi i just read your blog description and
how does one even begin to go about downloading an entire bootleg onto a Nintendo 3DS, of all things? what exactly prompted you to do this?
I am so glad you asked!
I enjoy the 3DS (and have an alt blog dedicated to my Nintendo shenanigans!) and I absolutely love having access to media entirely offline and without a buffering time! And to complete the trifecta, I had very bad writers block at the time. So uh there’s the why, the but how is chaos so do buckle in
First, I needed a bootleg as an MP4 as the 3DS no longer runs YouTube and I wanted to have it 100% offline. YouTube downloader and 5 minutes and that part was done. Next, actually getting it on the 3DS. A 3DS doesn’t tolerate MP4 files, and despite mine being homebrewed, I couldn’t find a program to play MP4 files. I, being me, tried to finagle it into working anyway. Unsurprisingly it didn’t, so back to the drawing board.
It took a few minutes of furious googling to remember that the 3DS had a pre-installed camera. That could take videos. However, there were some unfortunate limits..
- The filetype needed to be changed from MP4 to AVI.
- The videos could not exceed 10 minutes.
- The resolution is.. bad. 480x240. But if I wanted to watch Tanz with good resolution, why would I download it to a 3DS, eh? A grade-A viewing experience is clearly not the goal here.
Got to work chopping Tanz into 7-10 minute segments in the most sensible places I could. This is what took the longest, as I wanted the cuts to make some sort of sense. I tried to cut between songs or scenes, on top of an already present break in the music. Next, I ran all of these files through a converter to get them in the AVI that the 3DS can understand. Lastly, there was the small task of getting them onto the SD card and storing backup files in an organized manner on my computer so I can get Tanz onto my OTHER 3DS consoles at a later date. I also have a Switch Lite that I’d like to put it on, but my silly camera exploit won’t work because the Switch doesn’t have a camera. Shame.
Anyway I had to name the files so they would appear in order on the laptop and on the 3DS, and I had an AVI and MP4 for each portion. I think there were like 15 parts? I’ll check in the morning, I’m very tired and the system is dead at the moment. But there’s a folder in the applications section than I transferred the video files into, checking every so often to make sure they were working and uploading properly, and luckily they were so it was just a drag and drop operation from there. And that’s how I got Tanz on a 3DS.
I’ll proofread and add images (I think my blog banner is the Tanz credit screen on the 3DS) in the morning, and better explain some stuff. If you have any questions about this or other 3DS stuff please feel free to ask! I love to talk about it!
7 notes
·
View notes
Photo
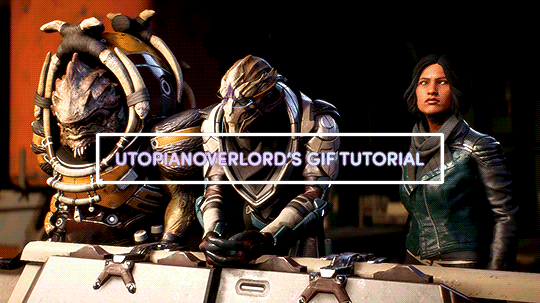

✨ BEFORE WE BEGIN,
I'd like to mention the obvious that my process is just one way to create a gif. What I do works best for me, and for beginners out there you might find later on that a different method suits you as you get familiarized with PS’s basic tools and functions. The important thing is you start somewhere.
So let’s get started!
✨ IMPORTANT NOTES
- Use high quality footage for gif-making. Whether it’s from a game, show or movie, you want the best you can get. The quality should be 720p at the very least. Lower quality footage can be frustrating to work with if you're just starting out. And in general, really.
- With the method I’ll be outlining, Photoshop will accept videos in .mp4 and .avi format. For game footage, these are the formats you’ll likely see the most.
- I use Nvidia ShadowPlay to record my own in-game footage which saves directly into .mp4 format. Software such as Bandicam and OBS are good, free recording alternatives that do the same.
- For downloading HQ videos from YT, I’d suggest 4k Video Downloader. 4k's free version has the option to save videos in .mp4 format.
- I use Windows and bum the latest version of Photoshop off of aesfocus but previously worked with CS5 for 8+ years. The same tools used in this tutorial are available in previous versions of PS.
- This post displays tumblr's current dimensions for gifs if you don't want them showing up fuzzy/blurry on the dashboard.
- Tumblr’s file size upload limit for each gif is currently 10MB.
✨ BONUS ACTION
With her permission, I’m very happy to provide my bestie aesfocus’ custom action for use which can be downloaded here! This action includes beautiful, subtle corrective image adjustments. I’ve been using this on every gif I’ve made over the past few months.
To set up this action:
Go to Window > Actions
Click the quadruple bar symbol (≣) to top right of the Action box
> Load Actions
Find the saved aes_gif.atn file
Load
Hit the play button (▶︎)
And you’re done! Until you either unselect or delete this action, it will be automatically applied to all video footage you load into Photoshop. Including what you’ll be creating!
✨ STEP 1 - VIDEO TIMELINE
1.) Go to Window > Timeline
Make sure what pops up is a video timeline (aka animation timeline), not frame animation. If you see the symbol below, then it means you're currently in frame animation. Click the symbol to convert to video timeline. (If you’re a Mac user, a similar button should be in the bottom right corner of the timeline.)

2.) Drag the .mp4/.avi video file from its location on your computer and drop it into Photoshop.
3.) In the upper right corner of the Timeline, click the quadruple bar symbol (≣) and go to > Set Timeline Frame Rate.

For a smooth and nicely paced frame rate, I usually stay somewhere between 20 to 24. If you’re doing a close-up gif of someone speaking, I’d suggest setting it to a slower speed of 18 or 19. (But be free to test different speeds!)
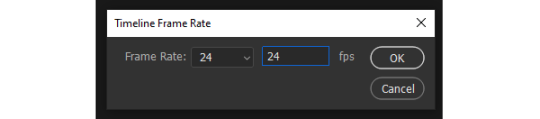
The higher the frame rate, the smoother the gif. However, the file size greatly increases as you get close to 60, so keep that in mind.
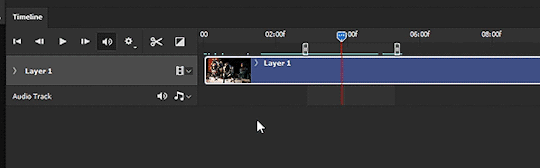
✨ STEP 2 - SETTING UP YOUR WORK AREA
1.) With the footage loaded and prepped, the next step is finding and carving out what you want to turn into a gif. I’ll refer to this as the work area. The work area is set by what footage is between the two slideable 'bumpers' shown below.
If you’re on a Mac or using an old version of PS, the timeline and button positions will look a little different but the functions are the same.

These bumpers will indicate where the gif will start (front bumper) and end (back bumper). Once you know what portion of the footage you'd like to make into a gif, we’ll cut and delete everything else outside the bumpers. What’s between the bumpers is your precious cargo.
Drag the playhead (attached to the red marker) at the top of the Timeline around. This will allow you to preview the loaded footage and help you determine where you're going to place the bumpers.
Try not to put too much footage into your work area if you're just starting out. The lengthier the gif is, the larger the file size. Remember, when the gif is saved it must be under 10MB in order for tumblr to upload it.
2.) Move the playhead to the left until the red marker is at the beginning of the work area where the gif will start (the front bumper). Click on the scissor icon to the left to cut the footage. Click on the unwanted footage that was cut and delete it.
3.) Move the playhead to the right until the red marker is at the end of the work area (the back bumper). Click the scissor icon to cut the unwanted footage, select it, then delete it.
4.) You should be left with your work area on a single layer. Select the work area and drag it to the left on the Timeline, until the start of it is under 00.
✨ STEP 3 - SIZING THE IMAGE
This step can be fiddled with as it's dependent on what size gif you'd like to make. In this example, let’s make a gif that's 540px wide.
1.) Right click the top of the file (or ALT+CTRL+I) to bring up Image Size. Here we'll only change the image Width to 600px and hit OK. (This will give us wiggle room when you decide what you want to crop.) CTRL+1 to bring the canvas to its new full size. (or hold ALT and use your mouse’s scroll wheel to zoom in/out)
After you change the image size, the footage layer (Layer 1) is automatically turned into a Smart Object with a Smart Filter applied. (You can double check this by going to Filter and seeing if the > Convert for Smart Filters option is greyed out. If by chance it's not greyed out, go ahead and convert it.)
SUPER FUN FACT!: Applying a Smart Filter is essential to making gifs. It acts as masking that protects your layer from irreversible change. When converting anything for Smart Filters, any filter you add (sharpening, blurring, etc.) can be adjusted/moved/deleted at any time - even after you save and exit PS! Without the Smart Filter, anything you do directly to the footage layer will be permanent and cannot be undone once you close the file.
✨STEP 4 - CROPPING
1.) Select the Crop tool from the toolbar to the left (C key). You'll notice white borders pop up around the canvas. Click and drag any part of the white border to adjust the crop preview.
Hold CTRL+left click on an outer corner for smoother scaling.
Feel free to drag the footage around within the crop preview to frame it as you see fit.
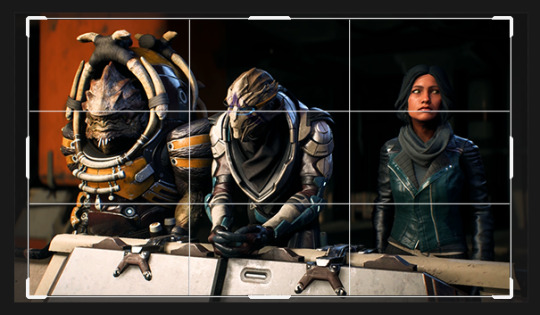
2.) As you move the border of the crop preview, you should see a small dialogue box following your cursor that tells you the current Width and Height of the current preview area. Since we're making a gif 540px wide, we'll adjust the selection to match that and set the height to whatever you prefer. When you're satisfied with the sizing, doubleclick the area within the preview box to crop. (Or go to Image > Crop)
It's beginning to look like something!
3.) To exit the Crop tool, click the Move tool or hit the V key.
✨STEP 5 - ADDING FILTERS
This step will go over one way to sharpen and lightly blur a gif. We’ll use the Unsharpen Mask to start, (Ironic name, I know) though a common filter used for sharpening is the Smart Sharpen option. I tend to use Unsharpen most often.
1.) With the Smart Filter already having been automatically applied earlier, it’s safe to go ahead and add the Unsharpen filter. While having the gif layer selected, go to Filter > Sharpen > Unsharpen Mask and use the following settings:
Amount: 200
Radius: 0.4
Threshold: 1
Hit OK when done.
Under your Layers tab in the dock to the right, you'll now see the Unsharp Mask beneath your Smart Filter layer mask.
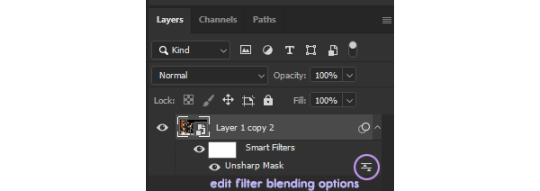
If you click the edit filter button to the right of Unsharp Mask (that look like two arrows between two lines), it'll bring up Blending Options. From here, you can adjust the opacity of your sharpening filter and set a blend mode if you want. For the sharpening we'll leave the opacity alone and keep the mode as Normal.
2.) Now we're going to apply a slight blur filter to sit atop the sharpening. Go to Filter > Blur > Box Blur, set the Radius to 2px and hit OK.
3.) Click on the edit filter button to the right of the Box Blur filter to get to the Blending Options. For this filter, set the Opacity to 45%. If you're working with dark footage, set the Blend to Screen. If the footage has plenty of light and colors, try setting it instead to Overlay. Hit OK.
This will give your sharpening a light softened halo/smeared light effect. Click the eye button to the left of Box Blur to hide the filter if you don't want it, or you can right click on Box Blur > Delete the Smart Filter.
✨STEP 6 - ADJUSTMENT LAYERS
1.) Now that we have filters applied, we'll add our first adjustment layer. Click on the black and white circle > Levels

2.) Below the histogram you'll see three arrows: the darkest arrow to the left, the mid-range grey arrow, and lighter arrow to the right. Move these arrows around only slightly to test how it effects the tonal range. I find that a Levels layer cleanly balances shadows more than anything, particularly with footage or images that are quite dark.
3.) Click again on the black and white circle > Color Balance
4.) On the Color Balance layer, the first tone you can adjust is Midtones by default. Under the dropdown list, you'll see an option for Shadows, Midtones and Highlights. For each Tone, move the sliding arrows around - again, only slightly - to see how it effects the colors of the footage. This is a great tool for color correction.
Similar to Color Balance, Selective Color and Channel Mixer are great color-focused adjustment layers to experiment with.
Curves is also a handy adjustment layer that will effect the tonal range of your gif, similar to Levels.
5.) Before the gif is saved, it’s important to look over the Timeline to make sure that each layer is evenly parallel to your footage layer.

The layers aligning with the footage layer will ensure that everything syncs when the gif loops. You’ll also want to make sure that the back bumper is also placed directly where the footage layer ends.
✨STEP 7 - SAVING
1.) File > Save (CTRL+S) the file on your computer wherever you prefer, keeping it in .psd format.
2.) To save as .gif, go to File > Export > Save for Web (Legacy). (CTRL+Shift+ALT+S) The settings below are what I typically use, but feel free to change Pattern to Diffusion or Noise to see how it effects the preview.
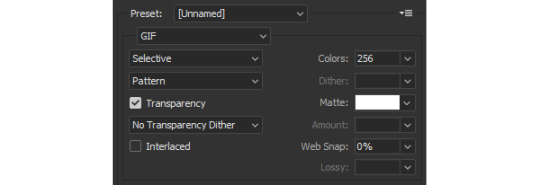
Each dither algorithm option (Pattern/Diffusion/Noise) will change the file size as well has the gif's appearance.
3.) If the file size is under 10MB, then you're ready to save the gif.

If the file size is larger than 10MB, it's likely the footage is too lengthy. In this case, try 1) trimming the footage down as we did previously using the scissors icon on the Timeline, and/or 2) changing the frame rate speed to a number higher than 24, starting with 25, 26, 27, etc. (This will reduce the gif size, but make the speed of the gif faster.)
There are other ways to reduce the file size as well, such as changing the number of Colors on the Save for Web (Legacy) screen from 256 to anything below that. (Which I don't really recommend if your gif is very vibrant or full of color. But it will work well on more neutrally colored/dark gifs.)
Congrats! You're all done.
✨CLOSING THOUGHTS
Hopefully this basic guide will help in making Photoshop seem less intimidating for those starting out. If you’ve found this tutorial useful in any way, a reblog would be appreciated. :~)
For helpful resources, please visit us at gamingresources. If you have a gif or edit tutorial of your own that you’d like us to share, please feel free to tag #gamingresources.
Happy creating! 🧡
#hopefully this helps anon!#this is my first lengthy step-by-step tutorial#I'd be happy to answer any questions as best I can#gif tutorial#gamingresources#gamingedit#vgedit#`reqs#`tutorials#`22
88 notes
·
View notes
Text
Come as we explore strange new video codecs 🔍🖖🎥
Our last few experiments with playing video+audio on the ESP32-S3 involved converting an MP4 to MJpeg + MP3, where MJpeg is just a bunch of jpegs glued together in a file, and MP3 is what you expect. This works, but we maxed out at 10 or 12 fps on a 480x480 display. You must manage two files, and the FPS must be hardcoded. With this demo https://github.com/moononournation/aviPlayer we are using avi files with Cinepak https://en.wikipedia.org/wiki/Cinepak and MP3 encoding - a big throwback to when we played quicktime clips on our Centris 650. The decoding speed is much better, and 30 FPS is easily handled, so the tearing is not as visible. The decoder keeps up with the SD card file, so you can use long files. This makes the board a good option for props and projects where you want to play ~480p video clips with near-instant startup and want to avoid the complexity of running Linux on a Raspberry Pi + monitor + audio amp. The only downside right now is the ffmpeg cinepak encoder is reaaaaallly slooooow.
#adafruit#startrek#voyager#startrekday#espressif#esp32#espfriends#display#videocodecs#esp32s3#mjpeg#aviplayer#cinepak#retrotech#videoplayback#quicktime#decoder#techinnovation
11 notes
·
View notes
Last Seen Blogs

mzgicmirror
𓏲ㅤㅤ𝒑𝒐𝒊𝒔𝒐𝒏ㅤ› ㅤ*

happy-demon-dragon
Howdy There

betokaled15-blog
Sin título

sablie
Spider’s Dance

chatfleurs
fml