#copy site source code
Explore tagged Tumblr posts
Visit Tumblr Blog
Explore Tumblr blogs with no restrictions, modern design and the best experience.
Last Seen Tumblr Blogs


Fun Fact
Tumblr Inc. is funded by 13 investors.
Text
Como Criar Sites com IA e Otimizar Seu Conteúdo Digital
Neste artigo, você aprenderá os passos essenciais para criar sites eficientes utilizando inteligência artificial. Abordaremos conceitos de copy site, design, código HTML, fontes, e como transferir seu site para WordPress de forma gratuita, além de dicas para otimizar seu conteúdo para mecanismos de busca. Início da Criação de Sites com IA Nos últimos anos, a inteligência artificial (IA)…
#copy near me#copy site#copy site ai#copy site code#copy site design#copy site free#copy site html#copy site source code#copy site to wordpress
0 notes
Text
I've been trying to find anyone who posted a link to the stories and there's nothing for some reason. Everyone is talking ABOUT them, but never bothering to share. So, here's the best link I could find for anyone curious:
Evidently there's some inaccuracies in the translations. For the Typhlosion one, here's a link that talks about the leak situation a bit and also about some context that's missing from the story:
For the record, the stories are super fascinating! They lend a lot more dimensionality to the Pokemon universe, exactly along the lines as some of the more disturbing official descriptions of Pokemon. They are par for the course, though certainly fleshed out to some extent via short story format instead of a 1-liner.
Also, before anyone goes clutching their little pearls about this because it's Pokemon or because "Pokemon is meant for kids":
They are myths. That tells you all you need to know. If it doesn't, go figure it out.
They're unpublished, so they're not even real! Typhlosion didn't do anything. But even if it did ...
It's fine. It would be cool and fine if the stories were published and canon and if a Typhlosion was actually the husband of a human and they had a kid together. The stories are super neat! They're myths! And they would be super neat even if they were real historical events in the Pokemon universe! Your "god" of humans is a Pokemon. What exactly do you think that means for humans in that world? Lol!
Nothing about this is gross or weird, at least not in the cancel culture way so many people are ranting about.
Nothing about this deserves anyone "defending" Typhlosion. Typhlosion hasn't done anything that requires defending. Child-brain outlook. Embrace the myths.
Nothing about this deserves people raging on other people making jokes. The jokes are funny. See all of the above.
I found a post where some lady was crying the Nile over the very idea that writers had spent their time writing this instead of writing PG stuff, because she couldn't fathom that anyone would spend time on anything that wasn't identically required as the end product ... and because these myths aren't PG, that made it an especial crime.
Tell me you don't have a creative bone in your body without telling me you don't have a creative bone in your body.
Anyway, I invite everyone to go check these stories out.
The Typhlosion one is my favorite and I 110% condone everything Typhlosion has ever done.

Anyway...
#Pokemon#Typhlosion#genuinely love the Typhlosion story#the mythology is so good#tho apparently there are multiple copies of the same story but with different pokemon??#idk. nobody's bothered to post the stories here or show anything coherent about it#the vid link shows images of text and I only found 2 of those and they didn't bother to link their sources. lazy#honestly what is wrong with tumblr that no one is sharing the goods?#have to do everything myself around here#anyway#so I can't tell you which versions are more 'official' or not#or what the best place to get them are#also the formatting of that teraleaks page is STUPIDLY BAD#it's SO bad. whoever coded that site needs to go back to school#you might not be able to read the stories on mobile because they don't word-wrap. FYI.#I'm eating popcorn over everyone's pearly rage
287 notes
·
View notes
Text
It's Time To Investigate SevenArt.ai
sevenart.ai is a website that uses ai to generate images.
Except, that's not all it can do.
It can also overlay ai filters onto images to create the illusion that the algorithm created these images.
And its primary image source is Tumblr.
It scrapes through the site for recent images that are at least 10 days old and has some notes attached to it, as well as copying the tags to make the unsuspecting user think that the post was from a genuine user.
No image is safe. Art, photography, screenshots, you name it.
Initially I thought that these are bots that just repost images from their site as well as bastardizations of pictures across tumblr, until a user by the name of @nataliedecorsair discovered that these "bots" can also block users and restrict replies.
Not only that, but these bots do not procreate and multiply like most bots do. Or at least, they have.
The following are the list of bots that have been found on this very site. Brace yourself. It's gonna be a long one:
@giannaaziz1998blog
@kennedyvietor1978blog
@nikb0mh6bl
@z4uu8shm37
@xguniedhmn
@katherinrubino1958blog
@3neonnightlifenostalgiablog
@cyberneticcreations58blog
@neomasteinbrink1971blog
@etharetherford1958blog
@punxajfqz1
@camicranfill1967blog
@1stellarluminousechoblog
@whwsd1wrof
@bnlvi0rsmj
@steampunkstarshipsafari90blog
@surrealistictechtales17blog
@2steampunksavvysiren37blog
@krispycrowntree
@voucwjryey
@luciaaleem1961blog
@qcmpdwv9ts
@2mplexltw6
@sz1uwxthzi
@laurenesmock1972blog
@rosalinetritsch1992blog
@chereesteinkirchner1950blog
@malindamadaras1996blog
@1cyberneticdreamscapehubblog
@neomasteinbrink1971blog
@neonfuturecityblog
@olindagunner1986blog
@neonnomadnirvanablog
@digitalcyborgquestblog
@freespiritfusionblog
@piacarriveau1990blog
@3technoartisticvisionsblog
@wanderlustwineblissblog
@oyqjfwb9nz
@maryannamarkus1983blog
@lashelldowhower2000blog
@ovibigrqrw
@3neonnightlifenostalgiablog
@ywldujyr6b
@giannaaziz1998blog
@yudacquel1961blog
@neotechcreationsblog
@wildernesswonderquest87blog
@cybertroncosmicflow93blog
@emeldaplessner1996blog
@neuralnetworkgallery78blog
@dunstanrohrich1957blog
@juanitazunino1965blog
@natoshaereaux1970blog
@aienhancedaestheticsblog
@techtrendytreks48blog
@cgvlrktikf
@digitaldimensiondioramablog
@pixelpaintedpanorama91blog
@futuristiccowboyshark
@digitaldreamscapevisionsblog
@janishoppin1950blog
The oldest ones have been created in March, started scraping in June/July, and later additions to the family have been created in July.
So, I have come to the conclusion that these accounts might be run by a combination of bot and human. Cyborg, if you will.
But it still doesn't answer my main question:
Who is running the whole operation?
The site itself gave us zero answers to work with.

No copyright, no link to the engine where the site is being used on, except for the sign in thingy (which I did.)

I gave the site a fake email and a shitty password.


Turns out it doesn't function like most sites that ask for an email and password.
Didn't check the burner email, the password isn't fully dotted and available for the whole world to see, and, and this is the important thing...
My browser didn't detect that this was an email and password thingy.

And there was no log off feature.
This could mean two things.
Either we have a site that doesn't have a functioning email and password database, or that we have a bunch of gullible people throwing their email and password in for people to potentially steal.
I can't confirm or deny these facts, because, again, the site has little to work with.
The code? Generic as all hell.

Tried searching for more information about this site, like the server it's on, or who owned the site, or something. ANYTHING.
Multiple sites pulled me in different directions. One site said it originates in Iceland. Others say its in California or Canada.
Luckily, the server it used was the same. Its powered by Cloudflare.
Unfortunately, I have no idea what to do with any of this information.
If you have any further information about this site, let me know.
Until there is a clear answer, we need to keep doing what we are doing.
Spread the word and report about these cretins.
If they want attention, then they are gonna get the worst attention.
12K notes
·
View notes
Text
how to send luigi a letter
address:

(This is from his website)
Important info and rules:
Paper is photocopied copied so keep the margins large. Give him a date on when u wrote it and number the pages.
You need a return address that includes ur full name
Sign the letter and print your name under the signature.
White paper with blue or black ink pen. Lined works.
No glitter, lipstick, stickers oil, or stains
Keep it apporopriate. The letters are screened and if anything breaks guidelines then he will not get ur letter.
I heard on tiktok that u cannot send drawings, but i am not able to find a source. I'd say better safe then sorry, don't send them.
you can send photos using shutterfly and freeprints. He has asked for people to not send more than 5 photos.
He also has said not to send books. He is only allowed a certain amount of things, and he is only allowed 5 books.
Ideas on stuff to send:
Be entertaining! Send jokes, fun facts, interesting stuff happening in ur life, pop culture updates, short stories, riddles. According to the summary of BOP rules, you can send crosswords and wordsearches, but try to make sure there aren't any inappropriate words that may break rules.
Cheer him up! Send encouraging messages and remind him that people support him and he isn't alone. Give him ur support because jail is tough and our guy needs encouragement.
How to see if he read your letter:
On his site he has a list he wrote saying whose letters he has recieved using dates, initials, and parts of ur zip code. He has said he reads every letter, so this is a good way to check it made thru checks and he recieved it.
128 notes
·
View notes
Text
Deforest Kelley's Filmography
(Incomplete, 53 still to be found)
Links directly to each episode or movie for free (Because I don't believe in paying for stuff)
Most of these will be YouTube, Internet Archive, ok.ru, or other sites that should be safe, but a few are from sites with a lot of redirects, I suggest using an ad blocker. I use the Brave web browser, it comes with a adblocker.
I will put a star(★) next to any link you need an adblocker for. if it says to download an app, just switch the page to desktop mode.
Nothing has to be downloaded; if a link doesn't work, if you find an unsafe site, or if there are any other errors. please tell me. (there are a few episodes on YouTube that are mislabeled but they should be the right episode)
I am only allowed 100 embedded links per post, so any new links will be line text.
If you've found any other links to the episodes I haven't found yet, pretty please send them to me <3
Time to Kill (1945)
Fear in the Night (1947)
Variety Girl (1947)
Beyond Our Own (1947)
Public Prosecutor: Case of the Man Who Wasn't There (1947)
Gypsy Holiday (1948)
There are copies of this archived at the UCLA Library, but they are all nitrate film and can only be handled by professionals. I think you can request to view them, but you have to go there in person.
Canon City (1948)
Duke of Chicago (1949)
Malaya (1949)
Life of St. Paul Series: Ambassador for Christ (1949)
The Men (1950)
Studio One: The Last Cruise (1950): https://archive.org/details/studio-one-the-last-cruise-cut-2
Speak No Evil (1950)
The Gallery of Madame Liu-Tsong: The Golden Women (1951)
The Web: Shine, Mister? (1951)
Armstrong Circle Theatre: Breakaway (1952)
Your Jeweler's Showcase: The Hand of St. Pierre (1952)
Taxi (1953)
The Lone Ranger:
The Legion of Old Timers (1949) Gold Train (1950) Death in the Forest (1953)
The Revlon Mirror Theater: Dreams Never Lie (1953)
The Pepsi-Cola Playhouse: Frozen Escape (1953)
Waterfront:
Shipper, Beware (1954) The Race (1954)
Duffy of San Quentin (1954): https://watchseries.bar/movie/duffy-of-san-quentin/174278 ★
The Lone Wolf:
The Murder Story (1954) The Las Vegas Story (1954)
Your Favorite Story:
The Man Who Sold His Shadow (1953) Inside Out: The Story of Bunder-Runger the Jailbird (1954)
Public Defender: The Murder Photo (1954)
Cavalcade of America: The Medal for Miss Walker (1954)
City Detective:
An Old Man's Gold (1953) Crazy Like a Fox (1954)
Mayor of the Town:
Long May It Wag (1954) Minnie's Job (1954) The Poet (1954)
The Loretta Young Show: Decision (1955)
House of Bamboo (1955)
Illegal (1955)
The Millionaire: The Iris Miller Story (1955)
Studio 57:
Storm Signal (1954) Vacation with Pay (1955)
The View From Pompey's Head (1955)
Matinee Theatre: Beyond a Reasonable Doubt (1955)
Gunsmoke: Indian Scout (1956)
The Man in the Grey Flannel Suit (1956)
You Are There:
The Capture of John Wilkes Booth (1953) The Surrender of Corregidor (1954) The Rescue of the American Prisoners from Santo Tomas (1955) The Gunfight at O.K. Corral (1955)
Eli Whitney Invents the Cotton Gin (1955): https://www.tumblr.com/spawksstuff/780662310126665728?source=share [clip]
Spindletop - The First Great Texas Oil Strike (1955) The Heroism of Clara Barton (1956) (clip) The Fall of Fort Sumter (1956)
Tension at Table Rock (1956)
Science Fiction Theatre:
Y..O..R..D.. (1955) The Long Day (1955) Survival in Box Canyon (1956)
Strange Stories: Such a Nice Little Girl (1956)
The Adventure's of Jim Bowie: An Eye for an Eye (1957): https://watch.plex.tv/watch/show/the-adventures-of-jim-bowie/season/1/episode/26?
Navy Log:
Cigar-Box John (1957) Nightmare off Brooklyn (1957)
Gunfight at O.K. Corral (1957)
Code 3: Oil Well Incident (1957): https://watch.plex.tv/watch/show/code-3/season/1/episode/12?
The Web: Kill and Run (1957)
Schiltz Playhouse: Hands of the Enemy (1957)
The O. Henry Playhouse:
Fog in Santone (1957) The Hiding of Black Bill (1957)
Raintree County (1957)
Boots and Saddles: The Marquis of Donnybrook (1957)
Playhouse 90:
The Edge of Innocence (1957) Point of No Return (1958)
The Silent Service:
The U.S.S. Spearfish Delivers (1957) The Gar Story (1957) The Archerfish Spits Straight (1958)
M Squad:
Pete Loves Mary (1957) Diamond Hard (1957) Hideout (1958)
The Law an Jake Wade (1958)
Steve Canyon: Operation Jettison (1958)
The Rough Riders: The Nightbinders (1958)
26 Men: Trail of Revenge (1959) [clip]
The Californians: The Painted Lady (1959) (use desktop)
Special Agent 7: Border Mascarade (1959)
Northwest Passage: Death Rides the Wind (1959)
Rawhide: Incident at Barker Springs (1959)
Mackenzie's Raiders: Son of the Hawk (1959)
Warlock (1959)
State Trooper: The Patient Skeleton (1959)
The Lineup: The Chloroform Murder Case (1959)
Mike Hammer:
I Ain't Talking (1959) Bride and Doom (1959)
21 Bacon Street: The Hostage (1959)
Trackdown:
The End of an Outlaw (1957) The Jail Break (1958)https://drive.google.com/file/d/1AKCNe8Mn8yKkH5S-XdKsYDMmo8hxxRKy/view Hard Lines (1959) (begins at 22:32) Quiet Night in Porter (1959)https://drive.google.com/file/d/1wZRJIYLP7Zs_jX5S3vU2HsIRB1ZxEqfx/view
Wanted: Dead or Alive:
Secret Ballot (1959) The Empty Cell (1959)
The Man from Blackhawk: Station Six (1959)
Black Saddle: Apache Trail (1959)
The Magical World of Disney: Elfego Baca: Mustang Man, Mustang Maid (1959)
Alcoa Theatre:
Johnny Risk (1958) 333 Montgomery (TV version) (1959)
333 Montgomery (1959)
Richard Diamond, Private Detective:
The Limping Man (1959) The Adjuster (1959)
Zane Grey Theater:
Stage for Tucson (1956)
Village of Fear (1957): https://youtu.be/Ppn8GhXXlbU?si=uxcs-w-23H4VuJ5X
Shadow of a Dead Man (1958): https://youtu.be/7PCxtCn_XJE?si=RHPAc_IULg0FdE1T
Calico Bait (1960): https://archive.org/details/lv_0_20250605005938/lv_0_20250605110209.mp4#
Johnny Midnight: The Inner Eye (1960)
Markham: Counterpoint (1960)
Two Faces West: Fallen Gun (1960)
Riverboat: Listen to the Nightingale (1961) https://drive.google.com/file/d/1xnVme0X3urNtzKSQELNUkcrXJf06G_u0/view
Tales of Wells Fargo: Captain Scofield (1961)
Assignment: Underwater: Affair in Tokyo (1961): https://youtu.be/gf2drne3NkM?si=F24-jxt773fY-t1h (clip)
Coronado 9:
Loser's Circle (1960) Run, Shep, Run (1961)
Lawman:
The Thimblerigger (1960) The Squatters (1961)https://drive.google.com/file/d/1tu6iDm37jqhXY327Gfw9IlwrXPg7Zydk/view
The Deputy: The Means to the End (1961)
Bat Masterson: No Amnesty for Death (1961)
Stagecoach West
Image of a Man (1961): https://drive.google.com/file/d/1fWwEk-hp-WSEFGOYzpHkmwvXjS08fDqs/view The Big Gun (1961): https://drive.google.com/file/d/1tfX6-wDGQOwwWyID4NdD5Mzkqno8JES7/view
Shannon: The Pickup (1961)
Cain's Hundred: The Fixer (1961)
Perry Mason: Case of the Unwelcome Bride (1961) (make sure to click on bride again to view video)
Route 66:
The Clover Throne (1961) 1800 Days to Justice (1962)
Have Gun - Will Travel: The Treasure (1962)
Laramie:
Gun Duel (1962) The Unvanquished (1963)
The Gallant Men: A Taste of Peace (1963)
The Dakotas: Reformation at Big Nose Butte (1963)
77 Sunset Strip: 88 Bars (1963)
Gunfight at Comanche Creek (1953)
The Virginian:
Duel at Shiloh (1963) is 1x15 https://watchseries.bar/tv/the-virginian/10180 ★
Man of Violence (1963) https://drive.google.com/file/d/1SzVex5abww0gHdNEOUR-qwSIWWI8qHrq/view
Where Love Has Gone (1964)
Slattery's People: Question: Which One Has the Privilege? (1964)
Black Spurs (1965)
Town Tamer (1965)
Marriage on the Rocks (1965)
The Fugitive: Three Cheers for Little Blue Boy (1965)https://drive.google.com/file/d/1EZBxHG-YscPAbeLlf-WTfgKS5WgI6lmu/view
The Donna Reed Show: Uncle Jeff Needs You (1965)
Apache Uprising (1965)
Bonanza:
The Honor of Cochise (1961) The Decision (1962) Ride the Wind Part 1 (1966) Ride the Wind Part 2 (1966)
A Man Called Shenandoah: The Riley Brand (1966) https://drive.google.com/file/d/13-bkwBGrr3XJpk9xYDIoABZes9jCYKkc/view
Laredo: The Sound of Terror (1966)
Death Valley Days:
The Breaking Point (1962) Coffin for a Coward (1963) Devil's Gate (1965) Lady of the Plains (1966)
Waco (1966)
Police Story (1967)
Ironside: Warrior's Return (1970)
The Silent Force: The Judge (1970)
The Bold Ones: The New Doctors: Giants Never Kneel (1970)
Owen Marshall, Counselor at Law: Make No Mistake (1971)
Room 222: The Sins of the Fathers (1971)
Night of the Lepus (1972)
The ABC Afternoon Playbreak: I Never Said Goodbye (1973)
(series is considered partially lost media)
The Cowboys: David Done It (1974)
The Littlest Hobo: Runaway (1981)
The Brave Little Toaster Goes to Mars (1998)
Sourses:
https://www.imdb.com/name/nm0001420/?ref_=ext_shr_lnk
https://en.wikipedia.org/wiki/DeForest_Kelley
https://drive.google.com/drive/folders/1OjqfnmsrtfDAieWASYNFJhVIq23HwaSg
Thank you to:
@iamenits
@spawksstuff
@forecast0ctopus
@spaceageslacker
@/Hellbat_the_Destron on youtube
Last Update: 6/8/25 8:50 PM PDT
#deforest kelley#leonard mccoy#star trek cast#de kelley#1900s film#1950s#1940s#1960s#1970s#1980s#1990s#old films#old westerns#film noir#black and white movies#Archive
102 notes
·
View notes
Text

Hi ^^
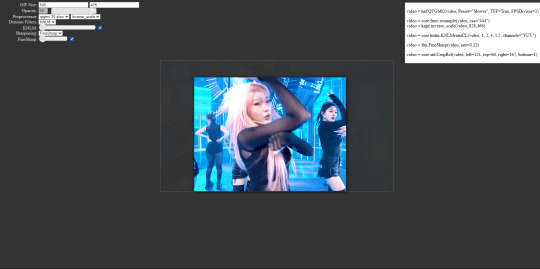
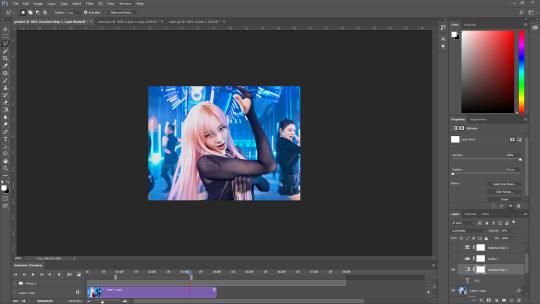
It’s me, the creator of some gifs you like and the creator of many gifs you could’ve probably lived without. A few people have asked me for a giffing tutorial recently so I have made one documenting my normal process! I’m going to gif this Aespa stage in this tutorial because I am still pretty bad at coloring stages. So come struggle along with me 🫶!
Step 1. Getting Sources & Vapoursynth
The worst enemy of the tumblr gifmaker is tumblr itself. You will spend your time making the clearest gif imagineable only for the blue site to reduce it to pixels. But alas, we must gif on. The best way to get good results is have a good source and to precompress your gif with vapoursynth.
As far as downloading from Youtube the best app to use is 4k Video Downloader. 4kVD let's you get download your file as a .mkv which is how youtube stores their 4k quality vids. Only limitation is on the free tier you get only 10 downloads. There are other more technically dubious methods to get 4kvids but I've literally never hit this limit.
10 out of 10 gifmakers agree if you want those good good crystal clear gifs you gotta stick with 4k or 1080p sources. Although if you are a complete sicko like me you can gif 720p and still get pretty good (not great) results.
So now you got your source video but you won't actually be able to open that bad boy up in PS yet. This is where the Vapoursynth step comes in. Vapoursynth will blast that footage into a nice denoised, sharpened and resized little baddie of a video clip for us.

To download VS and get a more in depth explanation of the exact steps on how to use it please reference this post. The basic steps of Vapooursynth are:
Drop your source video on the "vapourscript (drop a video file on me).bat" icon and type in the timestamps
Crop your gif to your liking (I do a lot of 540 x405 or 540x335 for horizontal gifs. 268x480 for vertical.)
Apply the sharpness and denoise (these are the options I use):

copy the code from the white box and paste it into the script like below
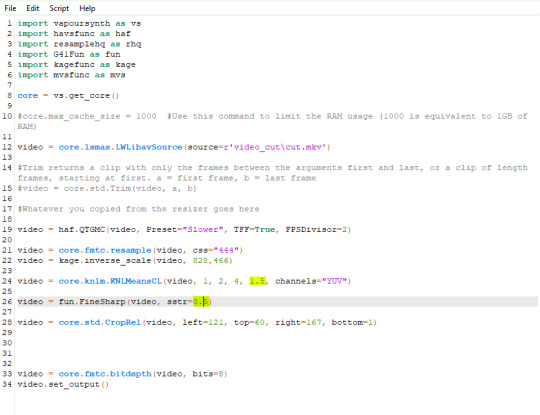
I set my denoiser to 1.5 and my sharpening to .5. (I stole this from @hyeongseo lol)
Go to Script > Encode Video. Make sure on this screen to name your file and set the header option to 'Y4M'. (Sometimes this is the step where it crashes and all your dreams are ruined because it can't convert it unfortunately. But 99% of videos are good lol)
You will find your Photoshop ready clip in gifs/output
Step 2. Photoshop
You are now good to open up your clip in Photoshop.

if we export our gif at this moment it will look like this:

Which isn't too bad. They just are pretty washed out and a lot of times at this step you'll see a lot of grain.
Sharpening (again lol) and Noise:
This might sound weird cause we just denoised lmao but stick with me.
We are going to convert our clip to a smart object. If you want to slow down or speed up your clip make sure to do so before converting.
(Often times if i have 60fps clip I put it at half speed, but if the action of the gif is really jerky or flashy at 30fps a lot of times I'll set it to 85% speed)
Convert your video to a smart object by right clicking it in the layers panel and selecting the "Convert to Smart Object" option
Create a copy of layer 1 and arrange it so it is aligned perfectly on top of the first video in the timeline. You have to drag it outside of the video group to do this. It should look like this once you are done:

On the bottom clip (layer 1), select filters -> sharpen -> smart sharpen. Apply the filter with these settings:

Then on the same clip (layer 1) apply the same smart sharpen filter with these settings

Setting up the Sharpness like this makes sure the finer details with stand out with crisp lines in the final product. (Look at how the mesh on her arms is in finer detail now)

Your video might look a little crispy at this point and that is ok cause we are going to soften that.
Now on our top video layer (layer 1 copy) select filters -> Blur -> Gaussian Blur. Use this setting:

Finally apply filters-> Noise -> Add Noise to layer 1 copy with these settings

"Vacancy what the hell? It looks like shit now."
Yeah... But now we'll put layer 1 copy at 25% opacity and it will look less like the shit that it does look like right now I prommy. Here is the current output:

The idea behind all this blurring and adding noise is that it will help create smoother transitions between the colors of the gif and reduce large blotchy bands of pixels that can sometimes show up
PLEASE!!! Save your current step as a PSD file. You can skip having to apply all those filters and just drag the filter groups on to the layers after the smart object conversion step.
Step 3. Coloring
Now to the fun part! There is a lot of trial and error in this step since we only have 256 colors to play with.
Typically my goals for this step are:
Raise the black point (Make Giselle's outfit in this gif black so more color can be used on her hair, skin and the background.)
Reduce the overall contrast of the gif. (Darken the lightest lights if possible)
Saturate the colors enough so they stand out but not so much that everything looks gross.
Depending on how we do these steps we may need to subtract frames from the gif. (Which I hope not cause there is exactly 69 frames in the current version lol)
Here is an example of what my coloring difference can look like:


In this case the colored gif is actually smaller because I elminated a lot of the dark greys in the background.
Vacancy's Dumbass Original Recipe thing
This is probably the only thing different that I do from most creators
My first adjustment layer is usually a gradient map. The green and red one to be more specific.

I then change the blend mode to luminosity and set the opacity somewhere between 12 and 20% (Usually 15%).
This step brings all our shades closer together so we have more freedom with coloring later. Also when idols are very white wash this seems to bring out the shadows and skin tone better in later steps as well. If you overdo it though the person in the gif can wind up looking very orange or yellow so less is sometimes more here.
There's also probably a better way to achieve this but you know... oh well
My Other adjusment layers usually consist of:
Levels: With the gradient map applied you can darken the blackpoint of your gif pretty significantly.
Selective Color: This is the most useful adjustment layer. Make sure to expirement with adding to the black slider on the blacks and neutrals color options. Often times kpop vids are over exposed and darkening this can bring out a lot of unseen color.
Hue/Saturation: I use this layer to darken the blues of the background with the lightness slider as well. You can adjust individual colors with this layer and with selective color and that is a very powerful tool for coloring.
Start:
Finish:
Because I darkened the gif so much I was able to add around 6 frames!
Though I’m not 100% satisfied with this gif, this would be my process from the start. You can put those adjustment layers all in a group and save it to the psd as well to skip all the steps to apply them. I used all the same adjustment layers for the header gif of this post as well which saved me a lot of time ^^!
Since every video is different you usually have to play around with the sliders a lot between clips.
Step 4. It Flops…
Jk jk but it does happen a lot tho on this site so don’t get discouraged ☺️
Parting Notes
If you want a really nicely colored fancam to practice on I would see if MIRAI on YouTube has a fancam of your fave idol. Their videos are really nicely color balanced from the start where stages like this tend to be very bright.
I’ll probably make a follow up post with more coloring tips and my thought processes while making gifs but this is the very basics to making hq gifs hope you learned a lot.
You can always hit my dms or inbox with questions if you have them ^^!
#hope this helps#tagging a few people#tuserflora#userdoyeons#forparker#useranusia#rhitag#usercherry#<- these are all creators I try to learn from#flashing tw#flashing cw#tutorials
95 notes
·
View notes
Text
Fandom 101: Getting Started on Fanlore.org
Not long ago, we at Duck Prints Press decided that we’d like the Press to have a page on Fanlore. To accomplish that, Press contributor Shea Sullivan made an account and figured out the nuts and bolts on how to add pages to Fanlore. Turns out, it’s not very hard, and now in this guest blog post, Shea will teach y’all how to do it too!
Making Your First Fanlore Page!
Hello! I am an editor on Fanlore as of a few days ago. Before that, I’d worked with mediawiki (the open source platform Fanlore uses) for unrelated projects, so I had a general understanding of how things worked, but no idea how Fanlore preferred their pages to be formatted or organized or linked.
This is how I got started!
First: What is Fanlore and Why Should You Care?
Fanlore is a wiki specifically dedicated to the fandom experience. It’s not for canon info about a specific fandom; rather, it’s for information about how fans interact with media and each other. Fanlore is run by the OTW, the same organization that brings us our beloved AO3. This context helped me in understanding the focus of Fanlore. It’s about fandom: the ups, the downs, the trends, the drama…all the things that can get lost forever when sites disappear or there’s a purge. And that said…well, you may still not care. But if you do, read on!
Second: You Care. Now What?
(read more)
Get an account. Right now. It’s worth getting the account, because you won’t be able to create new pages for a few hours. So, get the account first, figure out what to do with it later.
Go to fanlore.org and click on “Create Account” in the upper right-hand corner:
Third: You Have the Power (Soon)!
Read up! No need to invent the wheel in this post – they’ve got some great resources for getting started already written on their webpage.
Fanlore Getting Started Page
General Help Pages on Fanlore
Four hours after you create your account, you can create pages! Congrats! There are a ton of help pages out there, but the questions I had initially were:
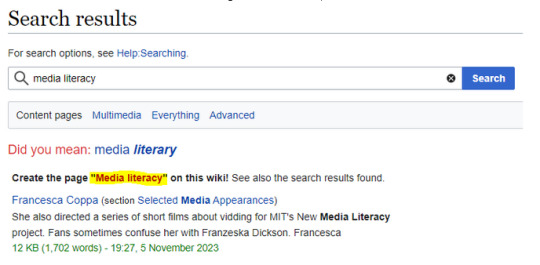
How do I make sure this page doesn’t exist already?
Search. Search for the page. Search for key phrases associated with the page. A page name is a fiddly thing, so search for significant phrases in a few different ways before you determine it doesn’t exist. Always make sure you check before you set out to create page!
How do I add this page?
If it’s not there, you’ll see it come up in red when you search. Type the page name you want to create in the search bar. Click “Search” to get all the results, and then click on that red link.
How do I format this page?
You now have an empty page. When I was getting started, my big question was: what should my page look like? Well, Fanlore has templates that can help with that! The templates are in a markup language, but do not fear! Copy and paste the template (everything in the blue box on the template page, typically starting with curly braces), make some updates, and click “Preview.” You can repeat those steps indefinitely until you get the hang of the markup. There’s also a ton of information on the Fanlore.org cheatsheet. (If you’re still confused, keep reading, there’s more specifics under the infobox section.)
Once you have the page created and published, you can edit it without the markup language if you prefer – there’s “Edit,” which gives you a non-code-based option, and an “Edit Source” button, which gives you the code-based option.

If your proposed page topic doesn’t have an official template created for that topic, you can look up similar pages and see how they’re structured. If you’re not sure how they managed to make something look a certain way, click the “Edit Source” button and look at the code there to get a sense of what they did. Be sure to cancel out of the edit when you’re done so you don’t make unintentional changes to someone else’s page! Some pages are locked down (like the template pages) so you can’t make edits, but most “normal” pages will have those links at the top so you can dig in and see what’s there and how the people who wrote that page made it look the way it does.
How do I add an infobox?
Those infoboxes on the right of a lot of pages give a quick overview of important information. These are templates, and you can find a list of available infobox templates here.
The templates, when you click into them, have a heading and some info that you can fill in. You can’t remove items from the template without making a new template, which I don’t recommend trying when you’re getting started. Use the template, fill in the information, and mark “N/A” if you don’t have information to insert in a specific field. A sample template for an infobox looks like this, and you fill in information after each “equals” sign. You can add a list, and you can add links to these after the equals sign using the markup for internal and external links on the Cheatsheet.
{{FanProfile |name=
|alias(es)=
|type=
|fandoms=
|communities=
|other=
|url=
}}
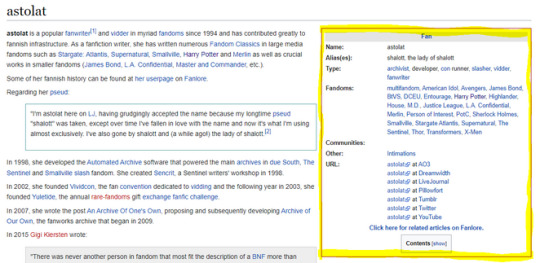
If you’re still confused, let’s go to Astolat’s fan page and click “Edit Source” and see how the infobox looks behind the scenes:
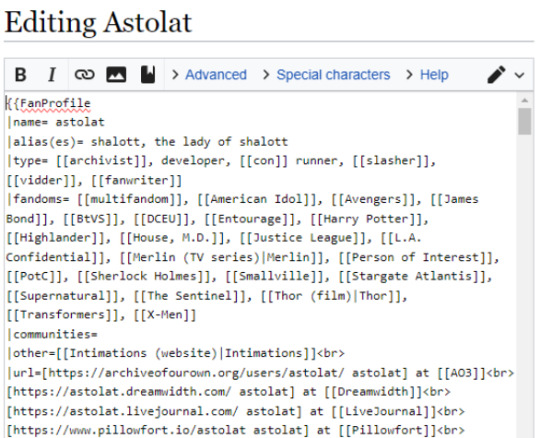
See how everything that was in the original template is still there, there’s just a list of information after the equals sign?
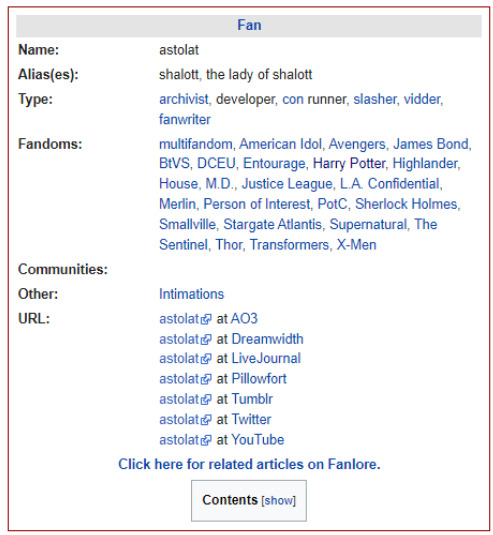
And here’s how it looks formatted:
How do I categorize this page?
Categories are important because they help Fanlore’s back-end coding group pages together so people can find the page you’ve created and so the page is in the right place in the site map. If you can’t figure it out, though, don’t worry, there are people who will find it and take care of it!
If you have an infobox from a template, this is taken care of.
If you didn’t use an infobox template, you can add a Category to index the page.
Finding a Category can be a little overwhelming. If you have an example page (another page that contains the same type of content as yours), you can scroll to the bottom of that page and see what Category has been assigned to it. You can add that Category to your page by editing the source and adding that category into your page at the bottom with 2 square brackets, like this: [[Category:YourCategory]]
Use “Preview” to make sure you set it up correctly before saving the page.
If you need to find a category and can’t find a good example page, I recommend going to the sitemap, finding what fits your article the best, and clicking into it. Categories are set up in hierarchies, so click through until you find the Category and Subcategory that fits best.
Add it at the very bottom of the page, and it should show up when you preview, at the very bottom of the page.
How do I add those nifty citation references[1]?
Review theFanlore page on citation formatting for details. The basics are:
Add a blank References heading at the bottom of the page.
Add tags and include the source information.
What is the difference between a citation and an external link? Good question! I don’t know for sure, but the way I’ve been using it, if I make a statement about a thing and I want to direct you to the “proof” (article, webpage, etc), I will use a citation. If there is a thing I’m linking to because it is relevant but not as proof of what I’m saying on the wiki, I will add it as an external link.
Fourth: Don’t Worry
You’ll find there are a lot of instances when you might not be sure what the “right” way is to do whatever it is you’re trying to do. Don’t let that stop you! Do a little research, do your best, and be okay with a learning curve.
The thing about wiki editing in general, and this includes Fanlore, is that it’s a community project, and everyone is doing their best. It’s worthwhile to think about trying to make your pages consistent with other pages where you can, because it will help people who are trying to find what you’re providing. So, poke around similar pages first and look for common trends in how they’re organized, and mimic that for your own page.
All that said, there is very little hierarchy in editors and few rules set in stone. It’s a community site put together by volunteers. You may find that you’ve labeled, referenced, cited, categorized, etc, a page incorrectly, or that you added a page that was already there under another name, or you may have put in a canon page when that’s really not what Fanlore is for. No problem! A page can be reverted to a previous version. It can be removed by a “Gardener” (higher-level editor), or edited by someone else who is more familiar with the inner wiki workings, or you can even tweak it yourself when you learn a better ways to code the page.
There is always a path forward, so get in there and get started!
Happy creating, happy fandom, and welcome!
GO VISIT FANLORE NOW!
148 notes
·
View notes
Text
Blinkie.World coding and efficiency
Hi everybody. Thank you all for the support on my last post! I literally only just got on Tumblr, and I already feel very loved and supported. This is a very nice community for sure. It makes me happy to see so many people excited about it. And to every person saying they'd love their blinkies to be included... bold of you to assume you're not already on my radar! When I say I'm collecting every blinkie, I mean EVERY blinkie! The only exceptions are immoral ones like proship and anti equal rights. Even if I'm already getting blinkies from you guys, I do appreciate everyone sharing/ pointing them out to me. It helps me to be sure I've got as many as I can! So, thanks you guys. You're all very kind.
Anyhow, since there seems to be interest in Blinkie.World, I'm sharing a little more about it. This is about how the site's being made physically, both explaining it and trying to think of ways to improve the process. Also a bit on the workflow side of things. If that's not of interest to you then you can go ahead and give this one a skip. This one's probably a bit boring for most people, but if you are interested... then onto the post!
Someone mentioned that they hope I have automation for making the site, since it seems like a lot of work. I've done what I can to help this go efficiently, but at the end of the day, I am just doing it by hand. Last time I showed what the code looks like per blinkie, which is this:
<a href="" target="_BLANK">
<img src="" alt="" title="Credit: . ID: """></a>
<!--Categories: -->
<!--Screencap: -->
That is the actual code I use. I copy and paste this every time, then enter in the details. I'm not sure that counts much as automation, but at least I'm not out here typing that over and over. This is an example of what a blinkie looks like coded in:
<a href="https://web.archive.org/web/20030406002318/http://mywebpage.netscape.com/antikao/pinkieblinkiepage1.html" target="_BLANK">
<img src="https://lonelycoconut.neocities.org/blinkie%20site/pink%20blinkies/Calvin%20%20%20Hobbes.gif" alt="Calvin + Hobbes" title="Credit: Pinky Blinkies. ID: "Calvin + Hobbes""></a>
<!--Categories: Pinky Blinkies, pink/, cartoons/, comics/, calvin and hobbes/, calvin/, hobbes/, kidcore/, animals/, mammals/, tigers/ -->
<!--Screencap: https://lonelycoconut.neocities.org/blinkie%20site/Screencaps/Pinky%20Blinkies.png -->
That is an actual snippet from the site! First is the link to the creator (and yes, it HAS to be the creator, not a reposter of any kind), and a target="_BLANK" which makes the link open in a new tab. Next is the image link. Each image is named the same as the text on the blinkie. That way, I type what the blinkie says, then copy and paste that to the image name, alt text, and image description (title). Then is the title. If you don't know, a title for an image in HTML is text that appears when you hover your mouse over an image. So, for each hover text (title), it says the name of the creator, then a caption of the blinkie's text (since they're often hard to read). After that is </a>, which closes the link, making only the image linked to the source.

After the link and image, there are the comments. In HTML, a comment is text that's in the code but doesn't appear or affect the website itself. It's usually just notes to self. The first comment is categories. First I put the creator, then the color category it is sorted in, and lastly every other category it's in. You'll also notice that each category listed has a slash after it. The reason is, when I put a slash after a category, that means it's already added to that category page.
Below that is the screencap. This is an image showing the creator, every blinkie they have made, and their terms if any. Here's this specific screencap if you want to see how that looks. I go in and screenshot all the pages I need, then combine them all in Photoshop, then name it after the creator, upload it to Neocities, and finally add the screencap image link below every blinkie by that creator! And, that's how I fill in the code for a blinkie!
So, yeah, this is definitely a lot. I'm sure I could benefit from more ways to speed up the process, but I don't know much else I can do. It's mostly copy pasting and routine. There are some other things I've done to help though, and that's browser extensions!
One I use is called Download All Images, which as you can assume, downloads all images on a page! You can also specify what kind of images you want to download. What I do is set it to add every gif that is 150x20 pixels (or bigger if I see that there are big blinkies on the page).
I also use GifsOnTumblr. If you've ever tried downloading gifs on Tumblr, you'd know Tumblr is a little weird about it. It always saves as a gifv, so you have to open the image link, then change the end of the link from gifv to just gif, click enter, THEN it downloads as a gif. It's not that hard, but let me tell you, now that I have an extension that makes it download as a gif immediately, it saves more time than you'd think!
That's about all I've figured out as far as maximizing efficiency here goes. If anyone else has any advice/ideas, I'd love to hear it! I've been at this since October (give or take, I'm not 100% on that), and as for the workflow, I'm wondering a bit how long it will take before all the blinkies I have are online. It seems like years for sure, but I think I can handle it if I'm slow when I need to be. As in, if I'm tired then I'll stop. I'm not going to treat it as something I HAVE to do, because then I'll burnout most definitely. I'm being chill about it. Especially since I'm currently on break from another huge project, believe it or not.
Just a few months ago, I burnt out from my other project, which is an animated music video I've been animating for almost two years (in which I initially planned out in 2020, started it in 2021, burnt out, cancelled it, then decided to try again and start it all over in 2023 and since). My point is, I'm very ambitious, often to a fault. I'm a workaholic. (I'm also ADHD, so I think being a workaholic is me overcompensating for it, at least partially.)
Because of that, I'm going out of my way not to take this too seriously. It's a passion project, and if it's not fun, then it's not a passion project, then what am I doing it for? Even so, my ambition cannot be held back! When I get excited on a project, I grind like crazy. I'm not scared by the idea of something taking a long time. I want to do this. I'm happy I'm doing this. I'm not going to pretend it's not a lot of work, but working is what I do! It's how I'm built. When I don't work, I feel like I start to loose it. It's not a matter of IF I work, it's a matter of WHAT I work on (and the intensity).
So, despite the somewhat daunting nature of such a big project, it makes me happy, and if it stops making me happy, then I'll stop doing it. It's as simple as that. That's about my feelings on the workload side of this. I can handle it, and if I'm wrong and I can't handle it, then that's okay too. But if anyone has any advice or ideas on how to make this process faster and/or easier, I'm more than open to hear it! (But don't give me ergonomics advice. I promise you I do every ergonomic thing in the book lol.)
27 notes
·
View notes
Text
I'm sure many of you are already aware of this, but in case I have any newer tumblr users, pet bill donation scams are very common on this site. If someone DMs or sends you an ask asking you to reblog some sort of donation post for a sick/injured pet, it is most likely a scam.
Below the cut, I have included tips to spotting a scam, and why I believe the post by 507-on-queue is a scam. @kyra45 runs an excellent tumblr scam awareness blog, and has more information and tips here about spotting pet scams. I have archived the scam post in question on my side blog here.
Here's some ways to spot these scams:
Age of the blog - most scam blogs are a week old or younger, they are often under a day old
Similar urls being used for multiple blogs - scam blogs are typically blocked/deleted rapidly, and the OP makes a new account with almost the same name
The blog bio/pfp are not unique
You can only access the dashboard view of the blog so the post archive cannot be accessed (for example, my dashboard view is this, but you can also visit my webpage view and see my 9 years of post history via /archive lol)
The blog has never interacted with you before
The blog follows you and immediately sends a DM/ask
The DM/ask is overly polite and guilt trips (they often ask you to reply privately to reduce digital footprint)
Images of pets can be found via reverse image search
OP's story is inconsistent or unrealistic
The Paypal link does not match the supposed country OP lives in
Most recently, a scam post has been going around about a sphynx cat named Draven. This has been done using multiple urls, including:
meer-lion (deactivated)
507-on-queue (deactivated)
507onqueue (deactivated)
507-onqueue (current as of Jan 13th, 2024)
Here's how this blog meets our scam watch criteria:
The current blog (507-onqueue) is less than a day old (19 hours at the time of this post). The oldest post:
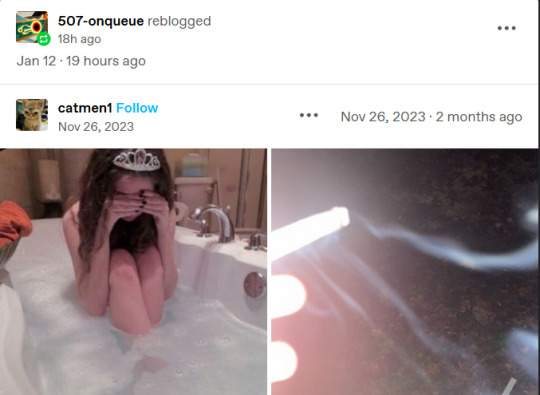
As listed above, OP uses multiple, similar URLs.
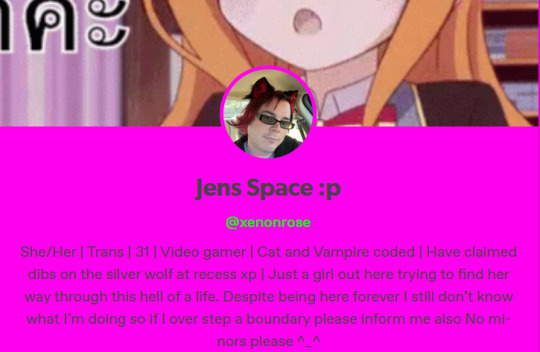
The bio of 507-onqueue is taken almost directly from another user (said user). Due to the same bio being used in previous scams, I suspect this is the same or related person to kappa-tundra/kappatundra (about this scam).
Scam blog:

Copied blog:
Only dashboard view is available.
The blog follows and immediately DMs/sends and ask. From my account:
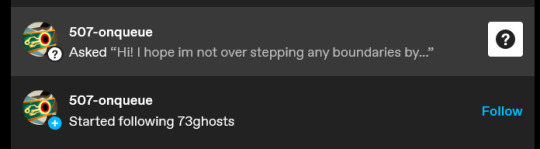
The ask from the account is very polite, guilt trips, and asks me to answer to the post privately. The goal of being so polite is to win your trust and lower your defenses. This isn't the worst guilt trip I've been in a scam (that goes to the child support scam from several years ago). By asking me to reply privately, they're attempting to reduce their digital footprint (making them harder to google) and disguise how much they are spamming asks.

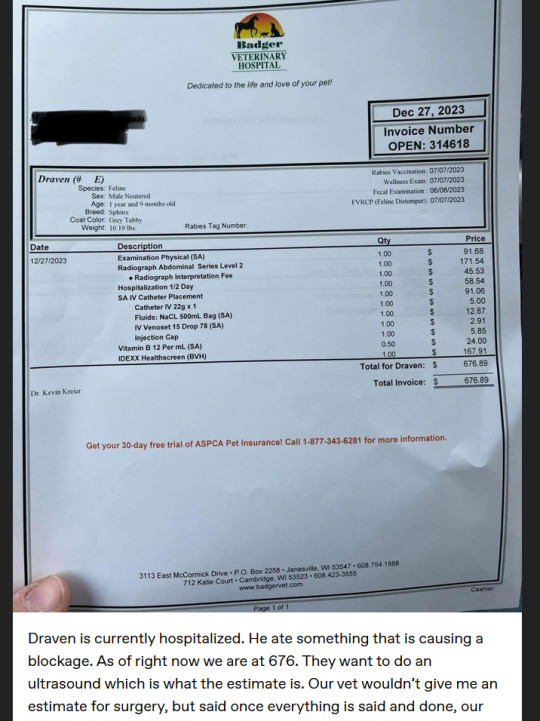
The information in that post was taken from a private Facebook account (source). I found the Facebook account in question and confirmed that the information was taken from there. I do not want to share the page because I view that as a further violation of the Facebook OP's privacy. For transparency, the images of Draven are not on Facebook OP's page any longer, but there are several other identifiable pieces of information that make it more than likely that the claims of her information being stolen are true.
The ask is inconsistent itself with the name of the cat (Draven vs Indie). This is also nearly identical to another scam ask from user captbridges. This user was using a real GoFundMe for a sick cat to scam.
The medical paperwork in OP's post is for a veterinary hospital in Wisconsin. However, OP's PayPal is based in the Philippines. The country.x= part of the url indicate the country of origin of the account; PH is the Philippines. The local.x= part of the url shows that the link was localized to the United States (making the donation currency USD). (PayPal's information page about country codes).

Stay safe out there and remain vigilant, everyone. If you don't already know them, try to pick up some boolean operators to refine your google searches when checking for scams. The tumblr search function sucks, so this is your best bet of finding information about scams like these online.
#meer-lion#507-on-queue#507-onqueue#507onqueue#scam alert#scam#You all can feel free to reblog this if you want#I normally make posts like this when a scam comes my way#But I haven't actually seen one in a while lol
244 notes
·
View notes
Text


Gideon: Uh... uh, one more thing. Look, I'm so sorry she was taken away, Elliot, but don't let her death close you off entirely. Find someone you can be your honest self with, okay?
Elliot (voice-over):I remember when I was a kid, I got into web design by ripping off sites I liked. All you had to do was view source on your browser and there it was, the code. You could copy-paste it, modify it a little, put your name on it, and like that, it was your site. View source.What if we had that for people? Would people really want to see? Find someone to be your honest self with? That sounds stupid. (out loud)Really good advice. Thanks.
19 notes
·
View notes
Text
﹙ cafe v. ﹚ ─── A guide for tumblr text colour 𖹭 ݁


It is quite simple actually! 𖹭 Three big steps ( with some sub steps guys, you can do it, I believe in you ) is all you have to go through for you to find the colour for your blog aesthetic!
step 1 ) find a colour
first, you find the colour desired for your blog. You can do this by looking up sites such as:
HTML colour codes
colour designer ( you can play around with this one a lot !! )
or by simply looking up the hexcode of your desired colour if you already have one or more!!

step 2 ) formatting the colour into your posts
You guys still with after step 1? You're doing great! Gold star for you alright! you got the colour you want for your blog aesthetic! now, this is where it might seem a bit intimidating, but we assure you, it is not!
now, we are all excited to put in the colour, and we'd think: "it's time to put it onto tumblr!" but then suddenly you notice, that doesn't work?
that is because to put things into tumblr with colour. You must use a formatter site. odd, we know
the one we here at valentine café use is ( drumroll )
Roleplay formatter
let us show you how it is done with some small screenshots!
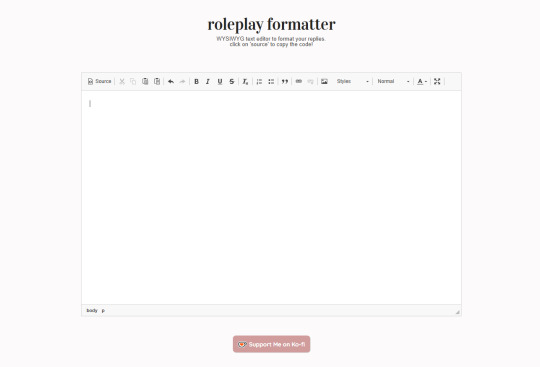
oh hey! good job you got on there with me! now just follow my steps, and you'll be good to go on your aesthetic adventure!
ready? okay let's go :DD !!
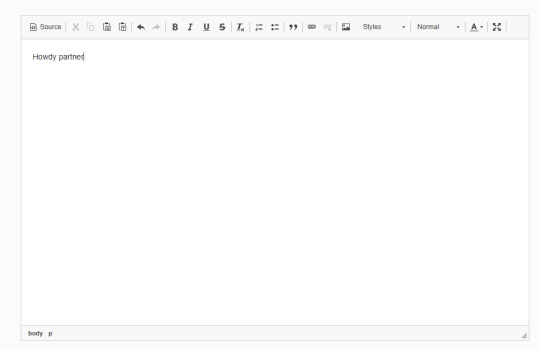
first, you write a little sentence ( you know, when eden first taught me this. I thought it'd be so complicated and hard, my brain couldn't comprehend it. I love my wife guys )

you then select your text, and then go to the little A in the corner! this is where you will find the colour options for your text, then at the bottom of the colour palate, there is an option that says "more colours"
jingle jingle jingle, pay attention. are you with? okay good! I give you a cookie and a gold star.
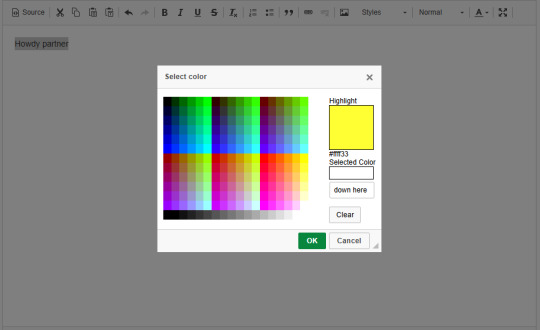
now that we are on more colours, you see the selected colour option in the corner! you paste the hexcode, right there <3
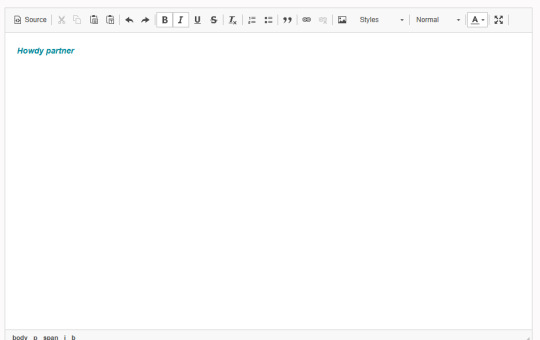
WHAPEESH, you got dat smexy colour down on your text now! What you do next, is perhaps the most intimdating of all. . . HTML ( screams of tired agony from Eden at 3AM )
You go up to the big tempting button that is called: "Source" and then you click on dat and-

oh my god bro. . . what IS THAT. That, my darling, is HTML and it looks like the link to hell I know. but this is what you use when you go to tumblr and go on the options button on post
Step 3 ) put the text into tumblr
okay guys, ( sobs ) it's been a journey. I'm so glad I can teach all of you about HTML and colour :,)) This is the last big step. . . Putting it into tumblr!! YIPPEE
What you will do now, is make the post for your fancy new text and smack that HTML onto it! But how do we do that?
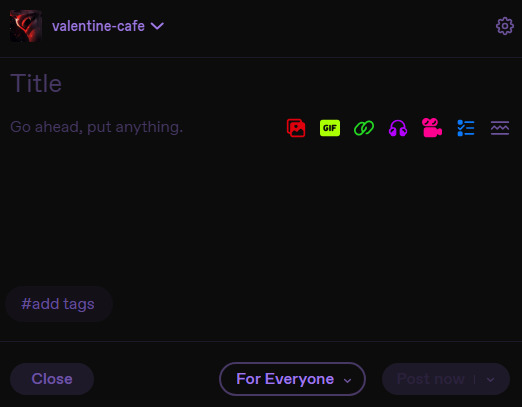
It's not too hard, don't worry, just a little clicking here and there you go onto the options and then right down by text editer!
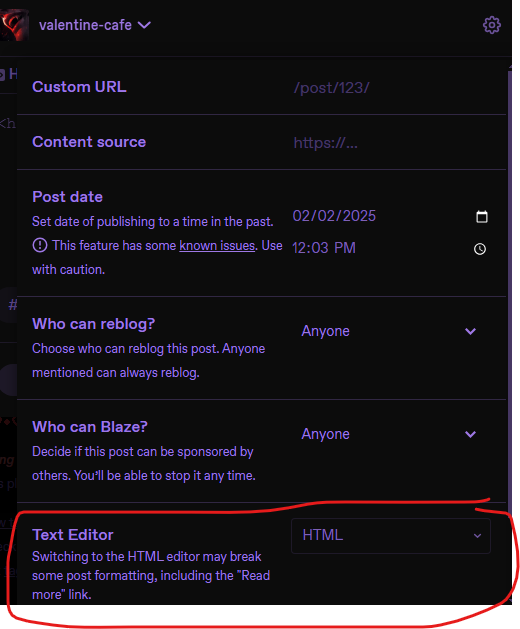
After that, your posting pop up on tumblr will tell you that you can copy the HTML you have onto the page and whambam thank you ma'am, you'll have that fancy schmancy text spread out on the paper sheet! You can sprinkle some more aesthetics onto the post even more for some extra good stuff!!
we really hope that this was of some help to those curious on how to make their blogs fit their own aesthetics more!
let us know if it helped!
18 notes
·
View notes
Note
Hi so sorry to bother you but how on earth did you get your images of your art imbedded into your fanfic of trees & telepathy ?? I’ve tried using a link to tumblr posts of my art and then I tried a Dropbox link but it seems nothing is working for viewing the fic I just posted on mobile in terms of being able to view the artwork. I’d really appreciate your help!! Thanks
Uhhhhhhhhhh below was my process
a. Upload image to tumblr ( or other image hosting site like deviant art or whatever, you just need to be able to get a clean link to the image)
If you are avoiding spoilers (or don't want to post porn on your main... hypothetically) maybe post it to a alt tumblr that people arent gonna see
b. Make sure you are in rich text, add image

c. Copy the link of the image you just uploaded,
NOT the link to the post, the link to the image.

and paste that puppy into the source section on A03

d. its way too big, scroll over and resize it
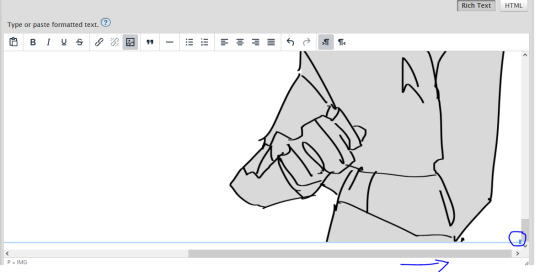

Cool so you could stop there OR you can do what i do and then shift that puppy into the chapter summary's cause i like them there, its neater
e. Swap to HTML view to get the juicy embed code
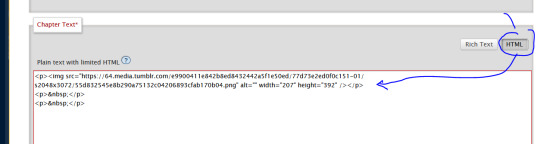
f. copy that up into your chapter notes
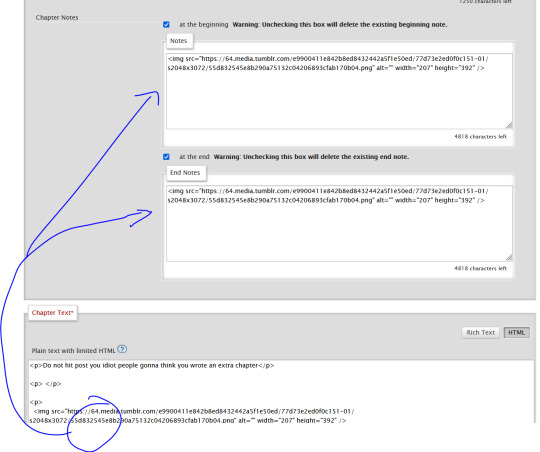
g. profit

yeah i dunno hope that helps
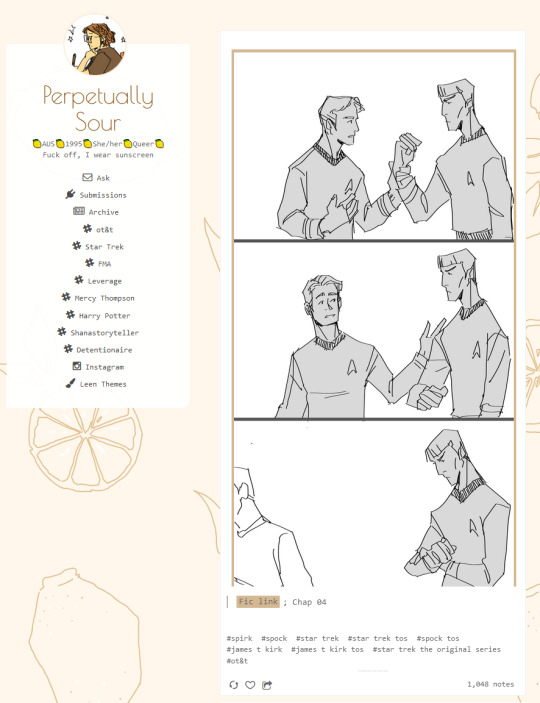
also fic link for those who want it based on the above images who dont already have it
48 notes
·
View notes
Note
can you actually talk about bitwarden / password managers, or direct me to a post about them? Idk my (completely uneducated) instinct says that trusting one application with all your passwords is about as bad as having the same password for everything, but clearly that isn’t the case.
So it is true that online password managers present a big juicy target, and if you have very stringent security requirements you'd be better off with an offline password manager that is not exposed to attack.
However, for most people the alternative is "reusing the same password/closely related password patterns for everything", the risk that one random site gets compromised is much higher than the risk that a highly security focussed password provider gets compromised.
Which is not to say it can't happen, LastPass gets hacked alarmingly often, but most online password managers do their due diligence. I am more willing to stash my passwords with 1Password or Bitwarden or Dashlane than I am to go through the rigamarole of self-managing an array of unique passwords across multiple devices.
Bitwarden and other password managers try to store only an encrypted copy of your password vault, and they take steps to ensure you never ever send them your decryption key. When you want a password, you ask them for your vault, you decrypt it with your key, and now you have a local decrypted copy without ever sending your key to anyone. If you make changes, you make them locally and send back an encrypted updated vault.
As a result, someone who hacks Bitwarden should in the absolute worst case get a pile of encrypted vaults, but without each individuals' decryption key those vaults are useless. They'd still have to go around decrypting each vault one by one. Combining a good encryption algorithm, robust salting, and a decent key, you can easily get a vault to "taking the full lifetime of the universe" levels on security against modern cryptographic attacks.
Now there can be issues with this. Auto-fill can be attacked if you go onto a malicious website, poorly coded managers can leak information or accidentally include logging of passwords when they shouldn't, and obviously you don't know that 1Password isn't backdoored by the CIA/Mossad/Vatican. If these are concerns then you shouldn't trust online password managers, and you should use something where you remain in control of your vault and only ever manually handle your password.
Bitwarden is open source and fairly regularly audited, so you can be somewhat assured that they're not compromised. If you are worried about that, you can use something like KeePassXC/GNU Pass/Himitsu/ (which all hand you the vault file and it's your job to keep track of it and keep it safe) or use clever cryptographic methods (like instead of storing a password you use a secret key to encrypt and hash a reproducible code and use that as your password, e.g. my netflix password could be hash(crypt("netflixkalium", MySecretKey)), I know a few people who use that method.
Now with any luck because Apple is pushing for passkeys (which is just a nice name for a family of cryptographic verification systems that includes FIDO2/Webauthn) we can slowly move away from the nightmare that is passwords altogether with some kind of user friendly public key based verification, but it'll be a few years before that takes off. Seriously the real issue with a password is that with normal implementations every time you want to use it you have to send your ultra secret password over the internet to the verifying party.
244 notes
·
View notes
Text
I've now posted my second weekly QL recap post and I'm honestly just really proud of myself. Not just that I've stuck to doing it but also that I've managed to make it something I might actually be able to keep doing because I've made it as easy as possible for myself. That way it's less likely that it'll start feeling like a chore or that it'll take up a lot of my time when I'd rather be talking about the shows than formatting a post.
So because I'm a nerd and I kinda wanna show off a little bit because I'm proud of what I've managed to make, let me tell you exactly what I've set up to make my weekly recap post.
The basis for the post is simple enough: an excel spreadsheet and a python script.
My Spreadsheet of BLs
The spreadsheet is based on My Watchlist on MyDramaList which I literally just do ctrl+A and copypaste into a sheet. This is then automatically compiled into a different sheet where I've made a better overview of all the shows I'm watching and have watched in the past.
Based on this I've set up the weekly overview in a separate sheet shown below
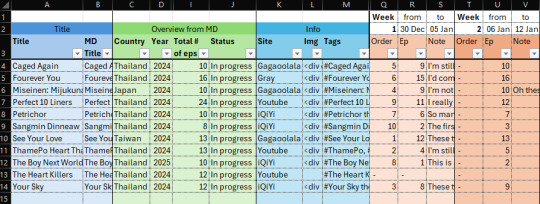
When I'm compiling my weekly recap I can then easily add any new information here.
For new shows I add the information below to the sheet
- MD Title (copied from MyDramaList overview sheet)
- Title (usually copy of MD title with minor edits)
- Site I'm watching the show on
- Tags I want to use for the show
- Episode nr. I'm starting the show on
I also make a banner for the show but I've found a good source for images so it doesn't take long most of the time.
I have to manually upload the banner for the first week but then for the second week a show is in the recap, I can add the HTML for the banner from the previous week's post to the sheet. That way the banner will just be automatically be added to the post every week after that.
Throughout the week I then write notes on each episode I watch into the sheet and before I make the actual post I add the order I want the shows to appear in on the post.
The Script is Where the Magic Happens
When I've finished filling out the spreadsheet for the week I go to my python script, change the week number in the script and run the script.
In the script I've taken the HTML code from my original recap post and set it up so the script fills the information from my spreadsheet for each show into the right places in the HTML code. Since I doubt you guys would find it riveting to look at my full script, here's a little snippet!

When I run the script it then prints out the HTML for the post which I can insert into a new post on tumblr and voila, a weekly recap!!!
I do then have to go through the text for each show and add breaks and spellcheck because that's easier to do here than in the excel cell where I write the notes to begin with. If I have any overall notes or any new banners I have to add, then this is also when I'd do it.
I'm sure there are things you could set up in a better way but this works for me and reduces the amount of time I have to set aside every week for creating the post by a lot. It just makes it easier for me to share my thoughts in a way that's nice to look at without having to spend a ton of time formatting a post each week.
Hope this didn't take away any of the magic behind my posts but just gave a cool insight into the things you can do to make recurring posts easier to make.
Any questions or comments are welcome!
Side note: if you use tumblr on the mobile app and notice that any of the lines with "Episode x of x || Watching on:[site]" are split into two lines, let me know!
That line was surprisingly the hardest to make look the way I wanted because the width of posts and look of text types change depending on whether you're on desktop or the mobile app.
#Sof's a Nerd™ and owning it#I'm actually pretty new to python#so it took me a hot minute to figure out how to wrangle the information out of the spreadsheet and into the HTML script#but at the end I'm pretty satisfied with the result of my hard work#I'd much rather have spent time on the script and spreadsheet in advanced than have to spend a lot of time on the post every Sunday/Monday#it makes it easier to keep up doing the recap posts when I'm busy during the weekend#I was also worried that it would become a chore and as a result also make it a chore to watch BL which is the last thing I want to do#Sof watches BL#Sof Watches Weekly
18 notes
·
View notes
Text
Embedding an Image on Ao3
You cannot host images on Ao3, so you ned to host it off-site, on a format that allows image hosting, such as Tumblr (make sure your post is private, so as not to leak your art), or Squidge.org. Once you have the image url, you can embed it on Ao3.
Embedding an Image in Rich Text
When you have the Rich Text option selected, you will have a bar across the top of the text box with a number of options. To insert an image, put your cursor in the text where you would like the image to appear and select the “Insert/edit image” button (pictured below).

That will bring up a dialogue box where you can include the image URL and some more metadata.

If you would like your image to have alt text (useful for screen readers and accessibility!), all you need to do is write an image description in the image description box.
It’s a good idea to size your image, or it will automatically display at full size, which can run off the edge of the screen. You can either choose to specify an amount of pixels (640 pixels will fit on most computer screens comfortably), or you can put in a percentage. Specifying “max-width 85%” (or 90%, whichever) will automatically size your image to 85% of the screen viewing it, which will make it mobile-accessible.
It's important to note that you need the IMAGE URL, and not the url of a page hosting the image. You can find this by right-clicking on an image and selecting "Copy Image Address".

Image page URLs often start looking like a normal url and might have a "share" as part of the url, like this.
https://antimony-medusa.tumblr.com/private/782903563243470848/tumblr_pqlYRjtCA8qyKsyFI?source=share
The above url will not work to embed.
However, an image URL will often be much more numbers-and-letters-based, and might have a date or the word "media" in it.
https://64.media.tumblr.com/a6b02fe154d74fba37919a27fe507a4d/4afa6d2300b1317f-b2/s1280x1920/91c5ceb5297a9fb0c522eb61ccc4ca7b6c957bf1.pnj
This url would embed.
Embedding an image in HTML
In order to insert an image into your fic using the HTML option, you will need to know the code to insert an image in HTML code. The HTML code to insert an image is straightforward:
<img src="[URL]" alt="[image description]">
Replace [URL] with the URL of the image you want to insert. AO3 does not host images, so your image must be hosted off-site.
If you would like your image to have alt text (useful for screen readers and accessibility!), all you need to do is write an image description instead of [image description] in the code above.
If you would like to set your image to size to your screen, the HTML for that is
<img src=[URL]" alt="[Image Description]" width="max-width 85%" />
Once your image is embedded, you can preview your work to make sure it all works and is sized appropriately, and then you can tag and title it like you would any other work on Ao3 (including the tags "art" or "collage" can be useful), and include the tags you're claiming in your author's note, and then post to your team's collection!
15 notes
·
View notes
Note
https://www.tumblr.com/deerdoegone/783158683631796224/sheriff-announces-end-to-search-for-missing?source=share
Firstly, this reality is absolutely amazing. Secondly, the post is beautiful. I'm new to tumblr so if it's not too much of a bother I'd appreciate it if you could help me out a bit thank you so much in advance. The color of the pink text is not the one that tumblr offers right? So you made it with html correct? But then how did you add the "keep reading" thing because I think it's unavailable in the html mode? I'm confused and lost and scared man
hi! thank you so much, first of all, you are so sweet and this is not a bother at all!
for starters, yes! this pink is not the same as this. neither is this one nor this one. so, you are right that i use the html editor, but i use this handy little website to achieve all sorts of results in html! it basically does everything for me.
there are tons of other sites you can use, but i’ve been using this one for years, plus you can do a lot with it, really fun stuff like this middle gradient! it's a bit different from a regular horizontal gradient
now, i have no clue how html works. i only use it to color words, but i have such limited knowledge that once i’m done with what i needed, i open up the same text editor list i first opened to get to html, and then i switch back to rich text editor. this allows me to add the keep reading cutoff! super simple, but if you're still confused, let me know!
(edit: i have a new method. instead of constantly switching between html and standard text, i have two tabs open, one with html and the other with my post itself on text mode. i put my code into the tab with the html editor, hit preview, copy and paste on my standard text post. this saves me time and the endless scrolling when i want to change a section)
10 notes
·
View notes