#text colour tutorial
Explore tagged Tumblr posts
Visit Tumblr Blog
Explore Tumblr blogs with no restrictions, modern design and the best experience.
Last Seen Tumblr Blogs


Fun Fact
The Tumblr office adopted Tommy, an 11-year-old Pomeranian.
Text
﹙ cafe v. ﹚ ─── A guide for tumblr text colour 𖹭 ݁


It is quite simple actually! 𖹭 Three big steps ( with some sub steps guys, you can do it, I believe in you ) is all you have to go through for you to find the colour for your blog aesthetic!
step 1 ) find a colour
first, you find the colour desired for your blog. You can do this by looking up sites such as:
HTML colour codes
colour designer ( you can play around with this one a lot !! )
or by simply looking up the hexcode of your desired colour if you already have one or more!!

step 2 ) formatting the colour into your posts
You guys still with after step 1? You're doing great! Gold star for you alright! you got the colour you want for your blog aesthetic! now, this is where it might seem a bit intimidating, but we assure you, it is not!
now, we are all excited to put in the colour, and we'd think: "it's time to put it onto tumblr!" but then suddenly you notice, that doesn't work?
that is because to put things into tumblr with colour. You must use a formatter site. odd, we know
the one we here at valentine café use is ( drumroll )
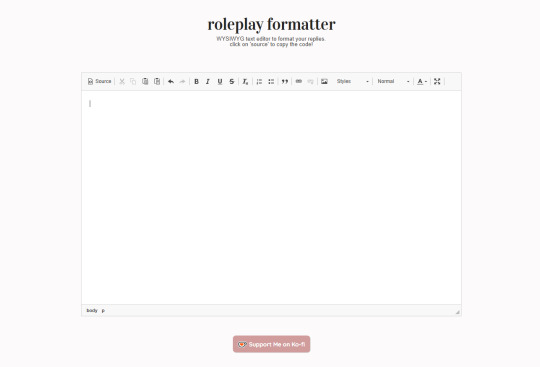
Roleplay formatter
let us show you how it is done with some small screenshots!
oh hey! good job you got on there with me! now just follow my steps, and you'll be good to go on your aesthetic adventure!
ready? okay let's go :DD !!
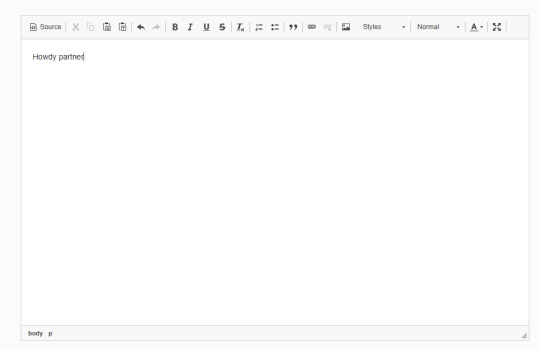
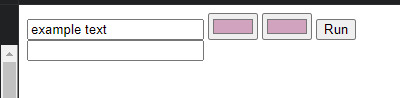
first, you write a little sentence ( you know, when eden first taught me this. I thought it'd be so complicated and hard, my brain couldn't comprehend it. I love my wife guys )

you then select your text, and then go to the little A in the corner! this is where you will find the colour options for your text, then at the bottom of the colour palate, there is an option that says "more colours"
jingle jingle jingle, pay attention. are you with? okay good! I give you a cookie and a gold star.
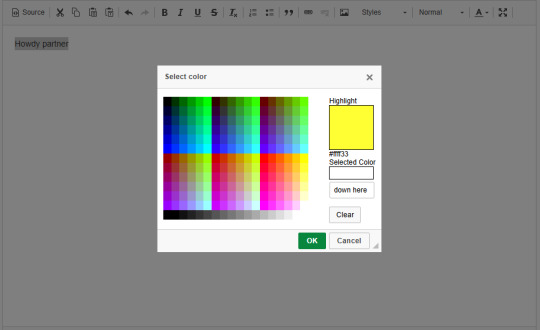
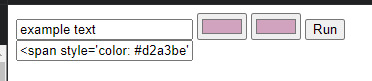
now that we are on more colours, you see the selected colour option in the corner! you paste the hexcode, right there <3
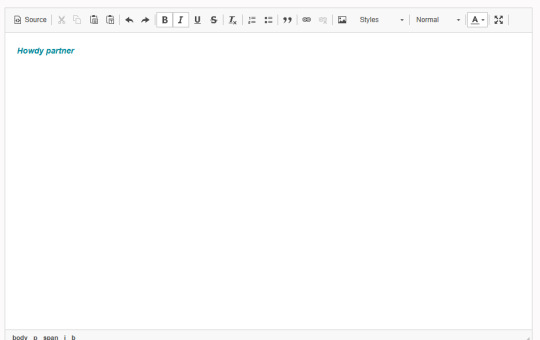
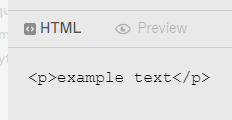
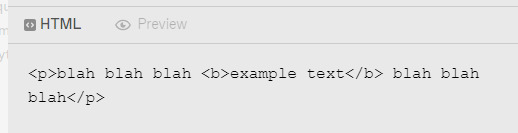
WHAPEESH, you got dat smexy colour down on your text now! What you do next, is perhaps the most intimdating of all. . . HTML ( screams of tired agony from Eden at 3AM )
You go up to the big tempting button that is called: "Source" and then you click on dat and-

oh my god bro. . . what IS THAT. That, my darling, is HTML and it looks like the link to hell I know. but this is what you use when you go to tumblr and go on the options button on post
Step 3 ) put the text into tumblr
okay guys, ( sobs ) it's been a journey. I'm so glad I can teach all of you about HTML and colour :,)) This is the last big step. . . Putting it into tumblr!! YIPPEE
What you will do now, is make the post for your fancy new text and smack that HTML onto it! But how do we do that?
It's not too hard, don't worry, just a little clicking here and there you go onto the options and then right down by text editer!
After that, your posting pop up on tumblr will tell you that you can copy the HTML you have onto the page and whambam thank you ma'am, you'll have that fancy schmancy text spread out on the paper sheet! You can sprinkle some more aesthetics onto the post even more for some extra good stuff!!
we really hope that this was of some help to those curious on how to make their blogs fit their own aesthetics more!
let us know if it helped!
18 notes
·
View notes
Note
how do you get your text that soft pink shade? tutorial?
BABY PINK TEXT TUTORIAL !
hi babe!! here's a short and hopefully easy to understand tutorial for the text i use in my posts ᥫ᭡
also, just a little disclaimer: the images on this post might not be visible because they exceed the limit of 10 images per post on mobile app. should be fine on a laptop or pc though!!

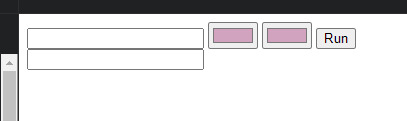
okay firstly, make sure you're using a laptop and open your post in one tab and in a seperate tab open jsfiddle.
you should be able to see this coding somewhere on your screen:
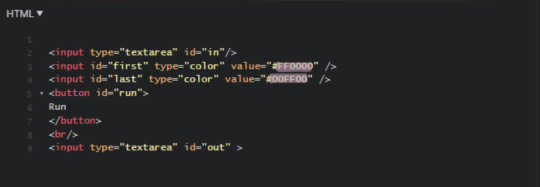
you're gonna replace the two hex-codes (highlighted text) with whichever colours you'd like. to do a gradient, like this, the two codes will be different, but i like to do a solid colour like this so my codes will be the same.
the hex code i use for the baby pink is D2A3BE, or you can use your own. if you don't have a hex code you like yet, you can use the colour picker on this site to find one!
just copy and paste the hex codes into the code so it looks like this:
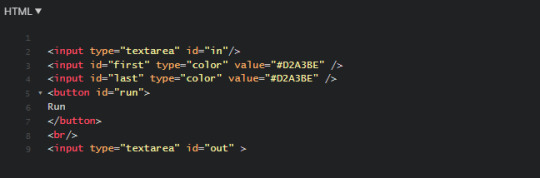
make sure it looks exactly like this. you still need all the spaces, quotations and other code. only change the hex codes.
in the top left of your screen, there should be a "run" button, and when you press it, the colours in the bottom right should change from the default ones to the ones you chose.
next, you're going to open your tumblr post in your first tab.

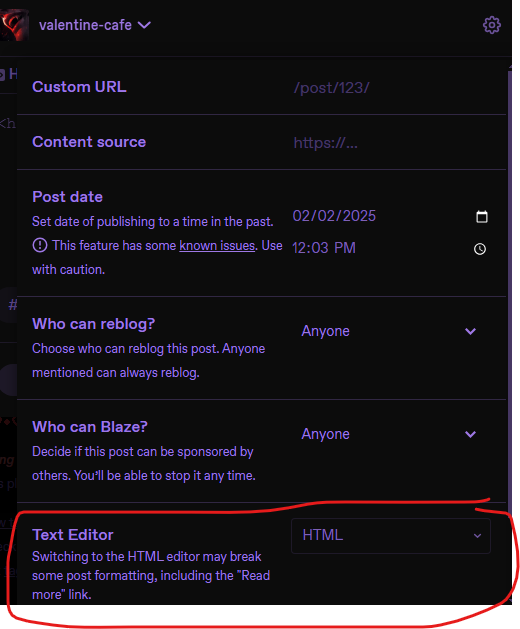
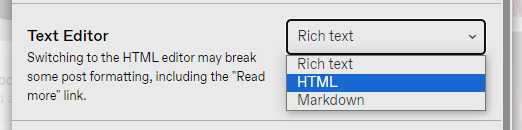
your post will start like this. you'll go to the settings button in the top right (circled) and change the post from rich text to HTML
this will enable coding on the post. you'll still have 'preview' where it will look normal and you can still type and edit the post as you usually would.
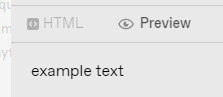
once you've typed something it will show it in the HTML option just in a different way:
you want to go to the preview page and make sure you've got the text looking exactly as you want it (bold, italic, small, etc.). also note that colours look especially good and show up well when the text is bold. i set mine to bold as an example.
when you switch to HTML it will look something like it does above.
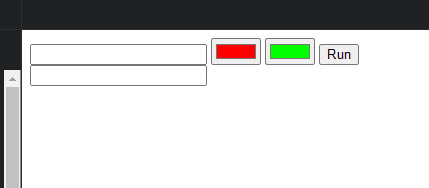
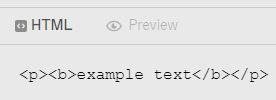
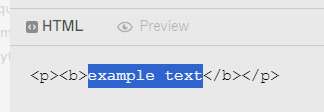
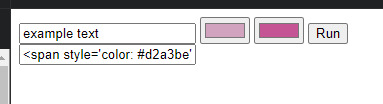
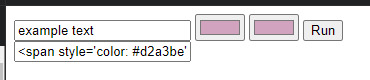
next, you'll copy the text between all the coding prompts (e.g. <p><b> and <b><p>). only copy the text you want to be pink or another colour!! don't highlight any of the coding. then paste it this top box on jsfiddle so it looks like this:
press "run" on the right, and it will spit out a line of code in the second box that will look something like this:
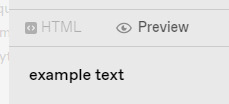
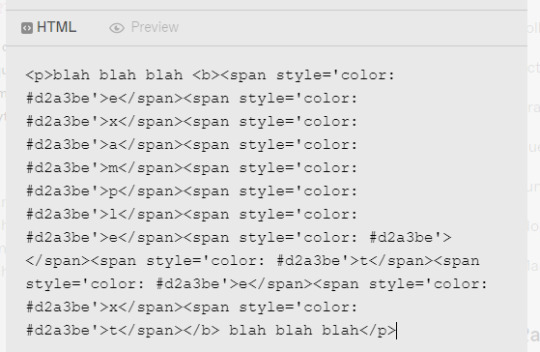
you're gonna copy that line of code and switch over to your tumblr tab. on your HTML version of your post, find the text you're changing and highlight it. then paste the code into that spot. make sure not to highlight any of the surrounding code - only the text you've written and want to change.
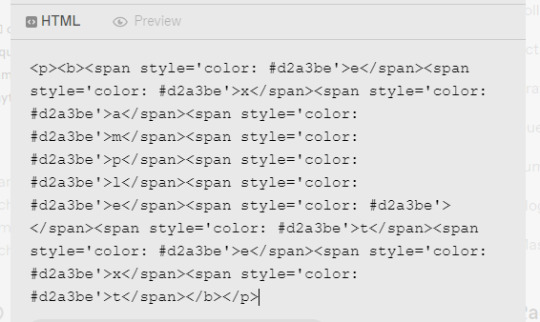
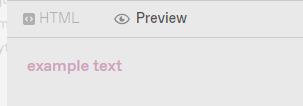
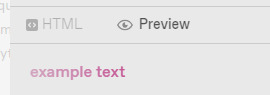
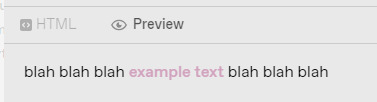
it will look super weird and long because it's colouring each symbol and letter, if you look closely, each letter of "example text" is separated and surrounded by code. when you switch to preview it will look like this:
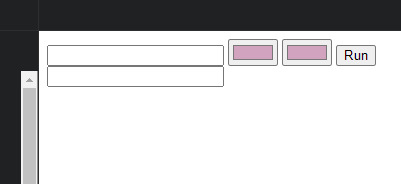
for gradient, the process is the exact same, but on jsfiddle, when you're replacing the default hex codes with yours, the second hex code you plug in will be different to the one you start with. for example:
this second colour is C45494 btw!!
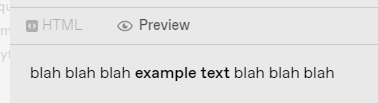
to do specific text in a paragraph as if bolding it (which i do in a lot of my posts), you just want to find that text in your HTML post, and copy and paste the specific word/s into your top box on jsfiddle, and then proceed as normal. example:

hopefully this helped!! let me know if you have any questions or need me to go over anything ( ˘³˘)
#coloured text tutorial#colored text tutorial#tumblr tutor#text tutorial#text tut#coloured text tut#colored text tut#colored text#coloured text#aesthetic#theme#aesthetic theme#pinterest#pink#hex codes#coding#jsfiddle#dodgesgirl helps#dodgesgirl answers#art donaldson#challengers#mike faist#challengers 2024#challengers movie#mike faist imagines#art donaldson fic#art donaldson smut#challengers smut#mike faist renaissance
230 notes
·
View notes
Note
hiii, I am writer 2 and I wanted to know how to get my colors like that, to fade and look different like yours
hello angel! I use this website (click the word 'this' it'll take you to it) you pick your colours, type out your words and click generate colour faded text. then you're gonna wanna go ahead and copy the long link in the box it generates. when you switch back to tumblr, create a post and click the little settings button. here, you can scroll down to text editor and change "rich text" to "HTML" and only then do you paste your long link. click back to rich text and everything should be perfect!! 🩷
#ellie williams x reader#lesbian#bisexual#straight#jason todd x reader#lgbtqia#dick grayson x reader#carl grimes x reader#daryl dixon x reader#vi arcane x reader#spencer reid x reader#steve harrington x reader#eddie munson x reader#text format#writers#poet#young writers#faded colour tutorial#faded colour text
102 notes
·
View notes
Note
hi! i love reading your fics but i specifically love the social media shenanigans in dearly beloathed. i was wondering how you would feel if i took some inspiration from that for a fic of mine because i would love to write something that's very similarly formatted but i wanted to make sure you were fine with that (cause i'm assuming it took some time and effort to come up with) before i did. anyways your writing is awesome and i love reading it
Yes sure of course! I took inspiration from ao3 fics (F1 fandom in particular is stunning at formatting, I have so much respect for their dedication), such as this one (I basically took the formatting from this) and this Twitch streamer AU. If you're posting on ao3, there's the option of playing with HTML/CSS for a more "realistic" socmed interface, for example this one for Twitter which is magic to me. This one is an extremely impressive Discord mockup. An Unauthorised Fandom Treatise is a nice look into mid 2010s Superwholock era fandom whereas F1 rpf and indeed mcyt / streamer stuff is more "modern". Anyways yeah there's a lot of potential in this genre of fics and loads of stuff to check out on ao3 if you wish :) I love scrolling through the Unconventional Format tag because people are just so creative. Good luck with your writing!
#im serious about the f1 thing. go into the f1 tag and search for social media or unconventional format and boom#theres also more simple css with different coloured text which can mimic socmed better than black and white#still the basic italics bold underlines is usually enough to sculpt the look of socmed#text symbols and emojis are also fun. the document is your sandbox yipppee#ao3 has a faq section about their built in html which is very helpful. lots of css tutorials on ao3 too#sorry if this is a lot i get excited about formatting <3#ask box#answered#writing#dearly beloathed#hrm posting on stuff like neocities gives even more customisation... but yeah it takes effort and time#theres also sth i like about simple mockups with no css and minimal html (it's easy to copy and paste / edit)
12 notes
·
View notes
Text
Uh oh!!!!
#my art#procreate#original art#oc#uhhhh idk what else to tag this with…..#anyways this was inspired by the creepy bad end screens for 14 days with you#I loooooove how the text progressively gets redder and shakier as the ending progresses#honestly I’ll probably let my demons win and download it from itch to play for myself lmao#I saw a yt tutorial on how to go from greyscale to colour and I’m really liking that method#my pea brain just cannot understand colour theory
17 notes
·
View notes
Text
Does anyone know any good tutorials on how to colour characters with dark skin?
Like, just a few shades lighter than black, kind of dark.
My preferred style is very comic-esque black linework with cell shading - so it's very easy for details to get lost. It's also hard for me to translate things like undertones, from real life references into flat colouring.
Also anything on colouring lips (any skintone honestly). Since they're part of a character's face and thus stick out very obviously when you do them wrong.
18 notes
·
View notes
Text
#how to gif:
This is a side-blog for all the helpful resources + pretty samples I’ve come across while learning to make GIFs. Welcome!
In late October 2023, I finally decided to learn how to make GIFs, using instructions from blogs on this website. (I hadn’t used Photoshop before. I had a lot to learn.)
I saved a lot of different resources (tutorials, samples, etc.), and I wanted to put them all in one place (here!). There are a lot of (really helpful! wonderful!) resources on this website, so I have outlined below the method I have been following, which is kind of cobbled together from different tutorials (all referenced), under the cut. (This is as much for my own reference as anything else!)
The tags on this post are to help me (maybe you?) navigate to the various tutorials/resources I have reblogged here. (I was really good with tagging in the beginning but not so much lately, so I need to catch up!)
All these resources (listed on this post and not) are really wonderful and helpful, and I am incredibly grateful to the kind and talented people who have generously taken the time to share their brilliance on this website—thank you so much to all of you!
@hollygl125
FOR REFERENCE
Screencapping:
I follow the instructions on screencapping from this post (#1), except that I use the latest version of MPV and I incorporate the additional lines for the mpv configuration file from this post (#2). Several times I tried checking for duplicate frames, as per the instructions from this post (#3), and each time the first frame was duplicated but no others. (As far as I can tell, none were missing?)
Gif-making (basic):
I have been following a mishmash of the instructions from this post (#4) and this post (#5) for basic GIF-making and initial colouring.
For making the initial GIF, I wanted to stick with the load files into stack method that most people seemed to use, so I mostly follow the instructions from this post (#4) for steps 4 (importing to Photoshop), 5 (cropping & resizing), 6 (animation), and 8 (sharpening) but with some alterations based on the instructions from this post (#5):
I add a few extra pixels to my initial crop size then after the initial GIF-making reduce the canvas size by that number of pixels, to eliminate the small white border that seems to show up otherwise. (See this post (#5) for much more detailed information.)
I do not play around with the initial GIF speed. (Again, see this post (#5) for more information.) The caveat on that is that, for whatever fun PS reasons, my initial frame has a 5-second delay while the others have no delay, so I change the initial frame to have no delay as well. Then at the very end, when I am exporting the GIF, I use the second action from this post (#6), which gets everything ready for export and puts all the frames to a nice 0.05 second delay. The downside is that, while I am preparing the GIF, it looks faster than it will upon export.
I use the following smart sharpening settings (sharpening twice): (1) amount: 500%, radius: 0.3 px; (2) amount: 10%, radius: 10 px. (Initially my first smart sharpen was at 0.4 px, but I found that was too sharp for some GIFs, so now I start with 0.3 px as the default and occasionally remember to check whether 0.4 px would work.)
Actions:
When I first started, I did not use any actions apart from the save action mentioned above because I wanted to understand what was going on/what I was doing. Once I had that memorized to the point that it was becoming tedious, I made my own action—which, it turns out, is really, really easy and makes the initial process way, way faster (like, almost instantaneous)! (You basically hit record, go through all your steps, then hit stop—super, super easy. But go check out this post (#7) for more detailed information/instructions.)
Colouring (initial):
This is for initially getting the colours to the right spot (i.e., something realistic).
I started by generally following the guidance from this post (#5), and I made myself a psd based on that, and then I make other adjustments from there. I have tried some other suggestions from other tutorials, but mostly I end up going back to that psd with adjustments for the particular scene/GIF.
Fonts + typograph:
After I had made my first GIF, following these initial steps, I tried adding some text, and my GIF looked... terrible. So I downloaded a bunch of fonts recommended in various places on this website then tried some different text options.
The following resources below were helpful for fonts, typography, text colouring, etc.: #8, #9, #10, #11, #12, #13.
Blending:
Though it is not what I used, this post (#14) looks like a good tutorial. This post (#15) also gives a tutorial on some gorgeous blending.
Colouring (fun!) and key frames:
This is for when you want, e.g., everything to be tinted in purple.
I really love the colouring method from this post (#17). This post (#16) talks about colouring with gradient maps and how to use key frames (for adjusting the placement of masks—for when you want Sara Sidle to have bright purple-tinted hair but not bright purple skin!), so it is also excellent.
Effects + special effects:
For clipping masks and putting multiple images in one, see this post (#10), this post (#20), and this post (#21).
For a tutorial on how to use overlays, see this post (#19).
Resources I have found particularly useful (or essential!):
gif tutorial by kylos
additions to mpv configuration file by castiel
duplicate frame deletion by laurabenanti
gifmaking for beginners by hayaosmiyazaki
giffing 101: a comprehensive guide by redbelles
action pack #2 by anyataylorjoy
actions (how-to-make) by hayaosmiyazaki
text/subtitles by hayaosmiyazaki (I have not actually made subtitles yet, only fun text—yes, the dopamine quest continues)
typography by momentofmemory
kate’s quick text styles tutorial by aubrey-plaza (which also very helpfully taught me about clipping masks)
basic gradient text by anya-chalotra
gradient text with blending options by anya-chalotra
difference/exclusion text colouring effects by yenvengerberg
how to: gif blending tutorial by delphines (not what I used but looks like a good basic intro)
double exposure/blending tutorial by yenvengerberg
how to: coloring gifs with gradient maps by delphines (taught me how to use keyframes for masks—actually very easy, even though I kept putting it off—don’t put it off!)
becca’s mega coloring tutorial by yenvengerberg (have used this a lot for making fun colourful gifs—both obviously colourful and less obviously so)
a few little tricks and tips to really make those colours pop by yenvengerberg
new & improved overlay tutorial by rosamundpkes
tutorial on how i use layer masks and clipping masks to get ‘multiple gifs in one’ by yenvengerberg
grid overlay effect by thereigning-lorelai
how to fix grainy gifs by kangyeosaang (have not used this yet but want to try it)
the beginner’s guide to channel mixer by aubrey-plaza (have not gone through this thoroughly yet but want to do so)
#gif-making#how to gif#gif tutorial#gif resources#gif sample#gif inspiration#screencapping#introduction#essentials#ps actions#fonts#typography#blending#channel mixer#brightening#effects#transition#colouring effects#special effects#overlays#key frames#gradient maps#sharpening#textures#layout templates#psds#text effects#colour palettes#templates#before and after
4 notes
·
View notes
Text


🌙SERENITY SHADER PRESET🌙
Here it is, finally, my newest shader preset, Serenity. This shader focuses on smooth and not oversaturated colour with a balance of shadows that work in all forms of gameplay. These presets are compatible with GShade. I've included 2 of the presets specifically modified to work for gameplay or screenshots and you can install both.
RELEVANT SITES & DOWNLOADS
Software
Gshade Download
Clean UI
Presets
Serenity Preset [Gameplay] - A gameplay-friendly preset which also includes an additional flair for CAS.
Serenity Preset [Screenshots] - A preset made specifically for taking screenshots.
THINGS YOU NEED TO KNOW
You can install both of the presets and swap between them.
Turn off EDGE SMOOTHING in your game settings to use MXAO and SAA shaders. Note: This will also make your text in game fuzzy and shadows appear behind the game UI. Unfortunately, it’s just a side effect of MXAO but the clean UI download fixes this!
The presets were made to work with GShade Version 5.0.2 so I cannot guarantee the presets will work for previous or future versions.
To get the game to look the exact same as mine you will also need my lighting mods: Northern Siberia Winds In-Game Lighting (average base) & Softerhaze's Sunblind
TUTORIAL
youtube
2K notes
·
View notes
Text


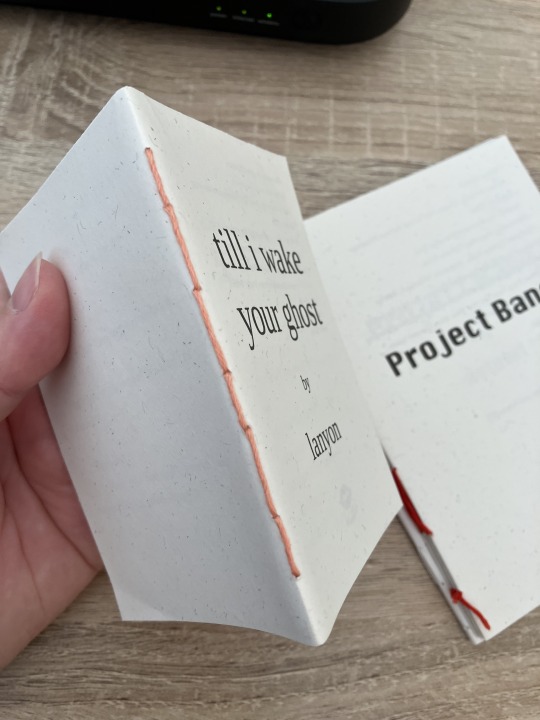
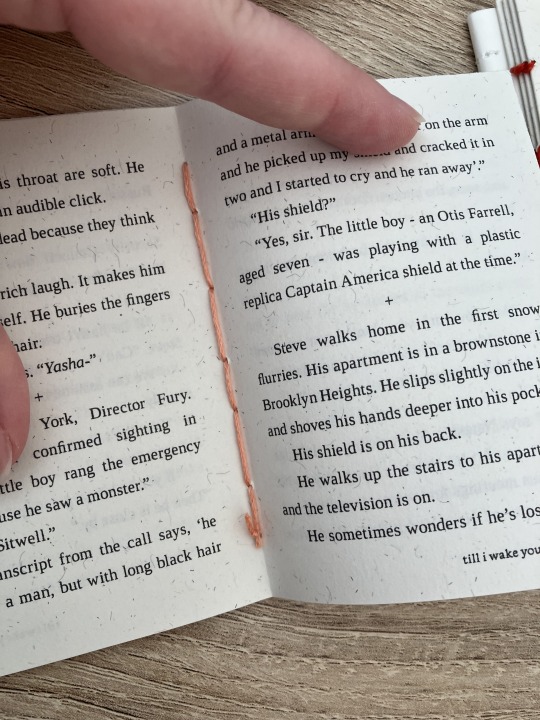
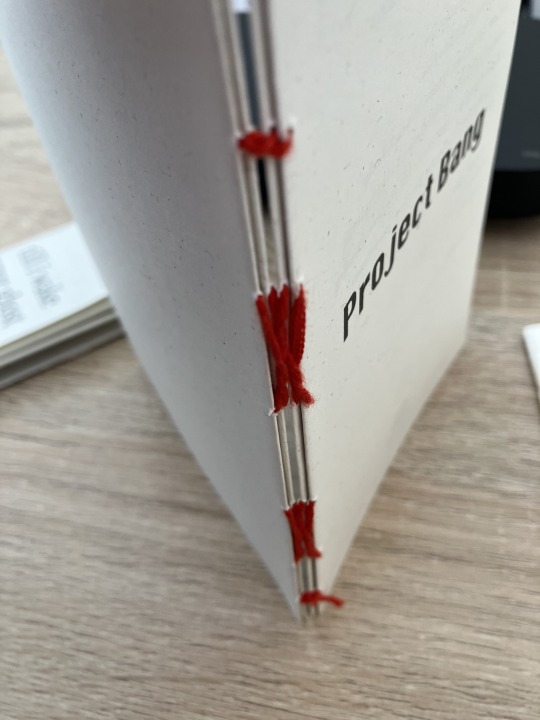
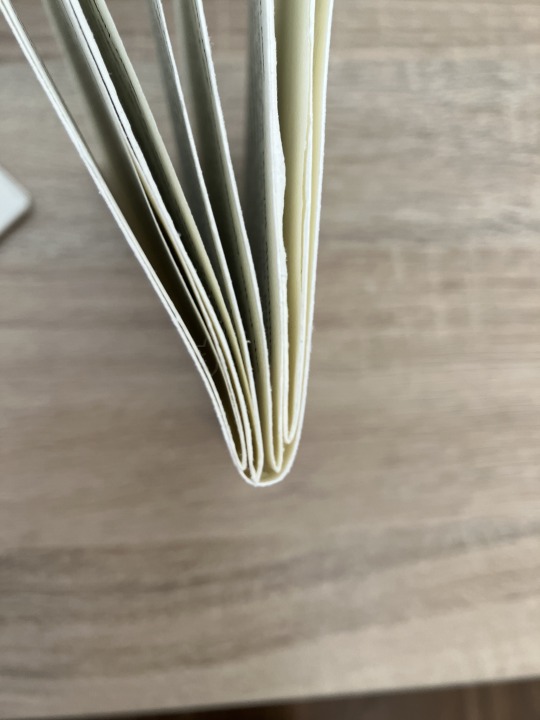
Fanbinding of Salvage by @muffinlance
This story has been on my binding list since I started learning how to bind books. It was probably the inspiration to learn even, after seeing all the really cool copies people had made already.
I've been working on this book on and off for the past month, and I've learned a lot of different things during the process. Mainly that it helps to look up tutorials for things before you actually start doing them.
It's an A4 folio (A5 sized book), is 528 pages long and about 3.5cm thick, so it's got quite a bit of weight to it. This was my first a5 book so it was very fun to make, it really feels like a real book and it lays open really nicely. It's also my first time doing a 3 piece bradel using an actual tutorial rather than just loking at a picture and going "I'm sure I can recreate that", turns out it's a lot easier following someone elses instructions, who knew lol.
Printed on sugarcane paper, hand sewn double core endbands, cover material is dubletta purple blue bookcloth, and the cover is decorated using a wrmk foil quill and silver foil.
The endbands were my second attempt at the double core style, I've done a few of a different type before but I found this method a lot easier, albeit it still took me 2hrs for each end :') I tried to match the colours to parts of the books, so the purple and turqoise(?) are from the bookcloth and the black and light blue from the endpaper.
For the title page and cover is used page borders from this shop, the title and chapter font is blackadder ITC, text font is EB garamond, drop caps are Aristokrat Zierbuchstaben and the paragraph dividers are just these emojis I found somewhere 𓆝 𓆟 𓆞 𓆝.
Thanks to @muffinlance for the amazing story, it really is a work of art, and I shall enjoy having a copy on my shelf next to all my other favourite stories <3
222 notes
·
View notes
Text
Apps we use as a system !

Simply plural!
Simply plural is a great app for Systems! it allows you to track who's fronting, add more in depth information about who's fronting, Sort headmates out into groups, it also has a chat function.
Negatives: whilst it is a great app! it is more ideal for Smaller to medium sized Systems or Systems that switch solidly or for longer periods of time, as a bigger system outself, we find it quite difficult to use Sometimes, as it can be difficult for us regrading having to get up and log things.
they are also supportive of endogenic "Systems" and their resources do contain misinformation.
Octocon!
octocon is very similar to simply plural!
you can add headmates, categorise them, it also has a bit directly in discord, so it could be easier for some systems to use! It also has a diary feature! we have less to say about this as we personally don't use it, but it could be helpful for other systems!, it is currently only on andriod but will be releasing on IOS late 2024/2025
we feel that the app is quite clunky and can be difficult to use, especially if your already using apps like simply plural.
they also have a limit on how many alters profiles you can create to "limit the amount of fakers" - to specify direct quote from the official octocon server linked on there website, “the alter limit is to basically protect against ddos attacks, without the limit someone could take up an unreasonable amount of the bots resources and crash it. theres no way to go past it, and nobody so far has gotten close to going past the alter limit as far as we know.” I heard the term fakers being thrown around, I also assume that by “fakers” they mean endo “systems” but still the tone is there and it rubs me the wrong way considering systems that have high high alter counts (such as ourselfs) :)
Notion!
Notion is a great app! we personally dont use it to track our system but we know many Systems that do! it can easily be used for tracking fronts, alters, giving alters journal pages etc! it's very easy to use for beginners and there are many tutorials on YouTube about it! It is also used by a alot of singlets too!
our only criticism is that it isn't built for Systems! So you would need to build it all yourself or use templates if that makes sense which we know for Some Systems could be a struggle!
Mindly
Mindly is a very easy to use app, which is commonly used for making innerworld maps! It's very simply to visualise and understand!
Our negatives for mindly are that there is a limit on how many maps you can make, if you are like us for example and have different layers in your system you wouldn't be able to make multiple maps for those layers, also it is very limited on how you can customise your bubbles, with only the colour, text and emoji
Fortelling
Fortelling is a great app! you can use it to create innerworld maps every easily! being able to include images and in-depth describes also!, we also use it to create split/fussion maps, and you can also use it similarly to Simply plural as you can add in depth information and also custom fields!
Anytype
Anytype is a good app for creating private journal pages for headmates!
It's a great way to allow alters there own private space to express themselves
Our negatives is that it can be quite confusing when you first start using the app, and it could get confusing if you are a bigger System
Twinote
we love twinote! it's such a fun way to communicate with your headmates! the app is very similar to twitter but it's completely private! alters can completely create there own profiles and communicate with each other very easily!, we also know singlets that use it for role playing also! :)
Daylio
We use daylio well daily! it's a great way to track things like switches or Symptoms eta very simply! we also use it for non system related things just like sleep, school, our mood etc!! It's been so helpful for us and our doctors!
We use daylio well daily! it's a great way to track things like switches or Symptoms eta very simply! we also use it for non system related things just like sleep, school, our mood etc!! It's been so helpful for us and our doctors!

#did system#endos dni#actually a system#anti endo#did stuff#anti endogenic#did osdd#traumagenic system#actually did#endos fuck off#didosdd#did education#system posting#system info#system blog#dissociative system
335 notes
·
View notes
Text
tiny red hearts II a.putellas

tiny red hearts II a.putellas
amid the pandemic everyone picked up a hobbie in lockdown.
if it be knitting, dancing, pottery, reading, cooking, puzzles. you name it, someone had likely perfected it as an art form during those weeks and weeks locked away from society.
for you it was no different. you'd tried cooking, reading, jigsaws, colouring in, sudoku, even gardening but nothing really clicked.
until one day you were endlessly doom scrolling your various social medias as again, everyone was, when you stumbled across a nail art video. intrigued you'd watched it, then another, and another, and another, the worm hole you fell down was one that was long and steep and swift.
then before you knew it you had package after package arriving on your doorstep, much to your girlfriends confusion at your sudden online shopping habits. normally you were quite the stickler for the 'its a want not a need' type attitude, but with the packages snatched up and hidden away in your room the days melted into weeks as you worked tirelessly to perfect your new art.
and a week of hard work and countless hours spent watching youtube tutorial after youtube tutorial later holed up in the guest bathroom, you'd done it.
that wasn't to say your clear dedication to your new hobbie was one your girlfriend enjoyed, forever trying to bait you into doing something with her but you'd just brush her off, eyes glued to your phone screen which was propped up against a bottle of shampoo.
which is how you came to be sitting on the floor of your living room weeks and weeks later, bottles of polish sat in perfect colour coded order on the coffee table with all your little brushes and tools neatly lined up in front.
your bottom lip was firmly between your teeth, eyebrows furrowed deeply with concentration as your eyes squinted and your hand moved slowly and precisely.
your girlfriend of two years whom you shared your home with and whom you'd been locked in with for the horrendously active period of this ghastly pandemic lay stretched out on the sofa behind you, toned tanned arms crossed firmly across her chest.
her face was stoic and seemingly stern as ever, you'd forever nag her about the frown lines she was embedding into her beautifully smooth skin with the scowl she'd not even clock was on her face nearly all the time when she found herself deep in thought or lost in her own mind.
but she'd merely brush it off with a wave or a hum, nothing unusual when she was reviewing game footage and given she wasn't currently able to play her studying of games when she could had only increased.
you were off in your own little world and she was in hers, you coexisted but knew how not to be codependent, something which had surprisingly caused your relationship to stay just as strong if not more so during this lockdown together.
one of the key things that made your relationship healthy was the fact that despite how long you'd been seeing one another you still spent time apart, and despite not being able to leave the house much you still had different hobbies and interests to preoccupy your time.
you would go shopping or out for drinks with your school friends you'd known for years, as alexia would often go for dinner or hikes with some of her own childhood friends, well that was when she wasn't chasing after ball and getting grass stains all over her legs.
but that's not by any means to say you weren't positively and certainly head over heels infatuated with one another, and whenever you did spend time apart you were increasingly clingy that night once you were reunited, but when out you knew to respect one another's time and space and didn't feel the need to be texting one another the entiere time.
after all there was seldom you loved more than laying down with alexia of an evening, the two of you knew how to treasure quality time and found that so long as you were together you could be doing nothing at all and still perfectly content.
with her body warm and strong it pressed against yours as you'd lay down squished on the sofa, soft gentle kisses littered across your shoulders as your fingers intertwined and you'd take turns filling one another in on how your days were since you'd spent them apart.
back to present day sat on the floor you gave a small exhale of relief when you finally finished the intricate design you'd been working on, your frown of concentration switching quickly into a grin of delight as you slipped your hand into the UV nail lamp and waited for them to dry.
as you had been every now and then you leaned your head back to rest against the couch, knocking it back into alexias good knee and puckering your lips expectantly.
then with a smile and a small chuckle your girlfriend pulled herself up to sit with a quiet grunt, leaning down and rewarding you with a soft kiss before returning back to her previous position.
punching the pillow behind her head and wiggling slightly until she was comfortable, her foot poked at your shoulder every now and then as if to reassure her you were still there without needing to look.
since a young age you had been known to daydream.
it got you into a fair deal of trouble in school, forever having a teachers hand or a heavy textbook slammed down onto your desk with a loud bang to snap you back into reality, your peers giggling and cheeks flashed bright red as you'd smile sheepishly and do your best to focus on your lessons.
your girlfriend however had always found it adorable as much as amusing as you'd zone out from reality and go somewhere she never understood.
sometimes as you drifted away into your own head alexia would just watch you with lovesick puppy dog eyes, filled with nothing but pure adoration that was so sweet it could give someone a tooth ache, though always in the privacy and intimacy of just one another's company.
after all the big bad la reina couldn't be known to be so whipped for her girlfriend (everyone already knew she was).
case in point right now where you'd clearly drifted off somewhere as the footballers eyes glanced down toward you and her hardened features softened, corners of her mouth curled upward into a smile.
"hola, princesa." you snapped right out of it as her foot moved to poke at your cheek this time, dragging you back down to earth as you pushed it away and sent her a playful glare, pulling your other hand out and flicking off the lamp as both of them were now dry.
"look amor!" you leapt up eagerly and dropped down on the lounge next to your girlfriend, sat practically on top of her, wiggling your fingers proudly at the blonde who hummed.
"muy bien bebé." alexia complimented, leaning up and softly kissing your cheek before turning her attention back to the television where the match had resumed, as did the stoic expression on her face.
"alee." you started with a coy smile, grabbing her hand and interlacing your fingers with a gentle squeeze. "mm?" the midfielder hummed, eyes unmoving from the screen.
"can i paint your nails cari?" you asked hopefully, alexia only letting out a puff of air from her nose as she chuckled, shaking her head. "por favor you know i am good and they will look good!" you pleaded, squeezing her hand again and even kissing over her knuckles a few times.
"no mi amor, no nails." alexia shook her head as you huffed, moving to rest your chin on her shoulder, lazily kissing her jaw. "sí nails. sí, sí, sí, sí, sí-" you repeated over and over, peppering kisses across her face.
now as much as alexia could be at times be a fierce woman, driven and passionate and willing to do absolutely anything to achieve whatever she set her mind to, she had a fatal soft spot.
you.
alexia would do nearly everything that you asked of her, especially with a few choice sweet words in her ear and a charming smile you had the catalan wrapped around your little finger, and you reveled in it.
so of course it was with a deep sigh that alexia inevitably gave into your demand, wordlessly placing her free hand in your lap as you beamed and perked right up.
clapping happily you sat up properly and grabbed her chin in your hand, pecking her lips a few times and reveling in the slight pink blush which coated her cheeks.
"tan lindo." you cooed, pinching her cheeks as her eyes rolled but she made no move to argue which only caused your elated grin to grow.
you moved her hand and sat back down on the ground, staring carefully at the arsenal of colours at your disposal, taking a few moments to decide what you wanted before nodding happily and grabbing what you needed.
you settled back down on the lounge as again alexia moved her hand into your lap, eyes glued to the match as her eyebrows turned downward in frustration at a fumbled tackle and an easily preventable shot at the barcelona goal, a shake of her head and an annoyed grumble under her breath.
"you will get wrinkles corazón." you teased, smoothing out her eyebrow with your thumb as the tiniest of smiles flickered across her face just for a moment which wasn't missed by you.
"déjame en paz." the footballer muttered as you chuckled and kissed her palm sweetly, turning her hand back over and adjusting your position a little.
warning her to stay still you placed her right hand down on your knee and grabbed the first colour, tugging the coffee table closer so everything you needed was well within reach to avoid anything being knocked or falling.
much as alexia might bend over backwards to do as you asked you knew well enough if you spilled even a drop of polish on the carpet or the sofa you knew you'd be hearing about it for weeks.
as you set to work your girlfriends face remained blank, but her bright hazel eyes flickered down to you curiously every now and then, corner of her lip curling upward at the look of sheer concentration on your face and the way the tip of your tongue poked out of the side of your mouth.
finishing one hand you blew gently on the nails, unable to use the machine which was plugged in on the floor and just out of reach. though not in any rush you awaited her first hand to dry as you kept a cautious eye that she didn't move as your head dropped to her shoulder.
there was a comfortable silence between you, the only sound the occasional grunt of frustration from the taller girl whose side you were curled into, a shake of her head and something mumbled under her breath at every costly mistake.
her first hand drying you tapped her knee, gesturing for her to swing her legs into your lap so you could reach her other hand. shuffling her body she did as you asked, sliding down a little as her head thumped backward into the soft cushions behind.
you couldn't do anything to keep the smile off your face as you worked on your girlfriends nail design, incredibly happy with how it turned out as again you gently blew on her other hand, settling it back into her lap to dry same as the first one.
warning her once again about not moving you crawled up the lounge and wedged yourself into her, sitting half on top of her much to the older girls amusement as you pulled her other arm to drape across your shoulder allowing you to tuck yourself even tighter into her side.
checking a few moments later you were happy they were dry and sat up a little, shrugging off your girlfriends arm and eagerly taking her hands in yours.
"listo!" you announced happily as alexia's eyes moved from the tv to her hands which made yours seem tiny, your own gaze falling to admire both the size difference and the small 11 tattooed on the back of her palm.
"i did more of a pale pink because i know you do not like them too bright, but i did tiny red hearts on each nail for barça!" you explained with a beaming smile, alexia melting at the confession as she stole a glance toward you and softened even more seeing the clear and pure joy in your eyes.
"muy perfecto bebita." your girlfriend gave you a small smile not giving much away, one of her hands slipping around to cup the back of your neck and bringing you into a tender kiss.
"can i put them on my story? i think these are some of my favourites." you asked hopefully as alexia shrugged, eyes having returned back to the final few minutes of the match, seemingly unfazed.
grabbing your phone you positioned her hands on her knees, taking a few photos and editing your favourite before adding it onto your instagram and curling back up on top of your girlfriend who held you tightly, eyes flickering down to her nails with a small hidden smile every few minutes.
~
that next day at training was a very different story though as alexia couldn't wait to show off her nails to the rest of the team.
the morning was spent with the midfielder very proudly boasting how good you were and that you were completely self taught, ignoring all the teasing remarks thrown her way about how she'd gone soft.
when you'd come to collect her that afternoon having dropped her off and borrowed her car for the day as yours was being serviced you were overwhelmed as a small group of the girls suddenly swarmed you in the carpark.
"hey hey hey back up!" alexia warned protectively, moving in front of you with a mean stare as a few of the younger girls cowered and hurried off to their own cars as the rest rolled their eyes, knowing that really she was all bark and no bite.
"me next amiga! maybe little black hearts? or...letters!" mapi beamed, eyes flickering toward her girlfriend who caught onto what she was wanting and blushed as you laughed.
"get your own! este es mío." alexia huffed, wrapping herself around you as her chin hooked into your shoulder and she sent her best friend a glare.
"tomorrow? but you must cook me dinner as payment maría." you offered with a grin, mapi agreeing eagerly as you promised to also do ingrid's nails when you caught her frowning at you over her girlfriends head.
"sí, sí! before the next game chicas, promise." you laughed as pina, salma and cata swooped in next undeterred by the murderous glare given by your girlfriend, who refused to unwind her arms where they wrapped tightly around your torso holding your back flush to her front.
"we are going! relax capi, you will get wrinkles." cata smirked as alexia's eyes narrowed even further and the three sprinted off and away.
with a small laugh you craned your back back staring up at your girlfriend with a wide grin.
"see amor? i warned you about the frown wrinkles."
~
you expected alexia to allow the nails for a couple of days before she'd want to return back to normal with a clean set again, so you were surprised when anytime you'd offer to help her take it off she seemed to come up with every and any excuse not to.
by the end of day five with the rigorous gym program and workouts needed with alexia's recovery the polish was cracked and chipped, most of it worn off and faded, hearts now barely recognisable as just small red blobs.
it was that night alexia finally seemed eager for you to wipe them clean, again swinging her long bare legs into your lap and settling her hands on her knee for you to work on.
the removal process compared to the creation was next to nothing and before even five minutes had passed you were finished, tapping her legs to let you up to move your things back to the bathroom where they normally lived.
when you returned it was to an empty and dark living room, so changing route you followed the light at the end of the hallway where you finally found your girlfriend once more.
you held a hand over your mouth to stifle the loud boom of laughter you wished you could get out, the catalan having fallen deep asleep on top of the bed, one of your favorite dramas playing in the background where she'd clearly intended the two of you to lay in bed together and watch.
with a small sigh of amusement you flitted back around the house ensuring everything was locked before you returned, closing the bedroom door behind you with a gentle click.
the room now only illuminated by the dim glow of the tv you flicked off the downlight and you made you way around to her side of the bed and crouched down.
"amor. amor. alexia!" you called out softly, moving one arm to shake her lightly when there was no response, the blondes chocolate brown eyes fluttering open tiredly once you shook her a little harder.
"hola bebé, into bed?" you ran a hand through her mane of hair, moving a few loose strands off her forehead with a soft smile as the footballer sighed tiredly but sat up with a curt nod as you tugged down the covers allowing her to slip in properly.
already showered and changed you ducked off to the bathroom to brush your teeth before joining her, chuckling as once more she was seemingly dead to the world, mouth ever so slightly ajar as her blonde hair sprawled across the pillow.
though as the mattress dipped, never the heaviest of sleepers alexia awoke a little, turning around to her other side and shuffling down the bed as her face pressed into your neck and her long legs tangled with yours, feet rubbing against one another.
you felt an i love you mumbled against your skin as her arms wrapped tightly around your torso, latching her taller body firmly onto yours making you smile and tangle a hand in her hair, lips lingering against the warm skin of her forehead.
"te quiero más."
~
a few days later you'd removed your own nail design and sat down to try a new one, having spent a few hours scrolling through for inspiration before it struck and within minutes you'd grabbed what you needed and settled.
though before you could even glance to the bottles of polish a body dropped down next to you and suddenly strong hands were on your hips lifting you up.
"ale!" you laughed as she set you down on her lap, long legs stretched out straight as you wiggled a little to get comfortable. "my turn first please." the girl spoke in her adorably accented english, hands moving around you and placing themselves on your knees.
"oh your turn?" you asked both equally pleased and surprised, turning a little so you could look at her properly. "sí, mi novia so my turn." alexia grinned, pointing to you and then back at herself before moving her head to press a soft and tender kiss against your lips.
you smiled as you pulled away, a hand softly carressing her cheek as your thumb pulled at her bottom lip, pressing another tender kiss against them with a lovesick sigh.
"of course mi amor whatever you want. so, what colour?"
#woso x reader#alexia putellas x reader#woso#woso community#woso fanfics#alexia putellas imagine#alexia putellas#woso imagine#woso blurbs
796 notes
·
View notes
Text

Tutorials for Aesthetics
Hi! Reign here :) this guide is dedicated to teaching you how to make:
a) colour gradient text b) dividers c) pictures with gradients
Now, as a disclaimer, I'm not saying you should have all these things on your posts. Having pretty things won't guarantee a boatload of interactions and aesthetics shouldn't take away from the actual substance of your writing. Many fics do very well without all the glitz and glamour, and indeed simplicity goes a long way.
You should always prioritise clarity, improvement, and conviction in your writings. Don't get caught up in trying to look pretty and definitely don't be copying other creators' aesthetics unless they've given consent for you to do so.
This serves only as a starting off point for exploring styles that suit you.
Another disclaimer is that Canva, since I wrote and posted this, has and might make more changes which will render parts of this guide inapplicable, but the main parts should remain the same. Canva is best used with premium but I understand that not everyone can and is willing to spend money on this. So my advice is to find a different platform and search up tutorials online.
How to get the colour gradient text!
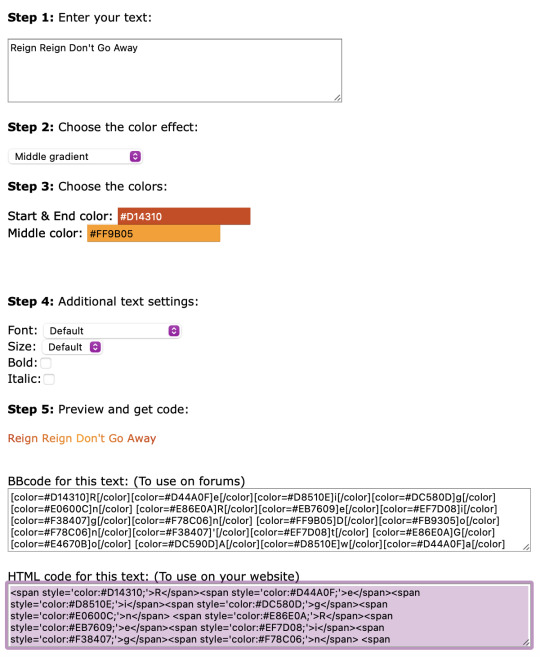
༯ I use stuffbydavid.com
༯ Decide if you want a horizontal gradient/middle gradient/three coloured gradient
༯ Pick your colours + write out the text you'd like to be coloured in the text box
༯ You can see the preview and when you're happy copy all the text in the HTML code box
༯ Go on Tumblr, create a post, click the settings icon of the post, then in the Text Editor function change it from Rich Text to HTML
༯ All your coding will be pasted in the HTML side and they'll appear formatted in the Preview on your Tumblr post


How to make dividers!


༯ I use Canva
༯ Click Create a design
༯ Click Custom size -> for my colour gradient dividers, I use the 3000 x 40 px but you can use whatever sizing you'd like of course -> experiment to your liking
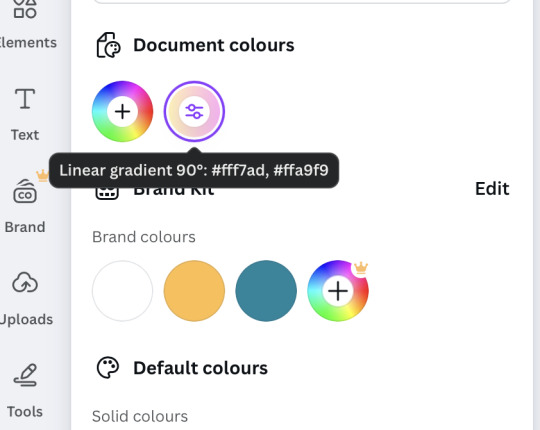
༯ Click the colour wheel to change your background colour
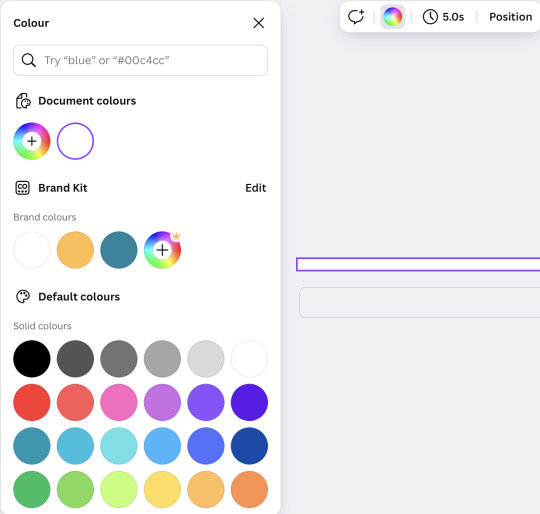
༯ You can do solid colours and use whatever hex code you'd like but to make gradients, scroll through the colour palettes to get to the different kinds of gradient options
༯ From there, you can change the colours of the gradient and adjust to your liking
༯ To download it, click Share, Download, keep it PNG, size 1 and Download for real

༯ On Tumblr, you're going to just drag and drop that downloaded image on the website or if you're on the app, just add it as a picture and adjust it where you'd like it to go on the post
༯ If you were to have drawings like the hearts or croissants for the divider, you'll want to adjust the Custom size, arrange the pictures or elements on the page, and download with a transparent background (it requires a premium subscription unfortunately but if you do the free trial and just make a bunch of banners and dividers before it runs out, you should be good)

༯ A lot of this will involve experimenting for what works for you. There's no cheat code to that, unfortunately. But have fun with it. Don't be afraid to trial and fail -- everyone did at some point
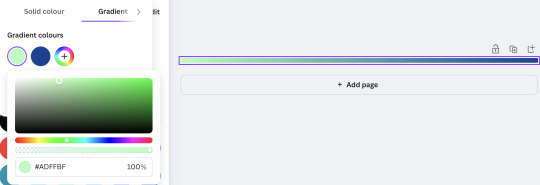
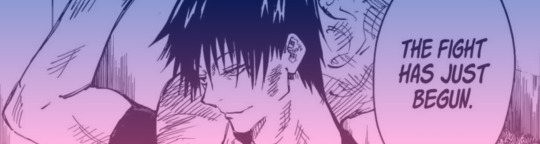
How to add gradient colour to pictures!
༯ Use Canva again
༯ Click Custom size -> 3000 x 800 px (or, again, whatever size you like)
༯ Pick a picture you like -> for manga panels, I like to use Pinterest
༯ Drag that picture onto the blank page and adjust to fit
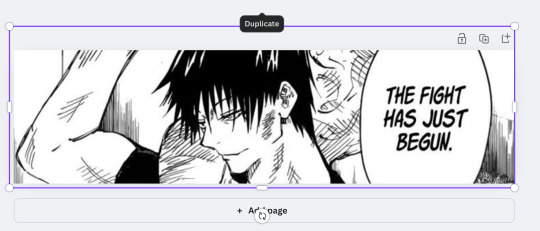
༯ Click Add Page -> on that page, change the background colour. You can use solid colours or gradient colours, it's the same process as for making gradient dividers

༯ Click the colour page, copy and paste it on your picture
༯ Adjust the transparency of your picture depending on how opaque you'd like the colour to be


༯ Delete the colour page and keep the picture
༯ Then, again, click Share and Download
༯ This is the final product -> you can obviously find better pictures and do whatever colours you'd like, this was just an example
༯ I'm not very tech savvy so if my explaining is terrible, I am so sorry 😭 but hopefully this makes senses and encourages you to experiment and be bolder with your layout!
149 notes
·
View notes
Text

^ iterator projection tutorial!! ^
this post follows on from this one made by @prismsoup, intended to cover my slightly more extended process (including post-processing)
step -1 : pre-requisites
this tutorial is designed around clip studio paint for PC because its what i work with. its probable that whatever other program / platform you're using has these features but under different names
i use a rainworld typography font for text. find it here (or do it yourself)
i use scanline textures as a part of this. find them here
step 0 : select a base image

maps, blueprints and diagrams are favourable due to lots of detail without it derailing into noise. get experimental though, my favourite one came out from a picture of a nebula, and another from a friends factorio screenshot
step 1 : binarise & flip
this command can be found under edit > tonal correction (D) > binarization. this forces every pixel in the image to be either black or white. adjust its sensitivity to your liking
step 2 : remove background

add in a black layer below (not just paper layer, as will become important later). wand select the background colour and delete it. if the remaining colour is black, CTRL+I to invert it to white
step 3 : add details

replace any text with rainworld font or simply remove it. add in blueprints or other complex decals (drawingdatabase is a decent source). during importing remember to binarise (after resizing). for "lower layer" elements such as contour lines create outlines for higher layers to retain clarity
step 4 : add multiply layer(s)
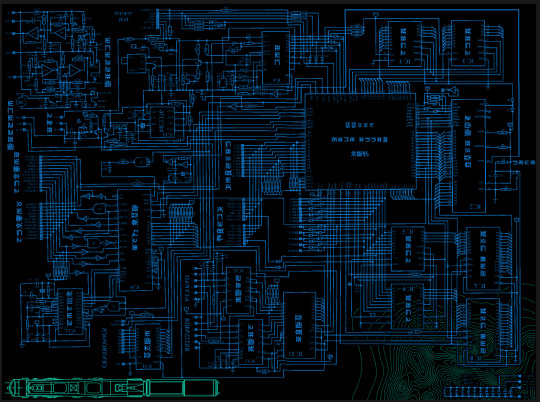
if you want to have multiple colours, put everything in the "higher" layer into a folder and set the top multiply to clipping above it
step 6 : post processing setup

copy all existing layers, create a new folder on top, and paste into that folder. right click the folder and "merge selected layers" set the resultant layer to add(glow). copy+paste and hide duplicate for now. from filters > blur apply a guassian blur with a strength of 130-170 (this creates the base bloom layer). set opacity to ~50%
step 7 : chromatic abberation
unhide not-blurred layer. guassian blur with a strength of 2. duplicate again. select top layer and move 1px up and 1px left (with arrow keys). CTRL+U then change the hue by 30. select bottom layer and move 1px down and 1px right, CTRL+U then change hue by -30.
stronger chromatic abberation can come from stronger gaussian blur and more change in hue
step 8 : scanlines
add the scan lines on top, invert so that they're white and set to add(glow). copy a multiply layer over it and make sure clipping is on. decrease layer opacity to ~10%. if it does not cover the whole image initially, paste more in and merge them together into one layer
tada! you now have one iterator projection. if you want to give it an extra affect, re-import the final PNG and filter > distort > convert to panorama. set distortion to 10 and scale to 101 (note that this drastically blurs the image)
299 notes
·
View notes
Text
──────── ♯; welcome to ©STURNIOZ navigation post.


▸ matt masterlist ⸝⸝ chris masterlist ⟶ includes. longer & shorter fics, series, drabbles and more.
▸ au catalogue ⟶ includes. a collection of alternative universes.
▸ kinktober '24 ⸝⸝ kinkmas ‘24 ⟶ includes. a collection of smut prompts written for seasonal events.
▸ html text codes ⟶ includes. a detailed step by step tutorial on how to use colour effects on your texts.
© STURNIOZ
444 notes
·
View notes
Note
As you've asked for asks!:
Do you have any quick-and-dirty book/fic binding methods a terrified-of-failure novice could use to bang something out to get over the first collywobbling step of Actually Doing The Thing? (this may be something I've been meaning to ask for ages)
yes! I absolutely do! in my opinion the best quick-and-dirty bookbinding method is a no-glue pamphlet: you don't have to mess with glue or measuring or cutting anything, all you need is your text, some paper, a needle and thread. you can use the same needle to punch holes if you don't have an awl.
this is going to be a little long but that's because I'm going to write out some fairly detailed instructions for an A5 sized pamphlet. If you don't want detailed instructions and think you can glean the necessary info from photos, just skip to the photos! I've also linked tutorials.
for preparing the text to printing, in whatever software you use (word, libreoffice, gdocs, whatever) make sure your document is set to page size A5. make it look readable. then save as/export that document as a straight-paged PDF. now go to the bookbinder JS tool (https://momijizukamori.github.io/bookbinder-js/), and upload the PDF. source manipulation: none printer paper size: A4 display unit (you can ignore, or choose cm if it gives you anxiety that it automatically displays points) printer type: select single-sided or duplex accordingly* rotate paper: ignore flip on long side: check if you are printing duplex and if your duplex printer flips the paper on the long side page layout: tick folio page scaling: original page positioning: centered ignore the rest flyfleaf: ignore signature format tick: standard signatures. in the length drop down, this depends on the type of pamphlet you are doing. for folio i generally find 4-5 pages per signature a comfortable thickness. if you have 6 whole A4 pages you can still do that as a single signature or you can split it into two signatures 3 pages each. wacky small layouts: ignore this signature info click the generate preview button to see what your PDF looks like imposed! I love this step especially when I'm doing quarto (A6) or octavo (A7) sized books generate output - click this to generate an imposed PDF
for A6 and A7 sized books the instructions are much the same, except for these you make sure the page size is A6 or A7 in your software, and then you choose quarto or octavo instead of folio. for signature length drop down I keep signature length to 1 for octavos typically and 2 for quartos, as this still refers to sheets of paper, and for octavo 1 sheet of A4 paper will turn into 4 smaller sheets in one signature once folded and cut.
*if you don't have a duplex printer you will have to manually turn the paper to print on the other side. I cannot be arsed with this so I bought a printer capable of duplex printing (I didn't have a printer anyway). if you already have a printer check what it can do as you might be surprised and go from there.
now to the pamphlets! you don't need a cover - I have one for the long stitch pamphlet but for the saddle stitch one I didn't bother and just made sure the first page had a title on it. you can always take a different piece of paper and print a cover on or or just use coloured cardstock and create a simple cover, but a cover is not necessary unless you're doing a long stitch pamphlet. all you need to do is to punch holes and start sewing. there are a few different stitch types below, I wouldn't say any of them are more difficult or easier than others, but they do look different so...pick one you like the look of and go from there?
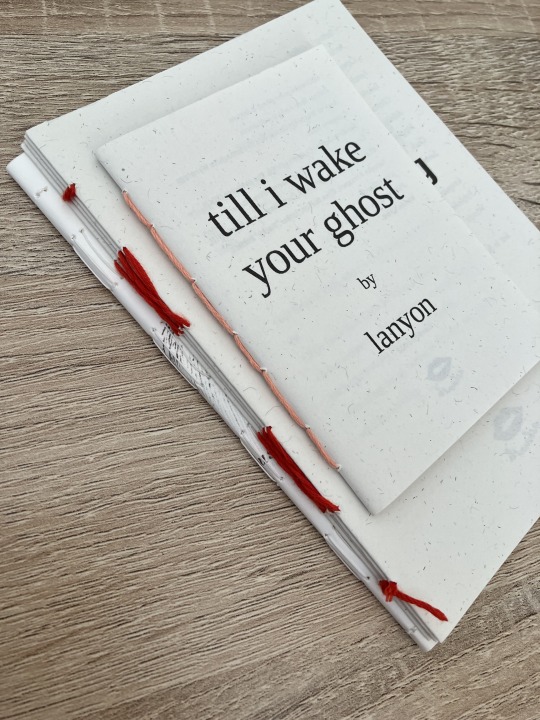
pamphlet stitch (uneven number of holes) I haven't ever done a pamphlet stitch but here's a tutorial for how to do it: https://www.starpointestudio.com/simple-pamphlet-stitch-book-step-by-step/
saddle stitch (uneven number of holes) I realised that what I was thinking of as a pamphlet stitch is actually saddle stitch, as in this A7 pamphlet:
here's a tutorial for how to sew saddle stitch: https://www.bookbindingworkshopsg.com/saddle-stitch-bookbinding-tutorial/ here's a video tutorial: https://www.youtube.com/watch?v=aWHkY5jOoqM (sealemon has a lot of bookbinding tutorials and I know many people who like her videos, I used her tutorial for coptic binding way back when I first made a book but I can't otherwise vouch for the quality as I haven't used her videos)
french link stitch (even number of holes) in this one I used french link stitch which I typically use for thicker textblocks that i'm not planning to use tapes with as the french link gives it some robustness, I used it here because I had never done it before and wanted to try it out. I am planning to take these stitches out and re-sew this pamphlet with a cover now that I've found a suitable piece of transformer fanart to use as a cover:
french link tutorial. it's quite long but it has a colour coded bit towards the end that shows how the thread is supposed to link which i find very helpful to visualise: https://www.handmadebooksandjournals.com/bindings/french-link-stitch-binding/
here's a video tutoral from DAS bookbinding (he is my go to for techniques and he has the most soothing Australian accent as well, though fair warning not all of his videos are for beginners): https://www.youtube.com/watch?v=O4ZPdbaM-Ws
long stitch (even number of holes) for this one I used long stitch and I had a cover. this one is my favourite variation because I can make these pretty and simple covers and the stitch looks nice on the outside as well, so this one scratches the 'i want to make a book' itch for me.

here's a tutorial that also includes a how to on a cover that is different from my cover: https://lccprintmaking.myblog.arts.ac.uk/files/2020/06/Long-Stitch-Tutorial-A4.pdf DAS also has a video tutorial for long stitch but it's like three videos long, maybe watch it later :'D here's one I haven't watched but seems decent: https://www.youtube.com/watch?v=XnignTL_wDQ
you can use saddle stitch for this kind of pamphlet as well, that's what I did for dozens of ships and hundreds of souls (https://ashmouthbooks.tumblr.com/post/681587080267202560).
I hope this helped!!
2K notes
·
View notes
Note
excuse me.. do you have a tutorial on how you make the banners of your themes?
⠀⠀⠀⠀⠀• GFX TUTORIAL !

honestly a bunch of people asked me how to make banners like I do, but chat im gna be fr there's no set tutorial because if u check some of my headers, they're quite different! but ill try to explain my process heh
⠀⠀⠀⠀⠀⠀⠀⠀⠀⠀⠀𝒇 . how to make banners !
⠀⠀⠀₊˚ thank u anon for asking!! if anyone wants to make banners like these, hopefully this tutorial will help u!!


⠀⠀resources 𝑖𝑖. pinterest
i usually use pinterest for overlays and pngs like these u can check some of them out here in my pinterest or just type up gfx overlays and itll show up!


for pictures of idols when I make smau headers or navi headers, I recommend choosing photos that match!! In most cases, I use photoshoots of the idol I chose. for example if it was jake, I would use something like this!


⠀⠀inspo 𝑖𝑖. pinterest
most of my header ideas come from pinterest! they have many gfx edits on there and its very helpful if u don't have a solid image on what u want! you can check out my pinterest once again for some ideas ( here are some I found on pinterest )


another important thing is to have a matching colour scheme!!! guys im telling u thats literally what brings it together!! STICK TO THE COLOUR SCHEME like genuinely imagine ur colour scheme is like white pink and yellow and u go ahead and put like a blue png on there. executed on the spot.
take a look at the pictures above, they have a matching colour scheme that compliments the edit! pro tip if u have a concept on what u want ur header to be ( for example grunge ) use colour schemes that match the concept ( so for grunge you would use for example red black and grey )
⠀⠀software. 𝑖𝑖. photoshop, procreate, ibis paint
now this is the part where u have to actually make it. I reccomeed ibis paint ( guys have u seen soov headers ) cuz its lowk mad easy to make stuff on there plus its free, but personally for me I would choose either photoshop and procreate ( I moved on from procreate to photoshop cuz the quality on procreate was buttcheeks ) icl I got photoshop for free ( @aewon my goat thank u ) and it took me like a few tries to get the hang of it ( okay I lied I made the gigi header on the first try ) BUT Its really easy honestly its just the system that looks intimidating.
⎯⎯ anyways here are some things I like to add on my headers based on what I have already made
( shapes ) guys the rectangle shapes thing with a gradient in it always does it for me. they fill up spaces u dont know what to add in really easily. just put some text over it and align it and call it a day LMFAOOO
( pngs ) okay hear me out, pngs but only ones that FIT the concept. say ur making a game themed banner, I would put either pixel pngs or those cute game consoles yk!! I wouldn't slap a postcard onto it, that wouldn't fit the vibe
( texts ) the go to fonts I use is coolvetica, la graziela demo and retro gaming. honestly these fonts fit literally almost any concept!!! its lowk fire! something I like to do is use my cursive font ( la graziela demo ) and type one letter and zoom it in. it looks really cute trust!!


( effects ) guys pixelate effect is literally my bsf cuz why do I use it in everything!!! it literally is so perfect I use it in EVERYTHING! guys trust it brings it together so well!! especially when its like blending in to the unpixelated area! another effect I love to use is grain! chat I basically use it for everything. genuinely its like going out without any setting spray on like TF!! add ur grain, it makes it look so much more expensive ( but not that much, it just has to be really subtle )
( overlays ) okay this again! but these overlays are some I use for quite literally anything ( u can see it if u zoom hard enough ) but add them in the right places and put the blending mode on lighten and ur good to go!!


⠀⠀results 𝑖𝑖. the finished product
well, if u have enough practice and a creative mind, it should look something like this!!


guys this was lowk so fun!! hope this helped u guys I literally pulled out every header I made lmfao 💭 lmk if u want one on how to make themes heh
#enhypen imagines#enhypen reactions#enhypen#enhypen texts#enha imagines#enha crack#enhypen headcanons#niki x reader#sunoo x reader#enha fluff#jungwon x reader#enhypen x reader#heeseung scenarios#gfx#kpop gfx#jake x reader#sunghoon x reader#heeseung x reader#jay x reader#sunoo imagines#jungwon imagines#niki imagines#sunghoon imagines#heeseung imagines#park jay imagines#sim jake imagine#niki fluff#kim sunoo#jay scenarios#park jay scenarios
132 notes
·
View notes